
Here we offer a free download of the XEye Application. XMEye is a Chinese company and they offer a great APP for Android and IOS versions. They also offer the setup of XMEye Software.
Basically, XMEye is not only a DVR manufacturer but also provides software for DVR manufacturers. Sometime before CP PLUS also launched a DVR which has XMEye software. So get ready for the XMEye for Windows CMS link button and installation procedure in this post.
So before the start just have a look at why we need this software.
Generally, Installed CCTV is configured on mobile for remote viewing but sometimes we need to watch all of our CCTV cameras on our computer.
If our computer has the Windows operating system it is necessary to have an application that supports the Windows operating system.
If you have a CCTV system that supports XMEye and you want to monitor your CCTV setup via your Windows computer then you can download a setup from the given below link and configure your CCTV setup on it.
The configuration of the setup is very easy and we tried to give a quick demonstration of the XMEye App here.
XMEye For Windows Remote Monitoring
The XMEye CMS is shared below. The download button is given. Click the button and get the app. It is given in a compressed format. Decompress it to load on your Windows PC.
The complete installation process is given in three distinct steps. The first step comprises the installation of the software. The second step is given for login to the app. The third step demonstrates the camera addition and remote monitoring step. Get them one by one.
XMEye CMS to Get Remote Monitoring on Mac PCs
The company has given the XMEYE software for Mac OS. It is shared here for installation and configuration. The application file is given in a download button. Press the link button to get the XMEYE file.
The installation and the setup processes are the same as given for Windows PC. Get the button and load the Mac CMS.
Install XMEye App to Monitor on Android Devices
The XMEye software is shared in the below download button for Android devices. The link button is shared for Android devices. It is a very popular application. It supports many devices and third-party products. The software has all the latest security surveillance features and functions. It gives you live telecast from anywhere.
Install the XMEye App to Monitor from iOS Devices
The XMEye application file is available here. It is given in the below button. This software is very popular around the globe. It can send you alert signals, give you a two-way talk facility, and you can check playbacks from remote locations.
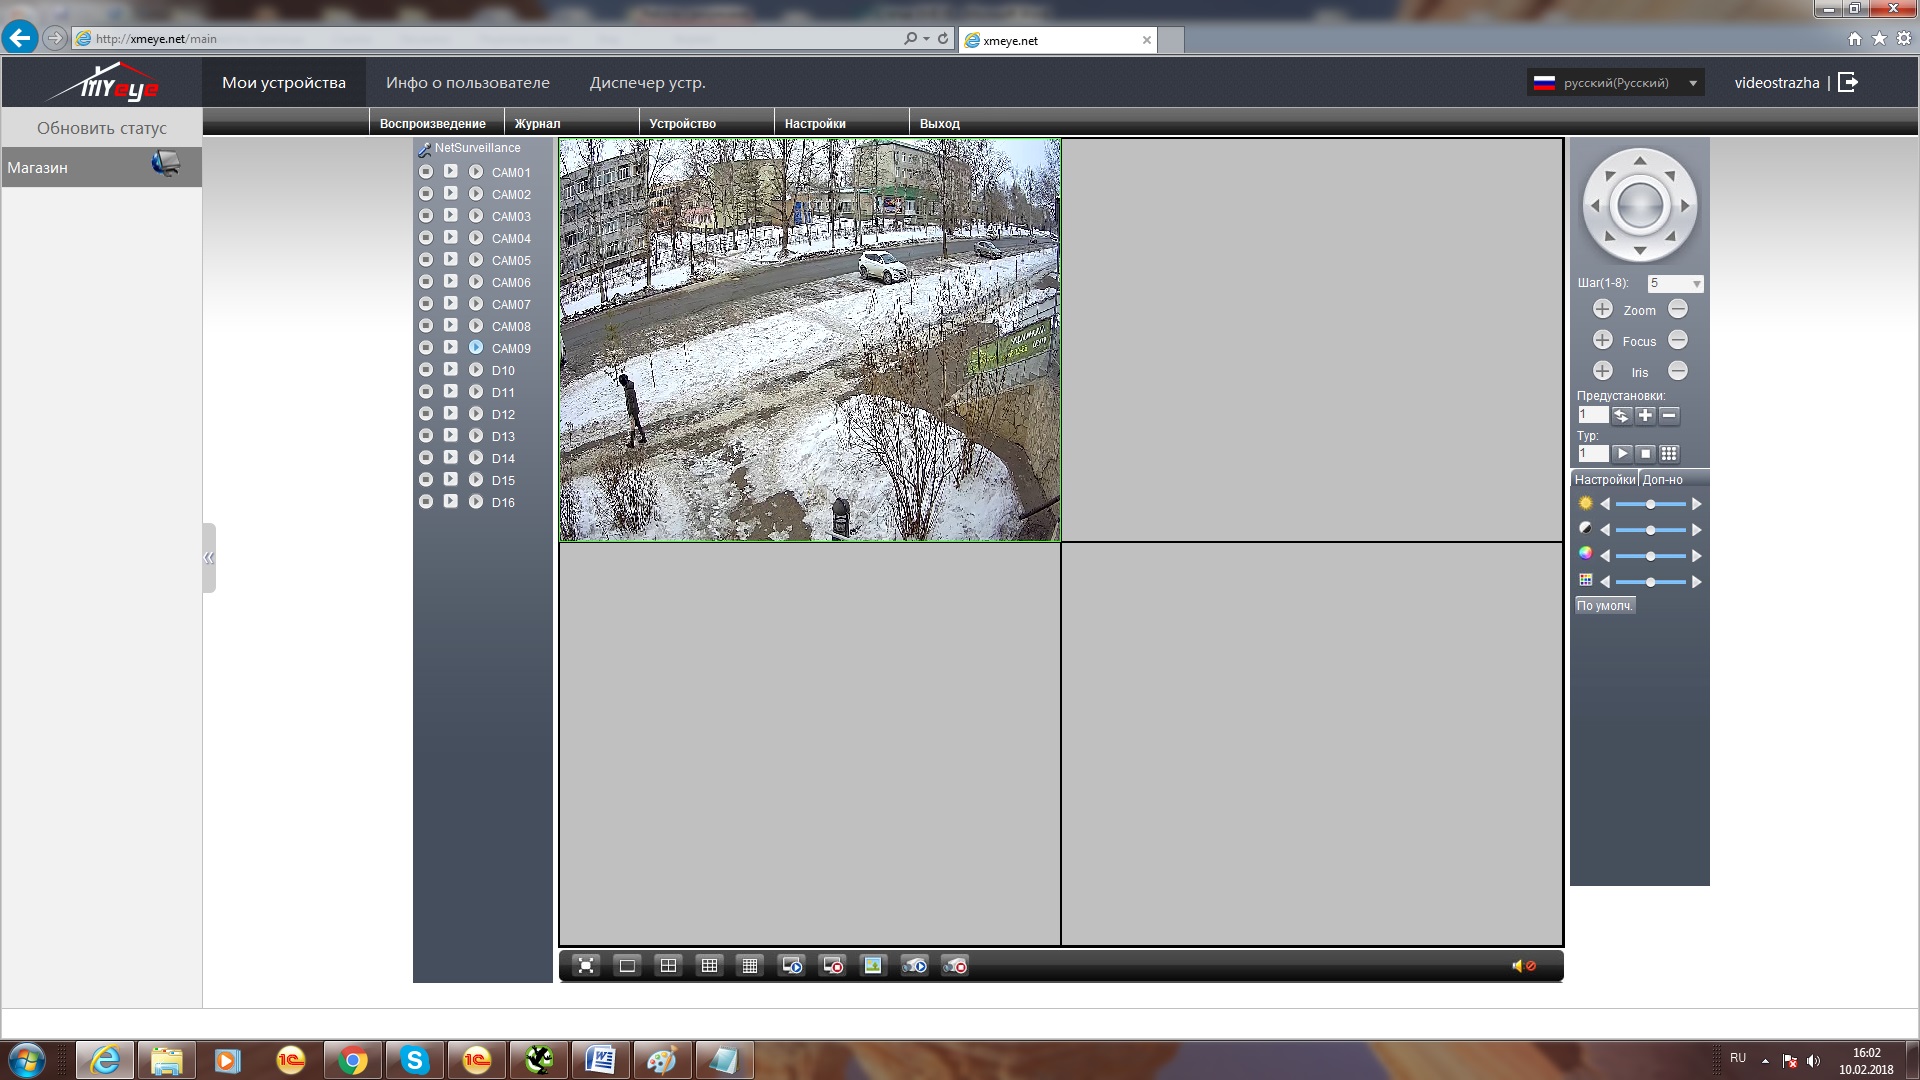
How To Configure XMEye Software on a Windows PC
There are two methods by which you can configure your XMEye camera or DVR on your Windows Laptop and computer. In the first method, you can directly use the software given by XMEye company and this method is more suitable in comparison to the other one.
In the second method, we will use an emulator that can run any Android app on your Windows system. Use this method only if you find a problem in the installation of the given software.
Method 1 # The XMEye CMS APP
The complete installation to monitoring process is shared here.
Step 1– Install XMEye on Windows OS
First, download the XMEye Application file from the above link and save it on your computer. Then double-click on the downloaded setup file. It will ask for some kind of permission just give it. Now follow the instructions that come in the installation process. Finally, complete the installation and run the setup.

Note: The first time it asks to set the language do not forget to set the correct language. If you forget then reinstall the whole setup again.
This window represents the path and folder selection for the app.

Select the folder and path. make sure the folder doesn’t contain any other files.
After that, press the next button. The moment you press it, the app begins to load on the screen.

The app installation is in progress. When the installation is finished, we get the login step.
Step 2- Login to the App
Login to the software and you will get the screen shown below.
The default ID and password are given. The Username and Password are respectively ‘admin’ and ‘admin’.

Step 3- Add Cameras and Monitor on Windows PC
When we sign in to the app, we get the homepage. It is the interface of the software.

Press the device manager button. When you click it the next page surfaces.

Here, you have to press the Manual Add button. When we press it, we get the IP address add page.
Just add the device to the software.

When you add the device, it becomes added gradually. Now come to the home screen and press the ‘Live View’ option. Now you will get a new screen to have a live option.

Open the live option and you will get the monitoring screen.

Gradually, added cameras will appear on the screen.

This way, you will connect cameras and monitor them on a Windows screen.
Pros and Cons of Method 1
Pros
- Nice view on windows.
- All DVR options are available.
- One-Click access.
- Playback the DVR is easy
Cons
- I have to have some technical knowledge when configured.
- Have to use the IP address
Method 2 # XMEye Installation With Bluestacks
Step 1
Download BlueStack.
Install BlueStack on your PC.
Step 2
Now Download the APK file from the given link below.
XMEye APP
Step 3
Watch the video and configure it as shown in the video above.
Pros and Cons of Method 2
Pros
- Easy to configure.
- You can use another Android application on your PC.
- The same configuration also works on mobile phone
Cons
- Hanging the PC.
- Can’t control all the functions on your PC.
Conclusion
This XMEYE CMS is a good application for viewing your cameras on your PC. The best part of this application is you can watch your cameras over the internet.
The limitation of this application is, It works only on the XM DVR/NVR, not on any other DVR. So if you have an XM device enjoy this application and secure your workplace and home as well. Thank you for visiting us.
This is all about XMEYE Application and if you have any kind of query or suggestions please write to us in the comment box below.
Frequently Asked Questions
What port does Xmeye use?
The default port for most of the XMEYE DVrs is 34567 and the http port is 80. You don’t require port forwarding in your router setting.
What is the default password for Xmeye CMS?
When you install the XMEYE VMS on your PCs, you can log in by entering the following Username and password. The username is ‘admin’ and the password is also ‘admin’.
What does maximum video link mean on Xmeye?
It happens because too many online users try to access the video feed. You can set a password, or reboot the device to access it again.
What is the default username for Xmeye?
The default username for XMEYE is admin.
How do I get a QR code for Xmeye?
To get the QR code for XMEYE, we have to go through the following steps.u003cbru003eConnect your DVR to a monitor. Click the right button of your mouse and enter the Main Menu on the monitor.u003cbru003eSelect Info.u003cbru003eClick Version.u003cbru003eTurn on the software, and check if the software can detect the system’s serial number. On the same page, you will also get the QR code of this device.
How do I reset my password on Xmeye?
Open the app and go to the ‘Edit’ option in the Add (+) menu. Click it open and then press the ‘forget password ‘ option to create a new password.
Is the XMEye app free?
Yes the XMEYE is free for Android and PCs.
Why is the XMEye app not working?
If your XMEye App is not working, then check the network area. If the data is slow or unstable, you can face the problem.
What is error code 11303 on Xmeye?
The error code 11303 is about the error. It says that the account is temporarily locked due to too many incorrect password attempts. Wait for 30 or 60 minutes or so and then try again to sign in.
5 Major Problems that You Face in CCTV Installation
CCTV installation: 5 common mistakes often made by an engineer
5 marketing Tricks to increase your CCTV Business
Настройка видеорегистратора
Во вкладке “Network” прописываем параметры нашей сети. Прописываем IP адрес нашему устройству, три первых цифры которого должны совпадать с IP адресом нашего роутера. Во избежание конфликта IP адресов, следует проверить не занят ли IP видеорегистратора другим устройством в сети. Если на Вашем роутере настроен DHCP сервер, то поставьте галочку в квадрате DHCP Enable в настройках сети видеорегистратора. Роутер сам зарезервирует IP адрес видеорегистратора.
В последней вкладке можно выставить по желанию приоритет на скорость загрузки или на качество изображения. Если все сделано верно, то в разделе “Сведения” в строке Nat статус запись изменится с “Зондирование DNS” на “Связанный”.
В разделе “Сведения” мы возьмем серийный номер, который понадобится нам дальше.
Настройка для Android и IOS.
1)Запускаем приложение. Мы можем пройти регистрацию(Register user) либо осуществить вход на прямую – локально(Local Login).
2)После регистрации или при локальном входе появится новая форма Device list. Здесь нам нужно добавить наше оборудование, нажимаем +.
Device Name – Любое выдуманное имя
Serial Number – Серийный номер устройства (вкладка сведения)
Port – Мобильный порт устройства (уточнить у производителя оборудования, в большинстве случаев оставить без изменения)
Password – Пароль видеорегистратора или IP видеокамеры
3)Нажмите на добавленное устройство, выберите необходимые каналы видеорегистратора.
Возможности сервиса.
1. Удаленный просмотр с ПК и мобильных устройств
2. Двусторонняя аудио связь
3. Удаленный просмотр видео архива с ПК и мобильных устройств
4. Отображение до 16 видеокамер на экране мобильных устройств
5. Управление PTZ видеокамерой
Официальный сайт находится по адресу xmeye.net, здесь можно скачать приложения для Ваших мобильных устройств на базе Android или IOS или осуществить прямой вход на ваше устройство.
Недостатки.
1. Частые неполадки в работе, сопровождающиеся бесконечными ошибками.
2. Частая рассинхронизация видео в режиме онлайн, даже при высокой исходящей скорости
3. Очень долгая загрузка локальных записей
Так же было создано огромное количество мобильных программ, работающих на сервере xmeye, но имеющие немного другую визуализацию. Это СamCloud.ru, vMEyeSuper, vMEye, JFeye, Matrix tech и многие другие. Принцип создания подключения у всех них абсолютно идентичен, а так, как серийный номер устройства присваивает сам xmeye, то работа с Вашей системой видеонаблюдения возможна сразу в нескольких приложениях. Зачастую это очень выручает, когда в одном приложении камеры отказываются грузиться, то в другом без проблем запускается.
Большинство производителей систем видеонаблюдения, за исключением Hikvision, Dahua, Axes использовали прошивки с поддержкой данного сервиса, и продолжают использовать. Связано это с тем, что рядовые производители систем видеонаблюдения не могут позволить себе затраты на создание собственного уникально софта, поддержку IT отдела и собственных серверов, поэтому используют данный бесплатный сервис.
Настройка для Windows
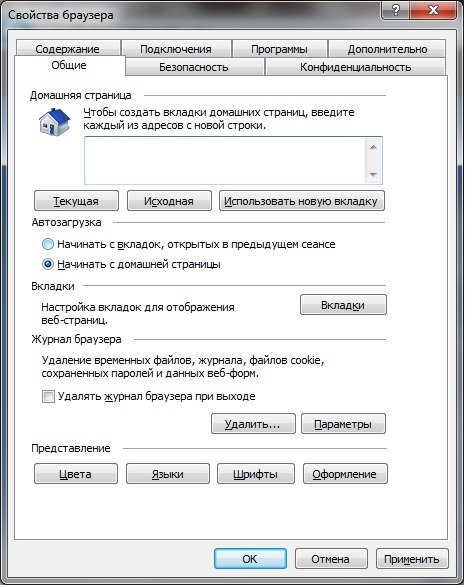
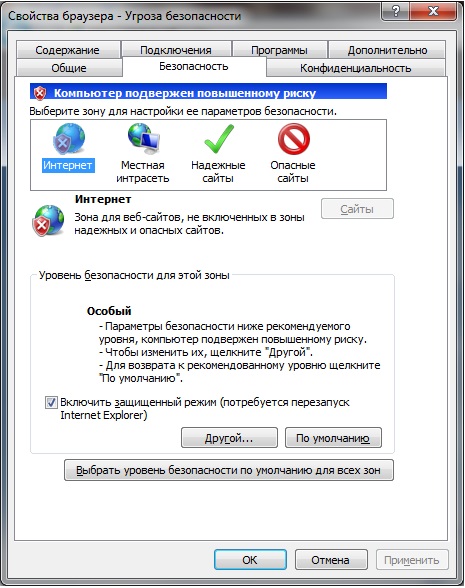
Для настройки Xmeye на ПК, нам понадобится стандартный браузер Internet explorer. Из-за особенностей работы с activeX настройками работа гарантированна только в нем. Открываем официальный сайт xmeye через IE, находим вкладку сервис (шестеренка) переходим в свойства браузера. Далее во вкладке безопасность выбираем интернет и другой. В новом окне “Параметры безопасности” включаем все настройки и сценарии со словом ActiveX. После завершения данных манипуляций на сайте xmeye.net скачиваем ActiveX плагин.
Если до этого Вы регистрировались в приложении, то в ЛК вводим логин и пароль подтверждаем код верификации. Для прямого входа в Разделе устройство вбиваем серийный номер, логин и пароль видеорегистратора. Дальше все по аналогии с мобильным приложением.
Проблемы подключения.
Почти 90% проблем, связанных с неработоспособностью удаленного доступа через xmeye возникают из-за устаревшей или некорректной прошивки видеорегистратора или камеры. Вы наверняка заказываете оборудование из Китая на сайтах по типу Aliexpress где продавец не несет никаких гарантий перед вами, он не предоставит Вам обновленную прошивку, если сервер xmeye внесет очередные изменения, да и вообще прошивка может быть собрана на коленке, а присвоенный индификатор (ID) p2p может быть удален из базы сервера xmeye.
Главная / Программы / Сервис Xmeye настройка и подключение
Что такое xmeye.net
Основное назначение сервиса, это
организация интернет канала для подключения к камерам и регистраторам без
использования белых ip адресов. Нам понадобится камера или регистратор с
поддержкой xmeye.net, любой интернет(3G,4G или классический проводной интернет), программное
обеспечение, установленное на компьютер, планшет, смартфон или просто банальный
internet explorer. Кстати, программное обеспечение,
так же как и сервис, абсолютно бесплатное. Так что платить придется только за
интернет.
Хватит разглагольствовать и перейдем
к настройке.
1. Для начала
Мы подключим наше устройство к интернету. Для этого можно использовать разные
способы: по простой локальной сети(через провода), wi-fi, 3G модем, это уже
зависит от Вашего устройства и его функционала, но самый простой и надежный
способ это подключение через провода(LAN интерфейс). Если Вы хотите
использовать мобильный интернет 3G или 4G, то для стабильной работы Вам
понадобится 4G модем и роутер. Я рекомендую использовать роутеры фирмы Zyxel, с
поддержкой USB модемов. Это не реклама, просто из многолетней практики они
зарекомендовали себя, как самые надежные и стабильные и, кстати, не самые
дорогие.
2. Переходим к
регистрации в сервисе «xmeye.net«. Для этого копируем адрес сервиса http://xmeye.net — вставляем в адресную строку браузера — internet explorer — переходим на сайт.
На сайте жмем кнопку «Регистрация».
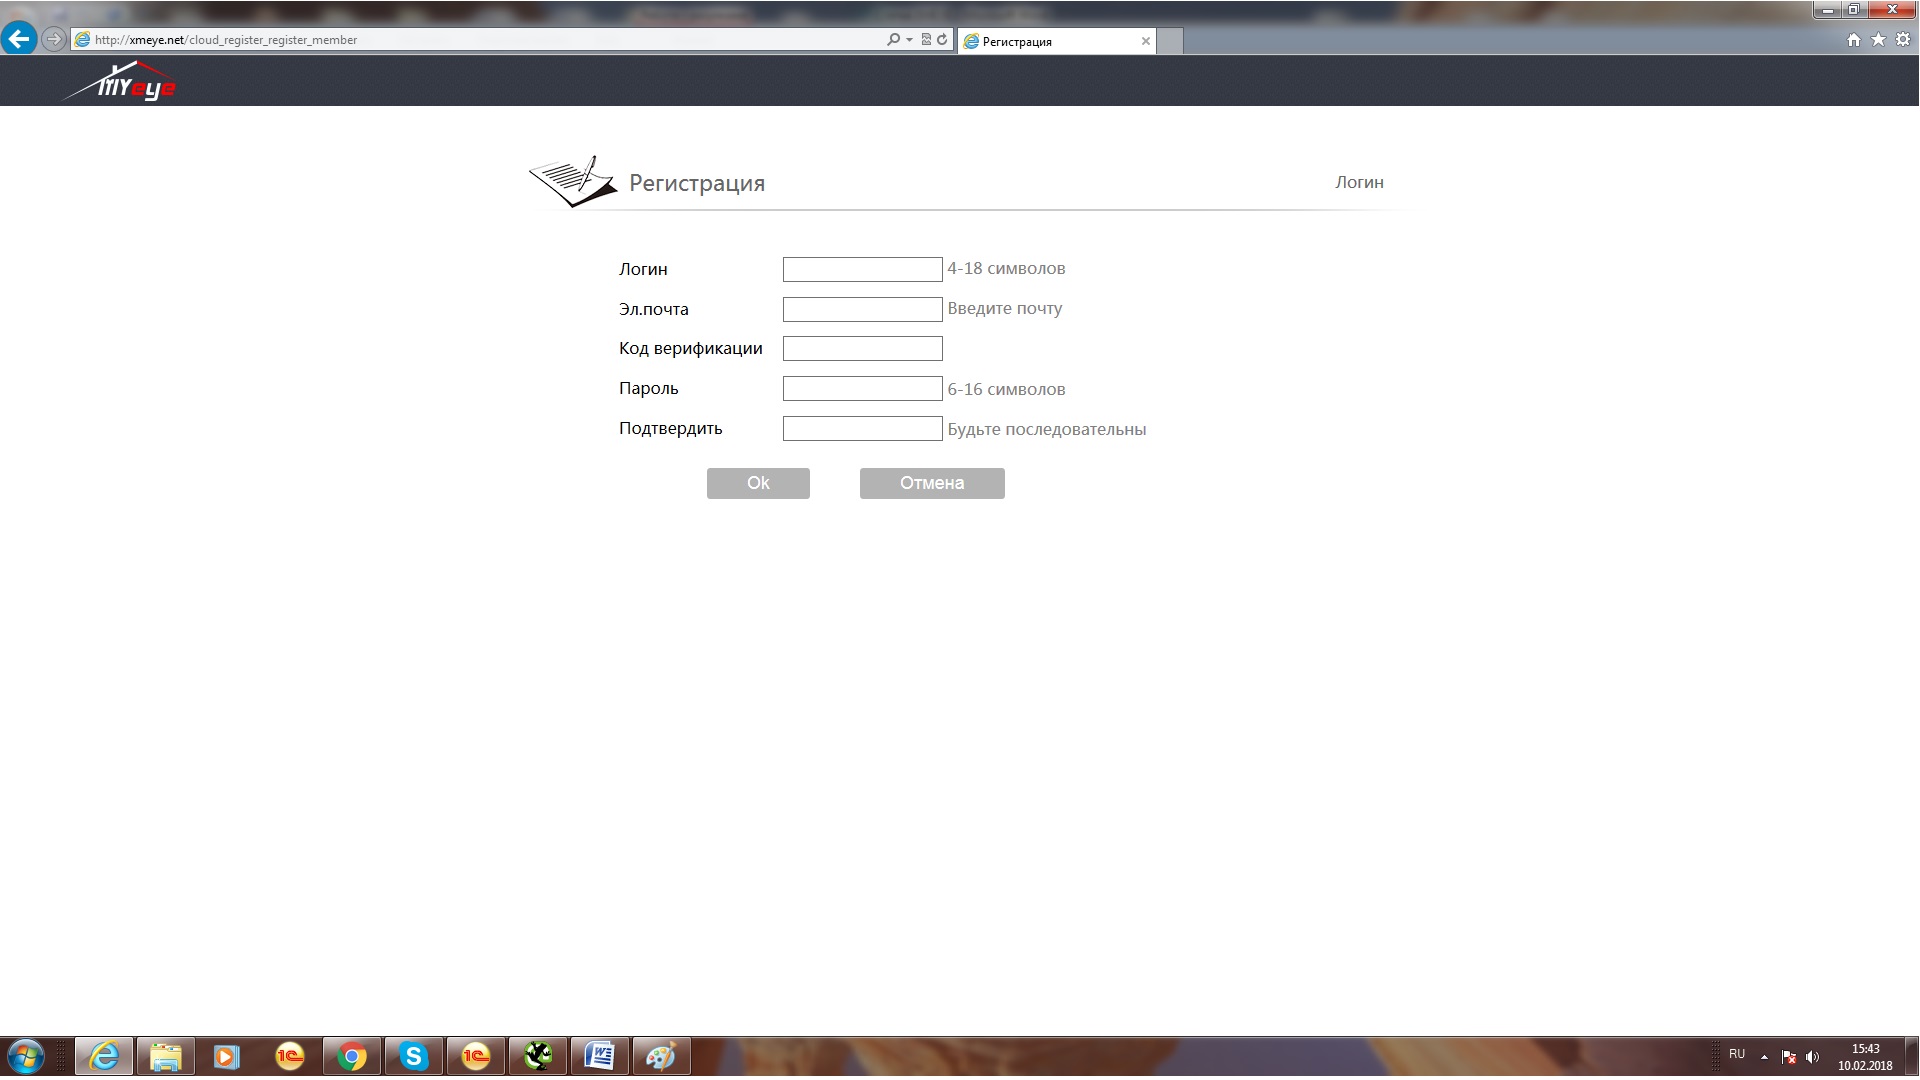
3. Заполняем
форму для регистрации. Логин, электронный адрес, пароль напротив пункта «код верификации«, нажимаем строку
«отправить код подтверждения на
почту«, после этого на адрес, указанный в форме регистрации, придет
письмо от сервиса, в котором будет код подтверждения, он будет выделен красным
цветом. Вписываем его в окне «код
верификации«. Проверяем правильность заполнения и нажимаем кнопку «OK». На экране появится «зеленая галочка».
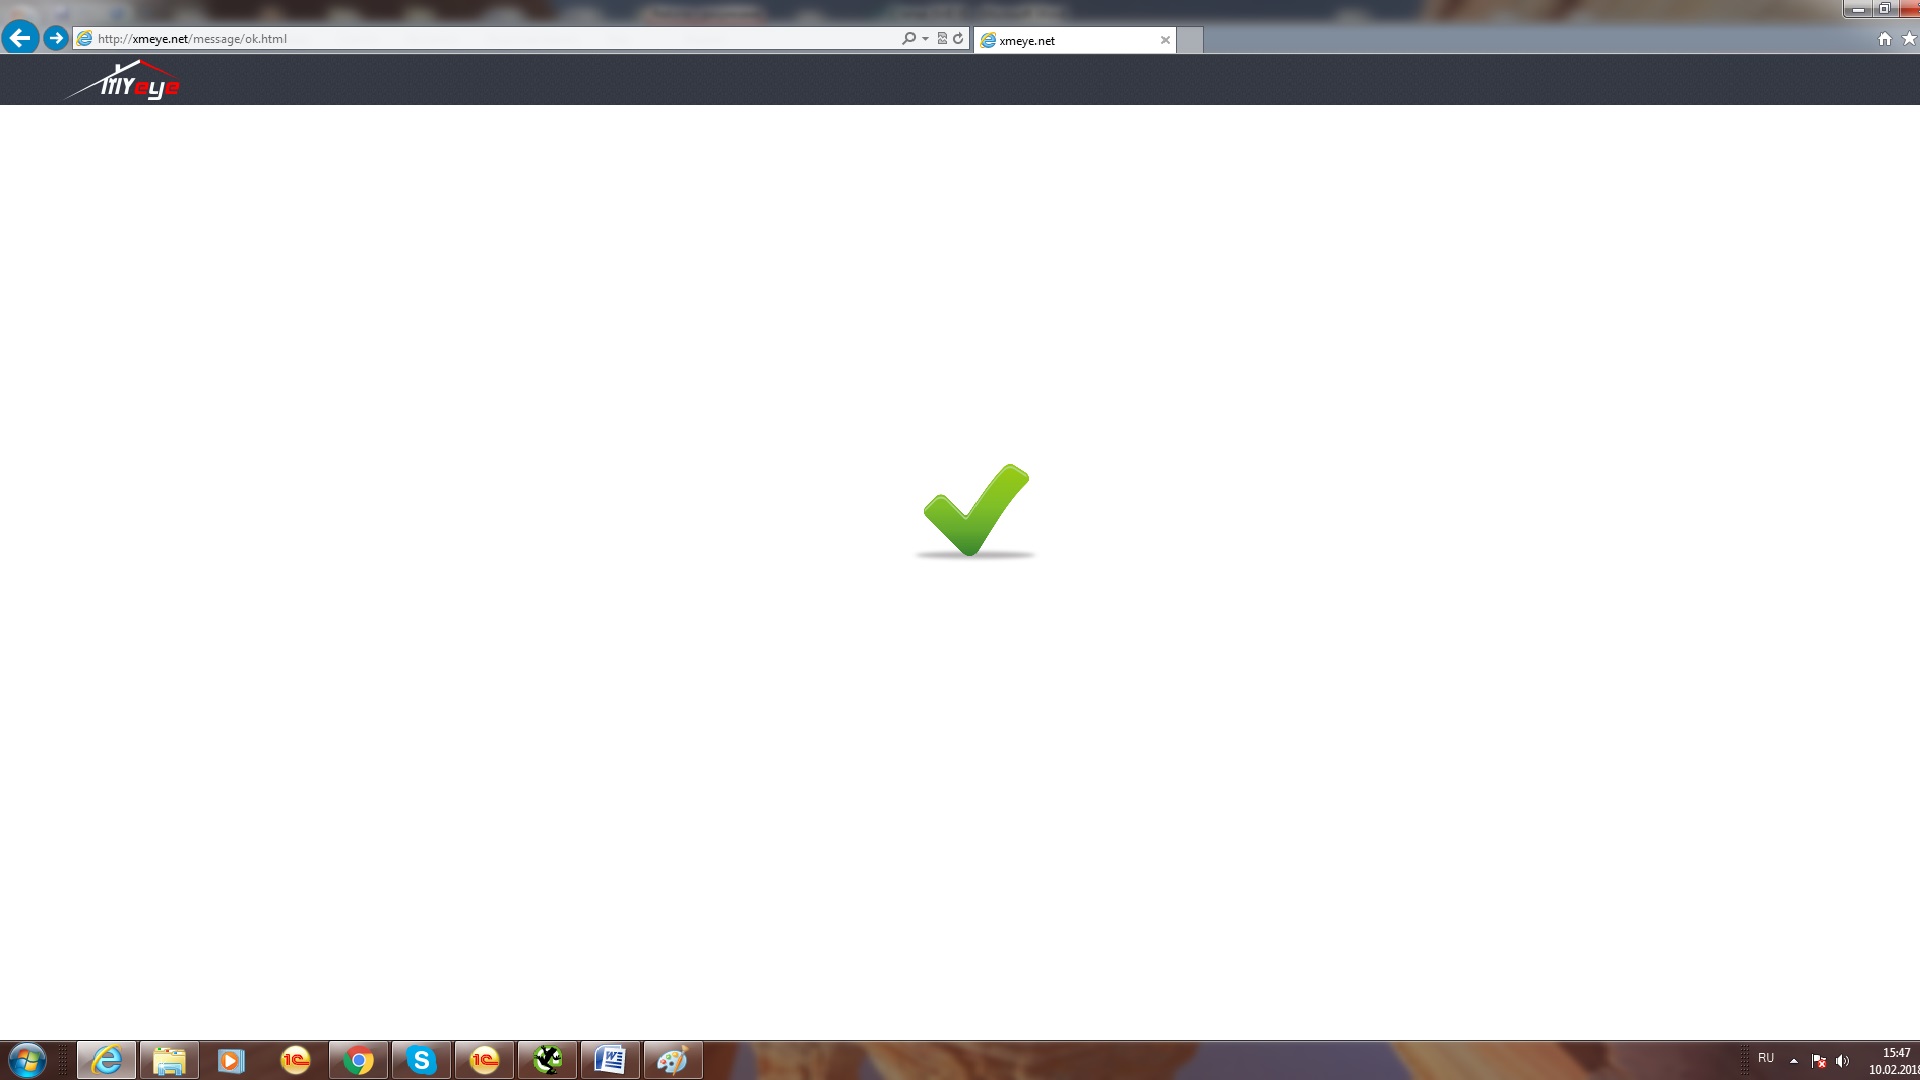
Через несколько секунд Вас переведут на
главную страницу регистрации. Поздравляю, Вы зарегистрировались, но это еще не
все, идем дальше…
4. Запускаем
установку плагина для internet explorer, нажимая на кнопку Скачать ActiveX в правом верхнем
углу экрана. Кстати, для установки плагина Вам потребуется разрешить установку
расширений ActiveX.
Чтобы это сделать в браузере, в верхнем правом углу нажимаем кнопку «сервис» в виде «шестеренки»,
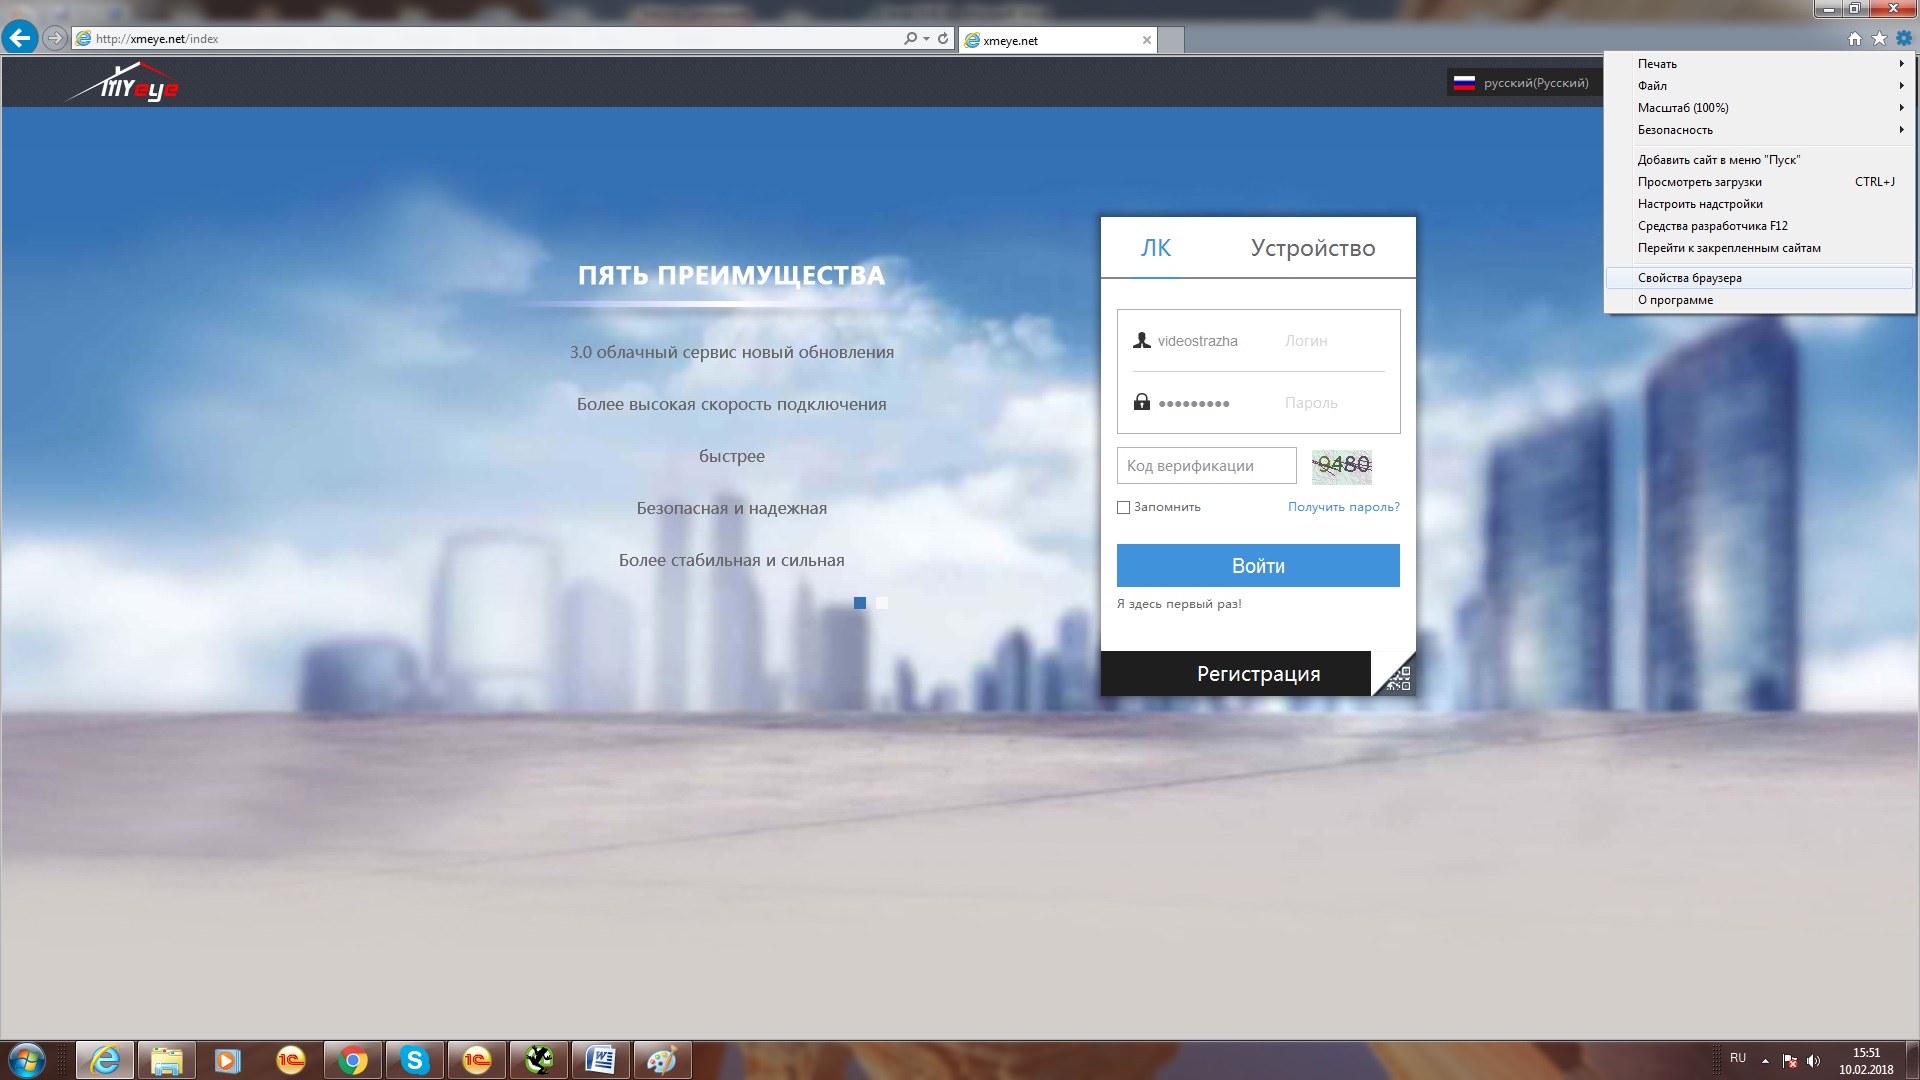
далее выбираем пункт «свойства браузера», откроется
дополнительное меню…
далее вкладка «безопасность»,
чуть ниже кнопка – «Другой», в открывшемся окне ищем поля с
надписью – «ActiveX»
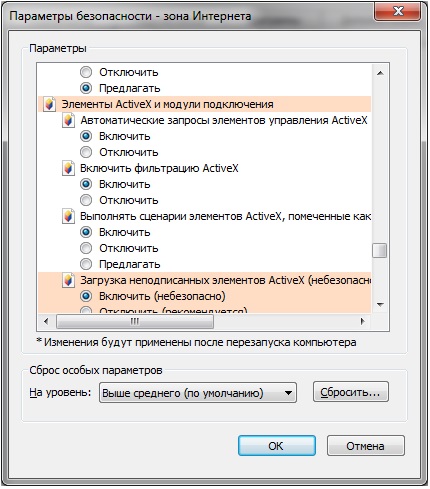
и
включаем их все. После этого — нажимаем «OK»,
«Применить», еще раз «OK» и перезапускаем браузер, заходим на
страницу сервиса и запускаем установку плагина, как было описано в начале
пункта 4, после установки плагина в
целях безопасности Вашего компьютера рекомендуем вернуть настройки AktiveX
в положение «по умолчанию».
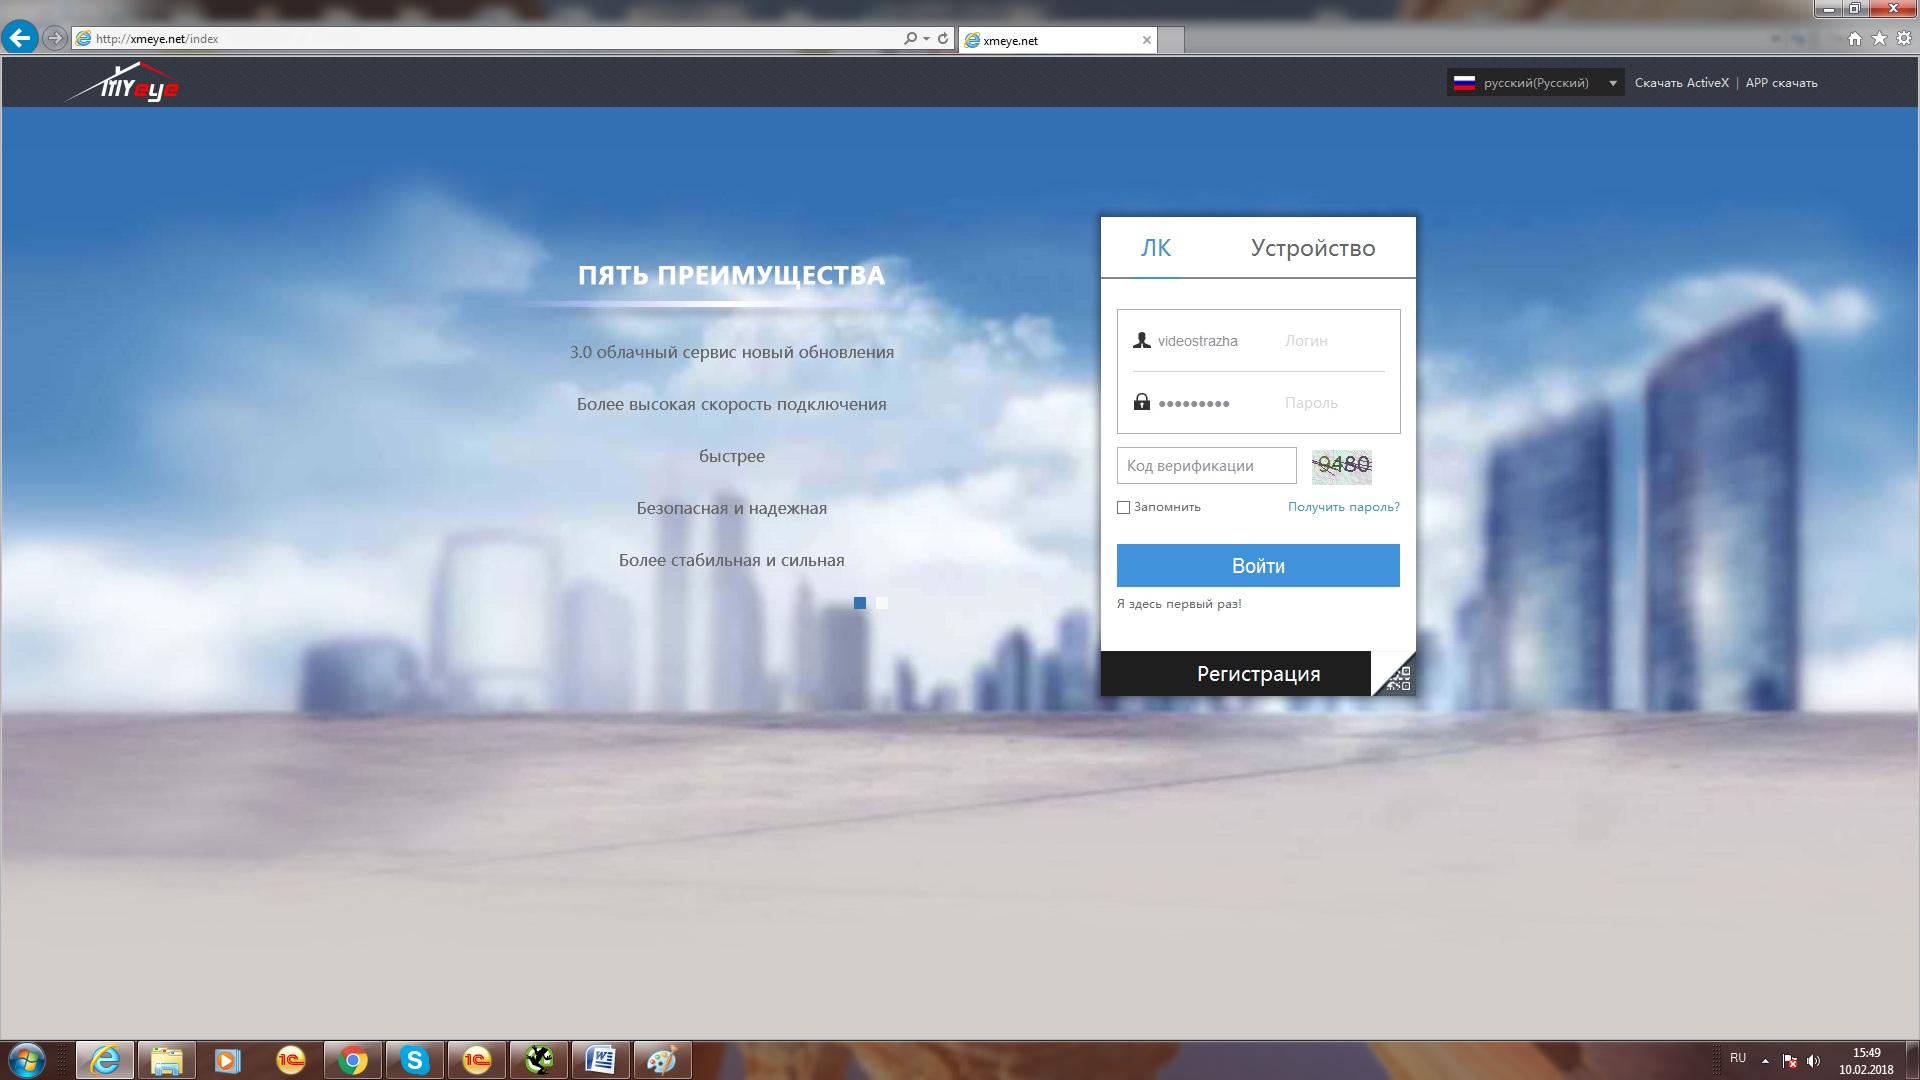
5. Вы на главной
странице сервиса. Вводим свой логин, пароль указанный при регистрации и
проверочный код, который находится рядом на картинке, нажимаем кнопку «Войти». Вы в личном кабинете сервиса.
6. Переходим на вкладку Диспечер
устройств и нажимаем кнопку Добавить.

В нижней части экрана появится форма
добавления устройства в список Ваших устройств.
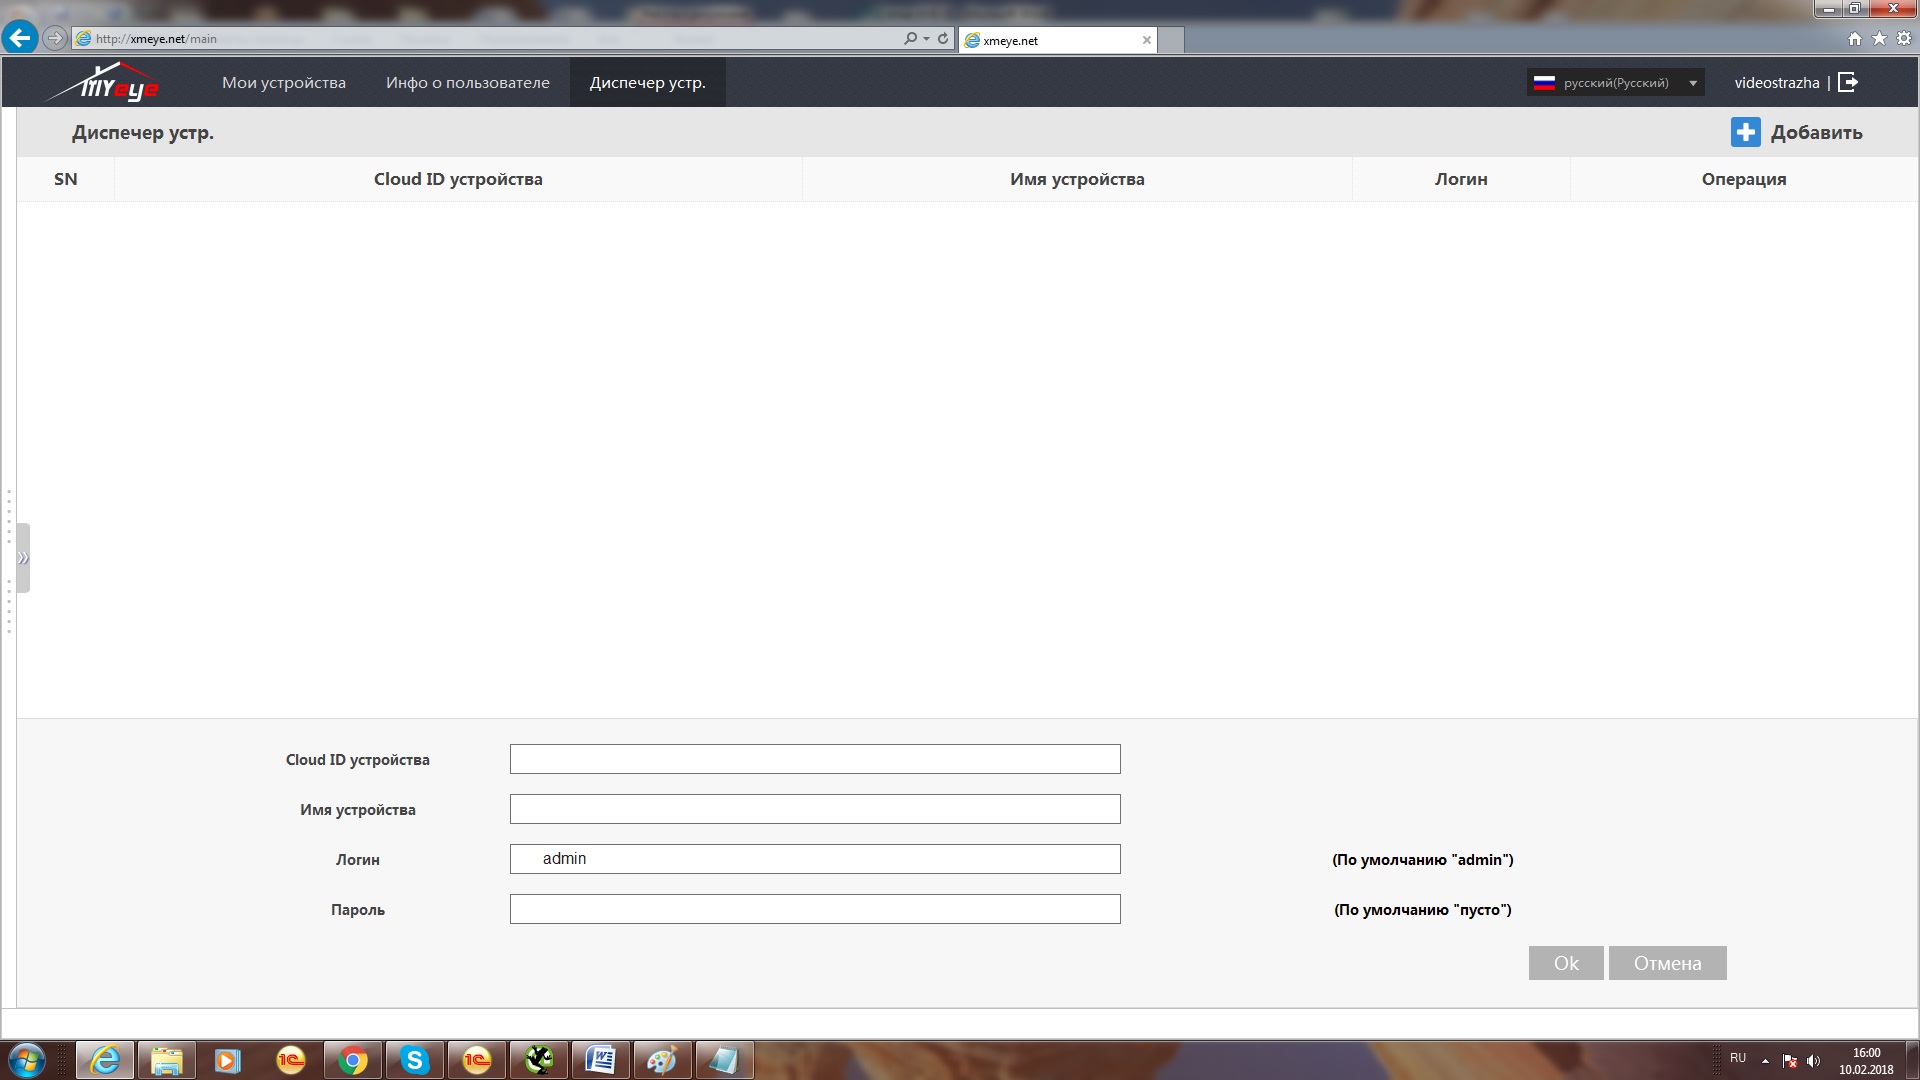
Чтобы добавить устройство нам понадобится узнать
его уникальный серийный номер, логин и пароль. С логином и паролем все понятно,
он, как правило, пишется в инструкции. Где же взять серийный номер? Все просто!
Заходим в главное меню нашего устройства — вкладка
«Сведения»
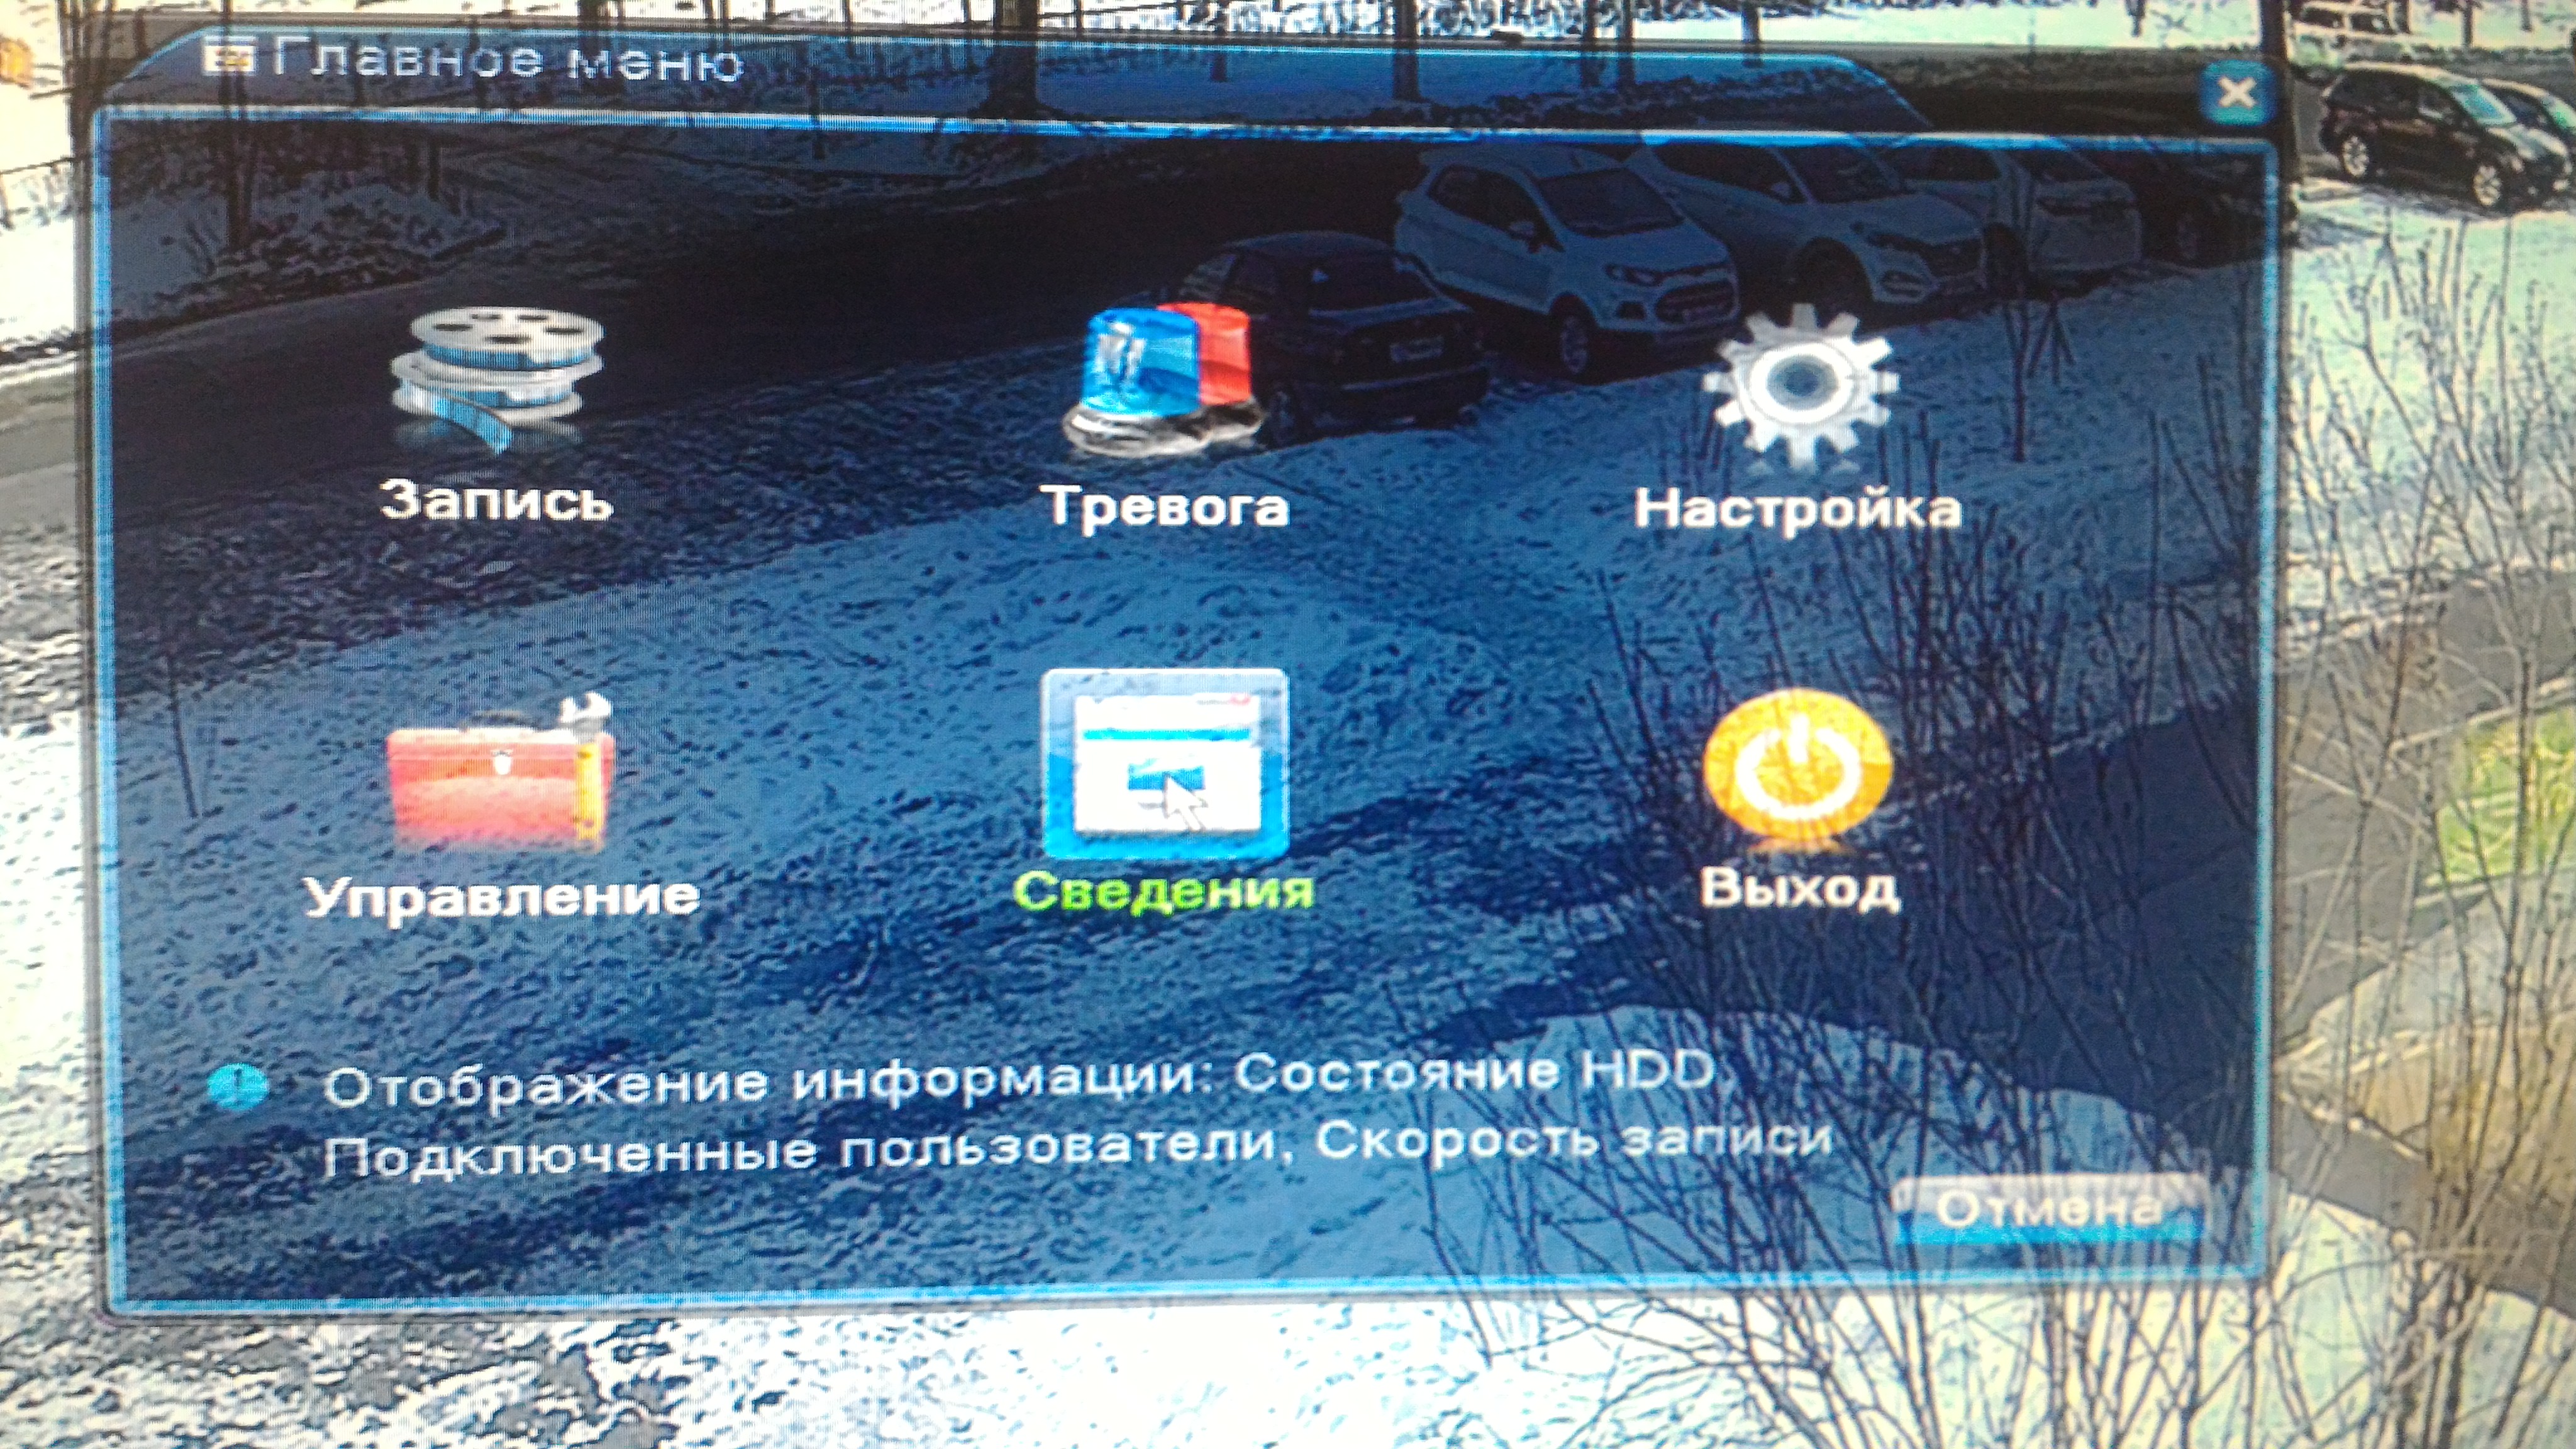
далее вкладка «Версия«
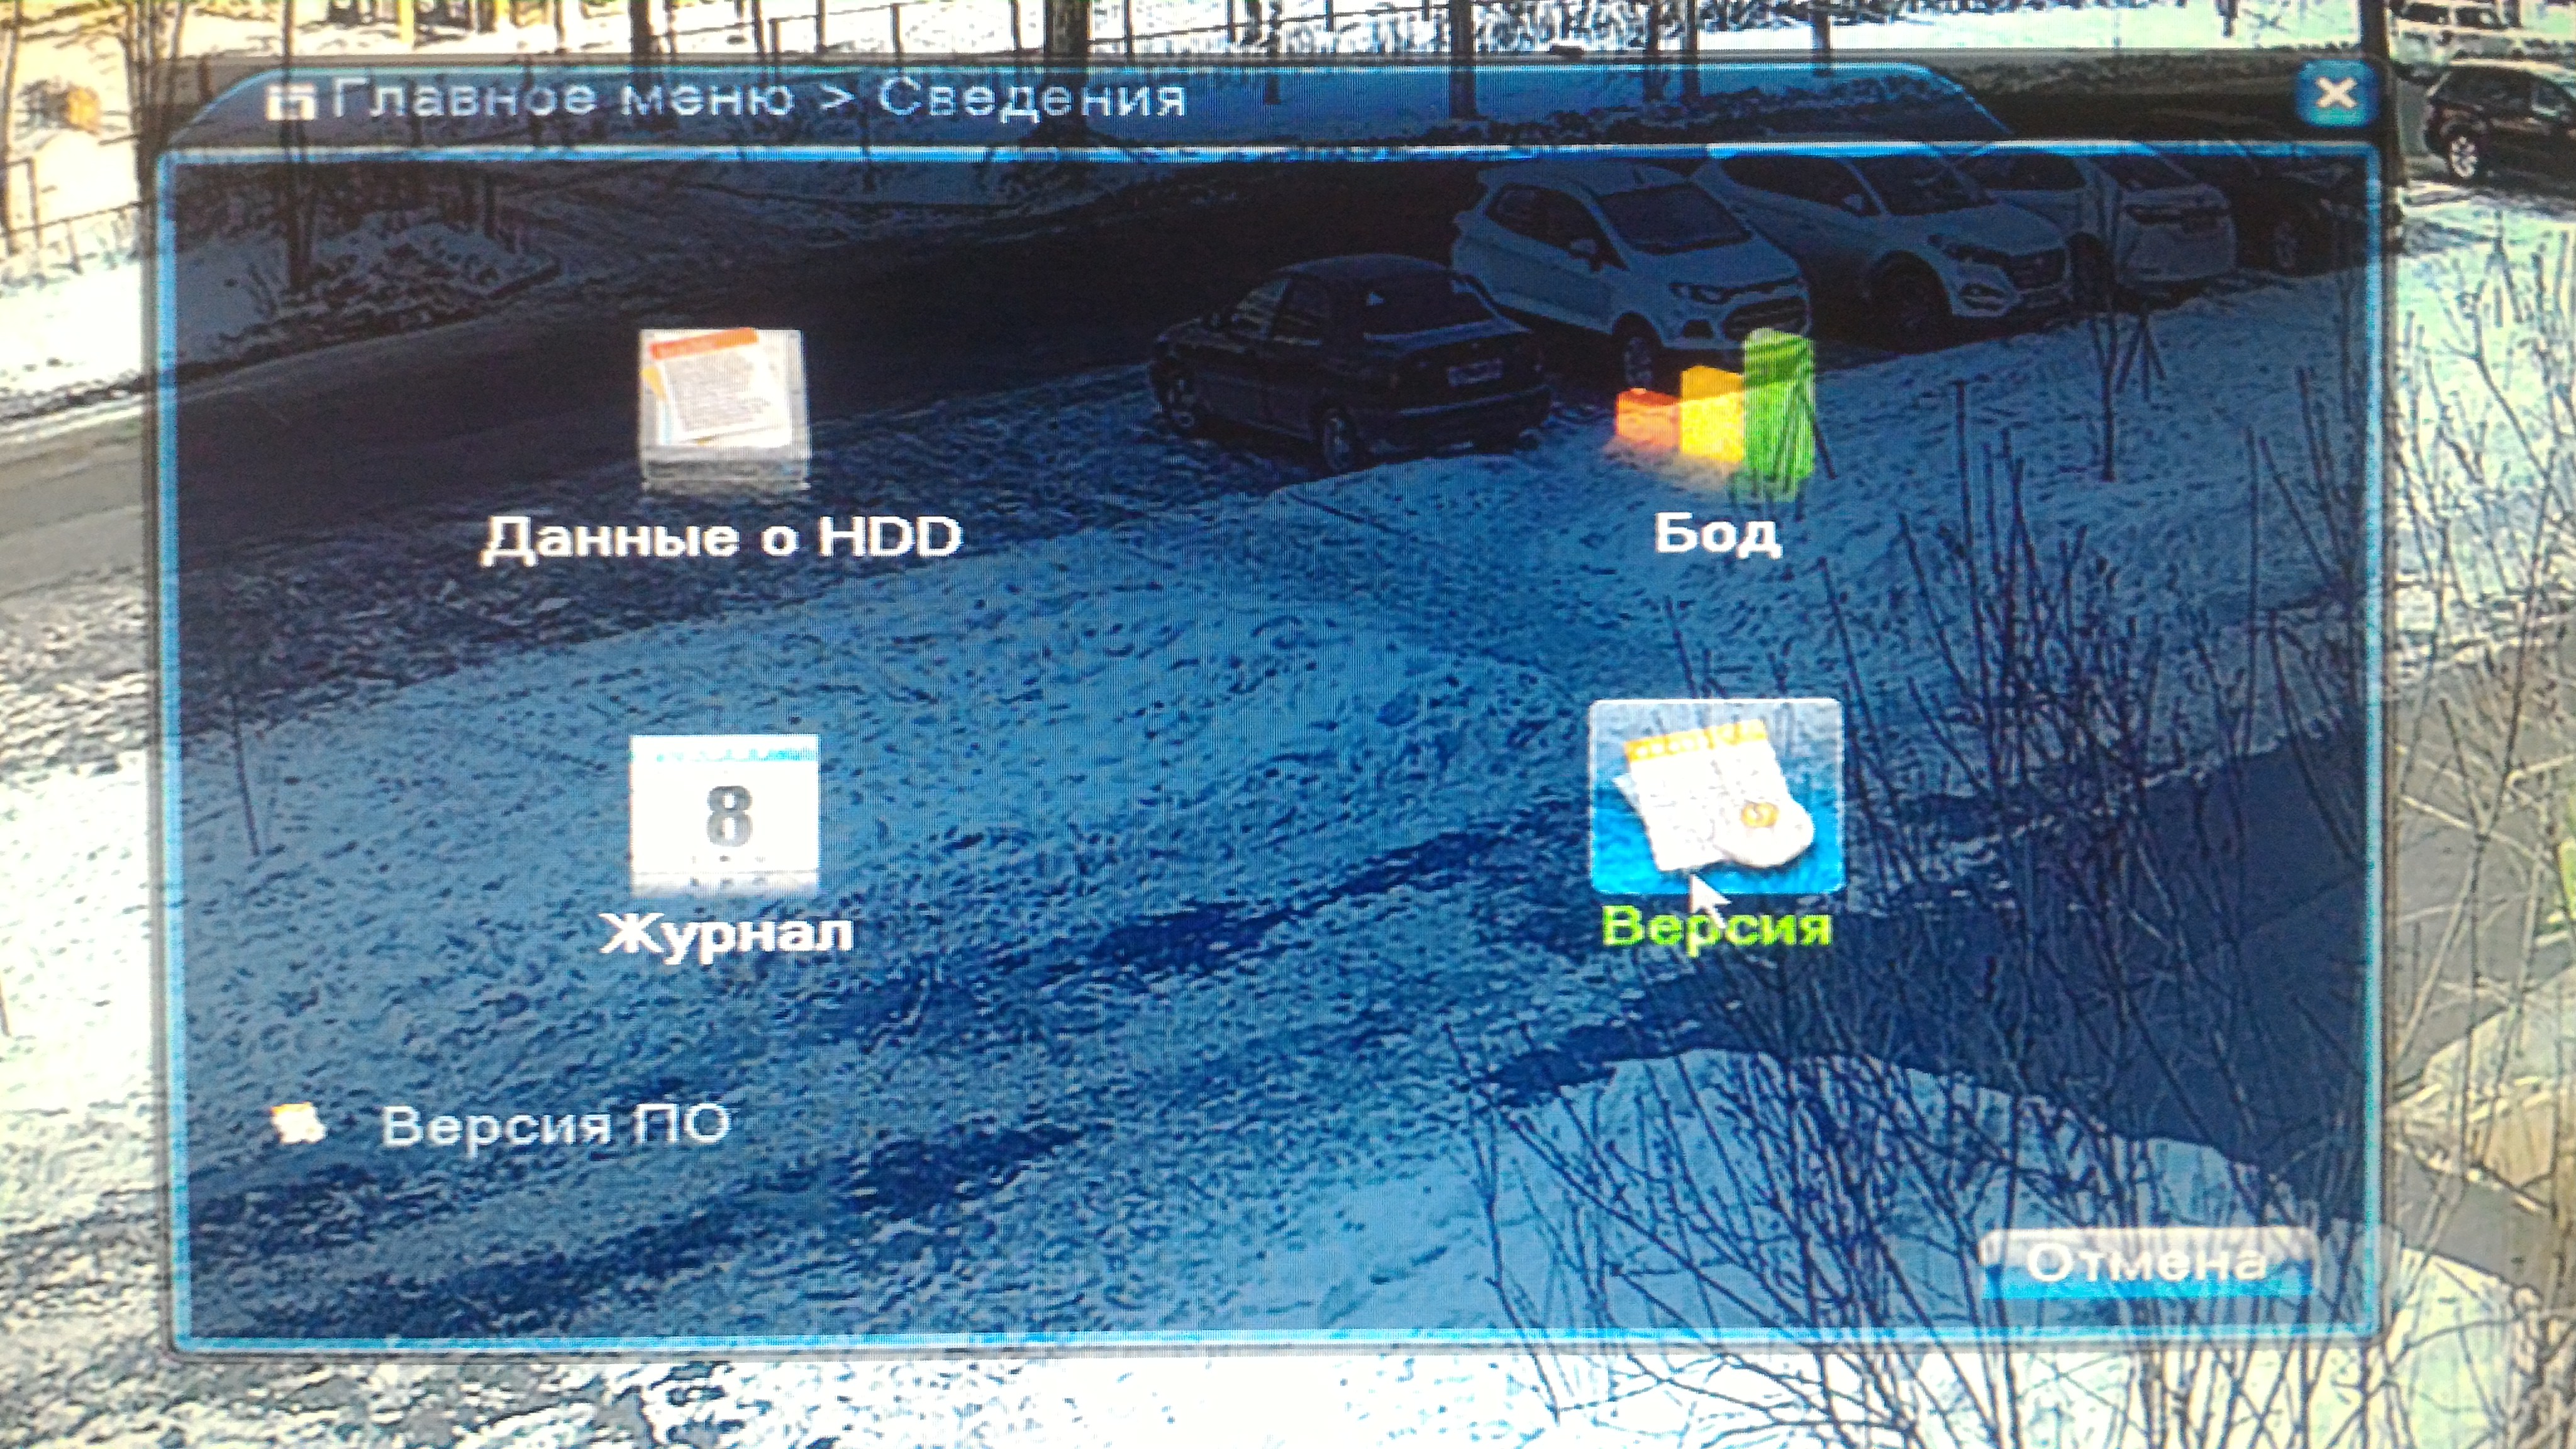
Откроется меню информации об устройстве…
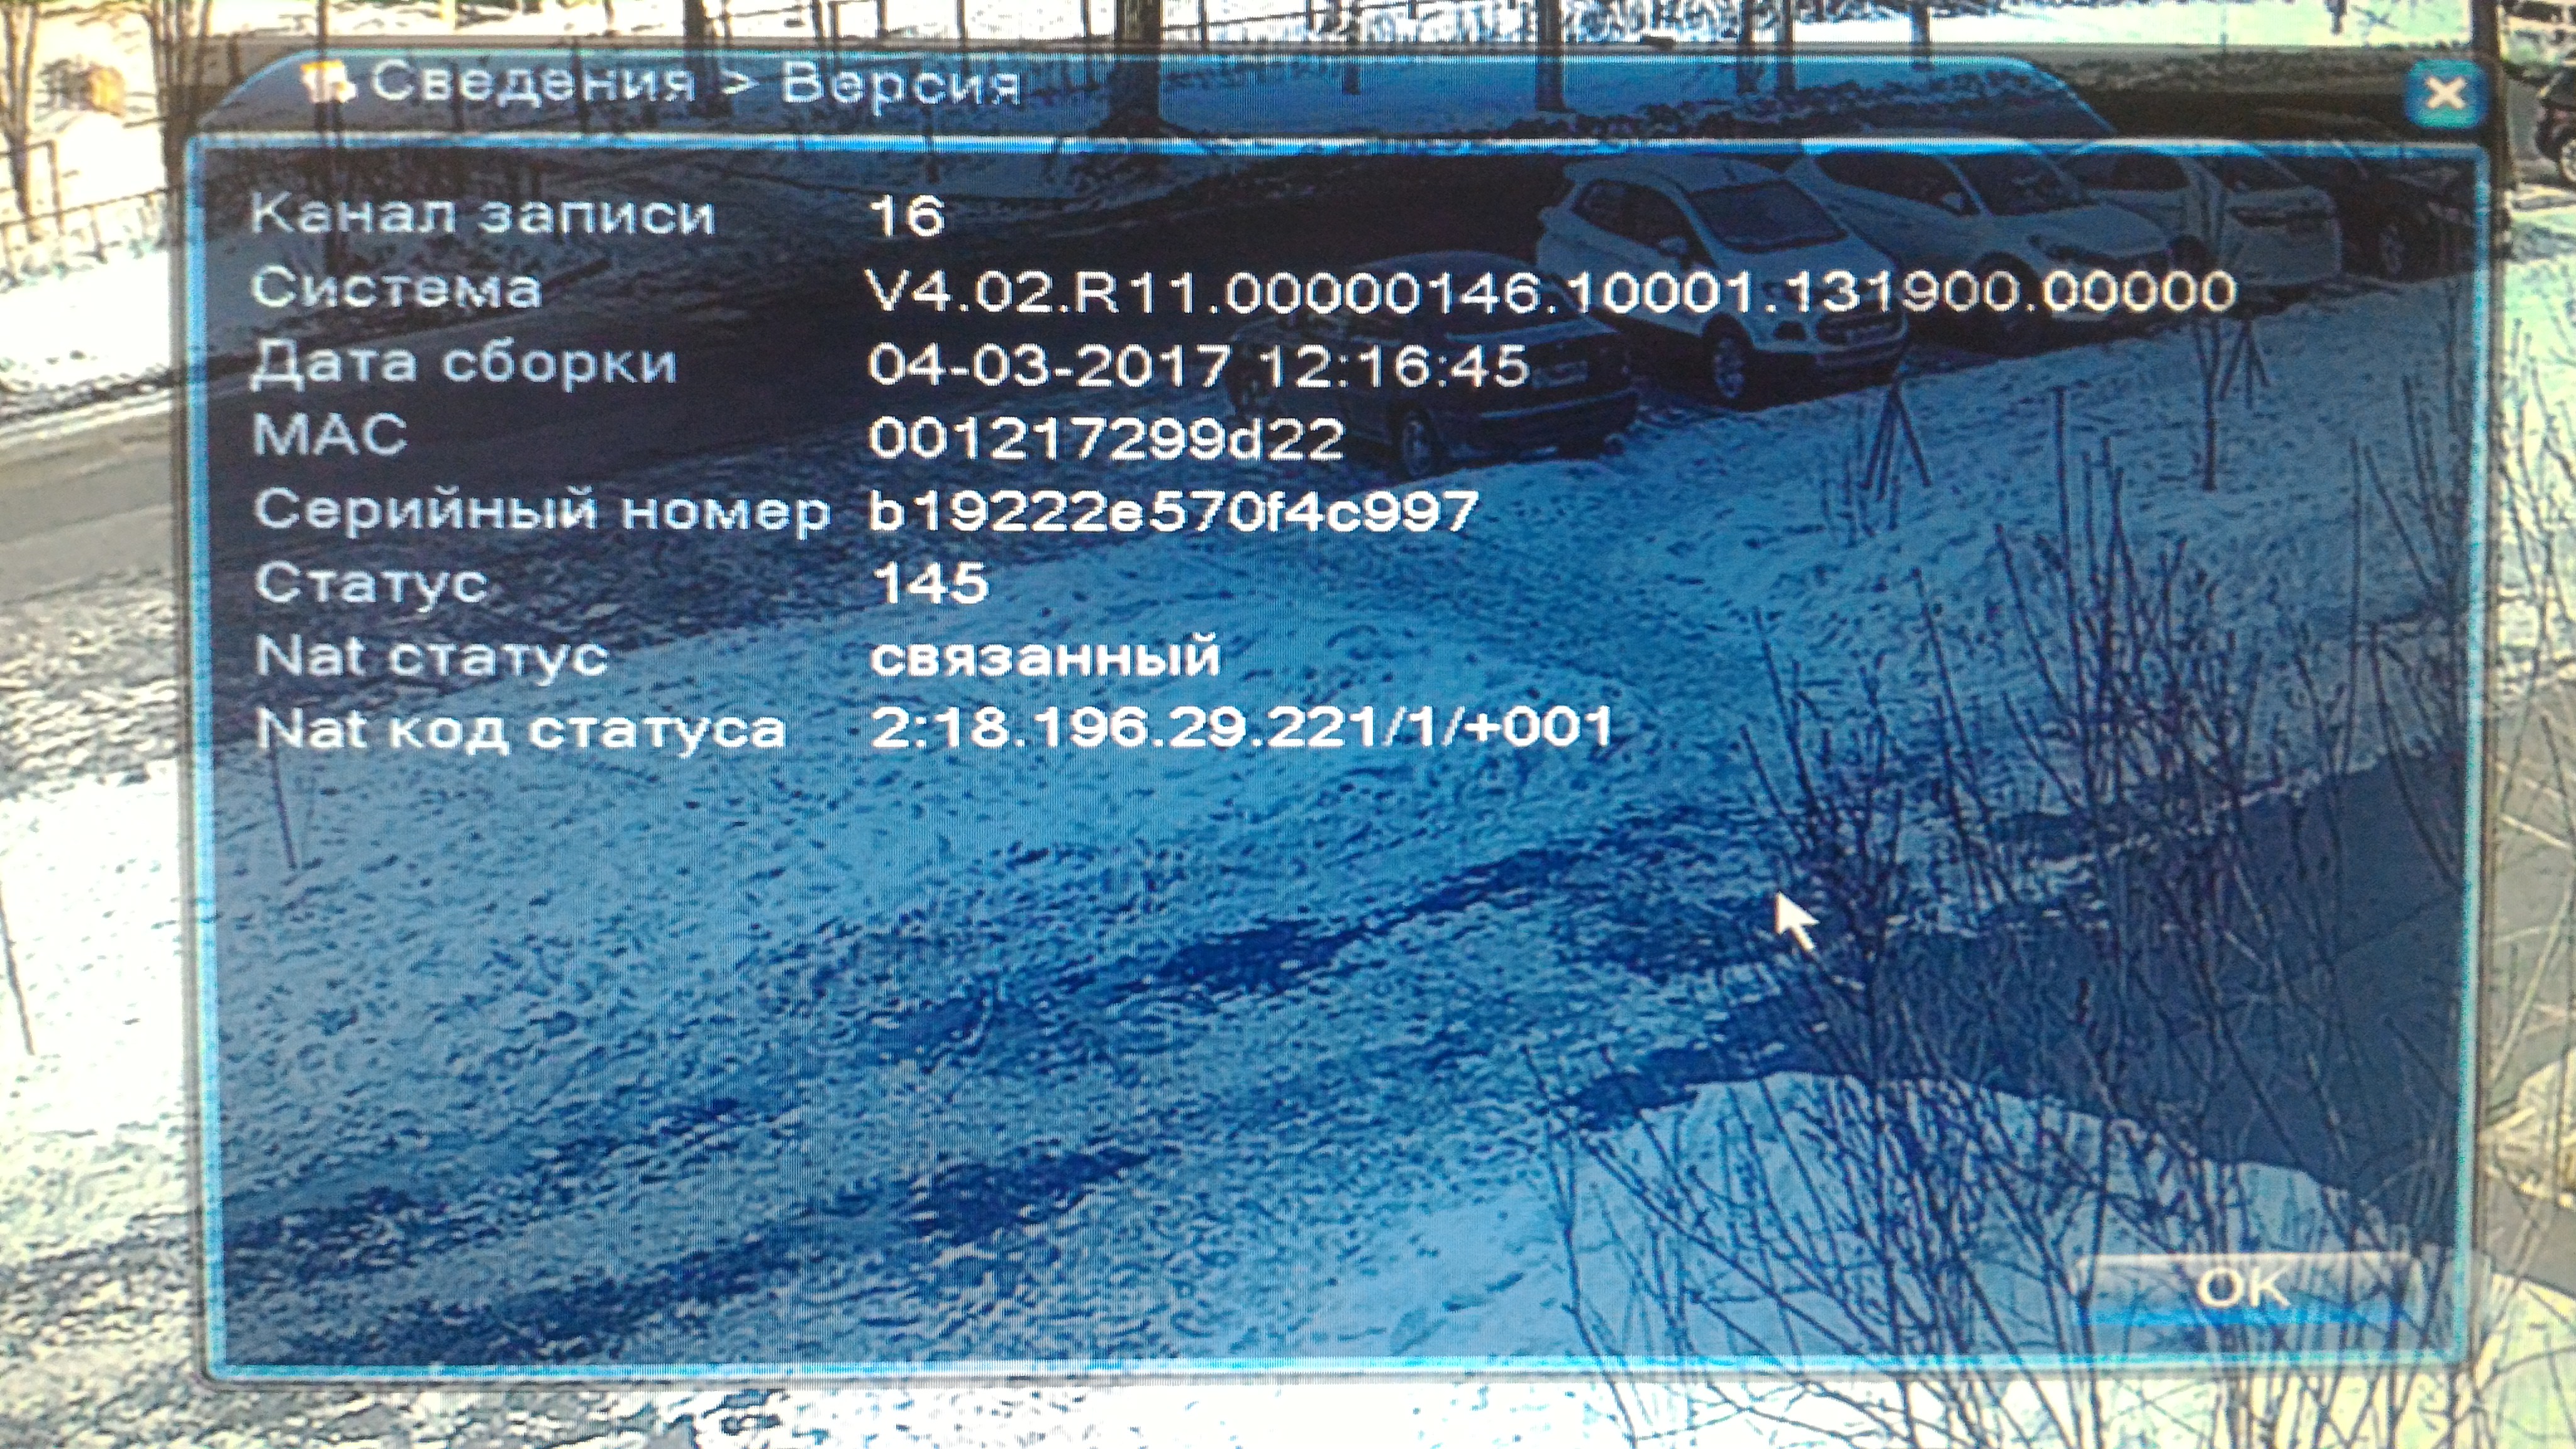
там же ищем строку с названием «Сирийный номер»(«SerialID»). Вписываем его в нашу форму, здесь этот пункт называется
«Cloud ID устройства«,
придумываем имя для нашего устройства, ну и не забываем про пароль с логином, нажимаем «OK«- устройство добавлено. Заходим в пункт «Мои устройства«, выбираем наше
устройство и наслаждаемся картинкой с камер.
Для удаленного просмотра видео с камер на мобильных гаджетах (смартфоны, планшеты),
Вам необходимо установить и настроить приложения xmeye или vmeyecloud. А как
это сделать….. Читайте нашу статью по настройке данных приложений.
Автор статьи Виноградов Сергей.
Если Вам понравилась наша статья, оставьте пожалуйста отзыв, лайкам в соц. сетях тоже будем признательны.
Отвечу на интересующие Вас вопросы. Рад помочь.
XMEYE VMS PC CLIENT Setup Guide, Please turn off antivirus protection and firewalls in Windows Security. Please make sure the DVR system has been connected to your router via the Ethernet cable. You can check the network connection status from the Startup Wizard.
INSTRUCTIONS FOR USING XMEYE PC CLIENT
Client Downloading and Installation
Add the DVR system to the Client
Option 1: Add the DVR system automatically
Please make sure the DVR system and your PC are connected with the same router.
Step 1:
Please log in to the client with the default User Name (admin) and Password (admin).

Step 2:
Click OK to add the DVR system automatically.

Step 3:
Tap YES on the pop-up window of “This operation may modify the device’s IP address, whether to continue?”

Step 4:
The DVR you added will be listed on the interface of Device Manager after 10s searching.

Invalid Password:
The VMS Client cannot load the password of the DVR system automatically, you need to modify it by clicking .
Connected:
The DVR system is ready to use.
Offline:
Please check if the DVR system and PC are connected to the same router.
Timeout:
Network may be disconnected, please click to refresh.
Option 2 : Add the DVR system manually
Step 1:
Click Manual Add at the lower left corner on the interface of Device Manager.

Step 2:
Change the Login Type from IP to CloudID and enter the required information on the interface of Add Device.

Device Name:
Set a name for the DVR.
CLOUD ID:
Also called Serial Number. You can get it from Startup Wizard or by accessing System > Version.
Password:
Enter the password you set for the DVR system.
Live Video
Please click Home > Live View to view the live videos from all channels.

- Click to select a screen (the selected one will be marked with the white border), then double click to select one channel under the list of Hiseeu, the live video from the channel will be displayed on the selected screen.
- For example, select Screen 1 and CAM02, the live video from CAM02 will be displayed on Screen 1.
- Double click on one screen to show the channel in full-screen mode, double click again to exit full-screen mode.
Video Recording
You can go to Home > OPERATION > Record Settings to set the disk in which the video will be saved for VMS Client.
Please go to Home > ADVANCE > Record Plan to set the detailed record plan.
Notes:
- You need always log in to VMS Client for saving the videos into the Disk of your PC.
- Select D:/ to save the videos in case of insufficient disk space and abnormal situation of your PC.
- The disk of PC is not designed for surveillance need and long-time recording may cause damage to your disk.
- If using VMS Client to record videos is inevitable, it’s advised to use the dedicated server and hard disk for surveillance.
Video Playback
Click Home > Playback to check all the videos recorded.
Check the box before the channel(s) you prefer, select Type of the video, select the Begin and End time, then click Search to list the filtered videos.

Double click on the selected video files to play the video or select one video file, then click button to play the video.
Video Downloading(Backup)
Stay on the interface of Video Playback, click to download the selected video, while click to download the video fragment by time period in this video file. The file you downloaded will be saved to the default path on the PC.
You can go to Home > SETTINGS > Systems Config to modify the path.

The format of the file you downloaded is H264 and the file is encrypted. It only can be played by the exclusive media player and you can download it from here
XMEYE DIGITAL VIDEO RECORDER SYSTEM INSTRUCTIONS FOR USE
This tutorial applies to XMEye digital video recorders.
Safety cautions
- Please do not place any container with liquid such as water, coffee, or beverage on the DVR.
- Please put the DVR at a ventilated space and do not block the air vents.
- For the system security, please use the original power supply provided.
- Check the power voltage in case of any damage due to the wrong voltage.
- Please obey the local security regulations and policies when installing the product.
- If the DVR starts or woks abnormally, please unplug the power adapter and carefully clean the dust on themainboard in the DVR device, then restart the DVR.
Product overview
DVR

Camera

Power Cable Splitter

BNC Cable

Hard Drive Installation
IMPORTANTTo record videos and play the historical videos, the installation of the Hard Disk Drive is a must.
Otherwise,you can only watch the live video.
This DVR system works with a 3.5” SATA Hard Drive.The Hard Drive should be formatted after it’s installed.

System Connections
IMPORTANTDo not fix the AHD camera before you can view the image on the monitor and confirm the ideal position to install it.
1.Plug a power adapter into the DVR and the socket to power on the DVR.

2. Connect a monitor to the HD Output or VGA Output on the DVR with an HDMI cable or VGA cable (not included).

3. Connect the Ethernet Cable with the DVR and your router.

4. Connect the AHD camera with the BNC Cable.

5. Connect the Yellow Video Connector to the BNC Video Input on the DVR, and connect the Red Power Connector to the Male Connector of the Power Cable Splitter.

6. Connect the Female Connector of the Power Cable Splitter with another power adapter. Then plug the power adapter into the socket to power on the camera.

Operate dvr system with a monitor
Startup Wizard
After connecting the DVR and cameras to power, wait for 2-3 minutes. A Startup Wizard will start to guide you via a series of pop-up windows.
Connect the USB mouse to the DVR, then click Next until you see the window of Time-Language Configuration.
1.Select the time zone, date format, time format, language, and set the time for your DVR system.

2. The default password is empty, please reset it for your DVR following the tip.
The new password should be more than 6 digits and use the combination of numbers and letters to ensure your system’s security.

3. Select safety questions and enter the answers for resetting the password if necessary.
You can also enter your email address for getting the verification code to reset the password.

4. Check if the network connection status is normal. If not, you can configure it by clicking Network.

5. Scan the QR code to get the Serial Number of your DVR system and download the App named XMEye into your mobile device.

6. Before fixing the cameras, you can log in to XMEye App to check the live view to confirm the ideal position.

7. Detection based on human shape is enabled by default.
The DVR system will send alerts to your mobile device when there is human shape detected by the cameras.
Please refer to the section of Motion Detect the detailed setting.

IMPORTANTClick Next and OK to exit the wizard. You can right click on the screen, then go to Main Menu > Startup Wizard to bring it up again.
If the wizard is no longer needed, just check the box before Don’t Display the Wizard again on the first interface of the Startup Wizard.
Live Video
You will see the live videos from the AHD cameras in split-screen mode (9 screens by default) after exiting the wizard.

※ Move the mouse cursor to the live video of any channel, some icons may be displayed according to the setting.

Notes:
- The icons of and are displayed by default, while for icon , and , please right click andgo to Main Menu > Alarm (see on page 15) to enable them.
2. If you want to loop to display the live videos from some certain channels in full-screen mode, please go to Main Menu > System > Tour to enable this function.
3. For viewing the live video from one channel in full-screen mode, please move the mouse cursor to the desired channel, then double click. To exit full-screen mode, double click again.
Hard Drive Formatting
When you receive the system, the system has a pre installed hard disk, which does not need to be formatted,but if you have to replace another hard disk, it needs to be formatted at first ,then it can be used normally Install the Hard Drive first, then right click and go to Main Menu >Advanced > Storage to check if the type is Read/Write or the status is Normal.
If not, please click Format Storage to start formatting your Hard Disk Drive.
Video Recording
Right click on the screen, then go to Main Menu > Record > Record Conf. to set the record mode and record plan.
This DVR is set to record videos 24 hours a day by default.

Channel:
Select the channel to set the record mode and plan. You can select a single channel or all channels.
Redundancy:
Installing 2 pieces of Hard Disk Drive is required when enabling this function, and HM245 doesn’t support it.
Length:
Set the maximum video length of each recording from 1 minute to 120 minutes. It’s 60 minutes by default.
PreRec:
The camera will start recording a video around 5s before it detects the motion or human shape.
You can reset the time from 1s to 30s, but the accuracy of the pre-recording time may be affected by the bitrate.
Mode:
Set the recording mode and the options are Schedule, Manual and Stop.
- Schedule: The camera will record videos according to your record plan.
- Manual: The camera will record standard videos 24 hours a day.
- Stop: The camera will stop recording videos.
Record Plan:
Set the recording schedules.
- Week and Period 1/2/3/4: Set the time period(s) of each day to record different types of videos.
- Regular: The system will continuously record standard videos during the time period(s) you set.
- Detect: The camera will start recording a video when it detects motion or human shape during the time period(s) you set. If you enable the alarms of Video Blind, Video Loss, and Face Detection, the camera will record the video as well.
- Alarm: An extra alarm device is required for this type of video, and HM245 doesn’t support it.
Notes:
The oldest video will be overwritten by the latest one by default when the Hard Disk Drive runs out
of space.
Video Playback
Right click on the screen, then go to Main Menu > Record > Playback to play the video recorded.
You will see the different playback modes in the pop-up window of Play Mode.
Explanation of playback modes
1.Common Playback
Select the channel(up to 4 channels at the same time), a period and a date on Blue background to
play all types of videos recorded.


1. Area for Video Playing
2. Playback Buttons
3. Timeline
4. Channel
5. Filters
6. Filtered Videos List
7. R: Standard Videos
8. M: Videos recorded when the camera detects motion or human shape.
9. Detailed Info. of the Selected Video
10. Search
11. Show/Hide Filtered Videos List
12.Timeline by Hour/Minute
TipFilters will not be available after you left click on the timeline, but you can exit this mode and re-enter to select the filter.
Option 1 :
Left click on the Green/Red (Green for standard videos recorded, and Red for the videos recorded whenthe camera detected motion or human shape) part of the timeline of each channel to play the historical videos.
Option 2 :
Left click on the live video of one channel, show the filtered video list, then double click on the selected video to play it.
Description of Playback Buttons
Left click on the live video of any channel, then start using the buttons to control the video playback.

Tips:
① You can click the icon to cut a video, then click to back up to the external storage.
② Previous Frame and Next Frame work only when pausing the video.
③ The speed of Fast Reverse and Fast Forward will be displayed on the right end of Playback Buttons.
2. Sync Playback
This function aims to put the videos from different channels at the same time to compare.
Select 2 channels at least ( up to 4 channels), a period and a date on Blue background to play the historical videos simultaneously at the selected time on the same timeline.

3. Dayparting
This function aims to put the videos from the same channel but at different time to compare.
Select a channel, number of split screens, and a period to play the videos recorded from this channel on different timelines.

NotesYou need to press and hold the left mouse and move on the bar of Period to select time period.
4. Smart Express
Select one channel or all channels, then select the speed of Fast Playback, the system will play all the videos recorded with the speed you selected.

5. Smart Search
Select one channel and a time period, then check the box before Detect and select a date on Blue background to play the videos recorded when the camera detected the motion or human shape.

※Double click the thumbnail to play the related videos.
6. Face Search
Select one channel, a time period and a date on Blue background to play the videos recorded when the camera detected faces.

Video Backup
Step 1:
Insert the USB disk into the USB port of the DVR system. Right click on the screen, then go to Main Menu >Record > Backup to start.
Step 2:
Select your USB disk, then click Backup to bring up a pop-up window.

Step 3:
Select Channel, Start Time and End Time, then click Add to display all the filtered videos.

Step 4:
Check the box to select the video files and Backup format, then click Start to back up the videos.

Tips:
① The format of the USB Drive should be FAT 32.
② An alternative solution to back up the videos is listed below.

Snapshot Setup
The system will capture the snapshots 24 hours a day when the camera detects motion or human shape.
Go to Main Menu > system> SnapShot Conf. to reset the time interval of capturing a snapshot, and set up the schedules when the camera will capture a snapshot as well.

Alarm
IMPORTANT:
The alarms of Motion Detect and Human Detect are enabled by default. If you need to record videos whenthe camera detects the face or gets blocked as well, please enable Face Detection and Video Blind.
Please go to Main Menu > Alarm to set the alarm you need.
Motion Detect
The camera will start to record videos when it detects motion.

Channel:
Select the channel you’d like to enable motion detection.
Enable:
Check the box to enable motion detection.
Sensitivity:
If you select higher sensitivity, the camera will be more easily to be triggered to start recording videos. It’s advised to select Middle to balance the accuracy and effectiveness of the alarm, thus reducing the false alarms.
Region:
Click Set, then press and hold the left mouse to drag and select the area for detecting. The pink area indicates the selected area.
Period:
Set up to 4 time periods for each day to send the alerts when the camera detects motion.
MD Interval:
Set the time interval of two alerts. It aims to decrease the frequency of the alerts caused by the same moving object.
Record Channel:
The selected channel(s) will start recording when the current channel detects motion.
Tour:
The display will loop to display the live video from the selected channel(s) in full-screen mode when the current channel detects motion. You can go to Main Menu > System > Tour to set the time interval to show the live video in full-screen mode.
Snapshot:
The selected channel(s) will capture a picture when the current channel detects motion.
PTZ Activation:
The cameras don’t support this function.
PostRec:
The camera will remain to record the video around 10s after the motion or human shape detection ends. You can reset the time from 10s to 300s.
Show Message:
After enabling this function, the display will pop up a window to show the Alarm Status for all kinds of alarms when the cameras detect motion, human shape, or more.

Send Email:
Before enabling this function, please go to Main Menu > System > NetService, then double click on EMAIL option to set up your email address to receive the alerts.
Write Log:
The logs of the alerts will be written into the system once you enable this function. You can go to Main Menu > Info > Log to check the detailed log information.
FTP upload:
The system will send the videos recorded or snapshots captured to the FTP server you set when the camera detects motion. Please go to Main Menu > System > NetService, then double click on FTP option to set up your FTP server.
Mobile reported:
The system will send alerts to your mobile device when the camera detects motion. Please install the App and add the DVR to the App following the section of OPERATE DVR SYSTEM ON MOBILE DEVICE on page 18.
Up-to-Coaxial Control
Right click on the main menu and select XVI control to start setting up your camera.

※If the live video from the camera is mirrored or flipped, you can check the box before Mirroring or Overturn to fix it.
※If you set something wrong, please click Restore to get back to default settings.
На чтение2 мин
Опубликовано
Обновлено
При настройке системы видеонаблюдения на базе устройств Xmeye на Windows 10 могут возникать определенные трудности. Однако с нашей подробной инструкцией вы сможете легко освоить все необходимые шаги для успешной настройки программы.
Первым шагом будет скачать и установить само приложение Xmeye на ваш компьютер с операционной системой Windows 10. Для этого пройдите на официальный сайт разработчика и следуйте инструкции по установке. Убедитесь, что вы загрузили версию программы подходящую вашей операционной системе.
После установки Xmeye откройте его и начните процесс настройки. Для этого необходимо создать учетную запись нового пользователя. Введите все необходимые данные, такие как имя пользователя и пароль. Обязательно запомните или запишите эти данные, так как они понадобятся вам в дальнейшем для входа в систему.
Далее вам потребуется добавить устройства видеонаблюдения в приложение Xmeye. Для этого нажмите на кнопку «Добавить устройство» и введите IP-адрес вашей видеокамеры, порт и учетные данные – имя пользователя и пароль. После этого сохраните изменения и вы сможете видеть видеопоток с вашего устройства в окне программы.
Теперь вы успешно настроили приложение Xmeye на Windows 10. Вы можете добавить все необходимые устройства видеонаблюдения и приступить к просмотру видео с них.
Установка программы Xmeye на компьютер с Windows 10
- Откройте веб-браузер на компьютере и перейдите на официальный сайт Xmeye, введя в адресной строке xmeye.net или найти ссылку на скачивание программы в Интернете.
- После открытия сайта найдите раздел загрузок и выберите вариант загрузки для Windows. Этот вариант обычно имеет название «PC Client».
- Нажмите на ссылку для скачивания программы Xmeye. Скачанный файл будет в формате .exe.
- Когда загрузка завершится, найдите файл .exe в папке загрузок на вашем компьютере и дважды кликните на нем, чтобы запустить установку программы.
- В окне установщика Xmeye нажмите на кнопку «Далее», чтобы продолжить.
- Прочитайте и принимайте условия соглашения о лицензии программы Xmeye, затем нажмите на кнопку «Далее».
- Выберите папку, в которую вы хотите установить программу Xmeye, или оставьте настройки по умолчанию, затем нажмите на кнопку «Далее».
- Пожалуйста, выберите компоненты, которые вы хотите установить. Рекомендуется установить все компоненты, чтобы функциональность программы была полностью доступна. Нажмите на кнопку «Далее».
- Теперь вы можете нажать на кнопку «Установить», чтобы начать установку программы Xmeye на ваш компьютер с Windows 10.
- Дождитесь завершения установки, после чего вы сможете запустить программу Xmeye, и она будет готова к использованию.
Теперь у вас есть приложение Xmeye на вашем компьютере с Windows 10, которое позволяет удаленно просматривать видео с камер видеонаблюдения. Вы можете настроить программу, добавив камеры видеонаблюдения и настроив соединение для удаленного доступа к видео.
Регистрация аккаунта в программе Xmeye
Для использования всех функций программы Xmeye необходимо зарегистрировать свой аккаунт. Регистрация аккаунта позволяет сохранять настройки, просматривать видеозаписи с IP-камер и получать уведомления о событиях.
Вот пошаговая инструкция, как зарегистрировать аккаунт в программе Xmeye:
- Запустите программу Xmeye на вашем устройстве.
- На главном экране программы нажмите на кнопку «Регистрация».
- Введите ваше электронное письмо в поле «Эл. почта». Это понадобится для восстановления пароля в случае потери доступа.
- Придумайте и введите пароль для вашего аккаунта в поле «Пароль». Пароль должен содержать не менее 6 символов и состоять из букв и цифр.
- Повторите пароль в поле «Подтверждение пароля».
- Нажмите на кнопку «Зарегистрироваться».
После успешной регистрации аккаунта в программе Xmeye, вы сможете входить в свой аккаунт с любого устройства и получать доступ ко всем функциям программы. Вы также сможете добавлять IP-камеры, настраивать оповещения и просматривать записи видео.