
Introduction: Diy Digital Signage With Xibo
Hi, in this instructables we are going to create our own digital signage system with Xibo.
Our Scenario is as follows; We have a small business and we want to broadcast some ads on two seperate screens. For this setup, we are going to use a free and open source digital signage software, “ xibo.”.
So why Xibo? Simply because it is open-source, freeware and rather practical by means of timing, design and display management. XIBO is a server-client based digital signage software. The system works with a PHP based CMS installed on a server and sending data to the clients connected to the server. You don’t necesarrily need a high power proccessor for the server because it only sends data to the clients.
Step 1: Prepare the Server and Install Xibo Cms
As you see, our server and clients are running on the same network. If you wish, you can use the server in the cloud-based system, but that would be the subject of another article.
Windows is not a MUST for the server, you can use linux as well. But for the client machines to broadcast the data on the screens, we have to use windows. Altough the XIBO is an open-source freeware, the player software on the android platform is a paid application. Only the windows player software is free. That’s why we need to use Windows on the client screens. These machines shoud have an HDMI output to broadcast the content on the screens.( we’d like to get high quality image and sound, right? “content is the king!”) The client machine should be able to play HD videos easily, it needs , at least, i3 processor, 4GB Ram and an entry level graphic card.
To do list for the server;
- Download Xibo CMS ve Xammp,
- Install apache+mysql (Xammp)
- change the mysql settings (give the root user a password, create a new user and a database for xibo)
- Install XIBO CMS on the Server
XAMMP Web Page
XIBO Web Page
XAMPP is totally free, easy to load, an Apache distribution and contains MySQL, PHP and PERL. Now, install XAMPP, nothing more to do, just click next,next,next..
Run the apache and mysql from the control panel and check on your browser.
On the adrress bar of your browser, write localhost or 127.0.0.1 and go.
Now before installing the xibo, we should assign a password for the root user on mysql, create a new user and a database.
Note down the passwords, database and the user names during installation.
After installation Xampp, unzip the xibo cms files you downloaded before and copy them into the htdocs directory in the main xammp directory and then rename it for easier use.
Now we begin to install the xibo. On your browser, write 127.0.0.1/xibo and go.
The first phase of the xibo installation there are some problems, we will continue after fixing the problems.
First of all, we need to activate the PHP FileInfo support. To do so, I open the xammp console, run the CONFIG and PHP.ini option from the apache tab. The opening file is the one where we do the PHP module setting. If you delete a wrong line, php may not work properly so you need to be careful. Let’s find the related line. Here is the correct line to change. When we remove the semi colon at the beginning of the line, the module will be activated.
Well, we solve the first problem, now let’s move on the other : large file uploads. Probably we will use video files in large size with XIBO. PHP file size setting is small by default. It will be useful to increase the file size setting. For example we can set it to 512 mb. We will do it on the PHP.ini file.
Finally, the last problem. Now we will activate the international support. To do so, we need to activate the php_int.dll module from the php.ini file.
So, we have solved all the problems, let’s continue with the installation.
In this phase, we will use the database and the user name we created before.
During installation the Xibo CMS, we will define the necessary user name and password for xibo cms.
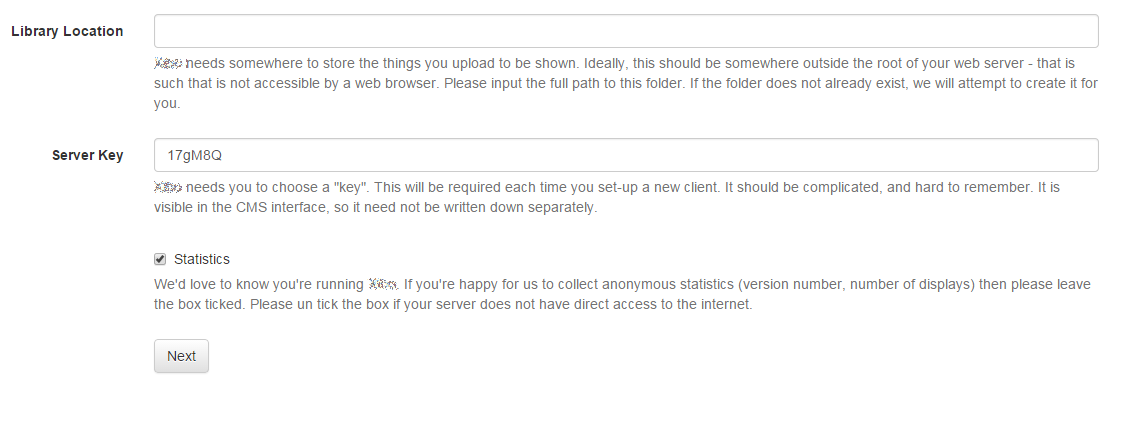
We need to set the path for files like images, texts, and videos. I set it to a new directory on D drive.
Server key is very important, we should note it down.
Let’s sign in xibo cms with the username and the password we created for xibo before.
That’s all for the server. On the next episode, we are going to install the player software.
Step 2: Install Xibo Windows Player
The client is very simple to set up . Now, install Xibo windows player, nothing more to do, just click next,next,next.
Important point is client setting. We are writing to previously saved information about the field. CMS adress is server ip address on the localhost.
We need to get a license from the server to the client computer screen .
Step 3: Easily Broadcast Ads With Xibo Digital Signage
The most important part is the contents of the digital signage. Because content is the king! People will pay attention to the content, not how you have set up high-tech system.
In this step we will broadcast same ads easily on Xibo CMS. We talked about how to set up the server and client in our previous steps. We continue to use the open source digital signage software of Xibo as a continuation of our previous step. We can use for the content of the photo is very important to have high resolution. We have prepared our case content in 1280×720 resolution. Because our example, the client supports 1280×720 resolution screen. if you use a higher resolution you can get even more impressive images.
For more detail; My Blog Page.
Содержание
- Установка Xibo на Ubuntu 12.04
- Требования
- Подготовка сервера
- Установка зависимостей
- Загрузка Xibo
- Настройка PHP
- Установка Xibo в веб-интерфейсе
- Работа с клиентом
- Код Xibo
- Установка из ветки bzr
- Search Results
- Prerequisites.
- Requirements:
- Prepare your monitor.
- Time and Date Settings.
- It is essential that the correct date, time and time zone are set on your monitor prior to player installation.
- Install the Xibo for webOS IPK.
- Locate the Server/SI Server settings page on your monitor.
- Access Server Settings on webOS 3.0:
- Access SI Server Settings on webOS 3.2 and later:
- From here, there are two methods for installing the player:
- 1. Using Remote URL
- 2. Using a USB flash drive
- Remote URL installation.
- When the installation is complete, please restart your monitor.
- USB Installation.
- When the installation is complete, please restart your monitor to complete the installation.
- Connect to your CMS.
- Automating CMS credentials entry using a USB stick.
- Use Authentication code to connect to your CMS.
- Activate your Licence.
- Display Setting Profiles.
- Display Authorisation.
- Search Results
- Requirements
- Release Download
- Community Guides
- Installation
- Download and extract the archive
- Starting the Installation
- Creating the database
- Database Details
- Start the Installation
- Admin Password
- Settings
- Complete
- XMR and XTR
- Get started with Xibo in 3 simple steps
- Intelligently Designed Software
- It all fits together with ease
- Content Management System
- Signage players
- Content Management System
- Self-hosted
- Cloud
- Xibo for Windows
- Xibo for Linux
- Xibo for Android
- Xibo for webOS
- Xibo for Tizen
- Support
- Best effort
- Enterprise Support
- Xibo for Windows
- Why choose Xibo for Windows?
- Built for Xibo
- Price
- Design
- Packed with benefits
- Hardware
- Value
- Built for the Xibo CMS, runs on Windows.
- Support
- White Label
Установка Xibo на Ubuntu 12.04
Xibo – это открытая платформа для digital signage.
Примечание: Digital signage – это технология, подразумевающая представление информации на электронных экранах с целью донесения её до широкой публики (как правило, используется для внешней рекламы); в настоящее время понятие «digital signage» не имеет точного перевода.
Система Xibo состоит из двух компонентов:
Требования
Для выполнения руководства понадобятся следующие программы:
Подготовка сервера
Для обновления репозиториев пакетов система Ubuntu использует пакетный менеджер apt-get.
sudo apt-get update
sudo apt-get upgrade
Просмотрите предлагаемые изменения и подтвердите их.
Установка зависимостей
Запустите следующие команды и подтвердите любые изменения, предлагаемые программой. Будьте внимательны при создании root-пользователя mysql (включено в процесс установки).
sudo apt-get install apache2 mysql-server php5 php5-gd php5-mysql php5-mcrypt
Примечание: Чтобы получить подробные инструкции по установке стека LAMP (Linux, Apache, MySQL, PHP) на Ubuntu 12.04, читайте эту статью.
Загрузка Xibo
Следующие команды загрузят и распакуют необходимые файлы, а затем переместят их в соответствующую точку системы и изменят права на них (это откроет веб-серверу необходимый уровень доступа).
Теперь нужно задать местонахождение медиа-файлов.
Настройка PHP
Стандартный конфигурационный файл PHP не разрешает запускать некоторые скрипты и загружать объёмные файлы. Чтобы изменить это, откройте файл в редакторе:
sudo nano /etc/php5/apache2/php.ini
Используйте комбинацию клавиш ctrl-w, чтобы найти следующие параметры:
Чтобы иметь возможность загружать файлы размером до 30МБ и отображать их до 10 минут, измените эти строки следующим образом:
upload_max_filesize = 30MB
post_max_size = 30MB
max_execution_time = 600
Чтобы сохранить файл, нажмите Ctrl-O и Enter. Чтобы закрыть его, нажмите Ctrl-X. Перезапустите веб-сервер, чтобы активировать изменения.
sudo /etc/init.d/apache2 restart
Установка Xibo в веб-интерфейсе
Теперь нужно открыть установочный веб-интерфейс и завершить установку Xibo. Откройте браузер и введите:
На экране появится станица install.php.
Вторая страница инсталлятора подтвердит, что все зависимости успешно установлены. Если это так, нажмите Next.
Третья страница спросит, хотите ли вы использовать существующую БД или нужно создать новую. Как правило, лучше создать новую БД.
Четвёртая страница инсталлятора запросит данные сервера mysql. Введите root-пароль (который был установлен ранее). В поля Xibo Database Username и Xibo Database Password внесите имя и пароль пользователя, которого создаст инсталлятор для доступа к этой базе данных.
Страница пятая сообщает об импортировании базы данных.
Шестая страница просит установить пароль для пользователя xibo_admin. Следующий экран подтвердит, что пароль указан верно.
Седьмая страница инсталлятора попросит указать местонахождение медиа-файлов (library location) и ключ сервера (server key). Этот ключ очень важен, он используется для взаимодействия сервера с клиентом. Если он указан неверно, клиент не сможет загрузить данные с сервера. В завершение укажит, нужно ли отправлять анонимные статистические данные поддержке проекта.
Следующая страница подтвердит, что настройка выполнена верно, и что программа успешно установлена.
Откройте страницу входа.
Работа с клиентом
Самый простой способ проверить работу сервера – пройти авторизацию и попробовать создать пару шаблонов. Работа с серверами выходит за рамки данного руководства. Подробную информацию о серверах Xibo можно найти здесь.
Код Xibo
Так как Xibo – открытый проект, за разработкой его кода может наблюдать любой пользователь. Если вы хотели бы поучаствовать в разработке проекта (в создании новых функций, исправлении ошибок, в переводе программы или тестировании кода), посетите сайт проекта.
Следуя инструкциям этого раздела, можно установить любую открытую ветку bzr, доступную на launchpad.
Примечание: Конечно, предварительная версия программы содержит больше потенциальных багов, чем официальный релиз. Потому предварительные версии программного обеспечения крайне не рекомендуется использовать в производстве.
Кроме того, нужно иметь в виду, что некоторые функции в ветках bzr могут быть неисправными. Используйте ветки bzr для тестирования.
Версии с чётными номерами (1.0, 1.2, 1.4) считаются стабильными; версии с нечётным номером (1.1,1.3,1.5) находятся в разработке. Эти релизы более надёжны, чем ветки bzr. Они доступны по этой ссылке и могут быть установленными согласно инструкциям данного раздела.
Установка из ветки bzr
Для начала нужно установить инструмент bzr.
sudo apt-get install bzr
Затем на странице кода нужно выбрать ветку и кликнуть по ссылке lp:, чтобы открыть страницу bzr-ветки выбранной версии. Чтобы скопировать ее, вернитесь в командную строку и введите:
Это займёт пару минут, после чего в домашнем каталоге появится новый каталог, который можно скопировать в root-каталог веб-сервера.
Затем нужно указать место хранения медиа-файлов:
Теперь можно просто посетить новый веб-адрес в браузере:
Программа предложит создать новую базу данных. Создайте новую БД с другим именем.
Источник
Search Results
Prerequisites.
Xibo for webOS is easy to install and configure and can be up and running in just a few minutes.
Before you begin the installation process, you should first make sure you have fulfilled the minimum requirements.
Requirements:
You should also check that you are using the recommended Firmware Version for your Series and Model, please refer to our webOS Firmware Matrix and Firmware Guide.
Since version R205, you can pre-prepare the credentials for your CMS using a USB stick. If you would like to set this up, please see the Automating CMS credentials guide before proceeding with the following steps. This will ensure that once you have completed the installation and restarted your monitor, the CMS URL, Key and License Pool address will be automatically entered for you.
Prepare your monitor.
Now that the prerequisites are taken care of, you can proceed with the monitor setup.
Time and Date Settings.
It is essential that the correct date, time and time zone are set on your monitor prior to player installation.
Use the Settings button (cogwheel icon) on the remote control to access the General Menu:
Now click on Time & Date:
Use the drop down to select the correct Time and Date or alternatively вЂSet Automatically’
Next, click on Time Zone:
Use the drop down to select the Continent, Country/Territory and City.
Install the Xibo for webOS IPK.
Now we are ready to proceed with the player installation!
Locate the Server/SI Server settings page on your monitor.
To install Xibo for webOS, you will need to access the Server or SI Server Settings, depending on the webOS version running on your monitor.
Please follow the relevant instructions for the webOS version you are using.
Example screenshots have been provided so you can confirm when you have found the correct page.
Access Server Settings on webOS 3.0:
Access SI Server Settings on webOS 3.2 and later:
From here, there are two methods for installing the player:
1. Using Remote URL
2. Using a USB flash drive
Remote URL installation.
To remotely install the latest version of Xibo for webOS, set the fields on the Settings menu to the values provided below.
If you would prefer to auto-fill the settings, please follow the Option 2: Auto-fill the Settings with USB-flash drive instructions,
Option 1: Manually enter the settings:
Option 2: Auto-fill the Settings with USB-flash drive:
If you would rather configure these settings in a text file instead, then you can do so and install those on the monitor via USB flash drive with the following JSON file content:
When the installation is complete, please restart your monitor.
USB Installation.
If you have a specific version of Xibo for webOS that you wish to install, or you do not have access to the internet to use the remote URL installation method, you can install the player locally via USB.
[USB_root]/application/com.lg.app.signage.ipk
Insert the USB flash drive into the USB port on your monitor.
Now access the Server Settings menu, as described earlier in this guide.
On the Settings menu, set the fields with the values provided below.
Setting Local Application Upgrade to USB will start the copying of the Xibo for webOS Player to your monitor. This should be the last field you complete.
When the installation is complete, please restart your monitor to complete the installation.
Connect to your CMS.
After installing the player and restarting your monitor, the Connect to CMS screen will appear. This is where you need to enter:
CMS URL: This is the fully qualified address of your CMS installation. For example https://cms.example.org or http://example.org/cms
CMS Key: The secret CMS Key that will authenticate this Display with the CMS.
This key can be viewed from the CMS under the Administration menu by clicking on Settings and the Configuration tab.
This information can be entered manually, or by using one of our alternative methods, which are listed below:
Automating CMS credentials entry using a USB stick.
If you are using R205 or newer, you can auto populate those credentials by preparing a JSON file.
If you have followed the steps in this guide, you should find that these fields are already filled in.
Use Authentication code to connect to your CMS.
If you are using a version 2 player which is R205 or later, another option will be available on the Connect to CMS page, named Use Code.This option is compatible with all CMS instances running version 2.0 or later:
Once you have successfully entered the credentials for your CMS using one of the above methods, you should see the message: Display is registered and awaiting authorisation from an administrator in the CMS.
Activate your Licence.
If you have provided a Licence Pool email address as a Display Setting Profile, or as an entry on the Connect to CMS page, your player will attempt to contact your license pool and acquire a license.
If you have not provided a Licence Pool, a trial period will begin.
Your player will require a license before the end of its trial period, or it will no longer receive scheduled events and media.
Display Setting Profiles.
Default Profiles have been provided for you. You only need to create a Display Setting Profile if you want to override these defaults, or if you want to provide your Licence Pool email address to all of your devices centrally.
For more information on available settings, please see webOS Display Profile Settings and the Display Settings sections of the Manual.
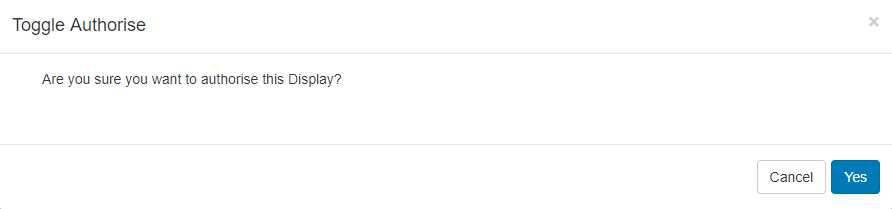
Before the Player can receive Scheduled Events and display your Layouts you will need to Authorise the Display to connect to the CMS.
Log into your CMS and click on Displays from the main menu to see your newly registered Player in the list.
Click the row-menu for this Player and select Authorise from the list.
Click Yes to confirm the authorisation of the Display.
Xibo Signage Ltd
Curtis House, 34 Third Avenue, Hove, BN3 2PD, United Kingdom
Registered company: 07811749
Xibo Signage Netherlands BV
Blaak 520, 3011TA, Rotterdam, Netherlands
Источник
Search Results
It is possible to install Xibo without using Docker, this is referred to as a Manual or Custom installation, however, a working knowledge of how to install, configure and maintain a web server is recommended.
Please note: As Docker is our supported method of running Xibo it may not be possible for us to provide the assistance you need without opening a вЂpaid support’ incident.
Requirements
We have explained some common environment configurations in вЂPrepare your Environment’ which can be selected from the left-hand menu.
Release Download
The latest release can be downloaded from the release archives page on GitHub.
Please see the following guides for installing Xibo in specific environments.
A special thank you to the members of our Community who have written the following guides:
Please note: as these guides are community contributed they should be considered as guidance only:
Installation
Beyond this point, it is assumed that a web server running with PHP and MySQL is available and that the compressed archive (ZIP or Tarball) of the CMS installation package has been transferred to the server.
The installation process is:
Download and extract the archive
The extracted archive should look like the below screenshot:
A folder is provided for the Xibo library which will be used to store images, videos and other files. This folder can be moved to another location and changed during the install process.
Starting the Installation
Navigating to http://localhost will automatically start the installation.
The installation is in a wizard format that contains 6 steps in total. The wizard will guide the installer through the process of installing Xibo.
The installer contains a detailed checklist of all the items required for a successful installation. Each item will have either:
Any items with an exclamation mark or a cross should be addressed and the retest button used to run this step again.
The most common problems here are missing PHP modules, configuration of PHP settings and file permissions issues to the library.
Once all the items are ticked press next to advance.
Creating the database
The CMS can install into a new database or an existing one. We recommend a new database.
Xibo does not prefix its table names and may conflict with content in an existing database.
The choice for a new or existing database can be made by switching between the two available tabs.
Database Details
Whether you chose an existing database or a new one, the installer will need to collect some information about that database to allow the CMS to connect, read and write.
The installer will need the following information:
Admin Username The “root” username for your MySQL installation. This is only used for the installation and is only required if you have asked the installer to create a new database.
Admin Password The “root” password. This is only used for the installation and is only required if you have asked the installer to create a new database.
Database Name The name for the CMS database.
Database Password The password to use to connect to the database.
Start the Installation
The installer will now create/populate the database for Xibo. You should see a series of dots appear on the screen as this happens. It can take a few moments to complete. Assuming everything went well, click “Next”.
If there are errors at this point, please see the Troubleshooting Section.
Admin Password
Each installation will require at least one “Super User” level Administrator to manage the system, apply upgrades and configure the advanced settings. The installer will prompt for the creation of this user at Step 3.
This username and password should be kept safe as it will be required when the installation is complete.
Settings
The final tick box asks if it’s OK to send anonymous statistics back to the Xibo project. We would be very happy if you did!
Complete
The installation is now complete and the system is ready to log in.
XMR and XTR
XMR is the push messaging engine in Xibo and it is recommended to have XMR running for all installations.
XTR is the task runner and should be configured for all installations.
Installation and configuration instructions are available from the left-hand menu.
Xibo Signage Ltd
Curtis House, 34 Third Avenue, Hove, BN3 2PD, United Kingdom
Registered company: 07811749
Xibo Signage Netherlands BV
Blaak 520, 3011TA, Rotterdam, Netherlands
Источник
Get started with Xibo in 3 simple steps
Xibo’s digital signage platform is made up of a Content Management System (CMS), a choice of players, a choice of hosting options and different levels of support to meet your requirements. To get started with Xibo you need a CMS and at least 1 signage player.
Intelligently Designed Software
Designed with simplicity in mind, choose from self-hosted or a Cloud installation and start using Xibo in minutes.
It all fits together with ease
Content Management System
The Xibo CMS is a web application which can be self-hosted or run on our Xibo in the Cloud platform.
Manage your digital signage content with ease and deploy from anywhere in the comfort of your web browser.
Signage players
Xibo has a choice of players including Android, webOS, Tizen, Linux and Windows.
Content Management System
The Xibo CMS is a web application which runs on Docker or our Xibo in the Cloud platform.
Self-hosted
Use our super easy Docker installation to run on a server with Docker installed.
Cloud
Get peace of mind by running your CMS on our Cloud Hosting, called Xibo in the Cloud.
Xibo for Windows
Our signage player for windows is a native windows application available for Windows 7 and higher.
Run the windows installer, tell the player your CMS connection information and you’re done.
Xibo for Linux
Our signage player for Linux is a native C++ application which runs on any distribution supporting the Snap app store for Linux from Snapcraft.
Install from Snap, update your configuration with CMS connection details and you’re done.
Xibo for Android
Built for the Xibo CMS, runs on Android.
Our commercial player runs on Android 4.4 or higher and brings Xibo to Android!
It is a native android application, lovingly optimized for stability and performance.
Xibo for webOS
Built for the Xibo CMS, runs on webOS for Signage.
Our system-on-chip Player runs on compatible webOS 3.0 for Signage LG monitors, without additional hardware.
It is a native webOS application, lovingly optimized for stability and performance.
Xibo for Tizen
Built for the Xibo CMS, runs on Tizen SSSP5/6/7.
Our system-on-chip Player runs on compatible Tizen SSSP5/6/7 Samsung monitors, without additional hardware.
It is a native SSSP application, lovingly optimized for stability and performance.
Support
We provide best effort support for free to every customer for purchased products, but if you need guaranteed support you can choose our Enterprise support option. We also have a community forum where you can find FAQ’s.
If you need assistance our Help Desk is open 24/7 for new tickets and is monitored by our support team Monday to Friday, 8AM to 4:30PM in the UK timezone (GMT/BST).
Best effort
Xibo in the Cloud, Xibo for Android, Xibo for webOS and Xibo for Tizen come with our standard support service.
Contact us here for help with any problems you might have.
Enterprise Support
Open a ticket below if you are an Enterprise Support contract holder.
Contact Us if you are interested in commercial support but don’t currently hold a support contract.
Источник
Xibo for Windows
Built for the Xibo CMS, runs on Windows.
Open Source and Free
Why choose Xibo for Windows?
Our very first native player built for the Xibo CMS. This player is open source and has no licence fee and is therefore available as a free download.
Built for Xibo
Connects to the CMS, on-premise or Cloud hosted, and fully supports latest releases.
Price
The Xibo for Windows player is free of charge. You can get started today at no cost.
Design
Our signage player for windows is a native windows application available for Windows 7 and higher.
Packed with benefits
Xibo for Windows brings a host of benefits to your digital signage network.
Hardware
Xibo for Windows requires a PC running Windows 7 or later, and we recommend the Professional edition of Windows so that you have better control of Windows updates and other operating system features.
Please make sure you thoroughly test your chosen hardware before making a commitment.
Value
Xibo for Windows is free of charge, simply Run the windows installer, tell the player your CMS connection information and you’re done.
Released under the Open Source AGPLv3 Licence, which means that you and any users of the Player can download the source code. The CMS has links for this on its login/about pages, or you can use the GitHub button on this website.
We develop the Windows Player with as much care and attention to detail as any of our commercial offerings.
Built for the Xibo CMS, runs on Windows.
A native Windows application, lovingly optimised for stability and performance.
Fully compatible with our open source Xibo CMS and can run against a on-premise ‘self-hosted’ solution as well as our Xibo in the Cloud.
Scheduling, Layouts, Campaigns, Video, Images, RSS, Text, DataSets and much more. Xibo for Windows understands the Xibo CMS.
Local, secure media storage means your content is on your Player in advance and played back even when the device loses connection with the CMS.
Support
With a comprehensive Knowledge Base, you have all the tools you need to get the most out of Xibo.
If you do require a little help, Players connected to our Cloud CMS, or covered by an Enterprise Support Contract qualify for support from our team of experts.
White Label
Your Xibo, your brand
Want to present your corporate/organisation brand? Providing to your customers? Purchasing on someone’s behalf?
White label Xibo for Windows with your own branding for £150.00 GBP per brand. Pick an application name, upload an icon and splash screen.
Our state of the art build environment is available to run your white label build 24/7. Log into your customer portal account to request a rebuild.
Pick a specific version, or select «Latest» and we will keep your build updated as new releases are available.
Источник
Requirements:
- IIS Webserver running on Windows
Tested with Windows Server 2019 and Windows 11 - NSSM – The Non-Sucking Service Manager
- MySQL v5.7 or v8.3
Tested with MySQL version 8.3 - MySQL Workbench 8 (Requires Visual Studio 2019 Redistributable)
Tested with MySQL Workbench v8.0.40 - PHP version 8.2.10 NTS
We currently have ZMQ binaries only for this v of PHP - ZeroMQ for PHP 8.2.10 NTS, compiled for Windows
Download from here and install as per readme - PHP Manager 2 for IIS
Tested with version 2.12 RTW
Part 1 – Installing the pre-requisites
(1.1) Installing IIS on Windows 10/11
- Open the Control Panel
- Click “Programs”
- Click Turn Windows features On or Off
- Select the box next to “Internet Information Services”.
- In “Internet Information Services”, open “World Wide Web Services”, then open “Application Development Features” and select “CGI”
- Click OK
- Launch IIS from the run command with “inetmgr”
(1.2) Installing PHP 8.2.10
- Download the correct version of PHP for Windows from the PHP Archive.
https://windows.php.net/downloads/releases/archives/php-8.2.10-nts-Win32-vs16-x64.zip - Create a folder in “c:\program files\” called “php”
- Create a folder in “c:\program files\php” called “8.2.10-nts”
- Unzip the contents of your downloaded PHP zip to the folder above.
The path to php.exe should be: “c:\program files\php\8.2.10-nts\php.exe” - Copy “php.ini-production” to “php.ini”
(1.3) Installing ZeroMQ for PHP 8.2.10
- Download the pre-compiled ZMQ zip file. This one is compatible with PHP8.2.10-NTS 64bit.
- Extract libzmq-v142-mt-4_3_4.dll to “c:\program files\php\8.2.10-nts\”
- Extract php_zmq.dll to “c:\program files\php\8.2.10-nts\ext\”
(1.4) Install PHP Manager 2 for IIS
- Download PHP Manager 2 for IIS (x64) from https://github.com/phpmanager/phpmanager/releases
- Install it on your IIS server using the default selections.
(1.5) Installing MySQL 8.3
- MySQL requires the latest Microsoft Visual Studio 2019 redistributable, so download that from here:
https://learn.microsoft.com/en-us/cpp/windows/latest-supported-vc-redist?view=msvc-170#visual-studio-2015-2017-2019-and-2022 - Install the redistributable file (vc_redis.x64.exe).
- Restart your computer.
- Download “mysql-8-3-0-winx64.msi” from https://downloads.mysql.com/archives/community/ (we are using version 8.3.0).
- Install MySQL using the “Typical” installation settings.
- Run “MySQL Configurator” at the end of the install.
- Click “Next” on the “Welcome to the MySQL Server Configurator” page.
- Confirm your “Data Directory”. (The default is “C:\ProgramData\MySQL\MySQL Server 8.3\”). Click Next
- Choose your “Config Type”. “Development Computer” if this is a test on your Windows PC. “Server Computer” if you are installing to a dedicated server. Click Next.
- Create a “MySQL Root Password” and make a note of it somewhere safe. Click Next.
- Accept the defaults for the “Windows Service” page. Click Next.
- Accept the defaults for the “Server File Permissions” page. Click Next.
- Accept the defaults for the “Sample Databases” page. Click Next.
- On the “Apply Configuration” page, click “Execute”.
- You should get all green ticks. Click Next and then Finish.
(1.6) (Optional) Installing MySQL Workbench 8.0
There are many ways to manage / interact with your MySQL database server and databases. I quite like MySQL Workbench for the GUI based approach.
- Download MySQL Workbench 8.0.40 from https://dev.mysql.com/downloads/workbench/. Take care to avoid the misleading Oracle MySQL redirect. You want the “Windows (x86, 64-bit), MSI Installer” under “Other Downloads”. Click Download.
- Next, again, avoid the Oracle spam page by clicking “No thanks, just start my download”.
- Install the MySQL Workbench MSI, accepting all defaults.
- Launch MySQL Workbench when you are finished. Enter your root password and click okay on the compatibility warning (it does everything we need it to do).
Part 2 – Installing Xibo and Configuring IIS
(2.1) Create Folders and Copy Xibo Data
- Create folder in c:\Inetpub called “xibo”. This will be your website root folder.
- Create a library folder in c:\ called “xibolibrary“.
- Download the latest CMS zip file (This install guide presumes 4.1.2).
- Extract the contents of the Xibo zip file to c:\Inetpub\xibo. The “xibo” folder should contain folders including “bin” and “web” if you’ve done it correctly.
(2.2) Install FastCGI Application (at Server level)
- Launch IIS and create a “FastCGI handler mapping for PHP”
- To do this at server level, select your sever in the left hand side, and then double click “Handler Mappings”
- On the Right, click “Add Module Mappings” and add the following :
- Request Path:
*.php - Select
FastCGIModulefrom the drop down. (if it’s missing, add CGI to your IIS installation) - Executable (optional):
"C:\Program Files\php\8.2.10-nts\php-cgi.exe" - Name:
PHP-FastCGI - Click “Request Restrictions”
- Ensure “invoke Handler…” is ticked
- Check the radial for “File or Folder”
- Click OK
- Click OK again
- Click Yes to confirm that you wish to add the FastCGI application
- Request Path:
- Back in IIS, select your server on the left hand side and now double click “PHP Manager”
- Under PHP Setup, you should see a “Not optimal PHP configuration detected on this machine”.
- Click “View Recommendations”.
- Select all options and click OK. (we can tailor this stuff later)
(2.3) Optimise and Customise your PHP.INI (at Server Level)
- Back in IIS, select your server on the left hand side and now double click “PHP Manager”
- Under PHP Setup, you should see a “Not optimal PHP configuration detected on this machine”.
- Click “View Recommendations”.
- Select all options and click OK.
- Under “PHP Extensions” click “Enable or disable an extension”
- Right click “php_fileinfo.dll” and choose “Enable”.
- Right click “php_zmq.dll” and choose “Enable”.
- Right click “php_gd.dll” and choose “Enable”.
- Right click “php_pdo_mysql.dll” and choose “Enable”.
- Right click “php_zip.dll” and choose “Enable”.
- Right click “php_gettext.dll” and choose “Enable”.
- Right click “php_soap.dll” and choose “Enable”.
- Right click “php_curl.dll” and choose “Enable”.
- Right click “php_mbstring.dll” and choose “Enable”.
- Click “Back to main page”
- Under “Set Runtime Limits”
- Change Maximum POST size” to “128M”
- Change “Maximum Execution Time” to “300”
- Click “Apply” and “Back to main page”
- Under “Manage all settings”
- Change “upload_max_filesize” to “128M”
- Click “Back to main page”
(2.4) Create a Windows Service to run XMR
- Create a service to run XMR.
- Download NSSM and extract the x64 nssm.exe to your Windows directory.
- To create the service, run
c:\windows\nssm.exe install "Xibo XMR"- Application/Path = C:\Program Files\PHP\8.2.10-nts\php.exe
- Application/Startup = c:\inetpub\xibo\vendor\xibosignage\xibo-xmr\bin
- Application/Arguments = xmr.phar
- Details\Display Name : Xibo XMR
- Details\Description = Xibo XMR Service using NSSM Service Installer
- Shutdown\Generate Control-C = untick (no idea why I did this, may not be necessary)
- Click “Install Service” to install the service
- Create your config file:
- In notepad, create a text file and enter the following text, replacing
123.123.123.123with the IP address of your server (the address clients will connect to):{
"listenOn": "tcp://127.0.0.1:50001",
"pubOn": ["tcp://123.123.123.123:9505"],
"debug": false
} - Save the file as “config.json” to “c:\inetpub\xibo\vendor\xibosignage\xibo-xmr\bin”
- In notepad, create a text file and enter the following text, replacing
- Start the “Xibo XMR” service in services.msc
(2.5) SQL Database Setup
As Xibo fails to create the DB for me, I create it manually in MySQL Workbench 8.0 (connected to my MySQL 8.3 database).
- You will need to choose and modify three variables. They can be anything, but bear in mind you might wish to add other databases in the future:
- Database Name (
xibodbnamein the example lines below) - Database admin Username (
xibodbname-admin the example lines below) - Database admin Password (
SecurePasswordOfYourChoicein the example lines below)
- Database Name (
- Execute the following 3 lines on your SQL server (changing the 3 variables as appropriate:
create database `xibodbname`;CREATE USER 'xibodbname-adm'@'localhost' identified By 'SecurePasswordOfYourChoice';GRANT ALL PRIVILEGES ON `xibodbname`.* to 'xibodbname-adm'@'localhost';
- Verify that the database has been added (refresh the “Schemas” list on the Left hand side).
- Verify that the user has been added (“Server” menu / “Users and Privileges”) – Select the user and verify that under the “Schema Privileges” tab, they have access to your new database.
(2.6) Create your Virtual Site and Configure IIS
- Load IIS Manager
- If you want to use localhost for your website, select “Sites”, then right click “Default Web Site”, “Manage Wesbite”, “Stop” to avoid clashing with your xibo site.
- Now, right-click “Sites”, then “Add Website” to create a new virtual website
- Site Name = “Xibo”
- Physical Path = “C:\inetpub\xibo\web”
- Host Name = If you have a DNS name, then enter the host name for your website here
- Start Immediately = UNTICK
- OPTIONAL: IIS Bindings (for HTTPS, you’ll need a certificate – free from https://letsencrypt.org/)
- Select your site on the left-hand side and choose “Bindings” from the right-hand side.
- Click Add and add a https binding with the same hostname. Choose a certificate from the drop down.
- Okay and save
- IIS “Request Filtering” Settings:
- Select your site on the left-hand side and choose “Request Filtering”
- Choose “Edit Feature Settings” from very right hand side
- Increase the “Maximum Query String (Bytes)” from 2048 to 8192
- Set the “Maximum allowed content length (Bytes)” to 30000000
- IIS “PHP Manager” Settings:
- Select your site on the left-hand side and choose “PHP Manager”
- Select “Change PHP Version” to 8.2.10-nts (required for ZMQ support).
- IIS “Handler Mappings” Settings
- Select your site on the left-hand side and choose “Handler Mappings”
- Find “PHP-FastCGI” in the list and double click
- Click “Request Restrictions”
- On the verbs tab, ensure “One of the following Verbs” is selected and that the following is listed: GET,HEAD,POST,DELETE,PUT,PATCH
- Click Ok to return the edit module mapping page. Now, add quote marks around the “Executable (optional)” path name to avoid an error and click OK
- Confirm that you do want to create a FastCGI application by clicking yes.
- IIS “URL Rewrite” Settings:
- Select your site on the left-hand side and choose “URL Rewrite”
If “URL Rewrite” does not exist, download and run the x64 installer from Microsoft. Close and re-open IIS. - Click “Import Rules” on the far right-hand side.
If “Import Rules” is missing, be sure you have selected the “Xibo” virtual site and not the IIS root. - Configuration File = “C:\inetpub\xibo\web\.htaccess”
- Click Import
- Select the red error line <!–The rule cannot be converted into an …–>
- Now, delete the highlighted line in the top window:
- (RewriteRule .* – [E=HTTP_AUTHORIZATION:%{HTTP:Authorization}]
- Click Apply
- Select your site on the left-hand side and choose “URL Rewrite”
IIS “MIME Types” SettingsDefault Web Site->MIME Types -> Add (.woff = font/x-woff )Default Web Site-> MIME Types -> Add (.woff2 = font/woff2 )
- Windows Permissions
- Add Modify for “IUSR” and “computername\IIS_IUSRS” to your web root folder:
- “c:\inetpub\xibo“
- “c:\xibolibrary”
(Possibly) Add Modify for IUSR to Windows\Temp
- Add Modify for “IUSR” and “computername\IIS_IUSRS” to your web root folder:
Part 3 – Browser-Side Installation
(3.1) Encryption Keys
Instructions care of rithm on the Xibo Forums
- Open your Xibo Library folder (“C:\xibolibrary”) and create a folder called “certs”
- In that folder, create three empty text files:
- encryption.key
- private.key
- public.key
- Visit Online RSA Key Generator and generate a key pair.
- Copy the contents of “Private Key” to the private.key text file.
- Copy the contents of the “Public Key” to the public.key text file.
- Visit Random Base64 String Generator
- Change the number from 16 to 32 and hit generate.
- Copy the generated string into your encryption.key text file.
(3.2) Xibo Installation Wizard
- Start the website in IIS
- Check the website loads in your browser of choice. You should see a list of items. Everything should be ticked. Click Next.
- Under Xibo Installation, choose the “Existing” tab.
- Select the “use an existing database” radial.
- Enter the hostname:port relative to the IIS server (127.0.0.1:3306)
- Enter the database name you used earlier (xibodbname)
- Enter the Database Username you used earlier (xibodbname-adm)
- Enter the Database Password you used earlier (SecurePasswordOfYourChoice)
- Click Next
- Provide Xibo with a username and password for your website management user
- Enter the path to your library file with a trailing backslash (e.g. “c:\xibolibrary\”)
(3.3) Xibo Settings
- In Administration / Settings / Displays enter the addresses you used earlier in step 2.4:
- XMR Private Address = tcp://127.0.0.1:50001
- XMR Public Address = tcp://
123.123.123.123
(3.4) Xibo Scheduled Task (XTR)
- Open Scheduled Tasks (start/run/taskschd.exe) and “create a basic task”
- Task Name “Xibo Maintenance”. Click Next.
- Select Daily as the schedule. Click Next.
- Select 00:00:00 as the start time and repeat every “1” day. Click Next.
- Select “Start a Program”. Click Next.
- Program / Script: c
:\program files\php\8.2.10-nts\php-win.exe - Add arguments :
-f c:\inetpub\xibo\bin\xtr.php
- Check “Open the Properties dialog for this task when i click Finish”. Click Finish.
- “Security Options” / “Change User or Group”: Type System and hit enter.
- Click the “Triggers” tab and then the “Edit” button.
- “Repeat task every”: “1 minute” for duration of “1 day”
- Click Ok.
- Run the task.
Issues and Errors
- HTTP Error 500.0 – Internal Server Error
c:\program files\php\8.2.10-nts\php.exe – The FastCGI process exited unexpectedlyYou have pointed PHP at php.exe instead of php-cgi.exe. Revisit and verify the settings in the “Install FastCGI Application” section above.
Sources
Install FastCGI
Xibo 4.1.0 release notes
Installing Xibo on a Web Server
Xibo step-by-step installation IIS 8.5 on Windows Server 2012
Generating Encryption key pairs for Windows

Windows Xibo Client Xibo Community There are 4 steps to follow: installation double click the msi to start the installation process. connect connect your player to the cms. authorise authorise your display with the cms. launch player! 1. preparation minimum requirements. Second part on xibo guide, is how to install xibo windows client and configure windows client. also create simple layout. support channel: youtub.

Xibo Windows Client Only Showing Xibo Splash Screen Xibo Community How can i silently deploy xibo client to windows systems so that i do not need to manually configure the cms server address and secret key in the player options? is there a config file, registry setting or msi property?. Download the xibo player for windows from: xibosignage xibo for windowswant to know how to run xibo server on ubuntu? check out:. You would then follow the xibo for windows installation steps, for each windows display you wish to deploy. use both the administration and user manuals to guide you and we also have a number of online courses from our xibo training school . The document outlines the steps to install the xibo digital signage software on a windows 10 system, which includes downloading and installing xampp and xibo, configuring the php.ini file, creating a database through the web interface, and installing the xibo player client to approve and license displays.

Xibo Client Option Get Help Xibo Community You would then follow the xibo for windows installation steps, for each windows display you wish to deploy. use both the administration and user manuals to guide you and we also have a number of online courses from our xibo training school . The document outlines the steps to install the xibo digital signage software on a windows 10 system, which includes downloading and installing xampp and xibo, configuring the php.ini file, creating a database through the web interface, and installing the xibo player client to approve and license displays. Welcome to the xibo set up documentation which will guide administrators through the installation and main set up of the xibo system. to get started with xibo you need a cms and at least one signage player. Download xibo server 1.0.3 1.zip (2.1 mb) extract the zip file on your web host. browse to xibo.yourdomain and follow the wizard. installation of the client. the client is currently only available for a windows xp workstation (work is underway to develop a linux client). build a windows xp workstation. Install on windows . this windows install guide is focused mainly on someone who wants to use a windows pc to be the server as well as the client, or perhaps has a spare windows xp machine to use as a server. the instructions should work equally well on windows server operating systems. 1. the document provides instructions for installing the xibo windows client, which requires downloading an msi installer file, running it, and then connecting the client to the cms. 2. it describes the minimum system requirements including windows version, framework, browser and additional software. 3.

Xibo Client Option Get Help Xibo Community Welcome to the xibo set up documentation which will guide administrators through the installation and main set up of the xibo system. to get started with xibo you need a cms and at least one signage player. Download xibo server 1.0.3 1.zip (2.1 mb) extract the zip file on your web host. browse to xibo.yourdomain and follow the wizard. installation of the client. the client is currently only available for a windows xp workstation (work is underway to develop a linux client). build a windows xp workstation. Install on windows . this windows install guide is focused mainly on someone who wants to use a windows pc to be the server as well as the client, or perhaps has a spare windows xp machine to use as a server. the instructions should work equally well on windows server operating systems. 1. the document provides instructions for installing the xibo windows client, which requires downloading an msi installer file, running it, and then connecting the client to the cms. 2. it describes the minimum system requirements including windows version, framework, browser and additional software. 3.
About Xibo
Xibo is a powerful Open Source Digital Signage platform with a web content management system and Windows display player
software. We have commercial player options for Android, LG webOS and Samsung Tizen, as well as CMS hosting and support.
See https://xibosignage.com for more information.
Our first open source release 1.0.0-rc1 landed in 2009, and we’re committed to keeping everything you need to run a
digital signage network, or single screen, open source and free to use.
Licence
Copyright (C) 2006-2024 Xibo Signage Ltd and Contributors.
Xibo is free software: you can redistribute it and/or modify it under the terms of the GNU Affero General Public
License as published by the Free Software Foundation, either version 3 of the License, or any later version.
Xibo is distributed in the hope that it will be useful, but WITHOUT ANY WARRANTY; without even the implied warranty
of MERCHANTABILITY or FITNESS FOR A PARTICULAR PURPOSE. See the GNU Affero General Public License for more details.
You should have received a copy of the GNU Affero General Public License along with Xibo.
If not, see http://www.gnu.org/licenses/.
Installation
We recommend installing an official release via Docker. Instructions for doing so can be found in our
documentation.
Developing
Please only install a Development environment if you intend make code changes to Xibo. Installing from the
repository is not suitable for a production installation.
Xibo uses Docker to ensure all contributors have a repeatable development environment which is easy to get up and
running. The very same Docker containers are used in our recommended end user installation to promote consistency
from development to deployment.
To these ends this repository includes a docker-compose.yml file to spin up a model development environment.
Prerequisites
The development Docker containers do not automatically build vendor files for PHP or JS, this is left as a developer
responsibility. Therefore you will need the following tools:
- Git
- Composer
- NodeJS version 12
- npm
- Docker
Clone the repository
Create a folder in your development workspace and clone the repository. If you intend to make changes and submit
pull requests please Fork us first and create a new branch.
git clone git@github.com:<your_id>/xibo-cms.git xibo-cms
Branches
We maintain the following branches. To contribute to Xibo please use the develop branch as your base.
- kopff: Work in progress toward 4.2.x
- develop: Bug fixes for 4.1.x
- master: Currently 4.0
- release40: Bug fixes for 4.0
- release33: Bug fixes for 3.3
- release23: Bug fixes for 2.3
- release18: Archive of 1.8
- release17: Archive of 1.7
- release1.6.4: Archive of 1.6
Install dependencies
Change into your new folder
We recommend installing the dependencies via Docker, so that you are guarenteed consistent dependencies across
different development machines.
PHP dependencies
docker run --interactive --tty --volume $PWD:/app --volume ~/.composer:/tmp composer install
This command also mounts the Composer /tmp folder into your home directory so that you can take advantage of
Composer caching.
Website dependencies (webpack)
If you have installed node locally:
npm install webpack -g
npm install
npm run build
Alternatively you can use a Docker container:
docker run -it --volume $PWD:/app --volume ~/.npm:/root/.npm -w /app node:22 sh -c "npm install webpack -g; npm install; npm run build;"
Mapped Volumes
The development version of Xibo expects the code base to be mapped into the container such that changes on the host
are reflected in the container.
However, the container itself creates some files, such as the twig cache and library uploads. These locations will need
to be created and the container given access to them.
The easiest way to do this is to make the cache and library folders and chmod 777 them. Obviously this is not
suitable for production, but you shouldn’t be using these files for production (we have containers for that).
API Keys
The API requires a pub/private RSA keypair and an encryption key to be provided. The docker entrypoint will create
these in /library/certs.
You can override the generated keys paths and encryption key by providing an alternative in settings-custom.php.
For example:
$apiKeyPaths = [
    'publicKeyPath' => '/var/www/cms/custom/public.key',
    'privateKeyPath' => '/var/www/cms/custom/private.key',
    'encryptionKey' => ''
];
OpenOOH specification
Xibo can present the OpenOOH venue classifications in the display edit form. For this functionality to work in
development, it is necessary
to download the latest file and
place it in here: openooh/specification.json
The production/CI containers add this file during the build process so that it is already available in the Docker
image.
Bring up the Containers
Use Docker Compose to bring up the containers.
docker-compose up --build -d
Login
After the containers have come up you should be able to login with the details:
U: xibo_admin
P: password
Translations
To parse the translations:
docker-compose exec web sh -c "cd /var/www/cms; rm -R ./cache"
docker-compose exec web sh -c "cd /var/www/cms; php bin/locale.php"
find ./locale ./cache ./lib ./web -iname "*.php" -print0 | xargs -0 xgettext --from-code=UTF-8 -k_e -k_x -k__ -o locale/default.pot
To import translations:
bzr pull lp:~dangarner/xibo/holmes-translations
Convert to mo format:
for i in *.po; do msgfmt "$i" -o $(echo $i | sed s/po/mo/); done
Move the resulting mo files into your locale folder.
Swagger API Docs
To generate a swagger.json file, with the dev containers running:
docker-compose exec web sh -c "cd /var/www/cms; vendor/bin/swagger lib -o web/swagger.json"
Application Structure
To find out more about the application code and how everything fits together, please refer to
the developer docs.
Contributing
We would be delighted to accept contributions to the project — please refer to
CONTRIBUTING.md for further information.
Sponsorship
We’ve built commercial products and services on top of our open source project. If you want to support our work the
best way is to become a customer. We’re committed to keeping our project open
source either way!
Reporting Problems
Support requests can be reported on the Xibo Community Forum. Verified,
re-producable bugs with this repository can be reported in
the Xibo parent repository.