
iOS Simulator устанавливается вместе с Xcode, поэтому мы рассмотрим установку Xcode:
- Откройте App Store на вашем компьютере Mac.
- В поисковой строке найдите «Xcode» и нажмите Enter.
- Нажмите кнопку установки рядом с Xcode.
- Найдите Xcode в Launchpad на вашем компьютере и откройте его.
- При первом запуске Xcode может потребоваться установить дополнительные компоненты. Если это произошло, следуйте инструкциям на экране и установите требуемые компоненты.
- После установки компонентов вы можете начать работу с iOS Simulator.
Как работает iOS Simulator?
Для упрощения жизни разработчикам Apple создала iOS Simulator, он действительно упрощает и ускоряет процесс разработки, позволяя в 99% случаев отказаться от использования физического iPhone в качестве отладочного устройства. Но не так много разработчиков знает, как это работает на самом деле.
Главный процесс
iOS Simulator по своей сути является обычным приложением для Mac OS, которое имитирует работу разных моделей iPhone. Но как на нем запускаются ваши приложения? Расскажем далее.
Дочерние процессы
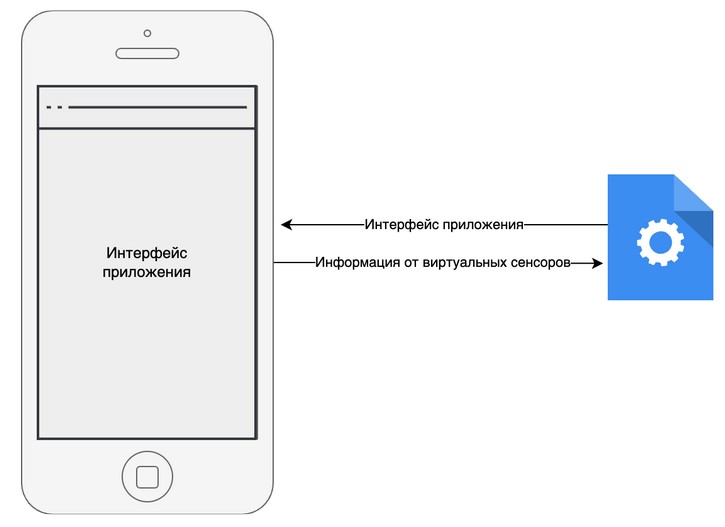
Если вы захотите протестировать ваше приложение используя iOS Simulator, то оно запустится в виде обычного Mac OS процесса. Как же оно тогда открывается внутри симулятора? А дело тут в межпроцессном взаимодействии, то есть дочерний процесс — ваше приложение, открывает канал связи с хост-процессом — iOS Simulator. Оно начинает передавать информацию об изображении, которое нужно отобразить. В свою очередь iPhone Simulator отправляет информацию с виртуальных сенсоров, таких как: тачскрин, датчик тряски, GPS и.т.д.
Вы можете спросить, если приложения для iOS построены как обычные приложения для Mac OS, почему бы просто не показывать их в отдельных окнах? Да, это будет работать, но в таком случае не будет имитации поведения разных моделей iPhone, поэтому Apple выпустила iOS Simulator.
Как тестировать адаптивность верстки, используя iOS Simulator
Может показаться, чтобы убедиться, что ваша верстка будет хорошо выглядеть на разных размерах форм факторах всего многообразия моделей iPhone, нужно протестировать приложение на всех девайсах, представленных в iPhone Simulator, имеющих уникальный форм фактор, но, как показывает практика, достаточно протестировать на двух крайних устройствах. Например: iPhone SE (3rd generation) и IPhone X.
| iPhone SE (3rd generation) | IPhone X | |
| Есть Face ID | нет | да |
| Есть кнопка Home | да | нет |
| Размер экрана | 4,7″ | 5,8″ |
| Плотность пикселей | 326 dp | 458 dp |
Так первых два пункта влияют на размер безопасной зоны экрана, и нужно проверить, как ваше приложение с ней работает.
Вторые два указывает на то, как сильно придется сжаться вашей верстке, как правило, увеличенные размер экрана и плотность пикселей не ломает верстку, а вот уменьшенные могут, поэтому не обязательно брать самый большой симулятор для теста, но стоит взять самый маленький, симулируемое устройство которого на данный момент официально поддерживается.
Таким образом вы можете выявить 99% всех возможных проблем с адаптивностью верстки и не потратите много времени.
Некоторые фишки iOS Simulator
Корпорация Apple снабдила iOS Simulator всеми необходимыми функциями для комфортной разработки приложения, не прибегая к использованию физического устройства, вот некоторые из них:
Имитация местонахождения и физического передвижения пользователя
В iOS Simulator предусмотрена функция имитации данных с датчика GPS, а также разных сценариев передвижения пользователя. Для этого нужно перейти в меню iOS Simulator, в раздел Features, далее в подраздел Location.

Вы увидите несколько вариантов имитации работы GPS датчика:
- none – имитация отсутствия сигнала от спутников.
- Custom Location – позволяет указать широту и долготу, которые «определяет» датчик.
- City Run – имитация данных GPS, получаемых при беге.
- City Bicycle Ride – имитация данных GPS, получаемых при езде на велосипеде.
- Freeway Drive – имитация данных получаемых при езде на машине.
Отладка разметки и анимации
iOS эмулятор для Xamarin располагает широким набором функций для отладки разных аспектов приложения, одними из самых полезных является отладка разметки и анимации.
Отладка анимации
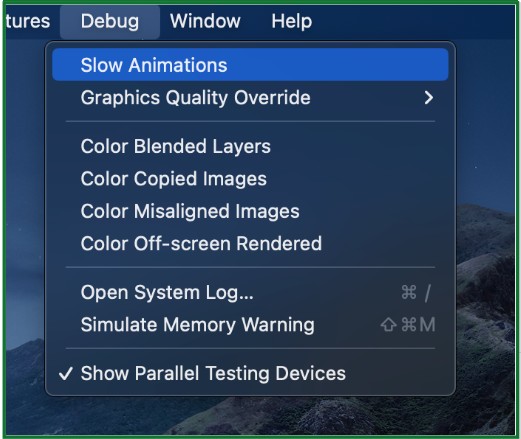
Чтобы отладить анимацию, вы можете ее сильно замедлить, тем самым проследить, идет ли анимация по задуманному сценарию, и не возникает ли во время ее выполнения визуальных дефектов. Чтобы замедлить анимацию, перейдите в раздел меню Debug, затем выберите пункт Slow Animations. Чтобы закончить отладку нажмите на данный пункт еще раз.
Отладка разметки
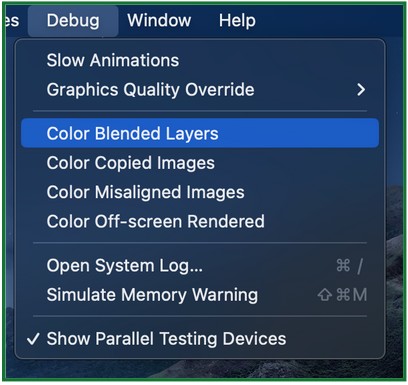
Разрабатывая приложение сложно уследить за всеми факторами, влияющими на производительность. Особенно остро вопрос стоит, если речь заходит о производительности пользовательского интерфейса. Чтобы упростить разработчикам процесс оптимизации приложения, Apple разработала механизмы, подсвечивающие места, которые могут препятствовать плавной работе пользовательского интерфейса. Для их включения необходимо открыть раздел меню Debug и выбрать один или несколько вариантов отладочной индикации:
| Color Blended Layers | Показывает наложенный друг на друга слои интерфейса. Несколько слоев интерфейса, которые нарисованы друг над другом с включенным смешиванием цветов, выделены красным цветом, а несколько слоев, которые нарисованы без смешивания цветов, выделены зеленым цветом. Уменьшите количество красного цвета в вашем приложении, когда вы задействуете смешивание цветов, чтобы значительно повысить производительность вашего приложения. Большое количество слоев интерфейса со смешиванием цветов часто являются причиной медленного скроллинга в приложении. |
| Color Copied Images | Помечает синим цветом изображения, если наблюдаются проблемы с отрисовкой изображения или красным, если проблема существенная. Проблемы при отрисовки изображений возникают, если формат изображения не поддерживаются. В таком случае следует изменить формат изображения. |
| Color Misaligned Images | Окрашивает пурпурным изображения, чьи границы смещены, это означает, что изображение было отрисовано в рамках квадрата с дробными координатами или с дробным размером, что влечет потери в производительности при расчете цвета пикселя с наложением слоев со смешиванием цветов. Также окрашивает желтым изображения, которые были подвергнуты масштабированию, так как масштабирование изображений является весьма дорогим. Рекомендуется избегать масштабирования и добавлять в проект изображения соответствующего размера. |
| Color Off Screen Rendered | Помечает желтым части интерфейса, которое рендерится, но при этом пользователь его не видит. Рекомендуется не допускать большого количествам таких зон, чтобы не расходовать ресурсы устройства. |
Установка масштаба симулятора
С одной стороны, может показаться, что данная настройка не представляет особого интереса, однако иногда ее использование бывает очень полезно. Чтобы получить доступ к данной настройке, необходимо перейти в раздел меню Window и выбрать один из следующих пунктов:
- Physical Size – симулятор принимает размер аналогичного физического устройства, данная опция позволяет оценить, как приложение будет выглядеть в реальном масштабе на физическом устройстве.
- Point Accurate – масштабирует окно симулятора таким образом, чтобы устройства с разным DPI можно было сравнивать. Это может быть очень полезно при верстке, так как при таком масштабе размера элементов интерфейса нарисованного в Figma или в другой подобной программе будут совпадать с симулятором.
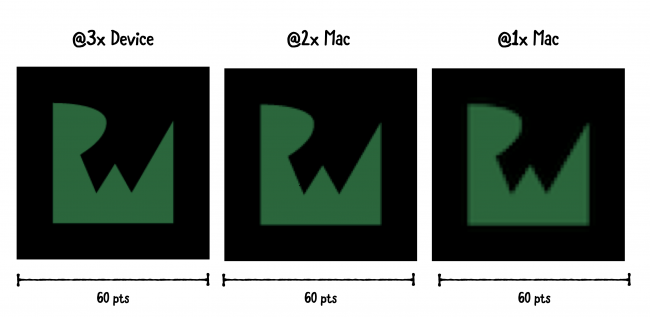
- Pixel Accurate – растягивает симулятор так, чтобы каждый пиксель на симулиремом устройстве имел такой же размер как пиксель на дисплее вашего Mac. Настройка может быть полезной для проверки появления графических дефектов на реальном устройстве, связанных со смещением пикселей.
- Fit Screen – растягивает симулятор на весь экран, сохраняя пропорции.
Заключение
Корпорация Apple разработала действительно удобный инструмент, обладающий огромным количеством полезных функций, в том числе которые не вошли в данную статью, например:
- встроенная запись видео;
- опция по выводу окна симулятора поверх всех окон;
- функция быстрой доставки фото и файлов через drag & drop в память симулятора;
- тестирование обработки уведомлений приложением;
- управление iOS эмулятором через терминал;
- удаленная сборка и управление эмулятором удаленно через другой Mac или Windows компьютер.
Получить доступ к iOS без покупки iPhone всё же можно. Хоть и с некоторыми оговорками.
Что нужно знать об эмуляторах iOS
Есть ли работающий эмулятор iOS
В интернете можно найти массу утилит, которые обещают чуть ли не установку iOS на Android и Windows, но это всего лишь бесполезные и заражённые вирусами пустышки.
Поскольку мобильная операционная система Apple имеет закрытый исходный код, её полноценных эмуляторов не существует. Попытки создать такое ПО заканчивались судебными тяжбами с компанией и неизбежно проваливались. По факту все программы, которые выдают за эмуляторы, на самом деле являются симуляторами.
Чем симулятор отличается от эмулятора
Оба термина созвучны и многие считают их синонимами, но это далеко не так.
Эмуляция подразумевает воссоздание идентичной копии оборудования и всех его свойств. В этом случае программный код выполняется в «родной» среде, которая строится на тех же компонентах, что и оригинал.
Симуляция — это всего лишь имитация интерфейса оригинального ПО и его поведения. Симулятор реализует функции приложений не полностью и иначе. Внешне они могут выглядеть как полная копия, но о выполнении оригинального программного кода речь не идёт.
Можно ли поиграть на симуляторе
Открыть игру или любое другое приложение из App Store на компьютере не получится. Даже в официальном симуляторе Apple можно запустить только собственноручно созданные программы — чужие проекты, для которых нет исходников, открыть не выйдет.
Поэтому не стоит рассчитывать поиграть в какой‑нибудь громкий эксклюзив с iOS, который недоступен на Android.
Зачем тогда вообще нужны симуляторы
Действительно извлечь какую‑то пользу из подобного ПО могут только разработчики приложений для iOS. Симуляторы позволяют тестировать свои программы, даже если под рукой нет реального iPhone и других гаджетов Apple.
Обычные пользователи с помощью симуляторов iOS могут разве что удовлетворить любопытство и поближе взглянуть на интерфейс операционной системы Apple.
1. Xcode Simulator

- Платформа: macOS.
- Цена: бесплатно.
Лучшее решение для тестирования iOS‑приложений, которое уступает только запуску ПО на реальных устройствах. Simulator входит в состав Xcode — фирменной среды разработки для платформ Apple — и имитирует работу iOS, iPadOS, watchOS, tvOS настолько точно, насколько это вообще возможно.
Симулятор запускается прямо из проекта Xcode. При этом даже здесь создается специально скомпилированная под архитектуру x86 версия для работы на Mac. Тестировать можно как проекты на Objective‑C или Swift, так и веб‑приложения — Simulator полностью воспроизводит внешний вид и поведение iOS на выбранном устройстве.
2. Xamarin iOS Simulator

- Платформа: Windows.
- Цена: бесплатно.
Набор инструментов для кросс‑платформенной разработки Xamarin входит в среду Microsoft Visual Studio, и это единственный способ получить полноценный симулятор iOS в Windows. Правда, для его использования нужно подключаться к удалённому Mac, на котором фактически всё и работает. Зато возможности симуляции такие же, как в Xcode.
Встроенный iOS‑симулятор Xamarin позволяет тестировать приложения без использования iPhone. В нём есть поддержка тачскрина, скриншоты и много других полезных опций. Главное преимущество Xamarin — возможность разработки в универсальном формате с последующим развёртыванием как на iOS, так и на Android без необходимости переписывать всё с нуля.
Перейти на официальный сайт →
3. Appetize

- Платформа: веб.
- Цена: бесплатно 100 минут в месяц или премиум от 40 долларов в месяц.
В отличие от предыдущих двух симуляторов Appetize является онлайн‑решением и функционирует в любом браузере, включая мобильные. Сервис предоставляет доступ к рабочему столу iOS, а также позволяет запускать собственные приложения после загрузки исходников.
В Appetize реализована симуляция всех iOS‑устройств, начиная от iPhone 4S и заканчивая iPhone 11 Pro Max. Помимо этого есть возможность выбора между различными версиями операционной системы, а также журнал отладки и логирование сети.
Перейти на официальный сайт →
4. Electric Mobile Studio

- Платформа: Windows.
- Цена: 40 долларов, бесплатная пробная версия на 7 дней.
Полезная утилита для тестирования iOS‑приложений в среде Windows. Electric Mobile Studio поддерживает интеграцию с Microsoft Visual Studio, поэтому в процессе написания кода можно сразу же отлаживать его, проверять отображение интерфейса и другие компоненты.
Симулятор имеет встроенный движок WebKit и инструменты отладки Google Chrome, которые упрощают разработку и тестирование. Есть возможность переключаться между профилями различных устройств, менять разрешение, ориентацию и множество других параметров.
Перейти на официальный сайт →
5. Ripple

- Платформа: Chrome.
- Цена: бесплатно.
Ещё один онлайн‑симулятор, который в отличие от Appetize доступен не в виде сервиса, а как расширение для Google Chrome. Ripple призван облегчить разработку веб‑приложений на HTML5 и позволяет тестировать их прямо в браузере.
При активации на текущей странице симулятор перезагружает её и отображает в соответствии с выбранными настройками. Среди параметров доступны разрешение экрана, платформа, а также данные геолокации, акселерометра и несколько дополнительных опций.
Приложение не найдено
Introduction
As a developer, testing and debugging mobile applications can be a challenging task, especially when it comes to iOS applications. However, with the help of Xamarin Remoted iOS Simulator, you can now test and debug iOS applications entirely within Visual Studio Enterprise on Windows. In this article, we will explore the features and benefits of Xamarin Remoted iOS Simulator and provide a step-by-step guide on how to use it.
What is Xamarin Remoted iOS Simulator?
Xamarin Remoted iOS Simulator is a tool that allows you to run and test iOS applications on your Windows-running computer. It provides a simulated environment that mimics the behavior of an actual iOS device, allowing you to test and debug your applications without the need for a physical device. With Xamarin Remoted iOS Simulator, you can interact with the simulator using a variety of actions, such as rotation, launching a shake gesture, or rebooting, as well as using the following buttons: Home, Lock, Screenshot, and Settings.
Features of Xamarin Remoted iOS Simulator
Xamarin Remoted iOS Simulator offers a range of features that make it an essential tool for developers. Some of the key features include:
- Simulated Environment: Xamarin Remoted iOS Simulator provides a simulated environment that mimics the behavior of an actual iOS device. This allows you to test and debug your applications without the need for a physical device.
- Interactions: You can interact with the simulator using a variety of actions, such as rotation, launching a shake gesture, or rebooting, as well as using the following buttons: Home, Lock, Screenshot, and Settings.
- Simulator Options: A variety of simulator options are available, such as rotate, shake, or invoke other states in the simulator. Simply right-click anywhere in the simulator window to view all the options available in the simulator.
- Debugging: Xamarin Remoted iOS Simulator allows you to debug your applications using the Visual Studio Enterprise debugger. This provides a comprehensive debugging experience that includes breakpoints, step-through execution, and variable inspection.
Benefits of Using Xamarin Remoted iOS Simulator
Using Xamarin Remoted iOS Simulator offers a range of benefits for developers. Some of the key benefits include:
- Cost-Effective: Xamarin Remoted iOS Simulator is a cost-effective solution for testing and debugging iOS applications. You don’t need to purchase a physical device or subscribe to a cloud-based testing service.
- Convenient: Xamarin Remoted iOS Simulator allows you to test and debug your applications from the comfort of your own office or home. You don’t need to worry about setting up a physical device or dealing with the hassle of traveling to a testing lab.
- Comprehensive Debugging: Xamarin Remoted iOS Simulator provides a comprehensive debugging experience that includes breakpoints, step-through execution, and variable inspection. This allows you to identify and fix issues quickly and efficiently.
How to Use Xamarin Remoted iOS Simulator
Using Xamarin Remoted iOS Simulator is a straightforward process. Here’s a step-by-step guide on how to use it:
Step 1: Install Xamarin Remoted iOS Simulator
To use Xamarin Remoted iOS Simulator, you need to install it on your Windows-running computer. You can download the installer from the official Xamarin website.
Step 2: Launch Visual Studio Enterprise
Once you have installed Xamarin Remoted iOS Simulator, launch Visual Studio Enterprise on your Windows-running computer.
Step 3: Create a New Project
Create a new project in Visual Studio Enterprise by selecting the «File» menu and then clicking on «New» > «Project…».
Step 4: Select the iOS Project Template
Select the iOS project template from the list of available project templates.
Step 5: Configure the Project
Configure the project by selecting the target device and platform, as well as any other required settings.
Step 6: Run the Application
Run the application by clicking on the «Run» button or by pressing F5.
Step 7: Interact with the Simulator
Interact with the simulator using the variety of actions available, such as rotation, launching a shake gesture, or rebooting, as well as using the following buttons: Home, Lock, Screenshot, and Settings.
Step 8: Debug the Application
Debug the application using the Visual Studio Enterprise debugger. This provides a comprehensive debugging experience that includes breakpoints, step-through execution, and variable inspection.
Conclusion
Xamarin Remoted iOS Simulator is a powerful tool that allows you to test and debug iOS applications entirely within Visual Studio Enterprise on Windows. With its simulated environment, interactions, and debugging capabilities, it provides a comprehensive solution for developers. By following the step-by-step guide outlined in this article, you can start using Xamarin Remoted iOS Simulator today and take your iOS development to the next level.
Troubleshooting
If you encounter any issues while using Xamarin Remoted iOS Simulator, here are some troubleshooting tips to help you resolve the problem:
- Check the System Requirements: Make sure that your Windows-running computer meets the system requirements for Xamarin Remoted iOS Simulator.
- Check the Installation: Ensure that Xamarin Remoted iOS Simulator is installed correctly on your Windows-running computer.
- Check the Visual Studio Enterprise Version: Ensure that you are using the latest version of Visual Studio Enterprise.
- Check the iOS Project Template: Ensure that you are using the correct iOS project template.
FAQs
Here are some frequently asked questions about Xamarin Remoted iOS Simulator:
- Q: What is Xamarin Remoted iOS Simulator?
A: Xamarin Remoted iOS Simulator is a tool that allows you to run and test iOS applications on your Windows-running computer. - Q: What are the benefits of using Xamarin Remoted iOS Simulator?
A: The benefits of using Xamarin Remoted iOS Simulator include cost-effectiveness, convenience, and comprehensive debugging. - Q: How do I use Xamarin Remoted iOS Simulator?
A: To use Xamarin Remoted iOS Simulator, you need to install it on your Windows-running computer, launch Visual Studio Enterprise, create a new project, configure the project, run the application, interact with the simulator, and debug the application.
References
Here are some references that you can use to learn more about Xamarin Remoted iOS Simulator:
- Xamarin Remoted iOS Simulator Documentation: The official documentation for Xamarin Remoted iOS Simulator provides a comprehensive guide on how to use the tool.
- Xamarin Remoted iOS Simulator Tutorials: The official tutorials for Xamarin Remoted iOS Simulator provide step-by-step guides on how to use the tool.
- Xamarin Remoted iOS Simulator Community Forum: The official community forum for Xamarin Remoted iOS Simulator provides a platform for developers to ask questions and share knowledge.
Xamarin Remoted iOS Simulator Q&A: Frequently Asked Questions and Answers
====================================================================================
Introduction
Xamarin Remoted iOS Simulator is a powerful tool that allows you to test and debug iOS applications entirely within Visual Studio Enterprise on Windows. However, like any complex tool, it can be challenging to understand and use, especially for beginners. In this article, we will provide a comprehensive Q&A section that answers some of the most frequently asked questions about Xamarin Remoted iOS Simulator.
Q&A Section
Q: What is Xamarin Remoted iOS Simulator?
A: Xamarin Remoted iOS Simulator is a tool that allows you to run and test iOS applications on your Windows-running computer. It provides a simulated environment that mimics the behavior of an actual iOS device, allowing you to test and debug your applications without the need for a physical device.
Q: What are the benefits of using Xamarin Remoted iOS Simulator?
A: The benefits of using Xamarin Remoted iOS Simulator include cost-effectiveness, convenience, and comprehensive debugging. With Xamarin Remoted iOS Simulator, you can test and debug your applications from the comfort of your own office or home, without the need for a physical device.
Q: How do I use Xamarin Remoted iOS Simulator?
A: To use Xamarin Remoted iOS Simulator, you need to install it on your Windows-running computer, launch Visual Studio Enterprise, create a new project, configure the project, run the application, interact with the simulator, and debug the application.
Q: What are the system requirements for Xamarin Remoted iOS Simulator?
A: The system requirements for Xamarin Remoted iOS Simulator include a Windows-running computer with a minimum of 4 GB of RAM, a 64-bit processor, and a compatible graphics card.
Q: Can I use Xamarin Remoted iOS Simulator with other development tools?
A: Yes, you can use Xamarin Remoted iOS Simulator with other development tools, such as Visual Studio Code, Xamarin Studio, and Xcode.
Q: How do I troubleshoot issues with Xamarin Remoted iOS Simulator?
A: To troubleshoot issues with Xamarin Remoted iOS Simulator, you can check the system requirements, ensure that the tool is installed correctly, and check the Visual Studio Enterprise version.
Q: Can I use Xamarin Remoted iOS Simulator to test and debug iOS applications on other platforms?
A: No, Xamarin Remoted iOS Simulator is specifically designed to test and debug iOS applications on Windows-running computers.
Q: How do I get started with Xamarin Remoted iOS Simulator?
A: To get started with Xamarin Remoted iOS Simulator, you can download the tool from the official Xamarin website, install it on your Windows-running computer, and follow the step-by-step guide outlined in this article.
Q: What are the limitations of Xamarin Remoted iOS Simulator?
A: The limitations of Xamarin Remoted iOS Simulator include the need for a Windows-running computer, the requirement for a compatible graphics card, and the potential for performance issues.
Q: Can I use Xamarin Remoted iOS Simulator to test and debug iOS applications on multiple devices?
A: Yes, you can use Xamarin Remoted iOS Simulator to test and debug iOS applications on multiple devices, including iPhones, iPads, and iPod touches.
Q: How do I update Xamarin Remoted iOS Simulator to the latest version?
A: To update Xamarin Remoted iOS Simulator to the latest version, you can download the latest installer from the official Xamarin website and follow the installation instructions.
Q: Can I use Xamarin Remoted iOS Simulator to test and debug iOS applications with multiple languages?
A: Yes, you can use Xamarin Remoted iOS Simulator to test and debug iOS applications with multiple languages, including English, Spanish, French, and many others.
Q: How do I reset the simulator to its default state?
A: To reset the simulator to its default state, you can click on the «Reset» button in the Visual Studio Enterprise toolbar.
Q: Can I use Xamarin Remoted iOS Simulator to test and debug iOS applications with multiple frameworks?
A: Yes, you can use Xamarin Remoted iOS Simulator to test and debug iOS applications with multiple frameworks, including UIKit, Core Graphics, and Core Animation.
Q: How do I get support for Xamarin Remoted iOS Simulator?
A: To get support for Xamarin Remoted iOS Simulator, you can visit the official Xamarin website, check the community forum, or contact the Xamarin support team.
Conclusion
Xamarin Remoted iOS Simulator is a powerful tool that allows you to test and debug iOS applications entirely within Visual Studio Enterprise on Windows. By understanding the benefits, features, and limitations of Xamarin Remoted iOS Simulator, you can use it to take your iOS development to the next level. If you have any further questions or need additional support, please don’t hesitate to contact us.
Additional Resources
Here are some additional resources that you can use to learn more about Xamarin Remoted iOS Simulator:
- Xamarin Remoted iOS Simulator Documentation: The official documentation for Xamarin Remoted iOS Simulator provides a comprehensive guide on how to use the tool.
- Xamarin Remoted iOS Simulator Tutorials: The official tutorials for Xamarin Remoted iOS Simulator provide step-by-step guides on how to use the tool.
- Xamarin Remoted iOS Simulator Community Forum: The official community forum for Xamarin Remoted iOS Simulator provides a platform for developers to ask questions and share knowledge.
- Xamarin Remoted iOS Simulator YouTube Channel: The official YouTube channel for Xamarin Remoted iOS Simulator provides video tutorials and demonstrations on how to use the tool.

Join our monthly Unpacking Software livestream to hear about the latest news, chat and opinion on packaging, software deployment and lifecycle management!
Learn More

Join the Chocolatey Team on our regular monthly stream where we put a spotlight on the most recent Chocolatey product releases. You’ll have a chance to have your questions answered in a live Ask Me Anything format.
Learn More

Join us for the Chocolatey Coding Livestream, where members of our team dive into the heart of open source development by coding live on various Chocolatey projects. Tune in to witness real-time coding, ask questions, and gain insights into the world of package management. Don’t miss this opportunity to engage with our team and contribute to the future of Chocolatey!
Learn More

Webinar from
Wednesday, 17 January 2024
We are delighted to announce the release of Chocolatey Central Management v0.12.0, featuring seamless Deployment Plan creation, time-saving duplications, insightful Group Details, an upgraded Dashboard, bug fixes, user interface polishing, and refined documentation. As an added bonus we’ll have members of our Solutions Engineering team on-hand to dive into some interesting ways you can leverage the new features available!
Watch On-Demand

Join the Chocolatey Team as we discuss all things Community, what we do, how you can get involved and answer your Chocolatey questions.
Watch The Replays

Webinar Replay from
Wednesday, 30 March 2022
At Chocolatey Software we strive for simple, and teaching others. Let us teach you just how simple it could be to keep your 3rd party applications updated across your devices, all with Intune!
Watch On-Demand

Livestream from
Thursday, 9 June 2022
Join James and Josh to show you how you can get the Chocolatey For Business recommended infrastructure and workflow, created, in Azure, in around 20 minutes.
Watch On-Demand

Livestream from
Thursday, 04 August 2022
Join Paul and Gary to hear more about the plans for the Chocolatey CLI in the not so distant future. We’ll talk about some cool new features, long term asks from Customers and Community and how you can get involved!
Watch On-Demand

Livestreams from
October 2022
For Hacktoberfest, Chocolatey ran a livestream every Tuesday! Re-watch Cory, James, Gary, and Rain as they share knowledge on how to contribute to open-source projects such as Chocolatey CLI.
Watch On-Demand
Posted by Suthahar on Thursday, November 24, 2016
No comments
Xamarin is great technology for develop cross mobile application development. You can create, Build and Debug iOS application in windows machine using Visual Studio. In this article, I will explain what are the way to debug and build Xamarin.iOS application in windows machine.
Xamarin and Microsoft giving very great solution for create, build and debug IOS application on windows machine using visual studio. but, it cannot do this alone, an IOS app cannot be created without apple Compiler, and it cannot be deployed without apple certificate and code-signing tools. Read below I will explain about software requirement and steps.
Software Requirement
You can install following software from Windows and Mac machine.

Windows Machine
- Windows OS 7 or higher (7, 8, 8.1,10 +)
- Visual Studio 2013 professional or higher.
- Download Update Visual Studio from https://www.visualstudio.com/downloads/
- VS 2015 ++ included xamarin .
- If VS 2013 , Download Xamarin for Visual Studio from https://www.xamarin.com/download
- Note: You cannot use the Xamarin plug-in Visual Studio Express editions.
- Mac Machine:
- A Mac running OS X El Capitan (10.11) or higher
- Xamarin Studio 5.10 or higher with Xamarin.iOS SDK
- Apple Xcode(7+) IDE and iOS SDK from https://itunes.apple.com/us/app/xcode/id497799835?uo=8&at=11ld4k
It greatly helps if your machines are physically near each other, since when you build and run on Windows, the iOS Simulator will load on your Mac.
Build and Debug iOS Application
I have explained about basic xamarin.Form application creation in my previous article .You can refer and create basic xamarin.iOS or xamarin.Form application
After create, Visual Studio will prompt you to prepare your Mac to be the Xamarin build host using below 3 steps.
Mac Machine
Step 1: On the mac Machine, Select “System Preferences”

Step 2: In System Preferences, Click on “Sharing”

Step 3: In Sharing, Turn on Remote Login and Change Allow access to All Users or Only these users and add a user.

Windows Machine
Step 1: In the Visual Studio, you can click on “Connection Indicator “
Step 2: You Can Select your mac name from mac agent window and click on “connect”.

Step 3: you can enter mac username and password and Click on Login .

After connection, Connection indicator color will change to green, If its connection is very less bandwidth means it will change to orange color (it’s not recommended for debug application)
Your app will compile and execute, but you won’t see it running on Windows. Instead, you’ll see it on your Mac build host.
iOS Simulator Remoting
The Evolve 2016 Conference, Xamarin announced iOS Simulator remoting that will soon allow you to interact with apps running in Apple iOS simulator as through the Simulator were running on your Windows Machine.
iOS Simulator Remoting also you need follow above all the steps and below steps as well
Windows Machine
Step 1: Download the installer and install on your Windows computer
Step 2: After install, In Visual Studio go to Tools > Options > Xamarin > iOS Settings and tick the box for Remote Simulator to Windows:

Output
Now build and run solution and ios simulator will open in windows machine

Issues and Resolution
Issue 1:
Error Cannot resolve reference: C:/Program Files (x86)/Reference Assemblies/Microsoft/Framework/Xamarin.iOS/v1.0/Facades/System.IO.FileSystem.Watcher.dll I1Vector.iOS
Resolution:
This issue happened because of different versions of Xamarin.iOS on Windows Machine and mac machine. After updating xamarin.ios, this problem will get resolved.
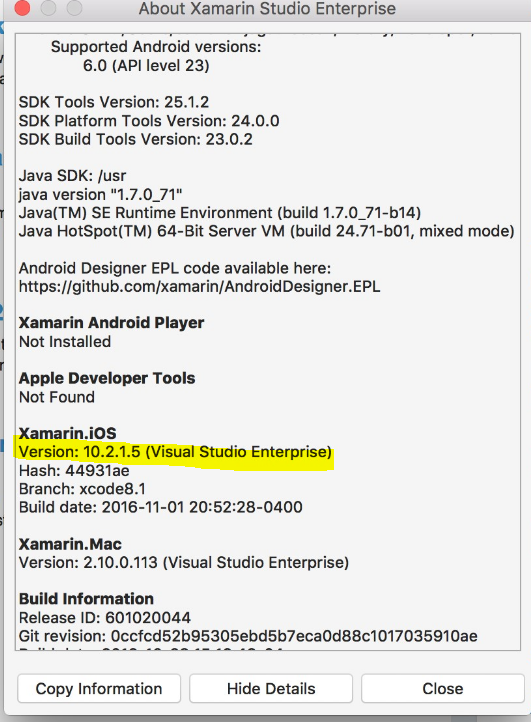
How to Check xamarin.iOS Version Number ?
In Windows Machine, Go to Visual Studio ➔ Help ➔ About Microsoft Visual Studio
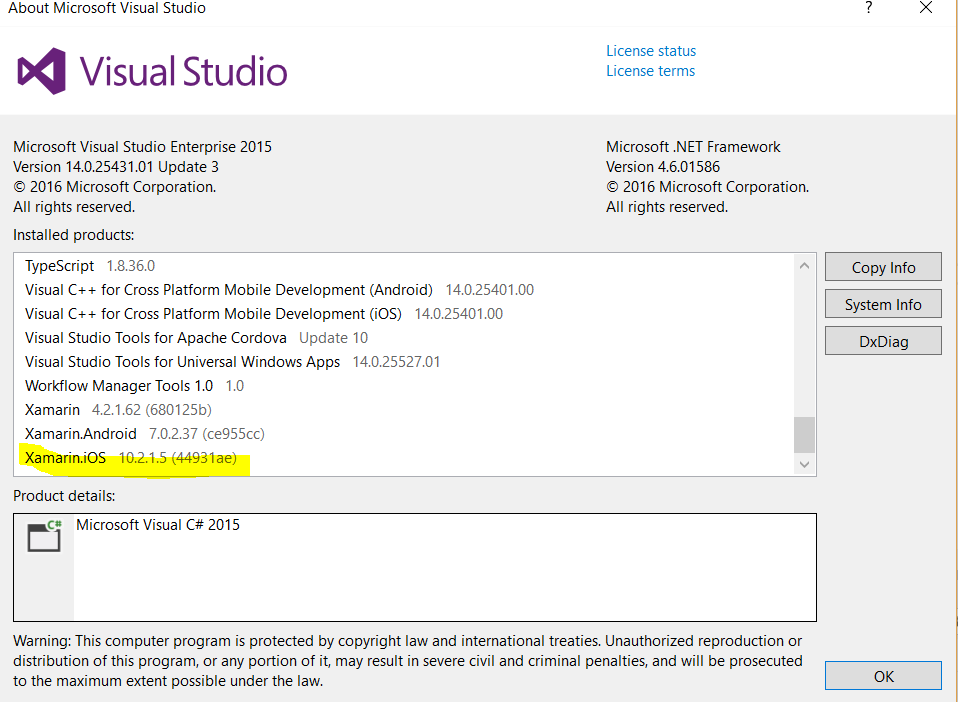
In mac machine, Go to Xamarin Studio ➔ Select Xamarin Studio Menu ➔ Click About Xamarin Studio ➔ click Show details
How to Update Xamarin.Ios in Mac and Windows?
Mac Machine:
Go to xamarin Studio and Click on “Check for Update” and Update
Windows Machine:
Go to Visual Studio ➔ Tools ➔ extensions and updates.
Some time it won’t available in update list. if it’s not available, go to control Panel➔Uninstall program ➔ Select Visual studio ➔ and Click Change option and update
Issue 2: Mac Agent can’t connect after update:
Starting connection to mac machine. Xcode license must be accepted in order to be connected and working against the Mac
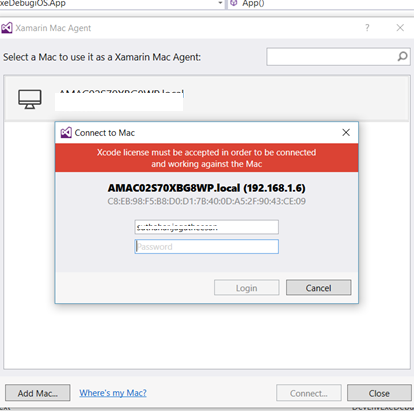
Solution:
Go to Xcode ➔ Preferences ➔ Location
Check if «Command Line Tool» set or Select XCode version
Run sudo xcodebuild -license in terminal
Xcode license must be accepted press Space bar and press q
Issue 3: iOS simulator not display on Windows
Solution 1: Check Windows and Mac firewall rule or disable and test application.
Solution 2:
You need make sure xcode installed in Application Folder. If it’s not ,you need to change in visual studio Apple SDK path

Suthahar Jegatheesan is Mobile and Cloud Specialist/Architect and he has 15+ years of IT experience as a Technology Consultant /Programmer/Developer in IT industry. Suthahar is an industry luminary focused on AI, Computer Vision, Bot, Machine Learning, UWP, Azure, Xamarin and Web Emerging User Experiences as subject matter expert (SME) in implementation, architecture, development and administration.