
Table of Contents
Getting X2Go
X2Go consists of several software components. The minimal requirement is X2Go Server (on the terminal server) and X2Go Client / PyHoca-GUI (on the client machine).
The minimal X2Go setup installs out of the box. But note that X2Go can be highly customized by a series of X2Go add-on components.
The Client-Side of X2Go
At the time of writing there are two client applications available for X2Go: X2Go Client (the native client), and Pyhoca-GUI (a Python based system tray applet for X2Go).
X2Go Package Repositories for GNU/Linux
When on GNU/Linux, you can obtain all X2Go components from one of the package archives listed below.
For those who want to help testing bleeding edge code of X2Go, please read about our Nightly Builds.
The Server-Side of X2Go
X2Go Sources
X2Go Live Demos
В Astra Linux Special Edition x.7 пакет x2goserver входит в расширенный репозиторий и после подключения расширенного репозитория может быть установлен с помощью графического менеджера пакетов synaptic или из командной строки командой:
sudo apt install x2goserver
В Astra Linux Special Edition 1.6 и Astra Linux Common Edition пакет может быть установлен из стандартного репозитория Astra Linux Common Edition.
После установки служба запускается автоматически.
Для добавления службы разделения принтеров через x2go требуется установить два дополнительных пакета:
После установки этих пакетов принтер x2go будет доступен в менеджере печати как Virtual_X2Go_printer.
Клиент x2go на Astra Linux
Установка пакета
Клиент x2go для Astra Linux представлен пакетом x2goclient. В Astra Linux Special Edition x.7 пакет x2goclient входит в расширенный репозиторий и после подключения расширенного репозитория может быть установлен с помощью графического менеджера пакетов synaptic или из командной строки командой:
sudo apt install x2goclient
В Astra Linux Special Edition 1.6 и Astra Linux Common Edition пакет может быть установлен из стандартного репозитория Astra Linux Common Edition.
Подключение
После установки клиентское приложение x2go доступно в меню «Пуск» — «Сеть» — «X2go Client»:
Для подключения к серверу:
- Создать подключение:
- Открыть форму для создания новой сессии («Сесия» — «Новая сессия»).
- Заполнить реквизиты сервера.
- Сохранить изменения.
- Для подключения:
- Открыть форму сохраненной сессии,.
- Ввести аутентификационные данные.
- Нажать «ОК».
Клиент x2go на Windows
Установка клиента x2go на Windows
Внимание
Имя пользователя Windows должно содержать только латинские буквы!
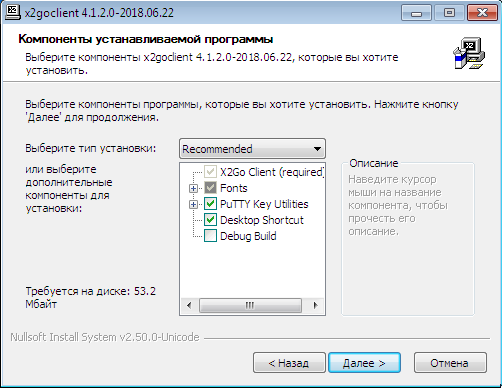
Скачать с официального сайта клиент x2go для Windows.
Установить клиента, выбрав тип установки «Recommended»:
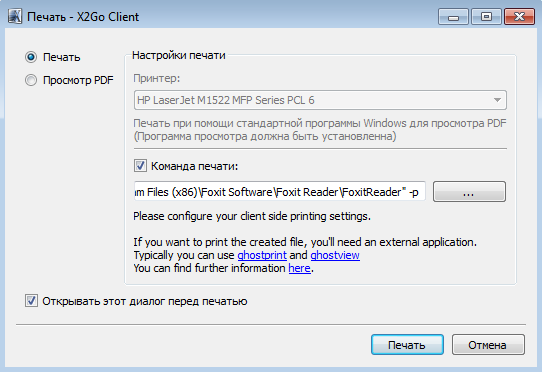
Настройка печати на Windows
Для печати на локальном принтере установить программу для чтения PDF. Например Foxit Reader.
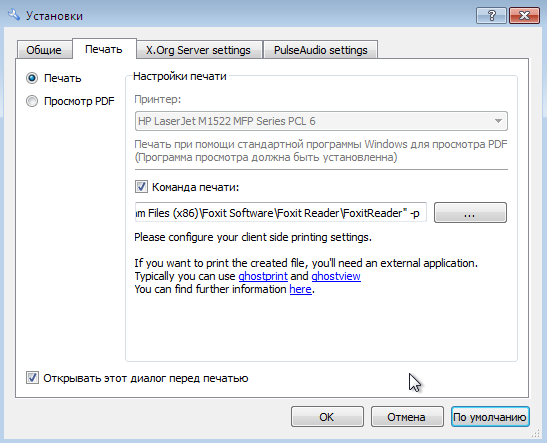
Запустить x2go клиент. В меню выбрать «Опции» — «Установки», перейти на вкладку «Печать»
Выбрать команда печати и нажать кнопку «…»
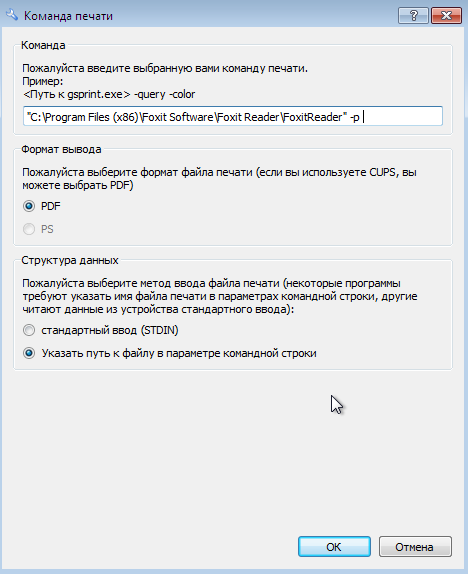
Ввести команду печати (путь до Foxit Reader с параметром «-р», Формат вывода PDF, Структура данных — «Указать путь к файлу в параметре командой строки»
Подключение к серверу x2go из клиента Windows
В клиенте х2go нажать «Создать новую сессию».
Ввести данные:
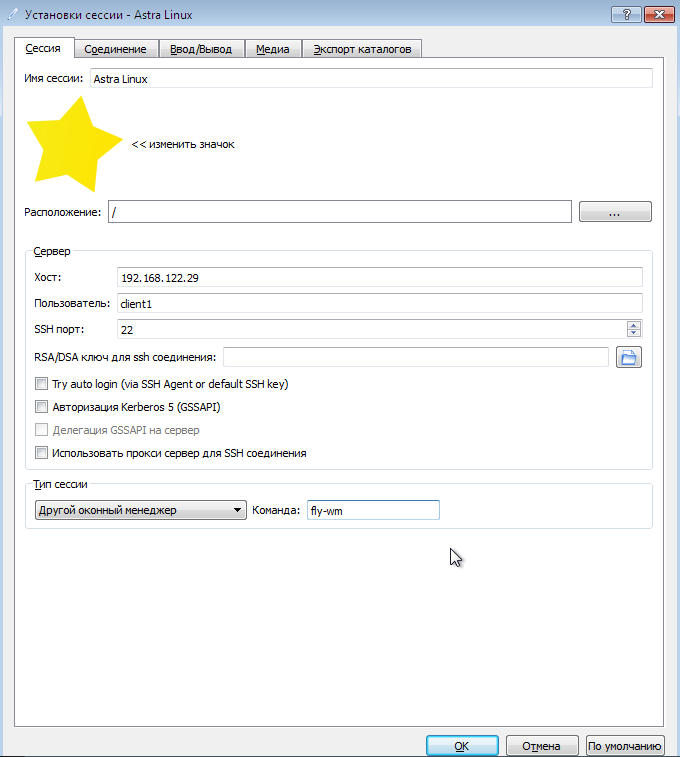
Тип сессии:
- выбрать «Другой оконный менеджер» и указать команду: «fly-wm»;
- или выбрать «x2Go/X11 desktop sharing» (или «Подключение к сущетвующей сессии») для подключения к существующей сессии (может не работать на ранних версиях Astra Linux).
На вкладке «Соединение» выбрать тип соединения соответствующий вашему подключению.
На вкладке «Экспорт каталогов» можно добавить локальные папки для подключения их к удаленному серверу.
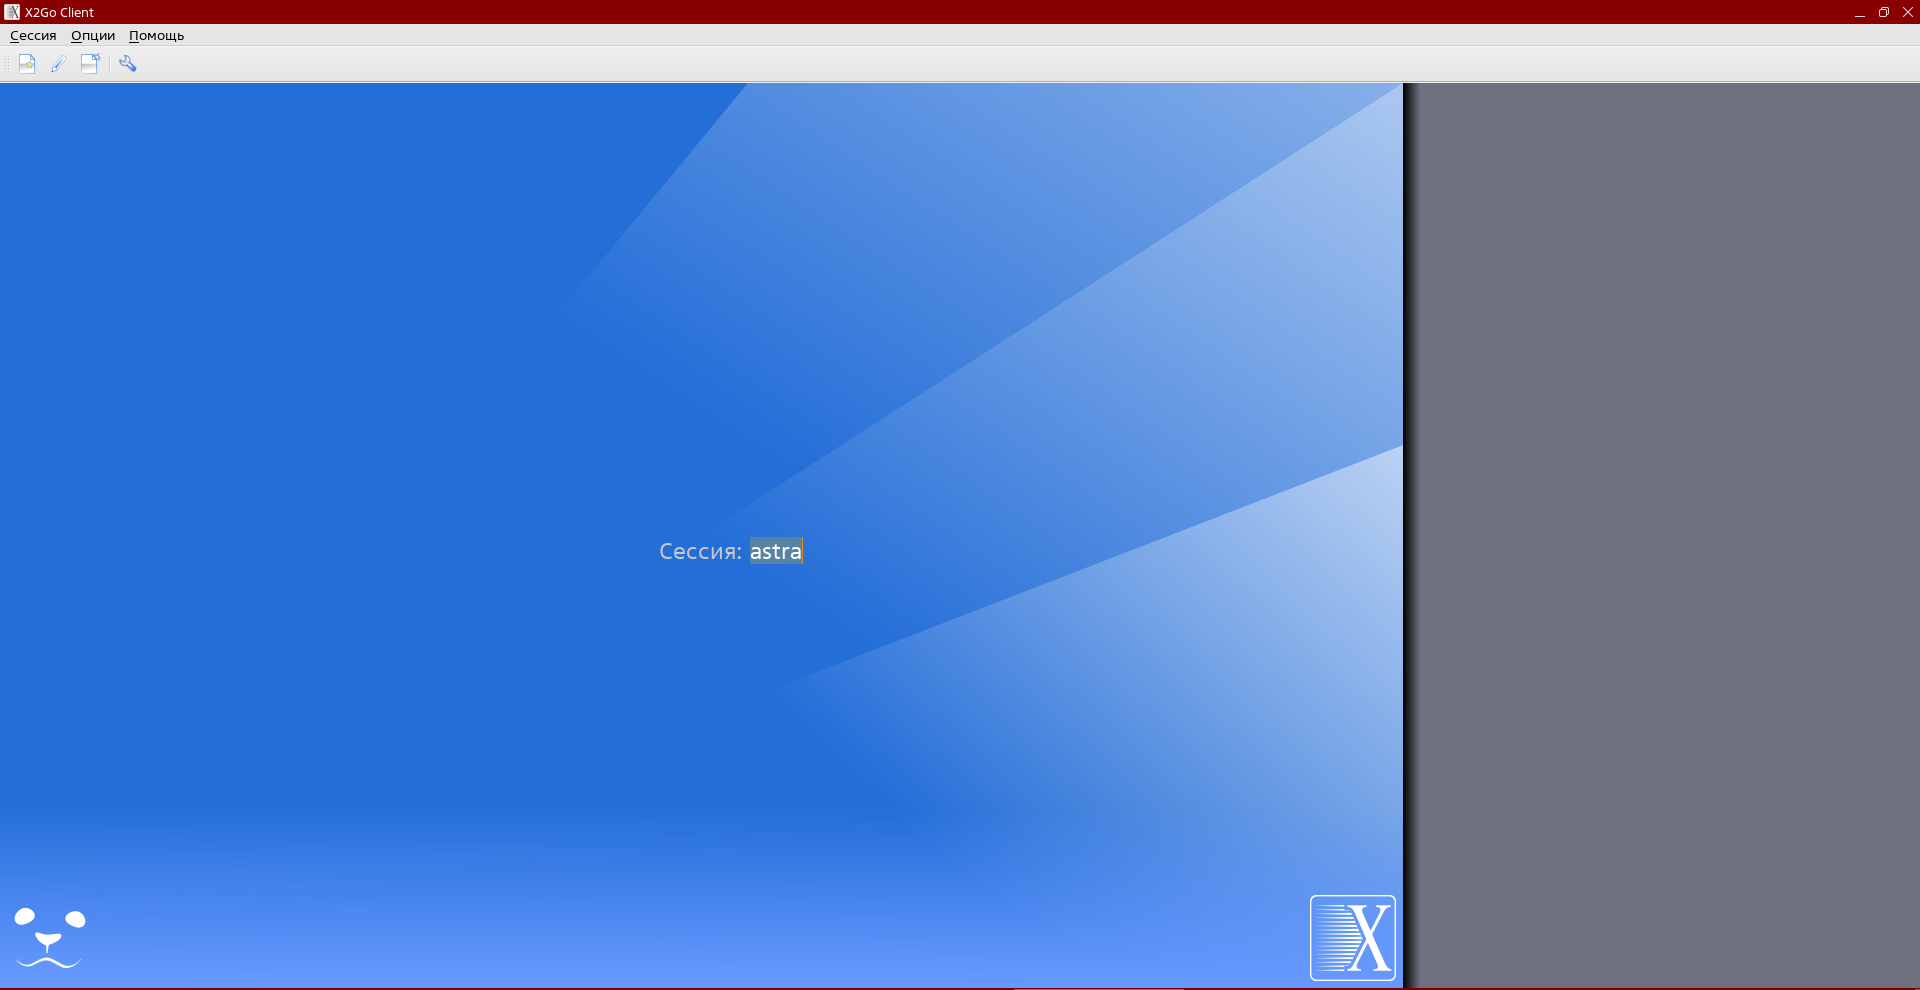
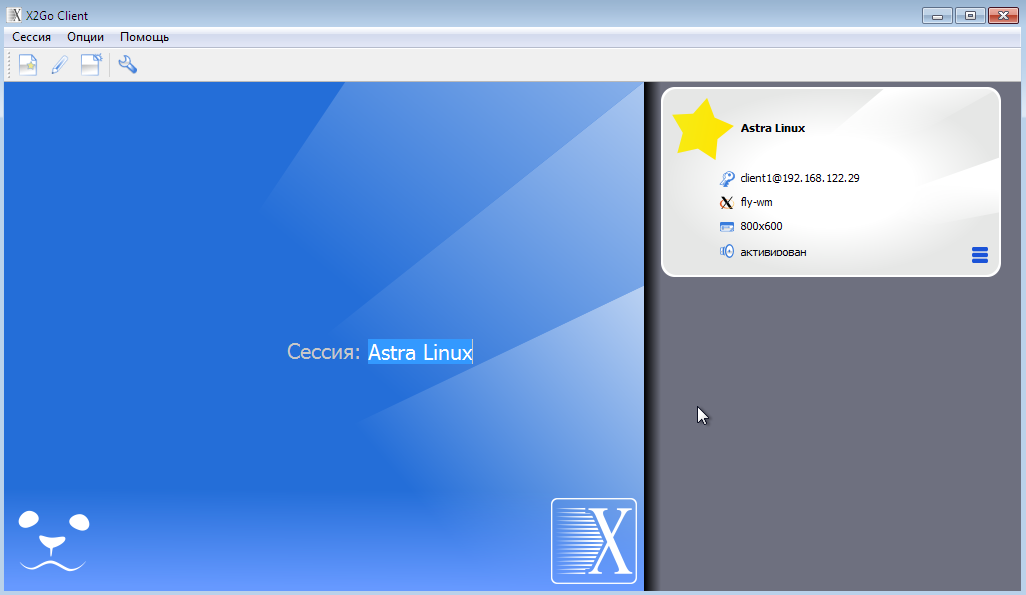
Кликнуть на появившуюся сессию справа:
Ввести имя пользователя и пароль:
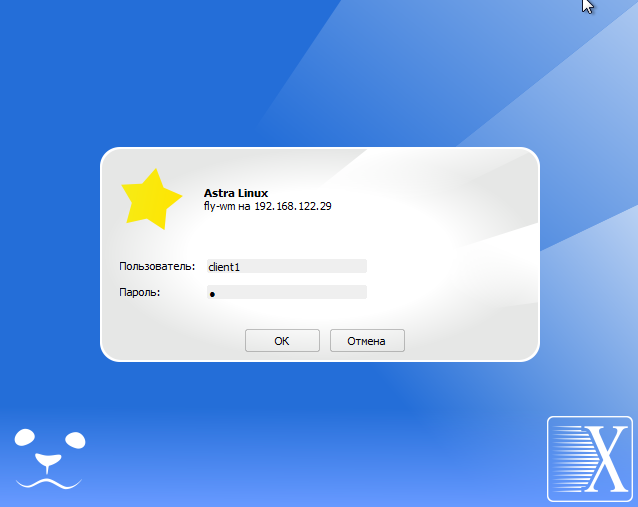
и нажать ОК.
Для печати выбирать принтер x2go, установленный ранее. В появившемся окошечке x2go нажать «Печать»:
Привет! На связи Александр Бархатов — DevOps-инженер в крупнейшем продуктовом холдинге. Сегодня без удаленного доступа к компьютерам и серверам сложно представить полноценную работу как технических специалистов, так и обычных пользователей. Для организации удаленного доступа используют специальный класс программного обеспечения. К таким программам относят, например, TeamViewer, AmmyyAdmin, AnyDesk. Однако порой бывает довольно трудно найти достойную альтернативу для ОС семейства Linux. В связи с этим мы протестировали и нашли решение для пользователей Linux-систем — программу под названием X2Go.
X2Go использует протокол NX technology (более известный под именами NX или NoMachine) и позволяет организовать удаленный доступ к рабочему столу. Среди достоинств X2Go можно выделить высокую скорость подключения при низкой скорости интернет-соединения, возможность запуска отдельных приложений, проброс устройств (принтеры, внешние накопители и т. д.), отсутствие дополнительной настройки, а также шифрование трафика посредством протокола SSH.
В этой статье мы произведем установку X2Go на ОС Ubuntu версии 22.04. Подключаться будем, используя официальную клиентскую программу для ОС Windows 10.
How to Install X2go on Windows 11
X2go is an open-source remote desktop solution that allows Linux servers to be accessed remotely from a Windows client. In this tutorial, we will guide you through the installation process of X2go on Windows 11.
Prerequisites
Before starting the installation process, make sure that you have the following items ready:
- A Windows 11 machine
- A Linux server with a desktop environment installed
- Internet connectivity on both machines
Step 1: Download X2go
Go to the X2go website at http://wiki.x2go.org/doku.php and download the latest version of X2go for Windows.
Step 2: Install X2go
- Once the download is complete, double-click on the downloaded file to launch the X2go Installer.
- Click «Next» on the welcome screen.
- Click «I Agree» to accept the license agreement.
- Choose the installation directory (or use the default) and click «Next.»
- Choose which components you want to install and click «Next.»
- Click «Install» to begin the installation process.
- Wait for the installation to finish, and then click «Finish.»
Step 3: Configure X2go
- Launch X2go by running the X2go client from the Windows start menu.
- Click the «New Session» button to set up a new connection to your Linux server.
- In the «New Session» dialog box, enter the following information:
- Session name: A name of your choosing.
- Host: The IP address or hostname of your Linux server.
- Login: Your Linux username.
- SSH port: The default is 22, but you may have changed it.
- Session type: Choose «XFCE» or your preferred desktop environment.
- Click «OK» to save your settings and return to the X2go main screen.
- Double-click on the session you just created to start the connection.
- Enter your Linux password when prompted, and wait for the connection to be established.
Congratulations! You have successfully installed and configured X2go on your Windows 11 machine. You can now remotely access your Linux server’s desktop environment with ease.
If you want to self-host in an easy, hands free way, need an external IP address, or simply want your data in your own hands, give IPv6.rs a try!
Alternatively, for the best virtual desktop, try Shells!
This used to be the repo providing the code for the version of VcXsrv that got shipped
with the Windows client of x2go (https://www.x2go.org). Starting with version 4.1.2.0
of the client (released 2018-06-25) VcXsrv’s (then current) upstream version 1.20.0.0
is shipped. So this repo is no longer updated. Bug reports regarding the X server should
be opened at the upstream VcXsrv site: https://sourceforge.net/projects/vcxsrv/
VcXsrv Windows X Server (Custom builds by X2Go & Arctica)
The X2Go Project and Arctica Project are maintaining 1.15.2.x & 1.17.0.0-x branches of VcXsrv.
VcXsrv is a Windows X-server based on the xorg git sources (like xming or cygwin’s xwin), but compiled with Visual Studio.
The upstream VcXsrv project can be found on SourceForge. Their last release of VcXsrv 1.15.2.x was 1.15.2.0, and it lacks Windows XP support.
Differences from VcXsrv
The primary differences from upstream VcXsrv are:
- Compatibility with Windows XP
- Prompt security updates
There are frequent security updates because numerous 3rd-party components are in the source tree. In addition to xorg-server, there are components such as openssl, freetype2 & various X11 libraries.
Other changes are:
- Only 32-bit builds (for the time being)
- Fixes for issues when used with nx-libs
- Improvements for contributors: Build Instructions are current & correct, we accept pull requests/patches, we respond to issues (although we cannot guarantee timely fixes), etc
- Better compression within the installer (for 1.17.0.0-x)
Download Builds:
Current versions of both 1.15.2.x & 1.17.0.0-x and be found on the Releases page on GitHub.:
1.15.2.6 and earlier, as well as 1.17.0.0-1, can be found here.
Community Support
You can post issues using GitHub.
You can also ask questions about VcXsrv usage or discuss development on the X2Go mailing lists. Note that this may change in the future.
Professional Support
Professional Support is available from one of the X2Go Developers.
Info for Developers
Why this repo and these builds exist.
You might be wondering why this repo and these builds exist. Why not upstream your changes?
- The primary developer of this repo and these builds (Mike DePaulo) tried multiple times to submit merge requests (the SourceForge equivalent of pull requests) and bug reports to the upstream VcXsrv project. The upstream VcXsrv developer (marha) only replied once. He rejected the merge request (for a legit reason), and gave good advice. However, he did not reject the merge request via the actual SourceForge system, and he has not responded since.
- SourceForge’s support for git is terrible. For example, whenever I tried to merge request from branch Y on my personal repo to the master branch on the upstream VcXsrv repo, it tried to merge my master branch instead.
- SourceForge has recently done terrible things as GitHub has gained popularity
- Using a GitHub repo is much preferable to using a personal SourceForge repo in terms of visibility.
Explanation of Branches:
- master — The upstream VcXsrv branch that upstream VcXsrv is built from. Currently on the 1.16.x version series.
- release/1.15.2.x — the 1.15.2.x branch maintained by Arctica and X2Go.
- release/1.17.0.0-x — the 1.17.0.0-x branch maintained by Arctica and X2Go.
- release/external — Upstream copies the released (or git) versions of the various packages into this branch, which they call
released. They then update the packages.txt file at the root. This branch contains 0 modifications to those packages. Upstream then uses git’s merge feature to merge these packages updates/upgrades into master, where upstream does make modifications to those packages. - release/external-1.15.2.x — same as
release/external, but forrelease/1.15.2.xrather thanmaster. - release/external-1.17.0.0-x — same as
release/external, but forrelease/1.17.0.0-xrather thanmaster.