
Набор инструментов wxPython GUI не встроен в Python, поэтому вам нужно будет установить его самостоятельно. К счастью, на большинстве платформ сделать это будет достаточно просто. В этой статье мы рассмотрим, как установить wxPython 4.0.3.
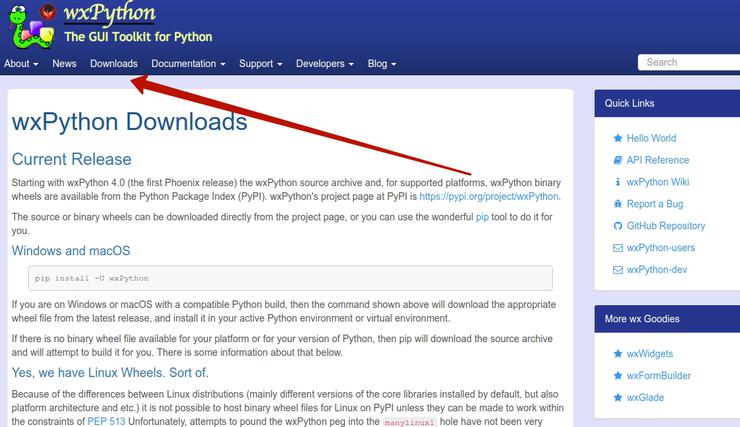
Вам нужно просто перейти по ссылке http://www.wxpython.org, найти там подходящий установщик или тарбол, соответствующий вашей платформе и версии Python.
После того как вы установили wxPython, убедитесь, что он выполняет следующий скрипт:
|
1 2 3 4 5 6 7 8 9 10 11 12 13 14 15 16 17 18 19 20 21 22 23 24 25 26 27 28 29 30 31 32 33 34 35 36 37 38 39 |
import platform import wx class MyFrame(wx.Frame): def __init__(self): «»»Constructor»»» wx.Frame.__init__( self, None, size=(500, 200), title=‘Version Info’ ) panel = wx.Panel(self) py_version = ‘Python version: ‘ + platform.python_version() wx_version = ‘wxPython version: ‘ + wx.version() os_version = ‘Operating System: ‘ + platform.platform() main_sizer = wx.BoxSizer(wx.VERTICAL) size = (20, —1) main_sizer.Add( wx.StaticText(panel, label=py_version), 0, wx.ALL, 5 ) main_sizer.Add( wx.StaticText(panel, label=wx_version), 0, wx.ALL, 5 ) main_sizer.Add( wx.StaticText(panel, label=os_version), 0, wx.ALL, 5 ) panel.SetSizer(main_sizer) self.Show() if __name__ == ‘__main__’: app = wx.App(False) frame = MyFrame() app.MainLoop() |
А теперь давайте научимся устанавливать wxPython Classic!
Classic
Ветвь Classic для wxPython была создана путём старомодного вреппинга wxWidgets (например, SWIG вместо SIP). И даже если это не имеет значения для вас как для разработчика, это влияет на процесс установки wxPython. В версии Classic, вы не можете использовать pip для установки wxPython. Вместо этого вам придётся найти установщик, файл deb или dmg, или же, если вы не найдёте подходящего варианта, создать билд wxPython с нуля.
Для пользователей Windows проектом wxPython был предоставлен установщик, который подходит для Classic. Просто зайдите на веб-сайт wxPython и загрузите установщик версии 4.0.3 или новее. Убедитесь в том, что версия установленного у вас Python и платформы совпадают (речь идёт о 32-х и 64-х битных системах).
Пример: вы не сможете установить 64-битную версию wxPython на Python 2.7 для 32-битных систем.
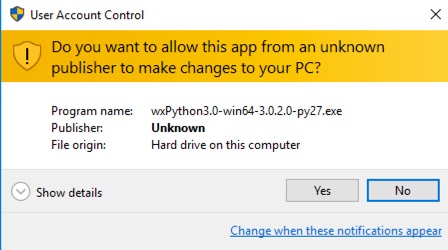
В данном разделе мы рассмотрим процесс установки wxPython на Windows 7. Сразу же после загрузки исполнительного файла, запустите его. Вам нужно будет разрешить установщику доступ к контролю учётных записей пользователей. Это можно сделать, выбрав «Да» в окне, которое всплывёт сразу же после запуска.
Сразу же после этого действия, вы должны увидеть следующий диалог:
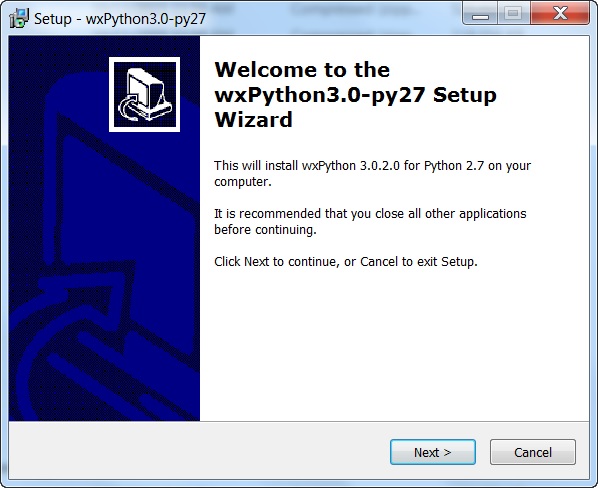
Это стандартный мастер установки, с которым вы могли столкнутся в множестве других программ. Нажмите «Далее» и вы будете перенаправлены на окно лицензионного соглашения.
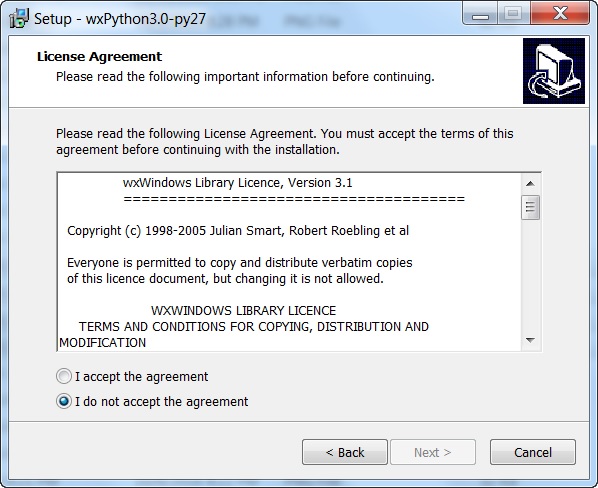
Вы можете прочесть лицензионное соглашение wxPython, если захотите. Оно представляет собой слегка модифицированную версию стандартной лицензии свободного программного обеспечения, позволяющую вам делать с wxPython всё, что вам заблагорассудится, даже продавать собственные коды, написанные с его применением. Просто примите соглашение, чтобы продолжить.
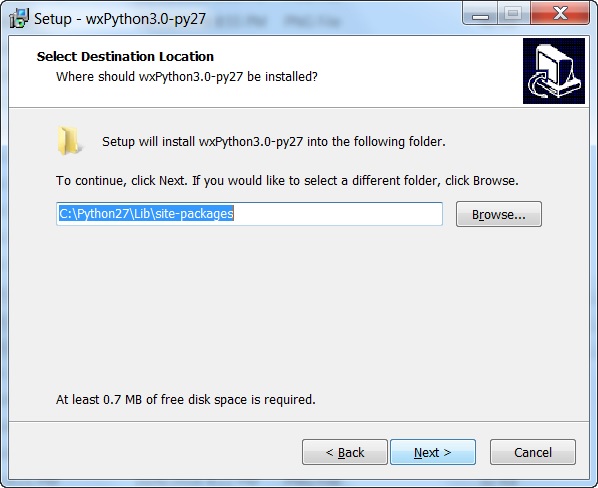
Здесь мы выбираем место, куда будет установлена программа. Установщик достаточно умён, чтобы предложить вам текущее место расположения Python в качестве места установки wxPython. Разумеется, если у вас установлены другие версии Python 2.7, то придётся выбрать путь установки вручную. Когда закончите с этим, просто нажмите кнопку «Далее».
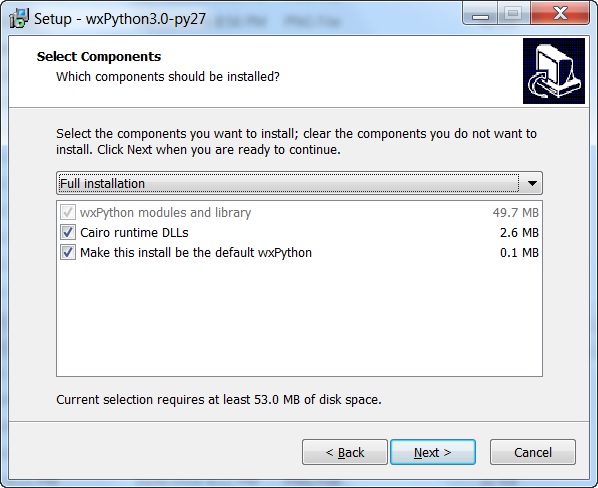
На данном экране вы можете выбрать те, компоненты wxPython, которые хотите установить. Обычно здесь следует согласиться с параметрами, предложенными по умолчанию. После этого, нажмите «Далее» и wxPython будет устанавливаться. Когда установка будет завершена, вы увидите следующее:
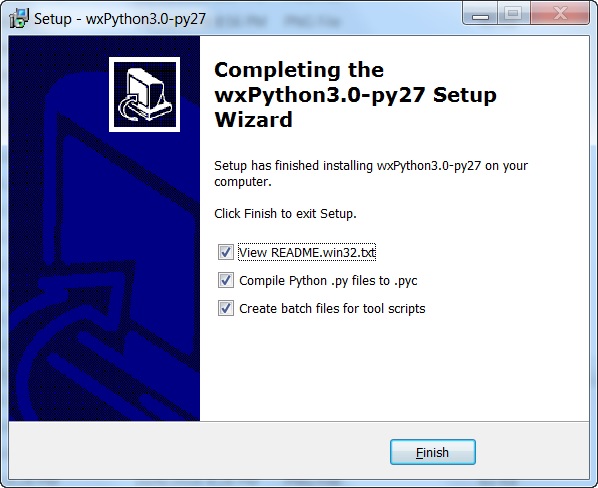
Это последнее диалоговое окно установщика. Я обычно убираю галочки с «README», так как я уже читал его. Если же вы хотите ознакомиться с этим файлом, то просто оставьте галочку. Остальные 2 варианта я оставляю выбранными. Когда вы нажмете «Завершено», вы заметите появление командной строки, в которой будет проносится масса текста. Это означает, что установщик компилирует различные скрипты Python в .pyc-файлы и добавляет пакетные скрипты.
После этого установку wxPython на Windows можно считать завершённой.
Есть вопросы по Python?
На нашем форуме вы можете задать любой вопрос и получить ответ от всего нашего сообщества!
Telegram Чат & Канал
Вступите в наш дружный чат по Python и начните общение с единомышленниками! Станьте частью большого сообщества!
Паблик VK
Одно из самых больших сообществ по Python в социальной сети ВК. Видео уроки и книги для вас!
Попробуйте запустить код, который вы видели в начале статьи. Вы должны будете увидеть что-то похожее на это:
Установка wxPython на Mac
wxPython поддерживает как 32-х так 64-х битную версию Mac OS. Если вдруг у вас установлена старая версия программного обеспечения Mac, вам скорее всего нужно установить версию Carbon для wxPython. Однако, Carbon не поддерживает 64-битную версию операционной системы Mac, поэтому если у вас установлена именно она, рекомендуется устанавливать версию Cocoa. Обратите внимание на то, что установка Classic будет осуществляется посредством dmg-файла.
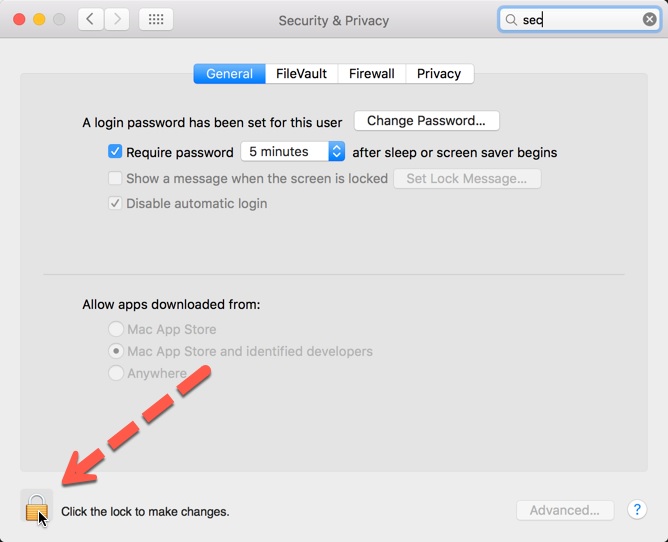
После загрузки подходящей версии, вам нужно будет задать настройки безопасности Mac, позволяющие вам установить wxPython. Перейдите в System Preferences, нажав на яблоко в верхнем левом углу экрана:
Как только вы там окажетесь, найдите Security Settings. В строке поиска вам будут предложены подсказки:
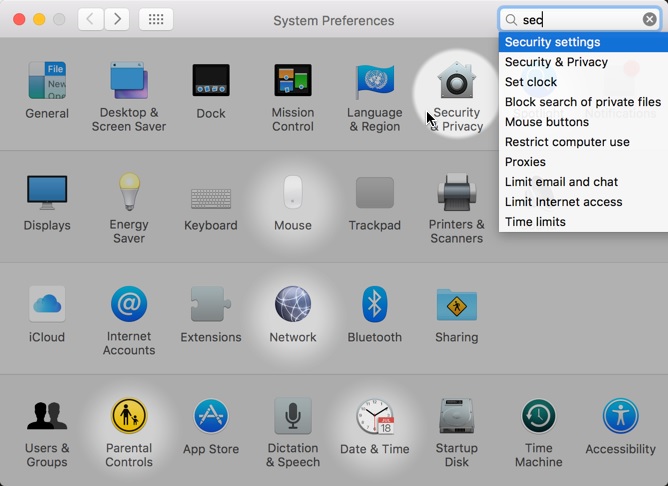
Выберите Security Settings и нажмите на маленький замочек, расположенный в нижнем левом углу диалогового окна.
Как только он разблокируется, замените параметр, отвечающий за источник устанавливаемого программного обеспечения, на Anywhere.
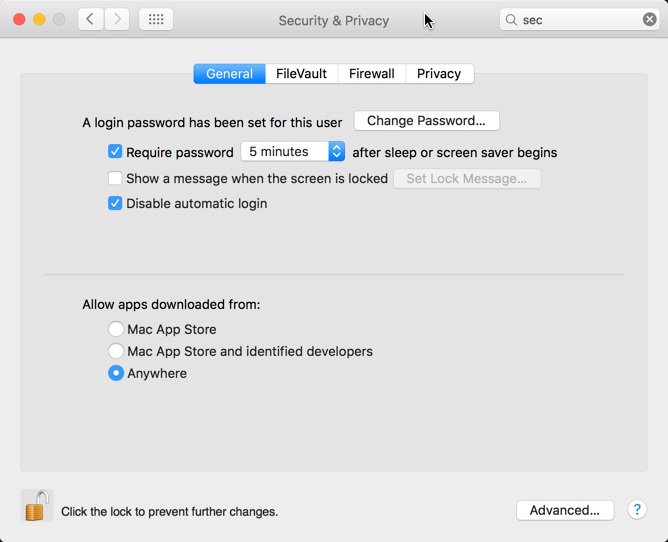
Теперь запустите загруженный вами dmg-установщик. Сразу же после установки wxPython верните настройки безопасности к прежним значениям. Это позволит избежать установки вредоносного программного обеспечения в будущем.
Чтобы проверить правильность установки wxPython, запустите скрипт, расположенный в начале статьи. Вы должны будете увидеть что-то вроде этого:
Установка wxPython на Linux
Установка wxPython на Linux является одним из наиболее сложных процессов на сегодняшний день. Долгое время вы могли использовать сопровождающие пакеты Linux для того, чтобы упаковать wxPython, а затем использовать менеджер пакетов Linux, чтобы установить wxPython.
wxPython уже доступен для установки через pip.
Установка нужных библиотек:
|
apt—get install —y libgtk2.0—dev libgtk—3—dev \ libjpeg—dev libtiff—dev \ libsdl1.2—dev libgstreamer—plugins—base0.10—dev \ libnotify—dev freeglut3 freeglut3—dev libsm—dev \ libwebkitgtk—dev libwebkitgtk—3.0—dev |
Устанавливаем wxPython:
Пакеты Docs и Demo для wxPython
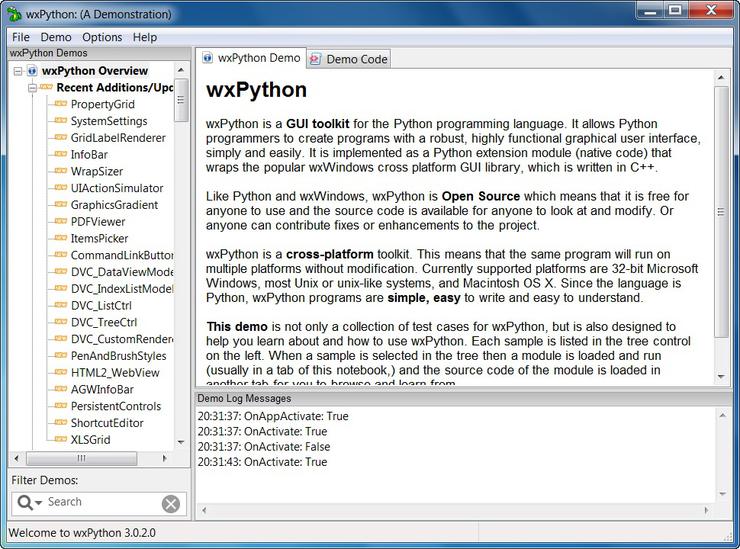
Набор инструментов wxPython GUI также имеет демо-пакет, который вы можете загрузить. Для Windows и Mac существуют установщики. Сам пакет представляет собой коллекцию файлов Python, которые демонстрируют преимущественное большинство виджетов, идущих в комплекте с wxPython. Он также содержит документацию для wxPython и коллекцию программ, написанных с его помощью, среди которых IDE и программа для рисования. Данный пакет абсолютно бесценен в освоении новых виджетов. Я использую его каждый раз, когда хочу протестировать новый виджет и понять его принцип работы. Главным преимуществом является то, что вы можете модифицировать сам демо-пакет даже когда он запущен и наблюдать за тем, как это влияет на виджеты.
Подведем итоги
На данном этапе, вы уже должны довольно чётко понимать, как установить wxPython. В разделе wxPython мы рассмотрели множество различных вариантов, так что трудностей с установкой wxPython Classic на Windows, Mac и Linux у вас возникнуть не должно. Вы также знаете, как установить Phoenix с помощью одной простой команды с использованием pip. Следующий этап – установка wxPython на ваш компьютер и изучение других рецептов на сайте!
Являюсь администратором нескольких порталов по обучению языков программирования Python, Golang и Kotlin. В составе небольшой команды единомышленников, мы занимаемся популяризацией языков программирования на русскоязычную аудиторию. Большая часть статей была адаптирована нами на русский язык и распространяется бесплатно.
E-mail: vasile.buldumac@ati.utm.md
Образование
Universitatea Tehnică a Moldovei (utm.md)
- 2014 — 2018 Технический Университет Молдовы, ИТ-Инженер. Тема дипломной работы «Автоматизация покупки и продажи криптовалюты используя технический анализ»
- 2018 — 2020 Технический Университет Молдовы, Магистр, Магистерская диссертация «Идентификация человека в киберпространстве по фотографии лица»
Project description
Welcome to wxPython’s Project Phoenix! Phoenix is the improved next-generation
wxPython, “better, stronger, faster than he was before.” This new
implementation is focused on improving speed, maintainability and
extensibility. Just like “Classic” wxPython, Phoenix wraps the wxWidgets C++
toolkit and provides access to the user interface portions of the wxWidgets
API, enabling Python applications to have a native GUI on Windows, Macs or
Unix systems, with a native look and feel and requiring very little (if any)
platform specific code.
For more information please refer to the
README file,
the Migration Guide,
or the wxPython API documentation.
Archive files containing a copy of the wxPython documentation, the demo and
samples, and also a set of MSVC .pdb files for Windows are available
here.
The utility tools wxdocs and wxdemo will download the appropriate files with wxget,
(if necessary), unpack them, (if necessary) and launch the appropriate version of
the respective items. (Documents are launched in the default browser and demo is started
with python).
Project details
Download files
Download the file for your platform. If you’re not sure which to choose, learn more about installing packages.
Source Distribution
Built Distributions
File details
Details for the file wxPython-4.2.3.tar.gz.
File metadata
-
Download URL:
wxPython-4.2.3.tar.gz - Upload date:
- Size: 58.9 MB
- Tags: Source
- Uploaded using Trusted Publishing? Yes
- Uploaded via: twine/6.1.0 CPython/3.12.9
File hashes
Hashes for wxPython-4.2.3.tar.gz
| Algorithm | Hash digest | |
|---|---|---|
| SHA256 | 20d6e0c927e27ced85643719bd63e9f7fd501df6e9a8aab1489b039897fd7c01 |
|
| MD5 | d9b4c75202bb5d7d15a104c48b234807 |
|
| BLAKE2b-256 | 4cd94451392d3d6ba45aa23aa77a6f1a9970b43351b956bf61e10fd513a1dc38 |
See more details on using hashes here.
Provenance
The following attestation bundles were made for wxPython-4.2.3.tar.gz:
Publisher:
ci-build.yml on wxWidgets/Phoenix
Attestations:
Values shown here reflect the state when the release was signed and may no longer be current.
-
Statement:
- Statement type:
https://in-toto.io/Statement/v1 - Predicate type:
https://docs.pypi.org/attestations/publish/v1 - Subject name:
wxpython-4.2.3.tar.gz - Subject digest:
20d6e0c927e27ced85643719bd63e9f7fd501df6e9a8aab1489b039897fd7c01 - Sigstore transparency entry: 194698456
- Sigstore integration time:
Source repository:
- Permalink:
wxWidgets/Phoenix@3b5f7988939ba3bd23072d090045dd8b0cf22936 - Branch / Tag:
refs/tags/wxPython-4.2.3 - Owner: https://github.com/wxWidgets
- Access:
public
Publication detail:
- Token Issuer:
https://token.actions.githubusercontent.com - Runner Environment:
github-hosted - Publication workflow:
ci-build.yml@3b5f7988939ba3bd23072d090045dd8b0cf22936 - Trigger Event:
push
- Statement type:
File details
Details for the file wxpython-4.2.3-cp313-cp313-win_amd64.whl.
File metadata
-
Download URL:
wxpython-4.2.3-cp313-cp313-win_amd64.whl - Upload date:
- Size: 16.6 MB
- Tags: CPython 3.13, Windows x86-64
- Uploaded using Trusted Publishing? Yes
- Uploaded via: twine/6.1.0 CPython/3.12.9
File hashes
Hashes for wxpython-4.2.3-cp313-cp313-win_amd64.whl
| Algorithm | Hash digest | |
|---|---|---|
| SHA256 | dac14ea1b04d90b403414f0401704beecae0d3e7143755a20da0ac2cfec02bf9 |
|
| MD5 | 931c5aa7803da7adbce006ec1587226b |
|
| BLAKE2b-256 | 835c1692523ab503b34065add84f184e1b0e4b6af6b5bde6447666a0d192b29d |
See more details on using hashes here.
Provenance
The following attestation bundles were made for wxpython-4.2.3-cp313-cp313-win_amd64.whl:
Publisher:
ci-build.yml on wxWidgets/Phoenix
Attestations:
Values shown here reflect the state when the release was signed and may no longer be current.
-
Statement:
- Statement type:
https://in-toto.io/Statement/v1 - Predicate type:
https://docs.pypi.org/attestations/publish/v1 - Subject name:
wxpython-4.2.3-cp313-cp313-win_amd64.whl - Subject digest:
dac14ea1b04d90b403414f0401704beecae0d3e7143755a20da0ac2cfec02bf9 - Sigstore transparency entry: 194698486
- Sigstore integration time:
Source repository:
- Permalink:
wxWidgets/Phoenix@3b5f7988939ba3bd23072d090045dd8b0cf22936 - Branch / Tag:
refs/tags/wxPython-4.2.3 - Owner: https://github.com/wxWidgets
- Access:
public
Publication detail:
- Token Issuer:
https://token.actions.githubusercontent.com - Runner Environment:
github-hosted - Publication workflow:
ci-build.yml@3b5f7988939ba3bd23072d090045dd8b0cf22936 - Trigger Event:
push
- Statement type:
File details
Details for the file wxpython-4.2.3-cp313-cp313-win32.whl.
File metadata
-
Download URL:
wxpython-4.2.3-cp313-cp313-win32.whl - Upload date:
- Size: 14.5 MB
- Tags: CPython 3.13, Windows x86
- Uploaded using Trusted Publishing? Yes
- Uploaded via: twine/6.1.0 CPython/3.12.9
File hashes
Hashes for wxpython-4.2.3-cp313-cp313-win32.whl
| Algorithm | Hash digest | |
|---|---|---|
| SHA256 | 676aeb82d64d3d3cb94210e882a508bb1013de5fb55917f54f8dd2c1483f9110 |
|
| MD5 | 8f5ba77f8631112265ad9036661a3d2e |
|
| BLAKE2b-256 | 9e42fe653ffb7817d09cbc146bb67ace7fc690bdbe2739bbe472f99d8c51b01c |
See more details on using hashes here.
Provenance
The following attestation bundles were made for wxpython-4.2.3-cp313-cp313-win32.whl:
Publisher:
ci-build.yml on wxWidgets/Phoenix
Attestations:
Values shown here reflect the state when the release was signed and may no longer be current.
-
Statement:
- Statement type:
https://in-toto.io/Statement/v1 - Predicate type:
https://docs.pypi.org/attestations/publish/v1 - Subject name:
wxpython-4.2.3-cp313-cp313-win32.whl - Subject digest:
676aeb82d64d3d3cb94210e882a508bb1013de5fb55917f54f8dd2c1483f9110 - Sigstore transparency entry: 194698463
- Sigstore integration time:
Source repository:
- Permalink:
wxWidgets/Phoenix@3b5f7988939ba3bd23072d090045dd8b0cf22936 - Branch / Tag:
refs/tags/wxPython-4.2.3 - Owner: https://github.com/wxWidgets
- Access:
public
Publication detail:
- Token Issuer:
https://token.actions.githubusercontent.com - Runner Environment:
github-hosted - Publication workflow:
ci-build.yml@3b5f7988939ba3bd23072d090045dd8b0cf22936 - Trigger Event:
push
- Statement type:
File details
Details for the file wxpython-4.2.3-cp313-cp313-macosx_11_0_arm64.whl.
File metadata
-
Download URL:
wxpython-4.2.3-cp313-cp313-macosx_11_0_arm64.whl - Upload date:
- Size: 17.9 MB
- Tags: CPython 3.13, macOS 11.0+ ARM64
- Uploaded using Trusted Publishing? Yes
- Uploaded via: twine/6.1.0 CPython/3.12.9
File hashes
Hashes for wxpython-4.2.3-cp313-cp313-macosx_11_0_arm64.whl
| Algorithm | Hash digest | |
|---|---|---|
| SHA256 | a1a367e4242ae83aedbaf2728f622be8ee7aec4721eb4254fe8cf2d86f893bc5 |
|
| MD5 | dc342ff8ba23b74a92dd9d46eadccdcc |
|
| BLAKE2b-256 | 7db5f65ba11cd6b1de8279085fba287ec869a35eb122743d620a58d65d54a177 |
See more details on using hashes here.
Provenance
The following attestation bundles were made for wxpython-4.2.3-cp313-cp313-macosx_11_0_arm64.whl:
Publisher:
ci-build.yml on wxWidgets/Phoenix
Attestations:
Values shown here reflect the state when the release was signed and may no longer be current.
-
Statement:
- Statement type:
https://in-toto.io/Statement/v1 - Predicate type:
https://docs.pypi.org/attestations/publish/v1 - Subject name:
wxpython-4.2.3-cp313-cp313-macosx_11_0_arm64.whl - Subject digest:
a1a367e4242ae83aedbaf2728f622be8ee7aec4721eb4254fe8cf2d86f893bc5 - Sigstore transparency entry: 194698458
- Sigstore integration time:
Source repository:
- Permalink:
wxWidgets/Phoenix@3b5f7988939ba3bd23072d090045dd8b0cf22936 - Branch / Tag:
refs/tags/wxPython-4.2.3 - Owner: https://github.com/wxWidgets
- Access:
public
Publication detail:
- Token Issuer:
https://token.actions.githubusercontent.com - Runner Environment:
github-hosted - Publication workflow:
ci-build.yml@3b5f7988939ba3bd23072d090045dd8b0cf22936 - Trigger Event:
push
- Statement type:
File details
Details for the file wxpython-4.2.3-cp313-cp313-macosx_10_13_x86_64.whl.
File metadata
-
Download URL:
wxpython-4.2.3-cp313-cp313-macosx_10_13_x86_64.whl - Upload date:
- Size: 18.8 MB
- Tags: CPython 3.13, macOS 10.13+ x86-64
- Uploaded using Trusted Publishing? Yes
- Uploaded via: twine/6.1.0 CPython/3.12.9
File hashes
Hashes for wxpython-4.2.3-cp313-cp313-macosx_10_13_x86_64.whl
| Algorithm | Hash digest | |
|---|---|---|
| SHA256 | 718a1560e341b5c4755fe9e8a431a1c6796a9d742a4bfce7ebd90d8a71ac0dd4 |
|
| MD5 | 70e118c62ac0084a4ca73dd0d28996c5 |
|
| BLAKE2b-256 | afd9da813737843fe4290d63061f8c77d172a3c3f9242a2d3590ecec4ff91d6d |
See more details on using hashes here.
Provenance
The following attestation bundles were made for wxpython-4.2.3-cp313-cp313-macosx_10_13_x86_64.whl:
Publisher:
ci-build.yml on wxWidgets/Phoenix
Attestations:
Values shown here reflect the state when the release was signed and may no longer be current.
-
Statement:
- Statement type:
https://in-toto.io/Statement/v1 - Predicate type:
https://docs.pypi.org/attestations/publish/v1 - Subject name:
wxpython-4.2.3-cp313-cp313-macosx_10_13_x86_64.whl - Subject digest:
718a1560e341b5c4755fe9e8a431a1c6796a9d742a4bfce7ebd90d8a71ac0dd4 - Sigstore transparency entry: 194698461
- Sigstore integration time:
Source repository:
- Permalink:
wxWidgets/Phoenix@3b5f7988939ba3bd23072d090045dd8b0cf22936 - Branch / Tag:
refs/tags/wxPython-4.2.3 - Owner: https://github.com/wxWidgets
- Access:
public
Publication detail:
- Token Issuer:
https://token.actions.githubusercontent.com - Runner Environment:
github-hosted - Publication workflow:
ci-build.yml@3b5f7988939ba3bd23072d090045dd8b0cf22936 - Trigger Event:
push
- Statement type:
File details
Details for the file wxpython-4.2.3-cp312-cp312-win_amd64.whl.
File metadata
-
Download URL:
wxpython-4.2.3-cp312-cp312-win_amd64.whl - Upload date:
- Size: 16.6 MB
- Tags: CPython 3.12, Windows x86-64
- Uploaded using Trusted Publishing? Yes
- Uploaded via: twine/6.1.0 CPython/3.12.9
File hashes
Hashes for wxpython-4.2.3-cp312-cp312-win_amd64.whl
| Algorithm | Hash digest | |
|---|---|---|
| SHA256 | 9231853d8a15b0610a6153cbef65f392164c17f234c65916df499619f7e75bd9 |
|
| MD5 | cbdf9b71d09cd9c33836c89d312fb13e |
|
| BLAKE2b-256 | 1a25ca90e9dc793c328fb97cc011ae92d48337c1a8ef8c54576979840d74226f |
See more details on using hashes here.
Provenance
The following attestation bundles were made for wxpython-4.2.3-cp312-cp312-win_amd64.whl:
Publisher:
ci-build.yml on wxWidgets/Phoenix
Attestations:
Values shown here reflect the state when the release was signed and may no longer be current.
-
Statement:
- Statement type:
https://in-toto.io/Statement/v1 - Predicate type:
https://docs.pypi.org/attestations/publish/v1 - Subject name:
wxpython-4.2.3-cp312-cp312-win_amd64.whl - Subject digest:
9231853d8a15b0610a6153cbef65f392164c17f234c65916df499619f7e75bd9 - Sigstore transparency entry: 194698483
- Sigstore integration time:
Source repository:
- Permalink:
wxWidgets/Phoenix@3b5f7988939ba3bd23072d090045dd8b0cf22936 - Branch / Tag:
refs/tags/wxPython-4.2.3 - Owner: https://github.com/wxWidgets
- Access:
public
Publication detail:
- Token Issuer:
https://token.actions.githubusercontent.com - Runner Environment:
github-hosted - Publication workflow:
ci-build.yml@3b5f7988939ba3bd23072d090045dd8b0cf22936 - Trigger Event:
push
- Statement type:
File details
Details for the file wxpython-4.2.3-cp312-cp312-win32.whl.
File metadata
-
Download URL:
wxpython-4.2.3-cp312-cp312-win32.whl - Upload date:
- Size: 14.5 MB
- Tags: CPython 3.12, Windows x86
- Uploaded using Trusted Publishing? Yes
- Uploaded via: twine/6.1.0 CPython/3.12.9
File hashes
Hashes for wxpython-4.2.3-cp312-cp312-win32.whl
| Algorithm | Hash digest | |
|---|---|---|
| SHA256 | 361db46442376ba1cae4ce9f8fab4081b4d085458f973b4c10b68e04492067ad |
|
| MD5 | a9818a9ff0b4b7e6e4baef17f4765352 |
|
| BLAKE2b-256 | e76340700ad4a43962e31adf754d420d6b2a5e2d50fa5e1041a01ed73b2b0e90 |
See more details on using hashes here.
Provenance
The following attestation bundles were made for wxpython-4.2.3-cp312-cp312-win32.whl:
Publisher:
ci-build.yml on wxWidgets/Phoenix
Attestations:
Values shown here reflect the state when the release was signed and may no longer be current.
-
Statement:
- Statement type:
https://in-toto.io/Statement/v1 - Predicate type:
https://docs.pypi.org/attestations/publish/v1 - Subject name:
wxpython-4.2.3-cp312-cp312-win32.whl - Subject digest:
361db46442376ba1cae4ce9f8fab4081b4d085458f973b4c10b68e04492067ad - Sigstore transparency entry: 194698467
- Sigstore integration time:
Source repository:
- Permalink:
wxWidgets/Phoenix@3b5f7988939ba3bd23072d090045dd8b0cf22936 - Branch / Tag:
refs/tags/wxPython-4.2.3 - Owner: https://github.com/wxWidgets
- Access:
public
Publication detail:
- Token Issuer:
https://token.actions.githubusercontent.com - Runner Environment:
github-hosted - Publication workflow:
ci-build.yml@3b5f7988939ba3bd23072d090045dd8b0cf22936 - Trigger Event:
push
- Statement type:
File details
Details for the file wxpython-4.2.3-cp312-cp312-macosx_11_0_arm64.whl.
File metadata
-
Download URL:
wxpython-4.2.3-cp312-cp312-macosx_11_0_arm64.whl - Upload date:
- Size: 17.9 MB
- Tags: CPython 3.12, macOS 11.0+ ARM64
- Uploaded using Trusted Publishing? Yes
- Uploaded via: twine/6.1.0 CPython/3.12.9
File hashes
Hashes for wxpython-4.2.3-cp312-cp312-macosx_11_0_arm64.whl
| Algorithm | Hash digest | |
|---|---|---|
| SHA256 | a7c95c385895b94b4784a78c06a1626329c3552fcc47a78ab88f0a02ffe1e2db |
|
| MD5 | 5bb1a74e557fac5b294f4037fdc9fa22 |
|
| BLAKE2b-256 | daaa86bf3300c921d81f59ccebcb919ca7516ca7ea2b560eab36ac45e1b9931d |
See more details on using hashes here.
Provenance
The following attestation bundles were made for wxpython-4.2.3-cp312-cp312-macosx_11_0_arm64.whl:
Publisher:
ci-build.yml on wxWidgets/Phoenix
Attestations:
Values shown here reflect the state when the release was signed and may no longer be current.
-
Statement:
- Statement type:
https://in-toto.io/Statement/v1 - Predicate type:
https://docs.pypi.org/attestations/publish/v1 - Subject name:
wxpython-4.2.3-cp312-cp312-macosx_11_0_arm64.whl - Subject digest:
a7c95c385895b94b4784a78c06a1626329c3552fcc47a78ab88f0a02ffe1e2db - Sigstore transparency entry: 194698480
- Sigstore integration time:
Source repository:
- Permalink:
wxWidgets/Phoenix@3b5f7988939ba3bd23072d090045dd8b0cf22936 - Branch / Tag:
refs/tags/wxPython-4.2.3 - Owner: https://github.com/wxWidgets
- Access:
public
Publication detail:
- Token Issuer:
https://token.actions.githubusercontent.com - Runner Environment:
github-hosted - Publication workflow:
ci-build.yml@3b5f7988939ba3bd23072d090045dd8b0cf22936 - Trigger Event:
push
- Statement type:
File details
Details for the file wxpython-4.2.3-cp312-cp312-macosx_10_13_x86_64.whl.
File metadata
-
Download URL:
wxpython-4.2.3-cp312-cp312-macosx_10_13_x86_64.whl - Upload date:
- Size: 18.8 MB
- Tags: CPython 3.12, macOS 10.13+ x86-64
- Uploaded using Trusted Publishing? Yes
- Uploaded via: twine/6.1.0 CPython/3.12.9
File hashes
Hashes for wxpython-4.2.3-cp312-cp312-macosx_10_13_x86_64.whl
| Algorithm | Hash digest | |
|---|---|---|
| SHA256 | c007b153ebf74a8429789a5dcb93c76b3901c531b1413695fdb96f222ec207fc |
|
| MD5 | c960fa7498260ac6b7ad01f8110ad3e2 |
|
| BLAKE2b-256 | 182f550022808bcf4cfafc94021d3f77fec2ceccfc21d37cc2ce465027802f87 |
See more details on using hashes here.
Provenance
The following attestation bundles were made for wxpython-4.2.3-cp312-cp312-macosx_10_13_x86_64.whl:
Publisher:
ci-build.yml on wxWidgets/Phoenix
Attestations:
Values shown here reflect the state when the release was signed and may no longer be current.
-
Statement:
- Statement type:
https://in-toto.io/Statement/v1 - Predicate type:
https://docs.pypi.org/attestations/publish/v1 - Subject name:
wxpython-4.2.3-cp312-cp312-macosx_10_13_x86_64.whl - Subject digest:
c007b153ebf74a8429789a5dcb93c76b3901c531b1413695fdb96f222ec207fc - Sigstore transparency entry: 194698481
- Sigstore integration time:
Source repository:
- Permalink:
wxWidgets/Phoenix@3b5f7988939ba3bd23072d090045dd8b0cf22936 - Branch / Tag:
refs/tags/wxPython-4.2.3 - Owner: https://github.com/wxWidgets
- Access:
public
Publication detail:
- Token Issuer:
https://token.actions.githubusercontent.com - Runner Environment:
github-hosted - Publication workflow:
ci-build.yml@3b5f7988939ba3bd23072d090045dd8b0cf22936 - Trigger Event:
push
- Statement type:
File details
Details for the file wxpython-4.2.3-cp311-cp311-win_amd64.whl.
File metadata
-
Download URL:
wxpython-4.2.3-cp311-cp311-win_amd64.whl - Upload date:
- Size: 16.6 MB
- Tags: CPython 3.11, Windows x86-64
- Uploaded using Trusted Publishing? Yes
- Uploaded via: twine/6.1.0 CPython/3.12.9
File hashes
Hashes for wxpython-4.2.3-cp311-cp311-win_amd64.whl
| Algorithm | Hash digest | |
|---|---|---|
| SHA256 | 9040fe6ae7e0fd1b33c7020c392a08f94d205614a24e23b9c7a3a74a9836140d |
|
| MD5 | 0f5cc6237ce0582b256c74e5a98c8e4c |
|
| BLAKE2b-256 | da8abeb38cf4c74a6d8587372aef86c00dde6fec2c8d88292b8e36389aa9dc73 |
See more details on using hashes here.
Provenance
The following attestation bundles were made for wxpython-4.2.3-cp311-cp311-win_amd64.whl:
Publisher:
ci-build.yml on wxWidgets/Phoenix
Attestations:
Values shown here reflect the state when the release was signed and may no longer be current.
-
Statement:
- Statement type:
https://in-toto.io/Statement/v1 - Predicate type:
https://docs.pypi.org/attestations/publish/v1 - Subject name:
wxpython-4.2.3-cp311-cp311-win_amd64.whl - Subject digest:
9040fe6ae7e0fd1b33c7020c392a08f94d205614a24e23b9c7a3a74a9836140d - Sigstore transparency entry: 194698462
- Sigstore integration time:
Source repository:
- Permalink:
wxWidgets/Phoenix@3b5f7988939ba3bd23072d090045dd8b0cf22936 - Branch / Tag:
refs/tags/wxPython-4.2.3 - Owner: https://github.com/wxWidgets
- Access:
public
Publication detail:
- Token Issuer:
https://token.actions.githubusercontent.com - Runner Environment:
github-hosted - Publication workflow:
ci-build.yml@3b5f7988939ba3bd23072d090045dd8b0cf22936 - Trigger Event:
push
- Statement type:
File details
Details for the file wxpython-4.2.3-cp311-cp311-win32.whl.
File metadata
-
Download URL:
wxpython-4.2.3-cp311-cp311-win32.whl - Upload date:
- Size: 14.5 MB
- Tags: CPython 3.11, Windows x86
- Uploaded using Trusted Publishing? Yes
- Uploaded via: twine/6.1.0 CPython/3.12.9
File hashes
Hashes for wxpython-4.2.3-cp311-cp311-win32.whl
| Algorithm | Hash digest | |
|---|---|---|
| SHA256 | 4e5028d7092701ab20b3bef4547d6a7d528d82f12192d72595eeb98b2ebe6364 |
|
| MD5 | 4d2364541fa4ae2f68bb970b7b31c10f |
|
| BLAKE2b-256 | 9a2818fc80c1ae7bdbbb2c03f6bc995b328b3518e5b3cd69a01fa5354b9acfa4 |
See more details on using hashes here.
Provenance
The following attestation bundles were made for wxpython-4.2.3-cp311-cp311-win32.whl:
Publisher:
ci-build.yml on wxWidgets/Phoenix
Attestations:
Values shown here reflect the state when the release was signed and may no longer be current.
-
Statement:
- Statement type:
https://in-toto.io/Statement/v1 - Predicate type:
https://docs.pypi.org/attestations/publish/v1 - Subject name:
wxpython-4.2.3-cp311-cp311-win32.whl - Subject digest:
4e5028d7092701ab20b3bef4547d6a7d528d82f12192d72595eeb98b2ebe6364 - Sigstore transparency entry: 194698469
- Sigstore integration time:
Source repository:
- Permalink:
wxWidgets/Phoenix@3b5f7988939ba3bd23072d090045dd8b0cf22936 - Branch / Tag:
refs/tags/wxPython-4.2.3 - Owner: https://github.com/wxWidgets
- Access:
public
Publication detail:
- Token Issuer:
https://token.actions.githubusercontent.com - Runner Environment:
github-hosted - Publication workflow:
ci-build.yml@3b5f7988939ba3bd23072d090045dd8b0cf22936 - Trigger Event:
push
- Statement type:
File details
Details for the file wxpython-4.2.3-cp311-cp311-macosx_11_0_arm64.whl.
File metadata
-
Download URL:
wxpython-4.2.3-cp311-cp311-macosx_11_0_arm64.whl - Upload date:
- Size: 17.8 MB
- Tags: CPython 3.11, macOS 11.0+ ARM64
- Uploaded using Trusted Publishing? Yes
- Uploaded via: twine/6.1.0 CPython/3.12.9
File hashes
Hashes for wxpython-4.2.3-cp311-cp311-macosx_11_0_arm64.whl
| Algorithm | Hash digest | |
|---|---|---|
| SHA256 | 84a01d90c4514d738a05d9045f62b1f1850fbe8d967b4ae545ba090e74cb1216 |
|
| MD5 | c0f88f365f183cf87eddf6e8dd56a2bd |
|
| BLAKE2b-256 | c343e6dd8277465e03a372127d610dd7223de9126eb42fea381747ea67a91ebd |
See more details on using hashes here.
Provenance
The following attestation bundles were made for wxpython-4.2.3-cp311-cp311-macosx_11_0_arm64.whl:
Publisher:
ci-build.yml on wxWidgets/Phoenix
Attestations:
Values shown here reflect the state when the release was signed and may no longer be current.
-
Statement:
- Statement type:
https://in-toto.io/Statement/v1 - Predicate type:
https://docs.pypi.org/attestations/publish/v1 - Subject name:
wxpython-4.2.3-cp311-cp311-macosx_11_0_arm64.whl - Subject digest:
84a01d90c4514d738a05d9045f62b1f1850fbe8d967b4ae545ba090e74cb1216 - Sigstore transparency entry: 194698459
- Sigstore integration time:
Source repository:
- Permalink:
wxWidgets/Phoenix@3b5f7988939ba3bd23072d090045dd8b0cf22936 - Branch / Tag:
refs/tags/wxPython-4.2.3 - Owner: https://github.com/wxWidgets
- Access:
public
Publication detail:
- Token Issuer:
https://token.actions.githubusercontent.com - Runner Environment:
github-hosted - Publication workflow:
ci-build.yml@3b5f7988939ba3bd23072d090045dd8b0cf22936 - Trigger Event:
push
- Statement type:
File details
Details for the file wxpython-4.2.3-cp311-cp311-macosx_10_10_x86_64.whl.
File metadata
-
Download URL:
wxpython-4.2.3-cp311-cp311-macosx_10_10_x86_64.whl - Upload date:
- Size: 18.7 MB
- Tags: CPython 3.11, macOS 10.10+ x86-64
- Uploaded using Trusted Publishing? Yes
- Uploaded via: twine/6.1.0 CPython/3.12.9
File hashes
Hashes for wxpython-4.2.3-cp311-cp311-macosx_10_10_x86_64.whl
| Algorithm | Hash digest | |
|---|---|---|
| SHA256 | 0a66b0d6fe1d7e8e133fdfdee3cae95f70cc433929f36af08f377e103584f49c |
|
| MD5 | 8183cd6a476c99ef03c737a98a401d4a |
|
| BLAKE2b-256 | d0f9e9c38a0231d993810b8b4bc2f4e12a3162a3eb2d4d51788022f054f60a75 |
See more details on using hashes here.
Provenance
The following attestation bundles were made for wxpython-4.2.3-cp311-cp311-macosx_10_10_x86_64.whl:
Publisher:
ci-build.yml on wxWidgets/Phoenix
Attestations:
Values shown here reflect the state when the release was signed and may no longer be current.
-
Statement:
- Statement type:
https://in-toto.io/Statement/v1 - Predicate type:
https://docs.pypi.org/attestations/publish/v1 - Subject name:
wxpython-4.2.3-cp311-cp311-macosx_10_10_x86_64.whl - Subject digest:
0a66b0d6fe1d7e8e133fdfdee3cae95f70cc433929f36af08f377e103584f49c - Sigstore transparency entry: 194698474
- Sigstore integration time:
Source repository:
- Permalink:
wxWidgets/Phoenix@3b5f7988939ba3bd23072d090045dd8b0cf22936 - Branch / Tag:
refs/tags/wxPython-4.2.3 - Owner: https://github.com/wxWidgets
- Access:
public
Publication detail:
- Token Issuer:
https://token.actions.githubusercontent.com - Runner Environment:
github-hosted - Publication workflow:
ci-build.yml@3b5f7988939ba3bd23072d090045dd8b0cf22936 - Trigger Event:
push
- Statement type:
File details
Details for the file wxpython-4.2.3-cp310-cp310-win_amd64.whl.
File metadata
-
Download URL:
wxpython-4.2.3-cp310-cp310-win_amd64.whl - Upload date:
- Size: 16.8 MB
- Tags: CPython 3.10, Windows x86-64
- Uploaded using Trusted Publishing? Yes
- Uploaded via: twine/6.1.0 CPython/3.12.9
File hashes
Hashes for wxpython-4.2.3-cp310-cp310-win_amd64.whl
| Algorithm | Hash digest | |
|---|---|---|
| SHA256 | 8e729d3110a6ed5f6520371bb3cd5f05f993f6b40d5f80ec6446b8678f2fc2ac |
|
| MD5 | b8231910ef65323151aedda1e15adb97 |
|
| BLAKE2b-256 | c048b7f73096a5912033020d8c9ac1826c4f840724216253e2f95d575b50b62c |
See more details on using hashes here.
Provenance
The following attestation bundles were made for wxpython-4.2.3-cp310-cp310-win_amd64.whl:
Publisher:
ci-build.yml on wxWidgets/Phoenix
Attestations:
Values shown here reflect the state when the release was signed and may no longer be current.
-
Statement:
- Statement type:
https://in-toto.io/Statement/v1 - Predicate type:
https://docs.pypi.org/attestations/publish/v1 - Subject name:
wxpython-4.2.3-cp310-cp310-win_amd64.whl - Subject digest:
8e729d3110a6ed5f6520371bb3cd5f05f993f6b40d5f80ec6446b8678f2fc2ac - Sigstore transparency entry: 194698470
- Sigstore integration time:
Source repository:
- Permalink:
wxWidgets/Phoenix@3b5f7988939ba3bd23072d090045dd8b0cf22936 - Branch / Tag:
refs/tags/wxPython-4.2.3 - Owner: https://github.com/wxWidgets
- Access:
public
Publication detail:
- Token Issuer:
https://token.actions.githubusercontent.com - Runner Environment:
github-hosted - Publication workflow:
ci-build.yml@3b5f7988939ba3bd23072d090045dd8b0cf22936 - Trigger Event:
push
- Statement type:
File details
Details for the file wxpython-4.2.3-cp310-cp310-win32.whl.
File metadata
-
Download URL:
wxpython-4.2.3-cp310-cp310-win32.whl - Upload date:
- Size: 14.8 MB
- Tags: CPython 3.10, Windows x86
- Uploaded using Trusted Publishing? Yes
- Uploaded via: twine/6.1.0 CPython/3.12.9
File hashes
Hashes for wxpython-4.2.3-cp310-cp310-win32.whl
| Algorithm | Hash digest | |
|---|---|---|
| SHA256 | d2cf6a99ec39440298a2c6fbbfd95e386f0ad7d56ae7880553c1ae45709c091a |
|
| MD5 | db74bfbe5e79852cc00ba72bd63757cb |
|
| BLAKE2b-256 | d8a730946564eb241c02bf30c262114f1bf5540fdcc376f46245d2a5703ae9de |
See more details on using hashes here.
Provenance
The following attestation bundles were made for wxpython-4.2.3-cp310-cp310-win32.whl:
Publisher:
ci-build.yml on wxWidgets/Phoenix
Attestations:
Values shown here reflect the state when the release was signed and may no longer be current.
-
Statement:
- Statement type:
https://in-toto.io/Statement/v1 - Predicate type:
https://docs.pypi.org/attestations/publish/v1 - Subject name:
wxpython-4.2.3-cp310-cp310-win32.whl - Subject digest:
d2cf6a99ec39440298a2c6fbbfd95e386f0ad7d56ae7880553c1ae45709c091a - Sigstore transparency entry: 194698477
- Sigstore integration time:
Source repository:
- Permalink:
wxWidgets/Phoenix@3b5f7988939ba3bd23072d090045dd8b0cf22936 - Branch / Tag:
refs/tags/wxPython-4.2.3 - Owner: https://github.com/wxWidgets
- Access:
public
Publication detail:
- Token Issuer:
https://token.actions.githubusercontent.com - Runner Environment:
github-hosted - Publication workflow:
ci-build.yml@3b5f7988939ba3bd23072d090045dd8b0cf22936 - Trigger Event:
push
- Statement type:
File details
Details for the file wxpython-4.2.3-cp310-cp310-macosx_11_0_arm64.whl.
File metadata
-
Download URL:
wxpython-4.2.3-cp310-cp310-macosx_11_0_arm64.whl - Upload date:
- Size: 17.8 MB
- Tags: CPython 3.10, macOS 11.0+ ARM64
- Uploaded using Trusted Publishing? Yes
- Uploaded via: twine/6.1.0 CPython/3.12.9
File hashes
Hashes for wxpython-4.2.3-cp310-cp310-macosx_11_0_arm64.whl
| Algorithm | Hash digest | |
|---|---|---|
| SHA256 | c8ce9223d256b69815ef2c64842fb6a70303ab46d262b601382adff053779ab3 |
|
| MD5 | 2aec93c303d5bd990fe7683ac28d2d87 |
|
| BLAKE2b-256 | a41d2d26018397150818879a00be5aa66371877c39080d65edcf95674e9833ea |
See more details on using hashes here.
Provenance
The following attestation bundles were made for wxpython-4.2.3-cp310-cp310-macosx_11_0_arm64.whl:
Publisher:
ci-build.yml on wxWidgets/Phoenix
Attestations:
Values shown here reflect the state when the release was signed and may no longer be current.
-
Statement:
- Statement type:
https://in-toto.io/Statement/v1 - Predicate type:
https://docs.pypi.org/attestations/publish/v1 - Subject name:
wxpython-4.2.3-cp310-cp310-macosx_11_0_arm64.whl - Subject digest:
c8ce9223d256b69815ef2c64842fb6a70303ab46d262b601382adff053779ab3 - Sigstore transparency entry: 194698466
- Sigstore integration time:
Source repository:
- Permalink:
wxWidgets/Phoenix@3b5f7988939ba3bd23072d090045dd8b0cf22936 - Branch / Tag:
refs/tags/wxPython-4.2.3 - Owner: https://github.com/wxWidgets
- Access:
public
Publication detail:
- Token Issuer:
https://token.actions.githubusercontent.com - Runner Environment:
github-hosted - Publication workflow:
ci-build.yml@3b5f7988939ba3bd23072d090045dd8b0cf22936 - Trigger Event:
push
- Statement type:
File details
Details for the file wxpython-4.2.3-cp310-cp310-macosx_10_10_x86_64.whl.
File metadata
-
Download URL:
wxpython-4.2.3-cp310-cp310-macosx_10_10_x86_64.whl - Upload date:
- Size: 18.8 MB
- Tags: CPython 3.10, macOS 10.10+ x86-64
- Uploaded using Trusted Publishing? Yes
- Uploaded via: twine/6.1.0 CPython/3.12.9
File hashes
Hashes for wxpython-4.2.3-cp310-cp310-macosx_10_10_x86_64.whl
| Algorithm | Hash digest | |
|---|---|---|
| SHA256 | 80df5158129577b8b1153b9af28ef18cf738a8f200e87c836a1dfc9ca61f86b7 |
|
| MD5 | 3c591264ebf9c21c9908fa5fe88d141c |
|
| BLAKE2b-256 | d2ee883048ff3c8e83562a160c43a976034efaa7c502138774db9767679d648d |
See more details on using hashes here.
Provenance
The following attestation bundles were made for wxpython-4.2.3-cp310-cp310-macosx_10_10_x86_64.whl:
Publisher:
ci-build.yml on wxWidgets/Phoenix
Attestations:
Values shown here reflect the state when the release was signed and may no longer be current.
-
Statement:
- Statement type:
https://in-toto.io/Statement/v1 - Predicate type:
https://docs.pypi.org/attestations/publish/v1 - Subject name:
wxpython-4.2.3-cp310-cp310-macosx_10_10_x86_64.whl - Subject digest:
80df5158129577b8b1153b9af28ef18cf738a8f200e87c836a1dfc9ca61f86b7 - Sigstore transparency entry: 194698465
- Sigstore integration time:
Source repository:
- Permalink:
wxWidgets/Phoenix@3b5f7988939ba3bd23072d090045dd8b0cf22936 - Branch / Tag:
refs/tags/wxPython-4.2.3 - Owner: https://github.com/wxWidgets
- Access:
public
Publication detail:
- Token Issuer:
https://token.actions.githubusercontent.com - Runner Environment:
github-hosted - Publication workflow:
ci-build.yml@3b5f7988939ba3bd23072d090045dd8b0cf22936 - Trigger Event:
push
- Statement type:
File details
Details for the file wxpython-4.2.3-cp39-cp39-win_amd64.whl.
File metadata
-
Download URL:
wxpython-4.2.3-cp39-cp39-win_amd64.whl - Upload date:
- Size: 16.8 MB
- Tags: CPython 3.9, Windows x86-64
- Uploaded using Trusted Publishing? Yes
- Uploaded via: twine/6.1.0 CPython/3.12.9
File hashes
Hashes for wxpython-4.2.3-cp39-cp39-win_amd64.whl
| Algorithm | Hash digest | |
|---|---|---|
| SHA256 | f9d5a08199adb8e66ac15bdd494b398f5fa53e7a31ecd9dc07f522265d61aa47 |
|
| MD5 | 986f4e50f6900a994d4e4fbda7fffdcf |
|
| BLAKE2b-256 | 3f1a0940baecfb919f31fab688ebc33efe9dbc43c69f5237921e8e1132967f34 |
See more details on using hashes here.
Provenance
The following attestation bundles were made for wxpython-4.2.3-cp39-cp39-win_amd64.whl:
Publisher:
ci-build.yml on wxWidgets/Phoenix
Attestations:
Values shown here reflect the state when the release was signed and may no longer be current.
-
Statement:
- Statement type:
https://in-toto.io/Statement/v1 - Predicate type:
https://docs.pypi.org/attestations/publish/v1 - Subject name:
wxpython-4.2.3-cp39-cp39-win_amd64.whl - Subject digest:
f9d5a08199adb8e66ac15bdd494b398f5fa53e7a31ecd9dc07f522265d61aa47 - Sigstore transparency entry: 194698471
- Sigstore integration time:
Source repository:
- Permalink:
wxWidgets/Phoenix@3b5f7988939ba3bd23072d090045dd8b0cf22936 - Branch / Tag:
refs/tags/wxPython-4.2.3 - Owner: https://github.com/wxWidgets
- Access:
public
Publication detail:
- Token Issuer:
https://token.actions.githubusercontent.com - Runner Environment:
github-hosted - Publication workflow:
ci-build.yml@3b5f7988939ba3bd23072d090045dd8b0cf22936 - Trigger Event:
push
- Statement type:
File details
Details for the file wxpython-4.2.3-cp39-cp39-win32.whl.
File metadata
-
Download URL:
wxpython-4.2.3-cp39-cp39-win32.whl - Upload date:
- Size: 14.8 MB
- Tags: CPython 3.9, Windows x86
- Uploaded using Trusted Publishing? Yes
- Uploaded via: twine/6.1.0 CPython/3.12.9
File hashes
Hashes for wxpython-4.2.3-cp39-cp39-win32.whl
| Algorithm | Hash digest | |
|---|---|---|
| SHA256 | 23afd08aa530a5ede0bcee0526ce185e38e28374ef5c3d2f65f058c1d7204f67 |
|
| MD5 | b08796a35e58ca3e8b614d836a36dbe4 |
|
| BLAKE2b-256 | 3bb3044da69a38ebb3637ed15bb52466f0c601f892822e5fdd5a17c8835ed323 |
See more details on using hashes here.
Provenance
The following attestation bundles were made for wxpython-4.2.3-cp39-cp39-win32.whl:
Publisher:
ci-build.yml on wxWidgets/Phoenix
Attestations:
Values shown here reflect the state when the release was signed and may no longer be current.
-
Statement:
- Statement type:
https://in-toto.io/Statement/v1 - Predicate type:
https://docs.pypi.org/attestations/publish/v1 - Subject name:
wxpython-4.2.3-cp39-cp39-win32.whl - Subject digest:
23afd08aa530a5ede0bcee0526ce185e38e28374ef5c3d2f65f058c1d7204f67 - Sigstore transparency entry: 194698457
- Sigstore integration time:
Source repository:
- Permalink:
wxWidgets/Phoenix@3b5f7988939ba3bd23072d090045dd8b0cf22936 - Branch / Tag:
refs/tags/wxPython-4.2.3 - Owner: https://github.com/wxWidgets
- Access:
public
Publication detail:
- Token Issuer:
https://token.actions.githubusercontent.com - Runner Environment:
github-hosted - Publication workflow:
ci-build.yml@3b5f7988939ba3bd23072d090045dd8b0cf22936 - Trigger Event:
push
- Statement type:
File details
Details for the file wxpython-4.2.3-cp39-cp39-macosx_11_0_arm64.whl.
File metadata
-
Download URL:
wxpython-4.2.3-cp39-cp39-macosx_11_0_arm64.whl - Upload date:
- Size: 17.8 MB
- Tags: CPython 3.9, macOS 11.0+ ARM64
- Uploaded using Trusted Publishing? Yes
- Uploaded via: twine/6.1.0 CPython/3.12.9
File hashes
Hashes for wxpython-4.2.3-cp39-cp39-macosx_11_0_arm64.whl
| Algorithm | Hash digest | |
|---|---|---|
| SHA256 | 0f73aebf960f0ec6961454841deed242c2d852066ab2c538e617c5eabd95bd7b |
|
| MD5 | 50c4713053742e388d5670f0738cefee |
|
| BLAKE2b-256 | 11738e041128db1765aa456a9ff1360dd9cf67f7255156c5cedc11f2bc9e6023 |
See more details on using hashes here.
Provenance
The following attestation bundles were made for wxpython-4.2.3-cp39-cp39-macosx_11_0_arm64.whl:
Publisher:
ci-build.yml on wxWidgets/Phoenix
Attestations:
Values shown here reflect the state when the release was signed and may no longer be current.
-
Statement:
- Statement type:
https://in-toto.io/Statement/v1 - Predicate type:
https://docs.pypi.org/attestations/publish/v1 - Subject name:
wxpython-4.2.3-cp39-cp39-macosx_11_0_arm64.whl - Subject digest:
0f73aebf960f0ec6961454841deed242c2d852066ab2c538e617c5eabd95bd7b - Sigstore transparency entry: 194698472
- Sigstore integration time:
Source repository:
- Permalink:
wxWidgets/Phoenix@3b5f7988939ba3bd23072d090045dd8b0cf22936 - Branch / Tag:
refs/tags/wxPython-4.2.3 - Owner: https://github.com/wxWidgets
- Access:
public
Publication detail:
- Token Issuer:
https://token.actions.githubusercontent.com - Runner Environment:
github-hosted - Publication workflow:
ci-build.yml@3b5f7988939ba3bd23072d090045dd8b0cf22936 - Trigger Event:
push
- Statement type:
File details
Details for the file wxpython-4.2.3-cp39-cp39-macosx_10_10_x86_64.whl.
File metadata
-
Download URL:
wxpython-4.2.3-cp39-cp39-macosx_10_10_x86_64.whl - Upload date:
- Size: 18.8 MB
- Tags: CPython 3.9, macOS 10.10+ x86-64
- Uploaded using Trusted Publishing? Yes
- Uploaded via: twine/6.1.0 CPython/3.12.9
File hashes
Hashes for wxpython-4.2.3-cp39-cp39-macosx_10_10_x86_64.whl
| Algorithm | Hash digest | |
|---|---|---|
| SHA256 | 0b1b5ac5ced6bc46a4bf9041d16b3e35373a5a0c1dddac9384b59c43d06cc294 |
|
| MD5 | 1fa7ce7113b6732be1dcb3ca6d2ba2ba |
|
| BLAKE2b-256 | ca770baf8a17812185c15b47fad9acf19cdb609aacdccc7b7ba744de11797323 |
See more details on using hashes here.
Provenance
The following attestation bundles were made for wxpython-4.2.3-cp39-cp39-macosx_10_10_x86_64.whl:
Publisher:
ci-build.yml on wxWidgets/Phoenix
Attestations:
Values shown here reflect the state when the release was signed and may no longer be current.
-
Statement:
- Statement type:
https://in-toto.io/Statement/v1 - Predicate type:
https://docs.pypi.org/attestations/publish/v1 - Subject name:
wxpython-4.2.3-cp39-cp39-macosx_10_10_x86_64.whl - Subject digest:
0b1b5ac5ced6bc46a4bf9041d16b3e35373a5a0c1dddac9384b59c43d06cc294 - Sigstore transparency entry: 194698485
- Sigstore integration time:
Source repository:
- Permalink:
wxWidgets/Phoenix@3b5f7988939ba3bd23072d090045dd8b0cf22936 - Branch / Tag:
refs/tags/wxPython-4.2.3 - Owner: https://github.com/wxWidgets
- Access:
public
Publication detail:
- Token Issuer:
https://token.actions.githubusercontent.com - Runner Environment:
github-hosted - Publication workflow:
ci-build.yml@3b5f7988939ba3bd23072d090045dd8b0cf22936 - Trigger Event:
push
- Statement type:
Last Updated :
22 Sep, 2021
Python provides wxpython module which is an open-source module that allows us to create a high functional, cross-platform graphical user interface. In this article, we will look into the process of installing the wxpython module on a windows machine.
Pre-requisites:
The only thing that you need for installing the Scrapy module on Windows are:
- Python
- PIP or Conda (depending upon user preference)
Installing wxpython Module on Windows using Conda:
If you want the installation to be done through conda, open up the Anaconda Powershell Prompt and use the below command:
conda install -c anaconda wxpython
Type y for yes when prompted.
You will get a similar message once the installation is complete:
Make sure you follow the best practices for installation using conda as:
- Use an environment for installation rather than in the base environment using the below command:
conda create -n my-env
conda activate my-env
Note: If your preferred method of installation is conda-forge, use the below command:
conda config --env --add channels conda-forge
Verifying wxpython Module Installation on Windows using Conda:
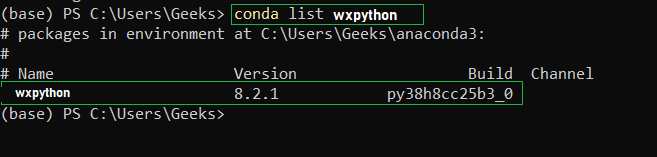
To verify if wxpython Module has been successfully installed in your system run the below command in Anaconda Powershell Prompt:
conda list wxpython
You’ll get the below message if the installation is complete:
Installing wxpython Module on Windows using PIP:
If you want the installation to be done through PIP, open up the Command Prompt and use the below command:
pip install wxpython
You will get a similar message once the installation is complete:

Verifying wxpython Module Installation on Windows using PIP:
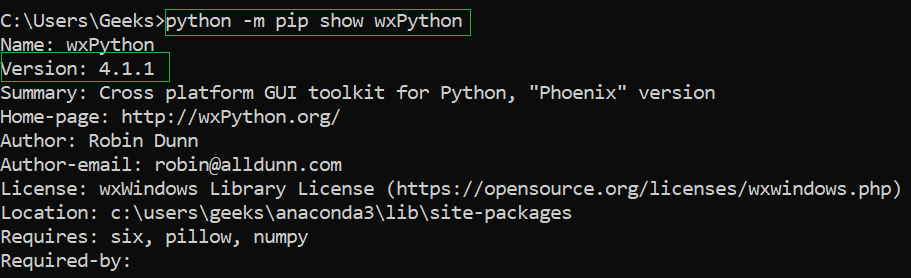
To verify if the wxpython Module has been successfully installed in your system run the below command in Command Prompt:
python -m pip show wxPython
You’ll get the below message if the installation is complete:
Этим занятием
мы с вами открываем серию видеоуроков по модулям языка Python.
Модули – это
встроенные или сторонние разработки, которые существенно расширяют и упрощают
функционал Python.
И начнем с
модуля wxPython, который
позволяет создавать оконный интерфейс наших программ. Конечно, подобных модулей
множество. Например, из наиболее популярных и знакомых мне, следующие:
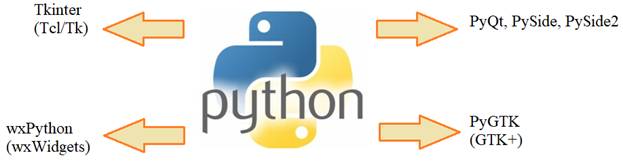
Конечно, все эти
библиотеки кросс-платформенные и могут быть скомпилированы под любую известную
ОС, например, Window, Linux или Mac OS. И первый – это,
конечно, стандартный пакет Tkinter – оболочка над Tcl/tk, поставляемый
вместе с Python. Однако,
внешний вид интерфейса и богатство функционала оставляет желать лучшего. Другая
известная библиотека Qt имеет несколько оболочек: PyQt, PySide и PySide2. Наиболее
старая из них – это PyQt (которая продолжает развиваться) и распространяется
по лицензии GPL, т.е. для
свободного использования в некоммерческих целях. Поэтому позже и появились
библиотеки PySide и PySide2,
распространяемые по лицензии LGPL и их уже можно использовать в
коммерческих приложениях. Следующая библиотека PyGTK – оболочка над GTK+. Основной ее
недостаток в том, что под ОС Windows интерфейс выглядит несколько
чужеродно, неестественно, особенно диалоги для работы с файлами. Под ОС Linux такой проблемы
нет, там к интерфейсу на GTK пользователи уже привыкли. Наконец, wxPython – оболочка над
библиотекой wxWidgets, написанной на
С++. Почему выбор пал именно на нее? Здесь есть ряд важных, на мой взгляд, преимуществ:
-
в
разных операционных системах отображается «родной» интерфейс, т.к. wxWidgets использует
родной API ОС, а не
имитирует свой; -
небольшой
размер в компилируемых приложениях; -
большое
разнообразие виджетов для создания интерфейса; -
без
проблем создаются запускаемые файлы конечного приложения с помощью cx_Freeze (или аналогов).
Конечно,
библиотек по работе с GUI гораздо больше. Если у вас есть опыт
работы с какими-либо из них, то пишите в комментариях об их характеристиках,
это естественным образом дополнит мой скромный обзор.
Далее, я буду
рассказывать о порядке работы с wxPython (главный разработчик и идеолог
этого пакета – Robin Dunn). И первое что
нужно сделать – это установить его. Для этого нужно зайти в репозиторий
https://pypi.org
в поиске набрать
wxPython и я здесь
выбрал версию «wxPython 4.0.7.post2», которая использует функционал языка Python 3 (более
младшие версии были написаны для Python 2). Чтобы ее установить, нужно
выполнить команду:
pip
install wxPython
(Если вы не
знаете как устанавливать пакеты, то вот ссылка на это занятие).
Давайте проверим
корректность установки пакета. Напишем вот такую простую программу для
отображения оконного приложения:
import wx

app = wx.App()

frame = wx.Frame(None, title='Hello World!')
frame.Show()

app.MainLoop()
Если при запуске
вы видите вот такое окно, значит wxPython был успешно установлен и готов к
использованию.
Прежде чем
разбираться с текстом программы, давайте вначале я расскажу об общей концепции
построения приложений на основе событий. Смотрите, когда мы распахиваем окно на
весь экран, происходит определенное событие, если мы его минимизируем,
происходит другое событие, если мы просто кликнем мышкой в области окна,
произойдет третье событие, и так далее. То есть интерфейс реагирует на события.
Условно это можно представить в виде вот такой событийной шкалы нашего приложения:
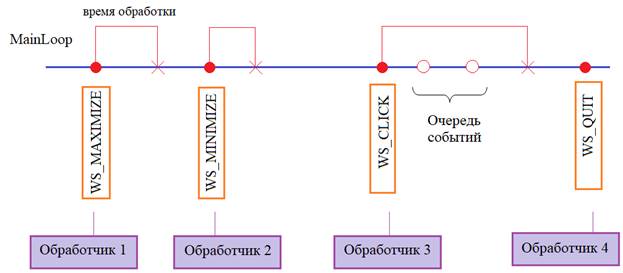
В определенные
моменты возникают различные события (красные точки) и они некоторое время
выполняются (или, как говорят, обрабатываются). Эта обработка занимает
некоторое время. То есть, с каждым событием связан определенный обработчик,
попросту функция, которая и выполняет запрограммированные действия. Время
работы функции – это фактически и есть время обработки события. После обработки
событие пропадает и приложение переходит в режим ожидания следующего события. Когда
оно возникает, снова выполняется его обработка, и, затем, оно также пропадает.
Если в момент обработки события появляются другие события, то они помещаются в
очередь и их обработка (в порядке следования) начнется после завершения
текущего события. Наконец, при возникновении события WM_QUIT приложение
завершает свою работу. Вот все эти операции по отслеживанию и обработке событий
составляют главный цикл приложения, который реализуется вызовом метода:
app.MainLoop()
И обратите
внимание, мы здесь отслеживаем все события приложения, а не только текущего
окна. Программа может содержать несколько окон и события для каждого из них
обрабатываются в этом главном цикле. Вот почему приведенная простейшая
программа использует два разных класса:
-
App – класс общего
функционала приложения; -
Frame – класс
отдельного окна (их может быть несколько).
Соответственно,
в программе мы должны создать экземпляр класса App:
и позже
запускаем для него главный цикл обработки событий:
До запуска,
создаем одно главное окно приложения с помощью класса Frame:
wnd = wx.Frame(None, wx.ID_ANY, "Hello World!")
и отображаем его
на экране:
В конструкторе
класса Frame мы указываем три
параметра:
-
parent – ссылка на
родительское окно (если его нет, то указывается None, тогда окно
становится главным окном приложения); -
id – уникальный
идентификатор виджета (указывая wx.ID_ANY мы говорим,
чтобы он формировался автоматически); -
title
– заголовок
окна.
Вот это
простейшие действия, которые мы должны сделать для построения программы с
графическим пользовательским интерфейсом (GUI) с помощью wxPython.
Конечно,
конструктор класса Frame содержит и другие параметры, полный
синтаксис следующий:
wx.Frame(parent,
id=-1, title=», pos=wx.DefaultPosition, size=wx.DefaultSize,
style=wx.DEFAULT_FRAME_STYLE, name=»frame»)
Названия
параметров говорят сами за себя, единственно, что следует подробнее
расшифровать – это параметр DEFAULT_FRAME_STYLE, который
состоит из набора следующих констант:
wx.DEFAULT_FRAME_STYLE = wx.MINIMIZE_BOX
| wx.MAXIMIZE_BOX | wx.RESIZE_BORDER | wx.SYSTEM_MENU | wx.CAPTION |
wx.CLOSE_BOX | wx.CLIP_CHILDREN
Здесь вот эта
вертикальная черта – операция побитового ИЛИ, с помощью которой и происходит
объединение всех этих свойств. А сами свойства означают следующее:
-
wx.MINIMIZE_BOX
– кнопка для свертывания окна; -
wx.MAXIMIZE_BOX
– кнопка для распахивания окна; -
wx.CLOSE_BOX
– кнопка закрытия окна; -
wx.RESIZE_BORDER
– делаем окно с изменяемым размером; -
wx.SYSTEM_MENU
– разрешаем системное меню; -
wx.CAPTION
– разрешаем заголовок у окна.
Давайте в
качестве примера попробуем создать окно с другим набором свойств, например,
так:
wnd = wx.Frame(None, wx.ID_ANY, "Hello World!", size=(200, 200))
или так:
wnd = wx.Frame(None, wx.ID_ANY, "Hello World!", size=(500, 200),
          style=wx.MAXIMIZE_BOX | wx.RESIZE_BORDER | wx.SYSTEM_MENU | wx.CAPTION | wx.CLOSE_BOX)
Видите, мы здесь
уже не можем минимизировать окно. Далее, уберем wx.CAPTION, получим окно без
верхней рамки. Изменим положение окна:
wnd = wx.Frame(None, wx.ID_ANY, "Hello World!", size=(500, 200), pos = (100,0))
Или так:
wnd = wx.Frame(None, wx.ID_ANY, "Hello World!", size=(500, 200))
wnd.Centre()
Получим окно по
центру. Также доступны такие полезные методы класса Frame:
-
Close()
– закрывает
окно; -
Maximize() – распахивает
окно на весь экран; -
Move(x, y) – располагает
окно со смещением x, y пикселей от
верхнего левого угла экрана; -
SetPosition( pt: wx.Point ) – помещает
окно с начальной точкой pt, например, wnd.SetPosition( wx.Point(100, 500) ); -
SetSize(x, y, width, height) – устанавливает
положение и размер окна.
Разумеется, есть
много других методов класса Frame. Приводить их все и описывать смысла
особого нет, т.к. это уже будет похоже на декларирование справочного материала.
К тому же за более детальной информацией всегда можно обратиться к
первоисточнику:
https://docs.wxpython.org
На этом мы
завершим первое ознакомительное занятие по wxPython. В качестве
задания выполните установку этого пакета и попробуйте реализовать простую
программу с отображением главного окна, как мы это только что с вами делали.
Видео по теме
There are many graphical user interface (GUI) toolkits that you can use with the Python programming language. The big three are Tkinter, wxPython, and PyQt. Each of these toolkits will work with Windows, macOS, and Linux, with PyQt having the additional capability of working on mobile.
A graphical user interface is an application that has buttons, windows, and lots of other widgets that the user can use to interact with your application. A good example would be a web browser. It has buttons, tabs, and a main window where all the content loads.
In this article, you’ll learn how to build a graphical user interface with Python using the wxPython GUI toolkit.
Here are the topics covered:
- Getting Started with wxPython
- Definition of a GUI
- Creating a Skeleton Application
- Creating a Working Application
Let’s start learning!
Getting Started With wxPython
The wxPython GUI toolkit is a Python wrapper around a C++ library called wxWidgets. The initial release of wxPython was in 1998, so wxPython has been around quite a long time. wxPython’s primary difference from other toolkits, such as PyQt or Tkinter, is that wxPython uses the actual widgets on the native platform whenever possible. This makes wxPython applications look native to the operating system that it is running on.
PyQt and Tkinter both draw their widgets themselves, which is why they don’t always match the native widgets, although PyQt is very close.
This is not to say that wxPython does not support custom widgets. In fact, the wxPython toolkit has many custom widgets included with it, along with dozens upon dozens of core widgets. The wxPython downloads page has a section called Extra Files that is worth checking out.
Here, there is a download of the wxPython Demo package. This is a nice little application that demonstrates the vast majority of the widgets that are included with wxPython. The demo allows a developer to view the code in one tab and run it in a second tab. You can even edit and re-run the code in the demo to see how your changes affect the application.
Installing wxPython
You will be using the latest wxPython for this article, which is wxPython 4, also known as the Phoenix release. The wxPython 3 and wxPython 2 versions are built only for Python 2. When Robin Dunn, the primary maintainer of wxPython, created the wxPython 4 release, he deprecated a lot of aliases and cleaned up a lot of code to make wxPython more Pythonic and easier to maintain.
You will want to consult the following links if you are migrating from an older version of wxPython to wxPython 4 (Phoenix):
- Classic vs Phoenix
- wxPython Project Phoenix Migration Guide
The wxPython 4 package is compatible with both Python 2.7 and Python 3.
You can now use pip to install wxPython 4, which was not possible in the legacy versions of wxPython. You can do the following to install it on your machine:
Fortunately, the error messages that pip displays are helpful in figuring out what is missing, and you can use the prerequisites section on the wxPython Github page to help you find the information you need if you want to install wxPython on Linux.
There are some Python wheels available for the most popular Linux versions that you can find in the Extras Linux section with both GTK2 and GTK3 versions. To install one of these wheels, you would use the following command:
Be sure you have modified the command above to match your version of Linux.
Definition of a GUI
As was mentioned in the introduction, a graphical user interface (GUI) is an interface that is drawn on the screen for the user to interact with.
User interfaces have some common components:
- Main window
- Menu
- Toolbar
- Buttons
- Text Entry
- Labels
All of these items are known generically as widgets. There are many other common widgets and many custom widgets that wxPython supports. A developer will take the widgets and arrange them logically on a window for the user to interact with.
Event Loops
A graphical user interface works by waiting for the user to do something. The something is called an event. Events happen when the user types something while your application is in focus or when the user uses their mouse to press a button or other widget.
Underneath the covers, the GUI toolkit is running an infinite loop that is called an event loop. The event loop just waits for events to occur and then acts on those events according to what the developer has coded the application to do. When the application doesn’t catch an event, it effectively ignores that it even happened.
When you are programming a graphical user interface, you will want to keep in mind that you will need to hook up each of the widgets to event handlers so that your application will do something.
There is a special consideration that you need to keep in mind when working with event loops: they can be blocked. When you block an event loop, the GUI will become unresponsive and appear to freeze to the user.
Any process that you launch in a GUI that will take longer than a quarter second should probably be launched as a separate thread or process. This will prevent your GUI from freezing and give the user a better user experience.
The wxPython framework has special thread-safe methods that you can use to communicate back to your application to let it know that the thread is finished or to give it an update.
Let’s create a skeleton application to demonstrate how events work.
Creating a Skeleton Application
An application skeleton in a GUI context is a user interface with widgets that don’t have any event handlers. These are useful for prototyping. You basically just create the GUI and present it to your stakeholders for sign-off before spending a lot of time on the backend logic.
Let’s start by creating a Hello World application with wxPython:
In this example, you have two parts: wx.App and the wx.Frame. The wx.App is wxPython’s application object and is required for running your GUI. The wx.App starts something called a .MainLoop(). This is the event loop that you learned about in the previous section.
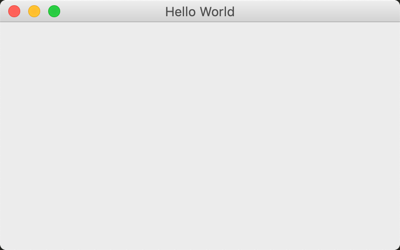
The other piece of the puzzle is wx.Frame, which will create a window for the user to interact with. In this case, you told wxPython that the frame has no parent and that its title is Hello World. Here is what it looks like when you run the code:
By default, a wx.Frame will include minimize, maximize, and exit buttons along the top. You won’t normally create an application in this manner though. Most wxPython code will require you to subclass the wx.Frame and other widgets so that you can get the full power of the toolkit.
Let’s take a moment and rewrite your code as a class:
You can use this code as a template for your application. However, this application doesn’t do very much, so let’s take a moment to learn a little about some of the other widgets you could add.
Widgets
The wxPython toolkit has more than one hundred widgets to choose from. This allows you to create rich applications, but it can also be daunting trying to figure out which widget to use. This is why the wxPython Demo is helpful, as it has a search filter that you can use to help you find the widgets that might apply to your project.
Most GUI applications allow the user to enter some text and press a button. Let’s go ahead and add those widgets:
When you run this code, your application should look like this:
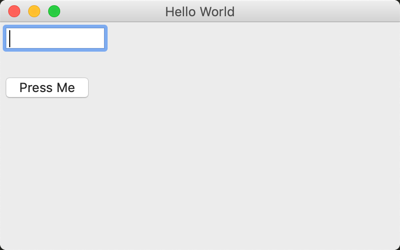
The first widget you need to add is something called wx.Panel. This widget is not required, but recommended. On Windows, you are actually required to use a Panel so that the background color of the frame is the right shade of gray. Tab traversal is disabled without a Panel on Windows.
When you add the panel widget to a frame and the panel is the sole child of the frame, it will automatically expand to fill the frame with itself.
The next step is to add a wx.TextCtrl to the panel. The first argument for almost all widgets is which parent the widget should go onto. In this case, you want the text control and the button to be on top of the panel, so it is the parent you specify.
You also need to tell wxPython where to place the widget, which you can do by passing in a position via the pos parameter. In wxPython, the origin location is (0,0) which is the upper left corner of the parent. So for the text control, you tell wxPython that you want to position its top left corner 5 pixels from the left (x) and 5 pixels from the top (y).
Then you add your button to the panel and give it a label. To prevent the widgets from overlapping, you need to set the y-coordinate to 55 for the button’s position.
Absolute Positioning
When you provide exact coordinates for your widget’s position, the technique that you used is called absolute positioning. Most GUI toolkits provide this capability, but it’s not actually recommended.
As your application becomes more complex, it becomes difficult to keep track of all the widget locations and if you have to move the widgets around. Resetting all those positions becomes a nightmare.
Fortunately all modern GUI toolkits provide a solution for this, which is what you will learn about next.
Sizers (Dynamic Sizing)
The wxPython toolkit includes sizers, which are used for creating dynamic layouts. They manage the placement of your widgets for you and will adjust them when you resize the application window. Other GUI toolkits will refer to sizers as layouts, which is what PyQt does.
Here are the primary types of sizers that you will see used most often:
wx.BoxSizerwx.GridSizerwx.FlexGridSizer
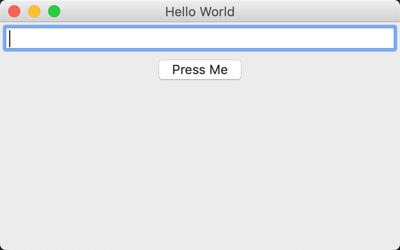
Let’s add a wx.BoxSizer to your example and see if we can make it work a bit more nicely:
Here you create an instance of a wx.BoxSizer and pass it wx.VERTICAL, which is the orientation that widgets are added to the sizer.
In this case, the widgets will be added vertically, which means they will be added one at a time from top to bottom. You may also set a BoxSizer’s orientation to wx.HORIZONTAL. When you do that, the widgets would be added from left to right.
To add a widget to a sizer, you will use .Add(). It accepts up to five arguments:
window(the widget)proportionflagborderuserData
The window argument is the widget to be added while proportion sets how much space relative to other widgets in the sizer this particular widget should take. By default, it is zero, which tells wxPython to leave the widget at its default proportion.
The third argument is flag. You can actually pass in multiple flags if you wish as long as you separate them with a pipe character: |. The wxPython toolkit uses | to add flags using a series of bitwise ORs.
In this example, you add the text control with the wx.ALL and wx.EXPAND flags. The wx.ALL flag tells wxPython that you want to add a border on all sides of the widget while wx.EXPAND makes the widgets expand as much as they can within the sizer.
Finally, you have the border parameter, which tells wxPython how many pixels of border you want around the widget. The userData parameter is only used when you want to do something complex with your sizing of the widget and is actually quite rare to see in practice.
Adding the button to the sizer follows the exact same steps. However, to make things a bit more interesting, I went ahead and switched out the wx.EXPAND flag for wx.CENTER so that the button would be centered on-screen.
When you run this version of the code, your application should look like the following:
If you’d like to learn more about sizers, the wxPython documentation has a nice page on the topic.
Adding an Event
While your application looks more interesting visually, it still doesn’t really do anything. For example, if you press the button, nothing really happens.
Let’s give the button a job:
The widgets in wxPython allow you to attach event bindings to them so that they can respond to certain types of events.
You want the button to do something when the user presses it. You can accomplish this by calling the button’s .Bind() method. .Bind() takes the event you want to bind to, the handler to call when the event happens, an optional source, and a couple of optional ids.
In this example, you bind your button object to the wx.EVT_BUTTON event and tell it to call on_press() when that event gets fired.
An event gets “fired” when the user does the event you have bound to. In this case, the event that you set up is the button press event, wx.EVT_BUTTON.
.on_press() accepts a second argument that you can call event. This is by convention. You could call it something else if you wanted to. However, the event parameter here refers to the fact that when this method is called, its second argument should be an event object of some sort.
Within .on_press(), you can get the text control’s contents by calling its GetValue() method. You then print a string to stdout depending on what the contents of the text control is.
Now that you have the basics out of the way, let’s learn how to create an application that does something useful!
Creating a Working Application
The first step when creating something new is to figure out what you want to create. In this case, I have taken the liberty of making that decision for you. You will learn how to create a MP3 tag editor! The next step when creating something new is to find out what packages can help you accomplish your task.
If you do a Google search for Python mp3 tagging, you will find you have several options:
mp3-taggereyeD3mutagen
I tried out a couple of these and decided that eyeD3 had a nice API that you could use without getting bogged down with the MP3’s ID3 specification. You can install eyeD3 using pip, like this:
When installing this package on macOS, you may need to install libmagic using brew. Windows and Linux users shouldn’t have any issues installing eyeD3.
Designing the User Interface
When it comes to designing an interface, it’s always nice to just kind of sketch out how you think the user interface should look.
You will need to be able to do the following:
- Open up one or more MP3 files
- Display the current MP3 tags
- Edit an MP3 tag
Most user interfaces use a menu or a button for opening files or folders. You can go with a File menu for this. Since you will probably want to see tags for multiple MP3 files, you will need to find a widget that can do this in a nice manner.
Something that is tabular with columns and rows would be ideal because then you can have labeled columns for the MP3 tags. The wxPython toolkit has a few widgets that would work for this, with the top two being the following:
wx.grid.Gridwx.ListCtrl
You should use wx.ListCtrl in this case as the Grid widget is overkill, and frankly it is also quite a bit more complex. Finally, you need a button to use to edit a selected MP3’s tag.
Now that you know what you want, you can draw it up:
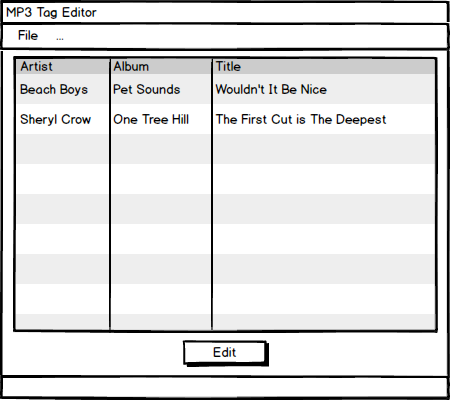
The illustration above gives us an idea of how the application should look. Now that you know what you want to do, it’s time to code!
Creating the User Interface
There are many different approaches when it comes to writing a new application. For example, do you need to follow the Model-View-Controller design pattern? How do you split up the classes? One class per file? There are many such questions, and as you get more experienced with GUI design, you’ll know how you want to answer them.
In your case, you really only need two classes:
- A
wx.Panelclass - A
wx.Frameclass
You could argue for creating a controller type module as well, but for something like this, you really do not need it. A case could also be made for putting each class into its own module, but to keep it compact, you will create a single Python file for all of your code.
Let’s start with imports and the panel class:
Here, you import the eyed3 package, Python’s glob package, and the wx package for your user interface. Next, you subclass wx.Panel and create your user interface. You need a dictionary for storing data about your MP3s, which you can name row_obj_dict.
Then you create a wx.ListCtrl and set it to report mode (wx.LC_REPORT) with a sunken border (wx.BORDER_SUNKEN). The list control can take on a few other forms depending on the style flag that you pass in, but the report flag is the most popular.
To make the ListCtrl have the correct headers, you will need to call .InsertColumn() for each column header. You then supply the index of the column, its label, and how wide in pixels the column should be.
The last step is to add your Edit button, an event handler, and a method. You can create the binding to the event and leave the method that it calls empty for now.
Now you should write the code for the frame:
This class is much simpler than the first one in that all you need to do is set the title of the frame and instantiate the panel class, Mp3Panel. When you are all done, your user interface should look like this:
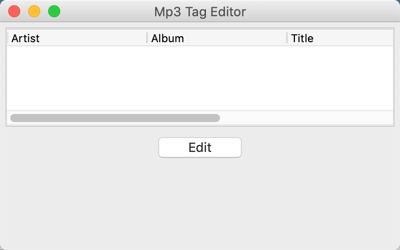
The user interface looks almost right, but you don’t have a File menu. This makes it impossible to add MP3s to the application and edit their tags!
Let’s fix that now.
Make a Functioning Application
The first step in making your application work is to update the application so that it has a File menu because then you can add MP3 files to your creation. Menus are almost always added to the wx.Frame class, so that is the class you need to modify.
Let’s learn how to add a menu bar to our application:
Here, you add a call to .create_menu() within the class’s constructor. Then in .create_menu() itself, you will create a wx.MenuBar instance and a wx.Menu instance.
To add a menu item to a menu, you call the menu instance’s .Append() and pass it the following:
- A unique identifier
- The label for the new menu item
- A help string
Next, you need to add the menu to the menubar, so you will need to call the menubar’s .Append(). It takes the menu instance and the label for menu. This label is a bit odd in that you called it &File instead of File. The ampersand tells wxPython to create a keyboard shortcut of Alt+F to open the File menu using just your keyboard.
To create an event binding, you will need to call self.Bind(), which binds the frame to wx.EVT_MENU. When you use self.Bind() for a menu event, you need to not only tell wxPython which handler to use, but also which source to bind the handler to.
Finally, you must call the frame’s .SetMenuBar() and pass it the menubar instance for it to be shown to the user.
Now that you have the menu added to your frame, let’s go over the menu item’s event handler, which is reproduced again below:
Since you want the user to choose a folder that contains MP3s, you will want to use wxPython’s wx.DirDialog. The wx.DirDialog allows the user to only open directories.
You can set the dialog’s title and various style flags. To show the dialog, you will need to call .ShowModal(). This will cause the dialog to show modally, which means that the user won’t be able to interact with your main application while the dialog is shown.
If the user presses the dialog’s OK button, you can get the user’s path choice via the dialog’s .GetPath(). You will want to pass that path to your panel class, which you can do here by calling the panel’s .update_mp3_listing().
Finally you need to close the dialog. To close a dialog, the recommended method is to call its .Destroy().
Dialogs do have a .Close() method, but that basically just hides the dialog, and it will not destroy itself when you close your application, which can lead to weird issues such as your application now shutting down properly. It’s simpler to call .Destroy() on the dialog to prevent this issue.
Now let’s update your Mp3Panel class. You can start by updating .update_mp3_listing():
Here you set the current directory to the specified folder and then you clear the list control. This keeps the list control fresh and only showing the MP3s that you are currently working on. That also means that you need to re-insert all the columns again.
Next, you’ll want to take the folder that was passed in and use Python’s glob module to search for MP3 files.
Then you can loop over the MP3s and turn them into eyed3 objects. You can do this by calling the .load() of eyed3. Assuming that the MP3s have the appropriate tags already, you can then add the artist, album, and title of the MP3 to the list control.
Interestingly, the method of adding a new row to a list control object is by calling .InsertItem() for the first column and SetItem() for all the subsequent columns.
The last step is to save off your MP3 object to your Python dictionary, row_obj_dict.
Now you need to update the .on_edit() event handler so that you can edit an MP3’s tags:
The first thing you need to do is get the user’s selection by calling the list control’s .GetFocusedItem().
If the user has not selected anything in the list control, it will return -1. Assuming that the user did select something, you will want to extract the MP3 object from your dictionary and open a MP3 tag editor dialog. This will be a custom dialog that you will use to edit the artist, album, and title tags of the MP3 file.
As usual, show the dialog modally. When the dialog closes, the last two lines in .on_edit() will execute. These two lines will update the list control so it displays the current MP3 tag information that the user just edited and destroy the dialog.
Creating an Editing Dialog
The final piece of the puzzle is creating an MP3 tag editing dialog. For brevity, we will skip sketching out this interface as it is a series of rows that contains labels and text controls. The text controls should have the existing tag information pre-populated within them. You can create a label for the text controls by creating instances of wx.StaticText.
When you need to create a custom dialog, the wx.Dialog class is your friend. You can use that to design the editor:
Here you want to start off by sub-classing wx.Dialog and giving it a custom title based on the title of the MP3 that you are editing.
Next you can create the sizer you want to use and the widgets. To make things easier, you can create a helper method called .add_widgets() for adding the wx.StaticText widgets as rows with the text control instances. The only other widget here is the Save button.
Let’s write the add_widgets method next:
add_widgets() takes the label’s text and the text control instance. It then creates a horizontally oriented BoxSizer.
Next you will create an instance of wx.StaticText using the passed-in text for its label parameter. You will also set its size to be 50 pixels wide and the default height is set with a -1. Since you want the label before the text control, you will add the StaticText widget to your BoxSizer first and then add the text control .
Finally, you want to add the horizontal sizer to the top level vertical sizer. By nesting the sizers in each other, you can design complex applications.
Now you will need to create the on_save() event handler so that you can save your changes:
Here you set the tags to the contents of the text controls and then call the eyed3 object’s .save(). Finally, you call the .Close() of the dialog. The reason you call .Close() here instead of .Destroy() is that you already call .Destroy() in the .on_edit() of your panel subclass.
Now your application is complete!
Conclusion
You learned a lot about wxPython in this article. You became familiar with the basics of creating GUI applications using wxPython.
You now know more about the following:
- How to work with some of wxPython’s widgets
- How events work in wxPython
- How absolute positioning compares with sizers
- How to create a skeleton application
Finally you learned how to create a working application, an MP3 tag editor. You can use what you learned in this article to continue to enhance this application or perhaps create an amazing application on your own.
The wxPython GUI toolkit is robust and full of interesting widgets that you can use to build cross-platform applications. You are limited by only your imagination.
Further Reading
If you would like to learn more about wxPython, you can check out some of the following links:
- The Official wxPython website
- Zetcode’s wxPython tutorial
- Mouse Vs Python Blog
For more information on what else you can do with Python, you might want to check out What Can I Do with Python? If you’d like to learn more about Python’s super(), then Supercharge Your Classes With Python super() may be just right for you.
You can also download the code for the MP3 tag editor application that you created in this article if you want to study it more in depth.