

Many Windows users are having an issue with their Windows Update. If they check for updates on their Windows system, they get an error that says “Windows Update cannot currently check for updates, because the service is not running“. And they can’t install updates for their system.
This is an annoying issue. And trying to fix it is just as annoying, because you’ll spend a lot of time reading suggestions on the Internet, and most won’t work.
But don’t worry. The following are some methods that have helped many Windows users fix their error.
Try these fixes
You don’t have to try them all; just work your way down the list until you find the one that works for you.
- Run Windows Update troubleshooter
- Check for malicious software
- Restart your Windows Update associated services
- Clear the SoftwareDistribution folder
- Update your device drivers
Method 1: Run Windows Update troubleshooter
Windows has a built-in troubleshooter that can check and fix issues with Windows Update. You should run it when an error occurs on your Windows Update. To do so:
on Windows 10
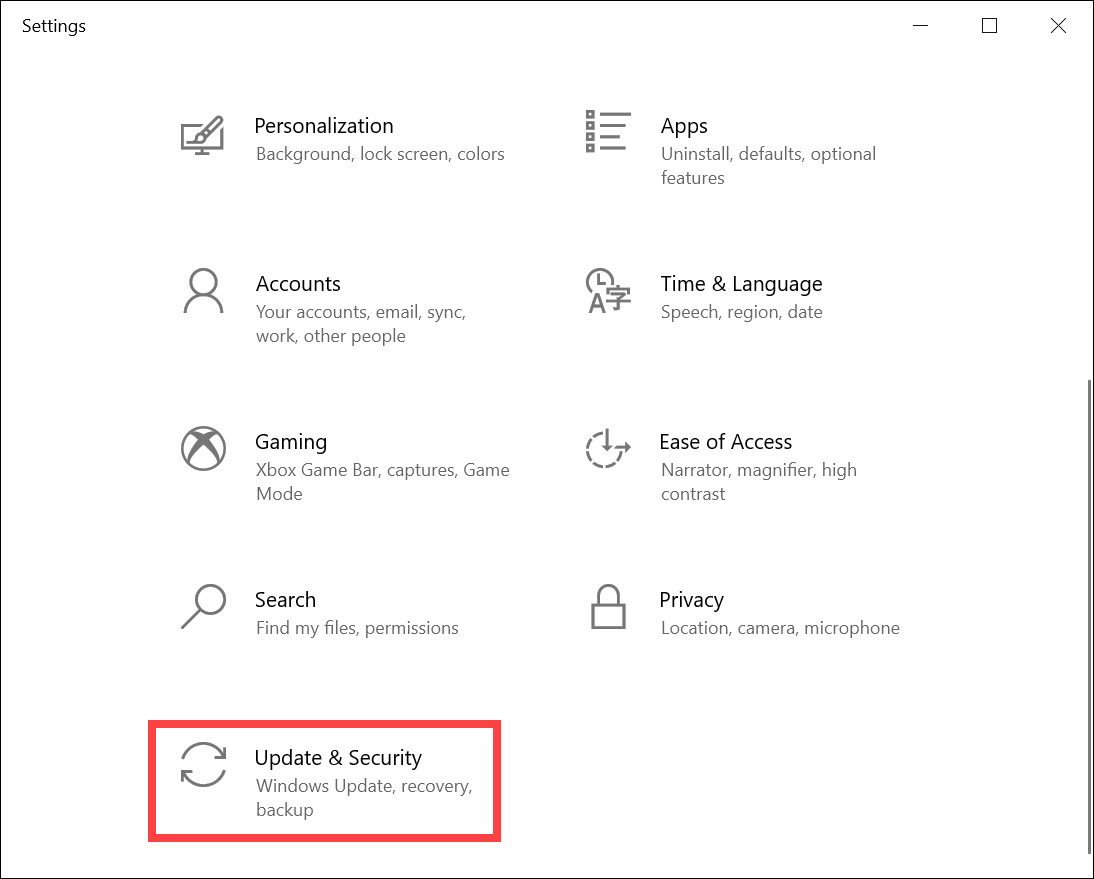
1) On your keyboard, press the Windows logo + I keys simultaneously to open Settings.
2) Select Update & Security.
2) Click Troubleshoot > Additional troubleshooters.
3) Find Windows Update and click Run the troubleshooter.
4) Follow the on-screen instructions to complete the troubleshooting process.
5) Run your Windows Update again and see if your error is fixed.
on Windows 11
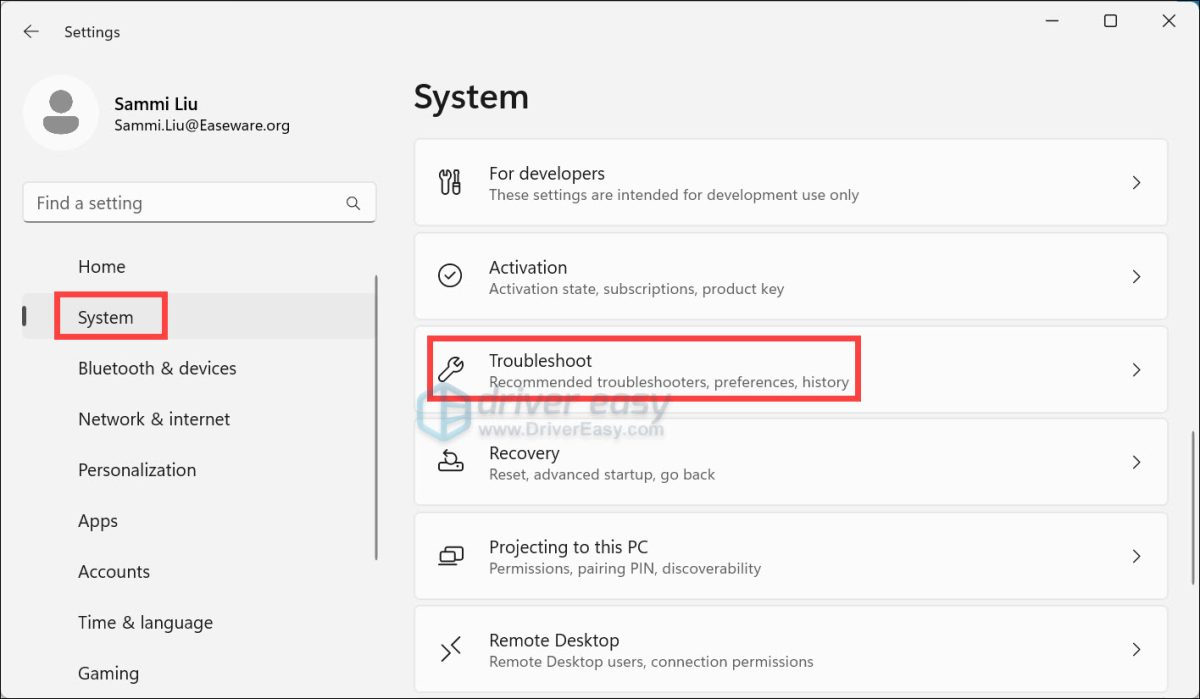
1) On your keyboard, press the Windows logo + I keys simultaneously to open Settings.
2) From the left navigation panel, select System. Click Troubleshoot.
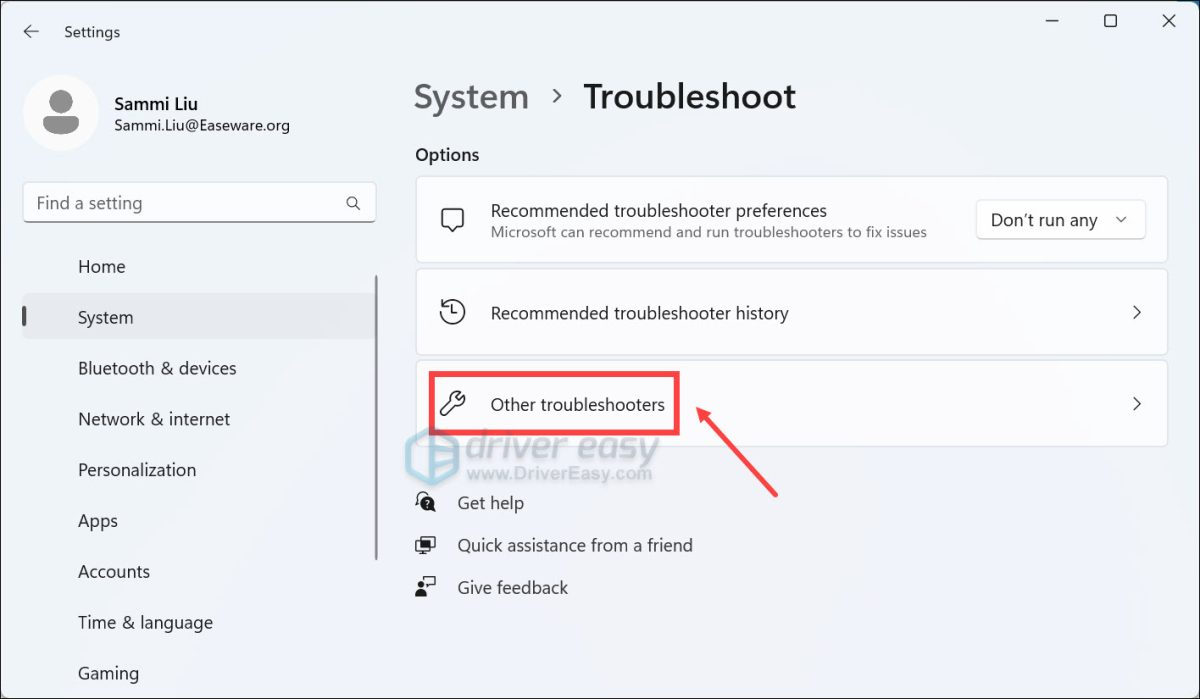
3) Click Other troubleshooters.
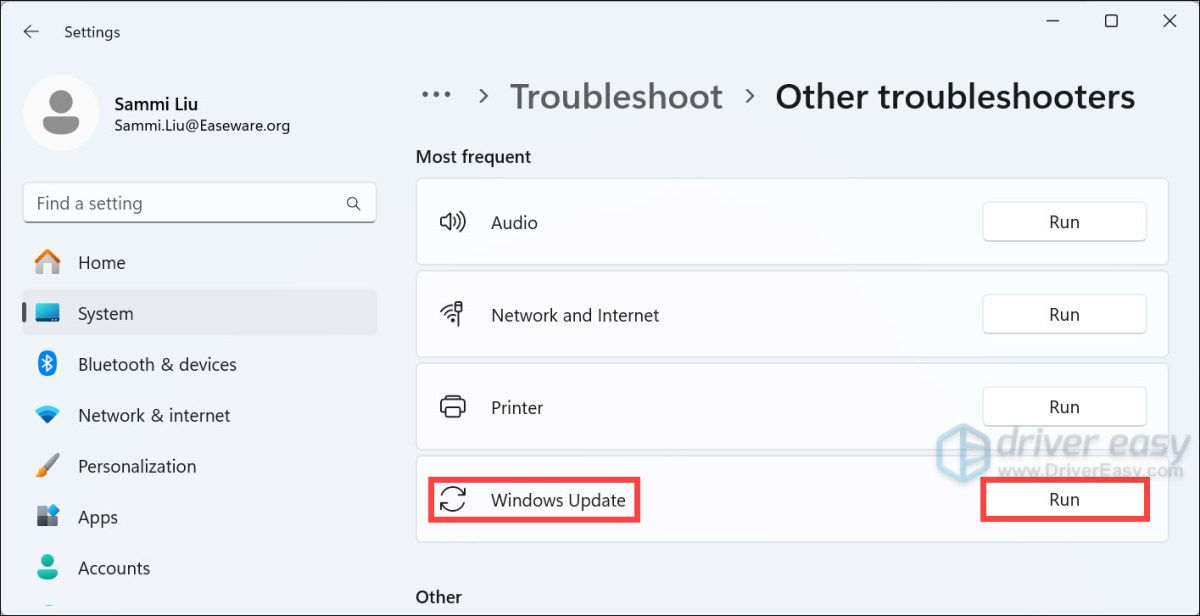
4) Click on the Run button next to Windows Update.
5) Follow the on-screen instructions to complete the troubleshooting process.
6) Run your Windows Update again and see if your error is fixed.
Method 2: Check for malicious software
Your error may occur because of interference from malicious software. You should run a scan on your computer for any malicious program.
You can use the Malicious Software Removal Tool released by Microsoft. Download the tool and run it on your computer. Then follow its instructions to complete the scanning process. If this method works for you, you won’t see the error on your Windows Update again.
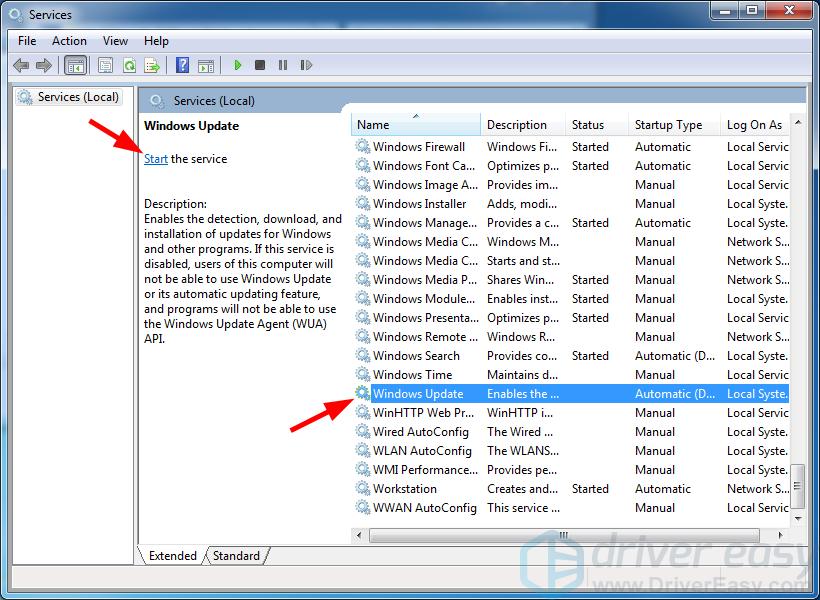
Method 3: Restart your Windows Update associated services
You may get the service not running error because the services associated with your Windows Update are disabled. You should restart those services and see if this fixes your error. To do so:
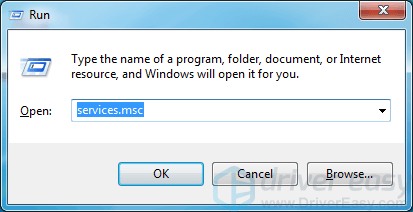
1) Press the Windows logo key and R on your keyboard to invoke the Run box.
2) Type “services.msc” and click OK to open the Services snap-in.
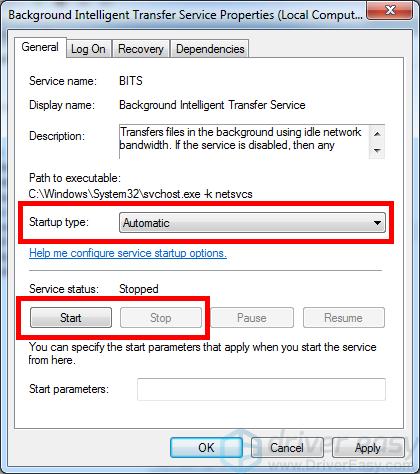
3) Double click Background Intelligent Transfer Service.
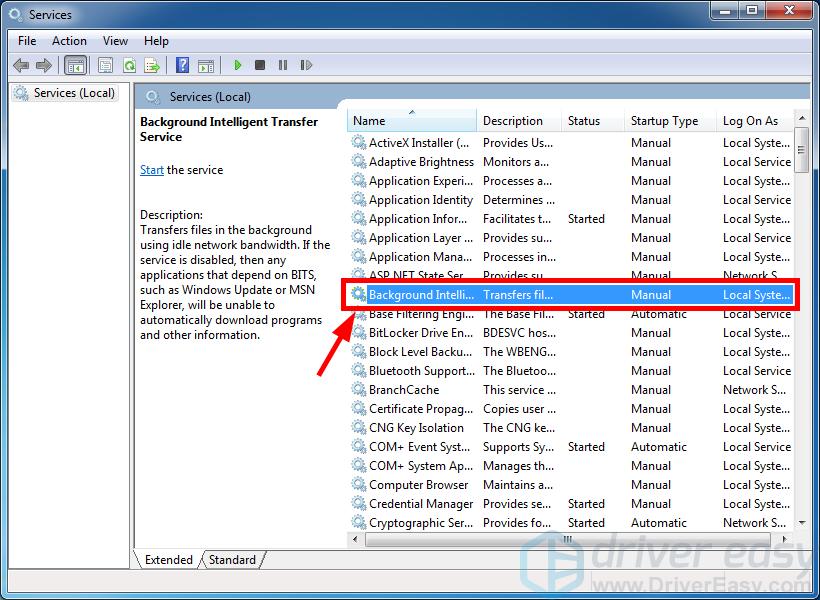
4) Make sure the startup type is set to Automatic. Then click the Start button (if the Start button is in gray, click the Stop button and then click the Start button). Then click OK to close the window.
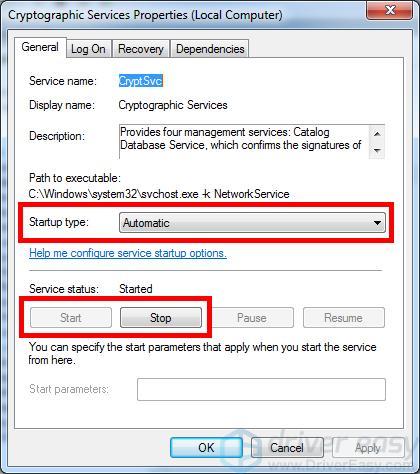
5) Double click Cryptographic Services.
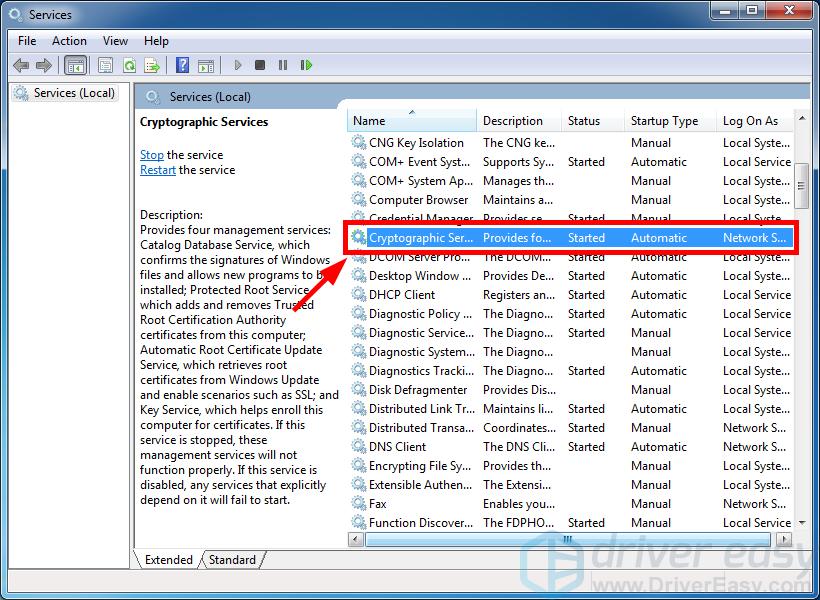
6) Make sure the startup type is set to Automatic. Then click the Start button (if the Start button is in gray, click the Stop button and then click the Start button). Then click OK to close the window.
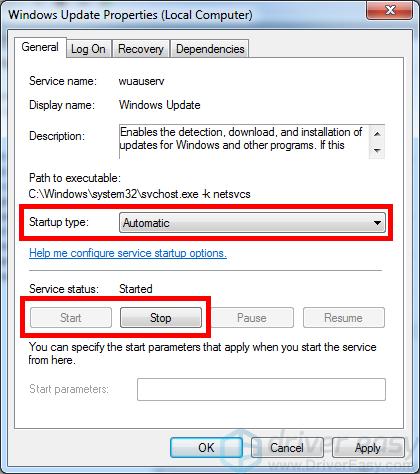
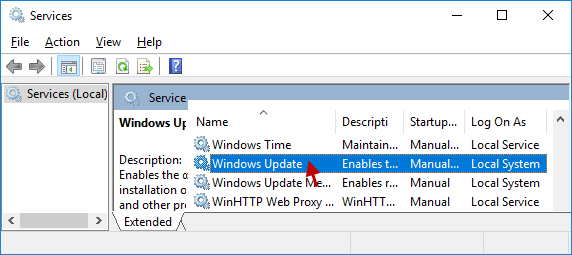
7) Double click Windows Update.
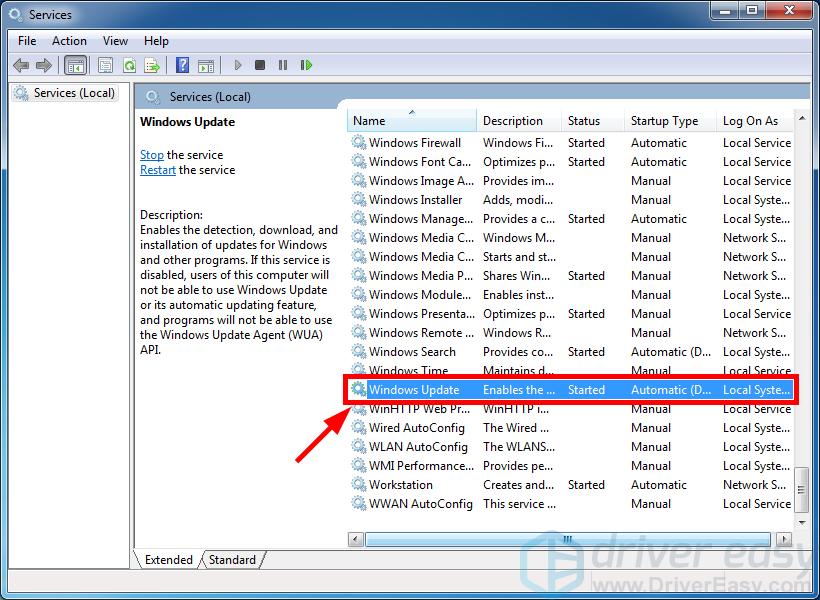
6) Make sure the startup type is set to Automatic. Then click the Start button (if the Start button is in gray, click the Stop button and then click the Start button). Then click OK to close the window.
7) Close the Services snap-in and restart your computer. Then check to see if this resolves your problem.
Method 4: Clear the SoftwareDistribution folder
The SoftwareDistribution folder stores temporary files for Windows Update. You may get the error due to corruption issues with these files. To see if these files are the cause, you should remove all the content of this folder.
1) Press the Windows logo key and R on your keyboard to invoke the Run box.
2) Type “services.msc” and click OK to open the Services snap-in.
3) Click Windows Update and then click Stop (the service).

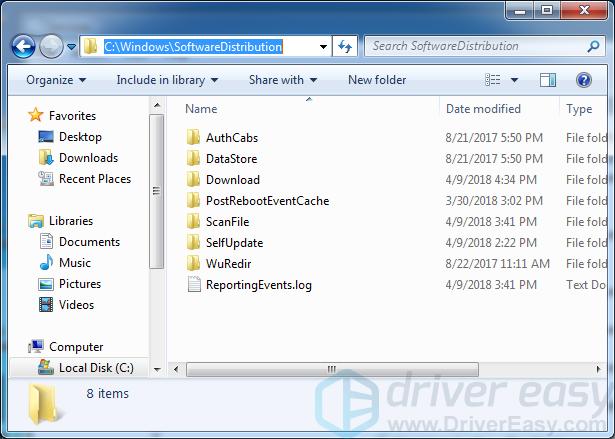
4) Open File Explorer (press the Windows logo key and E on your keyboard at the same time), then go to C:\Windows\SoftwareDistribution and delete all the files and folders there.
5) Restore the Services snap-in. Then click Windows Update and click Start (the service).
6) Restart your computer. Then run Windows Update see if this helps you get rid of the Windows Update service not running error.
Method 5: Update your device drivers
Your error may occur because you’re using a wrong device driver or it’s out of date. To see if that’s the case for you, you should check your computer and update all those outdated or wrong drivers.
Updating drivers can consume a lot of time. But if you want to do it easily and quickly, you can use Driver Easy.
Driver Easy will automatically recognize your system and find the correct drivers for it. You don’t need to know exactly what system your computer is running, you don’t need to risk downloading and installing the wrong driver, and you don’t need to worry about making a mistake when installing.
You can download and install your drivers by using either Free or Pro version of Driver Easy. But with the Pro version it takes only 2 clicks (and you get full support and a 30-day money back guarantee):
1) Download and install Driver Easy.
2) Run Driver Easy and click the Scan Now button. Driver Easy will then scan your computer and detect any problem drivers.

3) Click the Update button next to your each of your devices to download the latest and correct driver for it. You can also click the Update All button at the bottom right to automatically update all outdated or missing drivers on your computer (this requires the Pro version — you will be prompted to upgrade when you click Update All).
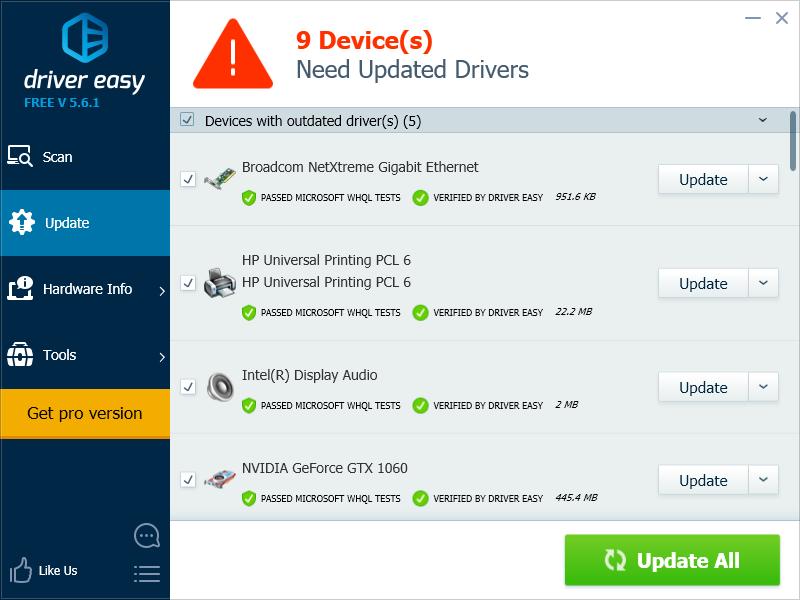
4) Restart your computer. Then run you Windows Update to see if this resolves your problem.
87
87 people found this helpful
Windows Update is the service that keeps Windows 10 and other Microsoft products up-to-date on your computer. Unfortunately, it has a history of issues, with update errors being a common occurrence. But rarely, various reasons—such as incorrectly configured or conflicting settings—can also prevent it from running on your computer altogether.
If you keep receiving an error claiming that the Windows Update service (or a related service) is not running on your computer, the list of fixes that follow should help you get it functioning normally again.

Run Windows Update Troubleshooter
Windows 10 includes a built-in troubleshooter that can automatically diagnose and resolve issues with Windows Update. You must run it first before digging into the rest of the fixes.
1. Open the Start menu and select Settings.

2. Select Update & Security.

3. Select Troubleshoot on the sidebar.
4. Select the option labeled Additional troubleshooters.

5. Select Windows Update > Run the troubleshooter.

Restart Computer
Restarting your PC helps flush the system memory and works as a quick fix for random service-related issues that crop up in Windows 10. So if you haven’t already, try doing that now and follow by running Windows Update manually (open the Start menu and go to Settings > Update & Security > Check for updates).
Re-Configure the Windows Update Service
If Windows Update still fails to run, you must check if it’s set up to run automatically in Windows 10. You must also double-check the settings for other related services.
1. Press Windows + R to open the Run box.
2. Type services.msc and select OK.
3. Right-click Windows Update and select Properties.

4. Set the Startup type to Automatic and select Apply. Follow that by setting Service status to Running.

5. Select OK to save the changes.
6. Repeat steps 3–5 for the following services:
- Background Intelligent Transfer Service
- Cryptographic Services
7. Restart your computer.
Check for Computer Viruses
Harmful software is another reason that prevents the Windows Update service from running in Windows 10.
Using the built-in Windows Security applet should help you to detect and remove malware. But since Windows Update isn’t running, it may not have the most up-to-date antimalware definitions to perform a comprehensive scan of your computer.
So the best way to deal with that is to use a dedicated third-party malware remover such as Malwarebytes. Try running a quick scan, and follow that with a system-wide check for computer viruses.

Disable Third-Party Antimalware Service
Conversely, a third-party firewall or anti-malware utility can end up blocking Windows Update.
To rule that out, try pausing any antivirus software via the Windows 10 system tray. Then, run Windows Update manually.

Reset Windows Update
Windows Update stores downloaded data temporarily in a specifically designated folder labeled SoftwareDistribution. Deleting it might help rule out a corrupt or obsolete update cache from causing issues. But before you do that, you must stop the Windows Update service (assuming that it’s running and hasn’t crashed).
1. Press Windows + R to open the Run box.
2. Type cmd and press Ctrl + Shift + Enter to launch the Command Prompt with administrative privileges.
3. Run the commands as follows to disable the Windows Update service:
net stop wuauserv

4. Run the two commands below to delete the SoftwareDistribution and catroot2 folders:
rmdir %systemroot%SoftwareDistribution /s

You must confirm your action by pressing Y > Enter.
5. Run the following command to restart the Windows Update service:
net start wuauserv
If the steps above didn’t help, try resetting all Windows Update-related components manually. We recommend checking the relevant support article by Microsoft for specific instructions.
Delete Temporary Files
Deleting files from previous operating system updates may also help get the Windows Update service up and running again on your PC.
1. Open the Start menu and select Settings.
2. Select System.
3. Select Storage on the sidebar.
4. Pick the option labeled Temporary files.

5. Check the box next to Windows Update Cleanup.
6. Select Remove files.

Run SFC Scan and DISM Tool
If Windows Update fails to run due to general file corruption or other stability-related issues in Windows 10, you can attempt to fix them using the SFC (System File Checker) and DISM (Deployment Image Servicing and Management) tools.
Run SFC Scan
1. Open an elevated Windows PowerShell console.
2. Type the following command:
sfc /scannow

3. Press Enter.
Run DISM Scan
1. Open an elevated Windows PowerShell console.
2. Type the following command and press Enter:
DISM /Online /Cleanup-Image /CheckHealth

3. If the DISM tool detects any issues, run the two commands as follows:
DISM /Online /Cleanup-Image /ScanHealth
DISM /Online /Cleanup-Image /RestoreHealth
Update Windows 10 Manually
Rather than using Windows Update, you can download and install the latest updates for Windows 10 manually via the Microsoft Update Catalog website. That might help fix the service for subsequent updates.
1. Press Windows + R to open the Run box.
2. Type winver and select OK.
3. Note down the Windows 10 version—e.g., 21H1.

4. Visit the Windows 10 update history website and note down the latest KB (Knowledge Base) ID for your Windows 10 version.

5. Visit the Microsoft Update Catalog website and search for the KB ID.

6. Select and download the latest update for your Windows 10 version.

7. Run the downloaded installer to apply the update.
Optionally, consider installing the latest Servicing Stack Update for your Windows 10 version. That can help fix additional issues with Windows Update. You can search for and download it from the Microsoft Update Catalog website.
Use the Windows Update Assistant
If the Windows Update service still fails, you can use the Windows Update Assistant to force-install the latest feature update for Windows 10.
After downloading the applet to your PC, simply run it and select Update Now.

Roll Back or Reset Windows
If you continue to experience problems, you might want to perform a system restore. That helps roll back any recent changes to the operating system that prompted the issue to occur. You can also try uninstalling the previous Windows update.
Finally, resetting Windows 10 to factory defaults should work as a last-ditch measure to fix the Windows Update service for good.
Related Posts
- How to Fix a “This file does not have an app associated with it” Error on Windows
- How to Fix an Update Error 0x800705b4 on Windows
- How to Resolve “A JavaScript error occured in the main process” Error on Windows
- How to Fix the Network Discovery Is Turned Off Error on Windows
- How to Change Folder Icons in Windows
Readers help support Windows Report. We may get a commission if you buy through our links.
Read our disclosure page to find out how can you help Windows Report sustain the editorial team. Read more
As a veteran Windows user, I can assure you that Windows updates are important for the smooth running and security of your PC. However, there are times when the Windows update won’t work and delivers a prompt saying that the service is not running.
The full error message states: Windows Update cannot currently check for updates, because the service is not running. You may need to restart your computer.
This can prevent you from installing important updates and make your PC vulnerable. Fortunately, as I have also dealt with this issue before, I can help you with a few tips and tricks that I have learned over the years.
How can I fix the Windows Update service not running issue?
Before exploring the sophisticated fixes in this section to make the Windows Update service run, below are some general troubleshooting steps you should try:
- Restart your PC. Read our guide to learn what you can do if Windows won’t restart.
- Disable or remove the third-party antivirus software.
1. Run the Windows update troubleshooter
- Press the Windows key + I to open the Settings app, and select Update & Security.

- Select Troubleshoot in the left pane and click Additional troubleshooters.
- Now, select Windows Update and click Run the troubleshooter.

- Finally, apply any recommended troubleshooting steps.


The Windows Update troubleshooter is one of the best tools for fixing update issues, including the service not running error. After running the troubleshooter, try checking and installing updates again.
2. Disable or remove problematic services
2.1. Enable Clean boot
- Press the Windows key + R, type msconfig, and click OK.
- Click the Services tab at the top, check the Hide all Microsoft services box, and click Disable all.

- Now, choose the Startup tab at the top and click Open Task Manager.
- Right-click each service there and select the Disable option.

- Go back to the System Configuration window, click the Apply button, followed by OK, and restart your PC.
- Now, press the Windows key + R, type service.msc, and click OK.
- Double-click the Windows Update service to open its properties.

- Finally, set its Startup type to Automatic, choose the Start option, and click the Apply button, followed by OK.


The first step to disabling any problematic app or process that could be causing the Windows update service not running issue is to clean boot your PC. If the issue is fixed after restarting your PC, you need to find the service or app that could be causing the problem.
You can do this by enabling the disabled services in batches. One service that users have found to cause this issue is the StopUpdates10Guard service. Below are the steps to follow to disable or remove it.
2.2. Disable or remove faulty service
- Press the Windows key + R, type services, and click OK.
- Double-click the StopUpdates10Guard service to open its properties.
- Now, set its Startup type to Disabled and click the Stop button.
- From here, click the Apply button, followed by OK.
- To remove the service completely, download the Autorun tool.

- Unzip the file, right-click the Autorun 64-bit (for 64-bit system) option, and select Run as administrator.

- Finally, look for any reference to the StopUpdates10Guard service, right-click it, and select Delete.


With this, you should be able to fix the Windows update service not running issue.
- Recent Windows 11 update lets you disable profanity filter in voice typing
- Windows 11 KB5055627 update makes File Explorer more fluid
- A few keyboard settings are moving from Control Panel to Settings app in Windows 11
- Microsoft finally launches the controversial Recall feature after a long delay
- Details of Windows 11 25H2 spotted in the wild; likely to be a smaller update
3. Clear the update cache
- Press the Windows key + R, type services.msc, and click OK.
- Right-click the Background Intelligence Transfer Service and select the Stop option.
- Now, right-click on Windows Update and then click Stop.
- Press the Windows key + E to open File Explorer and navigate to the path below:
C:/Windows/SoftwareDistribution
- Now, delete the contents of the SoftwareDistribution folder.
- Finally, go back to the Services app, right-click the BITS and Windows Update services, and select Start.


Restart your PC after applying the steps above. You can now check if you are still getting the Windows service not running error.
- Recent Windows 11 update lets you disable profanity filter in voice typing
- Windows 11 KB5055627 update makes File Explorer more fluid
Why is the Windows Update service stopped?
Below are some of the factors that can cause the Windows update service not running error:
- Faulty apps and services: One of the main causes of Windows could not start the Windows Update service on the Local Computer prompt is problematic apps. In some cases, it might be your third-party antivirus or service that is running in the background. The solution is to disable or remove the program using one of the best uninstaller software.
- Corrupt update cache: If you get the Access denied prompt while trying to install a Windows update or restart the service, it might be down to a corrupt cache. You need to clear the update cache and restart the needed services again to fix this.
With this, we have come to the end of this guide. You now have everything to fix the Windows update service not running error on your PC. All you need to do is follow the detailed instructions, and everything should be back to normal.
If you are facing other issues like Windows update not showing, check our detailed guide to restore it. We also have a guide dedicated to the 0x8024001e error in Windows Update, so don’t miss it.
Feel free to let us know the solution that helped you solve the problem in the comments below.
Milan Stanojevic
Windows Toubleshooting Expert
Milan has been enthusiastic about technology ever since his childhood days, and this led him to take interest in all PC-related technologies. He’s a PC enthusiast and he spends most of his time learning about computers and technology.
Before joining WindowsReport, he worked as a front-end web developer. Now, he’s one of the Troubleshooting experts in our worldwide team, specializing in Windows errors & software issues.
If you are facing the “Windows Update Service not running” error, and you restart your computer several times and click “Check for updates” again, but you will still get the same issue, that’s probably there may have some bugs in Windows Update, but don’t worry, Windows Update service is not running is a very common problem. In this guide, we’ll discuss how to resolve this problem.
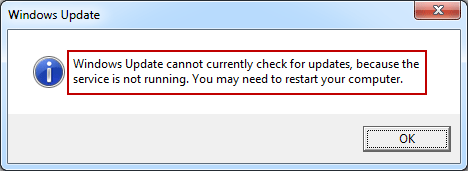
Here are four ways to fix the “Windows Update cannot currently check for updates, because the service is not running. You may need to restart your computer.” issue. By following one of these approaches, you will be able to implement it.
- Way 1: Manually Start the Windows Update Service
- Way 2: Delete the SoftwareDistribution folder
- Way 3: Re-register Windows Update DLL Files
- Way 4: Run the Windows Update troubleshooter
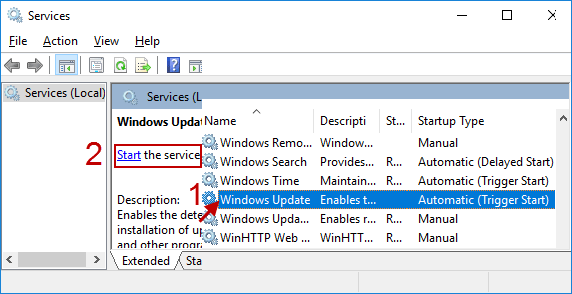
Way 1: Manually Start the Windows Update Service
You received an error saying “Windows Update cannot currently check for updates, because the service is not running. You may need to restart your computer.”, possibly because Windows update service is disabled. You can choose to restart the services by setting the Startup type as Automatic. Follow the below-stated guidelines for accomplishing the process properly.
Step 1: Open Services window in Windows 10.
Launch Run dialog box by pressing Windows logo+R keys on your keyboard. Type services.msc and click OK button.
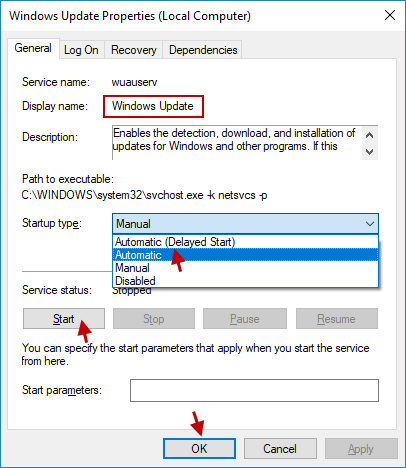
Step 2: Locate and double-click Windows Update in the Services snap-in window.
Step 3: From the new pop-up dialog, set the Startup type as Automatic and click Start button. Then click OK to close the window.
Restart your PC. And then check if you have resolved your problem by doing so. If that doesn’t work out, move on to the next method.
Way 2: Delete the SoftwareDistribution folder
When you get an error “Windows Update cannot currently check for updates, because the service is not running. You may need to restart your computer.”, there may be a corruption problem with the temporary files for Windows updates in the SoftwareDistribution folder. To fix this problem easily, you need to delete all the contents of the folder. If you find some files missing after deletion, it means that the deleted files are the damaged files, and the others will not be affected. To do this:
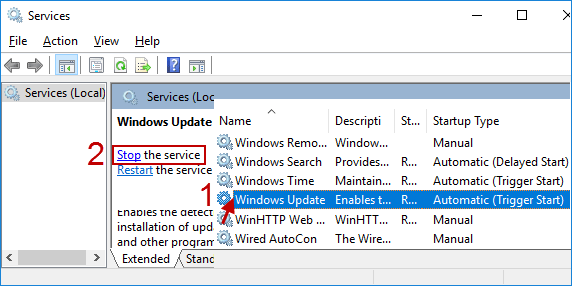
Step 1: Go to the Services snap-in window.
Step 2: In the new dialog, stop the Windows Update service by clicking Windows Update and then click Stop the service.
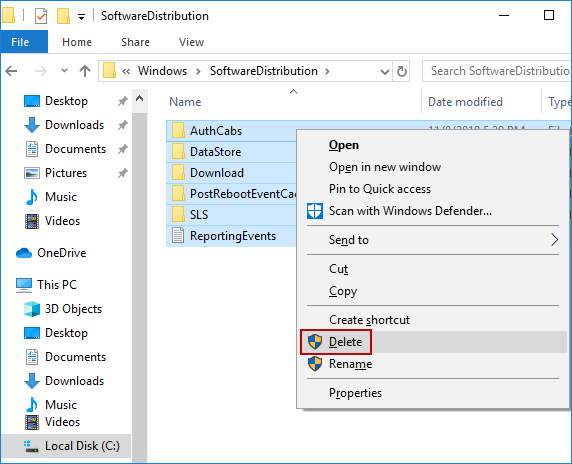
Step 3: Open File Explorer in Windows 10. (Press Windows logo+E keys simultaneously)
Step 4: Look for the folder named like C:\Windows\SoftwareDistribution and delete all the files and folders there.
Step 5: Return to the Services snap-in window. And then click Windows Update and click Start the service.
Step 6: Go back to the File Explorer window, you will see that the some of Windows distribution folders are missing/deleting. They are all temporarily updated folders that have been corrupted.

Restart your computer. Then run the Windows Update to see if this fixes your issue.
Way 3: Re-register Windows Update DLL Files
Windows has a Command Prompt that can resolve a number of errors, including the current one. Here, it makes a big difference. So, when you encounter any problems running Windows Update, you can use it to re-register the Windows update.dll file, which will help fix the problem. All in all, it is a good method and worth considering. Please follow it properly:
Step 1: Open Command Prompt as Administrator in Windows 10.
Step 2: Type the following commands in sequence at the administrative command prompt, press Enter after each command, and after each command is executed, the registration will be succeeded.
- regsvr32 wuapi.dll
- regsvr32 wuaueng.dll
- regsvr32 wups.dll
- regsvr32 wups2.dll
- regsvr32 wuwebv.dll
- regsvr32 wucltux.dll
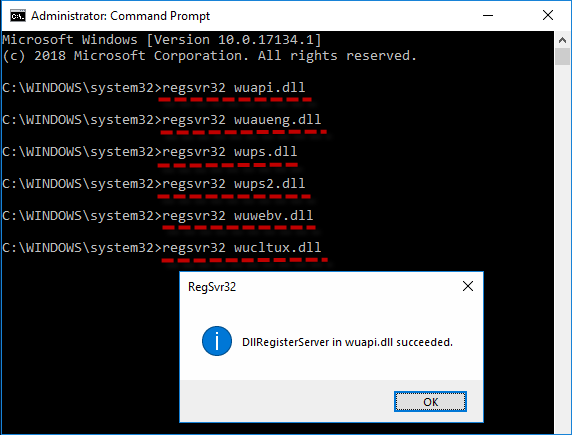
Step 3: After executing all of these commands, exit the command prompt. Restart your PC and check if this makes an available effect.
Way 4: Run the Windows Update troubleshooter
If you see an error “Windows Update cannot currently check for updates, because the service is not running. You may need to restart your computer.”, you can run the troubleshooter, it is a built-in Windows program that helps you detect and resolve problems in Windows Update. Hopefully, this detailed troubleshooting guide below will help resolve this problem. Let’s see how it works.
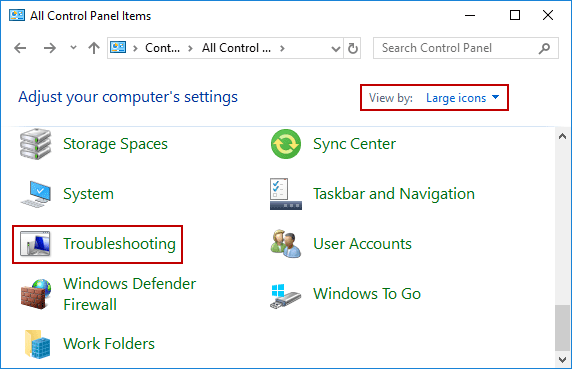
Step 1: Open Control Panel in Windows 10. In Control Panel, set the View by as Large icons, find and choose Troubleshooting.
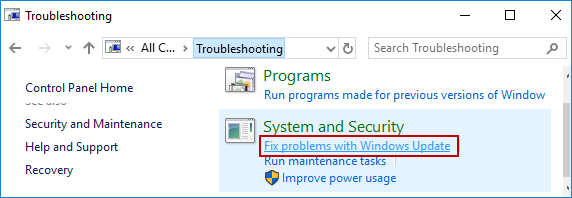
Step 2: Under System and Security section, click Fix problems with Windows Update.
Step 3: Click Advanced from the Windows Update troubleshooting panel.

Step 4: Tick the option which says “Apply repairs automatically“. Then choose Run as administrator to run the troubleshooter.
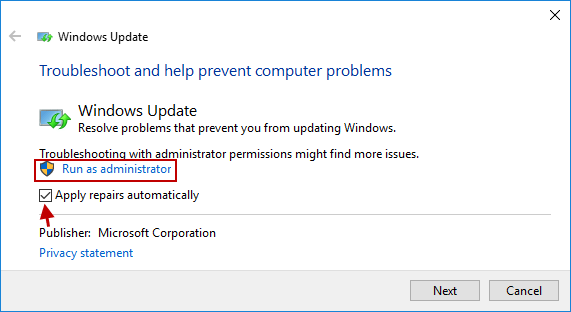
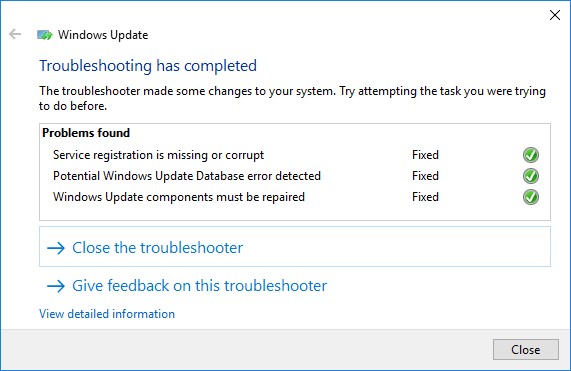
Step 5: Follow the instructions on the screen to complete the troubleshooting process. When the troubleshooting is complete, your problem will be fixed.
Conclusion
The methods outlined in this article have proven useful in fixing “Windows Update Service Not Running” problem on thousands of PC, so I hope this will also work for you and help you solve the problem.
See this video for details: 4 Ways to Fix Windows Update Service Not Running on Windows 10/7 issue
If you’re experiencing an issue where Windows Update keeps disabling itself automatically in Windows 11/10, then you can try the solutions that we will provide in this post to successfully resolve the issue.
A Windows user on Reddit reported as follows:
My windows update is always disabled even when I turn the startup type to automatic. When I turn on the computer it is always disabled. This prevents me from using the Microsoft store. Please Help. I have tried the troubleshooter. When I turn the startup type to automatic and start it, it just runs for a bit before stopping”.
Why does Windows Update keep disabling itself?
This issue of Windows Update keeps disabling itself automatically can happen due to a corrupt file in the Windows Update itself or due to incompatibility issues with any third-party antivirus program installed on your Windows 11/10 computer. The antivirus software may cause issues with other programs, so there is no exception for Windows Update. In addition, If the Windows Update service is not started properly, the issue that Windows Update keeps turning off also may occur.
A possible malware infection could also be auto disabling Windows Update.
If you’re faced with this issue, you can try our recommended solutions in the order presented below to resolve the issue.
- Run antivirus scan
- Run SFC scan
- Disable/Uninstall 3rd party security software (if applicable)
- Troubleshoot in Clean Boot state
- Reset Windows Update components
- Set critical Windows Update components to automatic
- Modify the registry
- Perform Reset This PC, Cloud Reset or In-place Upgrade Repair
Let’s take a look at the description of the process involved concerning each of the listed solutions.
1] Run antivirus scan
This solution requires you to run a full system antivirus scan with Windows Defender or any reputable third-party AV product. You can also perform Windows Defender Offline Scan at boot time or use bootable AntiVirus Rescue Media to clean your computer.
2] Run SFC scan
If you have system file errors, you may encounter this issue. In which case, you can run an SFC scan and see if that helps.
3] Disable/Uninstall 3rd party security software (if applicable)
This largely depends on the security software you have installed. Refer to the instruction manual.
To disable your antivirus software, locate its icon in the notification area or system tray on the taskbar (usually in the lower right corner of the desktop). Right-click the icon and choose the option to disable or exit the program.
If disabling the security software doesn’t fix the issue, you’ll have to remove all third-party antivirus programs from your PC using the dedicated removal tool to remove all files associated with your antivirus program. Using the security software native uninstaller tool will ensure all residual files, registries and dependencies installed deep within the OS, which can be conflicting with Windows Update is removed.
If removing the antivirus fixes this error, you can switch to alternative security software or better still stick to Windows 10 native AV program – Windows Defender.
TIP: If you installed the StopUpdates10 tool. You need to uninstall it.
4] Troubleshoot in Clean Boot state
Chances are you’re dealing with some kind of interference caused by a 3rd-party process of startup service, which in turn causes Windows Update to keep disabling itself automatically. In this case. you can troubleshoot in Clean Boot State and see if the issue will be resolved. Else, continue with the next solution.
5] Reset Windows Update components
In this solution, you can manually reset each Windows Update components to default and see if that helps.
6] Set critical Windows Update components to automatic

Do the following:
- Press Windows key + R to invoke the Run dialog.
- In the Run dialog box, type
cmdand then press CTRL + SHIFT + ENTER to open Command Prompt in admin/elevated mode. - In the command prompt window, type the commands below one after the other and hit Enter after each line:
SC config wuauserv start= auto

SC config bits start= auto

SC config cryptsvc start= auto

SC config trustedinstaller start= auto
After executing the commands, restart your device and see if the issue is resolved or not. If the latter is the case, try the following:
- Launch the Run dialog box.
- In the Run dialog box, type
services.mscand hit Enter to open Services. - In the Services window, scroll and locate the Windows Update service.
- Double-click on the service and make sure Startup type is set to Automatic.
- Now, click on Dependencies Tab.
- Expand By clicking the Plus sign icon.
- Now, note down all the services name from the list.
- In the Service manager window, locate these services and make sure that the startup type of these services is also set to automatic.
If the issue is still unresolved, try the next solution.
7] Modify the Registry
Since this is a registry operation, it is recommended that you back up the registry or create a system restore point as necessary precautionary measures. Once done, you can proceed as follows:
- Open Command Prompt in admin mode.
- In the command prompt window, type or copy and paste in the command below and hit Enter:
reg add “HKEY_LOCAL_MACHINE\SOFTWARE\Microsoft\Windows\CurrentVersion\WindowsUpdate\Auto Update" /v AUOptions /t REG_DWORD /d 0 /f
Once the command executes successfully, input the command below and hit Enter:
sc config wuauserv start= auto
Exit CMD prompt window and restart your device and see if the issue is resolved. If not, proceed with the next solution.
8] Perform Reset This PC, Cloud Reset or In-place Upgrade Repair
At this point, if the issue is still unresolved, it’s most likely due to some kind of system corruption that cannot be resolved conventionally. In this case, the applicable solution here is that you can try Reset This PC, or Cloud Reset to reset every Windows component. You may also try In-place Upgrade Repair and see if that helps.
Any of these solutions should work for you!
Can Windows Update be permanently disabled?
Yes, you can permanently disable or block automatic Windows updates for your Windows 11/10 system. For this, you can open the Group Policy Editor and then access and disable Configure Automatic Updates setting. The path for this setting is as follows:
Computer Configuration > Administrative Templates > Windows Components > Windows Update > Manage end user experience
When automatic updates are disabled for Windows 11/10, you can manually download and install the security and other updates by accessing the Windows Update section using the Settings app.
That’s all!