
С помощью сервера обновлений Windows Server Update Services (WSUS) вы можете развернуть собственную централизованную систему обновления продуктов Microsoft (операционных систем Widows, Office, SQL Server, Exchange и т.д.) на компьютерах и серверах в локальной сети компании. В этой статье мы рассмотрим, как установить и настроить сервер обновлений WSUS в Windows Server 2019/2016/2012R2.
Содержание:
- Установка роли WSUS в Windows Server
- Начальная настройка сервера обновлений WSUS в Windows Server
- Установка консоли администрирования WSUS в Windows 10/11
- Оптимизация производительности WSUS
Как работает WSUS?
Сервер WSUS реализован в виде отдельной роли Windows Server. В общих словах сервис WSUS можно описать так:
- После установки сервер WSUS по расписанию синхронизируется с серверами обновлений Microsoft Update в Интернете и скачивает новые обновления для выбранных продуктов;
- Администратор WSUS выбирает, какие обновления нужно установить на рабочие станции и сервера компании и одобряет их установку;
- Клиенты WSUS в локальной сети скачивают и устанавливают обновления с вашего сервера обновлений согласно настроенным политикам.
Установка роли WSUS в Windows Server
Начиная с Windows Server 2008, сервис WSUS выделен в отдельную роль, которую можно установить через консоль управления сервером или с помощью PowerShell.
Если вы развертываете новый сервер WSUS, рекомендуется сразу устанавливать его на последнем релизе Windows Server 2022 (возможна установка на Windows Serve Core).
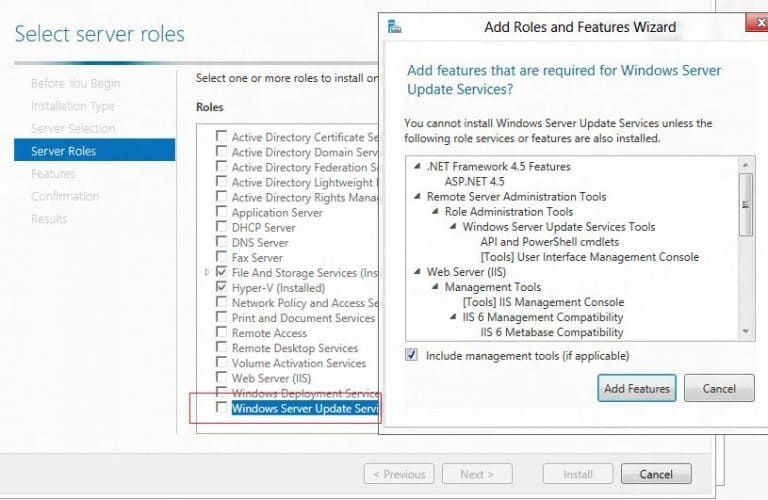
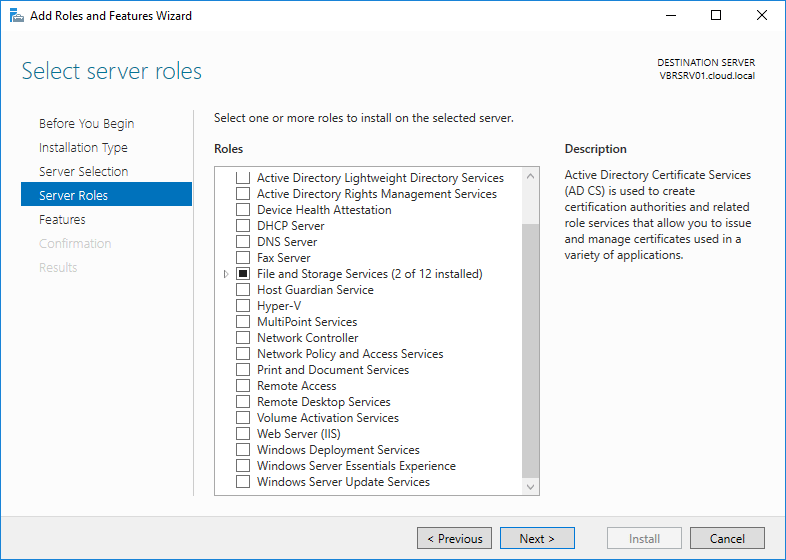
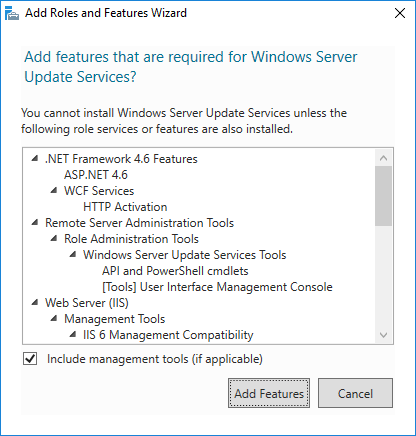
Чтобы установить WSUS, откройте консоль Server Manager и отметьте роль Windows Server Update Services (система автоматически выберет и предложит установить необходимые компоненты веб сервера IIS).

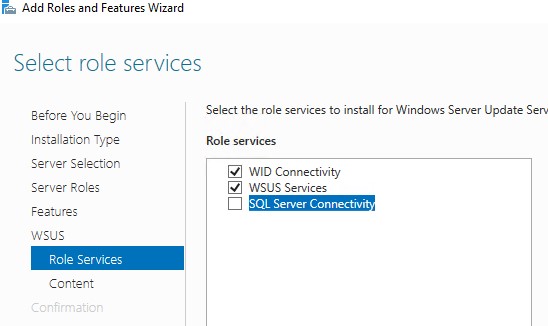
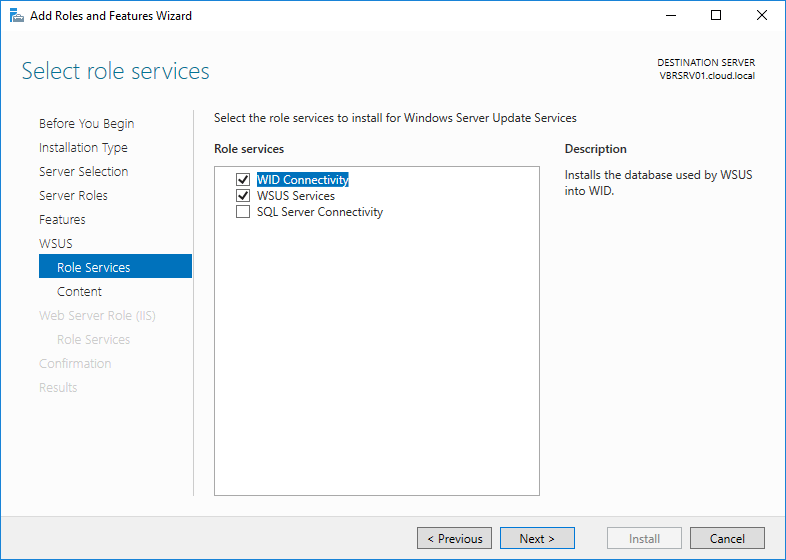
В следующем окне нужно выбрать, какие компоненты WSUS нужно установить. Обязательно отметьте опцию WSUS Services. Две следующие опции зависят от того, какую базу данных вы планируете использовать для WSUS.
Настройки сервера, метаданные обновлений, информация о клиентах WSUS хранятся в базе данных SQL Server. В качестве базы данных WSUS вы можете использовать:
- Windows Internal Database (WID) – встроенную базу данных Windows, опция WID Connectivity (это рекомендуемый и работоспособный вариант даже для больших инфраструктур);
- Отдельную базу Microsoft SQL Server, развернутую на локальном или удаленном сервере. Вы можете использовать редакции MS SQL Enterprise, Standard (требуют лицензирования) или бесплатную Express редакцию. Это опция SQL Server Connectivity.
Внутреннюю базу Windows (Windows Internal Database) рекомендуется использовать, если:
- У вас отсутствуют лицензии MS SQL Server;
- Вы не планируется использовать балансировку нагрузки на WSUS (NLB WSUS);
- При развертывании дочернего сервера WSUS (например, в филиалах). В этом случае на вторичных серверах рекомендуется использовать встроенную базу WSUS.
В бесплатной SQL Server Express Edition максимальный размер БД ограничен 10 Гб. Ограничение Windows Internal Database – 524 Гб. Например, в моей инфраструктуре размер базы данных WSUS на 3000 клиентов составил около 7Гб.
При установке роли WSUS и MS SQL Server на разных серверах есть ряд ограничений:
- SQL сервер с БД WSUS не может быть контроллером домена Active Directory;
- Сервер WSUS нельзя разворачивать на хосте с ролью Remote Desktop Services.
База WID по умолчанию называется SUSDB.mdf и хранится в каталоге windir%\wid\data\. Эта база поддерживает только Windows аутентификацию (но не SQL). Инстанс внутренней (WID) базы данных для WSUS называется server_name\Microsoft##WID.
Базу WID можно администрировать через SQL Server Management Studio (SSMS), если указать в строке подключения
\\.\pipe\MICROSOFT##WID\tsql\query
.
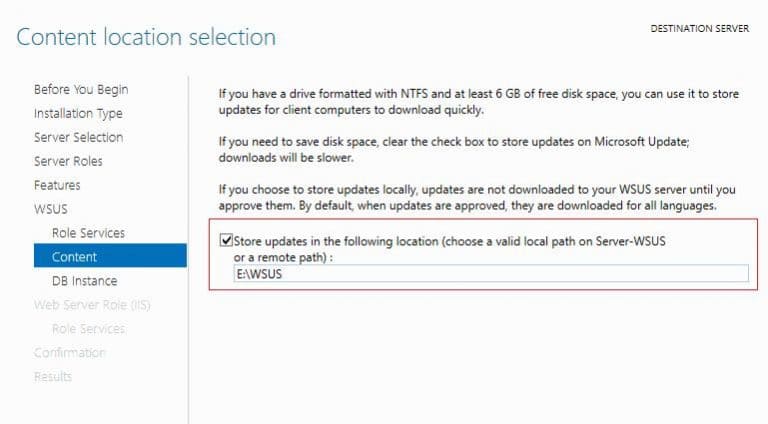
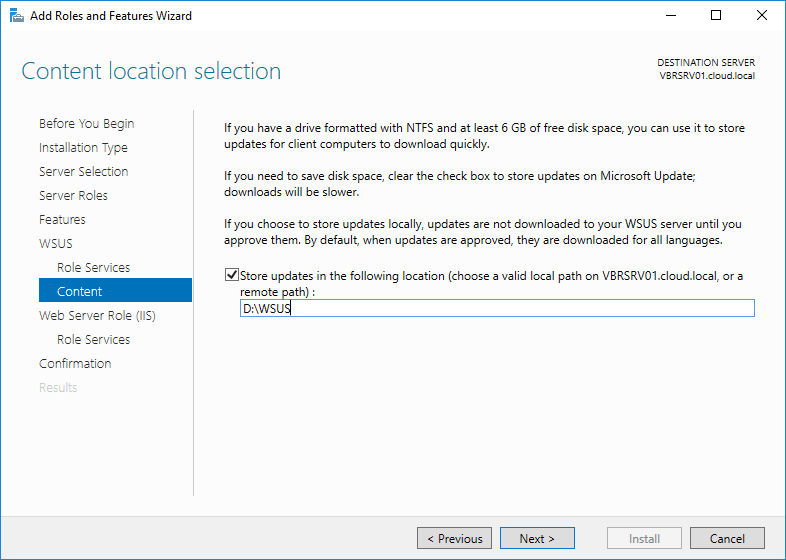
Если вы хотите хранить файлы обновлений локально на сервере WSUS, включите опцию Store updates in the following locations и укажите путь к каталогу. Это может быть папка на локальном диске (рекомендуется использовать отдельный физический или логический том), или сетевой каталог (UNC путь). Обновления скачиваются в указанный каталог только после их одобрения администратором WSUS.
Размер базы данных WSUS сильно зависит от количества продуктов и версий ОС Windows, которое вы планируете обновлять. В большой организации размер файлов обновлений на WSUS сервере может достигать сотни Гб.
Если у вас недостаточно места на дисках для хранения файлов обновлений, отключите эту опцию. В этом случае клиенты WSUS будут получать одобренный файлы обновлений из Интернета (вполне рабочий вариант для небольших сетей).

Также вы можете установить сервер WSUS с внутренней базой данный WID с помощью PowerShell командлета Install-WindowsFeature:
Install-WindowsFeature -Name UpdateServices, UpdateServices-WidDB, UpdateServices-Services, UpdateServices-RSAT, UpdateServices-API, UpdateServices-UI –IncludeManagementTools
Начальная настройка сервера обновлений WSUS в Windows Server
После окончания установки роли WSUS вам нужно выполнить его первоначальную настройку. Откройте Server Manager и выберите Post-Deployment Configuration -> Launch Post-Installation tasks.

Для управления WSUS из командной строки можно использовать консольную утилиту
WsusUtil.exe
. Например, чтобы указать путь к каталогу с файлами обновлений WSUS, выполните:
CD "C:\Program Files\Update Services\Tools"
WsusUtil.exe PostInstall CONTENT_DIR=E:\WSUS
Или, например, вы можете перенастроить ваш WSUS на внешнюю базу данных SQL Server:
wsusutil.exe postinstall SQL_INSTANCE_NAME="SQLSRV1\SQLINSTANCEWSUS" CONTENT_DIR=E:\WSUS_Content
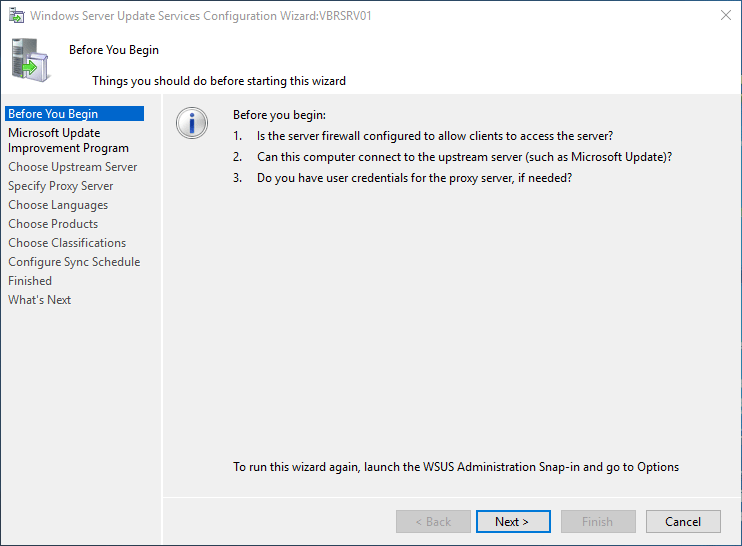
Затем откройте консоль Windows Server Update Services. Запустится мастер первоначальной настройки сервера обновлений WSUS.
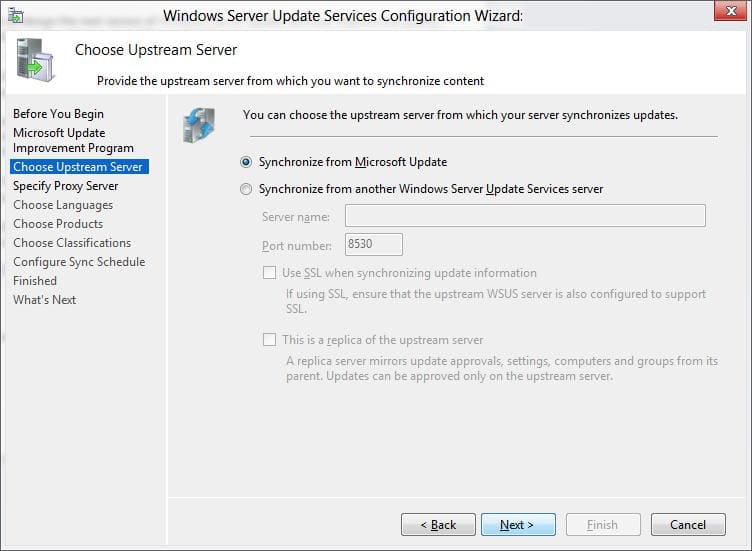
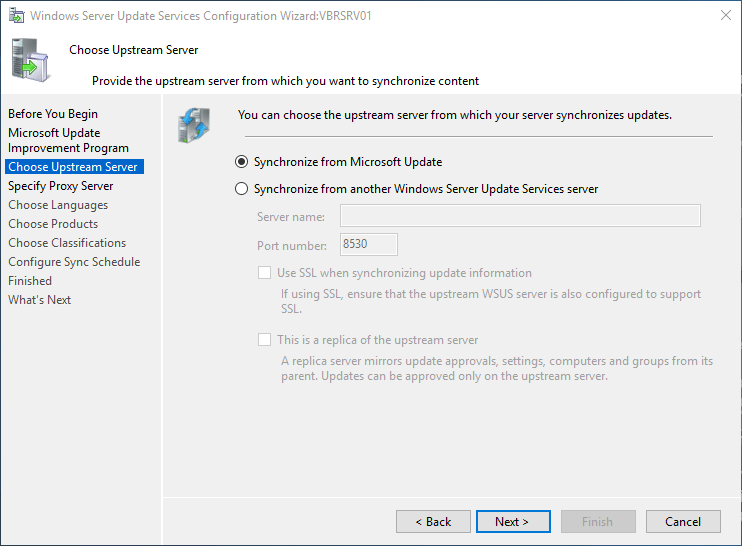
Укажите, будет ли сервер WSUS скачивать обновления с сайта Microsoft Update напрямую (Synchronize from Microsoft Update) или он должен получать их с вышестоящего WSUS сервера (Synchronize from another Windows Update Services server). Дочерние WSUS сервера обычно развертываются на удаленных площадках с большим количеством клиентов (300+) для снижения нагрузки на WAN канал.

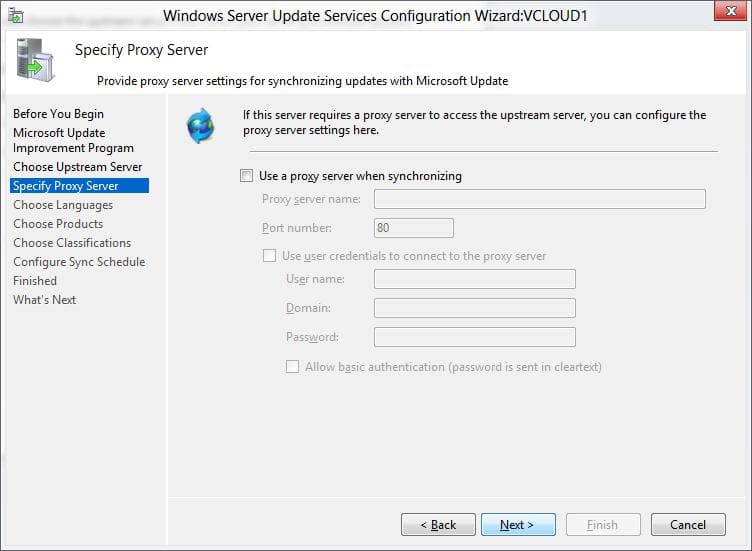
Если в вашей сети используется прокси-сервер для доступа в Интернет, далее нужно указать адрес и порт прокси сервера, и логин/пароль для аутентификации.

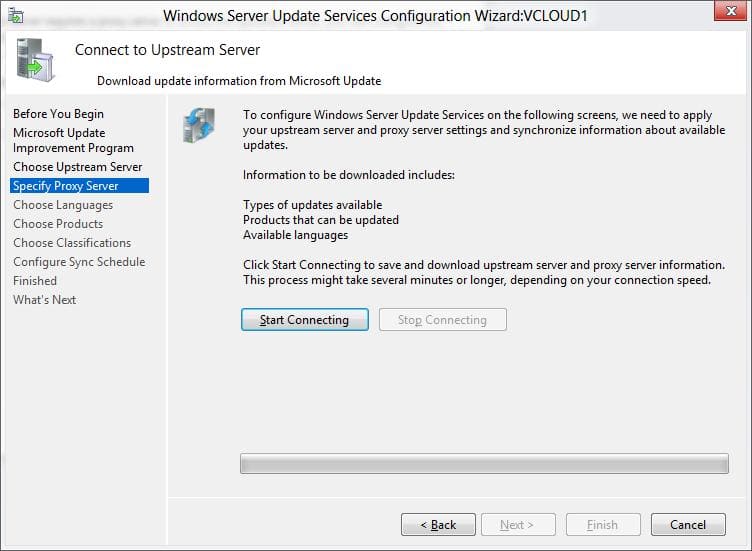
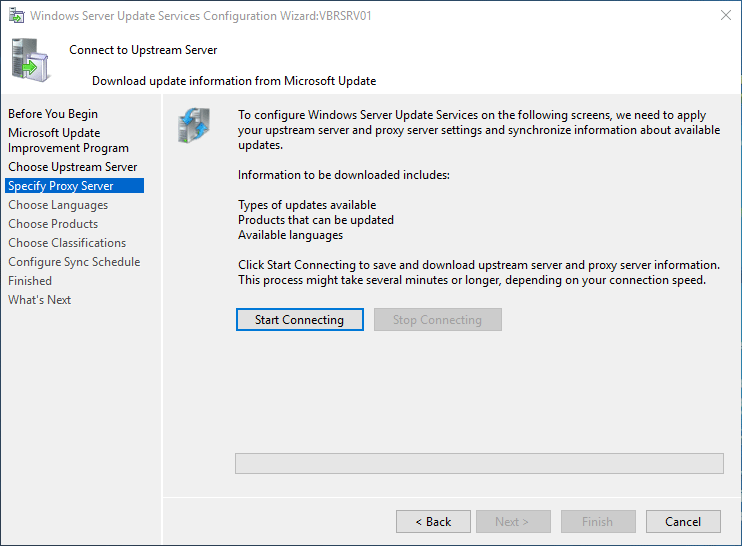
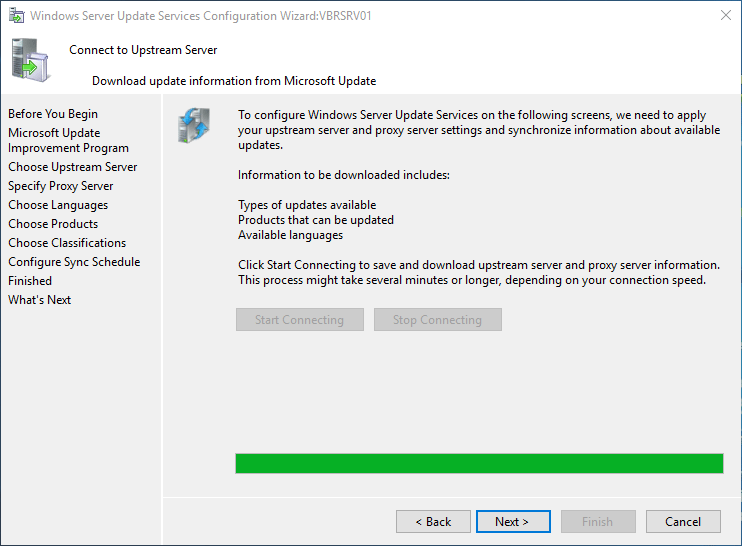
Проверьте подключение к вышестоящему серверу обновлений (или Windows Update). Нажмите кнопку Start Connecting.

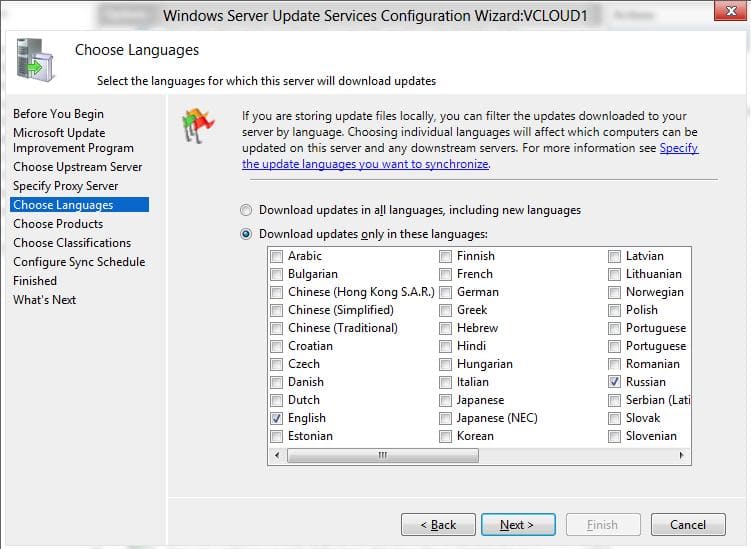
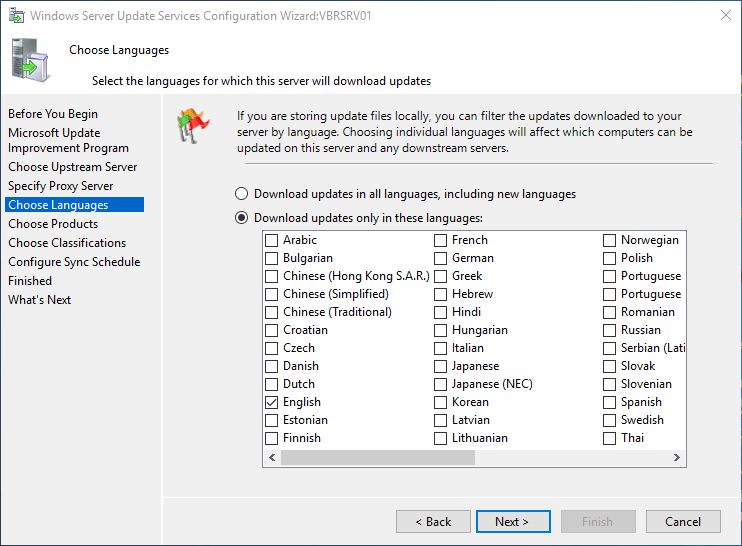
Выберите языки продуктов, для которых WSUS будет получать обновления. Мы укажем English и Russian (список языков может быть в дальнейшем изменен из консоли WSUS).

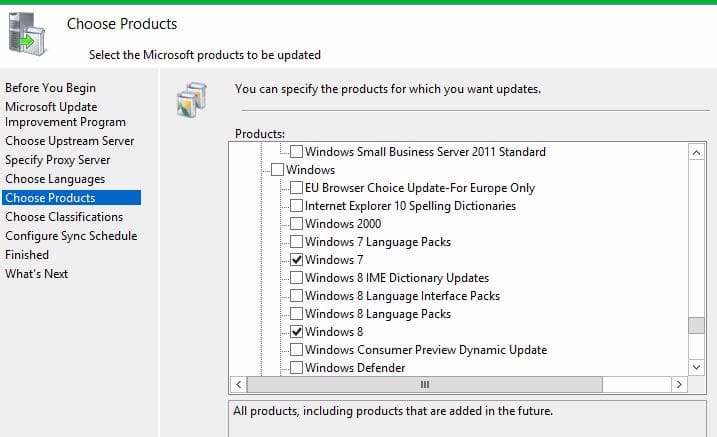
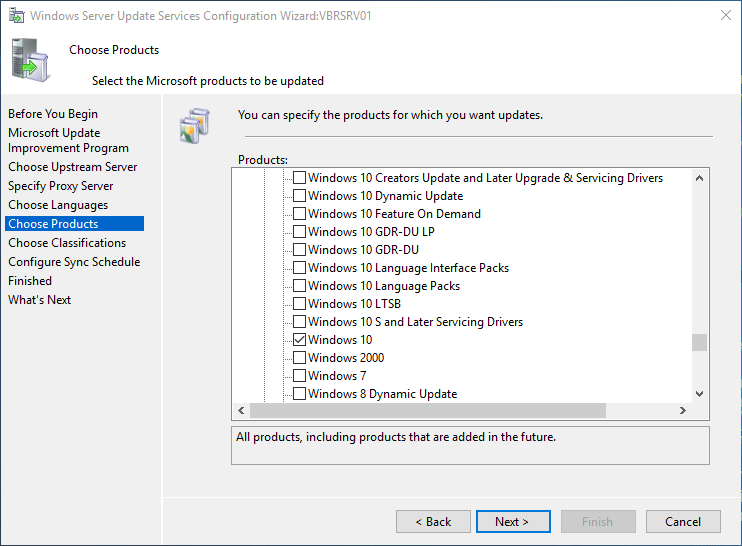
Затем выберите продукты, для которых WSUS должен скачивать обновления. Выберите только те продукты Microsoft, которые используются в Вашей корпоративной сети. Например, если вы уверены, что в вашей сети не осталось компьютеров с Windows 7 или Windows 8, не выбирайте эти опции.
Обязательно включите в классификации следующие общие разделы:
- Developer Tools, Runtimes, and Redistributable — для обновления библиотек Visual C++ Runtime
- Windows Dictionary Updates в категории Windows
- Windows Server Manager – Windows Server Update Services (WSUS) Dynamic Installer

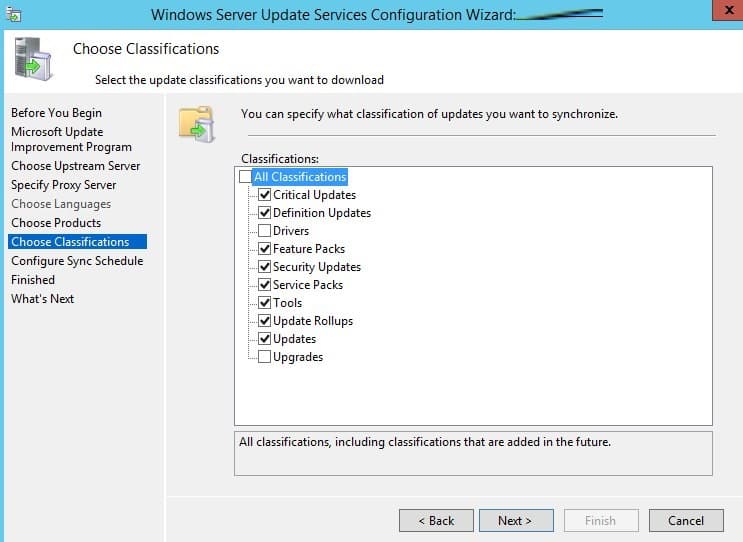
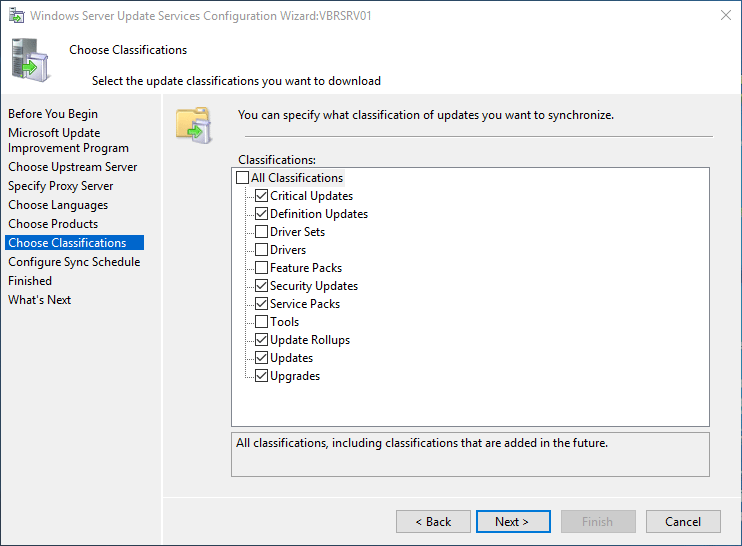
На странице Classification Page, нужно указать типы обновлений, которые будут распространяться через WSUS. Рекомендуется обязательно указать: Critical Updates, Definition Updates, Security Packs, Service Packs, Update Rollups, Updates.

Обновления редакций (билдов) Windows 10 (21H2, 20H2, 1909 и т.д.) в консоли WSUS входят в класс Upgrades.
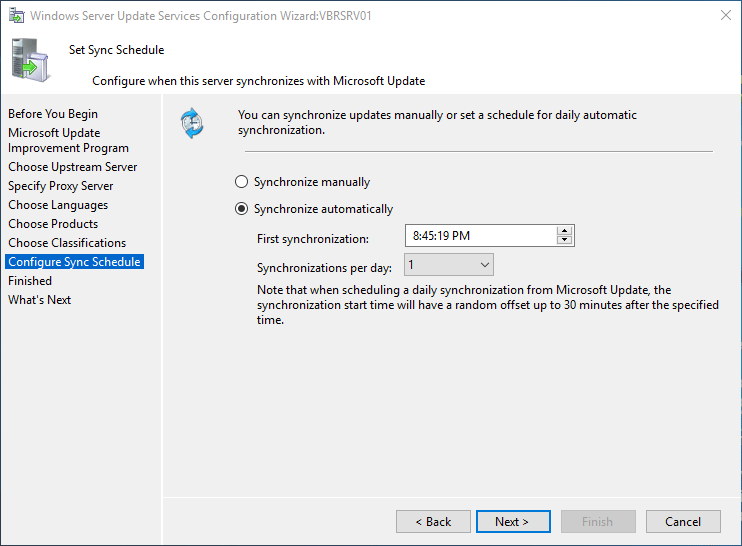
Настройте расписание синхронизации обновлений. В большинстве случаев рекомендуется использовать автоматическую ежедневную синхронизацию сервера WSUS с серверами обновлений Microsoft Update. Рекомендуется выполнять синхронизацию в ночные часы, чтобы не загружать канал Интернет в рабочее время.

Первоначальная синхронизация сервера WSUS с вышестоящим сервером обновлений может занять несколько дней (в зависимости от количества продуктов, которое вы выбрали ранее).
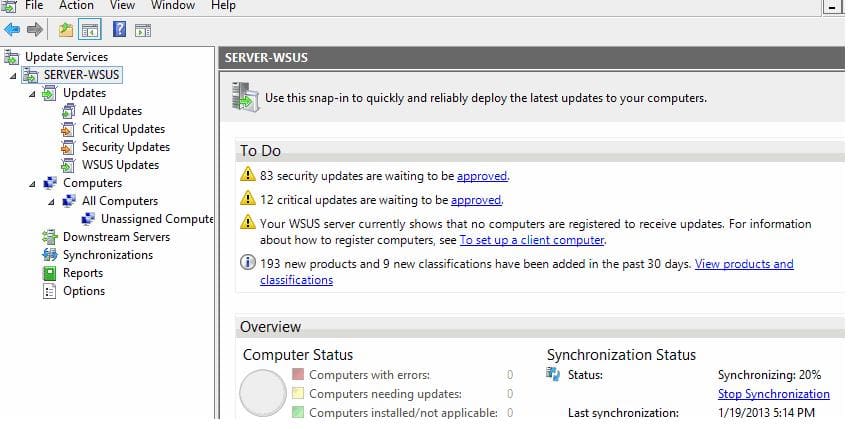
После окончания работы мастера запустится консоль WSUS.

Консоль WSUS состоит из нескольких разделов:
- Updates – обновления, доступные на сервере WSUS (здесь можно управлять одобрением обновлений и назначать их для установки)
- Computers – здесь можно создать группы клиентов WSUS (компьютеры и серверы)
- Downstream Servers – позволяет настроить, будете ли вы получать из обновления Windows Update или вышестоящего сервера WSUS
- Syncronizations –расписание синхронизации обновлений
- Reports – отчёты WSUS
- Options – настройка сервера WSUS
Клиенты теперь могут получать обновления, подключившись к WSUS серверу по порту 8530 (в Windows Server 2003 и 2008 по умолчанию использоваться 80 порт). Проверьте, что этот порт открыт на сервере обновлений:
Test-NetConnection -ComputerName wsussrv1 -Port 8530
Можно использовать защищенное SSL подключение по порту 8531. Для этого нужно привязать сертификат в IIS.
Если порт закрыт, создайте соответствующее правило в Windows Defender Firewall.
Установка консоли администрирования WSUS в Windows 10/11
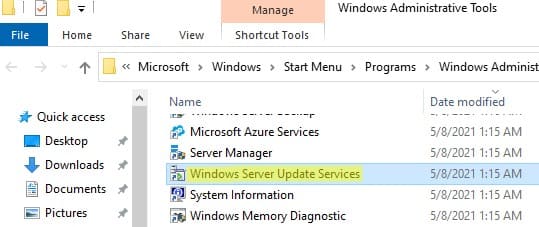
Для администрирования сервера обновления WSUS используется консоль Windows Server Update Services (
wsus.msc
). Вы можете управлять серверов WSUS как с помощью локальной консоли, так и по сети с удаленного компьютера.
Консоль администрирования WSUS для десктопных компьютеров с Windows 10 или 11 входит в состав RSAT. Для установки компонента Rsat.WSUS.Tool, выполните следующую PowerShell команду:
Add-WindowsCapability -Online -Name Rsat.WSUS.Tools~~~~0.0.1.0
Если вы хотите установить консоль WSUS в Windows Server, выполните команду:
Install-WindowsFeature -Name UpdateServices-Ui

При установке WSUS в Windows Server создаются две дополнительные локальные группы. Вы можете использовать их для предоставления доступа пользователям к консоли управления WSUS.
- WSUS Administrators
- WSUS Reporters
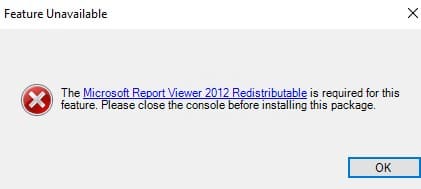
Для просмотра отчетов по установленным обновлениям и клиентам на WSUS нужно установить:
- Microsoft System CLR Types для SQL Server 2012 (SQLSysClrTypes.msi);
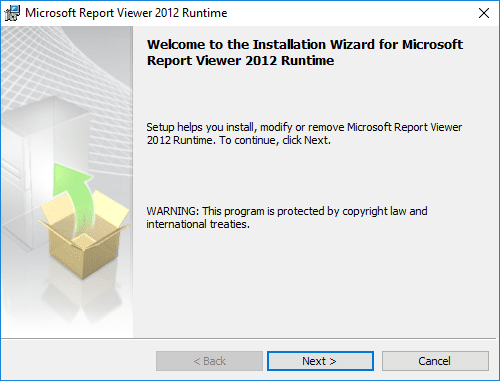
- Microsoft Report Viewer 2012 Runtime (ReportViewer.msi).
Если компоненты не установлен, при формировании любого отчета WSUS появится ошибка:
The Microsoft Report Viewer 2012 Redistributable is required for this feature. Please close the console before installing this package.

Оптимизация производительности WSUS
В этом разделе опишем несколько советов, касающихся оптимизации производительности сервера обновлений WSUS в реальных условиях.
- Для нормальной работы WSUS на сервере обновлений нужно должно быть свободным минимум 4 Гб RAM и 2CPU;
- При большом количестве клиентов WSUS (более 1500) вы можете столкнутся с существенным снижением производительность пула IIS WsusPoll, который раздает обновления клиентам. Может появляться ошибка 0x80244022 на клиентах, или при запуске консоль WSUS падать с ошибкой Error: Unexpected Error + Event ID 7053 в Event Viewer (The WSUS administration console has encountered an unexpected error. This may be a transient error; try restarting the administration console. If this error persists). Для решения проблемы нужно добавить RAM на сервер и оптимизировать настройки пула IIS в соответствии с рекомендациями в статье. Воспользуетесь такими командами:
Import-Module WebAdministration
Set-ItemProperty -Path IIS:\AppPools\WsusPool -Name queueLength -Value 2500
Set-ItemProperty -Path IIS:\AppPools\WsusPool -Name cpu.resetInterval -Value "00.00:15:00"
Set-ItemProperty -Path IIS:\AppPools\WsusPool -Name recycling.periodicRestart.privateMemory -Value 0
Set-ItemProperty -Path IIS:\AppPools\WsusPool -Name failure.loadBalancerCapabilities -Value "TcpLevel" - Включите автоматическое одобрения для обновлений антивируса Microsoft В противном случае WSUS станет существенно тормозить и потреблять всю доступную оперативную память.
Антивирусные проверки могут негативно влиять на производительность WSUS. Во встроенном Microsoft Defender антивирусе в Windows Server рекомендуется исключить следующие папки из области проверки:
- \WSUS\WSUSContent;
- %windir%\wid\data;
- \SoftwareDistribution\Download.
В этой статье мы подробно рассмотрим процесс установки и настройки сервера обновлений WSUS (Windows Server Update Services) на операционных системах Windows Server 2019, 2016 и 2012 R2. WSUS позволяет централизованно управлять обновлениями продуктов Microsoft, таких как Windows, Office, SQL Server, Exchange, и других. Мы рассмотрим шаги установки, настройки, а также оптимизацию производительности WSUS.
Приобрести оригинальные ключи активации можно у нас в каталоге:
Windows Server 2019 — от 2740 ₽
Windows Server 2016 — от 2470 ₽
Windows Server 2012 R2 — от 1370 ₽
Как работает WSUS?
Сервер WSUS представляет собой отдельную роль Windows Server, которая выполняет следующие функции:
— Периодическая синхронизация с серверами обновлений Microsoft для получения новых обновлений.
— Администратор выбирает и одобряет установку необходимых обновлений для рабочих станций и серверов.
— Клиенты WSUS скачивают и устанавливают обновления в соответствии с политиками, настроенными администратором.
Установка роли WSUS в Windows Server
Начиная с Windows Server 2008, WSUS выделен в отдельную роль, которую можно установить через консоль управления сервером (Server Manager) или с помощью PowerShell.
Установка через Server Manager:
1. Откройте консоль Server Manager.
2. Отметьте роль Windows Server Update Services. Система автоматически выберет необходимые компоненты веб-сервера IIS.
В окне выбора компонентов WSUS выберите WSUS Services. Далее выберите, какую базу данных будет использовать WSUS:
— Windows Internal Database (WID) — встроенная база данных Windows. Это рекомендуемый вариант, особенно для больших инфраструктур.
— Microsoft SQL Server — для использования локальной или удалённой базы данных SQL Server. Это опция SQL Server Connectivity.

Важно: SQL Server для WSUS не может быть установлен на контроллере домена Active Directory, и WSUS не должен работать на сервере с ролью Remote Desktop Services.
База WID по умолчанию называется SUSDB.mdf и хранится в каталоге %windir%\wid\data.
Для её администрирования используйте строку подключения \\.\pipe\MICROSOFT##WID\tsql\query в SQL Server Management Studio.
Если вы хотите хранить файлы обновлений локально на сервере WSUS, включите опцию Store updates in the following locations и укажите путь к каталогу. Это может быть папка на локальном диске (рекомендуется использовать отдельный физический или логический том), или сетевой каталог (UNC путь). Обновления скачиваются в указанный каталог только после их одобрения администратором WSUS.
Размер базы данных WSUS сильно зависит от количества продуктов и версий ОС Windows, которое вы планируете обновлять. В большой организации размер файлов обновлений на WSUS сервере может достигать сотни Гб.
Если у вас недостаточно места на дисках для хранения файлов обновлений, отключите эту опцию. В этом случае клиенты WSUS будут получать одобренный файлы обновлений из Интернета (вполне рабочий вариант для небольших сетей).
Установка через PowerShell:
Чтобы установить сервер WSUS с использованием WID, выполните следующую команду:
Install-WindowsFeature -Name UpdateServices, UpdateServices-WidDB, UpdateServices-Services, UpdateServices-RSAT, UpdateServices-API, UpdateServices-UI –IncludeManagementTools
Начальная настройка сервера обновлений WSUS в Windows Server
После установки роли WSUS выполните начальную настройку через Post-Deployment Configuration => Launch Post-Installation tasks в Server Manager.

Основные шаги настройки:
1. Запустите мастер начальной настройки.
2. Выберите, будет ли сервер WSUS синхронизироваться с Microsoft Update или с вышестоящим WSUS сервером.
3. Укажите настройки прокси, если используется прокси-сервер для доступа в Интернет.
4. Проверьте подключение к вышестоящему серверу обновлений (или Windows Update). Нажмите кнопку Start Connecting.
5. Выберите языки и продукты, для которых WSUS будет скачивать обновления.
Выберите продукты Microsoft, которые актуальны для вашей инфраструктуры. Например, если компьютеры с Windows 7 больше не используются, отключите обновления для этой версии ОС.
Обязательно включите в классификации следующие общие разделы:
— Developer Tools, Runtimes, and Redistributable — для обновления библиотек Visual C++ Runtime
— Windows Dictionary Updates в категории Windows
— Windows Server Manager – Windows Server Update Services (WSUS) Dynamic Installer
На этапе выбора типов обновлений рекомендуем включить следующие классификации:
— Critical Updates
— Security Updates
— Service Packs
— Updates
— Update Rollups
Задайте расписание синхронизации. Оптимально настроить автоматическую ежедневную синхронизацию в ночные часы, чтобы не перегружать сеть в рабочее время.

Первоначальная синхронизация сервера WSUS с вышестоящим сервером обновлений может занять несколько дней (в зависимости от количества продуктов, которое вы выбрали ранее).
После окончания работы мастера запустится консоль WSUS.
Консоль WSUS состоит из нескольких разделов:
Updates – обновления, доступные на сервере WSUS (здесь можно управлять одобрением обновлений и назначать их для установки).
Computers – здесь можно создать группы клиентов WSUS (компьютеры и серверы).
Downstream Servers – позволяет настроить, будете ли вы получать из обновления Windows Update или вышестоящего сервера WSUS.
Syncronizations – расписание синхронизации обновлений.
Reports – отчёты WSUS.
Options – настройка сервера WSUS.
Клиенты теперь могут получать обновления, подключившись к WSUS серверу по порту 8530 (в Windows Server 2003 и 2008 по умолчанию использоваться 80 порт). Проверьте, что этот порт открыт на сервере обновлений:
Test-NetConnection -ComputerName wsussrv1 -Port 8530
Если порт закрыт, создайте соответствующее правило в Windows Defender Firewall.
Установка консоли администрирования WSUS в Windows 10/11
Для администрирования сервера обновления WSUS используется консоль Windows Server Update Services ( wsus.msc ).
Консоль WSUS (wsus.msc) доступна как в локальной установке на сервере, так и удалённо через RSAT (Remote Server Administration Tools) на рабочих станциях с Windows 10 или 11.
Установка RSAT для WSUS:
Для установки WSUS консоли на Windows 10/11 выполните команду PowerShell:
Add-WindowsCapability -Online -Name Rsat.WSUS.Tools~~~~0.0.1.0
Для установки консоли WSUS на сервере используйте:
Install-WindowsFeature -Name UpdateServices-Ui
После установки создаются две локальные группы:
— WSUS Administrators — для пользователей с полным доступом к управлению WSUS.
— WSUS Reporters — для пользователей с доступом к отчетам.
Чтобы формировать отчеты в WSUS, необходимо установить:
— Microsoft System CLR Types для SQL Server 2012
— Microsoft Report Viewer 2012 Runtime
Если компоненты не установлен, при формировании любого отчета WSUS появится ошибка:
«The Microsoft Report Viewer 2012 Redistributable is required for this feature. Please close the console before installing this package.»
Оптимизация производительности WSUS
Для оптимальной работы WSUS рекомендуется следующее:
1. Минимум 4 Гб оперативной памяти и 2 процессорных ядра.
2. При большом количестве клиентов (1500+) может потребоваться увеличение ресурсов, чтобы избежать ошибок производительности, таких как 0x80244022 или Event ID 7053.
Для решения проблемы нужно добавить RAM на сервер и оптимизировать настройки пула IIS. Воспользуетесь следующими командами:
Import-Module WebAdministration
Set-ItemProperty -Path IIS:\AppPools\WsusPool -Name queueLength -Value 2500
Set-ItemProperty -Path IIS:\AppPools\WsusPool -Name cpu.resetInterval -Value "00.00:15:00"
Set-ItemProperty -Path IIS:\AppPools\WsusPool -Name recycling.periodicRestart.privateMemory -Value 0
Set-ItemProperty -Path IIS:\AppPools\WsusPool -Name failure.loadBalancerCapabilities -Value "TcpLevel"
Включите автоматическое одобрения для обновлений антивируса Microsoft В противном случае WSUS станет существенно тормозить и потреблять всю доступную оперативную память.
Исключения для антивируса:
Добавьте следующие папки в исключения антивируса, чтобы не снизить производительность WSUS:
— \WSUS\WSUSContent
— %windir%\wid\data
— \SoftwareDistribution\Download
Эти действия помогут улучшить работу WSUS и обеспечить своевременное обновление клиентов
Теперь, следуя этим инструкциям, вы сможете установить и настроить сервер WSUS на Windows Server, обеспечить централизованное управление обновлениями и оптимизировать его работу в вашей инфраструктуре.
In this article, we are going to learn the ‘Complete Guide to Install and Configure WSUS Server 2016 (Windows Server Update Services)’. Windows Server Update Services (WSUS), formerly known as Software Update Services, is a computer program and network service developed by Microsoft Corporation that enables administrators to distribute Microsoft-issued updates and hotfixes for Microsoft products in a corporate environment.
Before proceeding with installation and configuration, make sure your machine meets the following requirements:
- The static IP address configured.
- Turned off the Windows firewall.
- The latest security updates from Microsoft are installed.
- The Internet connection is working.
Follow the below Steps To Install and Configure WSUS Server 2016 (Windows Server Update Services):
Step 1. Open Server Manager.
Step 2. Click Add Role and Features.
Step 3. Read the important requirements and try to meet them (this includes a strong password for the administrator account, stable IP configuration, and installation of the latest security updates). Click next to continue.
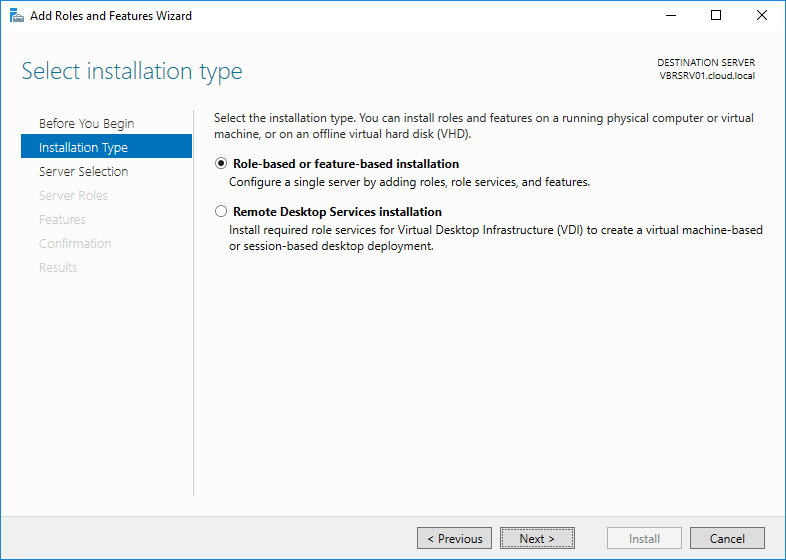
Step 4. Choose Role-based or Feature-based installation and click Next.
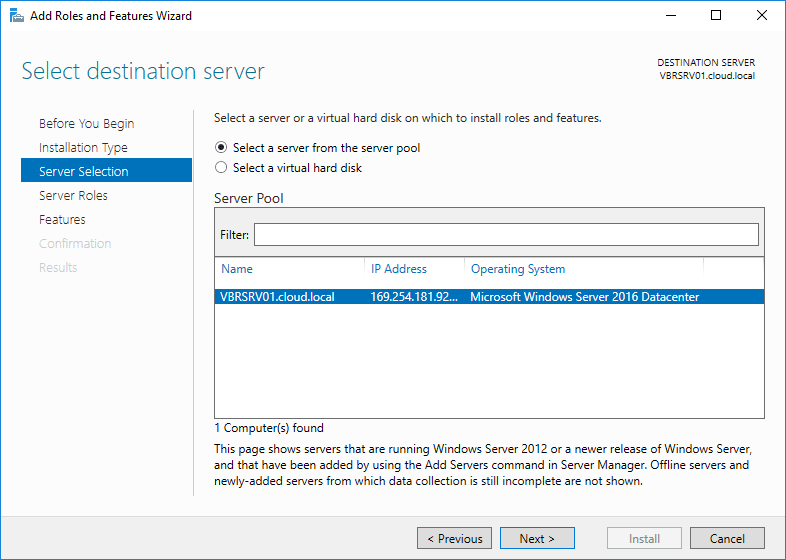
Step 5. Select a server from the server pool, and click next.
Step 6. Select the destination server for Windows Server Update Services from the server pool and click Next.
Step 7: Click Add Features
Step 8: Click Next
Step 9: Click Next
Step 10: Select WID Connectivity & WSUS Services then Click on Next.
Step 11: On the Content location selection page, type a valid location to store the updates. For example, you can create a folder named WSUS at the root of Private Drive D for this purpose and type WSUS as a valid location.
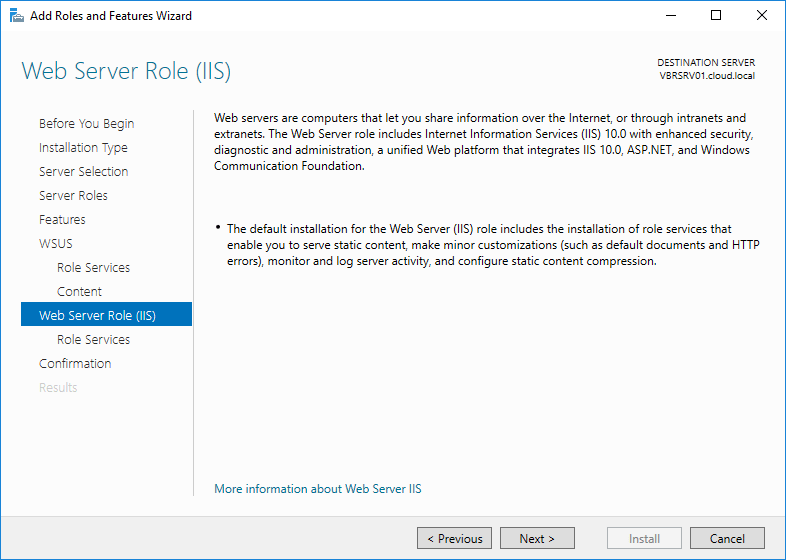
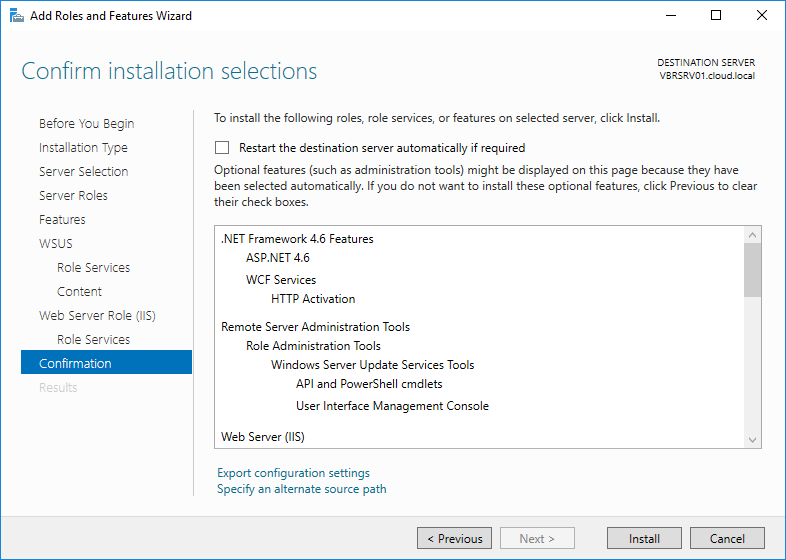
Step 12: The Web Server Role (IIS) page opens. Review the information, and then click Next.
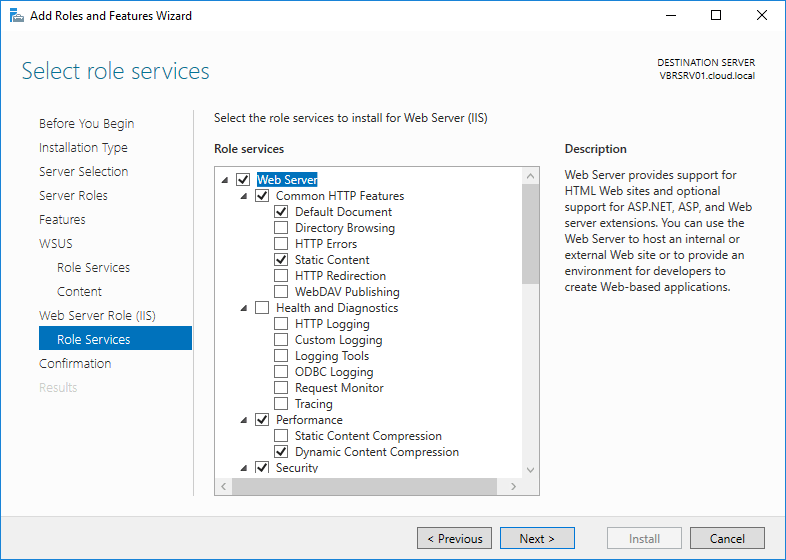
Step 13: In select the role services to install for Web Server (IIS), retain the defaults, and then click Next.
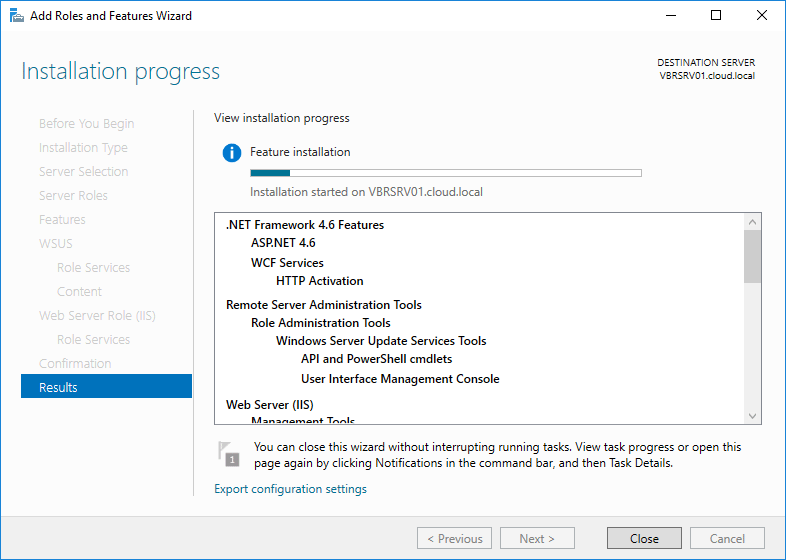
Step 14: Click Install and the installation will begin which can take 10 – 15 minutes to complete.
Step 15: Now you can see the WSUS installation process is completed.
Also Read – Step by Step Configure WDS Server (Windows Deployment Services) On Windows Server 2016
Configuring WSUS Server:
Once the WSUS installation is complete, in the summary window on the Installation progress page, click Launch Post-Installation tasks. The text changes, requesting: Please wait while your server is configured. When the task has finished, the text changes to Configuration successfully completed. Click Close.
Step 1: Open your server manager dashboard, Click Tools -> Windows Server Update Services
Step 2: Click Next
Step 3: Click Next
Step 4: Select Synchronize From Microsoft Update or another server & click on Next.
Step 5: If you have a proxy server in your network, configure the proxy settings otherwise click Next
Step 6: Click Start Connecting to connect to the upstream server of Microsoft
Step 7: Select language and click Next.
Step 8: Select the product you need to download updates for. Click Next.
Step 9: Select the type of updates and click Next
Step 10: Select Synchronize manually and click Next. You can also set up an automatic schedule for synchronization.
Step 11: Click Next.
Step 12: Click Finish.
As you can see above we have successfully Configure WSUS Server 2016. open update service and click on synchronizing.
WSUS Update Snapshot:-
Also Read – Tips For Troubleshooting WSUS Client That Are Not Reporting To The WSUS Server
That’s all, In this article, we have explained the Complete Guide to Install and Configure WSUS Server 2016 (Windows Server Update Services). I hope you enjoy this article. If you like this article, then just share it. If you have any questions about this article, please comment.
Patch management is one of those often thankless tasks that all too often gets assigned to whomever happened to draw the short straw. I mean if you think about all the different WSUS administrators you’ve ever met, how often do you find them just raving about the job they have to do? Most people really dread the monthly patch cycle with Microsoft, and even though the technologies and the tools to use them are much easier than they were back in the day, still, doing patch management is, in many ways, a tedious exercise in making sure that the right updates end up on the correct machines.
In windows server the WSUS role is taking care of the upadate part. WSUS stands for Windows Server Update Services, which we should take to mean that WSUS runs on servers even though it provides updates to both servers and clients. Now before Server 2008 R2, WSUS was a separate chunk of software you’d download for free from Microsoft. But as of that OS, it was elevated to the status of a built-in server role. So WSUS provides the ability to stage and control updates from Microsoft so that, for example, the IT managers/admins can review update metadata, and the updates themselves before approving and distributing them to designated groups of computer.
This is important because there have been a few occasions in some organizations where certain updates from Microsoft had unintended consequences, something that most IT professionals are severely allergic to.
WSUS BENEFITS
The approval mechanism is really the main one, but WSUS also lets us perform a certain amount of bandwidth management so that our networks aren’t inundated with update traffic when a large new update becomes available. Also the ability to monitor the updates, see who’s getting them and who isn’t, and to spit out reports on that kind of information is pretty much a requirement in a world where non-updated systems are vulnerable to ever-increasing threats.
Now we should don’t want to have to scan the event logs of individual Windows computers to find which updates got installed and which didn’t. And, by the way, tools such as WSUS become even more useful given the fact that Microsoft in Windows 10 no longer gives users the chance to specify which updates they do or do not want.
Difference between updates and upgrade
An update is a patch for security, reliability, or a bug fix. By contrast, an upgrade contains new features and may even remove some old features. With Windows 10 upgrades issue two or three times per year. Microsoft recently decided to start calling upgrades feature updates, but they don’t do so consistently, so you have to look at the context to figure out what’s being discussed. Anyway, the important point in the context of WSUS is that WSUS can now synchronize and distribute Windows 10 upgrades or feature updates, and this capability is baked into the Server 2016 flavor of WSUS. If you have windows server 2012 and you want to enable support for Windows 10 upgrades then you will need to install KB3095113 update on your wsus server. This update is not required to enable WSUS to sync and distribute servicing updates for Windows 10.
WSUS DEPLOYMENT TYPES
SIMPLE
A simple deployment is one in which the WSUS server gets update metadata and updates from Microsoft. An administrator performs testing and approval of those updates after which point they get distributed to WSUS clients. And just as a reminder, a WSUS client can be a server because servers get updates too. And when they do, the server is a client of the WSUS service. Now by the way in terms of the approval process, administrators can also create auto-approval rules for low-risk updates like anti-malware definitions.
AUTONOMOUS
A so-called autonomous WSUS deployment is one in which each server can be set up independently with their own WSUS groups and synchronization rules and lists of products and so forth. And each server can get updates and update metadata either from Microsoft or from another WSUS server. Each server can have different administrators who can perform different approvals at different times.
REPLICA
If we want to centralize WSUS administration and management, we might prefer to set up a downstream WSUS system as a replica server in which the files, group definitions, and approval statuses flow from parent to child, although it is relevant to note that the group members do not actually flow to the replica server. You can’t create new WSUS groups on a replica server, nor can you approve updates for distribution or configure auto-approval rules.
WSUS DATA MANAGEMENT
You may ask your self where does the data live in WSUS? To answer on that question we have to distinguish between update metadata and the update files themselves, which reside in two different places.
Database –> The database is where we maintain the metadata about Microsoft Updates. This metadata can live in an instance of the Windows internal database (WID) or SQL Server. Metadata provides information about the update and supplies information for the properties of an update, which helps you determine the usefulness of an update. Metadata also includes Microsoft Software License Terms. The metadata package that is downloaded for an update is typically much smaller than the actual update file package.
Content Location –> The content location is where the actual update files reside assuming we’re staging them, which is optional. Obviously, the actual updates will take more space than the update metadata, so we’ll need to allocate plenty of space. If we don’t have the space, we’re not required to store the updates locally. But if we don’t, then we depend on WSUS clients having decent internet connections so they can retrieve the update files from the internet in a reasonable time.
WSUS CLASSIFICATIONS
Microsoft classifies updates in a taxonomy that we can use to restrict what we actually need to download based on what we care about. We can also use classifications to define the scope of automatic approval rules.
Update Classification:
- Critical Updates — ( Better name for this should be non-security updates)
- Security Updates — Any important security updates show up under the security updates classification. So stuff that you may see in the security updates category may very well be critical in terms of its importance to your organization’s IT security, but they won’t fall under the critical classification.
- Updates (Non-critical, non-security)
- Definition Updates (anti-virus)
- Drivers (only metadata based on inventory) WSUS actually only downloads metadata for drivers based on the hardware, otherwise, the driver metadata downloads would be humongous and largely unnecessary.
- Feature packs, tools, rollups, and service packs
- UPGRADES ( This is a new category in 2016)
One more thing to discuss before we jump into server manager and install WSUS role.
WUDO (Windows Update Delivery Optimization)
Now for those of you who may have deployed Windows 10, you’re probably aware of something called WUDO or Windows Update Delivery Optimization. This is an operating system service in Windows 10 Enterprise and Education editions that permits peer updating that is the ability of a computer to receive and provide Windows Updates to peer PCs on the same local area network. So this can help keep more traffic on local links and avoid overloading links to your WSUS servers, and it can result in more rapid update deployment that PCs require at least 4 GB of RAM and 250 GB of disk space to participate in the peer updating scheme. So WSUS works with WUDO.
Now when we know all of that we are ready to install WSUS server role and start playing with it.
INSTALL WSUS 2016
Now just like with any service, installing a new role onto a machine requires actually installing that role, and its associated role services. Open server manager and click on Manage –> Add Roles and Features
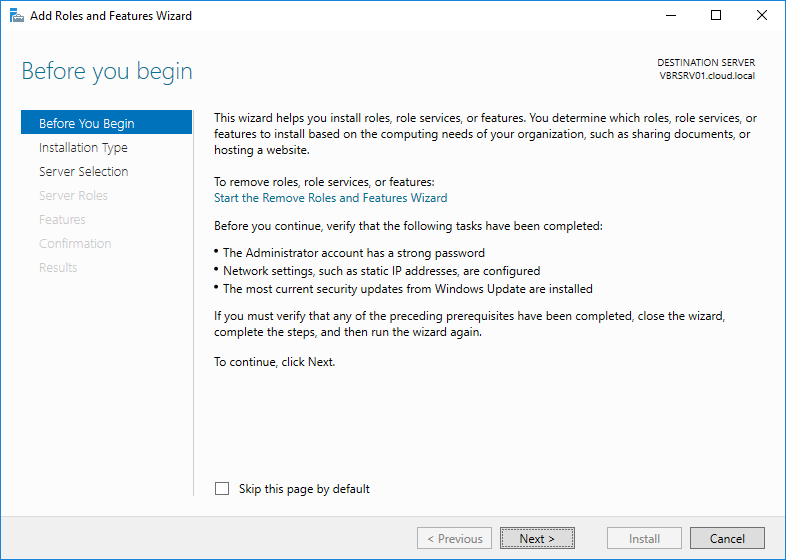
Before you begin page will pop-up. Click Next
Click next accepting the defaults until you come to Select server roles. Scroll down and check Windows Server Update Services. When we click it, we can see that we’re going to get various other features, .NET Framework, RSAT tools, etc. so go ahead and choose Add Features and Next

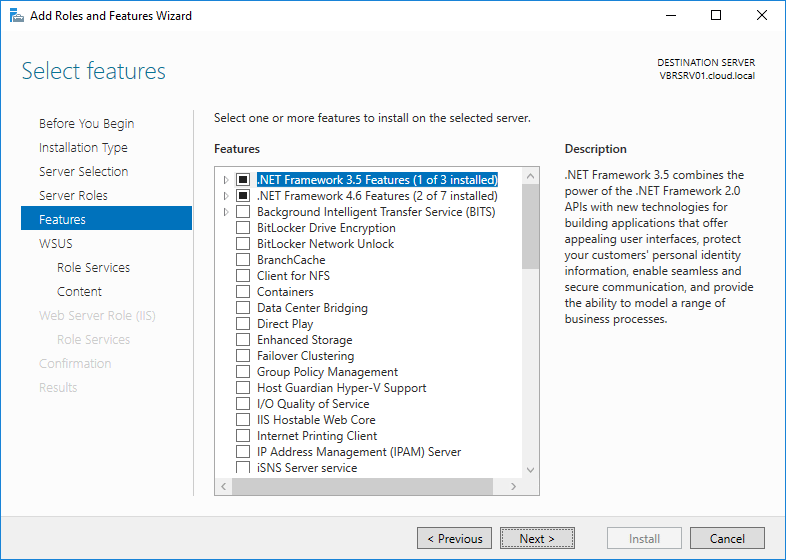
We don’t need to add any additional features beyond this, so we’ll click Next again.

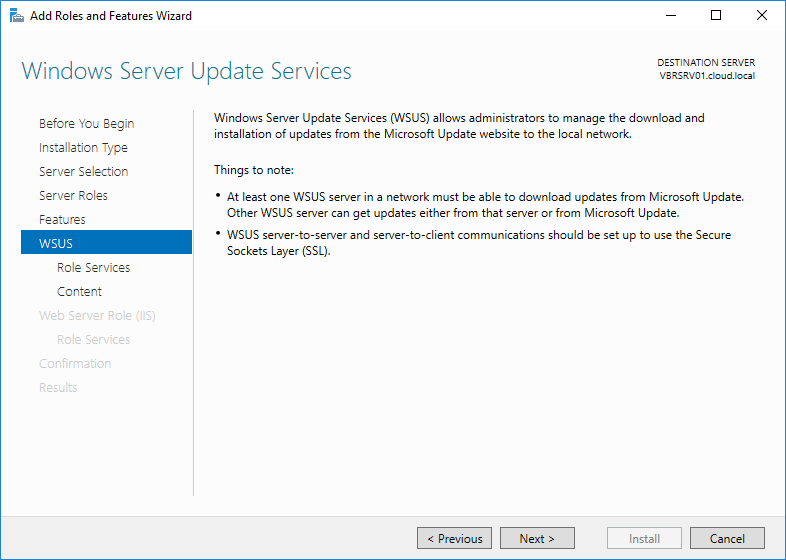
On Windows Server Update Services windows click next

Here we have the opportunity to make a decision about how we want to store the database WSUS uses for containing the information that it requires. Now, by default, and in most situations, the Windows internal database is just a perfect location for your WSUS database.
If you would like to store it on SQL server you would need to choose SQL Server Connectivity which corresponds essentially to a copy of SQL server that is either on this machine, or some other machine in your environment.
Once done, click next

Content location selection window, Here we have to determine where we want to store the content that WSUS will be using. If you clear checkbox then updates will come from Microsoft but approvals will still come from WSUS. This might be a good approach if the client systems have a slow WAN connection to the WSUS server but a reasonably zippy connection to the internet.
I will choose to download updates and I will specify the location

Once we’re done with that, the rest of the wizard is relatively straightforward so go through it and complete this installation.

Once that is done you will notice the link called launch post-installation tasks. This launch post-installation tasks view gives me the ability to then go through that post-installation config here for WSUS. Click on it.

Once done click Close.

We still do have a couple of things to configure, we need to configure WSUS to operate in the way that we’re looking for it to do. In order to accomplish that click on Tools –> Windows Server Update Services.
One of the very first things you’ll see, the first time you try to launch the console here, is this configuration wizard that WSUS will make available for you. It’s here where we can make some of the decisions about how we want this server to get its information, how we want it also to disseminate that information, and then also what kinds of information we care about. What kinds of languages, what kinds of products, what kinds of classifications that we’re interested in using the server for.
Click Next

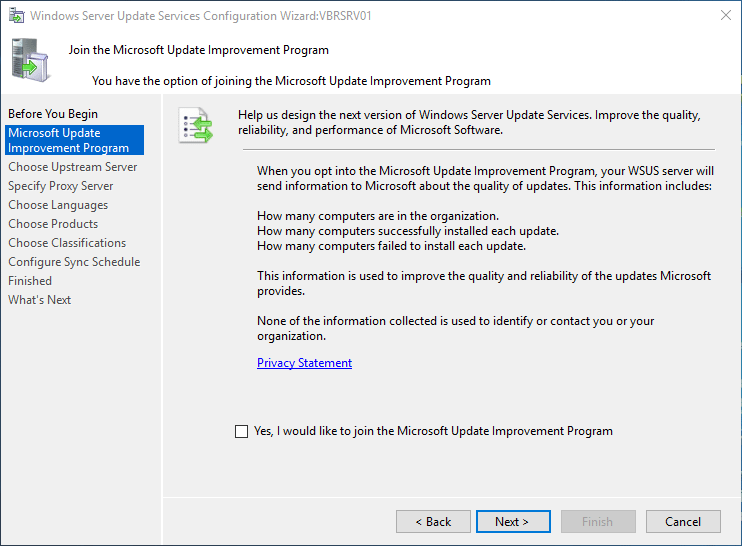
We can choose whether we want to join the Update Improvement Program. For our purposes, I’ll say No. Click next

Here we can determine where we want to synchronize our updates from. This is my first WSUS server so I will choose Sync from Microsoft Update, click next

I won’t choose a proxy server, because I have no outbound proxy server

here in the next screen, WSUS will complete an initial synchronization, in order to understand exactly what kind of updates are available, so that I can make the appropriate selections. I’ll click the start connecting button to go through the process of essentially just connecting up with Windows, and figuring out what those new categories are and then once we have that updated metadata, we can use that information to help us determine what exactly it is that we’re interested in updating.
Once done, click next

It’s here where we can choose the languages that we’re interested in. Curious little piece of trivia, some of the earlier instances, or versions of WSUS, had far more than just U.S. English as the available language, that was selected by default here in the interface. However, that decision on Microsoft’s part actually created a bit of a problem for early WSUS implementers. Because each additional language you select adds a significant amount of additional data that has to be downloaded every time you download an update. If you think about it, there’s an update for English, there’s an update for French, and another one for German and so on. So be very careful here with this screen. Do not select the top item (Download updates in all languages…), unless you’re absolutely sure that you require it. Because downloading updates only in the languages you require, will greatly reduce the amount of disk space you’ll need to store those updates locally. As you can see here, at least with this version, the English language is the only one that is selected, that’s the only one I’m interested in as well. Click Next

Also in terms of the number of products that you’re interested in downloading, it’s generally a good idea to right-size the number of products that you’re selecting, with the ones that you actually have. And so what this means is that if you don’t have, I don’t know, a BizTalk server in your environment, well then you probably don’t wanna be downloading the updates for BizTalk server. You will notice that all the updates for Windows are selected. I am only interested in Windows 10 and Windows Server 2016 so I will select only those.

In this next screen I can identify the types of classifications for the kinds of updates that I wanna keep under management. Critical updates, definition updates and security updates here will help you for those MSRC alerts that pop out on every patch Tuesday. If you have a need for, for example service packs or feature packs, you can add them. A lot of people don’t necessarily include the drivers for a lot of very good reasons. A lot of time your manufacturer drivers are gonna be more updated than those you’ll see here in Microsoft Update. But these provide you again, the ability to determine exactly what you’re interested in. I tend to at least at first, leave these as the default, because at least it gets me through that monthly patch cycle that has to do with protecting myself against security-related incidents.

Then lastly here, is where I can identify how often I want WSUS to synchronize itself with Microsoft. It is generally a good idea to go through an automatic synchronization at least once a day, if not more. Microsoft tends to release these updates on an every-month cycle, although in later months and years, there’s been a bit of a sea change for Microsoft releasing updates faster than what has, for many years, been the traditional second Tuesday of the month, Black Tuesday release of new updates. I’ll set our first synchronization here to be sometime early in the morning so it happens when I’m not around, and other people are not attempting to use server. And I’ll set a single synchronization per day at that time.

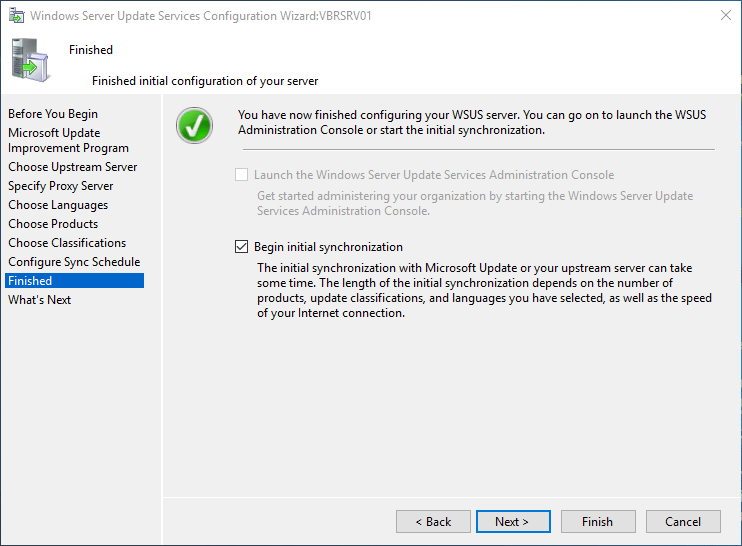
And now we can begin the initial synchronization and click Next and Finish to begin the implementation of WSUS. Sync will take some time so be patient.


When you open console again you will see sync status. Right now mine is at 28 %. You will have to wait until it finish with sync before you move forward.

That’s it. In the next part we will explore the WSUS console, create groups, configure synchronization and move forward with WSUS and update configuration.
Thanks for reading!
Cheers,
Nedim
Windows Server Update Services or WSUS is a Microsoft product that allows us to centrally manage patches for Microsoft operating systems and other Microsoft products. With Windows Server 2016, the process is basically the same as previous server operating systems to install and configure the product and generally get up and running with WSUS managing our patches in a particular environment. Let’s look at how to install and configure Windows Server 2016 WSUS.
Installing the Windows Server Update Services role is very straightforward and is basically what we would expect with installing any role or feature. This is done through Server Manager. The process is fairly next, next, finish in nature.
Here we select a role based installation.
Select our server.
Choose Windows Server Update Services all the way at the bottom of the Server Roles.
We will get prompted for additional features that need to be installed.
Next, Next finish process underway…
Finally, we get to the Role Services and should see WID Connectivity and WSUS Services.
Here we select a file path to use for storing updates.
We will have Web Server Role services installed with WSUS.

After the role service is installed, we will see a exclamation bang in the upper right hand corner of our Server Manager. It will show Post-deployment Configuration that will need to be done. Click this and it will finish things out.
WSUS Specific Configuration
Now we begin the WSUS configuration itself where we actually setup our configuration for the WSUS server portion.
Since I don’t have another WSUS server I am wanting to synchronize from, I choose to Synchronize from Microsoft Update which pulls directly from Microsoft.
Choose your connectivity options here. If you use a proxy, you need to configure it.

Now, click the Start Connecting button. This process will take a long time depending on your connection.
Click Next.
Choose your language here.
On our Choose Products screen we actually choose operating systems and products we want to pull down and store updates for.
Next, we choose our Classifications where we can set the types of updates for the selected operating systems. This includes choices on Critical updates, drivers, feature packs, security updates, etc.
Next is our Sync Schedule where we configure when we want a synchronization with our upstream source server to happen. We can also set the number of synchronizations per day.
On the Finished screen, we can choose to Begin initial synchronization which will start pulling down the updates that meet the criteria.
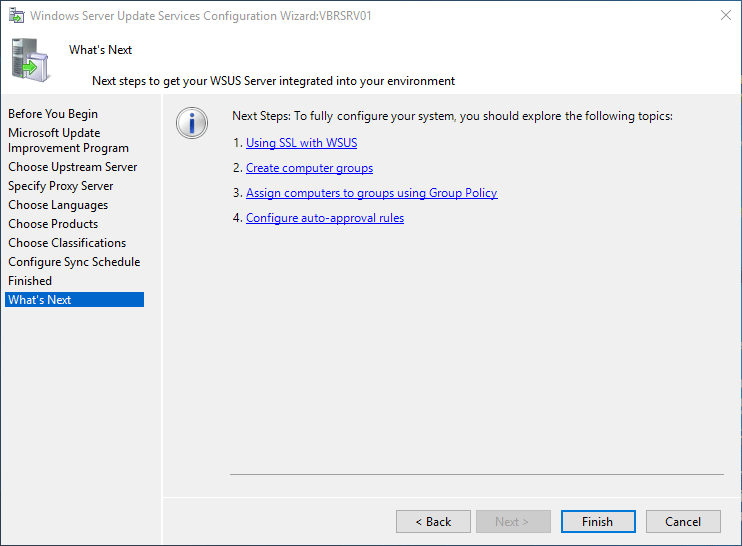
The basic summary screen tells us what we might want to think about doing next including setting up SSL, creating computer groups, etc.
That concludes the basic Windows Server 2016 Install and Configure of WSUS.
Reporting Services
If you try and click on any data in the WSUS screen such as updates needed, etc, you will quickly find several errors or warning pop up about SQL Server 2012 CLR Types and Report Viewer 2012 binaries.
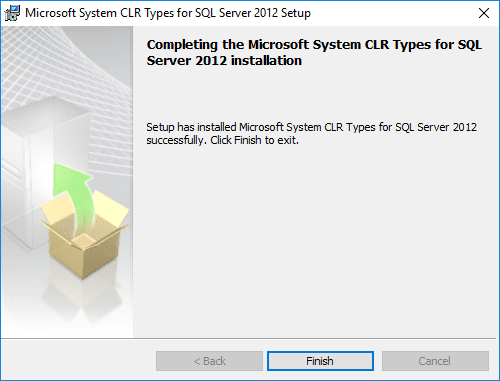
After installing the CLR types, I was able to run the Report Viewer 2012 Runtime.
Thoughts
In this basic tutorial on how to install and configure Windows Server 2016 WSUS, it is easy to see that the process is fairly straightforward to get the role installed and configured. Also, installing the needed report components allows us to view reports from the WSUS console on the server itself. In our next WSUS post, we will take a deeper dive into interacting with WSUS, troubleshooting, and other configuration.
Brandon Lee is the Senior Writer, Engineer and owner at Virtualizationhowto.com, and a 7-time VMware vExpert, with over two decades of experience in Information Technology. Having worked for numerous Fortune 500 companies as well as in various industries, He has extensive experience in various IT segments and is a strong advocate for open source technologies. Brandon holds many industry certifications, loves the outdoors and spending time with family. Also, he goes through the effort of testing and troubleshooting issues, so you don’t have to.