
x64 Windows Server 2012 R2
|
File property |
Value |
|---|---|
|
File name |
Amd64_23cff30c8022605fe85a84a00f7601ce_31bf3856ad364e35_6.3.9600.18228_none_fd28769a1ccb05a1.manifest |
|
File version |
Not applicable |
|
File size |
697 |
|
Date (UTC) |
05-Feb-2016 |
|
Time (UTC) |
19:14 |
|
Platform |
Not applicable |
|
File name |
Amd64_9fd8ad1efef830b66a5109563a3f509f_31bf3856ad364e35_6.3.9600.18228_none_e0848ac17b010d90.manifest |
|
File version |
Not applicable |
|
File size |
695 |
|
Date (UTC) |
05-Feb-2016 |
|
Time (UTC) |
19:14 |
|
Platform |
Not applicable |
|
File name |
Amd64_aa8cdad1b2a772c23f0bfc717563887b_31bf3856ad364e35_6.3.9600.18228_none_4ccd50e3017f3f15.manifest |
|
File version |
Not applicable |
|
File size |
704 |
|
Date (UTC) |
05-Feb-2016 |
|
Time (UTC) |
19:14 |
|
Platform |
Not applicable |
|
File name |
Amd64_ba4f6f9c6f5d91b78f32df8819961f1b_31bf3856ad364e35_6.3.9600.18228_none_2ff50b5169f4a2fd.manifest |
|
File version |
Not applicable |
|
File size |
683 |
|
Date (UTC) |
05-Feb-2016 |
|
Time (UTC) |
19:14 |
|
Platform |
Not applicable |
|
File name |
Amd64_updateservices-database-common_31bf3856ad364e35_6.3.9600.18228_none_6dcb14f8ff3be1d9.manifest |
|
File version |
Not applicable |
|
File size |
13,981 |
|
Date (UTC) |
04-Feb-2016 |
|
Time (UTC) |
19:26 |
|
Platform |
Not applicable |
|
File name |
Amd64_updateservices-services_31bf3856ad364e35_6.3.9600.18228_none_6fc82fce930a900a.manifest |
|
File version |
Not applicable |
|
File size |
58,825 |
|
Date (UTC) |
04-Feb-2016 |
|
Time (UTC) |
19:26 |
|
Platform |
Not applicable |
|
File name |
Amd64_updateservices-snapin_31bf3856ad364e35_6.3.9600.18228_none_ff96648c15f9932d.manifest |
|
File version |
Not applicable |
|
File size |
29,013 |
|
Date (UTC) |
04-Feb-2016 |
|
Time (UTC) |
19:26 |
|
Platform |
Not applicable |
|
File name |
Msil_microsoft.updateservices.baseapi_31bf3856ad364e35_6.3.9600.18228_none_eacd287befc7820c.manifest |
|
File version |
Not applicable |
|
File size |
1,333 |
|
Date (UTC) |
05-Feb-2016 |
|
Time (UTC) |
18:39 |
|
Platform |
Not applicable |
|
File name |
Update.mum |
|
File version |
Not applicable |
|
File size |
2,299 |
|
Date (UTC) |
05-Feb-2016 |
|
Time (UTC) |
19:14 |
|
Platform |
Not applicable |
x64 Windows Server 2012
|
File property |
Value |
|---|---|
|
File name |
Amd64_05a377c22fa7f195a8231fa658e6f73d_31bf3856ad364e35_6.2.9200.17646_none_cf4c64515edf536f.manifest |
|
File version |
Not applicable |
|
File size |
721 |
|
Date (UTC) |
04-Feb-2016 |
|
Time (UTC) |
23:07 |
|
Platform |
Not applicable |
|
File name |
Amd64_0793b6ab1ee1060582efddb60156aed5_31bf3856ad364e35_6.2.9200.17646_none_16aa4080ea4a04b5.manifest |
|
File version |
Not applicable |
|
File size |
721 |
|
Date (UTC) |
04-Feb-2016 |
|
Time (UTC) |
23:07 |
|
Platform |
Not applicable |
|
File name |
Amd64_1a29208ec7b9047f1e3d9b20f952ff34_31bf3856ad364e35_6.2.9200.17646_none_b2a90efdb4293d51.manifest |
|
File version |
Not applicable |
|
File size |
721 |
|
Date (UTC) |
04-Feb-2016 |
|
Time (UTC) |
23:07 |
|
Platform |
Not applicable |
|
File name |
Amd64_214c9272b9dc92ab2c34f14a4df1e1ae_31bf3856ad364e35_6.2.9200.17646_none_6d6d3ab898e51b3f.manifest |
|
File version |
Not applicable |
|
File size |
704 |
|
Date (UTC) |
04-Feb-2016 |
|
Time (UTC) |
23:07 |
|
Platform |
Not applicable |
|
File name |
Amd64_21652096aa640c9fb673c30c3c333bef_31bf3856ad364e35_6.2.9200.17646_none_427cec9042baa10c.manifest |
|
File version |
Not applicable |
|
File size |
721 |
|
Date (UTC) |
04-Feb-2016 |
|
Time (UTC) |
23:07 |
|
Platform |
Not applicable |
|
File name |
Amd64_24447995be5abb294f0fa33279c7507b_31bf3856ad364e35_6.2.9200.17646_none_019d3eb2a18c79b7.manifest |
|
File version |
Not applicable |
|
File size |
695 |
|
Date (UTC) |
04-Feb-2016 |
|
Time (UTC) |
23:07 |
|
Platform |
Not applicable |
|
File name |
Amd64_27e6cf50b9993246499d71e5ae0cf84b_31bf3856ad364e35_6.2.9200.17646_none_418b14255a2878af.manifest |
|
File version |
Not applicable |
|
File size |
721 |
|
Date (UTC) |
04-Feb-2016 |
|
Time (UTC) |
23:07 |
|
Platform |
Not applicable |
|
File name |
Amd64_2b9d8ca1e34887c6adf1552ab07624dc_31bf3856ad364e35_6.2.9200.17646_none_cb58f4d5ccd7072f.manifest |
|
File version |
Not applicable |
|
File size |
721 |
|
Date (UTC) |
04-Feb-2016 |
|
Time (UTC) |
23:07 |
|
Platform |
Not applicable |
|
File name |
Amd64_35aa6ed8dd6c09fd2449045a24aa6bfd_31bf3856ad364e35_6.2.9200.17646_none_517cb545f2f165ae.manifest |
|
File version |
Not applicable |
|
File size |
683 |
|
Date (UTC) |
04-Feb-2016 |
|
Time (UTC) |
23:07 |
|
Platform |
Not applicable |
|
File name |
Amd64_35f5fdfe099710499074a1b8ca68c809_31bf3856ad364e35_6.2.9200.21765_none_1814a7c5a636a4a0.manifest |
|
File version |
Not applicable |
|
File size |
721 |
|
Date (UTC) |
04-Feb-2016 |
|
Time (UTC) |
23:07 |
|
Platform |
Not applicable |
|
File name |
Amd64_37983c333b72bbd2140709ef32d2f4f5_31bf3856ad364e35_6.2.9200.17646_none_bcca16c2faeac51b.manifest |
|
File version |
Not applicable |
|
File size |
721 |
|
Date (UTC) |
04-Feb-2016 |
|
Time (UTC) |
23:07 |
|
Platform |
Not applicable |
|
File name |
Amd64_3973c2187deda10102ca2cc3306f8ba8_31bf3856ad364e35_6.2.9200.21765_none_7a6e20bda891a44d.manifest |
|
File version |
Not applicable |
|
File size |
721 |
|
Date (UTC) |
04-Feb-2016 |
|
Time (UTC) |
23:07 |
|
Platform |
Not applicable |
|
File name |
Amd64_3bb262fbd27d69a53f426f1db9f3814e_31bf3856ad364e35_6.2.9200.17646_none_0e8b7b3c355a9637.manifest |
|
File version |
Not applicable |
|
File size |
721 |
|
Date (UTC) |
04-Feb-2016 |
|
Time (UTC) |
23:07 |
|
Platform |
Not applicable |
|
File name |
Amd64_3c1f0f13dc95f0dcf03929d202cd2f72_31bf3856ad364e35_6.2.9200.21765_none_1263301a57f77bf1.manifest |
|
File version |
Not applicable |
|
File size |
721 |
|
Date (UTC) |
04-Feb-2016 |
|
Time (UTC) |
23:07 |
|
Platform |
Not applicable |
|
File name |
Amd64_3f53f21d6f0d4ab1cbe3f0b1477c2b4e_31bf3856ad364e35_6.2.9200.17646_none_6dfa2ad079011be6.manifest |
|
File version |
Not applicable |
|
File size |
721 |
|
Date (UTC) |
04-Feb-2016 |
|
Time (UTC) |
23:07 |
|
Platform |
Not applicable |
|
File name |
Amd64_43fef97e5810600eab4d720d5e0e9f42_31bf3856ad364e35_6.2.9200.21765_none_3841c6b062cd1033.manifest |
|
File version |
Not applicable |
|
File size |
721 |
|
Date (UTC) |
04-Feb-2016 |
|
Time (UTC) |
23:07 |
|
Platform |
Not applicable |
|
File name |
Amd64_4ce70eec7f42dd76ff132da26a76f0ee_31bf3856ad364e35_6.2.9200.21765_none_d97e85c02d91191c.manifest |
|
File version |
Not applicable |
|
File size |
721 |
|
Date (UTC) |
04-Feb-2016 |
|
Time (UTC) |
23:07 |
|
Platform |
Not applicable |
|
File name |
Amd64_67f4fce5e5632336011b69403bac1803_31bf3856ad364e35_6.2.9200.17646_none_9552a05ec3cd0d65.manifest |
|
File version |
Not applicable |
|
File size |
721 |
|
Date (UTC) |
04-Feb-2016 |
|
Time (UTC) |
23:07 |
|
Platform |
Not applicable |
|
File name |
Amd64_6955e3f5778377bbf4805707d256dec3_31bf3856ad364e35_6.2.9200.21765_none_cfeca3d2a6dcd3d3.manifest |
|
File version |
Not applicable |
|
File size |
695 |
|
Date (UTC) |
04-Feb-2016 |
|
Time (UTC) |
23:07 |
|
Platform |
Not applicable |
|
File name |
Amd64_6c3d8f489b60d9708669ba45e81856d4_31bf3856ad364e35_6.2.9200.21765_none_2dd37fbc922e650c.manifest |
|
File version |
Not applicable |
|
File size |
721 |
|
Date (UTC) |
04-Feb-2016 |
|
Time (UTC) |
23:07 |
|
Platform |
Not applicable |
|
File name |
Amd64_6c835c7603e5285f5a8b6d09650496c8_31bf3856ad364e35_6.2.9200.17646_none_4e21b6ab52b94bb3.manifest |
|
File version |
Not applicable |
|
File size |
721 |
|
Date (UTC) |
04-Feb-2016 |
|
Time (UTC) |
23:07 |
|
Platform |
Not applicable |
|
File name |
Amd64_70097b9bd390089f575338b185b39303_31bf3856ad364e35_6.2.9200.21765_none_5774eb3ea808e9c3.manifest |
|
File version |
Not applicable |
|
File size |
721 |
|
Date (UTC) |
04-Feb-2016 |
|
Time (UTC) |
23:07 |
|
Platform |
Not applicable |
|
File name |
Amd64_75d879f43843667139dcbdb1942e25a3_31bf3856ad364e35_6.2.9200.21765_none_061a80c615d72616.manifest |
|
File version |
Not applicable |
|
File size |
721 |
|
Date (UTC) |
04-Feb-2016 |
|
Time (UTC) |
23:07 |
|
Platform |
Not applicable |
|
File name |
Amd64_7e0dbdab9837f8c4d9707151034b668b_31bf3856ad364e35_6.2.9200.21765_none_e1058562d0199659.manifest |
|
File version |
Not applicable |
|
File size |
721 |
|
Date (UTC) |
04-Feb-2016 |
|
Time (UTC) |
23:07 |
|
Platform |
Not applicable |
|
File name |
Amd64_86efc56cf4faedad7fad7541f20405e8_31bf3856ad364e35_6.2.9200.17646_none_05313366463dc14c.manifest |
|
File version |
Not applicable |
|
File size |
721 |
|
Date (UTC) |
04-Feb-2016 |
|
Time (UTC) |
23:07 |
|
Platform |
Not applicable |
|
File name |
Amd64_93c45463496726fb1d0abd703c9c4e1e_31bf3856ad364e35_6.2.9200.21765_none_e6d0e17a67fecf04.manifest |
|
File version |
Not applicable |
|
File size |
721 |
|
Date (UTC) |
04-Feb-2016 |
|
Time (UTC) |
23:07 |
|
Platform |
Not applicable |
|
File name |
Amd64_a8234c82858e13e07ccad75376b5d3a9_31bf3856ad364e35_6.2.9200.21765_none_039f075620615f67.manifest |
|
File version |
Not applicable |
|
File size |
721 |
|
Date (UTC) |
04-Feb-2016 |
|
Time (UTC) |
23:07 |
|
Platform |
Not applicable |
|
File name |
Amd64_ad53090a9a51f4ebac091577f36280fa_31bf3856ad364e35_6.2.9200.21765_none_00590c6705de397a.manifest |
|
File version |
Not applicable |
|
File size |
721 |
|
Date (UTC) |
04-Feb-2016 |
|
Time (UTC) |
23:07 |
|
Platform |
Not applicable |
|
File name |
Amd64_b96bca87ec24a3eb0f403113b50d3d31_31bf3856ad364e35_6.2.9200.21765_none_95a00153b6630846.manifest |
|
File version |
Not applicable |
|
File size |
721 |
|
Date (UTC) |
04-Feb-2016 |
|
Time (UTC) |
23:07 |
|
Platform |
Not applicable |
|
File name |
Amd64_bb32ace34f445d5f62eeab14f8699453_31bf3856ad364e35_6.2.9200.17646_none_700e32bf0038e06d.manifest |
|
File version |
Not applicable |
|
File size |
721 |
|
Date (UTC) |
04-Feb-2016 |
|
Time (UTC) |
23:07 |
|
Platform |
Not applicable |
|
File name |
Amd64_c223184e1159438691bde151d158225b_31bf3856ad364e35_6.2.9200.21765_none_b324f158e1742fdb.manifest |
|
File version |
Not applicable |
|
File size |
721 |
|
Date (UTC) |
04-Feb-2016 |
|
Time (UTC) |
23:07 |
|
Platform |
Not applicable |
|
File name |
Amd64_c6c8744437cdf52e6e8bd3ff7fe1d00c_31bf3856ad364e35_6.2.9200.21765_none_c758a188c593025b.manifest |
|
File version |
Not applicable |
|
File size |
721 |
|
Date (UTC) |
04-Feb-2016 |
|
Time (UTC) |
23:07 |
|
Platform |
Not applicable |
|
File name |
Amd64_cd990e1d5d04c1fbf831455af3f57a1e_31bf3856ad364e35_6.2.9200.21765_none_7b952399553833cc.manifest |
|
File version |
Not applicable |
|
File size |
683 |
|
Date (UTC) |
04-Feb-2016 |
|
Time (UTC) |
23:07 |
|
Platform |
Not applicable |
|
File name |
Amd64_cefe55543bdaf8308f60e9c7488589ee_31bf3856ad364e35_6.2.9200.21765_none_9a36c36325461f98.manifest |
|
File version |
Not applicable |
|
File size |
704 |
|
Date (UTC) |
04-Feb-2016 |
|
Time (UTC) |
23:07 |
|
Platform |
Not applicable |
|
File name |
Amd64_d3e8f67453aad153cf1bc43304f4db15_31bf3856ad364e35_6.2.9200.21765_none_7adafcdc5b4d9a2c.manifest |
|
File version |
Not applicable |
|
File size |
721 |
|
Date (UTC) |
04-Feb-2016 |
|
Time (UTC) |
23:07 |
|
Platform |
Not applicable |
|
File name |
Amd64_d4119d91bce575932786190840db6631_31bf3856ad364e35_6.2.9200.17646_none_3c3913dda56087dd.manifest |
|
File version |
Not applicable |
|
File size |
721 |
|
Date (UTC) |
04-Feb-2016 |
|
Time (UTC) |
23:07 |
|
Platform |
Not applicable |
|
File name |
Amd64_d6eb17770af038ac1da9417965bbbe0d_31bf3856ad364e35_6.2.9200.17646_none_79efc219f38bed61.manifest |
|
File version |
Not applicable |
|
File size |
697 |
|
Date (UTC) |
04-Feb-2016 |
|
Time (UTC) |
23:07 |
|
Platform |
Not applicable |
|
File name |
Amd64_d8870a21d8cd981298dca90672bde7ad_31bf3856ad364e35_6.2.9200.17646_none_a132f47e1da26662.manifest |
|
File version |
Not applicable |
|
File size |
721 |
|
Date (UTC) |
04-Feb-2016 |
|
Time (UTC) |
23:07 |
|
Platform |
Not applicable |
|
File name |
Amd64_dad4d041be28a50c78b159c7a4e0530d_31bf3856ad364e35_6.2.9200.21765_none_d45a70abfc9b9165.manifest |
|
File version |
Not applicable |
|
File size |
697 |
|
Date (UTC) |
04-Feb-2016 |
|
Time (UTC) |
23:07 |
|
Platform |
Not applicable |
|
File name |
Amd64_db62ef6fb77b7fe23a0e01415649deee_31bf3856ad364e35_6.2.9200.21765_none_2b3e53edfb2c0d88.manifest |
|
File version |
Not applicable |
|
File size |
721 |
|
Date (UTC) |
04-Feb-2016 |
|
Time (UTC) |
23:07 |
|
Platform |
Not applicable |
|
File name |
Amd64_e36fbebf0b0a91b2fc570af26c7d60e3_31bf3856ad364e35_6.2.9200.21765_none_fb06074103dbbbf9.manifest |
|
File version |
Not applicable |
|
File size |
721 |
|
Date (UTC) |
04-Feb-2016 |
|
Time (UTC) |
23:07 |
|
Platform |
Not applicable |
|
File name |
Amd64_eb3e440f1bc5adaeda113d35f52c4b31_31bf3856ad364e35_6.2.9200.17646_none_6fd5a339e963b5af.manifest |
|
File version |
Not applicable |
|
File size |
721 |
|
Date (UTC) |
04-Feb-2016 |
|
Time (UTC) |
23:07 |
|
Platform |
Not applicable |
|
File name |
Amd64_f0cadb0cd11da918a3b19361609cfd7c_31bf3856ad364e35_6.2.9200.17646_none_5d9c7a28810131b4.manifest |
|
File version |
Not applicable |
|
File size |
721 |
|
Date (UTC) |
04-Feb-2016 |
|
Time (UTC) |
23:07 |
|
Platform |
Not applicable |
|
File name |
Amd64_f1b76eef2080f4b2bfaa0b6d15314244_31bf3856ad364e35_6.2.9200.17646_none_4f35fc9017b81342.manifest |
|
File version |
Not applicable |
|
File size |
721 |
|
Date (UTC) |
04-Feb-2016 |
|
Time (UTC) |
23:07 |
|
Platform |
Not applicable |
|
File name |
Amd64_f874993e017bda5cdcd6a5bd081e89d6_31bf3856ad364e35_6.2.9200.21765_none_f80e4a192ae5040d.manifest |
|
File version |
Not applicable |
|
File size |
721 |
|
Date (UTC) |
04-Feb-2016 |
|
Time (UTC) |
23:07 |
|
Platform |
Not applicable |
|
File name |
Amd64_fbe6850ff0e8f044f24f270053b93e01_31bf3856ad364e35_6.2.9200.17646_none_6bfa1d4b837f6c4a.manifest |
|
File version |
Not applicable |
|
File size |
721 |
|
Date (UTC) |
04-Feb-2016 |
|
Time (UTC) |
23:07 |
|
Platform |
Not applicable |
|
File name |
Amd64_updateservices-database-common_31bf3856ad364e35_6.2.9200.17646_none_d5beda46b51af18b.manifest |
|
File version |
Not applicable |
|
File size |
13,981 |
|
Date (UTC) |
03-Feb-2016 |
|
Time (UTC) |
18:10 |
|
Platform |
Not applicable |
|
File name |
Amd64_updateservices-database-common_31bf3856ad364e35_6.2.9200.21765_none_d631d6efce49afe0.manifest |
|
File version |
Not applicable |
|
File size |
13,981 |
|
Date (UTC) |
03-Feb-2016 |
|
Time (UTC) |
18:07 |
|
Platform |
Not applicable |
|
File name |
Amd64_updateservices-services_31bf3856ad364e35_6.2.9200.17646_none_d7bbf51c48e99fbc.manifest |
|
File version |
Not applicable |
|
File size |
55,225 |
|
Date (UTC) |
04-Feb-2016 |
|
Time (UTC) |
23:07 |
|
Platform |
Not applicable |
|
File name |
Amd64_updateservices-services_31bf3856ad364e35_6.2.9200.21765_none_d82ef1c562185e11.manifest |
|
File version |
Not applicable |
|
File size |
55,225 |
|
Date (UTC) |
04-Feb-2016 |
|
Time (UTC) |
23:07 |
|
Platform |
Not applicable |
|
File name |
Amd64_updateservices-snapin_31bf3856ad364e35_6.2.9200.17646_none_678a29d9cbd8a2df.manifest |
|
File version |
Not applicable |
|
File size |
29,016 |
|
Date (UTC) |
04-Feb-2016 |
|
Time (UTC) |
23:07 |
|
Platform |
Not applicable |
|
File name |
Amd64_updateservices-snapin_31bf3856ad364e35_6.2.9200.21765_none_67fd2682e5076134.manifest |
|
File version |
Not applicable |
|
File size |
29,016 |
|
Date (UTC) |
04-Feb-2016 |
|
Time (UTC) |
23:07 |
|
Platform |
Not applicable |
|
File name |
Msil_microsoft.updateser..resources.resources_31bf3856ad364e35_6.2.9200.17646_cs-cz_f3ba7e75bfbfd8b1.manifest |
|
File version |
Not applicable |
|
File size |
1,611 |
|
Date (UTC) |
03-Feb-2016 |
|
Time (UTC) |
21:16 |
|
Platform |
Not applicable |
|
File name |
Msil_microsoft.updateser..resources.resources_31bf3856ad364e35_6.2.9200.17646_de-de_8e1ff3d8b7dc294a.manifest |
|
File version |
Not applicable |
|
File size |
1,611 |
|
Date (UTC) |
03-Feb-2016 |
|
Time (UTC) |
21:39 |
|
Platform |
Not applicable |
|
File name |
Msil_microsoft.updateser..resources.resources_31bf3856ad364e35_6.2.9200.17646_en-us_3710c9d1a6ba350f.manifest |
|
File version |
Not applicable |
|
File size |
1,611 |
|
Date (UTC) |
03-Feb-2016 |
|
Time (UTC) |
17:13 |
|
Platform |
Not applicable |
|
File name |
Msil_microsoft.updateser..resources.resources_31bf3856ad364e35_6.2.9200.17646_es-es_36dc26b5a6e126b4.manifest |
|
File version |
Not applicable |
|
File size |
1,611 |
|
Date (UTC) |
03-Feb-2016 |
|
Time (UTC) |
21:33 |
|
Platform |
Not applicable |
|
File name |
Msil_microsoft.updateser..resources.resources_31bf3856ad364e35_6.2.9200.17646_fr-fr_d9939cb499b33d16.manifest |
|
File version |
Not applicable |
|
File size |
1,611 |
|
Date (UTC) |
03-Feb-2016 |
|
Time (UTC) |
21:52 |
|
Platform |
Not applicable |
|
File name |
Msil_microsoft.updateser..resources.resources_31bf3856ad364e35_6.2.9200.17646_hu-hu_21041cfc7e130c32.manifest |
|
File version |
Not applicable |
|
File size |
1,611 |
|
Date (UTC) |
03-Feb-2016 |
|
Time (UTC) |
21:21 |
|
Platform |
Not applicable |
|
File name |
Msil_microsoft.updateser..resources.resources_31bf3856ad364e35_6.2.9200.17646_it-it_c3bb92fb70e52294.manifest |
|
File version |
Not applicable |
|
File size |
1,611 |
|
Date (UTC) |
03-Feb-2016 |
|
Time (UTC) |
20:56 |
|
Platform |
Not applicable |
|
File name |
Msil_microsoft.updateser..resources.resources_31bf3856ad364e35_6.2.9200.17646_ja-jp_65e112086400346f.manifest |
|
File version |
Not applicable |
|
File size |
1,611 |
|
Date (UTC) |
03-Feb-2016 |
|
Time (UTC) |
20:45 |
|
Platform |
Not applicable |
|
File name |
Msil_microsoft.updateser..resources.resources_31bf3856ad364e35_6.2.9200.17646_ko-kr_094aeebd5670fb85.manifest |
|
File version |
Not applicable |
|
File size |
1,611 |
|
Date (UTC) |
03-Feb-2016 |
|
Time (UTC) |
20:47 |
|
Platform |
Not applicable |
|
File name |
Msil_microsoft.updateser..resources.resources_31bf3856ad364e35_6.2.9200.17646_nl-nl_f01cbb302fc23116.manifest |
|
File version |
Not applicable |
|
File size |
1,611 |
|
Date (UTC) |
03-Feb-2016 |
|
Time (UTC) |
21:27 |
|
Platform |
Not applicable |
|
File name |
Msil_microsoft.updateser..resources.resources_31bf3856ad364e35_6.2.9200.17646_pl-pl_365915b214e49eca.manifest |
|
File version |
Not applicable |
|
File size |
1,611 |
|
Date (UTC) |
03-Feb-2016 |
|
Time (UTC) |
21:22 |
|
Platform |
Not applicable |
|
File name |
Msil_microsoft.updateser..resources.resources_31bf3856ad364e35_6.2.9200.17646_pt-br_38ad0056136e32ae.manifest |
|
File version |
Not applicable |
|
File size |
1,614 |
|
Date (UTC) |
03-Feb-2016 |
|
Time (UTC) |
20:56 |
|
Platform |
Not applicable |
|
File name |
Msil_microsoft.updateser..resources.resources_31bf3856ad364e35_6.2.9200.17646_pt-pt_398ecfc212dda28a.manifest |
|
File version |
Not applicable |
|
File size |
1,611 |
|
Date (UTC) |
03-Feb-2016 |
|
Time (UTC) |
20:48 |
|
Platform |
Not applicable |
|
File name |
Msil_microsoft.updateser..resources.resources_31bf3856ad364e35_6.2.9200.17646_ru-ru_8031e185f7bf30b6.manifest |
|
File version |
Not applicable |
|
File size |
1,611 |
|
Date (UTC) |
03-Feb-2016 |
|
Time (UTC) |
20:59 |
|
Platform |
Not applicable |
|
File name |
Msil_microsoft.updateser..resources.resources_31bf3856ad364e35_6.2.9200.17646_sv-se_1c2ccbfaeee83b11.manifest |
|
File version |
Not applicable |
|
File size |
1,611 |
|
Date (UTC) |
03-Feb-2016 |
|
Time (UTC) |
21:00 |
|
Platform |
Not applicable |
|
File name |
Msil_microsoft.updateser..resources.resources_31bf3856ad364e35_6.2.9200.17646_tr-tr_c53a1641dda43d02.manifest |
|
File version |
Not applicable |
|
File size |
1,611 |
|
Date (UTC) |
03-Feb-2016 |
|
Time (UTC) |
21:52 |
|
Platform |
Not applicable |
|
File name |
Msil_microsoft.updateser..resources.resources_31bf3856ad364e35_6.2.9200.17646_zh-cn_9697343f8ddc0f21.manifest |
|
File version |
Not applicable |
|
File size |
1,616 |
|
Date (UTC) |
03-Feb-2016 |
|
Time (UTC) |
21:24 |
|
Platform |
Not applicable |
|
File name |
Msil_microsoft.updateser..resources.resources_31bf3856ad364e35_6.2.9200.17646_zh-hk_95422ccd8eb781b1.manifest |
|
File version |
Not applicable |
|
File size |
1,614 |
|
Date (UTC) |
03-Feb-2016 |
|
Time (UTC) |
21:54 |
|
Platform |
Not applicable |
|
File name |
Msil_microsoft.updateser..resources.resources_31bf3856ad364e35_6.2.9200.17646_zh-tw_9a9371958b4ceb91.manifest |
|
File version |
Not applicable |
|
File size |
1,616 |
|
Date (UTC) |
03-Feb-2016 |
|
Time (UTC) |
21:02 |
|
Platform |
Not applicable |
|
File name |
Msil_microsoft.updateser..resources.resources_31bf3856ad364e35_6.2.9200.21765_cs-cz_f42d7b1ed8ee9706.manifest |
|
File version |
Not applicable |
|
File size |
1,611 |
|
Date (UTC) |
03-Feb-2016 |
|
Time (UTC) |
21:22 |
|
Platform |
Not applicable |
|
File name |
Msil_microsoft.updateser..resources.resources_31bf3856ad364e35_6.2.9200.21765_de-de_8e92f081d10ae79f.manifest |
|
File version |
Not applicable |
|
File size |
1,611 |
|
Date (UTC) |
03-Feb-2016 |
|
Time (UTC) |
21:36 |
|
Platform |
Not applicable |
|
File name |
Msil_microsoft.updateser..resources.resources_31bf3856ad364e35_6.2.9200.21765_en-us_3783c67abfe8f364.manifest |
|
File version |
Not applicable |
|
File size |
1,611 |
|
Date (UTC) |
03-Feb-2016 |
|
Time (UTC) |
18:01 |
|
Platform |
Not applicable |
|
File name |
Msil_microsoft.updateser..resources.resources_31bf3856ad364e35_6.2.9200.21765_es-es_374f235ec00fe509.manifest |
|
File version |
Not applicable |
|
File size |
1,611 |
|
Date (UTC) |
03-Feb-2016 |
|
Time (UTC) |
21:24 |
|
Platform |
Not applicable |
|
File name |
Msil_microsoft.updateser..resources.resources_31bf3856ad364e35_6.2.9200.21765_fr-fr_da06995db2e1fb6b.manifest |
|
File version |
Not applicable |
|
File size |
1,611 |
|
Date (UTC) |
03-Feb-2016 |
|
Time (UTC) |
22:24 |
|
Platform |
Not applicable |
|
File name |
Msil_microsoft.updateser..resources.resources_31bf3856ad364e35_6.2.9200.21765_hu-hu_217719a59741ca87.manifest |
|
File version |
Not applicable |
|
File size |
1,611 |
|
Date (UTC) |
03-Feb-2016 |
|
Time (UTC) |
21:19 |
|
Platform |
Not applicable |
|
File name |
Msil_microsoft.updateser..resources.resources_31bf3856ad364e35_6.2.9200.21765_it-it_c42e8fa48a13e0e9.manifest |
|
File version |
Not applicable |
|
File size |
1,611 |
|
Date (UTC) |
03-Feb-2016 |
|
Time (UTC) |
21:54 |
|
Platform |
Not applicable |
|
File name |
Msil_microsoft.updateser..resources.resources_31bf3856ad364e35_6.2.9200.21765_ja-jp_66540eb17d2ef2c4.manifest |
|
File version |
Not applicable |
|
File size |
1,611 |
|
Date (UTC) |
03-Feb-2016 |
|
Time (UTC) |
21:36 |
|
Platform |
Not applicable |
|
File name |
Msil_microsoft.updateser..resources.resources_31bf3856ad364e35_6.2.9200.21765_ko-kr_09bdeb666f9fb9da.manifest |
|
File version |
Not applicable |
|
File size |
1,611 |
|
Date (UTC) |
03-Feb-2016 |
|
Time (UTC) |
21:42 |
|
Platform |
Not applicable |
|
File name |
Msil_microsoft.updateser..resources.resources_31bf3856ad364e35_6.2.9200.21765_nl-nl_f08fb7d948f0ef6b.manifest |
|
File version |
Not applicable |
|
File size |
1,611 |
|
Date (UTC) |
03-Feb-2016 |
|
Time (UTC) |
21:13 |
|
Platform |
Not applicable |
|
File name |
Msil_microsoft.updateser..resources.resources_31bf3856ad364e35_6.2.9200.21765_pl-pl_36cc125b2e135d1f.manifest |
|
File version |
Not applicable |
|
File size |
1,611 |
|
Date (UTC) |
03-Feb-2016 |
|
Time (UTC) |
21:20 |
|
Platform |
Not applicable |
|
File name |
Msil_microsoft.updateser..resources.resources_31bf3856ad364e35_6.2.9200.21765_pt-br_391ffcff2c9cf103.manifest |
|
File version |
Not applicable |
|
File size |
1,614 |
|
Date (UTC) |
03-Feb-2016 |
|
Time (UTC) |
21:51 |
|
Platform |
Not applicable |
|
File name |
Msil_microsoft.updateser..resources.resources_31bf3856ad364e35_6.2.9200.21765_pt-pt_3a01cc6b2c0c60df.manifest |
|
File version |
Not applicable |
|
File size |
1,611 |
|
Date (UTC) |
03-Feb-2016 |
|
Time (UTC) |
21:11 |
|
Platform |
Not applicable |
|
File name |
Msil_microsoft.updateser..resources.resources_31bf3856ad364e35_6.2.9200.21765_ru-ru_80a4de2f10edef0b.manifest |
|
File version |
Not applicable |
|
File size |
1,611 |
|
Date (UTC) |
03-Feb-2016 |
|
Time (UTC) |
21:17 |
|
Platform |
Not applicable |
|
File name |
Msil_microsoft.updateser..resources.resources_31bf3856ad364e35_6.2.9200.21765_sv-se_1c9fc8a40816f966.manifest |
|
File version |
Not applicable |
|
File size |
1,611 |
|
Date (UTC) |
03-Feb-2016 |
|
Time (UTC) |
21:09 |
|
Platform |
Not applicable |
|
File name |
Msil_microsoft.updateser..resources.resources_31bf3856ad364e35_6.2.9200.21765_tr-tr_c5ad12eaf6d2fb57.manifest |
|
File version |
Not applicable |
|
File size |
1,611 |
|
Date (UTC) |
03-Feb-2016 |
|
Time (UTC) |
20:53 |
|
Platform |
Not applicable |
|
File name |
Msil_microsoft.updateser..resources.resources_31bf3856ad364e35_6.2.9200.21765_zh-cn_970a30e8a70acd76.manifest |
|
File version |
Not applicable |
|
File size |
1,616 |
|
Date (UTC) |
03-Feb-2016 |
|
Time (UTC) |
21:02 |
|
Platform |
Not applicable |
|
File name |
Msil_microsoft.updateser..resources.resources_31bf3856ad364e35_6.2.9200.21765_zh-hk_95b52976a7e64006.manifest |
|
File version |
Not applicable |
|
File size |
1,614 |
|
Date (UTC) |
03-Feb-2016 |
|
Time (UTC) |
22:12 |
|
Platform |
Not applicable |
|
File name |
Msil_microsoft.updateser..resources.resources_31bf3856ad364e35_6.2.9200.21765_zh-tw_9b066e3ea47ba9e6.manifest |
|
File version |
Not applicable |
|
File size |
1,616 |
|
Date (UTC) |
03-Feb-2016 |
|
Time (UTC) |
21:24 |
|
Platform |
Not applicable |
|
File name |
Msil_microsoft.updateservices.baseapi_31bf3856ad364e35_6.2.9200.17646_none_dac2b032db92476a.manifest |
|
File version |
Not applicable |
|
File size |
1,396 |
|
Date (UTC) |
03-Feb-2016 |
|
Time (UTC) |
18:10 |
|
Platform |
Not applicable |
|
File name |
Msil_microsoft.updateservices.baseapi_31bf3856ad364e35_6.2.9200.21765_none_c3f720cef537c07d.manifest |
|
File version |
Not applicable |
|
File size |
1,396 |
|
Date (UTC) |
03-Feb-2016 |
|
Time (UTC) |
18:07 |
|
Platform |
Not applicable |
|
File name |
Update.mum |
|
File version |
Not applicable |
|
File size |
15,008 |
|
Date (UTC) |
04-Feb-2016 |
|
Time (UTC) |
23:07 |
|
Platform |
Not applicable |
Hi,
in this post I will describe all steps to install a Windows Update Server at top an a Windows Server 2012R2 to fully support the Windows 10 Feature updates.
First of all install a Windows Server 2012R2 and install all updates. Especially KB2919355 is requiered. Windows Server2008 R2 with WSUS 3 SP2 only support Windows 10 Updates, not Features.
To install WSUS simply enable the
D:\> Install-WindowsFeature -Name UpdateServices,UpdateServices-Services,UpdateServices-WidDB -IncludeManagementTools
Success Restart Needed Exit Code      Feature Result
------- -------------- ---------      --------------
True    No             Success        {ASP.NET 4.5, Windows Server Update Servic...
WARNING: Additional configuration may be required. Review the article Managing WSUS Using PowerShell at TechNet Library
(http://go.microsoft.com/fwlink/?LinkId=235499) for more information on the recommended steps to perform WSUS installation using
PowerShell.
Before starting the sync, 2 fixes must be installed to enable Windows 10 Feature support. Its importent to install these fixes before syncing updates otherwise all previously synced updates have to delete and you have to start resync again after installation.
Check for Update KB2919355 and install updates KB3095113 (Enable Feature Support) and KB3159706 (ESD Decryption support).
C:\Windows\system32>systeminfo|findstr /i 2919355
                           [03]: KB2919355
c:\> wusa Windows8.1-KB3095113-v2-x64.msu
c:\> wusa AMD64-all-windows8.1-kb3159706-x64.msu
Create a Directory where the Updates are stored
D:\> mkdir D:\WSUS
D:\> & "C:\Program Files\Update Services\Tools\WsusUtil.exe" postinstall CONTENT_DIR=D:\WSUS
Enable WSUS and IIS Service
D:\> sc config W3SVC start= delayed-auto
D:\> sc config WsusService start= delayed-auto
D:\> sc config WSusCertServer start= delayed-auto
To change the default TCP Ports, a custom website must be enabled (default after installation)
D:\> wsusutil usecustomwebsite true
Let us assume http should be TCP/22222, then the https port must be httpPort+1 => 22223
Change the IIS Ports of the customwebsite. Open the IIS Management Console
you also have to change the http port in the registry to tell the WSUSUpdate Service on which port the IIS is running.
D:\> reg add "HKEY_LOCAL_MACHINE\SOFTWARE\Microsoft\Update Services\Server\Setup" /t REG_DWORD /v PortNumber /d 22222 /f
Adjust both WSUS incoming firewall rules (TCP Ports 8530=>22222 and 8531=>22223)
Reboot to get all changes active.
Addionally you have to install the Microsoft Microsoft Report Viewer to have a look at the Reports of Updates and Clients.
Start MMC and connect.
Update: If you have a large number of client which connects to your WSUS, the default settings for the IIS WSUS Apppool could be to conservative. The WsusPool then goes temporary offline. If this happens try to increase “Queue Length” and the “Private memory limit” properties of the Apppool.
To resolve the issue open System EventLog and Filter for EventSource WAS.
Increase Queue Limit
Disable worker process limit
Increase Memory limit
Also disable the SQL remote query timeout. Connect to the SQL Server and set timeout to 0 (disable timeout)
USE SUSDB ;
GO
EXEC sp_configure 'remote query timeout', 0 ;
GO
RECONFIGURE ;
GO
otherwise in some replication scenarios a SQL timeout will occur:
SqlException: Timeout expired.  The timeout period elapsed prior to completion of the operation or the server is not responding. ---> System.ComponentModel.Win32Exception: The wait operation timed out

at Microsoft.UpdateServices.DatabaseAccess.DBConnection.DrainObsoleteConnections(SqlException e)

   at Microsoft.UpdateServices.DatabaseAccess.DBConnection.ExecuteReader()

   at Microsoft.UpdateServices.Internal.DataAccess.HideUpdatesForReplicaSync(String xmlHiddenUpdateIds, String xmlAllUpdatesIds)

   at Microsoft.UpdateServices.ServerSync.CatalogSyncAgentCore.ProcessHiddenUpdates(Guid[] hiddenUpdates, UpdateIdentity[] allUpdates)

   at Microsoft.UpdateServices.ServerSync.CatalogSyncAgentCore.ReplicaSync()

   at Microsoft.UpdateServices.ServerSync.CatalogSyncAgentCore.ExecuteSyncProtocol(Boolean allowRedirect)
If you want to upgrade Windows 10 to a new feature version, i.e. 1511 to 1607 the IIS must known how to handle .esd files. Add the MIME Type application/octet-stream for file extension .esd to IIS by using the IIS Management Console
On the clients the Policy “User Configuration/Administrative Templates/Windows Components/Store/Turn off the offer to update to the latest version of Windows” must not be set. Check the registry key
C:\> reg query HKLM\Software\Policies\Microsoft\WindowsStore -v DisableOSUpgrade
    DisableOSUpgrade    REG_DWORD    0x0
Michael
Ref: Windows 10 Update History
Migration from WID to SQL Server
Microsoft официально объявила, что службы обновления Windows Server Update Services (WSUS) теперь устарели, но планирует сохранить их текущую функциональность и продолжить публикацию обновлений через канал.

Microsoft впервые указала WSUS как одну из «функций, удалённых или больше не разрабатываемых, начиная с Windows Server 2025» 13 августа. В июне компания также сообщила, что вскоре также упразднит синхронизацию драйверов WSUS.
Представленная в 2005 году как службы обновления программного обеспечения (SUS), WSUS позволяет IT-администраторам распространять и контролировать обновления для продуктов Microsoft в крупных корпоративных сетях, которым требуются последовательные и контролируемые обновления для большого количества устройств Windows. Она действует как посредник и предлагает централизованное управление обновлениями.
Хотя новые функции и разработка для WSUS прекратятся, Microsoft сегодня заявила, что планирует продолжить поддержку существующих функций и обновлений службы, которые будут распространяться даже после устаревания.
«В частности, это означает, что мы больше не инвестируем в новые возможности и не принимаем запросы на новые функции для WSUS. Однако мы сохраняем текущую функциональность и продолжим публиковать обновления через канал WSUS. Мы также будем поддерживать любой контент, уже опубликованный через канал WSUS», — заявил Нир Фроимовичи из Microsoft.
Изменение затрагивает корпоративные среды, которые полагаются на WSUS для управления обновлениями, доставляемыми на многие устройства, но не влияет на домашних пользователей или тех, кто использует Microsoft Configuration Manager.
После прекращения поддержки WSUS Microsoft призывает компании внедрять облачные решения для обновлений клиентов и серверов, такие как Windows Autopatch, Microsoft Intune и Azure Update Manager.
«Хотя роль WSUS остается доступной в Windows Server 2025, мы рекомендуем организациям перейти на облачные инструменты, включая Windows Autopatch и Microsoft Intune для управления обновлениями клиентов и Azure Update Manager для управления обновлениями сервера», — сказал Фроимовичи.
В июне Microsoft также официально прекратила поддержку аутентификации NTLM на Windows и серверах Windows, посоветовав разработчикам перейти на аутентификацию Kerberos или Negotiation, чтобы предотвратить будущие проблемы.
С помощью сервера обновлений Windows Server Update Services (WSUS) вы можете развернуть собственную централизованную систему обновления продуктов Microsoft (операционных систем Widows, Office, SQL Server, Exchange и т.д.) на компьютерах и серверах в локальной сети компании. В этой статье мы рассмотрим, как установить и настроить сервер обновлений WSUS в Windows Server 2019/2016/2012R2.
Содержание:
- Установка роли WSUS в Windows Server
- Начальная настройка сервера обновлений WSUS в Windows Server
- Установка консоли администрирования WSUS в Windows 10/11
- Оптимизация производительности WSUS
Как работает WSUS?
Сервер WSUS реализован в виде отдельной роли Windows Server. В общих словах сервис WSUS можно описать так:
- После установки сервер WSUS по расписанию синхронизируется с серверами обновлений Microsoft Update в Интернете и скачивает новые обновления для выбранных продуктов;
- Администратор WSUS выбирает, какие обновления нужно установить на рабочие станции и сервера компании и одобряет их установку;
- Клиенты WSUS в локальной сети скачивают и устанавливают обновления с вашего сервера обновлений согласно настроенным политикам.
Установка роли WSUS в Windows Server
Начиная с Windows Server 2008, сервис WSUS выделен в отдельную роль, которую можно установить через консоль управления сервером или с помощью PowerShell.
Если вы развертываете новый сервер WSUS, рекомендуется сразу устанавливать его на последнем релизе Windows Server 2022 (возможна установка на Windows Serve Core).
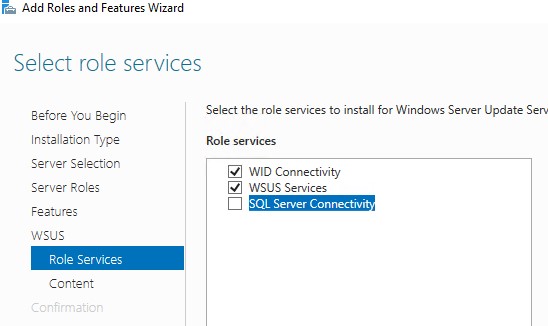
Чтобы установить WSUS, откройте консоль Server Manager и отметьте роль Windows Server Update Services (система автоматически выберет и предложит установить необходимые компоненты веб сервера IIS).

В следующем окне нужно выбрать, какие компоненты WSUS нужно установить. Обязательно отметьте опцию WSUS Services. Две следующие опции зависят от того, какую базу данных вы планируете использовать для WSUS.
Настройки сервера, метаданные обновлений, информация о клиентах WSUS хранятся в базе данных SQL Server. В качестве базы данных WSUS вы можете использовать:
- Windows Internal Database (WID) – встроенную базу данных Windows, опция WID Connectivity (это рекомендуемый и работоспособный вариант даже для больших инфраструктур);
- Отдельную базу Microsoft SQL Server, развернутую на локальном или удаленном сервере. Вы можете использовать редакции MS SQL Enterprise, Standard (требуют лицензирования) или бесплатную Express редакцию. Это опция SQL Server Connectivity.
Внутреннюю базу Windows (Windows Internal Database) рекомендуется использовать, если:
- У вас отсутствуют лицензии MS SQL Server;
- Вы не планируется использовать балансировку нагрузки на WSUS (NLB WSUS);
- При развертывании дочернего сервера WSUS (например, в филиалах). В этом случае на вторичных серверах рекомендуется использовать встроенную базу WSUS.
В бесплатной SQL Server Express Edition максимальный размер БД ограничен 10 Гб. Ограничение Windows Internal Database – 524 Гб. Например, в моей инфраструктуре размер базы данных WSUS на 3000 клиентов составил около 7Гб.
При установке роли WSUS и MS SQL Server на разных серверах есть ряд ограничений:
- SQL сервер с БД WSUS не может быть контроллером домена Active Directory;
- Сервер WSUS нельзя разворачивать на хосте с ролью Remote Desktop Services.
База WID по умолчанию называется SUSDB.mdf и хранится в каталоге windir%\wid\data\. Эта база поддерживает только Windows аутентификацию (но не SQL). Инстанс внутренней (WID) базы данных для WSUS называется server_name\Microsoft##WID.
Базу WID можно администрировать через SQL Server Management Studio (SSMS), если указать в строке подключения
\\.\pipe\MICROSOFT##WID\tsql\query
.
Если вы хотите хранить файлы обновлений локально на сервере WSUS, включите опцию Store updates in the following locations и укажите путь к каталогу. Это может быть папка на локальном диске (рекомендуется использовать отдельный физический или логический том), или сетевой каталог (UNC путь). Обновления скачиваются в указанный каталог только после их одобрения администратором WSUS.
Размер базы данных WSUS сильно зависит от количества продуктов и версий ОС Windows, которое вы планируете обновлять. В большой организации размер файлов обновлений на WSUS сервере может достигать сотни Гб.
Если у вас недостаточно места на дисках для хранения файлов обновлений, отключите эту опцию. В этом случае клиенты WSUS будут получать одобренный файлы обновлений из Интернета (вполне рабочий вариант для небольших сетей).

Также вы можете установить сервер WSUS с внутренней базой данный WID с помощью PowerShell командлета Install-WindowsFeature:
Install-WindowsFeature -Name UpdateServices, UpdateServices-WidDB, UpdateServices-Services, UpdateServices-RSAT, UpdateServices-API, UpdateServices-UI –IncludeManagementTools
Начальная настройка сервера обновлений WSUS в Windows Server
После окончания установки роли WSUS вам нужно выполнить его первоначальную настройку. Откройте Server Manager и выберите Post-Deployment Configuration -> Launch Post-Installation tasks.

Для управления WSUS из командной строки можно использовать консольную утилиту
WsusUtil.exe
. Например, чтобы указать путь к каталогу с файлами обновлений WSUS, выполните:
CD "C:\Program Files\Update Services\Tools"
WsusUtil.exe PostInstall CONTENT_DIR=E:\WSUS
Или, например, вы можете перенастроить ваш WSUS на внешнюю базу данных SQL Server:
wsusutil.exe postinstall SQL_INSTANCE_NAME="SQLSRV1\SQLINSTANCEWSUS" CONTENT_DIR=E:\WSUS_Content
Затем откройте консоль Windows Server Update Services. Запустится мастер первоначальной настройки сервера обновлений WSUS.
Укажите, будет ли сервер WSUS скачивать обновления с сайта Microsoft Update напрямую (Synchronize from Microsoft Update) или он должен получать их с вышестоящего WSUS сервера (Synchronize from another Windows Update Services server). Дочерние WSUS сервера обычно развертываются на удаленных площадках с большим количеством клиентов (300+) для снижения нагрузки на WAN канал.

Если в вашей сети используется прокси-сервер для доступа в Интернет, далее нужно указать адрес и порт прокси сервера, и логин/пароль для аутентификации.

Проверьте подключение к вышестоящему серверу обновлений (или Windows Update). Нажмите кнопку Start Connecting.

Выберите языки продуктов, для которых WSUS будет получать обновления. Мы укажем English и Russian (список языков может быть в дальнейшем изменен из консоли WSUS).

Затем выберите продукты, для которых WSUS должен скачивать обновления. Выберите только те продукты Microsoft, которые используются в Вашей корпоративной сети. Например, если вы уверены, что в вашей сети не осталось компьютеров с Windows 7 или Windows 8, не выбирайте эти опции.
Обязательно включите в классификации следующие общие разделы:
- Developer Tools, Runtimes, and Redistributable — для обновления библиотек Visual C++ Runtime
- Windows Dictionary Updates в категории Windows
- Windows Server Manager – Windows Server Update Services (WSUS) Dynamic Installer

На странице Classification Page, нужно указать типы обновлений, которые будут распространяться через WSUS. Рекомендуется обязательно указать: Critical Updates, Definition Updates, Security Packs, Service Packs, Update Rollups, Updates.
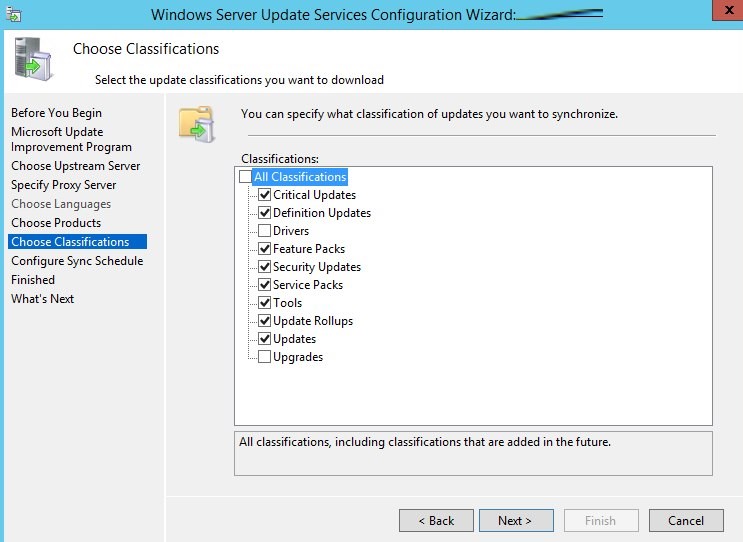
Обновления редакций (билдов) Windows 10 (21H2, 20H2, 1909 и т.д.) в консоли WSUS входят в класс Upgrades.
Настройте расписание синхронизации обновлений. В большинстве случаев рекомендуется использовать автоматическую ежедневную синхронизацию сервера WSUS с серверами обновлений Microsoft Update. Рекомендуется выполнять синхронизацию в ночные часы, чтобы не загружать канал Интернет в рабочее время.

Первоначальная синхронизация сервера WSUS с вышестоящим сервером обновлений может занять несколько дней (в зависимости от количества продуктов, которое вы выбрали ранее).
После окончания работы мастера запустится консоль WSUS.

Консоль WSUS состоит из нескольких разделов:
- Updates – обновления, доступные на сервере WSUS (здесь можно управлять одобрением обновлений и назначать их для установки)
- Computers – здесь можно создать группы клиентов WSUS (компьютеры и серверы)
- Downstream Servers – позволяет настроить, будете ли вы получать из обновления Windows Update или вышестоящего сервера WSUS
- Syncronizations –расписание синхронизации обновлений
- Reports – отчёты WSUS
- Options – настройка сервера WSUS
Клиенты теперь могут получать обновления, подключившись к WSUS серверу по порту 8530 (в Windows Server 2003 и 2008 по умолчанию использоваться 80 порт). Проверьте, что этот порт открыт на сервере обновлений:
Test-NetConnection -ComputerName wsussrv1 -Port 8530
Можно использовать защищенное SSL подключение по порту 8531. Для этого нужно привязать сертификат в IIS.
Если порт закрыт, создайте соответствующее правило в Windows Defender Firewall.
Установка консоли администрирования WSUS в Windows 10/11
Для администрирования сервера обновления WSUS используется консоль Windows Server Update Services (
wsus.msc
). Вы можете управлять серверов WSUS как с помощью локальной консоли, так и по сети с удаленного компьютера.
Консоль администрирования WSUS для десктопных компьютеров с Windows 10 или 11 входит в состав RSAT. Для установки компонента Rsat.WSUS.Tool, выполните следующую PowerShell команду:
Add-WindowsCapability -Online -Name Rsat.WSUS.Tools~~~~0.0.1.0
Если вы хотите установить консоль WSUS в Windows Server, выполните команду:
Install-WindowsFeature -Name UpdateServices-Ui
При установке WSUS в Windows Server создаются две дополнительные локальные группы. Вы можете использовать их для предоставления доступа пользователям к консоли управления WSUS.
- WSUS Administrators
- WSUS Reporters
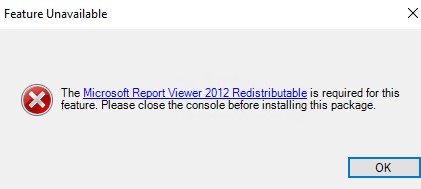
Для просмотра отчетов по установленным обновлениям и клиентам на WSUS нужно установить:
- Microsoft System CLR Types для SQL Server 2012 (SQLSysClrTypes.msi);
- Microsoft Report Viewer 2012 Runtime (ReportViewer.msi).
Если компоненты не установлен, при формировании любого отчета WSUS появится ошибка:
The Microsoft Report Viewer 2012 Redistributable is required for this feature. Please close the console before installing this package.
Оптимизация производительности WSUS
В этом разделе опишем несколько советов, касающихся оптимизации производительности сервера обновлений WSUS в реальных условиях.
- Для нормальной работы WSUS на сервере обновлений нужно должно быть свободным минимум 4 Гб RAM и 2CPU;
- При большом количестве клиентов WSUS (более 1500) вы можете столкнутся с существенным снижением производительность пула IIS WsusPoll, который раздает обновления клиентам. Может появляться ошибка 0x80244022 на клиентах, или при запуске консоль WSUS падать с ошибкой Error: Unexpected Error + Event ID 7053 в Event Viewer (The WSUS administration console has encountered an unexpected error. This may be a transient error; try restarting the administration console. If this error persists). Для решения проблемы нужно добавить RAM на сервер и оптимизировать настройки пула IIS в соответствии с рекомендациями в статье. Воспользуетесь такими командами:
Import-Module WebAdministration
Set-ItemProperty -Path IIS:\AppPools\WsusPool -Name queueLength -Value 2500
Set-ItemProperty -Path IIS:\AppPools\WsusPool -Name cpu.resetInterval -Value "00.00:15:00"
Set-ItemProperty -Path IIS:\AppPools\WsusPool -Name recycling.periodicRestart.privateMemory -Value 0
Set-ItemProperty -Path IIS:\AppPools\WsusPool -Name failure.loadBalancerCapabilities -Value "TcpLevel" - Включите автоматическое одобрения для обновлений антивируса Microsoft В противном случае WSUS станет существенно тормозить и потреблять всю доступную оперативную память.
Антивирусные проверки могут негативно влиять на производительность WSUS. Во встроенном Microsoft Defender антивирусе в Windows Server рекомендуется исключить следующие папки из области проверки:
- \WSUS\WSUSContent;
- %windir%\wid\data;
- \SoftwareDistribution\Download.
Due to naming changes, older terms like CB and CBB might still be displayed in some of our products, such as in Group Policy or the registry. If you encounter these terms, “CB” refers to the Semi-Annual Channel (Targeted)–which is no longer used–while “CBB” refers to the Semi-Annual Channel.
WSUS is a Windows Server role available in the Windows Server operating systems. It provides a single hub for Windows updates within an organization. WSUS allows companies not only to defer updates but also to selectively approve them, choose when they’re delivered, and determine which individual devices or groups of devices receive them. WSUS provides additional control over Windows Update for Business but does not provide all the scheduling options and deployment flexibility that Microsoft Endpoint Configuration Manager provides.
When you choose WSUS as your source for Windows updates, you use Group Policy to point Windows 10 client devices to the WSUS server for their updates. From there, updates are periodically downloaded to the WSUS server and managed, approved, and deployed through the WSUS administration console or Group Policy, streamlining enterprise update management. If you’re currently using WSUS to manage Windows updates in your environment, you can continue to do so in Windows 10.
Requirements for Windows 10 servicing with WSUS
To be able to use WSUS to manage and deploy Windows 10 feature updates, you must use a supported WSUS version:
- WSUS 10.0.14393 (role in Windows Server 2016)
- WSUS 10.0.17763 (role in Windows Server 2019)
- WSUS 6.2 and 6.3 (role in Windows Server 2012 and Windows Server 2012 R2)
- KB 3095113 and KB 3159706 (or an equivalent update) must be installed on WSUS 6.2 and 6.3.
Important
Both KB 3095113 and KB 3159706 are included in the Security Monthly Quality Rollup starting in July 2017. This means you might not see KB 3095113 and KB 3159706 as installed updates since they might have been installed with a rollup. However, if you need either of these updates, we recommend installing a Security Monthly Quality Rollup released after October 2017 since they contain an additional WSUS update to decrease memory utilization on WSUS’s clientwebservice. If you have synced either of these updates prior to the security monthly quality rollup, you can experience problems. To recover from this, see How to Delete Upgrades in WSUS.
WSUS scalability
To use WSUS to manage all Windows updates, some organizations may need access to WSUS from a perimeter network, or they might have some other complex scenario. WSUS is highly scalable and configurable for organizations of any size or site layout. For specific information about scaling WSUS, including upstream and downstream server configuration, branch offices, WSUS load balancing, and other complex scenarios, see Choose a Type of WSUS Deployment.
Configure automatic updates and update service location
When using WSUS to manage updates on Windows client devices, start by configuring the Configure Automatic Updates and Intranet Microsoft Update Service Location Group Policy settings for your environment. Doing so forces the affected clients to contact the WSUS server so that it can manage them. The following process describes how to specify these settings and deploy them to all devices in the domain.
To configure the Configure Automatic Updates and Intranet Microsoft Update Service Location Group Policy settings for your environment
- Open Group Policy Management Console (gpmc.msc).
- Expand Forest\Domains\Your_Domain.
- Right-click Your_Domain, and then select Create a GPO in this domain, and Link it here.
Note
In this example, the Configure Automatic Updates and Intranet Microsoft Update Service Location Group Policy settings are specified for the entire domain. This is not a requirement; you can target these settings to any security group by using Security Filtering or a specific OU. - In the New GPO dialog box, name the new GPO WSUS – Auto Updates and Intranet Update Service Location.
- Right-click the WSUS – Auto Updates and Intranet Update Service Location GPO, and then click Edit.
- In the Group Policy Management Editor, go to Computer Configuration\Policies\Administrative Templates\Windows Components\Windows Update.
- Right-click the Configure Automatic Updates setting, and then click Edit.
- In the Configure Automatic Updates dialog box, select Enable.
- Under Options, from the Configure automatic updating list, select 3 – Auto download and notify for install, and then click OK.
Note
There are three other settings for automatic update download and installation dates and times. This is simply the option this example uses. For more examples of how to control automatic updates and other related policies, see Configure Automatic Updates by Using Group Policy. - Right-click the Specify intranet Microsoft update service location setting, and then select Edit.
- In the Specify intranet Microsoft update service location dialog box, select Enable.
- Under Options, in the Set the intranet update service for detecting updates and Set the intranet statistics server options, type http://Your_WSUS_Server_FQDN:PortNumber, and then select OK.
Note
The URL http://CONTOSO-WSUS1.contoso.com:8530 in the following image is just an example. In your environment, be sure to use the server name and port number for your WSUS instance.Note
The default HTTP port for WSUS is 8530, and the default HTTP over Secure Sockets Layer (HTTPS) port is 8531. (The other options are 80 and 443; no other ports are supported.)
As Windows clients refresh their computer policies (the default Group Policy refresh setting is 90 minutes and when a computer restarts), computers start to appear in WSUS. Now that clients are communicating with the WSUS server, create the computer groups that align with your deployment rings.
Create computer groups in the WSUS Administration Console
Note
The following procedures use the groups from Table 1 in Build deployment rings for Windows 10 updates as examples.
You can use computer groups to target a subset of devices that have specific quality and feature updates. These groups represent your deployment rings, as controlled by WSUS. You can populate the groups either manually by using the WSUS Administration Console or automatically through Group Policy. Regardless of the method you choose, you must first create the groups in the WSUS Administration Console.
To create computer groups in the WSUS Administration Console
- Open the WSUS Administration Console.
- Go to Server_Name\Computers\All Computers, and then click Add Computer Group.
- Type Ring 2 Pilot Business Users for the name, and then click Add.
- Repeat these steps for the Ring 3 Broad IT and Ring 4 Broad Business Users groups. When you’re finished, there should be three deployment ring groups.
Now that the groups have been created, add the computers to the computer groups that align with the desired deployment rings. You can do this through Group Policy or manually by using the WSUS Administration Console.
Use the WSUS Administration Console to populate deployment rings
Adding computers to computer groups in the WSUS Administration Console is simple, but it could take much longer than managing membership through Group Policy, especially if you have many computers to add. Adding computers to computer groups in the WSUS Administration Console is called server-side targeting.
In this example, you add computers to computer groups in two different ways: by manually assigning unassigned computers and by searching for multiple computers.
Manually assign unassigned computers to groups
When new computers communicate with WSUS, they appear in the Unassigned Computers group. From there, you can use the following procedure to add computers to their correct groups. For these examples, you use two Windows 10 PCs (WIN10-PC1 and WIN10-PC2) to add to the computer groups.
To assign computers manually
- In the WSUS Administration Console, go to Server_Name\Computers\All Computers\Unassigned Computers.
Here, you see the new computers that have received the GPO you created in the previous section and started communicating with WSUS. This example has only two computers; depending on how broadly you deployed your policy, you will likely have many computers here.
- Select both computers, right-click the selection, and then click Change Membership.
- In the Set Computer Group Membership dialog box, select the Ring 2 Pilot Business Users deployment ring, and then click OK.
Because they were assigned to a group, the computers are no longer in the Unassigned Computers group. If you select the Ring 2 Pilot Business Users computer group, you will see both computers there.
Search for multiple computers to add to groups
Another way to add multiple computers to a deployment ring in the WSUS Administration Console is to use the search feature.
To search for multiple computers
- In the WSUS Administration Console, go to Server_Name\Computers\All Computers, right-click All Computers, and then click Search.
- In the search box, type WIN10.
- In the search results, select the computers, right-click the selection, and then click Change Membership.
- Select the Ring 3 Broad IT deployment ring, and then click OK.
You can now see these computers in the Ring 3 Broad IT computer group.
## Use Group Policy to populate deployment rings
The WSUS Administration Console provides a friendly interface from which you can manage Windows 10 quality and feature updates. When you need to add many computers to their correct WSUS deployment ring, however, it can be time-consuming to do so manually in the WSUS Administration Console. For these cases, consider using Group Policy to target the correct computers, automatically adding them to the correct WSUS deployment ring based on an Active Directory security group. This process is called client-side targeting. Before enabling client-side targeting in Group Policy, you must configure WSUS to accept Group Policy computer assignment.
To configure WSUS to allow client-side targeting from Group Policy
- Open the WSUS Administration Console, and go to Server_Name\Options, and then click Computers.
- In the Computers dialog box, select Use Group Policy or registry settings on computers, and then click OK.
Note
This option is exclusively either-or. When you enable WSUS to use Group Policy for group assignment, you can no longer manually add computers through the WSUS Administration Console until you change the option back.
Now that WSUS is ready for client-side targeting, complete the following steps to use Group Policy to configure client-side targeting:
To configure client-side targeting
Tip
When using client-side targeting, consider giving security groups the same names as your deployment rings. Doing so simplifies the policy-creation process and helps ensure that you don’t add computers to the incorrect rings.
- Open Group Policy Management Console (gpmc.msc).
- Expand Forest\Domains\Your_Domain.
- Right-click Your_Domain, and then click Create a GPO in this domain, and Link it here.
- In the New GPO dialog box, type WSUS – Client Targeting – Ring 4 Broad Business Users for the name of the new GPO.
- Right-click the WSUS – Client Targeting – Ring 4 Broad Business Users GPO, and then click Edit.
- In the Group Policy Management Editor, go to Computer Configuration\Policies\Administrative Templates\Windows Components\Windows Update.
- Right-click Enable client-side targeting, and then click Edit.
- In the Enable client-side targeting dialog box, select Enable.
- In the Target group name for this computer box, type Ring 4 Broad Business Users. This is the name of the deployment ring in WSUS to which these computers will be added.
Warning
The target group name must match the computer group name. - Close the Group Policy Management Editor.
Now you’re ready to deploy this GPO to the correct computer security group for the Ring 4 Broad Business Users deployment ring.
To scope the GPO to a group
- In GPMC, select the WSUS – Client Targeting – Ring 4 Broad Business Users policy.
- Click the Scope tab.
- Under Security Filtering, remove the default AUTHENTICATED USERS security group, and then add the Ring 4 Broad Business Users group.
The next time the clients in the Ring 4 Broad Business Users security group receive their computer policy and contact WSUS, they will be added to the Ring 4 Broad Business Users deployment ring.
Automatically approve and deploy feature updates
For clients that should have their feature updates approved as soon as they’re available, you can configure Automatic Approval rules in WSUS.
Note
WSUS respects the client device’s servicing branch. If you approve a feature update while it is still in one branch, such as Insider Preview, WSUS will install the update only on devices that are in that servicing branch. When Microsoft releases the build for Semi-Annual Channel, the devices in the Semi-Annual Channel will install it. Windows Update for Business branch settings do not apply to feature updates through WSUS.
To configure an Automatic Approval rule for Windows 10 feature updates and approve them for the Ring 3 Broad IT deployment ring
- In the WSUS Administration Console, go to Update Services\Server_Name\Options, and then select Automatic Approvals.
- On the Update Rules tab, click New Rule.
- In the Add Rule dialog box, select the When an update is in a specific classification, When an update is in a specific product, and Set a deadline for the approval check boxes.
- In the Edit the properties area, select any classification. Clear everything except Upgrades, and then click OK.
- In the Edit the properties area, click the any product link. Clear all check boxes except Windows 10, and then click OK.
Windows 10 is under All Products\Microsoft\Windows.
- In the Edit the properties area, click the all computers link. Clear all the computer group check boxes except Ring 3 Broad IT, and then click OK.
- Leave the deadline set for 7 days after the approval at 3:00 AM.
- In the Step 3: Specify a name box, type Windows 10 Upgrade Auto-approval for Ring 3 Broad IT, and then click OK.
- In the Automatic Approvals dialog box, click OK.
Note
WSUS does not honor any existing month/week/day deferral settings. That said, if you’re using Windows Update for Business for a computer for which WSUS is also managing updates, when WSUS approves the update, it will be installed on the computer regardless of whether you configured Group Policy to wait.
Now, whenever Windows 10 feature updates are published to WSUS, they will automatically be approved for the Ring 3 Broad IT deployment ring with an installation deadline of 1 week.
Warning
The auto approval rule runs after synchronization occurs. This means that the next upgrade for each Windows 10 version will be approved. If you select Run Rule, all possible updates that meet the criteria will be approved, potentially including older updates that you don’t actually want–which can be a problem when the download sizes are very large.
Manually approve and deploy feature updates
You can manually approve updates and set deadlines for installation within the WSUS Administration Console, as well. It might be best to approve update rules manually after your pilot deployment has been updated.
To simplify the manual approval process, start by creating a software update view that contains only Windows 10 updates.
To approve and deploy feature updates manually
- In the WSUS Administration Console, go to Update Services\Server_Name\Updates. In the Action pane, click New Update View.
- In the Add Update View dialog box, select Updates are in a specific classification and Updates are for a specific product.
- Under Step 2: Edit the properties, click any classification. Clear all check boxes except Upgrades, and then click OK.
- Under Step 2: Edit the properties, click any product. Clear all check boxes except Windows 10, and then click OK.
Windows 10 is under All Products\Microsoft\Windows.
- In the Step 3: Specify a name box, type All Windows 10 Upgrades, and then click OK.
Now that you have the All Windows 10 Upgrades view, complete the following steps to manually approve an update for the Ring 4 Broad Business Users deployment ring:
- In the WSUS Administration Console, go to Update Services\Server_Name\Updates\All Windows 10 Upgrades.
- Right-click the feature update you want to deploy, and then click Approve.
- In the Approve Updates dialog box, from the Ring 4 Broad Business Users list, select Approved for Install.
- In the Approve Updates dialog box, from the Ring 4 Broad Business Users list, click Deadline, click One Week, and then click OK.
- If the Microsoft Software License Terms dialog box opens, click Accept.
If the deployment is successful, you should receive a successful progress report.
- In the Approval Progress dialog box, click Close.