
WSL, which is a Windows Subsystem for Linux, has been not working for users right after they upgrade to Windows 11. According to users, it crashes when they try to launch it.
We had a look into the issue, and discovered that this problem can be caused by a number of reasons:
- WSL is disabled – the WSL feature should be enabled in the Windows features dialog for you to use it. There are times when an update disables this feature automatically, causing the issue at hand to occur.
- The virtual machine is disabled – like WSL, the virtual machine feature should also be enabled in the system for you to switch to another os in Windows. If this feature is disabled, you can enable it manually to resolve the problem.
- Corrupt Linux app installation – the installation file of the Linux app (Ubuntu) might be corrupt or faulty, preventing you from using WSL. In this case, you can either repair the application or reinstall it to resolve the issue.
- Malware – your Windows system may be dealing with a corruption error or malware, which is causing certain features and applications to act up. If this scenario is applicable, you can run a malware scan to identify the issue and resolve it.
- Faulty update – In case you started facing the error after installing a system update, then there is a chance that the faulty update is the culprit. Fortunately, Windows offers a way to uninstall the updates, so you can remove the update from your system and see if that makes any difference.
Now that we know about the potential causes behind the issue, let’s have a look at the troubleshooting methods that worked for other affected users. Hopefully, they will help you fix the issue for good as well. However, before you proceed with the methods, make sure you are logged in as an administrator in the system.
1. Enable WSL in Windows Features
Let’s start with the most effective solution in cases of errors such as this one.
In the majority of cases, the users were unable to use WSL because the feature automatically got disabled when they upgraded to Windows 11. The solution in this case is simple, as all that you need to do is enable the feature back manually.
Here is how you can do that:
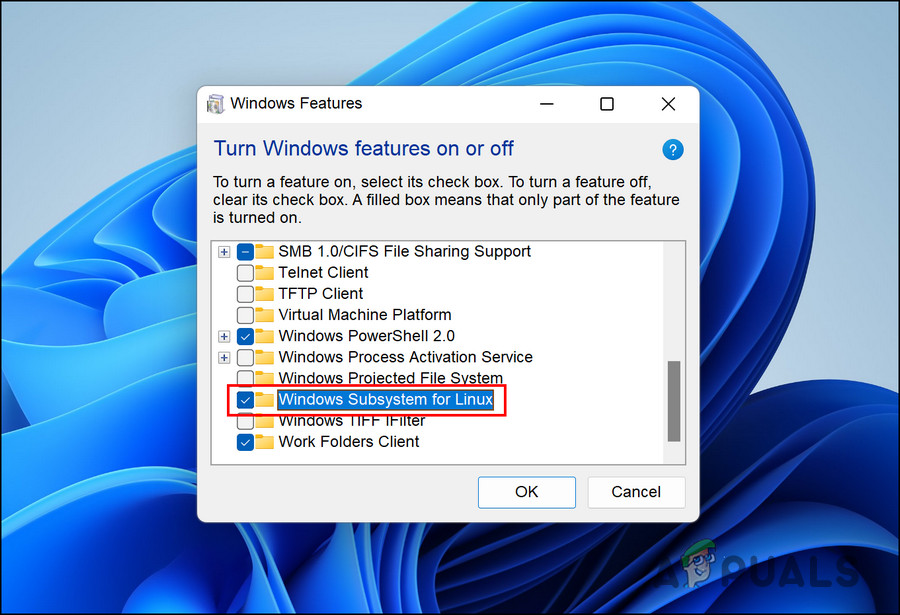
- Launch Windows search via taskbar, and type Turn Windows features on or off.
- Click Open from the list of options available.
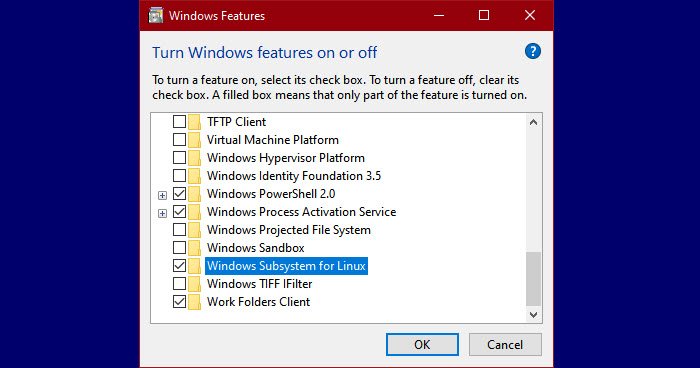
- In the following dialog, locate Windows Subsystem for Linux and checkmark the box associated with it.

Enable Windows subsystem for Linux - Click OK to save the changes.
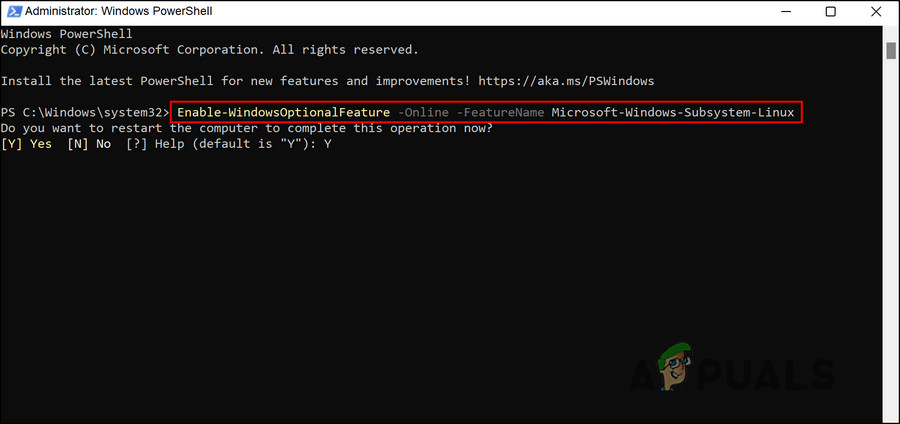
Alternatively, you can also use Windows Powershell to make these changes. If the steps mentioned above have not worked for you, then follow the ones below:
- Type Windows Powershell in the search area of the taskbar and click on Run as administrator.
- In the following window, type the command mentioned below and click Enter to execute it.
Enable-WindowsOptionalFeature -Online -FeatureName Microsoft-Windows-Subsystem-Linux

Enable Windows subsystem for linux - Once the command is executed, restart your PC. Upon reboot, the feature should be enabled.
If the feature was disabled, then enabling it should fix the problem. However, if the feature was already enabled, then move to the next troubleshooting method below.
2. Enable VM in Windows Features
For any of the subsystems to work in Windows, the virtual machine on your system should be working properly. Virtual machines are used to run multiple operating systems simultaneously on the same hardware. If we did not have virtualization, we would need two separate physical units to run Windows and Linux.
If the WSL feature was already enabled on the system, then the next thing that you need to do is check if VM is enabled. The steps for this are quite similar to the ones we listed above:
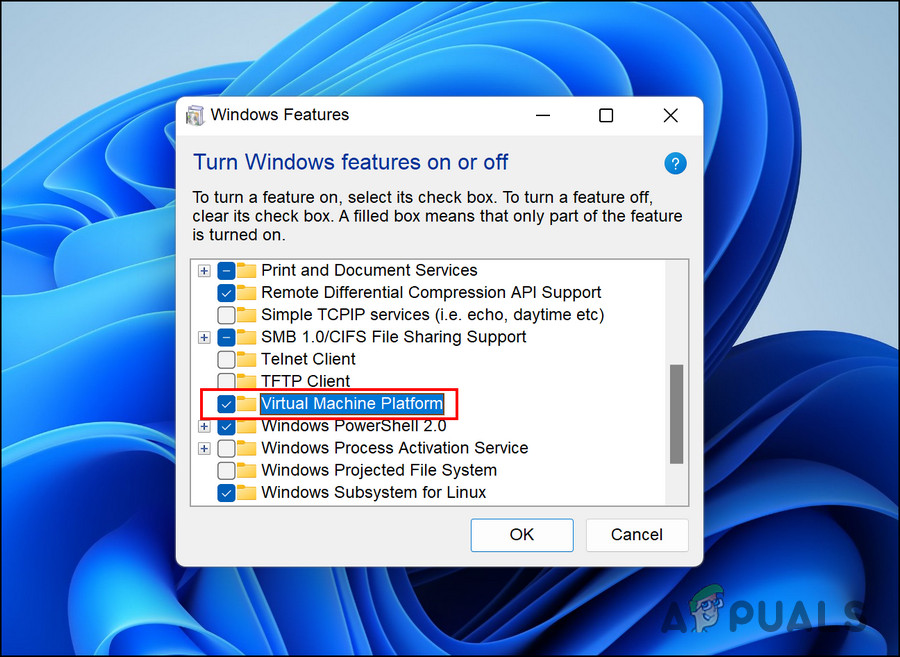
- Type Turn Windows features on or off in the search area of taskbar and click Open.
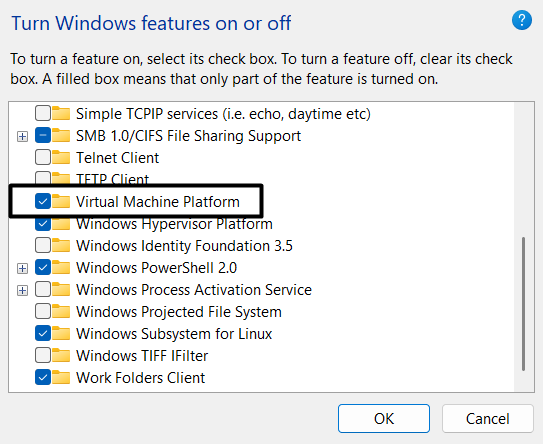
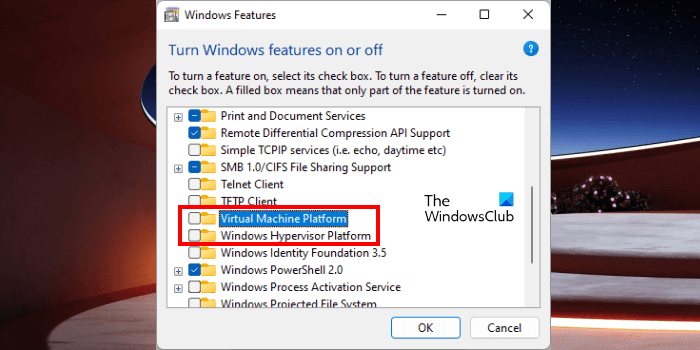
- Now, locate Virtual Machine Platform in the following dialog and checkmark the checkbox associated with it to enable it.

Enable the Virtual machine platform - While you are at it, we also recommend enabling Hyper-V in the same window. Hyper-V helps create a virtual environment in the system.
Once done, close the Windows features dialog and check if you can now use WSL without any problems.
3. Use the Microsoft Store to Launch WSL
You might also not be able to use WSL because of a temporary glitch within the installed application. In this case, you can try launching the app from the Microsoft Store instead of opening it directly.
This may sound too simple to work but since it worked for several other users, we recommend you give it a shot.
Here is what you need to do:
- Launch Microsoft Store and head over to the My Library section in the bottom left corner.

Click on the Library icon - In the list of apps available, look for your Linux distribution app and launch it.

If you are still not able to launch the application, proceed with the next method below.
4. Repair or Reinstall the Linux Distribution App
Your Linux distribution app may be dealing with a corrupt error or simply might be outdated, which is preventing you from using it properly.
To check if this is the issue, you can first try repairing the application and see if that makes any difference. If the error persists, then you can uninstall the app and reinstall it from scratch. This will fix any corruption issues within the app that may be causing the problem.
Follow these steps to proceed:
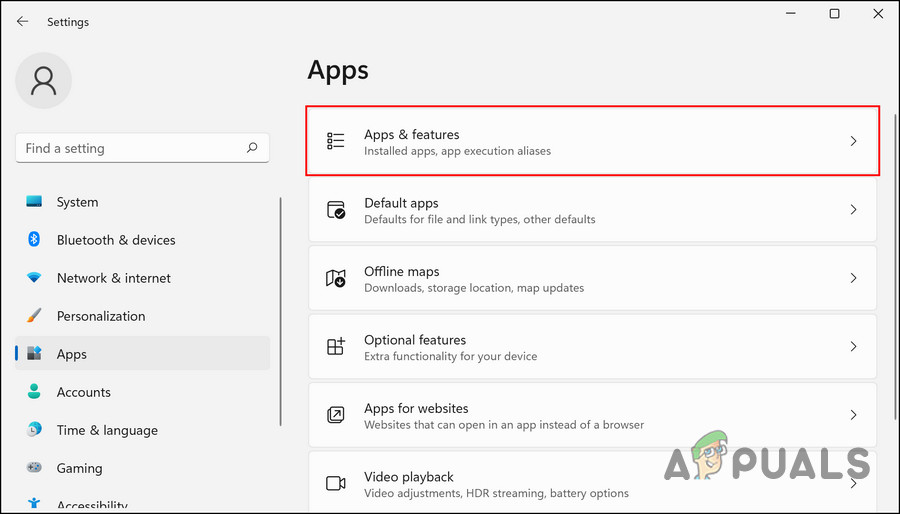
- Press Win + I to open the Settings app.
- Choose Apps from the left pane.
- Click on Apps & features in the right side of the window.

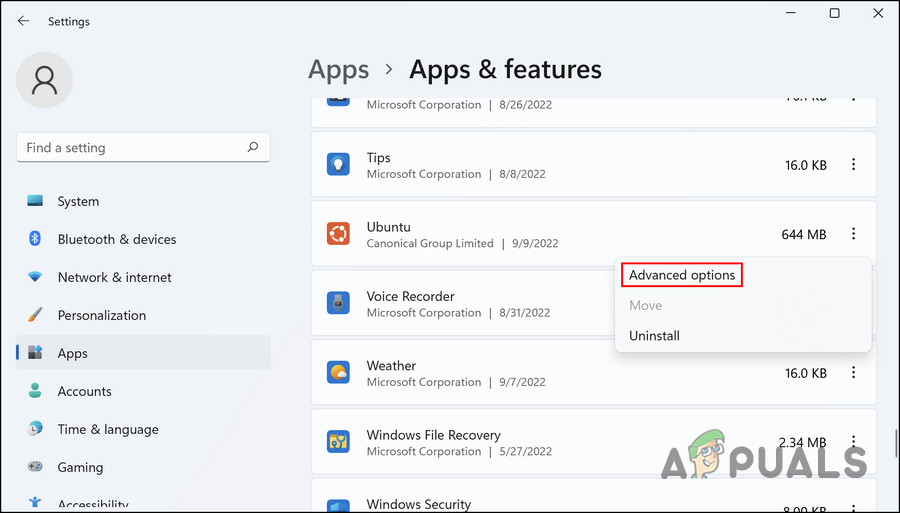
Click on Apps & features in the right pane - In the following window, scroll down to locate your Linux distribution app.
- Click on the three dots associated with it and choose Advanced options.

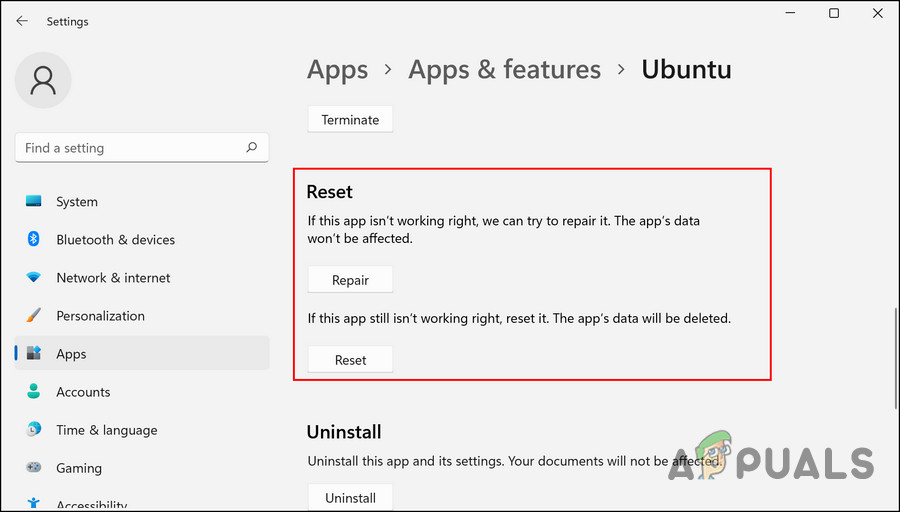
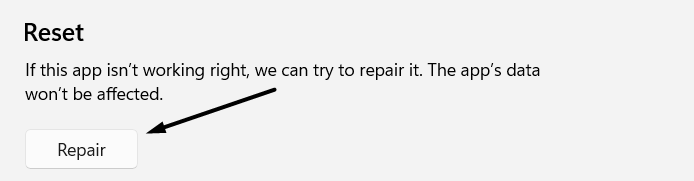
Click on Advanced options - Next, head over to the Reset section and click on the Repair button there.

Click on the Repair button - Follow the on-screen instructions to proceed and wait for the action to be completed.
Once the process completes, check if you can use WSL now. If not, then follow the steps below to uninstall the application:
- Follow steps 1-4 again.
- Click on the three dots associated with the app and choose Uninstall from the context menu.
- Follow the on-screen instructions to proceed.
Once the app is uninstalled, reinstall the latest version and then check if that fixes the problem.
5. Uninstall Updates
If you started encountering the problem right after installing a pending system update, then there is a good chance that the update was faulty. It is not uncommon for Windows users to encounter issues due to corrupt updates.
The best way to counter this problem is by uninstalling the update via Control Panel.
Here is how you can do that:
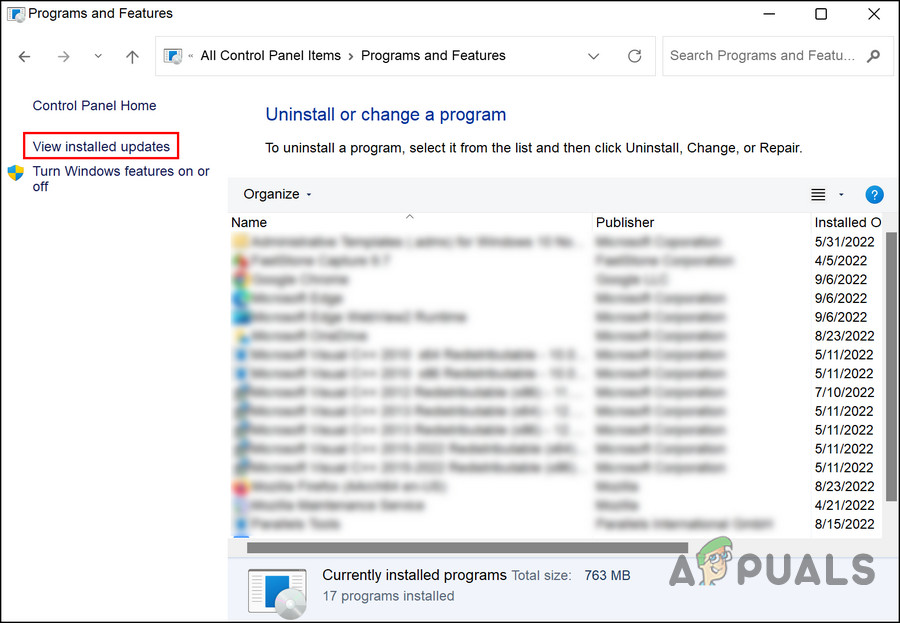
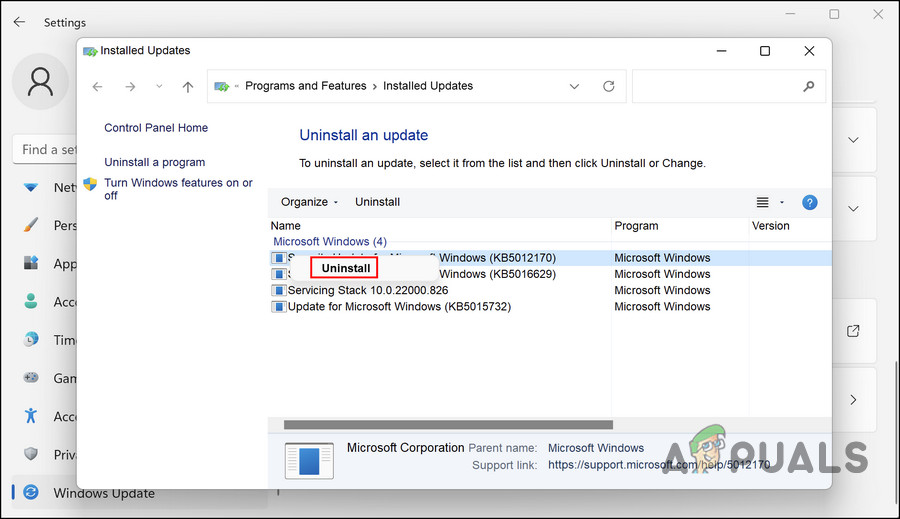
- Type Control Panel in Windows search and click Open.
- Choose View installed updates.

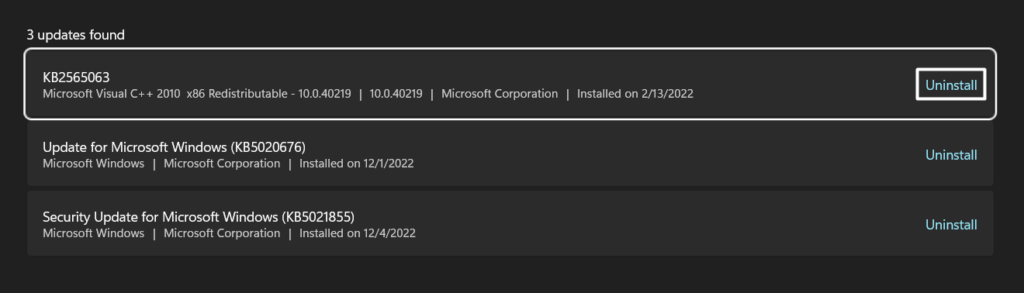
View the installed updates - In the following window, you should see a list of all the installed updates in Windows. Right-click on the problematic one and choose Uninstall.

Hit the Uninstall button
6. Run a Malware Scan
Finally, the last method on our list is performing a malware scan.
Your system may be dealing with a virus or malware that is causing certain components and features to act up. In such a situation, Windows Defender’s malware scan is the most effective solution.
Here is how you can run a complete system scan for malware using Defender:
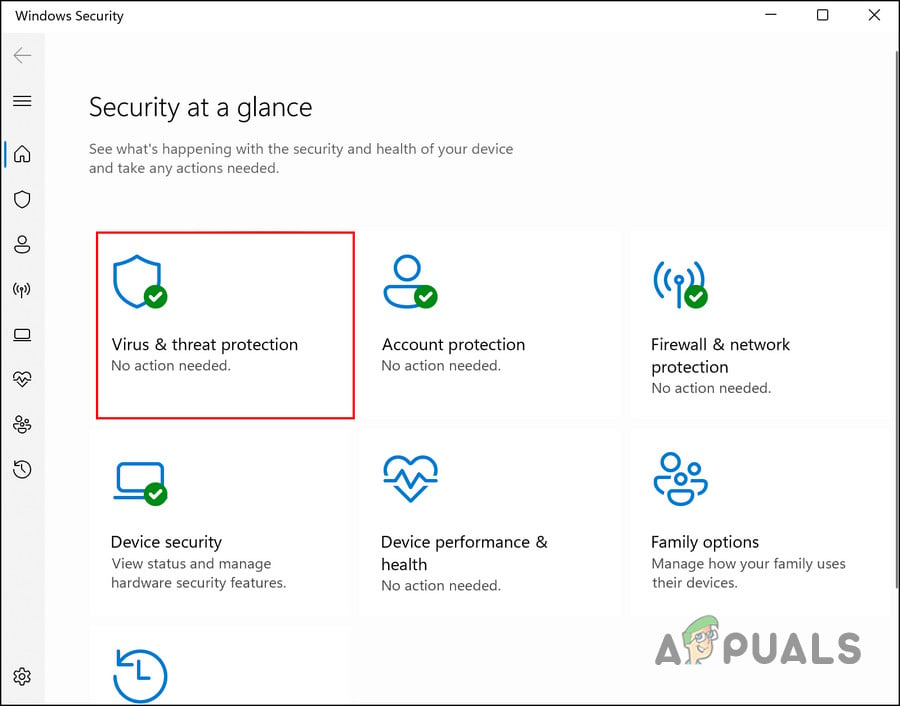
- Type Windows Security in Windows search and click Open.
- Choose Virus & threat protection from the left pane.

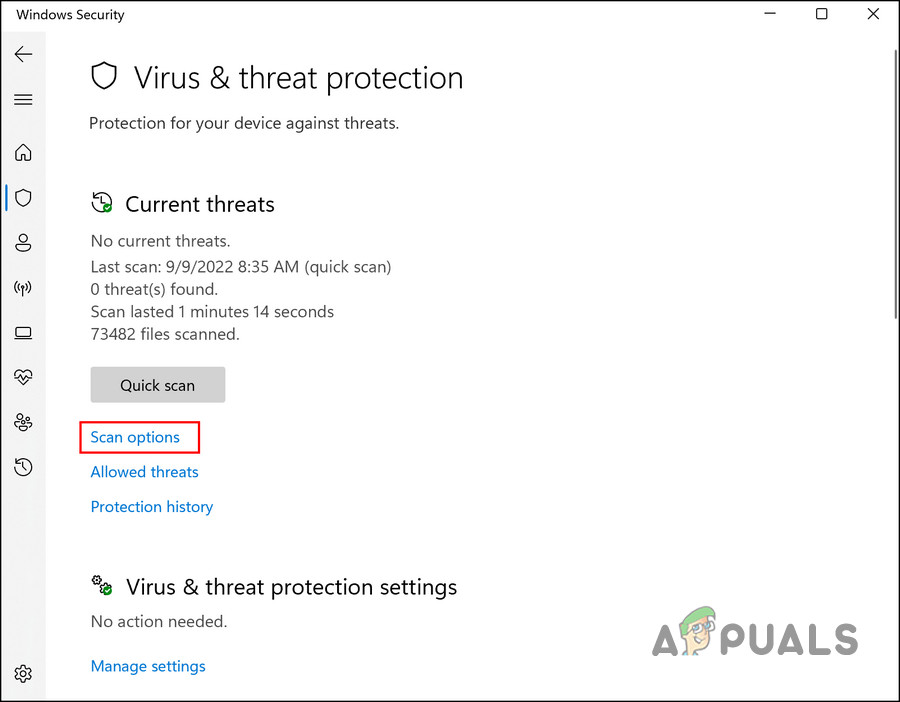
Access Virus & threat protection settings - Move to the right side of the window, and click on the Scan options hyperlink.

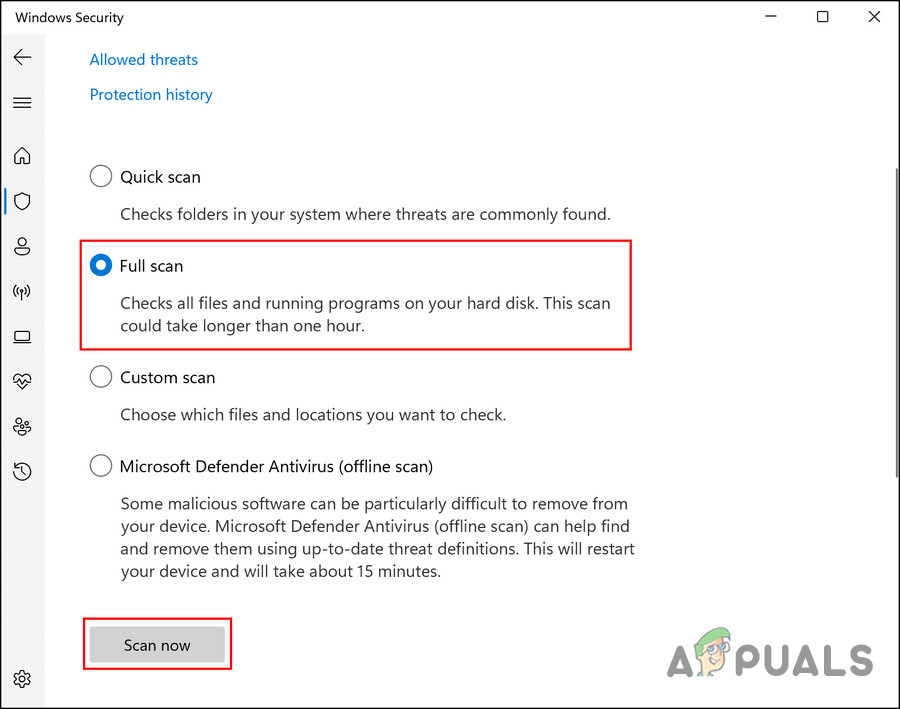
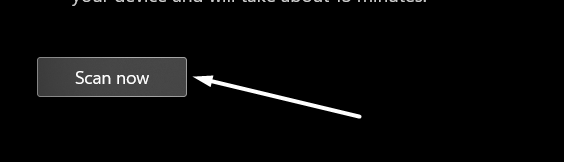
Click on Scan options - Click on Full Scan > Scan now.

Perform the scan
Now, wait for the scan to complete, and once done, try using WSL again.
Zainab Falak
Zainab Falak is a highly educated professional with a background in actuarial science and a strong passion for technology. Her expertise lies in the field of data analytics and she is a proficient programmer in languages such as Python and R. At Appuals, Zainab shares her extensive knowledge of Windows 8, 10, and 11, covering a broad range of topics related to these operating systems. Zainab’s ability to effectively communicate technical concepts in a clear and concise manner has earned her recognition and respect in the tech community. She is committed to staying up-to-date with the latest developments in the field and providing readers with insightful and informative content.
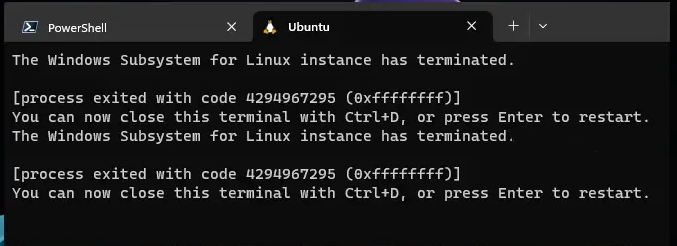
После обновления WSL в Windows 10 и 11 до второй версии часть пользователей столкнулись с ошибкой внезапного завершения работы экземпляра подсистемы без намека на причину, но с кодом ошибки. Поиск подходящего решения в Интернете по коду, скорее всего, не принесет положительного результата, поскольку дело тут наверняка в самом WSL2, а точнее в его обновлениях. Тем не менее, кое-что попробовать все же стоит.
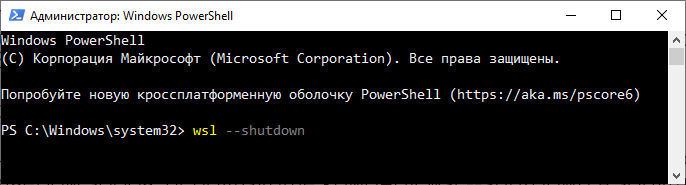
Перезапустите WSL
Для начала просто перезапустите подсистему, завершив и заново запустив процесс.
Чтобы не возиться с Диспетчером задач, используйте команду wsl —shutdown в запущенной с администраторскими правами командной строке или PowerShell.
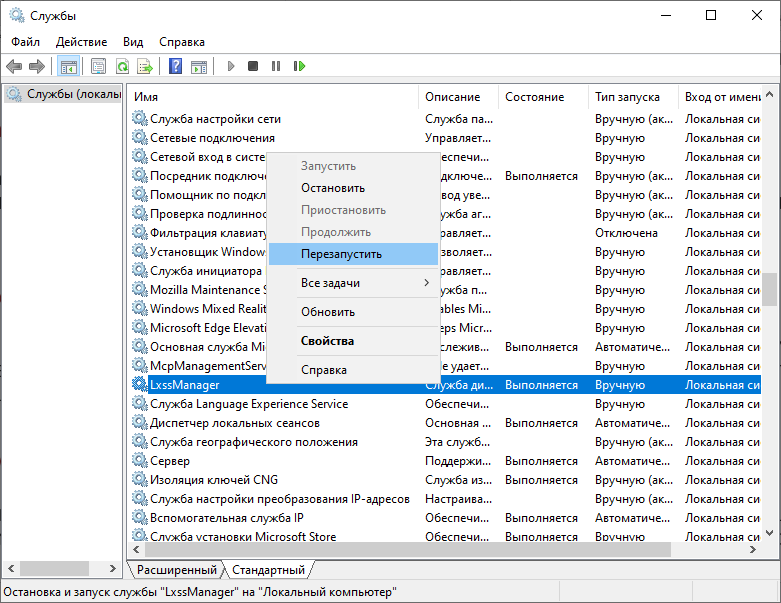
Проверьте службу WSL
Откройте оснастку управления службами командой services.msc, отыщите службу LxssManager и посмотрите, какой она имеет статус.
Она должна выполняться и иметь тип запуска «Вручную».
Перезапустите ее из контекстного меню.
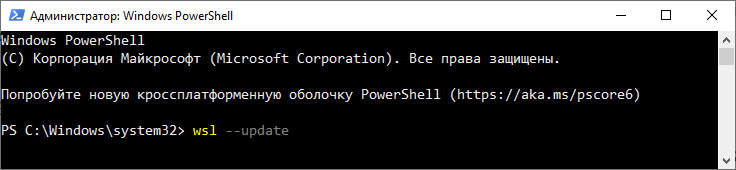
Обновите WSL
Убедитесь, что у вас установлена и используется последняя версия ядра WSL.
Для этого в запущенной с правами администратора консоли выполните команду wsl —update.
Если обновления будут найдены, система скачает необходимые пакеты и установит их.
Переключитесь на WSL1
Ошибка самопроизвольного завершения экземпляра WSL типична для второй версии подсистемы, поэтому устранить ее вы можете, временно переключившись на первую версию.
Для этого используется команда wsl —set-version 1 или wsl —set-default-version 1, если v1 нужно сделать версией по умолчанию.
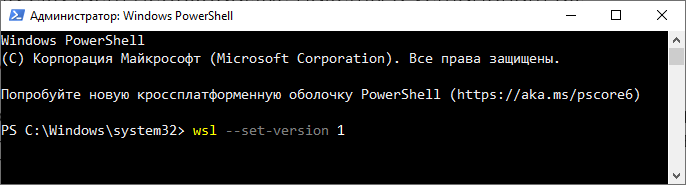
Для получения индекса текущей версии используйте команду wsl —version.
Учтите только, что перевод установленных дистрибутивов Linux на пониженную версию может занять длительное время.
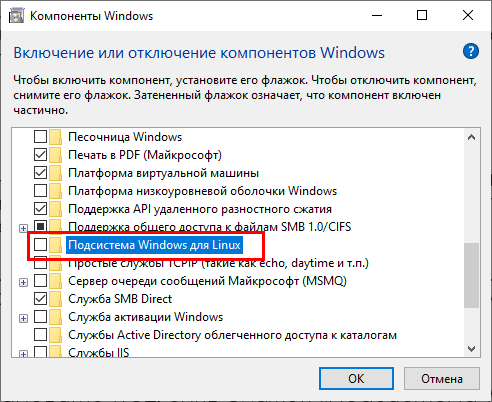
Переустановка WSL
В крайнем случае вы можете переустановить WSL, сняв флажок «Подсистема Windows для Linux» в окошке апплета «Включение и отключение компонентов Windows», перезагрузив компьютер, а затем заново включив компонент.
Windows 11 users face an error when they launch the WSL (Windows Subsystem for Linux) right after upgrading their Windows to Windows 11. To correctly tackle Windows 11’s WSL crash, we discovered several causes along with the fixes.
Why Is WSL Not Working On Upgraded Windows 11?
- Disabled Virtual Machine – For a successful switch to another OS in Windows, one must enable the visual machine feature.
- Disabled WSL – Similar to a virtual machine, it is also necessary to enable WSL when the root of the problem is just that.
- Faulty Updates
- Corruption Errors and Malware Accumulation
Having a brief overview of the legitimate causes of the “WSL Not Working On Upgraded Windows 11” matter, upon proceeding further, you will find out exactly how you can solve it through a variety of credible fixes.
Fix #1 – Enable WSL
As the name suggests, it is essential that you first enable the WSL if it hasn’t been enabled already. To do so, follow the steps described next:
- On the Windows taskbar search bar, type “Turn Windows features on or off”
- Click Open
- In the popped-up dialog, head over to Windows Subsystem for Linux.
- Put a checkmark on the box next to it.
- Click on OK to finalize the process.
Fix #2 – Enable Virtual Machine
Virtual machines are an important feature necessary to run multiple operating systems on one hardware. If you’ve already ruled out the WSL disabled option, then you’ll definitely have to make sure that virtual machines is enabled as well. Proceed ahead to find the steps to do so:
- On the Windows taskbar search bar, type “Turn Windows features on or off”
- Click Open.
- In the popped-up dialog, head over to Virtual Machine Platform.
- Put a checkmark on the box next to it.
- Click on OK.
Fix #3 – Scan For Malware
As mentioned previously, malware in the system could also lead to the recently upgraded Windows 11 crashing the WSL. To scan for any such malware bugs, use the Windows Defender’s malware scan to effectively diagnose and solve the problem:
- On the Windows taskbar search bar, type Windows Security.
- Open it.
- Click on Virus & threat protection option.
- Click on the Scan options hyperlink.
- Click on Full Scan and then on Scan now.
If you have third-party anti-virus software, use that to ensure there is no malware in your system.
Fix #4 – Repair/Reinstall Linux Distribution
Another reason WSL isn’t working on Windows 11 is the corrupt Linux Distribution app. First, try to repair the app and see if that works for you. If repairing the app doesn’t make WSL work on Windows 11, delete the Linux Distribution app and reinstall it.
Fix #5 – Delete Recent Updates
If Windows 11 users are encountering the WSL not working issue with the installation of recent updates, then the updates are causing the issue. It’s quite common for Windows users to experience such issues with OS updates. To fix the issue, uninstall recently installed OS updates. Open Control Panel > click on “View installed updates” > the next window will list the installed updates. Uninstall the most recent one, which should fix the WSL not working on the Windows 11 issue.
That is all for our fixes for WSL Not Working On Windows 11. If you are facing errors and issues with other PC games or your PC, then also see our hub for commonly occurring PC errors and their fixes.

Jake Bishop
I report on gaming news and occasionally create the best video game guides.
Finally, after a lot of thoughtful discussion between Microsoft and Linux, we got to see the much-needed Linux integration in the latest Windows 11. You can now run Linux commands and tools natively on your Windows 11 PC. Most users are enjoying the WSL integration by installing their favorite Linux program on their system.
But sadly, some users are still facing difficulties running their preferred Linux distribution on their Windows PC. After getting to know about these WSL-related issues, we researched more about them in detail and also found some possible workarounds that can fix them. To help you out, we’ve also mentioned those possible workarounds in this troubleshooting guide.
Why Is Windows Subsystem for Linux (WSL) Not Working Properly?
Here are some of the most common reasons behind the non-functioning of the Windows Subsystem for Linux (WSL) in Windows 11. Check them below:
- WSL Is Disabled on Your System
- Virtual Machine Platform & Hyper V Feature Is Disabled
- Corrupt Linux App Installation
- Malware & Viruses
- Faulty Windows Update
- Windows Firewall Restrictions
Fix Windows Subsystem for Linux Not Working in Windows 11
Here in this section, we’ve mentioned more than 15 workarounds that can fix the Windows Subsystem for Linux not working issue in your Windows 11 PC.
1. Make Sure Your Computer Can Run WSL
While searching for some solutions, we found that many users are facing difficulties in installing WSL 2, which is the latest version of WSL. When we dug deep into this issue to learn more about this, we found out that WSL 2 can only be run on systems having the Second Level Address Translation (SLAT) feature.
If you’re also unable to install WSL 2 on your Windows 11 PC, then this could be the same with you. Another requirement to run WSL 2 is that your system should be running on the latest generations of CPUs. If your system doesn’t meet the minimum requirements, you can’t run WSL 2 on it.
2. Ensure WSl Is Running on the Main Storage
Many users reported that when they try to install WSL on their Windows machine, the installation process suddenly fails, and they see the 0x80070003 error code on the screen. The most common reason for this error is not allowing the Windows Subsystem for Linux to run on the system’s primary storage drive, which is C: drive.
If the same error appeared in your case while installing WSL, then we suggest you make sure that it’s allowed to use the system’s primary storage drive. You can follow the below-mentioned steps to know how to check the same:
1. Open the Settings app on your Windows 11 PC using the Windows + I shortcut and move to the Storage section.

2. Next, expand the Advanced storage settings subsection of the Storage management section.
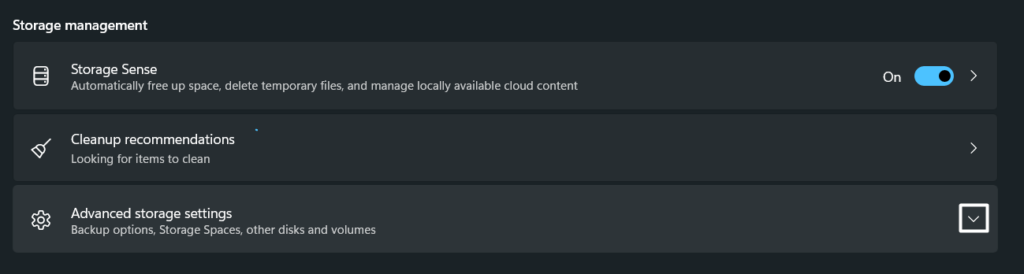
3. Now, expand the Where new content is saved subsection under the Advanced storage settings section.

4. In the Advanced storage settings section, select your system’s primary storage drive from the New apps will save to: dropdown menu and close the window.
Once you’ve made sure that WSL is allowed to use the primary storage drive, check if you can now install WSL on your Windows 11 PC.
3. Scan for Viruses & Malware on Your Computer
During the research, we found that the viruses and malware in the system can also prevent system’s essential components from functioning properly, which can lead to this issue. This could be the same in your case and, to avoid this, we suggest scanning the entire system and making sure no infected files are stored in it.
You can use the Windows’ built-in Malware Removal tool to scan for infected files on your PC and remove them. Follow the steps below to know how to do the same:
1. Open the Settings app on your Windows 11 PC using any method you want and proceed to the Privacy & security section.

2. Once you’ve moved to the Privacy & security section, click on Windows Security and then click on the Open Windows Security option.

3. In the Virus & threat protection section, click on Scan options and then select the scan type to Full scan.
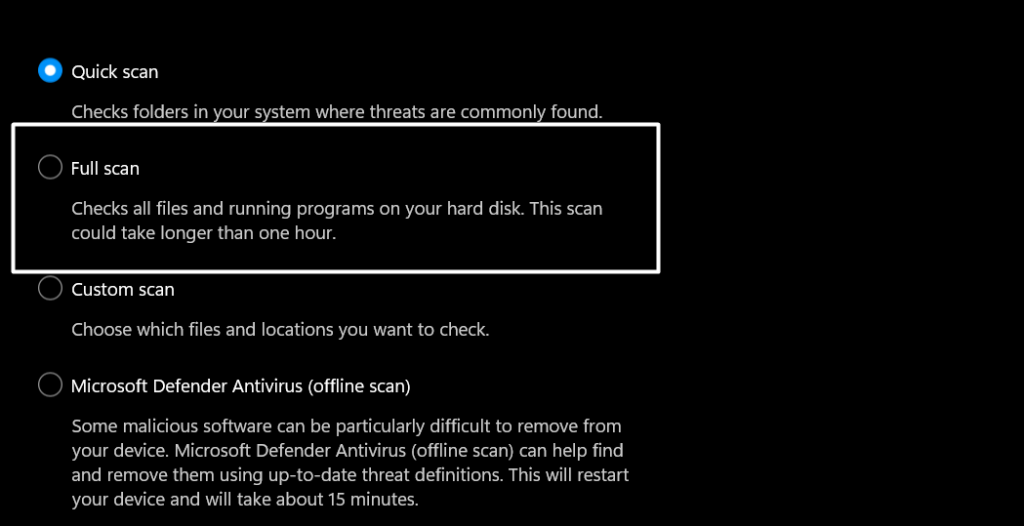
4. In the end, click on Scan now to begin the scan process and wait until the scan gets completed.
5. Once the malware scan is completed, you’ll see the scan results on the same screen. If the scanner process finds some harmful files on the system, you can quarantine them or remove them from the computer.
After doing the same, check the issue’s status.
4. Re-enable Windows Subsystem for Linux (WSL)
One of the most common yet effective solutions to overcome these WSL-related issues is to re-enable WSL on your Windows 11 PC. Doing so will reinstate all the WSL components and ensure the same issues don’t appear. We’ve mentioned one of the easiest methods to re-enable WSL on a Windows 11 PC below:
1. First, open Control Panel on your Windows 11 PC and navigate to the Programs section from the home screen.
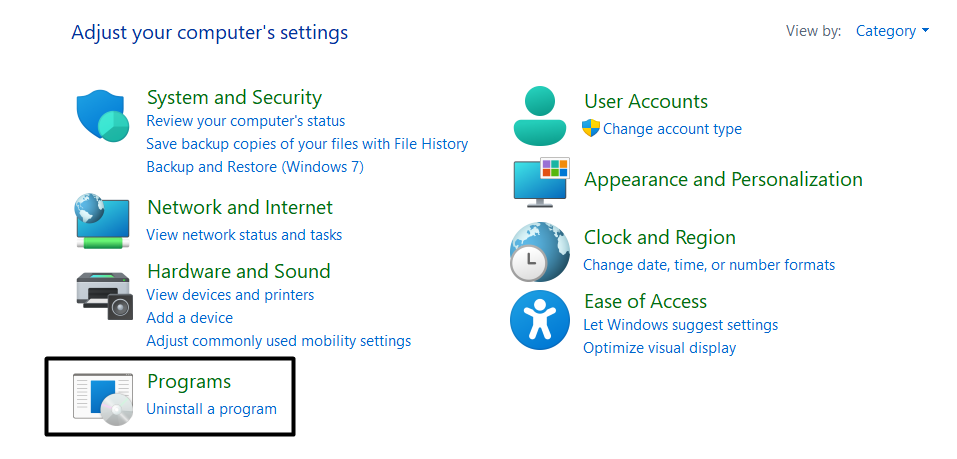
2. In the Programs section, select the Programs and Features section and click Turn Windows features on or off.
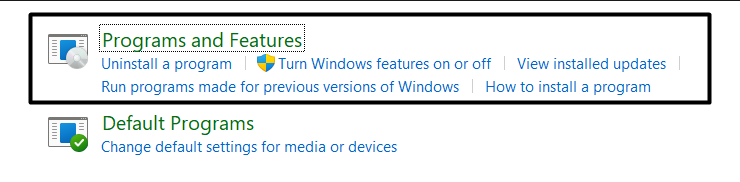
3. Search for the Windows Subsystem for Linux checkbox in the Windows Features pop-up and re-enable it.
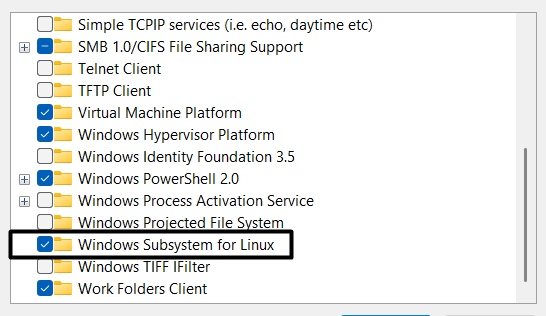
Once you’ve re-enabled the Windows Subsystem for Linux feature, check if you’re now able to install and run Linux on your Windows 11 PC.
5. Make Sure the Virtual Machine Platform Feature Is Enabled
According to Microsoft, the Virtual Machine Platform feature should be enabled on your Windows PC to run WSL smoothly. Therefore, we suggest you ensure that this feature is enabled on your Windows 11 PC. You can take a look at the steps below to ensure this feature is enabled on your PC:
1. To do so, move to the Programs and Features section in the Control Panel program and select Turn Windows features on or off from the left sidebar.
2. Now, search for the Virtual Machine Platform option in the Windows Features pop-up and re-enable it by re-ticking it.
After re-enabling the Virtual Machine Platform feature on your Windows PC, restart it and check if WSL is working fine or not.
6. Ensure Hyper-V Is Enabled
Hyper V, also known as Hypervisor, is a Windows feature that lets you create and run virtual machines on your Windows PC. To install and run WSL on your Windows 11 PC, the Hyper V feature must be enabled on your PC.
It could be possible that the Hyper V functionality is disabled on your PC, which is why this issue is occurring. You can check the same from Control Panel, and the below-mentioned steps demonstrate the same:
1. First, open the Control Panel app on your Windows computer and navigate to the Turn Windows features on or off section from the left sidebar.

2. Locate the Windows Hypervisor Platform feature in the Windows Features dialog box and re-enable it.
You should now be able to run and install different Linux distributions on your Windows 11 computer with ease.
7. Turn On Hardware Virtualization
In simple terms, Hardware Virtualization is a Windows component that helps you run different subsystems, like WSL, effectively on your PC. Along with the Windows Hyper Hypervisor Platform and Virtual Machine Platform feature, it’s essential to keep the Hardware Virtualization feature enabled to run different operating systems seamlessly. You need to make sure that this functionality is enabled on your Windows PC. The same thing can be ensured by following the below-mentioned steps:
1. First, open the Task Manager program on your Windows 11 PC and head to the CPU section from the home screen.
2. Now, in the CPU section, make sure the Virtualization option is enabled.
Once you’ve turned on the Hardware Virtualization functionality on your Windows 11 PC, check if everything WSL is working fine now.
8. Disable the Use Legacy Console Mode
Some users reported when they try to install WSL on their Windows PC; they get the 0x80040306 error code in the console. If that’s the same with you, then it has something to do with the Legacy Console mode.
In layman’s language, Legacy Console is a Windows tool that helps you install and use command-line tools on your Windows computer. In some cases, it’s found that the Legacy Console mode conflicts with WSL components and leads to these issues.
In that case, we suggest disabling the Legacy Console mode option on your Windows 11 computer. Follow the steps below to easily disable the Legacy Console mode on your computer:
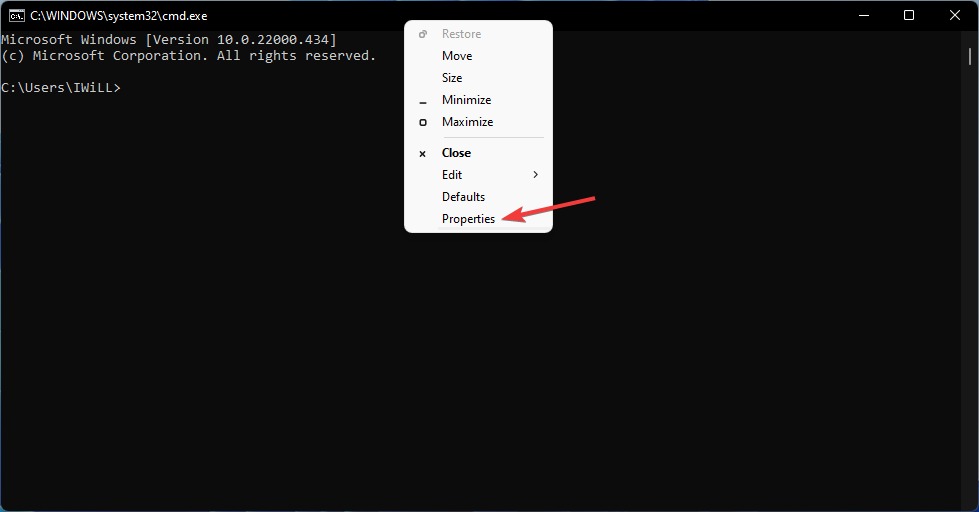
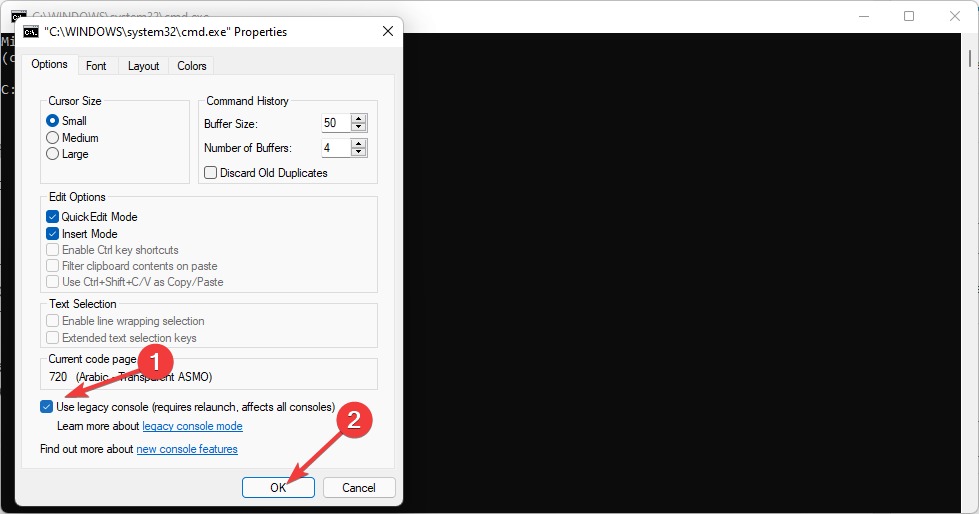
1. Open the Command Prompt app on your Windows 11 PC, right-click on the title bar, and choose the Properties option.
2. Once the Properties section is opened, untick the Use legacy console checkbox and click on OK.
After disabling the Use legacy console mode, confirm if the issues with WSL are resolved or not. We hope they’re fixed now.
9. Disable the BitLocker Device Encryption Feature
Bitlocker Device Encryption is a Windows security feature that protects the operating system and its data from data theft, loss, and other kinds of losses. During our research, we found that the Bitlocker Device Encryption feature can impose limitations on WSL and stop it from functioning properly.
In that case, we suggest disabling the Bitlocker Device Encryption feature on your PC and checking if it fixes the issue. Follow the mentioned instructions to learn how to do the same in a few simple steps:
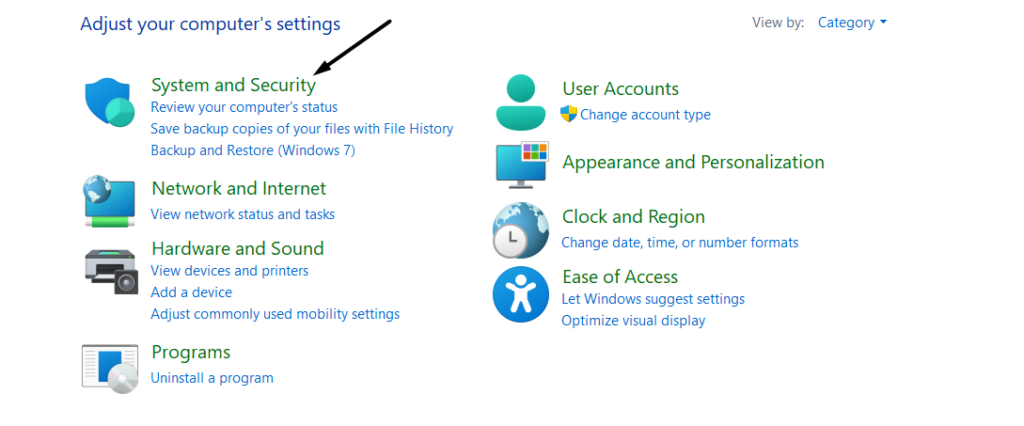
1. Open the Start Menu on your Windows 11 PC, search for Control Panel and select the app from the Best match section.

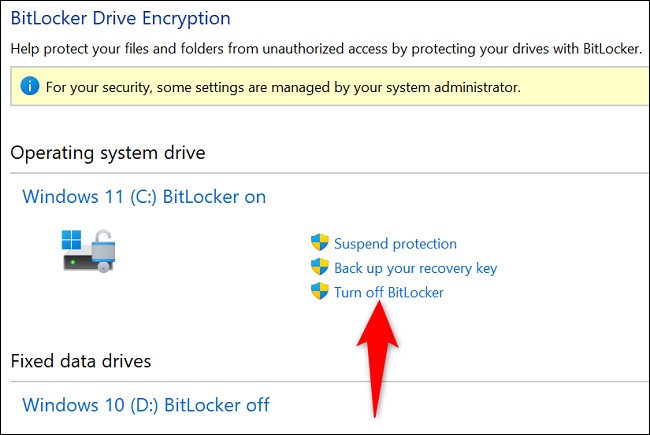
2. Then, head to the System and Security section and select the BitLocker Drive Encryption option from the present choices.
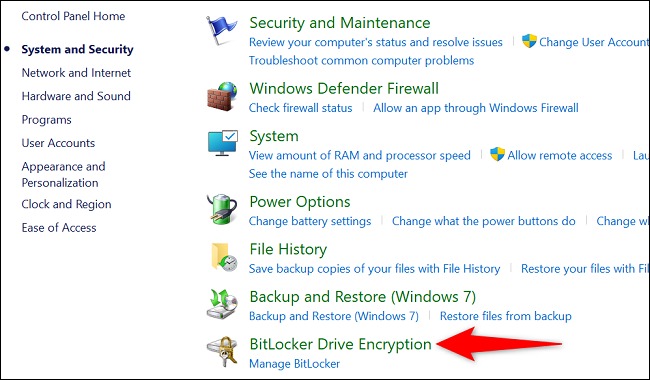
3. In the end, select the Turn off BitLocker option under the Operating system drive section to disable it.
After disabling this option, check if the issue is fixed. If it’s still not fixed, consider re-enabling the BitLocker Drive Encryption feature.
10. Ask Windows Firewall To Not Block WSL
Some users said that when they connect their PC to a VPN and open Linux, the bash automatically loses access to the network and stops working. In their case, the system’s own Firewall was preventing the app from accessing the internet and functioning correctly.
It could be the same in your case, and you can check this by disabling the Windows built-in Firewall. So, follow the below-mentioned steps to disable the Windows built-in Defender Firewall:
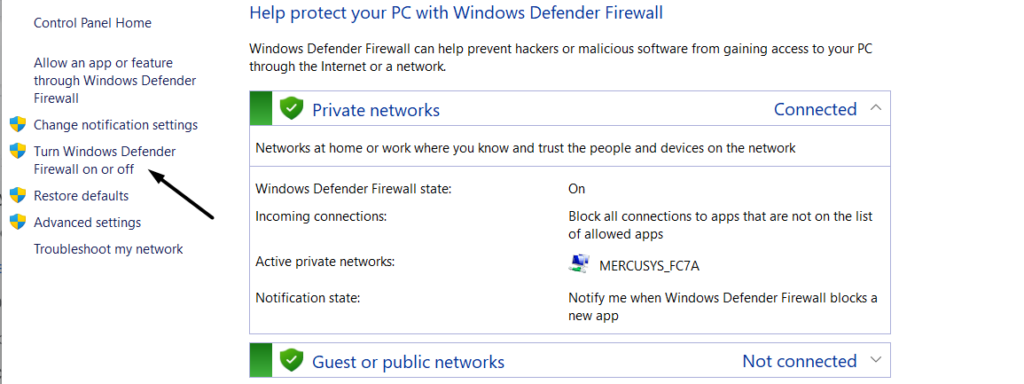
1. To do so, open the Control Panel app on your PC and navigate to the System and Security section to access the computer’s security settings.
2. Then, move to the Windows Defender Firewall section and choose the Turn Windows Defender Firewall on or off option.
3. At last, set the Private network settings and Public network settings option to turn off Windows Defender Firewall (not recommended).
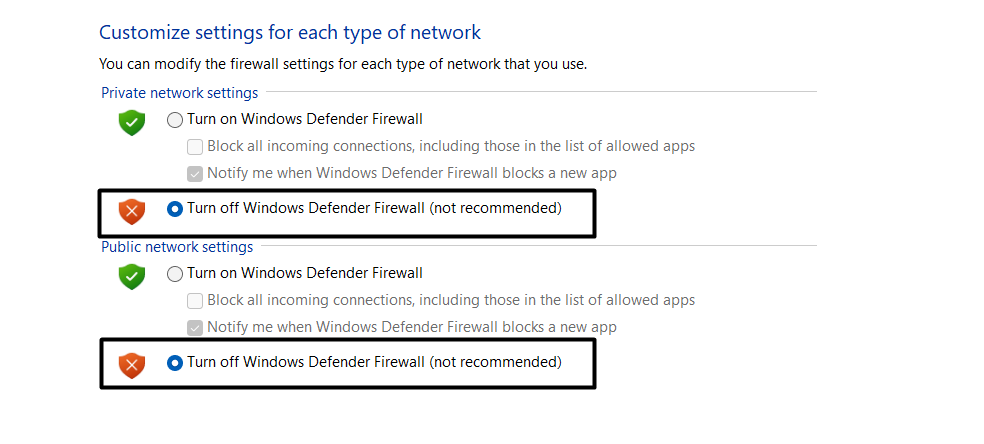
3. Alternatively, execute the below command in the elevated Command Prompt to disable the system’s integrated Firewall.
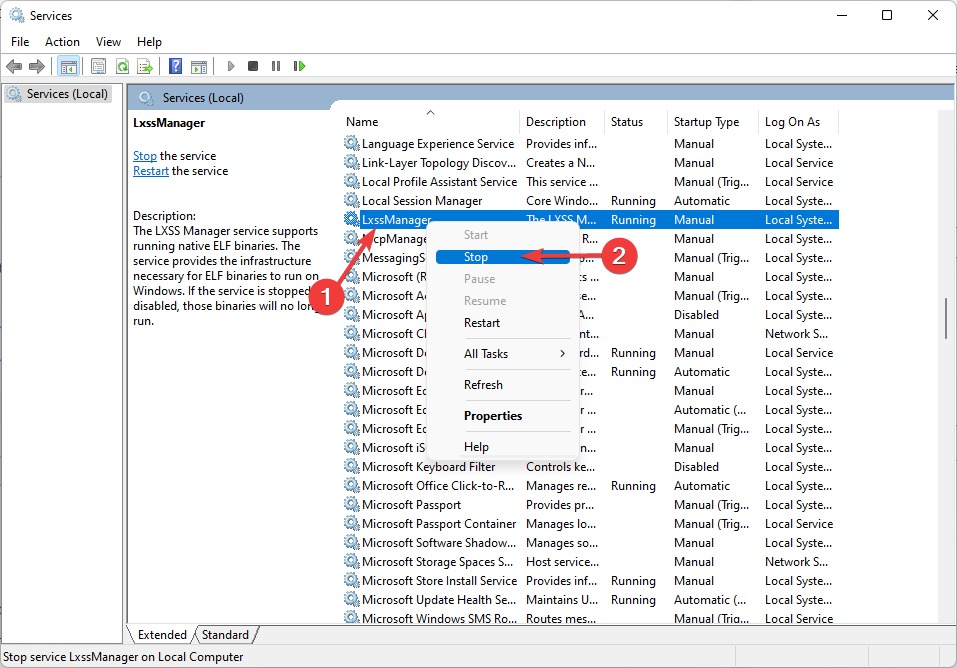
netsh advfirewall set allprofiles state off11. Restart the LxssManager Service
LxssManager is an essential Windows service that enables you to run native ELF binaries on your system with ease. If this service faces issues in functioning properly, then it can prevent WSL from working correctly. It could be possible that the LxssManager service isn’t functioning properly, which is why you’re going through this inconvenience.
Fortunately, you can restart the LxssManager service to see if it is of any help. Follow the mentioned instructions to learn how to reinstate the LxssManager service in a few simple steps:
1. Firstly, open the Windows Search Box, type Services in it, and select the same from the search results.

2. Now, look for the LxssManager service in the Services section and right-click on it to open the dropdown menu.
3. In the end, select the Stop option from the pop-up menu and relaunch WSL to restart the service to fix it.
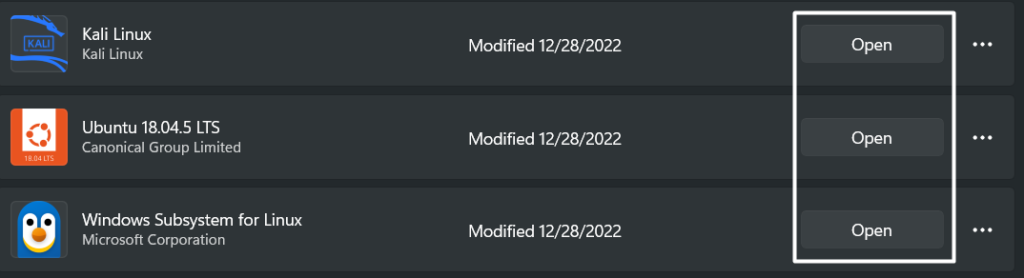
12. Launch WSL from Microsoft Store
If you can’t open WSL or Linux distribution on your PC from the Taskbar or Windows Search Box, then we suggest launching it from the Microsoft Store. It could be possible that there’s a glitch with the distribution program, which is why the program isn’t opening. You can follow the below steps to open WSL from the official Microsoft Store:
1. Open the Microsoft Store on your PC.
2. Click the Library icon at the bottom left corner of the screen.

3. Now, look for the Windows Subsystem for Linux app in the Apps section and click on Open next to it.
13. Reset & Repair the Linux Distribution App
It could be possible that the Linux distribution app has been corrupted, which is why these issues are appearing. The best solution to fix the corrupted data is to repair the affected Linux distribution app.
Fortunately, your Windows system allows you to easily repair and reset apps from the system’s Settings. You can follow the below-mentioned steps to reset and repair your Linux distribution app without putting much effort:
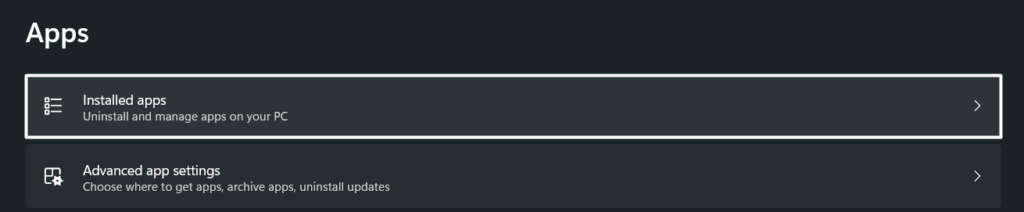
1. Open the Settings app on your Windows PC and move to the Apps section from the left navigation menu.

2. Then, head to the Installed apps section and search for the Linux distribution app you’re facing issues with.
3. Next, click on three dots (…) or More options next to the app and select the Advanced options from the dropdown menu.
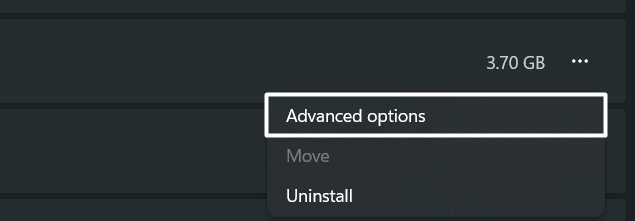
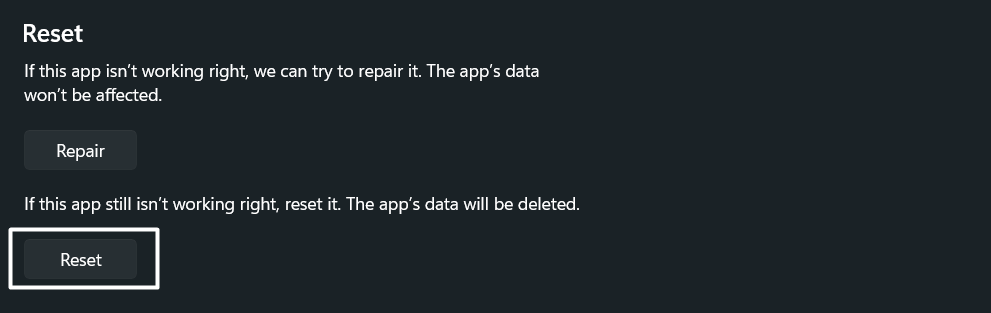
4. In the Advanced options section, move to the Reset section and click on Repair to start repairing the app.
5. Lastly, click on the Reset option in the Reset section to clear the app’s cache and data from the computer.
The previously affected Linux distribution app must be working fine now.
14. Update Linux Using Windows Terminal
Many users said updating WSL and the Linux distribution program to the latest version fixed the issue for them. Keeping this in mind, we also suggest you update WSL to the latest version to see if it makes some improvements.
Doing so will update all the WSL components and its kernel version to the most current version. You can check the steps below if you need some assistance:
1. To update WSL, open the elevated Windows PowerShell and CMD on your Windows PC and run the mentioned command in the console.
wsl --update2. Once you’ve updated WSL, execute the below command in the Linux distribution to update the Linux distribution user binaries.
apt-get update | apt-get upgradeOnce done, check the issue’s status.
15. Reinstall Linux distribution
If updating the Linux distribution doesn’t resolve the WSL not working issue, you can then consider reinstalling it. Doing so will completely remove the program and its existing data from the system and resolve the problem. So, you can try reinstalling your Linux distribution on your Windows 11 PC following the mentioned steps:
1. To start, open the elevated Command Prompt or Windows PowerShell on your PC and run the mentioned command in the console.
wls --list --all2. Next, execute the mentioned command in the console. But replace <DistributionName> with the Linux distribution installed on your system. For instance, we’ve installed Kali Linux on our Windows system, so we’ll replace <DistributionName> with Kali Linux.
3. Once you’ve completely removed the distribution from your system, move to Microsoft Store and reinstall it.
After reinstalling the Linux distribution on the system, you should be able to use Linux without any issues now.
16. Uninstall Faulty Windows Updates (Optional)
For some users, these issues with WSL started occurring after updating the PC to another version. If that’s the same in your case, then we suggest removing the malfunctioned Windows update from the system.
But before following the mentioned steps, you should know after which update the issue started appearing. Once you’ve found this out, follow the mentioned step to uninstall the faulty Windows update from your PC:
1. Firstly, move to Settings of your Windows PC and select Windows Update from the left navigation menu.

2. Now, proceed to the Update history section and then move to the Uninstall updates section to view the updates that can be uninstalled.

3. In the end, click on Uninstall next to the Windows update you want to uninstall and again select Uninstall to remove it from the system.
Once done, restart the computer, and confirm whether the issue is fixed.
17. Update Your Windows 11 PC To the Latest Version
It could be possible that these issues are appearing because of some bugs in the essential WSL components. Microsoft keeps pushing new updates to fix these bugs and to make Windows more efficient and stable. You can also try to search for new Windows 11 updates and install them to see if it resolves the issues: Here are the steps to do the same in a few simple steps:
1. To start, open the Settings app on your Windows 11 PC and proceed to Windows Update from the left navigation pane.
2. Click on the Check for updates option in the Windows Update section to search for new system updates.

3. If Windows finds and shows some new updates on the screen, click on Download & install all to install them on your Windows PC.

Once you’ve updated your Windows 11 PC to the latest build, restart it and try installing WSL again on the system.
Frequently Asked Questions
Will WSL Work on Windows 11?
Yes, the Windows Subsystem for Linux (WSL) function works on both Windows 11 and Windows 10. But your Windows 11 PC must meet the minimum installation requirements to install and enable the WSL.
How Do I Know if WSL Is Installed on Windows 11?
To check whether Windows Subsystem for Linux is installed on your Windows 11 PC, run the wsl --install command in the elevated Command Prompt or PowerShell program. If it’s already installed on your computer, it’ll display a message explaining WSL is already installed on your Windows 11 system.
How Do I Enable WSL in Windows 11?
To turn on WSL on your Windows 11 PC, move to Control Panel > Programs > Programs & Features > Turn Windows Features on or off section and tick the Windows Subsystem for Linux checkbox. You can also download the Windows Subsystem for Linux app from the Microsoft Store on your Windows 11 computer to enable WSL.
How Do I Fix WSL Error 0x80370102?
If you get the 0x80370102 error while using WSL on your Windows 11 PC, then we suggest making sure that the Virtual Machine Platform feature is enabled on your computer. You can execute the mentioned command in the elevated CMD or PowerShell to enable the Virtual Machine Platform option on your Windows PC.
dism.exe /online /enable-feature /featurename:VirtualMachinePlatform /all /norestartFinally, WSL Is Working Properly Now
We all always wanted to use our favorite Linux distribution on our Windows PC without creating any virtual machine. And even Microsoft tried to make it possible, and they were successful too in doing so. But like every other virtualization program, it may also have some issues.
Many users are experiencing issues in installing and running WSL on their Windows machines. If you were also facing the same issues with WSL on your system, then we hope the mentioned solutions helped you fix the issue. Also, before leaving this guide, let us know which of the mentioned workarounds worked for you.
Download Windows Speedup Tool to fix errors and make PC run faster
The Windows Subsystem for Linux(WSL) is a part of the Windows operating system feature and this allows you to run a Linux file system,command-line tools, and GUI apps on your Windows computer. However, a lot of users reported that the WSL is not working or starting on their Windows 11/10 computers. In this article, we are going to talk about this issue and see what you need to resolve it.

WSL will not work on your computer if the feature itself is disabled, this seems self-explanatory, but a lot of users tend to leave WSL disabled when trying to access the feature. This problem can also be caused if some of the related features such as Hyper-V and Virtual Machine Platforms are disabled. We are going to discuss such kinds of reasons and find the solutions for the said error. So, if WSL is not working or starting on your Windows 11 computer, follow the solutions mentioned below.
- Enable Windows Subsystem for Linux (WSL)
- Enable Virtual Machine in Windows
- Enable Hyper-V
- Launch Windows Subsystem for Linux (WSL) from Microsoft Store
- Repair the Linux Distribution App
Let’s see all these solutions in detail.
1] Enable Windows Subsystem for Linux (WSL)
It has been seen that when users upgrade their system to Windows 11 the feature, Windows Subsystem for Linux(WSL), gets disabled. So, don’t worry just go and enable this feature and it will be back to a normal state. Follow the prescribed steps to do the same.
- Press the Windows key and type “Turn Windows features on or off” and press Enter button.
- Scroll down the screen and select Windows Subsystem for Linux and enable it. Now click on the OK button.
- Wait for a few seconds, install system files and the system will ask you to restart the computer
and check if the problem is resolved.
Hopefully, this solution will resolve your issue.
2] Enable Virtual Machine in Windows Platforms
Virtual machine installation is needed for running Windows Subsystem for Linux(WSL) and it will allow you to run multiple operating systems at the same using the same hardware. If the Windows Subsystem for Linux is enabled then the next thing you have to check is whether the Virtual Machine is enabled or not. Follow the steps mentioned below to do the same.
- Press the Windows + S and type Turn Windows features on or off and press enter button.
- Scroll down the screen and select Virtual Machine Platform and enable it.
- Now click on the OK button.
- Wait for a few seconds, the system will ask you to restart the computer
and check if the problem is resolved.
Hopefully, when you enable the VM feature in Windows will resolve your issue.
3] Enable Hyper-V
Hyper-V is a feature in Windows Operating System that allows the system to create a virtual environment. In case, the feature is disabled on your system, you won’t be able to start or create WSL. That is why we need to follow the steps given below to enable Hyper-V.
- Open Control Panel.
- Go to Program > Programs and Features.
- Turn Windows Feature on or off.
- Look for Hyper-V and enable it.
After enabling the feature, restart your computer and check if the is fixed.
4] Launch Windows Subsystem for Linux (WSL) from Microsoft Store.
Sometimes users are unable to start WSL because there are glitches in the installed apps. Therefore you have to update WSL from Microsoft Store and you can launch Windows Subsystem for Linux (WSL) from Microsoft Store. This way you will not only get the latest updates and new features but also resolve the issue. Now, launch WSL and check if the issue persists or not.
- Press the Windows key and type Microsoft Store and press enter button.
- Select Library from the app’s bottom left of the screen.
- Select the Linux distribution app, such as Ubuntu, then click Launch and hope your issue will be resolved.
In case this fails, move on to the next solution.
5] Repair the Linux Distribution app
The error in question implies that there is an issue with your Linux Distribution app. You are either using a corrupted version of the tool. If it is the case, then you have two methods to fix the issue: repair it or uninstall it and then install it again. To repair the app, follow the steps prescribed below:
- Press Windows + I key to open settings.
- Select Apps from the left side of the screen.
- Click on Apps & features or Installed apps on the right side of the screen.
- Scroll down the screen and select the Linux distribution app.
- Click on the three-dot line and select Advanced options.
- Now click on the Repair button there.
- Follow the on-screen instruction to complete the process.
Hopefully, repairing the Linux Distribution app will resolve this issue.
Read: Fix Windows Subsystem for Linux Errors, Problems and Issues.
Anand Khanse is the Admin of TheWindowsClub.com, a 10-year Microsoft MVP (2006-16) & a Windows Insider MVP (2016-2022). Please read the entire post & the comments first, create a System Restore Point before making any changes to your system & be careful about any 3rd-party offers while installing freeware.