
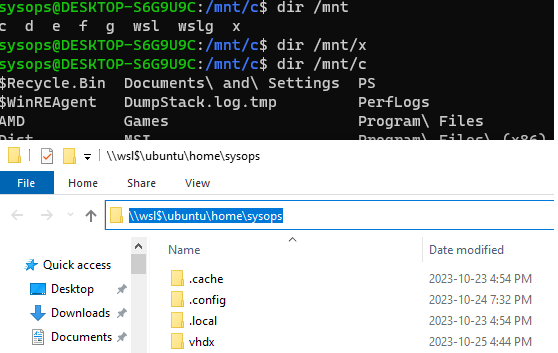
Windows Subsystem for Linux (WSL) предоставляет ряд удобных возможности подключения физических, виртуальных и сетевых дисков. По умолчанию в среде wsl в каталог
/mnt/
монтируются все логические диски, которые доступны в Windows. Кроме того, вы можете прямо из проводника Windows обратиться к файловой системе WSL по UNC пути
\\wsl$\
(например,
\\wsl$\ubuntu\etc\
).
В этой статье мы рассмотрим, как смонтировать различные типы дисков в среде WSL.
Содержание:
- Монтирование физических дисков Windows Subsystem for Linux 2
- Как подключить (смонтировать) сетевой диск в WSL
- Смонтировать виртуальный VHD/VHDX диск в WSL
Монтирование физических дисков Windows Subsystem for Linux 2
Новая версия Windows Subsystem for Linux (WSL 2) позволяет монтировать физические диски, или отдельные разделы с файловыми системами, которые не поддерживаются в Windows (список поддерживаемых файловых систем содержится в файле
/proc/filesystems
).
Например, у вас есть физический на которым созданы разделы с файловой системой диск ext4, и вы хотите получить к нему доступ из WSL и Windows.
Обновите свою версию WSL 2, прежде чем двигаться дальше:
wsl --update
Теперь нужно вывести список доступных дисковых устройств в Windows:
wmic diskdrive list brief
В этом примере к компьютеру подключены два физических диска.

Можно смонтировать в WSL диск целиком:
wsl --mount \\.\PHYSICALDRIVE2
Или только определенный раздел:
wsl --mount \\.\PHYSICALDRIVE2 --partition 1

Раздел физического диска был успешно смонтирован в директорию /mnt/wsl/PHYSICALDRIVE2p1.
Вы можете получить доступ к файлам на этом разделе из Windows по UNC пути
\\wsl$\ubuntu\mnt\wsl\PHYSICALDRIVE2p1
.
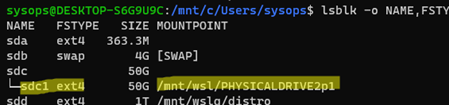
Проверьте, что раздел диска с файловой системой ext4 доступен в WSL:
lsblk -o NAME,FSTYPE,SIZE,MOUNTPOINT

Чтобы отмонтировать диск, выполните:
wsl --umount \\.\PHYSICALDRIVE2 --partition 1
Для автоматического монтирования раздела физического диска при входе пользователя в Windows, создайте с помощью PowerShell простое задание планировщика:
$TaskName="WSL_Mount"
$Trigger= New-ScheduledTaskTrigger -AtLogOn
$Action= New-ScheduledTaskAction -Execute "cmd" -Argument "/c wsl --mount \\.\PHYSICALDRIVE2 --partition 1"
Register-ScheduledTask -TaskName $TaskName -Trigger $Trigger -Action $Action -RunLevel Highest –Force
На данный момент WSL не поддерживает монтирование USB накопителей и SD карт. Для проброса USB накопителей в WSL рекомендуется использовать пакет usbipd-win, который позволяет реализовать проброс устройств с помощью протокола USB over IP.
Как подключить (смонтировать) сетевой диск в WSL
Из WSL вы можете получить доступ к общим сетевым папкам или NAS устройствам.
Есть два способа подключения сетевых дисков в WSL:
- Можно смонтировать сетевой диск, подключенный в Windows и которому назначена буква диска
- Смонитировать сетевую папку по UNC пути с помощью CIFS/SMB клиента в WSL.
Допустим, вы подключили сетевую папку в виде диска с помощью команды net.exe use X: \\192.168.31.102\tools или подключили сетевой диск через GPO. Чтобы получить доступ к этому сетевому диску из WSL нужно:
- Создать точку монтирования:
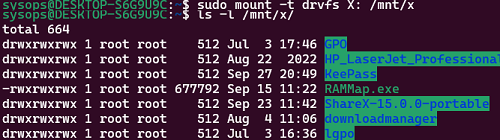
$ sudo mkdir /mnt/x - Смонтировать диск:
$ sudo mount -t drvfs X: /mnt/x - Теперь вы можете получить доступ к файлам и папкам на сетевом диске.
Чтобы автоматически монтировать этот сетевой диск, добавьте следующую строку в /etc/fstab:
X: /mnt/x drvfs defaults 0 0
Затем смонтируйте все файловые системы:
$ mount -a
Также можно смонтировать сетевые папки через пакет CIFS:
$ sudo apt install cifs-utils
$ sudo mount -t cifs -o user={user},pass={password},iocharset=utf8,vers=3.0 //192.168.31.102/tools /mnt/tools
Смонтировать виртуальный VHD/VHDX диск в WSL
WSL позволяет смонтировать виртуальные диски в форматах VHD/VHDX.
Если на компьютере установлен роль или PowerShell модуль Hyper-V, вы можете создать новый виртуальный диск с помощью команды:
New-VHD -Path $env:USERPROFILE\wsl_shared_disk.vhdx -Dynamic -SizeBytes 20GB
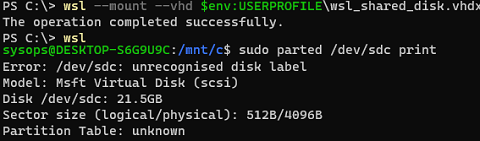
Затем смонтируйте виртуальный VHDX диск в WSL:
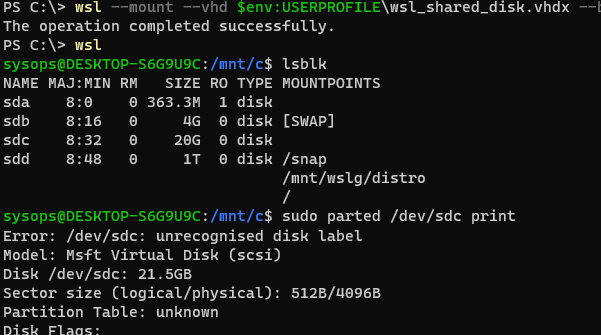
wsl --mount --vhd $env:USERPROFILE\wsl_shared_disk.vhdx --bare
Теперь вы можете создать на виртуальном диске таблицу разделов и раздел с файловой системой ext4:
$ lsblk
$ sudo parted /dev/sdc print
$ sudo parted /dev/sdc mklabel msdos
$ sudo parted -a optimal /dev/sdc mkpart primary ext4 0% 100%
$ lsblk -o NAME,FSTYPE,SIZE,MOUNTPOINT /dev/sdc
$ sudo mkfs.ext4 /dev/sdd1
Чтобы смонтировать новый раздел в определенную директорию, нужно получить его UUID;
$ sudo blkid
$ sudo mount UUID= 506f6faa-1f50-4763-b8a1-975f2b1c59fe /home/sysops/vhdx
Этот способ позволит смонтировать виртуальные диски других сред Linux, которые установлены на этом компьютере под WSL. Файловая система образов Linux WSL хранится в виртуальных дисках ext4.vhdx в папке
C:\Users\[user]\AppData\Local\Packages\[distro]\LocalState\[distroPackageName]
. Если на системном диске недостаточно места, можно перенести vhdx файл с файловой системой образа WSL на другой диск.
- How do I access Windows folder from WSL?
- Can WSL access Windows files?
- How do I mount a Windows drive in WSL?
- How do I access Windows files from WSL 2?
- How do I copy files from WSL to Windows?
- How do I share files between Windows and WSL?
- How do I enable WSL on Windows?
- How do I open WSL files on Windows?
- How view Linux files in Windows?
- Where are WSL files stored?
- What is MNT WSL?
- How do I mount a drive in Windows 10?
How do I access Windows folder from WSL?
Access Windows Subsystem for Linux files on Windows
- Open WSL terminal.
- Navigate the root directory or top folder inside of the Terminal.
- Type in explorer.exe and hit Enter to open that location inside of the File Explorer.
Can WSL access Windows files?
WSL also allows you to run Linux command-line tools and apps alongside your Windows command-line, desktop and store apps, and to access your Windows files from within Linux. This enables you to use Windows apps and Linux command-line tools on the same set of files if you wish.
How do I mount a Windows drive in WSL?
How to Mount Windows Network Drives in WSL
- Note the letter of the network drive that you would like to map in WSL. We will use M: in this example.
- Create a new folder for that drive letter under /mnt if it does not already exist. ( ex: mkdir /mnt/m )
- Mount the drive with sudo mount -t drvfs M: /mnt/m.
How do I access Windows files from WSL 2?
1 Answer
- Open File Explorer.
- Type \\wsl$ in the address bar.
- My distro shows up and click on it and you can see the file system.
How do I copy files from WSL to Windows?
So, from WSL you can copy files back and forth from Windows/Linux by copying files into these folders. For example, my home directory in Windows is mounted in /mnt/c/Users/mbuckaway. So, I can place files there to get access from Windows. You can work from this directory in WSL and then everything will be shared.
Share folder between Windows and WSL
- Project located in the Windows file system, accessed via /mnt/ in WSL.
- Symlink (created in WSL bash) of project located in the Windows file system.
- Copy the project to the WSL file system.
How do I enable WSL on Windows?
To install WSL using Setting on Windows 10, use these steps:
- Open Settings.
- Click on Apps.
- Under the «Related settings» section, click the Programs and Features option. …
- Click the Turn Windows features on or off option from the left pane. …
- Check the Windows Subsystem for Linux option. …
- Click the OK button.
How do I open WSL files on Windows?
Ways to run WSL
From Windows Command Prompt or PowerShell, to open your default Linux distribution inside your current command line, enter: wsl.exe . From Windows Command Prompt or PowerShell, to open your default Linux distribution inside your current command line, enter: wsl [command] .
How view Linux files in Windows?
First, the easy one. From within the Windows Subsystem for Linux environment you want to browse, run the following command: explorer.exe . This will launch File Explorer showing the current Linux directory—you can browse the Linux environment’s file system from there.
Where are WSL files stored?
Note: In beta versions of WSL, your “Linux files” are any of the files and folders under %localappdata%\lxss – which is where the Linux filesystem – distro and your own files – are stored on your drive.
What is MNT WSL?
Now the /mnt/wsl path is a recursive shared tmpfs mount that does not have the distros root filesystems automatically mounted. The upside of this is it allows users much greater flexibility of what to share with other distros (for example create a recursive bind mount of you’re entire distro including submounts).
How do I mount a drive in Windows 10?
How to mount drive on Windows 10
- Open Start.
- Search for Create and format hard disks partitions and click the top result to open Disk Management.
- Right-click the drive and select the Change Drive Letter and Path option. …
- Click the Add button. …
- Select the Assign the following drive letter option.
Windows Subsystem for Linux (WSL) is a great tool to virtualize Linux distributions on Windows. Common need is to share files between the two systems. Easiest way is to mount a Windows folder to the Linux subsystem.
Using the following code lines we are going to make Windows’ folder under path “c:/shared” available for Ubuntu on the path “/mnt/path_on_linux”.
Start up WSL command line tool and create the folder:
sudo mkdir /mnt/path_on_linuxNote: mkdir is the command to create folder
Note: sudo gives administrative rights to the command, it might ask for your admin password
Now mount up our Windows folder to WSL:
sudo mount -t drvfs c:/shared /mnt/path_on_linux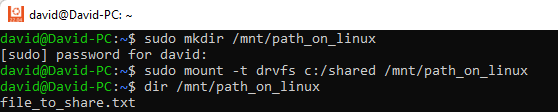
Windows OS Hub / Windows 11 / Mount Physical and Network Drives in WSL2 (Windows Subsystem for Linux)
There are several ways to mount and access physical, virtual, or network drives in Windows Subsystem for Linux (WSL2). By default, the WSL environment mounts all Windows logical drives to the /mnt/ directory. In addition, you can access the WSL file system directly from File Explorer running on the Windows host by using the UNC path \\wsl$\ (for example, \\wsl$\ubuntu).
This guide explains how to mount different drives in a WSL environment.
Contents:
- How to Mount Physical Drive (Partition) in WSL2
- Mounting Windows Network Drives in WSL
- Attach Virtual Hard Drive (VHD/VHDX) in WSL
How to Mount Physical Drive (Partition) in WSL2
Windows Subsystem for Linux (WSL 2) makes it possible to mount physical drives or specific partitions with file systems that are not supported by the Windows host itself. The /proc/filesystems file contains the list of supported filesystems in WSL.
For example, you have a physical disk with ext4 partitions on it and you want to access them from WSL.
Before proceeding, check and update your WSL 2 version:
wsl --update
Then list the available disk devices in Windows:
wmic diskdrive list brief
Two physical disks are connected to the computer in this example.

You can mount an entire hard disk drive in the WSL:
wsl --mount \\.\PHYSICALDRIVE2
Or just a specific partition:
wsl --mount \\.\PHYSICALDRIVE2 --partition 1

The partition of the physical hard disk will be mounted in the directory /mnt/wsl/PHYSICALDRIVE2p1.
You can access files on this partition from a Windows host using a UNC path: \\wsl$\ubuntu\mnt\wsl\PHYSICALDRIVE2p1.
Check that the ext4 filesystem partition is accessible in WSL:
$ lsblk -o NAME,FSTYPE,SIZE,MOUNTPOINT
To unmount the partition, run:
wsl --umount \\.\PHYSICALDRIVE2 --partition 1
To automatically mount a physical disk partition when a user logs on to Windows, create a simple scheduler task using PowerShell:
$TaskName="WSL_Mount_DISK1_PART1"
 $Trigger= New-ScheduledTaskTrigger -AtLogOn
 $Action= New-ScheduledTaskAction -Execute "cmd" -Argument "/c wsl --mount \\.\PHYSICALDRIVE2 --partition 1"
 Register-ScheduledTask -TaskName $TaskName -Trigger $Trigger -Action $Action -RunLevel Highest –Force
WSL 2 doesn’t currently support the mounting of USB drives or SD cards. To attach USB storage devices to WSL, it is recommended to use the usbipd-win package (allows to passthrough external USB devices using the USB over IP protocol).
Mounting Windows Network Drives in WSL
In WSL, you can access shared folders on network computers or NAS devices. There are two ways to mount network drives in WSL:
- You can mount a network drive that is mapped in Windows and has a drive letter assigned to it.
- It is possible to use the CIFS/SMB client in WSL to mount a shared network folder using a UNC path.
For example, you have mapped a network drive using GPO or with the net use X: \\192.168.100.12\tools command. To access this network drive from WSL:
- Create a mount point:
$ sudo mkdir /mnt/x - Mount the drive:
$ sudo mount -t drvfs X: /mnt/x - Now you can access files and folders on the network drive.
To automatically mount this network drive, add the following line to /etc/fstab:
X: /mnt/x drvfs defaults 0 0
Then mount all the file systems:
$ mount -a

Shared network folders can also be mounted directly from SMB-enabled devices using the CIFS package.
$ sudo apt install cifs-utils
 $ sudo mount -t cifs -o user={user},pass={password},iocharset=utf8,vers=3.0 //192.168.100.12/tools /mnt/tools
This example uses the SMB 3.0 protocol to connect to shared folders instead of SMBv1 which is disabled by default in current versions of Windows.
Attach Virtual Hard Drive (VHD/VHDX) in WSL
VHD/VHDX virtual hard disks can also be mounted with WSL. If the Hyper-V PowerShell module is installed on the computer, create a new virtual disk file using the command:
New-VHD -Path $env:USERPROFILE\wsl_shared_disk.vhdx -Dynamic -SizeBytes 20GB
Then mount the VHDX file in WSL:
wsl --mount --vhd $env:USERPROFILE\wsl_shared_disk.vhdx --bare
Now you can create a partition table and a partition with the ext4 file system on the virtual disk:
$ lsblk
 $ sudo parted /dev/sdc print
 $ sudo parted /dev/sdc mklabel msdos
 $ sudo parted -a optimal /dev/sdc mkpart primary ext4 0% 100%
 $ lsblk -o NAME,FSTYPE,SIZE,MOUNTPOINT /dev/sdc
 $ sudo mkfs.ext4 /dev/sdd1
Then you can mount a new partition to a directory by its UUID:
$ sudo blkid
 $ sudo mount UUID=c04d0309-b93a-47f2-ae0d-79c95c80cd51 /home/sysops/vhdx
Using this method, you will be able to mount the virtual hard disks of other Linux environments that are installed on this computer under WSL. The Linux WSL image file system is stored in the ext4.vhdx virtual disk in the C:\Users\[user]\AppData\Local\Packages\[distro]\LocalState\[distroPackageName] folder. If you don’t have enough free space on the system drive, you can move the VHDX file that contains the WSL image file system to another drive.
The Problem: WSL2 and Windows Files BAD
The reason I have wandered down this road is that the one reson I always stuck with WSL1 is its filesystem performance when working with files on the windows system.
I recently decided to jump to WSL2 due to some of its many features, but was horribly hampered by just how slow it was to interact with Windows files. A lot of my development is for Android and I run Android Studio on my computer but interact with the repo using WSL to manage Git and to sometimes run the Unit Tests. When I switched to WSL2, git ground to a halt. I was seeing typically everything taking 10x more time to complete. Running git status in WSL1 would take 0.5s or less. In WSL2 it takes 6.5 seconds on average, or 23+ seconds if it had to reindex the 1549 files in the project, which only tooke WSL1 about 2.7 seconds to complete previously.
My First Attempt with NFS
I began searching around for a solution to this file interoperability problem and found many people saying NFS would work. Well it didn’t. Since I don’t have Windows 11 Pro, I don’t get the fun NFS feature that was previously available in the Home version (they removed it for money I guess).
So I tried the third-party programs: FreeNFS, haneWin NFS, and some other winnfsd.exe program I found online. Sometimes I could get my local WSL2 mount to work, but then it would die after some small amount of time, causing the terminal to hang. Other time it just wouldn’t connect and just hang or timeout, and good luck getting it to connect on boot with fstab!
Next Try: Samba (not the dancer)
So the problem I was facing was trying to rely on a Linux-based feature to run reliably on Windows (a NFS server). So I started looking into alternatives, that’s when I saw some articles about mounting a Windows Samba share. Again I ran into many issues and couldn’t get a local linux samba client to connect to my windows host machine.
The IP Problem
The next big issue is that WSL2 runs inside of a special Hyper-V container. This means that it no longer shares the Windows NIC and localhost. Instead it is randomly assigned a new local IP address within the Hyper-V virtual network. This IP is in the 172.16.0.0/12 subnet. This leaves you with two options:
- Connect to my local network IP, thereby routing through my nearest WiFi router/Network Switch (in my case 192.168.1.101)
- Fetch my Windows Host machine’s IP on the virtual network and connect to that.
With Option 1, you can add the mount to /etc/fstab and have it auto-mounted by the system. But it won’t work if you change networks and get a different local IP.
With Option 2, you cannot add it to /etc/fstab but instead you can add it to your user’s ~/.bashrc file to auto mount on start up. This protects against dynamic host IP, but must be in each WSL2 user’s .bashrc to insure it is run.
The Solution: CIFS
I found someone online suggest to use CIFS. And it WORKED! There were some steps, and some issues with WSL2 IP, but now it works great. So I want to share with others how I went about getting this to work.
How-To Connect Windows 11 File Share to WSL2
Stage 1. Enable Network Sharing
- Open
Settings -> Network & internet -> Advanced network settings -> Advanced sharing settings - Under
Private networks, toggle ONNetwork discoveryandFile and printer sharing, and check ONSet up network connected devices automatically - Under
All networks, toggle ONPassword-protected sharing
Stage 2. (Optional) Create a Local user
Later you will have to store windows login credentials within the WSL2 files, so if you are concerned about leaving a plain-text password on your computer, I suggest you create a local user for this connection. Otherwise continue to stage 3
NOTE: Microsoft REALLY hates you making local users, so follow the steps carefully
- Open
Settings -> Accounts -> Other Users - Click the
Add accountbutton - Click the
I don't have this person's sign-in informationlink - Click the
Add a user without a Microsoft accountlink - Enter a username and password (I just use CIFS and cifs respectively) into the fields and enter some security questions. (You can just fill them all with the same answer)
- click
Next
Stage 3. Share Folders
Next you want to share the folders on your network so that WSL2 can find and mount them.
So for each folder you wish to mount, do the following:
- Navigate to the folder in explorer
- Open the folder’s properties, and click the
Sharingtab - Click
Sharebutton - If you created a local user in Stage 2, follow these steps to add them. Otherwise proceed to step 5.
- Select them from the drop-down menu and click
Add - Then click the
Readdropdown menu to the right of the user in the list and selectRead/Write
- Select them from the drop-down menu and click
- Click
Shareand wait for it to complete. Then clickDoneand close the folder properties window.
If you ever want to UnShare a folder
- Open the folder’s properties dialog and click the
Sharingtab - Click
Advanced Sharing... - Uncheck
Share this folder - Click
OKand close the folder properties dialog.
Stage 4. Setup CIFS on WSL2
Run the following commands to install CIFS:
sudo apt update
sudo apt install cifs-utils
The final script utilizes the following commands which I will explain here:
How we Fetch Host IP
(UPDATE 09/2023) Please see Update below if you are using Mirrored Network.
You can fetch the host IP using ip route and extracting the default via IP from the result. To do this we can use grep and sed.
$ ip route
default via 172.25.208.1 dev eth0 proto kernel
172.25.208.0/20 dev eth0 proto kernel scope link src 172.25.217.253

$ ip route | grep "default via" | sed -En 's/[^0-9]*([0-9]{1,3}\.[0-9]{1,3}\.[0-9]{1,3}\.[0-9]{1,3}).*/\1/p'`
172.25.208.1
How we Fetch User and Group ID
By default, the system will mount the drive under the root user, which means you’ll have to sudo everything. Instead you can specify which user and which group will be the default for the mount. This is done using the user and group ids.
$ id -u flame
1000

$ id -g flame
1000
You could also create a special group for the CIFS mounts so that multiple users could access it via group permissions.
How we Mount the Drive
The core command for mounting the drive is as follows:
# for local user 'CIFS' with password 'cifs' (if you created one in Stage 2)
sudo mount -t cifs //172.25.208.1/MyFolder /mnt/my-folder -o username=CIFS,password=cifs,uid=1000,gid=1000
# for microsoft account 'myemail@live.com' with password 'HelloWorld'
sudo mount -t cifs //172.25.208.1/MyFolder /mnt/my-folder -o username=myemail,domain=live.com,password=HelloWorld,uid=1000,gid=1000
This follows the pattern mount -t <type> <remote-folder> <local-folder> -o <options>
Final Script
(UPDATE 09/2023) Please see Update below if you are using Mirrored Network.
We can then combine all of this work into the following and add it to our ~/.bashrc
# file: ~/.bashrc

# Fetch our Windows Host IP
WIN_HOST_IP=`ip route | grep default | sed -En 's/[^0-9]*([0-9]{1,3}\.[0-9]{1,3}\.[0-9]{1,3}\.[0-9]{1,3}).*/\1/p'`
# Set our local user credentials
WIN_HOST_USER="CIFS" # Username of local user, or the user portion of a Microsoft Account email address
WIN_HOST_PASS="cifs"

# If you are using a Microsoft Account, uncomment and assign the domain portion of your email address
#WIN_HOST_DOMAIN="live.com"

# Fetch the current user's uid and gid.
WSL_UID=`id -u`
WSL_GID=`id -g` # You can use `id -g my-group` if you want the id of a specific group

# Create a function we can call to make it easier to mount multiple folders
mount_cifs() {
	# If the mount point is already in use, echo a notice and exit. You can remove the echo portion if it annoys you
	mount | grep "$2" &>/dev/null && echo "$2: Already mounted" && return 1
	# If the mount point folder does not exist, create it
	if [ ! "$2" ]; then
		sudo mkdir "$2"
	fi
	# (Local User) Comment out if using Microsoft Account
	sudo mount -t cifs "//$WIN_HOST_IP/$1" "$2" -o "username=$WIN_HOST_USER,password=$WIN_HOST_PASS,uid=$WSL_UID,gid=$WSL_GID"
	# (Microsoft User) Uncomment if using Microsoft Account
	#sudo mount -t cifs "//$WIN_HOST_IP/$1" "$2" -o "username=$WIN_HOST_USER,password=$WIN_HOST_PASS,domain=$WIN_HOST_DOMAIN,uid=$WSL_UID,gid=$WSL_GID"
}

# Mount your folders
# mount_cifs <remote-folder-name> <mount-point-folder>
mount_cifs Work /mnt/work
mount_cifs Projects /mnt/projs
mount_cifs Other /some/folder/path/other
UPDATE 09/2023: Mirrored Network Mode
With the update released in September 2023, you can now activate a Mirrored Network mode that allows WSL2 to share the same NIC as the host computer. This means we need to update our script if you have this feature enabled.
With a mirrored network, we no longer need to discover our IP address, and instead we can just use the standard loopback IP 127.0.0.1. So we no longer need the How we Fetch Host IP) step.
Here is the updated script:
# file: ~/.bashrc

# Set our local user credentials
WIN_HOST_USER="CIFS" # Username of local user, or the user portion of a Microsoft Account email address
WIN_HOST_PASS="cifs"

# If you are using a Microsoft Account, uncomment and assign the domain portion of your email address
#WIN_HOST_DOMAIN="live.com"

# Fetch the current user's uid and gid.
WSL_UID=`id -u`
WSL_GID=`id -g` # You can use `id -g my-group` if you want the id of a specific group

# Create a function we can call to make it easier to mount multiple folders
mount_cifs() {
	# If the mount point is already in use, echo a notice and exit. You can remove the echo portion if it annoys you
	mount | grep "$2" &>/dev/null && echo "$2: Already mounted" && return 1
	# If the mount point folder does not exist, create it
	if [ ! "$2" ]; then
		sudo mkdir "$2"
	fi
	# (Local User) Comment out if using Microsoft Account
	sudo mount -t cifs "//127.0.0.1/$1" "$2" -o "username=$WIN_HOST_USER,password=$WIN_HOST_PASS,uid=$WSL_UID,gid=$WSL_GID"
	# (Microsoft User) Uncomment if using Microsoft Account
	#sudo mount -t cifs "//127.0.0.1/$1" "$2" -o "username=$WIN_HOST_USER,password=$WIN_HOST_PASS,domain=$WIN_HOST_DOMAIN,uid=$WSL_UID,gid=$WSL_GID"
}

# Mount your folders
# mount_cifs <remote-folder-name> <mount-point-folder>
mount_cifs Work /mnt/work
mount_cifs Projects /mnt/projs
mount_cifs Other /some/folder/path/other