
Время на прочтение2 мин
Количество просмотров59K

Команда разработчиков Kali Linux представила графический интерфейс для подсистемы Windows для Linux (WSL). Решение называется Win-Kex (Windows + Kali Desktop EXperience). Теперь можно запускать популярный дистрибутив для пентеста на ПК с Windows 10 в WSL2 с GUI.
Специалисты портала Bleeping Computer проверили, что это действительно работает. Они опубликовали свою инструкцию по установке и запуску Kali Linux с графическим интерфейсом для подсистемы Windows для Linux (WSL2).
Установка Kali Linux с GUI возможна только на ПК с ОС Windows 10 версии 2004.
На подготовительном этапе необходимо в ОС активировать подсистему Windows для Linux.
Открыть PowerShell (сейчас и далее под администратором) и запустить:
Enable-WindowsOptionalFeature -Online -FeatureName Microsoft-Windows-Subsystem-LinuxПерезагрузить ПК.
Открыть PowerShell и запустить:
dism.exe /online /enable-feature /featurename:VirtualMachinePlatform /all /norestartdism.exe /online /enable-feature /featurename:Microsoft-Windows-Subsystem-Linux /all /norestartПерезагрузить ПК.
Далее необходимо скачать и установить WSL2.
Потом нужно открыть PowerShell и запустить:
wsl --set-default-version 2Далее нужно установить Kali Linux из магазина Microsoft Store.
Чтобы поменять тип установки kali-linux с WSL1 на WSL2 нужно в PowerShell запустить:
wsl --set-version kali-linux 2Далее нужно выполнить установку и запустить Kali Linux.
Потом нужно установить пакет Win-KeX.
sudo apt update && sudo apt install kali-win-kexили
sudo apt update
sudo apt dist-upgrade
sudo apt install -y kali-win-kex
Можно также установить расширенную сборку Kali Linux.
sudo apt install kali-linux-largeПосле окончание установки GUI для Kali Linux запускается командой «kex».

Видеоинструкция по установке Kali Linux на ПК с Windows 10 в WSL2 с GUI за 5 минут.
Уже некоторое время в Windows 10 присутствует возможность установить различные дистрибутивы Linux с помощью компонента «Подсистема Windows для Linux» или WSL, однако лишь в виде терминала без графического интерфейса. Начиная с Windows 10 2004 WSL обновился до версии 2.0, благодаря чему появились новые возможности и, в рамках этих возможностей появилась Kali Linux для WSL2 с поддержкой графического интерфейса или Win-Kex.
В этой инструкции подробно об установке графического интерфейса Kali Linux в Windows 10 версии 2004 или новее, а также дополнительная информация, например, о том, как включить русский язык интерфейса в установленной системе.
Установка Kali Linux с графическим интерфейсом в Windows 10
Порядок установки Kali Linux с графическим интерфейсом (GUI) для подсистемы Windows для Linux будет состоять из следующих шагов (напоминаю: необходима версия Windows 10 2004 или новее):
- Включите компонент «Подсистема Windows для Linux». Сделать это можно в Панель управления — Программы и компоненты — Включение или отключение компонентов Windows. После установки перезагрузите компьютер.

- Этот шаг можно пропустить, если у вас включены компоненты Hyper-V, иначе запустите Windows PowerShell от имени администратора (можно сделать через правый клик по кнопке «Пуск» и выполните команду
dism.exe /online /enable-feature /featurename:VirtualMachinePlatform /all /norestart
- Скачайте и установите обновление ядра Linux WSL2 со страницы https://docs.microsoft.com/ru-ru/windows/wsl/wsl2-kernel
- Перезагрузите компьютер, запустите PowerShell от имени администратора и выполните команду
wsl --set-default-version 2
- Зайдите в магазин приложений Windows Store, используйте поиск чтобы найти и установить Kali Linux.

- После завершения установки в PowerShell от имени администратора выполните команду:
wsl --set-version kali-linux 2
- Запустите Kali Linux (пункт будет доступен в меню «Пуск»), выполните первоначальную настройку (имя пользователя и пароль), после чего по порядку выполните следующие команды (требуется подключение к Интернету, последний шаг может занять много времени.
sudo apt update
sudo apt dist-upgrade
sudo apt install -y kali-win-kex
- В ходе выполнения последней команды вам будет предложено выбрать клавиатуру. Я оставил значения по умолчанию, но, возможно, стоило выбрать русскую, так как в дальнейшем при включении русского языка интерфейса в ряде случаев кириллица не отрисовывается (не знаю, есть ли связь, лишь предположение).
- По завершении установки введите команду kex для запуска Kali Linux с графическим интерфейсом. При первом запуске вам будет предложено создать отдельный пароль, можно от этого отказаться.


В результате запустится Kali Linux с графическим интерфейсом в полноэкранном режиме. Для выхода из полноэкранного режима можете вызвать меню клавишей F8 и отключить опцию «Full Screen».
Если вам потребуется включить русский язык интерфейса для Kali Linux, у меня сработал следующий метод:
- В графическом интерфейсе Kali Linux запускаем терминал, вводим команду
sudo dpkg-reconfigure locales
- Выбираем ru_RU UTF-8 на двух экранах (отметку ставим пробелом, переключаемся на кнопку Ok клавишей Tab).
- Закрываем окно терминала и окно графического интерфейса, в терминале из которого мы запускали графический интерфейс вводим kex stop (если приглашение ввода не отображается, попробуйте изменить размер окна — у меня встретился такой баг).
- Снова запускаем kex — в результате интерфейс будет на русском языке.


А в целом, хотя я еще и не придумал, для чего мне это использовать (возможно, попробую запускать пакеты от bitnami для экспериментов с сайтами), но на первый взгляд всё работает исправно и быстро: быстрее, чем в виртуальной машине.
How to Install Kali Linux in Windows Subsystem for Linux (WSL)
Step 1: Enable WSL in Windows 10
To enable WSL in Windows 10, open PowerShell as an administrator and run the following command:
dism.exe /online /enable-feature /featurename:Microsoft-Windows-Subsystem-Linux /all /norestart
Step 2: Install WSL
To install WSL, open a new PowerShell window as an administrator and run the following command:
Step 3: Set WSL 2 as Default
To set WSL 2 as the default version of WSL, open PowerShell as an administrator and run the following command:
wsl --set-default-version 2
Step 4: Install Kali Linux
To install Kali Linux, run the following command in a PowerShell window:
wsl --install -d kali-linux
Step 5: Install Kali Linux Desktop Environment (Optional)
To install the Kali Linux desktop environment (XFCE), run the following command:
sudo apt install kali-win-kex -y
Or u can use, kali-tweaks to install as per ur requirement.
Step 6: Start Kali Linux Desktop Environment (Optional)
To start the Kali Linux desktop environment (XFCE), run the following command:
Step 7: Install Zsh Shell (Optional)
To install the Zsh shell, run the following command:
Step 8: Set Zsh as the Default Shell (Optional)
To set Zsh as the default shell, run the following command:
Step 8: If you have the space, why not install “Kali with the lot”? (Optional)
Here, run the following command:
sudo apt install -y kali-linux-large
That’s it! You should now have Kali Linux installed in WSL with optional GUI and Zsh shell support. Your computer has now become a lethal weapon! 💣🚀💥
Install Kali Linux Desktop on Windows with WSL2
Linux in Windows 10 and 11 with Kali Linux Desktop – Win-KeX (“Windows Kali Desktop EXperience”), starting with feature update 2004 there is an XFCE GUI on the Windows desktop.
Win-KeX provides a Kali Desktop Experience for Windows Subsystem for Linux (WSL 2) with the features that support two dedicated modes.
Win-KeX window mode kex –win is the classic appearance in a window for the Kali Linux desktop.
Win-KeX SL mode kex –sl provides the seamless integration of Kali Linux into the Windows desktop with the Windows Start menu below and the Kali panel at the top of the screen. All applications start in their own windows that use the same desktop as Windows applications.
Win-KeX Features
Win-KeX SL Seamless
Sound support
Support multiple sessions
Run Win-KeX as root
Shared clipboard cut and paste content between Kali and Windows Apps
To install Kali Linux on Windows, Open PowerShell as administrator and run the command bellow.
Enable-WindowsOptionalFeature -Online -FeatureName Microsoft-Windows-Subsystem-LinuxRestart the computer now.
Back after reboot run the commands from PowerShell as administrator.
dism.exe /online /enable-feature /featurename:VirtualMachinePlatform /all /norestart
dism.exe /online /enable-feature /featurename:Microsoft Windows subsystem Linux /all /norestart
Restart the computer again.
Then download Windows Subsystem for Linux 2 (WSL 2) and run the Update Setup Wizard. Download the latest package here and choose WSL2 Linux kernel update package for x64 machine.
Run the next command from the PowerShell as administrator.
wsl --set-default-version 2Install Kali Linux from the Microsoft Store.
Kali Linux is a Debian-based Linux distribution that mainly includes penetration testing and digital forensics. Kali Linux is primarily aimed at professional and advanced users.
Now complete the initial setup and launch Kali Linux.
Debian is also available from Microsoft Store.
Debian for Windows Subsystem for Linux
Install Win-KeX
Win-KeX from the terminal as follows.
sudo apt update && sudo apt install -y kali-win-kexStart Win-KeX
Win-KeX can be run in window mode or Seamless mode. Win-KeX in window mode as follows.
kex --winStart Win-KeX in Seamless – Sameless mode.
kex --slWin-KeX Start Examples
kex - Desktop full screen
kex --win - Desktop Window
kex --sl - Desktop Seamless Mode
kex --sl -s - Desktop Seamless Mode with Sound
kex --sl --wtstart - KeX server and win-kex client in terminal
kex --esm - KeX desktop in native RDP windows
Prerequisite for Win-KeX
The Visual C++ Redistributable packages are required to run Win-KeX, if not already installed, the packages can be downloaded here. Install the Universal C Runtime x86 (vc_redist.x86.exe) and x64 (vc_redist.x64.exe). Kali Linux requires Windows 10 version 2004 or later, and the Windows subsystem for Linux – WSL 2.
To use Win-KeX, a computer with Intel virtualization function VT-x is required. The BIOS provides the operating system with the virtualization function, for which you activate the Intel (R) Virtualization Technology in the UEFI BIOS settings.
Linux Shell in Windows Terminal
Also now is a good time to mention the Windows Terminal, if not already installed, it is worth doing it now.
Windows Terminal can be installed from the Windows Store.
Windows Terminal is a multi-tabbed command-line frontend for Windows 10. The shell of Kali Linux – ZSH can be used with Windows Terminal.
Kali Linux Sources Link kali.org
Troubleshooting
If VcXsrv is trying to start Win-KeX in Seamless Mode, an error is issued by VcXsrv:
A fatal error has occurred and VcXsrv will now exit.
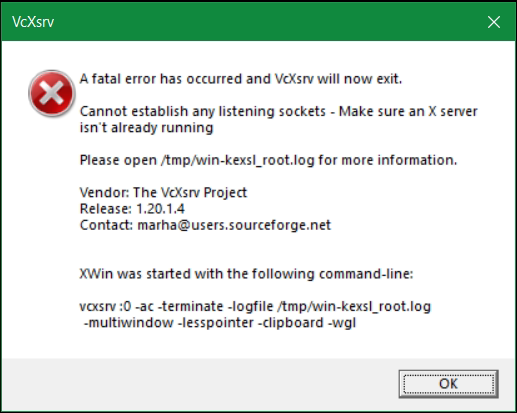
In the log, it’s the last lines in /tmp/win kexsl_user.log:
winMultiWindowXMsgProc - Fatal error 1 on xcb connection
winClipboardIOErrorHandler!
winClipboardProc - setjmp returned for IO Error Handler.
(II) Server terminated successfully (0). Closing log file.
here you can try to start Win-KeX with sudo:
sudo kex --sl --wtstart -sA solution also brought the deletion of the logs under /tmp.
sudo rm -f /tmp/*.logAnd stop the KeX server with the –stop and –kill option.
sudo kex --stop
sudo kex --kill
After that, the start of kex as a normal user became possible.
kex --sl --wtstart -sAlso, a Win-KeX reinstallation can fix the error:
sudo kex --stop
sudo kex --kill
sudo apt-get purge kali-win-kex
sudo apt-get install kali-win-kex
sudo apt-get install dbus-x11
The Win-KeX help can also be useful.
kex --help

        Win-Kex 2.10 provides a GUI desktop experience for Kali Linux
        in Windows Subsystem for Linux 2 (WSL 2)

        Usage:
                kex <mode> <command> <parameters>

                Mode:
                --esm            : Launch KeX desktop in a dedicated window using Windows native RDP
                --sl             : Seemlessly integrate KeX into the Windows desktop
                --win            : Launch KeX desktop in a dedicated window

                Command:
                [none]           : start KeX server and launch KeX client
                --start          : start kex server
                --start-client   : start kex client
                --stop           : stop kex server
                --status         : show kex server status
                --kill           : stop kex server and kill all related processes
                --passwd         : set kex server password
                --wtstart        : start kex server and launch win-kex client
                                   in Windows Terminal session
                --start-sound    : start Windows sound server
                --stop-sound     : stop Windows sound server
                --help           : display help
                --version        : display version

                Parameters:
                -i               : Use container IP address instead of "localhost"
                -m               : Optimized for Multiscreen (Win mode only)
                -s               : Sound support


        Examples:
                kex -s           : Start KeX server in window mode and launch KeX client with sound support
                kex --sl -s      : Start KeX in seemless mode and launch KeX client with sound support
                kex --esm -i -s  : Start KeX in ESM mode with arm workaround and launch KeX client with sound support
sudo kex : Start KeX server as root in window mode and launch KeX clientThe Windows Subsystem for Linux lets developers run a GNU/Linux environment including most command-line tools, etc. direct on Windows, unmodified, without the overhead of an ordinary virtual machine or dual-boot system.
Uses of WSL:
- Pick your preferred GNU/Linux distributions from the Microsoft Store.
- Run basic command-line tools, for example, grep, sed, awk, or other ELF-64 doubles.
- Run Bash shell and GNU/Linux command-line applications like tmux, emacs, SSHD, MySQL, and also could use the language compilers.
- Summon Windows applications utilizing a Unix-like command-line shell.
- Summon GNU/Linux applications on Windows.
WSL 2
WSL 2 is another form of the Windows Subsystem for Linux engineering that controls the Windows Subsystem for Linux to run ELF64 Linux binaries on Windows. Its essential objectives are to build file system execution, just as including full framework call compatibility. This new design changes how these Linux binaries associate with Windows and your PC’s equipment, yet at the same time gives a similar client experience as in WSL 1 (the current broadly accessible version).
Requirements For WSL 2:
- WSL 2 is only accessible in Windows 10, Version 1903, Build 18362, or higher.
- On the off chance that you are on Windows 10 form 1903 or 1909 ensure your minor build number is 1049 or higher.
- Running Windows 10, refreshed to version 2004 or higher, version 19041, for ARM64 systems.
- WSL 2 will work with VMWare 15.5.5+ and VirtualBox 6+.
Verifying the System Compatibility:
Step 1: Hold on the Windows logo key (on the keyboard) + R to open the run dialogue, and then type in the following command and select OK.
winver

Step 2: If your OS builds version is not compatible, then we have to update the Windows.
Step 3: For updating, Click on the Windows logo in the bottom left corner of your screen and then type in the following command and press enter:
check for updates
Step 4: Now, select the “Check for updates” option from the menu listed, and then a dialog box will appear.

Step 5: Click on the “Check for Updates” button on the screen, and after successful completion of the update, “restart” your machine. But, if you don’t get any information regarding the update then, after doing a restart/s you will be prompted an update.
Setting up WSL:
Step 1: Click on the Windows logo in the bottom left corner of your screen and then type in the following command:
powershell
Now, when the list appears in the menu, Right-Click on the “Windows Power Shell” option and chooses “Run as administrator”.
Step 2: Now, once the Power Shell is opened and ready to use, type the following command and hit enter:
Enable-WindowsOptionalFeature -Online -FeatureName Microsoft-Windows-Subsystem-Linux

Step 3: Restart your machine.
Step 4: After the restart, again run the “Windows PowerShell” in the administrator mode, and then type in the following command:
dism.exe /online /enable-feature /featurename:VirtualMachinePlatform /all /norestart

Step 5: Now, type in the next command:
dism.exe /online /enable-feature /featurename:Microsoft-Windows-Subsystem-Linux /all /norestart

Step 6: Now, again restart your machine.
Step 7: In order to update the kernel packages visit https://aka.ms/wsl2kernel, download the kernel package and install the same.
Step 8: In order to activate WSL 2 execute the following command in Windows Powershell running the same in administrator mode.
wsl --set-default-version 2
Installing and Setting up Kali Linux CLI:
Step 1: Hit the Windows logo button on your keyboard, and then type in the following command and then, choose the “Microsoft Store” option from the menu.
microsoft store
Step 2: Once the Microsoft store opens, search for “Kali Linux” in the search bar.
Step 3: On the Kali Linux page, click on the “Get” option in order to download the Kali Linux app.
Step 4: Once the Kali Linux app is downloaded, close the Microsoft-Store.

Step 5: Click on the Windows logo in the bottom left corner of your screen and then type in the following command and press enter:
Kali Linux
Step 6: After opening the Kali Linux app, the distribution will be installed in few seconds completely.

Step 7: Then, type in the credentials that you want to set in for the login purpose. Now, you will be able to use the Kali Linux easily in the command-line prompt and also execute the basic commands without an error.
Note: The base image does not contain any tool, or a graphical interface in order to keep the image small, however, it can be downloaded and installed via “apt” commands easily.
Setting Up Kali Linux(GUI):
Step 1: Open the Kali Linux app and login with your credentials.
Step 2: Type in the following command and hit enter:
sudo apt update && sudo apt upgrade -y


Step 3: After the successful completion of the above command, type the following command and hit Enter:
sudo apt upgrade && sudo apt install kali-win-kex -y
Step 4: Now, once the above command is completed installing, then type in the following:
kex


This will initiate the process to open up the GUI environment of the Kali Linux distribution installed.
Important:
1. Now, whenever we have to close the GUI opened, then we will press the “fn” key with “f8” in order to select the “exit viewer” option.
2. Then, after exiting the viewer type in the following command in order to completely close the running services:
kex stop

3. Thereafter, whenever we want to start the GUI Kali Linux environment then we will firstly open the Kali Linux app, and then type in the following commands by sequence: [or else you will get an error.]
kex stop [In any case you forgot to stop the kex services running before.]
kex
Note: The above GUI setup will work on Kali Linux versions 2020.3 or later.