
Contents
Updated on 2022-09-16
Installing and running WSL2 on Windows Server 2022 Core, i.e. without the desktop experience installed, is a bit more involved than when you have the desktop environment available to access locally or via a remote desktop session. Here I’m going to list the required steps, and caveats, for getting WSL2 installed and running in Windows Server 2022 Core.
Some of the steps below involve complex text that needs to be typed or copied into a console session. It is easier to copy and paste with a remote session via “Remote Desktop” to ensure the accuracy of the complex text. This is entirely optional, but can reduce the chance of typos.
- Login to your server
- If SConfig does not start automatically, launch it by typing
sconfigfollowed by enter - In SConfig choose the “Remote desktop” option by typing 7 followed by enter
- Next, press e followed by enter to choose to enable Remote desktop
- Decide whether you want to require “network level authentication” for your remote clients. This is the most secure option, and all official Microsoft clients support this feature
- If you want to require Network Level Authentication, choose the first option by pressing 1 followed by enter. Otherwise, choose the second option to disable the requirement by pressing 2 followed by enter
- Press enter to go back to the main menu
Micsoroft Update should be enabled for WSL2 to keep the Linux kernel and up-to-date automatically, according to the Microsoft documentation.
NOTE: I haven’t checked to see how to set up systems that use WSUS to manage their updates, so this assumes you are not using WSUS.
If your server does not currently have Microsft Update enabled, which will be the case if you haven’t explicitly enabled it as part of another installation or by any other means, then you can enable it with the steps below.
NOTE: I recommend doing these steps in a Remote Desktop session so that you can copy and paste the command to avoid any typos in the UUID value (the long hexadecimal text)
- Log into your server as an administrator
- If SConfig starts automatically, exit to a console session
- If PowerShell is not your default shell, start it by typing
powershellfollowed by enter - In PowerShell run the following command:
1(New-Object -ComObject Microsoft.Update.ServiceManager).AddService2("7971f918-a847-4430-9279-4a52d1efe18d",6,"")
Thank you to Don Zoomik for converting the VBScript example on Microsoft Docs to PowerShell shared via StackOverflow, which I’ve based this on. I used a different flag
6instead of7from the example to ensure that Microsoft Update is registered immediately.
We now need to ensure that your Windows Server 2022 installation has run at least once after enabling Microsoft Update. We also verify that all quality updates are installed from Microsoft Update. This is easy with the SConfig utility:
- Log into your server as an administrator
- If SConfig does not start automatically, launch it by typing
sconfigfollowed by enter - Press the 6 key on your keyboard to select the “Install Updates” option, and press enter
- Choose the “All quality updates” option by pressing the 1 key followed by enter
- Press a followed by enter to install all the available updates
- If prompted to reboot press y followed by enter to reboot your server
- Otherwise press enter to return to the main menu
Repeat these three steps until you have successfully installed all available updates.
- Press enter to return to the main menu. Your system is already up to date so we don’t need to do anything further here
Once your server is configured for Microsoft Update and fully up-to-date with patches, by following the process above, we can install WSL2.
-
Login to your server as an administrator
-
If SConfig starts automatically, exit to a console session
-
Use the following command to install WSL2:
-
You now need to reboot your server for WSL2 to be usable for the next steps
NOTE: The
wsl --installcommand will print the following two errors as part of its output. They can be safely ignored.1 2A error was encountered during installation, but installation may continue. Component: 'WSL Kernel' Error Code: 0x80040154 A error was encountered during installation, but installation may continue. Component: 'Ubuntu' Error Code: 0x80040154I’m unsure what causes the first error, but we will work around it by installing the kernel manually via the MSI package in the next step.
The second error is a byproduct of running on a system without the Desktop Experience and its supporting infrastructure. The install command attempts to download and install the Ubuntu distro, or another distro if you select one when issuing the
wsl --installcommand, from the Windows Store but fails with a message similar to the one above.The reason for the failure is that the distros on the Windows Store are distributed as
.appxpackages. These packages are unsupported (as far as I can tell) on Servers without the Desktop Experience enabled, so the installation attempt fails. We will work around this in the next section.
Once your server is rebooted, we need to manually install the WSL2 kernel via an .msi package or WSL2 will not function at all.
- Login to your server as an administrator
- If SConfig starts automatically, exit to a console session
- Download the MSI package with:
1curl -o wsl_update_x64.cab https://catalog.s.download.windowsupdate.com/d/msdownload/update/software/updt/2022/03/wsl_update_x64_8b248da7042adb19e7c5100712ecb5e509b3ab5f.cabNOTE: you can find the latest kernel package by loading https://www.catalog.update.microsoft.com/Search.aspx?q=wsl in your web browser, and selecting the
downloadbutton to the right of the newest entry. The popup window will include two links; one for x64 and one for arm64. Right-click the x64 link and select “copy link” or equivalent. When you have the address copied to your system clipboard, paste it into the command above replacing the original address. - Expand the MSI package from the
.cabfile1expand.exe wsl_update_x64.cab wsl_update_x64.msi - Install it with:
1msiexec.exe /package wsl_update_x86.msi /passive /promptrestart
-
Choose a distro from the list below and copy the URL
- Ubuntu 16.04: https://aka.ms/wsl-ubuntu-1604
- Ubuntu 18.04: https://aka.ms/wsl-ubuntu-1804
- Ubuntu 20.04: https://aka.ms/wslubuntu2004
- Ubuntu 22.04: https://aka.ms/wslubuntu2204
- Debian GNU/Linux: https://aka.ms/wsl-debian-gnulinux
- Kali Linux: https://aka.ms/wsl-kali-linux-new
- SUSE Linux Enterprise Server 12: https://aka.ms/wsl-sles-12
- SUSE Linux Enterprise Server 15 SP2: https://aka.ms/wsl-SUSELinuxEnterpriseServer15SP2
- SUSE Linux Enterprise Server 15 SP3: https://aka.ms/wsl-SUSELinuxEnterpriseServer15SP3
- openSUSE Leap 15.2: https://aka.ms/wsl-opensuseleap15-2
- openSUSE Leap 15.3: https://aka.ms/wsl-opensuseleap15-3
- openSUSE Tumbleweed: https://aka.ms/wsl-opensuse-tumbleweed
- Oracle Linux 7.9: https://aka.ms/wsl-oraclelinux-7-9
- Oracle Linux 8.5: https://aka.ms/wsl-oraclelinux-8-5
NOTE: if you can find a filesystem
.tar.gzfile for your preferred Linux Distro, you may use that.For example, Ubuntu provides suitable files at https://cloud-images.ubuntu.com/releases/. You will find the appropriate
.tar.gzfile within the directory for your chosen Ubuntu release codename with the suffix-server-cloudimg-amd64-wsl.rootfs.tar.gz, e.g. https://cloud-images.ubuntu.com/releases/jammy/release/ubuntu-22.04-server-cloudimg-amd64-wsl.rootfs.tar.gz for the Ubuntu 22.04 (Jammy) release. Ubuntu only provides suitable images since the 16.04 (Xenial) release. -
Login to your server (preferably as an unprivileged user)
-
If SConfig starts automatically, exit to a console session
-
If PowerShell is not your default shell, start it by typing
powershellfollowed by enter -
If you are using a URL from the above list, insert it into the following command replacing
https://aka.ms/wslubuntu2204. Paste or type the whole, amended, command into PowerShell and execute it by pressing enter:1curl.exe -L -o wsl-distro.zip https://aka.ms/wslubuntu2204Otherwise, if you have the direct link to a
.tar.gzfile, download it directly and skip to step 11:1curl.exe -L -o install.tar.gz https://cloud-images.ubuntu.com/releases/jammy/release/ubuntu-22.04-server-cloudimg-amd64-wsl.rootfs.tar.gz -
Unpack the ZIP file with:
1Expand-Archive wsl-distro.zip .\extracted-distro-step1 -
Use
Get-ChildItem .\extracted-distro-step1to list the contents of the directory.\extracted-distro-step1, which is where we unpacked the ZIP file. -
Find the name of the
.appxfile that contains the actual WSL2 filesystem.tar.gzfile; it will be named likedistro.appx,distro_x64.appx, ordistro.*_x64.appx, wheredistrois the name of the distro you downloaded, and*is the a version number like0.10.0— the actual nunmber isn’t important as it should be the same for every.appxfile in the extracted directory. e.g. For Ubuntu 22.04 the filename from the package that I downloaded while preparing this tutorial wasUbuntu_2204.0.10.0_x64.appx. -
With the file name you discovered in the previous step, renaming the
.appxfile to be suffixed.zipand extract it with the following two commands:1 2Rename-Item .\extracted-distro-step1\Ubuntu_2204.0.10.0_x64.appx distro.zip Expand-Archive .\extracted-distro-step1\distro.zip .\extracted-distro-step2 -
Use
Get-ChildItem .\extracted-distro-step2to find the.tar.gzfile included in the extracted.appxfile. For Ubuntu 22.04 this file is namedinstall.tar.gz, but different distros may vary the name they use -
Import the filesystem
.tar.gzfile as a new WSL2 distro with this command:1 2mkdir C:\Users\Administrator\WSL-disks wsl --import Ubuntu2204 C:\Users\Administrator\WSL-disks\Ubuntu2204 .\extracted-distro-step2\install.tar.gzReplace
Ubuntu2204with any name you desire. This will be used to identify your distro instance inwsl --listoutput, and for you to explicitly select if it isn’t the default distro withwsl --distro Ubuntu2204.Also replace
C:\Users\Administrator\WSL-disks\Ubuntu2204with any directory you have writable access to. This directory will be used to store the virtual disk image that holds the distro’s filesystem — the disk image will be namedext4.vhdx. Each distro instance that you import should use a unique directory to prevent overwriting a different distro instance’s disk image. The parent directory, hereC:\Users\Administrator\WSL-disks, must already exist, but theUbuntu2204directory will be created bywsl --import.If you downloaded and extracted an
.appxpackage, replace.\extracted-distro-step2\install.tar.gzwith the path to the distro’s.tar.gzfilesystem archive that you found in theextracted-distro-step2directory. Otherwise, if you downloaded a.tar.gzfile directly replace.\extracted-distro-step2\install.tar.gzwith the path to the.tar.gzfile you downloaded. -
Start the distro with
wsl --distro Ubuntu2204. Again, replaceUbuntu2204with the name you assigned your distro instance -
Create an unprivileged user so that you may run without root privileges until required. This is Linux best practice, as running as root by default is discouraged. Add the user with the following commands:
1 2 3adduser desired-username adduser desired-username users adduser desired-username sudoYou will be prompted to provide a password for the user, and again to confirm that you typed it correctly. You may not see any output as you type the password as the output is usually disabled while entering passwords. Some distros will print
*characters as you type a password into the prompt to provide feedback but this is quite rare.NOTE: some distros don’t have a
sudogroup. These distros often usewheelinstead, so if you get a message indicating that there is nosudogroup on the system then replacesudowithwheelin the command and try again. -
Configure the WSL2 distro to default to your new user account when launching a shell, unless overidden with the
--userparameter when callingwsl(e.g.wsl --user root --distro Ubuntu2204):1 2 3 4cat > /etc/wsl.conf <<'EOF' [user] default = "desired-username" EOFThe command above uses a “heredoc”, which is a POSIX shell feature that copies the contents between two markers, here
'EOF'andEOF(the quotes around the firstEOFtell the shell not to expand any variables that might be in the heredoc. Variables are indicated by a$sign followed by name, e.g.$HOME.) The marker at the end of the heredoc must be on a line by itself with no leading spaces.In the command above we’re using redirectors
<<to copy the heredoc into the commandcat. We are using a different redirector> /etc/wsl.confto take the output ofcatand write it into the file named/etc/wsl.conf. This combination of redirections with thecatcommand allow us to write a heredoc directly into a file that we choose to save us using a text editor.If you prefer to use a text editor then that is fine. Ensure that you add the following content into the
/etc/wsl.conffile with your preferred text editor:1 2[user] default = "desired-username"NOTE: The
wsl.conffile follows the INI file, with headings, format.You can find out about the other options you can add into the
wsl.conffile in Advanced settings configuration in WSL on the WSL section of the Microsoft Docs website. -
Finally, terminate the WSL2 distro instance so that your changes to
/etc/wsl.confare recognised; in PowerShell run:1wsl.exe --terminate Ubuntu2204
Congratulations, you now have WSL2 installed, and have set up a distro instance for your Windows User.
WSL2 distros are not shared system-wide so each user on the Server has their own separate WSL2 instances if they install any, and cannot access another user’s instances.
NOTE: User accounts do not need any special privileges to run WSL2 distros.
One thing that I’ve noticed is that despite the documentation provided by Microsoft indicating that enabling Microsoft Update will keep the Linux kernel updated automatically, I don’t believe this currently works in Windows Server 2022. We’ve performed the required steps to enable the capability but it seems that WSL2 and Microsoft Update do not currently update the kernel on Windows Server 2022 installations. You cannot update the kernel with wsl --update, either, as the command will report that the currently running kernel is already up-to-date even if Microsoft have released updated versions. For now, use the Microsoft Update Catalog as shown in the Installing the WSL2 kernel section above.
Composite
Posted on
• Edited on
Yay! WSL 2 now supports on Windows Server 2022!
and, Microsoft now introduced how to install WSL 2 on Windows Server 2022!
WSL2 now available on Windows Server 2022
TL;DR; for normal users:
- Install Windows update KB5014021 first. you can skip if you installed this update.
- Install Hyper-V if not installed.
- just run
wsl --installand see process of install kernel, default distro like Ubuntu, and done.
Well, are you still having trouble? okay, I tell you how to figure it out.
Cannot apply WSL version 2?
YOU MUST INSTALL KB5014021 UPDATE FIRST!
wsl --install does not work!
If you run wsl --install, some users will see HOWTO message instead of installing message.
Me too. but don’t worry. you can go manual solution for installing WSL 2 like Windows 10. note that if you see not working via wsl --install, you’ll see not working via wsl --update too. so, follow instructions below:
- run
wsl --set-default-version 2. - Download WSL Update Package
- Install and Reboot
-
wsl --install -d Ubuntuto install WSL Distro. You can change distro bywsl -l -ofor list of Available distros. - WSL2 will initialized automatically.
WSL 2 didn’t run and got message WslRegisterDistribution failed with error: 0x800706be.
when you install Windows Server, you’ll never see create user while installing and startup as Administrators.
Administrator is Windows root user and CANNOT use some specified features on Windows(such as Microsoft store apps, WSL2…). so, you must create a normal user with Administrator, Users group. Administrator group makes you can initialize distros and manage WSL status. yes, it also activates annoying privileges elevation popup like Windows 10.
after login a created user and run distros like Ubuntu, you’ll see just working without problem.
Is this not Windows 11 based?
Sadly, NO. so you can’t use WSL with Windows 11 only feature like these:
- attach Hyper-V Private network and set static IP.
- Startup script.
- WSLg.
I want to make SSH server open to external network.
You can follow this instructions.
Yes. he posted more easier solution but it can use only SSH solutions, not for other linux service.
If you scripted solution and attach in Task scheduler, I made and recommend powershell script below:
NOTE: sudo will prompt password by default. if you don’t want to do without password, use sudo visudo and append a line like:
# change username to your linux default user name who can run sudo.
username ALL=(ALL:ALL) NOPASSWD: /sbin/service, /usr/sbin/service
Enter fullscreen mode
Exit fullscreen mode
or you can just use NOPASSWORD: ALL instead for all sudo process without prompt password.
save to file with path you want, and make new task schedule with:
- Input task name as you want.
- User is current WSL’s user.
- Check Run whether user is logged on or not and Run with the highest privileges.
- Trigger: schedule every 5 mins recommended. if first run or IP changed, this script will register port forwarding and firewall inbound and outbound rules. or replace if exists.
- Action:
%WINDIR%\system32\\WindowsPowerShell\v1.0\powershell.exe - Arguments:
-NoProfile -NoLogo -NonInteractive -ExecutionPolicy Bypass -File "C:\Path\To\wsl2-network.ps1 - Working Directory: it’s optional. but you can input ps1 path.
Run it now! Next, how you can check it’s success:
-
wsl hostname -Ifor see current distro’s IP. (may be 1 or multiple IPs. but if it dosen’t work, check default distro and set default distro and run script again.) -
netsh interface portproxy show v4tov4for list of port forwaing. and see IPs equal towsl hostname -I. - Open Windows advanced firewall and see
WSL 2 Firewall Unlockexists in inbound and outbound rules.
At last, go to external client and connect SSH and see it works.
Don’t forget enable PubkeyAuthentication yes or PasswordAuthentication yes in distro’s /etc/ssh/sshd_config and check the SSH service is running or wsl service ssh start.
If you connected your WSL2 SSH Server, it’s done.
How to connect Windows RDP by tunneling WSL instead of Direct?
Yes, sure, RDP shouldn’t connect without any security tunnel.
First, Disable ALL RDP-In inbound rules in Windows Firewall. You can skip if your server’s network is in router.
and you must get distro’s gateway IP first.
$ ip route show | grep -i 'default via'| awk '{print $3 }'
Enter fullscreen mode
Exit fullscreen mode
If you wan’t tunneling hostname instead of IP, you can make crontab script with the script:
#!/bin/bash

IP=$(ip route show | grep -i 'default via'| awk '{print $3 }')
HOST="gateway"

if cat /etc/hosts | fgrep -q "$HOST"
        then sed -i "/$HOST/ s/.*/$IP\t$HOST/g" /etc/hosts
        else echo >> /etc/hosts; echo "$IP\t$HOST" >> /etc/hosts; echo >> /etc/hosts
fi
Enter fullscreen mode
Exit fullscreen mode
because WSL is always change /etc/hosts for localhost forwarding. but you can disable by follow instructions in /etc/hosts file.
Anyway, login as root via sudo -i and crontab -e for edit crontab file:
*/5 * * * * /root/gatehost.sh
Enter fullscreen mode
Exit fullscreen mode
and you must also run wsl sudo service cron start in Windows startup if you are using auto port forwarding powershell script by me, you don’t need it.
and connect SSH with tunneling such as:
ssh -N -L33389:gateway:3389 wsluser@external.wsl.host
Enter fullscreen mode
Exit fullscreen mode
and connect IP via localhost:33389 and see it works.
Once you followed these instructions, you are ready to serve with WSL, and serve with docker service, etc.
You know that’s not recommended for production use. it’s for workstation or development server. right?
For production, use Linux with Hyper-V, cloud or native instead. WSL is more extremely slow and unstable than Hyper-V, you know.
Happy Windows-ing!
Windows Subsystem for Linux (WSL) allows you to run Linux distributions natively on your Windows Server environment, enabling developers and IT professionals to use Linux tools and workflows seamlessly. While enabling WSL on Windows Server 2022 is slightly different from enabling it on Windows 10 or 11, the process is straightforward. This guide will walk you through the steps to enable WSL and install a Linux distribution on Windows Server 2022.
Prerequisites
Before proceeding, ensure that:
- You are running Windows Server 2022.
- You have administrator privileges.
- The server has an active internet connection.
Step 1: Install the Required Features
WSL requires specific Windows features to be enabled. To install these features, follow these steps:
Using PowerShell
- Open PowerShell as an administrator.
- Run the following command to enable the necessary features:
dism.exe /online /enable-feature /featurename:Microsoft-Windows-Subsystem-Linux /all /norestart
dism.exe /online /enable-feature /featurename:VirtualMachinePlatform /all /norestart
- Restart your server to apply the changes:
Restart-Computer
Using Server Manager
- Open Server Manager.
- Navigate to Add roles and features.
- Click through the wizard until you reach the Features section.
- Check the boxes for:
- Windows Subsystem for Linux
- Virtual Machine Platform
- Complete the wizard and restart the server.
Step 2: Update the WSL Kernel
Microsoft provides an updated WSL kernel that needs to be installed manually on Windows Server. Here’s how:
- Download the WSL kernel update package from the Microsoft website.
- Run the installer and follow the prompts.
Step 3: Set WSL 2 as the Default Version (Optional)
WSL 2 offers better performance and full system call compatibility. To set WSL 2 as the default version, use the following command:
wsl --set-default-version 2
If you encounter an error indicating that your hardware does not support WSL 2, ensure that virtualization is enabled in your server’s BIOS/UEFI settings.
Step 4: Install a Linux Distribution
With WSL enabled, you can now install a Linux distribution:
- Open PowerShell as an administrator.
- List available distributions by running:
wsl --list --online
- Install your preferred distribution (e.g., Ubuntu):
wsl --install -d Ubuntu
- Wait for the installation to complete. Once finished, the Linux distribution will launch, and you will be prompted to create a user account.
Step 5: Verify the Installation
To confirm that WSL is installed and working:
- Open PowerShell.
- Run the following command:
wsl --list --verboseThis will display the installed distributions and their WSL version.
- Launch the Linux distribution by typing its name in PowerShell (e.g.,
ubuntu).
Additional Configuration
- Accessing Files: You can access your Windows files from the Linux distribution under the
/mntdirectory (e.g.,/mnt/c/for the C:\ drive). - Updating the Distribution: Keep your Linux distribution updated using the package manager (e.g.,
sudo apt update && sudo apt upgradefor Ubuntu). - Uninstalling a Distribution: To uninstall a distribution, run:
wsl --uninstall -d <DistributionName>
Conclusion
Enabling WSL on Windows Server 2022 allows you to leverage the power of Linux tools directly within your server environment. Whether you are a developer or an IT professional, WSL provides a seamless way to integrate Windows and Linux workflows. By following the steps in this guide, you’ll have WSL up and running in no time.
Have you ever wondered if it’s possible to utilize the power of Linux’s development tools on your Windows Server 2022? Or perhaps you’ve maybe needed to deploy Docker applications while running your own Windows cloud instance? While this could seem impossible at a first glance, there is actually a way — by using WSL!
With WSL, short for Windows Subsystem for Linux, in addition to some extra help from the virtualization technology, you can easily install a Linux distribution onto your Windows Server! Not only that, but you can also get Docker and start deploying containers straight onto your server with ease!
In this tutorial, we are going to go over WSL and Docker in more detail, walking you through the installation process for both as well as giving you the minimum hardware requirements so that you can be sure that the software will run on your server.
What are WSL & Docker?
Before we can proceed to the installation and configuration process, it is important to have a look at both WSL and Docker as this will allow us to understand how they work, what their individual features are as well as what we can anticipate throughout the installation process.
WSL — run Linux on your Windows Server without emulation
As we previously mentioned, WSL is a powerful tool that enables you to run a full Linux kernel directly onto your Windows machine without having to use an emulator. This can save a lot of time, effort and help you configure your system much easier, ultimately combining the power and stability of Windows Server 2022 with the development flexibility that originates from Linux.
But what are the benefits to this emulator-less approach? Firstly, you can run any Linux distribution that you choose! This means that it doesn’t matter if you want to go for Ubuntu, CentOS or even newer distros like Rocky, everything is at your fingertips.
This means that if you are already accustomed to using a particular distribution, you can easily get it up and running on your Windows cloud server with zero effort. Additionally, with WSL, you also get access to tools like Bash, Vim and Python directly from the Windows environment!
Secondly, you get the privilege of not having to constantly switch between 2 different operating systems. With WSL you get the ability to share files, launch applications and use Linux software within your Windows server, saving you time, boosting your productivity and making your workflow optimized and efficient.
Docker — containerization & easy application deployment
Docker has been gaining popularity ever since its creation as an application because of its useful features.
With Docker you get the ability to essentially pack together everything a particular application needs in order to run on any machine in one single unit called a container. This container includes all software requirements, prerequisites and libraries meaning that the app will be able to run on any other machine immediately after being deployed without you having to worry about mismatching software versions or missing libraries.
In addition to this portability feature, Docker also supports isolation, meaning that each container can operate in its own isolated environment. This offers better security and prevents resource conflicts.
Not only that but Docker also offers exceptional scalability, allowing you to deploy or retrieve containers depending on your needs, which can be helpful for both big organizations and individual developers, which is why Docker is a go-to option for VPS and VDS servers and some are even looking for cloud servers with a pre-installed Docker application in order to save time and get directly to deploying.
What you need to consider before installing WSL
Before you can proceed to getting both WSL and Docker on your Windows server, it is crucial to check whether your system meets the minimum hardware requirements in terms of resources and configuration options.
Minimum system requirements
In order to get WSL and Docker up and running, it is recommended that your server has a 64-bit CPU that supports virtualization as well as a minimum of 4GB of RAM, while also being equipped with at least 2GB of storage space.
In terms of your Windows Server 2022 version, your system should be with a build of at least 19041 or above in order to meet the compatibility requirements. In this tutorial, we are going to be focusing on installing WSL on Windows Server 2022. For any older versions, you can check out the official Microsoft documentation.
How to install WSL on Windows Server 2022
In order to get WSL up and running, we are going to be using the Windows PowerShell. So, let’s begin!
Setting up WSL with Windows PowerShell
Start by opening up PowerShell and running it as an administrator.
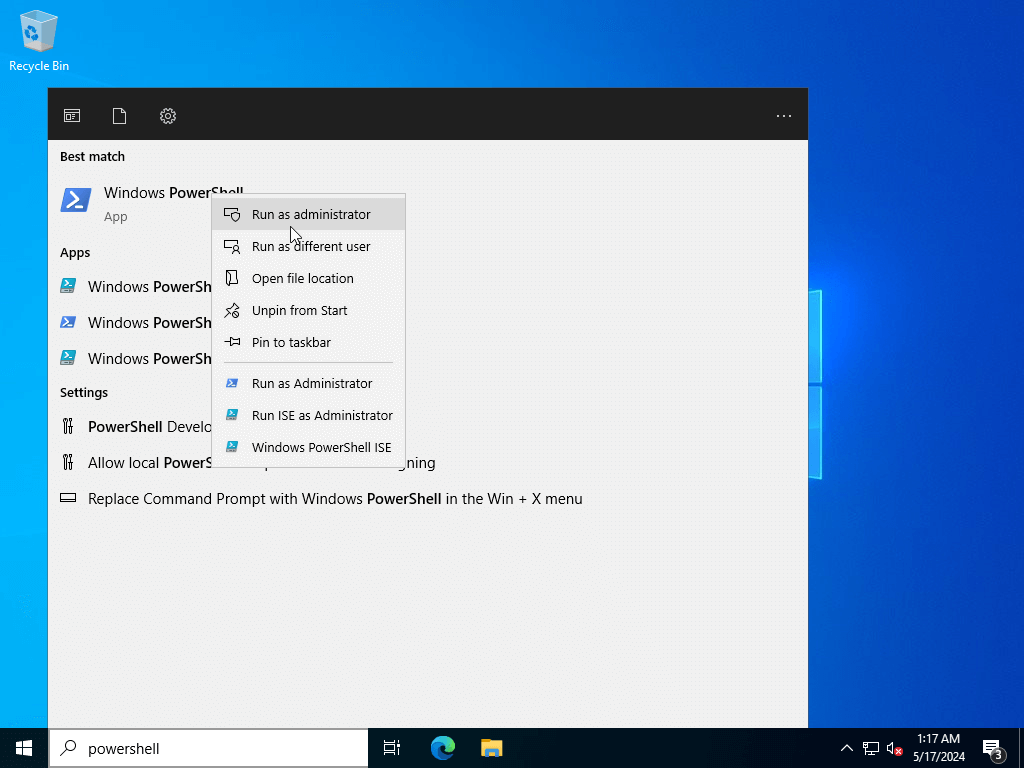
Next, enter the following command and press Enter:
wsl —install
Your distribution will then be downloaded and installed automatically.
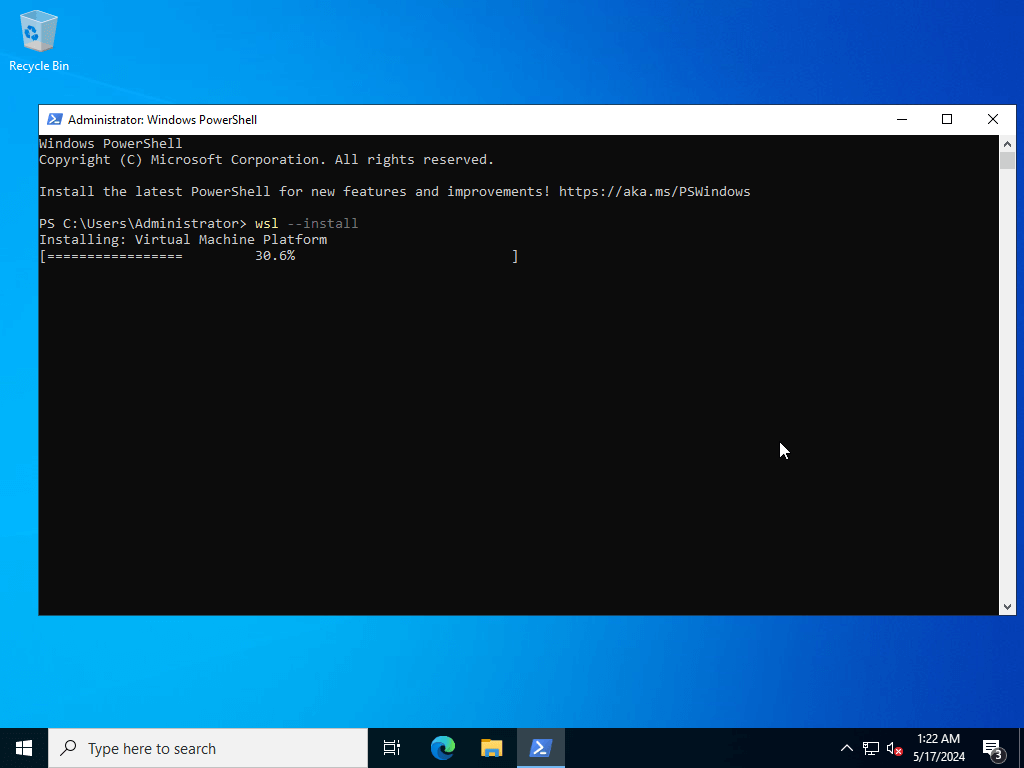
You will then need to restart your machine for the changes to take effect.
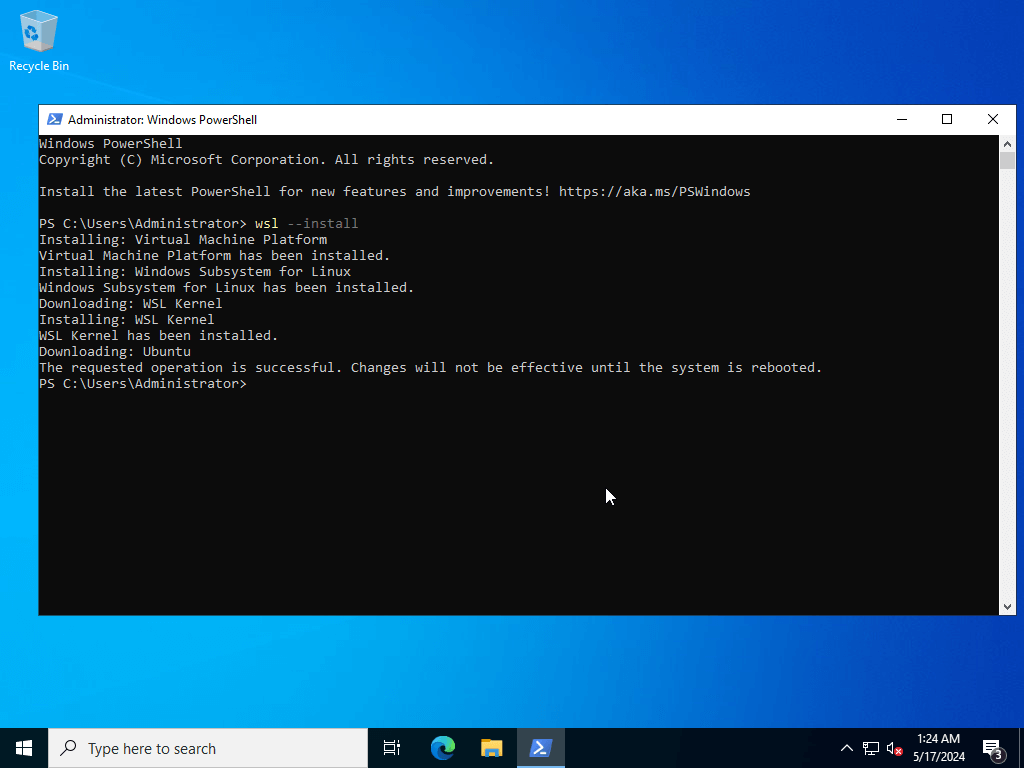
After the restart takes place, a terminal window will be opened and the WSL installation will automatically continue.
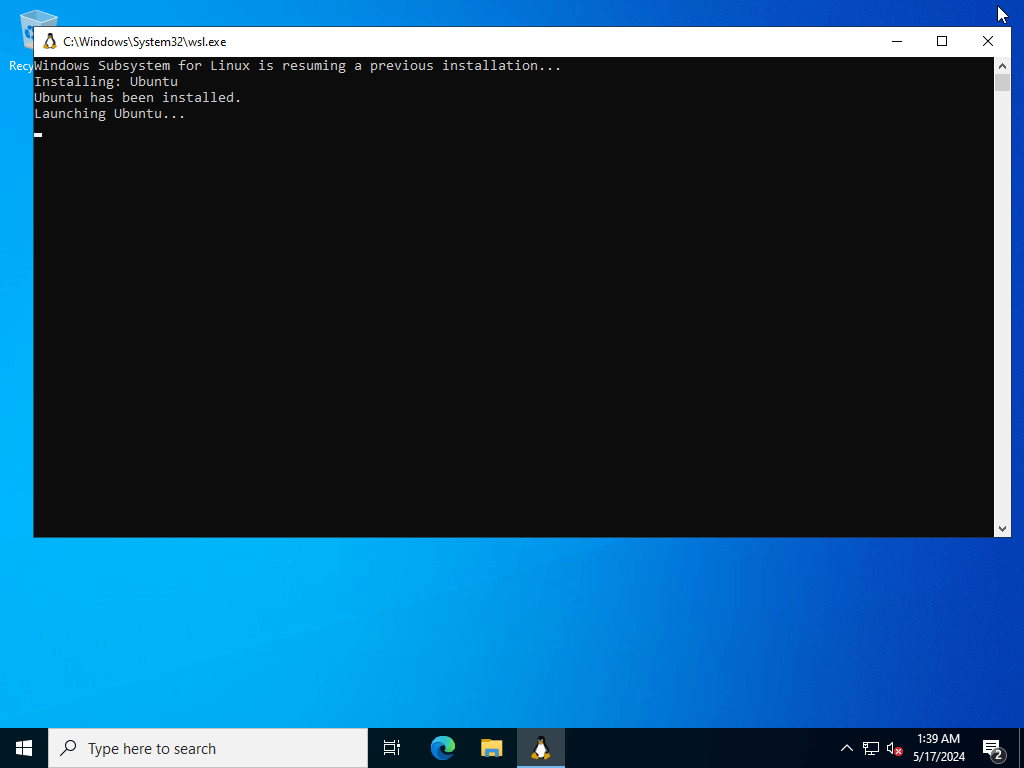
Finally, you’d be asked to create your default UNIX (Linux) user. Just enter the desired username and password and you will be able to take full advantage of the Linux environment!
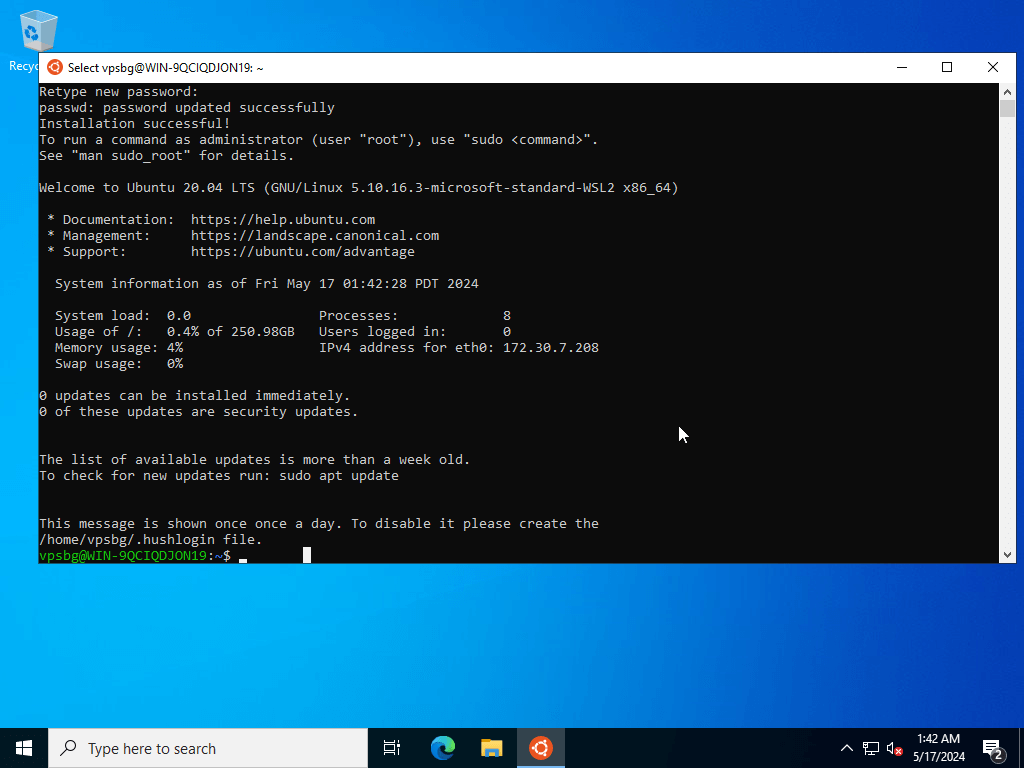
How to configure WSL
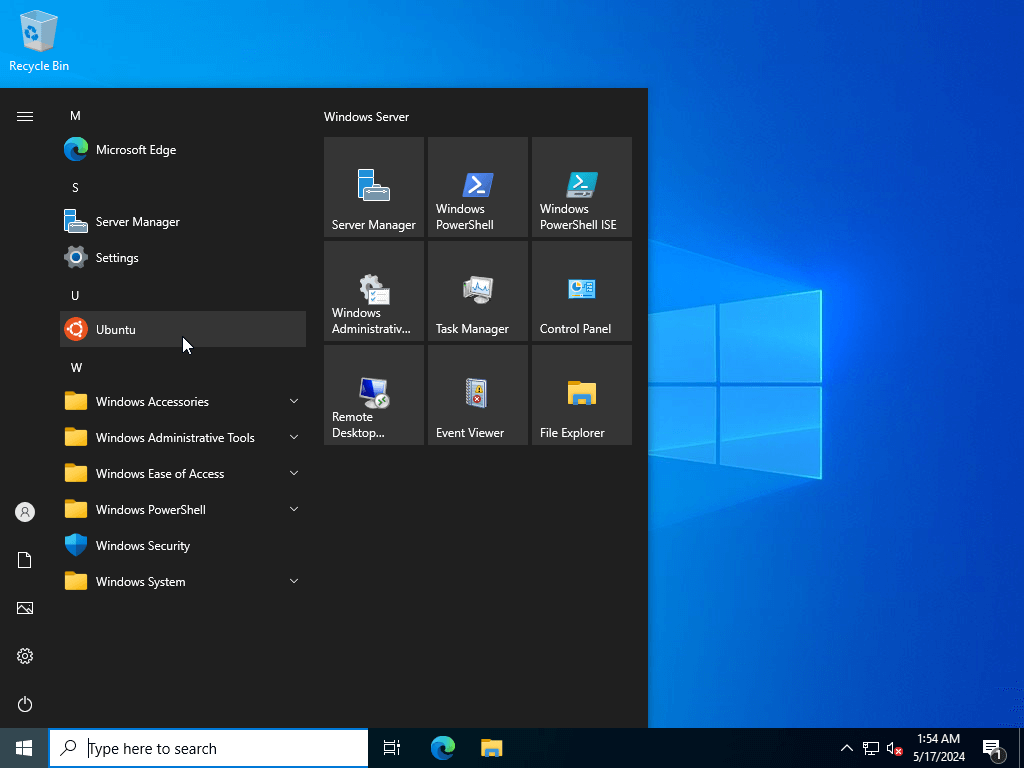
When the setup process concludes, you are going to see your Linux distribution appear in the Start menu. You now have to launch it in order to begin the initial configuration.
IMPORTANT: Your Linux distribution could start downloading some additional components when launched for the first time, meaning that you will need to wait for the download to complete! Do not close any windows and don’t worry if it takes longer to load.
You might want to update all software packages of your Ubuntu operating system, which you can do with the following command:
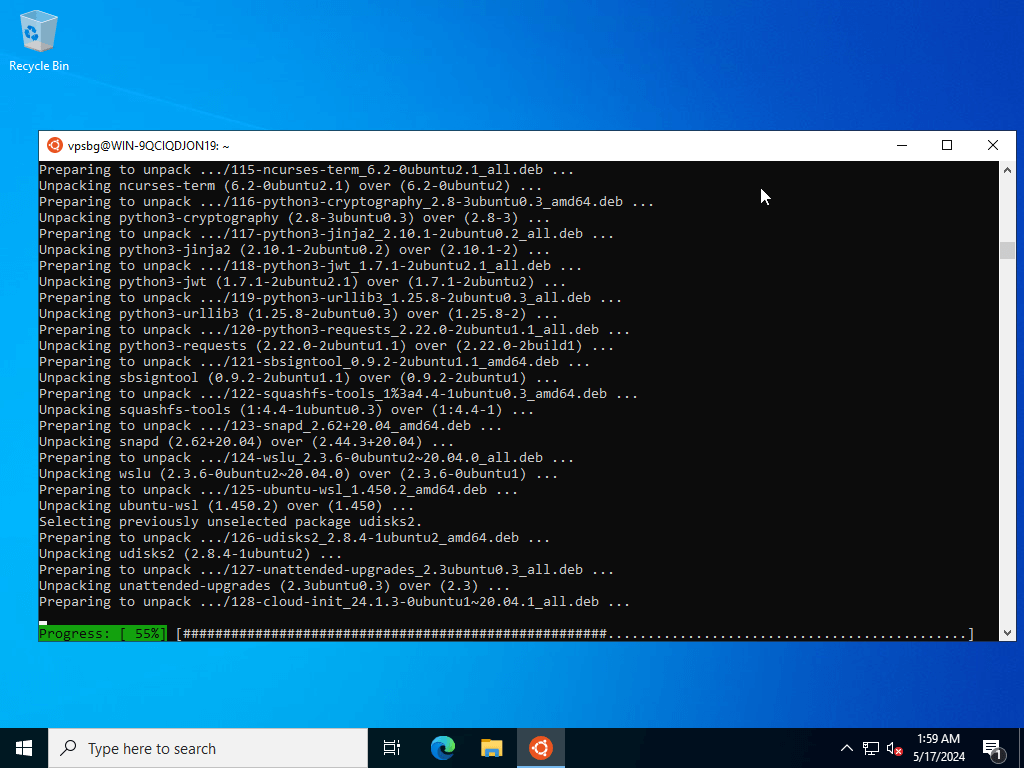
sudo apt update && sudo apt upgradeYou will be prompted to enter the password for your UNIX (Linux) user.
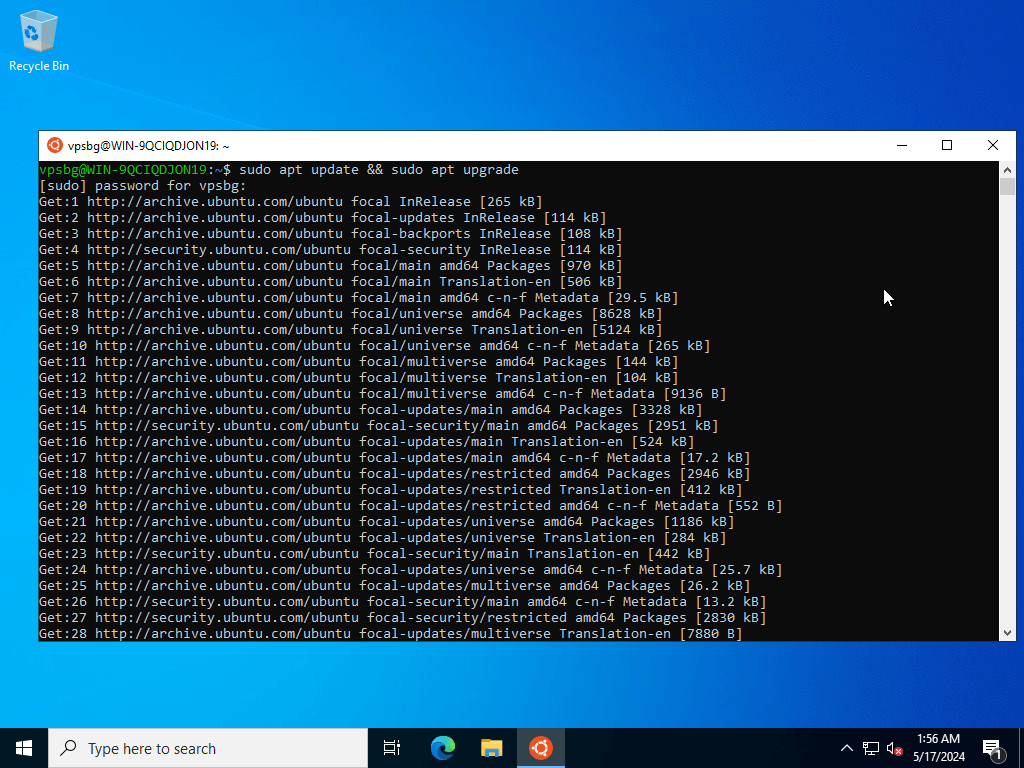
Afterwards, you will see a list of available upgrades, just enter Y when prompted to continue and install all of them.
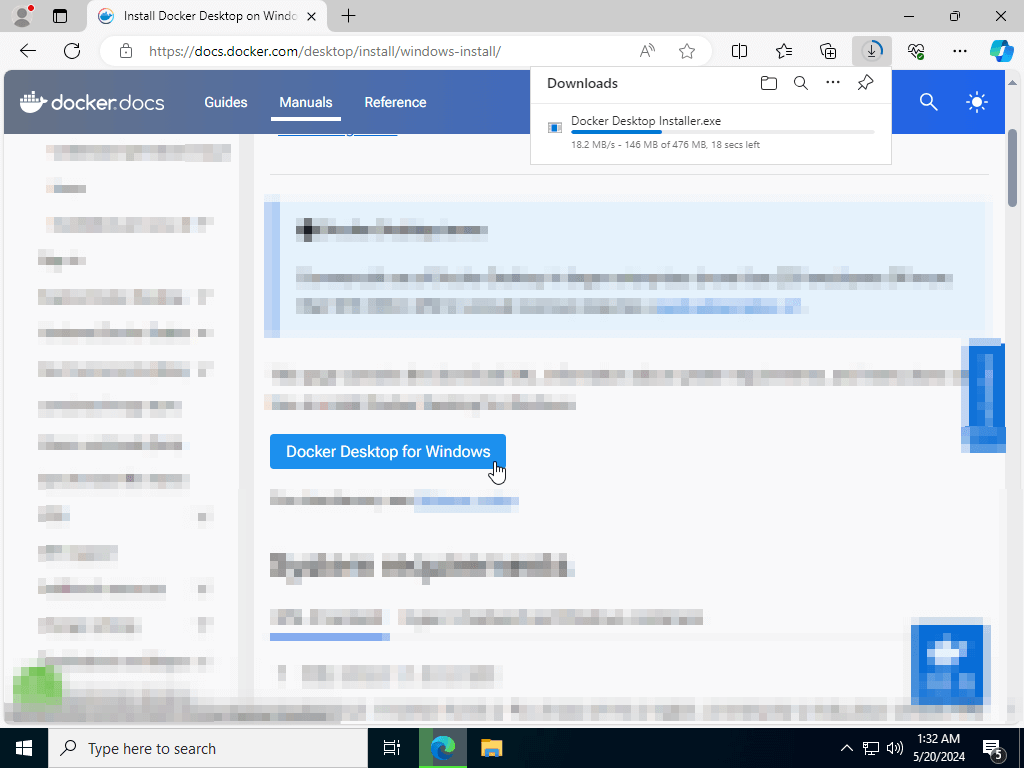
Installing Docker Desktop on Windows
Once you have successfully installed WSL, you can then proceed to setting up Docker Desktop. Start by navigating to the official Docker website. Next, click on the Docker Desktop for Windows button, which is located on the top of the page and your download should begin momentarily.
Once downloaded, double-click on the Docker Desktop Installer.exe file to run the installer.
IMPORTANT: Make sure to check the Use WSL 2 instead of Hyper-V box before clicking OK.
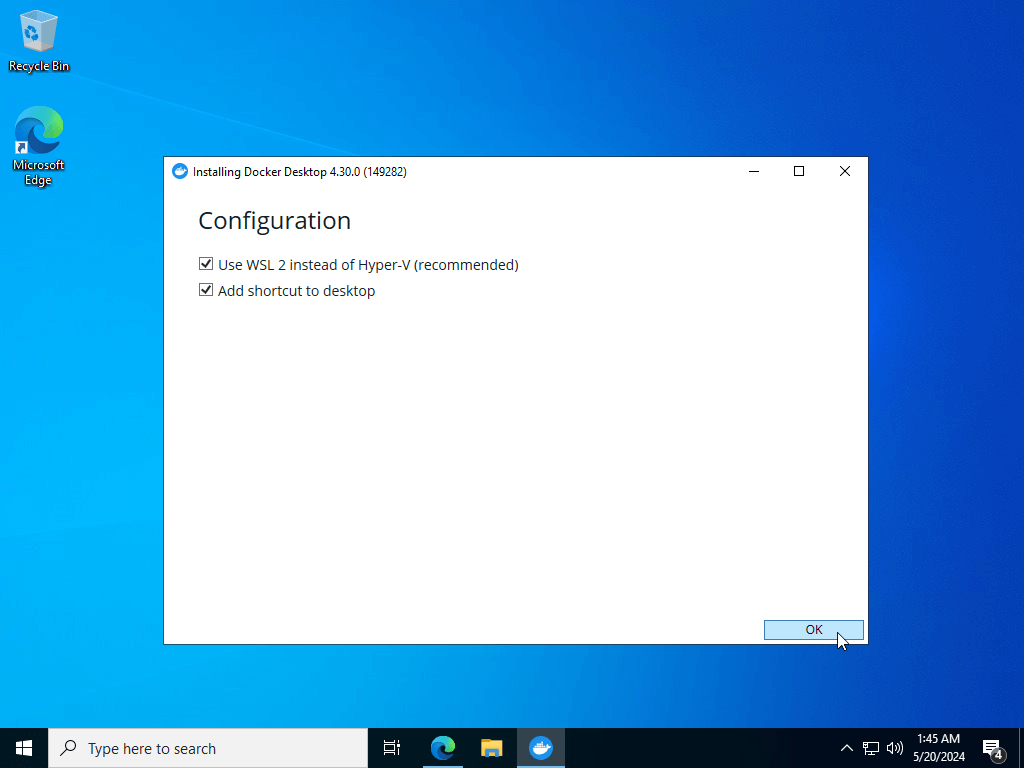
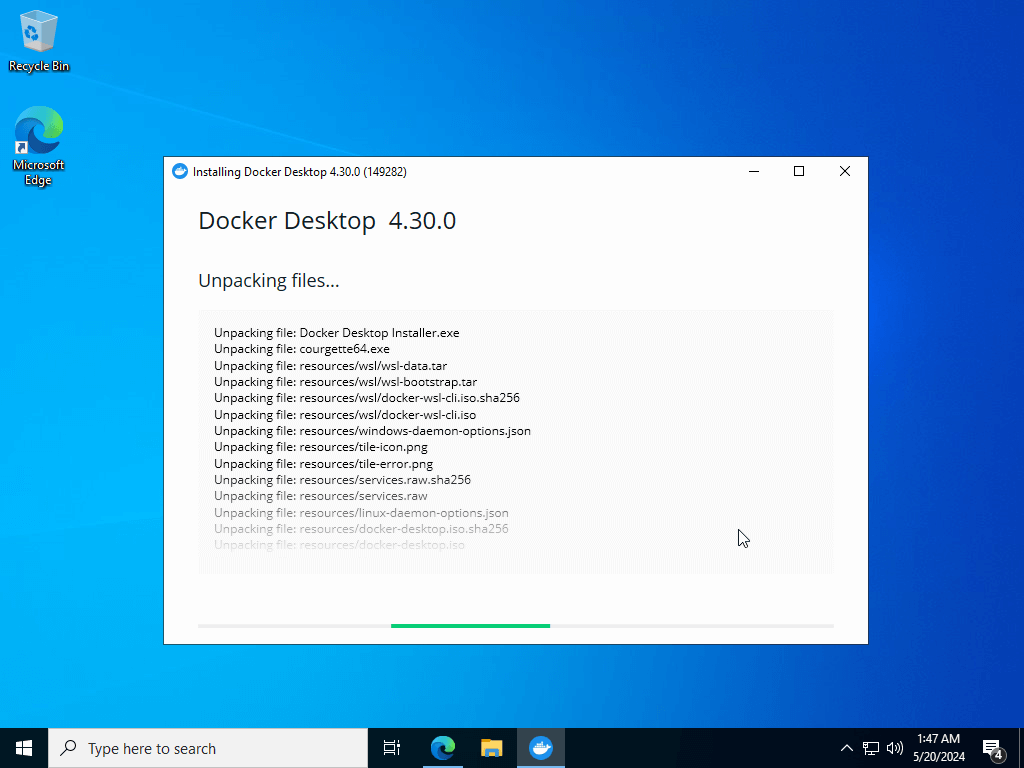
This will initiate the installation.
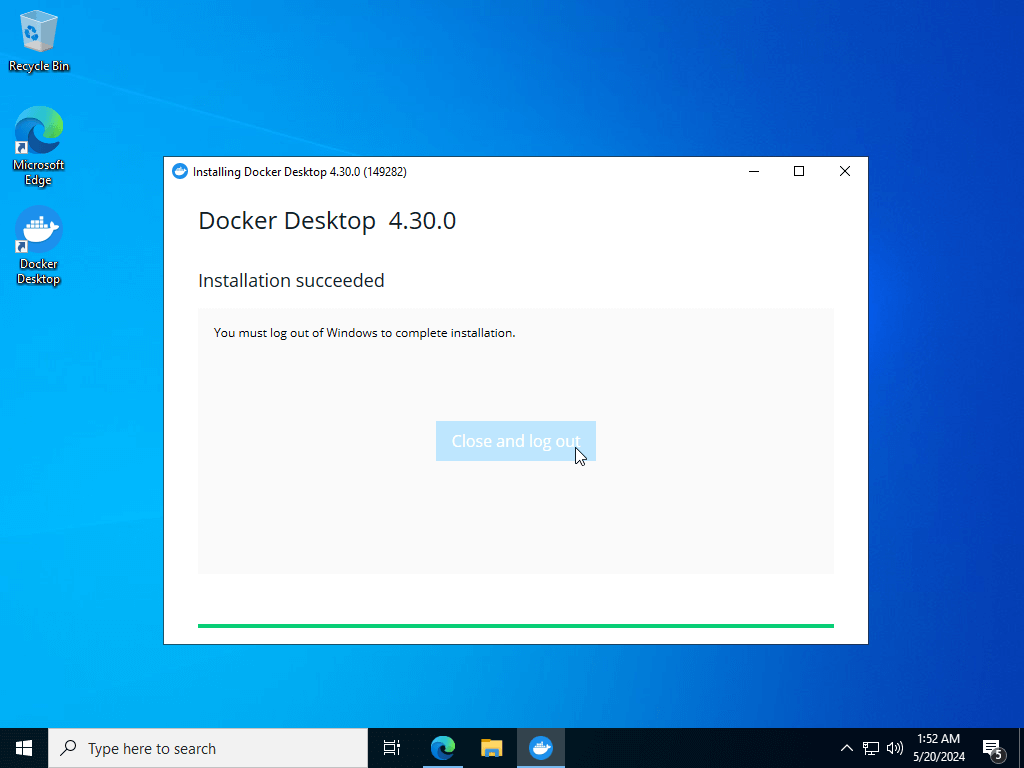
When the installation finishes, you will be asked to log out in order for the necessary settings to be applied. Click on the Close and log out button.
After logging back in, you will be prompted to finalize the Docker Desktop installation. That’s it! Now you can access the Docker Desktop GUI with the shortcuts from your desktop and Start Menu.