

Have you ever wondered, how to access the windows file system through WSL? If the answer is yes you are in the right place!
Microsoft WSL has given us an incredible way to access the windows file system, you have just to navigate through an exact path to do it. Without further due, let’s dive into the topic.
1. Use the cd command in the Linux terminal.
To access the windows files you have to navigate through /mnt/your_windows_path
cd /mnt/c/Users
**OR**
cd /mnt/d/your_folder/your_folder
Enter fullscreen mode
Exit fullscreen mode
Now you have access to every file in the Linux and Windows file systems.
2. Moving files between the two systems through WSL.
If you want to move files between the two operating systems you can simply use the cp or mv commands.
cp — command for copying files
mv — command for moving files
Use of cp command
cp /mnt/c/file.txt /home/username/Documents
Enter fullscreen mode
Exit fullscreen mode
Use of mv command
mv /mnt/c/file.txt /home/username/Documents
Enter fullscreen mode
Exit fullscreen mode
3. Editing windows files through WSL.
To edit windows files through the Linux terminal using WSL, you have to use any text editor that can be opened in the terminal. One of the most famous text editors is nano. In our example, I am going to use the nano editor.
Type into the terminal nano and the path to the file.
sudo nano /mnt/c/Users/file.txt
Enter fullscreen mode
Exit fullscreen mode
Now you can edit freely files from your terminal.
4. Creating files in windows through WSL.
To create a file in a specific windows directory you have first to navigate to it and then use the touch command to create a file.
touch — a command that creates a file.
!!! The file extension can be anything you want.
cd /mnt/c/Users/Public/Documents/
touch filename.txt
Enter fullscreen mode
Exit fullscreen mode
The file is created and can be opened from both systems.
5. Deleting files from the windows file system through WSL.
To delete windows files using WSL, you have to navigate to the directory where the file lives and use the rm command.
rm — a command that deletes files / directories
cd /mnt/c/Users/Public
sudo rm example_file.jpg
Enter fullscreen mode
Exit fullscreen mode
Congratulations you learned 5 vital skills about working with the Linux terminal. 🎺🎺🎺
If you have any questions, comment down, I will answer as soon as possible.
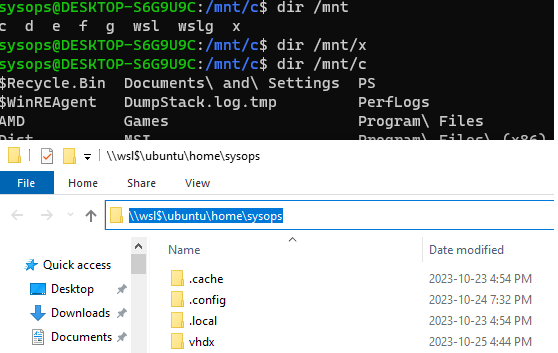
Windows Subsystem for Linux (WSL) предоставляет ряд удобных возможности подключения физических, виртуальных и сетевых дисков. По умолчанию в среде wsl в каталог
/mnt/
монтируются все логические диски, которые доступны в Windows. Кроме того, вы можете прямо из проводника Windows обратиться к файловой системе WSL по UNC пути
\\wsl$\
(например,
\\wsl$\ubuntu\etc\
).
В этой статье мы рассмотрим, как смонтировать различные типы дисков в среде WSL.
Содержание:
- Монтирование физических дисков Windows Subsystem for Linux 2
- Как подключить (смонтировать) сетевой диск в WSL
- Смонтировать виртуальный VHD/VHDX диск в WSL
Монтирование физических дисков Windows Subsystem for Linux 2
Новая версия Windows Subsystem for Linux (WSL 2) позволяет монтировать физические диски, или отдельные разделы с файловыми системами, которые не поддерживаются в Windows (список поддерживаемых файловых систем содержится в файле
/proc/filesystems
).
Например, у вас есть физический на которым созданы разделы с файловой системой диск ext4, и вы хотите получить к нему доступ из WSL и Windows.
Обновите свою версию WSL 2, прежде чем двигаться дальше:
wsl --update
Теперь нужно вывести список доступных дисковых устройств в Windows:
wmic diskdrive list brief
В этом примере к компьютеру подключены два физических диска.

Можно смонтировать в WSL диск целиком:
wsl --mount \\.\PHYSICALDRIVE2
Или только определенный раздел:
wsl --mount \\.\PHYSICALDRIVE2 --partition 1

Раздел физического диска был успешно смонтирован в директорию /mnt/wsl/PHYSICALDRIVE2p1.
Вы можете получить доступ к файлам на этом разделе из Windows по UNC пути
\\wsl$\ubuntu\mnt\wsl\PHYSICALDRIVE2p1
.
Проверьте, что раздел диска с файловой системой ext4 доступен в WSL:
lsblk -o NAME,FSTYPE,SIZE,MOUNTPOINT

Чтобы отмонтировать диск, выполните:
wsl --umount \\.\PHYSICALDRIVE2 --partition 1
Для автоматического монтирования раздела физического диска при входе пользователя в Windows, создайте с помощью PowerShell простое задание планировщика:
$TaskName="WSL_Mount"
$Trigger= New-ScheduledTaskTrigger -AtLogOn
$Action= New-ScheduledTaskAction -Execute "cmd" -Argument "/c wsl --mount \\.\PHYSICALDRIVE2 --partition 1"
Register-ScheduledTask -TaskName $TaskName -Trigger $Trigger -Action $Action -RunLevel Highest –Force
На данный момент WSL не поддерживает монтирование USB накопителей и SD карт. Для проброса USB накопителей в WSL рекомендуется использовать пакет usbipd-win, который позволяет реализовать проброс устройств с помощью протокола USB over IP.
Как подключить (смонтировать) сетевой диск в WSL
Из WSL вы можете получить доступ к общим сетевым папкам или NAS устройствам.
Есть два способа подключения сетевых дисков в WSL:
- Можно смонтировать сетевой диск, подключенный в Windows и которому назначена буква диска
- Смонитировать сетевую папку по UNC пути с помощью CIFS/SMB клиента в WSL.
Допустим, вы подключили сетевую папку в виде диска с помощью команды net.exe use X: \\192.168.31.102\tools или подключили сетевой диск через GPO. Чтобы получить доступ к этому сетевому диску из WSL нужно:
- Создать точку монтирования:
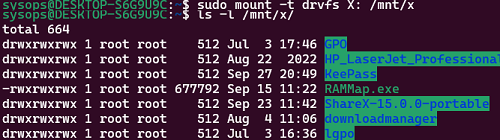
$ sudo mkdir /mnt/x - Смонтировать диск:
$ sudo mount -t drvfs X: /mnt/x - Теперь вы можете получить доступ к файлам и папкам на сетевом диске.
Чтобы автоматически монтировать этот сетевой диск, добавьте следующую строку в /etc/fstab:
X: /mnt/x drvfs defaults 0 0
Затем смонтируйте все файловые системы:
$ mount -a
Также можно смонтировать сетевые папки через пакет CIFS:
$ sudo apt install cifs-utils
$ sudo mount -t cifs -o user={user},pass={password},iocharset=utf8,vers=3.0 //192.168.31.102/tools /mnt/tools
Смонтировать виртуальный VHD/VHDX диск в WSL
WSL позволяет смонтировать виртуальные диски в форматах VHD/VHDX.
Если на компьютере установлен роль или PowerShell модуль Hyper-V, вы можете создать новый виртуальный диск с помощью команды:
New-VHD -Path $env:USERPROFILE\wsl_shared_disk.vhdx -Dynamic -SizeBytes 20GB
Затем смонтируйте виртуальный VHDX диск в WSL:
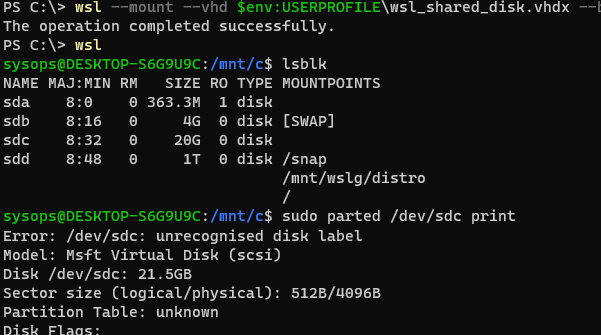
wsl --mount --vhd $env:USERPROFILE\wsl_shared_disk.vhdx --bare
Теперь вы можете создать на виртуальном диске таблицу разделов и раздел с файловой системой ext4:
$ lsblk
$ sudo parted /dev/sdc print
$ sudo parted /dev/sdc mklabel msdos
$ sudo parted -a optimal /dev/sdc mkpart primary ext4 0% 100%
$ lsblk -o NAME,FSTYPE,SIZE,MOUNTPOINT /dev/sdc
$ sudo mkfs.ext4 /dev/sdd1
Чтобы смонтировать новый раздел в определенную директорию, нужно получить его UUID;
$ sudo blkid
$ sudo mount UUID= 506f6faa-1f50-4763-b8a1-975f2b1c59fe /home/sysops/vhdx
Этот способ позволит смонтировать виртуальные диски других сред Linux, которые установлены на этом компьютере под WSL. Файловая система образов Linux WSL хранится в виртуальных дисках ext4.vhdx в папке
C:\Users\[user]\AppData\Local\Packages\[distro]\LocalState\[distroPackageName]
. Если на системном диске недостаточно места, можно перенести vhdx файл с файловой системой образа WSL на другой диск.

Among its numerous advantages, one notable feature is the seamless accessibility of Linux files stored within WSL from the Windows operating system itself.
In this article, you’ll explore various methods of accessing WSL files. This will enable smooth file management and interoperability between Windows and Linux environments.
You will look at both graphical and command-line ways of accessing WSL files inside Windows.
Access WSL files using Windows Explorer
The most basic way of accessing a file on Windows is by launching the Windows File Explorer. The file manager is present on the taskbar, and you can just open it to browse files. Wait! That is for Windows files, but for Linux?
Yes. WSL indeed stores the file inside Windows because it is the host. If you have set up the WSL correctly on Windows, you will see a Penguin icon on your File Explorer.
Just click on it.
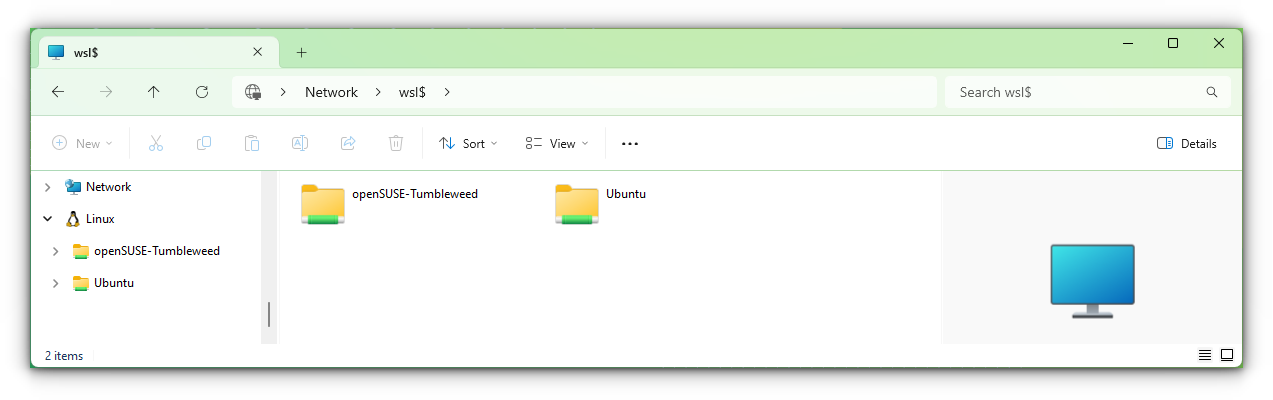
You will see the name of the WSL distributions you have installed currently as folders. I have two; an Ubuntu and an OpenSUSE Tumbleweeed.
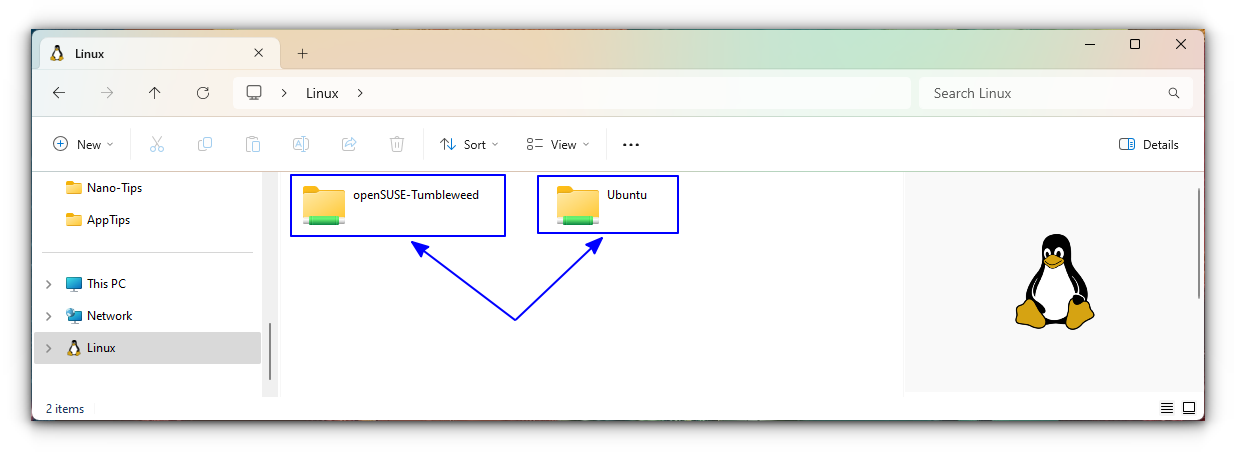
Double-click on the one you need to access. Now, you are inside the root directory of that system.
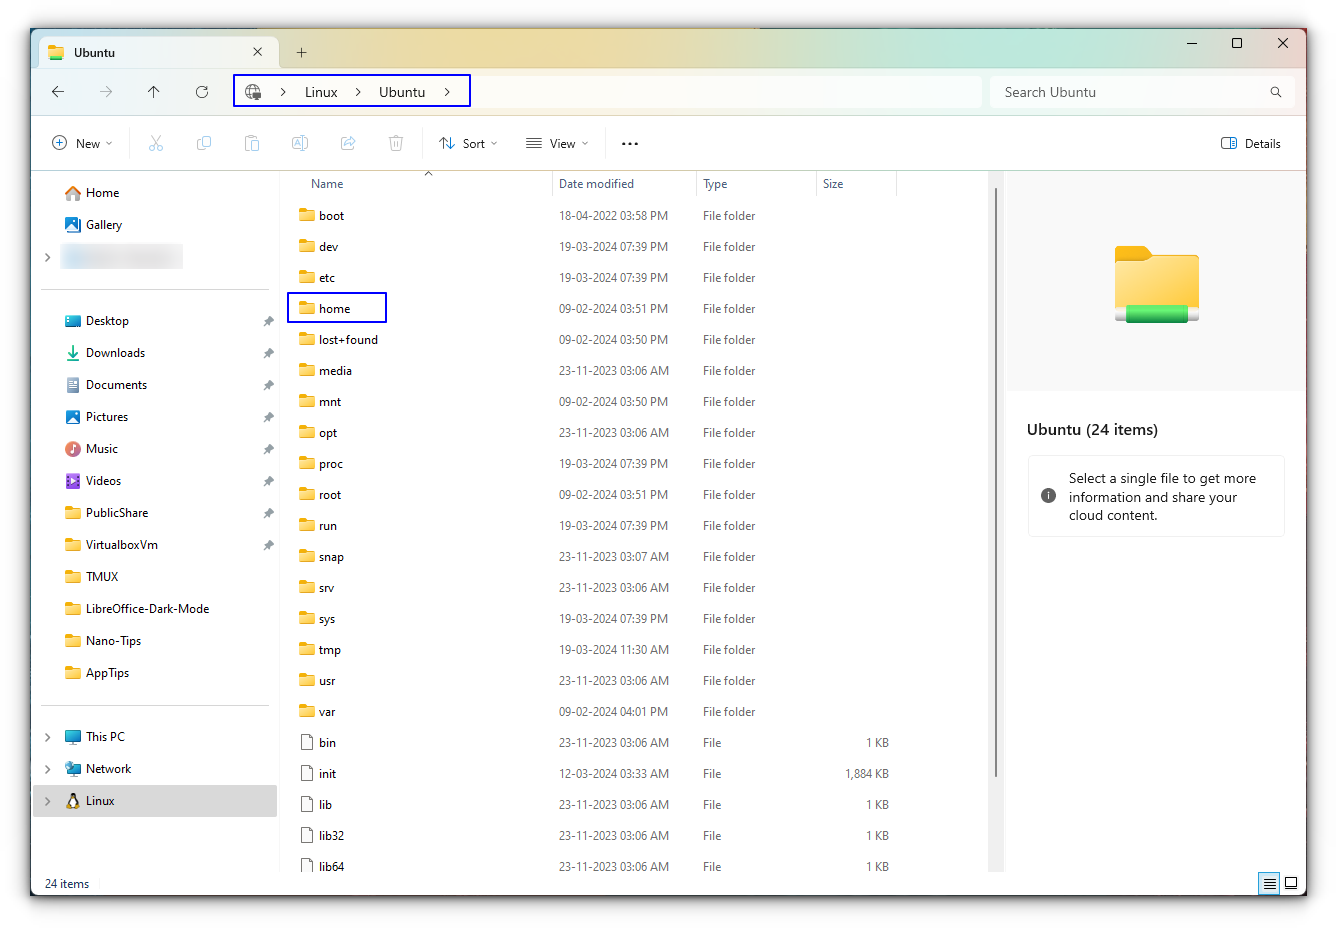
Go inside the home → username folder, and there it is.
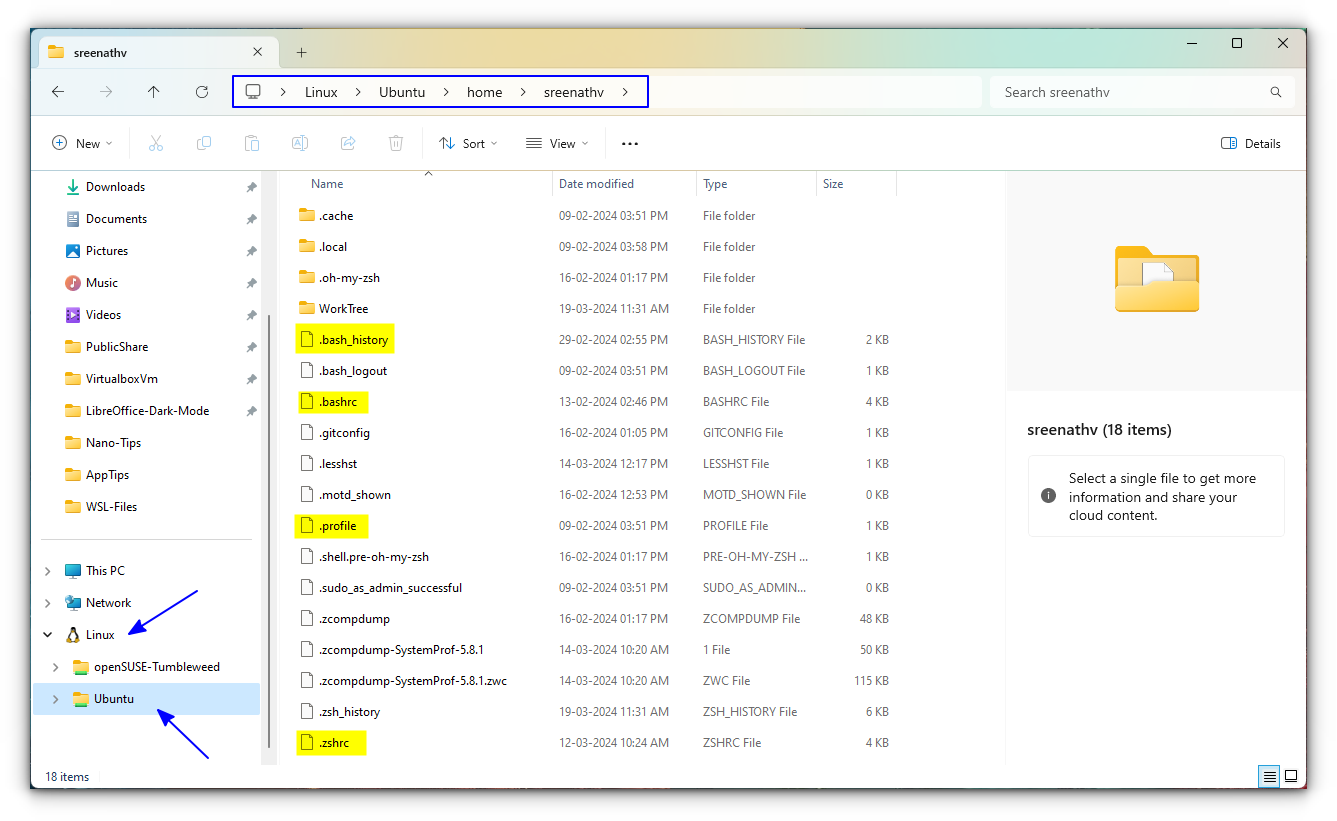
You are now accessing the home directory of the default user. Double-click on any file to open it on a Windows app. You can see in the screenshot below, I have opened the .bashrc file on Notepad app.
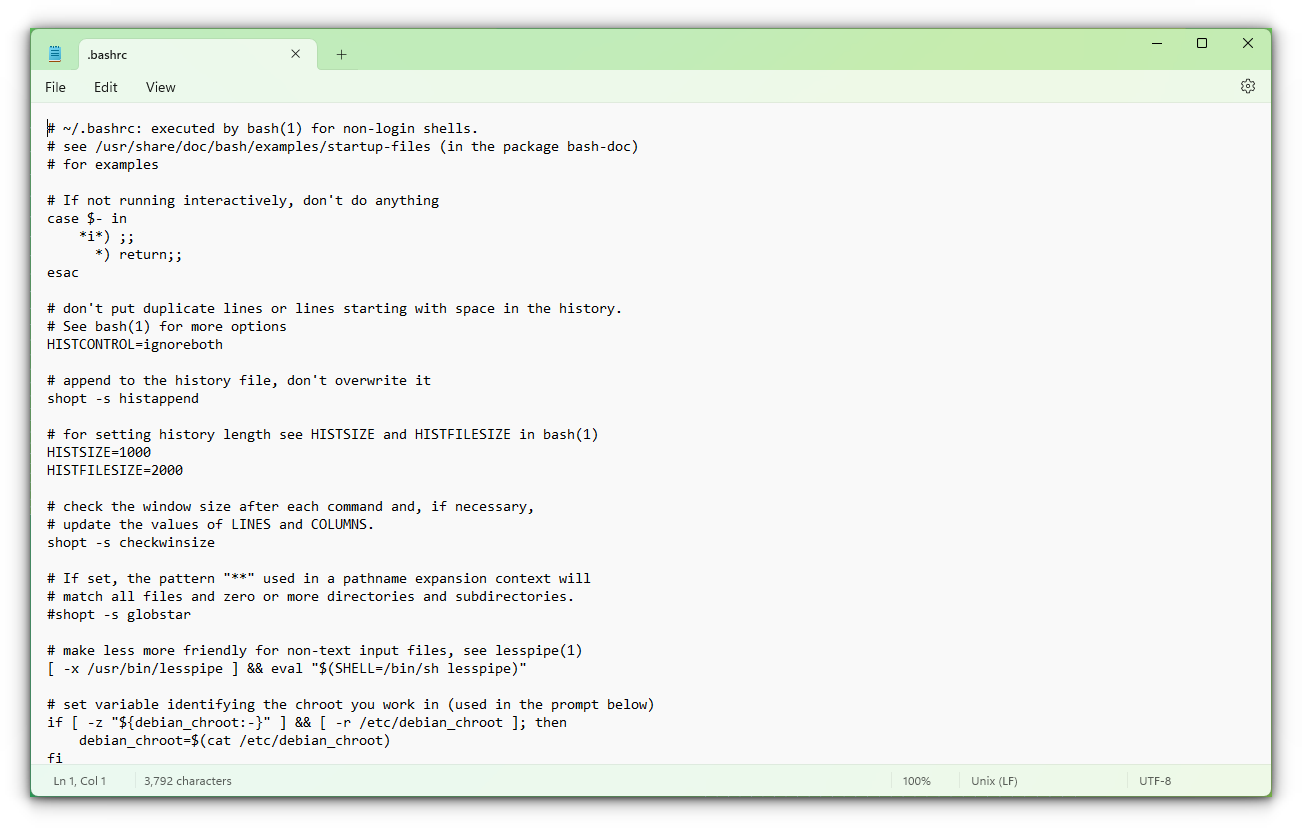
.bashrc file in NotepadUse the address bar of Explorer
You can use the address bar of Windows Explorer to go into the WSL folders. For this, click on the to address bar. When it is changed to editing, enter:
\\wsl$
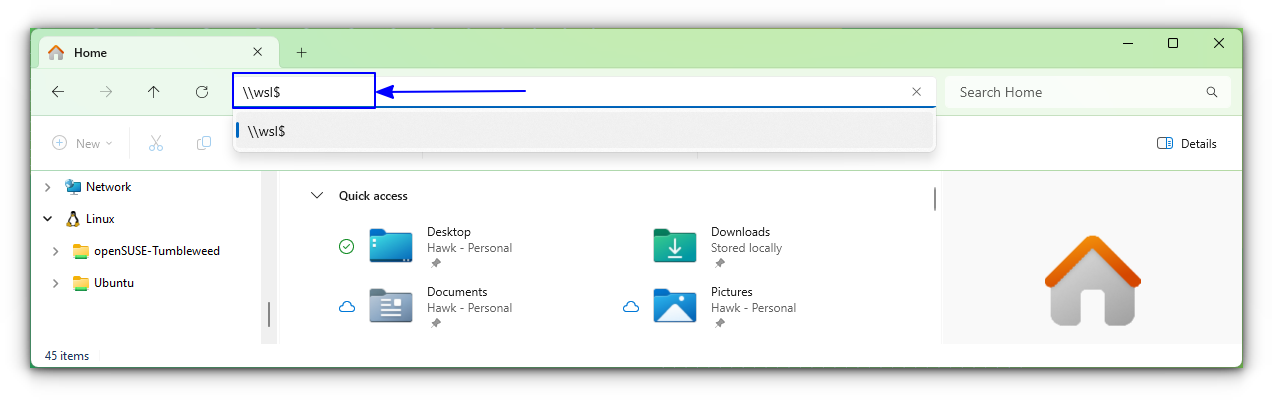
This will bring you to the same folder, where all the WSL distributions are listed as folders. Click on any to enter into it.
💡 Tip: Open the current Linux directory location in Windows
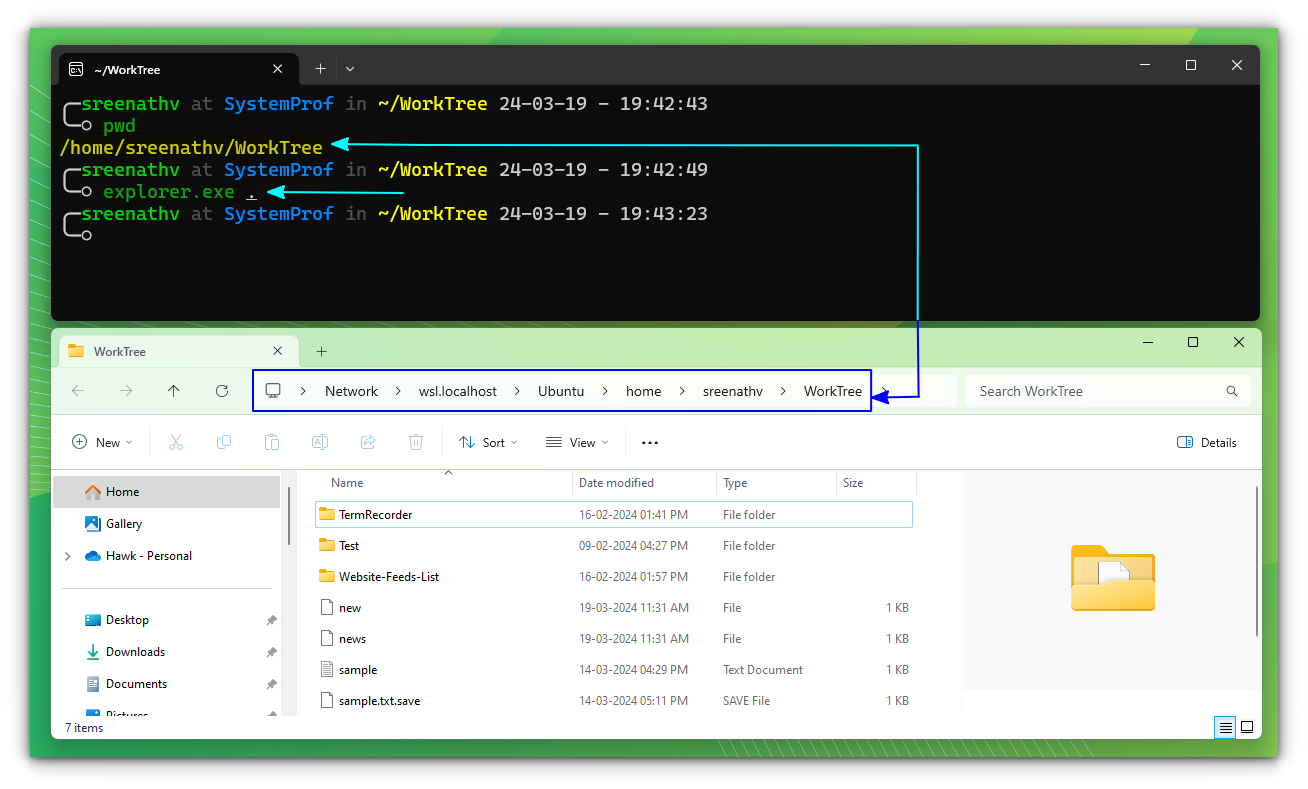
Imagine that you are using Linux through the Windows terminal and you are in a specific directory location. Now, you think it would be better if you could access it in the file explorer.
This is possible and quite easy. Enter the following command on the WSL terminal.
explorer.exe .
Here, the . refers to the current directory you are in. This means that your current directory will be opened in the Windows file explorer.
Similarly, while inside the WSL, you can specify a directory path to open that folder in Windows Explorer.
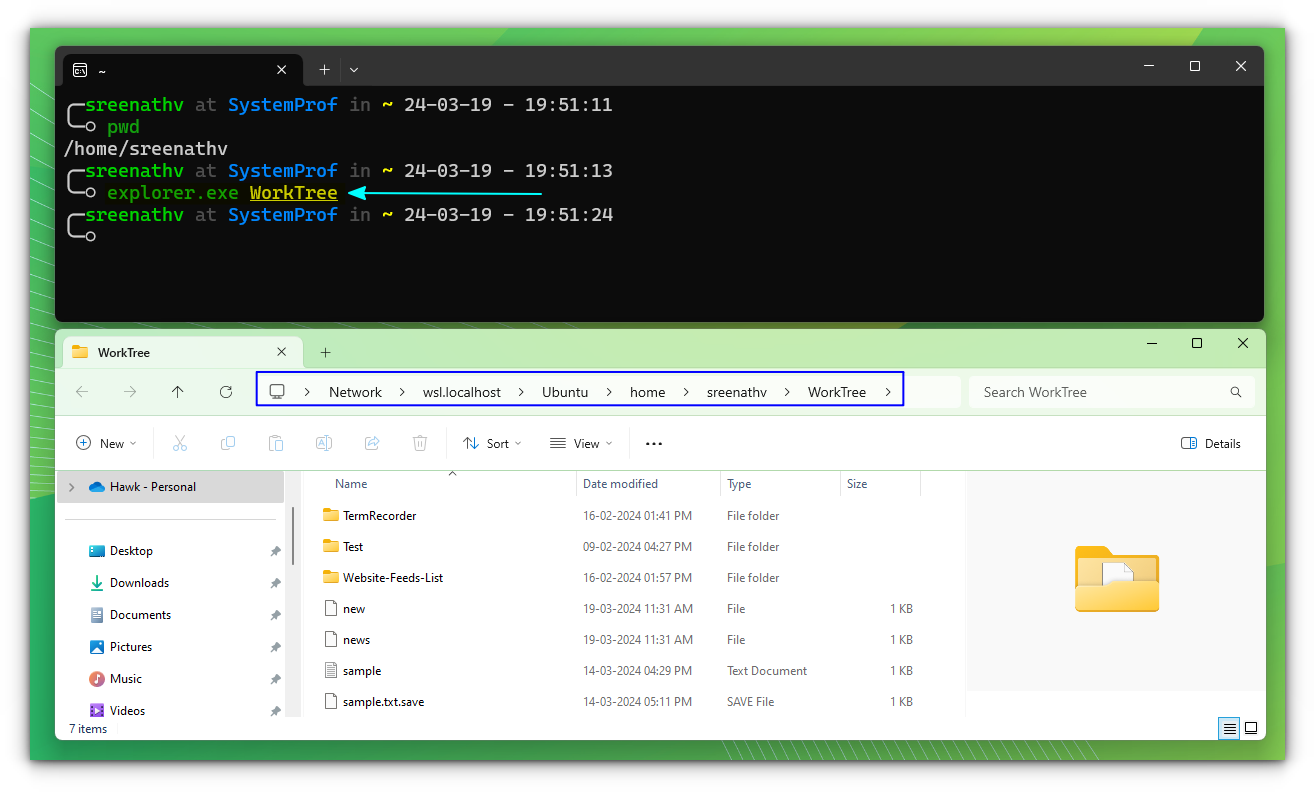
As you can see, the mentioned directory is opened in Windows Explorer and you can access the files.
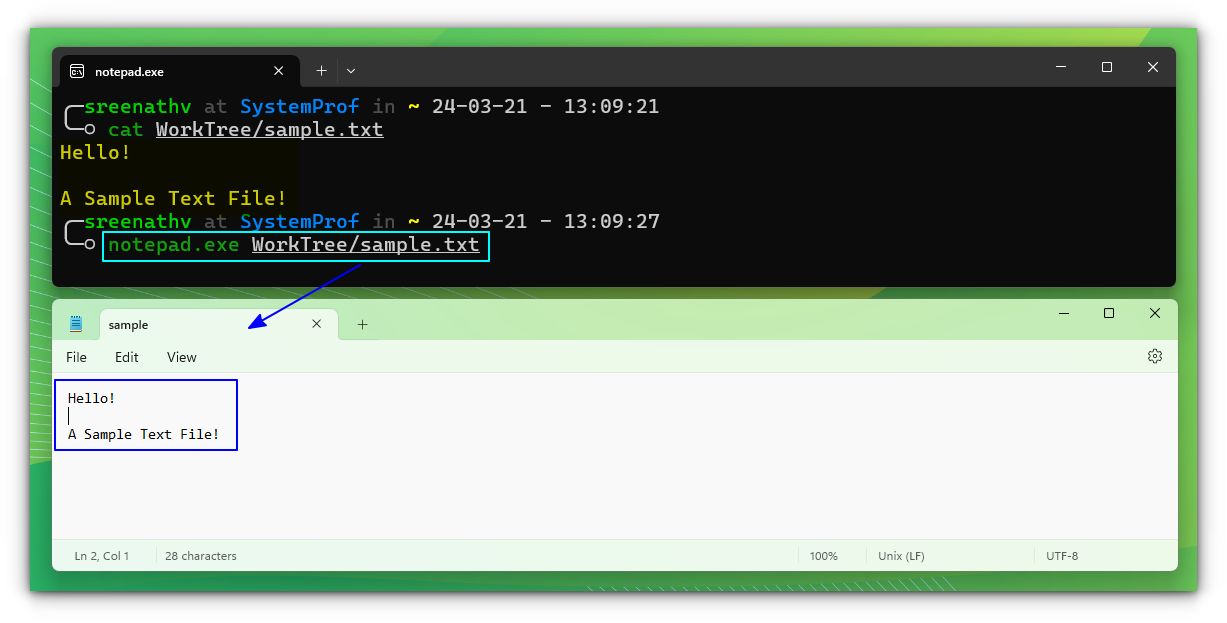
Open a WSL text file in Notepad
While there are terminal-based text editors available in Linux, you may not be comfortable with the idea of editing files in the command line.
Thankfully, you can easily open those Linux text files using Windows’s Notepad.
notepad.exe /path/to/the/file/inside/wsl/distribution
Accessing files between WSL and Windows
As you can easily guess by now, it is possible to access files between WSL and the Windows host operating system.
Here are a few tips on accessing files between Windows and Linux inside WSL.
✋
If you are working on a project inside WSL, be sure to store the files inside the respective WSL system. Similarly, store all the files inside the Windows filesystem if you are working on a project using Windows, you can ensure maximum speed and performance.
Edit Windows files inside WSL
While inside WSL, you can open a file stored on the Windows filesystem using Linux tools like the Nano editor.
For this, we use the Mounted Drive concept.
nano /mnt/c/Users/username/Documents/filename
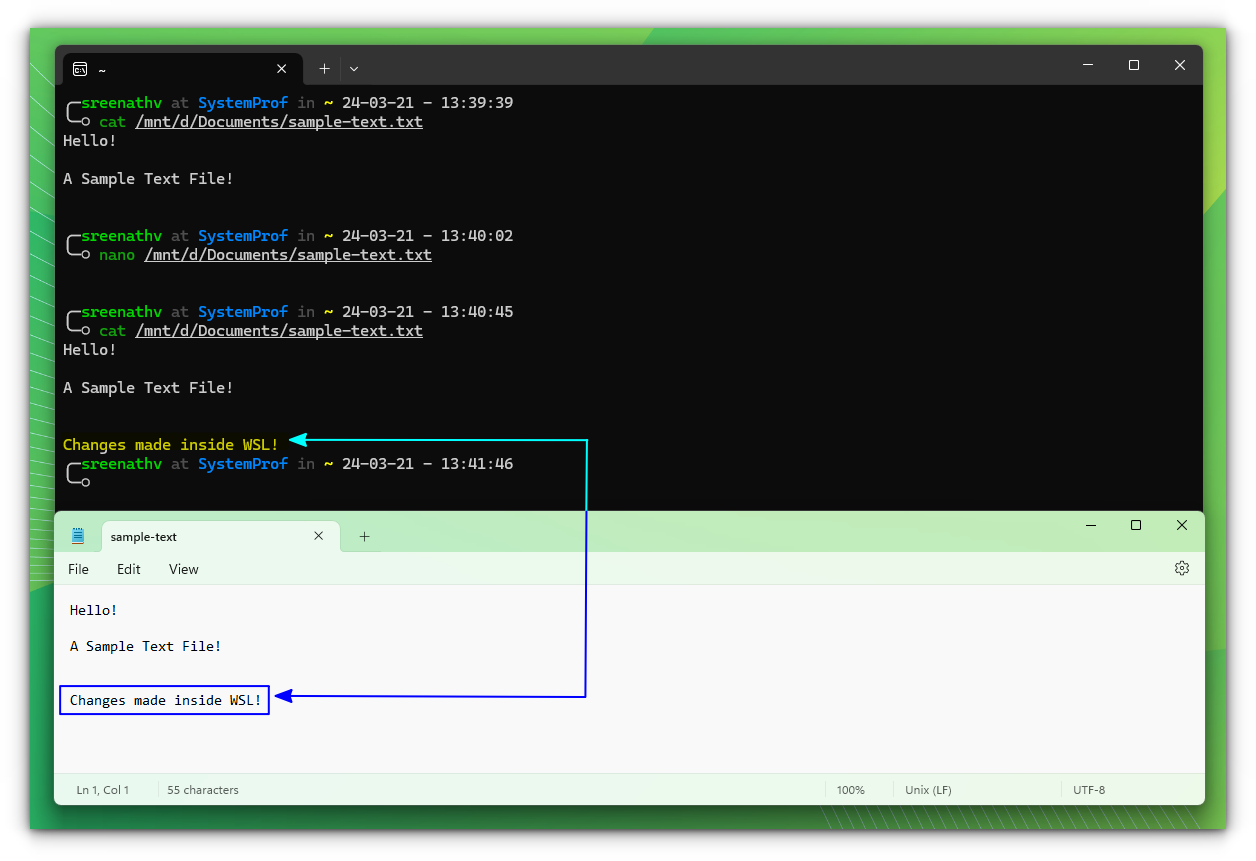
Here, the /mnt/c represents the C drive mounted to the WSL. So, what the command actually does is, open the specified file on the location specified in nano editor.
You can use /mnt/d, if you have a drive located with D: in Windows.
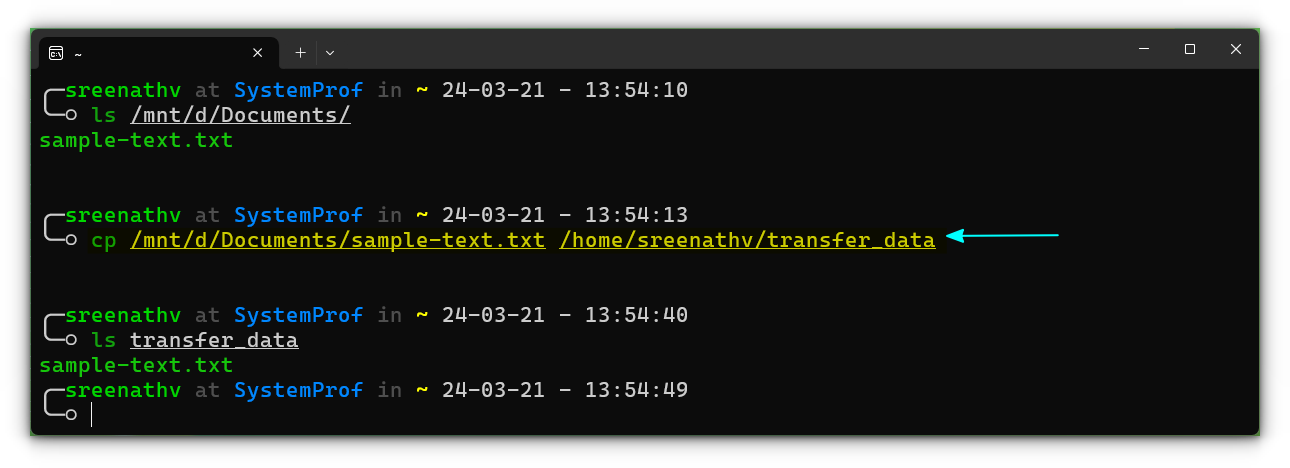
Copy files between WSL and Windows
Inside the WSL, you can copy a file from WSL to a specified Windows folder. To do that, use the cp command:
cp /home/$USER/filename /mnt/d/Documents/
This will copy the file called filename from the home directory of the user to the Documents folder (if exists) on the D drive.
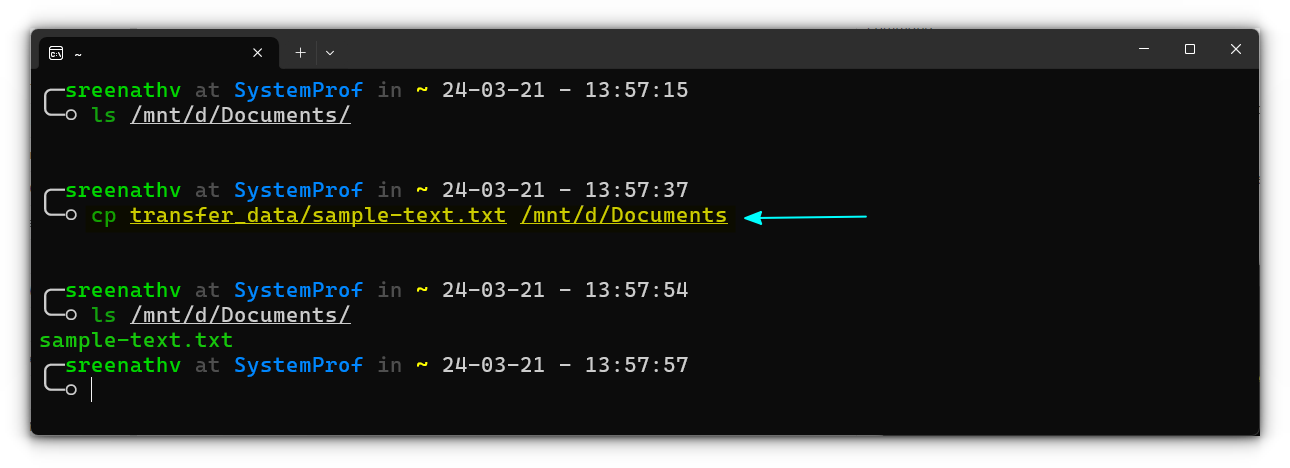
Similarly, if you want to transfer a file from a Windows folder into the WSL system, use:
cp /mnt/d/Documents/filename /home/$USER/
That’s it. You have copied the files.
🚧
Keep caution while managing files between the two operating systems. It can lead to file loses and corruption, if not handled properly.
Wrapping Up
Here, you learned about accessing files between Windows and Linux running inside WSL. The ability to access Linux files easily from Windows is super helpful for Windows users. Let me know if you have any questions.
How-To
How to Access Files on Windows Subsystem for Linux
Tom installs and uses Edge DX to monitor his WSL Linux instance and explains how to access files from and to Windows systems.

Windows Subsystem for Linux (WSL) allows you to run Linux on Windows without having to install a hypervisor and run a Linux instance in a virtual machine (VM). To enable WSL and install Linux on your Windows system, you only need to enter a few commands in the command line and reboot your system — that’s all there is to it.
Having this integration with Windows allows you to access the rich set of the tools that Linux offers. However, Windows also has a rich set of tools, and in fact many tools for manipulating and presenting data will only run on Windows. In this article, I will l take a look at how easy it is to read and write files to and from WSL and the Windows system on which it runs.
If you’re interested in learning how to install WSL using the command line and then access files from the base Windows system, be sure to check out my previous article here. I’ve also written extensively on WSL in the past, including articles you can find here and here.
Third-Party Monitoring
Before looking at files on WSL, I wanted to see if third-party software could work with it and, if so, what type of resources (for example, CPU, RAM and so on) it would consume. As I work for ControlUp, I was also curious as to whether or not Edge DX, their endpoint monitoring tool, would work with it. I was able to install the Edge DX user-mode agent without any difficulty as well as the Ubuntu WSL instance. You can read more about Edge DX in this series of articles.
The WSL instance was presented on the Edge DX portal without any issues. I did notice that the instance had ~ 3GB less (13GB) RAM than the Windows system (16GB), but it had the same number of CPU cores (4).
Using the Filesystem
Files are presented from/to the WSL Linux system in different ways depending on the distribution that you are using. The examples below are with Ubuntu, and if you are using a different distribution your results may differ.
One of the nice features is the WSL Ubuntu automatically mounts the C: drive under /mnt/c. I saw what filesystems were mounted and what type of filesystems they were by entering mount. This showed a lot of filesystems with the C:\ being of type 9p. 9p is an interesting way to mount the C: drive and it would take an entire blog to dissect its nuances; for the purposes of this article, however, you only need to know that it works.
I entered cd /mnt/c/ and then ls which showed the C: directory. Some of the files gave me a permission denied message.
The df command reports on filesystem disk space usage. To see how large the filesystem was and how much free space was left on it, I entered df — h /mnt/c. This jived with what I saw on my Windows system.
Accessing Windows Files from Linux
I had some bash scripts stored within a directory in Windows. I navigated to the directory by entering:
cd /mnt/c/Users/Fenton/Dropbox/ControlUp/CUp_2022/CUp_2022_05/EDx_Scripts.
I could see all of the scripts which had a txt extension.
When I tried to execute one of the scripts, I got the following error message:
/bin/bash^M: bad interpreter: No such file or directory
The ^M at the end of the path indicated to me that Windows put a carriage return at the end of the line.
I verified this by entering cat -v Linux_List_Printers.txt.
To correct the issue, I brought the script up in Notepad++ and saved it with only a line feed, and then I was able to execute it without any issues. As I now had Linux on the system, I found that I could also remove the CR by entering either of the following:
sed ‘s/\r$//’ file.txt > file.sh
or
tr -d ‘\r’ < file.txt > file.sh
Accessing Linux Files from Windows
I had no idea where my Linux files were presented to Windows, but since I know that many Windows commands are accessible from WSL, I entered explorer.exe on the WSL command line and, somewhat to my surprise, File Explorer did not launch. However, after I exited out of my Linux root user and re-entered the command, I was in the user’s home directory: \\wsl$\Ubuntu\home\user01.
I noticed that the path to the directory had a \\wsl$ prefix, so I brought up another File Explorer and entered \\wsl$ in the path window. This brought up the Ubuntu folder, and I could then navigate to my Linux files.
In this article, I installed and used Edge DX to monitor my WSL Linux instance and looked at how to access files from and to Windows systems. In previous releases of Windows, I had jump through some pretty big hoops to get a graphical interface to work with WSL. I will look and see if any improvements have been made with the latest release of WSL.
About the Author
Tom Fenton has a wealth of hands-on IT experience gained over the past 30 years in a variety of technologies, with the past 20 years focusing on virtualization and storage. He previously worked as a Technical Marketing Manager for ControlUp. He also previously worked at VMware in Staff and Senior level positions. He has also worked as a Senior Validation Engineer with The Taneja Group, where he headed the Validation Service Lab and was instrumental in starting up its vSphere Virtual Volumes practice. He’s on X @vDoppler.