
Updated on Apr 28, 2025
To help you completely get rid of wsappx taking high disk and CPU usage on Windows 11/10, we collected the three most effective fixes for you.
| Workable Solutions | Step-by-step Troubleshooting |
|---|---|
| Fix 1. Disable Windows Store | Go to Local Computer Policy > Computer…Full steps |
| Fix 2. Extend Virtual Memory | Type performance in Search and high Enter…Full steps |
| Fix 3. Check/Clean Disk Internal Error | Download EaseUS free partition manager…Full steps |
| More Fixes | Open Registry Editor on your computer…Full steps |
What Is Wsappx
Wsappx is a process that runs in the background on your Windows 10/8 computer as a part of the Windows Store and the Universal app platform of Microsoft.
Mostly, wsappx includes two separate background services — AppX Deployment Service (AppXSVC) and Client License Service (ClipSVC) on Windows 10. If you are using Windows 8, you will see AppXSVC and WSService (Windows Store Service).
Wsappx is used for installations, updates, and uninstallation of Store apps, so once you are done installing all updates, you don’t need it.
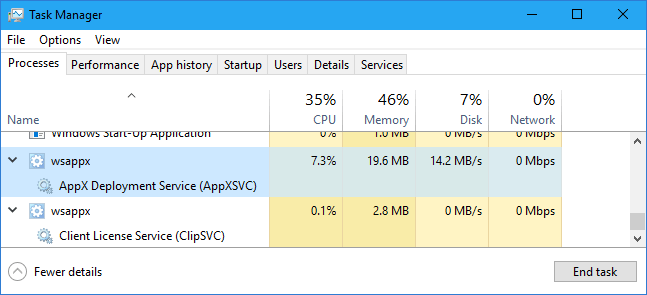
But at times you may face situations where you find that the wsappx is using high disk, CPU, and even memory in Task Manager as shown below.
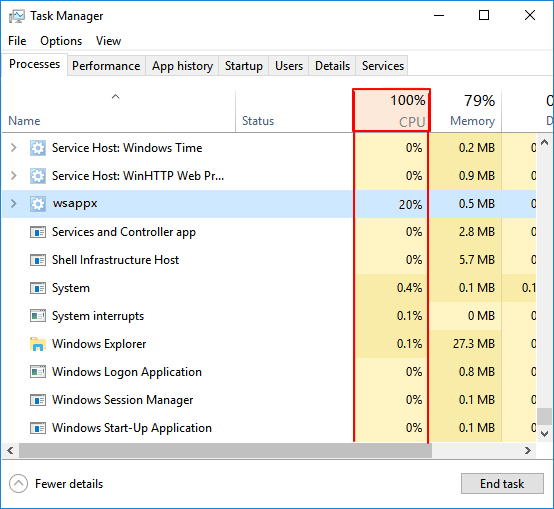
When you see wsappx hogging much of your CPU or Disk usage, in some cases, you will see wsappx (2) or wsappx (3) takes high disk usage, what would you do to fix wsappx taking the high disk and CPU usage on Windows 10 and speed up your PC? Let’s learn the reasons that causes wsappx taking up high disk pace first.
Why Is Xappx Using So Much Disk or Space?
To find the correct resolution to resolve wxappx high disk or high CPU usage issue, you should first know why is wxappx taking so much space. Here are the reasons:
- Wsappx will activate and use CPU, disk, etc. resources when you’re using Microsoft Store.
- Wsappx users more resources when you download an app or install an update as it needs them for the install process.
- When you install traditional desktop software, the installation process will take up resources, high CPU and disk uage.
- Apps updating in the background will also cause wsappx high CPU or high disk usage issue.
From what we know, this is a common problem in Windows. We have some effective solutions to help you get out of this situation.
Can I End Wsappx? Fixes for Wsappx High CPU/Disk Usage Available Here
So how to efficiently get rid of the Wsappx high CPU and high disk usage issue on your computer? Here we’ve collected 6 practical resolutions for you to follow and get rid of this issue from your PC immediately:
- #1. Disable Windows Store
- #2. Extend Virtual Memory
- #3. Check and Clean Disk Internal Error
- #4. Change Value of AppXSVC in Registry
- #5. Scan Your Computer to Check Virus
- #6. Troubleshoot in Clean Boot State
The provided methods work to fix this error on both Windows 10 and Windows 8.
Solution 1. Disable Windows Store to Fix wsappx High CPU Issue
Windows Store is one of the major causes of wsappx high CPU issue. And you can effectively disable Windows Store by using Local Group Policy and Registry Editor.
Follow to see how to disable Windows Store on your computer now:
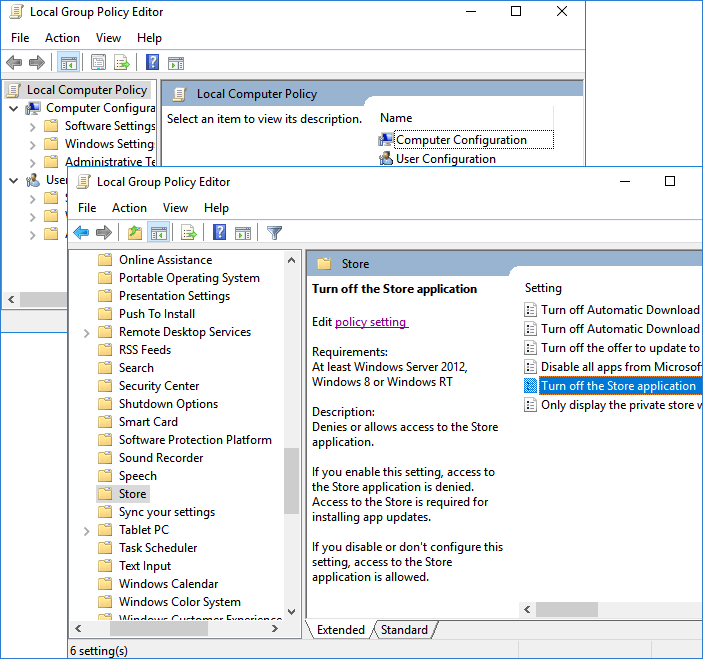
#1. Use Local Group Policy
Step 1. Press the Windows logo key + R then type gpedit.msc and click «OK».
Step 2. Enter Local Computer Policy and go to Computer Configuration.
Select «Administrative Templates», expand Windows Components, and double-click to open «Store».
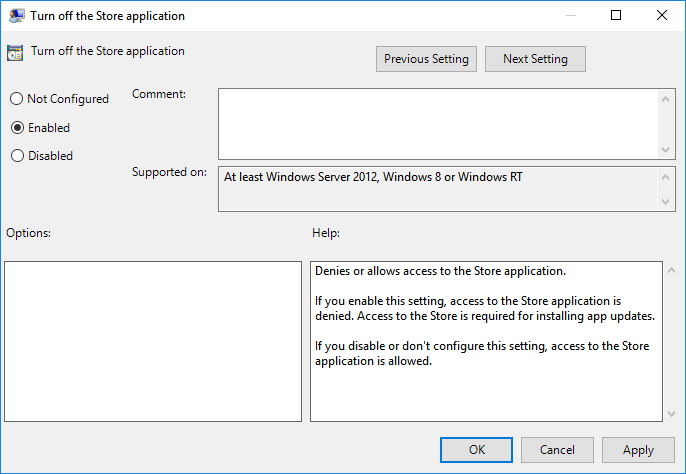
Step 3. Select «Turn off the Store application» and click «Edit policy setting».
Step 4. Change the status to «Enabled». Click «Apply» and «OK» to save and exit.
After the above steps, you can start your PC to check whether this solution works or not. If this solution fails to fix the high disk usage problem, please move on solutions below.
#2. Use Registry Editor
Note that Windows Registry Editor is a non-beginner application, and it mainly works for administrators to control applications and change settings on Windows computer.
Any false operation may cause serious results. Therefore, we suggest you be very careful while following the steps to disable Windows Store so as to resolve the wsappx high disk usage issue.
Step 1. Type regedit in Search and hit Enter to bring up Registry Editor. Click «Yes» to open it.

Step 2. Navigate to: HKEY_LOCAL_MACHINE\SOFTWARE\Policies\Microsoft\WindowsStore.
Step 3. Create a new DWORD value within the Widows Store keys and name it as «RemoveWindowsStore», set the value as «1».
Save the changes and exit Registry. Then you can restart Windows service.
Note that when you disable Windows Store, third-party Windows Store apps and programs won’t be able to installed or updated. If you want to enable the installation and update, you’ll need to enable Windows Store by using the above two recommended methods — disabling «Turn off the Store application» or change the value of RemoveWindowsStore to «0».
Solution 2. Extend Virtual Memory
Another efficient solution that can fix wsappx high disk usage or high CPU usage issue is to extend the virtual memory. And here are the steps:
Step 1. Type performance in Search and high Enter, select «Adjust Appearance vs. Performance in Windows».
Step 2. Go to the Advanced tab, click «Change» under Virtual Memory section.

Step 3. Uncheck «Automatically manage paging file size for all drives», then select the OS drive and click «Custom size».
Step 4. Set the Initial Size equal to your RAM size in MB, and the Maximum size to double of the Initial Size.
Step 5. Click «Set» and «OK» to keep all the changes.
Then restart your computer. You can check if this helps to resolve the high CPU issue.
Solution 3. Check and Clean Disk Internal Error
For those who got this problem very recently, performing a disk check should be taken into account. Sometimes, when a disk captures internal error or unknown file system mistakes, the computer may not run properly, coming up with high disk usage or high CPU error.
In order to perfectly solve this case, you will a reliable tool for help — EaseUS free partition tool.
This professional tool can help get this work done, and here is the detail:
When you finish all the steps, reboot your Windows 10. Go to Task Manager to see if the disk usage of wsappx is normal.
Solution 4. Change Value of AppXSVC in Registry
According to some experienced administrators, it seems that changing the value of AppxSvs in Registry may also help to resolve the wsappx high CPU or high disk usage error.
Here are the steps:
Step 1. Open Registry Editor on your computer.
Step 2. Navigate to this path: HKEY_LOCAL_MACHINE\SYSTEM\ControlSet001\Services\AppXSvc.
Step 3. Locate the key and change the Start value on in the right panel to «4».
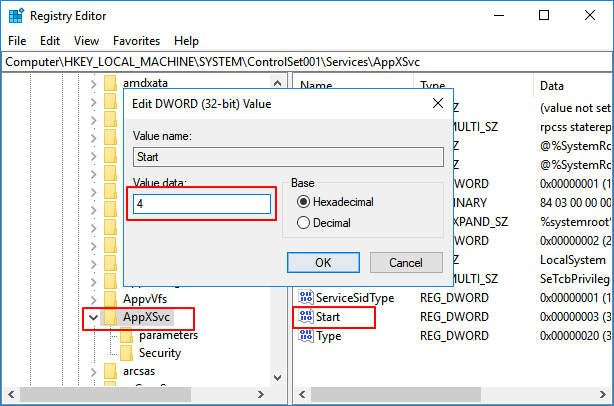
Step 4. Click «OK» to save the changes and exit Registry.
After this, restart your computer to see if the problem has been changed.
Solution 5. Scan Your Computer to Check Virus
Most people often ignore that in certain cases, this problem is caused by viruses or malware infection. If you haven’t fully scanned your system with an antivirus program, do it now.
Step 1. Run anti-virus software on your PC and let it scan your whole computer disk.
Step 2. Once the antivirus software finds suspicious files, remove it from your PC.
Step 3. Restart your computer to see if there is any change.
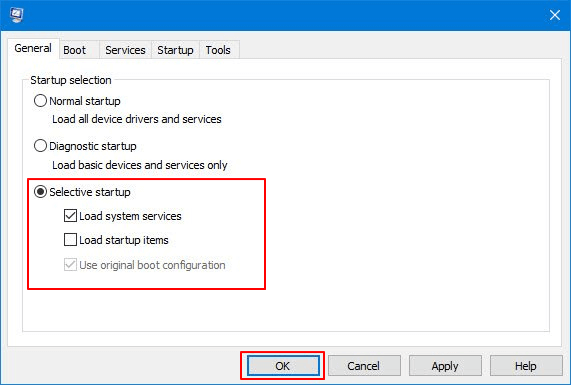
Solution 6. Troubleshoot in Clean Boot State
The last way that you can try to resolve the wsappx high CPU usage issue is to perform a Clean Boot. It will make Windows run only on a few essential drivers for settings and startup programs.
This will help you manually resolve the wsappx high CPU or high disk usage issue from startup:
Step 1. Type MSConfig in Search and hit Enter to open System Configuration Utility.
Step 2. Go to the Genergal tab, click «Selective Startup», check «Load system services» and «Use original boot configuration».
Click «OK» to continue.
Step 3. Go to the Services tab, select «Hide All Microsoft Services» and click «Disable all».
Click «Apply» and «OK» to keep all the changes.
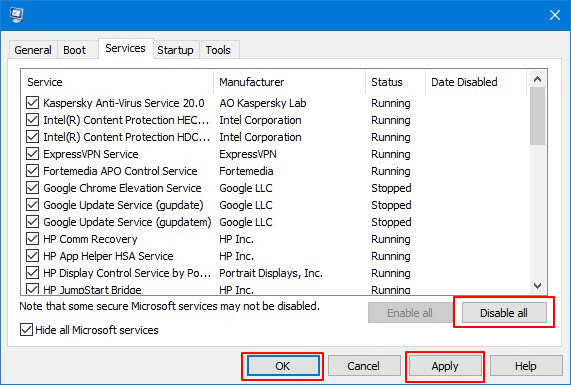
After this, restart your computer and Windows will execute a Clean Boot. It will help to resolve the issue. After this, you can repeat the above-listed steps and uncheck «Load System Services», save the changes and restart the computer.
Are the six solutions helpful? Share these ways to help more people facing similar issues.
Conclusion
On this page, we briefly introduced what is wsappx and explained why is wxappx taking so much CPU and disk memory on your computer. A lot of situations may cause wsappx taking high disk and CPU usage problem.
If you still haven’t found effective solutions, try the presented methods on this page. Never hesitate to try and help yourself out.
В диспетчере задач Windows 11 и 10 в разделе можно обнаружить один или несколько процессов wsappx с описаниями «Служба развертывания AppX (AppXSVC)», «Служба лицензий клиента (ClipSVC)», в ранних версиях Windows 10 вы также могли встретить «WSService». В некоторых случаях wsappx сильно грузит процессор по неизвестной причине.
В этой инструкции подробно о том, для чего используется процесс WSAPPX и что делать в ситуации, когда он вызывает высокую нагрузку на процессор, чтобы исправить проблему.
Что представляет собой процесс WSAPPX
В рамках процесса WSAPPX выполняются системные службы (указанные, когда мы разворачиваем процесс в диспетчере задач), отвечающие за установку, обновление и поддержку работы приложений магазина Windows 10, а также встроенных инструментов системы, многие из которых также представляют собой приложения AppX.

При штатной работе, соответствующие элементы в диспетчере задач могут появляться во время работы приложений (в том числе фоновой), их установке или удалении: как правило, период, в течение которого wsappx (Служба развертывания AppX) значительно нагружает процессор не слишком продолжителен: после фоновой установки всех обновлений, которые требуется установить, нагрузка падает до долей и единиц процентов.
При отсутствии устанавливаемых обновлений Windows 11/10 или приложений и при условии исправной работы системы, какой-либо существенной нагрузки на процессор WSAPPX не вызывает: нагрузка возрастает лишь кратковременно, обычно при очередном включении компьютера или ноутбука, когда этот же процесс может использоваться наряду с остальными компонентами, участвующими в проверки наличия обновлений.
Варианты действий при высокой нагрузке на процессор
Далее — по порядку методы, которые могут помочь исправить проблему с постоянной высокой нагрузкой со стороны процессов wsappx в Windows 11 и 10:
- Если проблема появилась после установки каких-то новых приложений из магазина Windows 11/10, попробуйте удалить их. Если у вас есть точки восстановления на дату, предшествующую появлению проблемы, можно использовать их.
- Запустите Microsoft Store в меню откройте «Скачивания» и обновите все приложения (во время обновления нагрузка может быть даже выше, чем в текущий момент, но после него может

- Зайдите в Параметры — Приложения — Установленные приложения (Параметры — Приложения — Приложения и возможности). Отсортируйте приложения по дате установки. Для всех недавно установленных/обновленных приложений из магазина Windows 11/10 (в списке будут и другие приложения, их пропускаем) зайдите в «Дополнительные параметры» (в Windows 11 для этого требуется нажать по трём точкам справа и выбрать нужный пункт меню, а в Windows 10 — по имени приложения с последующим переходом в дополнительные параметры) и нажмите «Сбросить». Ненужные приложения из списка лучше и вовсе удалить.

- Если вы отключали файл подкачки Windows 11/10, это может вызывать такое поведение wsappx, попробуйте вновь включить его. Подробнее о том, как это сделать: Файл подкачки Windows.
- Проверьте, решает ли проблему чистая загрузка Windows — если в этом случае нагрузка исчезает, следует искать проблему в элементах автозагрузки или сторонних службах.
- Удаление и повторная установка Microsoft Store также решает проблему у многих пользователей. Для удаления и последующей установки вы можете использовать следующие две команды, запущенные в PowerShell (Терминале Windows) от имени Администратора (запустить можно в меню по правому клику на кнопке Пуск):
Get-AppxPackage -alluser *WindowsStore* | Remove-Appxpackage
Get-AppxPackage -AllUsers *WindowsStore* | Foreach {Add-AppxPackage -DisableDevelopmentMode -Register "$($_.InstallLocation)\AppXManifest.xml"}
Есть и другие методы установки Microsoft Store.
- Полное отключение обновлений Windows также решит проблему, однако это не то, что я могу рекомендовать большинству пользователей. Если же решитесь, информация доступна в статьях Как отключить обновления Windows 11 и Как отключить обновления Windows 10.
- Если вам никоим образом не требуются приложения Windows 11/10 вы можете попробовать остановить и отключить службу, которая грузит процессор в рамках wsappx. Однако это может повлиять на работоспособность и других системных элементов и установки их обновлений, так как в самой ОС многое «завязано» на приложения UWP, а в некоторых версиях Windows — к ошибкам системы, потому рекомендую создать точку восстановления, прежде чем её отключать. Для отключения службы перейдите в Win+R — services.msc, найдите пункт «Служба развертывания AppX», дважды нажмите по службе, остановите её и измените тип запуска на «Отключена», сохраните настройки и перезагрузите компьютер. Если изменение типа запуска недоступно, вы можете отключить службу в реестре, подробно — в этой инструкции (подойдёт как для Windows 11 так и для Windows 10).
- Один из частых советов в этой ситуации — отключить Microsoft Store в редакторе локальной групповой политики (gpedit.msc) по пути Конфигурация компьютера — Административные шаблоны — Компоненты Windows — Магазин — Отключить приложение Store. На моей памяти этот метод ни разу не оказался полезным, но попробовать можно, причем дополнительно можно переключить и другие параметры в этом же разделе редактора локальной групповой политики.
- Мешать правильной работе рассматриваемых служб могу сторонние антивирусы, средства автоматической очистки системы, в некоторых случаях — действия по отключению телеметрии («слежки») Windows Если что-то из этого устанавливалось или делалось в последнее время, имейте в виду.
- Один из самых часто работающий, но не самых удобных вариантов, позволяющих исправить высокую нагрузку wsappx — создать нового пользователя, зайти под ним, убедиться, что нагрузка в норме, а затем полностью мигрировать на этого пользователя.


В большинстве случаев один из методов помогает решить проблему. Дополнительно отмечу, что среди часто замеченных приложений магазина, вызывающий повышенную нагрузку на процессор со стороны wsappx отмечают фирменные утилиты производителей ноутбуков или ПК (те из них, которые распространяются именно в виде UWP приложения, такие, например, есть у ASUS, Lenovo и Dell).
If your Windows 10 or 11 PC is running slow, Wsappx might be the problem.
Wsappx is a system process that manages Microsoft Store apps and updates.
However, it sometimes consumes too much CPU and memory, causing performance
issues. This is common on older computers or systems with low resources. In
2025, optimizing your PC is more important than ever to get smooth
performance.
The good news is that there are simple fixes to reduce Wsappx resource usage
like disabling unnecessary services and adjusting system settings. Let’s check
out 6 ways to fix Wsappx high CPU and memory usage.
Part 1: What Is Wsappx?
➤ Definition of Wsappx
It is a
background process related to the Windows Store and Universal Windows
Platform (UWP) apps. It manages app installations, updates and removals from the Microsoft
Store. Although it’s a necessary part of Windows, it can sometimes use too
many resources causing system slowdowns.
➤ Component of Wsappx
Wsappx consists of two main services in Windows 10: AppXSVC and ClipSVC.
-
AppX Deployment Service (AppXSVC): Handle app installations,
updates, and removals from the Microsoft Store. -
Client License Service (ClipSVC): Handle licensing and digital
rights management for Store apps.
Note:
In Windows 8, another service called
WSService (Windows Store Service) replaces ClipSVC. All
these services run under WSappx and are required to manage store apps.
Since WSappx manages app-related tasks, it will run automatically whenever
you install, update, or remove apps from the Microsoft Store.
Part 2. Why Is Wsappx Using So Much CPU/Memory?
Wsappx can sometimes cause high CPU and memory usage, making your PC slow.
Here are the main reasons why:
-
Microsoft Store Activity: Wsappx becomes active whenever you
download, install, or update apps from the Microsoft Store. If updates are
running in the background, it can use a lot of CPU and disk space. -
Background App Updates: Windows automatically updates Store apps in
the background. This process uses CPU and disk space, which can cause slow
performance. -
App Installation and Removal: If you install or uninstall multiple
apps, Wsappx will work harder to manage these changes, hence higher
resource usage. -
Licensing and Security Checks: ClipSVC ensures Store apps have
valid licenses. If this process runs continuously, it might cause high
memory usage, especially if an app has licensing issues. -
Potential Malware or System Corruption: Though Wsappx is a
legitimate Windows process, malware can disguise itself under similar
names. If Wsappx is consuming extremely high resources all the time, it’s
worth scanning your system for viruses. -
Windows System Updates: Windows updates sometimes trigger Wsappx to
run as part of system maintenance and cause temporary high CPU usage.
Part 3: How to Fix Wsappx High CPU on Windows 11/10
If you’re experiencing high CPU or memory usage due to Wsappx, you’re not
alone. This system process manages Windows Store and Universal Windows
Platform (UWP) app installations but sometimes consumes too many resources.
Here are 6 proven ways to fix Wsappx high CPU or RAM usage.
Way 1: Reinstall Windows Store in PowerShell
Reinstalling the Windows Store can resolve issues where corrupt or outdated
app packages cause Wsappx to work overtime. This approach, suggested by
Phillip_KKLTD on the Microsoft Answers forum, refreshes the core components
involved in app deployment.
-
The following command fetched the package name and full package
identifier:
Get-AppxPackage WindowsStore | Select Name, PackageFullName -
Using the PackageFullName from step one, the Store app was removed:
Remove-AppxPackage -Package

Microsoft.WindowsStore_12010.1001.2.0_x64__8wekyb3d8bbwe -
System reboot.
-
With the Name from step one, the Store app was restored using
Files\WindowsApps\Microsoft.WindowsStore\AppxManifest.xml"

-DisableDevelopmentMode -
Another reboot to check if it fix the Wsappx process high CPU usage.
Way 2: Check and Repair Disk Partition Errors Using 4DDiG Partition Manager
Sometimes, underlying disk partition issues make system services like Wsappx
work harder. One possible reason for this issue is disk partition errors.
You can use a reliable tool like 4DDiG Partition Manager to fix these
errors.
4DDiG Partition Manager
is an all-in-one disk management tool to help users maintain their disk
health and performance.
What Can 4DDiG Partition Manager Do:
- Check disk health to identify errors affecting system performance.
- Repair disk partitions that may be causing high CPU usage.
-
Can resize, split, merge, extend, shrink, create, move, and delete
partitions. - Clone disks for easy data migration and backup.
- Able to erase data and wipe disk to free up space
-
Support formatting hard drives like SD card, HDD, USB, etc. to FAT32,
exFAT, NTFS, and more file system formats. - Repair boot errors to optimize computer and software performance
- Create a bootable WinPE media without Media Creation Tool easily.
-
Help detect and download Windows ISO for upgrade to the latest OS, such as
Windows 11 version 24h2
Steps to Repair Disk with 4DDiG Partition Manager:
-
Download, install, and launch 4DDiG Partition Manager. If the partition
is on an external drive, connect it to your computer. Head to «Partition
Management», select your disks, and click om the «Disk Healthy» section
on the right panel to check the disk status on your PC. -
Go to «Toolkit» in the left panel and select «Repair Partition(s)».
-
Choose the disk where Wsappx is located and click «Repair Now».
-
Wait for the repair process to complete, then click «Finish». Restart
your computer to apply changes and check if this method help resolve the
Wsappx high CPU and RAM usage.
Way 3: Disable Antimalware Service Executable (Use with Caution!)
The Antimalware Service Executable (part of Windows Defender) may sometimes
conflict with other services, causing high CPU usage.
Caution:
Disabling this service exposes your computer to threats. Only do this if
you’re using an alternative security solution and understand the risks.
-
Press Win + R, enter regedit, and press Enter.
-
Go to:
HKEY_LOCAL_MACHINE\SOFTWARE\Policies\Microsoft\Windows Defender -
Right-click on the right pane, select «New» > «DWORD (32-bit) Value»
and name it «DisableAntiSpyware». -
Double-click «DisableAntiSpyware», set its value to 1, and click «OK».
-
Restart your system so the changes take effect.
Way 4: Stop Superfetch (Service Host: SysMain)
The SysMain service (formerly known as Superfetch) helps improve system
performance by preloading frequently used apps. However, it can sometimes
interfere with other services, including Wsappx. Chandy (MSFT) on Microsoft
Answers recommends this method to alleviate CPU spikes.
-
Press Win + R to open the Run dialog box.
-
Type services.msc and click «OK» to open the Services console.
-
In the Services window, locate «SysMain» by scrolling down.
-
Double-click «SysMain», then click «Stop» to halt the service.
-
Set the Startup type to «Disabled» using the dropdown menu.
-
Click «Apply», then «OK» to confirm your changes and close the window.
Way 5: Disable Automatic Store App Updates
Automatic updates from the Microsoft Store can trigger Wsappx activity as it
checks, downloads, and installs updates in the background. Disabling
auto-updates can help keep resource usage steady.
-
Open the Microsoft Store. Select your Profile icon located in the
top-right corner. -
Select «App settings» from the menu.
-
Locate the «App updates» option with the «Update apps automatically» tab
and toggle the switch to «Off». -
Restart your computer and check CPU usage.
Way 6: Check for Malware
While Wsappx is a legitimate process, persistent high resource usage could
sometimes be the result of malware masquerading as a system process. Running
a full system scan can rule out any infections.
-
Open Windows Security.
-
Select «Virus & Threat Protection», then select «Scan Options».
-
Choose «Full Scan» and click «Scan Now».
-
If malware is detected, follow the removal instructions and restart your
system.
Part 4: How to Diagnose Wsappx Service High CPU Usage
If your PC feels sluggish and Task Manager shows Wsappx consuming unusually
high CPU, it’s time to diagnose the issue. Wsappx is a Windows service
managing Microsoft Store apps and UWP applications. While it’s necessary,
its heavy resource use can sometimes indicate underlying issues like pending
updates or background tasks.
Steps to Diagnose Wsappx High CPU Usage
-
Press Ctrl + Shift + Esc to open the Task Manager.
-
In the «Processes» tab, find Wsappx and check its CPU usage.
-
Right-click Wsappx, select «Go to Details» and check for AppXSVC (app
installations) or ClipSVC (app licensing), which might be causing high
usage. -
Go to the «Performance» tab to see if CPU, disk or memory usage is too
high. -
Open «Resource Monitor» to track Wsappx’s resource consumption in real
time.
Part 5: People Also Ask About Wsappx High CPU Usage
Q1: What does Wsappx appx deployment service high CPU mean?
Wsappx high CPU usage occurs when the AppX Deployment Service (AppXSVC)
manages app installations, updates, or removals in Windows. This process can
lead to wsappx process high CPU and Wsappx high disk usage during
operations.
Q2: Is Wsappx a virus?
No, Wsappx is not a virus. It is a legitimate Windows process responsible
for managing Microsoft Store apps. However, Wsappx high CPU usage can
sometimes cause system slowdowns.
Q3: Is it OK to disable Wsappx?
Disabling Wsappx is not recommended, as it manages app installations and
updates. However, limiting background app activity can help reduce Wsappx
service’s high CPU and wsappx’s high memory usage.
Q4: How to fix high CPU usage?
Try disabling background apps, updating drivers, repairing the disk with
4DDiG Partition Manager, and scanning for malware.
Q5: Why is my CPU 100% usage?
Several reasons can cause high CPU usage like background apps, malware,
hardware issues or inefficient system processes like Wsappx.
Conclusion
Wsappx high CPU usage can slow down your PC, but the above solutions
can fix the issue. If the problem is due to disk errors,
4DDiG Partition Manager is the best solution to scan, repair and
optimize your storage. By managing background processes and keeping your
system clean, you can ensure smooth performance and avoid high CPU/memory
usage.
William Bollson (senior editor)
William Bollson, the editor-in-chief of 4DDiG, devotes to providing the best solutions for Windows and Mac related issues, including data recovery, repair, error fixes.
On Windows 11, WSAPPX is a required process that handles removing, installing, and managing apps from the Microsoft Store. But sometimes this important process can run into problems and start using a lot of CPU.
This doesn’t happen very often. This problem, like the Widgets problem with high CPU use, can be fixed, as this guide shows.
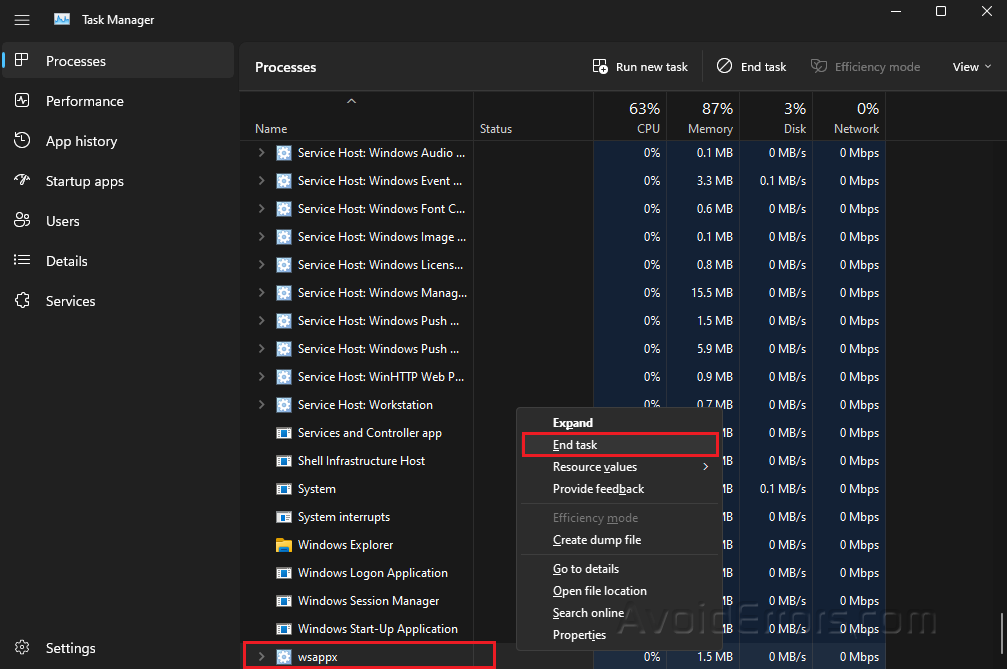
Disable WSAPPX in Windows 11
Press Win + X and select Task Manager.
Locate wsappx and right-click on it then select End task.

Disable Windows Store
Press Win + R to open Run dialog.
Type gpedit.msc and press OK.

Navigate to the following file path:
Computer Configuration > Administrative Templates > Windows Components > Store
Double-click the Turn Off the Store application option in the Store folder.

Select Enabled.
Click Apply and OK.

Scan for malware
Type Virus & Threat Protection in your Windows search bar and select Open.
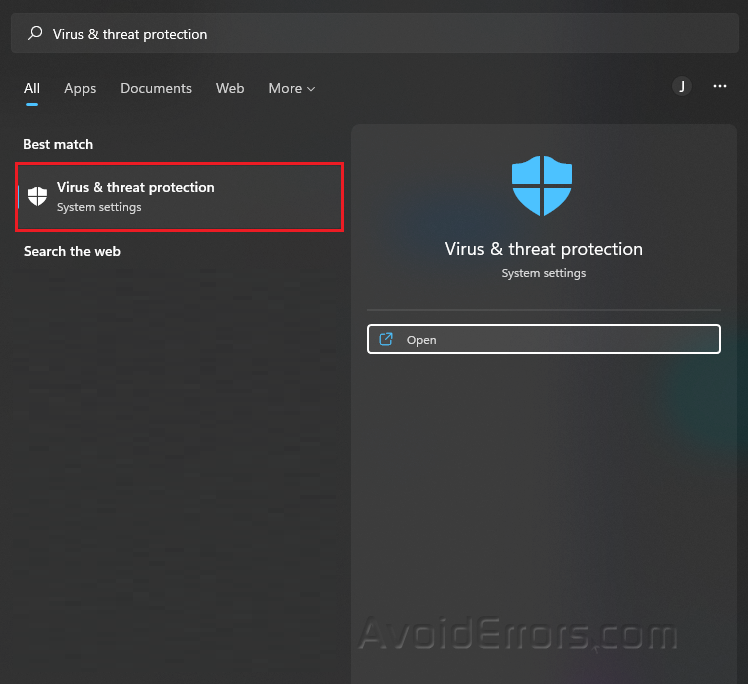
Press the Quick Scan button.
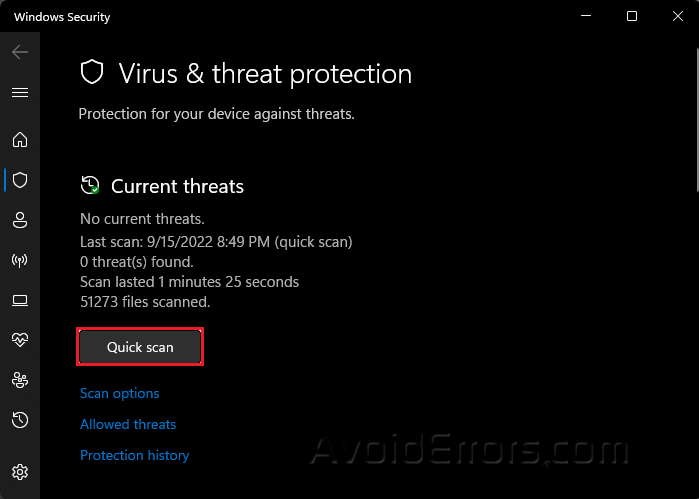
Once finished, Restart your PC and check if the problem is solved.
Perform a clean boot
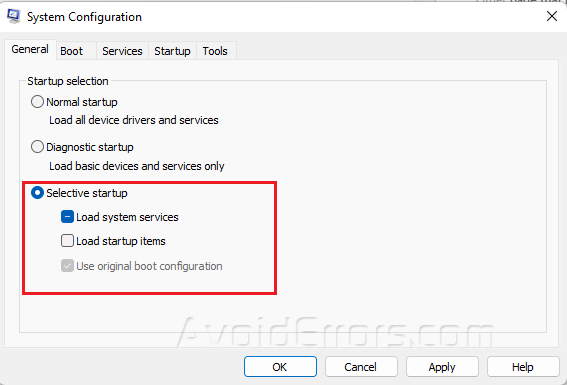
Press Windows + R to open Run dialog.
Type msconfig and press OK.
Go to the General tab.
Select the Selective Startup but uncheck Load System Items.
Go to the Services tab.
Select Hide all Microsoft services then click on Disable All.

Click Apply and OK to save changes.
Rhousse
Commerce major. My training enabled me to fully use the various Microsoft Applications while also allowing to work around problems. I spent my high school years working as a campus writer and researcher, as I get older, I want to broaden my horizons and live life to the fullest.
Readers help support Windows Report. We may get a commission if you buy through our links.
Read our disclosure page to find out how can you help Windows Report sustain the editorial team. Read more
WSAPPX is a necessary process on Windows 11 that takes care of removing, installing, and managing apps from the Microsoft Store. However, this important process can sometimes run into problems and start registering high CPU usage.
This is an unusual occurrence. Thankfully, just like the Widgets high CPU usage issue, this problem can be fixed, as shown in this guide.
How to disable WSAPPX in Windows 11?
- Press the Windows key + X and select Task Manager.
- Right-click the wsappx option.
- Now, select the End task option.


The WSAPPX on Windows 11 process comes in handy when updating or downloading the Microsoft Store. So, if you are not using the app and find the process running, you can disable it by following the steps above.
How to fix WSAPPX high CPU usage in Windows 11?
1. Disable Windows Store
-
1. Press the Windows key + R, type gpedit.msc, and click OK.

-
2. Navigate to the path below in the left pane:
HComputer COnfiguration\Administrative Templates\Windows Components\Store -
3. Now, double-click the Turn Off the Store application option in the Store folder.

-
4. Tick the radio button for Enabled.
-
5. Finally, click the Apply button, followed by OK to save the changes.


The WSAPPX process, as mentioned earlier, is connected to the Windows Store on Windows 11. So, to stop the high CPU usage, you can disable the Store app.
2. Scan for malware
- Press the Windows key, type virus, and select Virus & threat protection.

- Click Scan options.

- Now, select your preferred scan option and click Scan now.


If the WSAPPX consumes high resources on Windows 11, you might need to scan for viruses. This is because a virus might be disguised as the process to consume your PC resources.
- Gamers are migrating to Windows 11 even more as Windows 10 EoS nears
- Windows 11 will soon add ‘Advanced’ settings page with lots of useful options
- Microsoft’s forced BitLocker encryption causing Windows 11 users lose their data
- Mail and Calendar app now stops syncing your Outlook/Hotmail account in Windows 11
3. Perform a clean boot
- Press the Windows key + R, type msconfig, and click OK.
- Click the Services tab at the top, check the box for Hide all Microsoft services, and click Disable all.

- Now, click the Startup tab at the top and select Open Task Manager.
- Right-click each of the services there and select Disable.

- Finally, go back to the System Configuration window and click the Apply button, followed by OK.


If the fixes above failed to solve the WSAPPX high CPU usage on Windows 11, you need to perform a clean boot. This is because a third-party app or process might be causing the issue.
If the process does not occur, you need to enable the disabled apps and services in batches to find the problem.
There you have everything you need to fix the WSAPPX high CPU usage on Windows 11. We hope you can fix the issue in the comments below.
If you are facing the System Idle Process high CPU usage issue on Windows 11, check our detailed guide to fix it quickly.
Feel free to let us know the solution that helped you fix this issue in the comments below.
Vlad Turiceanu
Windows Editor
Passionate about technology, Windows, and everything that has a power button, he spent most of his time developing new skills and learning more about the tech world.
Coming from a solid background in PC building and software development, with a complete expertise in touch-based devices, he is constantly keeping an eye out for the latest and greatest!