
If you have a Windows 11 PC, you can use WPS to connect to a Wi-Fi network without knowing its password. As long as the router supports the WPS (Wi-Fi Protected Setup) standard and it’s enabled on it, you can connect by simply pushing a button on the router. Here’s the step-by-step guide on how to use WPS in Windows 11:
NOTE: Before we show you how to use WPS in Windows 11, you might want to read this first: What is WPS? Where is the WPS button on a router?. And, if you got here looking for other ways to connect to wireless networks, check this guide: How to connect to Wi-Fi in Windows 11.
Step 1: Choose the Wi-Fi network to connect via WPS in Windows 11
The first thing you need to do is to select the wireless network to which you intend to connect using WPS. On your Windows 11 computer or device, click or tap on the network icon from the system tray.
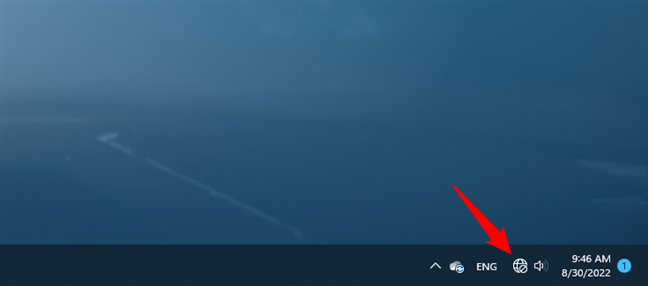
The network icon from Windows 11’s system tray
This action opens the quick settings fly-out. Make sure that Wi-Fi is enabled by checking whether its button is on. Then, press the caret (>) button next to it.
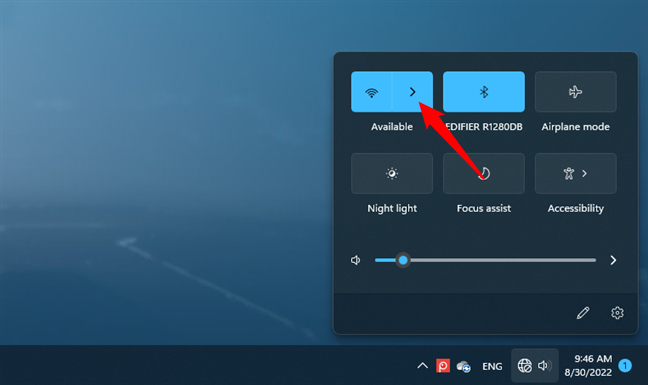
Opening the list of available Wi-Fi networks
Windows 11 will then list all the Wi-Fi networks available in your area. Identify the one you want to connect to using WPS and click or tap on its name. If it’s a network that you use regularly, you might want to enable the “Connect automatically” option by ticking its box. Then, press Connect.
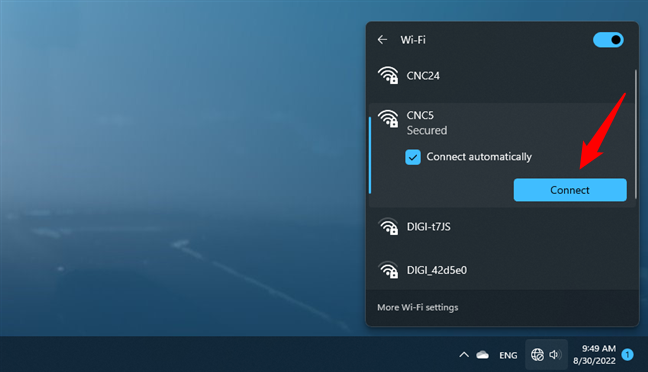
The Connect button of a Wi-Fi network
Next, Windows 11 will ask you to “Enter the network security key,” which is a fancier way of saying that you need to type the Wi-Fi password. However, under the password field, you should see another message: “You can also connect by pushing the button on the router.”
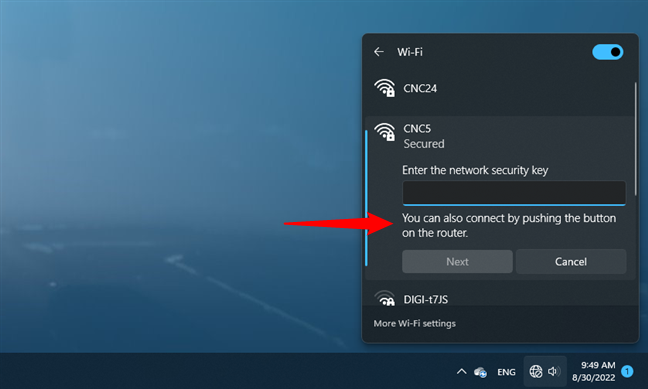
You can also connect by pushing the button on the router
NOTE: You’ll see the “[…] connect by pushing the button on the router” notification only if WPS is supported and enabled on the router broadcasting the Wi-Fi network.
Step 2: Push the WPS button on the router to connect to Wi-Fi
Now walk to the wireless router, mesh Wi-Fi, or access point. On it, locate the WPS button and push it for a few seconds. It’s usually found on the back, sides, or bottom.
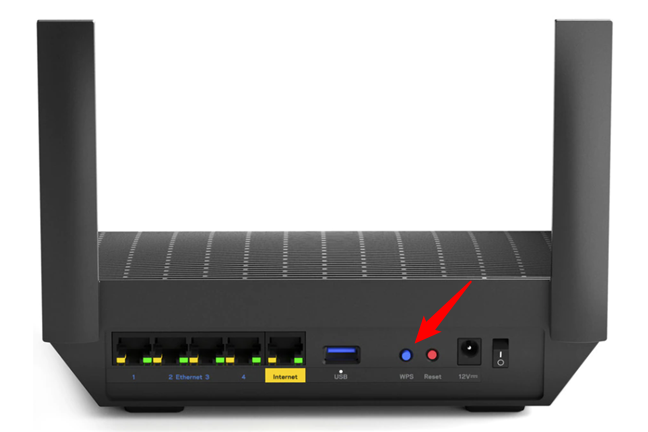
The WPS button found on a Linksys router
Some wireless routers don’t label the WPS button with text, instead using a WPS symbol, like this Linksys router below.
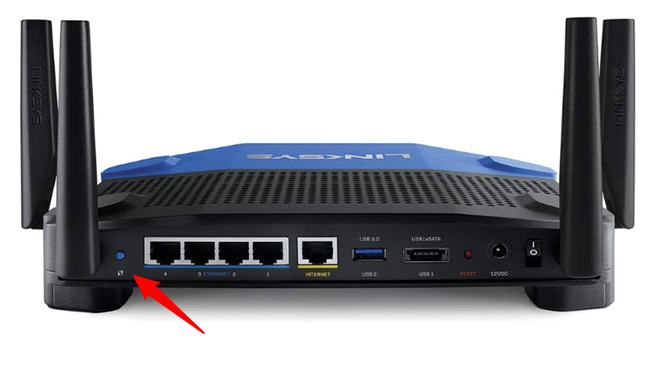
The router button labeled with the WPS symbol on a Linksys router
TIP: If you don’t know whether WPS is enabled on your router, here’s how to find your router’s IP address. Log in to it, and check its settings.
Step 3. Wait for your Windows 11 PC to connect to the Wi-Fi network via WPS
Go back to your Windows 11 computer or device. In the Wi-Fi panel that you opened earlier, it should now say that it’s “Getting settings from the router.”
It only takes a moment or two for Windows 11 to connect to the Wi-Fi network on its own.
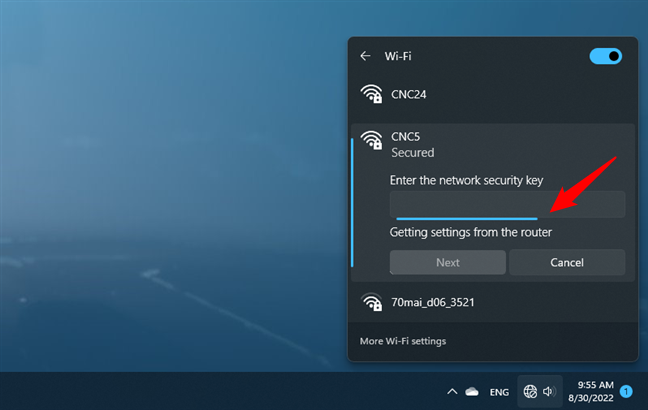
Windows 11 uses WPS for Getting settings from the router
Once the Wi-Fi connection has been established, you can double-check its status any time you want, in the same Wi-Fi panel available through Windows 11’s system tray.
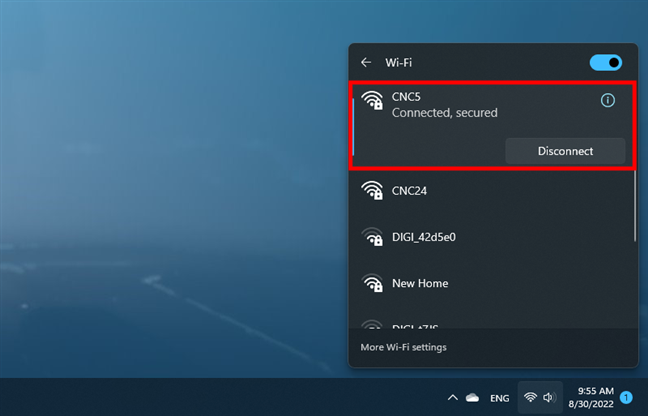
The connection via WPS was established
In the future, connecting to the same Wi-Fi network, from the same Windows 11 PC, will be seamless. You won’t have to push the WPS button on your router again because all the required settings have been memorized by Windows 11.
Is it possible to connect to Wi-Fi using a WPS PIN in Windows 11?
Besides the “push button method,” the Wi-Fi Protected Setup network security standard also supports another one called the WPS PIN method. While similar under the hood, the latter requires an eight-digit PIN code generated on both devices: one on the wireless router and one on the device attempting to connect to it.
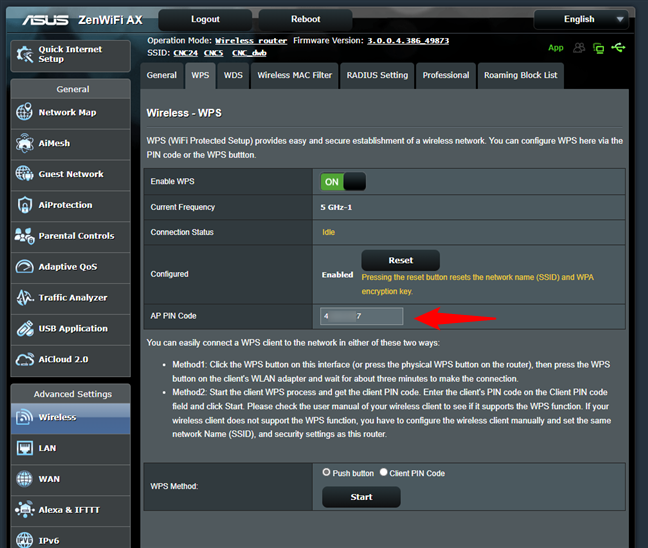
The WPS PIN code on an ASUS mesh Wi-Fi
Unfortunately, Windows 11 doesn’t support this feature, as it has no built-in app or setting that can generate a client WPS PIN code. On the other hand, this might be a fortunate choice on Microsoft’s part, as WPS PIN codes represent a major flaw of the standard. While the WPS “push button” method is quite secure, back in 2017, it was proved that WPS PIN codes could be cracked in less than a day using brute-force attacks. If you’re curious to learn more about this important security weakness, check out this analysis made by Stefan Viehböck: Brute forcing Wi-Fi Protected Setup.
Are you using WPS on Windows 11?
As you’ve seen, WPS works on Windows 11 computers, and it’s quite easy to connect to Wi-Fi networks this way. Up until now, did you know that you can also connect to Wi-Fi by pushing a button on your router? Do you use WPS often? If you have any further questions, let us know in the comments section below.
Играйте на ПК с BlueStacks или через наше облако
Запустите WIFI WPS WPA TESTER на PC или Mac
WIFI WPS WPA TESTER — приложение категории «Инструменты», разработанное студией Sangiorgi Srl. BlueStacks — лучшая платформа запуска приложений для Android на ПК или Mac. Получите незабываемый игровой опыт вместе с нами!
WIFI WPS WPA TESTER — бесплатное приложение для проверки скорости интернета, доступное для пользователей всех возрастов. Оно разработано эксклюзивно для смартфонов Android и iOS. Но, к счастью, вы можете использовать его и на другой платформе. Если вам нужен быстрый и надежный инструмент для проверки работоспособности интернета, скачайте WIFI WPS WPA TESTER на ПК с помощью BlueStacks!
Это приложение уже давно пробило отметку в 100 миллионов скачиваний на Android! Оно очень простое и функциональное: с помощью WIFI WPS WPA TESTER вы сможете устроить комплексную проверку интернет-соединения, к которому подключен ваш смартфон, ноутбук или компьютер. Инструмент анализирует сеть по нескольким критериям, в том числе по параметрам безопасности и скорости действия. Вы узнаете, какие уязвимости существуют в выбранной вами сети и сможете устранить их, либо использовать дополнительные программы для защиты.
В свою очередь, выяснение скорости интернета позволит вам узнать, сможете ли вы выполнить определенную задачу: от открытия текстового документа до просмотра видео в формате 4K или запуска онлайн-игры. Узнайте все о параметрах интернет-сети, к которой вы подключаетесь: скачайте WIFI WPS WPA TESTER на ПК вместе с BlueStacks!
Как скачать и запустить WIFI WPS WPA TESTER на ПК
-
Скачайте и установите BlueStacks на ваш ПК или Mac
-
Войдите в аккаунт Google, чтобы получить доступ к Google Play, или сделайте это позже.
-
В поле поиска, которое находится в правой части экрана, введите название игры – WIFI WPS WPA TESTER.
-
Среди результатов поиска найдите игру WIFI WPS WPA TESTER и нажмите на кнопку «Установить».
-
Завершите авторизацию в Google (если вы пропустили этот шаг в начале) и установите игру WIFI WPS WPA TESTER.
-
Нажмите на ярлык игры WIFI WPS WPA TESTER на главном экране, чтобы начать играть.

Watch Video
WIFI WPS WPA TESTER — программа-тестер, которая выявляет уязвимости и определяет скорость вашего интернет-соединения. Это незаменимый инструмент для тех, кому важно качество подключения для работы, отдыха или решения других задач.
Несмотря на то, что программа разрабатывалась специально для смартфонов Android, вы можете перенести ее и на компьютер. Ведь наверняка вы хотели бы протестировать ту сеть, с которой работаете на большой платформе. Чтобы это сделать, просто скачайте WIFI WPS WPA TESTER на ПК с помощью BlueStacks!
BlueStacks доступен для установки на Windows 7, 8, 10, 11 и Mac. Для этого вам не нужен мощный компьютер! Достаточно 4 Гб оперативной памяти, четырехъядерного процессора от Intel или AMD и видеокарты на 2 Гб. BlueStacks поддерживает версии ОС Android 9.0 Pie и Android 11.0 Velvet Cake, что делает эмулятор самым эффективным и производительным при запуске игр.
Используйте специальные инструменты BlueStacks для расширения своих возможностей. Активируйте мультиоконность, чтобы запустить сразу несколько игр или приложений для Android на компьютере. Обязательно включите режим Эко, чтобы система могла работать корректно и без перебоев из-за нехватки ресурсов. Устройте комплексную проверку сети — скачайте WIFI WPS WPA TESTER на ПК с BlueStacks!
Операционная система
Microsoft Windows 7 и выше, macOS 11 (Big Sur) и выше
Процессор
Intel, AMD или Apple Silicon Processor
ОЗУ
не менее 4 ГБ
Жесткий диск
10 ГБ свободного дискового пространства
Note:
* У вас должны быть права администратора на ПК. Актуальные драйверы видеокарты от производителя чипсета или Microsoft.
WIFI WPS WPA TESTER — FAQ
-
Как запустить WIFI WPS WPA TESTER на ПК с Windows и Mac?
Запустите WIFI WPS WPA TESTER на своем ПК или Mac, выполнив следующие простые действия.
- Нажмите «Скачать WIFI WPS WPA TESTER на ПК», чтобы загрузить BlueStacks.
- Установите его и авторизируйтесь в Google Play Store.
- Запустите приложение.
-
Почему BlueStacks — самая быстрая и безопасная платформа для игр на ПК?
BlueStacks уважает вашу конфиденциальность и всегда безопасен в использовании. Он не содержит вредоносных и шпионских программ или любого другого дополнительного программного обеспечения, которое может нанести вред вашему компьютеру.
Он разработан и оптимизирован чтобы обеспечивать ваш игровой процесс наилучшей производительностью.
-
Какие системные требования у WIFI WPS WPA TESTER к ПК?
Минимальные требования для запуска WIFI WPS WPA TESTER на вашем ПК
- ОС: Microsoft Windows 7 и выше
- Процессор: процессор Intel или AMD.
- Оперативная память: на вашем компьютере должно быть не менее 2 ГБ оперативной памяти. (Обратите внимание, что наличие 2 ГБ или более дискового пространства не заменяет ОЗУ)
- Жесткий диск: 5 ГБ свободного места на диске.
- Вы должны быть администратором на своем ПК.
85337
Не все знают, что можно быстро подключить свой ПК, или ноутбук на Windows 10 к Wi-Fi сети без ввода пароля. Просто нажав одну кнопку на маршрутизаторе. И в этой статье я покажу, как подключаться к беспроводным сетям с помощью WPS в Windows 10.
WPS (Wi-Fi Protected Setup) – функция, которая была разработана специально для упрощения процесса подключения разных клиентов к Wi-Fi сети. Благодаря WPS нам не нужно вводить пароль. Достаточно выбрать необходимую беспроводную сеть на устройстве и активировать WPS на маршрутизаторе. Подробнее об этой технологии, и о том, как подключать компьютеры на Windows 7 и мобильные устройства, я писал в статье Что такое WPS на Wi-Fi роутере? Как пользоваться функцией WPS?
Данный способ подключения может пригодится не только тогда, когда вам лень вводить пароль от Wi-Fi сети, но и когда вы его забыли. Или никогда не знали пароль, но у вас есть доступ к маршрутизатору. Так же можно где-то в гостя быстро подключить свой компьютер к Wi-Fi сети. Кстати, что делать когда вы забили пароль от Wi-Fi, я тоже рассказывал в этой статье.
Сама функция WPS может быть отключена в настройках маршрутизатора (подробнее об этом по ссылке выше). Но по умолчанию она включена. То есть, все будет работать, если кто-то специально не отключил WPS. Иногда данную функцию советуют отключать при появлении разных проблем в процессе подключения к беспроводной сети, или в целях безопасности.
WPS в Windows 10: подключение к Wi-Fi без ввода пароля
Чтобы открыть список всех доступных Wi-Fi сетей, которые обнаружил ваш компьютер, нужно нажать на значок беспроводной сети на панели уведомлений (в трее).
Дальше просто нажимаем на нужную нам беспроводную сеть и нажимаем на кнопку «Подключиться».

Появится привычное поле ввода пароля, а ниже должна быть надпись «Вы так же можете подключится, нажав кнопку на маршрутизаторе.» Это значит, что функция WPS на маршрутизаторе включена. Если она отключена, то такой надписи не будет.

Идем к маршрутизатору, находим кнопку WPS и нажимаем на нее. Здесь, в зависимости от модели маршрутизатора, может быть много нюансов. Например:
- Кнопка не всегда подписана как WPS. Может быть просто значок.
- Для активации функции может быть достаточно кратковременного нажатия. В некоторых случаях нужно подержать кнопку нажатой 2-3 секунды. Только не дольше, а то можно сбросить настройки маршрутизатора. Иногда кнопка активации WPS выполняет еще и функцию Reset.
- Скорее всего на маршрутизаторе начнет гореть/мигать индикатор WPS (в виде замочка). На ASUS, например, мигает индикатор питания.
Фото для наглядности:

В окне подключения на Windows 10 должен появится статус «Получение параметров от маршрутизатора».

Нужно немного подождать. Компьютер должен подключится к Wi-Fi сети.

Готово! На роутере ничего отключать не нужно. Функция WPS автоматически деактивируется через некоторое время. Индикатор перестанет мигать, или гореть.
Я пока тестировал это подключение, у меня ноутбук на Windows 10 почему-то никак не хотел подключаться к одному маршрутизатору (с другим все работало). Появлялась ошибка «Windows не удалось автоматически получить параметры. Введите ключ безопасности».
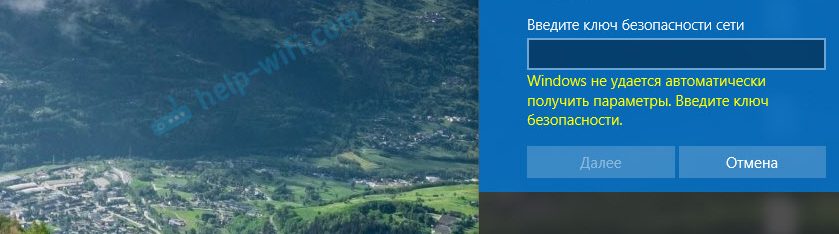
Почему, я так и не понял. Да и разбираться не стал. В таких ситуациях проще ввести пароль, чем искать решение. Ну, можете разве что маршрутизатор перезагрузить и компьютер.
Scan WiFi networks, Test WPS networks and Connect WPS networks
Information
Rating: 3.4 (68%) — 571 votes
Downloads: 100,000+
WiFi WPS Connect for PC on Windows 10/8.1/8/7 & Mac Laptop
WiFi WPS Connect is a Education app developed by WiFi Password Show. The latest version of WiFi WPS Connect is 1.6. It was released on 2025-04-29. You can download WiFi WPS Connect 1.6 directly on AppforPC.net. Over 571 users rating a average 571 of 5 about WiFi WPS Connect. More than 100,000+ is playing WiFi WPS Connect right now. Coming to join them and download WiFi WPS Connect directly!

Description of WiFi WPS Connect
WiFi WPS Connect is a free app designed to simplify your connection to 2.4GHz and 5GHz Wi-Fi networks using the WPS button. Most new routers feature WPS (Wi-Fi Protected Setup), allowing you to connect without needing a password. Scan Wi-Fi networks and test WPS vulnerability within a range of 24-25 meters for optimal connectivity. If it has any vulnerability, you can disable wps button on your router.
How to Use WiFi WPS Connect:
1.Open the app and select your desired Wi-Fi network.
2.Press the WPS button on your router.
3.The app will automatically connect you to the network.
WiFi WPS Connect is a secure method to connect to Wi-Fi networks. The WPS protocol utilizes a secure PIN to authenticate devices, ensuring your data remains safe.
Key Features:
1.Scan for available Wi-Fi networks
2.Test WPS vulnerability
3.Connect to WPS networks using a PIN
4.Display Wi-Fi passwords (root/superuser permission required)
5. Access default router PINs
Why Choose WiFi WPS Connect?
If you need a straightforward and secure way to connect to Wi-Fi networks, WiFi WPS Connect is the perfect solution.
Important Considerations:
WPS is less secure than using a password.
Some routers have security flaws that make WPS vulnerable to attacks.
For enhanced security, consider using a password instead of WPS.
Overall, WiFi WPS Connect offers a convenient method to connect to Wi-Fi networks. However, be aware of the associated security risks with WPS before using it.
Disclaimer:
WiFi WPS Connect is not a Wi-Fi hacking tool.
Do not misuse this app on routers or networks you do not own.
website:
https://www.wifipasswordshow.app
contact us: contact@wifipasswordshow.app
Changelog / What’s New
bugs fixed
Read more
Download WiFi WPS Connect for PC on Windows 10/8.1/8/7 & Mac Laptop
To be clear about download process of WiFi WPS Connect for PC, it is not available directly from the web. As of now, the app developer have made it available for only Android Platform. To enjoy using it on your PC device, installation of Android Emulator is mandatory.
For doing all these things on your Computers & Laptops, you need to download WiFi WPS Connect for PC/Laptop with Operating systems Windows 10/8.1/8/7 or Mac.
There are two ways of downloading this app on Laptop/PC. Use anyone, NOX App Player or Bluestacks for this purpose. As both of them support APK installation, you just need to install them on your Desktops and Install wps.wifi.wpa.wps-v1.6-AppforPC.net.apk file with it so that you can enjoy WiFi WPS Connect services on PC using NOX or Bluestacks. I will explain both methods here; you can choose anything you want.
As I was telling earlier, in this post, I will demonstrate two procedures, let’s see the first method of downloading WiFi WPS Connect for PC using Bluestacks emulator.
Install WiFi WPS Connect for PC Windows using BlueStacks
- Firstly, You should install Bluestacks Software on your Computer or Laptop. Click here to download bluestacks for PC. (Note: Come back to this post once you installed bluestacks correctly)
- After Bluestacks, now, you must download .APK file of WiFi WPS Connect. Click here.
- Open the Bluestacks App already installed on your PC/Laptop. In the left-hand corner toolbox, you will find an option of Add APK. Load the APK file using the option on the Bluestacks. Click on that.
- It will ask about the location where you have kept the downloaded APK. In my case, I have kept it on Desktop, so I am selecting that.
- It will now automatically install the application on Bluestacks. You will find the WiFi WPS Connect on applications tab on the main screen of the Bluestacks window.
- Now, you are all set to use WiFi WPS Connect on PC. Here is the WiFi WPS Connect successfully running on my PC after installing and clicked on the app.
Now, we should discuss the installation of WiFi WPS Connect on PC using NOX App player. You can use this method if Bluestacks method is not working properly on your Laptop or Computer.
Install WiFi WPS Connect on PC Windows using NOX App Player
- First of all, you must download Nox App player – https://www.bignox.com, click on the software to start installation on your Computer/Laptop.
- Now, download APK file from here.
- After installation, open the NOX player. In the right-hand side corner toolbox, you will find an option of Add APK. Click on that option.
- Select Don’t show again and click on I know.
- You have to choose the APK from the downloaded location. As I have saved it on the desktop, I choose from there. (If your downloaded file is in Downloads area, select the .APK from there itself)
- Nox will automatically install the Application. Open it from the home screen of Nox app player.
- You will then be asked about if you want to change your location from ‘Worldwide’ to any particular location. Initially, choose Later option.
- Now, you are ready to use the App with some pre-existing website links embedded in the App.
- Note: Use ESCAPE to come back to the home screen or else you can use the symbols to operate WiFi WPS Connect app on PC NOX app player.
We feel that you will not get any hitches while downloading the App through the suggested ways. If you do encounter some problem, do share it with us.
Older versions
More apps from this developer
Home » Connect wifi with Windows 10 WPS
- Connecting Windows Device to Wifi without password
- Pre-requisites for Windows 10 WPS connection
- Recommended Router
- Steps to Configure (Push Button Method)
Table of Contents
Connecting Windows Device to Wifi without password
Do you know you can connect your windows 10 laptop/desktop to a wifi network without the wifi password with Windows 10 WPS feature?
Yes but before we go into its details, If you want to know how WPS works please refer article what is WPS (Wi-Fi Protected Setup).
Pre-requisites for Windows 10 WPS connection
Your Existing network should support WPS Push button Mode connections.
Find WPS Button On router:
The WPS button is located as a physical button on modern routers either front on backside.
WPS button would have an icon similar to this

Recommended Router
[content-egg module=Offer template=custom/compact]
Steps to Configure (Push Button Method)
Step 2: Select the network (click on the wifi network name) to which you want to connect.
Step 1: Click on the system tray wireless icon in the taskbar. This will show all the wifi networks in range.
Step 3: Once you click on the network you can see the Connect button. The option Connect automatically is selected by default by Windows 10 operating system. You may want to uncheck it if this is not your default connection.
Step 4: You will be prompted for a network password. Since you do not know the password or you want to connect via the WPS option don’t enter anything here. There will be a tooltip message which says ” You can also connect by pushing the button on your router”
Step5: Press the WPS Button on your router immediately ( Your Wi-Fi router should support WPS (Wi-Fi Protected Setup). Your Windows 10 laptop will be connected to the wifi network.
Step 6: In some systems, you may see a popup “Getting settings from the router” on your Win 10 laptop.
With the above steps, the router/modem security paraphrase information is automatically transferred to your PC to establish the connection.
Step 7: Test the connection by browsing the internet.

Window 10 Supports WPS connectivity .Make sure to have a WPS enabled Router.
What to do if WPS connection fails?
Try the below options
– Make sure your laptop and router are in close range else move the Laptop closer to improve network signal strength.
– If you did not press the WPS button on the router within 2 minutes the setup mode gets timed out. restart the process and make sure to complete it within 2 minutes.
– Start the Network Connection process again.
Is this a one-time process, or needs to be repeated every time?
Don’t worry, it’s a one-time process.
Discover more on WPS