
In this blog I’m going to demonstrate how to setup WPA2 Enterprise with User Authentication for a wireless network. The advantage of a Wi-Fi network with WPA2 Enterprise authentication is that you can give users access based on group membership. In addition, you can use this authentication method to prevent unwanted users from logging onto the network using a password. Because personal certificates are used, you can also easily revoke access rights.
How does it work
When using WPA2 Enterprise authentication, users are authenticated using a user or computer certificate. This certificate comes from the Public Key infrastructure (PKI). When connecting to the Wi-Fi network, the authentication is sent to the Radius server, which handles the authentication. On the Radius server, connection policies are configured in which you specify what a connection request must satisfy in order to establish a connection. Upon approval, the user is granted access to the wireless network.
Prerequisites
To Setup WPA2 Enterprise with User Authentication within your network, there are a few prerequisites:
- Domain Controller
- CA server (Private Key Infrastructure) to issue certificates
- NPS server
- WiFi infrastructure which supports WPA2 Enterprise
Demo Setup
In this blog, I am using my demo environment “Vmlabblogdemo.com”. It consists of the following components:
- Domain Controller (DC1-2022)
- Private Key Infrastructure (CA-SUB-02-2022 and CA-OFF-01-2022)
- Network Policy Server (NPS01-2022)
- Unifi Wireless Network with two Access Points
- Dell W10 Laptop for Wifi testing (AD joined)
All servers are Windows Server 2022 and the laptop is running W10 Professional. In addition, I have a test user configured “aad@vmlabblogdemo.com”.
Wireless Group
As discussed earlier, one advantage of WPA2 Enterprise configuration is that you can give users access to the WiFi network based on group membership. Therefore, we start by creating an AD group to which we add the test user.
1. Configure an AD group for example “Wireless Wi-Fi Users”
2. Add your testuser to the group.
Configure User Certificate
Before users can log in with a certificate on the Wi-Fi network, we need to configure a certificate. It is important that the certificate can be automatically enrolled when logging into the computer, otherwise users will have to do it manually. Login to the certificate server to configure the certificate template.
3. Open the Certification Authority console, expand Certificate Templates, right click on the folder and click Manage. This will open the Certificate Templates Console.
4. Select the User certificate template which we will use as template, right click and select “Duplicate Template”.
5. Give the template a recognizable name and press “OK” to duplicate the certificate. Close the “Certificate Templates Console”
6. Select Extensions and remove all Application policies except “Client Authentication”
7. Select the “Security” tab. Add the Wireless Wi-Fi Users group and assign Read, Enroll and Autoenroll rights.
8. Rightclick “Certificate Templates” and select “new -> Certificate Template” to Issue.
9. Select the Template we just duplicated and press “OK” to enable the template to be used
Setup NPS Server
The network policy server (NPS) is the radius server that handles authentication requests. Log in to the server where you want to configure the NPS role and follow the steps described below to proceed.
10. Before you begin configuration, verify that the NPS server has a computer certificate. This is required to configure Protected EAP on the server. If there is no certificate you can request it in the (local computer) certificate plugin in MMC.exe.

11. Start “Server Manager” and select “add Roles and Features”. Select “Network Policy and Access Services”. In the popup select “Add Features”. Select next until you can select “Install” and close the window.
12. When the installation has finished select “Tools” -> “Network Policy Server” to configure the NPS Server.
13. First we need to register the NPS in the Active Directory. Rightclick “NPS (Local)” and select “Register server in Active Directory”. Press “OK” in the popup.
14. Now we are going to create a shared secret template. This is helpfull when you are using multiple Access Points. Expand Templates Management and select Shared Secrets -> New.
15. Enter a Secret to use for your NPS clients and press “OK” to save the template.
16. Select “RADIUS server for 802.1X Wireless and Wired Connections” (1) and select “Configure 802.1X” (2).
17. Select “Secure Wireless Connections” and press “Next”
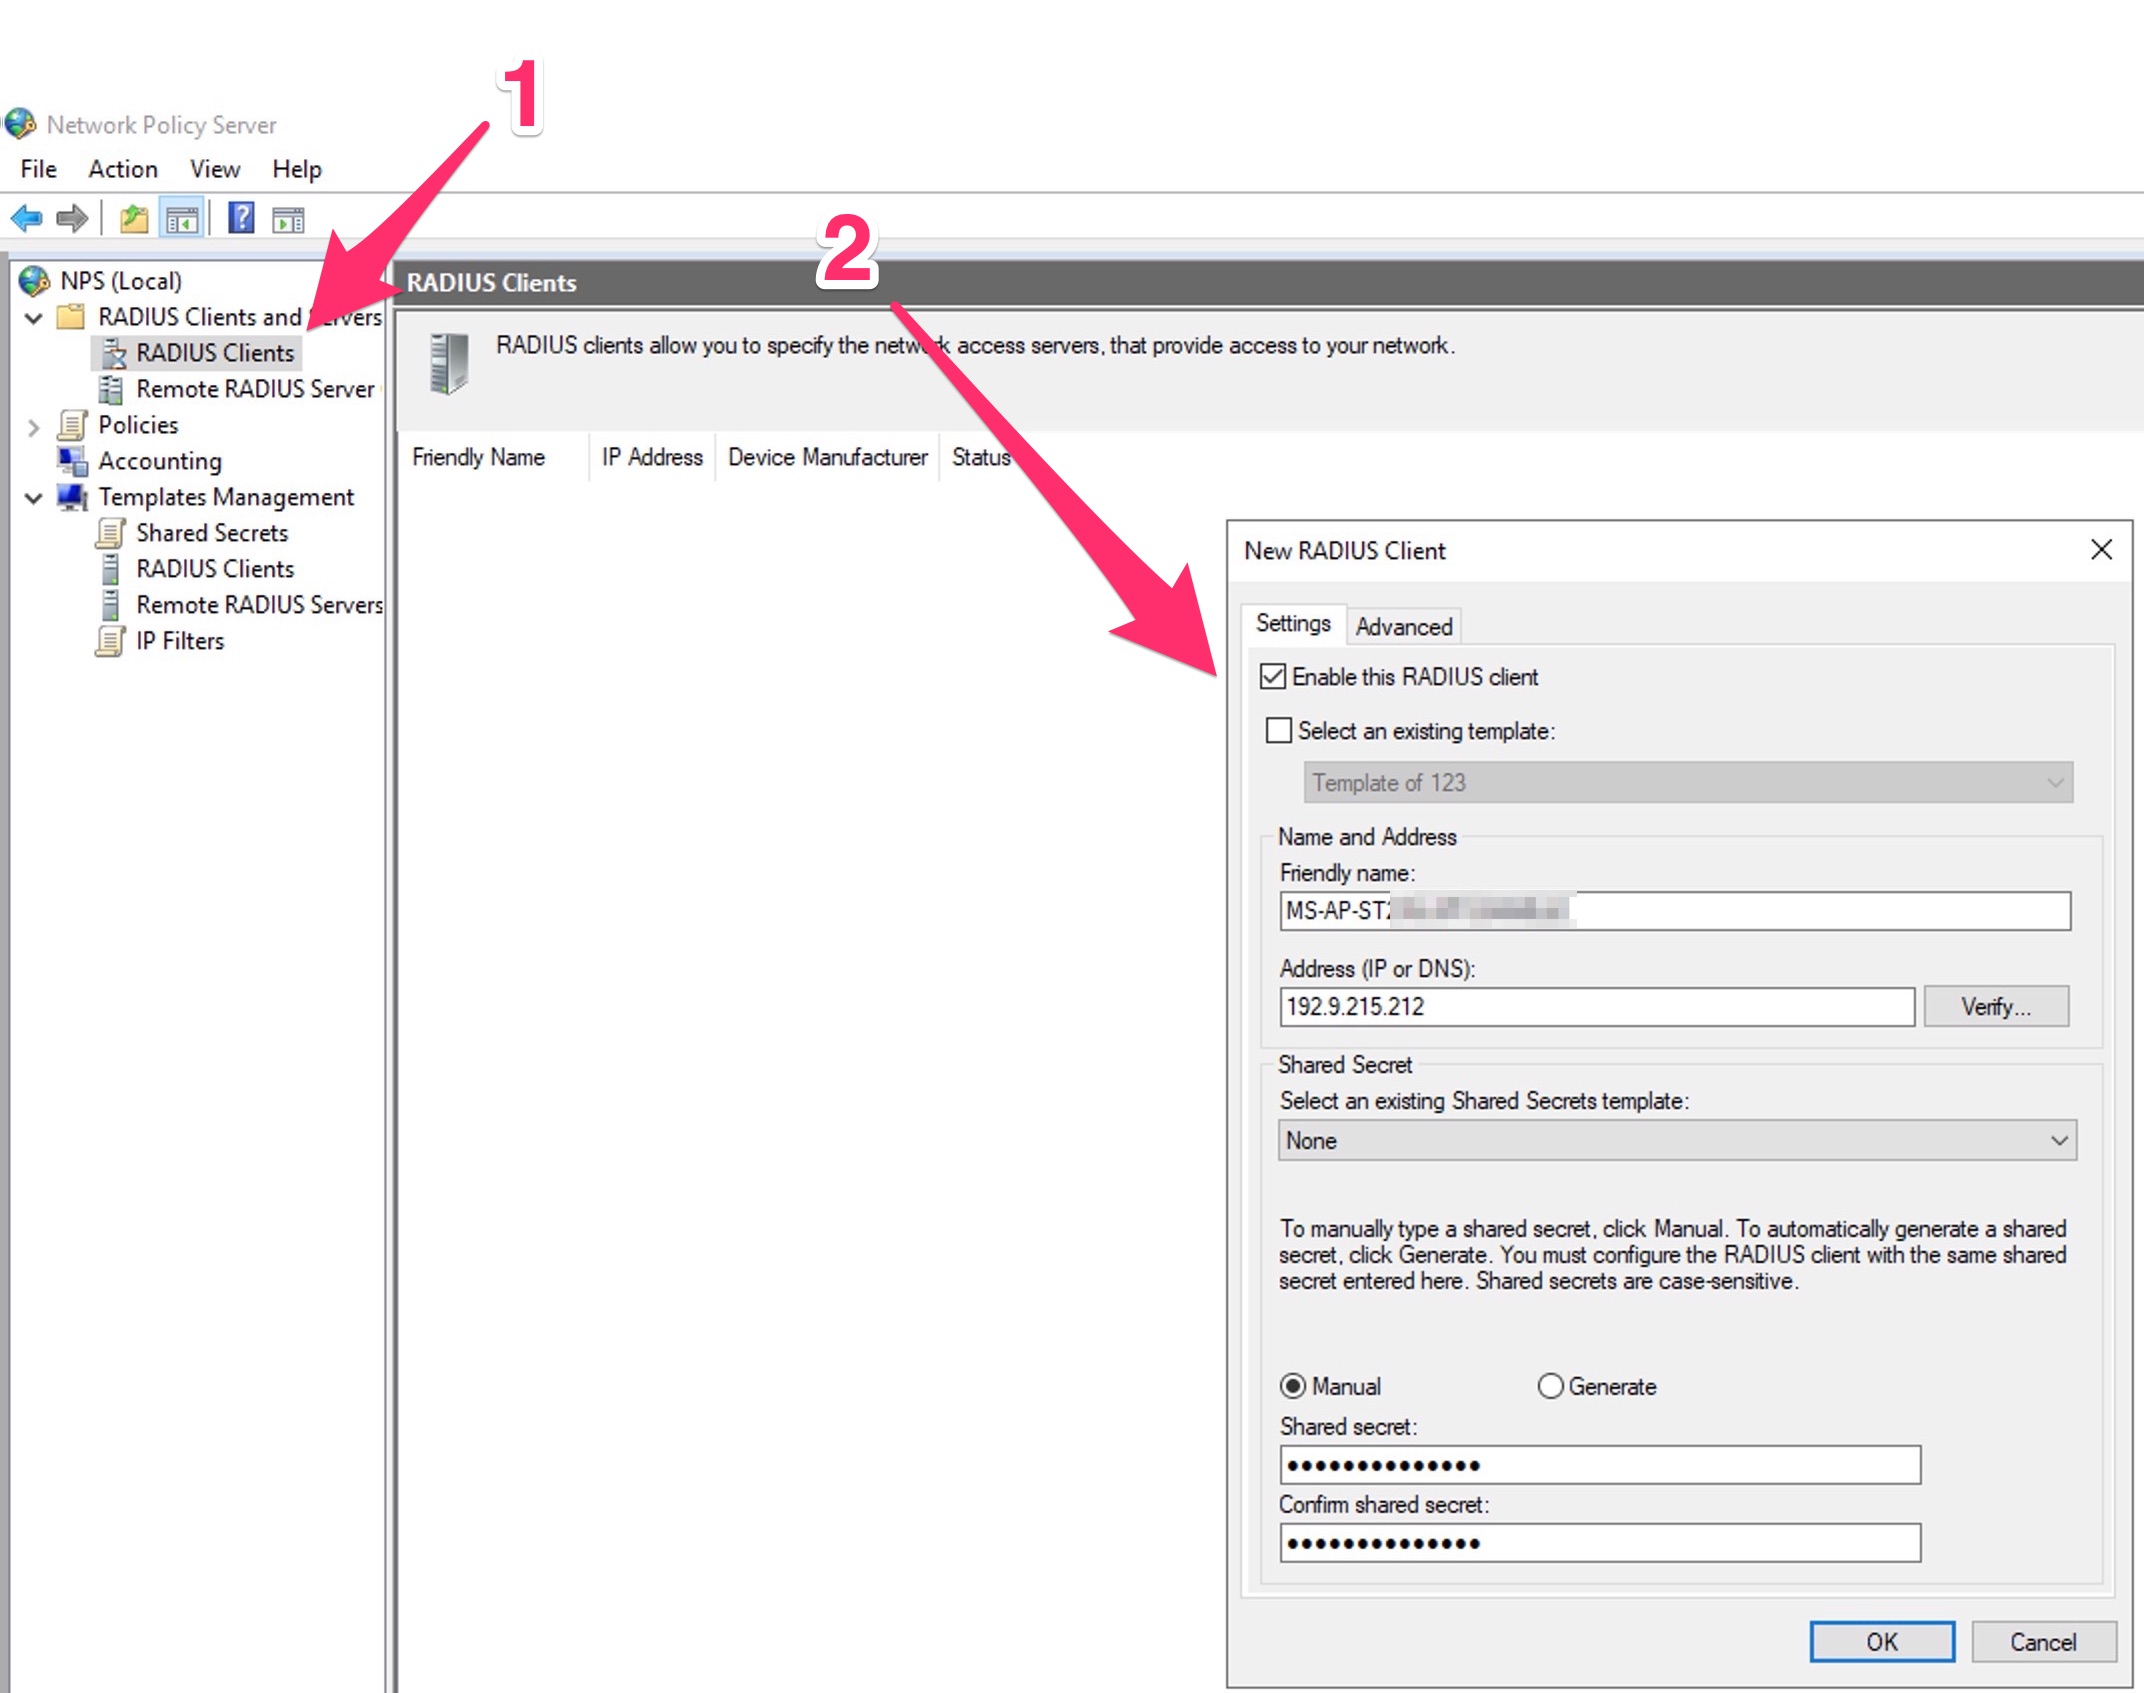
18. Add the Radius Client(s)by pressing “Add…”
19. Enter a Friendly name, IP or DNS Address and select the Shared Secret template. Press “OK” to add the access point. Repeat this for all access points.
20. When all APs are added press “Next” to continue.
21. Select “Microsoft: Protected EAP (PEAP) and select “Configure”. (If you get an error make sure your server has a computer certificate)
22. Under Eap Types check if “Secured password (EAP-MSCHAP v2)” is configured. Press “OK” to save the changes and “Next”.
23. Add the “wireless users group” (see step 1) and press “Next”.
24. As I do not want to configure traffic controls select “Next” to continue
25. Select “Finish” to finish the configuration.
26. Check the firewall rules. When you enable the NPS role the UDP ports 1645, 1646, 1812 and 1813 should be added to the firewall. If not you need to add them manually

Configure WiFi Network
Configuring the WiFi network depends on which brand of network equipment you use. Look for the specific settings in the manufacturer’s documentation. In this example, I am using Unifi.
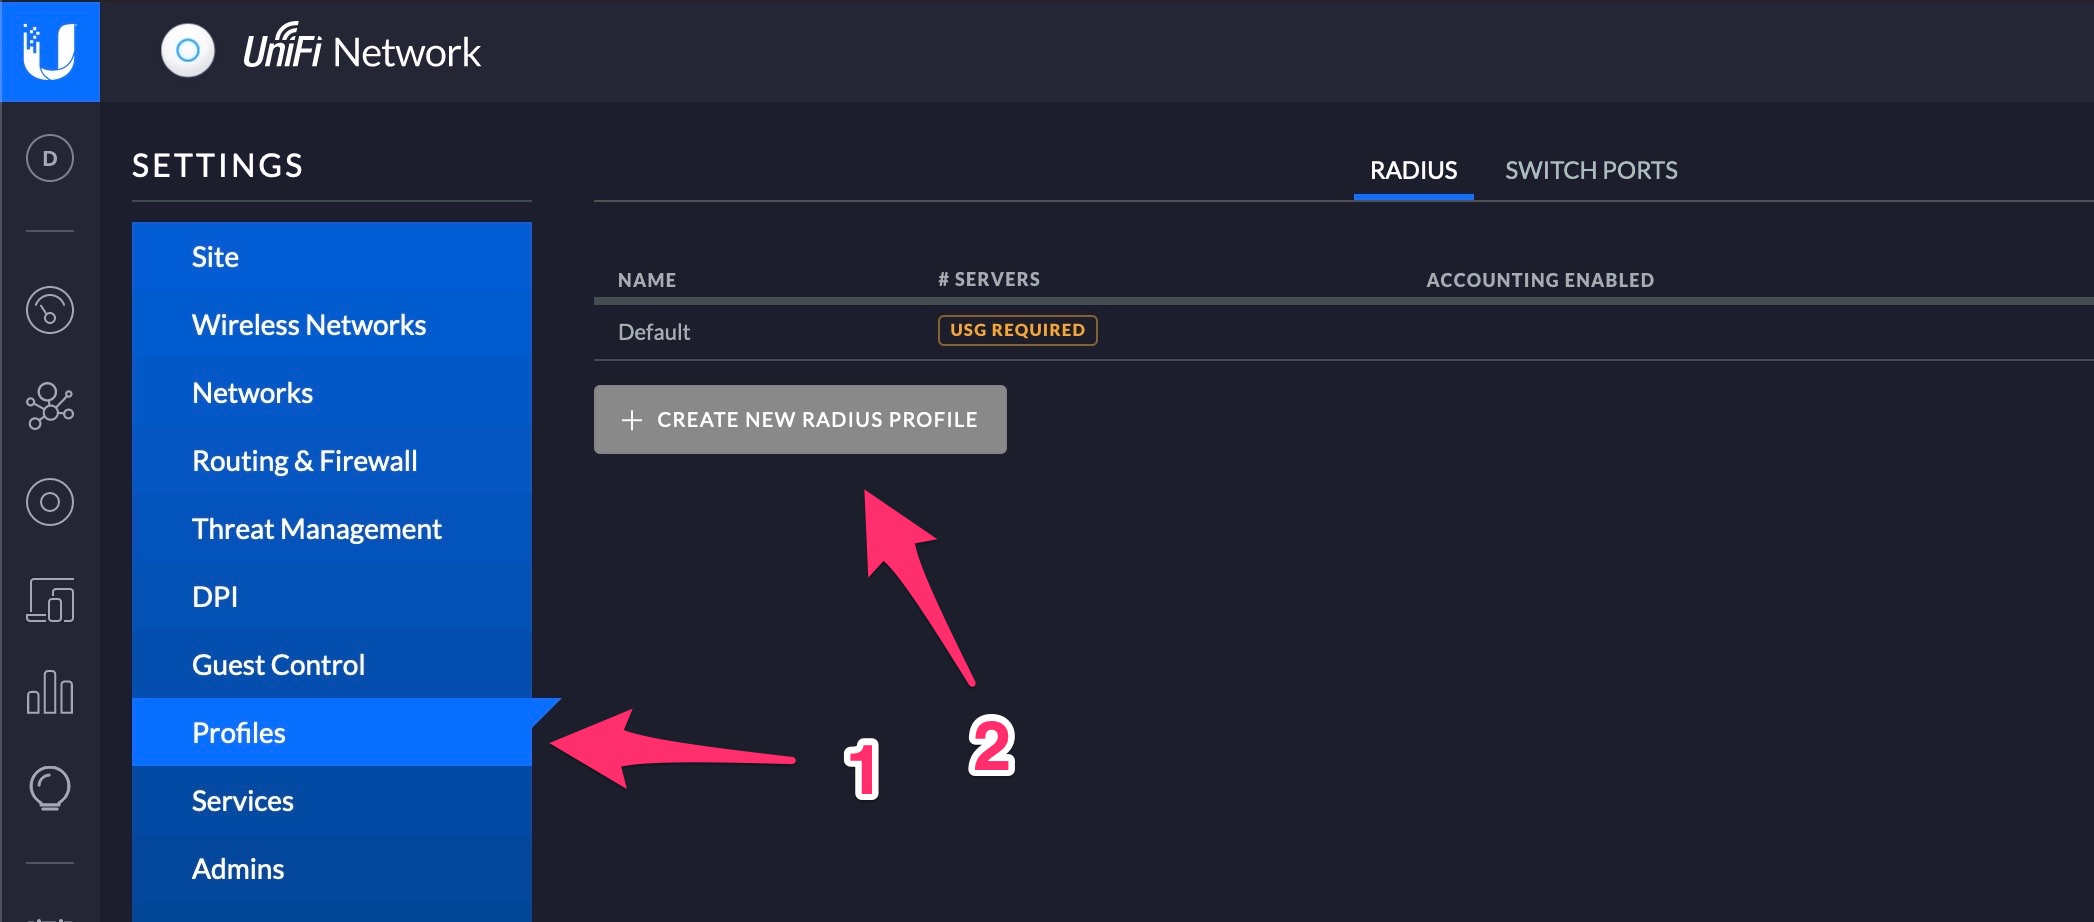
27. Login to the Unifi controller and go to settings. Select Profiles and press “Create New Radius Profile”.
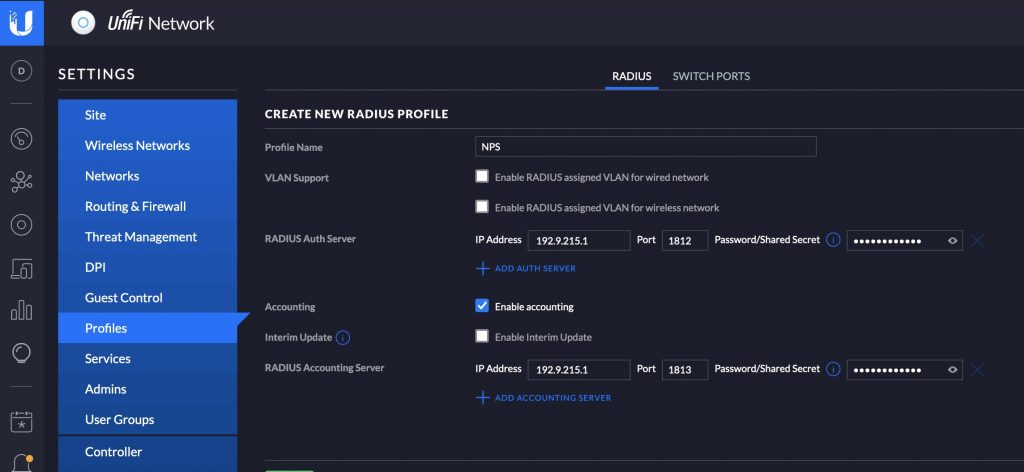
28. Enter a name for the profile and select the networks you want to support. Add the following Authentication and Accounting ports with your configured secret. Use the IP Address of your NPS server. The Legacy ports are optional for legacy purposes.
Authentication Servers
| Network Policy Server (RADIUS Authentication – UDP-In) | 1812 |
| Network Policy Server (Legacy RADIUS Authentication – UDP-In) | 1645 |
Accounting Servers
| Network Policy Server (RADIUS Accounting – UDP-In) | 1813 |
| Network Policy Server (Legacy RADIUS Accounting – UDP-In) | 1646 |
29. In settings select WiFi and select “Create New Wifi” to create a new WiFi Network.
30. Enter the SSID you want to use in this example “Test Wifi” and toggle the Advanced switch from “Auto” to “Manual”
31. Change Security Protocol from “WPA2” to “WPA2 Enterprise” (1) and select the “Radius Profile” you’ve created (2) in the previous step. Press “Add WiFi Network” (3) to add the WiFi Network.
Configure Group Policies
Now that we have configured the NPS and the Wifi network, we need to ensure that the configuration is available on the endpoint. In this step, we are going to configure the Wifi profile and user certificate enrollment. Run “Group Policy Manament” on the Domain controller and perform the steps below.
32. First we will create a new GPO for the Wifi configuration.
Configure WiFi Profile
33. Add a new wireless network policy to the GPO.
34. Enter a Policy Name and Description. Press “Add” to configure the WiFI Network.
35. Enter a Profile Name and add the SSID for the WiFi profile.
36. Check the Security Settings and change if necessary and press “OK” and “OK” to close the windows.
Configure autoenrollment for the user certificate
37. Expand the following path: Default Domain Policy, User Configuration, Policies, Windows Settings, Security Settings, Public Key Policies. Double-click Certificate Services Client – Auto-Enrollment.
38. In Configuration Model, select Enabled. Select the Renew expired certificates, update pending certificates, and remove revoked certificates check box and select the Update certificates that use certificate templates check box. Press “OK” to save the changes.
Result
All conditions are now configured. Log in to your test device with network cable connected. Run a gpupdate /force to apply the newly configured policy. When you check the personal certificates you will see that the wifi certificate has been added.
If you look at known wireless networks, you will see that the “Test Wifi” network has been added.
Now that we see that the wireless network and user certificate has been added we pull out the network cable. It would then automatically connect to the wireless network. If this does not happen select connect to see if it connects manually.
Troubleshooting
If you cannot connect after configuring, first check the logging of NPS. This can be found in the Event Viewer on the NPS. Go to Custom Views -> Server Roles -> Network Policy and Access Services.
- If the eventlog is empty try restarting the NPS service first. I have experienced several times that you have to do this before the service works properly.
- The event log also remains empty if connections between the AccessPoint and NPS are blocked. Try to ping from the AP to the NPS.
- Check the configured ports and IP addresses in the ra.
What is WPA 2 Enterprise?
WPA, or Wireless Protected Access, is a security certification developed by the Wi-Fi Alliance to protect wireless computer networks. And WPA2-Enterprise, also known as WPA2-802.1X, takes it to the next level by using the 802.1X mechanism to authenticate and provide role-based access control to users connecting to a secure wireless network.
Here’s the thing: WPA2-PSK (pre-shared key) is a popular choice for securing wireless networks, but it has its limitations. Anyone who knows the password can access and connect to the network, which can make it vulnerable to unauthorized access. With WPA2-Enterprise, only registered users with a username and password can authenticate and connect to the network.
To make this happen, a RADIUS authentication server is required. This server checks the user’s credentials, which are typically a username and password, to determine if they’re authorized to access the network.
But it doesn’t stop there. WPA2-Enterprise also allows for client-based certificates, biometrics, and other methods of authentication, depending on how the RADIUS server is set up.
Once a user passes RADIUS authentication, they can access the wireless network and the network resources that they’re authorized to access. And that’s thanks to the 802.1X part of WPA2-Enterprise. This IEEE Standard of Port-Based Network Access Control provides protected authentication for secure network access.
So if you’re looking for a more secure way to connect to a wireless network, consider WPA2-Enterprise. It may require a bit more setup than WPA2-PSK, but the peace of mind it provides is well worth it.
Importance of WPA 2 Enterprise
When it comes to network security, there are a lot of factors to consider. But one of the most important is authentication. That’s where WPA2-Enterprise comes in.
The thing is, a pre-shared key solution like WPA2-Personal can be vulnerable to attacks. When an attacker captures the 4-way handshake that generates the Pairwise Transient Key (PTK) from the Pairwise Master Key (PMK), they can perform attacks like Dictionary attacks, Brute Force attacks, Rainbow table attacks, etc. to the pre-shared key and gain access to the network.
But with WPA2-Enterprise, this problem doesn’t exist. Users authenticate using a central authentication server, which eliminates the security risks present in a pre-shared key solution.
Not only does WPA2-Enterprise protect against over-the-air attacks, but it also denies access to any man-in-the-middle. That’s because users must be authenticated before they can access the network. This makes it a crucial security measure for any network that deals with sensitive information.
And it doesn’t stop there. WPA2-Enterprise also allows for role-based access control using 802.1X. This means that access to certain network resources can be controlled based on the permission that each user is granted by the system administrator. This provides an additional layer of security, ensuring that only authorized users can access specific parts of the network.
Overall, WPA2-Enterprise is a powerful tool in network security. Authenticating users before granting access to the network, eliminates many of the vulnerabilities present in pre-shared key solutions. And role-based access control provides an extra layer of security that can help protect against both internal and external threats.
How Does WPA 2 Enterprise Work?
When it comes to securing a wireless network, WPA2-Enterprise (successor being WPA3-Enterprise) is one of the best solutions out there. But how does it work, exactly?
First of all, WPA2-Enterprise uses Advanced Encryption Standard – Counter Mode Cipher Block Chaining Message Authentication Code Protocol (AES-CCMP) to encrypt data transmitted over the wireless medium. This is a highly secure encryption method that’s designed specifically for data confidentiality.
In the past, weaker security protocol(s) like WEP which uses the RC4 encryption algorithm, and WPA which uses a variation of the RC4 algorithm called Temporal Key Integrity Protocol (TKIP) were used. However, they were deemed too easy to brute force and crack and hence were not secure. With AES-CCMP, you can rest assured that your data is well-protected.
But encryption is only part of the story. WPA2-Enterprise also uses a variety of authentication methods to ensure that only authorized users can access the network. To do this, it relies on the Extensible Authentication Protocol (EAP), which provides a secure method of sending identifying information over the wireless network.
Several types of EAP can be used with WPA2-Enterprise, including EAP-TLS, EAP-TTLS/PAP, PEAP-MSCHAP, EAP-CHAP, and PEAP-MSCHAPV2. Each of these authentication methods has its strengths and weaknesses, so it’s important to choose the right one for your particular network.
The wireless infrastructure will then utilize the EAP protocol to facilitate the secure exchange of information between the client devices and the RADIUS server. This is when the wireless infrastructure or the Authenticator, sends authentication-related information like username and password, client certificates, etc to the Authentication Server (RADIUS) for it to be authenticated and authorized for access.
The result of this would be the RADIUS server Accepting or Rejecting the provided user credentials.
In the case of a Reject, the connection will Fail and the user will have to perform the authentication again. When the authentication is accepted, the Authenticator will proceed to negotiate the appropriate encryption keys to secure data traffic.
Overall, WPA2-Enterprise is a highly secure solution that uses advanced encryption methods and strong authentication protocols to protect your wireless network. Whether you’re setting up a small business network or a large enterprise network, WPA2-Enterprise is worth considering.

Advantages of WPA 2 Enterprise
When it comes to securing wireless computer networks, WPA2-Enterprise is the way to go. It offers a wide range of benefits that make it an attractive option for organizations looking to keep their data safe and secure. Let’s take a closer look at some of these advantages.
First and foremost, WPA2-Enterprise provides improved security over WPA2-Personal. With WPA2-Personal, a pre-shared key (PSK) is used for users to authenticate to the network.
However, this key can be cracked with enough computing power, leaving your network vulnerable to attack. In contrast, WPA2-Enterprise uses user credentials or certificates to authenticate users, making it much more secure.
Another advantage of WPA2-Enterprise is the ability to implement additional authentication methods. For example, you can use a RADIUS server or certificates to further enhance your network’s security. This gives you the flexibility to choose the authentication method that works best for your organization.
Using a centralized authentication server like a RADIUS server also enables role-based access control to be implemented. This means that users can be segregated into different VLANs and granted different levels of permissions to access different network resources. This is particularly useful for larger organizations that need to manage access for multiple users across different departments.
Finally, one of the biggest advantages of WPA2-Enterprise is the ease with which you can manage user access. When an employee leaves your organization, their credentials can be revoked, deleted, or deactivated on the RADIUS or Active Directory server.
This prevents them from accessing your organization’s internal network resources after they’ve left. In a PSK deployment, you would have to change the wifi password every time an employee left to prevent unauthorized access, which can be time-consuming and cumbersome.
Overall, WPA2-Enterprise is a highly secure and flexible option for organizations looking to protect their wireless computer networks. By using user credentials or certificates for authentication and enabling role-based access control, you can ensure that your network remains secure at all times.
Before proceeding to the next section, let’s familiarize ourselves with some terms.
What is an Active Directory Server?
An Active Directory server is a type of domain controller that plays a crucial role in network security and management. It is responsible for authenticating and authorizing all users and computers in a network, as well as assigning and enforcing security policies for all computers.
Additionally, the Active Directory server can be used to install or update software across multiple computers in a centralized manner.
In the context of setting up a RADIUS server and WPA2-Enterprise, the Active Directory server’s role is primarily to create and store user credentials. It allows network administrators to manage user accounts, assign permissions, and implement security policies.
By using an Active Directory server in conjunction with a RADIUS server, organizations can enforce strict authentication protocols and ensure that only authorized users have access to network resources.
What is a Radius Server?
RADIUS or Remote Authentication Dial-In User Service is a protocol used for centralized authentication, authorization, and accounting of users attempting to log into a network.
The RADIUS server is a critical component in this process, responsible for handling these tasks. In the Windows Server 2016 Operating System, the RADIUS feature is known as Windows NPS or Network Policy Server.
To use the RADIUS server, RADIUS clients must first be registered. Only registered clients are allowed to query the RADIUS server or Windows NPS to authenticate, authorize, and account for users trying to log into the network.
When a user enters their credentials and attempts to log in, the RADIUS server checks with the Active Directory server to verify the username and password combination. If the combination is correct, the connection is accepted.
RADIUS uses the User Datagram Protocol (UDP) to transfer data. RADIUS authentication uses UDP port 1812 and RADIUS accounting uses UDP port 1813.
How to Set Up WPA 2 Enterprise Networks
WPA2-Enterprise using Windows NPS RADIUS Server on Windows Server 2016, you will need to follow a series of steps, which are explained in detail in the video embedded below.
The process involves creating an Active Directory (AD) Server to manage user accounts, setting up the NPS Server which is the RADIUS component, and authenticating the Cisco Autonomous Wireless Access Point to the RADIUS Server.
In centrally managed wireless infrastructures that use a Wireless Controller, it instead will have to be authenticated to the RADIUS Server. Here are the steps covered in the videos. Please scroll all the way down to find the videos:

var tag = document.createElement(‘script’);
tag.src = “https://www.youtube.com/iframe_api”;
var firstScriptTag = document.getElementsByTagName(‘script’)[0];
firstScriptTag.parentNode.insertBefore(tag, firstScriptTag);
var player;
function onYouTubeIframeAPIReady() {
player = new YT.Player(‘player’, {
videoId: ‘e0gwWJDJXZs’,
});
}
function setCurrentTime(slideNum) {
var object = [0, 39, 126, 216, 257, 313, 355, 387, 551, 784, 936];
player.seekTo(object[slideNum]);
}
Timestamps:
- 0:00 Install Active Directory Domain Services
- 0:39 Promote the server to Domain Controller
- 2:06 Create Organizational Unit (OU), Users, and User Groups
- 3:36 Added Users into the User Group
- 4:17 Install Active Directory Certificate Services
- 5:13 Generating Certificate
- 5:55 Install Network Policy Server (NPS RADIUS)
- 6:27 Configuring NPS RADIUS Server
- 9:11 Testing RADIUS using NTRadPing and observing in Wireshark
- 13:04 Configuring WPA2-Enterprise on Cisco Autonomous Access Points [AP] (SSID + RADIUS)
- 15:36 Testing WPA2-Enterprise SSID
You may run into these errors while setting up Windows Server, so watch these videos if you encounter any of these problems:
Problem #1: Unable to Select Enterprise CA – Unable to Request New Certificate – Windows AD Certificate Services
Problem #2: Verification of Prerequisites for Domain Controller Promotion Failed – Windows AD Domain Services
1. How to set up an Active Directory AD Server on Windows Server OS
- In the Server Manager, go to Manage -> Add Tools and Features
- Click Next until you reach Server Roles
- Select Active Directory Domain Services and click Install then Next.
- Click Next until you can click Install.
2. How to create a Domain Controller for the Active Directory server.
- After the installation of Active Directory Domain Services is done (steps above), click on Promote this server to a domain controller.
- Alternatively, you can select this later on by clicking the flag icon on the top-right corner of the Server Manager window.
- A new window will pop up. Under Deployment Configuration. Select Add a new forest and give it a name (e.g server. local). Then click Next.
- In Domain Controller Options, set any Password of choice and click Next
- Click Next all the way until you can click on Install.
- After clicking Install, your machine will reboot.
3. How to create user accounts, and Organisational Units (OU) in the Active Directory
- In the Server Manager, select Tools and click on Active Directory Users and Computers.
- Right-click on the newly created Domain Controller and click on New -> Organisational Unit. Give it a name.
- After your new Organisational Unit has been created, right-click on it, select New and now you can start creating your Users and User Groups.
4. How to install and configure Windows AD CS (Windows Active Directory Certificate Services)
- Active Directory Certificate Services is required to use EAP, and PEAP when setting up the certificate for it in the NPS (Network Policy Server).
- In the Server Manager, go to Manage -> Add Roles and Features
- Click Next until you reach Server Roles.
- Select Active Directory Certificate Services -> Add Feature and click Next until you are able to Install.
- After installation has been completed, you will need to click on Configure Active Directory Certificate Services on the destination server.
- A new menu will pop up. Hit Next and in the Role Services, select Certification Authority.
- Click Next all the way until you can finish the installation.
- The configurable options available when clicking Next includes Certificate validity duration, private key length, hash type, CA Name, etc.
- After this, we will have to set up the certificate so that it can be used by the RADIUS server. NPS in this case.
- Hit Windows key + R to bring up Run, then type ‘mmc’ and hit Enter.
- Inside the Console1 window that just opened, click on File -> Add/Remove Snap-in…
- Select Certificate and click on Add. A new window will then pop up, just click Finish.
- Expand the Personal folder, right-click on the Certificates folder -> All Tasks -> Request New Certificate.
- Click Next until you reach the Request Certificates screen. Here, select Domain Controller. Click Enroll and Finish.
- Next, we will install the Network Policy Server feature which is the RADIUS component.
5. How to set up a RADIUS Server on Windows Server OS using Windows NPS
- In the Server Manager, click on Manage -> Add Roles and Features.
- Click Next until you reach Server Roles. In Server Roles, select Network Policy Server and click Next until the Install option appears.
- To open up the NPS: Go to Server Manager -> Tools and click on Network Policy Server.
6. How to configure Windows NPS RADIUS Server
- Firstly, we will have to integrate the NPS into our AD. This is so that the NPS can use the user credentials that we have created in the AD.
- To do this, right-click on NPS (Local) and click on Register Server in Active Directory.
- Next, we will have to create our RADIUS Clients. What are our RADIUS clients?
- RADIUS Clients in this context are devices that will be connecting to and using our RADIUS server for authentication purposes. For example, a Wireless Controller will be our RADIUS client as it will use the registered user credentials in our AD to authenticate users.
- Here, you will configure the certificate and authentication type (PAP, CHAP, MSCHAPv2) that the RADIUS client uses to authenticate and register itself with the RADIUS server.
- After creating RADIUS Clients, Connection Request Policies and Network Policies will have to be created.
- These policies are the Role-based access feature of RADIUS whereby the RADIUS authorizes access and permissions to certain resources on the network.
- These policies can also tell whether to forward connection requests to another authentication server or to process it locally.
- For more detail on this, please refer to the 5:55 and 6:27 timestamps on the video.
7. How to view RADIUS packets on Wireshark
To test and troubleshoot the RADIUS Server, you will need to view RADIUS packets on Wireshark. Wireshark download link: https://www.wireshark.org/download.html
- On the Windows Server where the RADIUS/NPS is installed, open up Wireshark and start the capture on the network interface that is connected to the Wireless Access Point.
- After starting the capture, the number of packets coming can be overwhelming. To only view RADIUS packets, simply type radius in the filter box.
8. How to test and verify RADIUS connectivity with NTRadPing
- After our RADIUS has been configured, it is time to test whether we can authenticate to it or not.
- To do this, we will need to download a RADIUS testing utility called NTRAdPing: https://ntradping.apponic.com/
- When testing, you will see whether the RADIUS server Accepts or Rejects the connection request. These are shown in the form of Access-Accept or Access-Reject packets.
- Please follow the steps and refer to the video timestamp 9:11
9. How to configure WPA2-Enterprise on a Cisco Autonomous AP.
- For better understanding, please refer to timestamp 13:04 onward on the video.
- Log into the Cisco AP GUI by accessing its IP through the web browser.
- We are first going to configure the RADIUS server:
- Click on Security -> Server Manager
- Key in the details of the RADIUS Server in the Corporate Servers sections
- The default ports that RADIUS uses are UDP 1812 for Authentication and UDP 1813 for Accounting.
- Point the EAP Authentication to the newly created RADIUS Server.
Next, go to Encryption Manager -> select Cipher -> select AES CCMP from the dropdown menu and hit Apply
Next, go to the SSID Manager. Here we are going to create our WiFi SSID.
Give the SSID a name and Select the Frequency band you want it to run on (2.4GHz and/or 5GHz)
In Client Authentication Settings, select Open Authentication and select, MAC Authentication or EAP in the drop-down menu.
In the Server Priorities -> EAP Authentication Servers -> select Customize and select the Windows RADIUS server.
Next under Client Authenticated Key Management -> Key Management -> select Mandatory from the drop-down menu. Then check the Enable WPA option and select WPAv2.
Finally, scroll all the way down and click Apply.
Verification Steps
Now, you may have noticed that there is no SSID being broadcasted. To ensure it is broadcasting, we will have to access the Cisco AP through the command-line interface. Here, we will have to enable guest mode on the SSID.
After accessing the CLI using SSH or console cable, type in the following commands:
# conf t
# dot11 ssid <ssid-name>
# guest-mode
# end
You will notice that the WiFi radio will restart.
After this step, you will be able to see the SSID broadcast and connect to it.
In addition, the videos also cover how to fix some common issues that you may encounter during the set-up process, such as the “Verification of prerequisites for domain controller promotion failed” error and the “Unable to select Enterprise CA – Unable to request new certificate” error in AD CS Certificate Services.
Overall, the videos provide a comprehensive guide to setting up WPA2-Enterprise using Windows NPS RADIUS Server on Windows Server 2016 from scratch.
WPA 2 Enterprise Best Practices
- Use a separate VLAN for user traffic and ensure it is not in the same VLAN as the firewall and authentication servers.
- Limit management access to the authentication servers, firewalls, network switches/wireless routers, etc. to only certain users of certain VLANs.
- Configure Access Lists and firewall policies to deny access to network management from other VLANs/subnets that do not have management access.
- Recommend users to change their passwords once every 3-6 months.

В статье пойдёт речь о вопросах расширенной аутентификации в беспроводной сети через WPA2 Enterprise. Для данной системы используется RADIUS сервер, поэтому рассмотрим краткий пример упрощённой установки и настройки.
О методах аутентификации
В предыдущих статьях, в частности: Особенности защиты беспроводных и проводных сетей. Часть 1 — Прямые меры защиты, — мы рассказывали о различных методах аутентификации.
Более или менее надёжным можно считать алгоритм защиты начиная с WPA2, а самый современный протокол аутентификации — WPA3, входящий в состав новшеств от WiFi 6. Но так как не все ещё перешли на WiFi 6, то WPA2 пока остаётся актуальным.
В свою очередь технология WPA2 подразделяется на два направления: WPA2 Personal и WPA2 Enterprise.
Вариант WPA2 Personal с PSK (Pre-Shared Key), проще говоря, «один-ключ-на все-устройства» используется в небольших (обычно в домашних сетях). При этом единственный ключ (длинная символьная строка не менее 8 символов) хранится на самой точке доступа и на каждом устройстве, подключаемом к беспроводной сети. Когда просят дать «пароль от WiFi», это тот самый ключ и есть.
При увеличении числа клиентов обслуживание такой беспроводной сети превращается в кошмар для сисадмина.
Если кто-то из пользователей со скандалом уволился, умудрился потерять ноутбук или случайно переслал ключ по почте (выложил общем чате, на форуме и так далее) …
В общем, при малейшем подозрении на компрометацию ключа выход может быть только один — сгенерировать новый ключ и заменить его везде: на всех точках доступа и у всех пользователей на всех устройствах. При этом нужно обязательно проверить работает ли доступ у всех пользователей на всех корпоративных (а иногда и личных) девайсах, а ещё ответить на 1000 и 1 вопрос из разряда: «А зачем?», «А почему так произошло?», «А что, теперь постоянно менять придётся?» и так далее и тому подобное.
Поэтому для беспроводных сетей корпоративного уровня используется гораздо более совершенный вариант WPA2 Enterprise. Наиболее очевидной альтернативой общему ключу является индивидуальный ключ для каждого. Разумеется, в этом случае при подключении к сети запрашивается не только ключ, но и имя пользователя. Фактически это возврат к аутентификации на основе логин + длинный пароль. (Спасибо Капитану Очевидность за точные формулировки).
Вопрос в том, где хранить базу пользователей и паролей. Размер встроенной аппаратной флеш-памяти не «резиновый», а если точек доступа несколько, то нужно подумать, как выполнять синхронизацию учётных данных между ними.
Гораздо проще использовать внешний сервер для аутентификации. WPA2 Enterprise использует для этих целей RADIUS.
RADIUS (Remote Authentication in Dial-In User Service) — сервис AAA (Authentication, Authorization, Accounting), основанный на использовании отдельного сервера, взаимодействующего с клиентами (оборудованием) по специальным протоколам.
На сегодняшний момент наиболее популярны следующие реализации:
- Microsoft Network Policy Server (NPS), бывший IAS — для конфигурации используется встроенный инструментарий Microsoft. Соответственно, нужно купить необходимые лицензии.
- Cisco Secure Access Control Server (ACS) 4.2, 5.3 — для администрирования использует веб-интерфейс, имеет широкий набор полезных функций. Это также платный продукт.
- FreeRADIUS — распространяется бесплатно, может использоваться как в «чистом виде», так и вкупе с различными СУБД (MySQL и другие), имеются веб-интерфейсы (DaloRADIUS, Dual-In), в общем, довольно известное решение.
Существуют и другие реализации данного сервиса. Для настройки главное понять принцип взаимодействия с сервером аутентификации, всё остальное можно найти в документации.
Интересный факт. Аппаратные шлюзы и контроллеры точек доступа Zyxel уже имеют встроенный сервис RADIUS «на борту». А облачная среда Zyxel Nebula может похвастаться собственной системой аутентификации, отличной от RADIUS, но выполняющей те же функции. Поэтому самостоятельная установка внешнего сервера аутентификации — процесс интересный, но отнюдь не всегда обязательный. Есть и более простые варианты.
Взаимодействие точки доступа с сервером RADIUS
Для обмена данными с сервером RADIUS используется протокол UDP (User Datagram Protocol) по принципу «клиент-сервер». В роли клиента выступает точка доступа (или другое устройство, нуждающиеся в службе аутентификации), которая обращается к серверу RADIUS с запросами о проверке учётных записей.
В зависимости от настройки и схемы использования сервер RADIUS может сообщать клиенту не только информацию об успешной аутентификации, но и другие параметры: VLAN клиентского устройства, IP адрес, QoS профиль и так далее.
Для создания безопасного соединения клиент и сервер RADIUS обладают общим ключом.
В отказоустойчивой production схеме используется более одного сервера RADIUS. Например, точка доступа NWA210AX может использовать для проверки два сервера: основной и резервный.
Кратко рассмотрим порядок взаимодействия
Пользователь подключает устройство (корпоративный ноутбук или любое другое). Для этого он вызывает соответствующий интерфейс для настройки. Появляется окно подключения, где он вводит логин и пароль.
Точка доступа принимает эти данные и для проверки аутентификации передаёт на сервер RADIUS.
Сервер RADIUS по своим записям проверяет данного пользователя и его пароль, и, в зависимости от результата, возвращает одно из значений: «Accepted» (Принято) или «Rejected» (Отклонено).
При получении «Accepted» (Принято) между клиентом и точкой доступа происходит обмен индивидуальными ключами шифрования, действующими только на время, установленное для данной сессии.
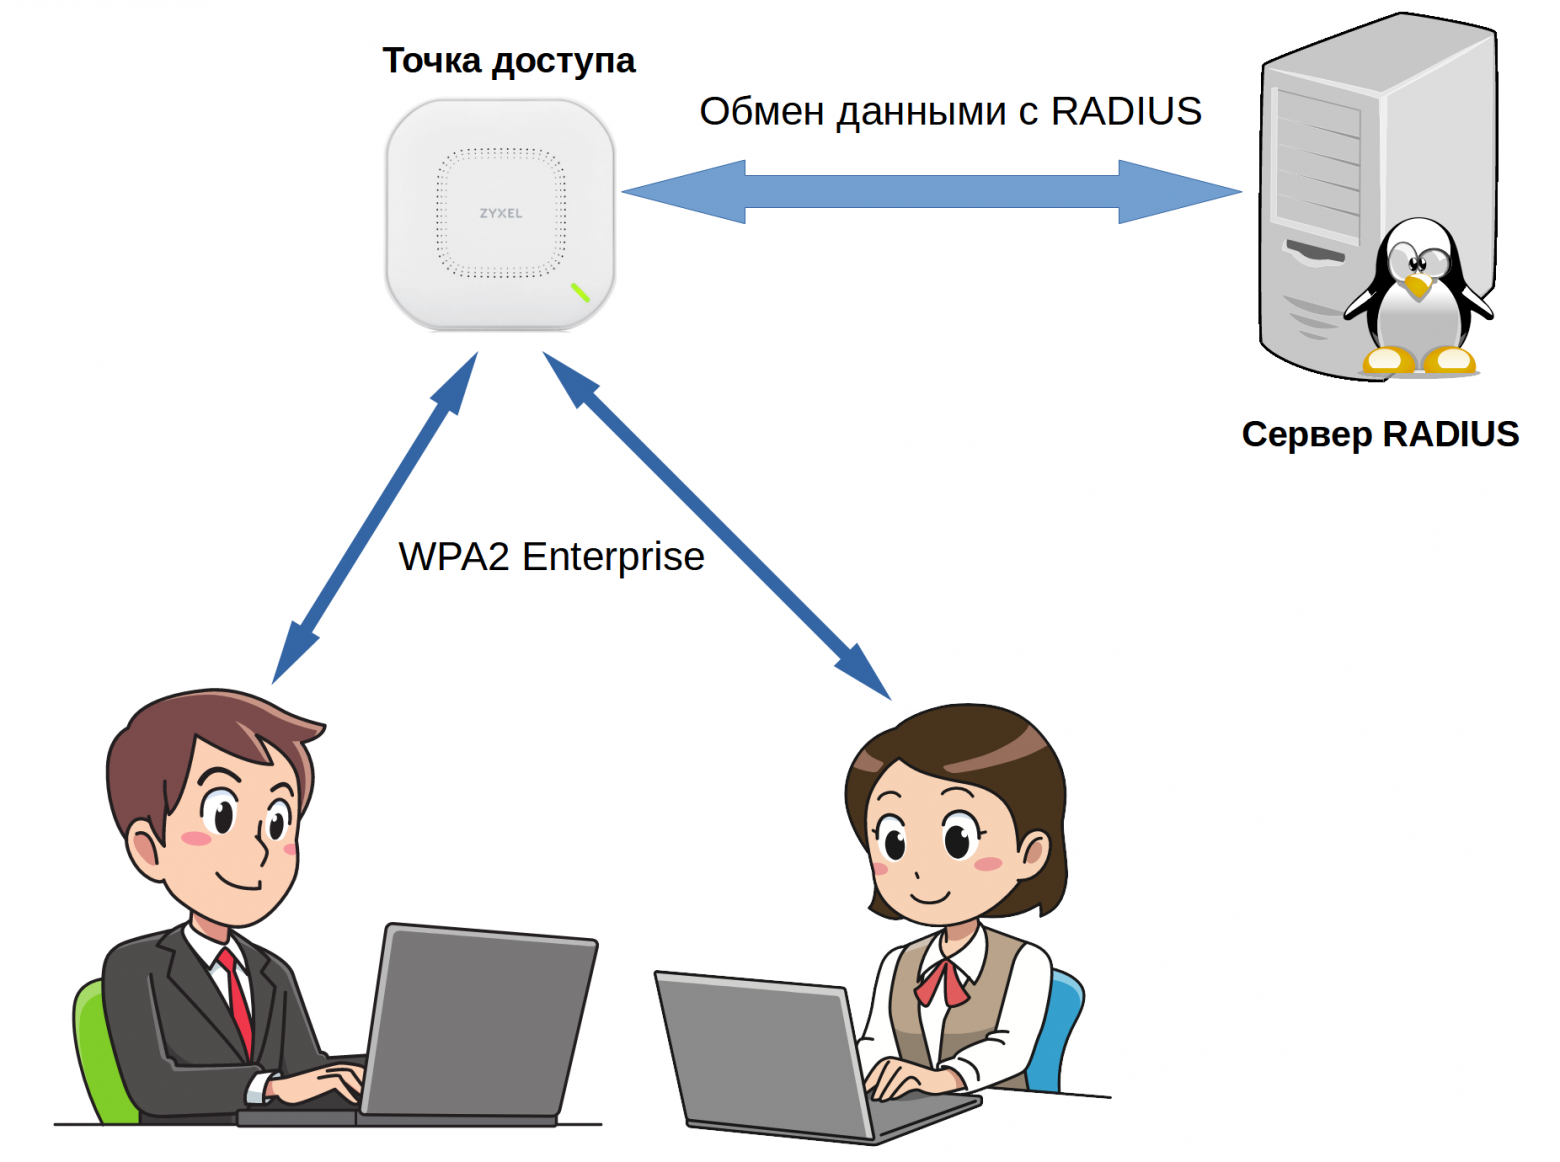
Рисунок 1. Использование сервера RADIUS для аутентификации.
Вообще на тему установки RADIUS написано очень много How-to, в том числе интеграцией с различными СУБД, использованию веб-интерфейса и так далее.
Однако невозможно объять необъятное, поэтому сейчас остановимся на самой простой реализации: сервер FreeRADIUS без сторонних продуктов, который настраивается путём изменения конфигурационных файлов.
ВНИМАНИЕ! Ниже приводится именно простейший пример для иллюстрации, а не готовая шпаргалка для копирования и размножения у себя в рабочей среде.
Описание примера настройки и взаимодействия точки доступа с сервером RADIUS
Конфигурация сервера FreeRADIUS
Это виртуальная машина со следующими характеристиками: RAM 1GB, 1xCPU, виртуальный диск 20GB (можно меньше, лишь бы разместилась операционная система и необходимые пакеты).
В роли гипервизора — Oracle Virtual Box 6.1.18
В качестве гостевой операционной системы для экспериментов использовался дистрибутив Oracle Linux 6.3. В принципе, можно выбрать любой другой дистрибутив, если нет специальных ограничений.
FreeRADIUS — из стандартного репозитория.
Точка доступа
В качестве клиента (точки доступа) — используется модель Zyxel NWA210AX. Это современное устройство, поддерживающее интеграцию в облачной системе Zyxel Nebula и обладающее массой других достоинств.
Несмотря на то, что NWA210AX поддерживает новые протоколы безопасности WiFi 6 и может использовать сервис аутентификации Nebula, в нашем случае она прекрасно выступит в качестве устройства доступа в сети WPA 2 Enterprise.

Рисунок 2. Точка доступа NWA210AX.
Клиент для проверки подключения
В качестве платформы для проверки клиентского подключения — наиболее наглядно данный процесс отображается на последних версиях Mac OS X.
Установка и настройка сервера RADIUS
Перед установкой рекомендуется настроить файервольные правила, в частности, разрешить порты 1812, 1813, а также, если понадобиться, выполнить настройку SELinux. Нашей целью было показать взаимодействие с RADIUS, поэтому такие нюансы, как настройка сети, файервола, других средств безопасности выходят за рамки статьи и остаются за кадром. И мы сразу переходим к установке FreeRADIUS.
sudo install freeradius freeradius-utils -y
Обратите внимание, мы устанавливаем не только пакет freeradius, но и дополнительные инструменты freeradius-utils.
Из этого пакета нам понадобится утилита radclient для проверки пользователей.
После окончания установки настроим запуск сервиса при старте системы:
sudo systemctl enable radiusd
Для проверки запустим FreeRADIUS:
sudo systemctl start radiusd
Проверим его состояние:
sudo systemctl status radiusd
Пример ответа системы:
radiusd.service - FreeRADIUS high performance RADIUS server.
Loaded: loaded (/usr/lib/systemd/system/radiusd.service; enabled; vendor preset: disabled)
Active: active (running) since Thu 2021-02-04 13:36:11 EST; 7min ago
Process: 953 ExecStart=/usr/sbin/radiusd -d /etc/raddb (code=exited, status=0/SUCCESS)
Process: 872 ExecStartPre=/usr/sbin/radiusd -C (code=exited, status=0/SUCCESS)
Process: 821 ExecStartPre=/bin/sh /etc/raddb/certs/bootstrap (code=exited, status=0/SUCCESS)
Process: 810 ExecStartPre=/bin/chown -R radiusd.radiusd /var/run/radiusd (code=exited, status=0/SUCCESS)
Main PID: 970 (radiusd)
Tasks: 6 (limit: 12425)
Memory: 82.9M
CGroup: /system.slice/radiusd.service
└─970 /usr/sbin/radiusd -d /etc/raddb
Feb 04 13:36:10 localhost.localdomain systemd[1]: Starting FreeRADIUS high performance RADIUS server....
Feb 04 13:36:10 localhost.localdomain sh[821]: server.pem: OK
Feb 04 13:36:11 localhost.localdomain systemd[1]: Started FreeRADIUS high performance RADIUS server..
Дополнительно проверить можно командой:
sudo ps aux | grep radiusd
Ответ системы должен быть примерно таким:
root 7586 0.0 0.2 112716 2200 pts/1 R+ 01:28 0:00 grep --color=auto radiusd
radiusd 13320 0.0 1.5 513536 15420 ? Ssl Dec23 0:00 /usr/sbin/radiusd -d /etc/raddb
Для настройки нам понадобится только два конфигурационных файла из каталога /etc/raddb:
clients и users.
ВНИМАНИЕ! Ещё раз повторяем — это всего лишь пример, помогающий понять механизм работы. Такой примитивный вариант, например, когда записи пользователей и ключи хранятся открытым текстом — в production лучше не использовать. Но именно для иллюстрации работы самого RADIUS — чем меньше и проще настраивать, тем лучше.
В файле /etc/raddb/clients настраивается доступ из конкретной сети и задаётся общий ключ для сервера RADIUS и клиентов, в нашем случае — точек доступа.
sudo vi /etc/raddb/clients
Находим подходящий пример записи:
#client private-network-2 {
# ipaddr = 198.51.100.0/24
# secret = testing123-2
#}
и на его основе создаём свою запись:
client private-network-rpcm {
ipaddr = 192.168.0.0/24
secret = testing123-3
}
Для примера используется самый простейший вариант «из коробки», и по умолчанию информация о пользователях хранится в файле /etc/raddb/users. Создадим двух пользователей: ivan и rodeon.
sudo vi /etc/raddb/users
Обратите внимание на следующее предупреждение в самом конце файла:
#########################################################
# You should add test accounts to the TOP of this file! #
# See the example user "bob" above. #
#########################################################
Самый простой способ правильной вставки информации о пользователях — найти пользователя bob и добавить прямо под ним следующие строки:
ivan Cleartext-Password := "Pass1van"
Reply-Message := "Hello, %{User-Name}"
rodeon Cleartext-Password := "PassR0deon"
Reply-Message :=  "Hello, %{User-Name}"
Перезапустим сервис radiusd, чтобы тот перечитал конфигурационные файлы:
sudo systemctl restart radiusd
Предварительная проверка заключается в том, чтобы сервис radiusd повторно в штатном режиме стартовал без сообщений об ошибках. Выше мы уже выполняли такую проверку (после установки FreeRADIUS) командой:
sudo systemctl status radiusd
После того, как убедились в стабильной работе сервиса, выполним проверку через команду radclient с передачей имени пользователя.
sudo echo "User-Name=ivan,User-Password=Pass1van" | radclient 192.168.0.104:1812 auth testing123-3
Где:
- команда echo «User-Name= ivan,User-Password= Pass1van» передаёт имя пользователя и пароль;
- 192.168.0.104:1812 — адрес сервера с портом UDP;
- auth testing123-3 — указывается общий ключ testing123-3.
Если всё в порядке, ответ должен быть примерно таким:
Sent Access-Request Id 54 from 0.0.0.0:57939 to 192.168.0.104:1812 length 44
Received Access-Accept Id 54 from 192.168.0.104:1812 to 192.168.0.104:57939 length 33
Последняя и самая главная проверка: настроить на точке доступа NWA210AX подключение к данному серверу RADIUS и подключить выбранное клиентское устройство к WiFi сети.
Настройка подключения к RADIUS на точке доступа
Чтобы выполнить настройку, необходимо узнать адрес устройства. Для сетевого оборудования Zyxel это можно легко сделать при помощи сетевой утилиты ZON (Zyxel One Networking Utility). О ней можно подробнее узнать и бесплатно скачать на сайте Zyxel.
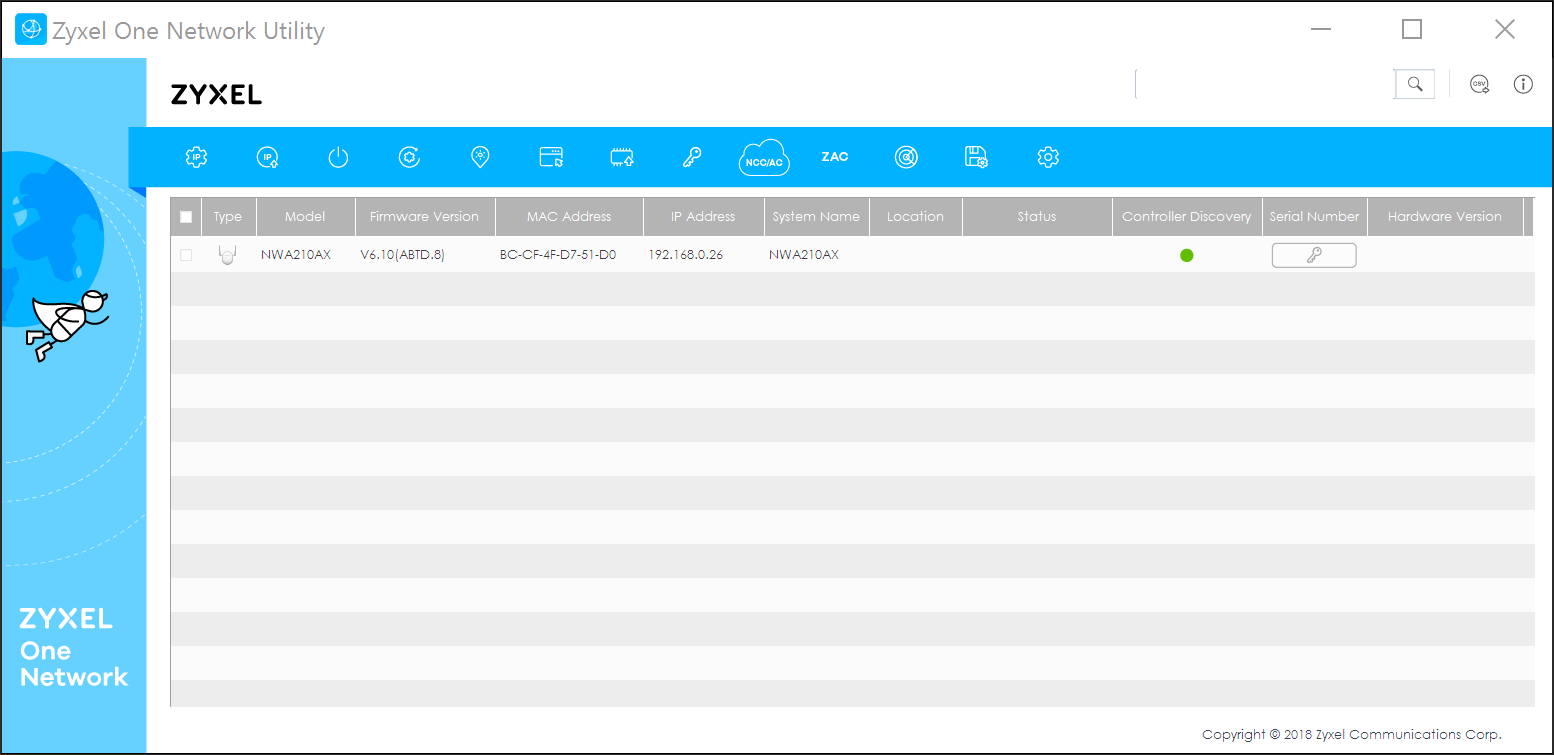
Рисунок 3. Утилита ZON (Zyxel One Networking Utility).
После того, как мы узнали IP, подключаемся через Интернет браузер.
Появляется первое окно с предложением сразу перейти к управлению через облачную среду Zyxel Nebula. Как уже было сказано выше, использовать «облако» проще, в отличие от автономной работы, в Nebula уже реализован аналог сервера аутентификации (и много чего другого, мониторинг, например). Но в данном случае используется автономная схема, поэтому выбираем режим — Standalone Mode.
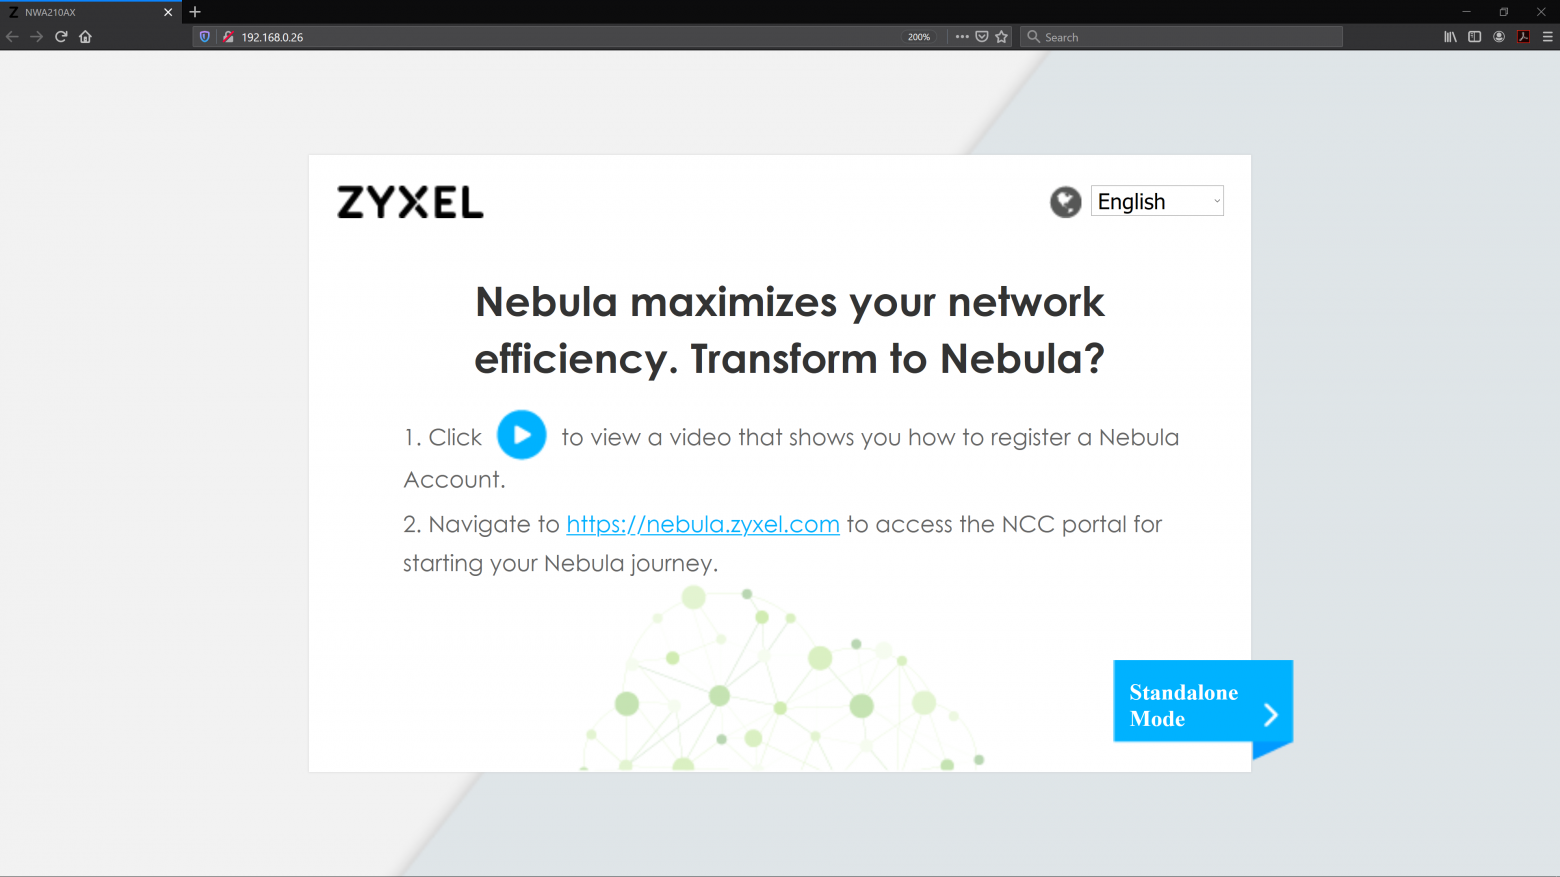
Рисунок 4. Окно с предложением сразу перейти в облачную среду Nebula.
Далее идёт окно ввода имени пользователя и пароля. Пользователь по умолчанию — admin, пароль по умолчанию — 1234.
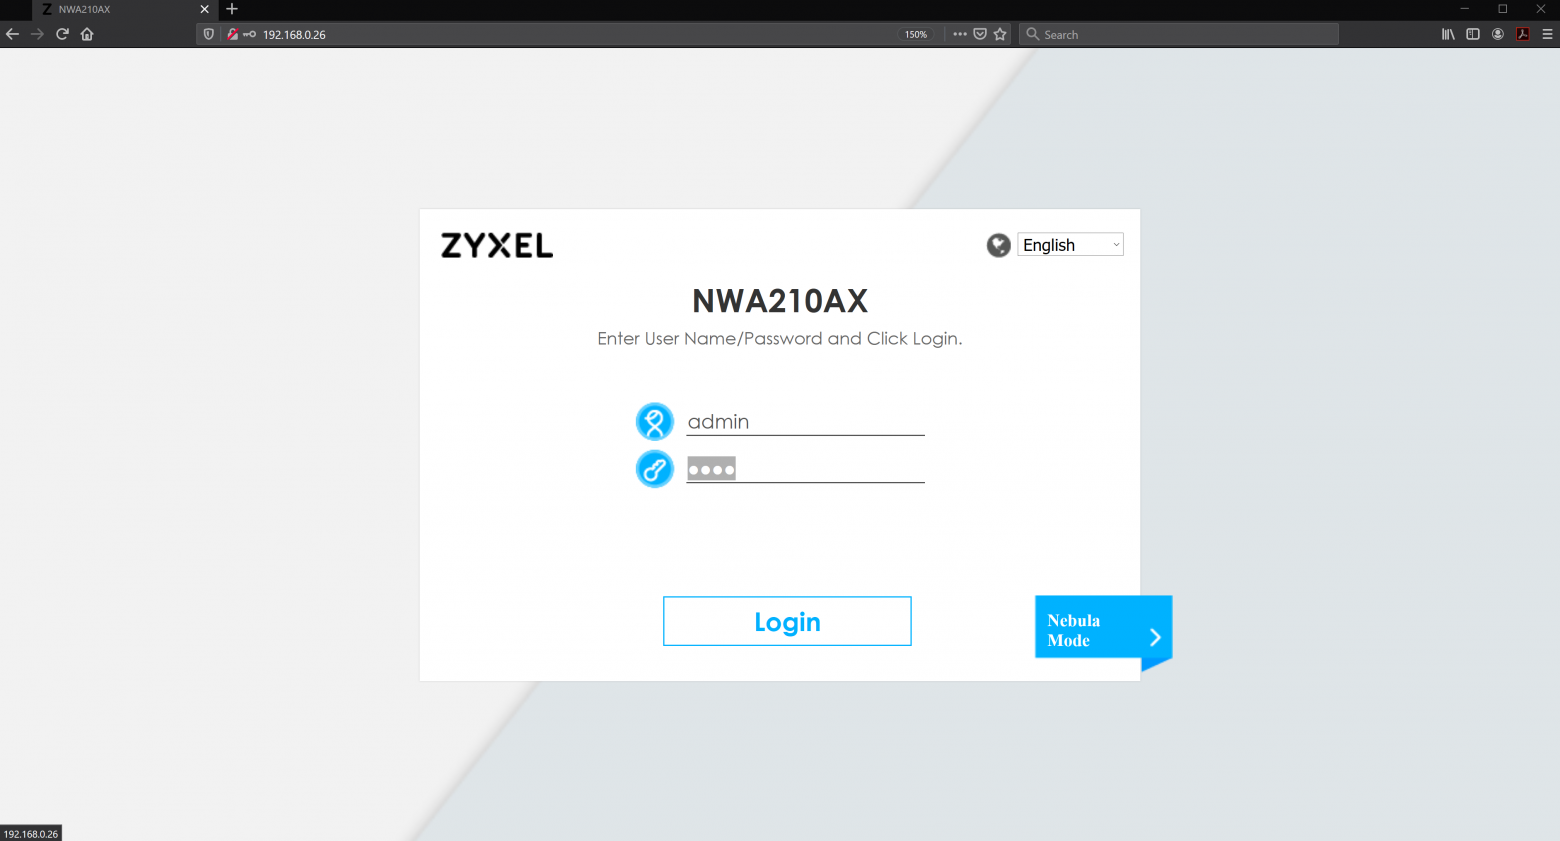
Рисунок 5. Окно ввода пользователя и пароля на NWA210AX.
Далее переходим в раздел Configuration —> AP Management. Нам необходимо настроить SSID профили.
В данном случае у нас два профиля: Wiz_SSID_1 и Wiz_SSID_2.
Для их настройки на соединение с RADIUS нужно задействовать элементы вызова окна редактирования (отмечено красным контуром на рисунке 6).
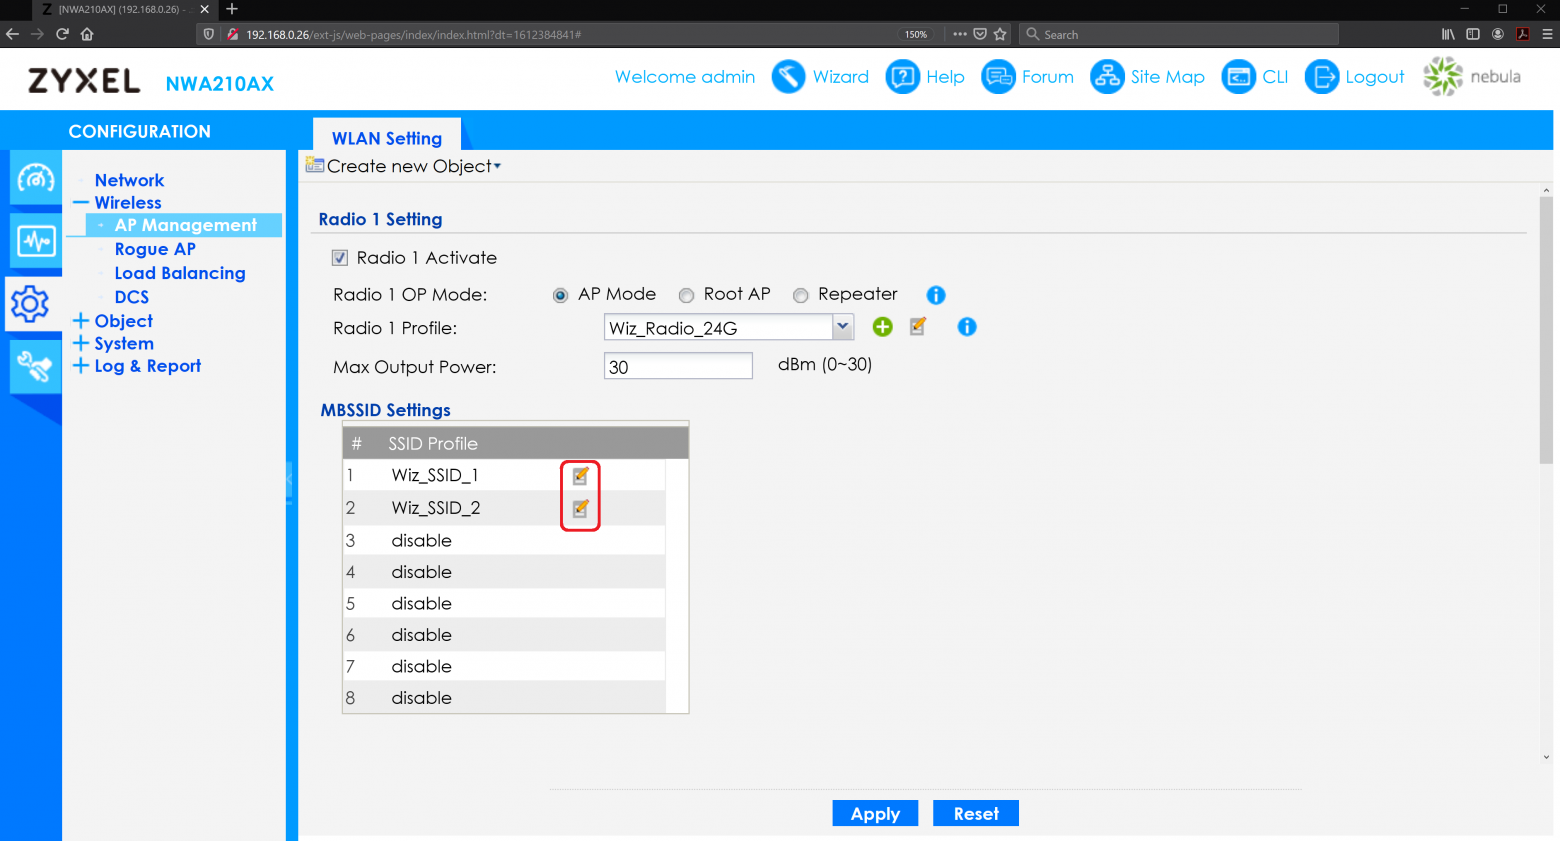
Рисунок 6. Раздел Configuration —> AP Management. Вызов окна редактирования SSID профиля.
Появится окно Edit SSID Profile Wiz_SSID_1.
В нём нас интересует переход к настройкам Security Profile (отмечено красным контуром на рисунке 7).
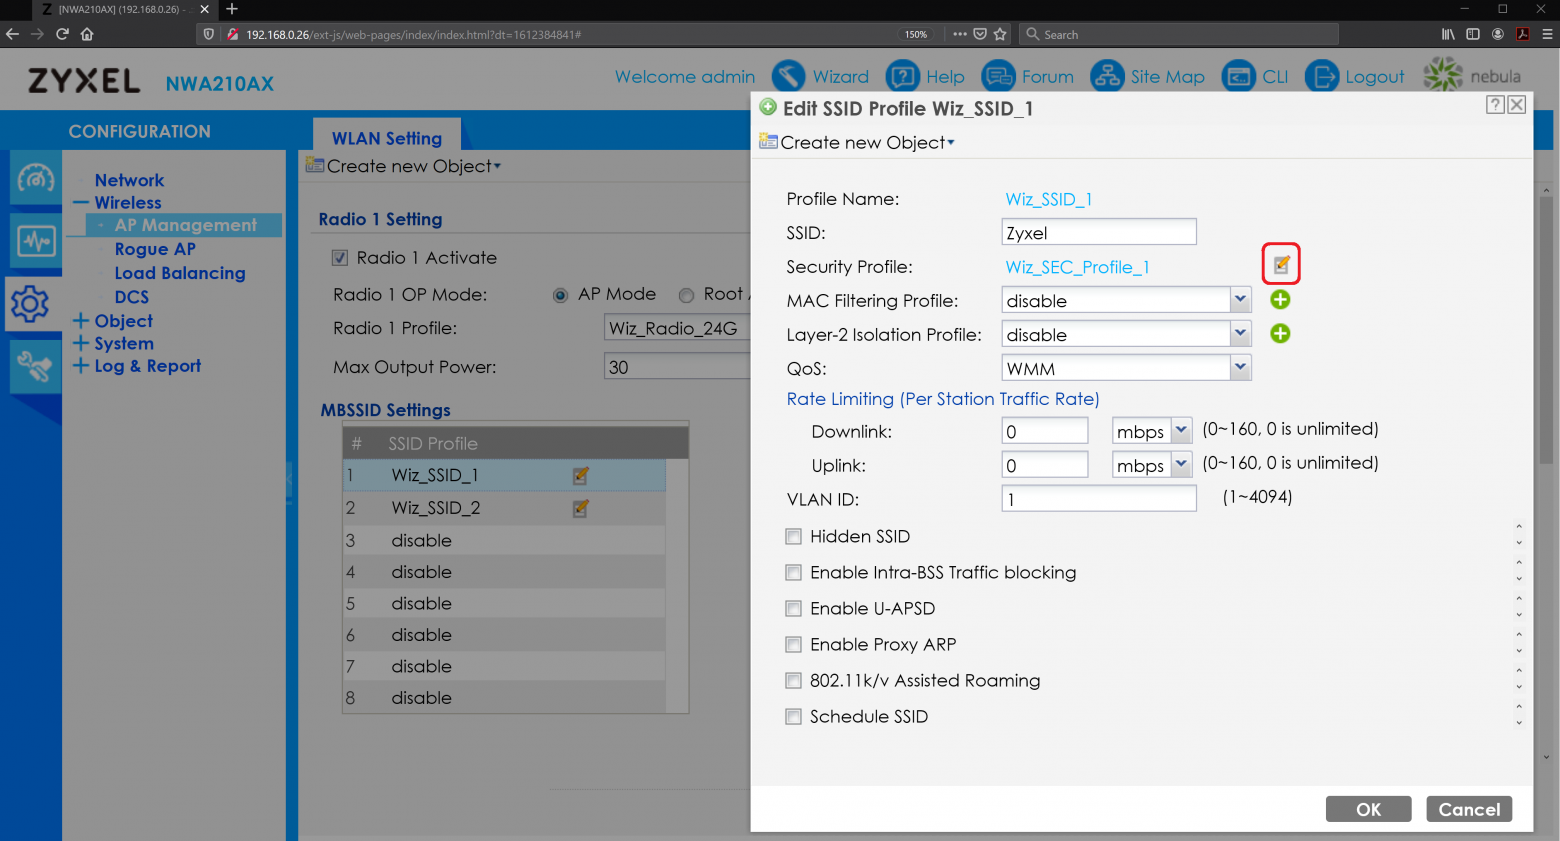
Рисунок 7. Окно Edit SSID Profile Wiz_SSID_1.
В появившемся окне Edit Security Profile Wiz_SEC_Profile_1 включаем опцию Primary Radius Server Activate и заполняем поля в соответствии с записями в файле /etc/raddb/clients нашего FreeRADIUS (отмечено красным контуром):
- Radius Server IP Address,
- Radius Server Port,
- Radius Server Secret.
Если есть резервный сервер RADIUS, то необходимо включить Secondary Radius Server Activate и заполнить для него значения (отмечено синим подчёркиванием). У нас тестовая среда, но в production наличие резервного сервера аутентификации обязательно.
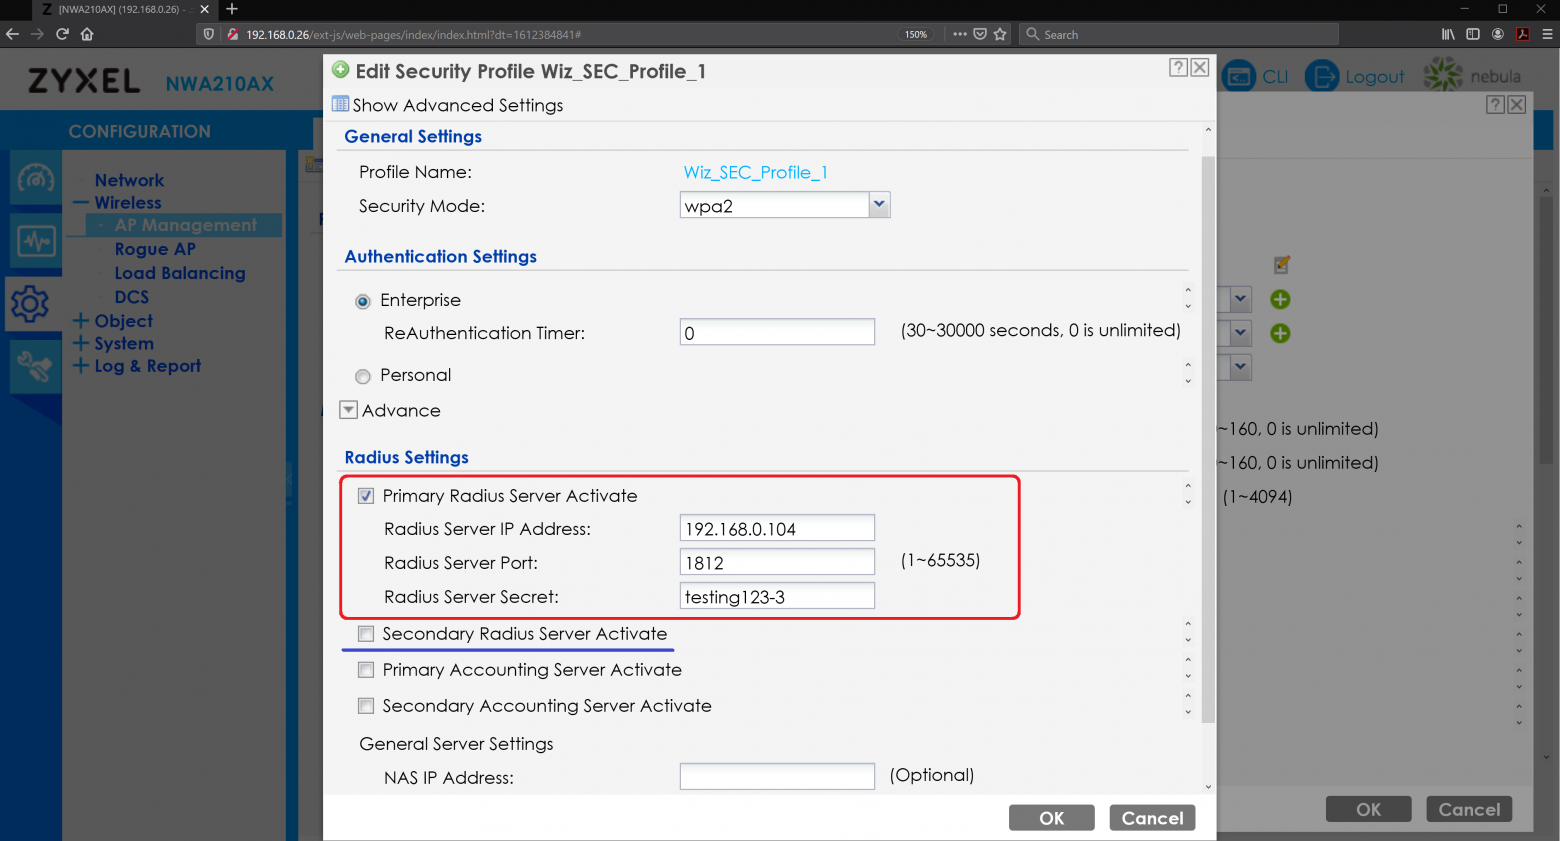
Рисунок 8. Окно Edit Security Profile Wiz_SEC_Profile_1.
Среди прочего присутствует вкладка Advance, в которой можно задать дополнительные значения. В данном случае у нас довольно простой пример, поэтому лучше оставить всё по умолчанию.
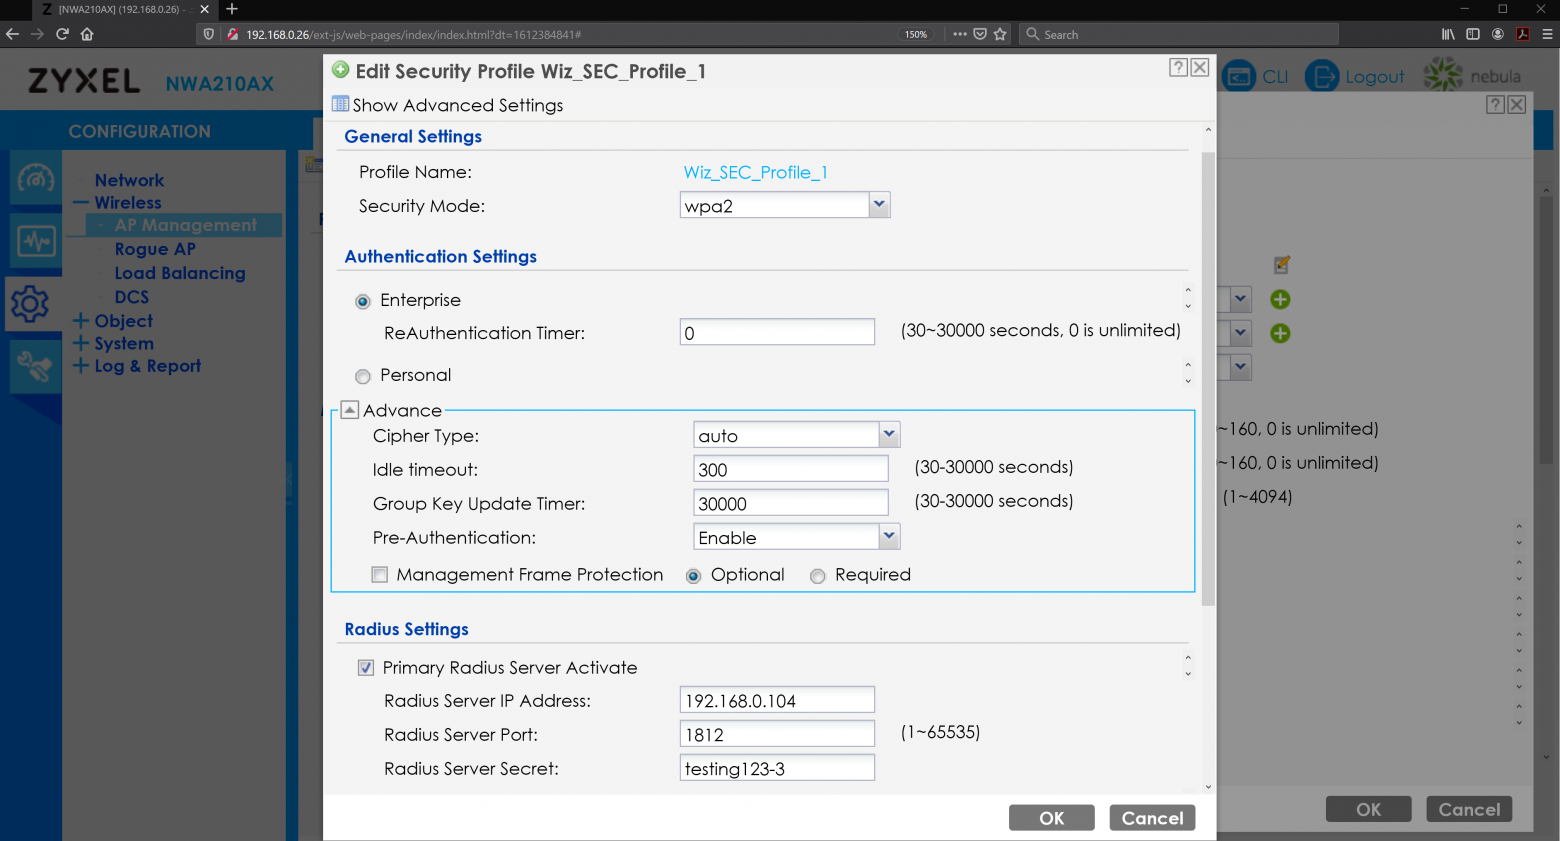
Рисунок 9. Окно Edit Security Profile Wiz_SEC_Profile_11 с раскрытой вкладкой Advance.
Проверка подключения
Как уже было сказано выше, более или менее точно процесс установки беспроводной связи иллюстрирует интерфейс Mac OS Х.
После того, как в списке подключений нашли соответствующий пункт (по умолчанию он называется Zyxel), операционная система показывает окно ввода имени пользователя и пароля/ключа, хранящегося в системе RADIUS.
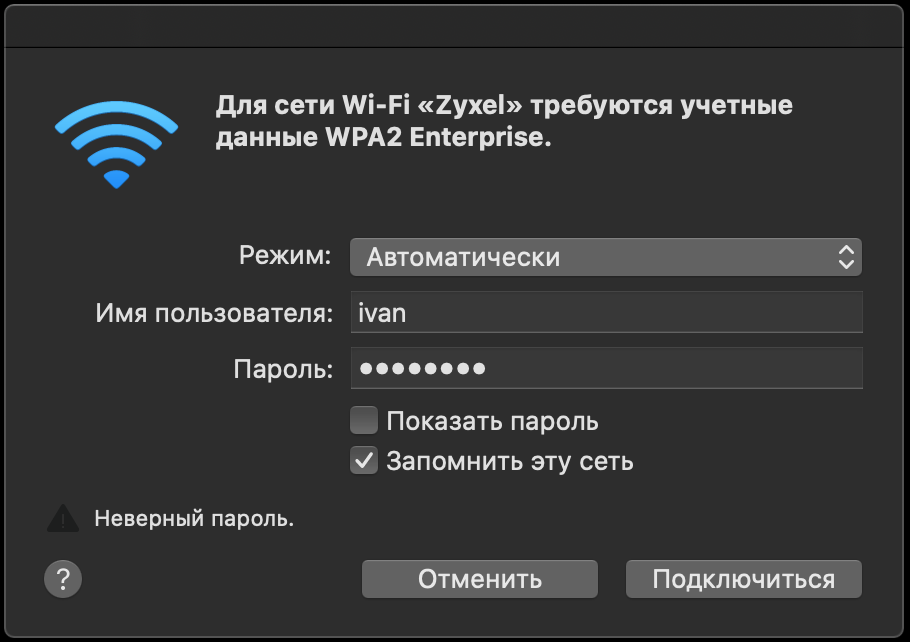
Рисунок 10. Запрос имени пользователя и пароля для входа в беспроводную сеть.
Далее происходит передача сертификата. В OS X об этом свидетельствует окно для подтверждения использования сертификата.
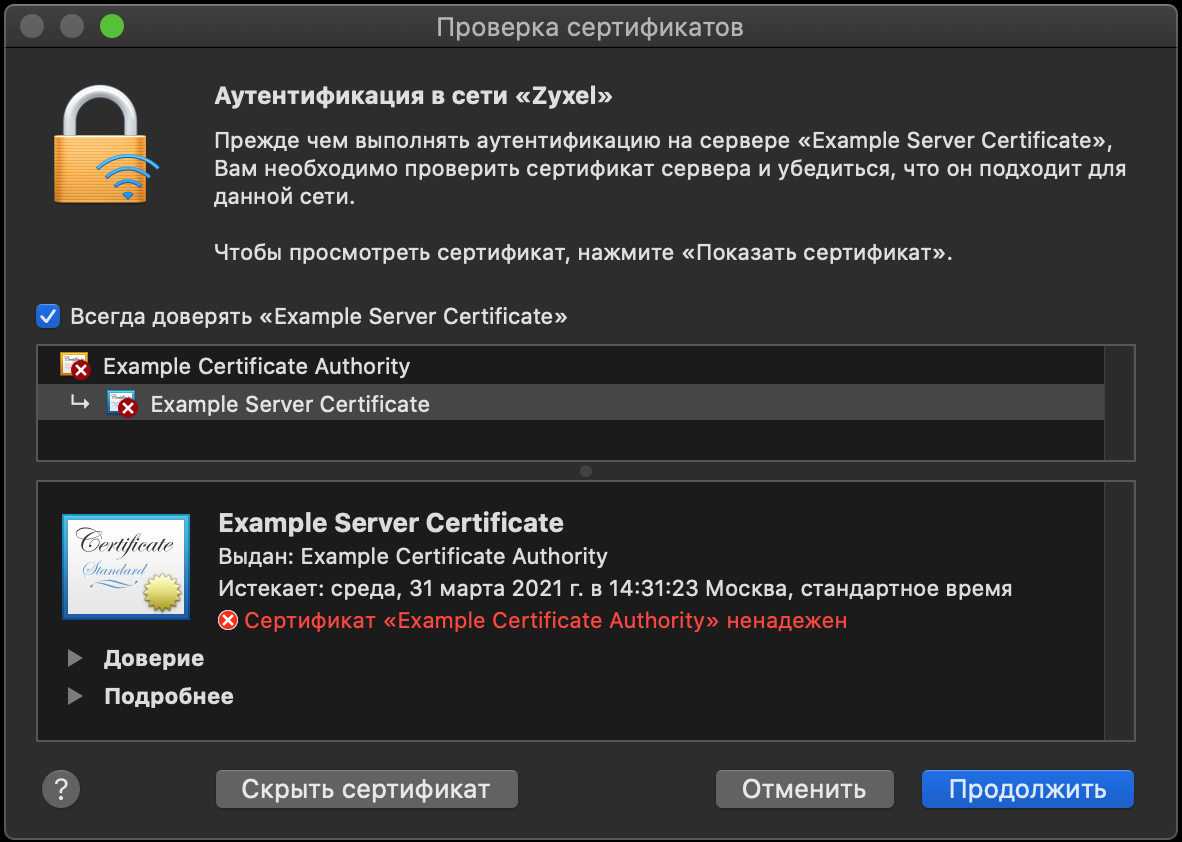
Рисунок 11. Окно проверки сертификата. Дополнительно нажата кнопка «Показать сертификат».
После этого можно работать, например, зайти по адресам, указанным в разделе Полезные ссылки (в конце статьи).
Заключение
Как видим, даже для такого простого примера нам потребовалось довольно много действий. Теперь представьте, что точек в сети довольно много. Позже мы рассмотрим, как можно обеспечить подобную систему аутентификации с меньшими усилиями благодаря облачной систем управления Zyxel Nebula или встроенным аппаратным решениям Zyxel.
Полезные ссылки
- Telegram chat Zyxel
- Форум по оборудованию Zyxel
- Много полезного видео на канале Youtube
- Особенности защиты беспроводных и проводных сетей. Часть 1 — Прямые меры защиты
- Двухдиапазонная точка доступа 802.11ax (WiFi 6) NWA210AX
- Zyxel ONE Network Utility (ZON)
- Домашняя страничка проекта FreeRADIUS
- Zyxel Nebula
In this guide we will setup a wireless network base on WPA2-Enterprise .
The hardware that we’ll use are Unifi APs with relative software controller and a Microsoft AD with NPS installed.
- Create a SelfSign certificate
- Add and configure NPS /Radius on our Windows 2019
- Create a Radius profile on your Unifi controller
- Configure the NPS and APs
- Create a WiFi network with WPA2-Ent
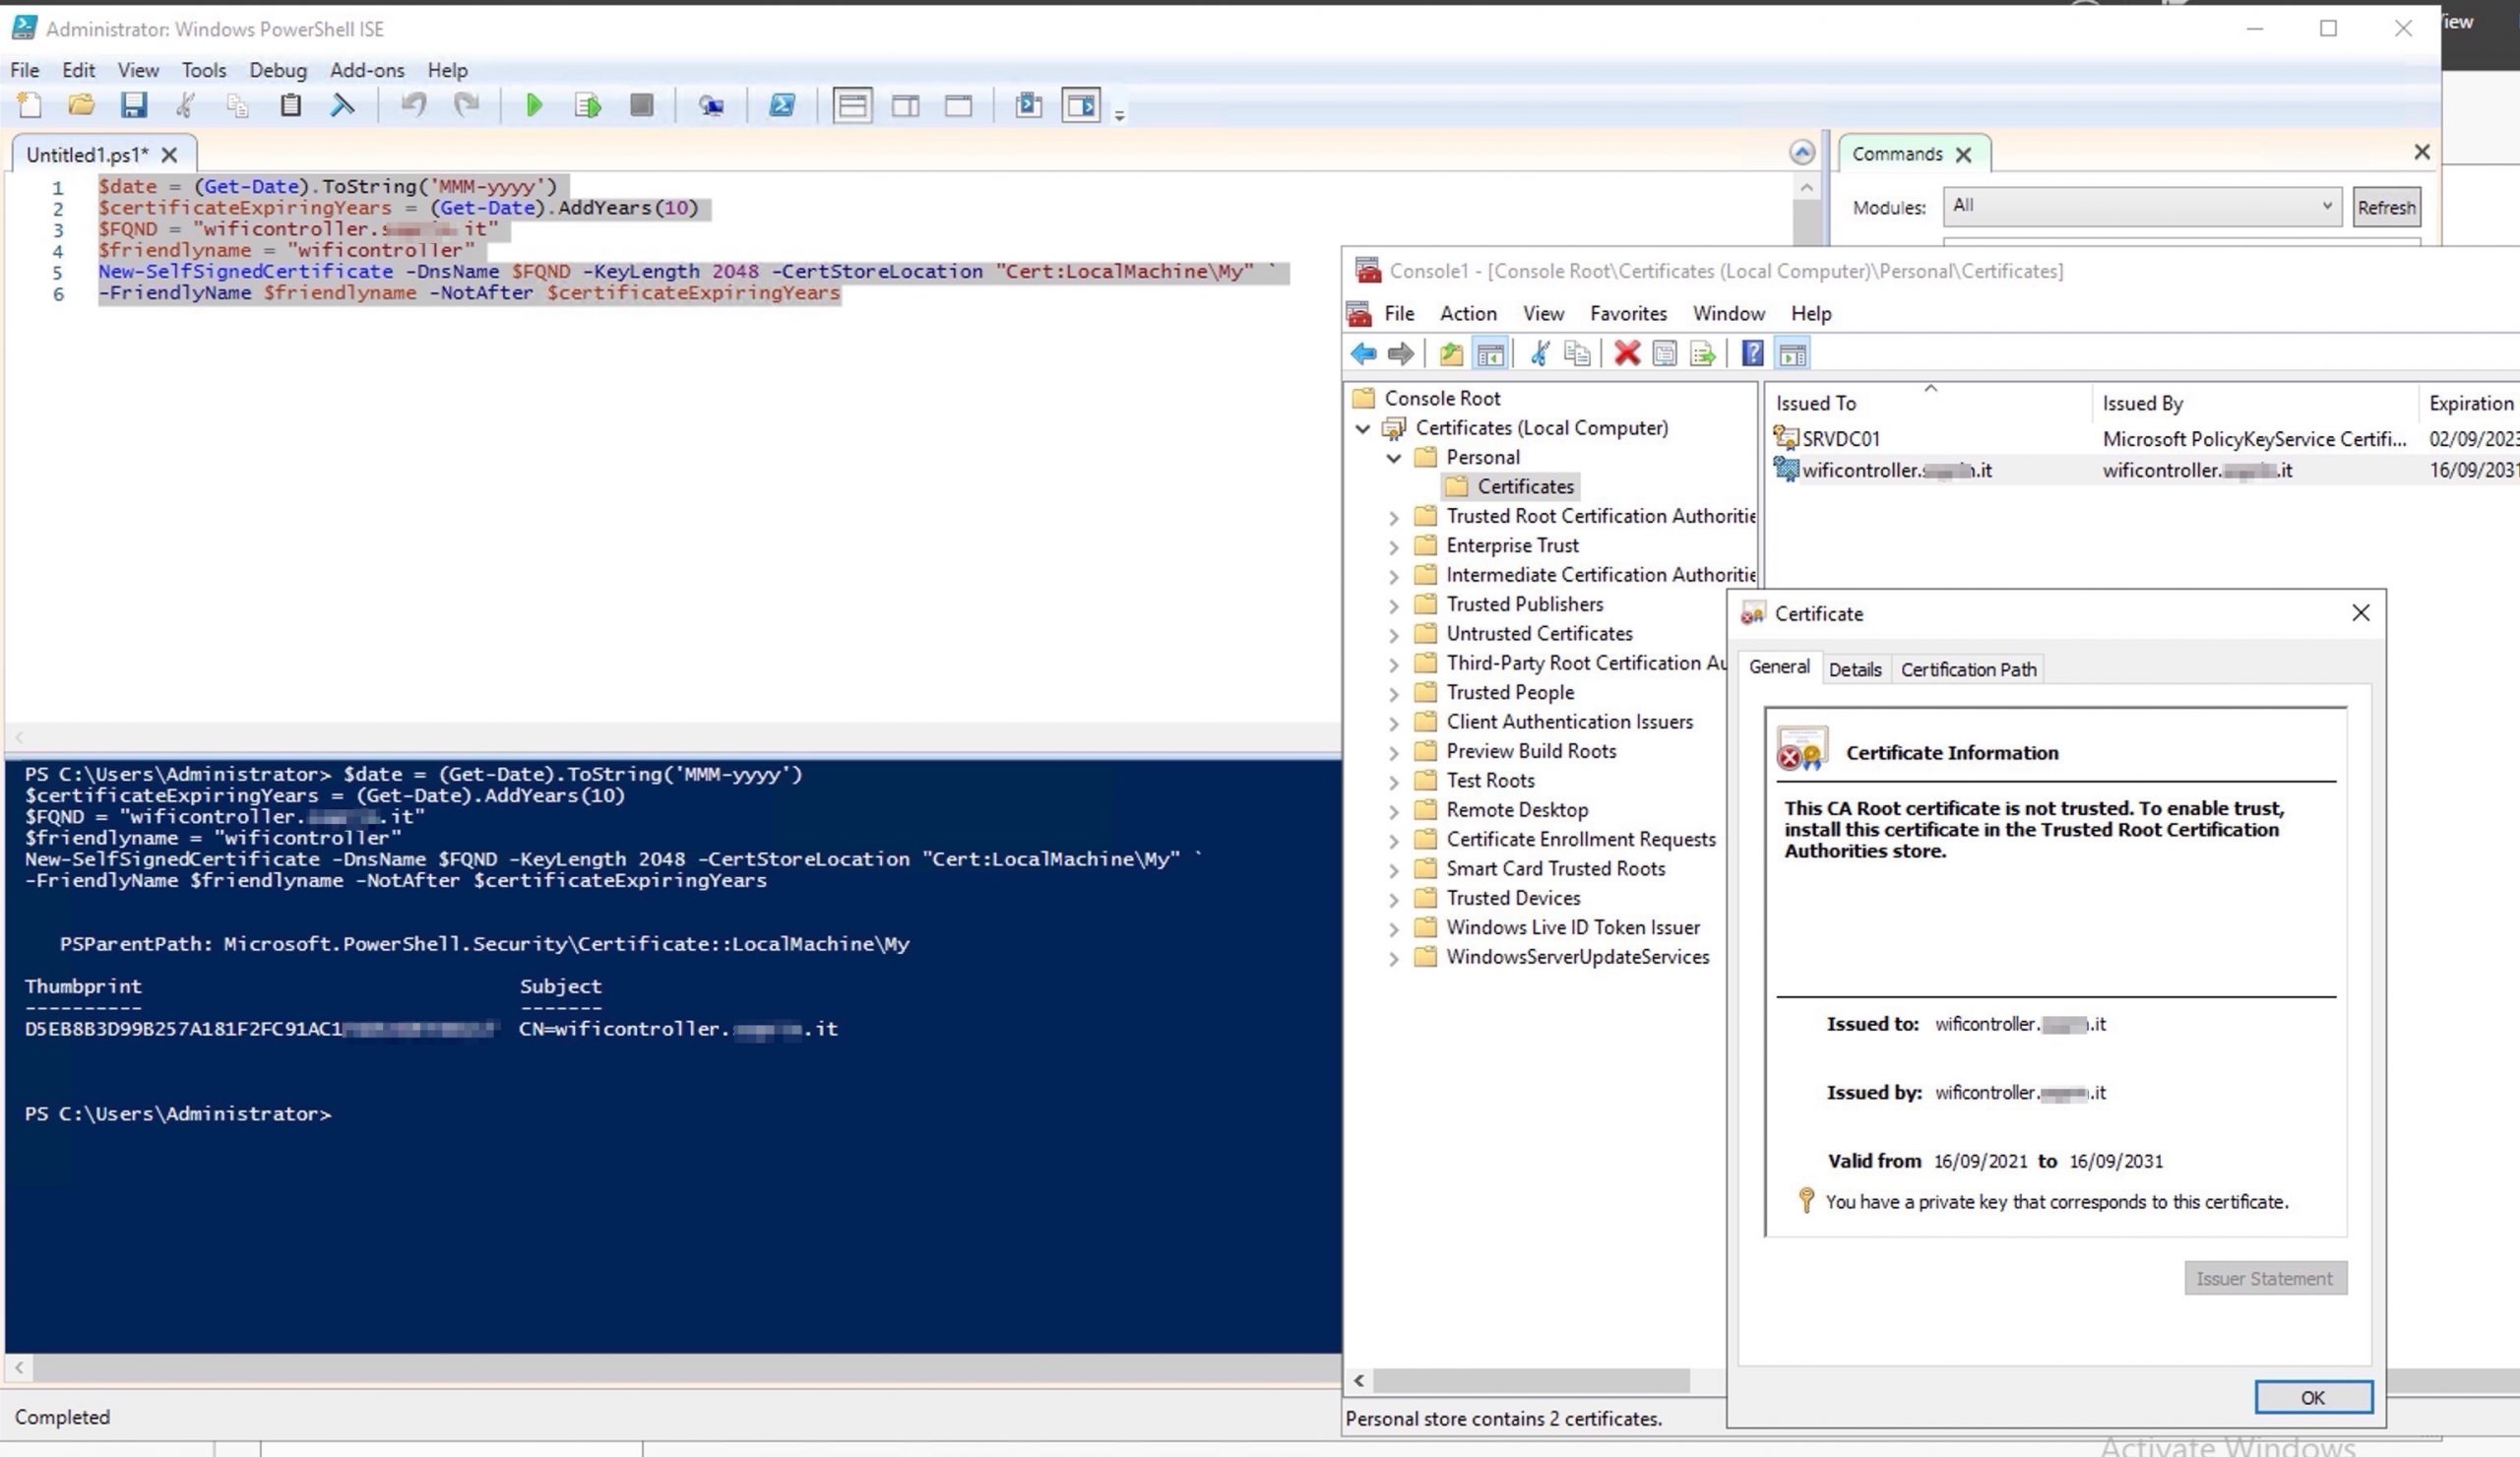
1)Create a Self-sign certificate for your WPA2-Ent
|
$date = (Get—Date).ToString(‘MMM-yyyy’) $certificateExpiringYears = (Get—Date).AddYears(10) $FQND = «wificontroller.xxxxxx.it» $friendlyname = «wificontroller» New—SelfSignedCertificate —DnsName $FQND —KeyLength 2048 —CertStoreLocation «Cert:LocalMachine\My» ` —FriendlyName $friendlyname —NotAfter $certificateExpiringYears |
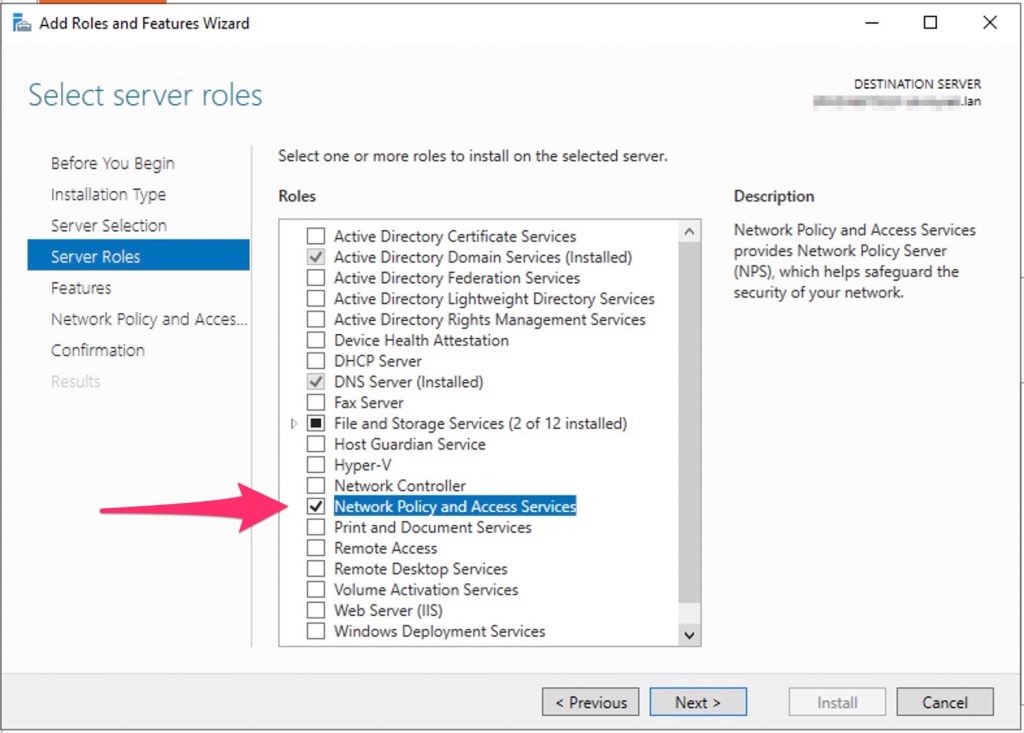
2) Add and configure and NPS /Radius on your Windows 2019
Open server manager and add the NPS role.
3) Now, go to the controller and create a new “radius profile”
4)Configure the NPS and APs
Now create a Policy that contains a dedicated AD group In my case I used all Domain Users.
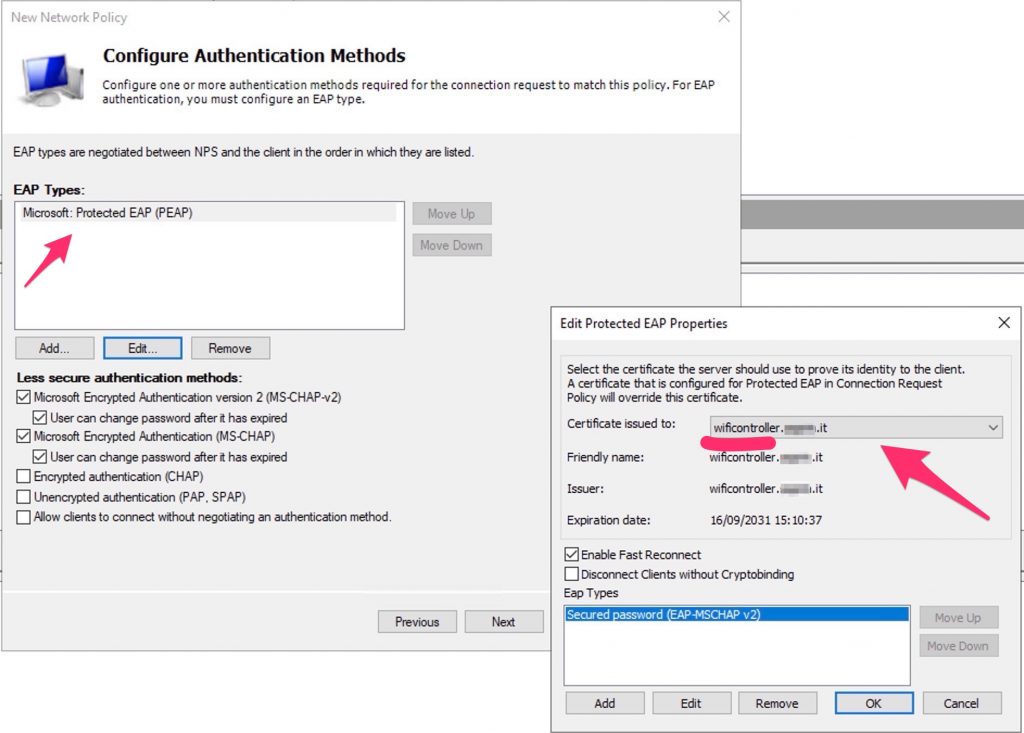
Select EAP and the Cert previously created
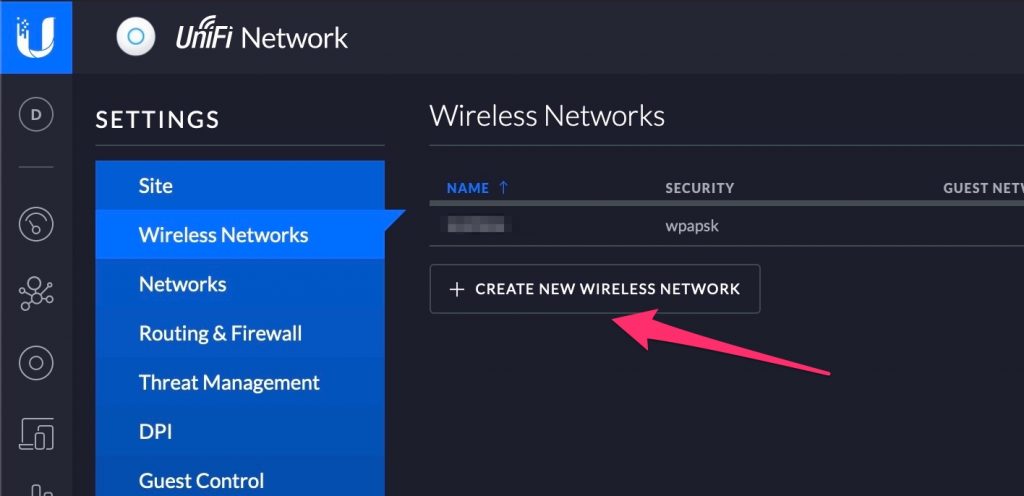
5) Create a WiFi network with WPA2-Ent
Open the Unifi Controller and create a new Wifi Net.
Select WPA Enterprise and the Radius profile previously created.

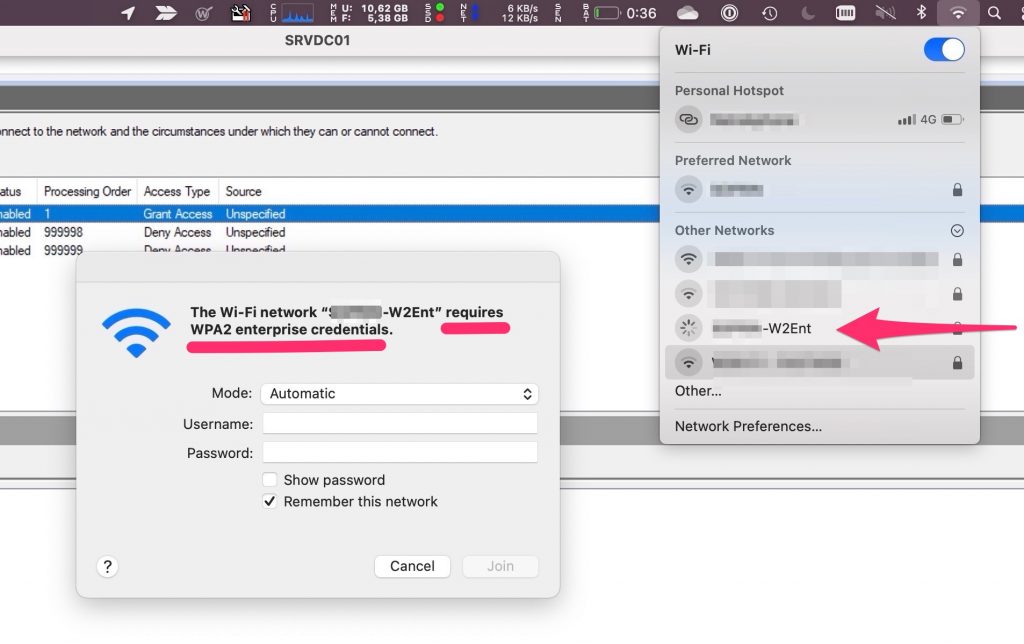
Now try to connect…
Done!
Below is a quick guide on how to setup WPA2-Enterprise with Meraki Wireless Cloud based Solution using Microsoft Windows 2008R2 server.
This will allow your Windows authenticated users seamlessly to connect onto a SSID you present without them having to enter any key etc… It will negotiate trust based on certificate and AD credentials cached onto the machine transparently.
1) Setup a Windows 2008R2 server and install the NPS (Network Policy Server) role on the server.
2) Open NPS on the server. Select “Templates Management” and right-click “Shared Secret”
3) Right click and select “New Radius Shared Secret Template”
4) Give the template a name and select “manual” and a “shared secret”. Select “OK”

5) Next select “RADIUS Clients” and “new” under “RADIUS Clients and Servers”

6) Add each Meraki AP you will enable WPA2-Enterprise. Give it a “friendly name”, “static IP” of the AP and then “shared secret” from the template created earlier.

7) Next right-click “Connection Request Policies” and select “new” under “Policies”

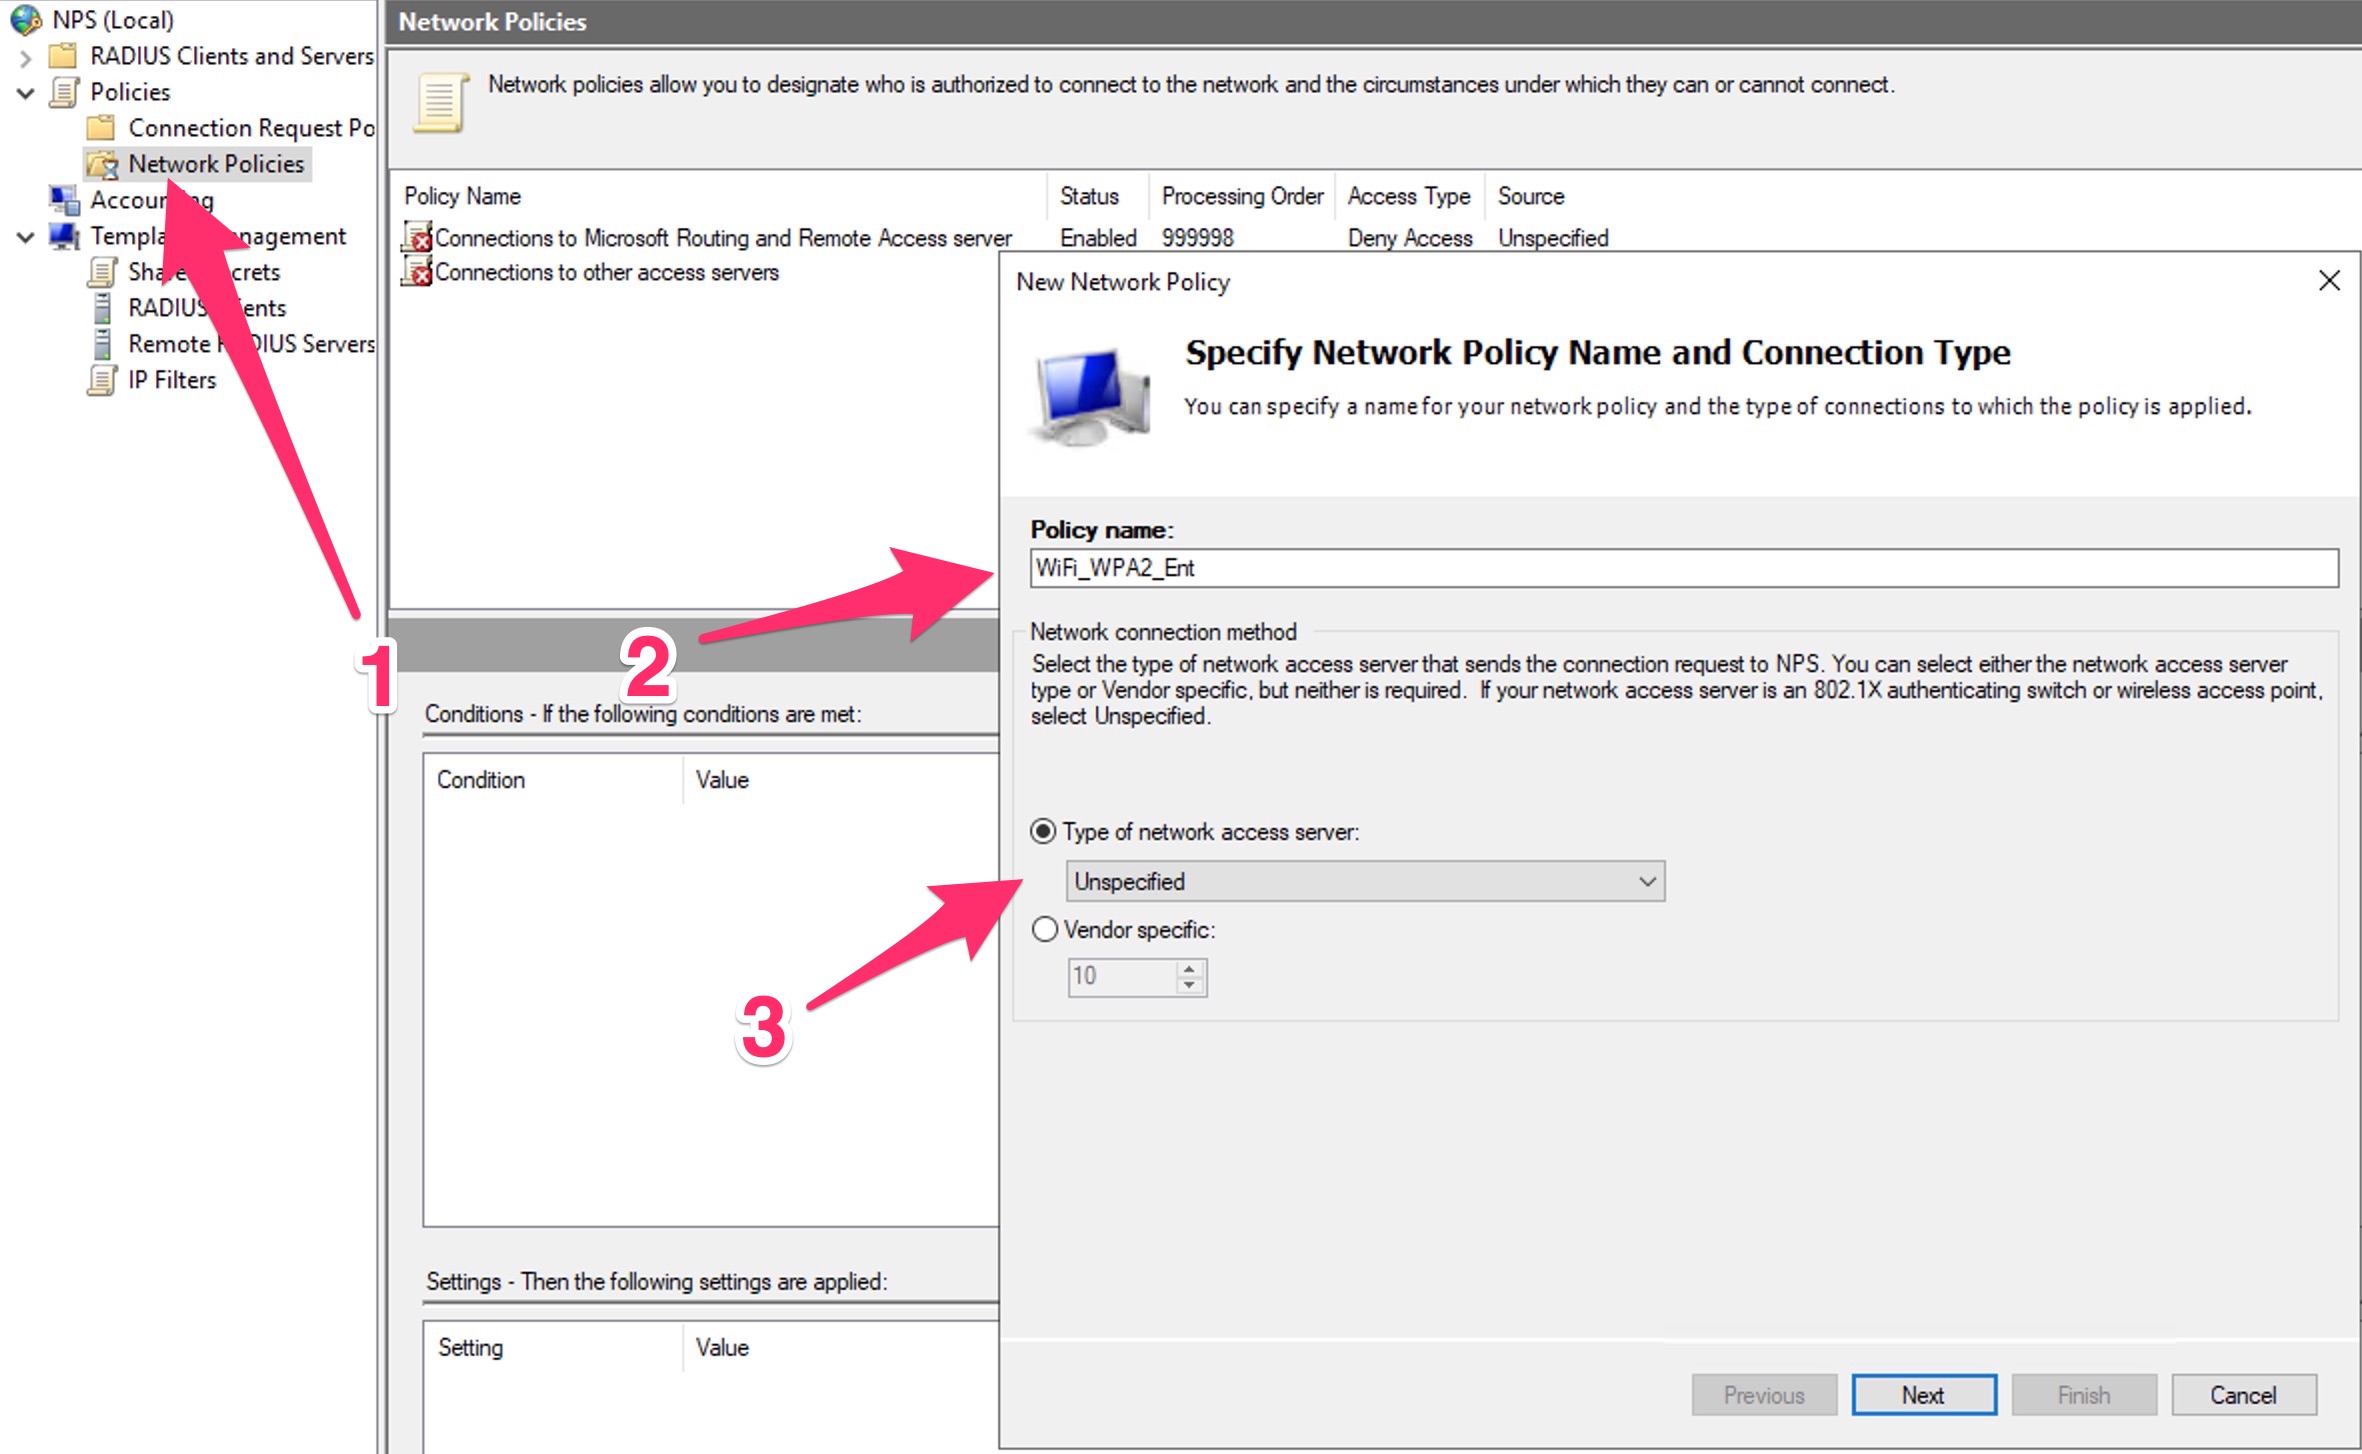
 Give it a policy name. Make sure policy is “enabled” and type of network access server is set to “Unspecified”

9) Select the “Conditions” tab and select “add”. Then tick “Wireless – IEEE 8.02.11 under “Common 802.1X connection tunnel types”. Also tick “Wireless – Other” under “Others”. Select “OK” twice to exit policy (rest default).

10) Next right-click “Network Policies” and “new” under “Policies”.
11) On the “Overview” tab select:
a) Policy Name: Give it a friendly name
b) Policy State: “Policy Enabled”
c) Access Permission: “Grant Access” and tick “Ignore user account dial-in properties”
d) Network Connection Method: “Unspecified”

12) Next select “Conditions” tab -> “add” and make sure you have:
a) NAS Port Type: Wireless – IEEE 802.11 or Wireless – Other (same as before)
b) I have specified a “Windows Group” – domain users. You can make a specific group if you want to tie down who can use the wireless.

13) Under “Constraints” tab -> Follow the screen shot below. We have an internal CA that handles all the certificates. If you don’t have this in place you can install IIS 7.5 on the server and assign a self signed certificate.


14) Now login to your Meraki Dashboard and select the “Network” you want to enable WPA2-Enterprise.
15) Select “Configure” and then “Access control” from the menu on the left. Make sure the correct SSID is selected.
Select under:
a) Associations Requirements select: “WPA2-Enterprise with my RADIUS server”
b) Splash page: “None (direct access)”
c) RADIUS server: click “add server” and enter the NPS servers “internal IP” address with Port:1812 (make sure this is open through your firewall). Enter the same “shared secret” setup earlier.
16) Save and select “Test” option by entering network credentials of a user with password.
If all successful you are good to go!
