
Does the xtajit.dll/wow64cpu.dll/wowarmhw.dll file not found error has a serious negative impact on your computer? How can you get rid of this error message? Now read this tutorial on MiniTool to get simple fixes.
Wowarmhw.dll File Not Found Windows 10/11
When you run the Autoruns tool to manage startup items or debug system problems, you may see some options marked in red or yellow, along with wowarmhw.dll file not found, wow64cpu.dll file not found, xtajit.dll file not found, etc.
There are many reasons for this error, such as human mistaken deletion, incorrect Windows update, third-party software interference, virus infection, etc.
Should the Wowarmhw.dll File Not Found Error Be of Great Concern to You?
The wowarmhw.dll file is a legitimate system file in Windows OS, mainly used to run 32-bit applications on 64-bit Windows systems. It is not part of the standard Windows system installation package, so the wowarmhw.dll file not found error usually does not have a significant impact on system stability and security. Therefore, if you do not feel that it interferes with normal system operation, you can ignore it.
However, some of you may find that this error causes certain applications to not run or work properly, or that something goes wrong with your computer. Under these circumstances, you can use the following solutions to get rid of it.
Possible Fixes to the Autoruns Missing Files Error on Windows
Method 1. Re-Register These Entries
Wowarmhw.dll file not found or missing errors may be caused by the DLL file not being properly registered with the system or being corrupted. Using the regsvr32 command to complete the DLL file re-registration task may be a good way to solve the problem. You can refer to the following steps:
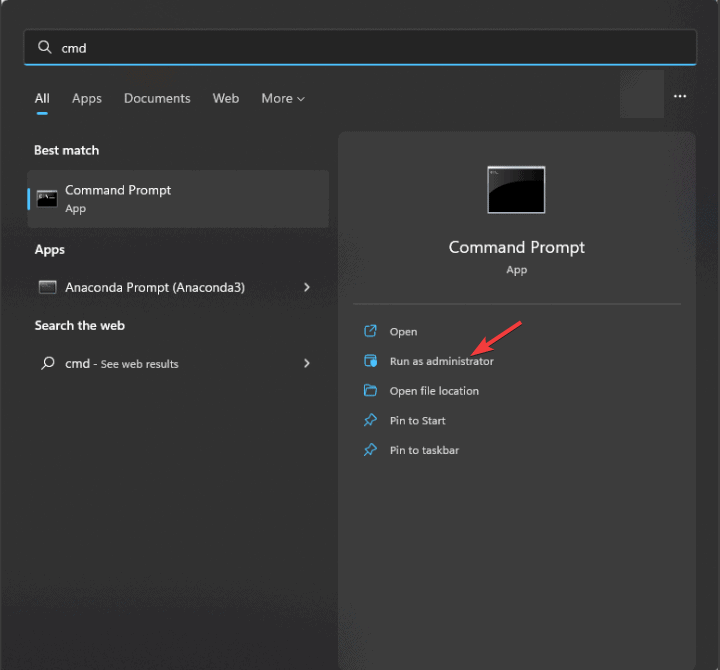
Step 1. In the Windows search box, type cmd. When the Command Prompt window shows up, hit the Run as administrator option from the right panel.
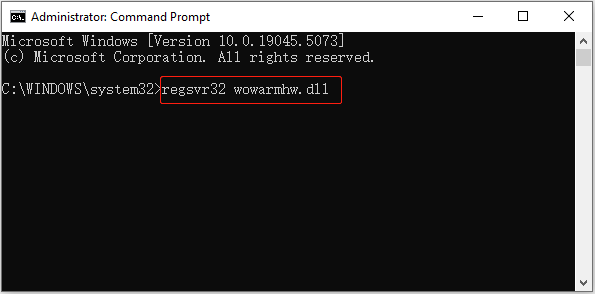
Step 2. Type regsvr32 wowarmhw.dll in the new window and press Enter to execute it.
Step 3. Duplicate this step to run the corresponding command lines to register the xtajit.dll file and the wow64cpu.dll file.
Method 2. Repair/Reset/Reinstall the Affected Programs
If some applications work improperly due to the wowarmhw.dll file not found error, you can try to repair the program. If this does not help, you can reset or reinstall the affected application.
How to repair/reset an app:
Step 1. Press the Windows + I key combination to open Settings.
Step 2. Select Apps.
Step 3. Scroll down the app list until you find the target app, click it, and hit Advanced options.
Step 4. In the new window, hit Repair to fix it. If it does not help, hit Reset.
After repairing/resetting the software, you can check if it runs smoothly. If not, you can uninstall it from the Control Panel and then download it from the Microsoft Store.
Tips:
Some programs are unable to be uninstalled due to certain errors. If you are in this situation, you can use MiniTool System Booster to uninstall them. This professional PC tune-up software can help complete diverse computer optimization tasks including removing programs. It has a 15-day free trial.
MiniTool System Booster TrialClick to Download100%Clean & Safe
Method 3. Run DISM and SFC Scans
DISM and SFC utilities are designed to detect and fix corrupted system files. You can use them to fix the wowarmhw.dll file not found error if it caused by damaged system files.
Step 1. Run Command Prompt as administrator.
Step 2. Type the following commands one by one, and press Enter after each command.
- Dism /Online /Cleanup-Image /CheckHealth
- Dism /Online /Cleanup-Image /ScanHealth
- Dism /Online /Cleanup-Image /RestoreHealth
Step 3. Once the DISM commands are executed, type sfc /scannow and press Enter.
Method 4. Recover Deleted DLL Files
When you are in a situation where DLL files have been deleted, you can check to see if they are in the Recycle Bin. If yes, right-click on them and choose Restore to restore them to their original locations. If they are not in the Recycle Bin, you can use MiniTool Power Data Recovery to recover them.
MiniTool Power Data Recovery is a secure and green file recovery tool developed for recovering documents, photos, videos, audio, emails, and other types of data on Windows 11/10/8.1/8. It provides you with a 1 GB of free data recovery capacity. Download it and have a try.
MiniTool Power Data Recovery FreeClick to Download100%Clean & Safe
See How to Recover Deleted DLL Files and Prevent Them From Being Lost.
Once you recover the DLL files, you can put them in the target directory shown in the error prompt interface.
Bottom Line
To sum up, this post focuses on the wowarmhw.dll file missing or not found error and shares you with several easy fixes for troubleshooting. Hope they are beneficial to you.
Readers help support Windows Report. We may get a commission if you buy through our links.
Read our disclosure page to find out how can you help Windows Report sustain the editorial team. Read more
Wowarmhw.dll, along with WoW64cpu, wow64, xtajit, and wow64win, are legitimate system files in Windows 10 and are part of the WOW64 emulator present in Windows 10. These files allow 32-bit apps to run on a 64-bit Windows system.
If Wowarmhw.dll is missing or can’t be found on your computer, it could be due to a corrupted DLL file, malware infection, or missing essential system files.
To begin with, restart your computer, ensure your Windows is up to date, and run a malware scan using a reliable antivirus tool.
How can I get rid of the Wowarmhw.DLL missing error?
1. Use a third-party DLL fixer tool
The Wowarmhw.DLL file is an important system file. It is part of the Windows WOW64 subsystem and helps manage the translation and execution of 32-bit code into a 64-bit environment.
If you have another computer with the same version of Windows, you can head to C:\Windows\SysWOW64, copy the Wowarmhw.DLL file, and paste it into the affected computer at the exact location. However, if you are not sure about the file or device you are using, it is best to use a third-party DLL fixer tool.
These tools can help you recover DLL files quickly and without any hassle. You only need to download and install the app and run it to restore the missing DLL files. This will resolve conflicts between OS and third-party apps and optimize your device’s performance.
2. Reregister the DLL file
- Press the Windows key, type cmd in the search box, and click Run as administrator to launch Command Prompt with elevated rights.

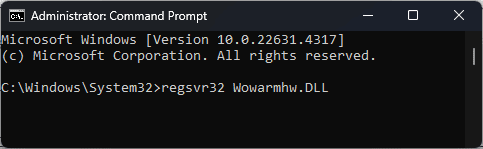
- Copy & paste the following command to reregister the Wowarmhw.DLL and press Enter:
regsvr32 Wowarmhw.DLL
- Click OK when prompted and restart your computer.
Sometimes, the file is already in the system and only needs to be re-registered. Refreshing the file registration within the Windows system can resolve the missing DLL file problem.
3. Repair/Reinstall the affected app
- Press Windows + I to open the Settings app.

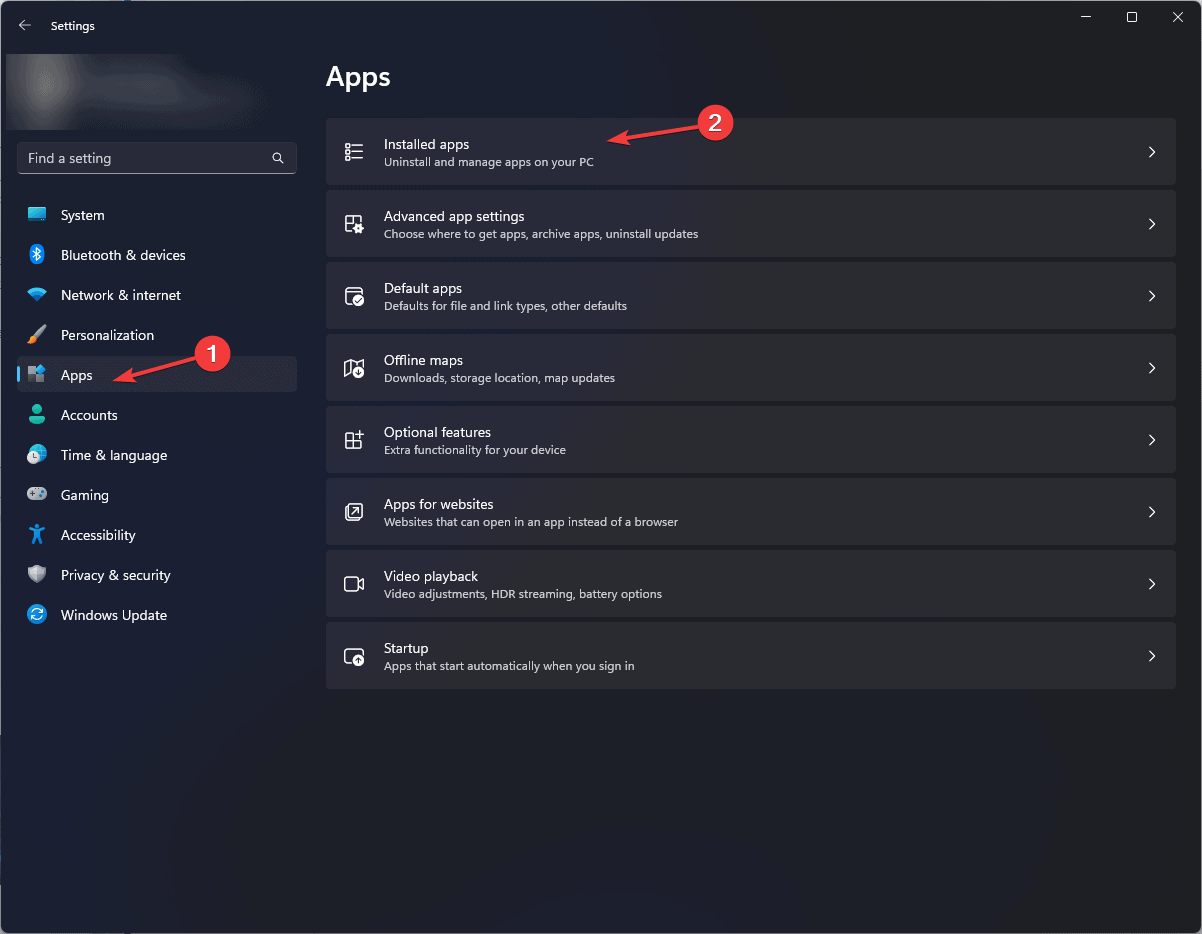
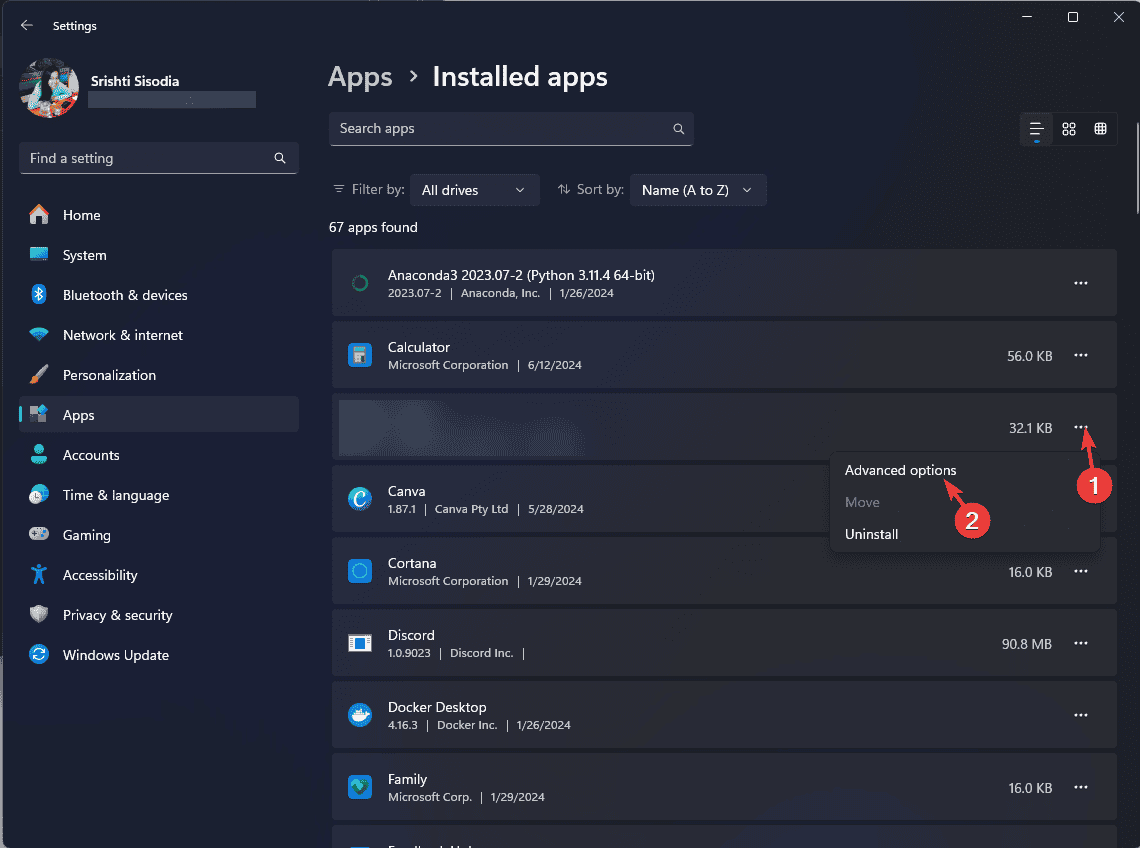
- Go to Apps, then click Installed apps to get the list of installed applications.
- Locate the affected app, click the three dots icon, and select Advanced options from the context menu.

- Go to the Reset section and click the Repair button. This process may take some time, but rest assured your app data will not be removed.

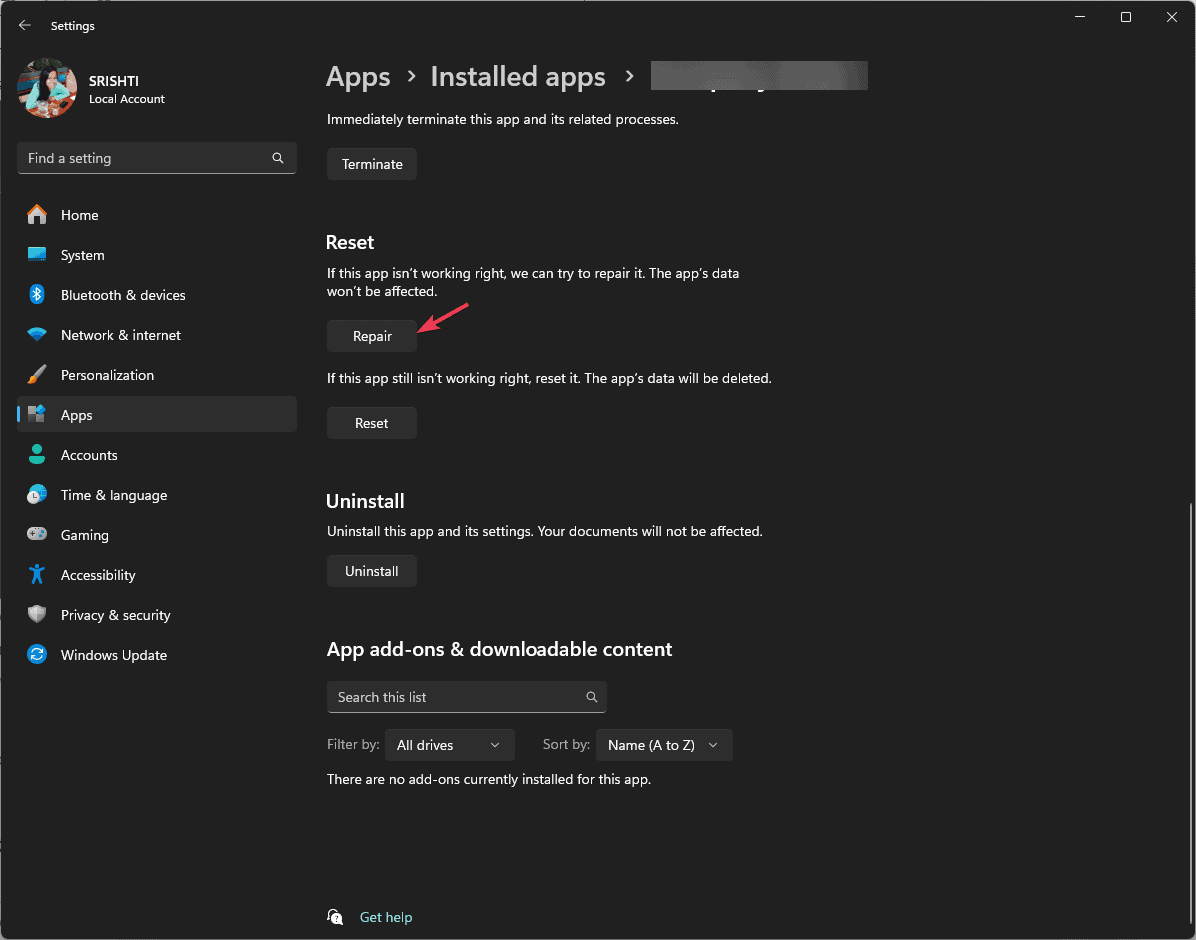
If repairing the app doesn’t fix the issue or the option is not available for the app, try reinstalling it. For that, follow these steps:
- Go to the Installed apps list in Settings again.
- Navigate to the affected app, click the three dots icon, and select Uninstall.

- Click Uninstall again and follow the on-screen instructions to complete.
- Open the Microsoft Store or the app’s official website, and click Download/Get to reinstall the app.
- Once done, reboot your computer.

4. Run SFC & DISM scans
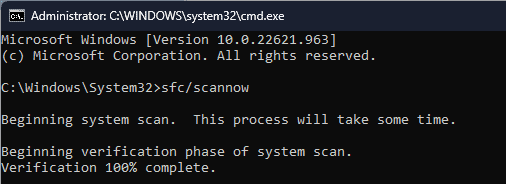
- Press the Windows key, type cmd in the search box, and click Run as administrator to launch Command Prompt with elevated rights.

- Click Yes on the UAC prompt.
- Copy & paste the following command to restore/repair the Windows system files and press Enter:
sfc/scannow
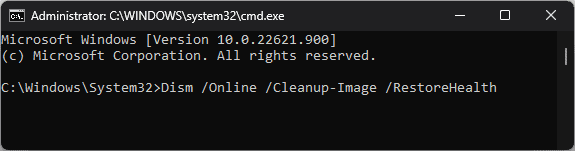
- Wait for the scan to execute, type the following command to scan the Windows image for corruption and repair it via Windows Update, and hit Enter:
Dism /Online /Cleanup-Image /RestoreHealth
- Once the scan is complete, restart your PC to let the changes take effect.
Read more about this topic
- Mfc120.dll is Missing in Windows: 7 Ways to Download the DLL
- How to Fix ERROR_WAIT_NO_CHILDREN 128 (0x80)
- Dism Host Servicing Process: 7 Ways to Reduce High CPU Usage
- Libgcc_s_dw2-1.dll Was Not Found: How to Get it Back
5. Perform a System Restore
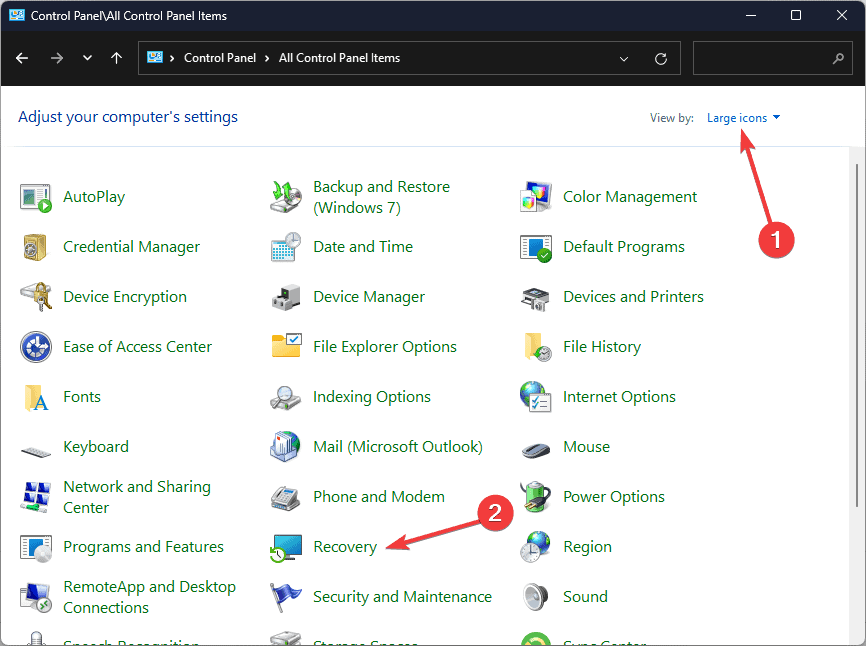
- Press the Windows key, type control panel in the search bar, and click Open to launch Control Panel.

- Select Large icons for View by and select Recovery.

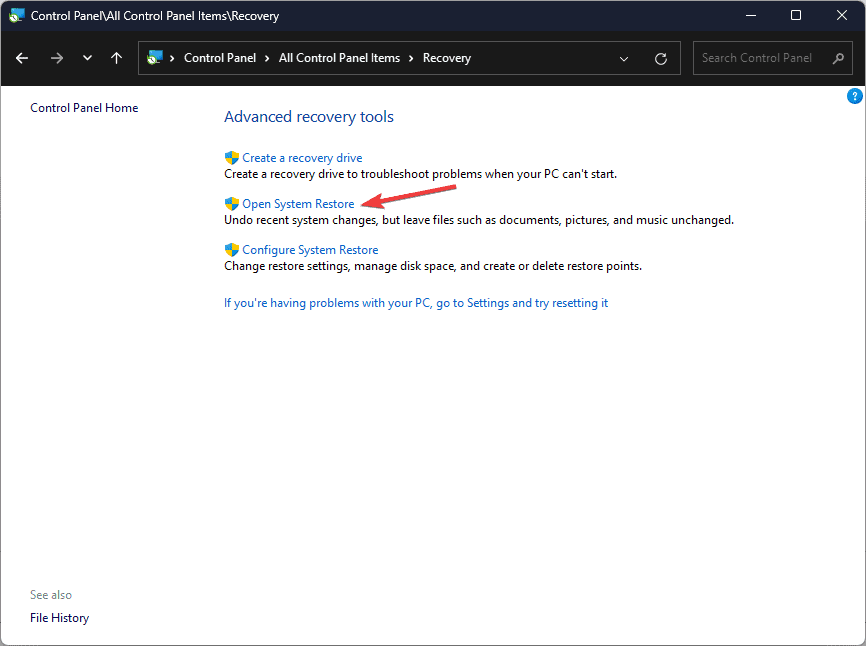
- Click the Open System Restore link.

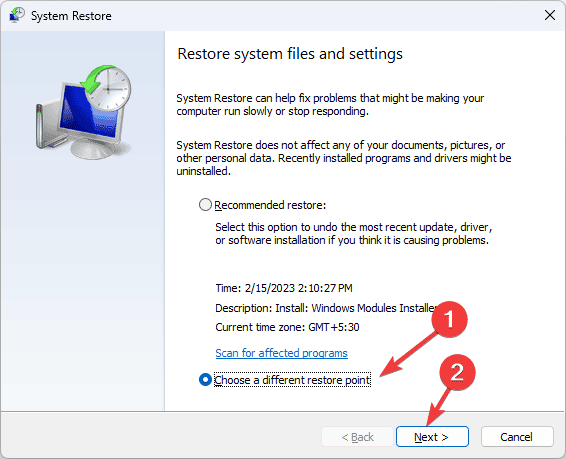
- Select Choose a different restore point on the System Restore window, then click Next.

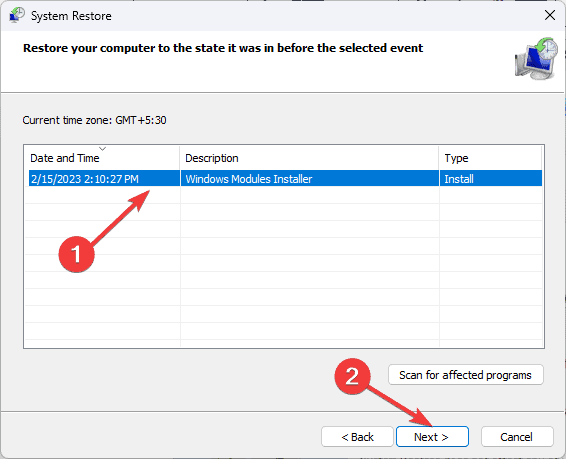
- You will get a list of available restore points on your computer. Select the restore point created before encountering the missing DLL error and click Next.
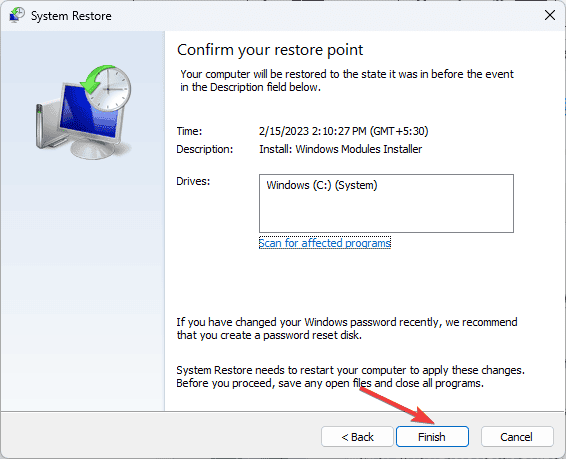
- Click Finish to initiate the process.

Windows will restart and restore to the chosen version. If you see the System Restore didn’t complete the error successfully, it could be due to conflicting programs or driver error, we recommend you check out this detailed guide for solutions.
6. Download the DLL file manually
NOTE
The last resort to get the DLL file is to download it from a reliable third-party website, like DLL-FILES, which has been verified and tested by WR experts.
- Click the DLL-FILES website to access the wowarmhw.dll page, then click Download.
- Double-click the downloaded folder to open, locate, and copy the .dll file.
- Go to this path and paste the DLL file. Don’t forget to replace C with your system drive letter if it is not C for you:
C:\Windows\SysWOW64 - Restart your PC to save the changes.
This is how you can fix the wowarmhw.dll missing error. However, if you are facing the same issue due to any other DLL file, this guide can help you quickly recover the DLL file.
If you want to learn more about the causes of missing DLL files on Windows, we have a separate guide for you. You can also fix a similar issue with the IEShims.dll guide.
Before you go, don’t forget to check out our latest guide on what to do if Invagent.DLL is missing from your computer.
Did we miss a step that helped you fix this missing DLL error? If so, share the method in the comments section below, and we will add it to the list.
Srishti Sisodia
Windows Software Expert
Srishti Sisodia is an electronics engineer and writer with a passion for technology. She has extensive experience exploring the latest technological advancements and sharing her insights through informative blogs.
Her diverse interests bring a unique perspective to her work, and she approaches everything with commitment, enthusiasm, and a willingness to learn. That’s why she’s part of Windows Report’s Reviewers team, always willing to share the real-life experience with any software or hardware product. She’s also specialized in Azure, cloud computing, and AI.
Skip to content
Navigation Menu
Provide feedback
Saved searches
Use saved searches to filter your results more quickly
Sign up
Appearance settings
Description
No size, version for Known dlls where image path is set to C:\WINDOWS\Syswow64
Steps to reproduce
Get-PSAutorun -KnownDLLs | ? Value -match "wow64" | ? { -not($_.Size)}

Path          : HKLM:\SYSTEM\CurrentControlSet\Control\Session Manager\KnownDLLs
Item          : _Wow64
Category      : Known Dlls
Value         : Wow64.dll
ImagePath     : C:\WINDOWS\Syswow64\Wow64.dll
Size          :
LastWriteTime :
Version       :

Path          : HKLM:\SYSTEM\CurrentControlSet\Control\Session Manager\KnownDLLs
Item          : _Wow64cpu
Category      : Known Dlls
Value         : Wow64cpu.dll
ImagePath     : C:\WINDOWS\Syswow64\Wow64cpu.dll
Size          :
LastWriteTime :
Version       :

Path          : HKLM:\SYSTEM\CurrentControlSet\Control\Session Manager\KnownDLLs
Item          : _Wow64win
Category      : Known Dlls
Value         : Wow64win.dll
ImagePath     : C:\WINDOWS\Syswow64\Wow64win.dll
Size          :
LastWriteTime :
Version       :
These above dll files only exist in System32
NB: wowarmhw.dll (not listed here) is not found
Environment data
> $PSVersionTable

Name                           Value
----                           -----
PSVersion                      5.1.16299.251
PSEdition                      Desktop
PSCompatibleVersions           {1.0, 2.0, 3.0, 4.0...}
BuildVersion                   10.0.16299.251
CLRVersion                     4.0.30319.42000
WSManStackVersion              3.0
PSRemotingProtocolVersion      2.3
SerializationVersion           1.1.0.1
- Dynamic-link library files are essential “guidelines” that store information and instructions that executable files, such as HelpPane.exe, should follow.
- If something happens to a generic DLL file, whether it’s lost or corrupted in some way, it can give you a “Runtime” error message.
- The error wow64.dll file indicates that the file is either corrupted, incorrectly installed, or removed from the system.
Unraveling the Enigma: Resolving the Wow64.dll Missing File Error
Update Windows: Ensure that your Windows operating system is up to date. Missing wow64.dll errors can sometimes be resolved by installing the latest Windows updates, as these updates often include fixes for known issues.
Understanding the Wow64.dll File
The Wow64.dll file is an essential component for running 32-bit applications on a 64-bit operating system like Windows 10. If you encounter a “Wow64.dll missing file” error, it can cause frustration and disrupt your PC’s functionality.
To fix this issue, you can follow these steps:
1. Open Command Prompt as an administrator by pressing Windows key + X and selecting “Command Prompt (Admin).”
2. In the Command Prompt, type “takeown /f C:\Windows\System32\wow64.dll” and press Enter. This command will give you ownership of the file.
3. Next, type “icacls C:\Windows\System32\wow64.dll /grant administrators:F” and press Enter. This command grants full control to administrators.
4. After that, copy the Wow64.dll file from a friend’s PC, USB drive, or a reliable software repository.
5. Paste the copied Wow64.dll file into the C:\Windows\System32 folder.
6. Restart your PC, and the error should be resolved.
By following these instructions, you can fix the Wow64.dll missing file error and get your PC up and running smoothly again.
A missing wow64.dll file can disrupt the functioning of 32-bit applications on a 64-bit operating system.
Downloading and Placing the Wow64.dll File
To fix the Wow64.dll missing file error on your Windows 10 PC, follow these simple steps:
1. Download the Wow64.dll file from a trusted source, such as the DLL database or Microsoft’s official repository.
2. Once downloaded, copy the Wow64.dll file to the appropriate location in your system. To do this, open File Explorer and navigate to the folder where the file needs to be placed.
3. Right-click on the folder and select “Properties.”
4. In the Properties window, go to the “Security” tab and click on “Advanced.”
5. Click on “Change” next to the owner name, and enter your username in the field provided. Click “OK” to save the changes.
6. Now, right-click on the Wow64.dll file and select “Properties” again.
7. In the Properties window, go to the “Security” tab and click on “Advanced.”
8. Click on “Add” and enter your username in the field provided. Click “OK” to save the changes.
9. Finally, restart your computer to apply the changes and check if the Wow64.dll missing file error is resolved.
For more information and troubleshooting steps, refer to Microsoft’s official support page or consult a professional PC tool.
The absence of the wow64.dll file can lead to compatibility issues and prevent certain software from running correctly.
python

import os

import sys
def find_missing_dll(dll_name):

    system_path = os.environ.get("PATH").split(";")
for path in system_path:
dll_path = os.path.join(path, dll_name)
if os.path.isfile(dll_path):
return dll_path
return None
def main():
dll_name = "wow64.dll"
dll_path = find_missing_dll(dll_name)
if dll_path:
print(f"Found {dll_name} at: {dll_path}")
else:
print(f"{dll_name} not found!")
if __name__ == "__main__":

    main()
The above Python code defines a function `find_missing_dll` that searches for a given DLL file (`dll_name`) within the system’s PATH environment variable. It iterates through each path in the PATH variable and checks if the file exists. The `main` function demonstrates how to use this function by searching for the “wow64.dll” file specifically. If the file is found, it prints the path; otherwise, it displays a “not found” message.
Remember, this code is a general example and may not address your specific scenario without further context.
Updating Device Drivers to Restore Missing .dll Files
To fix the Wow64.dll missing file error, you can update your device drivers. This will help restore any missing .dll files and resolve the issue. Follow these steps:
1. Press the Windows key + X and select “Device Manager.”
2. Expand the category that matches the component related to the missing .dll file.
3. Right-click on the device and select “Update Driver.”
4. Choose the option to search automatically for updated driver software.
5. If Windows doesn’t find any updates, you can also visit the manufacturer’s website and download the latest driver manually.
6. After updating the driver, restart your computer.
Note: It’s important to obtain drivers from official sources to ensure compatibility and avoid potential security risks.
By updating your device drivers, you can restore missing .dll files and resolve the Wow64.dll missing file error. This method is a simple and effective way to fix the issue.
Scanning for Malware to Fix Wow64.dll Error
To fix the Wow64.dll missing file error, you can scan for malware using a PC tool like Microsoft Defender or another trusted antivirus program. Malware can sometimes cause DLL errors, so it’s important to check for any malicious software on your computer.
First, download and install a reliable antivirus program if you don’t already have one. Then, open the program and run a full system scan. This will search your computer for any malware or viruses that may be causing the Wow64.dll error.
If the scan detects any malware, follow the program’s instructions to remove it from your system. Once the malware is removed, restart your computer and check if the Wow64.dll error is resolved.
Remember to regularly update your antivirus program and perform scans to ensure the ongoing security and integrity of your system.
Using System File Checker (SFC) and System Restore to Fix Wow64.dll Issues
To fix Wow64.dll missing file error, you can use System File Checker (SFC) and System Restore. These tools can help you resolve issues related to the Wow64.dll file.
To use SFC, follow these steps:
1. Press Windows key + X and select “Command Prompt (Admin)”.
2. In the command prompt, type “sfc /scannow” and press Enter.
3. Wait for the scan to complete and let SFC repair any corrupted system files.
If SFC doesn’t solve the issue, you can try using System Restore:
1. Press Windows key + R, type “rstrui“, and press Enter.
2. Follow the instructions to restore your system to an earlier point when Wow64.dll was working properly.
Remember to back up your important files before proceeding with System Restore.
By using these methods, you can fix Wow64.dll issues and ensure the proper functioning of your system.
Mark Ginter
Mark Ginter is a tech blogger with a passion for all things gadgets and gizmos. A self-proclaimed «geek», Mark has been blogging about technology for over 15 years. His blog, techquack.com, covers a wide range of topics including new product releases, industry news, and tips and tricks for getting the most out of your devices. If you’re looking for someone who can keep you up-to-date with all the latest tech news and developments, then be sure to follow him over at Microsoft.
WoW64 — aka Windows (32-bit) on Windows (64-bit) — is a subsystem that enables
32-bit Windows applications to run on 64-bit Windows. Most people today are
familiar with WoW64 on Windows x64, where they can run x86 applications.
WoW64 has been with us since Windows XP, and x64 wasn’t the only architecture
where WoW64 has been available — it was available on IA-64 architecture as
well, where WoW64 has been responsible for emulating x86. Newly, WoW64 is also
available on ARM64, enabling emulation of both x86 and ARM32
appllications.
MSDN offers brief article on WoW64 implementation details.
We can find that WoW64 consists of (ignoring IA-64):
- Translation support DLLs:
wow64.dll: translation ofNt*system calls (ntoskrnl.exe/ntdll.dll)wow64win.dll: translation ofNtGdi*,NtUser*and other GUI-related
system calls (win32k.sys/win32u.dll)
- Emulation support DLLs:
wow64cpu.dll: support for running x86 programs on x64wowarmhw.dll: support for running ARM32 programs on ARM64xtajit.dll: support for running x86 programs on ARM64
Besides Nt* system call translation, the wow64.dll provides the core
emulation infrastructure.
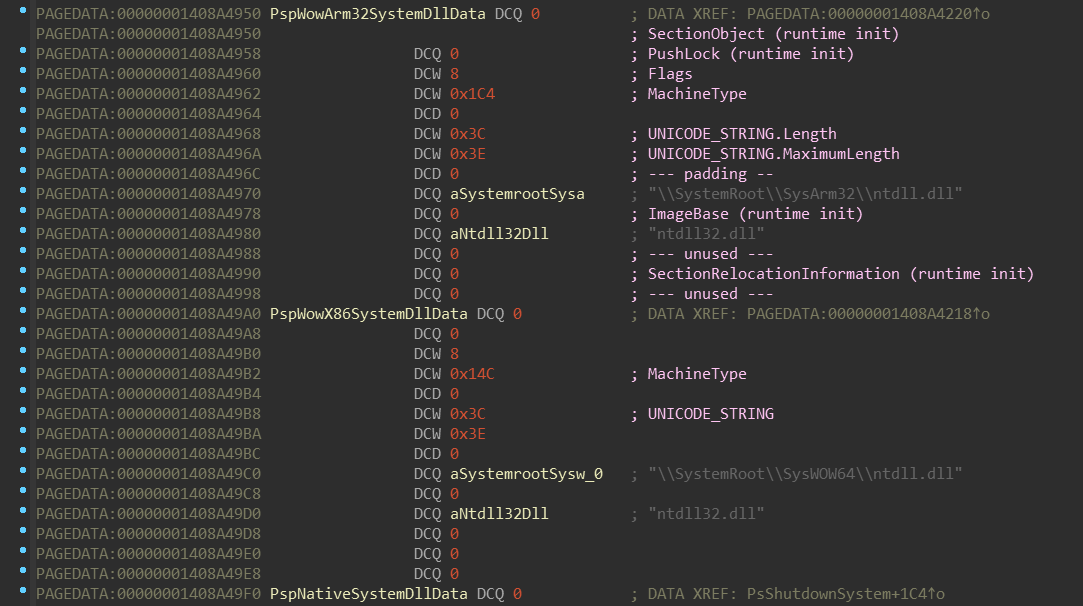
If you have previous experience with reversing WoW64 on x64, you can notice
that it shares plenty of common code with WoW64 subsystem on ARM64. Especially
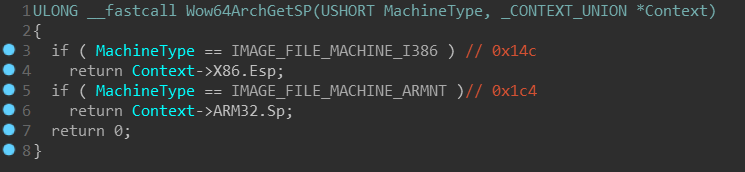
if you peeked into WoW64 of recent x64 Windows, you may have noticed that it
actually contains strings such as SysArm32 and that some functions check
against IMAGE_FILE_MACHINE_ARMNT (0x1C4) machine type:
WoW on x64 systems cannot emulate ARM32 though — it just apparently shares
common code. But SysX8664 and SysArm64 sound particularly interesting!
Those similarities can help anyone who is fluent in x86/x64, but not that much
in ARM. Also, HexRays decompiler produce much better output for x86/x64 than
for ARM32/ARM64.
Initially, my purpose with this blogpost was to get you familiar with how WoW64
works for ARM32 programs on ARM64. But because WoW64 itself changed a lot with
Windows 10, and because WoW64 shares some similarities between x64 and ARM64,
I decided to briefly get you through how WoW64 works in general.
Everything presented in this article is based on Windows 10 — insider preview,
build 18247.
Table of contents
- Terms
- Kernel
- Kernel (initialization)
- Kernel (create process)
- Initialization of the WoW64 process
wow64!ProcessInitwow64!ServiceTableswow64!Wow64SystemServiceEx
wow64!ProcessInit(cont.)wow64!ThreadInit
- x86 on x64
- Entering 32-bit mode
- Leaving 32-bit mode
- Turbo thunks
- Disabling Turbo thunks
- x86 on ARM64
Windows\SyCHPE32&Windows\SysWOW64
- ARM32 on ARM64
nt!KiEnter32BitMode/SVC 0xFFFFnt!KiExit32BitMode/UND #0xF8
- Appendix
Terms
Througout this article I’ll be using some terms I’d like to explain beforehand:
ntdllorntdll.dll— these will be always refering to the nativentdll.dll(x64 on Windows x64, ARM64
on Windows ARM64, …), until said otherwise or until the context wouldn’t indicate otherwise.ntdll32orntdll32.dll— to make an easy distinction between native and
WoW64ntdll.dll, any WoW64ntdll.dllwill be refered with the*32suffix.emuoremu.dll— these will represent any of the emulation support DLLs (one ofwow64cpu.dll,
wowarmhw.dll,xtajit.dll)module!FunctionName— refers to a symbolFunctionNamewithin themodule.
If you’re familiar with WinDbg, you’re already familiar with this notation.CHPE— “compiled-hybrid-PE”, a new type of PE file, which looks as if it was x86
PE file, but has ARM64 code within them.CHPEwill be tackled in more detail
in the x86 on ARM64 section.- The terms emulation and binary-translation refer to the WoW64 workings
and they may be used interchangeably.
Kernel
This section shows some points of interest in the ntoskrnl.exe regarding to
the WoW64 initialization. If you’re interested only in the user-mode part of
the WoW64, you can skip this part to the
Initialization of the WoW64 process.
Kernel (initialization)
Initalization of WoW64 begins with the initialization of the kernel:
nt!KiSystemStartupnt!KiInitializeKernelnt!InitBootProcessornt!PspInitPhase0nt!Phase1Initializationnt!IoInitSystemnt!IoInitSystemPreDriversnt!PsLocateSystemDlls
nt!PsLocateSystemDlls routine takes a pointer named nt!PspSystemDlls,
and then calls nt!PspLocateSystemDll in a loop. Let’s figure out what’s
going on here:
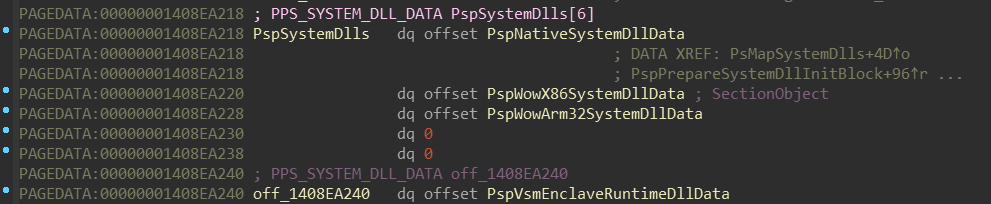

nt!PspSystemDlls appears to be array of pointers to some structure, which
holds some NTDLL-related data. The order of these NTDLLs corresponds with
this enum (included in the PDB):
Now, let’s look how such structure looks like:
The nt!PspLocateSystemDll function intializes fields of this structure. The
layout of this structure isn’t unfortunatelly in the PDB, but you can
find a reconstructed version in the appendix.
Now let’s get back to the nt!Phase1Initialization — there’s more:
...nt!Phase1Initializationnt!Phase1InitializationIoReadynt!PspInitPhase2nt!PspInitializeSystemDlls
nt!PspInitializeSystemDlls routine takes a pointer named nt!NtdllExportInformation.
Let’s look at it:

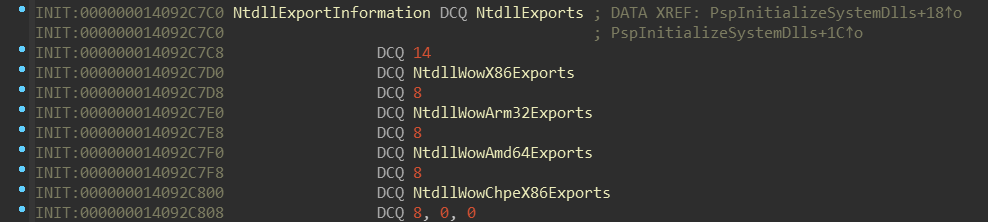
It looks like it’s some sort of array, again, ordered by the enum _SYSTEM_DLL_TYPE.
Let’s examine NtdllExports:
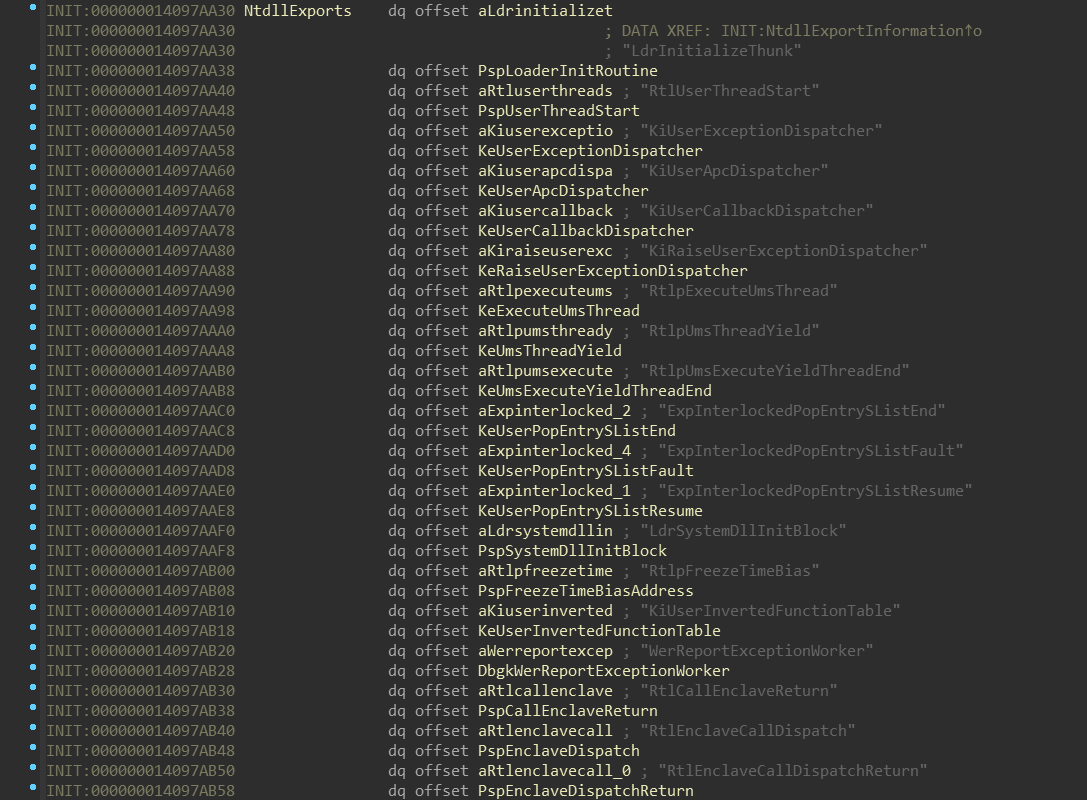
Nothing unexpected — just tuples of function name and function pointer.
Did you notice the difference in the number after the NtdllExports field? On x64
there is 19 meanwhile on ARM64 there is 14. This number represents number
of items in NtdllExports — and indeed, there is slightly different set of them:
| x64 | ARM64 |
|---|---|
(0) LdrInitializeThunk |
(0) LdrInitializeThunk |
(1) RtlUserThreadStart |
(1) RtlUserThreadStart |
(2) KiUserExceptionDispatcher |
(2) KiUserExceptionDispatcher |
(3) KiUserApcDispatcher |
(3) KiUserApcDispatcher |
(4) KiUserCallbackDispatcher |
(4) KiUserCallbackDispatcher |
| — | (5) KiUserCallbackDispatcherReturn |
(5) KiRaiseUserExceptionDispatcher |
(6) KiRaiseUserExceptionDispatcher |
(6) RtlpExecuteUmsThread |
— |
(7) RtlpUmsThreadYield |
— |
(8) RtlpUmsExecuteYieldThreadEnd |
— |
(9) ExpInterlockedPopEntrySListEnd |
(7) ExpInterlockedPopEntrySListEnd |
(10) ExpInterlockedPopEntrySListFault |
(8) ExpInterlockedPopEntrySListFault |
(11) ExpInterlockedPopEntrySListResume |
(9) ExpInterlockedPopEntrySListResume |
(12) LdrSystemDllInitBlock |
(10) LdrSystemDllInitBlock |
(13) RtlpFreezeTimeBias |
(11) RtlpFreezeTimeBias |
(14) KiUserInvertedFunctionTable |
(12) KiUserInvertedFunctionTable |
(15) WerReportExceptionWorker |
(13) WerReportExceptionWorker |
(16) RtlCallEnclaveReturn |
— |
(17) RtlEnclaveCallDispatch |
— |
(18) RtlEnclaveCallDispatchReturn |
— |
We can see that ARM64 is missing Ums (User-Mode Scheduling) and
Enclave functions. Also, we can see that ARM64 has one
extra function: KiUserCallbackDispatcherReturn.
On the other hand, all NtdllWow*Exports contain the same set of function names:
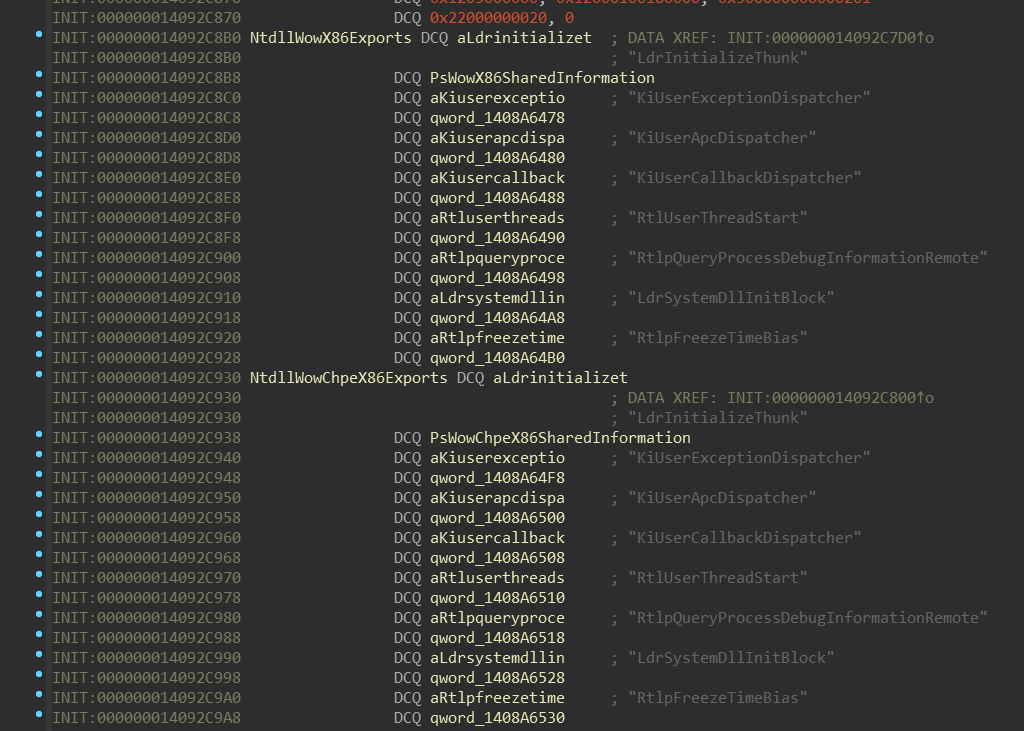
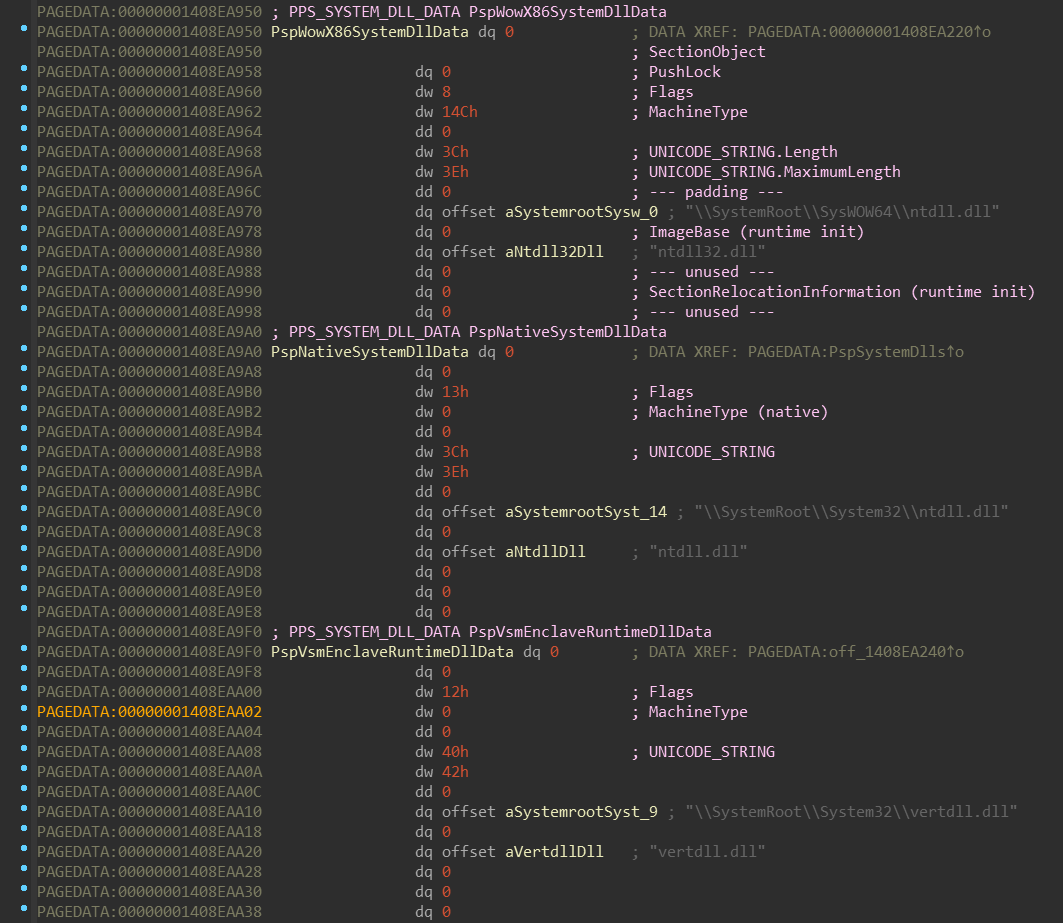
Notice names of second fields of these “structures”: PsWowX86SharedInformation,
PsWowChpeX86SharedInformation, … If we look at the address of those fields,
we can see that they’re part of another array:
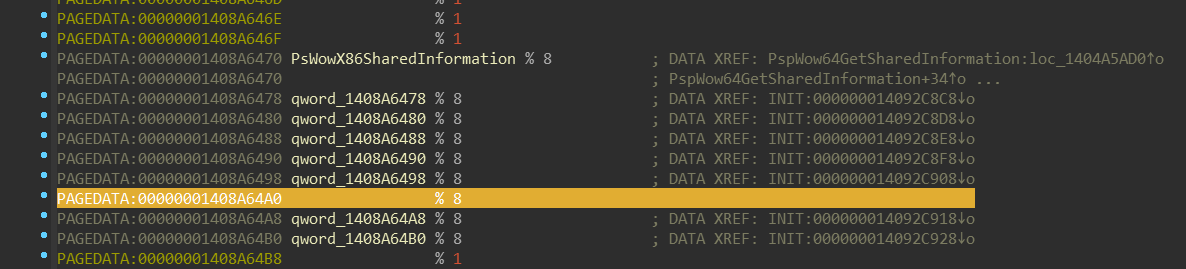
Those addresses are actually targets of the pointers in the NtdllWow*Exports
structure. Also, those functions combined with PsWow*SharedInformation might
give you hint that they’re related to this enum (included in the PDB):
Notice how the order of the SharedNtdll32BaseAddress corellates with the empty field in
the previous screenshot (highlighted). The set of WoW64 NTDLL functions is same
on both x64 and ARM64.
(The C representation of this data can be found in the appendix.)
Now we can tell what the nt!PspInitializeSystemDlls function does — it gets
image base of each NTDLL (nt!PsQuerySystemDllInfo), resolves all
Ntdll*Exports for them (nt!RtlFindExportedRoutineByName). Also, only for
all WoW64 NTDLLs (if ((SYSTEM_DLL_TYPE)SystemDllType > PsNativeSystemDll))
it assigns the image base to the SharedNtdll32BaseAddress field of the
PsWow*SharedInformation array (nt!PspWow64GetSharedInformation).
Kernel (create process)
Let’s talk briefly about process creation. As you probably already know, the
native ntdll.dll is mapped as a first DLL into each created process. This
applies for all architectures — x86, x64 and also for ARM64.
The WoW64 processes aren’t exception to this rule — the WoW64 processes share
the same initialization code path as native processes.
nt!NtCreateUserProcessnt!PspAllocateProcessnt!PspSetupUserProcessAddressSpacent!PspPrepareSystemDllInitBlocknt!PspWow64SetupUserProcessAddressSpace
nt!PspAllocateThreadnt!PspWow64InitThreadnt!KeInitThread // Entry-point: nt!PspUserThreadStartup
nt!PspUserThreadStartupnt!PspInitializeThunkContextnt!KiDispatchException
If you ever wondered how is the first user-mode instruction of the newly created
process executed, now you know the answer — a “synthetic” user-mode exception
is dispatched, with ExceptionRecord.ExceptionAddress = &PspLoaderInitRoutine,
where PspLoaderInitRoutine points to the ntdll!LdrInitializeThunk.
This is the first function that is executed in every process — including WoW64
processes.
Initialization of the WoW64 process
The fun part begins!
NOTE: Initialization of the
wow64.dllis same on both x64 and ARM64.
Eventual differences will be mentioned.
ntdll!LdrInitializeThunkntdll!LdrpInitializentdll!_LdrpInitializentdll!LdrpInitializeProcessntdll!LdrpLoadWow64
The ntdll!LdrpLoadWow64 function is called when the ntdll!UseWOW64 global variable is TRUE,
which is set when NtCurrentTeb()->WowTebOffset != NULL.
It constructs the full path to the wow64.dll, loads it, and then resolves
following functions:
Wow64LdrpInitializeWow64PrepareForExceptionWow64ApcRoutineWow64PrepareForDebuggerAttachWow64SuspendLocalThread
NOTE: The resolution of these pointers is wrapped between pair of
ntdll!LdrProtectMrdatacalls, responsible for protecting (1) and
unprotecting (0) the.mrdatasection — in which these pointers reside.
MRDATA(Mutable Read Only Data) are part of the CFG (Control-Flow Guard)
functionality. You can look at Alex’s slides for more
information.
When these functions are successfully located, the ntdll.dll finally
transfers control to the wow64.dll by calling wow64!Wow64LdrpInitialize.
Let’s go through the sequence of calls that eventually bring us to the entry-point
of the “emulated” application.
wow64!Wow64LdrpInitializewow64!Wow64InfoPtr = (NtCurrentPeb32() + 1)NtCurrentTeb()->TlsSlots[/* 10 */ WOW64_TLS_WOW64INFO] = wow64!Wow64InfoPtrntdll!RtlWow64GetCpuAreaInfowow64!ProcessInitwow64!CpuNotifyMapViewOfSection // Process imagewow64!Wow64DetectMachineTypeInternalwow64!Wow64SelectSystem32PathInternalwow64!CpuNotifyMapViewOfSection // 32-bit NTDLL imagewow64!ThreadInitwow64!ThunkStartupContext64TO32wow64!Wow64SetupInitialCallwow64!RunCpuSimulationemu!BTCpuSimulate
Wow64InfoPtr is the first initialized variable in the wow64.dll. It contains
data shared between 32-bit and 64-bit execution mode and its structure is not
documented, although you can find this structure partialy restored in the appendix.
RtlWow64GetCpuAreaInfo is an internal ntdll.dll function which is called a lot
during emulation. It is mainly used for fetching the machine type and architecture-specific
CPU context (the CONTEXT structure) of the emulated process. This information is fetched into an undocumented
structure, which we’ll be calling WOW64_CPU_AREA_INFO. Pointer to this structure
is then given to the ProcessInit function.
Wow64DetectMachineTypeInternal determines the machine type of the executed
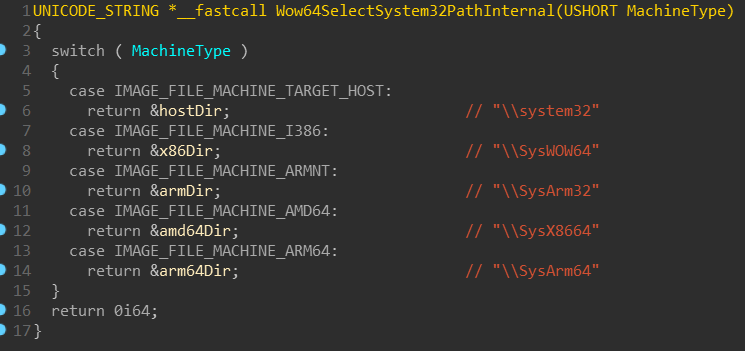
process and returns it. Wow64SelectSystem32PathInternal selects the “emulated”
System32 directory based on that machine type, e.g. SysWOW64 for x86 processes
or SysArm32 for ARM32 processes.
You can also notice calls to CpuNotifyMapViewOfSection function. As the name
suggests, it is also called on each “emulated” call of NtMapViewOfSection.
This function:
- Checks if the mapped image is executable
- Checks if following conditions are true:
NtHeaders->OptionalHeader.MajorSubsystemVersion == USER_SHARED_DATA.NtMajorVersionNtHeaders->OptionalHeader.MinorSubsystemVersion == USER_SHARED_DATA.NtMinorVersion
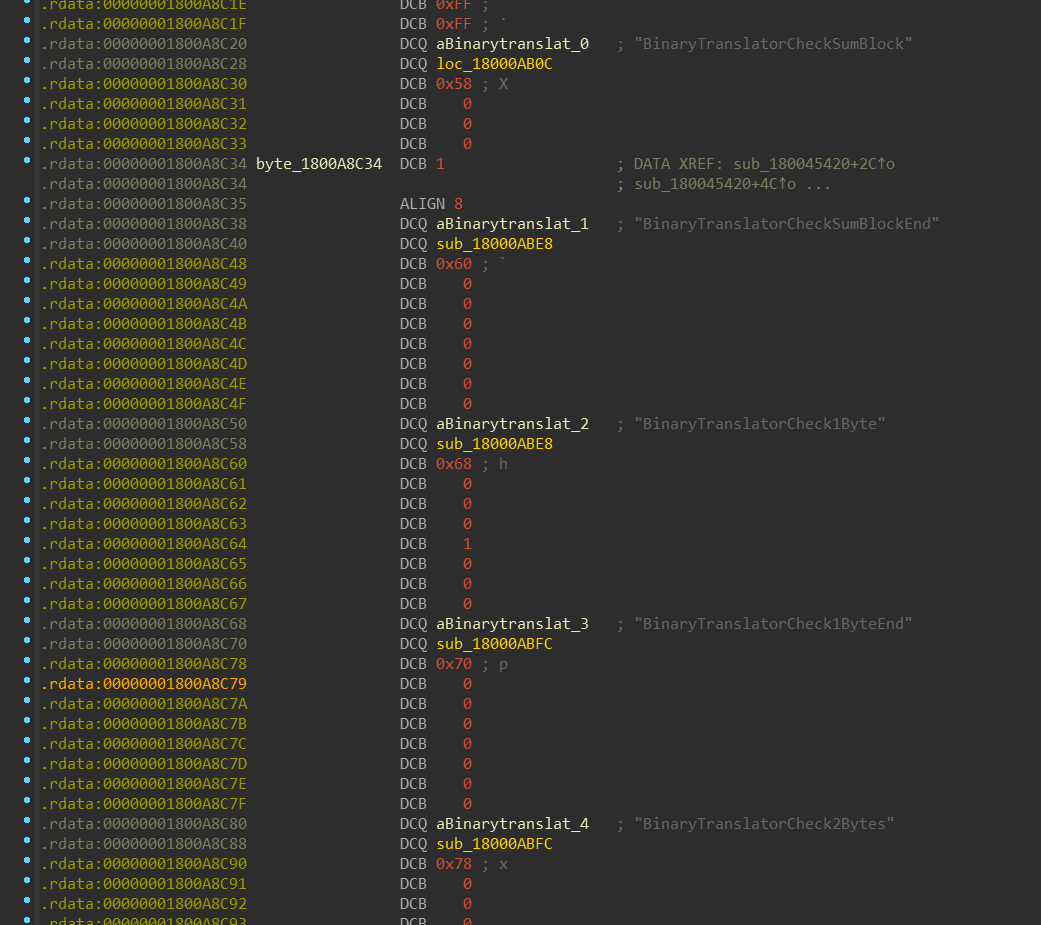
If these checks pass, CpupResolveReverseImports function is called. This function
checks if the mapped image exports the Wow64Transition symbol and if so, it
assigns there a 32-bit pointer value returned by emu!BTCpuGetBopCode.
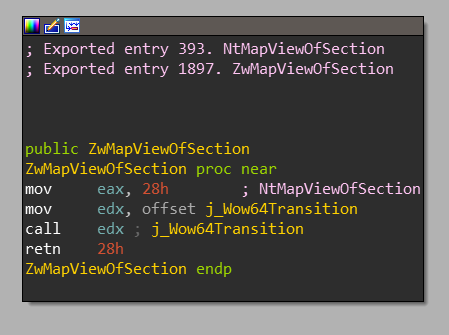
The Wow64Transition is mostly known to be exported by SysWOW64\ntdll.dll,
but there are actually multiple of Windows’ WoW DLLs which exports this symbol.
You might be already familiar with the term “Heaven’s Gate” —
this is where the Wow64Transition will point to on Windows x64 — a simple far
jump instruction which switches into long-mode (64-bit) enabled code segment.
On ARM64, the Wow64Transition points to a “nop” function.
NOTE: Because there are no checks on the
ImageName, theWow64Transition
symbol is resolved for all executable images that passes the checks mentioned
earlier. If you’re wondering whetherWow64Transitionwould be resolved for
your custom executable or DLL — it indeed would!
The initialization then continues with thread-specific initialization by
calling ThreadInit. This is followed by pair of calls
ThunkStartupContext64TO32(CpuArea.MachineType, CpuArea.Context, NativeContext)
and Wow64SetupInitialCall(&CpuArea) — these functions perform the necessary
setup of the architecture-specific WoW64 CONTEXT structure to prepare start
of the execution in the emulated environment. This is done in the exact same
way as if ntoskrnl.exe would actually executed the emulated application — i.e.:
- setting the instruction pointer to the address of
ntdll32!LdrInitializeThunk - setting the stack pointer below the WoW64
CONTEXTstructure - setting the 1st parameter to point to that
CONTEXTstructure - setting the 2nd parameter to point to the base address of the
ntdll32
Finally, the RunCpuSimulation function is called. This function just
calls BTCpuSimulate from the binary-translator DLL, which contains the
actual emulation loop that never returns.
wow64!ProcessInit
wow64!Wow64ProtectMrdata // 0wow64!Wow64pLoadLogDllntdll!LdrLoadDll // "%SystemRoot%\system32\wow64log.dll"
wow64.dll has also it’s own .mrdata section and ProcessInit begins with
unprotecting it. It then tries to load the wow64log.dll from the constructed
system directory. Note that this DLL is never present in any released Windows
installation (it’s probably used internally by Microsoft for debugging of the
WoW64 subsystem). Therefore, load of this DLL will normally fail. This isn’t
problem, though, because no critical functionality of the WoW64 subsystem
depends on it. If the load would actually succeed, the wow64.dll would try
to find following exported functions there:
Wow64LogInitializeWow64LogSystemServiceWow64LogMessageArgListWow64LogTerminate
If any of these functions wouldn’t be exported, the DLL would be immediately
unloaded.
If we’d drop custom wow64log.dll (which would export functions mentioned above)
into the %SystemRoot%\System32 directory, it would actually get loaded into
every WoW64 process. This way we could drop a custom logging DLL, or even inject
every WoW64 process with native DLL!
For more details, you can check my injdrv project which implements
injection of native DLLs into WoW64 processes, or check this post by Walied Assar.
Then, certain important values are fetched from the LdrSystemDllInitBlock array.
These contains base address of the ntdll32.dll, pointer to functions like
ntdll32!KiUserExceptionDispatcher, ntdll32!KiUserApcDispatcher, …,
control flow guard information and others.
Finally, the Wow64pInitializeFilePathRedirection is called, which — as the name
suggests — initializes WoW64 path redirection. The path redirection is completely
implemented in the wow64.dll and the mechanism is basically based on string
replacement. The path redirection can be disabled and enabled by calling
kernel32!Wow64DisableWow64FsRedirection & kernel32!Wow64RevertWow64FsRedirection
function pairs. Both of these functions internally call ntdll32!RtlWow64EnableFsRedirectionEx,
which directly operates on NtCurrentTeb()->TlsSlots[/* 8 */ WOW64_TLS_FILESYSREDIR] field.
wow64!ServiceTables
Next, a ServiceTables array is initialized. You might be already familiar
with the KSERVICE_TABLE_DESCRIPTOR from the ntoskrnl.exe, which contains — among
other things — a pointer to an array of system functions callable from the user-mode.
ntoskrnl.exe contains 2 of these tables: one for ntoskrnl.exe itself and one
for the win32k.sys, aka the Windows (GUI) subsystem. wow64.dll has 4 of them!
The WOW64_SERVICE_TABLE_DESCRIPTOR has the exact same structure as the KSERVICE_TABLE_DESCRIPTOR,
except that it is extended:
(More detailed definition of this structure is in the appendix.)
ServiceTables array is populated as follows:
ServiceTables[/* 0 */ WOW64_NTDLL_SERVICE_INDEX] = sdwhnt32ServiceTables[/* 1 */ WOW64_WIN32U_SERVICE_INDEX] = wow64win!sdwhwin32ServiceTables[/* 2 */ WOW64_KERNEL32_SERVICE_INDEX = wow64win!sdwhconServiceTables[/* 3 */ WOW64_USER32_SERVICE_INDEX] = sdwhbase
NOTE:
wow64.dlldirectly depends (by import table) on two DLLs:
the nativentdll.dllandwow64win.dll. This means thatwow64win.dllis
loaded even into “non-Windows-subsystem” processes, that wouldn’t normally
loaduser32.dll.These two symbols mentioned above are the only symbols that
wow64.dllrequires
wow64win.dllto export.
Let’s have a look at sdwhnt32 service table:
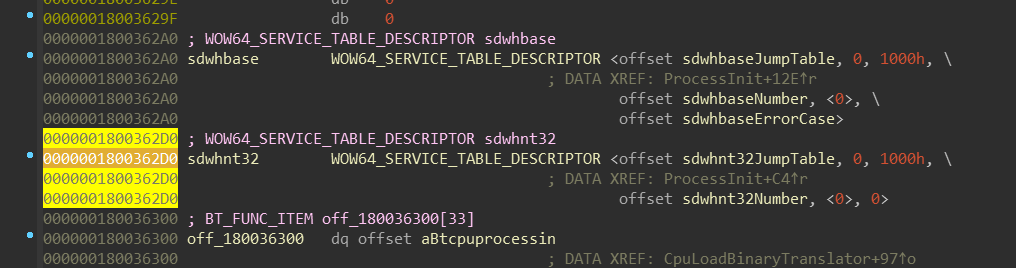
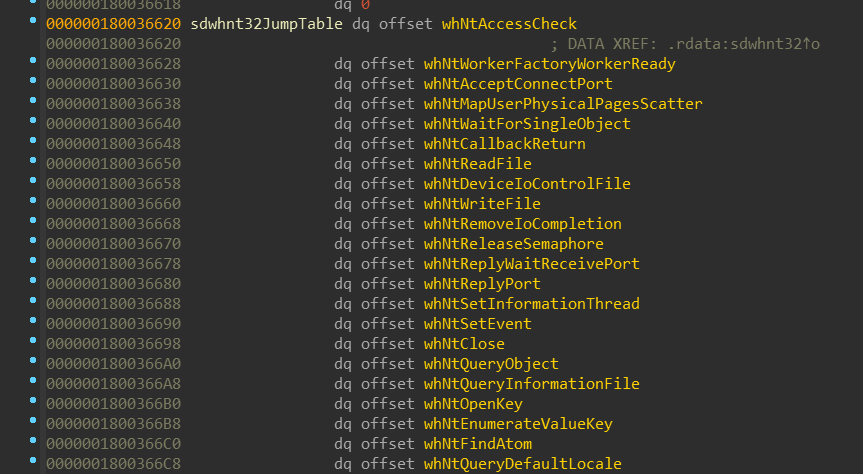
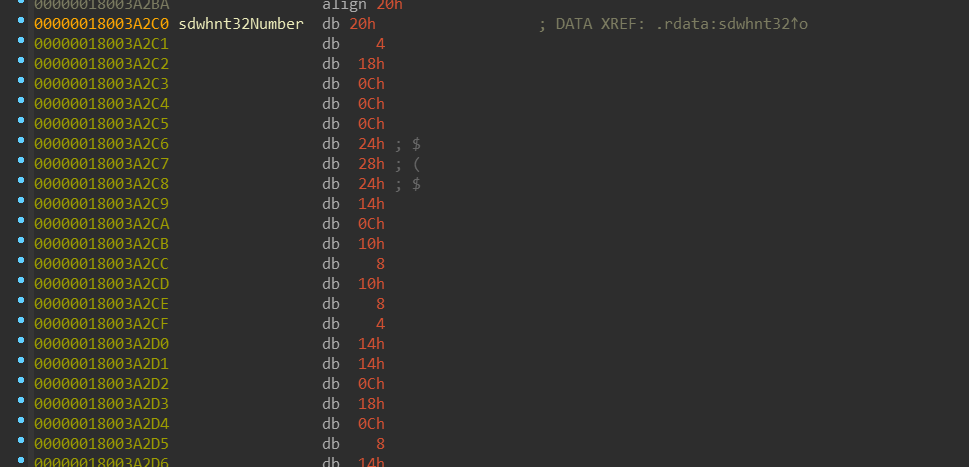
There is nothing surprising for those who already dealt with service tables in ntoskrnl.exe.
sdwhnt32JumpTable contains array of the system call functions, which are
traditionaly prefixed. WoW64 “system calls” are prefixed with wh*, which
honestly I don’t have any idea what it stands for — although it might be the
case as with Zw* prefix — it stands for nothing and is simply used as an
unique distinguisher.
The job of these wh* functions is to correctly convert any arguments and
return values from the 32-bit version to the native, 64-bit version. Keep in
mind that that it not only includes conversion of integers and pointers, but
also content of the structures. Interesting note might be that each of the
wh* functions has only one argument, which is pointer to an array of 32-bit
values. This array contains the parameters passed to the 32-bit system call.
As you could notice, in those 4 service tables there are “system calls” that
are not present in the ntoskrnl.exe. Also, I mentioned earlier that the
Wow64Transition is resolved in multiple DLLs. Currently, these DLLs export
this symbol:
ntdll.dllwin32u.dllkernel32.dllandkernelbase.dlluser32.dll
The ntdll.dll and win32u.dll are obvious and they represent the same thing
as their native counterparts. The service tables used by kernel32.dll and
user32.dll contain functions for transformation of particular csrss.exe calls
into their 64-bit version.
It’s also worth noting that at the end of the ntdll.dll system table, there
are several functions with NtWow64* calls, such as NtWow64ReadVirtualMemory64,
NtWow64WriteVirtualMemory64 and others. These are special functions which are
provided only to WoW64 processes.
One of these special functions is also NtWow64CallFunction64. It has it’s own
small dispatch table and callers can select which function should be called
based on its index:

NOTE: I’ll be talking about one of these functions — namely
Wow64CallFunctionTurboThunkControl—
later in the Disabling Turbo thunks section.
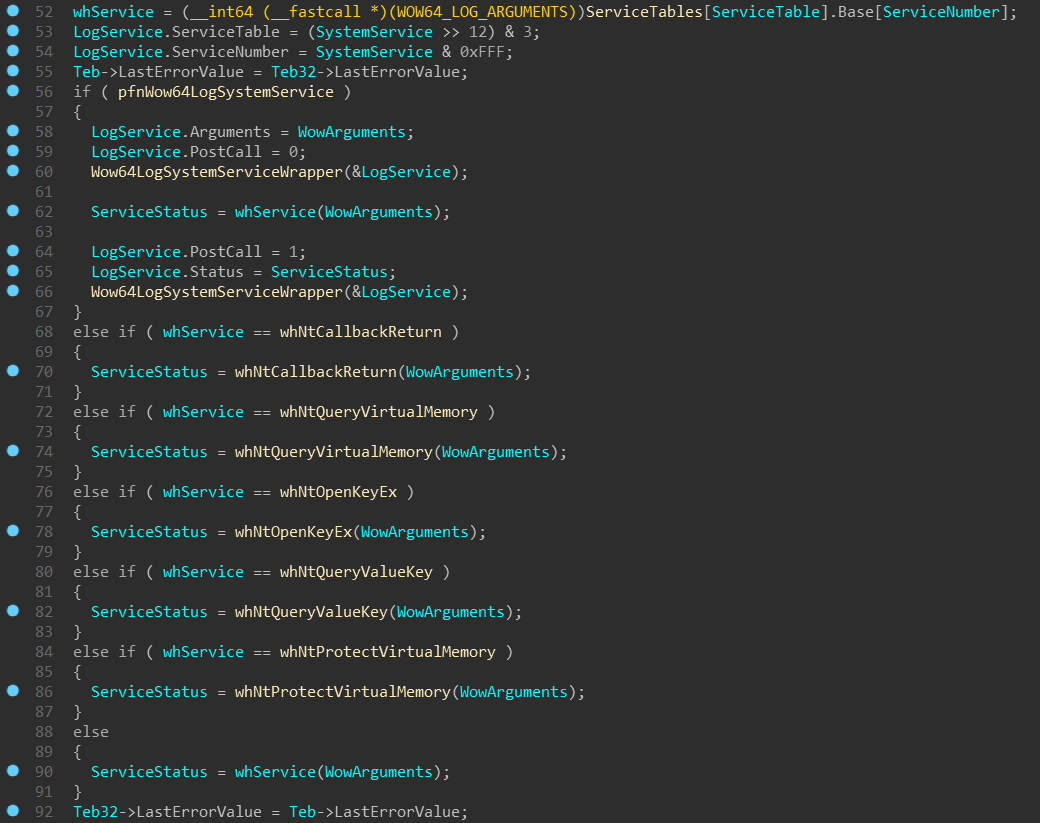
wow64!Wow64SystemServiceEx
This function is similar to the kernel’s nt!KiSystemCall64 — it does the
dispatching of the system call. This function is exported by the wow64.dll
and imported by the emulation DLLs. Wow64SystemServiceEx accepts 2 arguments:
- The system call number
- Pointer to an array of 32-bit arguments passed to the system call (mentioned earlier)
The system call number isn’t just an index, but also contains index of a system
table which needs to be selected (this is also true for ntoskrnl.exe):
This function then selects ServiceTables[ServiceTableIndex] and calls the
appropriate wh* function based on the SystemCallNumber.
NOTE: In case the
wow64log.dllhas been successfully loaded, theWow64SystemServiceEx
function callsWow64LogSystemServiceWrapper(wrapper aroundwow64log!Wow64LogSystemService
function): once before the actual system call and one immediately after. This
can be used for instrumentation of each WoW64 system call! The structure
passed toWow64LogSystemServicecontains every important information about
the system call — it’s table index, system call number, the argument list and
on the second call, even the resultingNTSTATUS! You can find layout of
this structure in the appendix (WOW64_LOG_SERVICE).
Finally, as have been mentioned, the WOW64_SERVICE_TABLE_DESCRIPTOR structure
differs from KSERVICE_TABLE_DESCRIPTOR in that it contains ErrorCase table.
The code mentioned above is actually wrapped in a SEH __try/__except
block. If whService raise an exception, the __except block calls
Wow64HandleSystemServiceError function. The function looks if the corresponding
service table which raised the exception has non-NULL ErrorCase and if it does,
it selects the appropriate WOW64_ERROR_CASE for the system call. If the ErrorCase
is NULL, the values from ErrorCaseDefault are used. The NTSTATUS of the
exception is then transformed according to an algorithm which can be found in the appendix.
wow64!ProcessInit (cont.)
...wow64!CpuLoadBinaryTranslator // MachineTypewow64!CpuGetBinaryTranslatorPath // MachineTypentdll!NtOpenKey // "\Registry\Machine\Software\Microsoft\Wow64\"ntdll!NtQueryValueKey // "arm" / "x86"ntdll!RtlGetNtSystemRoot // "arm" / "x86"ntdll!RtlUnicodeStringPrintf // "%ws\system32\%ws"
As you’ve probably guessed, this function constructs path to the binary-translator DLL,
which is — on x64 — known as wow64cpu.dll. This DLL will be responsible for
the actual low-level emulation.


We can see that there is no wow64cpu.dll on ARM64. Instead, there is xtajit.dll
used for x86 emulation and wowarmhw.dll used for ARM32 emulation.
NOTE: The
CpuGetBinaryTranslatorPathfunction is same on both x64 and
ARM64 except for one peculiar difference:
on Windows x64, if the\Registry\Machine\Software\Microsoft\Wow64\x86key cannot
be opened (is missing/was deleted), the function contains a fallback to load
wow64cpu.dll. On Windows ARM64, though, it doesn’t have such fallback and if
the registry key is missing, the function fails and the WoW64 process is terminated.
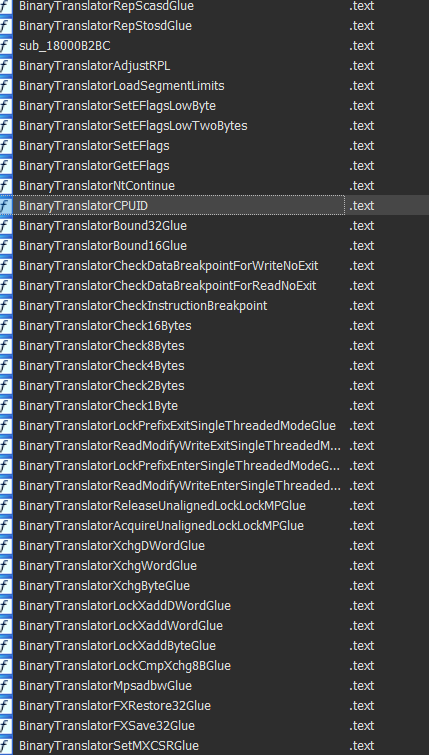
wow64.dll then loads one of the selected DLL and tries to find there following
exported functions:
BTCpuProcessInit (!) |
BTCpuProcessTerm |
BTCpuThreadInit |
BTCpuThreadTerm |
BTCpuSimulate (!) |
BTCpuResetFloatingPoint |
BTCpuResetToConsistentState |
BTCpuNotifyDllLoad |
BTCpuNotifyDllUnload |
BTCpuPrepareForDebuggerAttach |
BTCpuNotifyBeforeFork |
BTCpuNotifyAfterFork |
BTCpuNotifyAffinityChange |
BTCpuSuspendLocalThread |
BTCpuIsProcessorFeaturePresent |
BTCpuGetBopCode (!) |
BTCpuGetContext |
BTCpuSetContext |
BTCpuTurboThunkControl |
BTCpuNotifyMemoryAlloc |
BTCpuNotifyMemoryFree |
BTCpuNotifyMemoryProtect |
BTCpuFlushInstructionCache2 |
BTCpuNotifyMapViewOfSection |
BTCpuNotifyUnmapViewOfSection |
BTCpuUpdateProcessorInformation |
BTCpuNotifyReadFile |
BTCpuCfgDispatchControl |
BTCpuUseChpeFile |
BTCpuOptimizeChpeImportThunks |
BTCpuNotifyProcessExecuteFlagsChange |
BTCpuProcessDebugEvent |
BTCpuFlushInstructionCacheHeavy |
Interestingly, not all functions need to be found — only those marked with the
“(!)”, the rest is optional. As a next step, the resolved BTCpuProcessInit
function is called, which performs binary-translator-specific process initialization.
At the end of the ProcessInit function, wow64!Wow64ProtectMrdata(1) is called,
making .mrdata non-writable again.
wow64!ThreadInit
wow64!ThreadInitwow64!CpuThreadInitNtCurrentTeb32()->WOW32Reserved = BTCpuGetBopCode()emu!BTCpuThreadInit
ThreadInit does some little thread-specific initialization, such as:
- Copying
CurrentLocaleandIdealProcessorvalues from 64-bitTEBinto
32-bitTEB. - For non-
WOW64_CPUFLAGS_SOFTWAREemulators, it callsCpuThreadInit, which:- Performs
NtCurrentTeb32()->WOW32Reserved = BTCpuGetBopCode(). - Calls
emu!BTCpuThreadInit().
- Performs
- For
WOW64_CPUFLAGS_SOFTWAREemulators, it creates an event, which added into
AlertByThreadIdEventHashTableand set toNtCurrentTeb()->TlsSlots[18].
This event is used for special emulation ofNtAlertThreadByThreadIdand
NtWaitForAlertByThreadId.
NOTE: The
WOW64_CPUFLAGS_MSFT64 (1)or theWOW64_CPUFLAGS_SOFTWARE (2)
flag is stored in theNtCurrentTeb()->TlsSlots[/* 10 */ WOW64_TLS_WOW64INFO],
in theWOW64INFO.CpuFlagsfield. One of these flags is always set in the
emulator’sBTCpuProcessInitfunction (mentioned in the section above):
wow64cpu.dllsetsWOW64_CPUFLAGS_MSFT64 (1)wowarmhw.dllsetsWOW64_CPUFLAGS_MSFT64 (1)xtajit.dllsetsWOW64_CPUFLAGS_SOFTWARE (2)
x86 on x64
Entering 32-bit mode
...wow64!RunCpuSimulationwow64cpu!BTCpuSimulatewow64cpu!RunSimulatedCode
RunSimulatedCode runs in a loop and performs transitions into 32-bit mode
either via:
jmp fword ptr[reg]— a “far jump” that not only changes instruction pointer (RIP),
but also the code segment register (CS). This segment usually being set to0x23,
while 64-bit code segment is0x33- synthetic “machine frame” and
iret— called on every “state reset”
NOTE: Explanation of segmentation and “why does it work just by changing
a segment register” is beyond scope of this article. If you’d like to know more about
“long mode” and segmentation, you can start here.
Far jump is used most of the time for the transition, mainly because it’s faster.
iret on the other hand is more powerful, as it can change CS, SS, EFLAGS, RSP and RIP
all at once. The “state reset” occurs when WOW64_CPURESERVED.Flags has
WOW64_CPURESERVED_FLAG_RESET_STATE (1) bit set. This happens during exception
(see wow64!Wow64PrepareForException and wow64cpu!BTCpuResetToConsistentState).
Also, this flag is cleared on every emulation loop (using btr — bit-test-and-reset).
You can see the simplest form of switching into the 32-bit mode. Also, at the beginning
you can see that TurboThunkDispatch address is moved into the r15 register.
This register stays untouched during the whole RunSimulatedCode function.
Leaving 32-bit mode
The switch back to the 64-bit mode is very similar — it also uses far jumps.
The usual situation when code wants to switch back to the 64-bit mode is upon
system call:
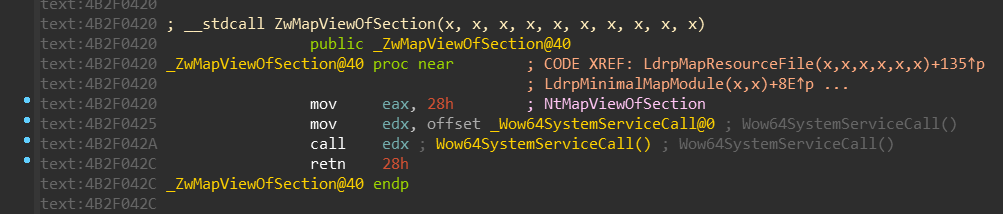
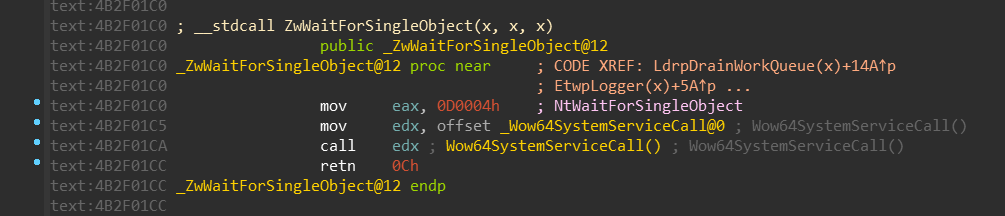
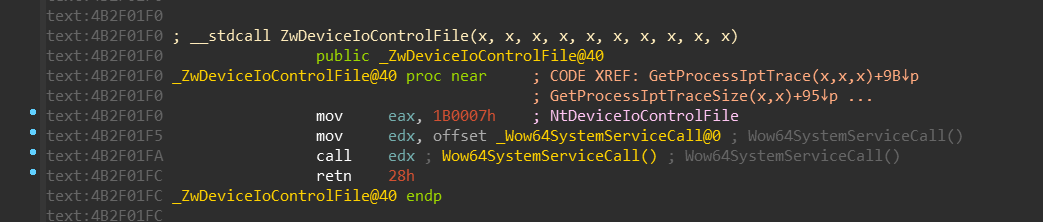
The Wow64SystemServiceCall is just a simple jump to the Wow64Transition:

If you remember, the Wow64Transition value is resolved by the wow64cpu!BTCpuGetBopCode
function:
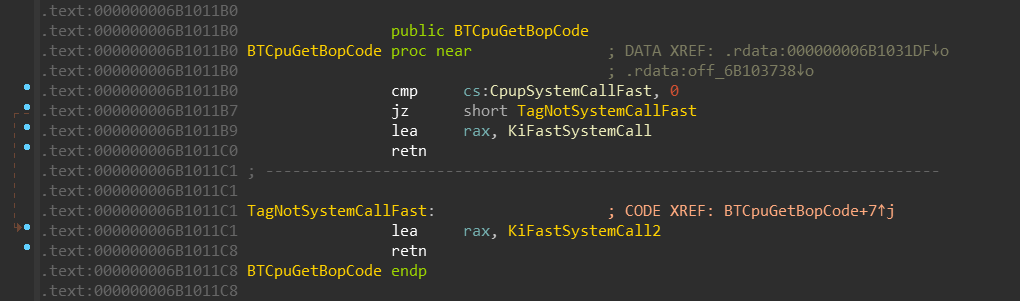
It selects either KiFastSystemCall or KiFastSystemCall2 based on the CpupSystemCallFast
value.
The KiFastSystemCall looks like this (used when CpupSystemCallFast != 0):
[x86] jmp 33h:$+9(jumps to the instruction below)[x64] jmp qword ptr [r15+offset](which points toCpupReturnFromSimulatedCode)
The KiFastSystemCall2 looks like this (used when CpupSystemCallFast == 0):
[x86] push 0x33[x86] push eax[x86] call $+5[x86] pop eax[x86] add eax, 12[x86] xchg eax, dword ptr [esp][x86] jmp fword ptr [esp](jumps to the instruction below)[x64] add rsp, 8[x64] jmp wow64cpu!CpupReturnFromSimulatedCode
Clearly, the KiFastSystemCall is faster, so why it’s not used used every time?
It turns out, CpupSystemCallFast is set to 1 in the wow64cpu!BTCpuProcessInit function if
the process is not executed with the ProhibitDynamicCode mitigation policy
and if NtProtectVirtualMemory(&KiFastSystemCall, PAGE_READ_EXECUTE) succeeds.
This is because KiFastSystemCall is in a non-executable read-only section (W64SVC) while
KiFastSystemCall2 is in read-executable section (WOW64SVC).
But the actual reason why is KiFastSystemCall in non-executable section by default and needs to be
set as executable manually is, honestly, unknown to me. My guess would be that
it has something to do with relocations, because the address in the jmp 33h:$+9
instruction must be somehow resolved by the loader. But maybe I’m wrong. Let me know if you know the answer!
Turbo thunks
I hope you didn’t forget about the TurboThunkDispatch address hanging in the
r15 register. This value is used as a jump-table:
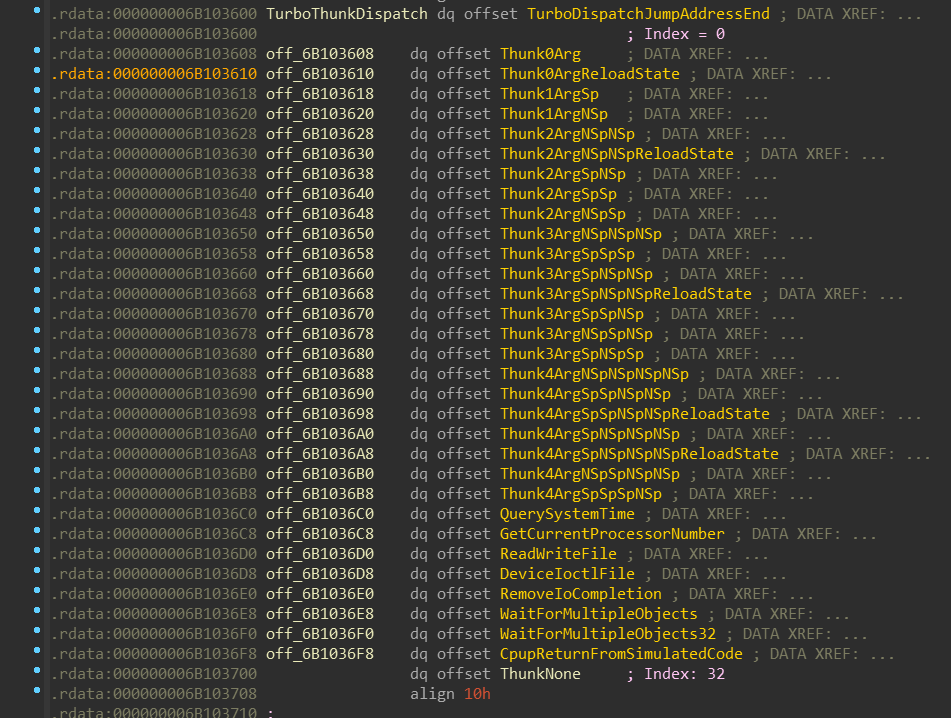
There are 32 items in the jump-table.
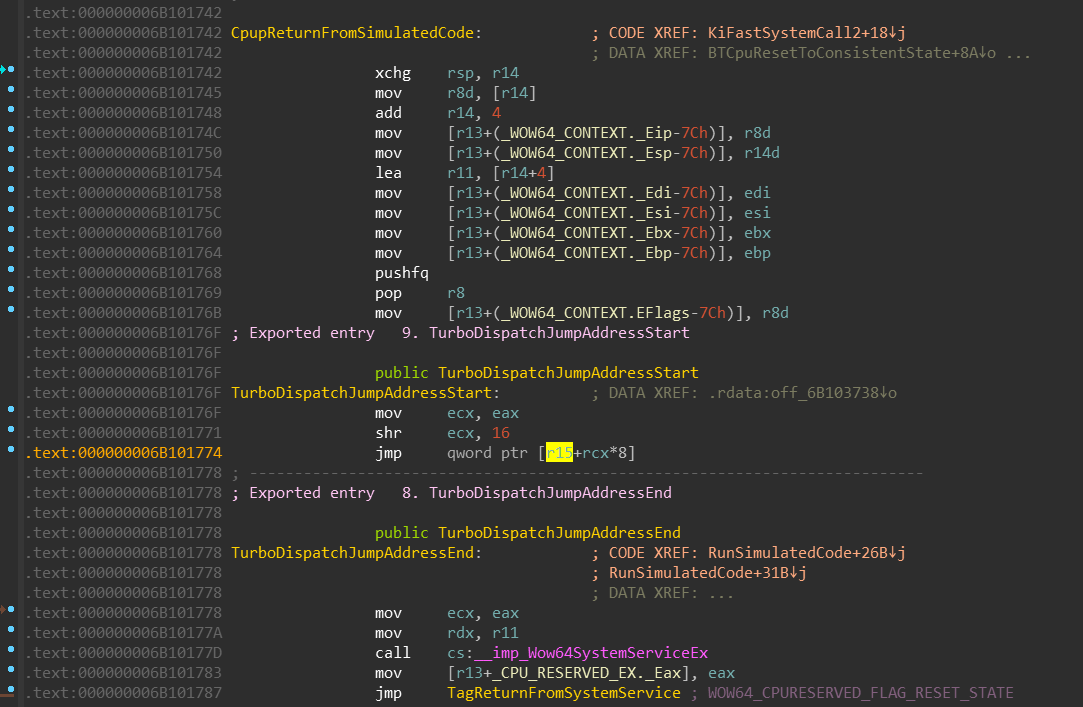
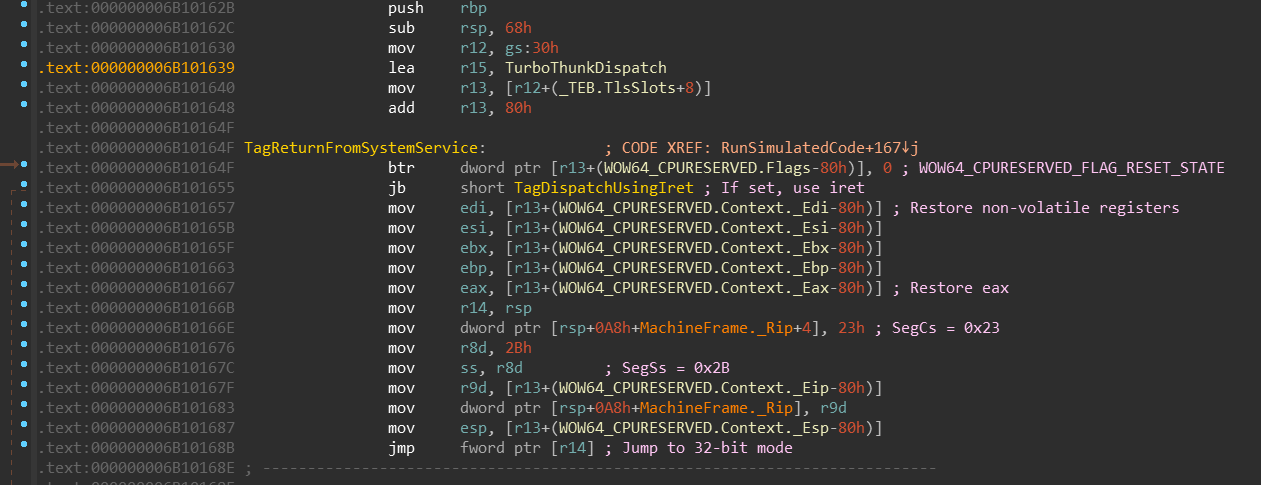
CpupReturnFromSimulatedCode is the first code that is always executed in the 64-bit
mode when 32-bit to 64-bit transition occurs. Let’s recapitulate the code:
- Stack is swapped,
- Non-volatile registers are saved
eax— which contains the encoded service table index and system call number —
is moved into theecx- it’s high-word is acquired via
ecx >> 16. - the result is used as an index into the
TurboThunkDispatchjump-table
You might be confused now, because few sections above we’ve defined the service
number like this:
…therefore, after right-shifting this value by 16 bits we should get always 0,
right?
It turns out, on x64, the WOW64_SYSTEM_SERVICE might be defined like this:
Let’s examine few WoW64 system calls:
Based on our new definition of WOW64_SYSTEM_SERVICE, we can conclude that:
NtMapViewOfSectionuses turbo thunk with index 0 (TurboDispatchJumpAddressEnd)NtWaitForSingleObjectuses turbo thunk with index 13 (Thunk3ArgSpNSpNSpReloadState)NtDeviceIoControlFileuses turbo thunk with index 27 (DeviceIoctlFile)
Let’s finally explain “turbo thunks” in proper way.
Turbo thunks are an optimalization of WoW64 subsystem — specifically on Windows x64 —
that enables for particular system calls to never leave the wow64cpu.dll — the
conversion of parameters and return value, and the syscall instruction itself
is fully performed there. The set of functions that use these turbo thunks reveals,
that they are usually very simple in terms of parameter conversion — they receive
numerical values or handles.
The notation of Thunk* labels is as follows:
- The number specifies how many arguments the function receives
Spconverts parameter with sign-extensionNSpconverts parameter without sign-extensionReloadStatewill return to the 32-bit mode usingiretinstead of far jump,
ifWOW64_CPURESERVED_FLAG_RESET_STATEis setQuerySystemTime,ReadWriteFile,DeviceIoctlFile, … are special cases
Let’s take the NtWaitForSingleObject and its turbo thunk Thunk3ArgSpNSpNSpReloadState
as an example:
- it receives 3 parameters
- 1st parameter is sign-extended
- 2nd parameter isn’t sign-extended
- 3rd parameter isn’t sign-extended
- it can switch to 32-bit mode using
iretifWOW64_CPURESERVED_FLAG_RESET_STATEis set
When we cross-check this information with its function prototype, it makes sense:
The sign-extension of HANDLE makes sense, because if we pass there an INVALID_HANDLE_VALUE,
which happens to be 0xFFFFFFFF (-1) on 32-bits, we don’t want to convert this value
to 0x00000000FFFFFFFF, but 0xFFFFFFFFFFFFFFFF.
On the other hand, if the TurboThunkNumber is 0, the call will end up in the
TurboDispatchJumpAddressEnd which in turn calls wow64!Wow64SystemServiceEx.
You can consider this case as the “slow path”.
Disabling Turbo thunks
On Windows x64, the Turbo thunk optimization can be actually disabled!
In one of
the previous sections I’ve been talking about ntdll32!NtWow64CallFunction64 and
wow64!Wow64CallFunctionTurboThunkControl functions. As with any other NtWow64*
function, NtWow64CallFunction64 is only available in the WoW64 ntdll.dll.
This function can be called with an index to WoW64 function in the
Wow64FunctionDispatch64 table (mentioned earlier).
The function prototype might look like this:
NOTE: This function prototype has been reconstructed with the help of the
wow64!Wow64CallFunction64Nopfunction code, which just logs the parameters.
We can see that wow64!Wow64CallFunctionTurboThunkControl can be called with an
index of 2. This function performs some sanity checks and then passes calls
wow64cpu!BTCpuTurboThunkControl(*(ULONG*)InputBuffer).
wow64cpu!BTCpuTurboThunkControl then checks the input parameter.
- If it’s 0, it patches every target of the jump table to point to
TurboDispatchJumpAddressEnd(remember, this is the target that is called when
WOW64_SYSTEM_SERVICE.TurboThunkNumberis 0). - If it’s non-0, it returns
STATUS_NOT_SUPPORTED.
This means 2 things:
- Calling
wow64cpu!BTCpuTurboThunkControl(0)disables the Turbo thunks, and
every system call ends up taking the “slow path”. - It is not possible to enable them back.
With all this in mind, we can achieve disabling Turbo thunks by this call:
What it might be good for? I can think of 3 possible use-cases:
-
If we deploy custom
wow64log.dll, disabling Turbo thunks
guarantees that we will see every WoW64 system call in our
wow64log!Wow64LogSystemServicecallback. We wouldn’t see such calls if the Turbo thunks
were enabled, because they would take the “fast path” inside of thewow64cpu.dll
where thesyscallwould be executed. -
If we decide to hook
Nt*functions in the nativentdll.dll, disabling
Turbo thunks guarantees that for eachNt*function called in thentdll32.dll,
the correspondintNt*function will be called in the nativentdll.dll.
(This is basically the same point as the previous one.)NOTE: Keep in mind that this only applies on system calls, i.e. on
Nt*
orZw*functions. Other functions are not called from the 32-bitntdll.dll
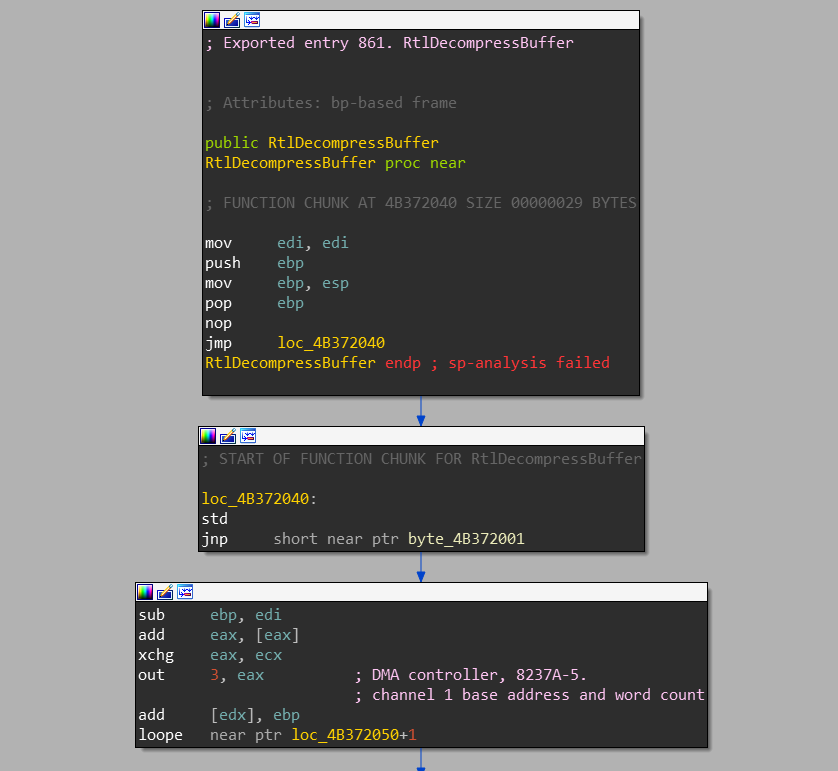
to the 64-bitntdll.dll. For example, if we hookedRtlDecompressBuffer
in the nativentdll.dllof the WoW64 process, it wouldn’t be called
onntdll32!RtlDecompressBuffercall. This is because the full implementaion of the
Rtl*functions is already in thentdll32.dll. -
We can “harmlessly” patch high-word moved to the
eaxin every WoW64 system call stub to 0.
For example we could see inNtWaitForSingleObjectthere ismov eax, 0D0004h.
If we patched appropriate 2 bytes in that instruction so that the instruction
would becomemov eax, 4h, the system call would still work.This approach can be used as an anti-hooking technique — if there’s a jump
at the start of the function, the patch will break it. If there’s not a jump,
we just disable the Turbo thunk for this function.
x86 on ARM64
Emulation of x86 applications on ARM64 is handled by an actual binary translation.
Instead of wow64cpu.dll, the xtajit.dll (probably shortcut for “x86 to ARM64 JIT”)
is used for its emulation. As with other emulation DLLs, this DLL is native (ARM64).
The x86 emulation on Windows ARM64 consists also of other “XTA” components:
xtac.exe— XTA CompilerXtaCache.exe— XTA Cache Service
Execution of x86 programs on ARM64 appears to go way behind just emulation. It
is also capable of caching already binary-translated code, so that next execution
of the same application should be faster. This cache is located in the Windows\XtaCache
directory which contains files in format FILENAME.EXT.HASH1.HASH2.mp.N.jc.
These files are then mapped to the user-mode address space of the application.
If you’re asking whether you can find an actual ARM64 code in these files — indeed,
you can.
Unfortunatelly, Microsoft doesn’t provide symbols to any of these xta* DLLs or executables. But if
you’re feeling adventurous, you can find some interesting artifacts, like
this array of structures inside of the xtajit.dll, which contains name of the function and its pointer.
There are thousands of items in this array:
With a simple Python script, we can mass-rename all functions referenced in
this array:
I’d like to thank Milan Boháček for providing me this script.

Windows\SyCHPE32 & Windows\SysWOW64
One thing you can observe on ARM64 is that it contains two folders used for x86
emulation. The difference between them is that SyCHPE32 contains small subset
of DLLs that are frequently used by applications, while contents of the SysWOW64
folder is quite identical with the content of this folder on Windows x64.
The CHPE DLLs are not pure-x86 DLLs and not even pure-ARM64 DLLs. They are
“compiled-hybrid-PE”s. What does it mean? Let’s see:
After opening SyCHPE32\ntdll.dll, IDA will first tell us — unsurprisingly —
that it cannot download PDB for this DLL. After looking at randomly chosen Nt*
function, we can see that it doesn’t differ from what we would see in the
SysWOW64\ntdll.dll. Let’s look at some non-Nt* function:
We can see it contains regular x86 function prologue, immediately followed by
x86 function epilogue and then jump somewhere, where it looks like that there’s
just garbage. That “garbage” is actually ARM64 code of that function.
My guess is that the reason for this prologue is probably compatibility with
applications that check whether some particular functions are hooked or not —
by checking if the first bytes of the function contain real x86 prologue.
NOTE: Again, if you’re feeling adventurous, you can patch
FileHeader.Machine
field in the PE header toIMAGE_FILE_MACHINE_ARM64 (0xAA64)and open this
file in IDA. You will see a whole lot of correctly resolved ARM64 functions.
Again, I’d like to thank to Milan Boháček for this tip.
If your question is “how are these images generated?”, I would answer that I don’t know,
but my bet would be on some internal version of Microsoft’s C++ compiler toolchain. This idea
appears to be supported by various occurences of the CHPE keyword in the ChakraCore codebase.
ARM32 on ARM64
The loop inside of the wowarmhw!BTCpuSimulate is fairly simple compared to
wow64cpu.dll loop:
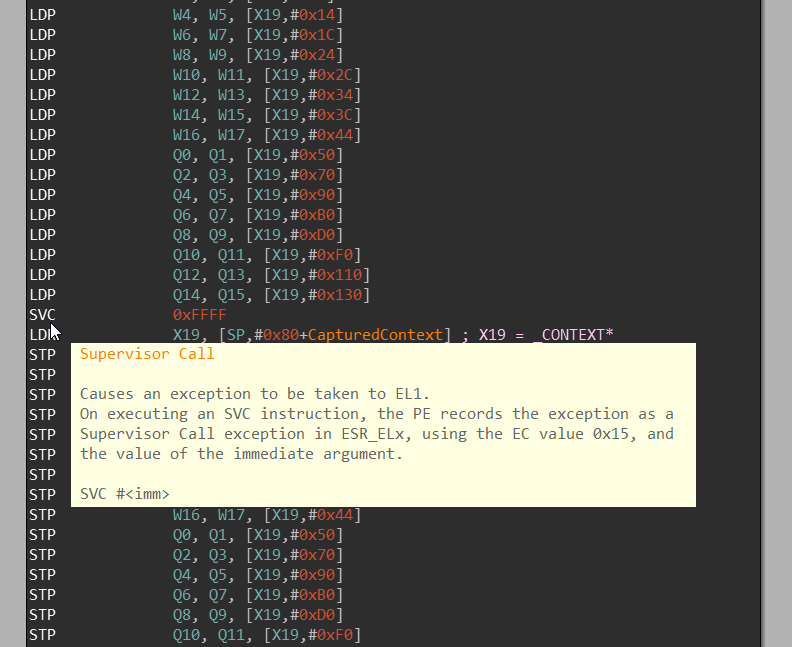
CpupSwitchTo32Bit does nothing else than saving the whole CONTEXT, performing SVC 0xFFFF
instruction and then restoring the CONTEXT.
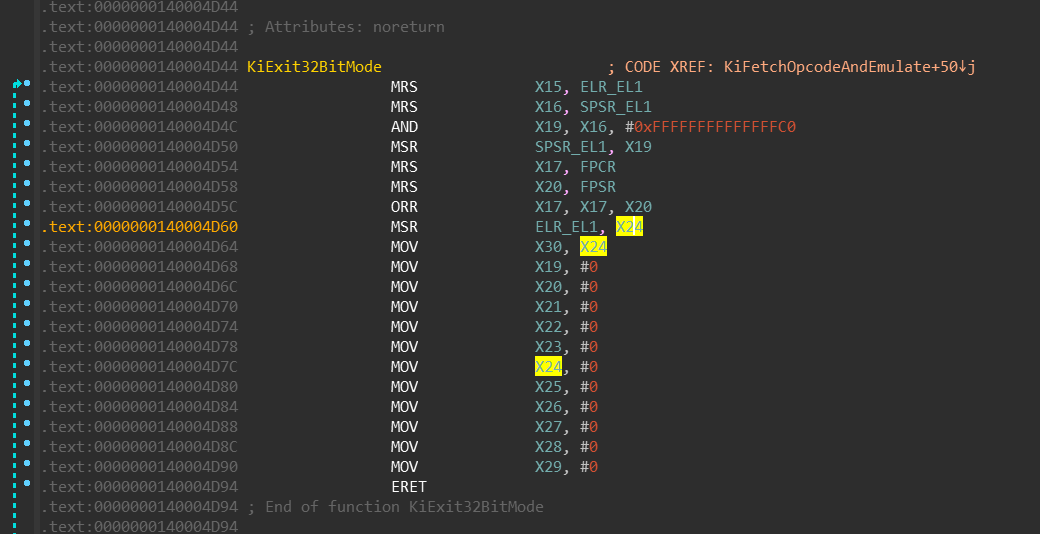
nt!KiEnter32BitMode / SVC 0xFFFF
I won’t be explaining here how system call dispatching works in the ntoskrnl.exe —
Bruce Dang already did an excellent job doing it.
This section is a follow up on his article, though.
SVC instruction is sort-of equivalent of SYSCALL instruction on ARM64 — it
basically enters the kernel mode. But there is a small difference between SYSCALL
and SVC: while on Windows x64 the system call number is moved into
the eax register, on ARM64 the system call number can be encoded directly
into the SVC instruction.
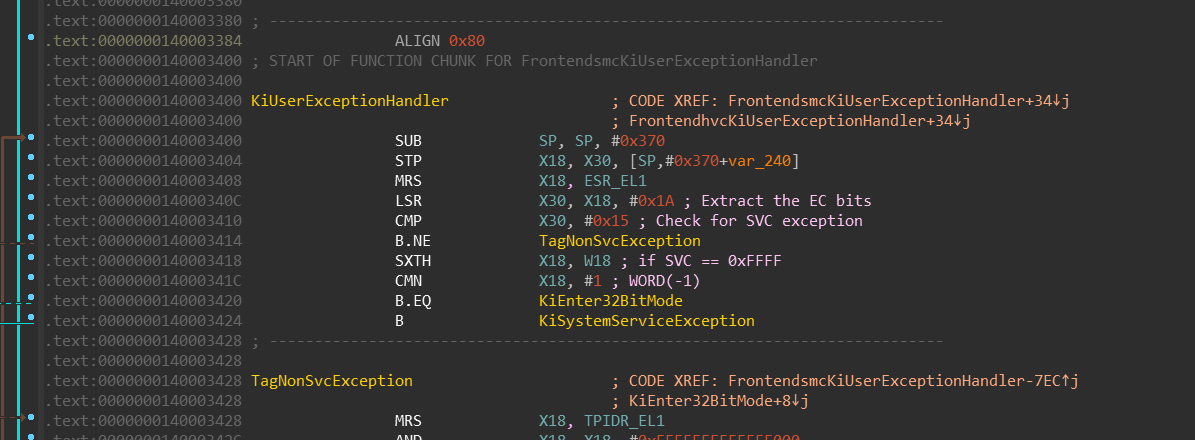
Let’s peek for a moment into the kernel to see how is this SVC instruction handled:
nt!KiUserExceptionHandlernt!KiEnter32BitMode

We can see that:
MRS X30, ELR_EL1— current interrupt-return address (stored inELR_EL1system
register) will be moved to the registerX30(link register —LR).MSR ELR_EL1, X15— the interrupt-return address will be replaced by value
in the registerX15(which is aliased to the instruction pointer register —
PC— in the 32-bit mode).ORR X16, X16, #0b10000— bit [4] is being set inX16which is later moved
to theSPSR_EL1register. Setting this bit switches the execution mode to
32-bits.
Simply said, in the X15 register, there is an address that will be
executed once we leave the kernel-mode and enter the user-mode — which happens
with the ERET instruction at the end.
nt!KiExit32BitMode / UND #0xF8
Alright, we’re in the 32-bit ARM mode now, how exactly do we leave? Windows
solves this transition via UND instruction — which is similar to the UD2
instruction on the Intel CPUs. If you’re not familiar with it, you just
need to know that it is instruction that basically guarantees that it’ll
throw “invalid instruction” exception which can OS kernel handle. It is defined-“undefined instruction”.
Again there is the same difference between the UND and UD2 instruction in
that the ARM can have any 1-byte immediate value encoded directly in the
instruction.
Let’s look at the NtMapViewOfSection system call in the SysArm32\ntdll.dll:
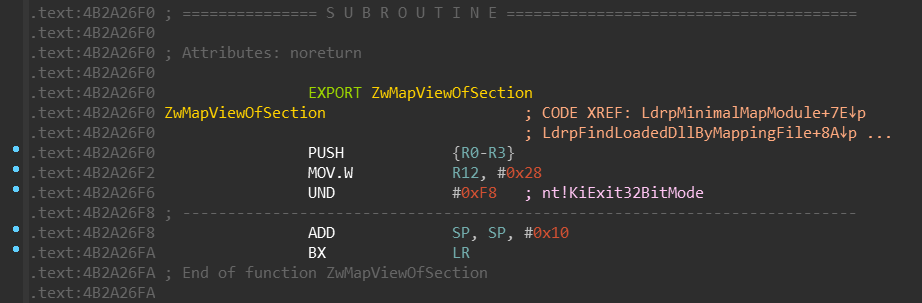
Let’s peek into the kernel again:
nt!KiUser32ExceptionHandlernt!KiFetchOpcodeAndEmulatent!KiExit32BitMode
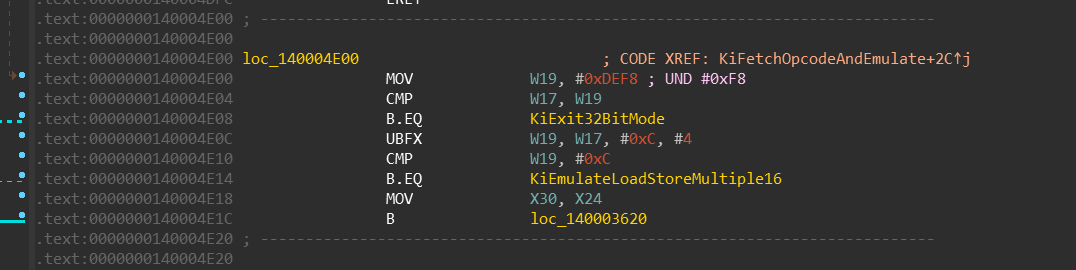
Keep in mind that meanwhile the 32-bit code is running, it cannot modify the value of the
previously stored X30 register — it is not visible in 32-bit mode. It stays there the
whole time. Upon UND #0xF8 execution, following happens:
- the
KiFetchOpcodeAndEmulatefunction moves value ofX30intoX24register
(not shown on the screenshot). AND X19, X16, #0xFFFFFFFFFFFFFFC0— bit [4] (among others) is being cleared
in theX19register, which is later moved to theSPSR_EL1register.
Clearing this bit switches the execution mode back to 64-bits.KiExit32BitModethen moves the value ofX24register into theELR_EL1register. That means when
this function finishes its execution, theERETbrings us back to the 64bit code,
right after theSVC 0xFFFFinstruction.
NOTE: It can be noticed that Windows uses
UNDinstruction for several
purposes. Common example might also beUND #0xFEwhich is used as a breakpoint
instruction (equivalent of__debugbreak()/int3)
As you could spot, 3 kernel transitions are required for emulation of the
system call (SVC 0xFFFF, system call itself, UND 0xF8). This is because on
ARM there doesn’t exist a way how to switch between 32-bit and 64-bit mode only
in user-mode.
If you’re looking for “ARM Heaven’s Gate” — this is it. Put whatever function
address you like into the X15 register and execute SVC 0xFFFF.
Next instruction will be executed in the 32-bit ARM mode, starting with that
address. When you feel you’d like to come back into 64-bit mode, simply
execute UND #0xF8 and your execution will continue with the next instruction
after the SVC 0xFFFF.
Appendix
References
How does one retrieve the 32-bit context of a Wow64 program from a 64-bit process on Windows Server 2003 x64?
http://www.nynaeve.net/?p=191
Mixing x86 with x64 code
http://blog.rewolf.pl/blog/?p=102
Windows 10 on ARM
https://channel9.msdn.com/Events/Build/2017/P4171
Knockin’ on Heaven’s Gate – Dynamic Processor Mode Switching
http://rce.co/knockin-on-heavens-gate-dynamic-processor-mode-switching/
Closing “Heaven’s Gate”
http://www.alex-ionescu.com/?p=300