
Все способы:
- Способ 1: Проверка соединения
- Способ 2: Обновление списка принтеров
- Способ 3: Ручное добавление принтера
- Способ 4: Поиск последней версии драйвера принтера
- Способ 5: Использование средства устранения неполадок
- Способ 6: Проверка отображения в «Диспетчере устройств»
- Способ 7: Удаление файлов печати
- Способ 8: Включение дополнительных компонентов Windows
- Способ 9: Установка драйвера старого принтера
- Вопросы и ответы: 0
Способ 1: Проверка соединения
Для корректного обнаружения принтера в Windows 11 требуется соблюдать правила подключения устройства. Вам необходимо убедиться в том, что печатающее оборудование включено, все кабели подсоединены, а на экране не отображаются никакие ошибки. Сам принтер при включении обычно сигнализирует о том, что готов к работе: немного ездят печатающие головки и происходит подготовка к печати. Вы должны слышать все эти звуки и внимательно смотреть, что показано на дисплее.
Если у вас возникают проблемы с пониманием того, как правильно подсоединять принтер к ПК, нужно более детально изучить этот вопрос. На нашем сайте есть специализированный материал, посвященный данной теме. Его можно считать универсальным и подходящим для всех типов печатающих устройств, которые подсоединяются при помощи кабелей.
Читайте также: Как установить принтер на Windows 11
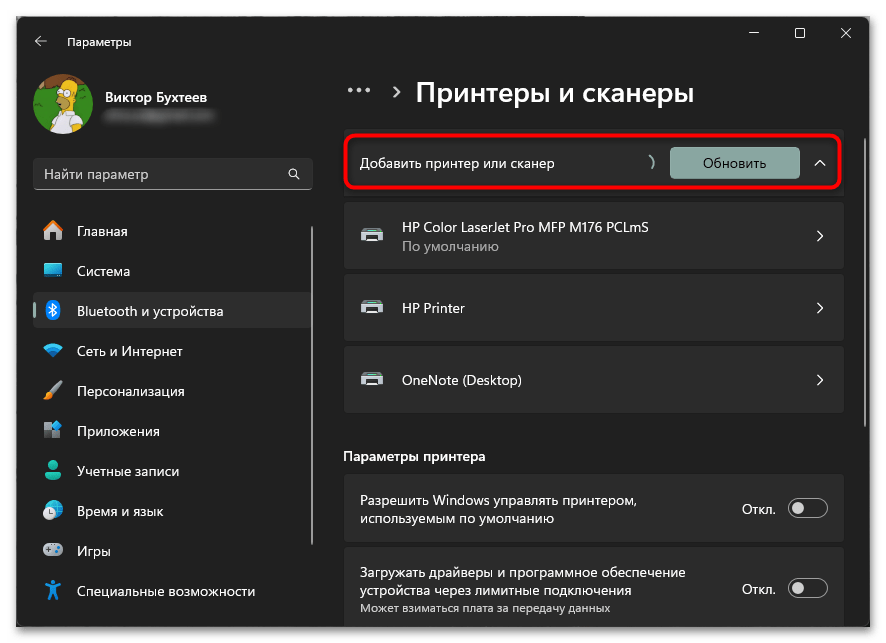
Способ 2: Обновление списка принтеров
В некоторых случаях пользователи делают все правильно, включая установку драйвера. Иногда ручная инсталляция ПО даже не требуется, поскольку принтер использует универсальный драйвер. Тогда проблемы с его отображением могут быть вызваны просто тем, что компонент управления устройствами показывает устаревшую информацию. Нужно обновить список оборудования вручную, чтобы проверить, поможет ли это решить ситуацию.
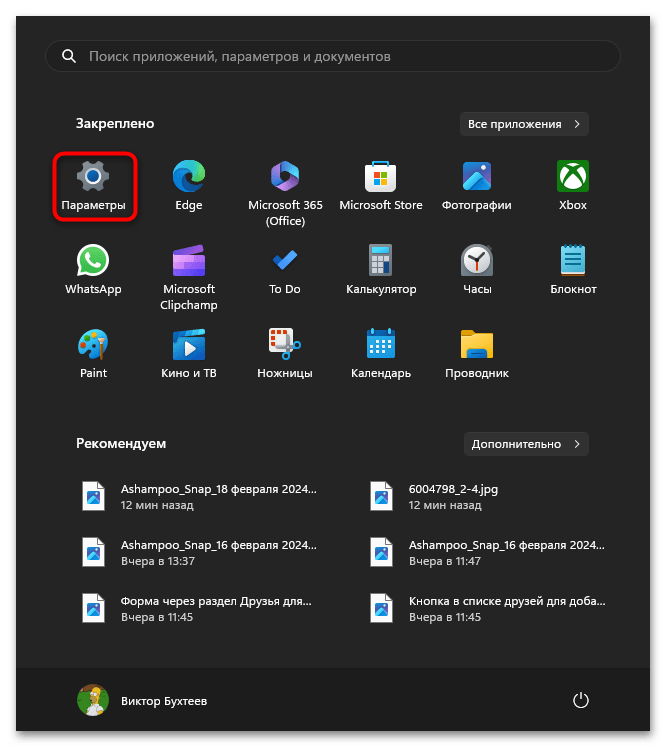
- Для этого откройте «Пуск» и перейдите в «Параметры», кликнув по значку с изображением шестеренки.
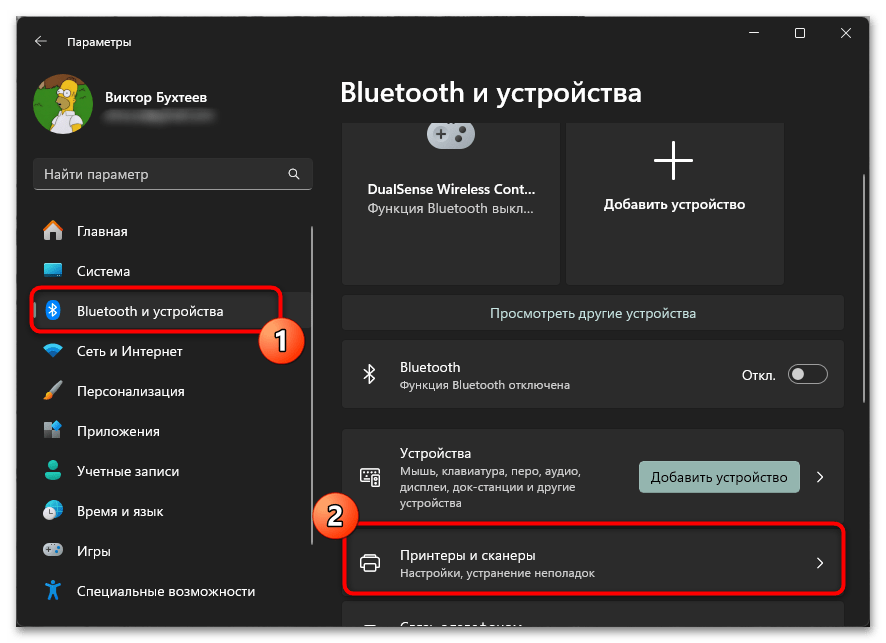
- Все необходимые действия осуществляются через раздел «Bluetooth и устройства». В нем справа отыщите категорию «Принтеры и сканеры».
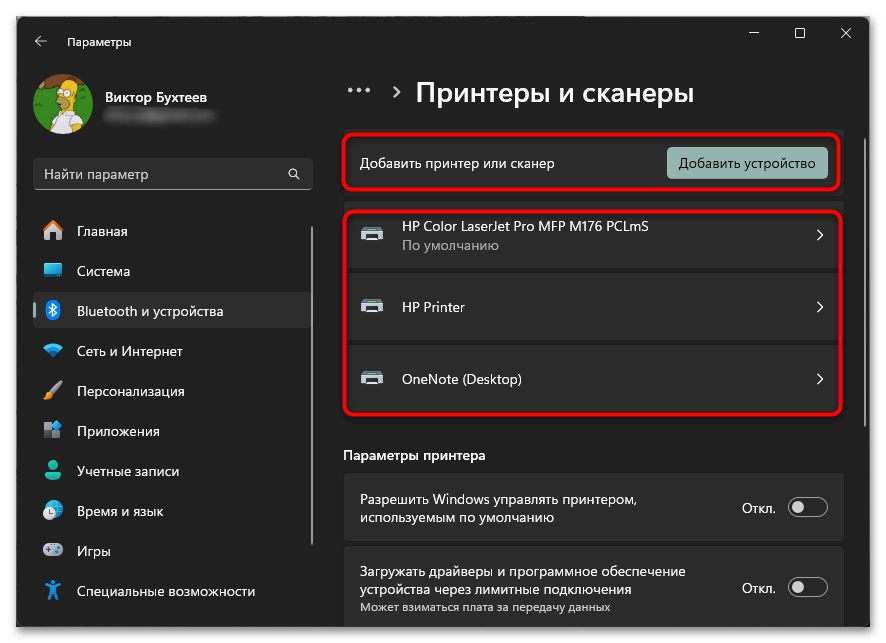
- Если принтер все еще отсутствует в списке устройств, щелкните по кнопке «Добавить устройство».
- Подождите отображения дополнительной информации. Если принтер долгое время не обнаруживается, используйте кнопку «Обновить».
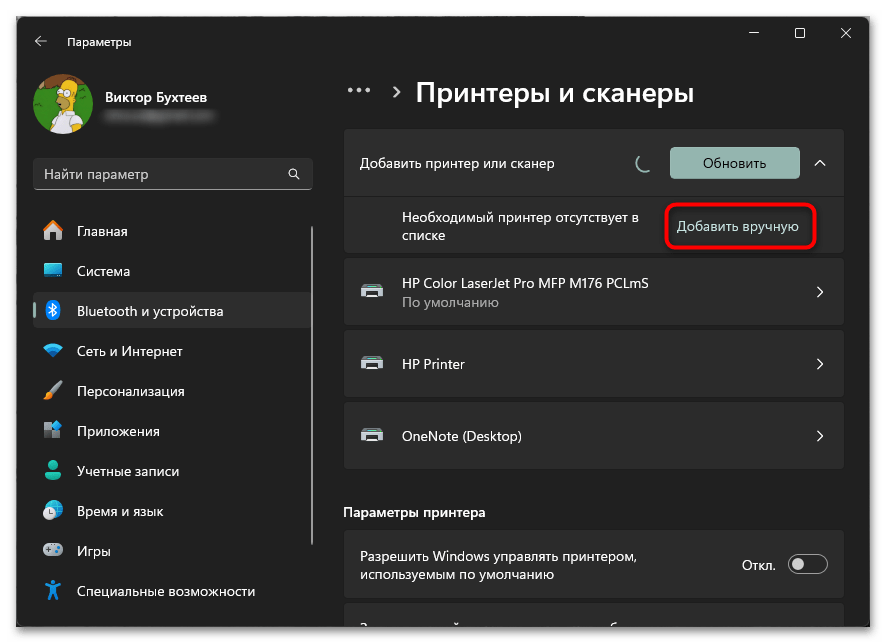
Способ 3: Ручное добавление принтера
При отсутствии какого-либо результата во время автоматического поиска подключенных устройств можно пойти далее, используя это же самое средство. Однако в этот раз через него придется перейти к ручному добавлению, чтобы выбрать, с каким принтером вы собираетесь взаимодействовать. Windows 11 предложит установить для него последний подходящий драйвер, имеющийся в базе, что часто позволяет решить ситуацию с обнаружением оборудования.
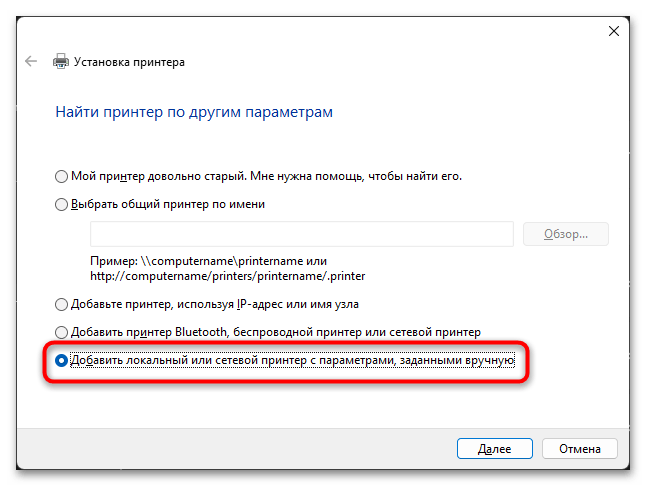
- После запуска добавления принтера, если никаких устройств не найдено, через некоторое время появится кнопка «Добавить вручную», по которой и следует кликнуть для перехода к следующему окну.
- В нем отметьте маркером пункт «Добавить локальный или сетевой принтер с параметрами, заданными вручную», после чего двигайтесь далее.
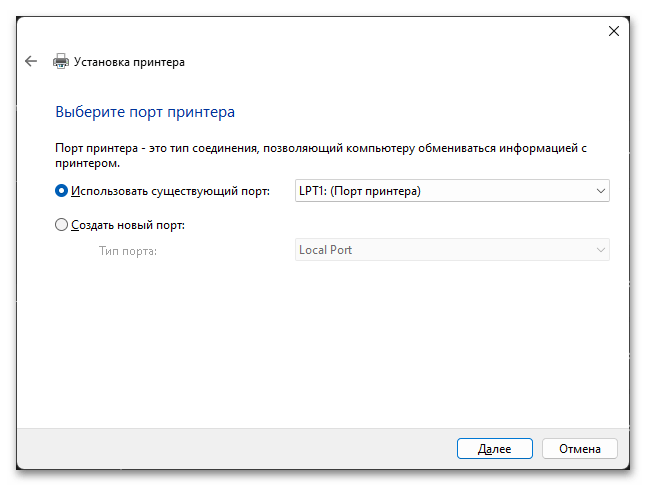
- Тип используемого порта стоит оставить без изменений, если, конечно, у вас нет каких-то специфических требований. Тогда отталкивайтесь от своих настроек.
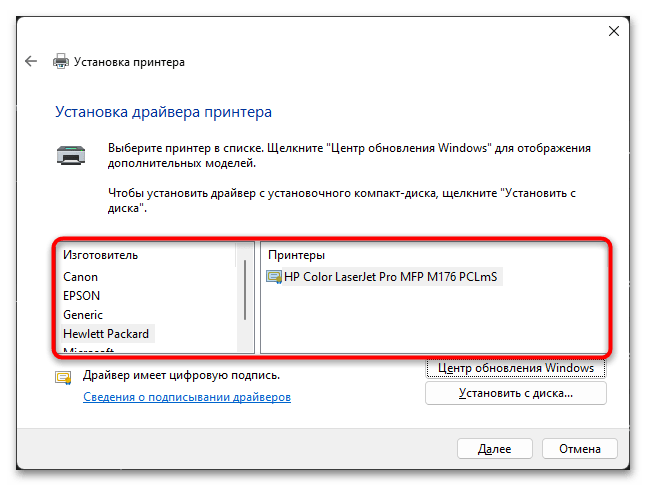
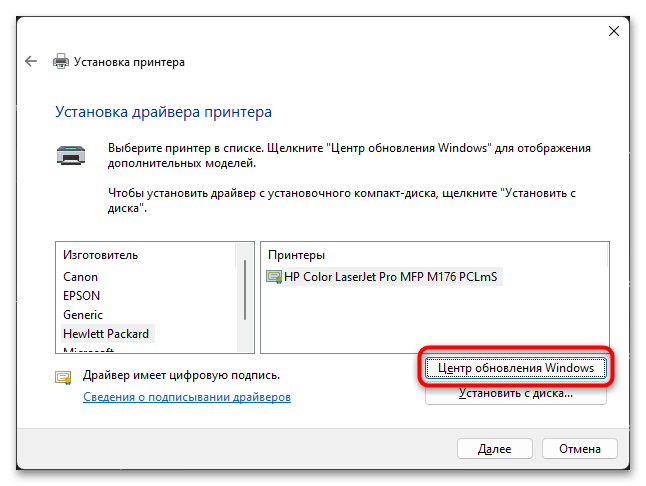
- Будет предложено вручную установить драйвер принтера, однако по умолчанию список довольно ограничен. Его необходимо загрузить в полном формате, кликнув по «Центр обновления Windows».
- Следите за тем, чтобы список изготовителей и принтеров пополнился новыми устройствами. Выберите среди них своего изготовителя и соответствующую модель печатающего оборудования.
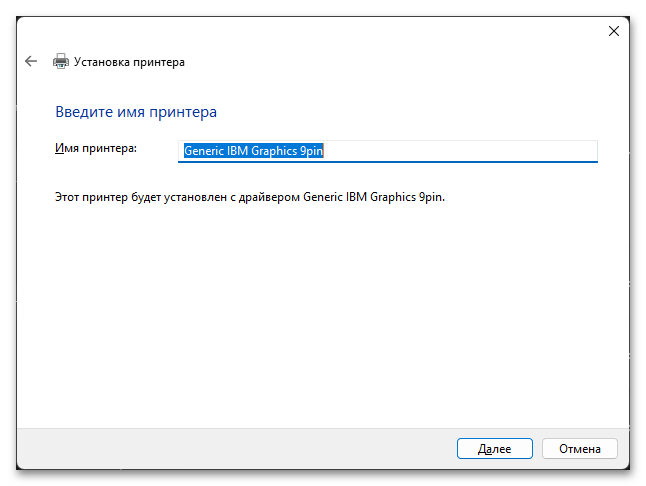
- В следующем шаге нужно будет только задать название, с которым принтер будет отображаться в операционной системе. По завершении вы получите уведомление о том, что устройство готово к работе, и сможете запустить пробную печать.
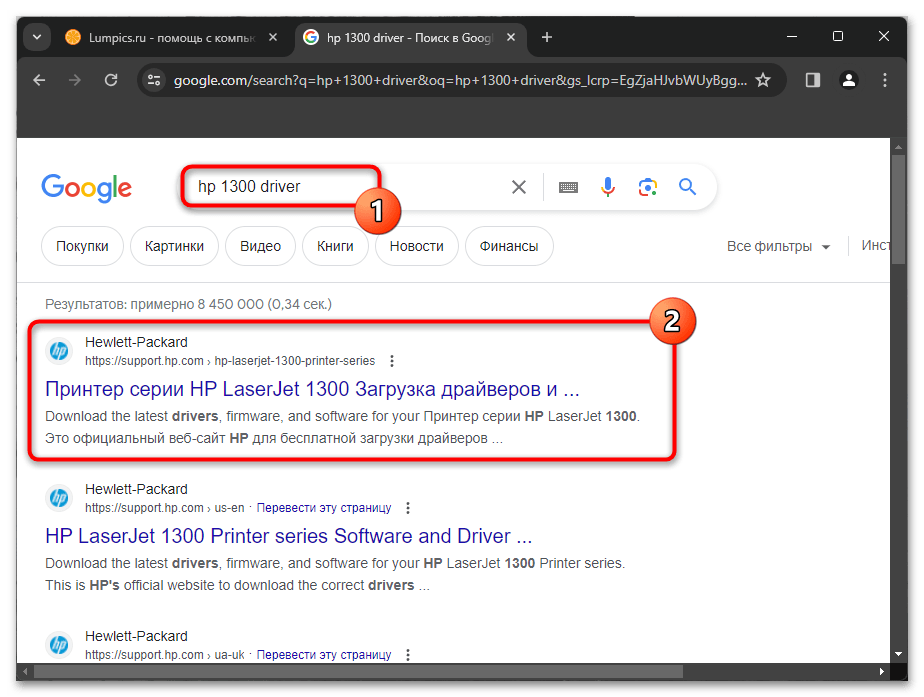
Способ 4: Поиск последней версии драйвера принтера
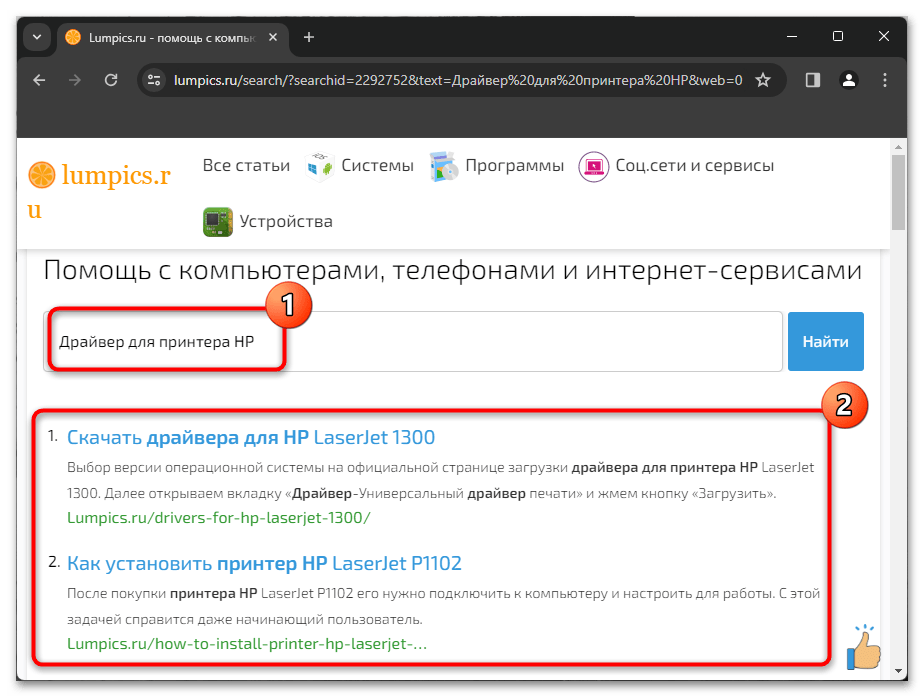
При помощи описанного выше средства можно найти только ограниченное количество драйверов, а также нет никаких гарантий того, что это будет именно последняя версия ПО, полностью совместимая с Windows 11. Поэтому чаще всего пользователю приходится искать другие методы инсталляции драйвера принтера, чтобы проверить, решит ли это проблему с его обнаружением. Вы можете воспользоваться поиском по нашему сайту, введя название своего принтера. Вероятно, вы найдете полноценную статью, в которой рассказано обо всех доступных методах установки драйвера конкретно для вашего оборудования.
В материалах представлены разные методы, но приоритетным всегда остается использование официальных сайтов. На них разработчики выкладывают актуальные версии ПО и вспомогательные утилиты, которые тоже могут пригодиться при работе с принтером. Если поиск по нашему сайту не принес результата, воспользуйтесь следующей универсальной инструкцией.
- В удобном для вас поисковике введите название вашего принтера и слово «driver», чтобы отобразить в первых строчках именно официальную страницу.
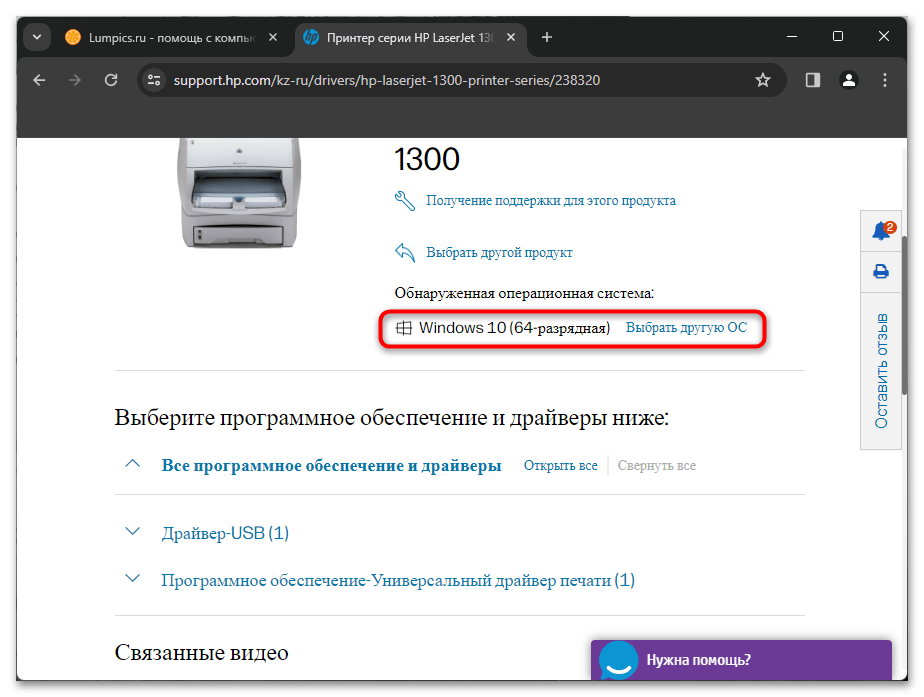
- В большинстве случаев переход по ней перенаправит на страницу поддержки по конкретному устройству. Если присутствует меню выбора операционной системы, обязательно убедитесь, что стоит правильное значение.
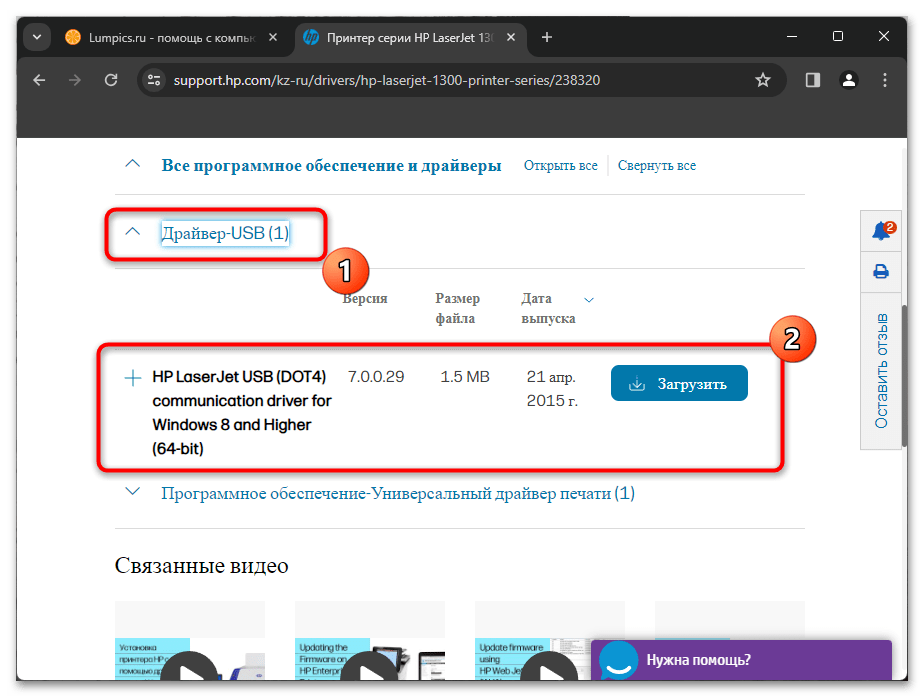
- Далее найдите раздел с драйверами и начните скачивание последней версии.
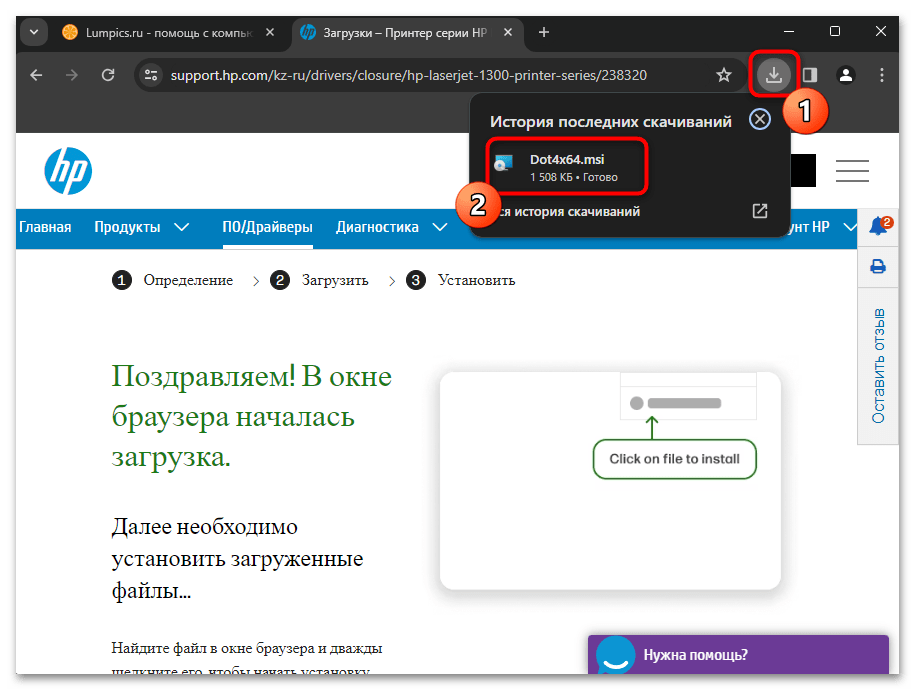
- Драйверы для принтеров почти всегда распространяются в виде исполняемых файлов EXE или MSI. После завершения загрузки запустите такой файл и начните процесс инсталляции.
Способ 5: Использование средства устранения неполадок
В некоторых случаях проблемы с обнаружением принтеров в Windows 11 связаны со сбоями в работе сетевых служб. Можно было бы вручную перезапускать их все, проверять файлы и вносить какие-то исправления, но этот процесс в ОС автоматизирован и заключается в том, что пользователю нужно только запустить средство устранения неполадок.
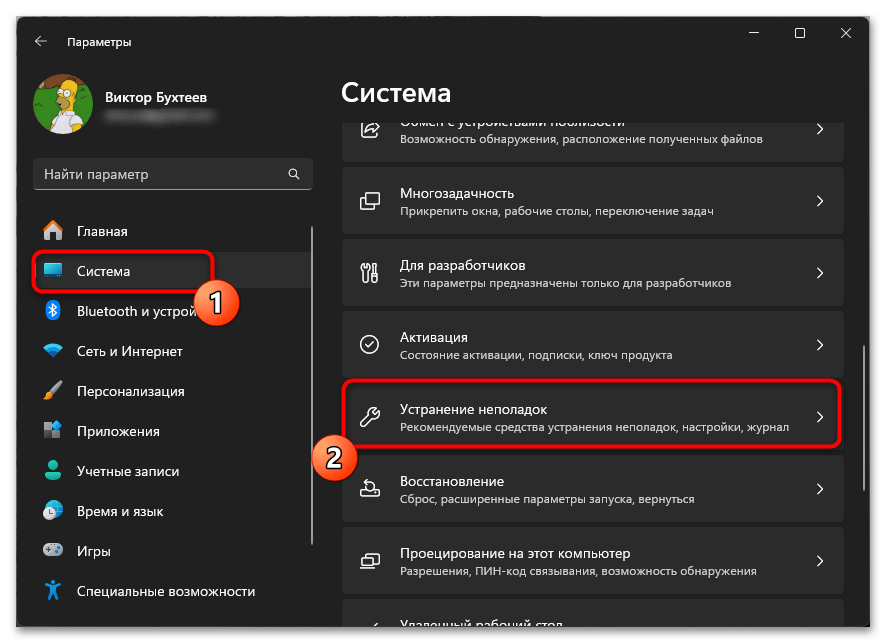
- Для этого снова перейдите в «Параметры», но на этот раз выберите раздел «Система». Справа щелкните по категории «Устранение неполадок».
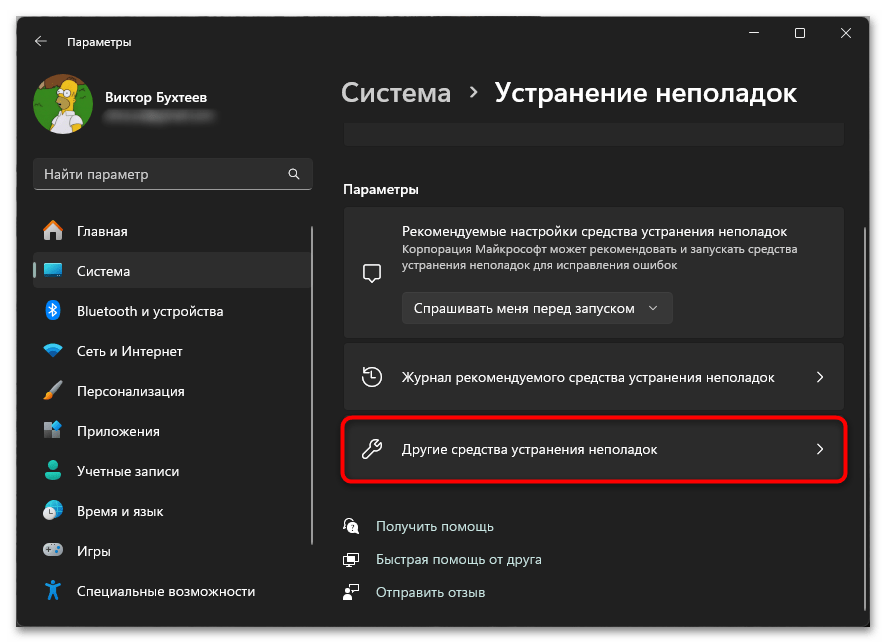
- Перейдите к следующему окну, кликнув по «Другие средства устранения неполадок».
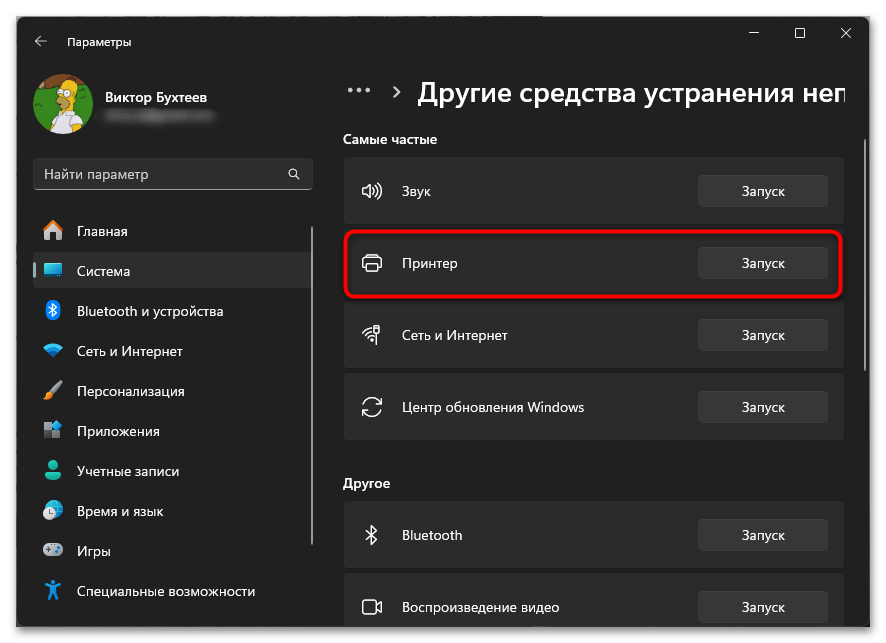
- Найдите среди самых частых «Принтер» и запустите данное средство.
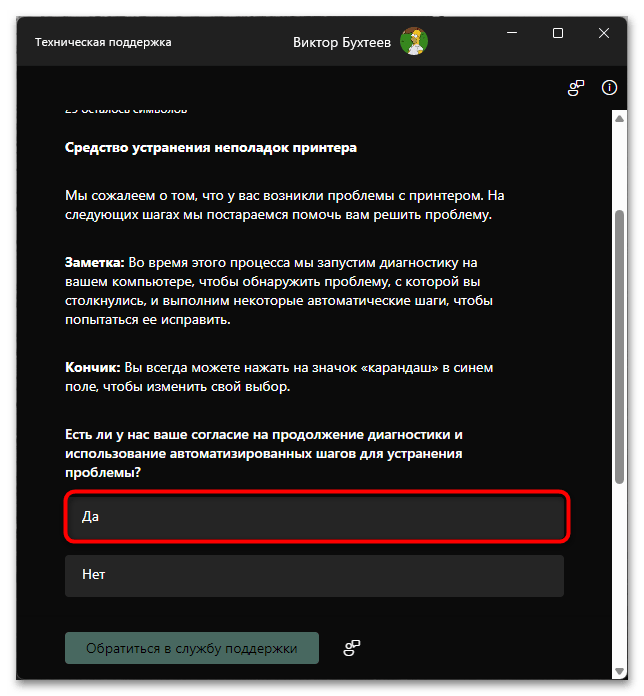
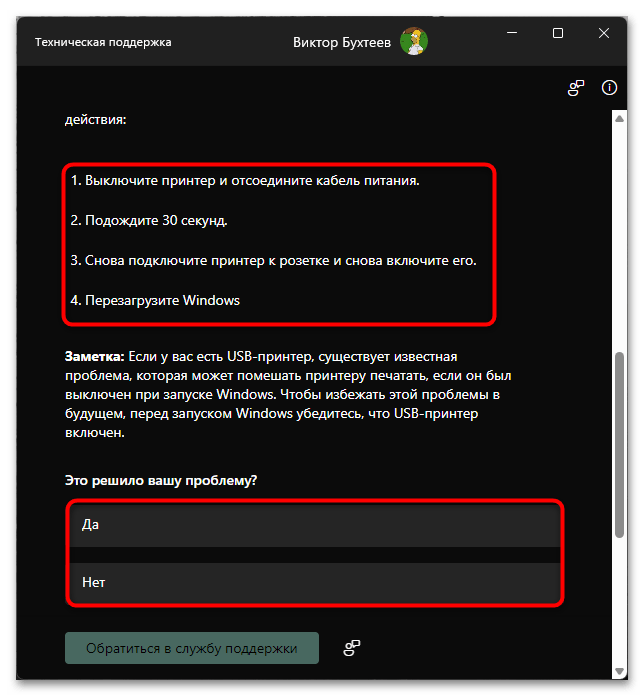
- Теперь следует выполнить рекомендованные инструкции. Сначала нажмите «Да», чтобы подтвердить запуск средства устранения неполадок.
- Прочитайте общие рекомендации и выполните некоторые из этих шагов, если еще не сделали их ранее. При сохранении проблемы нажмите «Нет».
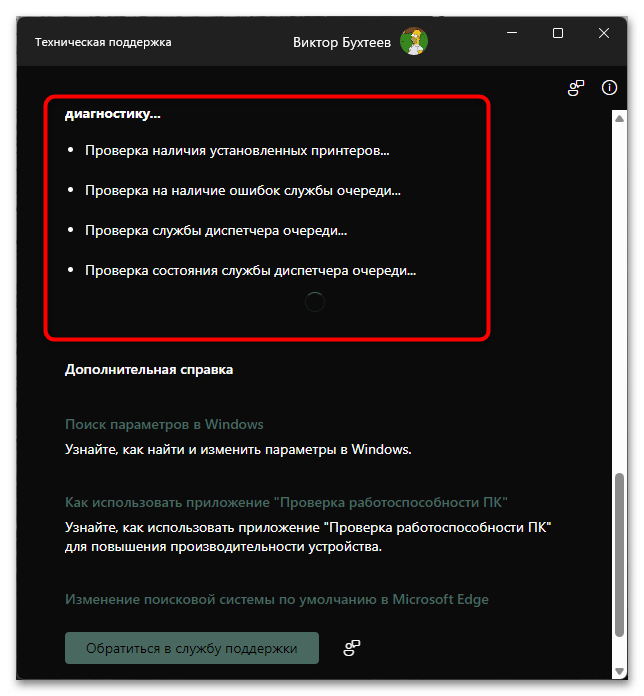
- После этого запустится автоматическая диагностика проблем. Процесс займет некоторое время, а вам нужно только отслеживать его.
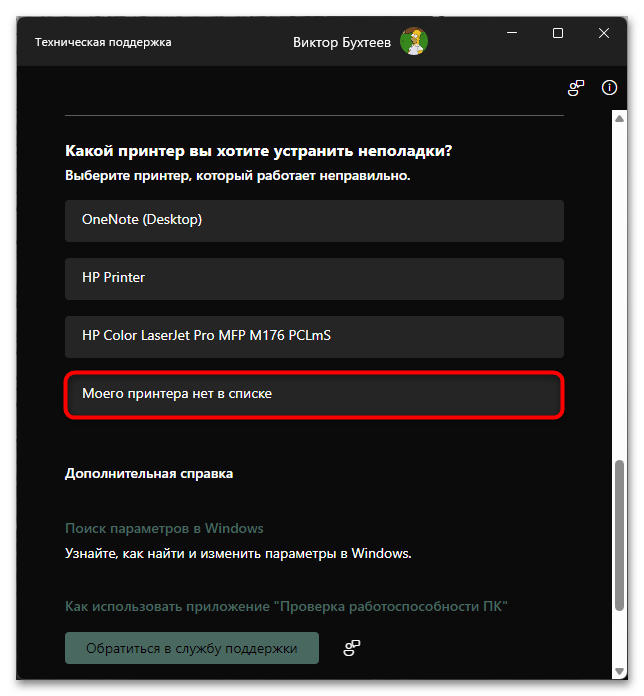
- Если средству не удалось обнаружить ваше устройство, выберите вариант «Моего принтера нет в списке». Ожидайте завершения сканирования и ознакомьтесь с его результатами.
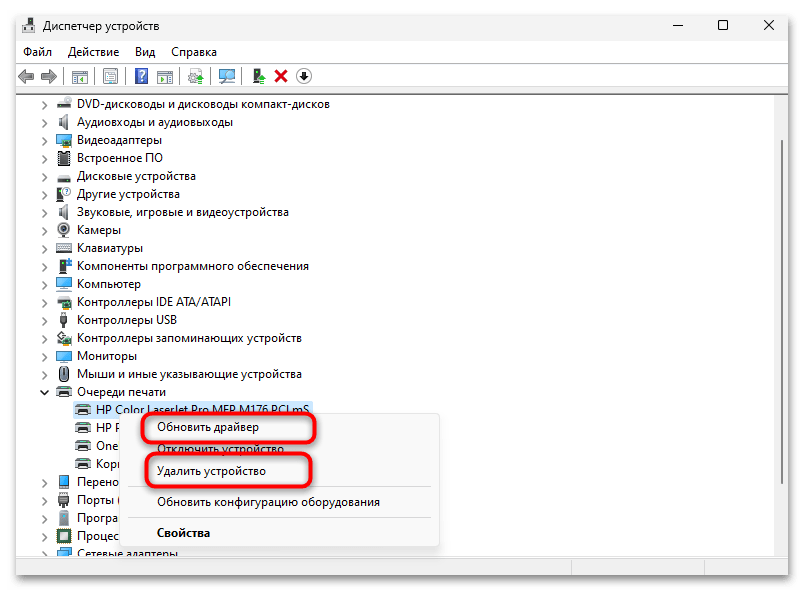
Способ 6: Проверка отображения в «Диспетчере устройств»
Ошибки в установке оборудования или сбои в работе операционной системы могут привести к тому, что принтер будет отображаться только в «Диспетчере устройств», при этом любая работа с ним станет недоступна. Тогда решение будет заключаться в том, чтобы исправить драйвер или удалить устройство с повторным его добавлением вручную.
- Щелкните правой кнопкой мыши по «Пуску» и из появившегося контекстного меню выберите пункт «Диспетчер устройств».
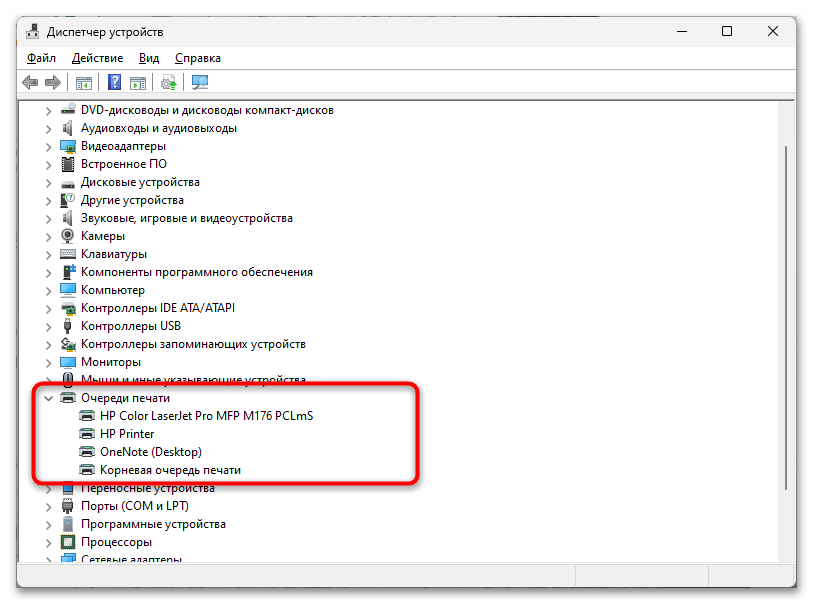
- Разверните блок «Очереди печати» и посмотрите, есть ли среди списка название того принтера, с работой которого вы испытываете проблемы. Если да, нажмите по его строке дважды, чтобы открыть окно «Свойств».
- Если будет удобнее, можно выполнить те же самые действия и через контекстное меню. Вас интересует попытка автоматического обновления драйвера или удаление устройства. Сначала попробуйте первый вариант, а при отсутствии каких-либо изменений удалите принтер и инсталлируйте его драйвер заново так, как об этом уже было рассказано ранее.
Способ 7: Удаление файлов печати
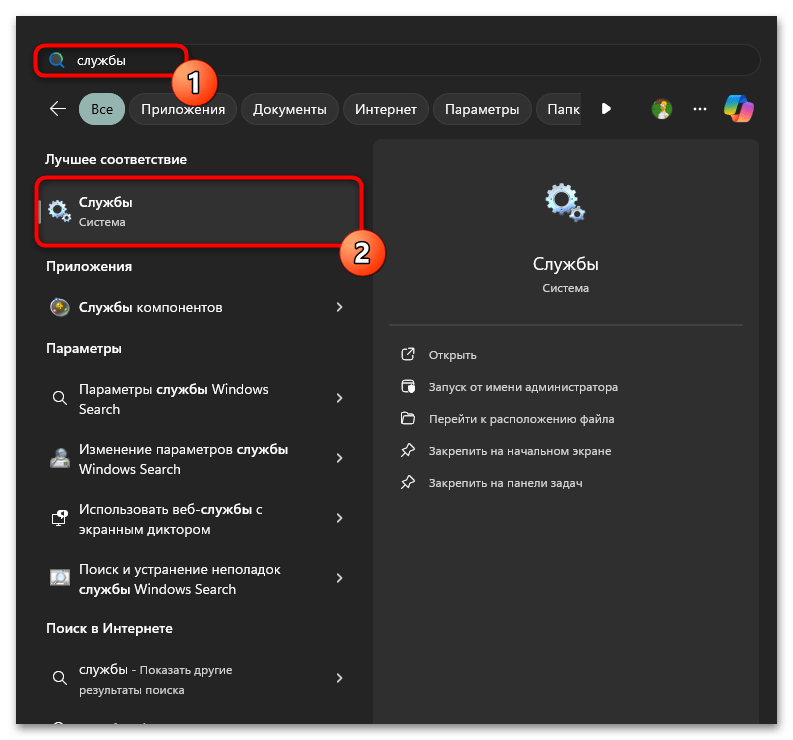
При работе с печатающим оборудованием в Windows 11 могут скапливаться временные файлы, представляющие собой очередь печати. Если они не были удалены, нередки сбои в работе оборудования, поэтому становится возможной ситуация, когда новый принтер просто не обнаруживается. Вам нужно вручную удалить эти самые файлы, но перед этим обязательно остановить связанные службы.
- Отыщите системное приложение «Службы» через поиск в «Пуске» и запустите его.
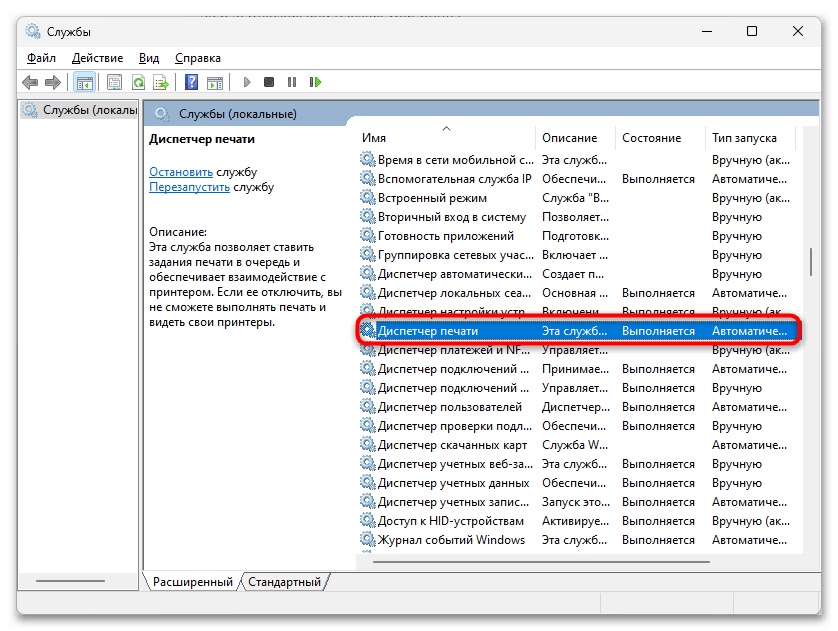
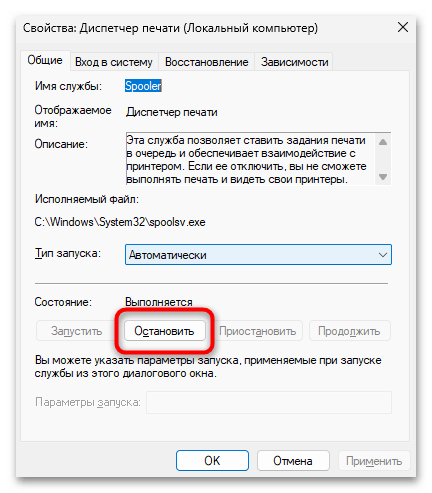
- Найдите службу «Диспетчер печати» и дважды кликните по ней ЛКМ.
- Нажмите «Остановить» и примените изменения.
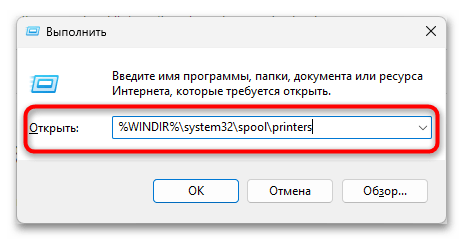
- Для удобства перехода по нужному пути вызовите утилиту «Выполнить» через контекстное меню «Пуска». То же самое действие можно осуществить и при помощи стандартной горячей клавиши Win + R.
- Введите путь
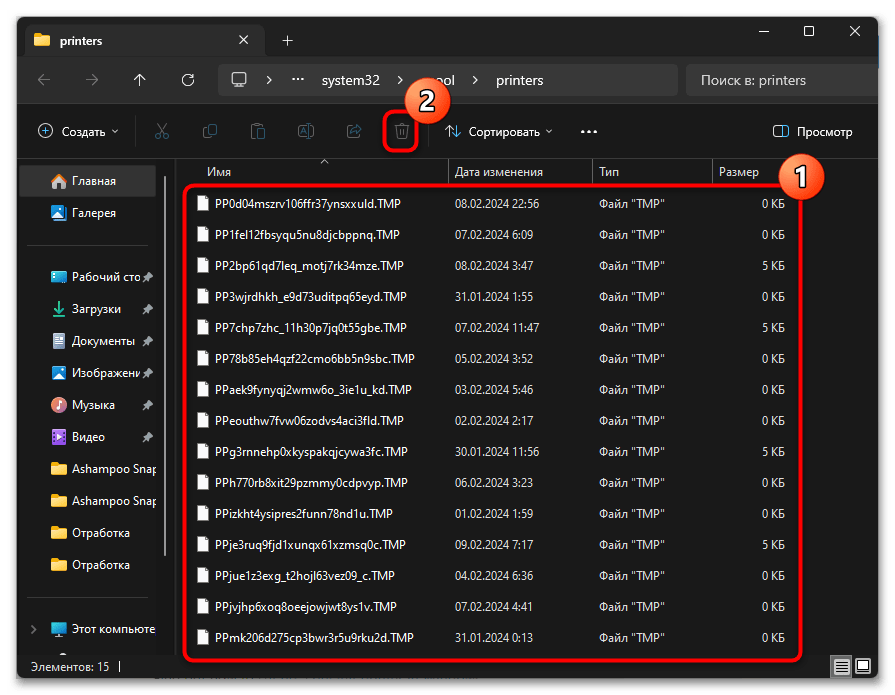
%WINDIR%\system32\spool\printersи нажмите Enter для перехода к целевой папке. - Выделите абсолютно все находящиеся в ней файлы и удалите их. Никакого критического влияния на работу принтеров они не оказывают, поскольку являются временными.
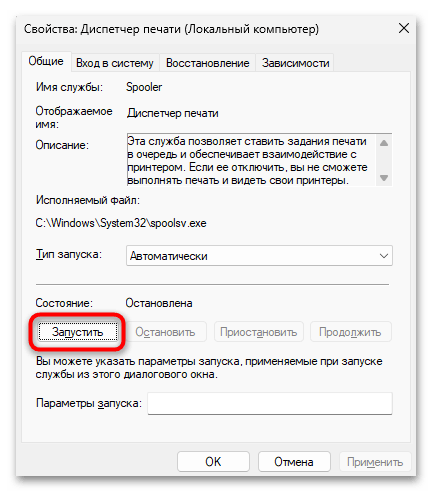
- Перед проверкой подключения оборудования не забудьте запустить службу «Диспетчер печати», которая останавливалась ранее.
Способ 8: Включение дополнительных компонентов Windows
Завершающие методы нашей статьи являются узконаправленными. Например, связь ошибки с подключением и отключенными дополнительными компонентами Windows прослеживается довольно редко, поскольку они не являются обязательными. Однако если решение до сих пор не было найдено, наверняка стоит проверить такой способ решения и включить компоненты печати, что осуществляется так:
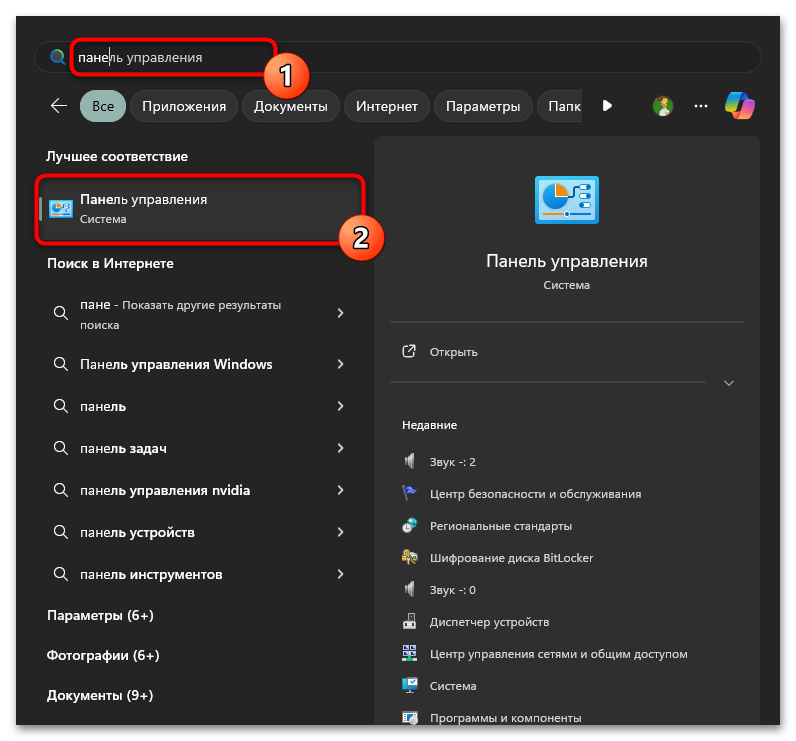
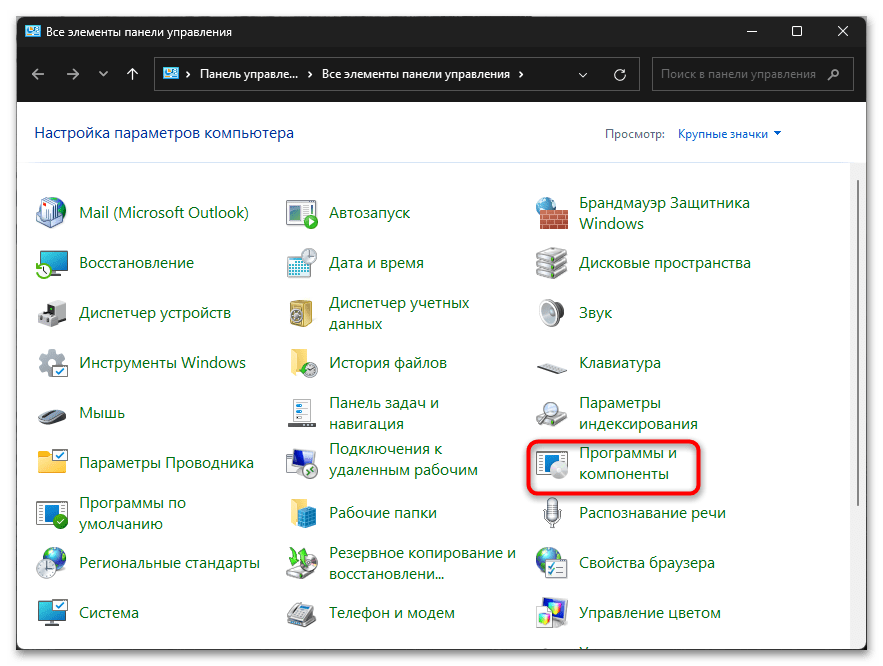
- Откройте «Пуск» и через поиск отыщите «Панель управления».
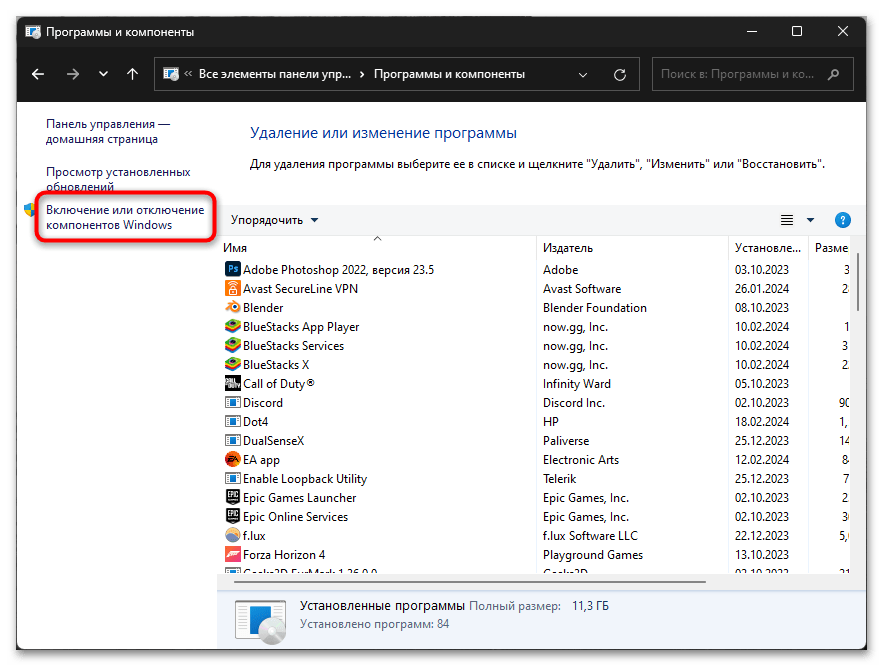
- Перейдите к разделу «Программы и компоненты».
- Слева выберите «Включение или отключение компонентов Windows».
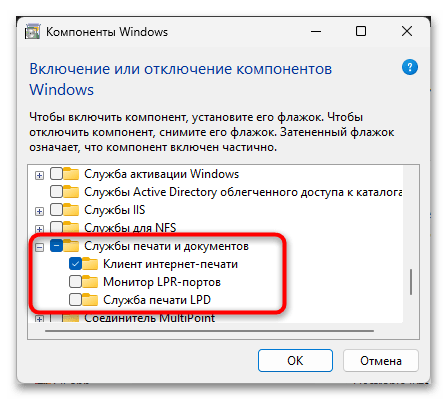
- Необходимо отыскать папку «Службы печати и документов» и включить все, что находится внутри нее. После применения изменений перезагрузите компьютер.
Способ 9: Установка драйвера старого принтера
Если вы имеете дело со старым принтером, драйверы которого не удалось найти при помощи упомянутых выше методов, возможно, единственным решением ситуации станет его добавление в качестве старого устройства. Эта функция предусмотрена в Windows 11 и как раз позволяет обеспечить совместимость с устаревшим оборудованием.
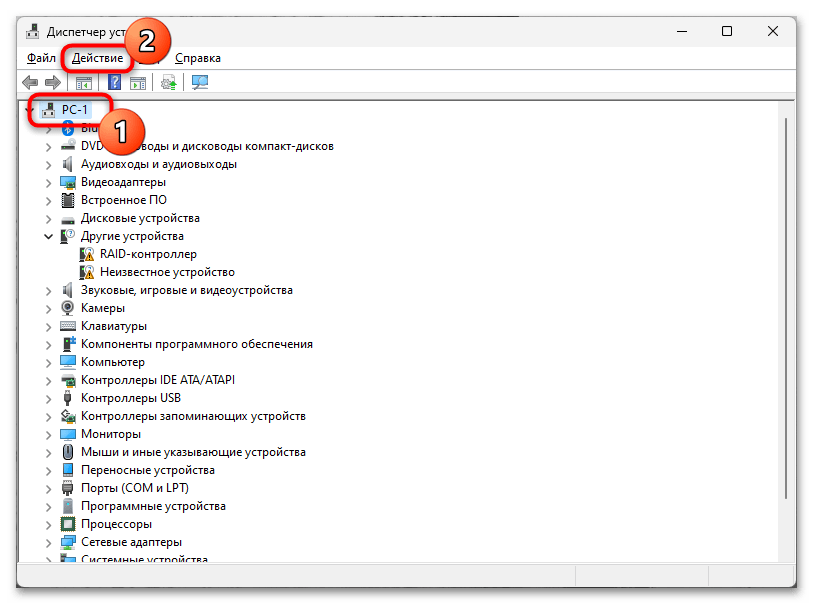
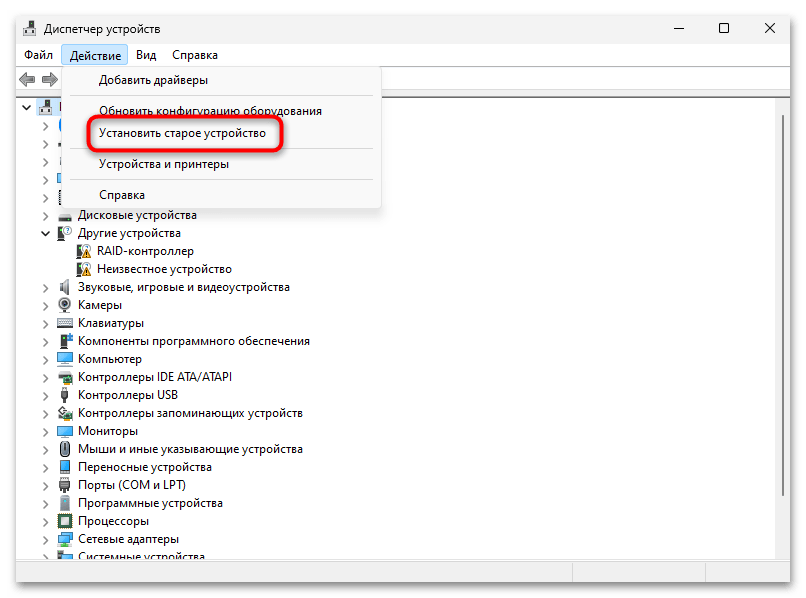
- Щелкните ПКМ по «Пуску» и перейдите в «Диспетчер устройств».
- Выделите раздел с названием вашего ПК и разверните меню «Действие».
- Из него выберите пункт «Установить старое устройство».
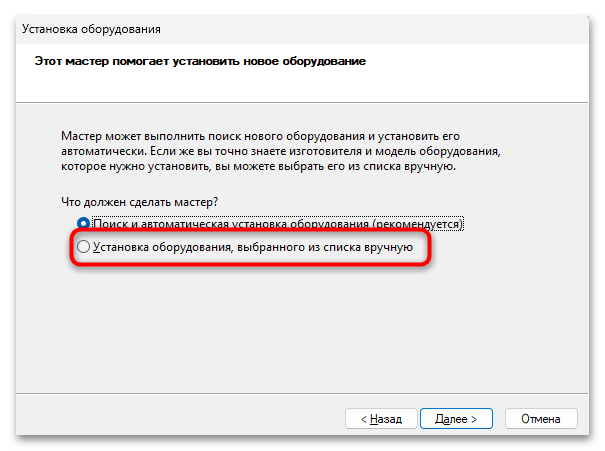
- Отметьте маркером пункт «Установка оборудования, выбранного из списка вручную» и переходите далее.
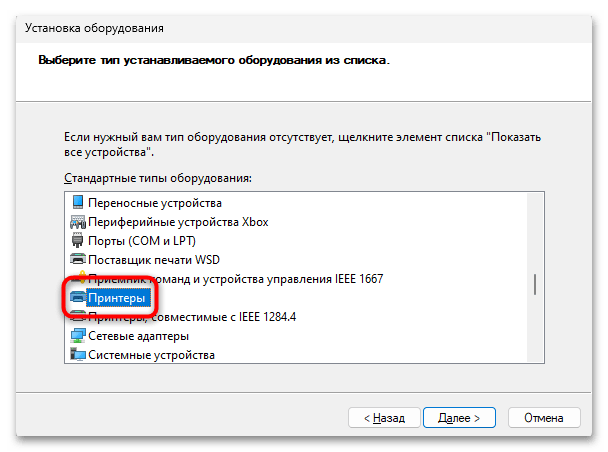
- Из списка типов устройств выберите «Принтеры».
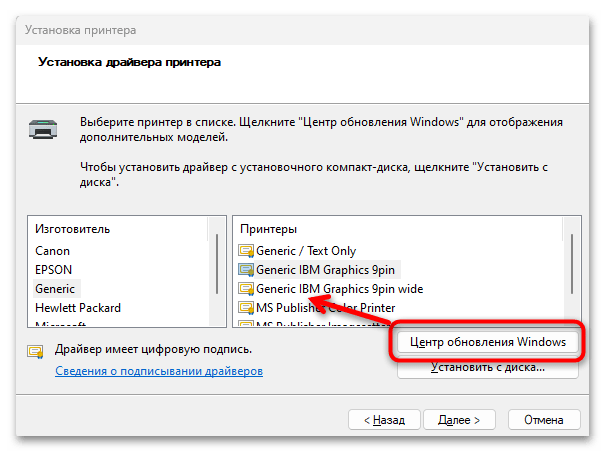
- Используйте кнопку «Центр обновления Windows», чтобы загрузить все доступные драйверы. Среди них выберите свой принтер и завершите его добавление. После этого проверьте, отображается ли он теперь, а также запустите тестовую печать для тестирования работы.
Наша группа в TelegramПолезные советы и помощь
When Microsoft announced Windows 11 to be revolutionary in terms of seamlessness, you’d expect them to have gotten their [expletive] together. But here we go again with another round of bugs.
If you’re here because your Windows 11 can’t find or connect to your printer, I bet you’d be as frustrated as I when I tried printing my pitch deck only to discover that my Windows 11 had started yet another round of being a tough row to hoe.
Don’t let out all that frustration on your printer; it most certainly isn’t its fault. Many other people have complained about this issue, and one or two of the following workarounds I’ve applied should work for you too.
Read on below to find out:
Check Windows Update Section
Most printer-related issues on Windows 11 sprung up after users updated to the build codenamed KB5006746. For some users, Windows could simply not recognize the printer, while for some, the printer would give an error when trying to establish a connection.
Microsoft itself has confirmed the existence of this issue and has released an update that promises to fix it. Check your Windows Update section to see if you have this update yet.
- Hold Windows + I and then launch Windows 11 settings
- Navigate to the updates section and check if there’s any update
- If there is, click on it to start the download if you had disabled automatic downloads
- Check If the Printer’s Drivers Is Up to Date
This particular fix did the trick for me, and many other users have reported that updating their drivers fixed the issues they’re having with their printers. Knock on wood; you can try the same method if Windows 11 can’t find your printer.
- Launch desktop search bar by pressing Windows + C
- Type device manager in the search box
- Launch the app that comes up in the results
- Inside the device manager is a list of hardware on your PC; expand the printers section by clicking on it
- Click on your printer and open the drivers’ section
- Let it search for drivers update automatically in the next prompt.
Disable Windows Firewall
The in-house windows firewall can alter the communication between the software and your printer due to its security systems. This is a possibility, and you can confirm if your firewall is not the culprit by disabling it, after which you can disconnect and reconnect your printer to see if it gets recognized.
To disable Windows Firewall:
- Go to the desktop search bar again to type Windows Defender Firewall and click on the relevant result
- On the left-pane menu of the firewall, click on Turn Windows Defender Firewall On or Off
- Click on the same option for public and private network settings.
- Click ok to save all changes
Troubleshoot Your Printer
Like its predecessors, Windows 11 also comes with an embedded troubleshooting utility that helps fix subtle glitches and errors. You can harness this app to fix all printer-related issues with the following steps:
- Again, launch the Windows settings with the combination of Windows + I
- Navigate to the system bar and then select troubleshoot
- You’ll find the option for other troubleshooters; click on it to access printer troubleshoot
- Run the troubleshoot by clicking on the panel
Final Notes
The fixes I demonstrated above work for many Windows 11 Users whose systems can’t find or connect to their printer. If the problem persists with one printer, you may want to confirm the root of the problem. Apply the methods for another printer to confirm that the issue is not coming from your printer.

Ganiu Abdurahman
Ganiu is an astute technical writer with a special interest in gaming and Cryptocurrency. He is a PlayStation enthusiast whose passion lies in writing problem-solving articles.
Many Windows 10/11 users complain that the network printer does not show up on the PC. Even after restarting the PC and printer, it still does not work. This is confusing. But do not worry, I will provide you with some valid methods to fix it.
Try these fixes
Here are 5 fixes to solve the printer problem. You can just try until your network printer shows up.
- Check the network connection
- Add your network printer to the Devices and Printers
- Update your printer drivers
- Enable the Print Spooler service
- Run Printer Troubleshooter
Fix 1: Check the network connection
The network connection is necessary but easily neglected. When your printer does not show up on the PC, you should check the network connection first. Once you find the network is disconnected, you need to reconnect it.
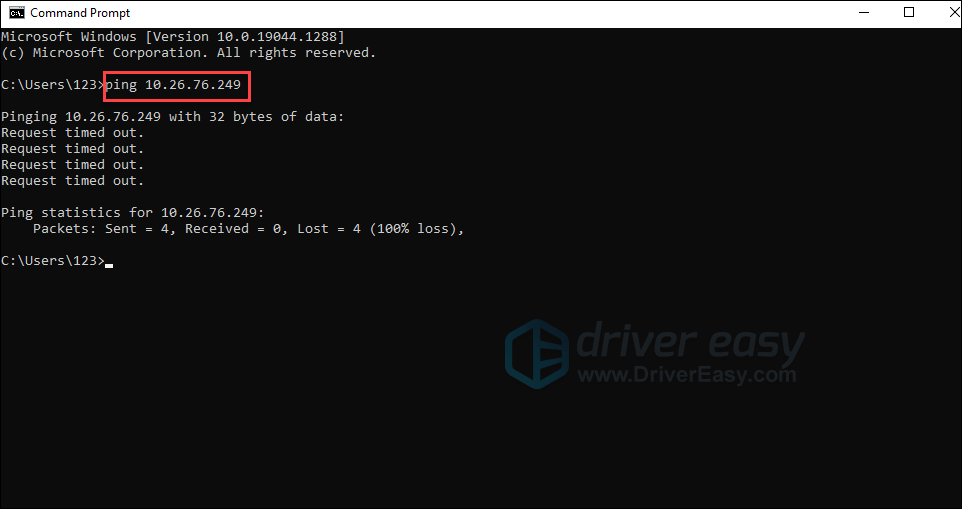
Step 1: Run a ping command
- Click the Search box, and then type cmd. Click Command Prompt.
- Find out the IP address on your printer information tag.
- Type ping and then IP address (eg. ping 10.26.76.249) on the Command Prompt dialog and press Enter. Note that a space is necessary between the ping command and the IP address.

- Your PC will perform the ping command and detect if your printer is connected to the network.
Step 2: Reconnect the printer
If your printer is not connected to the network, you can reconnect the printer. Since this varies from manufacturer to printer, you can refer to your printer manual for instructions or consult the service personnel on the printer website.
If your printer has been connected but it still doesn’t show up on the PC, you can move to the next method.
Fix 2: Add your network printer to the Devices and Printers
Only when your printer is added to the Devices and Printers, can your PC detect and find it. That is, if your network printer is not added to the Devices and Printers, your network printer will not show up. You can add your network printer to fix the problem.
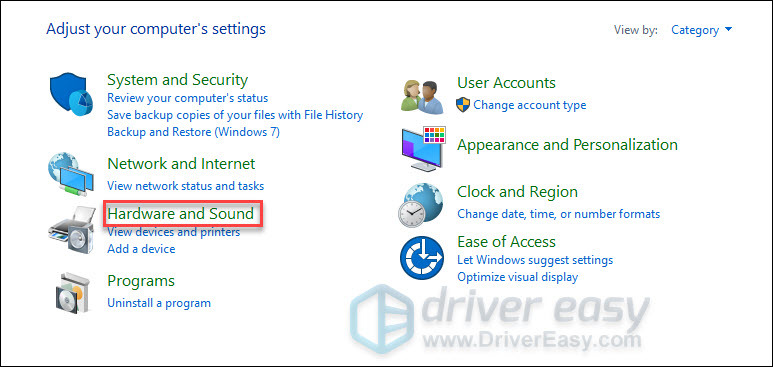
- Click the Search box in the lower left corner of your screen and then type control panel. Click the Control Panel.
- Click Hardware and sound.

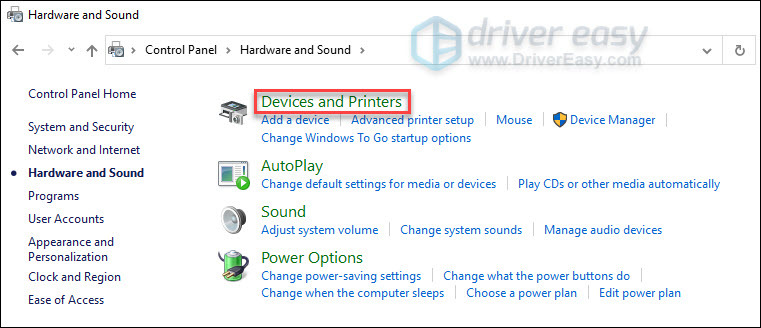
- Click Devices and Printers.

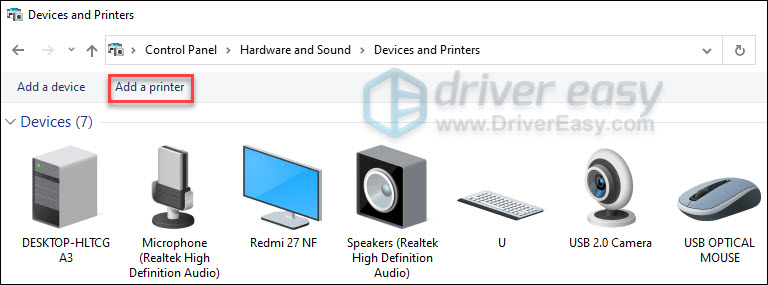
- Click Add a printer.

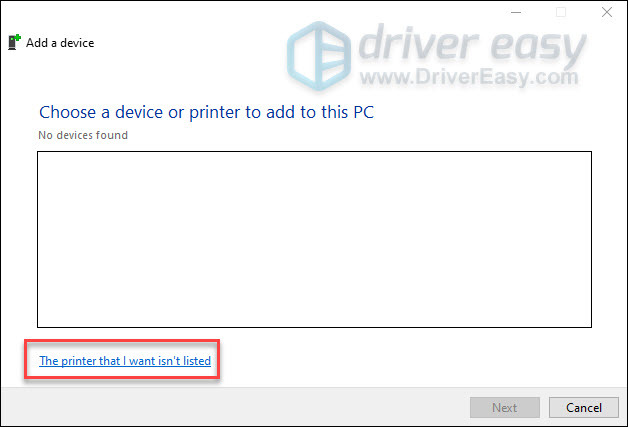
- The windows below will pop up. If your PC doesn’t detect your printer automatically, click The printer that I want isn’t listed.

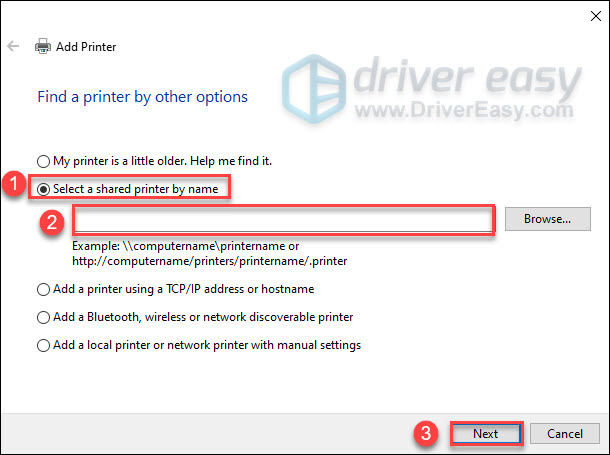
- Click the option button next to Select a shared printer by name. Type your computer or printer name in the empty text box and then click the Next Button.

- Your PC will connect to the printer you add. Then you can check if your network printer is visible on your PC.
Fix 3: Update your printer drivers
When your Windows updates but your printer driver doesn’t, your printer may be not compatible with your Windows version. It can cause a series of problems, including your printer not showing up on the PC. Therefore, you can try to update your printer drivers in two ways to fix the problem.
Option 1- Manually download and install the driver
You can update your print driver manually by going to the manufacturer’s website, and searching for the most recent correct driver. It will take time and effort.
Option 2- Automatically update the driver
If you don’t have the time, patience or computer skills to update the printer driver manually, you can do it automatically with Driver Easy.
Driver Easy will automatically recognize your system and then find the correct drivers for it. In other words, You don’t need to know exactly what system your computer is running, you don’t need to risk downloading and installing the wrong driver, and you don’t need to worry about making a mistake when installing.
You can update your drivers automatically with either the FREE or the Pro version of Driver Easy. But with the Pro version it takes just 2 clicks:
- Download and install Driver Easy.
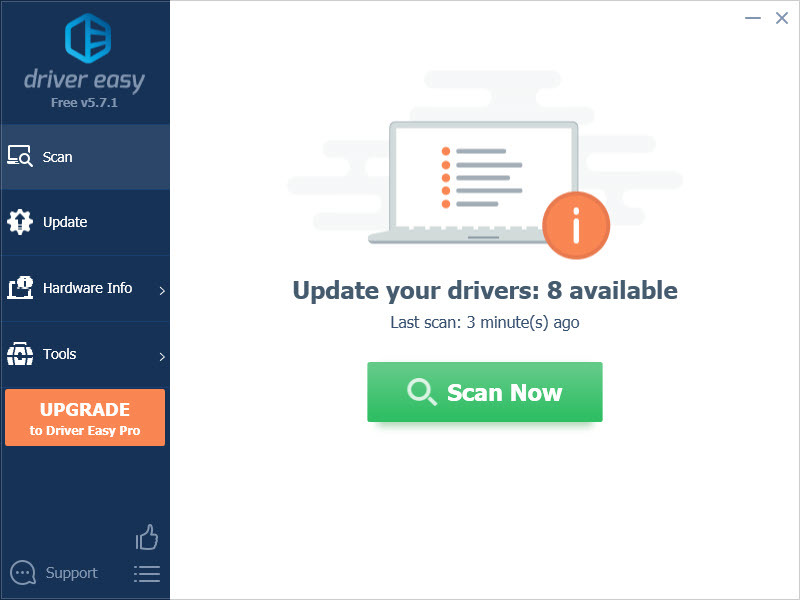
- Run Driver Easy and then click the Scan Now button. Driver Easy will then scan your computer and detect any drivers that need to update.

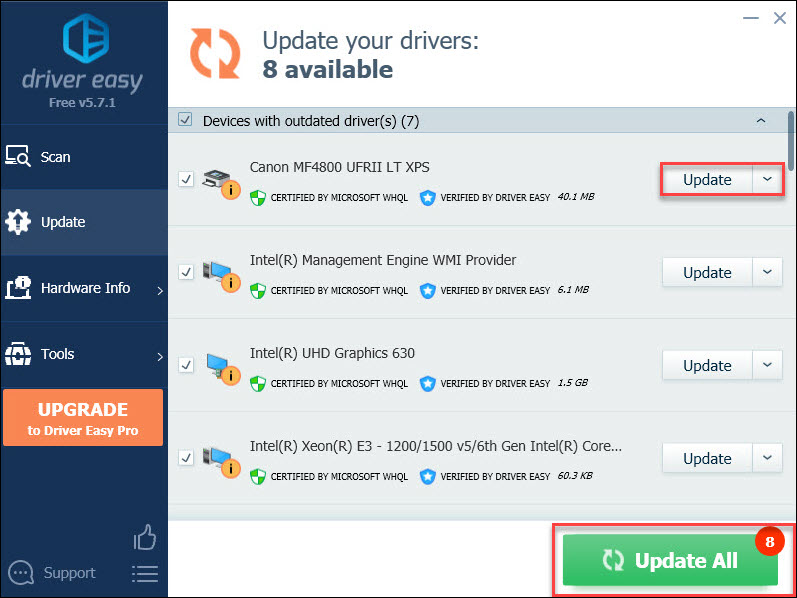
- You can choose to update the driver with a FREE version. Click the Update button next to the flagged driver to automatically download the correct version of that driver, then you can manually install it.
Or you can click Update All to automatically download and install the correct version of all the drivers that are missing or out of date on your system. (This requires the Pro version – you’ll be prompted to upgrade when you click Update All).
After updating your device drivers, see if your network printer shows up. If not, move to the next method.
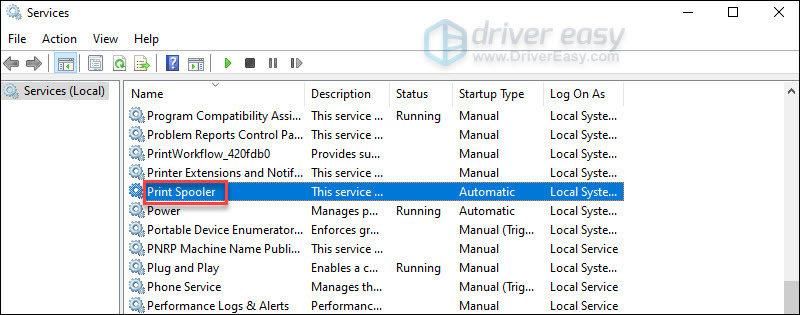
Fix 4: Enable the Print Spooler service
The Printer Spooler service is responsible for managing all printing jobs. That is, if the service is disabled, it will cause a series of printer problems. So when your network printer is not visible on the PC, you can try to check the print spooler service and enable it.
- Press the Windows logo key and R key on keyboard at the same time to open the Run dialog.
- Type services.msc and then press Enter.
- Slide down your mouse until you find the Printer Spooler. Double click the Printer Spooler.

- The Print Spooler Properties dialog will pop up. Click Start and then select the OK button.

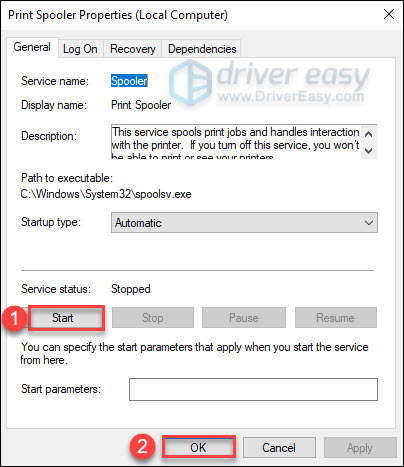
After enabling the Print Spooler service, you can check if your network printer appears on your PC.
Fix 5: Run Printer Troubleshooter
The Troubleshooter can find and solve any problem of your PC automatically. After you have tried the above method, it still doesn’t work. You can run the Troubleshooter to check if there is an error in the printer.
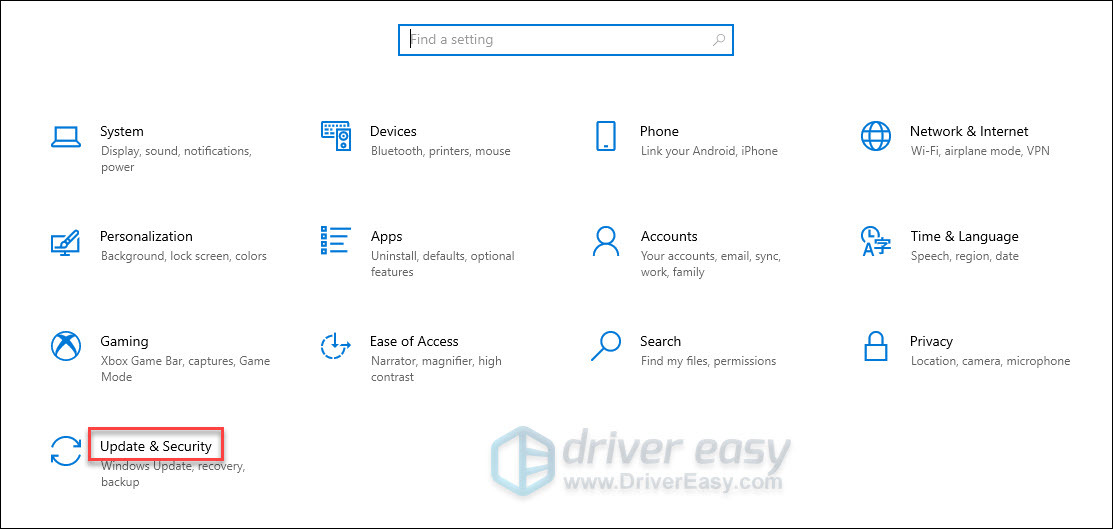
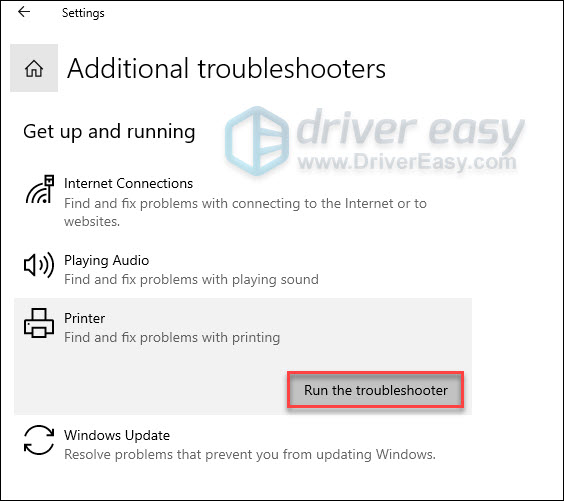
- On the keyboard, press the Windows logo key and I key at the same time to open the Settings.
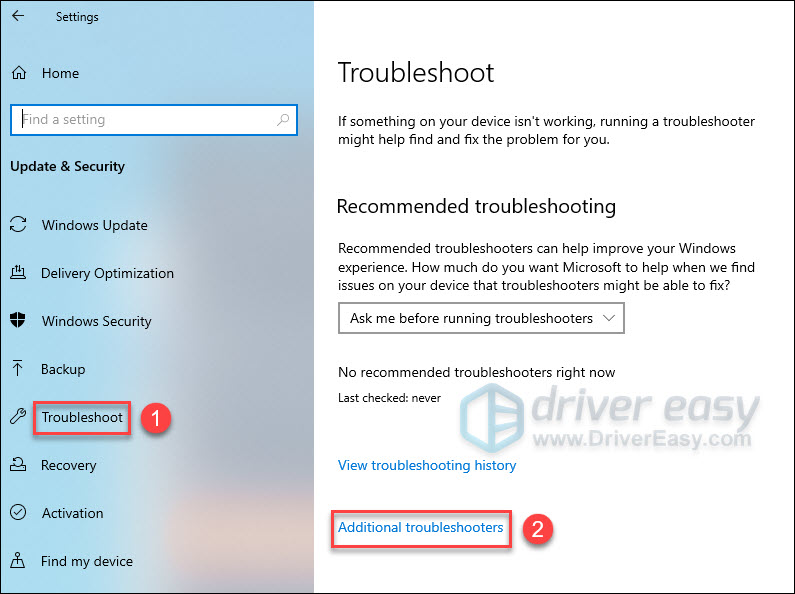
- Click the Update and Security from the menu options.

- Select Troubleshoot on the left panel and click Additional troubleshooters (or if Printer appears on the right panel, click Run the troubleshooter below Printer).

- Click Run the troubleshooter below Printer.

- The troubleshooter will fix problems it might find. After the troubleshooter finishes work, see if your printer is visible on your PC.
In short, I hope this article is helpful to you. If you have any questions, please feel free to leave a comment below.
10
10 people found this helpful
- To fix a not working printer on Windows 11, use the “Printer” troubleshooter.
- Alternatively, you can uninstall and reinstall the printer driver to fix common issues.
- You can also try checking the physical connection, revising the configuration, and resetting the spooler.
If your printer isn’t working correctly on Windows 11 (be it an HP, Canon, Brother, Epson, or another brand), several factors might be responsible. For example, likely causes include:
- Connectivity issues: The computer may have lost connection with the printer due to software glitches or physical disconnections.
- Driver problems: Outdated or corrupted printer drivers can prevent proper operation.
- Print spooler errors: Malfunctions in the print spooler service can hinder print jobs.
- Incorrect printer selection: Accidentally sending print jobs to the wrong printer can result in no output.
Regardless of the problem, you can follow different troubleshooting steps to fix the printing issue on Windows 11, from simple actions like restarting the devices and checking the physical connection to using the troubleshooters to resetting the printer spooler and reinstalling the device driver.
In this guide, I’ll teach you several ways to troubleshoot and resolve common printing problems on Windows 11.
Fix not working printer on Windows 11
On Windows 11, you have several different ways to troubleshoot and fix issues when your printer is not working, no matter your brand (HP, Epson, Canon, Brother, etc.). To fix a printer, you can restart the device, check the connection, configure the default settings, run a troubleshooter, reset the printer spooler, and reinstall the printer.
1. Restart printer method
Although it might be obvious, it’s easy to forget that turning off, unplugging the power cord from the printer, and turning the peripheral back online can resolve the most common issues. For example, if Windows 11 is not detecting the USB printer, the printer suddenly starts having issues, or the device is unavailable.
Once the printer restarts, you can try to print again. If the printer is still not working, restart your computer and try again. If the printer doesn’t respond, continue with another troubleshooting method.
2. Check connection method
If you have a USB printer, ensure the data cable is properly connected to the printer and computer. You can try disconnecting and reconnecting the cable. Also, you may want to try a different USB port on the device.
If this is a wireless printer, ensure that the wireless functionality is turned on and working. You can also try to run the wireless connectivity test from the printer. Typically, the printer will have a blue wireless icon indicating the connection. You may need to check your device manufacturer for more specific details.
If you have problems with other wireless devices, you may need to restart the router or access point to fix the connectivity issue.
3. Configure default printer method
It could also happen that you have multiple printers installed on the computer and are sending the print job to the default printer, which is unavailable at that specific location.
You can quickly fix this problem by selecting the correct device when printing or changing the default printer settings.
To change the default printer settings on Windows 11, use these steps:
-
Open Settings on Windows 11.
-
Click on Bluetooth & devices.
-
Click the Printers & scanners page.

-
Turn off the “Let Windows manage my default printer” toggle switch under the “Printer preferences” section.
-
Select the printer from the list.
-
Click the “Set as default” button.


Once you complete the steps, you can try to print again.
However, if you already sent a print job to the wrong device, you may also need to open the queue and cancel any pending jobs before printing to the correct printer.
You can cancel the print job by going to Settings > Bluetooth & devices > Printers & scanners > (your) printer > Open print queue, right-clicking the job, and selecting the “Cancel” option.
4. Printer Troubleshooter method
Windows 11 comes with many troubleshooters, which are tools that run different scripts to diagnose and fix common problems automatically. After checking the connections, you may want to run the “Printer” troubleshooter to resolve common driver and settings problems or issues after an update with the wireless or USB printer.
To fix printer problems with the troubleshooter option on Windows 11, use these steps:
-
Open Settings.
-
Click on System.
-
Click the Troubleshoot tab.
-
Click the Other troubleshooters setting.

-
Under the “Most frequent” section, click the Run button for the “Printer” troubleshooter.
-
Continue with the on-screen directions from the “Get Help” app (if applicable).


Once you complete the steps, the troubleshooter will run a series of scripts to resolve the printing problem.
5. Reset printer spooler method
One of the most common issues while printing is a document getting stuck in the queue and trying to cancel the job won’t work. If this happens, the problem is likely to be with the “print spooler,” which is the service that sends the printing jobs to the printer.
To fix the print spooler service to continue printing on Windows 11, use these steps:
-
Open Start.
-
Search for services.msc and click the top result to open the Services console.
-
Right-click the Print Spooler service and select the Properties option.

-
Click the General tab.
-
Click the Stop button.

-
Use the “Windows key + R” keyboard shortcut to open the Run command.
-
Type the following path to access the “printers” folder and press Enter:
-
C:\Windows\System32\spool\printers
-
Click the Continue button (if applicable).
-
Select everything in the “printers” folder (Ctrl + A keyboard shortcut) and hit the Delete button to remove the contents.

-
Click the General tab on the “Printer Spooler Properties” page.
-
Click the Start button to restart the service.

-
Click the OK button.


Once you complete the steps, you can try to print a document one more time, and the printer should work as expected.
6. Reinstall printer method
If the printer isn’t working because of corruption or a bug with the driver, you may be able to fix this problem by uninstalling and reinstalling the printer driver.
Uninstall driver
To remove a printer on Windows 11, use these steps:
-
Open Settings.
-
Click on Bluetooth & devices.
-
Click the Printers & scanners page.
-
Select the printer to open its properties page.
-
Click the Remove button.
-
Click the Yes button.


Once you complete the steps, you can delete the driver from Windows 11.
Install printer automatically
To add a wireless printer on Windows 11, make sure the printer is turned on and connected to the network, and then use these steps:
-
Open Settings.
-
Click on Bluetooth & Devices.
-
Click the Printers & scanners page.
-
Click the “Add device” button in the “Add a printer or scanner” setting.

-
Click Add device to install the wireless printer to Windows 11.


Once you complete the steps, Windows 11 will automatically set up the wireless printer. This guide provides more ways to install a wireless printer on your computer.
Install printer manually
If this is a USB printer, disconnect and reconnect the USB cable to trigger the installation once you remove the driver.
If Windows 11 fails to find the printer, you may need to install it manually with these steps:
-
Open Settings.
-
Click on Bluetooth & Devices.
-
Click the Printers & scanners page.
-
Click the “Add device” button in the “Add a printer or scanner” setting.
-
Click the “Add a new device manually” option for the “The printer that I want isn’t listed” option.
-
Select the “Add a printer using a TCP/IP address or hostname” option.

-
Click the Next button.
-
Select the Autodetect option in the “Device type” setting.
-
Check the “Query the printer and automatically select the driver to use” option.
-
Confirm the IP address of the printer.
Quick tip: This information can be found in the printer’s settings.
-
Click the Next button to install the wireless printer on Windows 11.
Quick note: If the setup doesn’t recognize the printer, you may have to select the brand and model from the wizard to install the correct drivers. If you can’t find the printer, click the “Windows Update” button to download the driver library. (This action can take a long time.)
-
Confirm the printer’s name.
-
Click the Next button.
-
Select the “Do not share this printer” option.
-
Click the Next button.
-
(Optional) Click the “Print a test page” button to test the printer connection.
-
Click the Finish button.


After you complete the steps, you can start printing from your laptop or desktop computer.
Additional troubleshooting steps
If this process didn’t resolve the issue, but the issue is related to the printer driver, you may need to uninstall and remove the driver from the computer before trying to reinstall the printer.
When the problem occurs after a driver or system update, rolling back to the previous version of the driver may resolve the problem or uninstall the most recent system update. Alternatively, you can also try downloading and installing an older printer driver version.
Are you still having issues with your printer? Let me know in the comments.
The Printer sharing feature enables network computers to print files easily. This means no need to separately connect the printer to each PC to complete the print job. And it’s easy to share printers on windows 11, Open settings, navigate Bluetooth & devices then select printer & scanners. Locate the printer looking for share on the network, click on the Printer properties option than move to sharing tab and check mark on share this printer option. But sometimes you may notice printer sharing not working or “Can’t Connect to Printer” Error on Windows 11. Here is the reason why Windows 11 printer sharing not working and how to troubleshoot the problem.
There are chances, Firewall is blocking access to the printer, you need to Temporarily Disable Firewall and check if the printer sharing working. You may also experience such problems if the printer is not correctly configured. In addition, you need to check if the connection to the primary PC has been done correctly. check and enable the file and printer Sharing option, Run Printer Troubleshooter or Reshare Printer or Add Printer again are some common solutions you can apply if you are unable to find the printer on the network or if the Printer Sharing not working in Windows 11.
Contents
- 1 Windows 11 printer sharing not working
- 1.1 Update windows 11
- 1.2 File and Printer Sharing
- 1.3 Disable the Windows Firewall
- 1.4 Enable Nearby Sharing for everyone
- 1.5 Restart the Print Spooler Service
- 1.6 Run printer troubleshooter
- 1.7 Update the Printer Driver
Let’s first reboot your computer and printer that clear temporary glitches that may prevent access the printer or complete the print job.
The next thing you need to check the PC is turned on where the physical printer is connected. And the computer is properly connected to your local area network or wifi network. In addition, check the printer and computer for loose connection, and ensure that the power supply to the printer is proper.
Update windows 11
Microsoft regularly drops windows updates with a number of bug fixes and security enhancements. Installing the latest windows updates may have fixes for this printer problem on windows 11.
- Press the Windows key + X and select settings,
- Navigate windows update then hit the check for updates button,
- If pending updates there, allow them to download and install your computer,
- Next click on the advanced option, the optional updates,
- Expand the driver section and checkmark if any updates are pending there
- Click on download and install, once done reboot your PC to apply the changes.
File and Printer Sharing
The next thing you need to check and enable the File and Printer Sharing feature on the PC. If due to any reason, Printer Sharing on Windows 11 option is disabled or yet not enabled you may experience problems with printer sharing on windows 11.
- Search for and select the control panel then click on Network and sharing center,
- Click on the Change Advanced Sharing Settings,
- Here select the radio button Turn on network discovery and Turn on file and printer sharing options,
- Click on Save changes, Make sure you have administrator access to make these changes.
Disable the Windows Firewall
It may be Windows firewall is blocking the printer for some reason, let’s turn off the firewall temporarily and check if this help fixes the problem.
- Press Windows key + R, type control panel and click ok
- When the control panel opens, click on Windows defender firewall then on the lefthand panel click on Turn Windows Firewall Defender On or Off.
- On the next page Turn off Windows Defender Firewall for both Private Network Settings and Public Network Settings.
- Now check if the Windows Couldn’t Connect to the Printer is fixed.
In addition, Allow the printer over the firewall by following steps below.
- Open Windows Security then Click on Firewall & network protection.
- Here Click the “Allow an app through firewall” setting, then Click the Change settings button.
- Check the “Network Discovery” option with the Private option (and select the Public option if you are in a public network.)
- Check the “File and Printer Sharing” option with the Private option (and select the Public option if you are in a public network.)
Enable Nearby Sharing for everyone
Check and enable the nearby sharing feature that helps your computer to recognize other PC and printers in the network.
- Press Windows key + X and select settings,
- Navigate System then Nearby sharing, and select the Everyone Nearby option.
Restart the Print Spooler Service
Still need help restarting the print spooler service may help fix this issue.
- Press Windows key + R, type services.msc and click ok
- Scroll down to locate Print Spooler in the list, right-click on it select restart.
Note – If the service is not started you need to double click on it to open its properties, here change the startup type automatic and start the service next to service status.
Now Try to reconnect your printer with your computer.
Run printer troubleshooter
Run the dedicated troubleshooter that detects possible problems with printer settings and fixes them automatically.
- Press the Windows key + I to open the settings
- Navigate System then troubleshoot and click on other troubleshooters,
- This will list all available troubleshooters, click Run next to the printer,
- Let the tool diagnose and fix if something wrong over there.
Once done reboot your PC and check if this help fixes the printer sharing not working problem on windows 11.
Update the Printer Driver
If all the above solutions didn’t fix the problem, you need to update or reinstall the printer driver to fix such problems on windows 11.
- Press Windows key + X and select Device Manager,
- This will display all devices and peripherals connected to your computer,
- Expand the printer section, right-click on printer driver select the update driver option,
- Set the option for the system to look for available drivers from the internet and install the same for the printer.
- Also, you can select the uninstall option here to remove the current printer driver.
- Next, download and install the latest printer driver from the manufacturer’s site.
- After updating the driver of your printer, restart your PC and then try to print your files through printer sharing.
In addition, you can touch with a tech support team of the brand of printer that you use for help. They better guide what is the problem, and how to fix the problem. Also, ensure the power supply to the printer is proper and connections are properly set. Check the LAN settings and connect that computer to the network and you should be able to print now via Printer Sharing.
FAQ:-
Why can’t I see a shared printer on my network?
Make sure File and Printer Sharing and Network Discovery are enabled on the printer server or the computer where the printer is physically connected.
Why is my printer not working after Windows 11 update?
Uninstall then reinstall the printer software and drivers to continue using the printer
How do I enable printer sharing on my laptop?
Also read:
- Printer not working or printing documents after the windows 11 update
- How to Install Printer Via IP Address In Windows 11 and 10
- HP Printer Not Printing or documents in queue not printing [Troubleshooting Guide]
- Solved: Can’t print documents, Printer Driver is unavailable in Windows 10
- Laptop Wi-Fi Not working after windows 11 update (7 solutions)
- SFC Scannow Not Working or stuck repair In Windows 11 (7 Solutions)