Среди работающих в фоне процессов Windows 10, 8.1 или Windows 7 вы можете заметить WmiPrvSE.exe или WMI Provider Host, причем иногда этот процесс активно использует ресурсы процессора компьютера или ноутбука.
В этой статье подробно о том, что за процесс WmiPrvSE.exe, о причинах возможной высокой нагрузки на процессор и способах исправить ситуацию. Схожие темы: Что за процесс csrss.exe, Процесс dwm.exe в Windows.
Что такое WmiPrvSE.exe
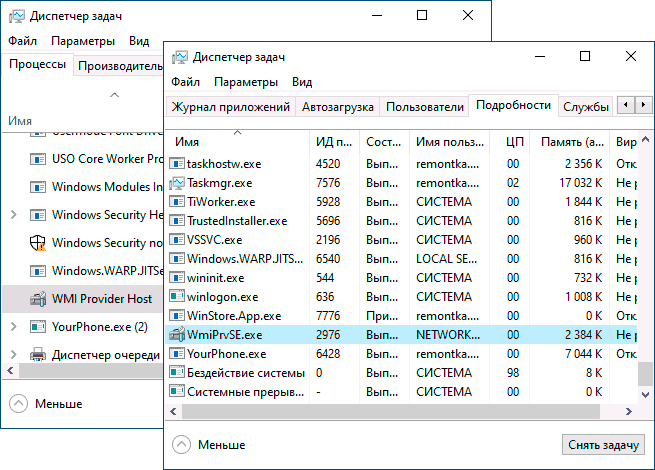
Процесс WmiPrvSE.exe или WMI Provider Host — один из необходимых системных процессов Windows, позволяющий программам на компьютере получать различную информацию о системе. При обычной работе этот процесс не вызывает высокой нагрузки на процессор, но это не всегда так.
WMI означает Windows Management Instrumentation и служит в качестве стандартного метода, позволяющего различному ПО получать сведения о состоянии системы и ее характеристиках. Помимо сторонних программ, такие сведения можете получать и вы: например, когда в командной строке вы выполняете команды WMIC для получения тех или иных данных об оборудовании компьютера или ОС (например, такой метод описан в инструкции Как узнать, какая материнская плата на компьютере), задействуется именно MI Provider Host.
При условии, что речь именно о системном процессе (находящемся в папке wbem внутри System32 или SysWOW64), отключить или удалить WmiPrvSE.exe нельзя (вернее, вы можете отключить службу, однако это может привести к проблемам в работе некоторых, в том числе системных, программ в дальнейшем), но при высокой нагрузке на процессор, проблему обычно можно решить.
Что делать, если WMI Provider Host грузит процессор
Кратковременная высокая нагрузка со стороны WmiPrvSE.exe является нормальным явлением: например, если вы запустите какую-либо программу определения характеристик компьютера, нагрузка со стороны этого процесса на некоторое время возрастет. Однако, если нагрузка является постоянной и процессор всегда нагружен, можно предположить, что что-то не так.
Чтобы исправить ситуацию, вы можете использовать следующие методы:
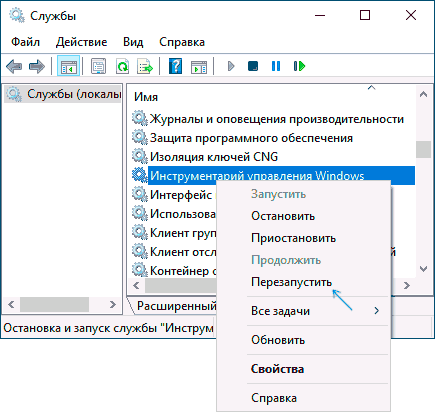
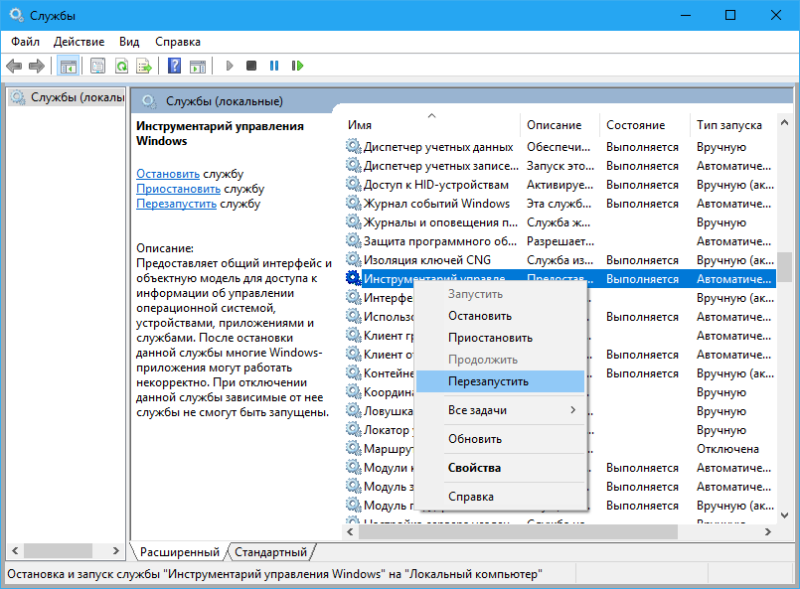
- Перезапуск службы «Инструментарий управления Windows». Нажмите клавиши Win+R, введите services.msc, найдите указанную службу (или Windows Management Instrumentation Service), нажмите по ней правой кнопкой мыши и выберите пункт «Перезапустить».
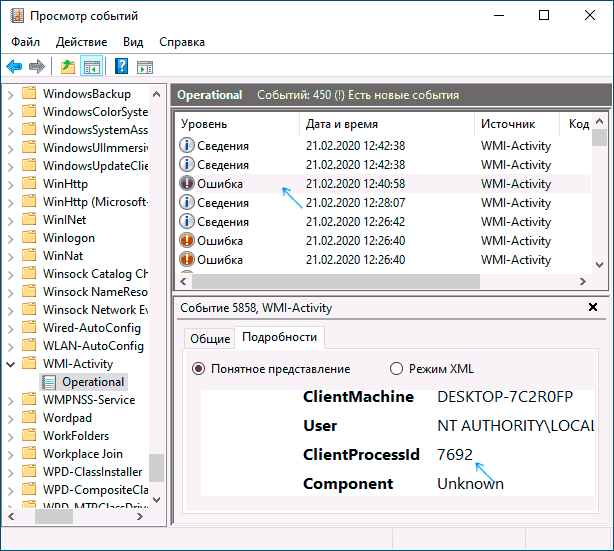
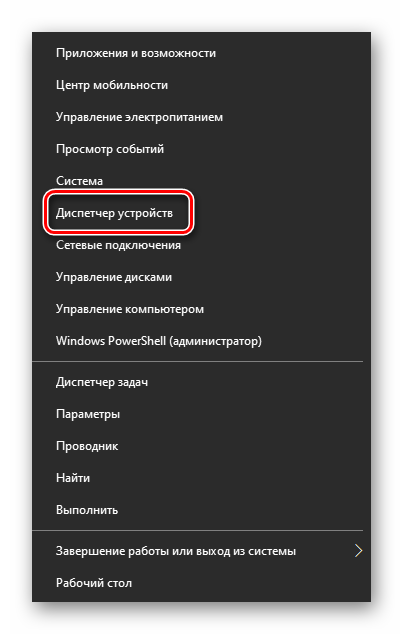
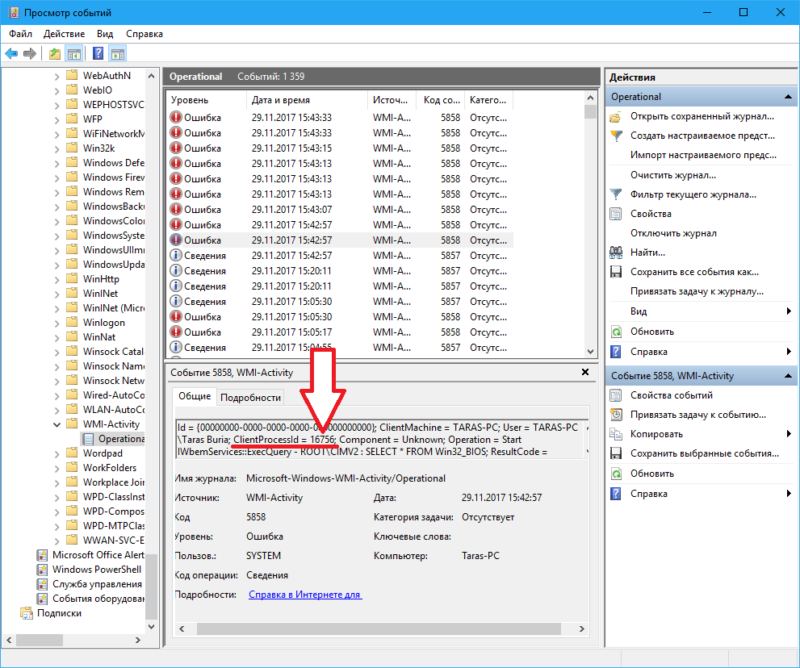
- Используйте «Просмотр событий», чтобы определить какая программа вызывает нагрузку при использовании WMI Provider Host. Зайдите в «Просмотр событий» (Win+R — eventvwr.msc), зайдите в «Журналы приложений и служб» — Microsoft — Windows — WMI-Activity — Operational. Просмотрите последние сообщения с уровнем «Ошибка» (некоторое количество ошибок нормально и при обычной работе). После выбора ошибки в подробностях найдите параметр «ClientProcessID», затем откройте диспетчер задач и найдите процесс с тем же значением в столбце ИД (в Windows 10 — на вкладке «Подробности»). Это позволит узнать, что за программа вызывает нагрузку. Если под этим ID оказался svchost, то речь идет о какой-то службе, подробнее: Что делать, если svchost.exe грузит процессор.
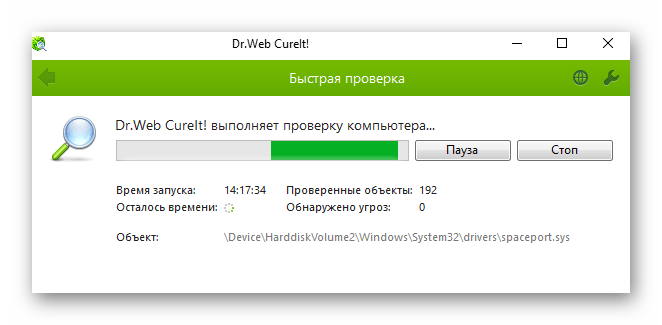
- Если выяснить службу или программу не удалось, но нагрузка появилась недавно, с большой вероятностью виной тому недавно установленное ПО, особенно если оно как-то связано с оптимизацией системы и подобными функциями. Можно попробовать отключить или удалить такие программы, а также использовать точки восстановления системы.
Надеюсь, материал помог разобраться с процессом WmiPrvSE.exe и высокой нагрузкой, если она имеет место быть.
A process that you may have come across, often seen as “WMI Provider Host” in the Task Manager, is one of the critical processes of the Windows OS that ensures smooth running. However, users have often reported that the process is consuming insane amounts of system resources, especially the CPU. At such times, it is often difficult to perform other tasks as the system slows down and lags.
The Windows Management Instrumentation Provider Service, also known as WMIPRVSE.EXE, enables monitoring and error reporting for Windows systems.
This article will be helpful to those who have such a problem. Let us delve into the details about what the purpose of this function is, and does it even need to run on your PC at all?
Table of Contents
What is WMI Provider Host process
The WMI Provider Host is a process seen in the Task Manager by many. The executable running behind this process is called WmiPrvSE.exe. The purpose of the process WMI Provider Host is to relay information between a software requesting the information and the software transmitting it. The information it relays is about your system and your OS, which is the sort of information required by many other processes, services, and applications to ensure that your device runs smoothly, without a hiccup.
The WMI Provider Host process is the parent process for other provider processes that transport the information. The WMI Provider Host process controls these child processes to ensure they function properly.
The task of the process does not end there. This process can be used by third party services to query and obtain information from apps, networks, Windows devices, etc. Not only that, an application that creates alerts when certain information is obtained is usually created using the WMI Provider Host process.
Is WMI Provider Host process a virus?
As you get the gist, the process is not originally a virus and is a legitimate process in a Windows 10 environment. However, if you see that the WMI Provider Host is consuming large amounts of system resources, it may be possible that it is a virus disguised as a legitimate Windows process.
This technique is very common amongst hackers to hide a virus in plain sight.
To ensure whether a process on your device is a virus or not, you can check its digital signature for authenticity. However, in the case of the WMI Provider Host, this information is not given in the file. Nonetheless, you can still check its authenticity depending upon which location is opened in the File Explorer when you open the file location.
To check the WMI Provider Host process’s authenticity, open up the Task Manager, right-click the WMI Provider Host process, and click Open file location from the context menu. If the following location is opened in the Explorer, it means that the process is authentic:
C drive -> Windows -> System32 -> wbem

However, if you see any other location open besides this one, it is likely that the process is a hoax. In this case, immediately terminate the process and scan your computer for any potential viruses.
Is it safe to disable the WMI Provider Host process
As we mentioned, the WMI Provider Host process relays system information between different software. If that communication is not transported, the system would not know how to handle itself. Therefore, you can assume that other services are dependent upon the WMI Provider Host, and it is a critical process in running the OS smoothly.
Moreover, when exploring the responsible service for WMI Provider Host, which is Windows Management Instrumentation service, it states the following:
If this service is stopped, most Windows-based software will not function properly. If this service is disabled, any services that explicitly depend on it will fail to start.

Therefore, it can be concluded that it is not safe to disable or stop the Windows Management Instrumentation service, or the WMI Provider Host process.
Now that we understand just how important the process is, let us continue to fix the issue of high resource utilization so that you are able to perform your other important tasks without delay or lag.
Causes of WMI Provider Host high resource consumption in Windows 10
In best case scenario, WMI Provider Host should not use high amount of resources including CPU and memory usage for a prolonged amount of time. If this is the case, it may suggest that a third party app is making use of WmiPrvSE.exe process incorrectly and this needs to be stopped.
According to Microsoft, the WMI Provider Host process consumes large amounts of CPU due to 2 main reasons:
Process is using a high number of handles
A place in the kernel structure (BaseNameObjects) stores the handles. Handles, as the name implies, are something that contains a more complex object. It may be possible that this structure may be containing an excess amount of handles, which it cannot contain, causing the operation to have high CPU usage.
A number over 30,000 may be considered as an excess amount of handles.
The running process is consuming high memory
Another reason for the WMI Provider Host to be using large amounts of system resources is that another process may be consuming large amounts of system memory. Since the memory area of each running process will need to be queried, and the memory portion may be fragmented, this makes the task of the WMI Provider Host more resource-intensive, causing it to consume higher amounts of system resources.
Fix WMI Provider Host (WmiPrvSE.exe) high CPU usage
Restart Windows Management Instrumentation service
As we said, the service running behind the WMI Provider Host process is Windows Management Instrumentation. You can try and restart this service to make it behave normally and free up unnecessary usage of system resources.
To restart the service, open the Services window by typing in services.msc in Run. From there, scroll down and right-click on the service Windows Management Instrumentation. Click Restart from the context menu.

You will then be informed of the dependent services and that they will be automatically restarted too. Click Yes.

All services will now restart. Once they do, recheck if you can still see the WMI Provider Host process consuming large amounts of CPU.
Scan for corrupted system files
Windows 10 comes with a built-in tool to fix system files that may have been corrupted. This tool is the System File Checker (SFC) which automatically repairs corrupted system files that may be redundantly available on your PC, or have just gone missing. What it does is replace any damaged or missing files. If the dependencies for the WMI Provider Host are corrupted, this should fix the error and make the process behave normally again.
Perform the following to run the tool:
- Open Windows PowerShell with administrative privileges and then enter the following command:
sfc /scannow - Now allow some time for the command to fully run and scan your PC and make any fixes if possible along the way.
- Restart the computer.
Once done, recheck if the issue persists.
Perform a clean boot
A clean boot is a bootup process that temporarily blocks unnecessary background apps and processes from interfering with the critical system processes. This is an excellent method to rule out any apps or programs that may be causing an issue with your device.
To perform a clean boot, start by typing in msconfig in Run. Under the General tab, uncheck the box next to Load startup items.

Now switch to the Services tab, check the box next to Hide all Microsoft services at the bottom and then click Disable all.

Now switch to the Startup tab and click Open Task Manager. The Task Manager will now open in the Startup tab. Click on each item in the list and click Disable each time so that they are not started automatically the next time you sign in to your device.

Once done, close the Task Manager and click Apply and Ok in the System Configuration window to save the changes and close it. Reboot your computer and check to see if the WMI Provider Host is still taking up more system resources than it should.
Disable suspicious process using Event Viewer
If you find that the process is not legitimate using the trick we discussed earlier in the post, you must disable the process. Here is how to do so:
Open the Event Viewer by right-clicking the Start Menu button in the Taskbar and then clicking Event Viewer. Then click View from the menu bar at the top and then click Show Analytic and Debug Logs.

Now, navigate to the following location using the left pane:
Applications and Services Logs -> Microsoft -> Windows -> WMI-Activity -> Operational
Now, look for any Error in the right pane. If you have one, click on it. You will then be able to see its details under the General section. From there, note down their ClientProcessID.

Now close the Event Viewer and open the Task Manager. Switch to the Services tab and now look for the process that has the same Process ID (PID) as the one you noted in the Event Viewer. When found, right-click it and click Stop from the context menu. Also, delete the application that was using the service since it was clearly affecting the performance of your system.
Closing words
Determining the root cause of a process’s unreasonable consumption of system resources can be tricky. We certainly hope that your issue was resolved using the guide provided in this post.
Все способы:
- Устранение проблемы с процессом «WMI Provider Host»
- Способ 1: Проверка работы службы
- Способ 2: Проверка на вирусы
- Способ 3: Откат обновлений
- Способ 4: Отключение сторонних служб
- Способ 5: «Просмотр событий»
- Способ 6: Проверка оборудования
- Вопросы и ответы: 1
Во время работы операционной системы Windows 10 в фоновом режиме постоянно функционирует множество процессов. Иногда случается, что некоторые из них потребляют значительно больше системных ресурсов, чем полагается. Подобное поведение наблюдается и у процесса «WMI Provider Host». В данной статье мы расскажем о том, что делать, если он сильно грузит процессор в Windows 10.
Устранение проблемы с процессом «WMI Provider Host»
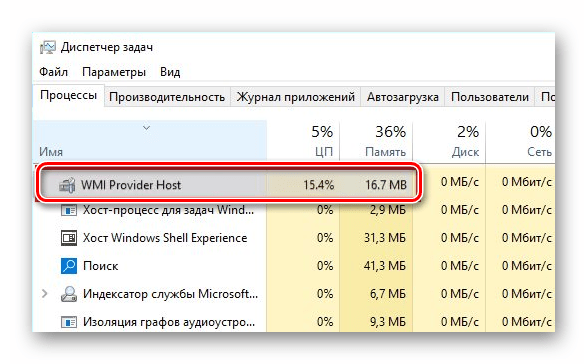
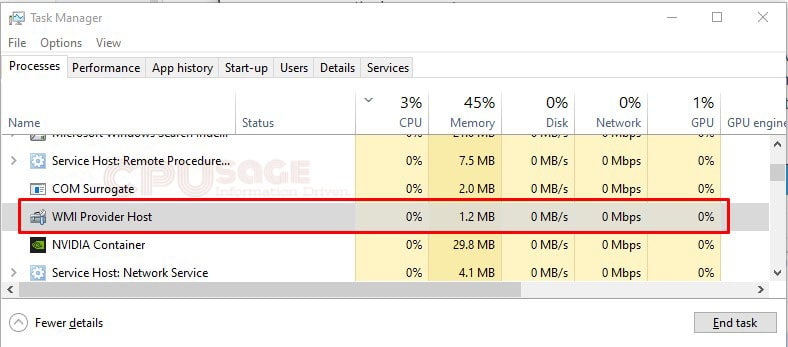
Процесс «WMI Provider Host» является системным, а не устанавливается вместе со сторонним ПО. Он крайне необходим для корректного и регулярного обмена данными между всеми устройствами/программами с самой операционной системой. В «Диспетчере задач» отображается следующим образом:
Читайте также: Восстановление работоспособности «Диспетчера задач» в Windows 10
Сказать наверняка, что именно вызвало подобное поведение процесса, достаточно тяжело. Это может быть как временная нагрузка при подключении нового оборудования к компьютеру, так и влияние вредоносного программного обеспечения. О самых распространенных вариантах решения проблемы мы расскажем подробнее.
Способ 1: Проверка работы службы
В первую очередь мы рекомендуем убедиться в том, что служба процесса работает корректно. При необходимости ее можно перезапустить или вовсе отключить. Делается это следующим образом:
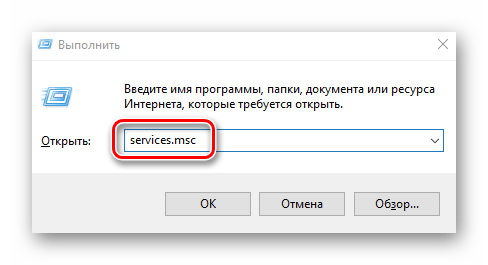
- Нажмите комбинацию клавиш «Windows+R». В текстовое поле открывшегося окна введите команду
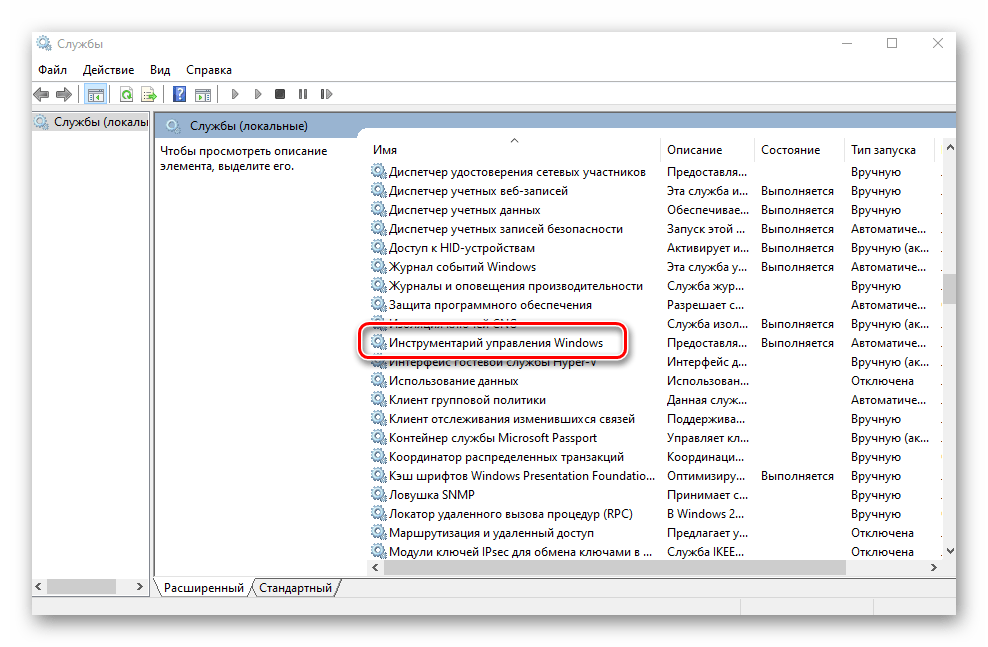
services.msc. Нажмите после этого «Enter» на клавиатуре. - В появившемся окне будет показан список всех доступных служб. Часть из них будут работать, а остальные – выключены. В данном перечне вам нужно найти строку, отмеченную на скриншоте ниже. Кликните по ее названию два раза левой кнопкой мышки.
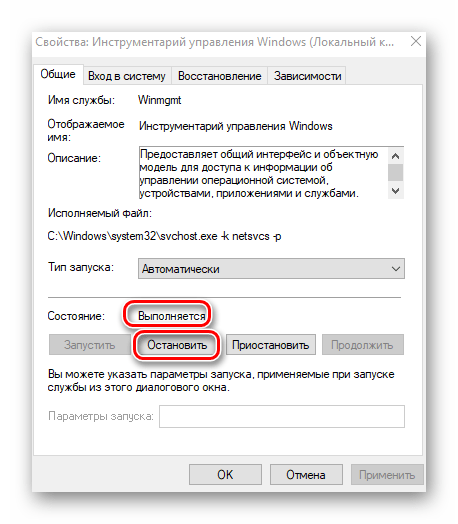
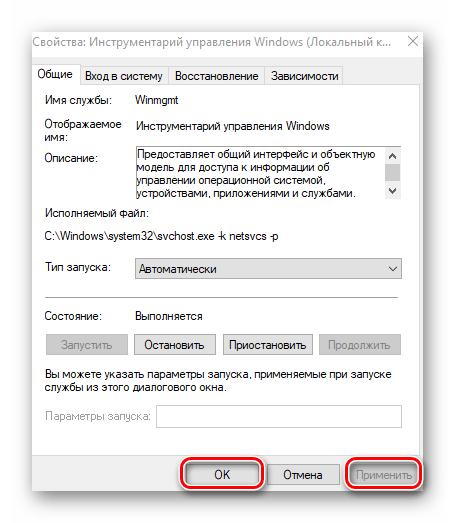
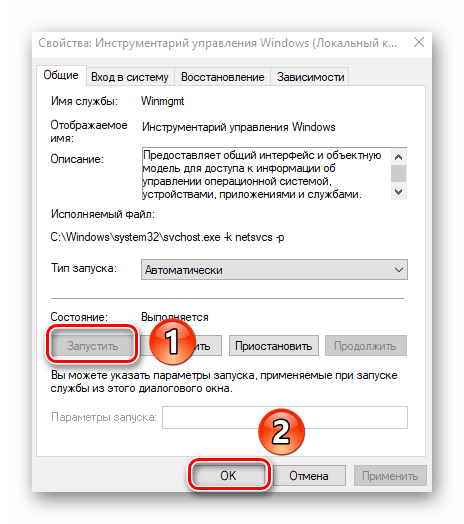
- Откроется окно с кнопками управления службой. Убедитесь, что в строке «Состояние» указано «Выполняется». Это значит, что служба работает. Необходимо попробовать сперва перезапустить ее. Для этих целей нажмите кнопку «Остановить».
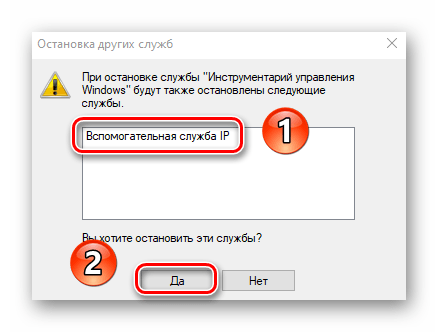
- Появится предупреждение о том, что в результате отключения одной службы будет деактивирована и зависимая от нее процедура. Соглашаемся с этим и жмем кнопку «Да».
- Далее не забудьте нажать «Применить» или «OK» в окне управления. В противном случае изменения не вступят в силу.
- Перезагрузите компьютер или ноутбук. После повторного входа в систему протестируйте работу ОС. Убедитесь, что нет ошибок во время использования сторонних приложений и системных утилит. После этого снова откройте окно управления службой «Инструментарий управления Windows» и включите ее. Не забудьте применить внесенные правки, нажав кнопку «OK».
- Если же ошибка повторится, попробуйте полностью деактивировать службу. В противном случае воспользуйтесь советами из следующих методов.
Читайте также: Отключение ненужных и неиспользуемых служб в Windows 10
Способ 2: Проверка на вирусы
Нередко процесс «WMI Provider Host» потребляет много системных ресурсов из-за негативного влияния вирусов. В первую очередь необходимо убедиться, что работающий процесс на самом деле оригинальный, а не подменен «зловредом». Для этого выполните следующее:
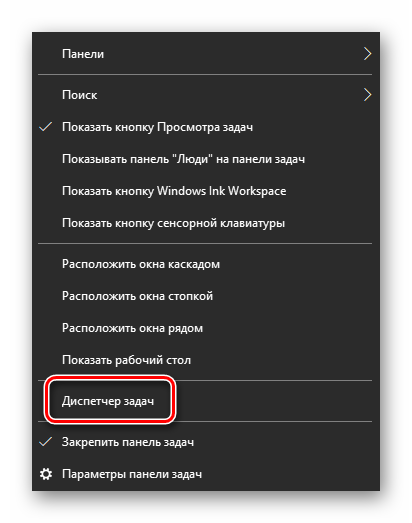
- Откройте «Диспетчер задач», кликнув правой кнопкой мышки на «Панели задач» и выбрав одноименный пункт.
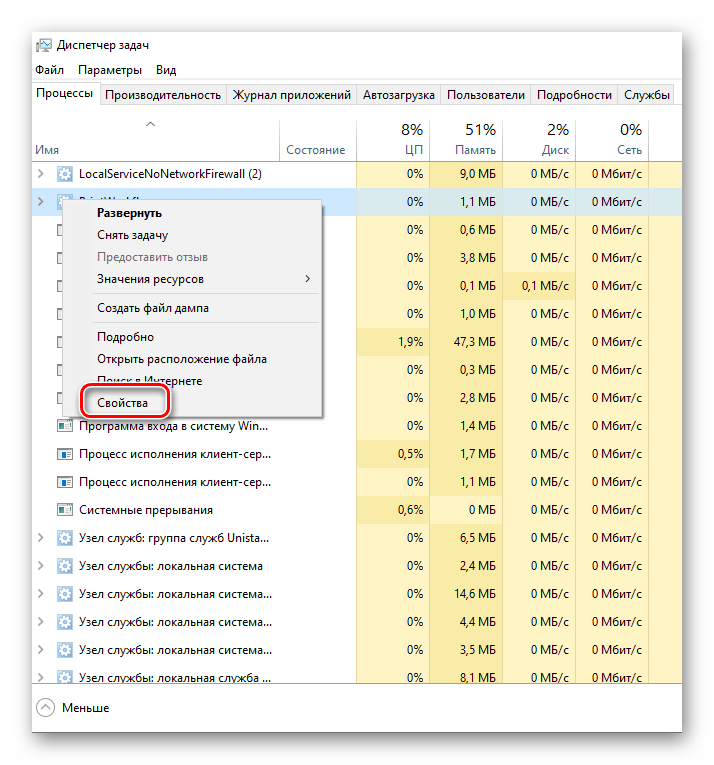
- В списке процессов найдите строку «WMI Provider Host». Нажмите на ее названии ПКМ и выберите из контекстного меню последнюю строку «Свойства».
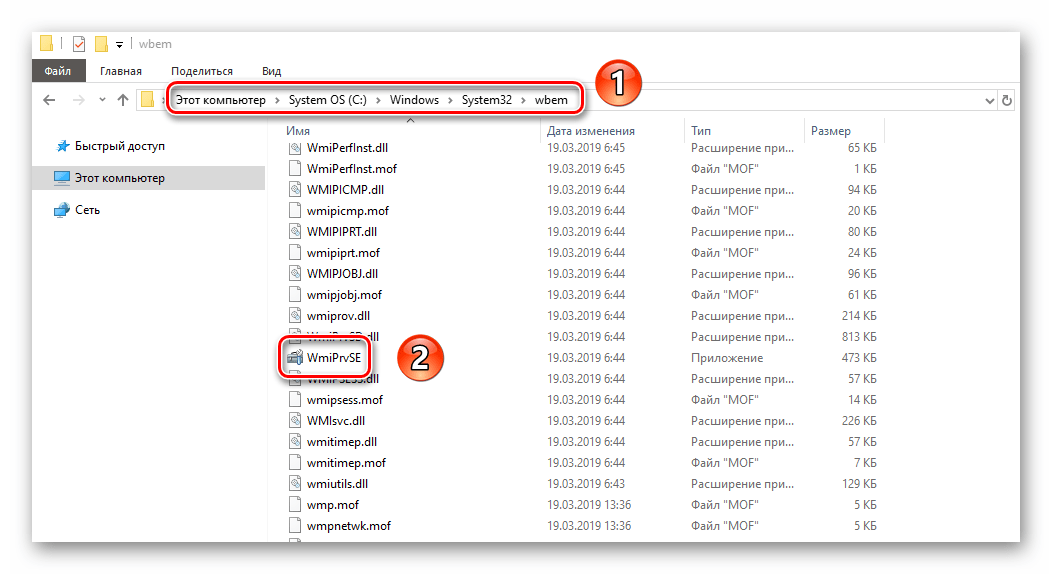
- Вам нужно обратить внимание на строку «Расположение» в открывшемся окне. Оригинальный файл носит название «wmiprvse.exe». По умолчанию он находится в директории по следующему пути:
C:\Windows\System32\wbemЕсли вы используете 64-битную версию Windows 10, тогда файла с аналогичным названием должен находиться в еще одной папке, которая расположена по пути:
C:\Windows\SysWOW64\wbem - Если процесс запускается оригинальным файлом, а не вирусной копией, тогда стоит поискать других вредителей с помощью специального софта. Для этих целей лучше использовать антивирусное ПО, которое не нужно устанавливать. Во-первых, при инсталляции некоторые вирусы успевают заразить защитный софт, а во-вторых, такие приложения хорошо справляются со сканированием оперативной памяти. Туда зачастую тоже проникает вирус. О лучших представителях таких антивирусов мы ранее писали в отдельной статье:
Подробнее: Проверка компьютера на наличие вирусов без антивируса
- После сканирования системы перезагрузите компьютер и проверьте, осталась ли проблема.
Способ 3: Откат обновлений
Разработчики Windows 10 регулярно выпускают обновления для системы. Но иногда случается так, что подобные накопительные пакеты не помогают, а лишь вызывают новые ошибки. Если после установки очередного апдейта вы заметили проблемы с процессом «WMI Provider Host», стоит попробовать откатить изменения. Это можно сделать двумя методами, о которых мы во всех подробностях писали в отдельном руководстве.
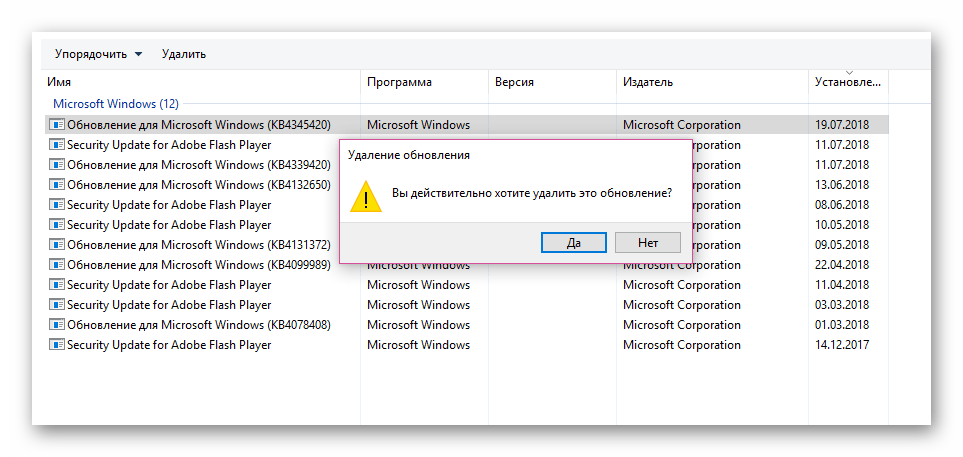
Подробнее: Удаление обновлений в Windows 10
Способ 4: Отключение сторонних служб
При инсталляции стороннего софта вместе с ним зачастую в систему устанавливается и зависимая служба. Иногда их функционирование может стать причиной перегрузки процесса «WMI Provider Host» поэтому стоит попробовать отключить все второстепенные службы. Сделайте следующее:
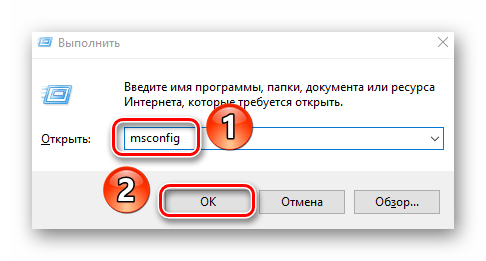
- Нажмите одновременно клавиши «Windows» и «R». В открывшееся окно введите команду
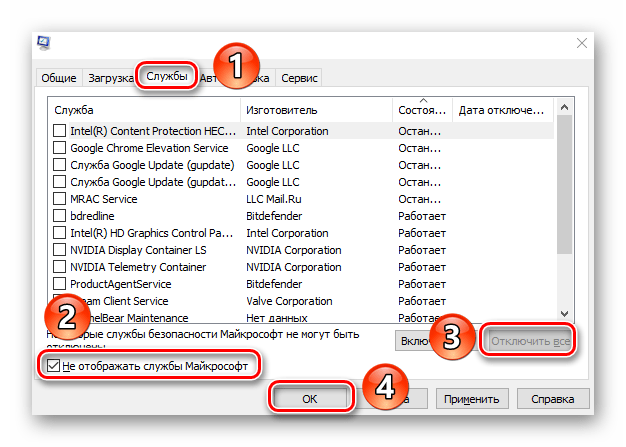
msconfig, после чего в этом же окне нажмите кнопку «OK». - В следующем окне перейдите во вкладку «Службы». В самом низу поставьте отметку возле строки «Не отображать службы Майкрософт». В результате в списке останутся лишь второстепенные службы. Отключите их все, убрав галочки рядом с названием. Также можно кликнуть по кнопке «Отключить все». После этого нажмите «OK».
- Затем перезагрузите компьютер. Если проблема, тогда можете вернуться в данную вкладку и попробовать включить половину служб. Подобным образом постарайтесь выявить виновника проблемы, после чего можно либо удалить его, либо же обновить ПО.
Способ 5: «Просмотр событий»
В каждой редакции Windows 10 есть встроенная утилита под названием «Просмотр событий». В ней можно отследить, какое стороннее приложение обращалось к службе «WMI Provider Host». Узнав это, мы сможем удалить или переустановить проблемный софт. Вам нужно выполнить следующее:
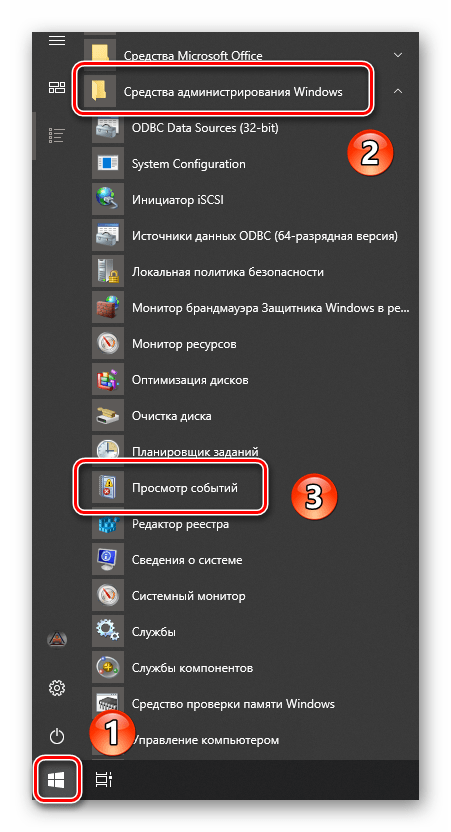
- Нажмите на кнопку «Пуск». Левую часть открывшегося меню прокрутите в самый низ. Найдите и откройте папку «Средства администрирования Windows». Из выпадающего списка выберите пункт «Просмотр событий».
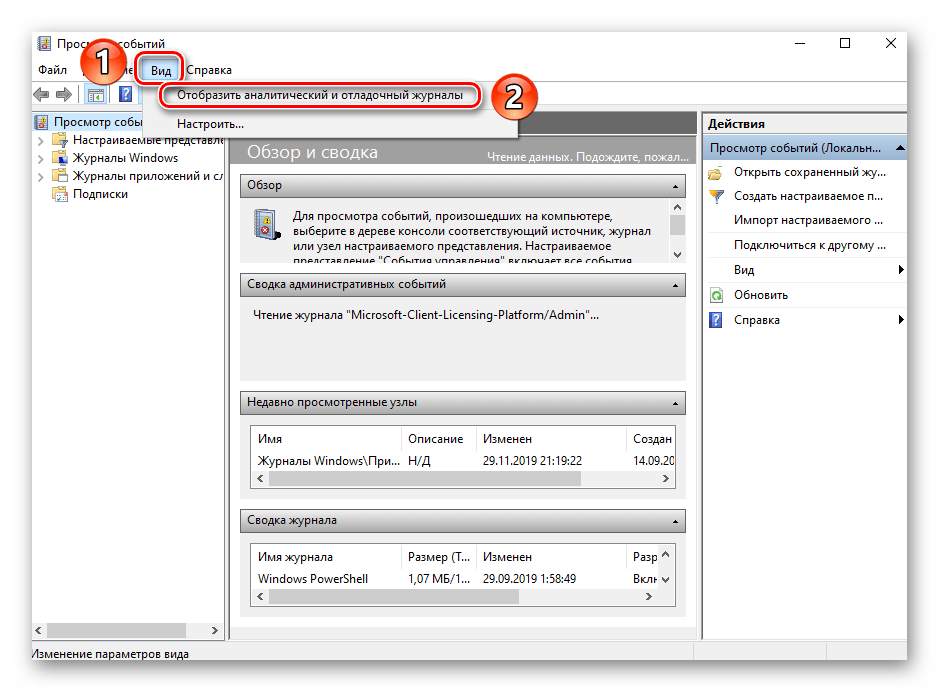
- В верхней части открывшегося окна кликните по строке «Вид», а затем выберите пункт «Отобразить отладочный и аналитический журнал».
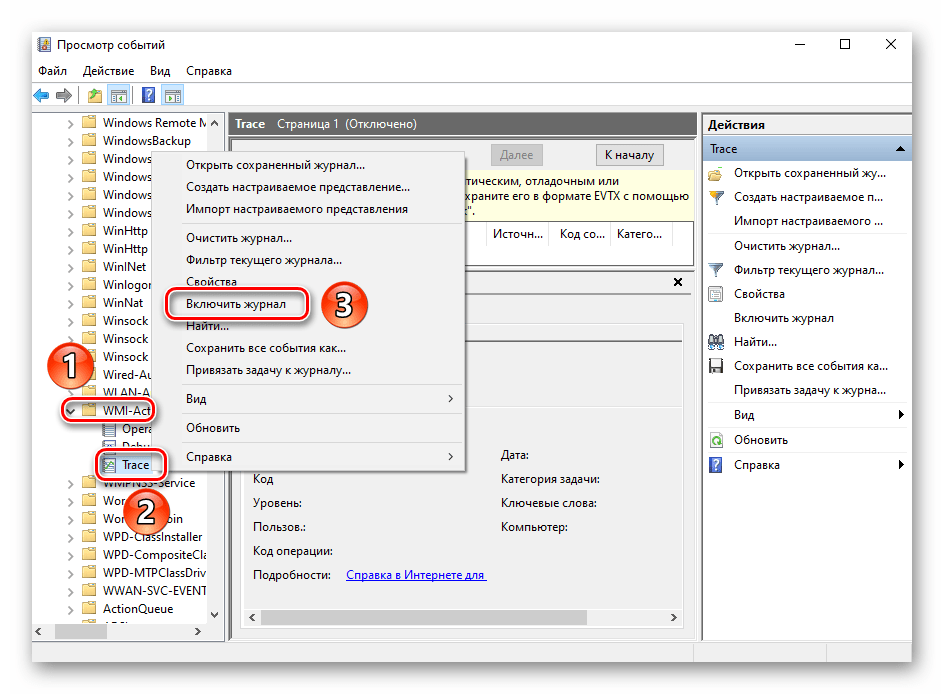
- Используя древовидную структуру папок в левой части окна перейдите в каталог «WMI-Activity». Он находится по следующему пути:
Журналы приложений и служб/Microsoft/WindowsВ указанной директории найдите файл «Trace» и кликните по нему правой кнопкой мышки. Из контекстного меню выберите строку «Включить журнал».
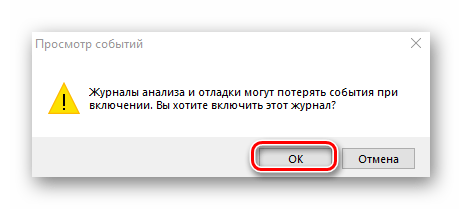
- Появится предупреждение о том, что во время включения логирования часть отчетов может быть утеряна. Соглашаемся и жмем кнопку «OK».
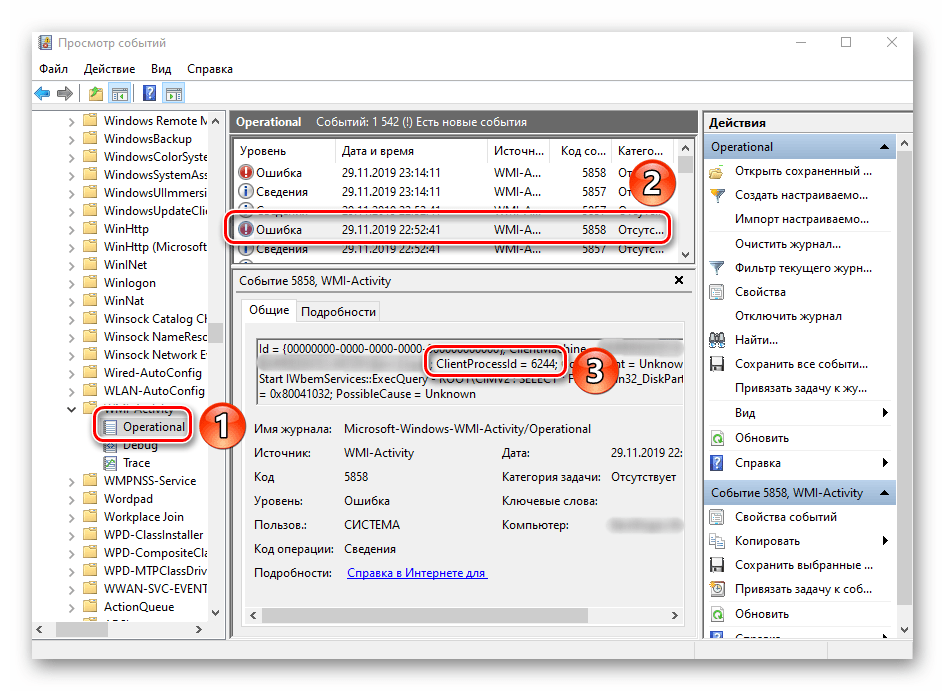
- Далее выберите файл «Operational» в этом же каталоге «WMI-Activity». В центральной части окна, начиная сверху вниз, кликайте на тех строках, в названии которых числится «Ошибка». В поле описания проблемы обратите внимание на строку «ClientProcessId». Напротив нее будет указан код приложения, которое обращалось к процессу «WMI Provider Host». Запомните его.
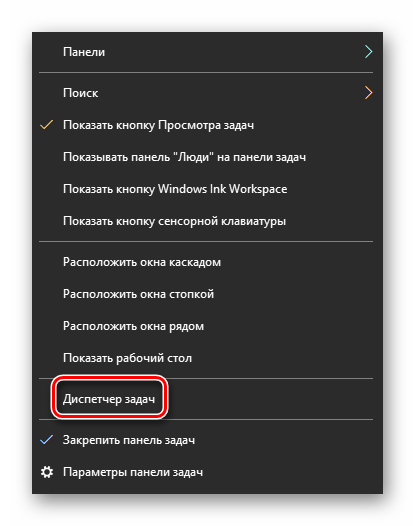
- Далее откройте «Диспетчер задач». Для этого нажмите ПКМ на «Панели задач» и выберите отмеченную на скриншоте ниже строку.
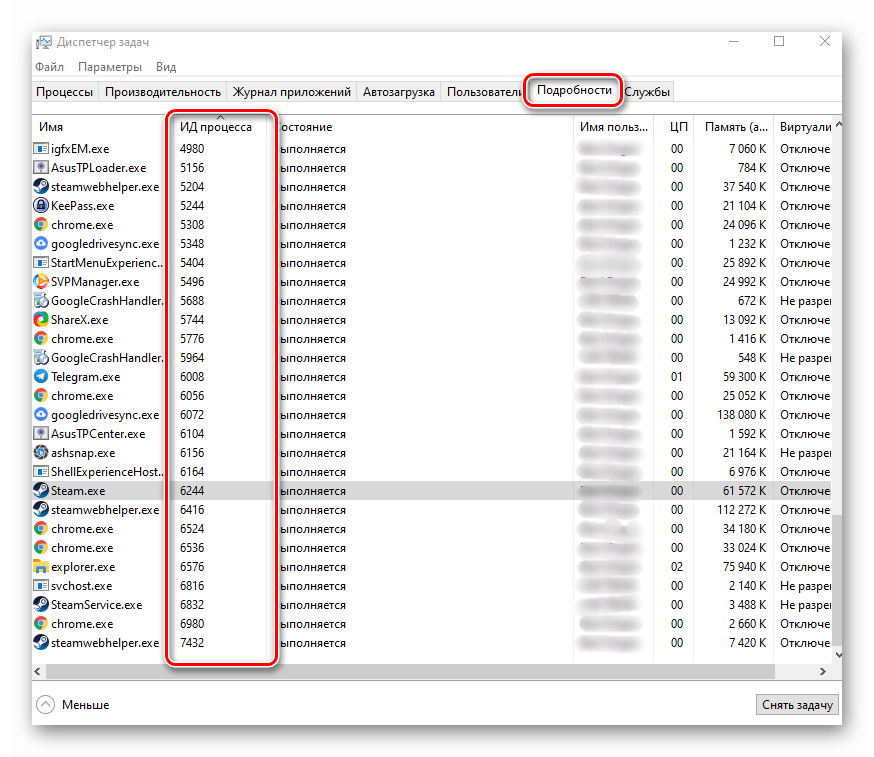
- В открывшемся окне перейдите во вкладку «Подробности». В перечне процессов обратите внимание на второй столбик «ИД Процесса». Именно в нем нужно отыскать цифры, которые вы запомнили из утилиты «Просмотр событий». В нашем случае это приложение «Steam».
- Теперь, зная виновника проблемы перегрузки процесса «WMI Provider Host», можно удалить или обновить найденное приложение. После этого нужно проверить, появится ли аномальная загрузка процессора вновь или нет.
Способ 6: Проверка оборудования
Как мы писали в начале статьи, упомянутый процесс отвечает за обмен информацией между оборудованием и системой. Иногда случается так, что проблема кроется в самом оборудовании, а не в программном обеспечении. Поэтому стоит попробовать поочередно отключить внешние устройства и проверить, появится ли проблема без них или нет. Это можно сделать либо физически, либо же через «Диспетчер устройств».
- На кнопке «Пуск» нажмите правой кнопкой мышки и выберите из контекстного меню строчку «Диспетчер устройств».
Читайте также: Открываем «Диспетчер устройств» в Windows 10
- Далее кликните ПКМ на нужном устройстве и выберите пункт «Отключить устройство».
- После проверки работоспособности системы проделайте то же с другим устройством. Найдя виновника, попробуйте обновить драйвера для него либо изменить настройки.

Таким образом, вы узнали обо всех основных способах снижения нагрузку на процесс «WMI Provider Host». В качестве заключения мы хотели бы напомнить, что проблема может возникнуть не только по вине самой системы, но и из-за использования некачественной кастомной сборки. В подобных случаях, к сожалению, решается все только переустановкой Windows 10.
Читайте также: Руководство по установке Windows 10 с USB-флешки или диска
Наша группа в TelegramПолезные советы и помощь
WMI Provider Host – один из стандартных компонентов Windows, который появляется вместе с «рождением» (установкой) операционной системы. Зачастую этот процесс никак не грузит процессор и не мешает работе компьютера. Тем не менее, бывают случаи, когда из-за другого процесса WmiPrvSE.exe начинает сильно грузить процессор вашего компьютера. Вслед за другими статьями о системных процессах Windows, эта подробно объяснит вам предназначение WMI Provider Host и расскажет, что делать, если wmiprvse.exe сильно нагружает процессор.
Что это за процесс WMI Provider Host
WMI расшифровывается как “Windows Management Instrumentation” — инструментарий управления Windows. Это специальная функция операционной системы, которая предоставляет стандартизированный способ получения необходимой информации о состоянии Windows административными скриптами или различным программным обеспечением. «WMI-провайдеры» или «поставщики» предоставляют нужную информацию, когда скрипт или приложение обращается за ней к операционной системе. К примеру, программа или команда запрашивает информацию о состоянии шифрования BitLocker на диске компьютера, просматривает записи в журнале событий или получает сведения от установленных приложений, в состав которых входит тот самый «провайдер». На официальном сайте Microsoft можно найти список WMI-провайдеров.
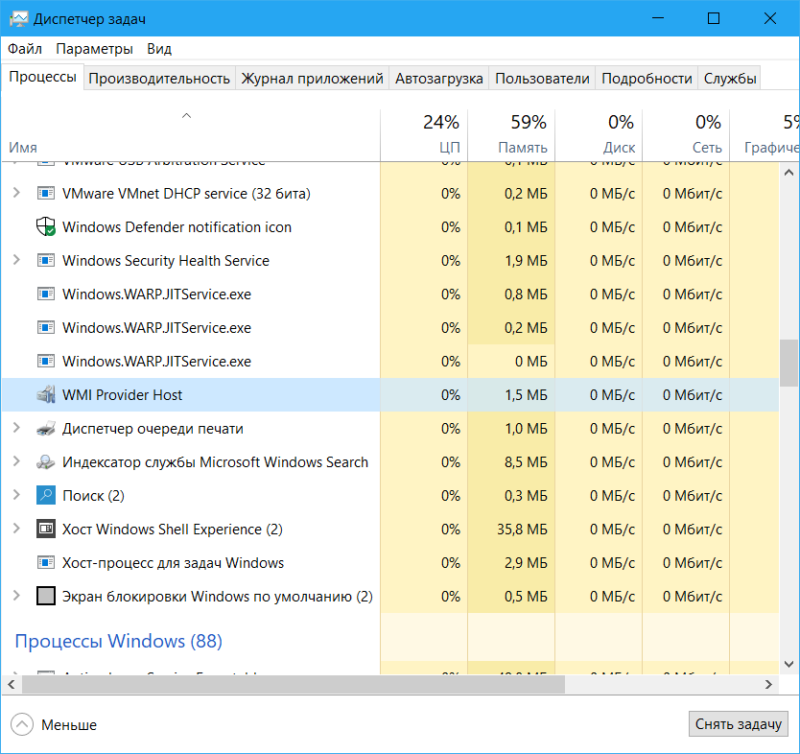
WMI Provider Host в Диспетчере задач.
WMI Provider Host является особо полезной функцией для предприятий, где управление компьютерами происходит централизованно. Информация собирается с помощью скриптов и отображается в администраторских консолях. Все же WMI Provider Host будет полезной даже для домашнего пользователя. К примеру, для поиска информации, которая зачастую скрыта и нигде не отображается в интерфейсе системы. Это может быть серийный номер компьютера или та же модель материнской платы. В недавней инструкции, которая рассказывает, как узнать модель материнской платы, мы описывали способ добычи нужных сведений с помощью WMI в Командной строке. Примерно таким же образом можно узнать и другую информацию, вроде состояния здоровья жесткого диска.
Wmiprvse.exe сильно грузит процессор
Так быть не должно, что вполне очевидно. В обычных условиях WMI Provider Host ничего не делает, поэтому не нагружает процессор и не потребляет оперативной памяти, а то и вовсе не отображается в списке процессов в Диспетчере задач. Время от времени нагрузка на ЦП может слегка увеличиваться, когда приложение или скрипт на вашем компьютере запрашивает информацию через WMI. Это норма, поэтому временное увеличение нагрузки является лишь сигналом обращения к WMI. Нагрузка должна относительно быстро вернуться к нулю. Если же wmiprvse.exe долгое время нагружает процессор, значит что-то пошло не так.
Прежде всего надо попробовать перезапустить службу Инструментарий управления Windows (Windows Management Instrumentation). Если вы имеете дело с банальным багом, перезапуск вернет процесс в нормальное состояние. Можно конечно просто перезагрузить компьютер, но в Windows предусмотрен способ рестарта WMI Provider Host без перезагрузки самого компьютера. Делается это следующим образом:
- Нажмите Win + R и введите services.msc. Система откроет окно управления службами Windows.
- Найдите в списке служб Инструментарий управления Windows. Нажмите по службе правой кнопкой мыши и выберите Перезапустить. Можно также воспользоваться меню слева от списка служб. Просто кликните Перезапустить службу.
Если этот метод не помог, тогда причиной постоянной нагрузки скорее всего является другой процесс, который запрашивает большое количество информации от WMI-поставщиков. В таком случае проблем скрыта не в WMI Provider Host, а в том самом процессе, выполняющем обращение. Для обнаружения этого загадочного процесса надо использовать журнал событий Windows.
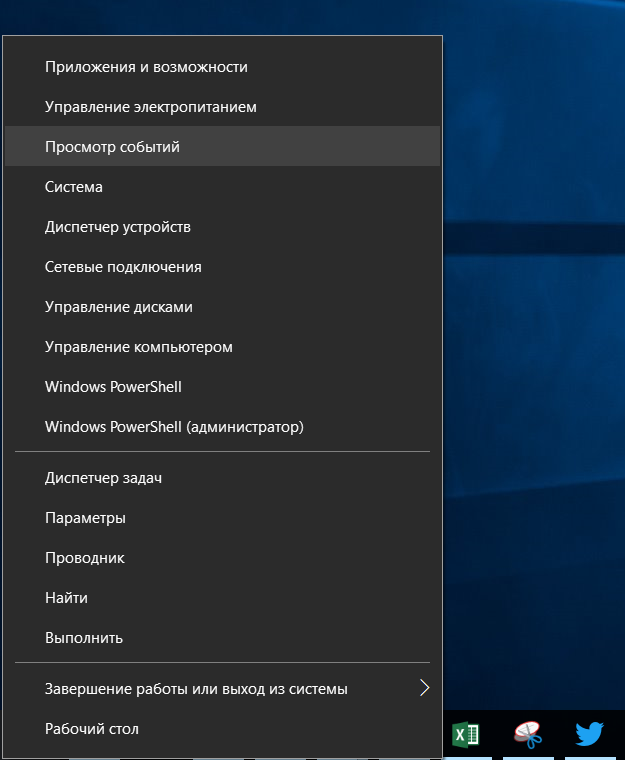
- Нажмите Win + X (или просто кликните правой кнопкой мыши по кнопке Пуск) и выберите Просмотр событий. Опционально можно нажать Win + R и ввести Eventvwr.msc.
- В левой части экрана выберите Журналы приложений и служб – Microsoft – Windows – WMI Activity – Operational.
- Пролистайте список и найдите процессы с обозначением Ошибка. Нажмите на один из них (если их много, пройдитесь по нескольким) и на вкладке Общие (расположена в нижней части окна) найдите параметр ClientProcessId. Этот параметр указывает на идентификатор процесса, который повлек за собой ошибку WMI.
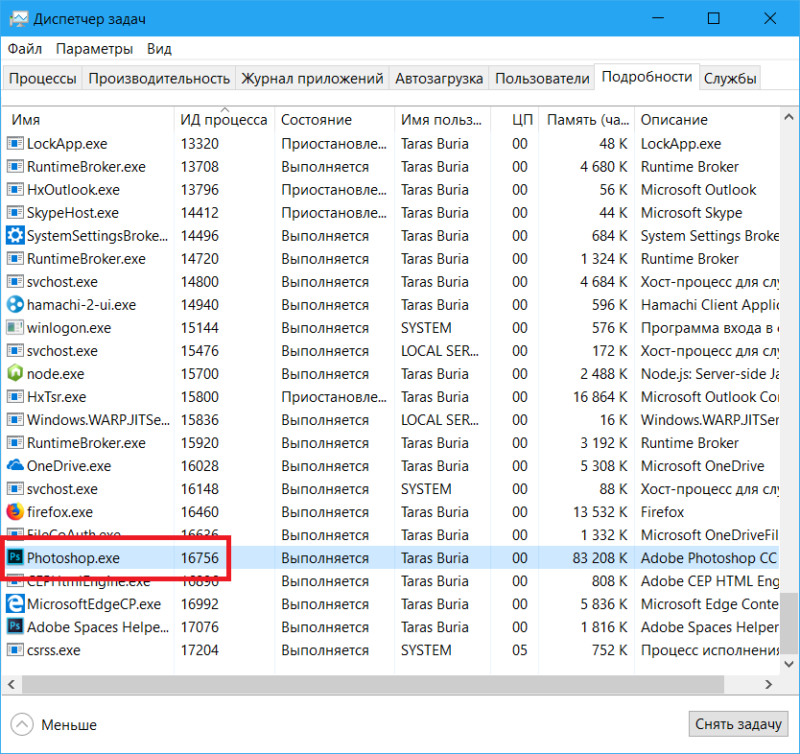
- Запомните найденный идентификатор, а затем откройте Диспетчер задач. Перейдите на вкладку Подробности и в списке нажмите на ИД процесса, чтобы удобно отсортировать процессы по идентификатору.
- Найдите нужный вам идентификатор. На скриншоте видно, что ошибки в WMI были вызваны процессом Photoshop.exe.
Если с момента возникновения ошибки процесс завершил свою работу, он не будет отображаться в Диспетчере задач. Кроме того, система присваивает новый уникальный идентификатор каждый раз, когда процесс перезапускается. Именно поэтому в журнале событий надо просматривать лишь самые свежие ошибки. Попросту нет смысла исследовать старые записи, потерявшие актуальность.
Когда вы обнаружили процесс, виновный в аномальном поведении WMI, пробуйте решить проблему уже с самим процессом. Остановите его работу или перезагрузите процесс. Попытайтесь обновить приложение или переустановить его. Если оно вам не нужно попробуйте вовсе удалить его. Причины нестандартного поведения различных процессов будут разные, поэтому здесь вам уже надо самостоятельно искать их решение.
Как отключить WMI Provider Host
Теоретически и технически можно отключить службу «Инструментарий управления Windows» на вашем компьютере в окне управления службами Windows. Все же делать это мы не рекомендуем, поскольку отключение может повлечь за собой выход из строя разных компонентов Windows или установленных приложений. WMI Provider Host – это важная часть операционной системы, поэтому просто оставьте ее в покое. Вместо снятия задачи в Диспетчере задач или отключения инструментария управления Windows вы должны искать сторонний процесс, который приводит к постоянной нагрузке на железо компьютера. WMI Provider Host здесь не при чем, поэтому его отключение не исправит проблему.
Вирус Wmiprvse.exe
Wmiprvse.exe – это не вирус (на нормальных системах). Кто бы и что бы вам не говорил, WMI Provider Host должен работать в вашем компьютере. Он работает не всегда (следовательно, не отображается в Диспетчере задач), но, если вы нашли его в списке процессов, значит он там должен быть. Высокая нагрузка на процессор будет обусловлена либо другим приложением (решение этой проблемы описано выше), либо вирусом, который маскируется под системный процесс. Проверить это можно очень просто. Если вы читали другие статьи о процессах Windows, тогда эта процедура уже будет вам знакомой. Ну а если вы пользователь-новичок, тогда просто следуйте вот этой инструкции:
- Откройте Диспетчер задач и найдите WMI Provider Host в списке процессов (или на вкладке Подробности – WmiPrvSE.exe).
- Нажмите правую кнопку мыши и выберите Открыть расположение файла.
- После этого откроется Проводник по адресу C:\Windows\System32\wbem. Файл WmiPrvSE.exe должен располагаться именно там и нигде иначе.
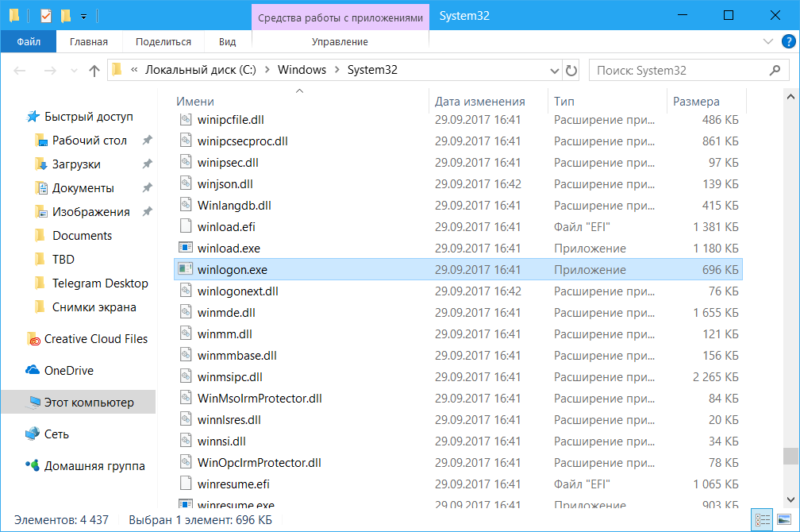
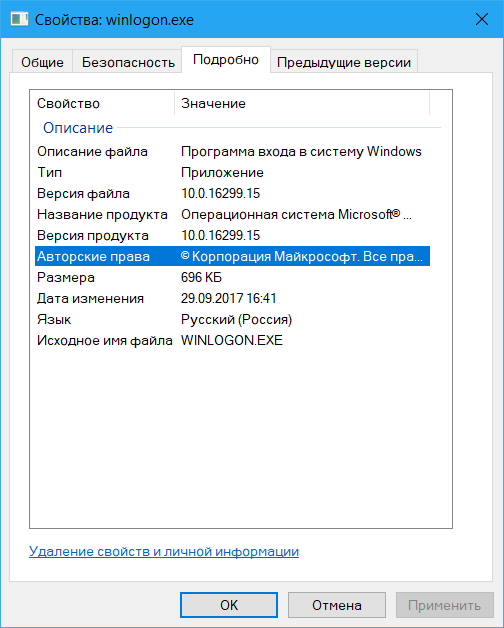
- Если открылась правильная папка, тогда дополнительные шаги необязательны, но для пущего успокоения вы можете также проверить информацию на вкладке Подробно в Свойствах файла WmiPrvSE.exe. Она должна соответствовать той, что указана на скриншоте.
Надеемся, эта информация помола вам, была интересной или же просто пополнила ваши знания операционной системы Windows и того, что происходит внутри нее.
Windows Management Instrumentation (WMI) Provider Host High CPU Usage – Has it ever occurred to you that your CPU resources are being in use even if your Windows PC is left idle? This could be due to the background processes that are essential for carrying out some common system functions. One such process is the WMI Provider Host (WmiPrvSE.exe). These processes are only meant to take a fraction of your resources and shouldn’t hog all of it. However, in some cases, there is a fair chance of finding the Windows Management Instrumentation (WMI) Provider Host high CPU usage. This is definitely a thing to worry about. If you are one among the sufferers, you are at the right spot.
Now that you have figured that the WMI Provider Host is the actual culprit, one of these questions might already have popped in your head – What is WMI Provider Host? Can I stop Windows Management Instrumentation (WMI) Provider Host or How do I remove WMI Provider Host? You’ve got questions – we’ve got answers. Let’s roll in!
What is WMI Provider Host (WmiPrvSE.exe)?
WMI is an acronym for ‘Windows Management Instrumentation’, which is an essential component of the Windows Operating System aimed at providing management data to other components of the System. In simple words, many parts of the system are dependent on the information provided by the WMI Provider Host (WmiPrvSE.exe) for their proper functioning.
Apart from this, WMI also helps in the smoother execution of the software and administrative scripts by providing them with information like the state of the windows operating system and crucial data relating to it. This is very essential especially in the case of remote management of computers.
This brings you to the next big question.
How do I remove WMI Provider Host?
Removing the WMI Provider Host isn’t technically possible as most programs are dependent on this service for their proper functioning. Stopping which will cause great instability in the system components and may end up crashing your Operating System. It is highly advised that you should never try stopping or removing the Windows Management Instrumentation (WMI) Provider Host (WmiPrvSE.exe).
Why is WMI Provider Host using so much CPU?
WMI Provider Host isn’t meant to run all the time. Its only job is to stay idle and respond when another piece of software or a script requests information via WMI. Technically, it shouldn’t consume your CPU power as long it stays idle. It might occasionally use some CPU resources to respond to a request and this usage should only last a while. Prolonged high CPU usage is a sign that something is terribly wrong as the WMI Provider Host shouldn’t use lots of CPU resources all the time.
The reason can be anything, the process itself might have stuck in a bad state or there must be a problem with another service that kept on engaging the WmiPrvSE.exe service or it can also be a malicious program that kept the WMI Provider Host in the loop.
Whichever the reason can be, we have figured out a few simple fixes to help you get rid of WMI Provider Host high CPU usage problem on your Windows PC.
Wasting your system resources on useless background activities can be annoying as they keep slowing down your computer and might even cause it to freeze often. We at CPUsage have committed to easing your annoyance by figuring out a few working fixes to this issue.
Fix 1: Restarting the WMI Provider Host service on Windows 10
Restarting your Windows Management Instrumentation service (WMI) might sound a bit cliche but trust me this should do the job in most cases. There is a fair chance that your service is stuck in a bad state and a simple restart should fix it like a charm. However, you don’t need to restart the entire computer but the service itself.
To do this, open the service management console on your computer. You can achieve this in two ways.
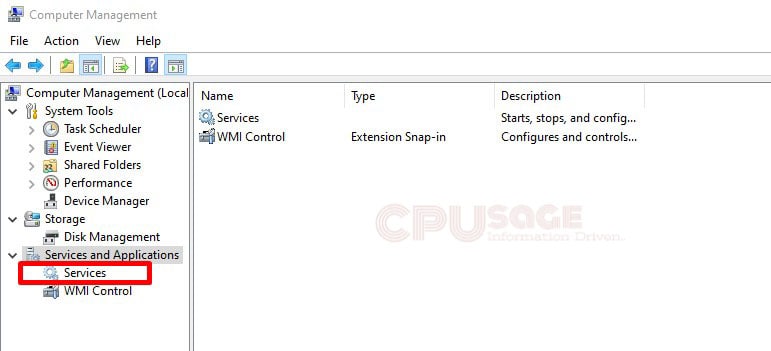
Right-click on the My Computer/This PC icon and choose Manage from the list. This should bring up a new window. Now click on the Services and Applications option on the left pane and choose Services from the displayed options. This should open the service management console.
Open start menu and type ‘Services.msc’ and hit enter. This should directly open the service management console.
Once you are on the Service list window, scroll down to find a service with the name ‘Windows Management Instrumentation Service’. On finding it, right-click on the service and choose the ‘Restart’ option.
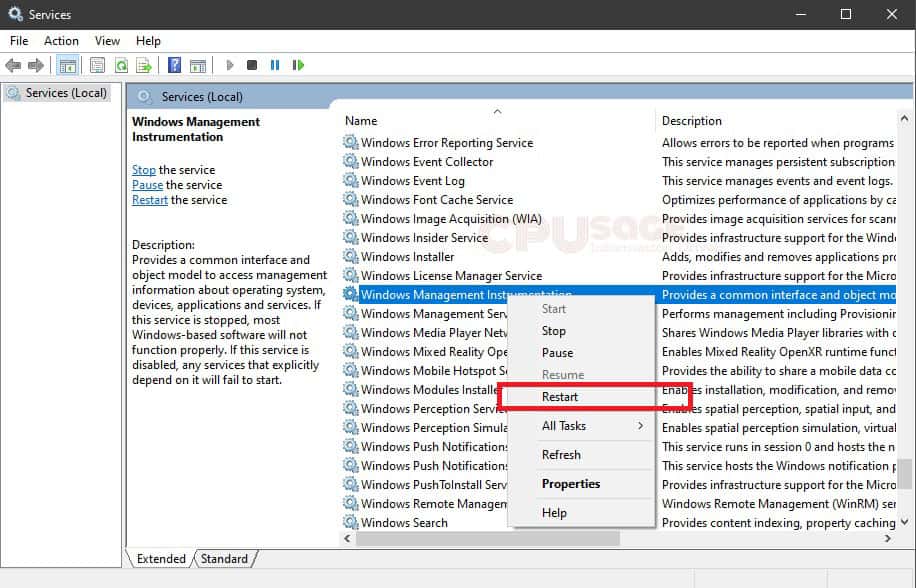
This should restart your WMI service. Check if this helped. In most cases, this should fix the WMI Provider Host High CPU usage issue. If it didn’t, try the other possibilities that we are going to list down.
FIX 2: Identifying the process causing the problem with WMI on Windows 10 computer –
If restarting the WMI Service didn’t help, understand that the problem is with another process that is continuously sending requests to the WMI Provider Host (WmiPrvSE.exe) service, keeping it busy which ultimately hogs up a lot of CPU resources. Identifying that particular program or service and either disabling it or uninstalling it should fix the problem.
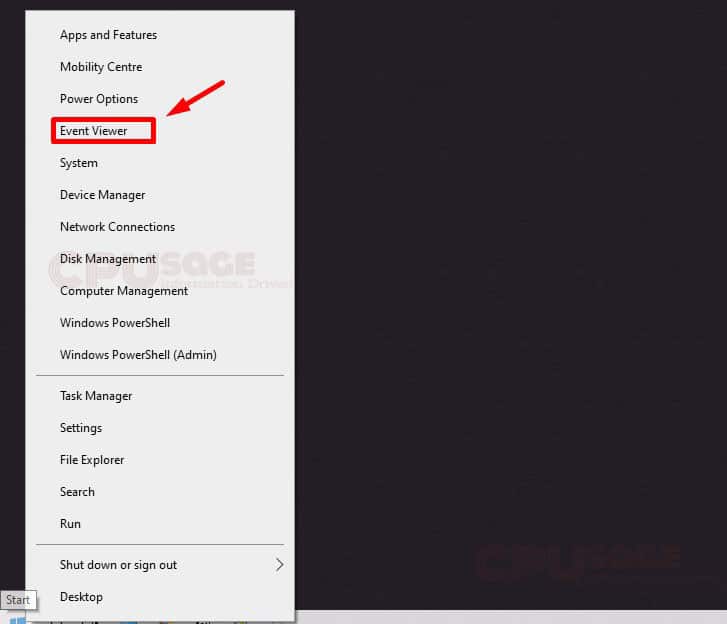
If you are on Windows 8 or 10, you can directly right-click on the Start button and choose ‘Event Viewer’ from the list. However, Windows 7 users can still access the Event viewer by typing in ‘Eventvwr.msc’ in the start menu and click on the suggested application to launch it.
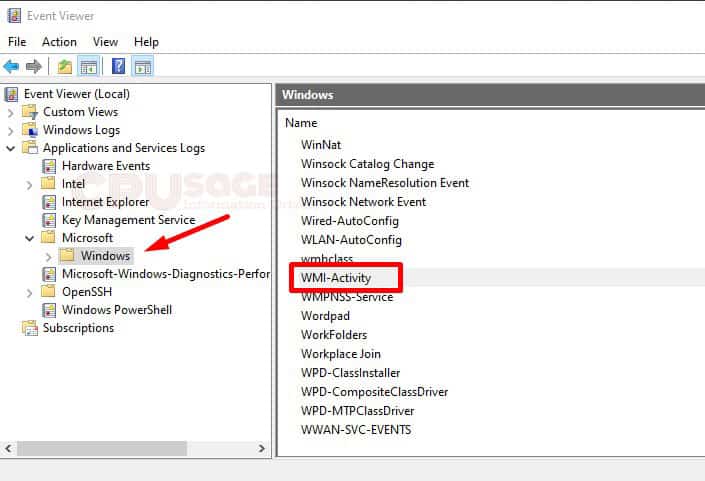
Once you have the ‘Event Viewer’ opened, in the left pane of the window, navigate to Applications and Service Logs\Microsoft\Windows and click on the WMI-Activity option as seen in the image below.
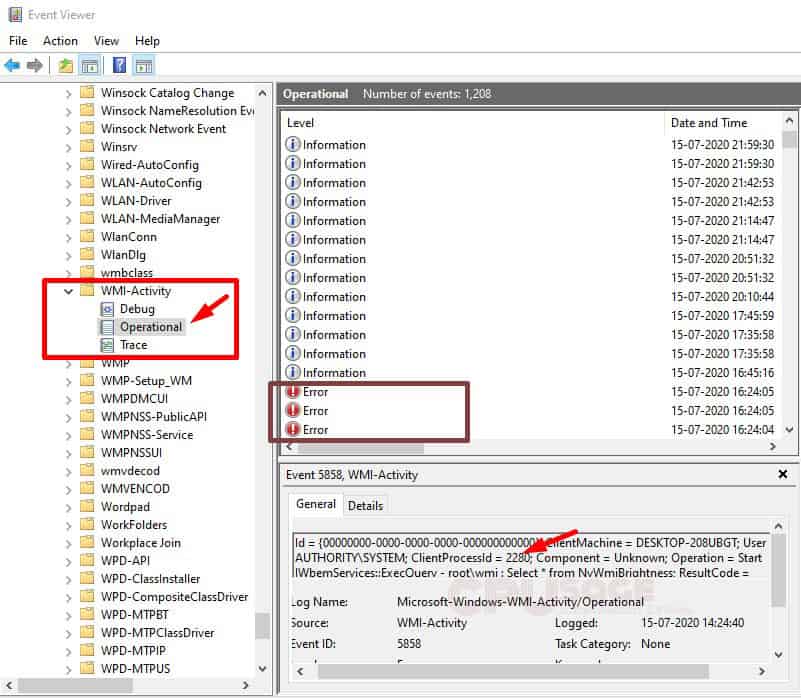
Once you click on the WMI-Activity, choose ‘Operational’. This should display the WMI-Activity events. Now check for the recent activity with errors and note down the ID number of the process that caused the WMI error. There is a high chance that you see more errors. Note down the process IDs for each error.
Now that you know the process IDs of the processes that are causing the errors, you can proceed with terminating those processes one after the other to see if that fixes your issue. To do this, head over to Task Manager. You can open the task manager either by right-clicking on the taskbar and selecting Task Manager from the list or use the keyboard shortcut Ctrl+Shift+Esc.
In my case, the ClientProcessID causing WMI operational error is 2280. Now search the Task Manager for the same.
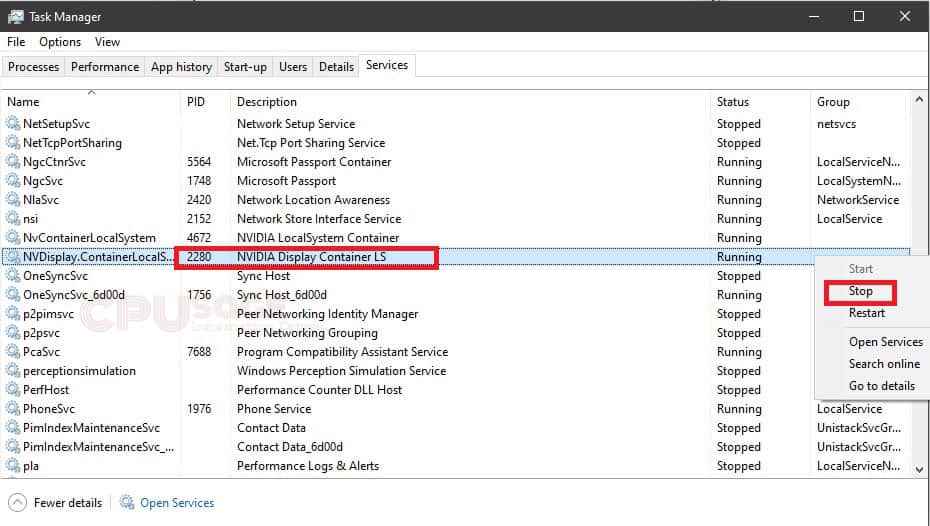
In my case, ‘NVIDIA Display Container LS’ is causing the error. I can go ahead and terminate the service by right-clicking on it and selecting the stop option.
This should fix the wmiprvse.exe WMI Provider Host high CPU usage problem on my Windows 10 computer.
FIX 3: Boot into safe mode with Networking –
If the above two fixes didn’t work for you, try booting your Windows computer into safe mode with networking enabled. What it technically does is, in safe mode the essential services required to run the system software are only permitted to run leaving behind all other services related to the application software on your computer. If one of the services related to the programs you have installed is causing the trouble, you will get to know it in this stage.
How to boot your Windows 10 PC into safe mode with networking?
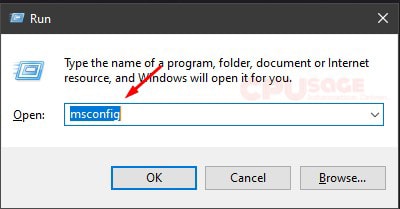
1. Use the keyboard shortcut Windows Key + R to open the Run command box. Once your run command box pops up, type msconfig in the search box and hit enter key on your keyboard.
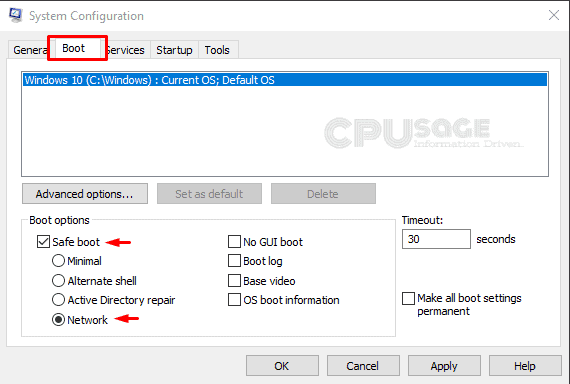
2. Doing the 1st step should bring the System Configuration window on the screen. Now click on the Boot tab present at the top of the window and then check the box for Safe boot. Also, make sure to highlight the network option below the Safe boot option. Now click on Apply and then click OK to save the changes to your configuration.
3. Once you are done applying the above changes, you should see another dialog box asking you to restart your computer in order to apply the changes. Click on the Restart button in the appeared dialog box. After making changes, even if the dialog didn’t appear, do not worry. You can take the privilege of restarting your system manually. Either way, it is important to restart your Windows 10 computer after changing the boot configuration.
4. After the reboot, your Windows should start in Safe Mode. Once you are in the safe mode, press Windows Key + X on your keyboard and select Windows PowerShell (Admin) from the menu.
5. Once your PowerShell window opens up, type the following command and press enter.
msdt.exe -id MaintenanceDiagnosticUpon entering the command, you should now see a window pop up to help you troubleshoot your computer for possible problems. Click on the Next button on the troubleshooter window to proceed with detecting if there are any potential problems.
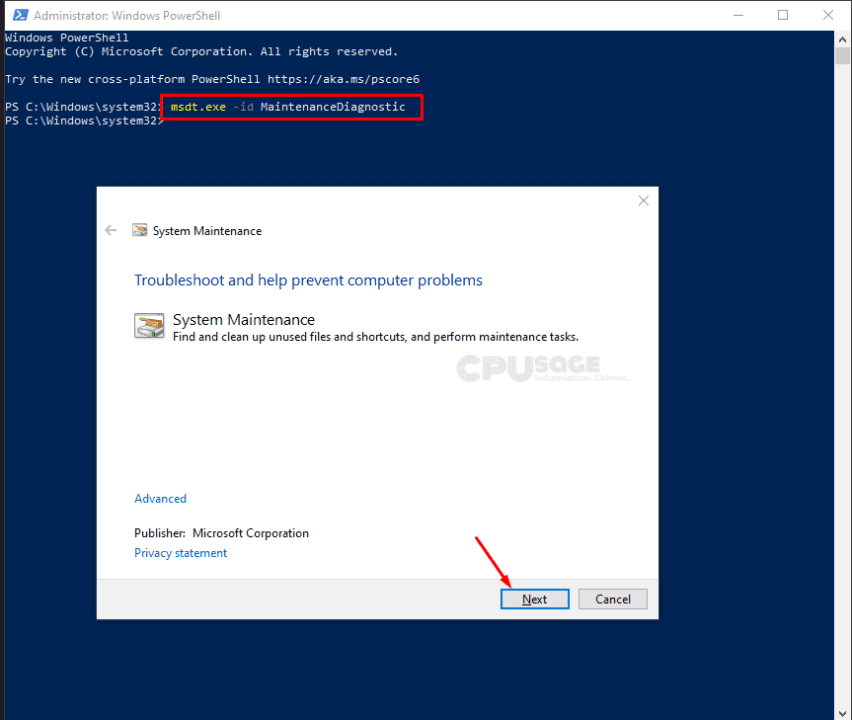
If there is any issue in this session, the troubleshooter will alert you and will do the needful to repair the same. If there isn’t any problem detected in this case, proceed to the next step.
6. Now in the PowerShell window (if there is no active PowerShell window, open it by redoing step 4), type the following command and press enter.
msdt.exe /id PerformanceDiagnosticYou should now see another window popping up. This should fix all the problems related to speed and performance and optimize your windows better. Click on the Next button to proceed with diagnostics.
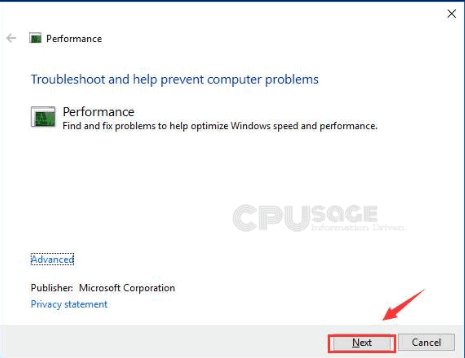
It alerts you if there is anything that requires you to change manually. Do as it instructs you.
7. Doing the above should fix your WMI Provider Host high CPU usage issue in Windows 10. Now, to exit safe boot and boot into normal mode, redo 1st step and uncheck safe boot in the Boot tab and click on the Apply and then OK button and reboot your computer.
How to Fix WMI Provider Host high Process usage issue in Windows Server 2008, 2011, 2012, 2016, 2019?
If you are on any of the Windows Server Operating Systems from Windows 2008, 2011, 2012, 2016 to 2019 and are experiencing the WMI Provider Host high CPU usage, the fixing process should technically be the same as that of the Windows 10 version.
Feel free to comment down, if you lost somewhere. One of our team members should get to assist you in a short time.
FAQs About WMI Provider host High processor utilization Around the web
Can I end WMI Provider Host High CPU Usage?
Windows Management Instrumentation (WMI) Provider Host is an essential windows functional service that provides system information to other programs and services. Stopping the WMI Provider Host will result in system instability. It is recommended not to terminate the WMI Provider Host.
What is WMI Provider Host?
WMI Provider Host is one of the components of the Windows Operating System aimed at providing management data to other components. In simple words, many parts of the Operating System are dependent on the information provided by the WMI Provider Host for their proper functioning.
What is WmiPrvSE high CPU?
WmiPrvSE is a component of the Windows Management Instrumentation provider aimed at providing management data to other programs and services of the operating system.

