
Использую облачный сервер на ubuntu 20.04, работает по ip 185.253.44.4:3333, вот содержание конфига(wg0.conf):
[Interface]
Address = 185.253.44.4/24
ListenPort = 3333
PrivateKey = mLc+jV2XjWt9OLvXyqa2+J+OOPmuV77As4jUZTss8mk=
Вот, что выводит по команде «sudo systemctl status wg-quick@wg0»:
● wg-quick@wg0.service - WireGuard via wg-quick(8) for wg0
     Loaded: loaded (/lib/systemd/system/wg-quick@.service; enabled; vendor preset: enabled)
     Active: active (exited) since Wed 2022-03-16 10:50:13 UTC; 4s ago
       Docs: man:wg-quick(8)
             man:wg(8)
             https://www.wireguard.com/
             https://www.wireguard.com/quickstart/
             https://git.zx2c4.com/wireguard-tools/about/src/man/wg-quick.8
             https://git.zx2c4.com/wireguard-tools/about/src/man/wg.8
    Process: 4443 ExecStart=/usr/bin/wg-quick up wg0 (code=exited, status=0/SUCCESS)
   Main PID: 4443 (code=exited, status=0/SUCCESS)
      Tasks: 0 (limit: 527)
     Memory: 1.5M
     CGroup: /system.slice/system-wg\x2dquick.slice/wg-quick@wg0.service

Mar 16 10:50:13 opezd79549 systemd[1]: Starting WireGuard via wg-quick(8) for wg0...
Mar 16 10:50:13 opezd79549 wg-quick[4443]: [#] ip link add wg0 type wireguard
Mar 16 10:50:13 opezd79549 wg-quick[4443]: [#] wg setconf wg0 /dev/fd/63
Mar 16 10:50:13 opezd79549 wg-quick[4443]: [#] ip -4 address add 185.253.44.4/24 dev wg0
Mar 16 10:50:13 opezd79549 wg-quick[4443]: [#] ip link set mtu 1420 up dev wg0
Mar 16 10:50:13 opezd79549 systemd[1]: Finished WireGuard via wg-quick(8) for wg0.
Вывод после «sudo ip a show wg0»:
interface: wg0
  public key: FRrQgjEXAeY7MpLPcdDuCd1e6LylHc6414zbpUEclkQ=
  private key: (hidden)
  listening port: 3333
root@opezd79549:/etc/wireguard# sudo ip a show wg0
3: wg0: <POINTOPOINT,NOARP,UP,LOWER_UP> mtu 1420 qdisc noqueue state UNKNOWN group default qlen 1000
    link/none
    inet 185.253.44.4/24 scope global wg0
       valid_lft forever preferred_lft forever
На windows подключаюсь через приложение от wireguard. Вот конфиг тоннеля:
[Interface]
PrivateKey = 6JW3oWJ/cXg1T9Q7b9jCShQ8snoEaf4sCBSllJD6a0E=
Address = 178.155.6.110/24

[Peer]
PublicKey = FRrQgjEXAeY7MpLPcdDuCd1e6LylHc6414zbpUEclkQ=
AllowedIPs = 0.0.0.0/0
Endpoint = 185.253.44.4:3333
PersistentKeepalive = 15
Я не использую фаерволл, так как даже после открытия порта для сервера, к нему невозможно подключится.
На клиенте ВПН подключается моментально, но перестает работать интернет соединение.
Велик соблазн написать «наконец-то нормальный» мануал для настройке wireguard. Но в итоге такой мануал станет очередным, который не решает все проблемы пользователя при настройке. Поэтому данная запись носит цель подсветить возможные проблемы, с которыми может столкнуться рядовой пользователь при настройке базового vpn через wireguard на типовом vds.
Использовал данный мануал по настройке:
Вполне возможно, что статья будет добавлять или в итоге в комментариях окажется больше полезной информации нежели в самом посте.
- базовый VDS в DIgitalOcean за $4: 512 MB Memory / 10 GB Disk / SGP1 — Ubuntu 22.10 x64
- регион Сингапур. Скорее всего не лучший вариант, но точно рабочий. Изначально пробовал другие регионы, но в процессе поиска проблем менял сервера. Встречал комменты, что для некоторых регионов не «заводилось». Пример замера скорости в конце статьи.
Примечание: при регистрации Digital Ocean предоставил пробный период с «$200.00 (expires in 59 days)». При этом DO сделал списание (и сразу возврат) тестовой суммы в $5 при регистрации. Если есть подходящая карта, то скорее всего есть рабочий вариант завести новый аккаунт и раскатать wireguard еще раз на два месяца. При необходимости повторить.
Пробовал настраивать VDS по нескольким инструкциям. Вцелом, они однотипны и по каждой из них была проблема на финальном шаге — подключаюсь в WireGuard через клиент, но интернета нет. Скорее всего если есть проблема, то она будет воспроизводиться именно на этом шаге.
Полагаю, что вы прошли инструкцию и понимаете о чем идет речь дальше.
Проверьте еще раз файлы конфигураций. При минимальной настройке файлов получается два:
- первый файл wg0.conf располагается на самом VDS и задает настройки для wireguard
- второй, к примеру, mac.conf в моем случае, в котором задаются настройки клиента
Пример моего файла wg0.conf
[Interface]
Address = 10.0.0.1/24
PostUp = iptables -A FORWARD -i wg0 -j ACCEPT; iptables -A FORWARD -o %i -j ACCEPT; iptables -t nat -A POSTROUTING -o eth0 -j MASQUERADE
PostDown = iptables -D FORWARD -i wg0 -j ACCEPT; iptables -D FORWARD -o %i -j ACCEPT; iptables -t nat -D POSTROUTING -o eth0 -j MASQUERADE
ListenPort = 51830
PrivateKey = <private_key>
[Peer]
PublicKey = <public_key>
AllowedIPs = 10.0.0.2/32
Пройдемся по основным полям:
- PrivateKey & PublicKey. В процессе настройке можно вполне легко перепутать данные для вставки в поля PrivateKey и PublicKey при вставке в файлы конфигураций. Проверьте еще раз, что в этой части все правильно.
- ListenPort. У меня указан 51830, но вроде как 51820 согласно другим инструкциям тоже должен работать. Проблем тут быть не должно.
- AllowedIPs. По сути данное значение должно совпадать с указанным в файле настроек клиента.
- ⚡⚡⚡ PostUp & PostDown. Молния. Даже три. В инструкции указана такая строчка:
PostUp = iptables -A FORWARD -i %i -j ACCEPT; iptables -t nat -A POSTROUTING -o eth0 -j MASQUERADE
PostDown = iptables -D FORWARD -i %i -j ACCEPT; iptables -t nat -D POSTROUTING -o eth0 -j MASQUERADE
Данные команды выполняются при старте/останове wireguard сервера. Здесь нас интересуют значения %i и eth0.
Так понял значение %i является шаблоном для сетевого интерфейса, вместо которого в итоге подставляется конкретное значение. В моем случаем указал хардкодом ‘wg0’. Без этого у меня не работало.
Также вместо eth0 иногда требуется указать ваше значение сетевого интерфейса. Для просмотра сетевых интерфейсов можно использовать команду ifconfig -a в терминале VDS. В моем случае eth0, но может быть ens3 или другое значение. Если здесь указан неправильный интерфейс, то при просмотре статуса через команду systemctl status wg-quick@wg0.service видел ошибку в консоли. В моем случае правка относительно инструкции не понадобилась.
Пример моего файла mac.conf (файл клиента)
[Interface]
PrivateKey = <private_key>
Address = 10.0.0.2/32 # должно совпадать с указанным в wg0.cong в для настойки [Peer]
DNS = 1.1.1.1 # сами задаем DNS, можно 8.8.8.8 или любой другой
[Peer]
PublicKey = <public_key>
Endpoint = <ip_vds>:51830 # проверяем порт
AllowedIPs = 0.0.0.0/0 # пропускаем весь трафик через wireguard
PersistentKeepalive = 20
Основные момент прокомментировал по файлу.
Клиент настраивал на MacOS. Приложение WireGuard можно скачать из AppStore. Приложение в итоге рабочее, но не отличается многословностью в случае ошибок. Даже в кривыми конфигами подключается и горит зеленым. что появились строки — получено данных, отправлено данных, последнее рукопожатие. Пример скрина с удачно запущенным wireguard:
Напоследок замеры скорости по WI-FI:
10 часов назад, Gim12 сказал:
Поэтому и хочу уточнить что за правили и для чего оно?
В статье имеется в виду правило, по типу как на изображении

Но только адрес назначения нужно указать сеть за VPN-Сервером. В рамках статьи имеется в виду сеть 192.168.22.0/24
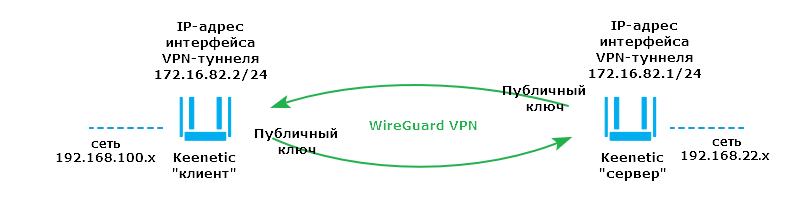
Такое правило на домашней сети vpn-клиента, по идее, не нужно, так как там не производится изменение security-level WG-интерфейса.
На vpn-сервере это правило необходимо, т.к. после изменения security-level WG-интерфейса на private, траффик из одного private интерфейса (Домашняя сеть) в другой private интерфейс (WG) блокируется. Подробнее о том из каких в какие что блокируется, а что нет, можно почитать https://help.keenetic.com/hc/ru/articles/360001429839-Как-реализован-межсетевой-экран
Have you ever set up a WireGuard VPN on a local machine and a remote VPS, only to find out that the local machine can’t access the Internet, even though the VPS can? On top of that, neither can ping each other’s IPs? It’s a frustrating issue, but the good news is that the fix is actually quite simple. This article will guide you through the surprisingly easy solution to this irritating problem, which turns out to be a minor setting misconfiguration.
In my setup, I’m using a Raspberry Pi as the local machine, configured to act as a WireGuard client. This Raspberry Pi is set up as a transparent proxy and is strategically placed between my Wi-Fi router and ISP modem. My remote VPS, located in Amsterdam, serves as the WireGuard server. The goal was to securely exit to the Internet from Amsterdam via a VPS. I went with DigitalOcean as my VPS provider, opting for their most budget-friendly option. Despite the WireGuard VPN connection being successfully established—confirmed by running the sudo wg show command on both my Raspberry Pi and the VPS—Internet connectivity remained elusive for my Raspberry Pi, and neither device could ping each other’s IPs.
Disclaimer: I want to make it clear that I’m not promoting DigitalOcean, nor am I being compensated for writing this article or endorsing their services. I’ve been using DigitalOcean for five years and have found its services beneficial for my specific needs, which is why I’ve chosen to share this information.
Your setup might differ from mine. For instance, you might be using WireGuard to connect to your home network while you’re out at a coffee shop. Regardless of your specific environment, the core issue discussed in this article and its solution should be applicable to you.
Prerequisites
Before diving into the process of fixing the WireGuard connectivity issues, ensure you meet the following prerequisites:
-
WireGuard Installed: Make sure WireGuard is installed and configured on both the WireGuard client and the WireGuard server.
-
Terminal Access on Both Devices: You’ll need terminal access on both the WireGuard client and the WireGuard server to run various commands. This guide includes Linux terminal commands for troubleshooting.
-
Root or Sudo Access: You’ll need root or sudo access on both the WireGuard client and the WireGuard server to execute commands required.
-
Basic Linux Skills: Familiarity with basic Linux terminal commands like
sudo,wg, andipis beneficial as you’ll be using the terminal to execute these commands for troubleshooting.
Once you’ve checked off these prerequisites, you’re all set to proceed with resolving the WireGuard connectivity issues.
Solution
The solution is very simple. The problem lies in the mismatched MTU (Maximum Transmission Unit) settings. This solution needs to be applied on both machines: the WireGuard client and the WireGuard server.
Reminder: First three steps should be performed on both the WireGuard client and the WireGuard server to ensure consistent settings.
To understand the issue, the first step is to check the MTU setting on your WireGuard client using the following command:
In my case the output is:
1: lo: <LOOPBACK,UP,LOWER_UP> mtu 65536 qdisc noqueue state UNKNOWN group default qlen 1000
2: eth0: <BROADCAST,MULTICAST,UP,LOWER_UP> mtu 1500 qdisc pfifo_fast state UP group default qlen 1000
3: eth1: <BROADCAST,MULTICAST,UP,LOWER_UP> mtu 1500 qdisc pfifo_fast state UP group default qlen 1000
6: wg0: <POINTOPOINT,NOARP,UP,LOWER_UP> mtu 1420 qdisc noqueue state UNKNOWN group default qlen 1000
Notice that the MTU for the WireGuard interface (wg0) is set to 1420, while other interfaces are set to 1500.
To resolve the issue, change the MTU setting for the WireGuard interface to match the system MTU, which in my case is 1500. This can be done with the following command:
sudo ip link set dev wg0 mtu 1500
After applying the fix, confirm that the MTU setting have been updated:
And the output is:
1: lo: <LOOPBACK,UP,LOWER_UP> mtu 65536 qdisc noqueue state UNKNOWN group default qlen 1000
2: eth0: <BROADCAST,MULTICAST,UP,LOWER_UP> mtu 1500 qdisc pfifo_fast state UP group default qlen 1000
3: eth1: <BROADCAST,MULTICAST,UP,LOWER_UP> mtu 1500 qdisc pfifo_fast state UP group default qlen 1000
7: wg0: <POINTOPOINT,NOARP,UP,LOWER_UP> mtu 1500 qdisc noqueue state UNKNOWN group default qlen 1000
You should now see that the MTU for wg0 matches the system MTU.
Now that you’ve successfully completed the previous three steps for your WireGuard client, it’s time to repeat those exact steps but for your WireGuard server. This ensures that both ends of the VPN tunnel are properly configured.
The final step is to verify that your WireGuard client (Raspberry Pi in my case) can access the Internet and ping the WireGuard server (remote VPS in my case).
Run the following command to ping the internal IP address of you WireGuard server:
ping [Your WireGuard servers IP address]
Run the following command to check the Internet access by pinging the public DNS resolver from Cloudflare:
Run the following command to check the Internet access by pinging the Google.com domain name:
If you get a response from these pings, then congratulations! You’ve successfully fixed the WireGuard connectivity issue.
Conclusion
Resolving WireGuard connectivity issues between a WireGuard client (Raspberry Pi in my case) and WireGuard server (remote VPS in my case) might seem daunting at first, especially when you’re faced with no Internet access and an inability to ping internal IPs. However, with the right guidance and a few simple commands, you can easily troubleshoot and fix this problem. By following this guide, you should now have a fully functional WireGuard setup that allows your client machine to securely access the Internet via your VPS without any headaches.
I hope this article has helped you successfully resolve the WireGuard connectivity issues in your setup. If you found this guide beneficial, feel free to leave a comment
Thank you for taking the time to read this article. May your network remain secure and efficient, powered by your perfectly configured WireGuard VPN!
Additional resources:
- WireGuard Official Site
- DigitalOcean WireGuard Tutorials
- Raspberry Pi Networking Guide
- Understanding MTU (Maximum Transmission Unit)
Readers help support VPNCentral. We may get a commission if you buy through our links.
Read our disclosure page to find out how can you help VPNCentral sustain the editorial team Read more
If you have no internet access while using WireGuard, I’m here to help you out.
A VPN is a great way to protect your online privacy. However, sometimes you might face connectivity issues while on the WireGuard protocol.
Best VPNs we’ve tested and recommend:
In this guide, I’ll help you troubleshoot and resolve the problem in no time. But first:
Perform preliminary checks
Before diving into complex solutions, let’s start with some basic checks:
1. Test your internet connection
Before suspecting any issues with WireGuard or your VPN app, ensure that your base internet connection is working correctly.
- Disconnect VPN: Turn off the VPN and try accessing the internet.
- Check different websites: Visit several websites to confirm the internet is working without a VPN.
- Restart your router/modem: Unplug your router/modem, wait for about 30 seconds, and plug it back in. Wait for it to fully restart and try connecting again.
2. Restart your device
A simple restart can often resolve a range of connectivity issues.
- Restart your computer: Fully shut down your computer and turn it back on. This can clear temporary glitches in the system.
- Reconnect to the network: After restarting, reconnect to your Wi-Fi or Ethernet network before activating the VPN.
3. Update your VPN app
Using an outdated VPN app can lead to compatibility and performance issues.
- Check for updates: Visit the official website of your VPN provider or check the app store (if applicable) for any available updates.
- Install updates: If an update is available, install it and restart the app to see if the issue is resolved.
4. Temporarily disable antivirus software
Sometimes, these security applications can interfere with VPN connections. Temporarily disable your antivirus program and check if the VPN works.
5. Test on a different device or network
This step helps determine if the issue is with your device or network.
- Different device: Try connecting to the VPN on another device using the same network.
- Different network: If possible, connect to a different network (like a mobile hotspot) and see if the VPN works there.
6. Consult the VPN app’s FAQ or Help section
Many VPN providers offer a FAQ or help section that addresses common connectivity issues.
- Look for guides: Check the VPN provider’s website for troubleshooting guides or FAQs.
- Specific instructions: Look for instructions specific to WireGuard or your device type.
By going through these preliminary checks, you can often identify and resolve basic issues that might be causing problems with your WireGuard VPN connection.
If these steps don’t solve the problem, you should get into more advanced troubleshooting:
How to fix the WireGuard no internet issue
If you’ve completed the preliminary checks and still experience issues with your WireGuard VPN connection, it’s time to delve into more detailed troubleshooting. Here’s a step-by-step guide:
1. Switch servers
Sometimes, the issue might be with the specific VPN server you’re connected to.
- Switch servers: Open your VPN app and look for the option to change servers. It’s usually labeled as Locations, Servers, or something similar.
- Choose a different server: Select a server in a different location. Ideally, choose one that’s geographically closer to you for better speed and stability.
- Reconnect: After switching servers, reconnect to the VPN and check if the internet access issue is resolved.
2. Check WireGuard’s settings in the app
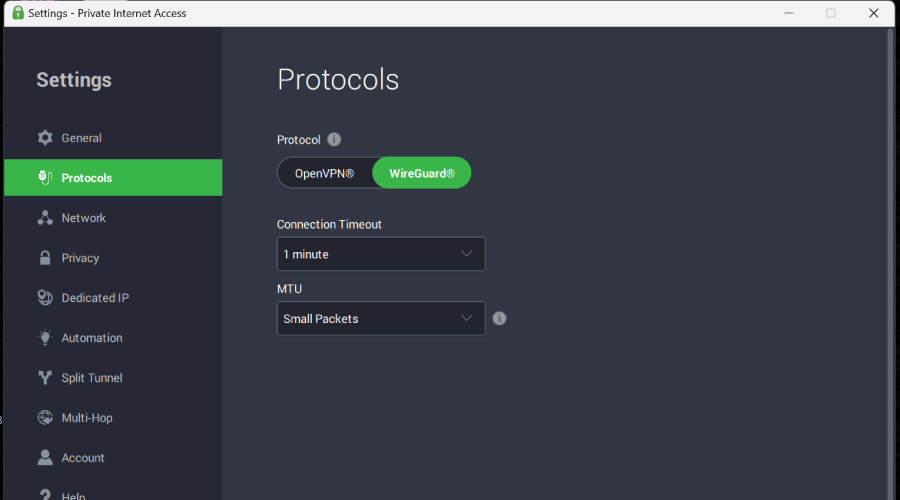
Ensure that WireGuard is correctly set as your VPN protocol.
- Access Settings: In your VPN app, go to the settings or preferences section.
- Locate Protocol Options: Look for a section labeled Protocol, VPN Protocol, or similar.
- Select WireGuard: Make sure WireGuard is selected as the active protocol. If it’s not, select it and save your changes.
3. Change your VPN’s DNS settings
Incorrect DNS settings can lead to connectivity issues.
To fix that:
- Find DNS settings: In the VPN app, look for DNS settings. This might be under Network Settings, Advanced Settings, or a similar section.
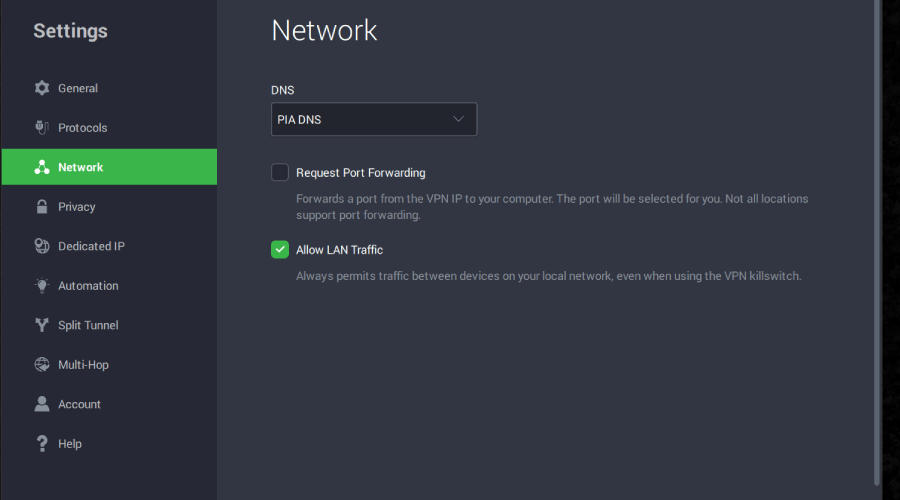
- Change DNS servers: If possible, change the servers to a public DNS service like Google DNS (8.8.8.8 and 8.8.4.4) or Cloudflare DNS (1.1.1.1).
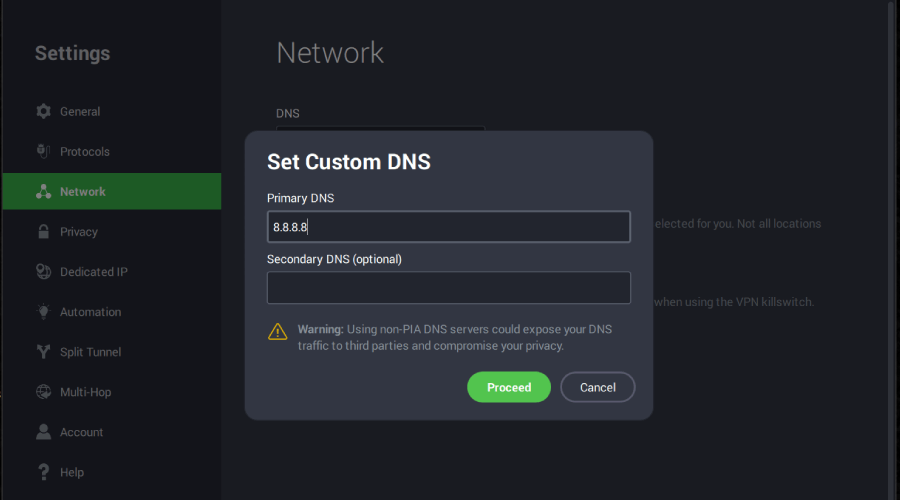
- Save and reconnect: Save your changes and reconnect to the VPN to test the new DNS settings.
4. Temporarily disable firewall
Disabling the firewall on your computer can be necessary for troubleshooting network issues, including WireGuard internet problems. Here’s how to do it:
For Windows:
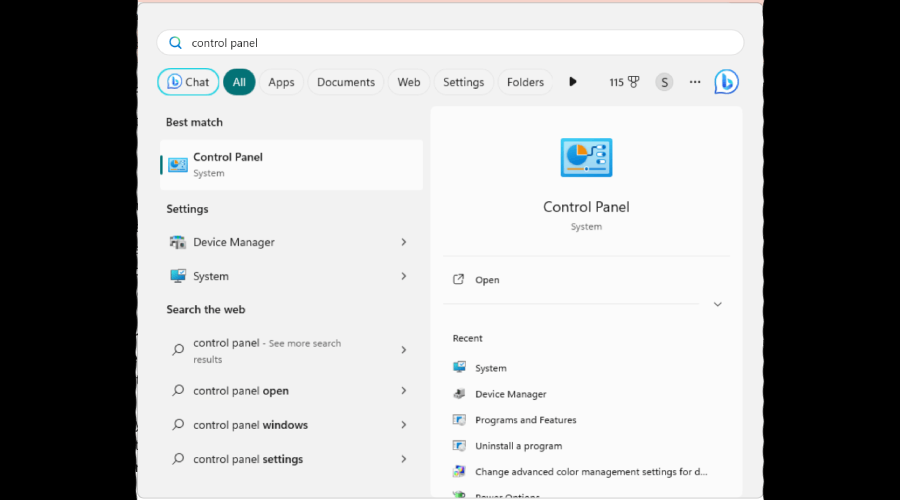
- Click on the Start menu or press the Windows key.
- Type “Control Panel” and click on the Control Panel app to open it.
- In the Control Panel, find and click on System and Security.
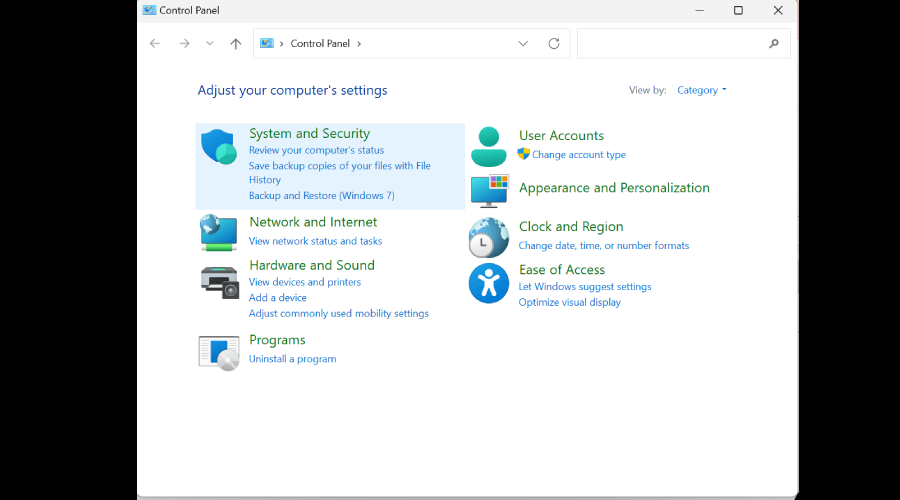
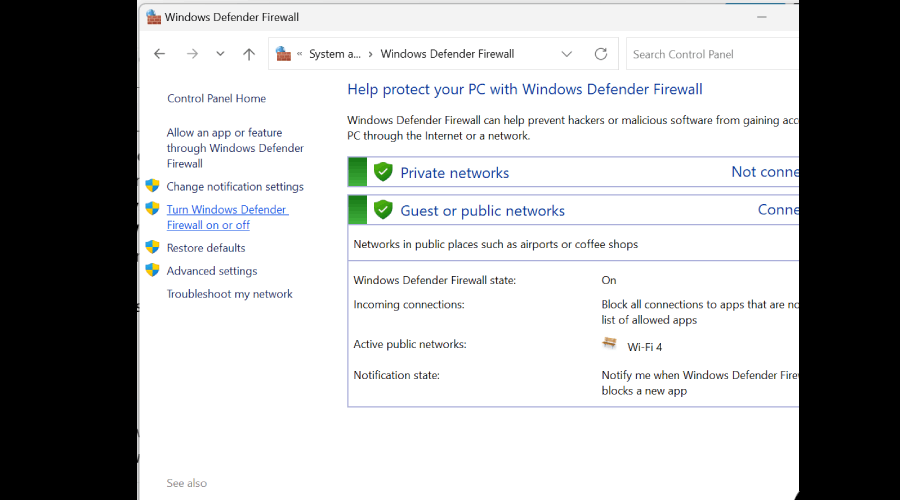
- Within System and Security, click on Windows Defender Firewall.
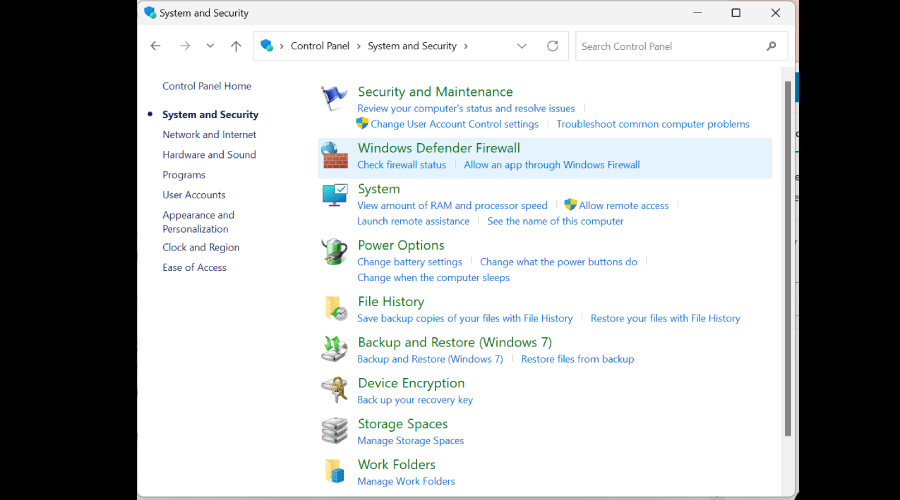
- On the left-hand side, you’ll see an option that says Turn Windows Defender Firewall on or off. Click on it.
- Under both the Private network settings and Public network settings, select the option Turn off Windows Defender Firewall.
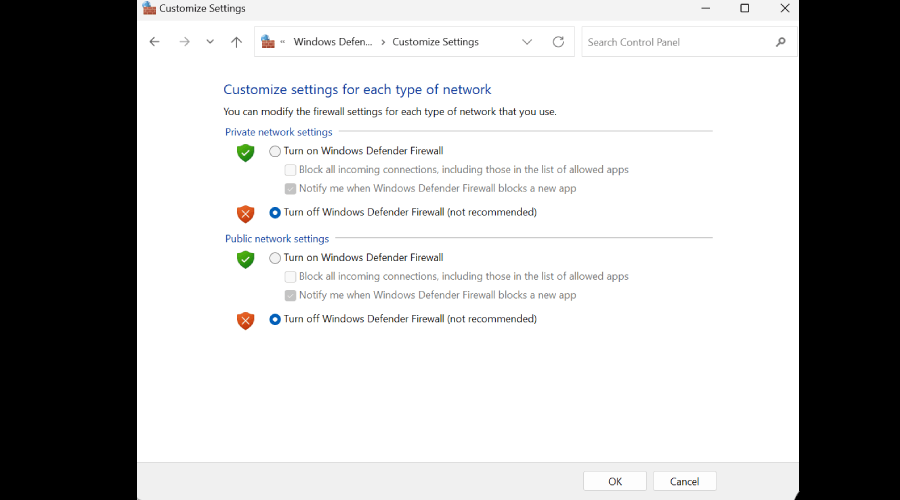
- Be cautious about turning off the firewall for public networks, as this can significantly increase security risks.
- Click OK to save your changes.
- Once you’re done troubleshooting, follow the same steps to turn your firewall back on. This time, select Turn on Windows Defender Firewall under both settings.
For macOS:
- Click on the Apple icon in the top left corner of your screen.
- Select System Settings from the drop-down menu.

- In System Settings, click on Network.
- In the Network window, go to the Firewall tab.
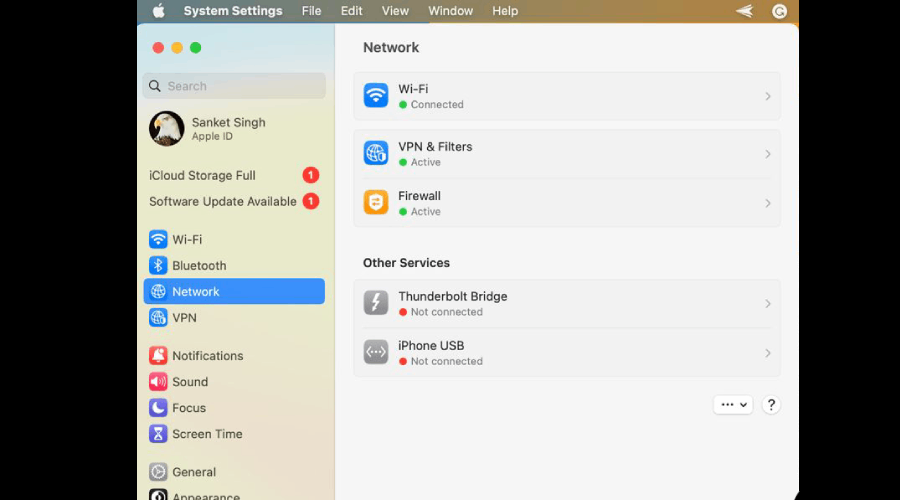
- If the settings are greyed out, click the lock icon at the bottom left of the window.
- Enter your administrator password to make changes.
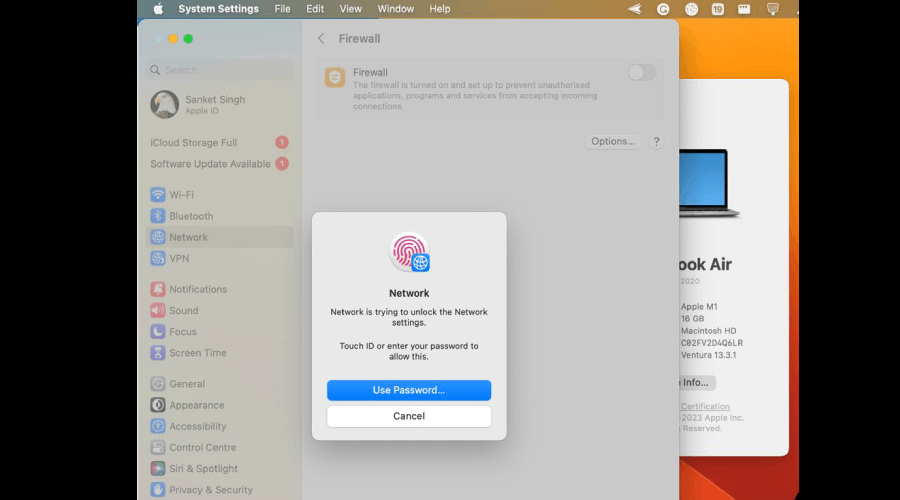
- Click the Turn Off Firewall button to disable the firewall.
- After finishing your troubleshooting, ensure you go back and turn the firewall back on for your protection.
Remember, while your firewall is off, your computer is more exposed to security risks. Always make sure to turn it back on as soon as possible after completing your troubleshooting tasks.
5. Tweak network adapter settings
Changing the adapter settings is a common step in troubleshooting network issues on a Windows computer. Here’s a step-by-step guide to help you through the process:
- Right-click on the Start menu and select Network Connections.
- alternatively, press Windows Key + I to open Settings, then go to Network & Internet.
- In the Network & Internet settings, scroll down and click on Change adapter options under the Advanced network settings section.
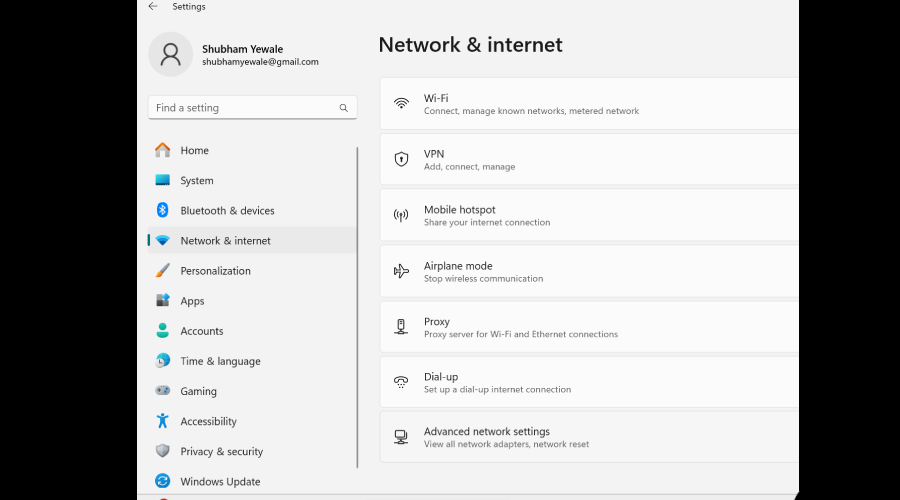
- In the Network Connections window, you’ll see a list of network adapters. These could include Ethernet, Wi-Fi, or others like VPN adapters.
- Expand the network adapter you want to configure (e.g., Ethernet or Wi-Fi) and select Edit.
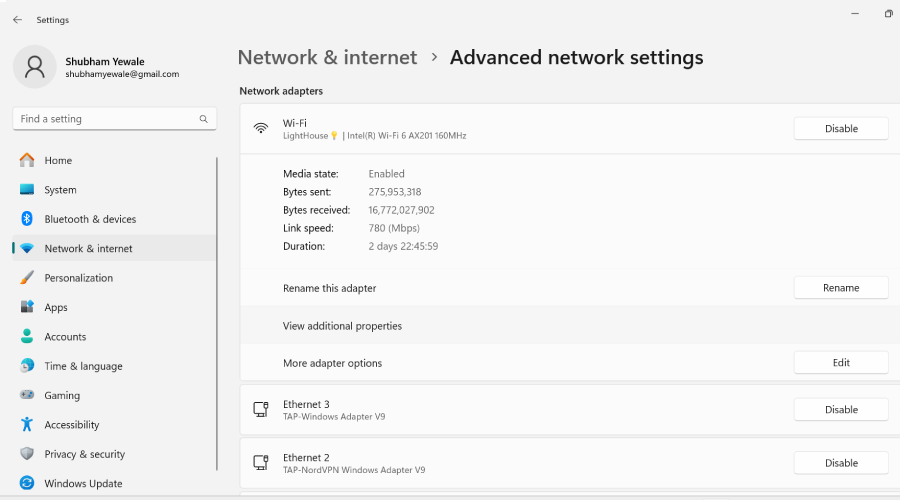
- Select Properties from the context menu.
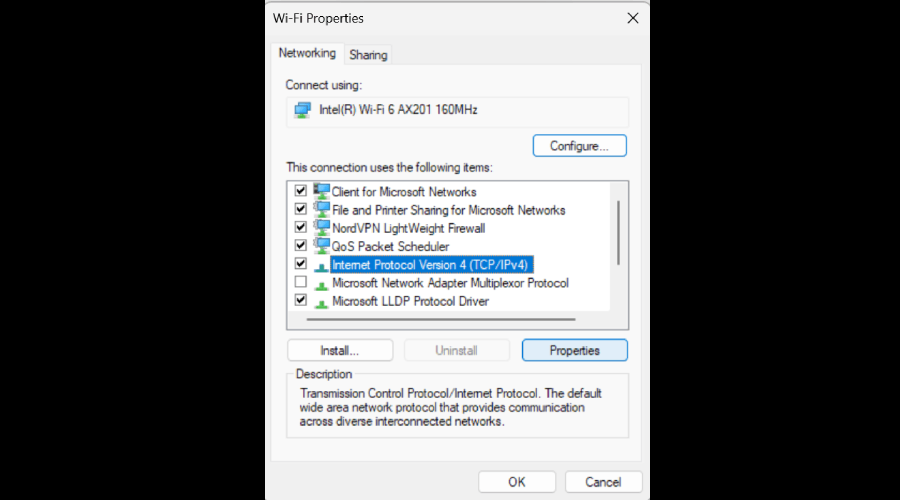
- In the Properties window, you will see a list of items used by the adapter. Here are some common changes you might need to make:
- To Change IP Settings: Select Internet Protocol Version 4 (TCP/IPv4) or Internet Protocol Version 6 (TCP/IPv6) and click Properties. Here, you can switch between obtaining an IP address automatically and using a specific IP address.
- To Change DNS Settings: In the same Internet Protocol Version 4 (TCP/IPv4) or Internet Protocol Version 6 (TCP/IPv6) properties, you can set the DNS server addresses at the bottom of the window. You can choose to obtain a DNS server address automatically or use specific DNS server addresses (like Google DNS: 8.8.8.8 and 8.8.4.4).
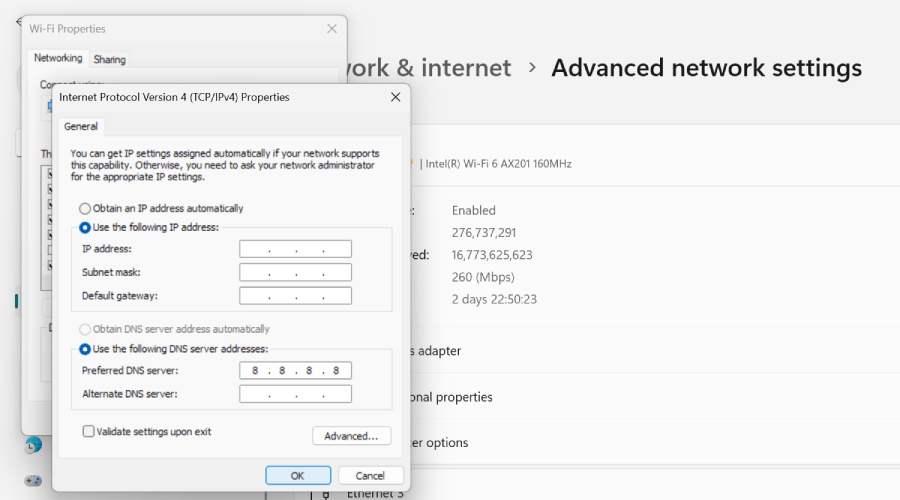
- After making the necessary changes, click OK to save. You might need to restart your computer or disable and re-enable the adapter for the changes to take effect.
- Once you’ve saved your changes and restarted your adapter or computer, check to see if your network issue is resolved.
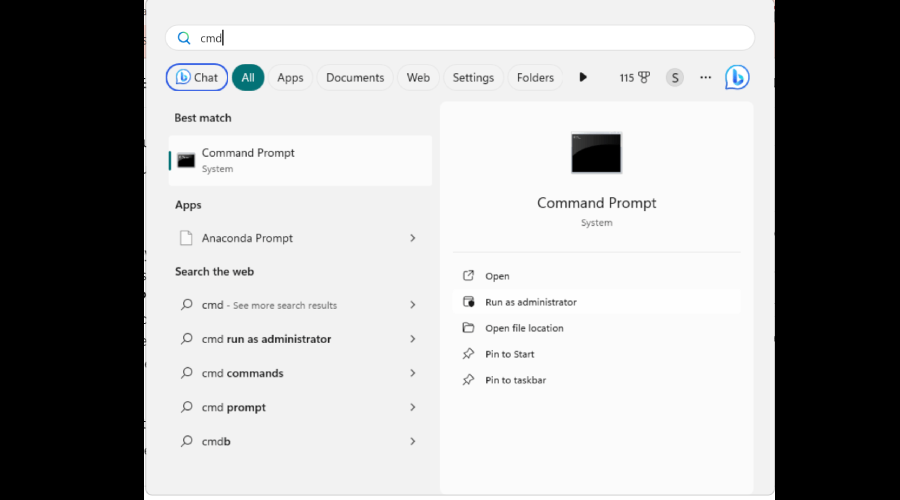
6. Flush DNS cache
Here’s a step-by-step guide to flush the DNS cache on both Windows and macOS. You need to have administrator rights to use this option.
For Windows:
- Press Windows Key + R to open the Run dialog.
- Type cmd and press Enter or click OK. This opens the Command Prompt.
- In the Command Prompt window, type the following command: ipconfig /flushdns
- Press Enter. This command clears the DNS cache.
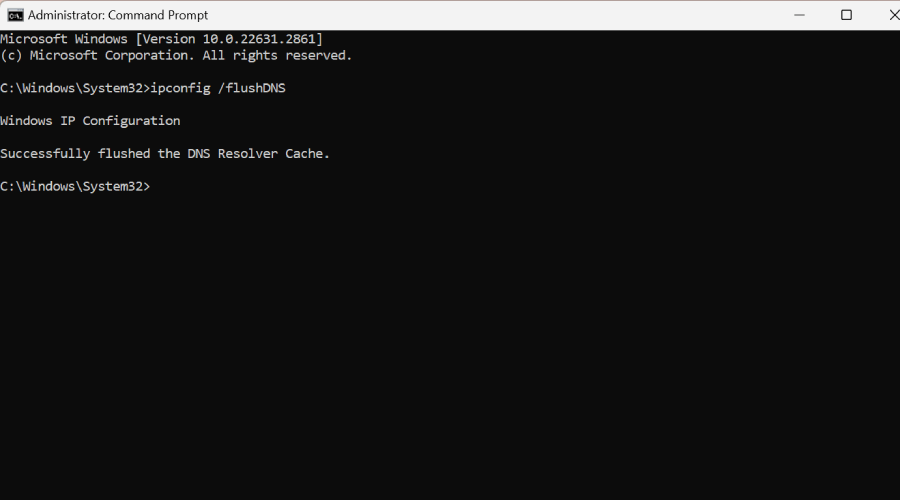
- After executing the command, you should see a confirmation message like: Successfully flushed the DNS Resolver Cache.
- You can now close the Command Prompt window.
Try accessing the website or service you were having trouble with. Flushing the DNS cache often resolves connectivity issues related to DNS.
For macOS:
- Go to Finder, then Applications, and then Utilities. Find and open Terminal.
- Alternatively, you can use Spotlight by pressing Command + Space, typing “Terminal”, and pressing Enter.

- The command to flush DNS cache varies slightly depending on your version of macOS:
- For macOS Sierra and later: Type sudo killall -HUP mDNSResponder and press Enter.
- For OS X Yosemite: Type sudo discoveryutil mdnsflushcache and press Enter.
- For OS X Mavericks, Mountain Lion, and Lion: Type sudo killall -HUP mDNSResponder and press Enter.
- For Mac OS X Snow Leopard: Type sudo dscacheutil -flushcache and press Enter.
- If prompted, enter your administrator password. This is the password you use to log in to your Mac. Note that the password won’t be visible as you type.
- Unlike Windows, macOS doesn’t typically show a confirmation message. If you don’t see an error message, the command has executed successfully.
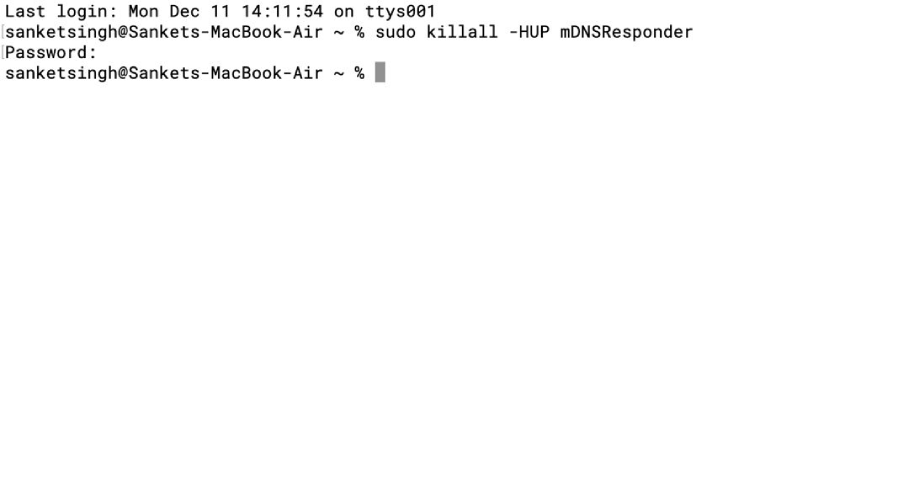
- You can now close the Terminal window.
- Try accessing the website or service again to see if the issue is resolved.
7. Reinstall your VPN app
A fresh installation can sometimes fix unexplained issues.
- Uninstall the App: Go to your system’s application settings and uninstall the VPN app.
- Download Latest Version: Visit the VPN provider’s website and download the latest version of the app.
- Install and Reconnect: Install the app, log in, and try connecting to the VPN again.
8. Change your VPN provider
If all of the above solutions fail, then your current VPN may be at fault.
By switching to a VPN like Private Internet Access, you not only enhance your chances of resolving connectivity issues but also benefit from improved security and privacy features.
Installing PIA is straightforward. Here’s how you can do it on Windows and macOS:
- Visit PIA’s website and pick a subscription.
- Download the right app for your operating system.
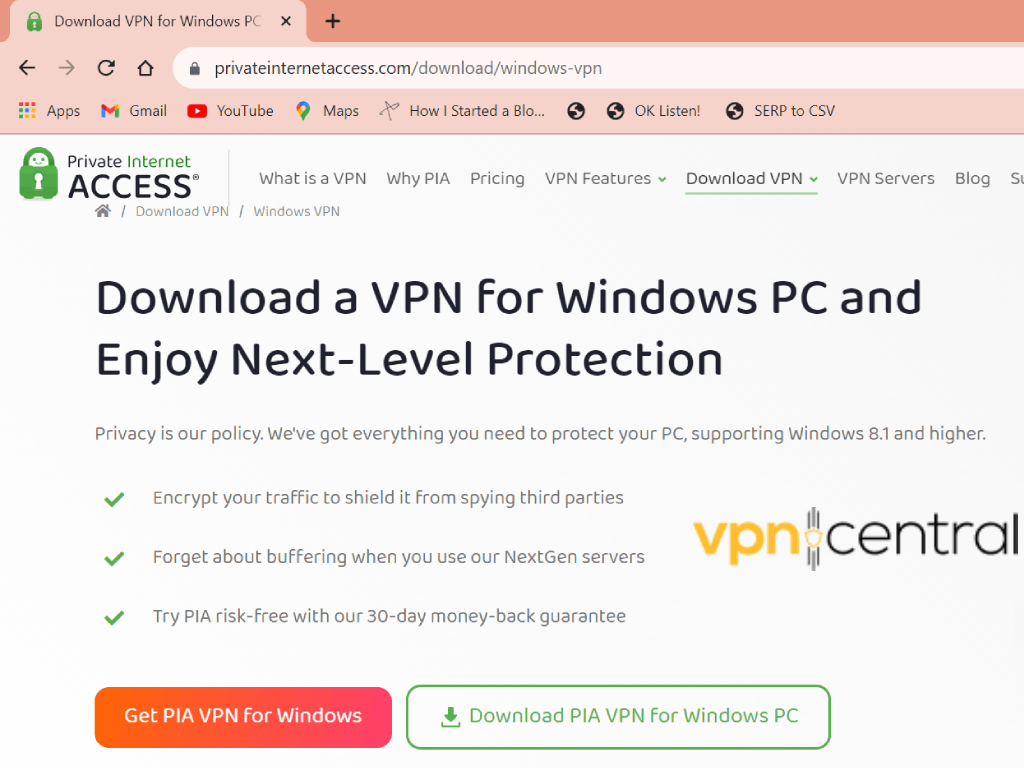
- Open the installer file and follow the on-screen instructions.
- Open the PIA app and log in with your credentials.
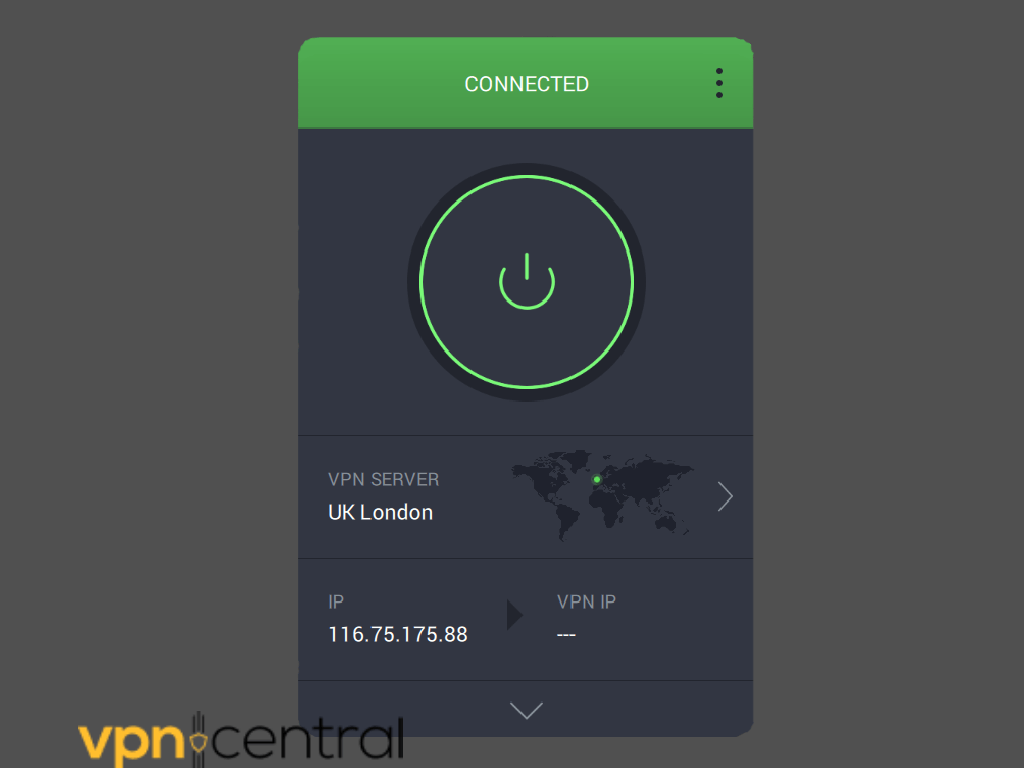
- Select a server based on country or region and click Connect to establish a VPN connection.
Private Internet Access
Enjoy a smooth connection and top-notch security and performance with this leading VPN provider.
Conclusion
Troubleshooting VPN problems can be a bit daunting, but by following these steps, you can resolve the no internet issue with WireGuard.
Just start with the easiest fixes and work your way down the list until you find one that works.
Shubham Yewale
Technical Writer
With a passion for technology, Shubham likes to solve computer/internet issues. He prides himself in helping others with his findings.