
С февраля 2022 года каждый пользователь в составе своего тарифа получает возможность использования сервера WireGuard и устанавливать одно подключение к нему из сети Интернет.
Соединение WireGuard является дополнительным к вашим существующим туннелям и использование WireGuard не считается туннелем в рамках тарифного плана.
В рамах базового тарифа пользователю предоставляются 2 туннеля с протоколами PPTP, L2TP, L2TP/IPsec, IKEv2/IPsec, SSTP, OpenVPN, Openconnect и дополнительно одно соединение по протоколу WireGuard. Таким образом, каждый пользователь сможет одновременно установить три соединения к VPNKI.
Соединение WireGuard отличается еще и тем, что пока в нем нет возможности маршрутизации сетей, расположенных «за маршрутизатором», но мы планируем добавить такую возможность несколько позже.
Так как протокол WireGuard использует другую архитектуру, то логика его настройки на сервере VPNKI отличается от традиционной.
Мы хотим получить удаленный доступ к своей сети из Интернет с использованием протокола WireGuard. При этом наша сеть уже подключена к VPNKI по любому из протоколов — PPTP, L2TP/Ipsec, OpenVPN.
В качестве клиентского ПО мы будем использовать клиентское ПО WireGuard для Windows. Компьютер с клиентом WireGuard будет расположен в Интернет.
В момент подключения, в вашем клиентском ПО WireGuard будет создан туннельный интерфейс и использован адрес 172.16.0.3 сети VPNKI. Ну а хотим мы «достучаться» до сервера с адресом 192.168.1.10 в домашней сети.
Схема представлена здесь.

1. Подготовка сервера
Основная особенность WireGuard состоит в том, что у него нет понятия клиент и сервер, а все соединения равнозначны.
Однако в нашей терминологии мы будем использовать слово «Сервер» применительно к тому WireGuard, который запущен на сервере VPNKI, а термин «Клиент» будем применять к Wireguard, который запущен на вашем компьютере с Windows.
Сначала нам будет необходимо сконфигурировать сервер WireGuard на VPNKI. Этот процесс состоит из двух шагов:
- Выбор порта UDP на котором будет «слушать» ваш сервер WireGuard и ожидать подключения из сети Интернет.
- Предварительная конфигурация сервера WireGuard — назначение приватного и публичного ключей сервера.
1.1. Начнем с выбора UDP порта. На главной странице туннелей выберите галочку «Использовать доступ через WireGuard».

Сервер выберет доступный UDP порт, на которому будет «слушать» ваш сервер WireGuard.

В данном примере система выбрала порт 26005 ( у вас будет какой-то другой). После завершения выбора порта можно переходить к предварительной конфигурации сервера.
1.2. На этом шаге система подготовит публичный и приватный ключи вашего сервере WireGuard.
Приватный ключ сервера VPNKI сохранит у себя, а вот публичный ключ покажет вам. Он будет необходим для корректной конфигурации вашего клиента WireGuard на ПК с ОС Windows.

Нажмите «Создать сервер WireGuard«.

После генерации ключей система подготовила вам Публичный ключ сервера: Clu9YfM1KD8C+zl11fob2QDUiZcV1wqJzUOwihmavHA=. (у вас он будет какой-то другой).
На этом этап подготовки завершен и можно переходить к конфигурации клиента.
2. Установка клиента WireGuard
2.1. Установите ПО WireGuard на ваш ПК с ОС Windows, скачав пакет с официального сайта.
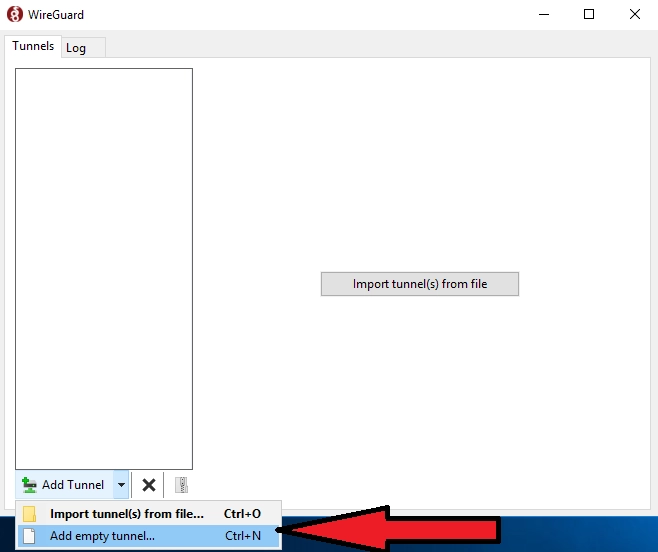
После установки вам будет необходимо создать новое соединение. Делается это в меню»Добавить туннель» и дальше нужно выбрать «Добавить пустой туннель».

После добавления пустого туннеля вам будет сгенерирован приватный и публичный ключи клиента. Эти ключи будут показаны на следующем экране. Нас будет интересовать только Публичный ключ (поле 1).

2.2. Назовите как-нибудь соединение (например VPNKI) и нажмите «Сохранить«.

Теперь у вас есть предварительно сконфигурированное подключение, но это еще не полная его конфигурация.
Мы вернемся к нему чуть позже, а пока пришло время сообщить серверу публичный ключ клиента, а клиенту сообщить публичный ключ сервера. Вроде бы просто, но путаница возникает часто.
Выделите и скопируйте в буфер обмена Публичный ключ (поле 1). Сейчас мы перейдем к серверу VPNKI и укажем его там в настройках подключения.
3. Конфигурация подключения на сервере VPNKI
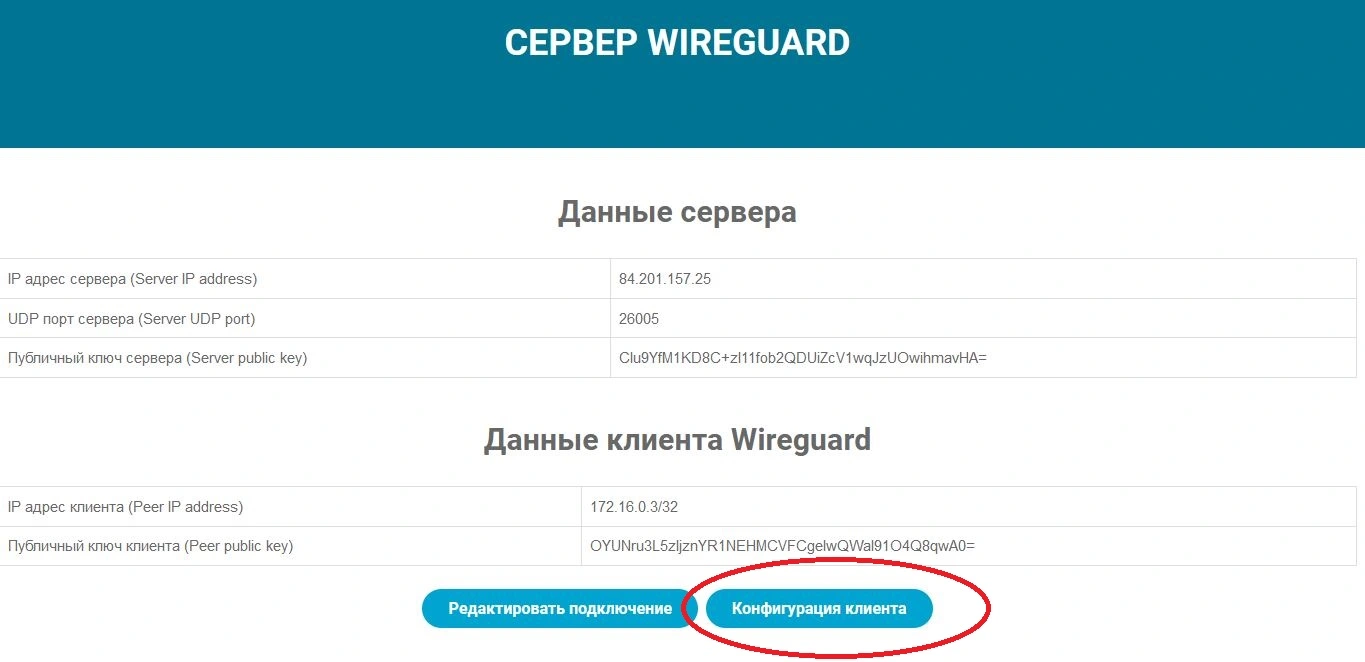
3.1. Вернитесь к экрану настройки сервера Wireguard и в разделе «Данные клиента» нажмите «Создать подключение».

3.2. На следующем экране вам предложат ввести «Публичный ключ клиента».

3.3. Вставьте Публичный ключ клиента из буфера обмена (который вы скопировали туда на шаге 2.2) и нажмите «Сохранить».
!!! Обратите внимание, что ключ всегда имеет длину 44 символа, последний из которых знак равенства =.

3.4. После сохранения публичного ключа клиента на сервере запустится процесс WireGuard и он будет готов принимать подключение.

Теперь осталась одна деталь… надо окончательно сконфигурировать клиента и попробовать подключиться.
4. Завершение конфигурации клиента WireGuard на ПК с ОС Windows для подключения
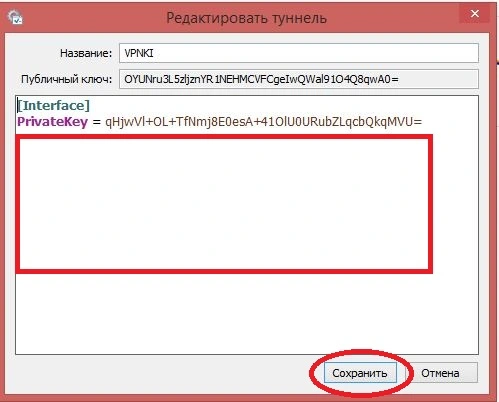
4.1. Завершим конфигурацию клиента. Для этого войдем в режим редактирования ранее созданного подключения при помощи кнопки «Редактировать«.
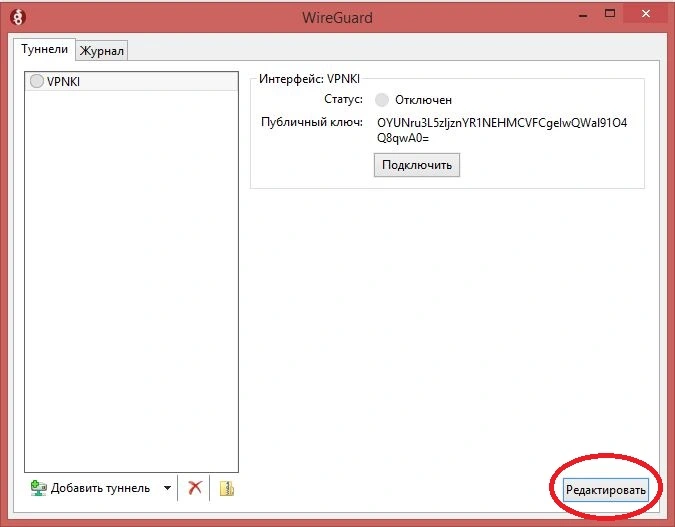
4.2. Теперь вам нужно дозаполнить данные, которые будут описывать сервер и его данные. Это описание должно будет располагаться в месте красной рамки.
Взять эти данные для заполнения нам предстоит на сервере VPNKI. Для этого нажмите на кнопку «Конфигурация клиента».
Откроется окно с данными, которые вам будет необходимо перенести в конфигурацию вашего клиентского подключения.
На скриншоте ниже показаны два окна — окно сервера VPNKI и окно редактирования клиентского подключения. Рамкой отомечен тот текст, который вам нужно будет скопировать и вставить.
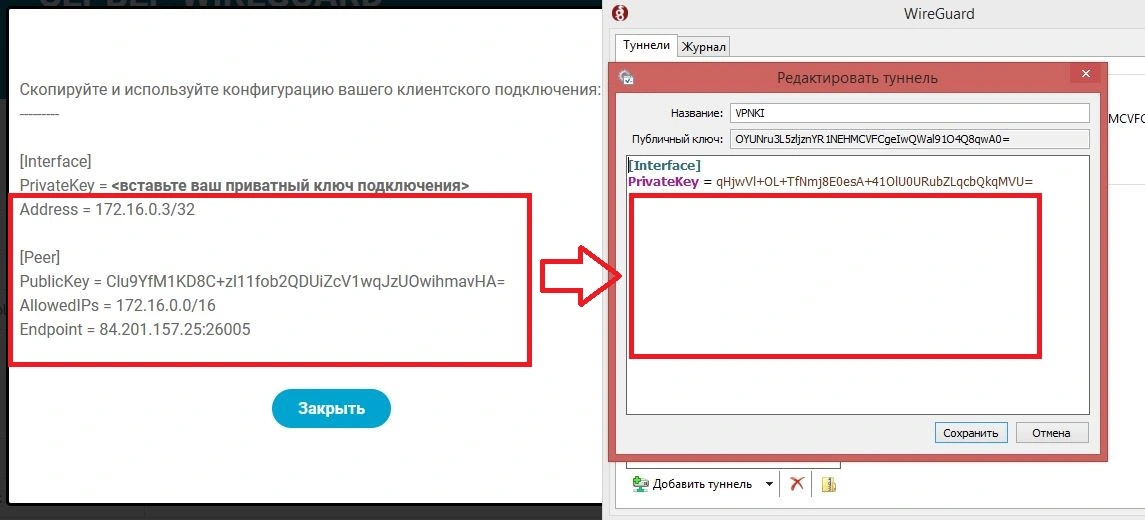
Вот так:
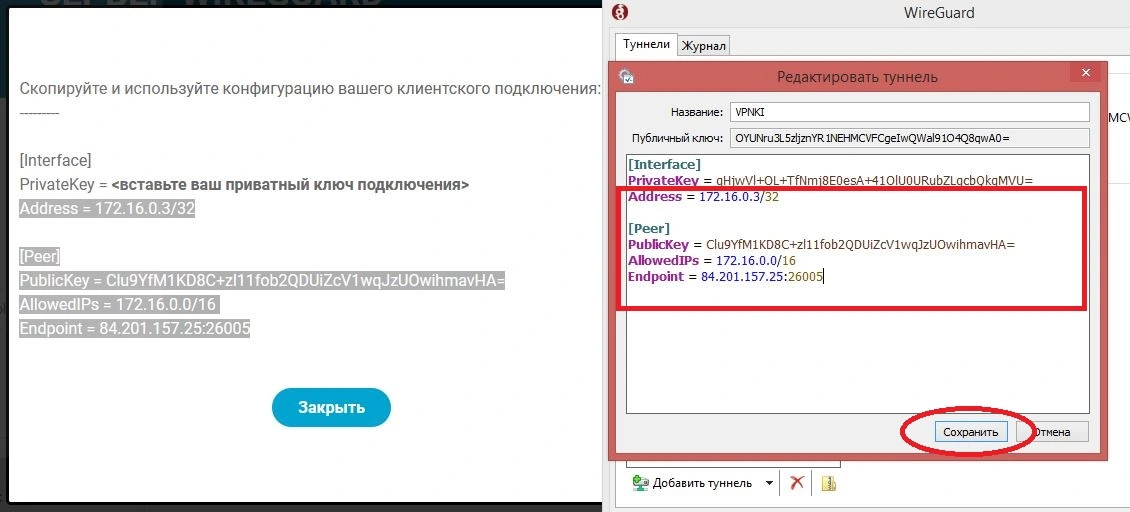
Нажмите «Сохранить«.
Теперь ваше клиентское подключение полностью сконфигурировано и готово к подключению. После сохранения вы увидите полную конфигурацию вашего клиента.
Однако перед нажатием кнопки подключиться давайте все еще раз проверим и поясним детали.
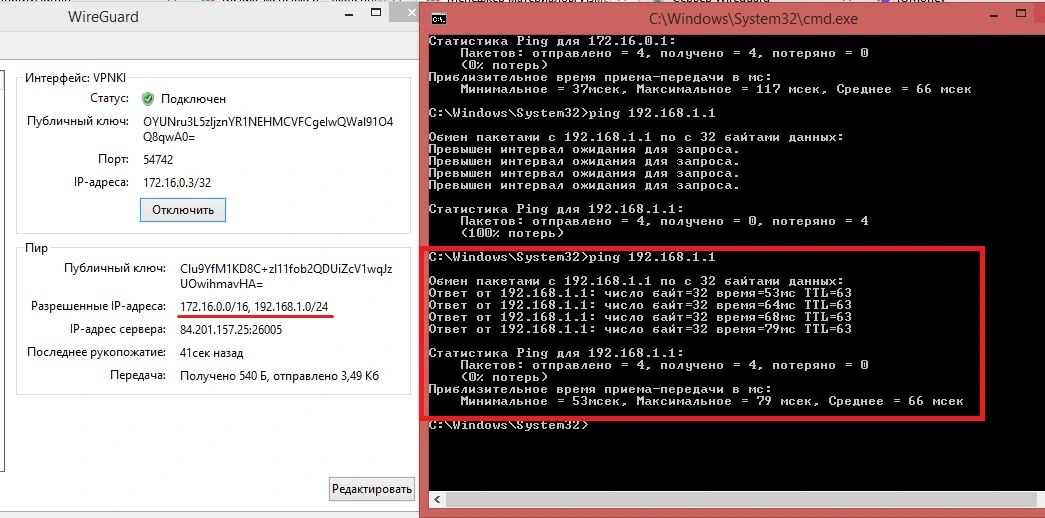
- В вашей настройке соединения на клиентском ПО верхняя часть описывает ваш собственный интерфейс. Хоть мы его и назвали VPNKI, но это ваш интерфейс. Он пока отключен. Его публичный ключ — OYUNru3L5zljznYR1NEHMCVFCgeIwQWal91O4Q8qwA0= IP адреса:172.16.0.3/32 это адрес, который будет использован на вашем интерфейсе после успешного подключения.
- Нижняя часть (Пир) описывает сервер. Публичный ключ сервера — Clu9YfM1KD8C+zl11fob2QDUiZcV1wqJzUOwihmavHA= Адреса, при обращении к которым, трафик вашего клиента пойдет в туннель WireGuard — 172.6.0.0/16. Это адреса вашей сети VPNKI. То есть при успешном подключении из Интернет пинг с вашего ПК, отправленный по адресу 172.16.0.1 пойдет в интерфейс WireGuard, а не куда-либо еще. По сути, это правило для таблицы маршрутизации вашего ПК. Ну и в завершении — IP адрес сервера и порт — 84.201.157.25:26005. Это то, куда ваш клиент будет подключаться из Интернет используя протокол UDP. Наверное все.
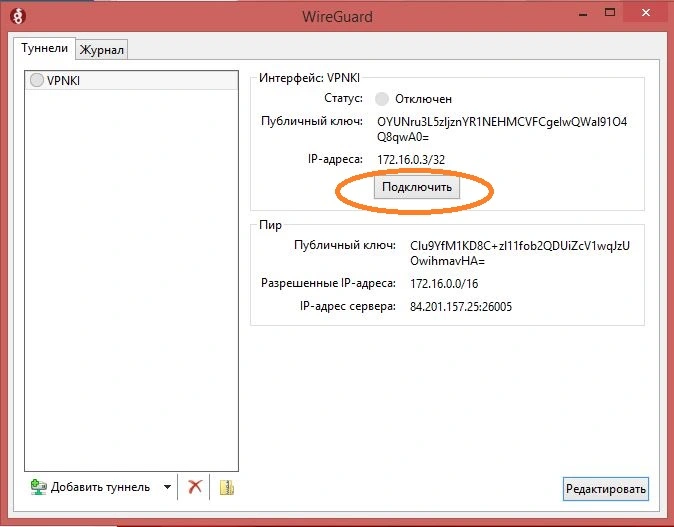
Теперь можно попробовать подключиться. Но ….
5. Подключаемся снаружи
Обратите внимание, что эта инструкция подразумевает, что ваш клиентский ПК расположен в сети Интернет. Но если сейчас ваш ПК подключен к домашней сети, которая, в свою очередь, уже подключена к VPNKI то имеет смысл выключить этот ПК из домашней сети и подключить его, например, к сотовому оператору связи.
Если ваш ПК уже в Интернет, то нажимайте Подключить и смотрите за результатом.
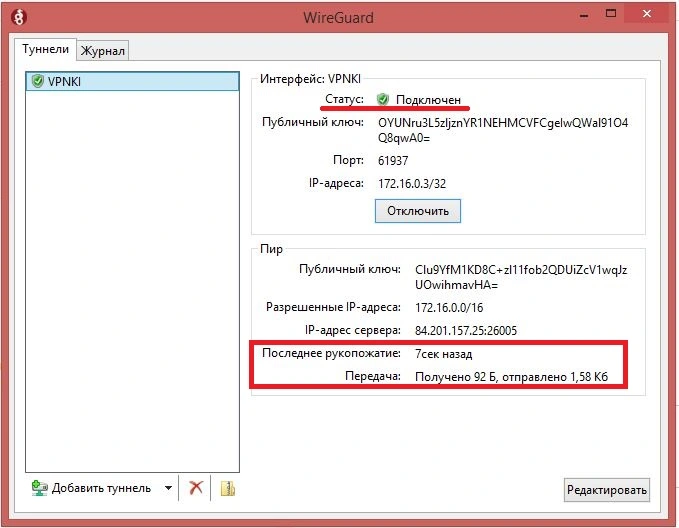
На скриншоте показано успешное подключение. Давайте попробуем выполнить пинг сервера VPNKI по туннелю WireGuard — ping 172.16.0.1.
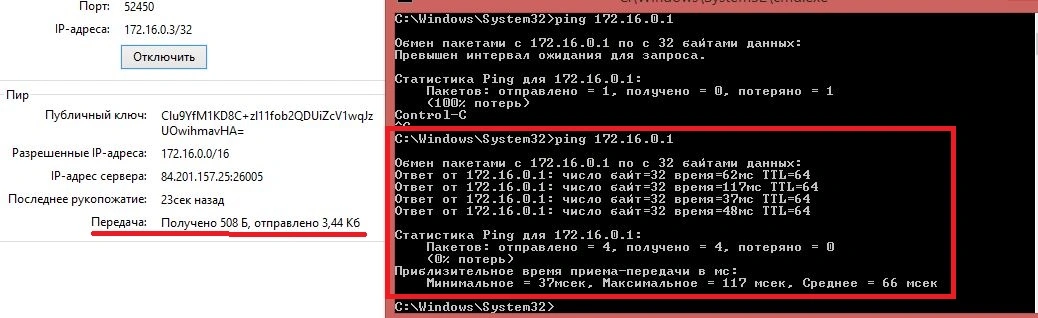
Пинг успешен. Это хорошо. Но как быть если нужно выполнить пинг, например, адреса 192.168.1.1, который расположен где-то в вашей сети VPNKI.
С текущими настройками это будет невозможно. Потому что ваш клиент просто не отправляет пакеты к адресу 192.168.1.1 в интерфейс Wireguard. Вот пинг и не успешен…
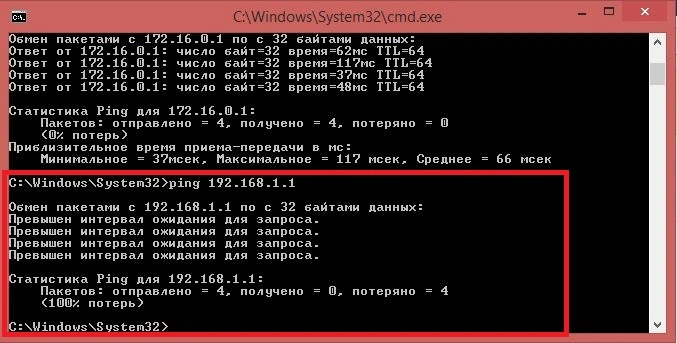
Давайте добавим маршрут к вашей сети 192.168.1.0/24 через интерфейс WireGuard. Для этого остановим соединение и внесем изменение в настройки подключения на вашем клиенте. А именно …

Добавим через запятую нужные адреса сетей, которые должны быть доступны через туннель WireGuard, сохраним настройки, переподключитмся и выполним пинг 192.168.1.1 .
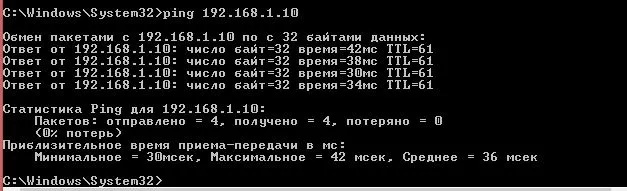
Вот теперь все успешно. И в завершение можно выполнить пинг адреса сервера в домашней сети — 192.168.1.10.
Теперь все.
PS: В процессе написания инструкции мы обратили внимание на некоторые странности в работе ПО WireGuard под Windows. При попытке подключения в статусе содинения может быть написано «Подключен», но при этом не появляется статистика числа переданных и полученных байт. Ну и фактически трафик по туннелю не передается. Поэтому больше доверяйте статистике, чем самому статусу подключения. Если статистика есть — значит туннель работает.
Спасибо за внимание и успехов в пингах!
*** WireGuard пока в тестовом режиме, если вдруг что-то не получилось, обращайтесь на Форум.
A few months ago, I wrote a tutorial on installing WireGuard, a simple, fast, and modern VPN, on Linux and opening a VPN connection from an Android device. Because I work most of the time on Windows, I was also especially interested in connecting my computer to a WireGuard VPN, but there was no Windows client available at that time.
In the meantime, the developers of WireGuard released a Windows version. This blog post shows you how to install and configure WireGuard on Windows and establish a VPN connection to a WireGuard server running on a VPS.
This tutorial assumes that you already have a WireGuard server running somewhere.
I connect the Windows client to a WireGuard server running on Amazon Lightsail, which is set up according to my previous blog post. If you follow my previous tutorial, skip the client setup section, and you also don’t have to generate the public/private key pair for the client.
The topology of our VPN that we will build in this tutorial looks like this:
I’m using WireGuard in this example as a VPN and route all IP traffic from my Windows computer to the Internet through the Linux server.
You can also use WireGuard to connect to a private network like a company LAN or connect two private networks over the public Internet; however, I will not cover these use cases.
Installation 
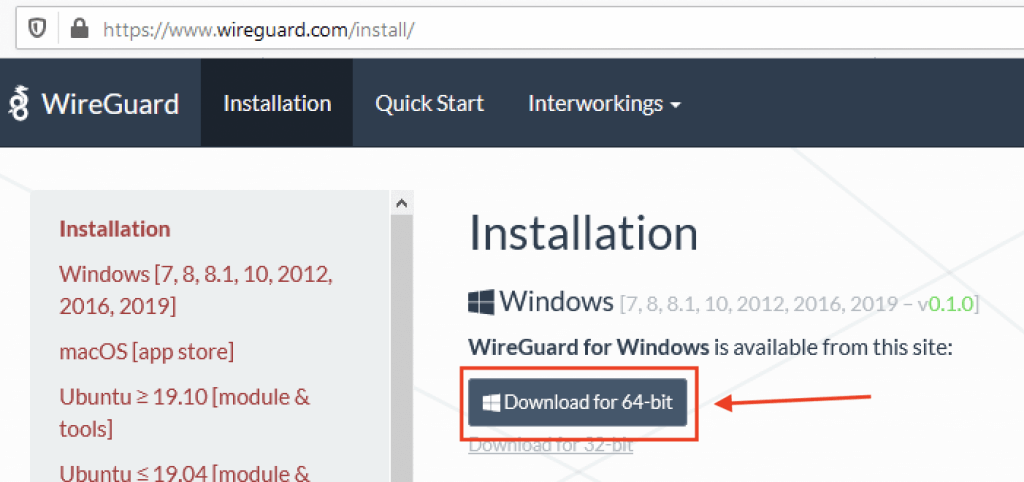
The first step is to download the software from the download page:
https://www.wireguard.com/install/
Install the msi file. After the installation, you should see the WireGuard icon in the icon bar.
WireGuard for Windows runs on Windows 7, 8, 8.1, 10, 2012, 2016, and 2019 and is available in a 64-bit and a 32-bit version. I’m testing the 64-bit version on Windows 10.
Be aware that all the WireGuard software packages are in a pre-release state and should only be used for testing. If you are concerned about security, I recommend waiting until the official release, and an independent third party has audited the software.
Configuration 
Next, we configure the VPN tunnel. This includes setting up the endpoints and exchanging the public keys.
Windows 
Open the WireGuard GUI and click on Add Tunnel -> Add empty tunnel…
The software automatically creates the public/private key pair and displays it on the screen.
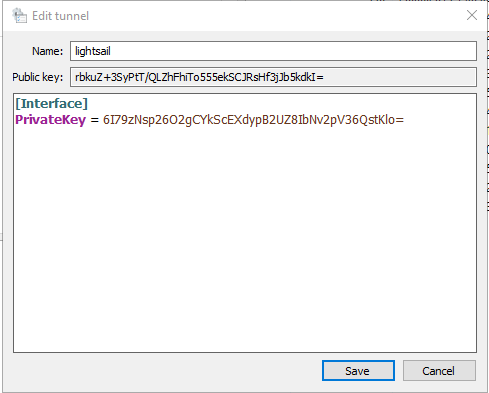
Give the tunnel a name and insert the following configuration. Change IP addresses and keys according to your environment.
[Interface]
PrivateKey = 6I79zNsp26O2gCYkScEXdypB2UZ8IbNv2pV36QstKlo=
Address = 192.168.2.2/32
DNS = 192.168.2.1

[Peer]
PublicKey = uZik78EWgYCLQRMdG6k6QK0mzHFqfr4uhOEjPyXe5WE=
AllowedIPs = 0.0.0.0/0
Endpoint = 35.174.118.17:54321
- PrivateKey: Private key of this client
- Address: IP address of this client. It must be unique among all clients.
- DNS: IP address of a DNS server. In this case, I use the DNS server running on the WireGuard server.
- PublicKey: Public key of the server
- AllowedIPs: Specifies what IP addresses should be routed over the VPN. For example, 0.0.0.0/0 is a catch-all configuration and routes everything over the VPN.
- Endpoint: External IP address of the server and listening port. Port must match the
ListenPortserver configuration.
Server 
On the server-side, you need to add a [Peer] section to the WireGuard configuration file (/etc/wireguard/wg0.conf)
[Peer]
PublicKey = rbkuZ+3SyPtT/QLZhFhiTo555ekSCJRsHf3jJb5kdkI=
AllowedIPs = 192.168.2.2/32
- PublicKey: Public key of the Windows client
- AllowedIPs: Specifies what IP addresses are allowed through this tunnel. This is the VPN IP address of the Windows computer.
Here is a screenshot showing the Windows client (left) and the Linux server (right) configuration.
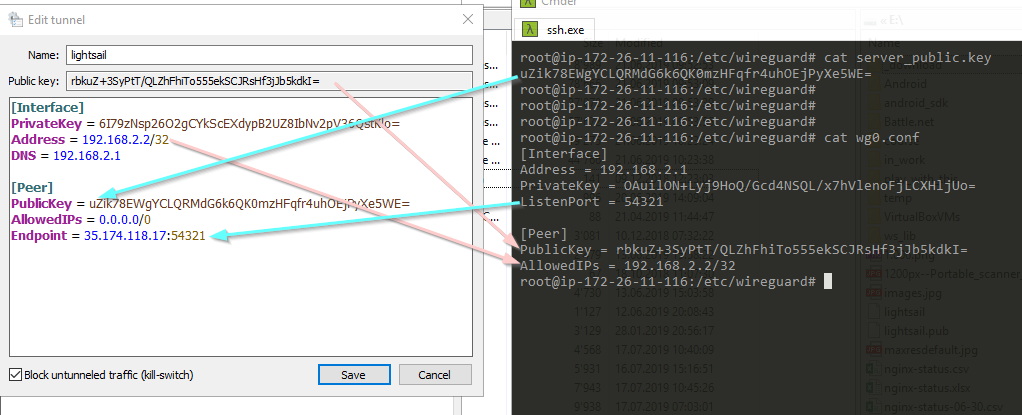
Ensure that you exchange the correct keys and the IP addresses are correct.
Block untunneled traffic 
You might notice the option Block untunneled traffic.
You can enable this option when your configuration has precisely one [Peer] section and AllowedIPs is set to a catch-all address.
If the option is enabled, the WireGuard client adds Windows Firewall rules to block all traffic that is neither to nor from the tunnel interface.
As mentioned before, I use this configuration to route all IP traffic through the VPN, so it makes sense to enable this option to prevent accidentally sending IP packets outside the VPN.
If you use WireGuard to connect to a private network, like a company LAN or your home network, you don’t need to enable this option. Instead, configure AllowedIPs so that only your private network IP addresses are routed through the VPN.
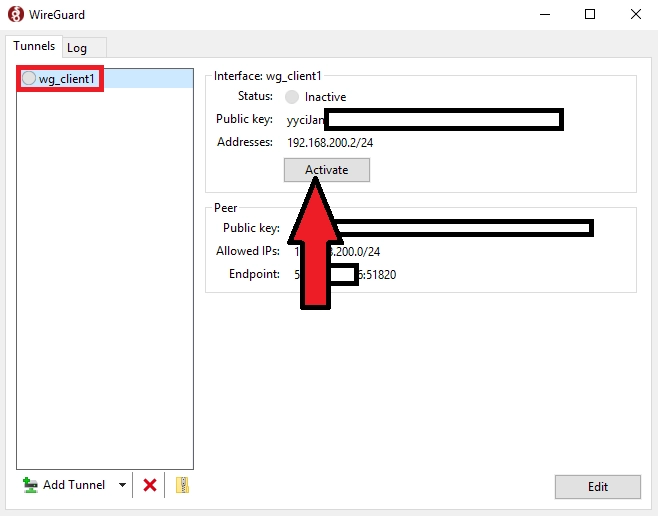
Activate 
You should now be able to activate the VPN connection.
Click on Activate.
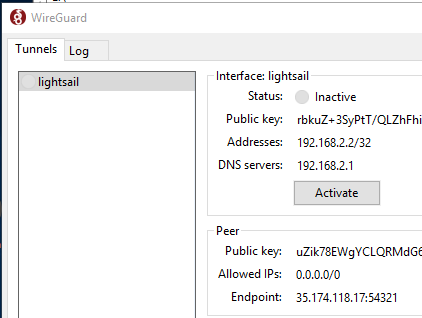
After a few seconds, the status should change to Active
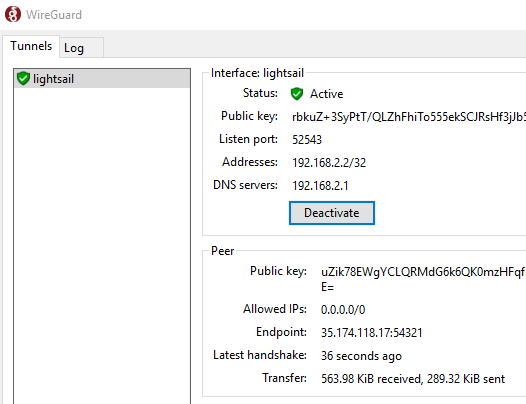
If that’s not the case, check the Log tab and double-check the client and server configuration.
Deactivate closes the VPN connection.
Checking VPN connection 
To check if the VPN works correctly, open a browser with the URL: https://www.whatismyip.com/
Or enter the search term «my ip» into the Google search.
If the connection is routed through the VPN, it should show the IP address of the WireGuard server as the public address.
If you run your own DNS server, as I do in this example, check if DNS requests are routed through the VPN.
Go to https://www.dnsleaktest.com and run the extended test. The test runs for a few seconds and displays a list of servers that answered the DNS queries.
Make sure that this list only contains the IP address of your DNS server.
Read this guide about DNS leaks to learn more about why you want to test for DNS leaks and it also shows you other methods for preventing leaks.
Adding more clients 
You can connect multiple clients to one server. Follow the configuration above and add a [Peer] section to the server configuration file for each client. Make sure that you assign a unique IP address for each client.
Don’t forget to restart WireGuard on Linux after you changed the configuration:
wg-quick down wg0 && wg-quick up wg0
I’ve been running the Windows client for a few days, and even though it’s a pre-release, it is remarkably stable and works without any problems.
One feature I like is that the Windows version of WireGuard remembers the VPN connection state. So when you reboot Windows while WireGuard is connected to the server, the software automatically reconnects and re-establishes the VPN tunnel when it starts up. This prevents you from accidentally connecting without a VPN.
This post belongs to my “mini-course” on Gain flexibility & increase privacy with WireGuard VPN. I’ll only be walking through how to set up a client for WireGuard on Windows 10.
If you don’t have a server (or even if you already have one), definitely start from the top. I make a few assumptions and I broke things into separate posts because I try to get as detailed as possible.
If you are just here for the client configuration, keep reading!
What you’ll achieve
- We will be using the official client from WireGuard on Windows 10 to connect to our WireGuard VPN server
- All Internet traffic on the Windows 10 Client will pass through our WireGuard VPN first, then access the Internet
Here is what this looks like:

Prerequisites
- You need a working WireGuard Server (learn how to set that up here)
- You need a Windows 10 computer with admin privileges for install
The user must also be apart of the local admins group to run the VPN connection (thanks to /u/dubtea on Reddit)- Admin privileges are no longer required on version 0.3.1 or higher
Download the WireGuard Client
Always download clients from official sources. You can find that here: https://www.wireguard.com/install/
Install & Configure
Once you install the client, you will want to click the arrow next to “Add Tunnel”, then click Add empty tunnnel....
What’s nice about this is the GUI creates a public and private key for us automatically.
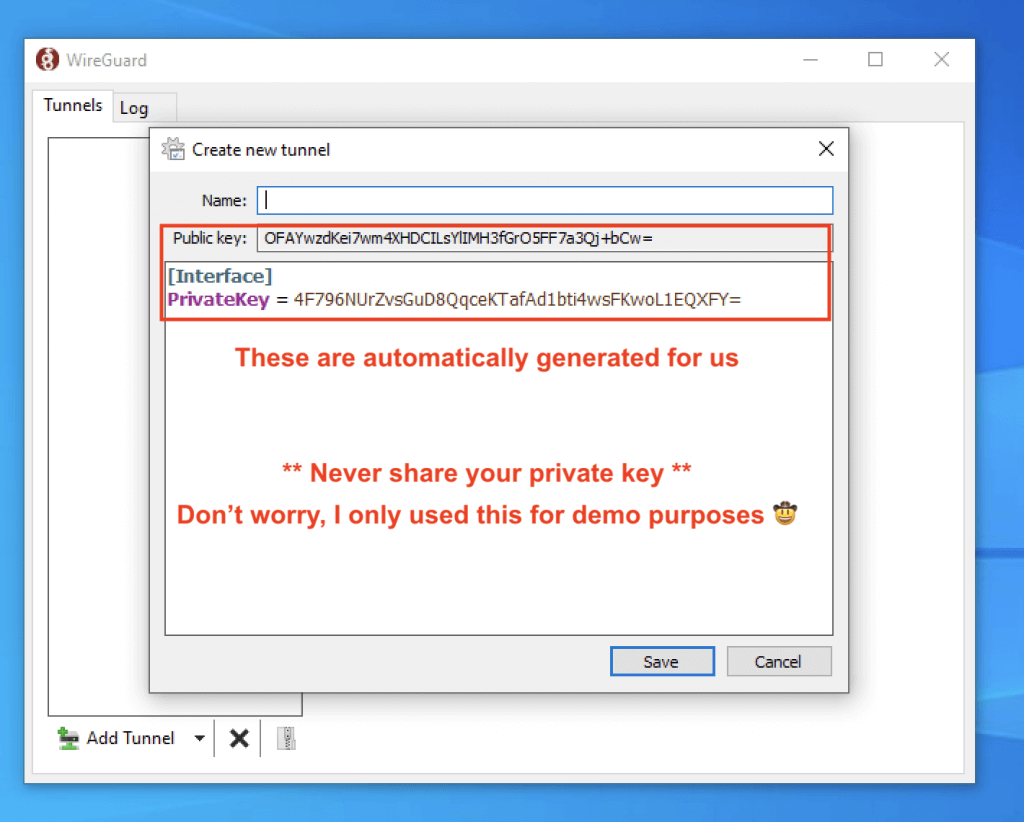
We’re far from done, so let’s get it to connect to our server.
Expanding the configuration
We need to update the configuration file to look like this:
[Interface]
PrivateKey = abcdefghijklmnopqrstuvwxyz1234567890=+
Address = 10.0.0.3/24
DNS = 1.1.1.1, 1.0.0.1

[Peer]
PublicKey = YOUR_SERVER_PUBLIC_KEY
AllowedIPs = 0.0.0.0/0
Endpoint = YOUR_SERVER_WAN_IP:51820
IMPORTANT: You need to replace YOUR_SERVER_PUBLIC_KEY and YOUR_SERVER_WAN_IP
I dive into detail what this all means in another post, but make sure you are also setting your Address to a unique IP address on your virtual private network.
This is what mine looks like (again, never share your private key. This is just a demo):
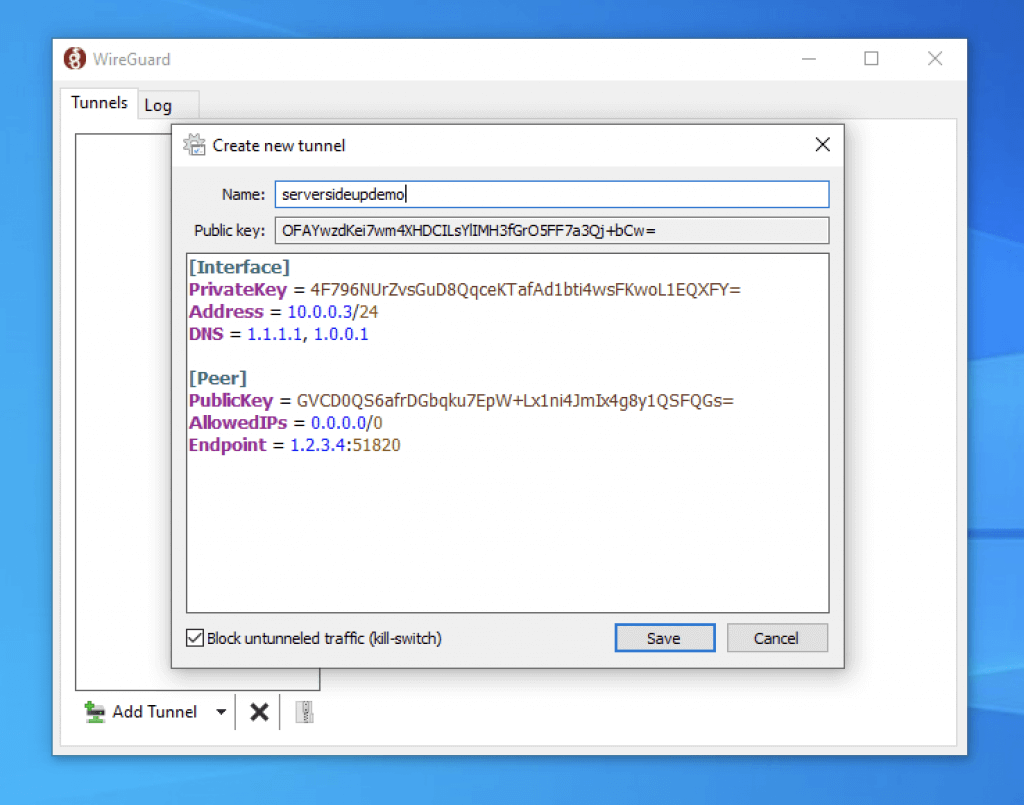
Checking Block untunneled traffic will make sure that all of our traffic is being routed through our VPN.
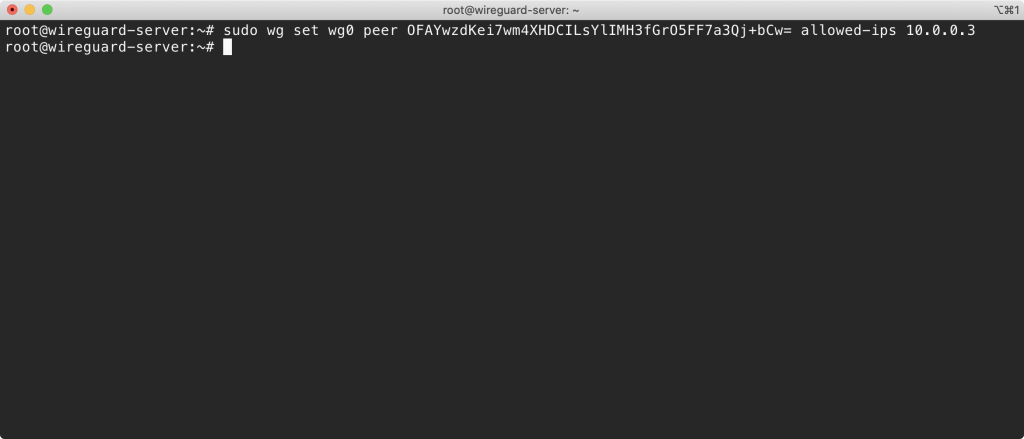
Add your client key to your server
If you press Activate on the next screen, it will not connect. Your server needs to know who you are.
Adding your client’s public key to the server
The easiest way to add your key to your server is through the wg set command.
ON YOUR SERVER run this command:
sudo wg set wg0 peer YOUR_CLIENT_PUBLIC_KEY allowed-ips YOUR_CLIENT_VPN_IPIMPORTANT: You need to replace YOUR_CLIENT_PUBLIC_KEY and YOUR_CLIENT_VPN_IP
You can compare my command below to my diagram at the top of my post for exactly what I mean:
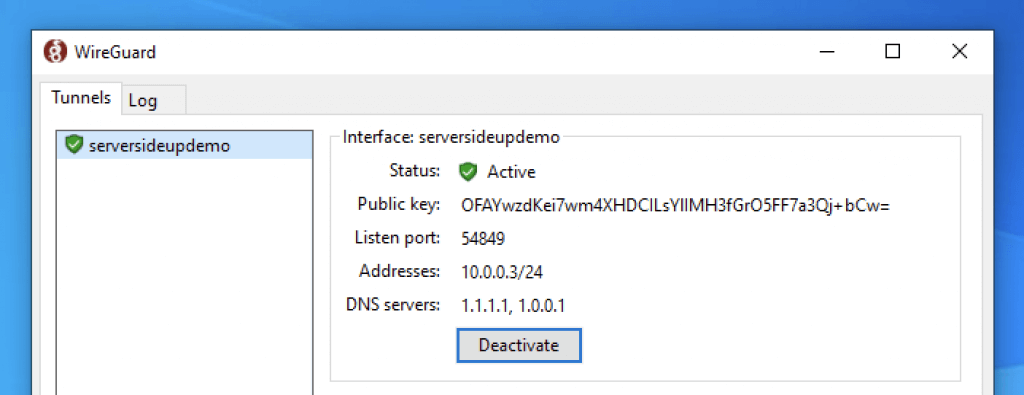
Test your connection
On your Windows 10 machine, press the Activate button. You should see a successful connection be made:
Once you are connected, head on over to dnsleaktest.com. This will tell you two things:
- Is your DNS “leaking” (using a different DNS provider outside of your VPN)?
- Is your IP Address different?
If you followed my configuration, all DNS tests should comeback using “CloudFlare”.
Test the DNS Leak with WireGuard VPN active and inactive. Compare the results.
The last place to run a test is fast.com. This will run a speed test of your connection. If you run notice a dramatic decline in speed, try setting up a server in a region that is close to you (where you will usually be connecting from). I’ve always had good luck with Digital Ocean, Vultr, and Linode.
That’s all!
If you have any other clients to configure, check out my “mini-course” where you can learn to configure macOS, iOS, Android and more with WireGuard VPN.
Any questions, just let me know! You can add them to the comments below or ask me on Twitter. If you like posts like this, you can get more of them if you sign up on our mailing list.
Перед выполнением описанных ниже команд убедитесь, что вы используете последнюю версию WireGuard и обладаете правами администратора на вашем устройстве.
Установка
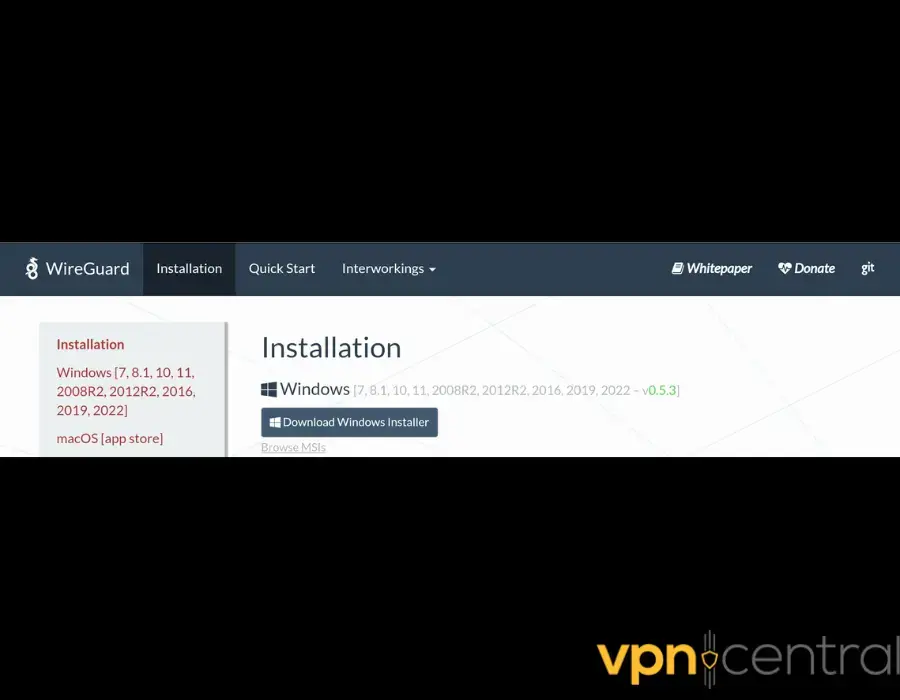
1) Скачайте текущую версию для Windows: https://www.wireguard.com/install/ и установите.
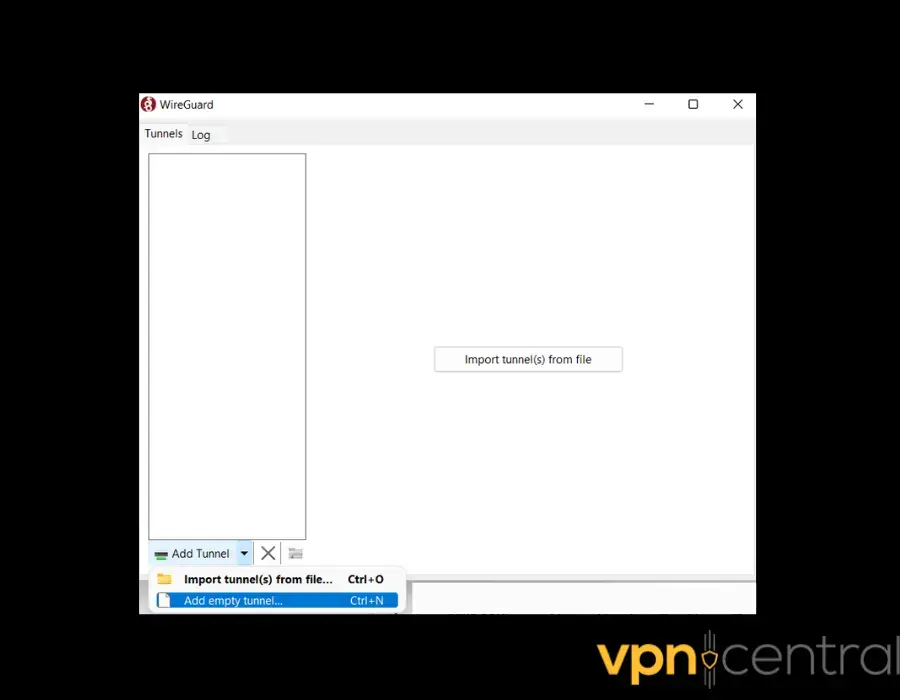
2) Запустите C:\Program Files\WireGuard\wireguard.exe и добавьте пустой туннель (мы будем настраивать серверную часть):
Добавить туннель → Добавить пустой туннель …
Регистрируем настройки:
Имя — имя сетевого подключения
Открытый ключ — открытый ключ сервера WireGuard (необходим для настройки клиентской части)
[Interface]
PrivateKey = # private key of WireGuard server
ListenPort = # port that WireGuard will listen to
Address = # desired IP address of WireGuard server
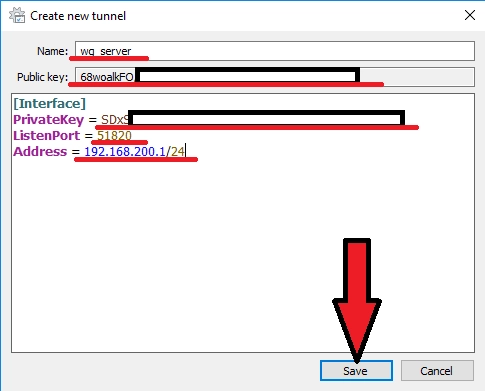
Включить параметры, позволяющие серверу WG использовать основной сетевой интерфейс
3) Добавляем еще один пустой туннель (будем настраивать клиентскую часть): Add tunnel → Add empty tunnel
Регистрируем настройки:
Имя — имя сетевого подключения
Открытый ключ — открытый ключ клиента WireGuard (необходим для настройки серверной части)
[Interface]
PrivateKey = # WireGuard client private key
Address = # desired IP address of WireGuard client
[Peer]
PublicKey = # public key of the WireGuard server (from step 2)
AllowedIPs = # specify the IP addresses for which you want to use the created WG tunnel (specifying the subnet 0.0.0.0/0 will allow you to route all traffic to the WG tunnel)
Endpoint = # Server IP address (real, not WireGuard) and port that WireGuard server listens on (configured in step 2)
4) Теперь нам нужно добавить нашего клиента в серверную часть WireGuard, для этого вернитесь к шагу 2 и добавьте его конфиг:
...
[Peer]
PublicKey = #WireGuard client public key (from step 3)
AllowedIPs = #IP user address
5) Настроим брандмауэр Windows для работы с WireGuard. Для этого:
- Создадим новое правило для входящего трафика:
-
Откройте «Windows Defender Firewall with Advanced Security» (Брандмауэр Windows с повышенной безопасностью).
-
В левой панели выберите «Inbound Rules» (Входящие правила).
-
Нажмите «New Rule…» (Создать правило).
-
- Укажем протокол (UDP) и порты (например, 51820):
-
В появившемся окне «New Inbound Rule Wizard» выберите «Port» (Порт) и нажмите «Next» (Далее).
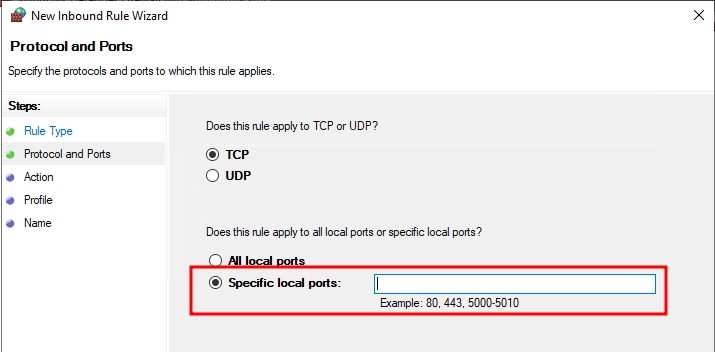
- В разделе «Protocol and Ports» (Протокол и порты) выберите тип протокола:
-
Выберите «UDP».
-
- Укажите конкретные локальные порты (Specific local ports):
-
Например, порт WireGuard по умолчанию — 51820.
-
Если используется несколько портов, перечислите их через запятую (например: 51820, 51821).
-
-
Нажмите «Next» (Далее).
-
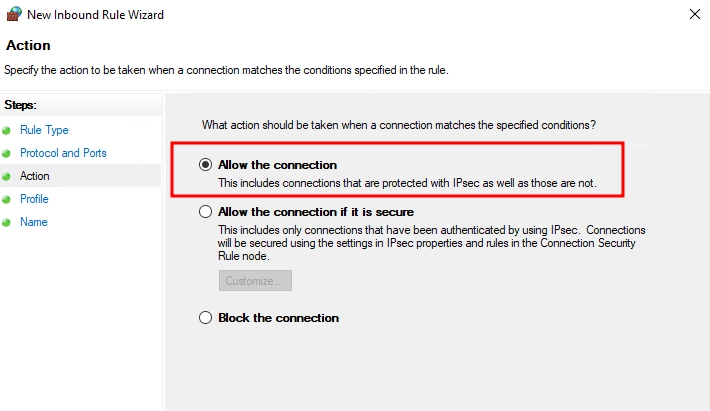
- Разрешим подключения:
-
В разделе «Action» (Действие) выберите «Allow the connection» (Разрешить подключение).
-
Нажмите «Next» (Далее).
-
- Сохраним правило:
- Определите профили, для которых будет применяться правило:
-
Domain (Доменный);
-
Private (Частный);
-
Public (Общий).
-
-
Нажмите «Next» (Далее).
-
Укажите понятное имя для нового правила, например: «WireGuard UDP 51820».
-
Нажмите «Finish» (Готово).
- Определите профили, для которых будет применяться правило:
Ваш брандмауэр настроен на пропуск трафика через указанные порты WireGuard
6) Теперь достаточно экспортировать файлы конфигурации Экспортировать все туннели в zip→Указатьместо для экспорта→Сохранить
Далее откройте сохраненный архив, там будут конфигурации всех наших туннелей.
Отдайте клиенту его конфигурационный файл.
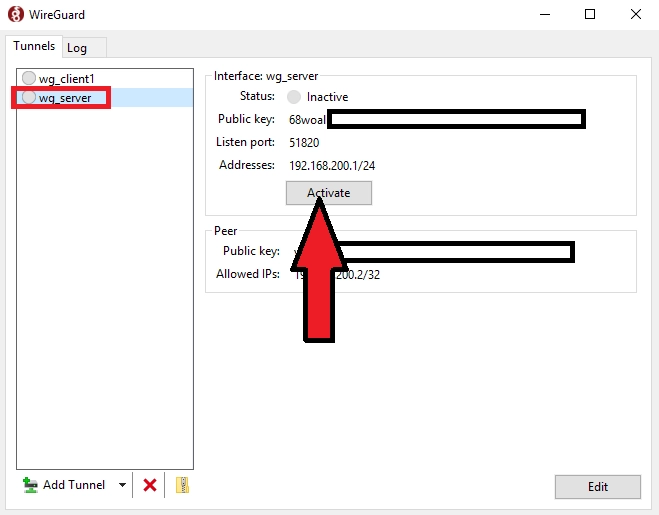
7) На сервере выберите конфигурацию сервера и запустите программу
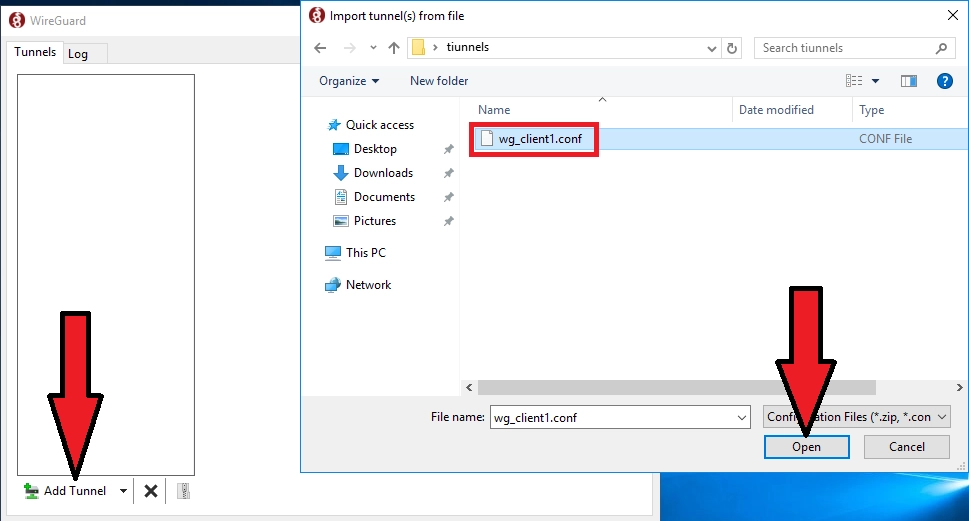
 На клиенте добавьте файл конфигурации в WireGuard. Добавить туннель→Выбрать файл конфигурации клиента->Открыть
Выберите конфигурацию клиента и запустите программу
На этом настройка первого клиента завершена, аналогичным образом настраиваются остальные клиенты путем добавления их данных в конфигурацию сервера (шаг 4).
Автоматический запуск WireGuard после перезапуска сервера.
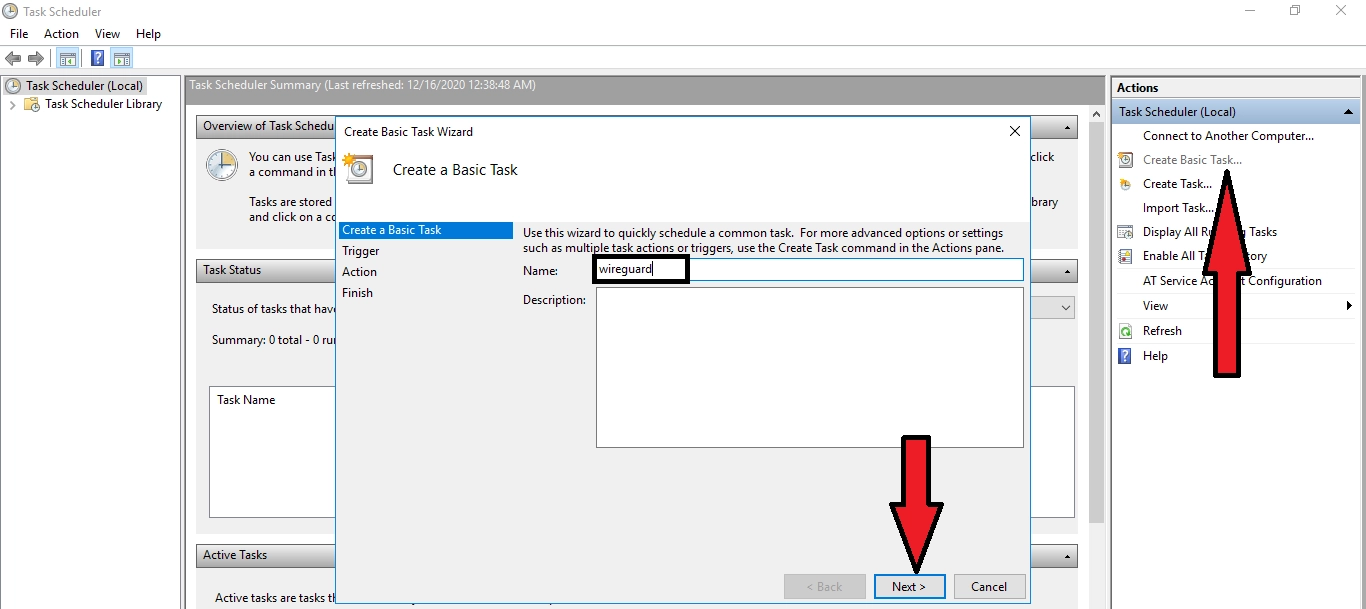
1) Добавьте файл запуска в автозапуск планировщика Windows: Пуск→taskschd.msc
Нажмите «Создать простую задачу» → Введите имя задачи (например, wireguard) → Далее
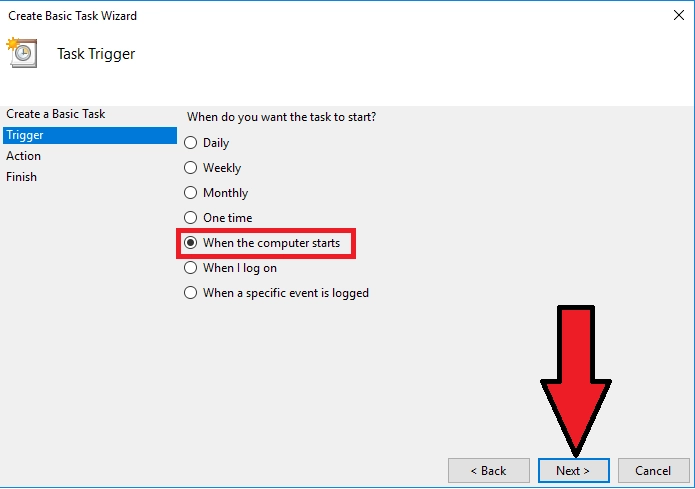
Выберите «При запуске компьютера» → Далее
Выберите «Запустить программу»→ Далее
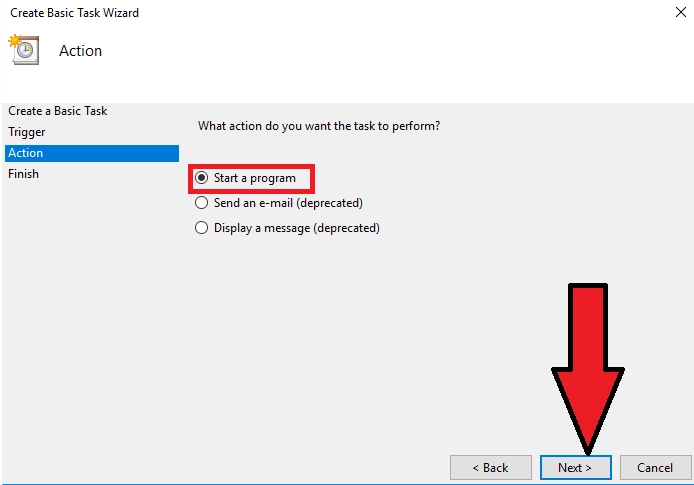
В поле «Программа или сценарий» выберите файл для запуска WireGuard (по умолчанию это «C:\Program Files\WireGuard\wireguard.exe»).
Добавьте аргументы:
/installtunnelservice "C:\Program Files\WireGuard\wg_server.conf"
где:
C:\Program Files\WireGuard\wg_server.conf — расположение конфигурационного файла *.conf
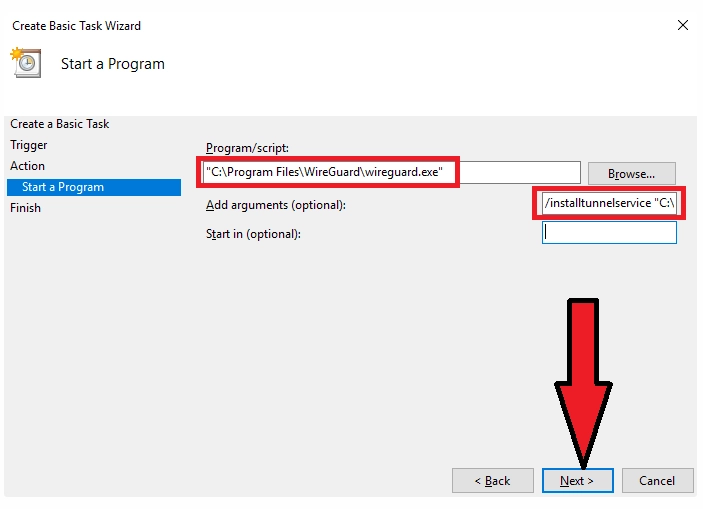
Установите флажок «Открыть окно свойств для этой задачи после нажатия кнопки «Готово»» → Готово

В открывшемся окне отметьте пункт «Запускать с наивысшими правами»→ОК

Готово. Выполните перезагрузку, проверьте
Readers help support VPNCentral. We may get a commission if you buy through our links.
Read our disclosure page to find out how can you help VPNCentral sustain the editorial team Read more
Is it difficult to create a WireGuard Windows config from scratch? Not really, and I’ll show you why.
Setting up WireGuard on your PC is one of the smartest ways to increase your online anonymity. Best of all, you can bolster your cybersecurity without experiencing the kind of speed loss associated with VPN sessions.
Ready? Let’s get into it:
How to configure WireGuard on Windows?
You’ll need three ingredients for a successful WireGuard Windows server config:
- A WireGuard virtual private server (VPS)
- The protocol’s native client
- A PC that runs Windows 7, 8.1, 10, or 11.
Installing WireGuard on a VPS is a topic for an entirely separate guide. So, this tutorial assumes that you’ve already done so.
Here are the simple steps you need to follow:
- Download the WireGuard Windows Installer from the official site.

- Run the msi file to install the WireGuard Windows client.
- Open the WireGuard GUI.
- Click on Add Tunnel > Add empty tunnel to generate a pair of public and private keys automatically.
- Name the tunnel.
- Add the following Interface and Peer sections to the configuration. Feel free to change the IP addresses and keys as you see fit.
[Interface]
PrivateKey = 6MfKZxmFlVcmwtTDH0djHSEy672449WZaXjwm/vzW08=
Address = 194.128.2.2/32
DNS = 192.168.2.1[Peer]
PublicKey = dZek49BWgVCLJRMsG6k6QK5mzHFrfy4uhOLjPyTe5WE=
AllowedIPs = 0.0.0.0/0
Endpoint = 32.185.112.15:12345For context:
PrivateKey: The Windows client’s private key.
Address: The client’s IP, which must be different from all clients.
DNS: The DNS server’s IP.
PublicKey: The VPS’s public key.
AllowedIPs: The IPs you route over your VPN. The 0.0.0.0/0 address is a catch-all. So, you’ll transmit everything through the VPN.
Endpoint: The server’s external IP. Also, it’s the listening port. So, it should be identical to the server configuration’s ListenPort data. - Insert this Peer section to the WireGuard configuration file:
[Peer]
PublicKey = rbkuZ+3SyPtT/QLZhFhiTo555ekSCJRsHf3jJb5kdkI=
AllowedIPs = 192.168.2.2/32For context:
PublicKey: The Windows client’s public key.
AllowedIPs: The IPs are permitted to use this tunnel. - Make sure that both configurations reference the right keys and IPs.
- Leave the Block untunneled traffic box checked.
Do this only when you have a single Peer section and use a catch-all configuration to restrict unwanted traffic.
- Click on Save.
- Click on Activate to establish your VPN connection.
That’s it!
To verify whether your VPN is leak-proof, go to ipleak.net. If your connection works, it should show your WireGuard server’s IP and not your device’s.
If you want to add more clients to your server, you can follow the same steps. Just make sure that each one uses a unique IP.
Related reads:
- WireGuard No Internet: Common Causes and Quick Fixes
- WireGuard Split Tunnel Config Guide for Windows and More
- Best WireGuard VPNs for Routers
Summary
Setting up WireGuard on your Windows system is more intimidating in your imagination than in practice.
As long as you follow the above steps, the status of your connection should say Active at the end. If it doesn’t, it means your client and server configurations don’t match.
So, you’ll just have to double-check the Log tab and look for errors in your WireGuard Windows config!
Deyan Georgiev
Managing Editor
Deyan Georgiev is the managing editor at VPNCentral. He is a software and technology expert, focused on online privacy and data protection. He’s a certified cybersecurity and IoT expert both by the University of London and the University System of Georgia. Furthermore, Deyan is an avid advocate of personal data protection. He also holds a privacy specialization from Infosec.