
Do you want to give your computer a fresh start? Wiping everything is the way to go if you’re selling it or just want a thorough cleaning. In case you’re not sure how to do it, that’s what this guide is for. I’ll walk you through the steps to completely wipe Windows 10 and restore it to its factory settings. This is also perfect if you’ve received a computer with Windows 10 from someone else and want to start fresh. So, if you’re ready to say goodbye to all those old files and apps and start with a clean slate, here’s how to factory reset Windows 10:
NOTE: If you want to reset Windows 10 and keep your files, you should read this guide instead: How to reset Windows 10 without losing your files.
Why would you factory reset your Windows 10 PC?
The most drastic way to reset Windows 10 is the Remove everything method. This method is the equivalent of a fresh installation of Windows 10, and there will be no traces of previous activity. Such a factory reset deletes everything, including all your personal files, applications, and settings made in Windows 10.
Factory reset means Remove everything
As you’ll see later in this guide, if you are sure that what you want is to Remove everything, you will also get an option during the reset process to not only remove all your files but also to clean your drive thoroughly by rewriting blank data on them. While this will significantly increase the time required to factory reset your Windows 10 computer, it will prevent the possibility of recovering your data in the future with specialized file recovery tools.
When you are ready to start, there are two ways to initiate the reset of your Windows 10. I cover them both in the following sections of this tutorial. The second method may be helpful if you have trouble booting or signing into Windows 10.
1. How to factory reset Windows 10 and delete everything on your PC using Settings
The first thing you do is open the Settings app. A fast way to do that is to press the Windows + I keys on your keyboard. In the Settings app, go to the Update & security category.
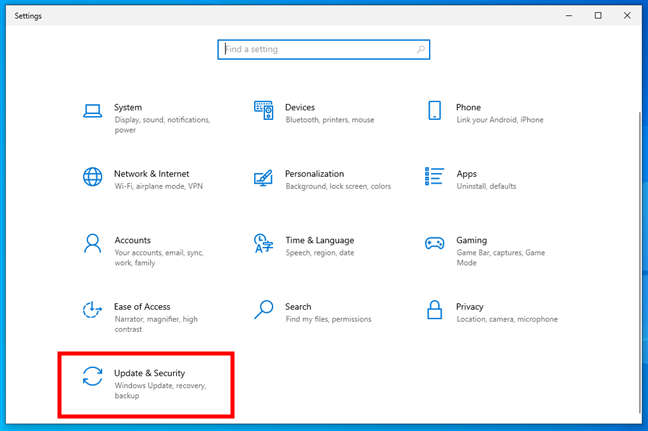
Open Update & Security in Settings
On the left side of the window, click or tap Recovery. On the right side of the Settings window, Windows 10 displays a section called Reset this PC, which tells you that “If your PC isn’t running well, resetting it might help. This lets you choose to keep your files or remove them, and then reinstalls Windows.” This is what you’re looking for. Click or tap the Get started button.
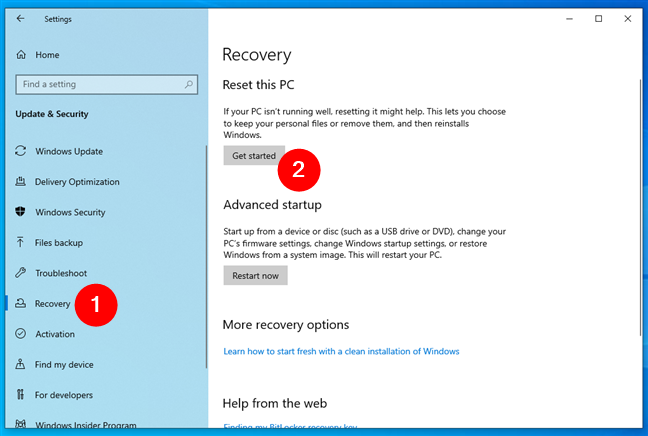
Get started with the reset process in Windows 10
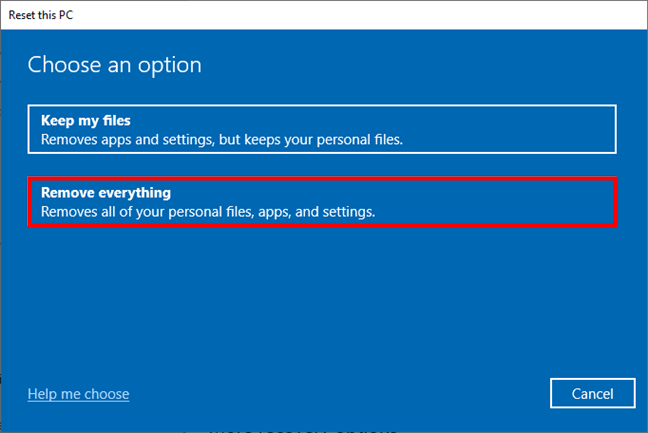
Windows 10 asks whether you want to keep your personal files or remove everything on the PC. Because you want a factory reset, choose “Remove everything (Removes all of your personal files, apps, and settings).”
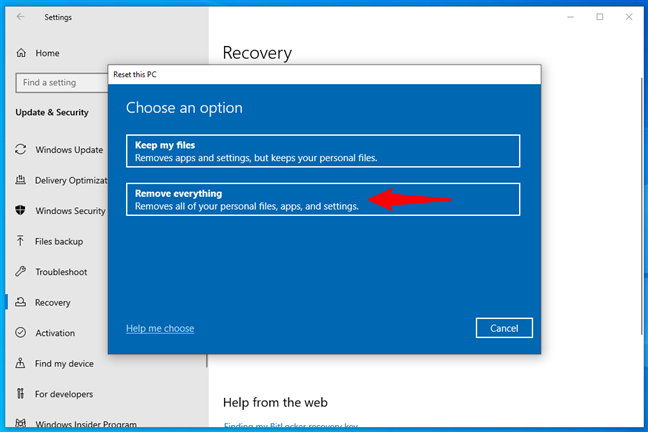
Choose Remove everything when resetting your PC
If you have a computer with multiple partitions, you are also asked whether you want to remove the files only from the drive where Windows is installed or if you prefer to reset Windows 10 while also wiping all drives. Make the choice that best suits your situation.
Then, the “Reset this PC” wizard asks “How would you like to reinstall Windows?”. Choose the option you prefer:
- Cloud download: during the reset, Windows 10 downloads the files it needs to reinstall from Microsoft’s servers
- Local reinstall: Windows 10 reinstalls itself using its locally stored files without downloading anything

Select Cloud download or Local reinstall of Windows 10
Then, you get to the Additional settings step of the wizard. By default, the Windows 10 factory reset wipes everything on your drives but doesn’t fully clean them. That means that the old data on them can still be retrieved with the help of specialized data recovery applications. If you’re resetting Windows 10 to start fresh, leave everything as it is and continue with the reset process. However, if you’re selling your PC or giving it away, you might also want to clean its drives fully. To do that, you need to press the Change settings link.
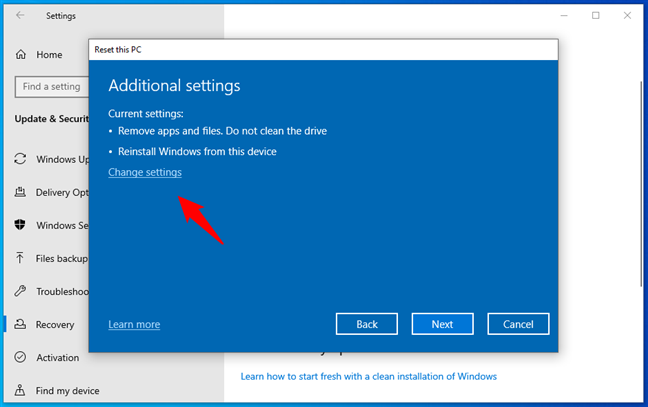
Change settings in Additional settings
If you want to clean the drive in addition to removing your files (to make it nearly impossible for anyone to restore your files), enable the Clean data? switch during the Choose settings step, and then press Confirm. The main downside of wiping everything is that Windows 10 takes much more time to reset your PC.

Choose between just removing files or fully cleaning your drives
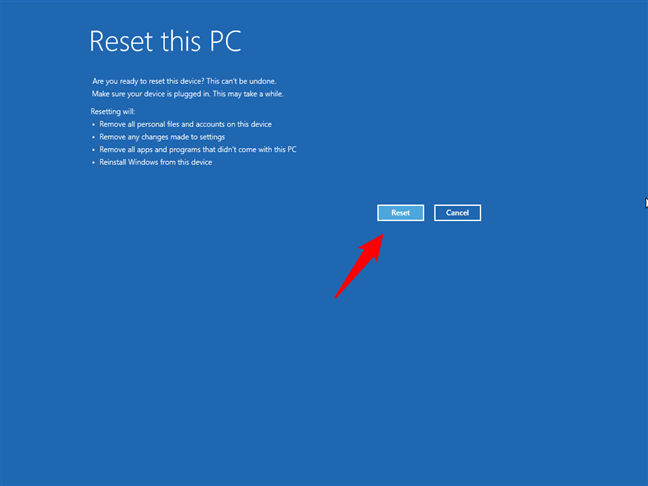
Then, Windows 10 needs a few moments to get everything ready. When it’s prepared, it lets you know about it and shows you the impact of the reset process. Resetting removes:
- All the personal files and user accounts on your PC
- All apps and programs
- Any changes made to the settings
If you are still sure that you want to reset, click or tap the Reset button. However, take note that this is the last moment you can change your mind and cancel the process.
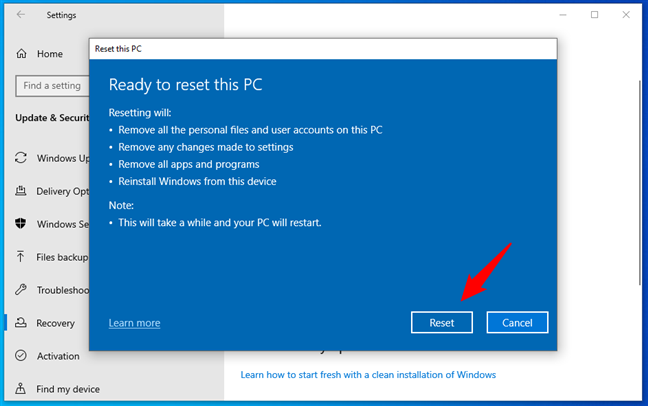
Ready to reset this PC
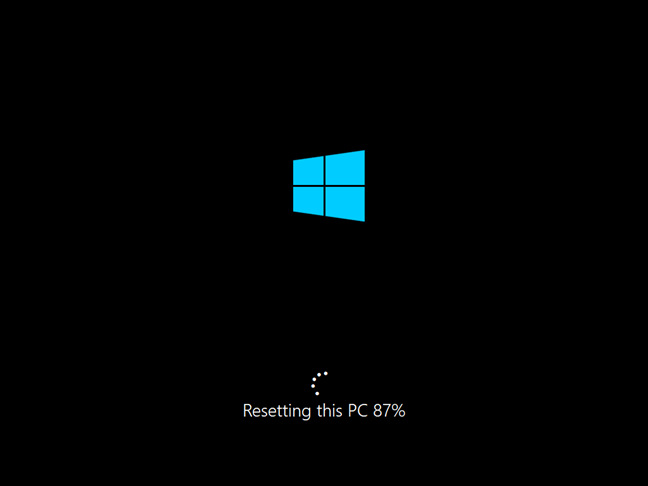
Windows 10 needs another minute or two to prepare things. Then, when it is done, it automatically reboots your PC.
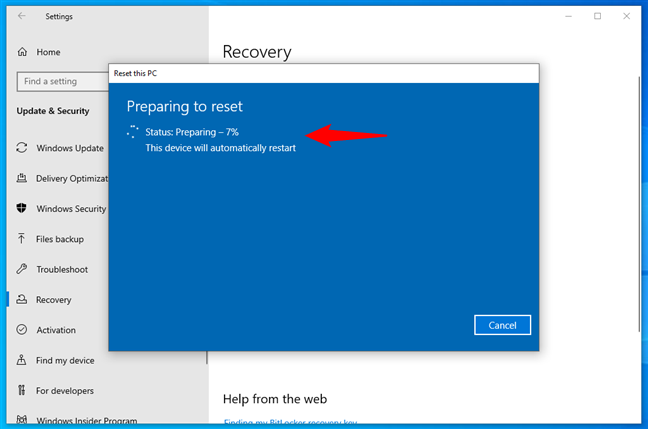
Resetting this PC
Grab yourself a cup of coffee or tea and wait for Windows 10 to reset itself. Depending on your computer’s hardware configuration, this step might take a while.

Progress on resetting this PC
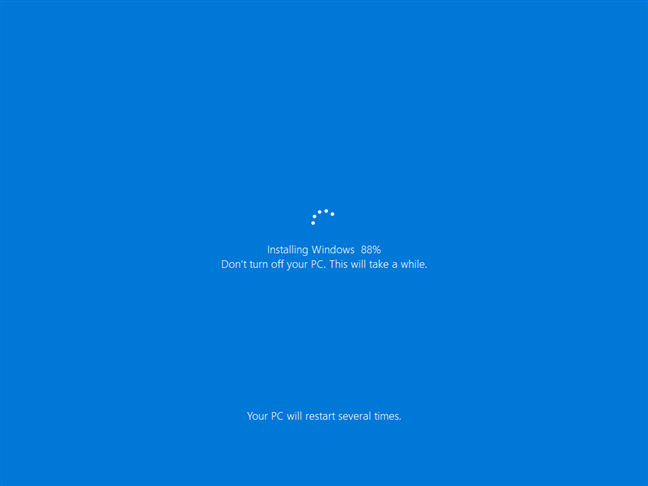
After a while, Windows 10 begins to reinstall itself.
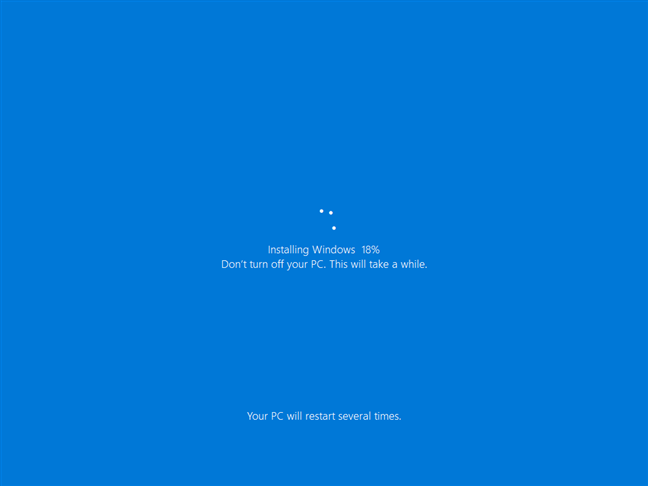
Installing Windows 10 as part of resetting your PC
When the installation is done, Windows starts asking you to customize the installation. You have to set things like the language and keyboard layout and create user accounts, just like on a new PC with Windows 10 freshly installed. If you need help with the personalization process, read How to install Windows 10, starting with the section named “How to customize your Windows 10 installation (setup steps).”
2. How to factory reset Windows 10 and wipe all data from the Windows Recovery Environment
When you’re having trouble booting or logging into Windows 10, this method to factory reset Windows 10 without Settings or logging in can be helpful. Here’s how to delete everything from your computer except Windows 10 using the Windows Recovery Environment:
If your computer is unable to reach the sign-in screen, it should automatically enter Windows 10’s Automatic Repair mode. Once you’re there, simply look out for the Advanced options button and click or tap it.
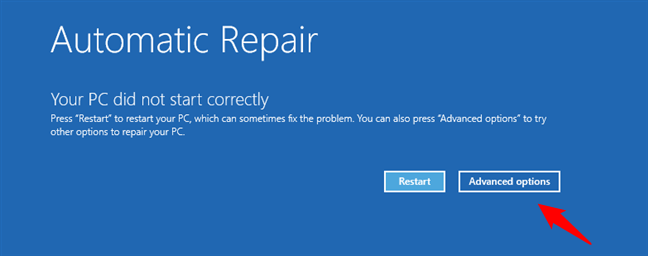
Click or tap the Advanced options button
TIP: Alternatively, you can also use the Tab key to select the Advanced options button and press Enter to factory reset Windows 10 with your keyboard. Similarly, you can perform all the next steps of the process using only your keyboard.
If Windows 10 manages to boot but you can’t get past its sign-in screen, press and hold the Shift key while clicking the Power icon and then Restart.

Restart your PC from the sign-in screen
After Windows 10 restarts, click or tap Troubleshoot.
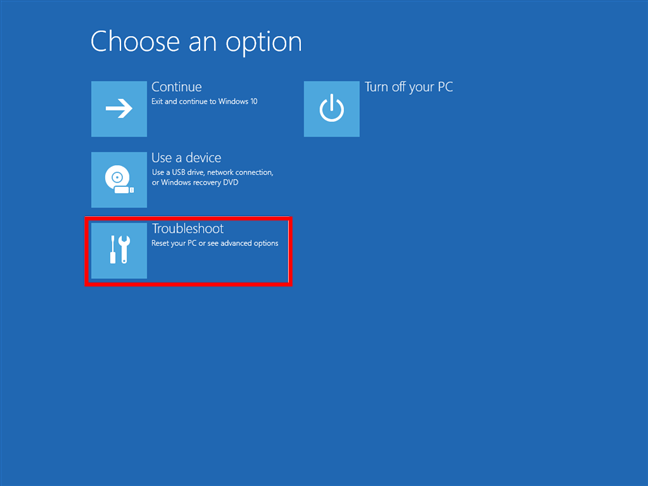
Choose Troubleshoot to reset your PC
Then, on the Troubleshoot screen, choose “Reset this PC.”

Choose Reset this PC from the Troubleshoot screen
Next, select “Remove everything (Removes all of your personal files, apps, and settings).”
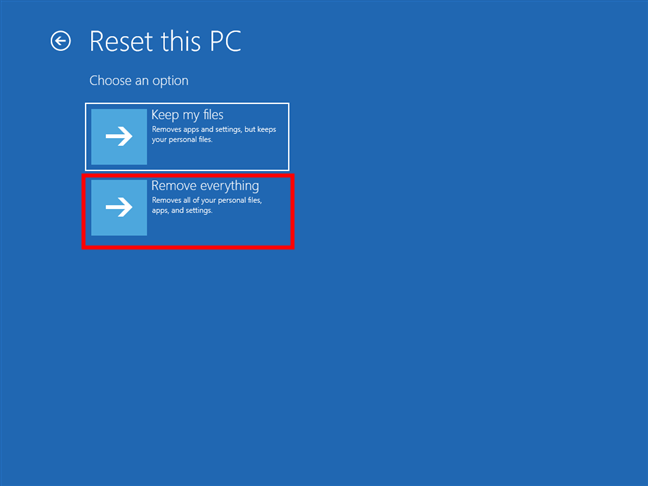
Choose Remove everything on the Reset this PC screen
If you have a computer with multiple drives or partitions, you are also asked whether you want to remove files only from the drive where Windows 10 is installed, or you prefer to wipe all drives. Make the choice that best suits your needs. Then, Windows 10 wants to know whether you prefer to reinstall it using the Cloud download or Local reinstall method. Select whichever way you like by clicking or tapping on it.
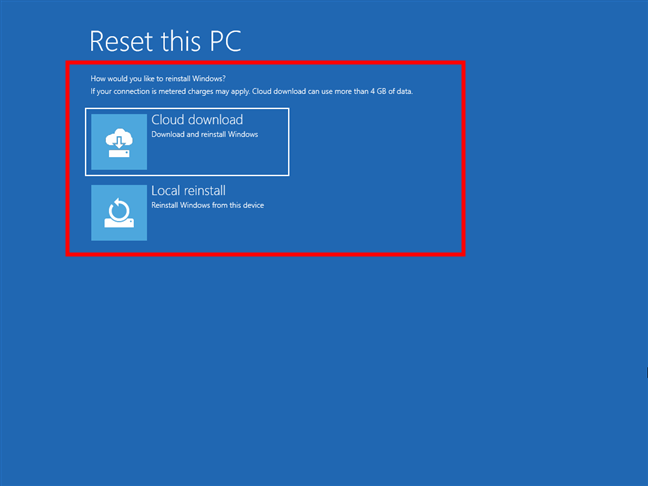
Choose between Cloud download and Local reinstall
Your PC needs a few moments to get everything ready, so be patient while it restarts. Next, you are asked to decide if you want to clean the drive in addition to removing your files. The cleaning provides more security for the confidentiality of your data, and it makes it nearly impossible for someone else to restore your files. The downside is a much longer time spent by Windows 10 resetting your PC. When you are sure of your decision, click or tap the option you prefer.
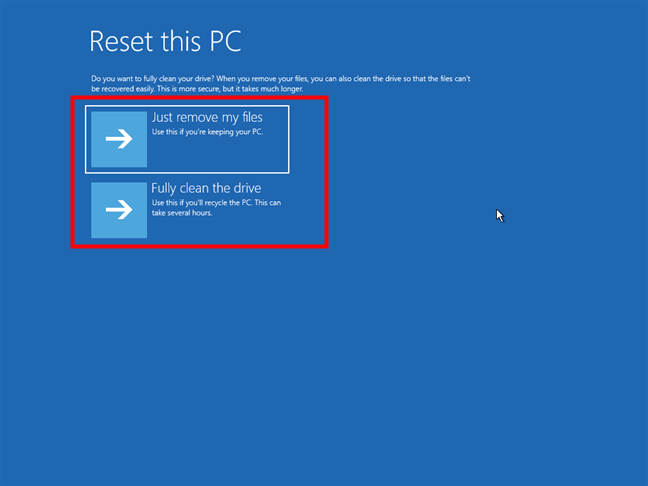
Just remove my files or Fully clean the drive
If you are still sure that you want to reset it, click or tap the Reset button. However, note that this is the last moment when you can change your mind and cancel the reset.
Start the resetting process
Wait for a few minutes for Windows 10 to reset your PC. Depending on your computer’s hardware, this step might take a while.
Resetting this PC progress
After a while, Windows 10 begins to reinstall.
Reset this PC reinstalls Windows 10
When the initial installation is done, Windows starts asking you to customize the installation. The steps are the same as the ones required when performing a fresh installation of Windows 10.
Why did you factory reset Windows 10?
I hope this tutorial has helped you make a successful reset of your Windows 10 PC or device and that it works just like a new one. Before closing this tutorial, let me know why you performed a complete reset of Windows 10 and why you chose to remove everything from it. Was it because you decided to sell your PC or give it to someone else? Or was it because you were bombarded with errors and encountered crashes all the time?
Introduction
Welcome to this guide on how to wipe a Windows 10 computer. Whether you’re looking to sell your old machine, hand it down to a family member, or simply want to start fresh, wiping your computer is an essential step to protect your privacy and ensure a clean slate. In this article, we will walk you through the step-by-step process of wiping a Windows 10 computer, allowing you to remove all personal data and reinstall the operating system.
Before diving into the process, it’s important to note that wiping your computer means that all files, applications, and settings will be permanently deleted. Therefore, it is crucial to back up any important files or documents that you wish to keep before proceeding. Additionally, make sure to sign out of all online accounts and services to prevent any unauthorized access to your personal information.
The process of wiping a Windows 10 computer involves resetting the PC using the built-in tool, choosing the appropriate reset option, reinstalling Windows 10, and setting up your computer again. We will guide you through each step, providing clear instructions to ensure a smooth and successful process. So, let’s get started and learn how to wipe a Windows 10 computer!
Step 1: Back up your important files
Before you proceed with wiping your Windows 10 computer, it is crucial to back up all your important files and documents. This step is essential to ensure that you don’t lose any valuable data during the process.
There are several ways you can back up your files. One option is to use an external hard drive or USB flash drive to manually copy and transfer your files. Simply connect the external storage device to your computer, navigate to the files you want to back up, and copy them to the device.
Another convenient option is to utilize cloud storage services like Google Drive, Dropbox, or Microsoft OneDrive. These services allow you to upload your files to the cloud, ensuring that they are securely stored and accessible from any device with an internet connection.
If you have a large amount of data to back up, you may consider using backup software that automates the process and allows you to schedule regular backups. This can save you time and ensure that your files are always protected.
Remember to include all important documents, photos, videos, music, and any other files that you want to keep. Take your time to ensure that you have successfully backed up everything you need before proceeding to the next steps.
By backing up your important files, you can have peace of mind knowing that even if something goes wrong during the wiping process, you will still have a copy of your files to fall back on. It is always better to be safe than sorry when it comes to preserving your valuable data.
Step 2: Sign out of all online accounts and services
Prior to wiping your Windows 10 computer, it is essential to sign out of all online accounts and services. This step ensures that your personal information and data are not accessible to anyone else during the wiping process.
Start by signing out of any email accounts you have linked to your computer. Open your email client, such as Microsoft Outlook or Gmail, and navigate to the settings or account options. Look for the option to sign out or log out of your account. Make sure you sign out of all accounts associated with the email client.
Additionally, sign out of any social media accounts you have accessed on your computer. Open the respective social media applications or websites and locate the account settings. Look for the option to sign out or log out of your account. Repeat this process for all social media accounts you use.
Don’t forget to sign out of any cloud storage services you have connected to your computer, such as Google Drive or Dropbox. Access the settings or account options of each service and follow the steps to sign out or log out.
If you use any productivity tools or online office suites, such as Microsoft Office or Google Docs, ensure that you sign out of those accounts as well. This will prevent any unauthorized access to your documents and files.
Lastly, sign out of any other online accounts or services that you frequently use on your computer. This can include online banking accounts, shopping accounts, streaming services, and any other platforms that require you to log in.
By signing out of all online accounts and services, you take an important precautionary step in protecting your personal information and privacy. It ensures that no one can access your accounts or view your sensitive data while your computer is being wiped and reset.
Step 3: Reset your PC using the built-in tool
Once you have backed up your important files and signed out of all online accounts, it’s time to reset your Windows 10 computer using the built-in tool. This tool allows you to erase all personal data, applications, and settings, bringing your computer back to its original factory state.
To access the reset tool, go to the Start menu and click on the “Settings” icon, which looks like a gear. In the Settings menu, scroll down and click on the “Update & Security” option.
In the Update & Security menu, you will find the “Recovery” tab on the left-hand side. Click on it to open the recovery options.
Under the “Reset this PC” section, click on the “Get started” button. You will be presented with two options:
- Keep my files: This option will remove apps and settings but keep your personal files intact. It is suitable if you want to start fresh but still retain important documents, photos, and other files.
- Remove everything: This option will remove all apps, settings, and personal files from your computer. It is the recommended choice if you are selling or giving away your computer and want to ensure that no personal data is left behind.
Select the option that aligns with your needs and preferences. Keep in mind that choosing the “Remove everything” option will delete all your files permanently, so make sure you have backed up everything you want to keep.
After selecting the desired reset option, you may be asked to confirm your choice and enter your Windows 10 password. Follow the on-screen instructions to proceed with the reset process.
This process may take some time, depending on the speed of your computer and the amount of data being erased. Once the reset is complete, your computer will restart, and you will be directed to the initial setup screen, as if you were setting up a new computer from scratch.
By utilizing the built-in reset tool, you can quickly and efficiently wipe your Windows 10 computer, removing all personal data and reverting it back to its original state. This ensures a clean slate and a fresh start for your computer.
Step 4: Choose the appropriate reset option
After initiating the reset process for your Windows 10 computer, you will be presented with two options: “Keep my files” and “Remove everything.” It is important to choose the appropriate option that aligns with your specific needs and goals.
Option 1: Keep my files:
If you select the “Keep my files” option, it means that your personal files will be preserved while removing apps and settings. This option is best suited if you want to start fresh with your computer but still want to retain important documents, photos, videos, and other files.
During the reset process, Windows will uninstall all apps and programs and revert the settings to their defaults. However, your personal files will remain untouched. It is important to note that some pre-installed apps that came with your computer may still be present after the reset.
This option is ideal if you want to quickly refresh your computer’s performance and remove unnecessary applications, while still retaining your important files. It allows for a clean and organized system without the need to back up and restore all your personal data.
Option 2: Remove everything:
If you choose the “Remove everything” option, it means that all personal files, apps, and settings will be permanently deleted from your computer. This option is recommended if you are selling or giving away your computer, or if you want to ensure that no personal data is left behind.
When selecting this option, Windows will erase all your files, including documents, photos, videos, music, and any other personal data. It will also uninstall all applications and restore the settings to their default state.
Ensure that you have backed up all your important files before choosing this option, as the data cannot be recovered once the reset process is complete. It is a thorough and comprehensive reset that provides maximum privacy and security by erasing all traces of your personal information.
Consider your specific needs and circumstances when choosing between these two options. Whether you want to retain your personal files or completely wipe everything, selecting the appropriate reset option is crucial to achieving your desired outcome.
Step 5: Confirm the reset process
After selecting the appropriate reset option for your Windows 10 computer, it is important to confirm the reset process before proceeding further. This step ensures that you understand the implications of the reset and are ready to proceed with the next stages.
Once you have chosen either the “Keep my files” or “Remove everything” option, Windows will display a confirmation screen outlining what will happen during the reset process. Take a moment to review the information provided and ensure that you have backed up any important files.
If you have chosen the “Keep my files” option, the confirmation screen will inform you that your personal files will be preserved, but apps and settings will be removed. It may also mention that some pre-installed apps will remain on your computer after the reset. Make sure you are aware of these details and are prepared to proceed.
On the other hand, if you have selected the “Remove everything” option, the confirmation screen will inform you that all personal files, apps, and settings will be permanently deleted. It is crucial to double-check that you have backed up all necessary files and are fully prepared for the complete removal of your data.
Take the time to read through the confirmation screen carefully, ensuring that you understand the consequences of the reset process. If you are satisfied with your selection and have backed up all important data, proceed to confirm and initiate the reset.
Keep in mind that once the reset process is confirmed, there is no turning back. All personal data, apps, and settings will be irreversibly erased. Therefore, it is vital to exercise caution and make sure you are ready to proceed before confirming the reset.
By confirming the reset process after understanding the implications, you will be one step closer to wiping your Windows 10 computer and starting fresh. It is a critical checkpoint to ensure that you are fully prepared for the next stages of the reset process.
Step 6: Reinstall Windows 10
After confirming the reset process, the next step is to reinstall Windows 10 on your computer. This is necessary to bring back the operating system and set up a fresh installation.
Once the reset process is initiated, your computer will automatically restart. During the restart, you will see the Windows logo and the message “Resetting this PC” or something similar. The system will enter a process called “Getting things ready” or “Preparing Windows,” which may take some time.
After this initial preparation, you will be presented with the Windows setup screen. Follow the on-screen prompts and provide the required information to reinstall Windows 10. These prompts may include selecting your language preferences, time zone, keyboard layout, and signing in with a Microsoft account or creating a local account.
If prompted to enter your Windows 10 product key, you may find it on the packaging of your computer or in your purchase confirmation email. However, if your computer came pre-installed with Windows 10 or you previously activated it, you can select the “I don’t have a product key” option to continue the installation.
Throughout the setup process, make sure to choose the appropriate settings that align with your preferences. These settings may include privacy options, Windows updates, and customizations such as choosing a computer name.
As the Windows 10 installation progresses, your computer will go through multiple restarts. This is normal and part of the installation process, so be patient and let the system complete the necessary steps to reinstall Windows 10 properly.
Once the installation is complete, you will be welcomed by the Windows 10 desktop and a fresh set-up. At this point, Windows 10 is successfully reinstalled on your computer, and you are ready to proceed to the next step of setting up your computer again.
Reinstalling Windows 10 not only ensures a clean, stable operating system but also provides the opportunity to start fresh with a clean slate. It allows you to have a system that is free from clutter and potential issues, providing a smooth, optimized experience.
Step 7: Set up your computer again
Now that you have successfully reinstalled Windows 10, the next step is to set up your computer again. This involves customizing your settings, installing necessary applications, and configuring your preferences to personalize your computing experience.
Upon reaching the Windows 10 desktop after the reinstallation, you will be guided through a series of initial setup screens. These screens will prompt you to choose your region and language preferences, review the privacy settings, and sign in with your Microsoft account or create a new local account.
If you choose to sign in with your Microsoft account, it will allow you to sync your settings, files, and preferences across multiple devices. This can be useful if you have other Windows 10 devices and want a seamless experience across them.
Once you’ve completed the initial setup, you can start personalizing your computer. Begin by customizing your desktop background, screen resolution, and other appearance settings to make your computer feel familiar and visually pleasing.
Next, install any essential applications that you regularly use. This may include productivity software, web browsers, media players, and antivirus software. Visit the official websites or app stores to download and install these applications, ensuring they are from trusted sources.
As you set up your computer again, you may also consider organizing your files and creating a folder structure that suits your needs. This can make it easier to locate and manage your documents, photos, videos, and other files.
Take the time to configure any additional settings, such as notification preferences, power management options, and automatic updates. Customize these settings to align with your preferences and optimize your computer’s performance.
Lastly, make sure to reconfigure any peripheral devices that you use with your computer, such as printers, scanners, and external hard drives. Connect these devices and follow the manufacturer’s instructions to install any necessary drivers or software.
Setting up your computer again allows you to recreate a tailored experience that suits your needs and preferences. By taking the time to personalize your settings and install the required applications, you can ensure that your Windows 10 computer is optimized for your specific usage.
Step 8: Restore your backed up files
Now that you have set up your computer again, it’s time to restore your backed up files and bring back your important data. By following this step, you can regain access to your documents, photos, videos, and other files that were previously backed up.
Start by connecting the external hard drive or USB flash drive that contains your backed up files. If you used cloud storage services, ensure that you are connected to the internet and have logged into the respective accounts.
If you backed up your files to an external storage device, navigate to the device using File Explorer or Finder, depending on your operating system. Locate the folders or files you want to restore and copy them to the appropriate locations on your computer.
If you utilized cloud storage services, access the respective platforms by opening your web browser and logging into the accounts. Locate your backed up files and download them to your computer, ensuring they are saved in the appropriate folders or directories.
Take the time to organize your restored files, creating folders and subfolders as needed to maintain a structured file system. This can make it easier for you to find and access your files in the future.
If you had any specific settings or customizations for certain applications, such as email clients or productivity software, take the necessary steps to restore those settings as well. This may involve importing email accounts, restoring preferences, or reconfiguring options to match your previous setup.
As you restore your backed up files, it’s important to verify that everything has been successfully transferred and is accessible. Open some of your restored documents, photos, and other files to ensure they open correctly and are intact.
By restoring your backed up files, you can reclaim your important data and continue where you left off before the computer reset. It allows you to seamlessly transition back into your workflow and regain access to your personal files and documents.
Conclusion
Congratulations! You have successfully learned how to wipe a Windows 10 computer and start fresh with a clean slate. By following the step-by-step process outlined in this guide, you were able to back up your important files, sign out of online accounts, reset your PC, reinstall Windows 10, set up your computer again, and restore your backed up files.
Wiping your computer is an essential step to protect your privacy, ensure the removal of personal data, and create a fresh environment for optimal performance. It allows you to start anew, whether you’re selling your computer, passing it on to someone else, or simply wanting a clean start.
Throughout the process, it is crucial to back up your important files to prevent any potential data loss. Signing out of online accounts and services adds an extra layer of security and ensures that your personal information remains protected.
Resetting your PC using the built-in tool and choosing the appropriate reset option helps you remove all personal data, applications, and settings. Reinstalling Windows 10 brings back the operating system, while setting up your computer again allows you to customize the settings and install necessary applications.
Finally, restoring your backed up files ensures that you regain access to your important data and files, completing the process of wiping and starting fresh.
Remember, the instructions provided in this guide are meant to serve as a general outline. It’s always a good practice to refer to official documentation or seek further assistance if you encounter any issues during the process.
Wiping your Windows 10 computer can be a transformative process, offering you a blank canvas to create a customized and efficient computing experience. Enjoy your freshly wiped computer and make the most of the clean start it provides!
Approved By
Rollins Duke
Published On
June 6th, 2022
Summary: Allowing another individual to have access to all of your personal information might be dangerous. That’s why it’s so important to get rid of all of your personal data from your device before you sell it, recycle it, or give it to a friend or family member. Therefore, in this post, we will explain how to wipe all personal data from Windows 10.
A knowledgeable IT expert understands that removing a file does not truly delete it from your hard disk. It truly deletes the file’s index from the File System, which implies that just the file’s access is erased. Even after the recycling bin or garbage is emptied, the files remain.
Consider the following:
When you remove a file, you truly conceal it’. Similarly, when you do a fast format on a hard disk, the old file system is replaced with the new one but no files on the storage medium are destroyed. Thus, deleted, destroyed, and files on a formatted disk can be readily retrieved using data recovery software, unless they have been overwritten.
Recovery, on the other hand, is not always required. Occasionally, you must permanently delete data in order to protect your privacy and personal information. Therefore, before selling, donating, or discarding storage devices, it is critical to securely wipe them, not only delete sensitive contents, to ensure that no residual data is left on the device that may be retrieved using typical off-the-shelf recovery tool. So, without further ado, let’s get to the subject.
How to Wipe All Personal Data from Windows 10?
There are several methods for erasing personal data. Below, we’ll discuss two of the most often used ways for wiping personal data from a Windows PC.
Method 1 – SDelete
It is a command-line application for Windows that performs safe deletion of files, directories, and empty spaces on the storage disk which may contain previously erased data. SDelete complies with one of the most recognized Department of Defense clearing and sanitizing standards, DOD 5220.222-M, which ensures that erased data is permanently removed.
To safely remove your secret and personal data from a storage media, follow these steps:
- SDelete.zip may be downloaded from Microsoft’s official website.
- It may be extracted to the Desktop or any other place.
- Navigate to the folder into which the SDelete utility was extract.
- While holding the Shift key, right-click within the folder.
- ‘Open Command window here’ is the option. A command prompt window appears. Type delete and press Enter to display a list of available alternatives.
- Locate the file or folder you wish to remove and type sdelete –p 2 “C:Usersravi.singhDocumentsSecret Info.docx”
- Utilize the –S or –R parameters to delete folders and subdirectories recursively. –P specifies the number of overwrite passes; the default is one.
- For instance, type sdelete –s –r –p 4 “C:Usersravi.singhDocumentsMySecretFolder”
- This command recursively deletes the MySecretFolder directory and its subdirectories containing files in four passes (or 4 times).
This Method Has Some Drawbacks
- One incorrect command will result in the destruction of your machine. Therefore, utilize it with caution.
- You must locate the files and directories produced by various applications and system programs on the C: (system) drive’s numerous places. This is a challenging undertaking, and you must conduct extensive study on each app to determine where they store your activity data.
- Each time you wish to remove a file or folder placed in a different location, you must write the whole command.
Method 2 – Use the Best Professional Software
As we can see the above method has many limitations. As a result, we would like to propose that you use a professional program to accomplish this. Disk Wipe Software is one such utility. This program allows you to completely erase all personal data from your Windows 10 machine. This program guarantees that it will totally delete your personal data without causing you any inconvenience. Also, the tool is helpful to wipe Windows 11 computer and more. This application’s user interface is really intuitive. This amazing utility is quite simple to use.
Consider the working process of this software
Download and run this application on your Windows machine.
For specific files and folders, select “files & folders,” alternatively select “Logical Drives.”

Next, select Wipe Options and select “Free Space” if you just want to delete free space on the drive, or “Total Space” if you want to erase all data on the disk.

By clicking on the “Drives” choices, you can now pick which drives you wish to delete data from.

To proceed, click the Next button.

Now that the tool window with the chosen data has shown, choose the folders and files you want to delete and click next.

Select “Filter Options” to erase certain files from the hard drive and apply the filter.

Then, from the drop-down menu, select the wipe techniques that best suit your needs.

When you press the wipe button, a warning notice will display, and you must click the yes symbol again.

The Abstract
In today’s article, we addressed the question of how to wipe all personal data from Windows 10 machine. Using the methods indicate, this work may complete quickly and easily. In addition, we propose that customers utilize any professional program.
Also Read: How to Permanently Erase Browsing History?
How to Remove All Data from Windows 10 Before Selling to Ensure Privacy?
Published On
July 31st, 2024
Reading Time
5 Minutes Reading
Are you looking for the software that can remove all data from Windows 10 computer? If so, then continue reading this blog. The best way to completely delete all data from your Windows 10 computer and permanently make it unrecoverable can be found right here.
The majority of people with technical backgrounds are aware that simply deleting files from Windows 10 doesn’t mean they are permanently gone. Even if we delete data from the recycle bin, we can still recover it using specialized software.
We are all aware of how quickly cybercrime is growing. Therefore, never simply delete your data and hand over your computer to someone else. Your personal, professional, accounting, and other data could be used improperly for their own gain.
So, what to do ? how to wipe data completely from Windows 10 computer? How to completely erase data from my Windows 10 computer? And the answer is using the well-known and regarded software 4n6 Data Erasure Wizard. We have tested this utility and can assure you that it will deliver 100% results. This application will delete your Windows 10 data in an unrecoverable manner. Windows 10 wiping software comes up with so many amazing features. You can remove required or complete data from your Windows 10 computer. You just have to follow some simplest steps to remove all data from Windows 10 computer.
Also Read
Benefits of Wiping Browser History
Software Walkthrough to Remove All Data from Windows 10 Computer
Read First: The application is available in both freeware and paid editions. This tool’s free edition allows you to test its full functionality and features without spending any money. It will also assist you in wiping data from Windows 10 that is less than 5 MB. The licensed edition, on the other hand, will assist you in completely erasing the Windows 10 machine.
Please follow the steps outlined below after free downloading or purchasing the software:
The software starts removing all data from Windows 10 computer. This Windows 10 wiping process will take a few moments. Please wait.
Please Note: The Start button cannot be undone once it has been pressed. The deleted data cannot be recovered. So, check again before wiping your Windows 10 computer. Do it only when you are absolutely sure.
Remove Data from Other Storage Devices As Well
With this solution, it is possible to remove all data from any storage devices including:
- Remove Data from External Hard Drive
- Wipe All Data from USB Flash Drive
- Remove Pen Drive Data Permanently
- Erase All Data from Your SSD
- Wipe Data from Memory Card
These are a few instances. It allows you to completely wipe all of your devices.
Points to Remember Before Wiping Windows 10 Computer or Other Device
Our Windows 10 wiping utility is a sophisticated and potent tool. Before using this or any other wiping software, you should take the following into mind:
- Make a backup copy of all of your data somewhere else because once it’s gone, it’s gone forever.
- Your installed software will be completely removed. So please memorize those serial numbers or use .exe.
Some Key Advantages of Windows 10 Eraser Software
- This app has a very user-friendly interface. You can easily use it to remove all data from Windows 10 without any technical assistance. So, if you are from non-technical background, don’t worry. You can still use it.
- The tool has no file size limitation. With the help of licensed edition, you can easily wipe complete Windows 10 data without facing hassle.
- This application is helpful to get the desired results. With this Windows 10 wiping software, you can delete free space only if required.
- The solution successfully supports to wipe complete data from Windows 10 computer in easy steps.
- It comes up with different wiping options including Simple, Advance, Complex, and Very Complex.
- This powerful Windows 10 wiping application has the ability to wipe selected or complete data.
The Conclusion
Nowadays, because crime is on the rise, it is critical to maintain one’s privacy. So, before selling any storage device to another person, please wipe it first so that no one can misuse your data.
In the above content, we have explained how to remove all data from Windows 10. You can use the suggested application to delete data from Windows 11, Windows 8.1, and earlier editions. Also, the application is tested and powerful. You can safely use it to wipe all your Windows 10 data without facing any type of hassle. So, if you must, kindly utilize the advised app. It will greatly benefit you.
How to Wipe Out Data to Free Hard Drive Windows 10 – Focus of this article is cleaning junk, garbage, and deficiently valuable files to raise the Disk space. During the process of abolishing these types of items, taking care of useful data is equally significant. Junk and extra-essential stuff and garbages reside in various locations apart from temp and recent files. Ahead to Wipe Out Data to Free Hard Drive Windows 10, the vast step is spotting the sites. Once the locations are traced out you need to eliminate the stuff taking care of and totally.
Steps to Wipe Out Data to Free Hard Drive Windows 10
Remove Temporary Files
A Temporary file is an extra file itself originated when a file is opened. More files are launched more identical temporary files proportionally increases. If you leave them for a long time they are gathered as a heap on the hard drive. So, it is firmly recommended to wipe out these kinds of files daily or utmost weekly.
- Spread out “Settings” by with the help of clicking or tapping on the combination of “Win and I”.
- Locate “System” residing in the first block of the “Settings” application and click it.
- Find “Storage” in the left flank of System Settings and click on it.
- In the corresponding right flank, the Drives are shown under “Storage” heading, hit on the first “C: Drive”.
- The drive Storage usage opens, scroll down until reaching Temporary Files. Click “Temporary files” to access Remove temporary files page.
- Tick all the 3 boxes ahead of “Temporary files”, “Download folders”, “Empty recycle bin” and click “Remove files”. Note – Prior to ticking the box beside Download folder, make sure that none of the necessary files exists here.
- Right in this manner, in every Drive wipe temporary files.
Wipe out previously created Restore Points
When Restore points are produced they capture a substantial quantity of area on Drives (lowest 500MB). To wipe Out a Hard Drive Windows 10 liberating this space is a wise decision
- Again move to “Storage” as told above and hit on “C:” Drive.
- Hit on “System & Reserved” within “Storage usage” page which leads to launch a list of several folders comprising regarding spaces used by them just beneath.
- In the nethermost region here, you witness a button indicating “Manage System Restore”, hit it.
- Once you click this button, “System Properties” wizard ejects on the screen.
- By default C: Drive is highlighted, hit the “Configure” button, the second from the top.
- Another wizard named “System Protection for Local Drive (C:)”, click on “Delete” button located adjacent to “Delete all restore points for this drive”
- A confirmation pop-up emerges on the screen, clicking on “Continue” will show the message “Successfully deleted”.
- Perform the equal operation for each drive respectively available on your machine.
Remove Unnecessary apps
Wiping out undesired applications evacuates a considerable amount of space on hard drive.
a. Default apps: Windows 10 assembles a bulk of default apps on a computer but many of these are useless for users. None of the methods exists which could assist you to eradicate them straightforwardly, but shell commands are still applicable for similar objectives. We have antecedently illustrated entire minute actions in an article to remove default apps via shell commands, which will certainly relieve.
b. The Apps obtained from Store or open source websites: Remaining applications can be readily erased through Storage.
As we have elaborated steps to reach Storage in the second paragraph nevertheless you can pursue the path –
Settings => System => Storage
- Once you arrive at storage page, hit on the drive where the applications are stored (Such as on my PC apps storehouse location is C: Drive).
- Storage usage page opens, here click “Apps & games”
- “Apps & games” page displays a huge list of applications existing on the PC.
- Detect the apps worthless and in vain.
- Hit on the “app” which you would prefer to “uninstall”.
- The application will stretch out, hit on “Uninstall”.
Disable Hibernate
Few people opt for engaging their machines into hibernation as an alternative of shutting down perfectly. Putting the computer into hibernate renders rapid startup in an identical status. But when a machine engages in hibernate, it stores a snapshot of files and drivers and this occupies a considerable magnitude of space. While the hibernation is being carried out a hiberfil.sys file is kept in reserve as snapshot and possesses 75 % of memory extent on a computer. This indicates that if you have 6GB of Memory you can wipe 4.5GB instantly by turning off hibernate. So to Wipe Out Data to Free Hard Drive Windows 10 choose to turn off Hibernate. How to Enable Hibernate on Power Button on Windows 10
Use OneDrive.com to Store Files not OneDrive Folder
Commonly OneDrive folder on Windows 10 contains all the items accumulated in the Cloud Storage OneDrive. This means one item occupies the space in two locations. For example, if 14.5GB Data of data is accumulated in the cloud storage at the same time 14.5GB space is occupied by them in OneDrive folder i.e. of the hard drive. You are capable of obtaining requisite items anytime from the cloud storage and hence, it is redundant to pile up them on the hard disk drive. So wipe out the items from OneDrive on Computer and change Sync for files and folders.
- Perform a right-click on cloud icon located at the right side of the taskbar (Sometimes it is found on System tray) and hit “Settings”.
- Click “Choose Folder” under the “Account” tab of Microsoft OneDrive wizard.
- Uncheck the folders one by one and after its finished click “OK”
Run Disk Cleanup
Disk cleanup stands amongst the top utilities to Wipe Out Data to Free Hard Drive Windows 10. It not only quashes daily generated garbage but also previous installation files, System error reports, Recycle bin, and plenty of more things. A crucial thing is to run it accurately hence, decipher our earlier illustrated Windows 10 – How to Open and Use Disk Cleanup.
Delete Old Backups
System Image Backup is a vital resource to keep a machine safe but, it holds a substantial field of Hard drive. If you have appointed an internal drive to accumulate, time to time multiple backup files are piled up here. The Backup file is considerably volumetric. Hence, to Wipe Out Data to Free Hard Drive Windows 10, eradicating these gigantic old backup volumes is necessary. Read the whole process to Delete Previous Image Backups to Free up Drive Windows 10