
WINS Servers in Windows 2003 – The Basics
WINS Servers in Windows 2003 – The Basics
March 2, 2014
Services, w2k3
WINS (Windows Internet Name Service) in Windows 2003
My mission in this section is to explain the purpose of WINS in Windows Server 2003 network. In particular, I have tutorials to show you, where and why you need to configure WINS.
The first point to remember about WINS is that only Microsoft clients use WINS servers for name resolution, whereas Linux, Unix and everyone else on the internet, use DNS exclusively. To keep matters in perspective, Active Directory, Exchange and IIS also require DNS. 95% of the time modern Microsoft products prefer DNS, but just occasionally they need to find a NetBIOS resource name – come in WINS. The ‘killer’ reason for implementing WINS is that Exchange, even Exchange 2003, needs NetBIOS name resolution.
Topics for WINS Servers in Windows 2003
- WINS the Basic of Name Resolution
- Installing a WINS Server
- A Goofy NetBIOS Problem
- Exchange Dependencies on WINS
- Registering WINS Records via DHCP
- Integrating WINS with DNS
- Troubleshooting WINS Server
- WINS Summary
‡
WINS – The Basics of Name Resolution
It goes without saying that you have to implement DNS, but that’s another story. In this section I want to concentrate on WINS for those few occasions where NetBIOS name resolution is vital. While both WINS and DNS deal with mapping ComputerName to IP addresses, there are two important differences; DNS is hierarchical and can support up to 254 characters, WINS, on the other hand, is a flat-field database limited to 15 letters. One of the few advantages that WINS formerly had over DNS was that WINS is dynamic. Well, starting with Windows 2000, DNS is also dynamic, so the only point of WINS in the 21st century is specifically for NetBIOS name resolution.
Keep in mind, especially when troubleshooting, the reason why we need databases such as WINS or DNS. The answer is name resolution. We humans prefer to remember friendly names like BigServer, whereas computers prefer IP addresses in dot decimal notation for example, 192.168.0.23.
Name resolution started with two files called ‘hosts’ and LMHosts files. The hosts file evolved into DNS and WINS took over the name resolution provided by LMHosts. Every Microsoft machine is born with these files in the folder: %systemroot%\system32\drivers\etc\. Here is a typical entry for LMHosts.
10.54.94.13 bigserver
»
Installing a WINS Server on Windows Server 2003
WINS is a service and as with DNS and DHCP, you install WINS via the Control Panel, Add or Remove Programs, Windows Components, Networking Services, Details –> WINS. The wizard will now prompt you for the Windows Server 2003 CD.
Once installation completes, you can find the Windows Snap-in in the Administrative Tools folder. What you are looking for is to make sure that the WINS Status is ‘Responding’.
Trap. In order for the clients to find their WINS server, you need to check to see that the very WINS server is registered in its own database.
See how WINS adds records.
Guy Recommends: A Free Trial of the Network Performance Monitor (NPM) v12
SolarWinds’ Network Performance Monitor will help you discover what’s happening on your network. This utility will also guide you through troubleshooting; the dashboard will indicate whether the root cause is a broken link, faulty equipment or resource overload.
Perhaps the NPM’s best feature is the way it suggests solutions to network problems. Its second best feature is the ability to monitor the health of individual VMware virtual machines. If you are interested in troubleshooting, and creating network maps, then I recommend that you give this Network Performance Monitor a try.
Download your free trial of SolarWinds Network Performance Monitor.
A Goofy NetBIOS Problem
The key technical difference is that Microsoft WINS servers use NetBIOS names whereas DNS relies on hostname. For years I thought that NetBIOS and hostname were one and the same. Then one day I had a bizarre naming problem. A mystery machine called ‘goofy’ appeared on the network. You could see it when you typed ‘net view’ at the command prompt. I identified it’s IP address with ping, and traced its hostname in DNS. For the solution, I launched regedit and and found two different name settings, hostname and computername. (Computername is an alias for NetBIOS name.) Well on this particular machine, the ‘user from hell’ had managed to set hostname = machinebythewall and computername = goofy. Just to emphasise, I have never seen different names for computername and hostname before or since.
Summary
WINS is an alternative to DNS for name resolution. You only need WINS if you have old Microsoft clients such as Windows 98, or servers that use NetBIOS name services. DNS is an superior system, and is required by Active Directory,
If you like this page then please share it with your friends
Related WINS topics
- WINS Server Home
- WINS Registration DHCP
- WINS & DNS integration
- WINS Server Replication
- WINS Troubleshooting
- Performance Monitor Tool
About The Author
Guy Thomas
Installation
Step 1: Open add/remove Windows by selecting add/remove programes in Control Panel
Step 2: Select Networking Service, click details
Step 3: Check Windows Internet Name Server
Step 4: Click Ok, Next
Configuration
Step 1: Open WINS from Administrative tools and expand Computer Name e.g TEST03-SERVER (192.168.1.102)
Step 2: Right Click on Active Registration then select Display
Step 3: From new window, Click Record Types (3rd Tab), Click Clear All
Step 4: Select only those tecord which you want to display, Click Find now
Back up WINS Database
Step 1: In WINS, right Click on computer name and select properties
Step 2: In General tab, click browse, select driver, make new folder e.g WINS backup, press OK.
Step 3: Right click again on computer name and click backu, it will take the backup
Restore WINS backup
Step 1: Stop WINS service by right click on Computer name in WINS, all taks then Stop, this will put red cross on WINS (cannot find WINS server)
Step 2: After stop, right click on computer name agian in WINS, click Restore Database
Step 3: Provide path and click ok
WINS Replication
Step 1: Install WINS on 2nd Computer in the same way did in frist.
Step 2: Open WINS from Administrative Tools, select computer name
Step 3: Right click on Replication Partner, select New Replication partner
Step 4: In pop-up windows give the IP or name of 2nd WINS e.g 192.168.1.104
Step 5: Select the Replication partner in right windows, right click on it
Step 6: Start push Replication, check Start for this partner only, press ok, ok
Step 7: Start pull Replication,
Step 8: FOLLOW SAME STEPS ON WINS SERVER 2 AT 192.168.1.104
Installing and Configuring WINS on Windows 2000/2003 Servers
If you’re running a network that has Windows NT 4.0 and earlier versions of Microsoft operating systems, you can continue to use the WINS servers you’ve already installed. However, you can also set up Windows 2000 Server or Windows Server 2003 to offer the WINS service to your network. Installing the WINS service is a simple matter. You can choose to install the WINS service during the initial installation of Windows 2000 Server, as you would with other networking services. You can also install the WINS service after you’ve completed the operating system installation by using the following steps:
|
1. |
Click Start, Programs (All Programs for Server 2003), Control Panel. |
|
2. |
From the Control Panel, double-click the Add/Remove Programs icon. |
|
3. |
When the Add Remove Programs window pops up, click Add/Remove Windows Components that you’ll see on the left part of the window. The Add Remove Programs window now displays a Components button in the upper-right side of the window. Click the Components button, and the Windows Components Wizard dialog box pops up. |
|
4. |
Scroll down until you find Networking Services and highlight it by clicking on it once. Then click the Details button (see Figure 29.4). Figure 29.4. Highlight Networking Services and click Details.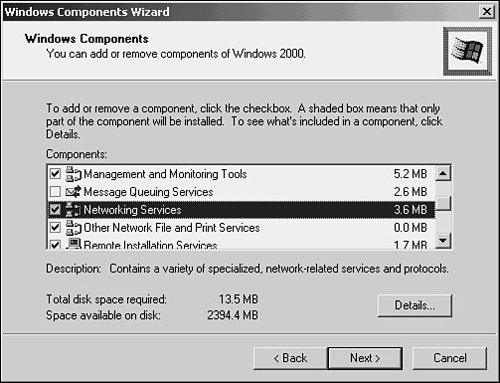
|
|
5. |
When the Networking Services dialog box appears, scroll down until you find Windows Internet Name Services (WINS). Click the check box next to the component and click the OK button, as shown in Figure 29.5. Figure 29.5. Select the WINS service from this dialog box and click OK to install the service.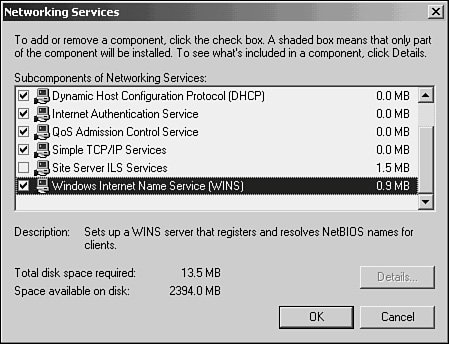
|
|
6. |
When prompted, insert the Windows 2000 or Server 2003 source CD into your CD-ROM drive and then wait a minute or so while files are copied to your hard drive. When the Windows Components Wizard window reappears, click Next. |
|
7. |
Another window, titled Completing the Windows Components Wizard appears. Click the Finish button. |
|
8. |
When the Add Remove Programs window reappears, click OK. |
After you’ve installed the service, you won’t have to reboot the computer. Instead, you can start managing the WINS service immediately.
Managing the Windows 2000 WINS Server
The Microsoft Management Console (MMC)discussed throughout this book because it’s Microsoft’s newest innovation in management interfaces introduced with Windows 2000is used to manage the WINS server, and you’ll find a new utility in the Administrative Tools folder. Simply click Start, Programs/Administrative Tools and then select WINS from the available tools.
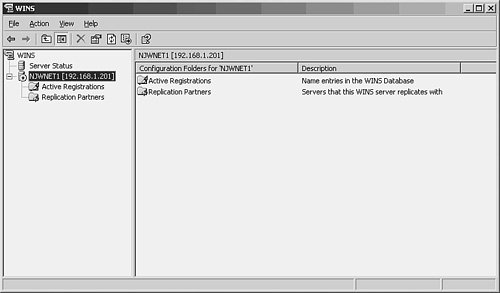
When the MMC console appears, you’ll see your server name and IP address listed in the tree in the left pane of the console. Click the server name and it will expand to show you two additional folders: Active Registrations and Replication Partners (see Figure 29.6).
Figure 29.6. WINS is managed on a Windows 2000 server using the MMC console.
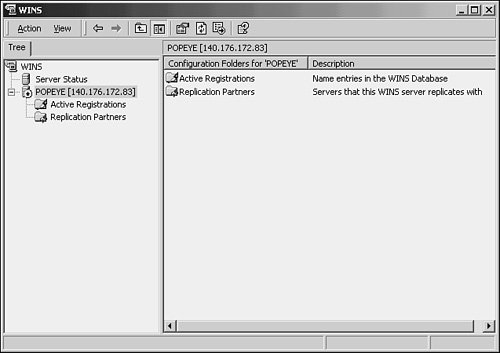
To see a list of computers and group names in the WINS database, simply click the Active Registrations folder. Similarly, to see any other servers you’ve configured to be a replication partner, just click the Replication Partners folder.
Of course, you’ll first have to set up clients and reboot them before you’ll see any computers registered in the database. And you’ll have to set up replication partners before anything will show up in that folder.
Adding Servers and Replication Partners
Most of the management capabilities for WINS servers can be accomplished through either the Action menu or by using properties pages. For example, to start or stop the WINS service, click the server once to highlight it and from the Action menu select Start or Stop. You can also use the Pause and Restart functions found there. These options work just as they did in the Windows NT 4.0 WINS server.
The MMC console enables you to manage multiple WINS servers from a single console. Simply click the WINS entry in the left pane (refer to Figure 29.6) and then, from the Action menu, select Add Server. The Add Server dialog box pops up and prompts you to enter the NetBIOS name or IP address of the server you want to add to the management console. Once it’s added, you can select which server you want to manage by simply clicking it once in the left pane tree of servers.
To add a replication partner, open the Replication Partners folder found under the server you want to set up for replication and, from the Action menu, select New Replication partner. A dialog box again prompts you for the name or IP address of the server with which you want to enable replication.
Using the Action Menu to Configure MMC Properties
The first entry in the tree structure found in the left pane of the MMC console is WINS. Click WINS and, from the Action menu, select Properties. Or you can right-click WINS and select Properties from the menu that pops up. In Figure 29.7, you can see the general properties page for the MMC WINS console.
Figure 29.7. Use the WINS server’s properties page to configure general properties for the server.

From this properties page, you can select to have WINS servers in the console tree be displayed using either their NetBIOS name or the IP address of the server. You can also select to show a DNS-style name for the server. Finally, you can configure the server to validate its cache of WINS servers when the server starts up to ensure that they’re still online and that the list is accurate. Because this involves sending a message to each server, this can take some time if you manage a lot of servers or if they’re connected by slow links.
Using the Action Menu to Manage Individual WINS Servers
You can perform most of the basic management tasks associated with WINS servers by selecting the WINS server from those you’ve added to the tree structure in the left pane and then using options from the Action menu. Alternatively, you can right-click on a server and select the same options from the menu that pops up. The things you can manage from the Action menu for any server are
-
Display Server Statistics This option enables you to see when the server was started, statistics about replication, name registrations, releases, and so on.
-
Scavenge Database This starts the scavenging process, as described earlier in this chapter. You can determine when this process has finished by looking in the event log.
-
Verify Database Consistency This function pulls records from other WINS servers by examining records in the local database to determine the owner of each record. If the record still exists on the owner-WINS server and is identical to the local record, the timestamp for the record is updated. Otherwise, if the record pulled from the owner-server has a higher version ID than that of the local record, the local record is marked for deletion and the new record is added to the local database.
Caution
Using the Verify Database Consistency option should be done during nonpeak hours on your network because it can produce a large amount of network traffic, depending on the number of records in the database and the number of WINS servers on the network. Don’t do this during rush hour at work! Note that you can schedule this operation for another time by using the properties page for the server.
-
Verify Version ID Consistency This is similar to the previous function, but the server checks to see that, for the records it owns, the local record has the highest version ID among other WINS servers on the network. This operation can take some time to complete.
-
Start Push Replication Use this to start an immediate replication, pushing records to a replication partner. This can be useful if you’ve made changes to the database (such as adding static records) and you don’t want to wait for the next scheduled replication interval. A dialog box prompts you for the server to which you want to push records.
-
Start Pull Replication Similar to the previous menu item, but you use this to force another server to immediately begin the replication process by sending records to your server.
-
Back Up Database Use this to back up the database. A dialog box prompts you to enter the location that you want to use to store the database file backup. When the process is finished, another dialog box pops up to inform you.
-
Restore Database Use this to restore a WINS database that you have previously backed up. Again, you’ll be prompted to enter the location of the backup files and will be informed when the process has finished.
-
All Tasks Start, stop, pause, resume, or restart the WINS server.
-
Delete Use this to delete a WINS server from the MMC console list. Note that this does not delete any data on that WINS server, but merely removes it from the list of servers you manage using MMC on the local computer.
-
Refresh Use this to refresh data displayed on the MMC console.
-
Export List This menu item enables you to export a list of records stored in the WINS database. You’re prompted for the location in which the file will be created. You can create ASCII text files or Unicode files, and can select that the file be either tab or comma delimited. This function is useful for exporting the WINS database records for use in another application, such as a spreadsheet.
-
Properties This displays the properties sheet for the selected server.
-
Help Use this when all else fails!
The properties page for a server (which can be displayed using the Action menu as just described) can be used to further configure the server. The properties page has four tabs:
-
General Here you can select the time interval used to automatically refresh the statistics shown on the MMC Console for the WINS server. You can also specify a location to store the database during a backup, and use a check box to enable backing up the database automatically when the server is shut down.
-
Intervals This tab allows you to set the time intervals used for record renewals, deletions, and verification.
-
Database Verification Use this tab to set a time for scheduling database verification. You can specify that it be done every so many hours or you can set a specific time for verification to begin. This function performs the database consistency check described earlier. If you have a large database, a field on this tab enables you to enter the maximum number of records to be verified during each interval.
-
Advanced This tab (shown in Figure 29.8) enables you to perform many functions.
Figure 29.8. The Advanced tab of the server’s properties page enables you to configure important server properties, such as the location of the database.
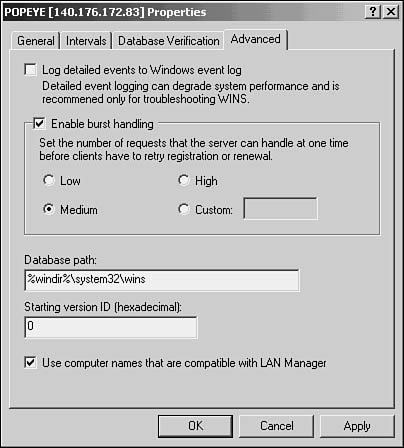
The Advanced tab is singled out here for special mention because it contains some important configuration items. For example, you can specify the path to use for the database files. You can decide to enable logging detailed events to the event log for troubleshooting purposes. This is not a feature you should leave enabled unless you’re having problems with WINS.
The Enable Burst Handling check box enables you to customize (low, medium, high, or specify a number) the number of client registrations and renewals that the server can handle at a single time. This can be useful if you have a server that you want to use mainly as a backup for your primary WINS server. You can set its burst mode to low and then change this property to high on the server you want to handle the most requests.
You can enter a starting version ID in a field at the bottom of this dialog box. Finally, you can use a check box to enable the use of computer names that are compatible with LAN Manager if you have older Microsoft clients on your network.
Managing the Windows Server 2003 WINS Service
Open the WINS MMC management console by selecting it from the Administrative Tools folder (Start, Administrative Tools, WINS). In Figure 29.9, you can see that the MMC console looks the same as that used for Windows 2000. You can use this MMC snap-in to manage WINS just as you did in Windows 2000.
Figure 29.9. The WINS MMC Console application looks the same in Windows Server 2003 as in Windows 2000.
Using the MMC interface to manage WINS servers on Windows Server 2003 is, for all practical matters, the same as discussed in the previous section about Windows 2000. However, if you’re still managing WINS in a network running Windows Server 2003, it might be time to consider an upgrade to the client systems or applications that still rely on the WINS infrastructure.
Using netsh Commands to Manage WINS
Both Windows 2000 Server and Windows Server 2003 enable you to use the netsh command (Netshell) set to manage WINS as well as other network services, such as DHCP and other network configuration utilities. This can be useful for those who are accustomed to using a command-line interface (such as the Command Prompt), or when you want to include commands in a batch file or other scripting file to manage WINS servers. The netsh commands can be used to manage a wide variety of other utilities. They can even be useful when troubleshooting a server via a Telnet link.
The netsh command is not limited to use with just WINS. Instead, netsh can serve to manage many other network services. Each different management scope is called a context. For example, after you enter the netsh> command prompt interpreter, you can enter the command WINS to set the Netshell command environment to enable you to manage WINS components. A selection of other contexts (which are discussed in much greater detail in their respective chapters) are
-
DHCP To manage the Dynamic Host Configuration Protocol
-
DIAG To execute diagnostic commands that are useful for troubleshooting operating system or application problems
-
IP An interface into managing the Internet Protocol configuration
-
RAS To manage any Remote Access Servers on your network
In this section, you learn about some simple tasks you can perform using netsh for WINS. However, it’s important to understand that the command-line interface, which greatly expands on the simple DOS and newer commands available in the Command Prompt, means that many of you can continue to write script files to control logins, network functions, and so forth.
Tip
netsh commands can also be useful when you’re administering a server across a wide area network link. In many instances, netsh commands can be accomplished more quickly than when using the GUI MMC interface.
The following list shows you some of the more important netsh commands for Windows Server 2003 that relate to WINS. To enter an interactive command session using commands available using the WINS context, use netsh and then at the netsh> prompt, enter wins.
Note
The syntax listed here for netsh is almost identical to that used for Windows 2000. You can check to be sure by entering the command netsh /? at the Windows 2000 Command Prompt. For help on an individual command, use netsh <command> /? instead. This second syntax can be useful in determining the commands available for a certain context, for example. From the help topics displayed, you can further drill down to find out more specifics of this well-implemented addition to the standard command-line utilities offered in early Windows operating systems.
You can create quite complex script files using netsh that can be used to manage many different aspects of a computer. Here you’ll learn about some of the commands used with WINS. For example, the two following commands select a WINS server that will be the target of the netsh commands:
-
server This shows the name of the current WINS server as well as your access (read/write) for the server.
-
server \\<servername> This syntax enables you to specify the remote WINS server that subsequent commands will be executed on. Use this to change the context to another WINS server other than the local host. You can use either a hostname or an IP address for servername.
After you enter server or a remote server name, the prompt will change to netsh <wins server> prompt (to reflect the server you’re now managing). From this prompt you can enter commands specific to this context, which are
-
Add Use to add a filter, add a name to the WINS database, add a replication partner, add a pgserver (Persona Grata servers), add a pngserver (Persona Non Grata server), or add another server to the WINS console utility. Persona Non Grata servers are those to block from sending records, and Persona Grata servers are ones to accept records from.
-
Check Check the WINS database for consistency, check a list of name records with a set of WINS servers, and check the version ID numbers for record owners in the database.
-
Delete Delete a name from the WINS database, delete records for particular owner from the database, delete replication partners, delete pgservers and pngservers, delete records from the database or mark them as in the tombstone state, or delete a WINS server from the MMC console interface.
-
Init This command has many uses, from initiating a backup of the WINS database to starting other functions, such as scavaging, searching, and pulling and pushing records.
-
Reset Reset the statistics counter for the local WINS server.
-
Set Use this command to set many options for WINS, from the default log parameters to a backup path for the database.
-
Show Similar to Set, this command will display a great deal of information about the current WINS server.
The complete syntax of the commands available is too vast to cover in a single chapter. The topic of the netsh command syntax could very well be a good reference book on its own because it can be used in other contexts to control other utilities, such as DHCP, and to perform diagnostics on the system.
Служба WINS (Windows Internet Name Service) обеспечивает поддержку распределенной базы данных для динамической регистрации и разрешения NetBIOS-имен. Служба WINS отображает пространство имен NetBIOS и адресное пространство IP друг на друга и предназначена для разрешения NetBIOS-имен в маршрутизируемых сетях, использующих NetBIOS поверх TCP/IP. Следует напомнить, что NetBIOS-имена используются ранними версиями операционных систем Windows как основной способ именования сетевых ресурсов. Служба WINS была разработана с целью упрощения процесса управления пространством имен NetBIOS в сетях на базе TCP/IP.
Основное назначение службы WINS заключается в разрешении NetBIOS-имен в IP-адреса. Процесс разрешения строится на основе базы данных WINS-сервера, содержащей отображения пространства NetBIOS-имен на пространство IP-адресов. Входя в сеть, клиент регистрирует свое имя в базе данных WINS-сервера. При завершении работы клиент отправляет сообщение WINS-серверу, извещая его об освобождении им зарегистрированного имени. На рис. 13.21 показан процесс взаимодействия WINS-клиента и WINS-сервера.
Рис. 13.21. Взаимодействие WINS-клиента и WINS-сервера
Реализация службы WINS в Windows Server 2003 характеризуется функциональными возможностями, перечисленными ниже.
- Постоянные соединения. Каждый WINS-сервер может быть настроен на обслуживание постоянного соединения с одним или большим количеством партнеров репликации. Это увеличивает скорость репликации и снижает затраты на открытие и завершение соединений.
- Управление «захороненными» записями. «Захороненными» (tombstoning) называются записи в базе данных WINS, которые были помечены для удаления. Информация о «захороненных» записях реплицируется между WINS-серверами, что позволяет синхронно удалить эти записи из всех копий базы данных WINS. Реализованный механизм управления позволяет администратору вручную удалять произвольные записи из базы данных WINS.
- Улучшенная утилита управления. Для управления WINS-сервером используется специальная утилита WINS, реализованная в виде оснастки ММС.
- Расширенная фильтрация и поиск записей. Улучшенная фильтрация и новые поисковые функции помогают находить записи, показывая только записи, соответствующие заданным критериям. Эти функции особенно полезны для анализа очень больших баз данных WINS.
- Динамическое стирание записей и множественный выбор. Эти особенности упрощают управление базой данных WINS. При помощи оснастки WINS можно легко манипулировать с одной (или более) записью WINS динамического или статического типа.
- Проверка записей и проверка правильности номера версии. Указанный механизм осуществляет проверку последовательности имен, размещенных в базах данных WINS-серверов. Проверка записей сравнивает IP-адреса, возвращаемые по запросу NetBIOS-имени с различных серверов WINS. Механизм проверки правильности номера версии проверяет номер владельца таблицы отображения «адрес-версия».
- Возможность экспорта базы данных WINS. При экспорте содержимое базы данных WINS-сервера сохраняется в текстовом файле с запятыми в качестве разделителей. Можно импортировать этот файл в различных форматах (в том числе и в формате Microsoft Excel).
- Динамическое обновление клиентов. Для возобновления регистрации локальных NetBIOS-имен не требуется перезапускать WINS-клиента. Обновление информации о зарегистрированных именах администратор может использовать утилиту Nbtstat.exe с параметром -гг.
- Консольный доступ только для чтения к оснастке WINS. Эта возможность предоставляется группе WINS Users (Пользователи WINS), которая автоматически создается в момент установки WINS-сервера. Добавляя членов к этой группе, можно предоставить доступ только для чтения к информации о WINS. Это позволяет пользователю, являющемуся членом указанной группы, просматривать (но не изменять!) параметры и содержимое базы данных WINS-сервера.