
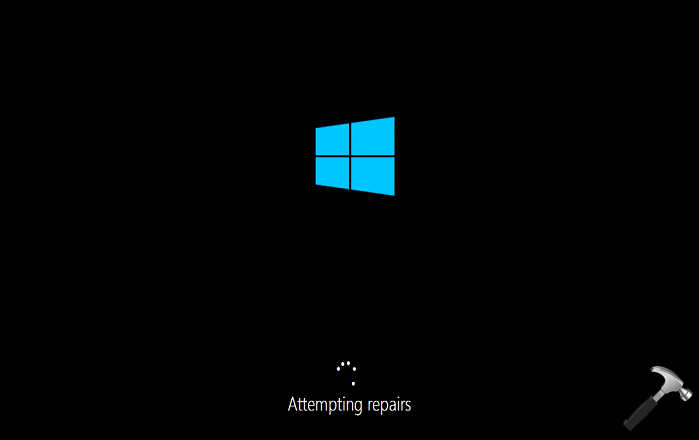
,
This tutorial contains instructions to fix the Windows boot error 0xc0000428, with description: «Windows cannot verify the digital signature for this file: «\Windows\system32\winload.efi», or «Windows cannot verify the digital signature for this file: «\Windows\system32\winload.exe».

How to FIX: Windows cannot verify the digital signature for file: winload.efi OR winload.exe (0xc0000428)*
* Note: The following instructions apply to all versions of Windows.
Requirements: To fix the Windows boot error «0xc0000428: Windows cannot verify the digital signature for this file: winload.efi» you need to start your PC from a Windows Installation USB or DVD Media. If you don’t own a Windows installation media, then (from another working pc) you can create one by using the Media Creation tool
- How to create a Windows 10 USB boot media.
- How to create a Windows 10 DVD boot media.
1. Boot your computer from the Windows Installation Media (USB or DVD).
2. At the Windows Setup screen press SHIFT + F10 to access command prompt, or choose Next –> Repair your computer –> Troubleshoot –> Advanced Options –> Command Prompt.

3. At command prompt type the following command and press Enter:
- bcdedit
4. Now notice the identifier value at the «\Windows\system32\winload.efi«
e.g. As you see at the screenshot bellow the identifier value is «{default}»

5. Now give the following command and press Enter: *
- bcdedit -set {identifier value} nointegritychecks 1
* Note: Replace the «identifier value» according your case. e.g. At this example the command will be:
-
bcdedit -set {default} nointegritychecks 1

6. Remove the Windows installation media.
7. Close all windows and restart your PC.
That’s it! Let me know if this guide has helped you by leaving your comment about your experience. Please like and share this guide to help others.
If this article was useful for you, please consider supporting us by making a donation. Even $1 can a make a huge difference for us in our effort to continue to help others while keeping this site free:
- Author
- Recent Posts
Konstantinos is the founder and administrator of Wintips.org. Since 1995 he works and provides IT support as a computer and network expert to individuals and large companies. He is specialized in solving problems related to Windows or other Microsoft products (Windows Server, Office, Microsoft 365, etc.).
Konstantinos Tsoukalas
Konstantinos is the founder and administrator of Wintips.org. Since 1995 he works and provides IT support as a computer and network expert to individuals and large companies. He is specialized in solving problems related to Windows or other Microsoft products (Windows Server, Office, Microsoft 365, etc.).
Одна из распространенных ошибок Windows 10, с которой можно столкнуться как при запуске ОС так и при её установке — «Не удалось проверить цифровую подпись этого файла», код ошибки 0xc0000428. В некоторых случаях появления синего экрана с этим кодом также указывается имя проблемного файла, частые варианты — oem-drv64.sys (для не вполне легальных ОС), winload.exe.
В этой инструкции подробно о возможных причинах этой ошибки и о способах её исправить в зависимости от ситуации и конкретного сценария появления проблемы.
Исправление ошибки 0xc0000428 при запуске Windows 10

В случаях появления ошибки «Не удалось проверить цифровую подпись этого файла» с кодом 0xc0000428 при запуске системы (при условии, что до этого Windows 10 запускалась нормально) среди причин можно предположить:
- Установку неподписанных драйверов устройств, в том числе виртуальных, которые может устанавливать стороннее прикладное ПО.
- Модификацию или замену системных файлов Windows 10, загрузчика системы, например, при использовании различных твиков системы, установке второй ОС на компьютер или ноутбук.
Сообщение об ошибке в нижней части, помимо прочего, предлагает нажать клавишу F8 для доступа к параметрам загрузки и именно её мы будем использовать для исправления ошибки:
- Нажмите F8, а если не сработает и у вас ноутбук — Fn+F8
- Откроется окно выборов параметров загрузки, вам требуется пункт «Отключить обязательную проверку подписи драйверов» — F7 или Fn+F7 (можно также использовать просто клавишу 7 в верхнем ряду).

- В этот раз, при условии исправного загрузчика запуск Windows 10 должен произойти без проблем.
- Дальнейшие действия могут быть следующими: удаление проблемного драйвера и соответствующих ему служб (в случае oem-drvsys может привести к проблемам с активацией и, в некоторых случаях, запуском), софта, который его установил или отключение проверки цифровой подписи драйверов Windows 10 на постоянной основе, о чем — пункт 5.
- Второе можно сделать с помощью командной строки, запущенной от имени администратора, введя команду bcdedit.exe /set nointegritychecks on а после перезагрузки также отключив Secure Boot в БИОС. При желании, можно использовать сторонние программы, такие как EasyBCD для отключения проверки цифровой подписи: в этой программе потребуется зайти в «Дополнительные параметры» (Advanced Settings) — Вкладка «Дополнительно» (Advanced) и установить отметку отключения проверки цифровой подписи драйверов (Allow use of unsigned drivers), а затем сохранить настройки кнопкой Save Settings (в программе есть и русский язык интерфейса, но при его включении иногда часть интерфейса становится не видна, потому привожу информацию на английском). После перезагрузки отключите функцию Secure Boot, если она включена в БИОС/UEFI.

Если указанные шаги не помогли или варианты загрузки по F8 не работают, попробуйте выполнить восстановление загрузчика Windows 10, используя загрузочную флешку с системой (при ее отсутствии придется создать где-то на другом компьютере). Есть и ещё один вариант входа в параметры загрузки: принудительное выключение долгим удержанием кнопки питания при загрузке Windows: после второго принудительного выключения будет произведена попытка автоматического восстановления, а затем появится экран, где кнопка «Дополнительные параметры» позволит зайти в среду восстановления.
Также можно попробовать использовать точки восстановления системы при их наличии: загрузитесь с загрузочной флешки Windows 10, на экране после выбора языка внизу справа нажмите «Восстановление системы» и найдите точки восстановления в параметрах.
Примечание: если ошибка вызвана файлом oem-drv64.sys и вы решили его удалить (напомню, на нелицензионных ОС после этого возможны дополнительные проблемы), удалите также раздел реестра
HKEY_LOCAL_MACHINE\SYSTEM\CurrentControlSet\services\oem-drv64
Ошибка 0xc0000428 при установке Windows 10
Причины появления рассматриваемой ошибки при установке Windows 10 на компьютер обычно диагностируются сложнее. Распространенными случаями являются следующие:
- Если флешка создана с использованием образа Windows 11/10, выпущенном до начала 2024 года, а БИОС материнской платы обновлен в этом году, причиной может быть блокировка отозванных загрузчиков UEFI из-за уязвимости CVE-2023-24932. Решение (при условии, что вы уверены в том, что образ оригинальный) — отключить Secure Boot в БИОС.
- Ошибка происходит при загрузке с установочной флешки — может возникать при использовании мультизагрузочных флешек и накопителей с загрузчиком Grub4DOS (такие, например, получаются при использовании WinSetupFromUSB). Попробуйте записать флешку другим образом, например с помощью Rufus. Также может помочь отключение Secure Boot в БИОС компьютера или ноутбука.
- Ошибка возникает при первой перезагрузке после начала установки. Здесь можно попробовать: если на компьютере стояла другая ОС, удалить раздел с загрузчиком от неё и заново запустить установку. Если установка выполняется на чистый диск, можно попробовать другой образ и отключение Secure Boot.
Если ни один из подходов не сработал в вашем случае, опишите в комментарии конкретную ситуацию, после чего возникла проблема и на какой файл указывает сообщение об ошибке, если такое указание присутствует. Я постараюсь помочь.
Sometimes, when you sign in, Windows 10 prompts you that the operating system couldn’t be loaded because the digital signature of a file couldn’t be verified, which is also called Windows 10 error 0xc0000428. Here the file usually refers to winload.exe file.
Undoubtedly, if Windows 10 cannot verify the digital signature for this file, you are also unable to boot your PC as usual.
Contents:
- What is Digital Signature on Windows 10?
- 2 Ways to Fix The Digital Signature For This File Couldn’t be Verified
What is Digital Signature on Windows 10?
Before you get down to tackle with Windows system 32 winload.exe error, you need to know why Windows cannot verify the digital signature for this file.
Digital signature is used to provide safety protection for your documents, files, etc. Once you have digitally signed your computer, it is a necessity for you to get this digital signature every time you boot your PC, which explained why it is called one of the boot manager.
To fix 0xc0000428 Windows 7 or Windows 10 effectively, this post will walk you through the digital signature for this file could not be verified issue.
How to Fix The Digital Signature For This File Couldn’t be Verified?
Provided that you encountered the digital signature error on Windows 10, the winload.exe file is missing or corrupted on your computer.
You failed to use the boot manager to correctly start Windows 10. It is high time that you managed to solve this startup issue right away, so just follow up.
Now move on to try the ways below in order to fix Windows 10 digital signature cannot be verified for the file.
Solutions:
- 1: Reboot Boot Manager
- 2: Disable Digital Signature Enforcement For a Moment
Solution 1: Reboot Boot Manager
On the basis that you cannot boot Windows 10 with the presence of 0xc0000428 error, the first thing you are supposed to do is to restart the boot manager.
You have to finish it from startup Advanced options.
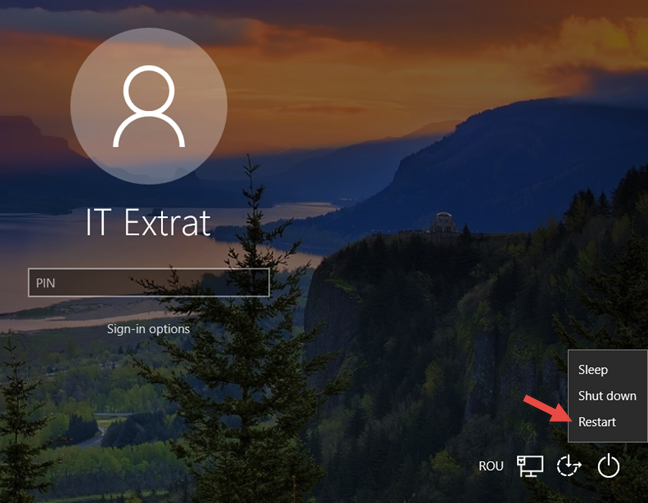
1. In the sign-in screen, click Restart and at the same time, press Shift key all the time until the option list pops up.
Here if you even cannot find out the sign-in window, maybe you have to use bootable USB device to get to this screen.
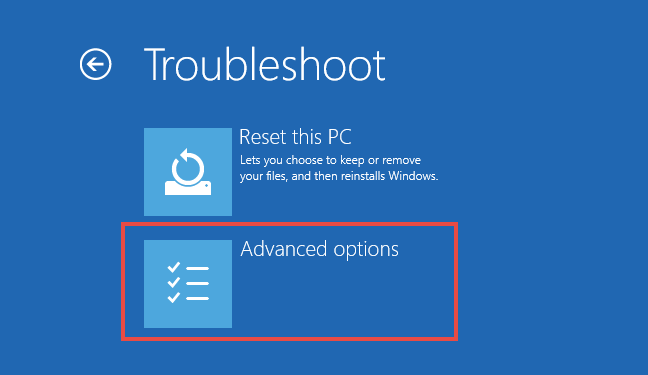
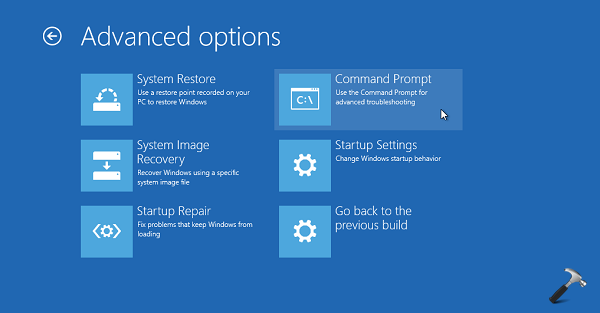
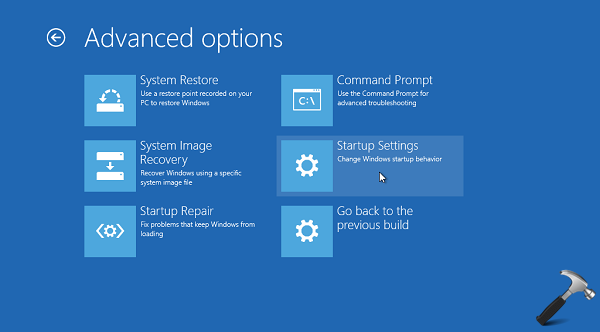
2. Choose Advanced options in Troubleshoot.
3. In Advanced options window, select Command Prompt.
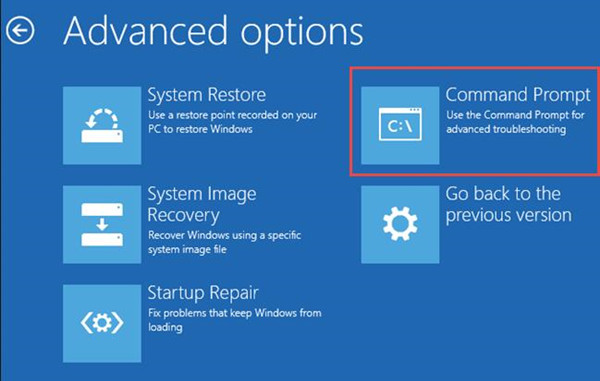
Here it is also useful for you to perform a Startup Repair for Windows 10 so as to solve digital signature for this file couldn’t be verified error on your computer as it will fix problems keeping Windows from loading.
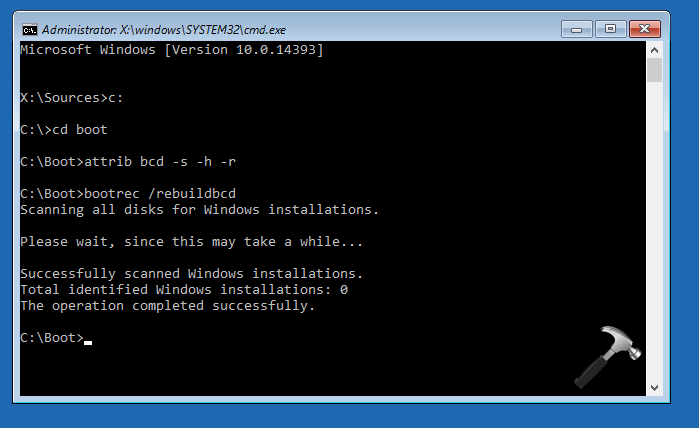
4. Then in Command Prompt, enter the following three commands one by one to reboot boot manager for Windows 10.
C:
cd boot
attrib bcd -s -h –r
bootrec /rebuildbcd
Tips: Here C: indicates the root manager on Windows 10, if yours is D: or F: or another disk drive, you should replace C: with it.
Now you will have properly rebooted the boot manager for your PC and you can check if the digital signature for this file could not be verified, error 0xc0000428 from Windows 10.
Solution 2: Disable Digital Signature Enforcement For a Moment
It is said that the digital signature enforcement is a powerful tool which can significantly improve the safety for Windows 10, while since you meet with the Windows 10 digital signature error 0xc0000428, you would better struggle to temporarily disable the digital signature enforcement.
After the winload.exe error vanished, you can try to enable it to prevent your PC from damaging. You can decide to close this option from startup settings if you failed to login into Windows 10.
1. Do as the above solution to press Shift key and click Restart in Power menu.
2. Then pick out Advanced options in Troubleshoot.
3. In Advanced options, select Startup Settings.
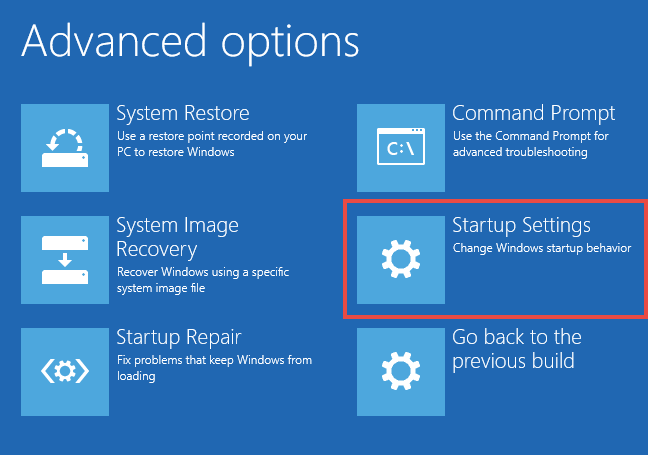
4. In Startup Settings, directly hit F7 to Disable Digital Signature Enforcement.
Then you can boot Windows 10 without getting stuck in digital signature for this file couldn’t be verified.
But if you are still unable to fix the winload.exe error or 0xc0000428 Windows 10 error for your PC, you may have to restore Windows 10 to a point until the digital signature cannot be verified for the file can be removed.
In a nutshell, this article is designed for you to fix Windows 10 cannot verify the digital signature for this file. Hope it works for your 0xc0000428 Windows 10 error.
More Articles:
Solved: Fix Critical Process Died BSOD on Windows 10
Fix INACCESSIBLE BOOT DEVICE BSOD on Windows 10
Fix IRQL_NOT_LESS_OR_EQUAL BSOD on Windows 10
How To Fix 0xc0000428 Error Code. In this article, you will read cause of 0xc0000428 error and how to solve Digital Signature For This File Couldn’t Be Verified code error.
The 0xc0000428 code error is a blue screen error. It leaves your screen bricked. You should fix these types of errors very carefully as they can damage your system that even you cannot perform system repair. If you do anything wrong, you will also not be able to reboot your system and also cannot go into safe mode. Here, we will going to troubleshoot this issue.
Cause Of 0xc0000428 Error:
You will see an error:
“Windows can’t verify the digital signature for this file: \Windows\System32\winload.exe – Error code: 0xc0000428“.
There are two reasons for this error:
-Outdated BOOTMGR.
-Dual boot is enabled because the older BOOTMGR is still in use and there is no boot record for the new operating system.
-Windows is not verifyingDigital Signature for recent Hardware or software change.
How To Fix 0xc0000428 Error Code?
To fix The Digital Signature For This File Couldn’t Be Verified error, follow the methods below.
Method 1 – Fix Boot Manager And BCD:
Use command prompt to open a tool called bootrec.exe. It is used to solve the boot related issues. As you are stuck at the boot screen, you have to open the Command Prompt from the boot screen. To do so, you need a recovery data on Windows 10.
1.Download and burn the Windows file from their website onto a USB.
2.Click on Repair your computer.
3.This will take you to Advanced Options.
4.Select Command Prompt.
5.Now, enter the following commands one by one and press Enter after each one.
bcdboot C:\windows /s C:
bootrec /fixMBR
bootrec /fixBoot
bootrec /rebuildBCD
Note: Here, C:\windows is the windows installation folder directory, and C: is the boot partition. Change them according to your device. There is a space before the /.
6.Restart your computer.
7.Try booting into your computer now.
8.Bootrec.exe tool will repair your device boot files.
9.Now, you will be able to boot normally.
Method 2 – Startup Repair In Windows Recovery Environment:
If you don’t want to use Command Prompt, then you can run a Startup repair as well.
1.Open the same boot menu as in method 1.
2.Select Startup Repair.
4.estart your computer.
5.It should boot normally.
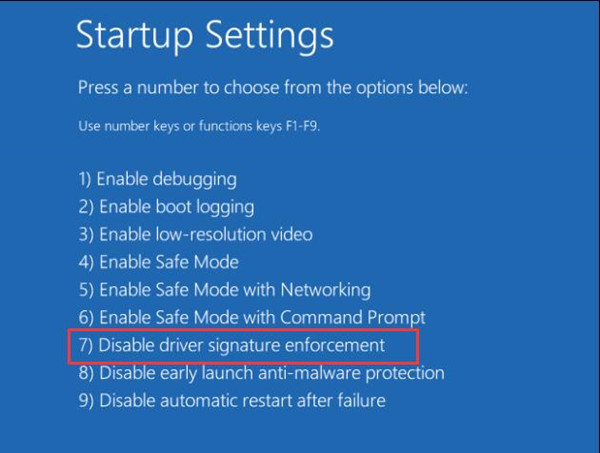
Method 3 – Disable Driver Signature Enforcement:
Disable the Driver Signature Enforcement from the boot menu can solve the issue. You can do this from repair media. To do so, follow the steps:
1.Download and burn the Windows file from their website onto a flash drive.
2.Click on Repair your computer.
3.This will take you to Advanced Options.
4.In Advanced Options, select Startup Settings.
5.Then, select Disable driver signature enforcement.
6.Click on number 7, or press the F7 key to select the option.
7.Press Enter to return to your Operating System.
8.Now try booting into Windows. It will work normally.
If you can boot into Windows, you can do this in Advanced settings from Windows Settings. Follow the steps:
1.Open Windows Settings app.
2.You can use the keyboard shortcut Win + I.
3.Open Update and Security.
4.From the left pane menu, select Recovery.
5.From the right pane, select Advanced Startup.
6.Click on Restart now to open Advanced Startup Options.
Boot manager errors are the most terrible issues for Windows users because you can’t boot to your operating system to fix them. Most of them require use of recovery media and if the user don’t have any install or recovery media, fixing the machine becomes more complex. Well, in this article, we’re going to talk about of one these boot manager errors, which we faced recently on a Windows 10 Pro system.
The error message and its screenshot is shown below.
A recent hardware or software change might have installed a file that is signed incorrectly or damaged, or that might be malicious software from an unknown source.
File: \windows\system32\winload.exe
Page Contents
Status: 0xc0000428
Info: The digital signature for this file couldn’t be verified.
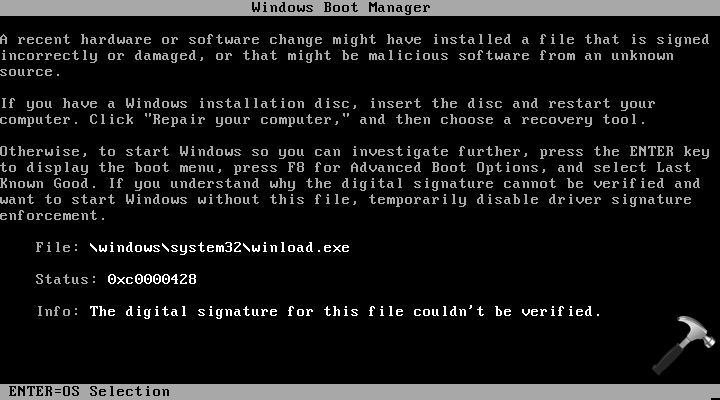
The above shown information indicates that something is wrong with boot manager. It may be corrupted or missing, anything could happen. The first thing we did after getting this error was to reboot the machine, but it didn’t helped. Then after trying the suggestions mentioned below, we were able to fix this hiccup.
FIX : Error 0xc0000428, The Digital Signature For This File Couldn’t Be Verified For Windows 10
FIX 1 – Rebuild Boot Manager And Perform Startup Repair
Since boot manager is housed inside Boot Configuration Data (BCD) file, we can try rebuilding this file. Here’s how:
1. Follow steps 1-5 of this fix.
2. Then in the Advanced options screen, choose Command Prompt entry.
3. Last step will result in opening of Command Prompt at boot.

4. Then you’ll be asked to choose an account to continue. Next, in the Command Prompt window, type these one by one and press Enter key after each:
C:
cd boot
attrib bcd -s -h -r
bootrec /rebuildbcd
NOTE: You have to substitute C: with your system root drive.
5. Then you can close Command Prompt and perform Startup or Automatic repair using steps mentioned here.
A final reboot after performing Startup repair should let you to boot normally to Windows.
FIX 2 – Disable Driver Signature Enforcement Temporarily
As per the error message, you can also disable driver signature enforcement and see if that helps you in this case. The dedicated steps are as follows:
1. Follow steps 1-5 of this fix. Choose Startup Settings option at Advanced Recovery Options screen.
2. Moving on, click Restart button on the next screen:
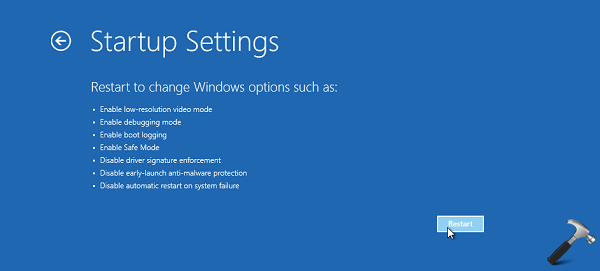
3. Finally, in the Startup Settings screen shown below, press F7 or key 7 to Disable driver signature enforcement. Now your PC will restart, making the setting effective.
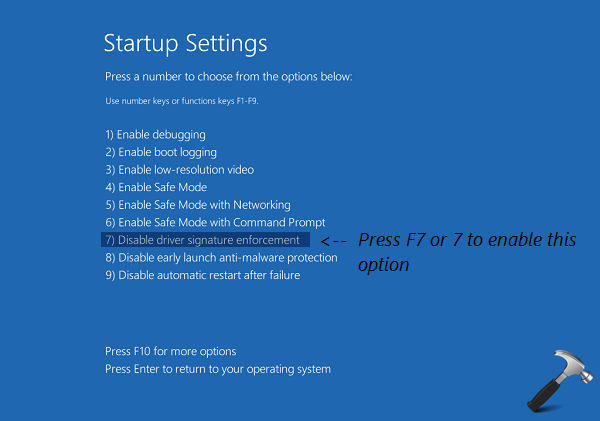
4. On next reboot, the system will start bypassing driver signature integrity checks and if you’re lucky you’ll be able to boot normally. If you succeeded, you should run System File Checker and DISM commands to repair any possible corruption. You can also try reinstalling your Windows 10 without affecting your data. In this way, you can fix boot manager completely. On another restart, Windows will again enable driver signature enforcement, so that it will remain safe from unsigned drivers.
Check following video for illustration of this method:
Hope this helps!