
Readers help support Windows Report. We may get a commission if you buy through our links.
Read our disclosure page to find out how can you help Windows Report sustain the editorial team. Read more
If you see the error message saying the Winload.efi is missing or corrupted, your computer cannot boot into Windows, and you may encounter a Blue Screen of Death screen.
In this guide, we will discuss some expert-recommended methods to fix the winload error on Windows 11 right after explaining the potential causes behind the problem.
What is the Winload.efi file?
The Winload.efi is an Extensible Firmware Interface file that is an integral component of the Windows Boot Manager, which uses the file to load the Windows kernel & other essential system files into memory.
Generally, the file is used for tasks such as restarting the computer, installing Windows, resetting your PC settings, and more. The file is located at C:\windows\System32\Boot\winload.efi
What causes the Windows 11 Winload error?
There could be various reasons for the Winload.efi is missing error; some of the common ones are mentioned here:
- Corrupted BCD – The Boot Configuration Data (BCD) store is misconfigured or damaged; you may encounter the error. Try rebuilding the BCD.
- UEFI firmware issues – If there is an issue with UEFI firmware settings, you could see this error during the boot process.
- Bad sectors – The bad sectors or system file corruption may result in this BSoD error. You need to scan your computer for bad sectors and repair system files using an SFC scan.
- Interrupted Windows update – If the Windows updates were interrupted or unsuccessful, it could corrupt system files, causing the problem.
- Damaged Winload.efi file – The disk errors, malware infection, or power failures during updates can corrupt the file, hindering the Windows booting process and causing the blue screen error.
Now that you know the causes of the issue, let us move quickly to learn the solutions to eliminate it.
How do I fix the Winload error in Windows 11?
Before engaging in advanced troubleshooting steps, you should consider performing the following checks:
- Try rebooting your PC.
- Ensure your BIOS firmware is updated.
- Remove all the external peripherals.
Once you are through these checks, check out the detailed methods to fix the problem.
1. Disable Secure Boot
- Restart your computer. During startup, you need to press a key designated by the OEM or computer manufacturer to access the UEFI settings. For HP, it is F10; for Dell, it is F2.
- You will enter the UEFI settings. Locate the Security or System Configuration section.
- Now look for Secure Boot or UEFI Secure Boot, select it, and change the status to Disabled.

- Depending upon your machine, you might also have to change the UEFI mode to Legacy mode to disable Secure Boot.

- Once done, Save & Exit to save the changes.
- Restart your computer.


Turning off Secure Boot allows you to boot non-signed OS or bootable tools, which can help you fix the issue. If, after reboot, you can’t get past the BSoD screen and get the Automatic Repair screen, move to the following method.
2. Run the Startup Repair tool
2.1 Prepare an installation media file & change the boot order
- On another device or PC, go to Windows 11 website, locate Windows 11 Installation Media, and click Download Now.

- The mediacreation.exe file will be downloaded; double-click to open it.
- Click Accept.

- For Select language and edition, choose Language and Edition and click Next.
- Select the USB flash drive option. Plug in the USB drive with a minimum of 8 GB storage.
- The Windows 11 Setup will detect and show the drive; click Next.
- Once ready, click Finish.
- Plug in the flash drive to the affected computer and turn it on. Press the key designated by the manufacturer to enter Boot options.
- Go to Boot and locate the USB flash drive, use the arrow keys to move it up in the list, and save the changes & restart.


2.2 Initiate Startup Repair
- After restart, you will see the Windows Setup screen, select Language to install, Time and currency format, and Keyboard or input method.

- Click the Repair your computer option from the next page.

- On the Choose an option screen, select Troubleshoot.

- Choose Advanced options from the next page.

- Select the Startup Repair option.

- Follow the onscreen prompts and wait for the process to complete, then restart your computer.


The Startup Repair tool diagnoses and repairs complex startup problems; that’s why it should be the first thing to do if the computer doesn’t boot up.
3. Repair the BCD files
- Boot your computer using Windows installation media via a USB flash drive created in Step 2.1. On the Windows Setup screen, input the details, and click Next.
- Select Repair your computer on the next page.
- On Choose an option screen, click Troubleshoot.
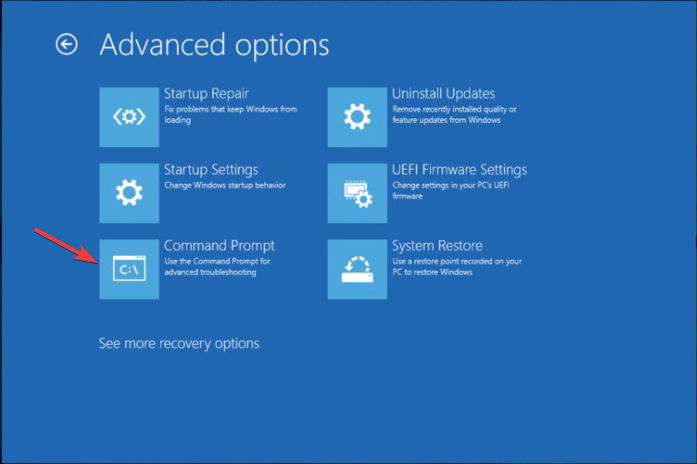
- Next, select Advanced options.
- On the Advanced options screen, choose Command Prompt. Your PC will restart and input the user account credentials when prompted.
- On the Command Prompt window, copy & paste the following commands one by one to fix Boot Record, Boot Sector, and BCD store, and press Enter after every command:
bootrec /fixmbr
bootrec /fixboot
bootrec /scanos
bootrec /rebuildbcd
- Restart your computer to see if you can now access Windows.
If you are facing booting issues on Windows 10, we have a great guide with solutions to fix it
4. Run the DiskPart command
- Boot your computer using Windows installation media via a USB flash drive created in Step 2.1. Fill in the details on the Windows Setup screen, and click Next.
- On the next page, click Repair your computer.
- From Choose an option screen, click Troubleshoot.
- Next, select Advanced options.
- Now choose Command Prompt. Your computer will reboot, and input the user account credentials if asked.
- Type the following commands one by one and hit Enter after every command:
diskpart
list volume
select volume=n
assign letter=m
- Copy & paste the command after replacing the c with the letter of your system drive and press Enter:
bcdboot c:\Windows /s m: /f uefi - Reboot your computer to check if the issue is fixed.
- Microsoft releases Windows 11 (KB5058411, KB5058405) May 2025 Patch Tuesday
- You can now share an app/browser window with Copilot Vision to help you with different tasks
5. Use an SFC scan to repair system files
- Restart your computer using the Windows installation media created in Step 2.1. On the Windows Setup screen, enter the details, and click Next.
- Select Repair your computer on the next screen.
- On Choose an option screen, select Troubleshoot.
- Choose Advanced options from the next screen to proceed.
- Select Command Prompt from the Advanced options window. The system will restart and enter credentials when prompted.
- On the Command Prompt window, type the following command to restore the system files and hit Enter:
sfc /scannow
- The command will take some time to complete; wait till you see a successfully completed message, then restart your PC.

6. Repair disk errors
- Reboot your PC using the Windows installation media created in Step 2.1. On the Windows Setup screen, fill in the details, and click Next.
- Click the Repair your computer option on the next screen.
- On Choose an option screen, select Troubleshoot.
- Next, click Advanced options.
- Select Command Prompt from the Advanced options window. Your PC will reboot and prompt you for a user account password; enter it to proceed.
- Type the following command to check and repair the disk errors after replacing C with the letter of the system drive and press Enter:
chkdsk c: /f /r /x - When prompted, press Y, then wait for the command to get executed.
If your computer is not able to boot up, you might want to check our guide on the subject to fix the issue on Windows 11.
7. Perform System Restore
- Restart your PC using the Windows installation media created in Step 2.1. On the Windows Setup screen, fill in the details, and click Next.
- Click the Repair your computer option on the next screen.
- On Choose an option screen, select Troubleshoot.
- Choose Advanced options.
- From the Advanced options window, choose System Restore. Your computer will reboot, and enter the user name and password to proceed.
- On the System Restore window, click Next.

- Select the Restore point and click Next.
- Click Finish and wait while the system returns to the last known good configuration.


8. Reinstall the operating system
- Restart your PC using the Windows installation media created in Step 2.1. Enter information for the Language to install, Time and currency format, & Keyboard or input method options, and click Next.
- Click Install Now.
- Enter the product key or choose I don’t have a product key.
- Choose the Windows version and click Next.

- Follow the onscreen prompts to complete the installation process.


So, these are methods you can use to fix the Winload error on Windows 11 and regain access to your computer.
If you are encountering missing Winload.efi error on Windows 10, feel free to check this informative guide to resolve the issue.
Please let us know of any additional solutions or thoughts you may have on this topic in the comment section below.
Claire Moraa
Windows Software Expert
Claire has a knack for solving problems and improving the quality of life for those around her. She’s driven by rationality, curiosity, and simplicity, and always eager to learn more about Microsoft’s products.
With a background in teaching and reviewing, she breaks down complex topics into easily understandable articles, focusing mostly on Windows 11, errors, and software.
В этой статье мы разберемся, как восстановить загрузчик Windows 10 или 11 на современном компьютере, на котором используется UEFI интерфейс вместо классического BIOS и таблица разделов диска GPT (вместо MBR). Повреждение загрузчика Windows может быть вызвано установкой второй ОС (Dual Boot — конфигурация), повреждением файловой систему, некорректным восстановлении Windows после сбоя, удалением скрытых разделов, вирусом-вымогателем и рядом других причин.
Данная статья содержит подробную пошаговую процедуру восстановления поврежденного или удаленного загрузчика ОС в Windows 11/10/8.1 и Windows Server 2022/2019/2016/2012R2 на компьютерах, которые работают в нативном (не legacy) режиме UEFI. Инструкцию можно использовать как для восстановления бинарных файлов загрузчика Windows, так и конфигурационного файла загрузчика EFI\Microsoft\Boot\BCD (в случаях, когда Windows не загружается из-за отсутствия или повреждения файла конфигурацией загрузка BCD.
Содержание:
- Не загружается Windows: Boot configuration data is missing EFI\Microsoft\Boot\BCD
- Автоматическое восстановление загрузчика Windows
- Ручное восстановление загрузчика Windows с помощью BCDBoot
Не загружается Windows: Boot configuration data is missing EFI\Microsoft\Boot\BCD
UEFI компьютер с Windows, установленной в наивном режиме, не сможет загрузиться при повреждении EFI загрузчика Windows. При попытке загрузиться с диска с повреждённым или отсутствующим EFI загрузчиком появится BSOD (синий экран смерти) с ошибкой:

The boot configuration data for your PC is missing or contains errors.
File :\EFI\Microsoft\Boot\BCD
Error code: 0xc000000f
или
Error code: 0xc000014c
В русской версии Windows ошибка может быть такая:
Ваш компьютер нуждается в ремонте Данные конфигурации загрузки для вашего ПК отсутствуют или содержат ошибки Файл:\EFI\Microsoft\Boot\BCD

Код ошибки: 0xc000000f
Эта ошибка говорит о повреждении или даже полном удалении конфигурации загрузчика Windows — Boot Configuration Data (BCD). Если вы попытаетесь восстановить загрузчик на UEFI компьютере с помощью утилиты
bcdedit
, вы получите такую ошибку:
The boot configuration data store could not be found.
The requested system device cannot be found.
Дело в том, что если Windows 10/11 установлена в нативном режиме UEFI на GPT диск, то EFI загрузчик Windows (Windows Boot Manager) хранит программу управления загрузкой и конфигурацию BCD на отдельном скрытом разделе EFI (размером 100 мб с файловой системой FAT32). Утилита bcdedit не видит этот EFI раздел, и соответственно не может управлять конфигурацией загрузчика на нем.
Если при загрузке Windows появляется только черный экран с надписью “Operating System not found”, скорее всего у вас полностью удален загрузчик Windows. Следуйте инструкции по ссылке.
Автоматическое восстановление загрузчика Windows
Процедура автоматического восстановления загрузчика, зашитая в среду восстановления Windows (WinRe), как правило, в таких случаях бессильна. Но попробовать все-же стоит:
- Загрузитесь с диска загрузочного диска, диска восстановления или установочной флешки с Windows 10 или 11;
- На экране установки нажмите кнопку Восстановление системы;
- Затем выберите пункт Поиск и устранение неисправностей -> Восстановление при загрузке и выберите ОС, загрузчик которой нужно попытаться восстановить;
- Но скорее всего результат будет отрицательный: Восстановление при загрузке не удалось восстановить компьютер


Ручное восстановление загрузчика Windows с помощью BCDBoot
Перейдем к процедуре ручного восстановления EFI загрузчика Windows на UEFI компьютере.
Для восстановления конфигурации загрузчика (BCD), вам нужно загрузить компьютер с оригинального установочного диска с Windows (диска восстановления или специально подготовленной установочной USB флешки с Windows ). После загрузки в среде восстановления нужно открыть окно командной строки: выберите Восстановление системы -> Диагностика -> Командная строка (System Restore -> Troubleshoot -> Command Prompt).
Командную строку также можно запустить, если у вас под рукой есть только установочный диск с Windows. Для этого достаточно на самом первом этапе установки Windows (при выборе языка и раскладки клавиатуры) нажать комбинацию клавиш Shift+F10 (или Shift+Fn+F10 на некоторых моделях ноутбуков).

В открывшейся командной строке выполните запустите утилиту управления дисками, набрав команду:
diskpart
Выведите список дисков в системе:
list disk
На этом этапе очень важно определить тип таблицы разделов на диске, на котором установлена Windows: MBR или GPT. Дело в том, что EFI загрузчик используется только на дисках с GPT разметкой.
Если у диска в столбце Gpt указана звездочка (
*
), тогда на диске используется таблица разделов GPT, если нет – MBR.
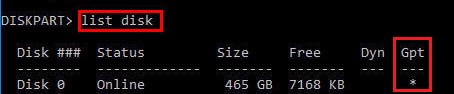
Если с помощью diskpart вы определили, что на вашем диске используется GPT разметка, следуйте дальнейшим шагам инструкции по восстановлению загрузчика.
Если у вас разметка MBR, тогда данная инструкция не применима к вашему компьютеру. Скорее всего у вас компьютер с BIOS, или в настройках UEFI включен режим совместимости Legacy/Compatibility Support Module/CSM.
На MBR дисках загрузчик хранится на отдельном разделе System Reserved, а не на EFI разделе (ни в коем случае не конвертируйте таблицу разделов MBR в GPT, пока не исправите загрузчик!!) Используйте другую инструкцию по восстановлению BCD загрузчика на MBR (Master Boot Record) диске.
Выберите диск, на котором установлена ваша Windows (если жесткий диск в системе один, его индекс должен быть равен 0):
sel disk 0
Выведите список томов и разделов в системе:
list partition
list volume
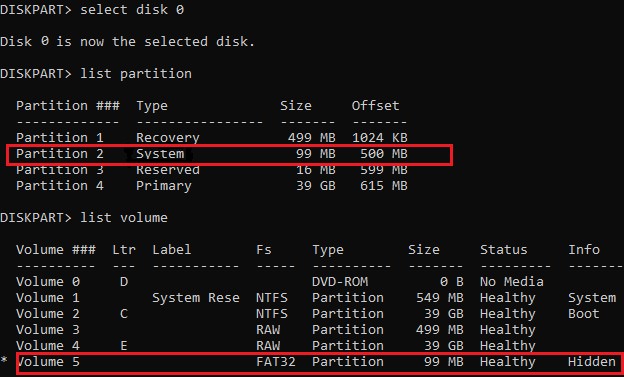
В нашем примере видно, что загрузочный раздел EFI имеет индекс Partition2 (он же Volume 5 с меткой Hidden). Проще всего определить EFI размер по файловой системе FAT32, размеру 100 Мб (это стандартный минимальный размер для Windows компьютеров, в редких случая размер раздела может быть). Чаще всего для него используется метка — System EFI или ESP/ EFI System Partion).
В нашем примере основной раздел, на который установлена Windows, имеет индекс volume 2, отформатирован в файловая система NTFS и ему назначена буква C:.
В вашем случае назначенная буква диске может отличаться. Это зависит, как вы загрузили свой компьютер в среде WinPE. Проще всего определить его по размеру. Если вы не уверены, нужно проверить что на этом диске есть каталог Windows. Выйдите из утилиты diskpart (команда exit) и выполните команду:
dir C:\
Убедитесь, что на этом диске есть каталоги
Windows
,
Program Files
,
Users
и прочие.
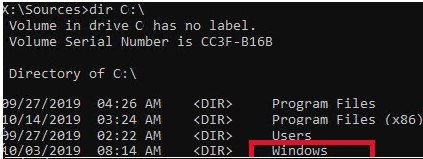
Если этих каталогов нет, значит вашему диску с Windows назначена другая буква диска. Проверьте содержимоет дисков с другими буквами.
Запомните букву диска, назначенную разделу с Windows, чуть ниже мы будем использовать ее в качестве одного из аргументов команды bcdboot.
В таблице также обязательно должен быть раздел MSR (Microsoft System Reserved) размером 16 мб в Windows 10/11 (или 128 Мб в Windows 8.1).
Назначьте скрытому EFI разделу произвольную букву диска (например, M:):
select volume 5
assign letter M:
Должна появится строка, свидетельствующая об успешном назначении буквы диска разделу EFI:
DiskPart successfully assigned the drive letter or mount point.
Завершите работу с diskpart:
exit
Перейдите в каталог с загрузчиком на скрытом разделе:
cd /d m:\efi\microsoft\boot\
В данном случае M: это буква диска, присвоенная разделу EFI чуть выше. Если каталог \EFI\Microsoft\Boot\ отсутствует
The system cannot find the path specified
), попробуйте следующие команды:
cd /d M:\Boot\
или
cd /d M:\ESD\Windows\EFI\Microsoft\Boot\
На этом этапе многие рекомендуют выполнить следующие команды, которые должны перезаписать загрузочную запись раздела, найти установленные Windows и добавить их в BCD:
bootrec /fixboot
bootrec /scanos
bootrec /rebuildbcd
или даже:
bootrec /FixMbr
(восстановление MBR записи для GPT диска выглядит странным)
Все эти команды применимы только для дисков с MBR. Если ваш компьютер загружается в UEFI режиме, то на нем обязательно используется таблица разделов GPT (как раз наш случай). Поэтому при запуске команд
bootrec
вы увидите ошибку:
access is denied
Для исправления загрузочных записей на EFI разделе нужно использовать утилиту
BCDBoot
, а не bootrec.
Утилита BCDBoot позволяет восстановить файлы загрузчика на EFI разделе, скопировав их системного каталога на разделе с Windows. Конфигурация загрузчика BCD пересоздается с помощью шаблона %WINDIR%\System32\Config\BCD-Template.
С помощью команды
attrib
снимите атрибуты скрытый, read-only и системный с файла BCD:
attrib BCD -s -h -r
Удалите текущий файл с конфигурацией BCD, переименовав его (так вы сохраните старую конфигурацию в качестве резервной копии):
ren BCD BCD.bak
С помощью утилиты bcdboot.exe нужно скопировать из системного каталога критические файлы среды загрузки UEFI в загрузочный EFI раздел и пересоздать конфигурацию загрузчика в хранилище BCD:
bcdboot C:\Windows /l en-us /s M: /f ALL
где,
- C:\Windows – путь к корневому системному каталогу Windows на диске (это ваш диск, на который была установлена ваша Windows, мы узнали его ранее с помощью команды diskpart);
- /f ALL – означает, что необходимо скопировать файлы среды загрузки Windows, включая файлы для компьютеров с UEFI и BIOS (теоретическая возможность загружаться на EFI и BIOS системах). Чтобы скопировать только EFI загрузчик, используйте команду /f UEFI;
- /l en-us — определяет языковой стандарт, который используется при инициализации хранилища BCD. По умолчанию используется en-US — английский язык (США);
- /s M: — скопировать файлы EFI загрузчика на указанный раздел;
- /с – эта новая опция BCDBoot в Windows 10, которая позволяет перезатереть имеющиеся загрузочные записи при создании нового хранилища (в том числе debugsettings). Используйте этот параметр, чтобы игнорировать старые настройки и создать полностью чистую конфигурацию BCD загрузчика;
- /v – используется для включения режима вывода подробной информации BCDBoot..
Теперь, если выполнить команду bcdedit, вы увидите следующую картину:
В секции диспетчера загрузки Windows (Windows Boot Manager) должна появится запись, указывающая на полный путь к файлу управления загрузкой UEFI. В этом примере он находится на разделе 2 (
partition=\Device\HarddiskVolume2
), путь
\EFI\MICROSOFT\BOOT\BOOTMGFW.EFI
.
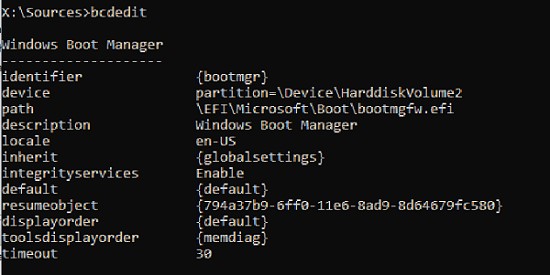
Windows Boot Manager
--------------------
identifier              {bootmgr}
device                  partition=\Device\HarddiskVolume2
path                    \EFI\Microsoft\Boot\bootmgfw.efi
description             Windows Boot Manager
locale                  en-US
inherit                 {globalsettings}
bootshutdowndisabled    Yes
default                 {CURRENT}
resumeobject            {xxxxxxxx-xxxx-xxxx-xxxx-xxxxxxxxxxxx}
displayorder            {default}
toolsdisplayorder       {memdiag}
timeout                 30
Windows Boot Loader
-------------------
identifier              {current}
device                  partition=C:
path                    \Windows\system32\winload.efi
description             Windows Server 10
locale                  en-US
inherit                 {bootloadersettings}
recoverysequence       {xxxxxxxx-xxxx-xxxx-xxxx-xxxxxxxxxxxx}
recoveryenabled         Yes
isolatedcontext         Yes
allowedinmemorysettings 0x15000075
osdevice                partition=C:
systemroot              \Windows
resumeobject            {xxxxxxxx-xxxx-xxxx-xxxx-xxxxxxxxxxxx}
В секции Windows Boot Manager должен быть указан путь к EFI разделу (
=\Device\HarddiskVolume2
), путь к файлу управления загрузкой (bootmgfw.efi). В секции Windows Boot Loader указан раздел Windows и путь к EFI загрузчику Windows (
\Windows\system32\winload.efi
). При включении компьютер передаст управление диспетчеру загрузки EFI, который запустит загрузчик Windows.
Возможные ошибки:
Перезагрузите компьютер, отключите загрузочный диск. Если вы все сделали правильно, в выборе устройств загрузки должен появиться пункт Windows Boot Manager в котором можно выбрать загрузку нужной операционной системы. Ваш EFI загрузчик и конфигурация BCD успешно восстановлены!
В некоторых случаях после восстановления BCD загрузчика, при загрузке Windows появляется ошибка
BAD SYSTEM CONFIG INFO
. Чтобы исправить ошибку:
Убедитесь, что вы не вносили недавно изменения в настройки UEFI
Загрузитесь с установочной/загрузочной флешки и измените конфигурацию загрузчика командами:
-
bcdedit /deletevalue {default} numproc -
bcdedit /deletevalue {default} truncatememory
Updated on April 22, 2024
Winload.efi is an EFI (Extensible Firmware Interface) file that plays a crucial role in booting, restarting, or resetting a computer and in the installation of Windows. It is a fundamental element in the core boot process. If this file is absent or corrupted, your Windows operating system will be unable to start normally. The system may become stuck on a blue or black screen, displaying various error codes such as «Winload.efi Missing» or «winload.efi error code 0xc00000e,» and so on.
«Winload.efi missing or contains error» typically occurs after cloning or installing Windows 11/10. Fortunately, there are tools available to fix this issue, and we’ll explore six solutions to resolve this problem.
How to Fix Missing Winload.efi
The «Winload.efi Missing» error occurs when the operating system is unable to locate or access the Winload.efi file. To fix the «winload.efi missing» issue, we offer six solutions. You can skip to the method you require or proceed sequentially through the following methods.
- Here are the translations of the given text into English:
- Option 1: Disable Secure Boot
- Option 2: Use the Boot Repair Tool
- Option 3: Run CHKDSK to Check for Drive Errors
- Option 4: Run SFC to Check System File Integrity
- Option 5: Rebuild BCD and MBR
- Option 6: Repair EFI Boot Loader
These are methods that have been proven effective by many users. You can click the social buttons below to share these methods with others in need! Then, let’s explore the best options to repair the winload.efi missing or containing errors issue.
Here they are in American English:
1. Mandarin Chinese: Mandarin Chinese
2. English: English
3. French: French
4. Spanish: Spanish
5. German: German
6. Japanese: Japanese
7. Korean: Korean
8. Arabic: Arabic
9. Russian: Russian
10. Italian: Italian
11. Portuguese: Portuguese
12. Thai: Thai
13. Hindi: Hindi
14. Vietnamese: Vietnamese
15. Turkish: Turkish
16. Greek: Greek
17. Dutch: Dutch
18. Danish: Danish
19. Swedish: Swedish
20. Norwegian: Norwegian
Option 1: Disable Secure Boot
The Safe/Secure Boot might be the cause of the winload.efi error. This issue arises when the UEFI-based system is unable to access the winload.efi file. To resolve this, you need to disable the Secure Boot in the UEFI configuration. Here are the detailed steps to disable the UEFI Secure Boot:
1. **Restart your computer and enter UEFI firmware settings:**
— Restart your PC and press the specific key (usually F2, F10, F12, or Del) during the initial startup screen to enter the BIOS or UEFI setup utility.
2. **Find the «Boot» menu:**
— Once inside the UEFI firmware settings, navigate to the «Boot» or «Startup» menu. The options may vary depending on your system manufacturer.
3. **Locate the «Secure Boot» option:**
— Search for an entry called «Secure Boot» or «Secure Boot Control.» It might be under «Security» or «Advanced» settings as well.
4. **Disable Secure Boot:**
— Select the «Secure Boot» option and change its status from «Enabled» to «Disabled.» You may need to enter a password if one has been set.
5. **Save and Exit:**
— After disabling Secure Boot, save the changes (often by selecting «Save and Exit» or pressing F10 followed by Enter) and allow your computer to restart normally.
6. **Reinstall or repair Windows:**
— Now that Secure Boot is disabled, try reinstalling or repairing Windows to address the winload.efi error. Boot from your Windows installation media, choose the appropriate language and settings, then select «Repair your computer» and follow the on-screen instructions.
7. **Re-enable Secure Boot (optional):**
— After fixing the issue, it’s recommended to re-enable Secure Boot for better system security. Follow the same steps above but enable the Secure Boot option instead.
By completing these steps, you should be able to resolve the winload.efi error related to Safe/Secure Boot. If the problem persists, there might be other underlying issues that require further investigation.
Important: The interface may vary per computer model. Please pay attention.
Step 1: Press «F2» or «Delete» when you see the logo after restarting your computer.
Step 2: Navigate to the «Secure Boot» option. Depending on your computer model, you might find this option under the «Boot,» «Security,» or «Authentication» tab.
Step 3: You’ll see the enabled «Secure Boot» interface. Change it to «Disabled.»
Disable secure boot in Windows UEFI

Step 4: Save your changes and exit the UEFI settings.
Step 5: Restart your device and check if it boots normally. If the problem persists, proceed with the next method.
Option 2. Use the Boot Repair Tool
tools Partition Master is a powerful and user-friendly boot repair tool. It enables you to create bootable devices, repair boot systems, and handle disk-related tasks with ease. Its «Boot Repair» feature is specifically designed to fix all system boot errors with just one click. Users can resolve issues like missing files and corrupted boot orders without any prior technical knowledge.
Furthermore, it aids in resolving various issues, such as system failure, system blue screen, system black screen, hard disk corruption, hard disk conversion, and many more. This tool is a trustworthy option for dealing with the winload.efi missing error.
Download the tool Partition Master and follow the steps to utilize its «boot repair» feature.
Step 1. Connect the USB drive/external drive to a working computer, open AOMEI Partition Assistant (RE), and click «Create Bootable Media.»
Step 2. Choose the Boot Toolkits and other components you need, then click «Next.»

Step 3. Choose your removable device and click «Go» to create an image on your USB drive/external hard drive. You can also burn the Windows ISO file to the storage media.

Step 4. Confirm the warning message, then wait for the creation process to finish.
Step 5. Connect the created bootable drive to the problematic computer and restart it while pressing and holding «F2» or «Del» to enter BIOS. Next, set the WinPE bootable drive as the boot disk and press «F10» to exit.

Step 6. Next, the computer will enter the WinPE desktop. Open BootRepair, select the system you wish to repair, and click «Repair.»
Select the OS to be repaired
Step 7. Wait a moment, and you will receive an alert that the system has been successfully repaired. Click «OK» to complete the boot repair process.

As one of the best Windows boot repair tools, Partition Master can also fix the following errors:
Option 3. Run CHKDSK to Check for Drive Errors
This option involves using the CHKDSK utility to scan your hard drive for any potential errors or issues that might be causing the problem. Here’s how to do it:
1. **Open Command Prompt as Administrator:**
— Press `Win + X` on your keyboard and select «Command Prompt (Admin)» from the menu.
2. **Run CHKDSK:**
— In the Command Prompt window, type the following command and press Enter:
«`
chkdsk /f /r C:
«`
— This command will check the C: drive for errors and attempt to fix them. If you want to check a different drive, replace ‘C:’ with the appropriate drive letter.
3. **Wait for the Process to Complete:**
— The CHKDSK process may take some time, especially if your hard drive is large. Do not interrupt the process or shut down your computer during this time.
4. **Review the Results:**
— Once the scan is finished, CHKDSK will display a report of any errors found and whether they were fixed.
— If no errors are found, it’s likely that the issue lies elsewhere.
5. **Reboot Your Computer:**
— After the CHKDSK process, restart your computer to see if the problem has been resolved.
If Option 3 doesn’t solve the issue, there might be other underlying problems, and you may need to explore additional troubleshooting steps or seek professional assistance.
CHKDSK is an built-in utility used to repair potential disk errors. Here are the steps to run CHKDSK:
1. Press the «Windows key» + «X» on your keyboard to open the Quick Access menu.
2. Select «Command Prompt (Admin)» or «PowerShell (Admin)» to open an elevated command prompt or PowerShell window.
3. Type the following command, and then press «Enter»:
«`
chkdsk /f /r C:
«`
Note: The «/f» switch tells CHKDSK to fix any errors it finds, while the «/r» switch locates bad sectors and recovers readable information.
4. If prompted, confirm that you want to check the disk the next time you restart your computer by typing «Y» and pressing «Enter».
5. Your computer will now schedule a disk check for the next boot. Restart your PC to initiate the process.
6. During the startup process, Windows will perform the CHKDSK scan on your C: drive. This may take some time, so be patient.
7. Once the scan is complete, your computer will continue to boot normally. Any issues found and repaired during the scan should be logged in the Event Viewer.
If you want to run CHKDSK immediately without scheduling, you can use the command `chkdsk /f /r` without restarting your PC. However, this requires that no other programs are accessing the disk, which might not always be possible.
Step 1: Connect a USB drive with Windows Installation Media to the computer.
Step 2: Boot the system from the USB and select «Repair your Computer.»
Step 3: Select the «Troubleshoot» and «Command Prompt» options.

Step 4: Type or paste the following command, then press «Enter.»
chkdsk C: /f

It will scan and fix any system drive errors. Once done, unplug the USB and restart your computer. Check if your system boots normally.
Option 4: Run SFC to Check System File Integrity
System File Checker is another built-in Windows feature designed to scan for and repair system file errors. Follow these steps to run SFC and check the integrity of your system files.
Step 1: Connect the Windows installation media drive to the computer and open Command Prompt. (Refer to the steps in Option 4).
Step 2: Type the upcoming command and press «Enter.»
sfc /scannow
This is the command for the System File Checker utility in Windows, which scans and repairs corrupted system files. In English, it would be written as:
System File Checker /scannow
Run this command to check and fix system integrity issues
Step 3: Restart your system and check if the winload.efi error code 0xc00000e message still appears.
If the «sfc /scannow» command fails to fix the missing Winload.efi file, try the next step.
Step 4: Open the Command Prompt and enter the following command.
Caution: Be careful; the wrong command can cause system errors.
sfc /scannow /offbootdir=C: /offwindir=C:windows
Replace «C» with the system hard drive partition letter.
Option 5. Rebuild BCD and MBR
As mentioned earlier, the Partition Manager tool is a universal solution. It will also help ensure that the current drive uses the MBR system format. If the system partition is running under BCD or another file system, the operating system won’t be able to read the winload.efi file. The Rebuild MBR feature of Partition Manager tool converts the BCD file system to MBR with just one click. It can also fix other issues like MBR error 1.
Here are the steps in English:
1. Identify the languages to be translated.
2. Utilize a translation tool or service, such as Google Translate or a professional translator.
3. Input the text in the original language.
4. Select the target language for translation (English).
5. Review the translated text for accuracy and context.
6. Make any necessary corrections or adjustments.
7. Proofread the final translation to ensure fluency and coherence.
8. If needed, consult a native speaker or language expert for verification.
9. Finalize the translated text and use it for the intended purpose.
Step 1. Create a WinPE bootable disk
- 1. Launch tools Partition Master, and click «Bootable Media» on the toolbar. Select «Create bootable media».
2. Click «Next» to complete the process.
Create a Bootable Disk
Step 2. Boot the Partition Master Bootable USB
- Connect the bootable USB or CD/DVD to your PC.
When you restart the computer, press F2 or Del to enter the BIOS screen. Set your computer to boot from «Removable Devices» or «CD-ROM Drive». The Partition Master tool will run automatically.
Step 3. Rebuild MBR
- Click «Toolkit» and select «Rebuild MBR».
Rebuild MBR
- Select the disk and the type of MBR, then click «Rebuild».
Rebuild MBR
- After that, you can see «MBR has been successfully rebuilt on Disk X».
Rebuild MBR
Option 6. Repair EFI Boot Loader
An EFI boot loader is an integral component of a computer’s boot process, often referred to as a UEFI boot loader (Unified Extensible Firmware Interface). Repairing the EFI loader aids in resolving issues related to corrupted or missing winload.efi errors.
Steps to fix the EFI boot loader:
Step 1: Use the Windows installation media to start your PC.
Step 2: Choose «Repair Your Computer» > «Troubleshoot» > «Advanced Options» > «Command Prompt.»
Step 3: Enter each of the following commands individually, and press «Enter» after each one.
- Here are the translations of the provided text into English:
- diskpart
- list disk
- select disk 0
- list vol
These are commands for the DiskPart utility in Windows, which is used to manage disks and volumes:
— `diskpart`: This is the command to launch the DiskPart tool.
— `list disk`: This command lists all the disks available on the system.
— `select disk 0`: This selects disk 0 for further operations. The number ‘0’ refers to the specific disk you want to work with.
— `list vol`: This command lists all the volumes (partitions or drives) on the currently selected disk.

Confirm that the EFI partition is formatted with the FAT32 file system.
Step 4: Assign the partition a drive letter. Type each of the following commands one at a time:
- Here are the translations of the provided phrases into English:
- sel vol
- assign letter=:
- exit
- cd /d:\EFI\Microsoft\Boot\
- bootrec /fixboot
1.
— Select volume
2.
— Assign letter equals colon (usually used to assign a drive letter in command prompt)
3.
— Exit (command to quit the current program or prompt)
4.
— Change directory to D:\EFI\Microsoft\Boot\ (used to navigate to the specified folder)
5.
— Bootrec with the /fixboot option (a command used to repair the Windows boot sector)
Restart your computer after a successful EFI loader repair.
What Causes the Winload.efi Missing Error
Now that you have learned the solutions to fix winload.efi missing or contains error after clone errors, let’s cover the potential causes.
- Here are the translations for the given languages into English:
1. The «winload.efi missing» error can be caused by errors made during system upgrades that affect the bootloader or system files.
2. Corrupted or damaged system files can lead to boot-related issues like the winload.efi error code 0xc00000e.
3. Incorrectly modifying disk partitions or updating antivirus software using third-party tools can corrupt the system’s boot process, resulting in a missing or erroneous winload.efi.
4. Cloning a Windows installation without necessary modifications can lead to boot issues, such as the winload.efi missing or containing an error after the cloning process.
5. Replacing or modifying a computer’s motherboard might cause issues with devices and drivers. If these aren’t resolved, the «winload.efi» problem may occur.
We recommend that all users attempt the appropriate methods provided in this article to resolve the «winload.efi missing» error. We also suggest utilizing the tool Partition Master to detect and rectify common hard disk issues.
Conclusion
This tutorial will guide you through resolving the «winload.efi missing» error seamlessly. Solving this issue can be time-consuming and frustrating; however, with the help of Partition Master, the process is simplified, offering users automated assistance to tackle this problem efficiently.
The following topics are also related to boot errors. If you’re interested, click the buttons to view more information.
FAQs About Missing Winload.efi
Please refer to this FAQ section if you have any further queries regarding the topic discussed on this page.
**1. What is error code 0xc000000f in Winload EFI?**
The Winload EFI error code 0xc000000f is a common Windows boot error that signifies a problem with the Winload.efi file or the boot loader configuration. This issue typically occurs when the boot loader fails to find the necessary files to start the operating system.
2. How do I fix Winload files?
To fix Winload files, follow these steps:
1. **Boot into Safe Mode:**
— Restart your computer and press F8 repeatedly during startup to access the Advanced Boot Options menu. Choose «Safe Mode with Networking» to start Windows in a minimal environment.
2. **Scan for Malware:**
— Download and run a reputable antivirus or anti-malware tool, such as Malwarebytes or Windows Defender (if it’s not already installed). Update the software to the latest virus definitions and perform a full system scan. Remove any detected threats.
3. **System File Checker (SFC):**
— Open an elevated Command Prompt by pressing Windows Key + X and selecting «Command Prompt (Admin)». Type `sfc /scannow` and press Enter. This command will scan for corrupted system files and attempt to repair them.
4. **Windows System Restore:**
— If SFC doesn’t fix the issue, try using System Restore. Type «Create a restore point» in the search bar, click on the result, and then choose «System Restore.» Follow the prompts to select a previous restore point before the problem occurred.
5. **DISM Tool:**
— In the Command Prompt (Admin), type `DISM /Online /Cleanup-Image /RestoreHealth` and hit Enter. This command repairs the system image and might fix issues with Winload files.
6. **Reinstall Windows:**
— As a last resort, you may need to reinstall Windows. Backup your important data and use the installation media to perform a clean install or repair the existing installation.
Remember that troubleshooting Winload issues can be complex, and professional assistance might be required if these steps don’t resolve the problem.
To fix the Winload files error, you can try:
1. Running System File Checker (SFC) scan:
Open Command Prompt as an admin and type «sfc /scannow». This’ll scan for corrupt system files and fix ’em if found.
2. Restoring from a System Restore point:
Go to Start, search for «System Restore,» and follow the on-screen cues to pick a restore point before the error hit.
3. Booting in Safe Mode:
Restart your rig and tap F8 repeatedly during startup to get to the Advanced Boot Options. Pick «Safe Mode with Networking» and try fixing the issue from there.
4. Using Windows Install Media:
Pop in the install disc or USB, restart your PC, and boot from it. Choose «Repair your computer» then «Troubleshoot» to access Advanced Options. From there, use the «Command Prompt» or «Startup Repair» tool.
5. Disabling Secure Boot:
Hit the relevant key (usually F2, F10, or Del) during startup to get into BIOS settings. Disable Secure Boot, enable Legacy Boot, save changes, and give your PC another shot.
6. Rebuilding the Boot Configuration Data (BCD):
In Command Prompt, type «bcdedit /export C:\BCD_Backup» to back up. Then, type «ren c:\boot\bcd bcd.old» to rename the current BCD store. Lastly, type «bcdboot C:\Windows /l en-us /s C:» to recreate the BCD store.
7. If all else fails, you might need a fresh Windows install. Make sure you’ve got all important data backed up first.
Remember, be careful with system file or boot setting changes, and consider getting pro help if you’re unsure.
— Running Windows Startup Repair.
-Rebuilding the BCD (Boot Configuration Data).
Fix the Master Boot Record (MBR).
3. What is the function of Winload EFI?
The function of Winload EFI (Windows Loader for Unified Extensible Firmware Interface) is to initialize and load the Windows operating system onto the computer’s memory during the boot process. It acts as a bridge between the firmware (UEFI) and the operating system, facilitating the communication and ensuring a smooth startup. Winload EFI is responsible for loading essential drivers, performing hardware initialization, and setting up the environment required for the Windows kernel to start executing. It plays a crucial role in the boot sequence of modern Windows systems that use UEFI instead of the traditional BIOS.
Winload.efi is a critical component for executing the Windows boot process. Its main function is to load the operating system, essential drivers, and data.

The Winload.efi error is a dreadful sight to see during a PC startup. If you too are facing this error on your computer, try the fixes in our article to get you through this problem smoothly.
The Winload.efi error is an error that is a bit difficult to solve compared to the other BSoD (Blue Screen of Death) errors. Since, the winload.efi file is responsible for launching Windows smoothly, its failure or absence can trigger peculiar errors. There are other factors that can contribute to this error as well. For example, unsuccessful updates, power outages, and HDD damage can also throw a Winload.efi error. Additionally, this error can also be caused due to wrong UEFI or Legacy settings. Generally, the error codes associated with Winload.efi error are – 0xc000000f, 0xc000000e, 0xc0000428, and 0xc0000001. You will be able to see the error code in the pop up that mentions the Winload.efi error.
Luckily, you won’t have to spend a lot of time trying to solve this error. Take a look the solutions for this problem listed below. You will be surprised at how easy it is to get rid of this error.
Related: Internal power error on Windows 11: How to fix it?
Secure boot error on Windows 11: How to fix it?
Fixes for Winload.efi error on Windows 11:


1) Disable secure boot:
Secure boot can sometimes stop your computer from accessing the Winload.efi file. So you might want to turn off secure boot from the BIOS settings in order to solve this error. Press and hold the power button on your PC for 10 seconds. Repeat this three times to activate Advanced Repair. Click on Troubleshoot and then select Advanced options. Next, select UEFI firmware settings. Now, change the Secure boot state to disabled. Save the changes and exit. Restart your computer. This should get rid of the Winload.efi file error.
2) Scan for abnormalities:
You can try to perform an SFC scan. This will check if any of the locally saved files are corrupted and need repairing. Insert a Windows installation media into your computer. Now, boot into advanced repair options and open the Command Prompt. Type in the following command –
sfc /scannow
This scan shouldn’t take more than 10 minutes. Let the command execute itself while you wait patiently. Once the scan is complete, restart your computer to see if everything is fine.
3) Rebuild BCD:
Use the installation media to boot into recovery mode again. Click on Troubleshoot > Advanced options > Command Prompt. Now, execute these commands one after the other and press enter after each one.
bootrec /fixmbr, bootrec /fixboot, bootrec /scanos, bootrec /rebuildbcd.
After this, restart your computer and check if everything has went back to normal. If the Winload.efi error still persists, try the next fix.
4) Reinstall OS:
You will have to reinstall Windows 11 on your computer if none of the above methods were able to fix the Winload.efi error on your computer. But, before you do that, copy your boot drive to another using the Command prompt. Just like the steps mentioned above, boot your PC into recovery mode using a Windows installation media. Open command prompt and type the following command –
“xcopy c:\ f:\ /s /e /h /i /c /y”
Feel free to interchange the drive name according to your device. Usually, C: is the primary drive for most users. That is where the OS is installed. Now, format the boot drive by entering the following command –
“format c: /fs:NTFS”
and press Enter. To confirm the process, you will have to type Y and press enter again.
When the format is complete, install Windows 11 again on the drive and everything should be fine. You won’t have to worry about the Winload.efi error again. Stay tuned for more such articles!