
Last Updated :
15 Oct, 2024
Running Windows apps on Linux using Wine is a great way to enjoy the functionality of Windows software on a Linux system without needing a virtual machine. Wine (Wine Is Not an Emulator) is a powerful tool that allows Windows applications to run on Linux by translating Windows API calls into POSIX calls. In this guide, we’ll walk through how to install Wine on Linux and configure it to run EXE files on Linux so you can enjoy your favourite Windows programs seamlessly.
What is Wine?
Wine stands for «Wine is Not an Emulator,» is a free and open-source application. No company has developed the Wine Software, it is developed with the volunteers. It allows Linux users to run various Windows applications. although it’s essential to clarify that Wine aids in the installation, not the execution of Windows apps. To integrate Wine into Linux, one must use the Command Line Tool for installation.
How to Install Wine on Linux?
To install Wine on Linux, use your system’s package manager. For example, on Ubuntu, run «sudo apt-get install wine.» This installs Wine, allowing you to run Windows applications on Linux. Let’s see the installation process with a step-by-step demonstration.
Step 1: Open Linux Terminal, and execute the following command to Update Packages with Linux APT Command.
sudo apt update

Step 2: Now, install the Wine on Linux, using the command mentioned below.
sudo apt install wine

How to Run Windows App on Linux Using Wine?
To Use Wine to Execute Windows Apps on Linux, the following guideline needs to be executed. We will start with some configuration needed on the Wine Application.
Section 1: Configure Wine App to Run Windows Apps on Linux
Configuring Wine involves adjusting settings and preferences within the Wine application, such as specifying the Windows version, to ensure compatibility and performance, to run specific Windows apps on Linux. Let’s see how to do this.
Step 1: On the Terminal, execute the following Linux Command. It will open the Wine Window to make changes.
winecfg

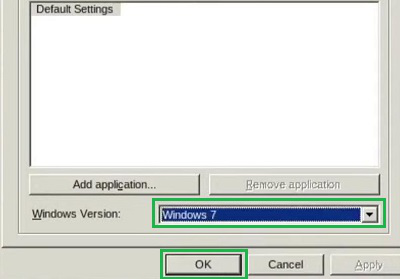
Step 2: From the Dropdown Menu, select the Windows Version of which app you want to run. Select OK there.
Section 2: Install Windows Apps on Linux Using Wine
To install a Windows app on Linux using Wine, download the .exe file, then double-click it to open with Wine. Click the Install button in the Wine Windows Program to proceed with the app installation. Let’s download it together.
Step 1: Download the App Exe File, go for the Wine Windows Program using double-click over it.
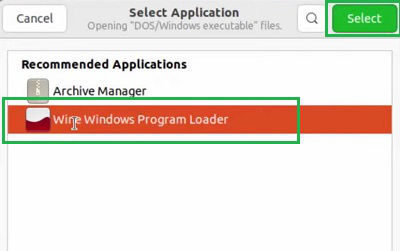
Step 2: Click on the Install Button to go inside the App Installer.

The above discussion will be enough to focus on the Steps to Use Wine to Run Windows Apps on Linux.
Conclusion
Using Wine makes it easy to run Windows applications on Linux and eliminates the need for complicated alternatives. Once you install Wine on Linux and configure it properly, you’ll have access to a wide range of Windows apps, enhancing your productivity. Whether you’re a developer or a gamer, knowing how to install EXE on Linux and utilize Wine software for Linux can unlock countless opportunities. Experiment with Wine configuration tips to optimize the performance of your favorite apps and games.
Also Read
- How to Run Linux Software on Windows?
- How to Run Linux Commands on Windows 10?
- How To Run Android Apps On Linux?
Switching to Linux can be difficult in terms of a completely different ecosystem for applications and it serves as a pain point for many. However, switching does not have to be all that painful after all, since you can easily run Windows apps on Linux.
Using Wine to Run Windows Applications
Using Wine, Linux users can run Windows applications seamlessly without a full installation or a virtual machine.
How to Install Wine on Linux
Wine, short for Wine Is Not an Emulator, is a compatibility layer that allows you to run apps on Linux without requiring a virtual machine. Installation steps are different for different Linux distributions.
- Install Wine on Ubuntu/Debian
Enable the 32-bit support that is a requirement for some applications:
sudo dpkg –add-architecture i386
Then update the packages list by running the following command:
sudo apt update

Lastly, install Wine:
sudo apt install wine64 wine32
Tech Delivered to Your Inbox!
Get exclusive access to all things tech-savvy, and be the first to receive
the latest updates directly in your inbox.
Verify installation by:
wine –version
- Install Wine on Fedora
Install Wine using DNF, by running the command:
sudo dnf install wine
If you need 32-bit support:
sudo dnf install wine.i686
Check if Wine is installed:
wine –version
- Install Wine on Arch Linux
Install Wine from the official repositories:
sudo pacman -S wine
Install additional components for better compatibility:
sudo pacman -S wine-mono wine-gecko
Verify the installation:
wine –version
- Install Wine on openSUSE
Use Zypper to install Wine:
sudo zypper install wine
Confirm the installation:
wine –version
- Install Wine from Source (For Advanced Users)
If you need the latest Wine version, you can compile it directly from the source:
Enhance Your CyerPanel Experience Today!
Discover a world of enhanced features and show your support for our ongoing development with CyberPanel add-ons. Elevate your experience today!

Download the latest Wine source from WineHQ. Extract and build it using:
./configure
make
sudo make install
Next Steps After Installation
Configure Wine using the command:
winecfg
Run a Windows application:
wine application.exe
Install additional dependencies using Winetricks for better compatibility.
Related Article: How to Run Android Apps on Linux? – A Complete Guide
Running Windows Programs with Wine
Once you have installed Wine, Windows executable files (.exe) can be launched directly from the terminal or file manager. When Wine runs for the first time, it may need you to create configuration directory prompts for additional installations like Wine Mono or Gecko.
Configuring Wine for Better Compatibility
To improved compatibility with a specific Windows application, Wine provides multiple configuration options:
- Winecfg: A graphical interface to tweak settings like Windows version emulation and DLL overrides.
- Winetricks: A script that helps install required Windows libraries and dependencies.
- Wine Prefixes: Separate Wine environments to isolate application settings and prevent conflicts.
Alternative Ways to Run Windows Applications on Linux
If you are not comfortable with using Wine, you can try one of these alternative methods:
- Run Windows Apps on Linux with Bottles

Bottles is one of the most user-friendly tools that helps simplify Wine configuration by providing pre-configured environments to run Windows apps on Linux. It offers to pre-tune settings for gaming and other productivity apps. Its super easy installations of dependencies like DirectX and a graphical interface for multiple environments sets it apart.
- Using Virtual Machines (VMs) to Run Windows Software
A full virtual machine is also another way to run Windows apps on Linux using a software like:
- VirtualBox – Free and open-source, supports Windows guest OS.
- VMware Workstation Player – Offers better performance and integration.
- KVM/QEMU – A powerful, Linux-native VM solution.VMs provide better compatibility but require more system resources.
- Using Remote Desktop to Access Windows Applications
Instead of running Windows software locally, you can access Windows machine remotely via;
- RDP (Remote Desktop Protocol) – Access a remote Windows PC with full desktop control.
- VNC (Virtual Network Computing) – Allows remote access across different platforms.
- Cloud-based services like AnyDesk or TeamViewer for remote Windows access.
- Using CrossOver for Commercial Support
Crossover is another tool that offers a premium and paid version of Wine. The Premium version of Wine provides:
- Better support for popular Windows applications and games.
- Official technical support and optimizations.
- A more user-friendly interface for managing Windows software.
- Using Cloud-Based Windows Applications
Many applications are now available to use as cloud-based services, thus eliminating the need for local installation. A few common examples are Microsoft 365 Online (Web versions of Word, Excel, and PowerPoint), Adobe Creative Cloud Web (Offers Photoshop and other tools in-browser), and Cloud gaming platforms (Services like NVIDIA GeForce Now run Windows games remotely on Linux).
Troubleshooting Windows Applications on Linux
| Issue | Possible Cause | Solution |
| Application does not launch | Missing dependencies or incorrect Wine settings | Use Winetricks to install required libraries, or adjust settings in winecfg |
| Application crashes on startup | Incompatible Wine version or missing DLL files | Try a different Wine version, enable debug logs, or install missing DLLs using Winetricks |
| Graphical glitches or UI issues | Improper DirectX settings | Enable DXVK for better DirectX support, or adjust rendering options in Winecfg |
| No audio in Windows applications | Audio driver conflicts | Check Wine’s audio settings and verify that PulseAudio or ALSA is properly configured |
| Slow performance in games or apps | Incorrect graphics settings or lack of 3D acceleration | Enable esync/fsync, use Vulkan instead of OpenGL, or allocate more system resources |
| Application asks for Windows updates | The app expects a Windows environment | Set the appropriate Windows version in Winecfg (e.g., Windows 10) |
| Installer does not run | 32-bit vs. 64-bit Wine prefix mismatch | Ensure the correct Wine architecture is used (WINEARCH=win32 or WINEARCH=win64) |
| Can’t install a Windows app | Permission issues or incorrect Wine prefix | Run Wine with user permissions, or create a new, clean Wine prefix |
| Application runs but has missing fonts | Required Windows fonts are not installed | Install Microsoft fonts using Winetricks |
| Mouse or keyboard input lag | Compatibility issues with input handling | Enable raw input in Wine settings or adjust input settings in the game/application |
Wrapping Up – Run Windows Apps On Linux
Transitioning to Linux can be made easy if you follow these methods to run Windows apps on Linux. Whether you need to fully transition to a Windows interface or use Linux as a subsystem, this guide will help you find solutions for all.
Frequently Asked Questions
1. Can I run Windows games on Linux?
Yes, many Windows games work on Linux using Steam Proton, Lutris, or Wine + DXVK. Check ProtonDB for game compatibility.
2. What is the difference between Wine and a Virtual Machine (VM)?
Wine allows you to run Windows apps natively on Linux without installing Windows. A Virtual Machine (VM), such as VirtualBox or KVM, creates a full Windows environment inside Linux, offering better compatibility at the cost of performance.
3. Can I run Microsoft Office on Linux?
Yes, you can run older versions of Microsoft Office using Wine or CrossOver. Alternatively, you can use the web-based Office 365 or install LibreOffice as a free alternative.
Contents
- Introduction
-
Installing Wine
- Ubuntu versions of Wine (Recommended)
- Newer versions of Wine (Not Recommended)
- Initial Setup
- Installing Windows Applications With Wine
- To start/run Windows programs using Wine
- Uninstalling Wine Applications
-
Configuring Wine
- Adding CD and DVD drives to Wine
- Adding applications to the menu
-
Changing application specific settings
- Using Windows Themes/Skins In Wine
- Color Scheme
- Using Theme/Skins
- Fullscreen issues with overlapping Panel
- Instructions for using wine over remote X11 sessions
- Instructions for specific Windows programs
- Creating file associations
-
Troubleshooting
- Error: Cannot change screen BPP from 32 to XX
- ‘dhtmled.ocx’ is missing or invalid
- Screen flickers to black when starting an application
- Related Wiki Pages
Introduction
-
Wine allows you to run many Windows programs on Linux. Its homepage can be found at WineHQ.org. They also have an Ubuntu page with installation and build advice.
-
If you are running the latest release of Wine which is v1.6, you can get further assistance on the #winehq IRC channel on irc.freenode.net. First,
-
please consider if you really need to run the specific Windows program because in most cases, its equivalent can be provided by an OpenSource program. Also, consider using Qemu instead of Wine if you need a complete Windows installation.
Installing Wine
Ubuntu versions of Wine (Recommended)
- open the software center
- Type wine and install ‘wine’
Newer versions of Wine (Not Recommended)
The Wine Ubuntu repository provides the newest development versions of Wine. Follow these steps to add the repository to your software sources:
- Open a terminal and run these commands:
-
wget https://dl.winehq.org/wine-builds/winehq.key
-
sudo apt-key add winehq.key
-
sudo apt-add-repository ‘https://dl.winehq.org/wine-builds/ubuntu/’
Note, however, that these are development packages (ie beta software), and may suffer from regressions and other problems not present in the stable version of Wine included with Ubuntu. You should avoid using them unless the current stable version of Wine does not support or is incompatible with the application you wish to use.
If you are using an older version of Wine and want support from WineHQ, you will need to upgrade to the latest development version first. If you do this, however, please file associated Wine bugs at winehq’s Bugzilla Page rather than in Launchpad.
Initial Setup
Before using Wine, it is necessary to create the fake C: drive where your Windows applications will be installed. To do this, enter the following command into the terminal: You may find the terminal by going to Applications -> Accessories -> Terminal
winecfg
You also have the option of configuring Wine via the Configure Wine option in the Applications-> Wine menu.
This will create a hidden folder (.wine) in your home directory containing the fake C: drive as well as registry files similar to those used in Windows. Once this directory is created, the Wine Configuration Window will appear. This window will allow you to customize a variety of settings for Wine, including which Windows Version that is emulated, drive mappings, DLL overrides, as well as application specific settings. Click the Ok button to close the window.
Installing Windows Applications With Wine
To install Windows applications using Wine, follow these instructions:
- Download the Windows application from any source (e.g. download.com). Download the .EXE (executable).
- Place it in a convenient directory (e.g. the desktop, or home folder).
-
Open the terminal, and cd into the directory where the .EXE is located.
-
Type wine the-name-of-the-application.extension (e.g. wine realplayer_installer.exe).
This will start the .EXE using Wine. If it is an installer, it should then run as it would in Windows. If the application asks for a directory to install the application to, select put it under C:\Program Files.
To start/run Windows programs using Wine
After installing an application using the directions above, those applications can be started and used by entering wine programname.exe (e.g. wine realplayer.exe). When done, close the application as one would normally. You must run the installed executable, which will by default be in the virtual Windows drive created by Wine, at ~/.wine/drive_c. Generally programs will install themselves somewhere under Program Files inside the virtual Windows drive, following Windows conventions.
You can also use the Wine file browser, by running winefile in a terminal. Clicking the C:\ button in the toolbar will open a window where you can browse the virtual Windows drive created in .wine. Doubleclicking an executable in the Wine file browser will run it in Wine.
Instead of having to always enter the terminal or use the Wine file browser, you may also create a desktop icon, and start a Wine application using that icon. To do this, right click on the desktop and select «Create a launcher.» If you wish, select an icon from the list of available icons (or browse to an icon you would like to use), fill out other information that is requested (Name, generic name, etc.). For the command, type in wine the-location-of-the-program.exe (e.g. wine /home/john/.wine/realplayer.exe). The most important part of creating a launcher is the command, the generic name is not as important. Just make sure you de-select «Run in terminal.» This completes the process.
In some cases the application requires to be running from a certain location. In this case create launcher with command
sh -c "cd /home/USER/.wine/drive_c/Program Files/Appdir/; wine /home/USER/.wine/drive_c/Program Files/Appdir/game.exe"
Of course you will need to replace USER and Appdir with the proper data.
If you desire to have an icon on the panel, create a launcher on the panel of choice. Do this by right-clicking the panel, selecting «Add to Panel,» and selecting «Custom Application Launcher.» This will ask you for the same information as before.
Alternatively, to make life easier, you can set it so wine will automatically open .exe files files for you — instead of using the Wine File to locate the file each time. To do so, right click on the .exe file, select Properties, and then select the Open With tab. Click the ‘Add’ button, and then click on ‘Use a custom command’. In the line that appears, type in wine, then click Add, and Close. Now all .exe files will be automatically opened by Wine, so you can use Nautilus to browse and open them instead of the Wine File.
Uninstalling Wine Applications
Open up a terminal window and type the command below.
wine uninstaller
What this will do is open up a program similar to the Windows add/remove programs control panel, allowing you to uninstall applications from a Wine installation. Running uninstall programs directly via Wine should also work normally. Alternatively, you could also simply delete the folder of the application. However, as when done in Windows, this method will be unclean and will not remove the program’s configuration from the Wine registry like using an uninstaller will.
Configuring Wine
On the command line or in Run Application, type winecfg
Adding CD and DVD drives to Wine
Go to the drives tab in winecfg. Hit the Autodetect button.
If you find that this does not work correctly for you, then follow these instructions:
-
Run
winecfg
-
Navigate to the drives tab
-
Click on Add…
-
In the path bar, type
/media/cdrom
-
Click Show Advanced button below the Browse… button and set the Type to
CD-ROM
-
Click OK
If you have more than one CD/DVD device you will need to identify each one differently. Use /media/cdrom0 for the first CD/DVD device, /media/cdrom1 for the second one, and so on. If in doubt, type the following command in your terminal.
ls -la ~/.wine/dosdevices/
What this command will do is check your CD/DVD device details after Wine is installed.
It is good procedure before setting up the menu entry to launch the new Windows program from the command line to make sure the program runs properly. To do this type this command in the terminal.
wine "C:\PATHTOPROGRAM\Program.exe"
For example the command would be wine «C:\Program Files\World of Warcraft\WoW.exe» Once you are satisfied that you have the correct details, use the normal menu editing process to add a new entry. When you get to the Command field of the entry editor be sure to copy and paste the line you used to launch the program from the terminal. Finish and save the new entry. Test to make sure the new Windows program loads via the menu.
Changing application specific settings
-
Type this command into your terminal.
winecfg
-
Click on Add Application…
- Navigate to where the .exe is and choose that program
- The dropdown at the bottom allows you to choose which version of Windows Wine should emulate. Also, any changes to the Libraries and Graphics tabs will only affect the chosen application in the Applications tab.
Using Windows Themes/Skins In Wine
Color Scheme
You can change the wine color scheme to closely match the default Ubuntu colors with this Terminal command.
gedit ~/.wine/user.reg
You may also want to create a backup copy in your Home folder with this command via terminal.
cp ~/.wine/user.reg ~/
Replace the [Control Panel\\Colors] section with
[Control Panel\\Colors] 1176981676
"ActiveBorder"="239 235 231"
"ActiveTitle"="203 133 61"
"AppWorkSpace"="198 198 191"
"Background"="93 77 52"
"ButtonAlternativeFace"="200 0 0"
"ButtonDkShadow"="85 85 82"
"ButtonFace"="239 235 231"
"ButtonHilight"="255 255 255"
"ButtonLight"="255 255 255"
"ButtonShadow"="198 198 191"
"ButtonText"="0 0 0"
"GradientActiveTitle"="239 235 231"
"GradientInactiveTitle"="239 235 231"
"GrayText"="198 198 191"
"Hilight"="246 200 129"
"HilightText"="0 0 0"
"InactiveBorder"="239 235 231"
"InactiveTitle"="239 235 231"
"InactiveTitleText"="255 255 255"
"InfoText"="0 0 0"
"InfoWindow"="255 255 166"
"Menu"="239 235 231"
"MenuBar"="239 235 231"
"MenuHilight"="246 200 129"
"MenuText"="0 0 0"
"Scrollbar"="239 235 231"
"TitleText"="255 255 255"
"Window"="255 255 255"
"WindowFrame"="0 0 0"
"WindowText"="0 0 0"
Using Theme/Skins
Wine has basic handling for Windows theme/skin files in the «msstyles» format. There is a large number of these themes on Deviant Art. To use these you must make a folder in Wine’s virtual Windows drive, then tell Wine to use the theme.
Firstly go into Wine’s virtual drive, which is usually «.wine/drive_c» in your Home folder (this is hidden, you may need to select View->Show Hidden Files in the file manager). Inside this folder go into the «windows» folder then make a new folder in there called «Resources». Enter this new folder and make a new folder called «Themes». Inside here you should make a folder for each theme you want, and put the files ending in «.msstyles» directly into them. For example, the full path to a theme file called sample.msstyles might be «/home/username/.wine/drive_c/windows/Resources/Themes/Sample/sample.msstyles».
Next you need to tell Wine to use your theme, so once again run this command in the terminal.
winecfg
In the configuration window select the tab Desktop Integration and un-check out the Theme: box, which should now have your theme in it’s menu. After selecting the theme click Apply at the bottom to see how it looks (they don’t always display properly), then if you are happy click ok and you’re done!
Fullscreen issues with overlapping Panel
Sometimes the Panel overlaps your fullscreen application you’re running in wine. If you are running Visual Effects, the first solution you should try is to turn those off: Go to System -> Preferences -> Appearance, and click the Visual Effects tab. Select None, and your screen will flash. Try your full-screen application again. You may re-enable Visual Effects afterwards — just don’t forget to turn them back off when you want to run that application again!
If that does not work, then you will have to turn off the panels prior to running the application and restarting it afterwards, until a better workaround can be found. In Ubuntu the commands are gnome-session-remove gnome-panel and gnome-panel & respectively. In Xubuntu I understand they are killall xfce4-panel and xfce4-panel.
Instructions for using wine over remote X11 sessions
If you’re (trying) to use wine over a forwarded X11 session (ie Ubuntu is on one computer; you’re connected to it by ssh or another connection and you already have X11 forwarding set up to display regular Ubuntu applications on your remote computer) and the windows opened by wine are lacking fonts etc, the answer is here
Instructions for specific Windows programs
Some Windows programs have been tested on Ubuntu. They are listed below:
-
DVDShrink
-
FlashPlayerStandalone
-
WorldofWarcraft
Also, see Wine’s Application Database at http://appdb.winehq.org/ or http://wine-review.blogspot.com/
Creating file associations
If you want certain files to open in a windows application by clicking on them, the best way is to create a script. For example I want Adobe Flash project files (*.fla) to open in Adobe’s Flash editor if I double click it.
You can for example create a file using this terminal command.
gedit ~/.wine/Flash\ 8
Now paste the following example script in it, save and close gedit.
Example script:
 #!/bin/sh

QUICKPARLOCATION="c:\\Program Files\\Macromedia\\Flash 8\\Flash.exe"
PARAM=`winepath -w "$*"`
wine "$QUICKPARLOCATION" "$PARAM"
exit 0
Make sure the file is executable with this command.
chmod +x ~/.wine/Flash\ 8
After you completed this go to an *.fla file right click it, properties, go to the “open with” pane, click add, add this line into your terminal and select the radio button.
'/home/<yourusername>/.wine/Flash 8'
Now if everything went ok, you can doubleclick the file and it will be openend in Flash 8.
Troubleshooting
Error: Cannot change screen BPP from 32 to XX
In some cases (mostly games) the application does not start and you get error: Cannot change screen BPP from 32 to 16 (or some other number).
In such case editing xorg.conf and CTRL-ALT-Backspace helps as is described on http://ubuntuforums.org/showthread.php?t=649283
‘dhtmled.ocx’ is missing or invalid
It seems that in Ubuntu Karmic Wine(v1.0.1) registry isn’t configured correctly to use ActiveX component dhtmled.ocx. On some application this can cause error like this: «Component ‘dhtmled.ocx’ or one of it’s dependencies not correctly registered: a file is missing or invalid». So we must tell Wine where to find this file.
1. Download registry file:
-
cd ~ wget http://jwc.sourceforge.net/other/ieslinux-dhtmledit.reg
2. Open regedit:
-
wine regedit.exe
3. Import the downloaded registry settings
-
file->import registry file->open ~/ieslinux-dhtmledit.reg
Screen flickers to black when starting an application
This is sometimes caused by a problem with the video driver not handling XRandR well. To see if this is actually a problem with XRandR, in a console, run:
xrandr
If your screen blanks while running that command, then this might be the issue. To work around this issue, Wine can be configured to not use XRandR. To do so:
- Start Wine’s Registry Editor.
- Navigate to «HKEY_CURRENT_USER\Software\Wine\X11 Driver». You may need to create X11 Driver.
- Create a new key called «UseXRandR» and set it to «N».
See Wine Bug #15214 and Wine Wiki page UsefulRegistryKeys.
-
Games
-
AdobePhotoshop — A guide for running CS4 under WINE.
Примечание: На момент 2023 года статья значительно устарела, актуализированную версию можно найти здесь: https://noostyche.ru/blog/2023/05/19/aktualizirovannye-osnovy-po-ispolzovaniyu-wine-na-2023-god/
Примечание: Статья предназначена для новичков, но, как минимум, потребуются базовые знания о Linux (структура файловой системы, права пользователей, навыки работы с терминалом).
Содержание.
- О Wine.
- Установка Wine в дистрибутивы на базе Ubuntu, включая Linux Mint 19.
- Удаление Wine.
- Использование Wine. Немного теории о префиксах (prefix).
- Использование Wine. Создание префиксов (prefix).
- Общая информация и ограничения префиксов.
- Конфигурирование Wine через GUI.
- winefile. Файловый менеджер Wine.
- Wine. Установка и запуск программ.
- Wine. Удаление установленной Windows-программы.
- Winetricks. Основы.
- Winetricks. Настройка префикса.
- Углубление в функционал Wine.
- Отладка.
- Практика.
- Чуть-чуть хитростей.
Почта для предложений и замечаний: feedback@noostyche.ru
О Wine.
https://ru.wikipedia.org/wiki/Wine
Много интересного по использованию Wine можно посмотреть так:
man wine
Руководство пользователя:
https://wiki.winehq.org/Wine_User’s_Guide
В основном устаревший перевод руководства, но некоторые вещи всё ещё актуальны:
https://www.opennet.ru/docs/RUS/wine_guide/index.html
Arch wiki (часть вещей устарела):
https://wiki.archlinux.org/index.php/Wine_(%D0%A0%D1%83%D1%81%D1%81%D0%BA%D0%B8%D0%B9)
Рецепты запуска конкретных программ и помощь от сообщества стоит искать здесь:
https://appdb.winehq.org
https://www.protondb.com
https://vk.com/native_wine
Примечание: В виду того, что с теоретической частью можно легко ознакомиться по приложенным к статье ссылкам, здесь она описывается кратко, оставляя больше пространства для практической части.
Установка в дистрибутивы на базе Ubuntu, включая Linux Mint 19.
https://wiki.winehq.org/Ubuntu
Для wine-staging, начиная с версии 4.5, требуется пакет libfaudio0. Для Ubuntu 19.10 и более новых выпусков этот пакет был добавлен в Universe-ветку репозитория, то есть в ветку с пакетами, поддерживаемыми сообществом.
Ещё libfaudio0 можно взять из этого репозитория:
https://download.opensuse.org/repositories/Emulators:/Wine:/Debian/xUbuntu_18.04/amd64/
https://download.opensuse.org/repositories/Emulators:/Wine:/Debian/xUbuntu_18.04/i386/
Для работоспособности Wine:i386 и Wine:amd64 потребуются пакеты соответствующей архитектуры.
Пример установки из репозитория:
sudo apt install --install-recommends libfaudio0
Пример установки скачанного пакета:
sudo apt install --install-recommends ~/Downloads/libfaudio0_19.07-0~bionic_i386.deb
Пример установки wine-staging в Linux Mint 19.
Рекомендую использовать именно wine-staging в виду того, что эта версия содержит множество дополнительных патчей, которые в значительной степени повышают шансы на успешный запуск той или иной программы. Недостатком этой версии является то, что она несколько менее стабильна, чем wine-stable, но в основном это не критично.
Первым шагом будет скачивание и добавление ключа:
wget -nc https://dl.winehq.org/wine-builds/winehq.key
sudo apt-key add winehq.key
Linux Mint 19 использует репозиторий Ubuntu bionic. Подключить соответствующую ветку репозитория Wine:
sudo apt-add-repository 'deb https://dl.winehq.org/wine-builds/ubuntu/ bionic main'
Обновить список пакетов:
sudo apt update
Установить wine-staging:
sudo apt install --install-recommends winehq-staging:amd64
Должны установиться winehq-staging:i386 и winehq-staging:amd64.
Основные компоненты wine-staging будут расположены в /opt/wine-staging/
Весь список компонентов и пути до них можно вывести следующей командой:
dpkg -L wine-staging

Удаление Wine.
Примечание: Отключить репозиторий и удалить его ключ можно через программу с графическим интерфейсом , но в данном примере будет рассмотрен вариант через терминал.
Сначала отключить репозиторий Wine:
sudo add-apt-repository -r https://dl.winehq.org/wine-builds/ubuntu/
Вывести список всех ключей используемых репозиториев:
apt-key list
Найти ключ репозитория Wine и по последним четырём символам удалить его. Пример:
sudo apt-key del F987672F
Удалить непосредственно Wine:
sudo apt remove --auto-remove winehq-staging
При этом будет удалён стандартный префикс ~/.wine. Поэтому, если он будет нужен в дальнейшем, стоит его заархивировать или переименовать.
Прочие префиксы нужно удалять вручную.
Обновить список репозиториев:
sudo apt update
После удаления Wine останутся иконки и некоторые пакеты. Их можно удалить вручную.
Место хранения ярлыков программ, установленных в Wine:
~/.local/share/applications/wine/
Место хранения иконок, включая тех программ, что установлены в Wine:
~/.local/share/icons/hicolor/
Кэш для установки таких пакетов, как wine-mono и wine-gecko:
~/.cache/wine/
Архив пакетов, которые устанавливались посредством winetricks в тот или иной префикс:
~/.cache/winetricks/
Использование Wine. Немного теории о префиксах (prefix).
Грубо говоря, префикс это отдельный экземпляр ОС Windows. Содержит в себе базовую структуру каталогов ОС Windows, набор библиотек и программ. В народе префикс называют «бутылкой» (bottle). Экземпляры компонентов для префикса хранятся в подкаталогах /opt/wine-staging/, откуда они копируются в создаваемый префикс.
В дистрибутивах Linux стандартный префикс располагается здесь:
~/.wine/
По умолчанию он 32-разрядной архитектуры.
Можно создавать префиксы в любых желаемых каталогах, принадлежащих пользователю. Описание процесса создания располагается далее по статье.
Примечание: Категорически недопустимо создание префиксов с правами суперпользователя. Это крайне небезопасно и пользователь не будет иметь прав с ним работать.
Стандартное содержимое префикса:
Описание иллюстрации:
- В каталоге dosdevices перечислены виртуальные «диски». В Windows разделы блочных устройств представлены в виде абстрактных «дисков» (томов), каждый из которых обозначается буквой. К примеру, системный «диск» по умолчанию называется «C:».
- drive_c — виртуальный диск C:, на котором располагаются компоненты Windows.
- .update-timestamp — метка времени.
- system.reg, user.reg и userdef.reg являются файлами реестра Windows. Если кратко, то это централизованное древовидное хранилище настроек Windows-программ.
В каталоге drive_c (диск C:) содержится классическая структура каталогов Windows.
Использование Wine. Создание префиксов (prefix).
Пример создания и конфигурирования 64-х разрядного префикса с именем .wine_new в домашнем каталоге (home) активного пользователя:
WINEARCH=win64 WINEPREFIX="/home/$USER/.wine_new" winecfg
Примечание: Для присваивания значений переменным среды правильнее использовать команду env, но в виду того, что интерпретатор умеет определять переменные среды (их имена обязательно должны быть в верхнем регистре), env можно опустить для упрощения набора команды.
Разбор команды:
WINEARCH=win64 — через переменную среды (environment variable) WINEARCH указываем, что префикс должен быть создан под архитектуру amd64. Это позволит запускать в нём 64-разрядные программы, а так же 32-разрядные. Для лучшего понимания стоит ознакомиться с Multiarch. Стоит отметить, что нельзя изменить архитектуру у созданного префикса.
WINEPREFIX=»/home/$USER/.wine_new» — через переменную среды WINEPREFIX указываем, по какому пути должен будет располагаться новый префикс. В данном примере это «/home/$USER/.wine_new». Wine требует указания абсолютного пути. Путь в виде «~/.wine_new» не подойдёт, и будет выведена ошибка: wine: invalid directory ~/.wine_new in WINEPREFIX: not an absolute path.
Немного о кавычках. Они используются для экранирования пути на тот случай, если в нём будут пробелы, чтобы интерпретатор разобрался с тем, что есть путь, а что прочие команды и аргументы.
winecfg — программа для конфигурирования префикса. После её запуска произойдёт процесс непосредственного создания префикса по указанному пути.
Сразу после выполнения увидим следующий вывод:

При первом создании префикса может быть предложено скачать пакеты Mono и Geko, но, начиная с Wine 5.0, они должны скачиваться вместе с установкой Wine без дополнительных запросов. В этом случае будет предложено просто установить их в префикс.
- Библиотеки Mono нужны для корректной работы программ, которым необходим Microsoft .NET Framework.
- Библиотеки Geko необходимы для корректной работы свободной реализации Internet Explorer (до Windows 10 стандартный интернет браузер в ОС Windows).
Пакеты будут размещены здесь:
~/.cache/wine/
После завершение создания префикса появится окно графического интерфейса (GUI) конфигуратора префикса (winecfg):
О настройках конфигуратора несколько далее по статье. На этом этапе его окно можно закрыть.
Объём свежесозданного префикса составит около 1,3 Гб.
По аналогии можно создать 32-разрядный префикс:
WINEARCH=win32 WINEPREFIX="/home/$USER/.wine_new32" winecfg
Общая информация и ограничения префиксов.
- Зачем вообще создавать префиксы? Почему бы не ставить программы куда-попало в пространство Linux-пользователя и запускать их из любого удобного места? | Если установить программу вне префикса, то она может оказаться неработоспособной в виду различия иерархии путей в Linux и Windows. В остальном, на деле программа будет как бы установлена в стандартный префикс /home/$USER/.wine. Именно оттуда она будет взаимодействовать с системными компонентами Windows, включая реестр. Туда же она будет сохранять свои рабочие файлы (конфиги, логи и подобное). Поэтому во избежание ошибок, несовместимости и замусоривания оптимальнее осознанно использовать префиксы.
- Можно создавать неограниченное количество префиксов.
- Нежелательно устанавливать все программы в один префикс, лучше создавать новый под каждую программу. Это в значительной степени упростит отладку и поможет избежать конфликтов.
- Можно настроить один префикс, копировать его и использовать копии в качестве отдельных префиксов. При этом можно свободно менять их имена.
- После создания префикса, для запуска программ из него, не нужно каждый раз указывать его архитектуру. Пример запуска программы control.exe:
WINEPREFIX="/home/$USER/.wine_new32" wine "/home/$USER/.wine_new32/drive_c/windows/system32/control.exe" - Да, для того, чтобы запустить программу из того или иного префикса, необходимо каждый раз передавать переменной окружения WINEPREFIX значение пути до желаемого префикса. Варианты упрощения этого описаны в конце статьи.
- Не рекомендуется размещать префикс на разделе с файловой системой NTFS (основная файловая система OC Windows), так как могут быть проблемы с правами на запуск программ в префиксе и в целом это менее безопасно.
- НЕЛЬЗЯ устанавливать в префикс Windows-драйвера для оборудования (видеокарт, звуковых карт и подобного). Потенциально это может привести к сбою устройства.
- Можно одновременно запускать программы из разных префиксов. Это возможно благодаря отдельным процессам wineserver, о котором рассказывается во второй половине статьи.
- В виду неполной изоляции префиксов, не стоит пытаться запускать вредоносные программы для Windows, так как потенциально они способны нанести вред Linux-системе. К примеру, запущенный в префиксе вирус-шифровальщик может зашифровать не только префикс, но и выйти за его пределы, зашифровав все каталоги и файлы, принадлежащие Linux-пользователю.
- На момент 2020 года значительная часть античитов (BattlEye, Easy Anti-Cheat и прочие) отказывается работать в префиксе Wine. Из-за этого будет недоступен мультиплеер или игра может вовсе не запуститься. К примеру, серия игр Arma. Игры запускаются, но в сетевой игре доступны сервера только без защиты BattlEye.
- Программы в префиксе запускаются с правами пользователя, который их запустил. То есть префикс не предоставляет изоляции от основной системы, поэтому безопасность (доверенность) запускаемых программ крайне важна. Очень желательно ограничить права доступа к префиксам. Рекомендую следующий уровень прав: для владельца разрешение на чтение, запись и выполнение; для его группы запрет всего; всем остальным запрет всего.
Пример применения прав к префиксу:
sudo chmod 700 -R ~/.wine/
-R — применить права рекурсивно для всех каталогов и файлов, включая вложенные.
Такой уровень прав может повлиять на работоспособность некоторых программ внутри префикса, поэтому в случае возникновения проблем с работоспособностью не забыть, что применены ограниченные права.
Конфигурирование Wine через GUI.
Основная масса полезной информации по winecfg описана здесь: https://wiki.winehq.org/Winecfg
Поэтому ниже рассмотрены только некоторые вещи.
Основная масса полезной информации по winecfg описана здесь: https://wiki.winehq.org/Winecfg
Поэтому ниже рассмотрены только некоторые вещи.
Конфигурирование осуществляется для каждого префикса в отдельности. Пример:
WINEPREFIX="/home/$USER/.wine" winecfg
Язык интерфейса конфигуратора можно изменить следующей командой:
WINEPREFIX="/home/$USER/.wine" LANG="en_US.utf8" winecfg
В данном случае русский сменится на английский.
Так же это позволяет cоздать англофицированный префикс, если при создании передать значение en_US.utf8 переменной среды LANG:
WINEARCH=win64 LANG="en_US.utf8" WINEPREFIX="/home/$USER/.wine_new_prefix" winecfg
Таким образом получится англофицированный префикс, в котором каталоги Windows-пользователя будут на английском языке.
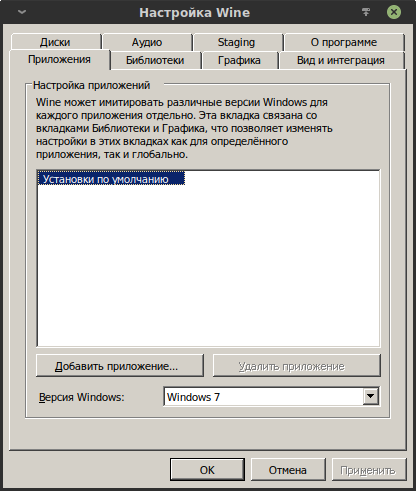
Вкладка «Приложения».
Одним из наиболее часто конфигурируемым параметром является выбор того, под какую версию Windows будет мимикрировать префикс. На момент 2020 года по умолчанию выбрана Windows 7. Полный список:

Эта опция особенно полезна для старых программ, которые требуют Windows XP.
Вкладка «Диски».
Здесь можно подключать виртуальные и физические разделы, виртуальные и физические DVD-приводы, сетевые диски и даже дисководы.

В данном случае подключено два виртуальных диска — C: и Z:. Диск C: является системным каталогом префикса, а диск Z: ведёт в корень файловой системы Linux. Второе в основном нежелательно, поэтому рекомендуется удалить этот виртуальный диск, тем самым изолировав префикс от основной системы. «Любопытным» программам будет сложнее выбраться за пределы префикса, что очень хорошо. При этом останется возможность указывать программам пути вне префикса вручную, то есть полная изоляция отсутствует.
Примечание: В виду неполной изоляции префиксов, вредоносные программы для Windows потенциально способны нанести вред Linux-системе.
Добавить виртуальный DVD-привод можно так:
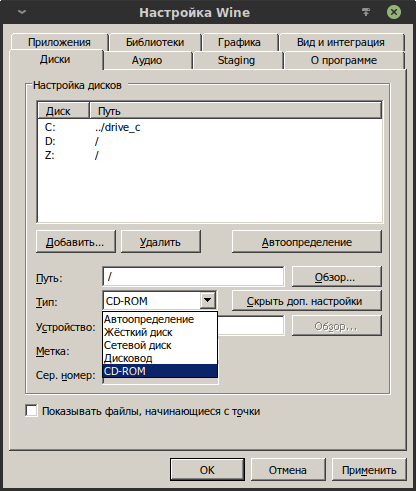
То есть нажать кнопку «Добавить…», выбрать букву тома (в данном примере D:) и подтвердить. Далее в строке «Тип» выбрать CD-ROM. Останется указать путь до желаемого для монтирования образа DVD.
По аналогии можно добавить физический DVD-привод, выбрав его в строке «Устройство».
Вкладка «Вид и интеграция».
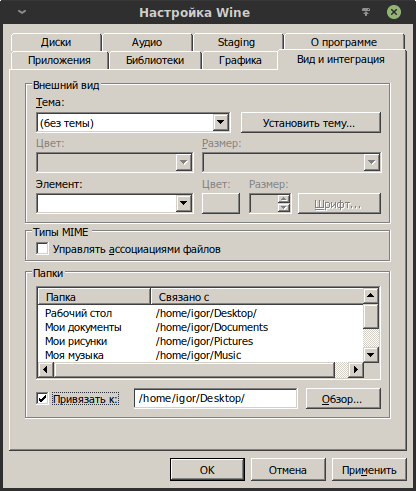
В этой вкладке основным является возможность выбора ассоциации стандартных каталогов Windows-пользователя, с домашними каталогами Linux-пользователя. Эта возможность располагается в блоке «Папки», он находится в нижней половине окна. Там показано то, какие каталоги Linux-пользователя соотносятся с каталогами Windows-пользователя в префиксе.
Стандартные каталоги Windows-пользователя располагаются в префиксе по следующему пути:
/home/$USER/.wine/drive_c/users/$USER/
Выглядит это так:
На снимке видно, что часть каталогов представлены символическими ссылками. Они указывают на домашние каталоги Linux-пользователя, который создал префикс. Это означает, что Windows-программы, запущенные в префиксе, будут использовать каталоги Linux-пользователя. К примеру, запущенная Windows-игра создаст каталог с сохранениями в ~/Documents. На мой взгляд, такое поведение нежелательно.
Можно легко изменить это ассоциирование, указав другие каталоги или вовсе убрав все ассоциации, что изолирует префикс от домашних каталогов пользователя (но не даёт полной изоляции). Для этого необходимо снять галку в блоке «Типы MIME» у пункта «Управлять ассоциациями файлов». Далее в блоке «Папки» появится возможность выбирать пункты и указывать им желаемые пути.
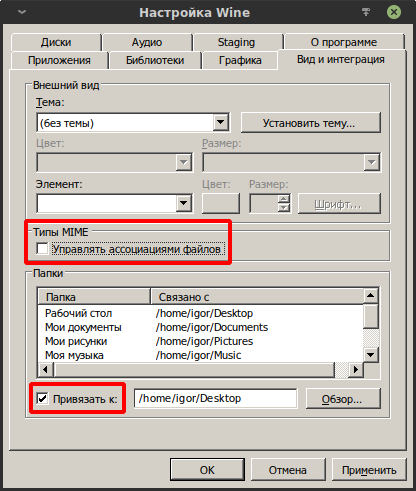
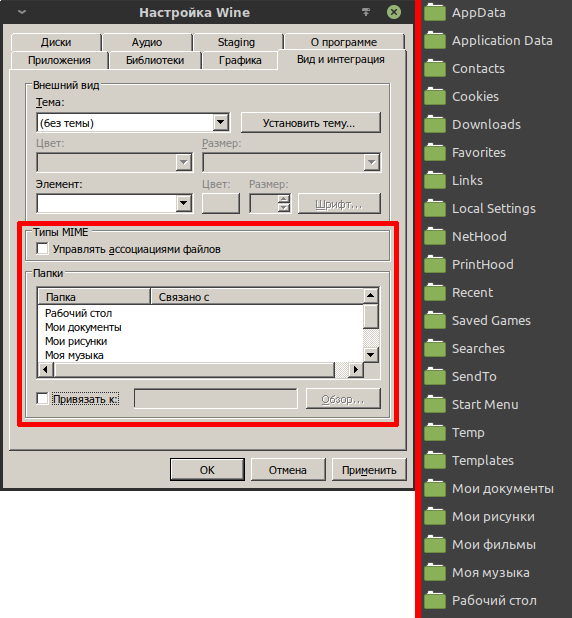
Если убрать галку у пункта «Привязать к», то связь удалится и будет использоваться соответствующий каталог внутри префикса, то есть стандартный каталог Windows-пользователя: «./drive_c/users/$USER/Мои документы«, «./drive_c/users/$USER/Мои рисунки» и так далее. На иллюстрации ниже хорошо видно, что теперь для Windows-пользователя используются обычные каталоги, а не символические ссылки на каталоги Linux-пользователя.
Примечание: При удалении файлов из префикса они помещаются в «Корзину» Linux-пользователя.
winefile. Файловый менеджер Wine.
В некоторой степени является аналогом проводника Windows (explorer). Команда запуска:
WINEPREFIX="/home/$USER/.wine_new" wine winefile

Функционал схож с файловыми менеджерами в дистрибутивах Linux: Dolphin, Thunar и прочих. Можно создавать каталоги, запускать исполняемые файлы, подключать сетевые диски и так далее. На иллюстрации изображён случай без «изоляции» префикса, поэтому виден корневой каталог Linux (диск Z:). «Корзина» для префикса является «Корзиной» Linux-пользователя.
Далее по статье рассматривается установка программ из установочных Windows-файлов (exe, msi). Установку из этих файлов можно осуществить через файловый менеджер Wine, но в данном случае будет рассмотрен только вариант установки с использованием терминала.
Wine. Установка и запуск программ.
В обычном случае алгоритм установки программ следующий:
- Ищем запись о желаемой программе в базе Wine AppDB: https://appdb.winehq.org/
- Изучаем истории успешного запуска (или их отсутствие).
- Подготавливаем префикс по описанию. В зависимости от капризности программы, может потребоваться изменить версию Windows и установить те или иные пакеты расширений (С++ redistributable, .NET Framework, DirectX, Microsoft Media Foundation и прочие).
- Устанавливаем программу.
Примечание: Не рекомендуется запускать программы из разделов с файловой системой NTFS, так как могут быть проблемы с правами на запуск и в целом это менее безопасно.
Пример установки клиента Steam.
Находим информацию о нём в базе Wine AppDB: https://appdb.winehq.org/objectManager.php?sClass=version&iId=19444
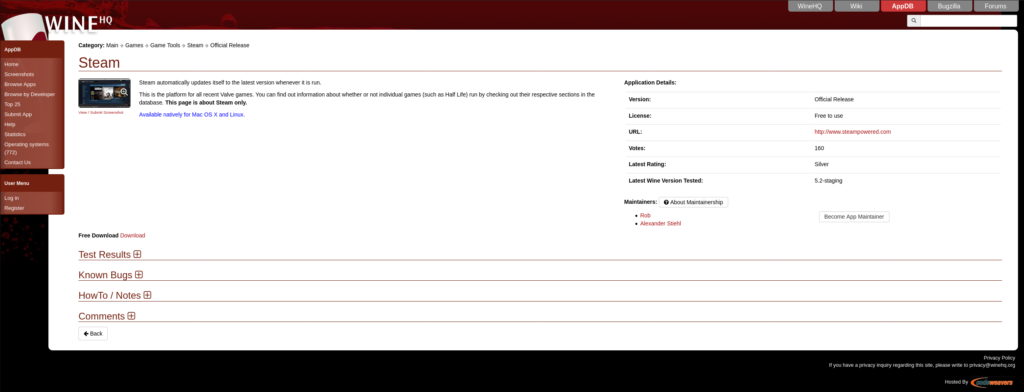
Разворачиваем свиток «Test Results». В верхней половине будет отображён крайний отчёт пользователя, в котором он описывает свою историю запуска программы. Блок в нижней половине содержит в себе ссылки на отчёты других людей. Красной рамкой отмечена колонка, где можно переключать их.

Скачиваем клиент SteamSetup.exe.
Производим установку в конкретный ранее созданный префикс:
WINEPREFIX="/home/$USER/.wine" wine "/home/$USER/Downloads/SteamSetup.exe"
Разбор команды:
wine «/home/$USER/Downloads/SteamSetup.exe« — запускаем посредством /opt/wine-staging/bin/wine исполняемый файл SteamSetup.exe, который расположен в пользовательском каталоге Downloads. Запускать исполняемые файлы можно из любого каталога Linux-пользователя, но потребуется указывать абсолютный путь.
После запуска SteamSetup.exe появится окно типичного мастера установки Windows:

В правой части иллюстрации видно, что программа устанавливается в указанный префикс, считая его ОС Windows.
Wine умеет преобразовывать создание ярлыков рабочего стола для Windows в ярлыки для рабочего стола и меню Linux. Тем самым можно будет запускать с ярлыка установленную в префикс Windows-программу. Файл ярлыка будет храниться здесь:
~/.local/share/applications/wine/
Набор иконок здесь:
~/.local/share/icons/hicolor/
Пример запуска программы напрямую из конкретного префикса:
WINEPREFIX="/home/$USER/.wine" wine "/home/$USER/.wine/drive_c/Program Files (x86)/Steam/Steam.exe"
Примечание: Для той части пути, которая внути префикса, регистр не имеет значения.
Альтернативный вариант запуска:
WINEPREFIX="/home/$USER/.wine" wine "C:/Program Files (x86)/Steam/Steam.exe"
Wine позволяет сократить путь до относительно префикса, имитируя путь в ОС Windows. Причём, как видно в примере, Wine поддерживает косую черту «/», не смотря на то, что в путях в Windows допустима только обратная косая черта «\».
Wine. Установка программы из .msi установочника.
О пакетах msi можно почитать здесь: https://ru.wikipedia.org/wiki/%D0%A3%D1%81%D1%82%D0%B0%D0%BD%D0%BE%D0%B2%D1%89%D0%B8%D0%BA_Windows
Установка msi-пакетов в префикс несколько отличается от установочника в виде .exe. Пример установки EpicInstaller-10.15.2-unrealtournament.msi:
WINEPREFIX="/home/$USER/.wine" wine msiexec /i "/home/$USER/.wine/drive_c/EpicInstaller-10.15.2-unrealtournament.msi"
Альтернативный вариант:
WINEPREFIX="/home/$USER/.wine" wine start /unix "/home/$USER/.wine/drive_c/EpicInstaller-10.15.2-unrealtournament.msi"
Wine. Запуск bat-файлов («батников»).
Их запуск отличается от запуска exe-файлов. Пример запуска script.bat:
WINEPREFIX="/home/$USER/.wine" wine start /unix "/home/$USER/.wine/drive_c/script.bat"
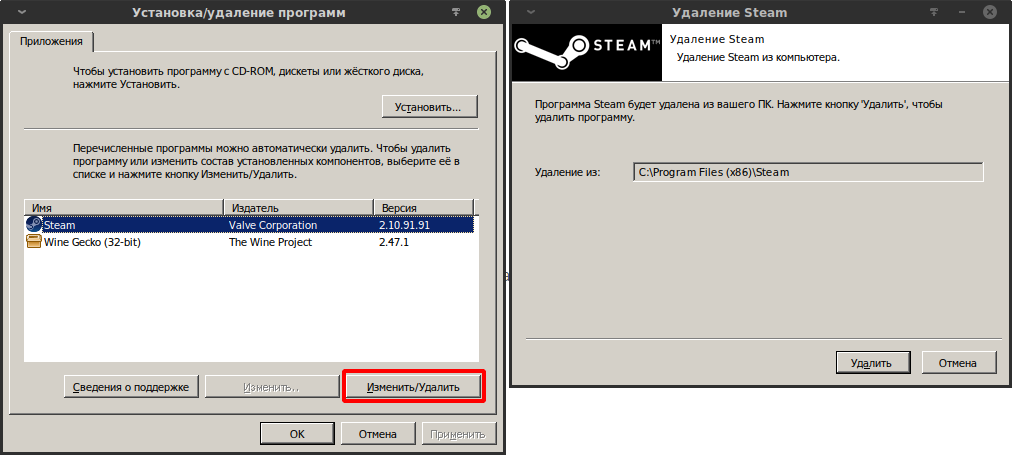
Wine. Удаление установленной Windows-программы.
Это можно сделать несколькими способами.
Удаление через Wine-программу uninstaller («Установка/удаление программ»):
WINEPREFIX="/home/$USER/.wine" wine uninstaller
В списке выбрать программу, которую нужно удалить, и нажать кнопку «Изменить/Удалить». Запустится мастер установки-удаления программы.
Удаление конкретной программы без использования GUI:
WINEPREFIX="/home/$USER/.wine" wine uninstaller --remove название_программы
Пример удаления программы Steam:
WINEPREFIX="/home/$USER/.wine" wine uninstaller --remove steam
Регистр имени программы не имеет значения.
Можно удалить напрямую через специальную программу для удаления, которая входит в комплект установленной программы:
WINEPREFIX="/home/$USER/.wine" wine "/home/$USER/.wine/drive_c/Program Files (x86)/Steam/uninstall.exe"
Альтернативный вариант через GUI. Метод тот же: удаление через программу «Установка/удаление программ», но через запуск из «Панели управления Wine». Для начала потребуется запустить «Панель управления Wine»:
WINEPREFIX="/home/$USER/.wine" wine control
Альтернативный способ запуска напрямую:
WINEPREFIX="/home/$USER/.wine" wine "/home/$USER/.wine/drive_c/windows/system32/control.exe"
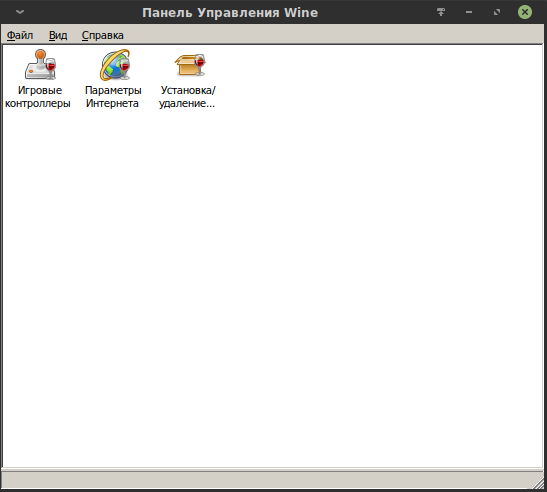
В появившемся окне через ярлык запустить программу «Установка/удаление программ»:
Радикальным вариантом является удаление префикса целиком. Недостатком этого метода является то, что от программы останутся ярлыки и иконки. Придётся найти и зачистить их вручную.
~/.local/share/applications/wine/
~/.local/share/icons/hicolor/
Winetricks. Основы.
Руководство по использованию: https://wiki.winehq.org/Winetricks
winetricks — конфигурационный shell-скрипт, позволяющий быстро и просто настроить различные параметры Wine через терминал и установить Windows-библиотеки и компоненты, указав соответствующие имена пакетов. Тем самым winetricks в основном дублирует функционал winecfg, но имеет дополнительные полезные возможности.
Официальный репозиторий: https://github.com/Winetricks/winetricks
Тело скрипта (крайняя версия): https://raw.githubusercontent.com/Winetricks/winetricks/master/src/winetricks
Скачивание из официального репозитория в ~/.local/bin/:
wget https://raw.githubusercontent.com/Winetricks/winetricks/master/src/winetricks -P ~/.local/bin/

Почему именно в ~/.local/bin/? Это каталог для скриптов и исполняемых файлов пользователя. Размещение скрипта в этом каталоге позволит запускать winetricks через терминал для любого префикса без указания абсолютного пути до winetricks.
Если до этого в каталоге не было никаких исполняемых файлов, то потребуется перезапустить сеанс или скрипт профиля пользователя:
source ~/.profile
После чего winetricks можно будет запускать через терминал, но перед этим потребуется разрешить его выполнение.
Рекомендую назначить такой уровень прав:
sudo chmod 700 ~/.local/bin/winetricks
Активный пользователь получит право на чтение, запись и запуск, его группа — всё запрещено, остальным — всё запрещено.
Вывести номер версии winetricks:
winetricks --version
Справка о winetricks:
winetricks --help
winetricks может самообновляться по команде:
winetricks --self-update
При этом будет сохранена резервная копия предыдущей версии.
Откатиться на предыдущую версию:
winetricks --update-rollback
Многие манипуляция с winetricks можно произвести в графическом режиме. Запуск winetricks в графическом режиме для конкретного префикса:
WINEPREFIX="/home/$USER/.wine" winetricks
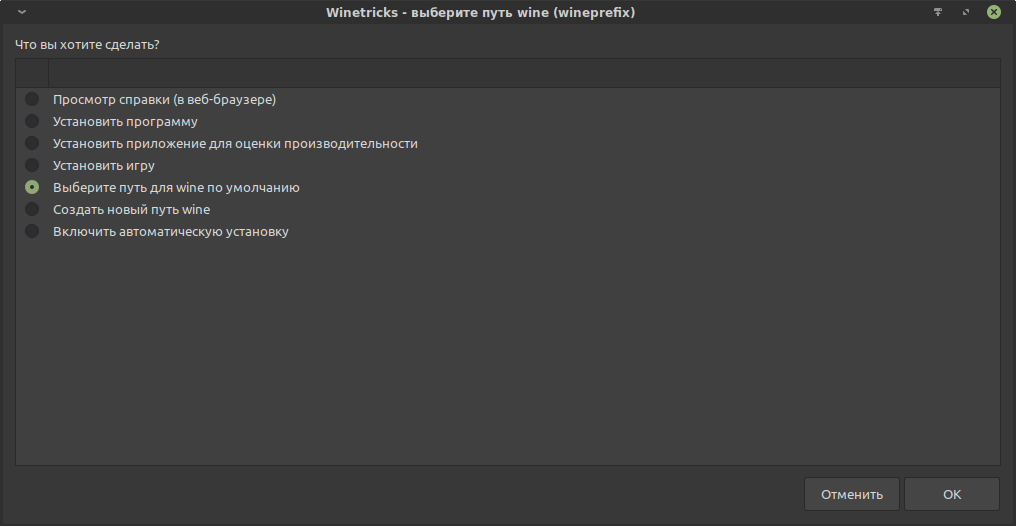
Не смотря на видимую удобность, графическим режим имеет ряд нюансов. Немало опций являются устаревшими и рудиментарными, а наиболее часто используемые опции скрываются в меню, которое, как ни странно, появляется после выбора пункта «Выберите путь для wine по умолчанию»:
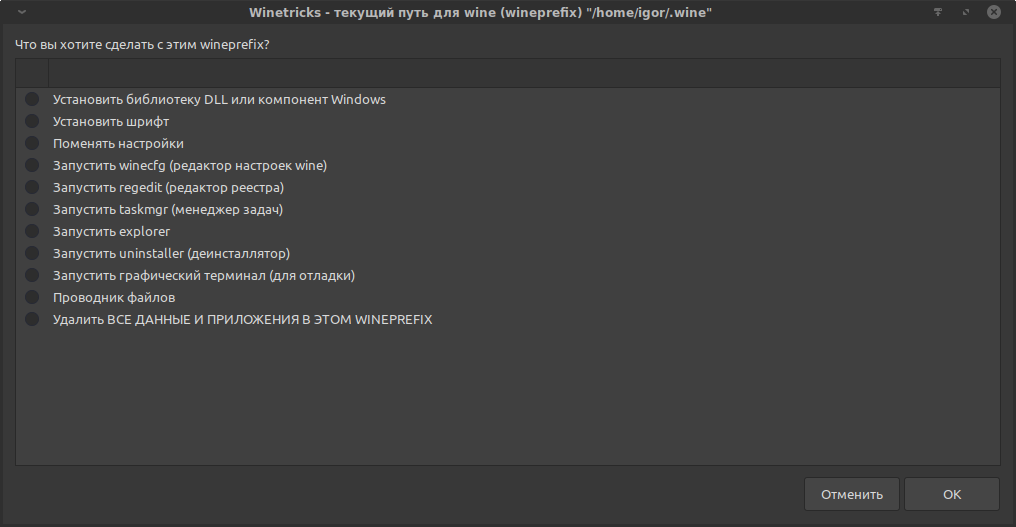
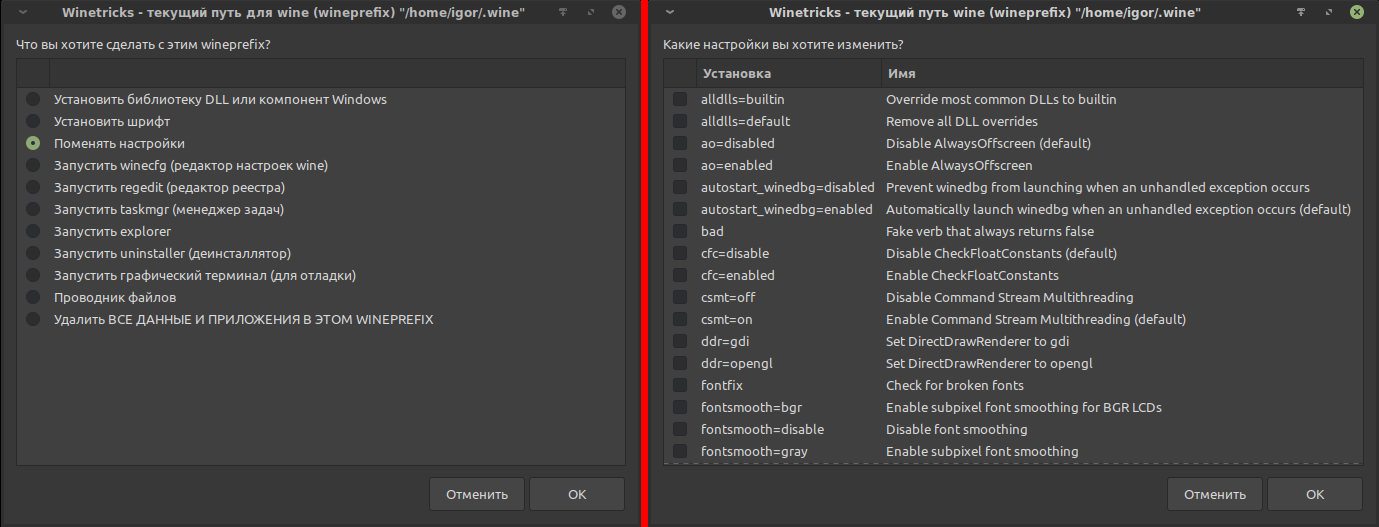
В этом меню ключевыми являются две опции: «Установить библиотеку DLL или компонент Windows» и «Установить шрифт».
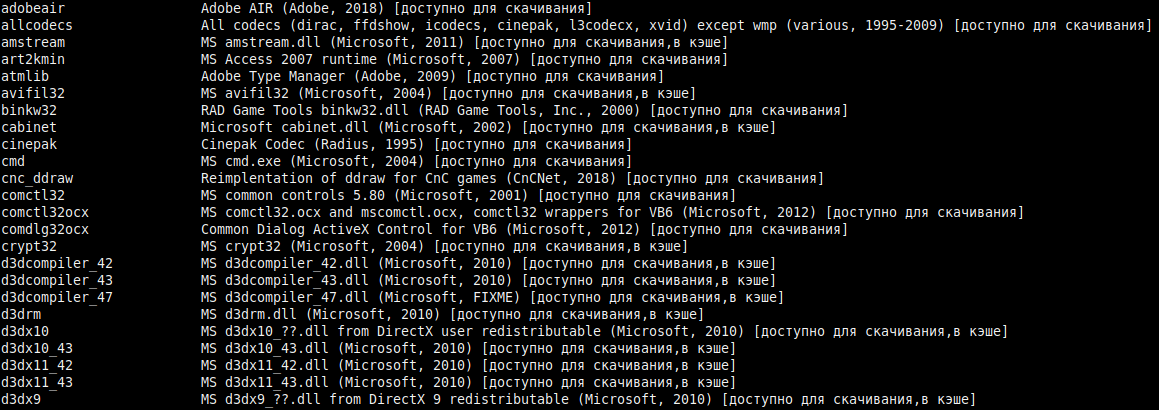
Опция «Установить библиотеку DLL или компонент Windows».

Здесь перечислены все библиотеки и компоненты, которые winetricks может скачать и инициализировать установку. Например, можно установить в префикс DirectX или отдельные его библиотеки. Не всё из представленного актуально и работоспособно, поэтому нужно действовать внимательно. Стоит отметить, что в рекомендациях на https://appdb.winehq.org/ попадаются советы с перечислением целой вереницы пакетов к установке, тут нужно учитывать, что люди нередко предлагают устанавливать всякую всячину для «подстаховки», поэтому так лучше не делать и постараться установить только действительно необходимые пакеты.
Скачивание производится с сайтов поставщиков (преимущественно Microsoft), так как лицензия многих библиотек и компонентов для ОС Windows не позволяет помещать их в общественные репозитории. Без winetricks пришлось бы самостоятельно перейти на сайт поставщика, найти в его дебрях нужный пакет, найти кнопку скачать (нередко, эта задача то ещё приключение) и наконец заполучить заветный установщик. Таковы реалии Windows на момент 2020 года.
Так же winetircks предоставляет возможность установить библиотеки или компонент напрямую через терминал:
WINEPREFIX="/home/$USER/.wine" winetricks "название_пакета"
Пример установки Microsoft Media Foundation, который часто необходим для работоспособности видеороликов в играх на Unreal Engine 4:
WINEPREFIX="/home/$USER/.wine" winetricks mf
В этой простой операции есть нюанс. Для установки ряда пакетов потребуется распаковщик cab-архивов, которые довольно широко применяются в Windows:
sudo apt install cabextract
После этого установка Microsoft Media Foundation пройдёт успешно:

Можно установить несколько пакетов в одну команду:
WINEPREFIX="/home/$USER/.wine" winetricks d3dx9 vcrun2008 vcrun2010 vcrun2012 vcrun2013 vcrun2015
winetricks позволяет вывести список всех доступных для загрузки библиотек через терминал, что избавляет от необходимости искать в графическом интерфейсе:
winetricks dlls list
На иллюстрации видно, что в выводе присутствует описание пакетов. Это позволяет воспользоваться grep, чтобы показать только искомое, если известна часть его описания:
winetricks dlls list | grep -i "c++"

Опция «Установить шрифт».
Эта возможность требуется довольно часто. В префиксе не может быть шрифтов, которые защищены лицензией, но немало программ, которые требуют такие шрифты. К примеру, Arial и Times New Roman. Когда программа не находит в префиксе нужный шрифт и при этом не умеет использовать имеющиеся, то в ней попросту не будет отображаться текст. К примеру, это актуально для Epic Games Launcher.
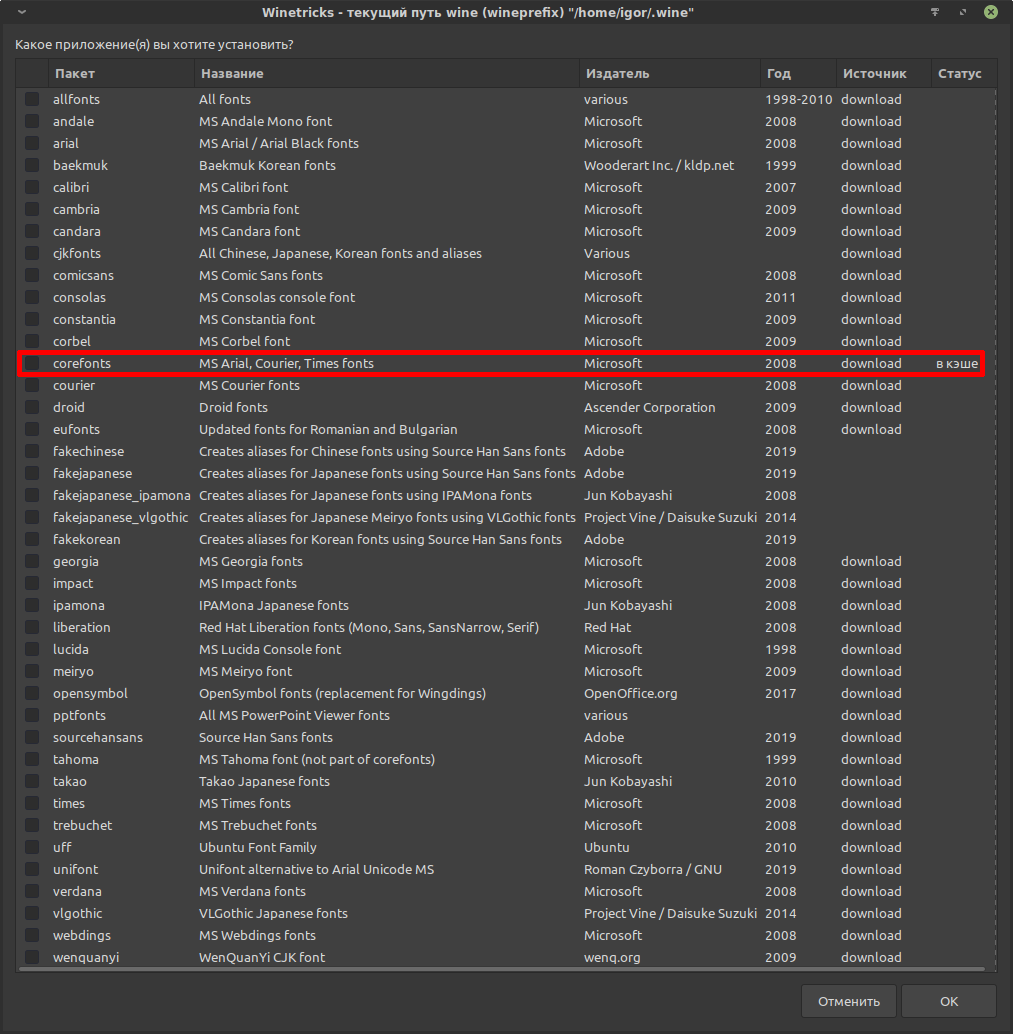
Чаще всего требуется пакет шрифтов corefonts, в том числе для упомянутого Epic Games Launcher. В этот пакет как раз входят шрифты Arial, Courier и Times. Через терминал установка выглядит так:
WINEPREFIX="/home/$USER/.wine/" winetricks corefonts
В префиксе шрифты хранятся по следующему пути:
/home/$USER/.wine/drive_c/windows/Fonts/
В этот каталог можно вручную помещать шрифты в формате .ttf.
Куда winetricks скачивает пакеты перед их установкой?
Все скачанные с помощью winetricks пакеты складируются здесь:
~/.cache/winetricks/
Можно вывести весь список пакетов, которые находятся в кэше:
winetricks list-cached
Winetricks. Настройка префикса.
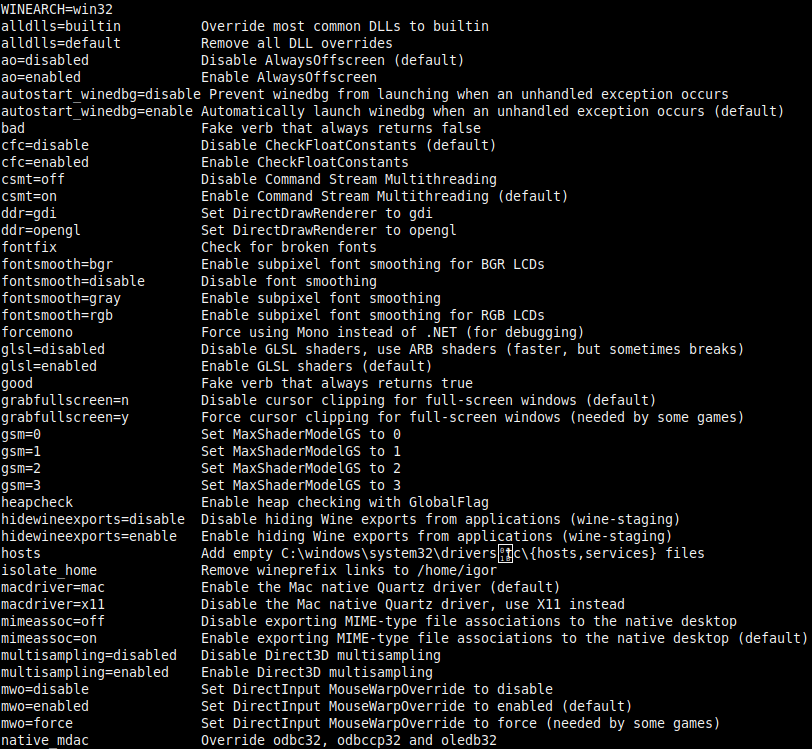
Вывести список настроек префикса:
winetricks settings list
Тоже самое в графическом режиме:
Из приведённого списка очевидно, что winecfg, который был рассмотрен ранее, предоставляет существенно более скромные возможности конфигурирования. Впрочем, многое из доступных опций не стоит трогать. Ниже рассмотрены часто применяемые и просто полезные.
Так как с графическим режимом всё понятно, далее речь пойдёт о настройке опций через терминал.
Переключить версию Windows:
WINEPREFIX="/home/$USER/.wine" winetricks win7
По аналогии: winxp, win8, win10
Через winetricks намного удобнее и проще осуществить «изоляцию» префикса, которая рассмотрена в первой половине статьи. Основной её целью является убрать прямой доступ из префикса к домашнему каталогу Linux-пользователя и к корню системы (диск Z:). Это осуществляется следующей командой:
WINEPREFIX="/home/$USER/.wine" winetricks sandbox
Это уберёт ассоциацию каталогов Windows-пользователя с домашними каталогами Linux-пользователя, а также удалит диск Z: (путь до корня Linux из префикса). Тем самым использование программ из такого «изолированного» префикса будет несколько более безопасным. При этом рабочие файлы Windows-программ будут сохраняться внутри префикса в соответствующих каталогах Windows-пользователя.
Углубление в функционал Wine.
wineserver.
Это специальный демон (служба, сервис), который выполняет роль ядра ОС Windows. Для каждого префикса запускается свой демон, что позволяет одновременно выполнять несколько программ из разных префиксов.
Справка:
man wineserver
Порой программа может зависнуть намертво, здесь поможет жёсткий перезапуск wineserver. Эффект схож с нажатием кнопки Reset. В этом случае произойдёт жёсткая перезагрузка префикса (Windows), но не основной системы (Linux). Команда выглядит так:
WINEPREFIX="/home/$USER/.wine" wineserver -k
wineboot.
Это программа, которая выполняет инициализацию, запуск и перезагрузку префикса. Так же она выполняет симуляцию завершения работы и перезапуска для программ, запущенных в префиксе.
Справка:
man wineboot
Мягкая перезагрузка префикса. Это полезно для программ, которые требуют перезагрузки ОС Windows после своей установки:
WINEPREFIX="/home/$USER/.wine" wineboot -r
Создание префикса через wineboot:
WINEPREFIX="/home/$USER/.wine-new-prefix" wineboot -i
-i — инициализировать префикс.
Альтернативный вариант:
WINEPREFIX="/home/$USER/.wine-new-prefix" wineboot -u
-u — обновить конфигурацию префикс.
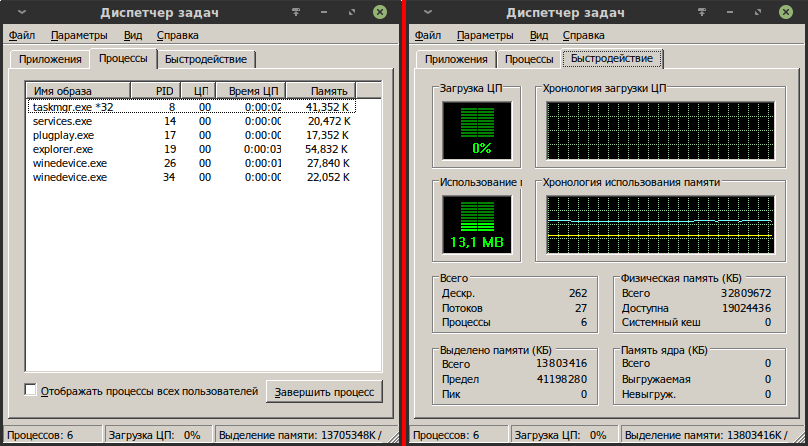
taskmgr — «Диспетчер задач».
Программа «Диспетчер задач» является аналогом системного монитора (gnome system monitor и подобных):
WINEPREFIX="/home/$USER/.wine" wine taskmgr
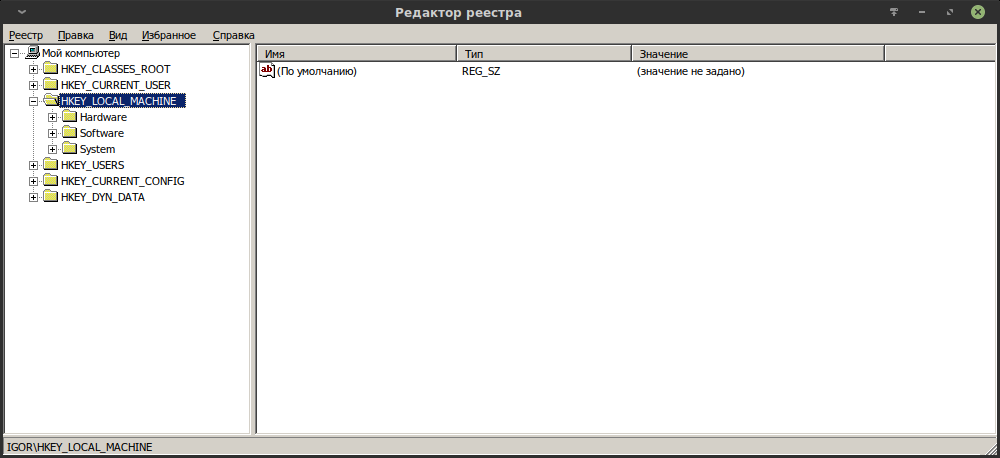
Реестр Windows и его редактирование в Wine.
Файлы реестра system.reg, user.reg и userdef.reg создаются после конфигурирования префикса. Пример пути расположения:
/home/$USER/.wine/
Их можно редактировать любым текстовым редактором.
- system.reg содержит ветвь HKEY_LOCAL_MACHINE.
- user.reg — HKEY_CURRENT_USER.
- userdef.reg — HKEY_HKEY_USERS\.Default (содержит настройки Windows-пользователя по умолчанию).
Для более удобной работы с реестром в Wine реализован аналог редактора реестра Windows — regedit. Для его запуска нужно выполнить:
WINEPREFIX="/home/$USER/.wine" regedit
Альтернативный вариант:
WINEPREFIX="/home/$USER/.wine" wine /home/$USER/.wine/drive_c/windows/regedit.exe
Примечание: Импорт рееста (куста) непосредственно из ОС Windows сломает префикс Wine.
Настройки, которыми можно управлять через winecfg и winetricks, сохраняются в реестр, а именно в HKEY_CURRENT_USER\Software\Wine:
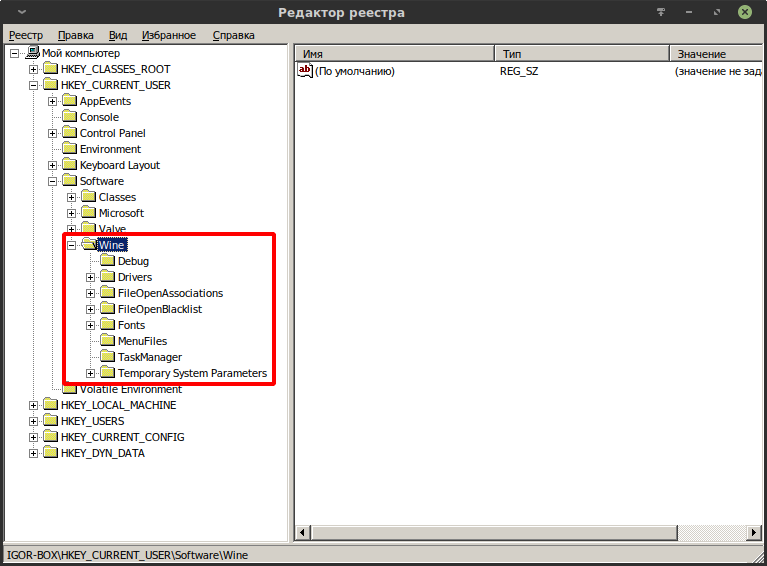
Подробно об этом рассказывается здесь: https://wiki.winehq.org/Useful_Registry_Keys
Виртуальный рабочий стол в Wine.
Имитирует рабочий стол Windows. Обычно используется для программ, которые плохо сворачиваются (Alt + Tab) или сбивают разрешение экрана для Linux. Причём сбивают так, что приходится выполнять команду xrandr -s 0 для восстановления исходного разрешения экрана. При использовании виртуального рабочего стола Wine после завершения программы разрешение экрана восстанавливается автоматически.
Рабочий стол можно включить через winecfg:
На иллюстрации выше в отмеченном поле можно настроить разрешение вирутального рабочего стола. Можно установить такое же разрешение, как в Linux или такое, какое максимально поддерживает запускаемая программа. К примеру, игра Diablo 2 поддерживает разрешение максимум 800×600, поэтому для виртуального рабочего стола такое разрешение будет оптимальным.

Виртуальный рабочий стол запустится после повторного запуска winecfg или любой другой программы в префиксе. При этом запущенная программа будет размещена в рамках виртуального рабочего стола:

Как можно было заметить на иллюстрации, виртуальный рабочий стол поддерживает ярлыки для программ, установленных в префикс.
Виртуальный рабочий стол можно запустить принудительно для программы в конкретном префиксе без настраивания через winecfg:
WINEPREFIX="/home/$USER/.wine" explorer /desktop="name_desktop",1920x1080 regedit
Разбор команды:
explorer — Wine-реализация проводника (файлового менеджера) Windows.
/desktop=»name_desktop»,1920×1080 regedit — создать рабочий стол с именем name_desktop и разрешением 1920×1080; запустить программу regedit — Wine-реализация программы редактирования реестра Windows.
Примечание: Можно запускать несколько виртуальных рабочих столов одновременно, но нужно дать им разные имена.
Так же вирутальным рабочим столом можно управлять через winetricks без использования winecfg.
Включение использования виртуального рабочего стола:
winetricks vd=1920x1080
Отключение:
winetricks vd=off
Если разрешение экрана всё-таки не восстановилось после завершения работы Windows-программы, то это исправит следующая команда:
xrandr -s 0
wineconsole.
Программа для работы с командной строкой в рамках префикса. Полезна для запуска программ и bat-скриптов так, как это было бы через интерпретатор командной строки Windows (cmd.exe), а так же для отладки.
Справка:
man wineconsole
Запуск командной строки Windows (cmd.exe) через wineconsole:
WINEPREFIX="/home/$USER/.wine" wineconsole cmd

Отладка.
Официальная документация:
https://wiki.winehq.org/Wine-Staging_Debug
https://wiki.winehq.org/Debug_Channels
Отключить показ диалога падения программы в Wine:
WINEPREFIX="/home/$USER/.wine" winetricks nocrashdialog
Ниже приведённые команды полезны для локализации проблем в работе программы. К примеру, по характерному выводу можно определить какой Windows-библиотеки не хватает для успешного запуска программы. Так же команды отладки необходимы для составления отчётов об ошибках, чтобы разработчики Wine знали о проблемах с той или иной программой.
Вывести ход выполнения программы game.exe в файл wine-log.txt, который будет сохранён в ~/:
WINEPREFIX="/home/$USER/.wine" wine "C:/games/my_game/game.exe" &> wine-log.txt
Вывести в файл wine-log.txt только ошибки и предупреждения в ходе выполнения программы:
WINEDEBUG=-all,+err,+warn WINEPREFIX="/home/$USER/.wine" wine "C:/games/my_game/game.exe" &> wine-log.txt
Вывести в файл wine-setup-log.txt ход установки программы из установочного файла setup.exe:
WINEDEBUG=+text,+file,+reg,+relay WINEPREFIX="/home/$USER/.wine" wine "C:/setup.exe" &> wine-setup-log.txt
Вывести в файл wine-dll-log.txt список Windows-библиотек (dll), используемых в процессе запуска программы:
WINEDEBUG=+loaddll WINEPREFIX="/home/$USER/.wine" wine notepad &> wine-dll-log.txt
builtin — встроенная библиотека Wine, то есть созданная разработчиками Wine.
native — «родная» библиотека Windows.
Практика.
Нюансы запуска S.T.A.L.K.E.R. на Linux — пример варианта указания рабочего каталога вручную.
Запуск CRYENGINE 5 на Linux.
Решение проблемы «Bad serial given in setup» в Arma через редактирование реестра в префиксе.
Монтирование виртуального CD-ROM для Wine.
Использование Wine и Proton для запуска игры и сервера Conan Exiles.
Запуск Epic Games Launcher посредством Wine.
Установка русификатора для игры из Steam.
В виду того, что Proton (Steam Play) представляет собой модифицированный Wine, они хорошо совместимы между собой. Поэтому для Proton-префикса можно использовать стандартные инструменты Wine. В примере будет рассмотрена установка русификатора для Borderlands GOTY Enhanced. С нюансами подготовки игры к запуску можно ознакомиться здесь: https://www.protondb.com/app/729040
Игра по умолчанию будет установлена сюда:
/home/$USER/.local/share/Steam/steamapps/common/BorderlandsGOTYEnhanced/
Чтобы префикс игры создался, её необходимо запустить и выключить. По умолчанию префикс будет располагаться здесь:
/home/$USER/.local/share/Steam/steamapps/compatdata/729040/pfx/
То есть игра находится вне префикса. В этом особенность Proton.
Для начала установки, необходимо запустить установочный файл русификатора — Borderlands_TTL.exe.
WINEPREFIX="/home/$USER/.local/share/Steam/steamapps/compatdata/729040/pfx" wine "/home/$USER/Downloads/Borderlands_TTL.exe"
Wine может предложить установить Mono и Gecko — отказываемся, для префикса игры это ни к чему.
Должно появиться окно мастера установки:
Мастер сообщит, что не может найти игру:
Это не удивительно, так как игра находится вне префикса. Здесь есть два варианта решения:
- Создать в префиксе символическую ссылку на каталог игры, тогда мастер сможет обнаружить игру и продожить установку. То есть создать символическую ссылку с именем BorderlandsGOTYEnhanced по пути /home/$USER/.local/share/Steam/steamapps/compatdata/729040/pfx/drive_c/Program Files/, которая будет ссылаться на каталог с установленной игрой /home/$USER/.local/share/Steam/steamapps/common/BorderlandsGOTYEnhanced/.
- Указать русификатору абсолютный путь до каталога игры. На иллюстрации виден тот самый «диск Z:», который является символической ссылкой на корневой каталог Linux. Через него можно указать желаемый катлог Linux-пользователя.
После завершения установки игра будет русифицирована.
Чуть-чуть хитростей.
Каждый раз прописывать путь до префикса и программы может быть довольно утомительно. Есть несколько способов это упростить.
- Для упрощения запуска программы из префикса рекомендую использовать shell-скрипт (sh) с командой на запуск. Cкрипт оптимально разместить в ~/.local/bin/, что позволит осуществлять запуск через терминал по имени скрипта без указания абсолютного пути до него.
- На скрипт можно создать кнопку для меню запуска и разместить её на рабочей панели.
- Ещё одним вариантом является использование символических ссылок. Если префикс находится на другом разделе, то для него можно создать символическую ссылку и разместить её в домашнем каталоге пользователя, что позволит сократить путь в команде. К примеру, префикс находится в /mnt/my_second_hdd/games/wine-prefix, можно создать символическую ссылку и разместить её в /home/$USER/. Пример команды работы с префиксом через символическую ссылку:
WINEPREFIX="/home/$USER/wine-prefix" winecfg
Почта для предложений и замечаний: feedback@noostyche.ru
Download Article
Use Wine to install Windows software and games on Ubuntu Linux
Download Article
- Installing Wine
- Installing Windows Apps
- Running Windows Apps
- Video
- Q&A
- Tips
|
|
|
|
|
Whether you want to use Adobe Photoshop, play World of Warcraft, or use Microsoft Word 365 on Ubuntu, it’s easy to install Windows programs using Wine. There are two ways to install Wine—through the Ubuntu Software Center, and through the developer’s repository. This wikiHow article will walk you through installing Wine on Ubuntu, show you how to install and run Windows programs, and give you lots of helpful tips along the way.
Things You Should Know
- You can easily install Wine through the Software Center, but it won’t be the latest version. For the latest version, install directly from the Wine developers.
- Once you’ve installed Wine, you can download a Windows application from the web and double-click the .exe file to install.
- Not all Windows software works flawlessly on Wine, but lots of popular apps and games do.
-

Ubuntu recommends that you install the Ubuntu-specific version of Wine straight from their repositories in the Software Center.[1]
But, the developers of Wine recommend that you install the latest version of Wine from their repositories (WineHQ).[2]
So, which should you choose?- The Software Center version is always going to be older than the version from WineHQ. However, if you want a simpler install process that doesn’t require typing any commands, you can quickly install a stable version of Wine through the Software Center.
- With this installation method, Wine will only update if there’s a newer version available the next time you update Ubuntu itself. You won’t be able to update Wine separately.
- To install the Ubuntu package, just open Software Center, type wine, and click Install. Then, skip down to step 8 to perform the final configuration steps.
- If you want the latest Wine release with frequent updates, you’ll want to install Wine from WineHQ. It’s not hard to install, but there are a few more steps than using Software Center. We’ll walk you through them!
- The Software Center version is always going to be older than the version from WineHQ. However, if you want a simpler install process that doesn’t require typing any commands, you can quickly install a stable version of Wine through the Software Center.
-
If you want the latest version of Wine from WineHQ, your first task is to find out if your system is 32-bit or 64-bit. If your system doesn’t support 32-bit programs, there will be an extra installation step. An easy way to check is to open a Terminal window and run the command lscpu.[3]
- Once you run the command, check the value of «CPU op-mode.» You’ll either see 32-bit, 64-bit, or both.
Advertisement
-
If the value of «CPU op-mode» does not include 32-bit, run this command to enable 32-bit architecture: sudo dpkg --add-architecture i386.[4]
- If CPU op-mode displayed both 64-bit and 32-bit, there’s no need to run this command.
-
Now you’ll need to run two commands that will allow you to easily install Wine:
- First, run sudo mkdir -pm755 /etc/apt/keyrings to create a directory for the repository key.
- Then, run sudo wget -O /etc/apt/keyrings/winehq-archive.key https://dl.winehq.org/wine-builds/winehq.key to add the repository key.
-
The command you’ll need to run will be a little different depending on your version of Ubuntu:
-
Ubuntu 22.04 (Jammy Jellyfish): sudo wget -NP /etc/apt/sources.list.d/ https://dl.winehq.org/wine-builds/ubuntu/dists/jammy/winehq-jammy.sources
- If there is no stable version available for Jammy when you run this command, you can install the development version instead. To do so, use sudo apt install --install-recommends winehq-devel.
- Ubuntu 20.04 (Focal Fossa): sudo wget -NP /etc/apt/sources.list.d/ https://dl.winehq.org/wine-builds/ubuntu/dists/focal/winehq-focal.sources
- Ubuntu 18.04 (Bionic Beaver): sudo wget -NP /etc/apt/sources.list.d/ https://dl.winehq.org/wine-builds/ubuntu/dists/bionic/winehq-bionic.sources.
- Ubuntu 16.04 (Xenial Xerus): sudo wget -NP /etc/apt/sources.list.d/ https://dl.winehq.org/wine-builds/ubuntu/dists/xenial/winehq-bionic.sources
- Ubuntu 14.04 (Trusty Tahr): sudo wget -NP /etc/apt/sources.list.d/ https://dl.winehq.org/wine-builds/ubuntu/dists/trusty/winehq-bionic.sources
-
Ubuntu 22.04 (Jammy Jellyfish): sudo wget -NP /etc/apt/sources.list.d/ https://dl.winehq.org/wine-builds/ubuntu/dists/jammy/winehq-jammy.sources
-
Once you do this, you’ll be ready to install Wine.
-
This installs Wine from the repository you’ve added.
- The Wine files are installed in /opt/wine-(branch).
-
No matter how you’ve installed Wine, you’ll want to run this command before you start installing Windows programs. This creates a directory called .wine in your home directory that contains a virtual Windows-style C drive (called drive_c) with the typical Windows file structure, including folders like Program Files, Program Files (x86), Windows, and ProgramData. It also opens a panel that lets you change your Wine preferences.[5]
- On the Applications tab, you’ll see that Wine can mimic different Windows versions for each application. The default Windows version is Windows 7, but you’ll probably want to select a newer version of Windows (such as Windows 10).
- On the Desktop Integration tab, you can choose to add Windows-style theme and link Windows-like folder structure (e.g., Desktop, My Documents) to directories in Ubuntu.
- You can customize the behavior of windows and mouse movements on the Graphics tab and sound on the Audio tab.
- Once you’re finished making configuration changes, click OK to save.


Advertisement
-
Now that Wine is installed, you can easily run any Windows installer that ends with the .exe extension.
- While lots of popular Windows software titles will work great in Wine, you might run into problems with some apps. Check out the Wine Application Database to see which apps will run flawlessly, with minor flaws, or not at all on Ubuntu.
-
Wine should automatically detect the .exe and start the Windows program. If the program doesn’t open in Wine, right-click its icon and select Run with > Wine.[6]
- If the installer doesn’t launch, you can also start it from the command line. In a Terminal window, use cd to enter the directory to which you saved the downloaded installer, then use wine filename.exe to launch it.
-
The installation will look like a typical Windows installer. Many installers allow you to choose a location for installing the file. The location will be in your virtual C drive, which is actually located in the folder called .wine/drive_c in your home directory.
- If prompted to choose an installation location, choose C:\Program Files.
- You can configure any apps you install in the winecfg tool. Just run wincfg at the prompt, click Add Application on the Applications tab, and select the newly installed app. Then, with the new app selected, go through the tabs and make modifications specifically for that app.


Advertisement
-
If the installer you ran prompted you to add an icon to your desktop, you’ll now see a shortcut to that app that you can easily double-click to launch with Wine. If not, you can run it from your file manager.
- First, open Files and make sure hidden files are visible. If you don’t see the .wine folder, press Ctrl + H to toggle showing hidden files.[7]
- Double-click the .wine folder and then navigate to the location to which you installed the Windows program.
- Right-click the .exe file and choose Open with > Wine.
- First, open Files and make sure hidden files are visible. If you don’t see the .wine folder, press Ctrl + H to toggle showing hidden files.[7]
-
If you’re having trouble running programs from the GUI or just want to use the command line, start by navigating to the directory to which you installed the program using the cd command. You’ll need to surround the path with single quotes.
- For example, if you installed it in the virtual C:\Program Files\Game\Risk directory, you’d use cd '.wine/drive_c/Program Files/Games/Risk'.[8]
- You can start Windows programs from the full path if you’d prefer, but you’ll need to start them with wine start. For example, wine start 'C:\Program Files\Game\Risk.exe'
- Start the program using wine appname.exe. For example, if the Windows application file is called Risk.exe, you’d use wine Risk.exe to open it from the current directory.
- For example, if you installed it in the virtual C:\Program Files\Game\Risk directory, you’d use cd '.wine/drive_c/Program Files/Games/Risk'.[8]
-
If you’re missing certain libraries required to install programs, you might be able to fix the issue with this easy-to-install tool. For example, if you’re trying to run Adobe programs and seeing errors about Adobe Type Manager or «atmlib,» Winetricks can fetch the DLLs you’ll need to run the program.
- You can install Winetricks from Ubuntu Software or using sudo apt-get install winetricks. However, if you want to get help from the Wine team, they may not provide assistance if you’re using Winetricks.[9]
- Once Winetricks is installed, run it from the prompt using the command winetricks. You can then use the tool to install working packages of popular apps and libraries.
- You can install Winetricks from Ubuntu Software or using sudo apt-get install winetricks. However, if you want to get help from the Wine team, they may not provide assistance if you’re using Winetricks.[9]


Advertisement
Add New Question
-
Question
When I install an app on my computer, it asks for a password. Why is this?
Living Concrete
Top Answerer
Some applications require administrator permissions in order to be installed. Simply enter your account password to continue.
-
Question
What can I do if I don’t have an internet connection to download the software?
Living Concrete
Top Answerer
Download the Debian Package (*.dpkg) file onto a flash drive on another computer. Then, put the flash drive into the computer that doesn’t have an internet connection. From here, you should be able to run the Debian Package by double clicking on it.
-
Question
Will it be possible to run Windows games on Ubuntu?
Yes, but not all games work with Wine yet. You can check Wine’s list of compatible programs to see if your game is listed.
See more answers
Ask a Question
200 characters left
Include your email address to get a message when this question is answered.
Submit
Advertisement
Video
-
To uninstall Windows apps, use wine uninstaller to launch the software removal tool.
-
If the app you want to use won’t run properly in Wine, search the web for the app name and «Ubuntu.» Many Wine users share information about their experiences getting their favorite games and apps to run in Ubuntu and you’re likely to find answers.
Thanks for submitting a tip for review!
Advertisement
About This Article
Thanks to all authors for creating a page that has been read 590,907 times.