
10.09.2024
Для запуска определенных действий по расписанию или при наступлении определенного события в Windows используется встроенный планировщик заданий (
Task Scheduler
). В этой статье мы рассмотри, как настроить автоматический запуск PowerShell скрипта с помощью планировщика задач Windows. Скрипт должен запускаться в фоновом режиме, не выдавать всплывающих окон и запускаться независимо от текущих настроек политики выполнения скриптов PowerShell.
В этом примере я хочу каждые 10 минут запускать PowerShell скрипт, который проверяет письма в почтовом ящике и, если есть новые письма с определенным отправителем и темой, отправляет содержимое в виде уведомления в Телеграм. Путь к файлу скрипта:
"C:\PS\OutlookEmailtoTG.ps1"
- Откройте консоль планировщика Task Scheduler, выполнив команду
taskschd.msc
. - Разверните дерево библиотеки Task Scheduler. Для удобства для хранения ваших кастомных заданий можно создать отдельную папку. Щелкните по ней и выберите Create Task
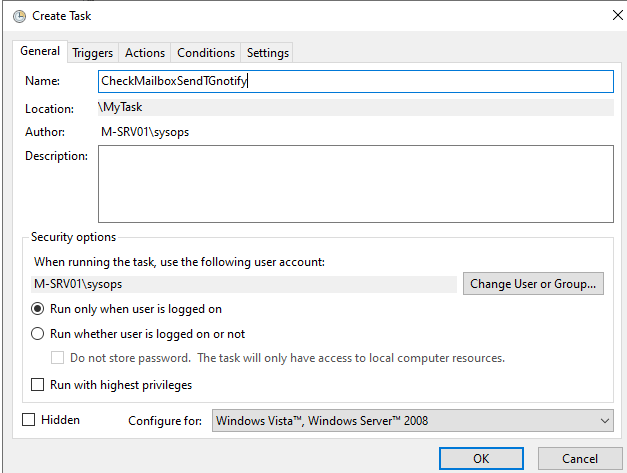
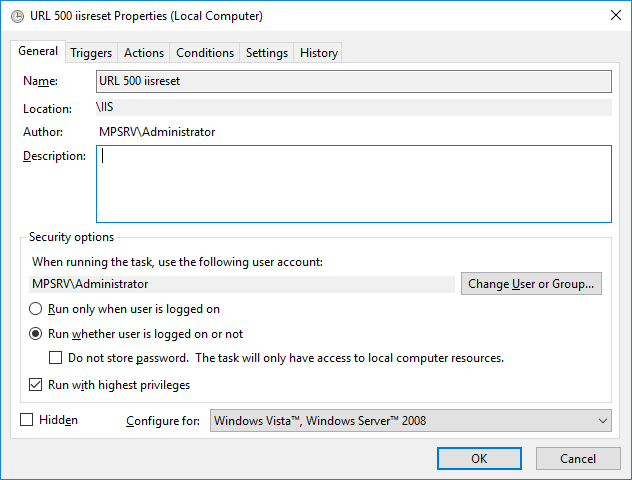
- На первой вкладке General нужно указать имя задания и пользователя, под которым оно будет запускаться. Задание может запускаться автоматически:
— когда пользователь вошел в систему пользователя (Run only the task is logged in)
— или независимо от того, выполнил ли пользователь вход или нет (Run whether user is logged on or not).
Второй режим используется чаще всего. Во втором случае можно указать, что задание будет запускаться от имени определенного пользователя (придется сохранить его пароль в диспетчер учетных данных Credentials Manager). Если для выполнения задания требуется повышение привилегий, нужно включить Run with highest privileges.
Чтобы не использовать сохраненный пароль можно настроить запуск задания с максимальными привилегиями от имени NT AUTHORITY\SYSTEM. Для этого в поле User укажите
SYSTEM
.
В среде AD можно настроить запуск заданий от имени сервисной учетной записи gMSA (пароль учетной записи gMSA не хранятся на компьютере в явном виде, вам не нужно их шифровать или защищать).
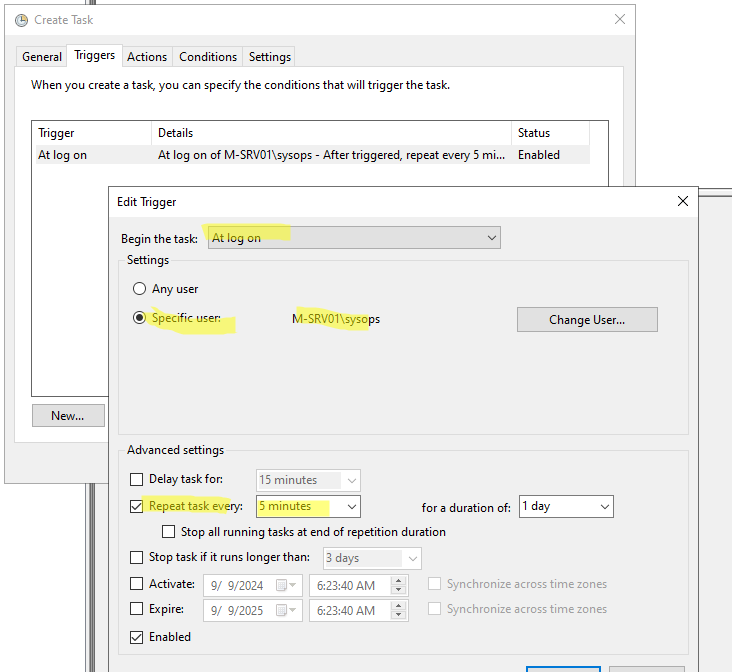
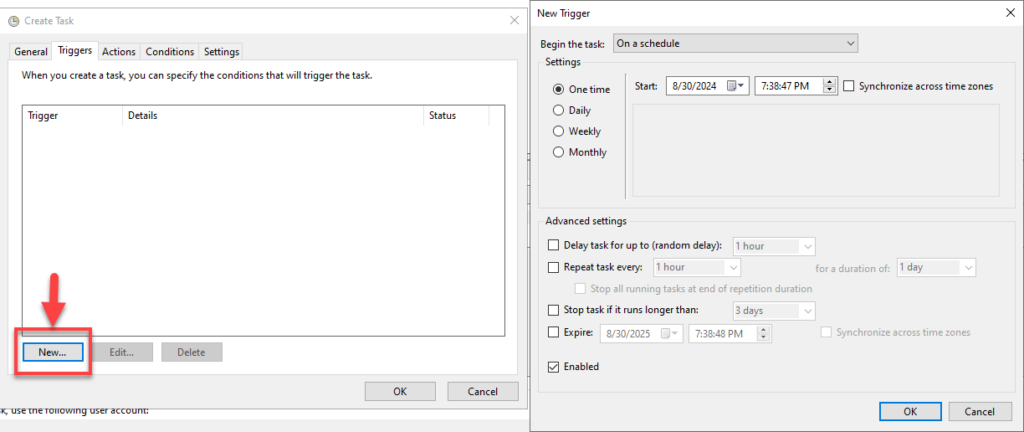
- На вкладке Триггеры (Triggers) нужно задать условие или время запуска задания планировщика. Например, чтобы запустить задание при входе пользователя, выберите тип триггера At log on и в поле Repeat task every выберите частоту повторного запуска каждые 10 минут.

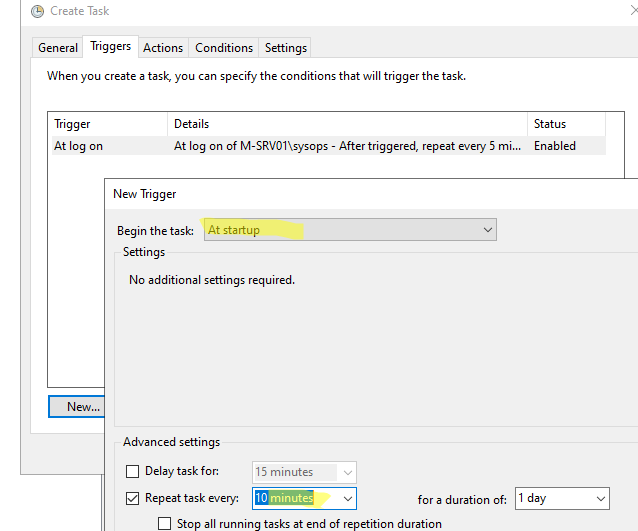
- Если задание запускается от имени SYSTEM или пользователя с сохраненным паролем, нужно выбрать что задание должно быть запущено при загрузке Windows (At startup) и периодически перезапускаться.

- Либо с помощью триггера On a schedule можно настроить точное время запуска задания. У одного задания можно настроить несколько триггеров запуска.
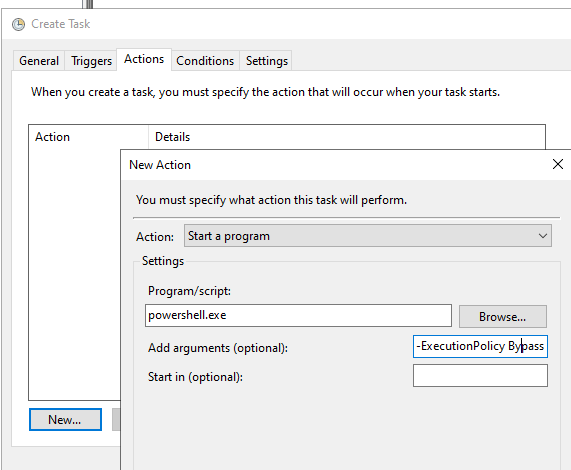
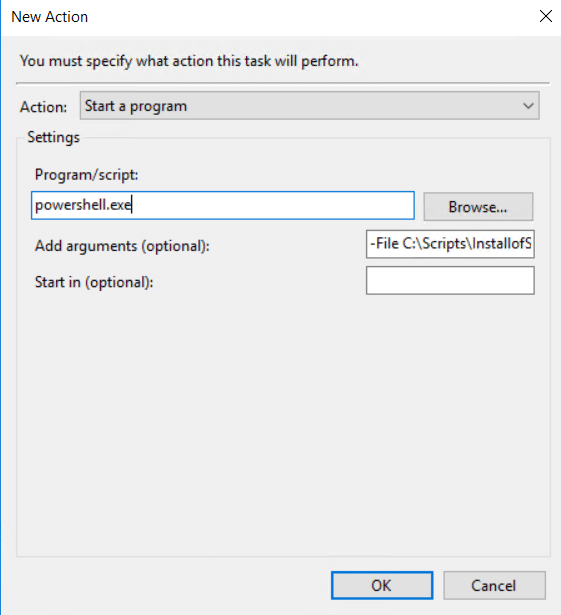
- Затем перейдите на вкладку Actions. Здесь указывается, что нужно сделать при срабатывании любого из триггеров. В нашем случае мы хотим запустить PowerShell скрипт. Выберите New -> Start a program. Укажите следующе настройки задания:
Program/script:
powershell.exe
Add arguments (optional):
-ExecutionPolicy Bypass -NonInteractive -WindowStyle Hidden -File "C:\PS\OutlookEmailtoTG.ps1"
Рекомендуем предварительно проверить, что ваш PowerShell скрипт работает корректно. Воспользуйтесь, такой командой:
powershell.exe -file C:\PS\OutlookEmailtoTG.ps1 -NoExit
- При запуске скрипта используются следующие опции:
-File
– полный путь к файлу скрипта (PS1)
-ExecutionPolicy
— позволяет задать настройки выполнения PowerShell скриптов для текущего сеанса. Когда указано Bypass, текущие настройки политики игнорируются и скрипт будет выполнен в любом случае;
-NonInteractive
– не выводить интерактивные запросы к пользователю
-WindowStyle Hidden
– не показывать окно консоли PowerShell пользователю (скрипт запускается скрыто). Если задание планировщика настроено на запуск при входе пользователя в систему, при запуске скрипт может появляться и пропадать окно PowerShell. Морганий не будет только со скриптами, которые запускаются в сеансе 0 (вне зависимости от входа пользователя).-NoProfile
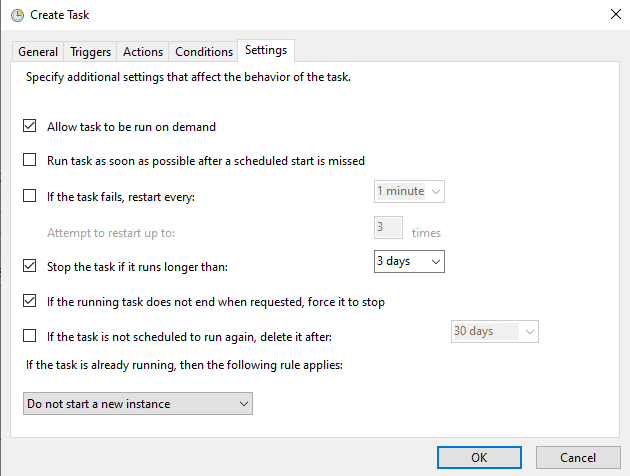
— если скрипт может работать без использования профиля пользователя, добавьте эту опцию. Она предотвращает загрузку профиля пользователя, что ускоряет выполнение скрипта; - На вкладке Settings можете включить следующие полезные опции:
Allow task to be run on demand — разрешить ручной запуск задания по запросу.
If the running task does not end when requested, force it to stop — завершить предыдущую задачу, если он не завершилась к моменту повторного запуска.
Do not start a new instance — не запускать новые экземпляры задания, если оно выполняется. - Сохраните настройки задания. Проверьте что задание появилось в консоли Task Scheduler. Чтобы протестировать работу задания, щелкните по нему и выберите Run.

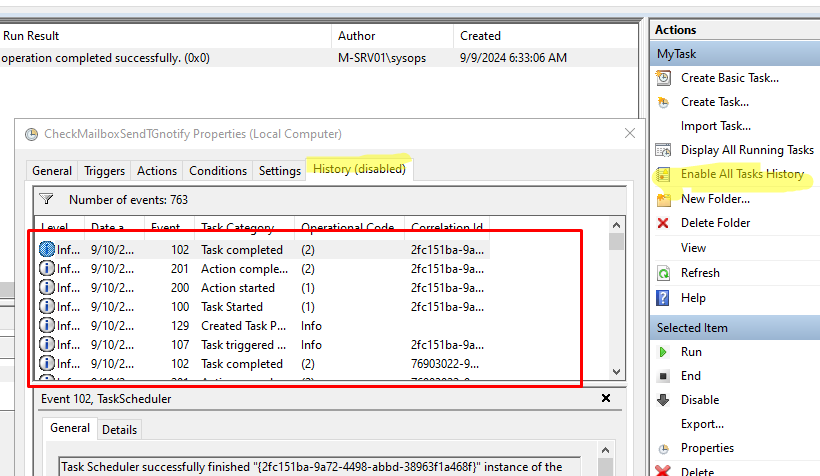
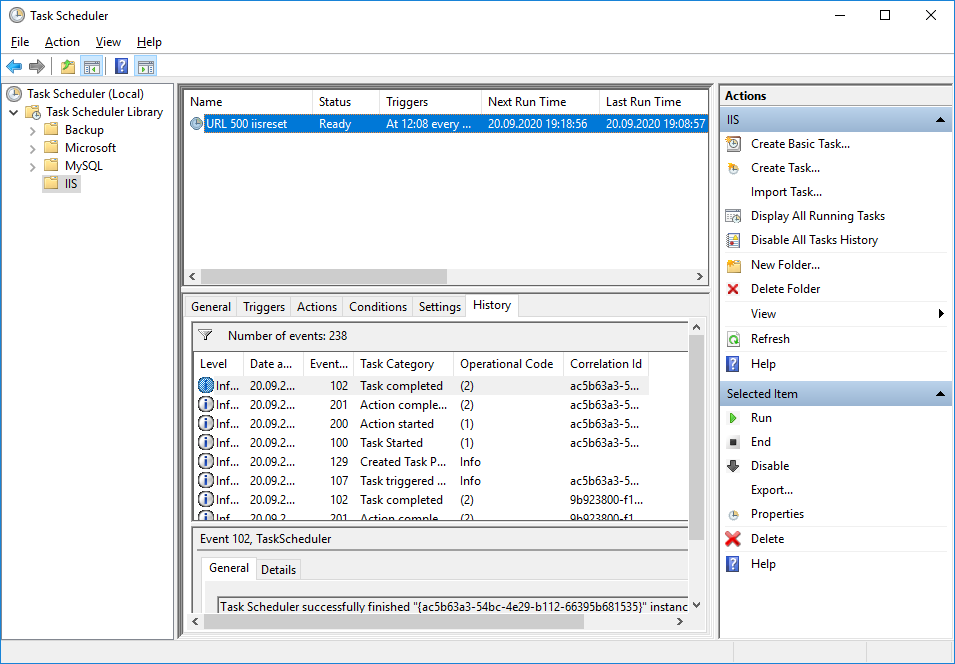
Если PowerShell скрипт был успешно запущен, в поле Last Run Result появится сообщение The operation completed sucessfully (0x0).
- На вкладке History можно отслеживать историю и результаты предыдущих запусков задания. По умолчанию Task Scheduler не ведет историю запусков заданий. Включается с помощью кнопки Enable All Tasks History в правой панели Actions консоли.


Можно создать задание планировщика для запуска скрипта PowerShell из командной строки:
$TaskName="CheckMailbox"
$Trigger = New-ScheduledTaskTrigger -AtStartup
$Trigger.Repetition = (New-ScheduledTaskTrigger -once -at "12am" -RepetitionInterval (New-TimeSpan -Minutes 10) -RepetitionDuration (New-TimeSpan -Minutes 10)).repetition
$User= "NT AUTHORITY\SYSTEM"
$Action= New-ScheduledTaskAction -Execute "PowerShell.exe" -Argument "-ExecutionPolicy Bypass -NonInteractive -WindowStyle Hidden -File C:\PS\OutlookEmailtoTG.ps1"
Register-ScheduledTask -TaskName $TaskName -Trigger $Trigger -User $User -Action $Action -RunLevel Highest -Force
Некоторые дополнительные моменты, которые нужно учитывать при запуске скриптов PowerShell через планировщик заданий Windows:
- Если вы планируете выполнять скрипт в среде PowerShell Core 7.x, вместо powershell.exe нужно запускать pwsh.exe.
- Если к компьютеру, на котором запускается PowerShell скрипт с привилегированными правами имеют доступ другие пользователи, нужно изменить NTFS права доступа к файлу PS1 так, чтобы они не смогли его отредактировать.
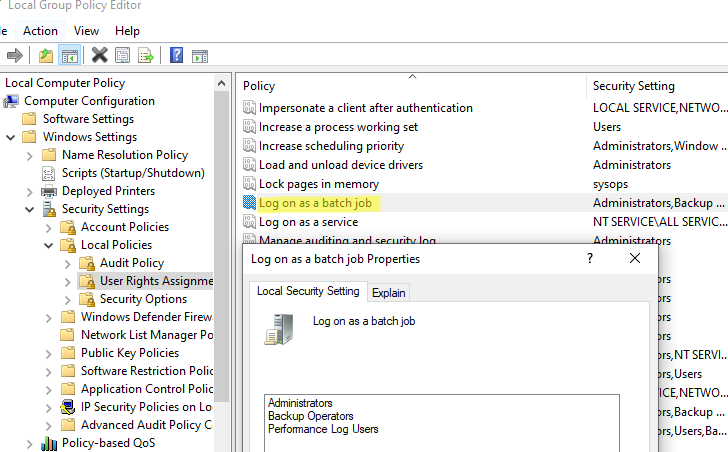
- Если задание запускается от имени непривилегированного пользователя, его учетную запись нужно добавить в локальную политику безопасности Log on as a batch job (gpedit.msc -> Computer Configuration -> Windows Settings -> Security Settings -> Local Policies -> User Rights Assignment). При создании такого задания появится предупреждение: This task requires that the user account specified has Log on as batch job rights

- В домене AD PowerShell скрипты с помощью GPO можно запускать при загрузке/входе пользователя или выключении компьютера. Такие скрипт нызываются логон-скриптами.
В задачи практически любого системного администратора входит написание различных скриптов и их запуск. Запланировать запуск скрипта по расписанию с помощью Task Sheduler — задача несложная, но при использовании PowerShell есть некоторые нюансы, о которых я расскажу в этой статье.
Итак, предположим, у меня есть скрипт start.ps1, который мне необходимо запускать ежедневно в течении 10 дней. Есть два способа решить эту задачу.
Способ 1
Для запуска скрипта воспользуемся оснасткой Task Scheduler, он же планировщик заданий. Найти его можно в разделе Administrative Tools, либо нажав Win+R и введя команду taskschd.msc. Открываем планировщик и в разделе Actions выбираем пункт Create Task.

На вкладке General указываем имя и описание задания, а также (по необходимости) пользователя, от имени которого задание будет запускаться. Для того, чтобы задание выполнялось вне зависимости от того, залогинен ли пользователь в системе, выбираем опцию «Run whether user is logged on or not». Если для выполнения задания требуется повышение привилегий, то отмечаем опцию «Run with highest privileges».

Далее идем на вкладку Triggers и создаем новый триггер, в котором будет храниться расписание запуска нашего задания. В поле Start указываем дату и время запуска, а в поле Expire — дату и время завершения задания. Указываем выполнять задание ежедневно (Daily) и задаем период повтора (Recur every) 1 день.
Примечание. Если вы хотите запускать задание чаще, чем раз в день, то надо выбрать одноразовое выполнение (One time), а в разделе Advanced settings отметить пункт Repeat task every и указать время повторения, минимум 5 минут, максимум 1 час. Если этого недостаточно, то дополнительно в поле Delay task for up to можно указать временную задержку.

И основное. Переходим на вкладку Action и указываем действие для запланированного задания. Напомню, что в целях безопасности PowerShell скрипты могут выполняться только интерактивно, то есть сначала надо запустить оболочку PowerShell и уже в ней указать путь к скрипту. Поэтому в поле «Action» указываем запуск powershell.exe, а в поле «Add Arguments» параметр -File и путь к нашему скрипту, вот так:
-File ″C:\Scripts\start.ps1″
Также в поле аргументы можно указать:
-Command — выполняет указанные команды и любые другие параметры. Этот параметр тоже можно использовать для запуска скрипта, например: -Command ″& {C:\Scripts\start.ps1}″. Кроме того, с его помощью можно передавать в скрипт параметры: -Command ″& {C:\Scripts\start.ps1 -a 1 -b 3}″;
-ExecutionPolicy — задает политику выполнения скриптов для текущего сеанса, может принимать значения Unrestricted, RemoteSigned, AllSigned и Restricted. Заданная политика будет действовать только в текущем сеансе и имеет приоритет над любыми ранее созданными политиками;
-NonInteractive — отключить вывод интерактивных запросов к пользователю;
-WindowStyle Hidden — запуск окна PowerShell в скрытом режиме, незаметно для пользователя;
-NoProfile — предотвращает загрузку профиля, что может несколько ускорить выполнение скрипта;
-NoExit — оставить оболочку открытой после отработки скрипта. Это может понадобиться при проверке и отладке скрипта.
Заполнив необходимые поля жмем ОК и сохраняем задание. Теперь скрипт будет запускаться по расписанию ежедневно в заданное время в течении 10 дней.
Способ 2
В PowerShell 3.0 появился новый функционал Sheduled Job, дающий возможность создавать запланированные задания прямо из консоли, не пользуясь оснасткой планировщика. Воспользуемся им для планового запуска нашего скрипта.
Сначала создаем расписание запуска (ежедневно в полпятого вечера, в течении 10 дней):
$t = New-JobTrigger -Daily -At 4:30PM -DaysInterval 10
Затем сохраняем в переменной учетные данные:
$cred = Get-Credential contoso\administrator
В качестве опции указываем запуск задания с повышенными привилегиями:
$o = New-ScheduledJobOption -RunElevated
И регистрируем задание с именем Start:
Register-ScheduledJob -Name Start -FilePath C:\Scripts\start.ps1 -Trigger $t -Credential $cred -ScheduledJobOption $o

Чтобы убедится в том, что задание создано, можно открыть планировщик и найти наше задание в разделе Microsoft\Windows\PowerShell\SheduledJobs.

Примечание. Для каждого запланированного задания PowerShell в директории %systemdrive%\Users\%username%\AppData\Local\Microsoft\Windows\PowerShell\ScheduledJobs создается одноименная папка. В этой папке находится само задание в XML-файле и папка Output, в которой, в подпапках по времени выполнения, хранится история выполнения задания — результат выполнения (файлs Result.xml) и статус задания (Status.xml). Эти файлы могут пригодиться для отладки и диагностики в том случае, если задание не отрабатывает должным образом.
Execution Policy
В заключение напомню об одном немаловажном моменте, а именно о политике выполнения скриптов Execution Policy. Посмотреть текущее значение политики можно командой Get-ExecutionPolicy. Политика выполнения может иметь значения:
• Restricted — блокируется выполнение любых скриптов. Значение по умолчанию;
• AllSigned — разрешено выполнение скриптов, имеющих цифровую подпись;
• RemoteSigned — скрипты, подготовленные на локальном компьютере, можно запускать без ограничений, скрипты, загруженные из Интернета — только при наличии цифровой подписи;
• Unrestricted — разрешено выполнение любых скриптов. При запуске неподписанного скрипта, который был загружен из Интернета, программа может потребовать подтверждение;
• Bypass — ничего не блокируется, никакие предупреждения и запросы не появляются.
Обычно для безпроблемного выполнения скриптов достаточно задать значение RemoteSigned. Изменить текущее значение можно командой Set-ExecutionPolicy, например:
Set-ExecutionPolicy RemoteSigned -force
Примечание. Если указанная в команде политика выполнения противоречит групповой политике, то параметр запишется в реестр, но действовать не будет.

Системному администратору часто приходится писать разные скрипты и настраивать их запуск по расписанию в Планировщике заданий (Task Scheduler). Простой пример ниже.
Написал небольшой скрипт и сохранил по адресу:
B:\scripts\web\url_status.ps1
Я хочу, чтобы этот скрипт запускался каждые 10 минут. Время работы скрипта — не более 60 секунд.
Открываю Планировщик заданий. Создаю папку, в которой будет находиться расписание, называю её IIS.
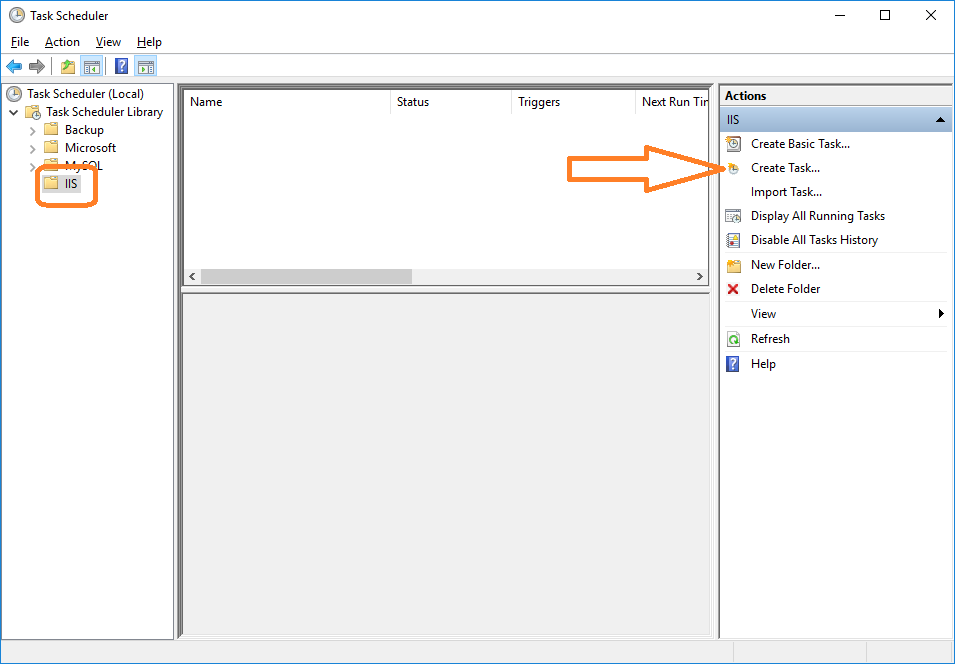
Нажимаю Create Task.
В первой вкладке General указываю:
- Name. Любое название расписания.
- Description. Любое описание, не обязательно.
- С помощью кнопки Change User or Group можно выбрать пользователя, от имени которого будет выполняться скрипт. Я выбираю локального администратора.
- Run whether user is logged on or not. Устанавливаю радиокнопку, чтобы скрипт выполнялся независимо от того, залогинен пользователь или нет. В этом случае нас попросят после сохранения расписания указать пароль пользователя.
- Run with highest privileges. Устанавливаю галку для запуска скрипта с правами администратора.
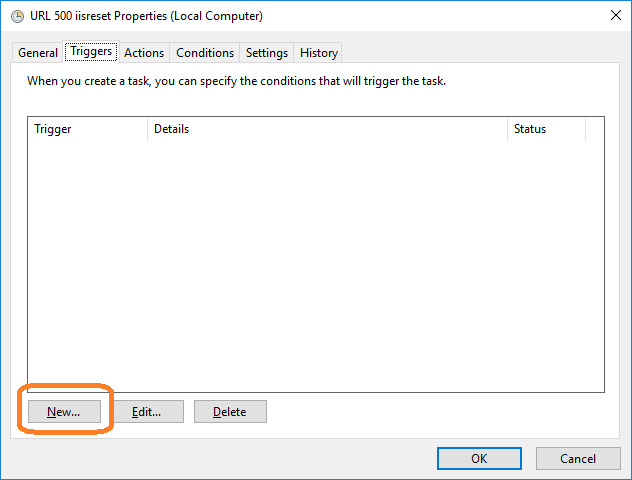
Перехожу на вкладку Triggers. Здесь нужно создать триггер для расписания. New.
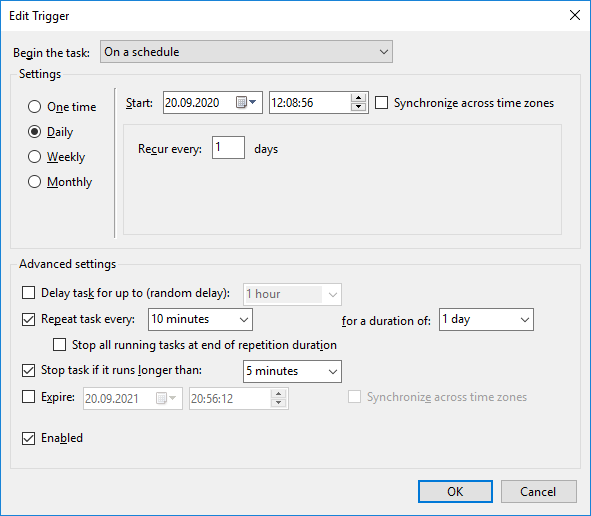
В настройках триггера:
- Begin the task. Выбираю On a schedule. Запуск по расписанию.
- Daily. Запускать каждый день.
- Recur every 1 days. Каждый день без пропусков.
- Repeat task every 10 minutes. Запускать каждые 10 минут for a duration 1 day. Весь день.
- Stop tasks if it runs longer than 5 minutes. Останавливать задачу, если она выполняется более 5 минут.
- Enabled. Включить расписание.
OK.
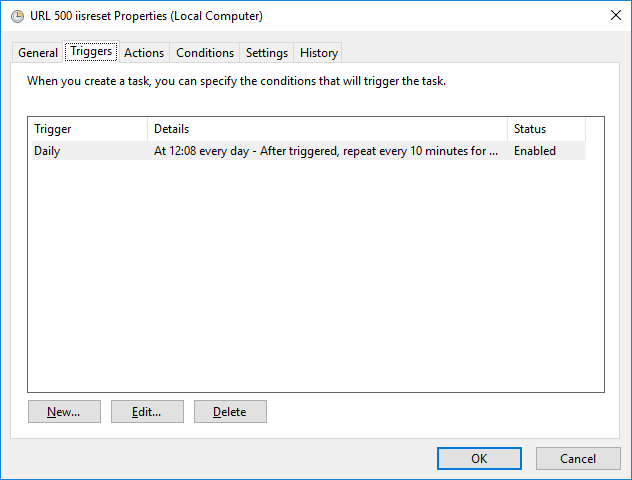
Расписание создано.
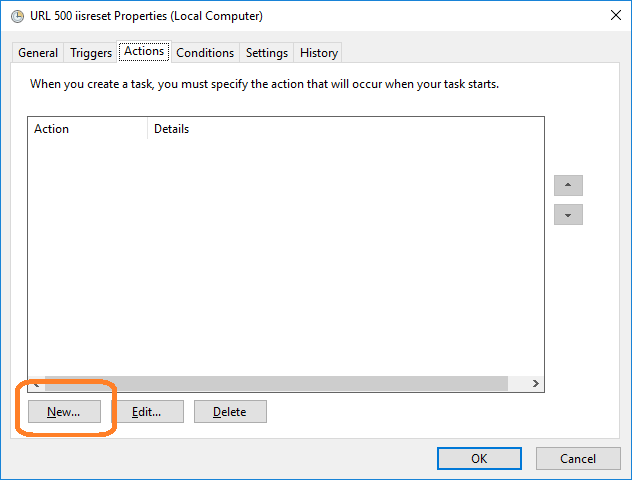
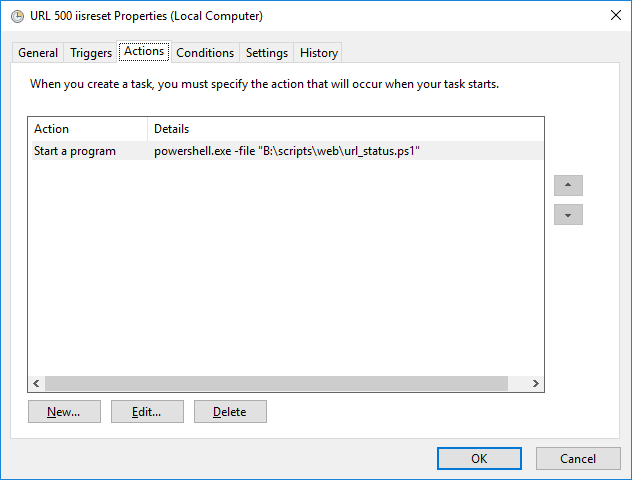
Перехожу на вкладку Actions. Здесь нужно указать скрипт для выполнения. New.
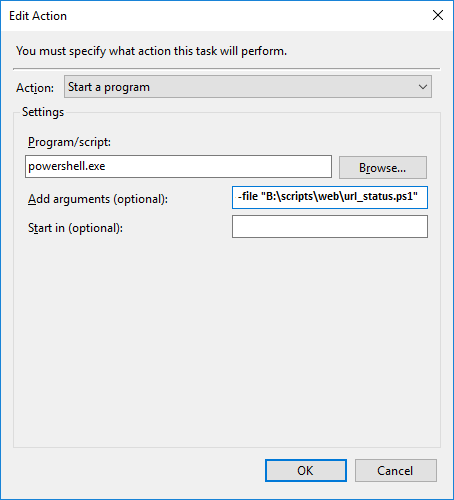
- Actions: Start a program. Выполнить программу.
- Program/script. Указываю powershell.exe
- Add arguments (optional). Здесь нужно указать параметры для запуска скрипта. Я пишу: -file «B:\scripts\web\url_status.ps1». Если нужно передать в скрипт аргументы, то можно написать -command «& {B:\scripts\web\url_status.ps1 -a 1 -b 3}».
OK.
Путь к выполняемому скрипту указан.
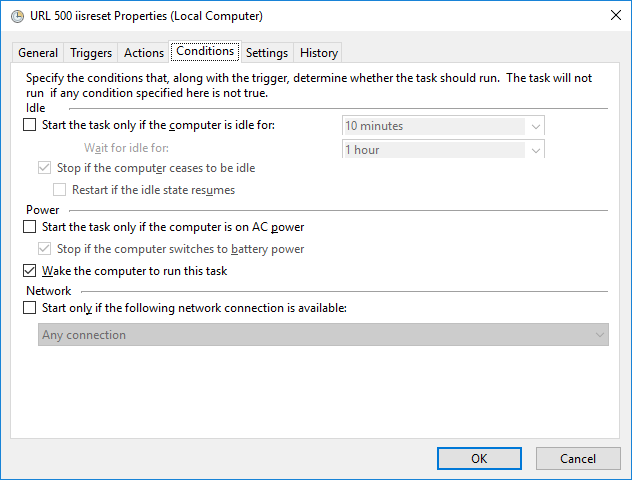
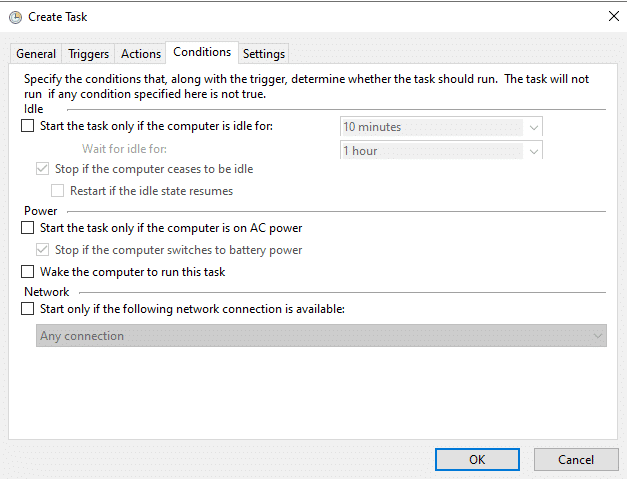
Перехожу на вкладку Conditions. Здесь определяются условия для запуска. Устанавливаю одну галку, просто на всякий случай:
- Wake the computer to run this task. Разбудить компьютер для выполнения скрипта.
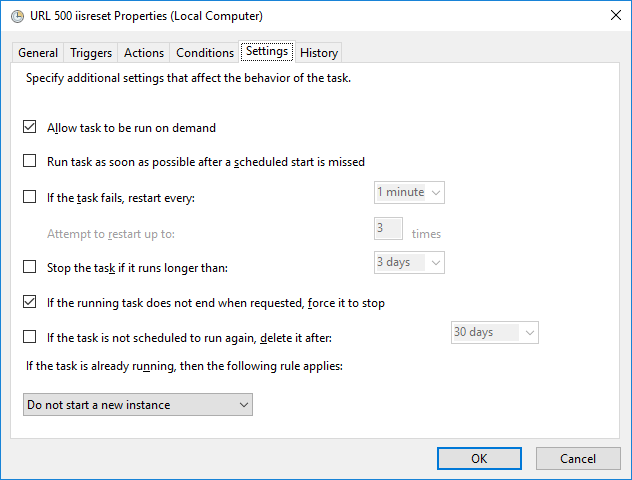
Перехожу на вкладку Settings. Здесь есть ряд полезных настроек. Ставлю галки:
- Allow task to be run on demand. Разрешить запуск скрипта по запросу.
- If the running task does not end when requested, force it to stop. Если задача не завершилась к моменту повторного запуска, то остановить её.
- Do not start a new instance. Не запускать второй экземпляр.
OK.
Указываю пароль локального администратора. OK.
Теперь скрипт будет запускаться по расписанию. В разделе History можно отслеживать результат выполнения.
Introduction
Windows Task Scheduler enables users to schedule tasks to run at a specific date and time, on a defined schedule, or when triggered by certain events. This built-in tool of Windows operating systems helps improve efficiency and ensure reliable execution of repetitive tasks. In this blog, we will show you how to run a PowerShell script from Task Scheduler and how to create scheduled tasks using PowerShell.
Setting Up PowerShell Scripts for Automation
Understanding Task Scheduler
The Task Scheduler library is a collection of all defined tasks, organized into folders. For each task, the GUI provides the following tabs:
- General — The tasks’ name and description, the account it should run under, and other security options.
- Triggers — The conditions that start a task, which can be time-based (e.g., daily, weekly), event-based (e.g., at system startup or user login), or custom
- Actions — The operations executed when a task is triggered, such as starting a program.
- Conditions — Criteria that control the execution of a task based on the state of the computer, such as only running when the computer is idle for a specific period
- Settings — Additional configurations that determine how and when a task is run, such as restarting a task if it fails or stopping it if it runs longer than expected
- History — A history of task executions, including start times, end times, and any errors or warnings encountered
Benefits of using Task Scheduler for Automating PowerShell Scripts
Automating PowerShell scripts through the PowerShell Task Scheduler offers many benefits, including the following:
- Time savings — When you run PowerShell scripts from Task Scheduler, you can save a considerable amount of time that would otherwise be spent on manual execution. This is particularly beneficial for scripts that need to run during off-hours.
- Consistency — Automation reduces the risk of human errors. A scheduled PowerShell script will execute exactly the same operations in the same order every time.
- Reliability — With Task Scheduler, you can ensure that critical maintenance tasks, such as backup and cleanup routines, are executed regularly. This increases the system’s reliability and reduces the risk of data loss or system failures.
- Resource efficiency — By scheduling scripts to run during periods of low system utilization, you can ensure that intensive tasks do not degrade system performance during peak hours.
- Flexibility — Task Scheduler offers a variety of scheduling options, including the ability to run tasks at system startup, on logon, when idle or in response to specific events. This level of control enables you to tailor script execution to your specific requirements.
- Error handling — You can configure scheduled tasks to attempt a rerun if a script fails, send emails upon task completion or failure, and write event logs. This enables timely troubleshooting and keeps you informed about the health of automated processes.
- Security — With Task Scheduler, PowerShell scripts can run under specific user accounts, including those with elevated privileges, without requiring the user to be logged on. This helps ensures that sensitive tasks are executed securely and allows for the automation of scripts that require higher privileges. However, since adversaries can exploit scheduled and triggered tasks for malicious purposes, you should leverage an auditing or tracking system to monitor tasks for potential abuse. Netwrix Access Analyzer is a good example of a tool that can mitigate malicious activity.
- Integration and extensibility — Scheduling PowerShell scripts allows for sophisticated automation scenarios that can react to system events, orchestrate multiple tasks and more.
- Management of complex workflows — Task Scheduler can manage complex workflows, such as chaining tasks together or using conditional logic based on the success or failure of a prior task. This is invaluable for scenarios where multiple, interdependent tasks need to be carefully orchestrated.
- Ease of use — Despite its powerful features, Task Scheduler has an intuitive graphical interface that simplifies the process of setting up and managing automated tasks. For more advanced users, Task Scheduler can also be configured and managed using command-line tools or PowerShell cmdlets.
Steps to Create a Schedule for a PowerShell Script
Before scheduling a PowerShell script with Task Scheduler, make sure the script is saved with the extension .ps1 and that it has been tested to ensure it functions correctly.
Then take the following steps:
- Open Task Scheduler: Press Win + R, type taskschd.msc to the Run dialog and press Enter.
- In the Actions pane on the right, click Create Task.
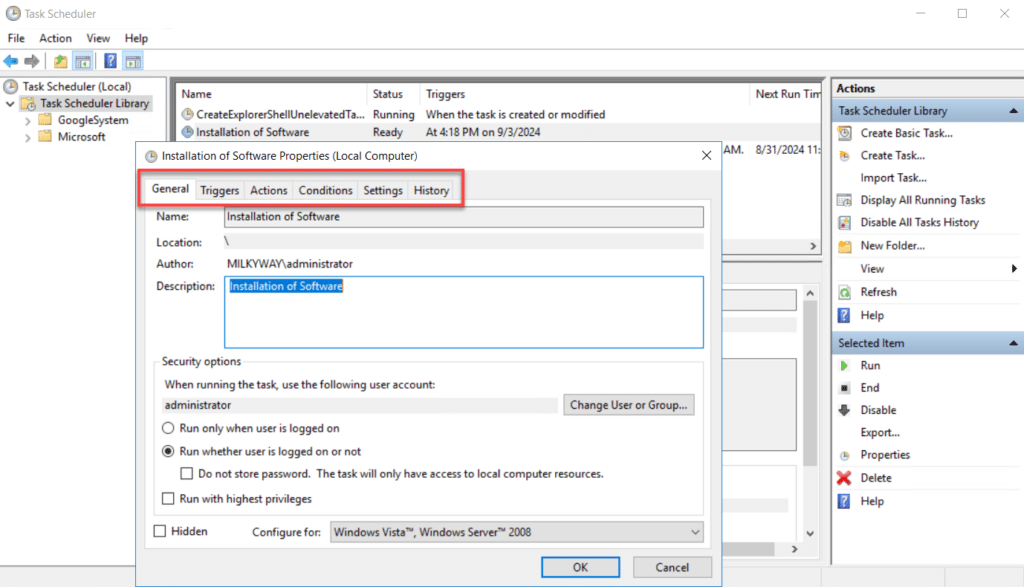
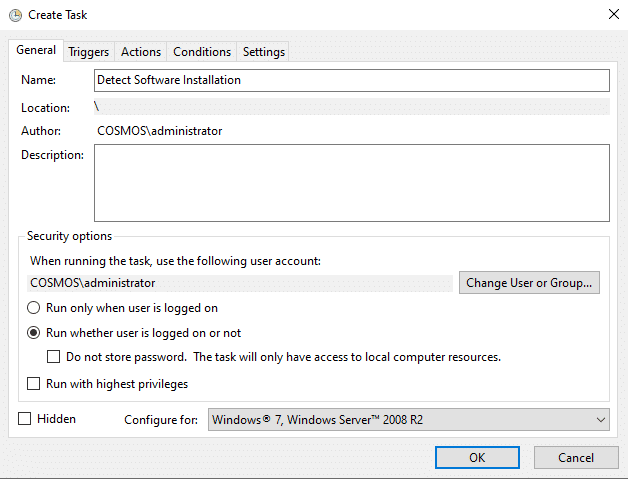
- On the General tab, do the following:
- Enter a name and description for your task.
- Configure the appropriate security options. For example, selecting Run whether user is logged on or not will ensure the task runs even if you are not logged in. If the script requires administrative rights, check Run with highest privileges.
Click OK to save your changes.
- Go to the Triggers tab and click New. In the New Trigger pane, choose the following:
- When the task should begin
- The frequency at which it should run, such as once, daily or weekly
- Any additional options you need, such as stopping the task if it runs longer than the time you specify
Click OK to save your changes.
- Go to the Actions tab.Click New to set up a new action to run your PowerShell script:
- From the Action dropdown menu, select Start a program.
- In the Program/script field, enter powershell.exe.
- In the Add arguments field, enter the following, making sure to specify the full path to your script: -File C:\Scripts\scriptname.ps1
- In the Start in field, specify the directory where the script, if needed. This is typically not required unless your script relies on relative paths.
Click OK to save your changes
- Click OK and go to the Conditions tab. St any conditions under which the task should run. For example, you can specify that the task should run only if the computer is on AC power or only if it is connected to a specific network. Click OK to save your selections.
- Next, go to the Settings tab and configure the following:
- Allow task to be run on demand — Check this if you want to be able to manually run the task.
- If the task fails — Specify what should happen if the task fails, such as restarting the task.
- Stop the task if it runs longer than — Set a time limit if applicable.
- If the task is already running — Choose what should happen if the task is triggered but it is already running.
- Click OK to finalize your task. You will be prompted to enter credentials for the user account under which the task will run.
Advanced Configuration and Best Practices
Controlling Script Execution and Visibility
To control script execution and visibility when using Task Scheduler, you can use the following parameters in the Add arguments field of the Action tab:
- NoExit — Add this parameter to prevent the PowerShell or command prompt window from closing automatically after the script has run. This option is useful for debugging or when you want the console window to stay open to check the output directly.
- Command — Use this parameter to specify the full path of a script to execute and any necessary arguments.
For example, you might specify the following in the Add arguments field:
-NoExit -Command -File C:\Scripts\InstallOfSoftware.ps1
Redirecting Output to a Text File or Other Destinations to Log Script Activity
Troubleshooting Common Windows Task Scheduler Issues
Here are some common issues that can prevent your scheduled tasks from running as expected and how to resolve them.
Task will not start or run.
- Make sure the user account running the task has the necessary permissions to execute the task and access any files or directories referenced by the task.
- Double-check the task’s configuration settings, such as the trigger settings, action parameters and conditions.
- Ensure the task is enabled.
- If the task uses a specific user account to run, check whether the password has been changed and update it for the task if necessary.
Task runs manually but not automatically.
- Verify the trigger settings are correct; common issues include incorrect start times, misconfigured schedules.
- Check for conditions that might prevent the task from running, such as that it will run only if the computer is idle for a specific time. If the task is scheduled to run during idle times or when the computer is not in use, power settings like sleep or hibernation mode can prevent execution. Adjust power settings to ensure the system remains active for the task to run.
Task stops unexpectedly or behaves incorrectly.
- Check whether there is enough memory, CPU or disk space available for the task to run smoothly.
- If the task involves running a script, ensure the script runs correctly outside of Task Scheduler. Consider how environment variables, paths or permissions might differ in the two situations.
Task fails with specific error codes.
Look up the error code provided in the task’s history or event log to get current information on the issue and how to resolve it.
Task runs but does nothing.
- Verify that the action set for the task, e.g., starting a program, is configured correctly.
- If the script is not executing due to policy restrictions, consider adding the -ExecutionPolicy Bypass argument to override the system’s execution policy and allow the script to run.
- Make sure paths to executable files or scripts are correct, and any command-line arguments are properly specified.
- If the task should output to a file or other destination, ensure the paths are correct and the running account has the necessary write permissions.
Practical Examples for Common Use Cases
Example Scripts for Common Administrative Tasks
Below are some practical use cases for common administrative tasks that you might want to automate using Windows Task Scheduler, along with sample scripts.
Back up a Folder
The following script can be used to back up a folder in C drive to a folder in local D drive:
Copy-Item -Path "C:\Source\*" -Destination "D:\Backup" -Recurse -Force
Install Software Updates
To update software or system components automatically, use this script:
Install-WindowsUpdate -AcceptAll -AutoReboot
Send User Notifications
To send reminders about upcoming events to an email distribution list, use this script:
Send-MailMessage -To "AbbeyCrawford@milkyway.com" -From "AbbeyTucker@milkyway.com" -Subject "Daily Meeting Reminder" -Body "This is a reminder about the meeting scheduled for 10:00 AM." -SmtpServer "smtp.milkyway.com"
Perform Security Scans
To automatically run security scans to detect malware or vulnerabilities, use this script:
Start-MpScan -ScanType QuickScan
Clean Up Temporary Files
This script removes temporary files from the specified directories:
Get-ChildItem -Path C:\Windows\Temp\*, $env:TEMP\* -Recurse | Remove-Item -Force -Recurse -ErrorAction SilentlyContinue
Restart a Service
To restart a service, such as a web server or Microsoft SQL server service, you can use commands like the following:
Restart-Service -Name W3SVC
Restart-Service -Name MSSQLSERVER
Scheduling Complex PowerShell Scripts
You can schedule more complex PowerShell scripts as well. As illustrated in the examples below, it’s a best practice to include comments that describe the purpose of the various sections of a script.
Report on Disk Space Usage
This script provides a quick overview of disk space usage:
# Script to report disk space usageGet-PSDrive -PSProvider FileSystem |
Select-Object Name, @{Name="UsedGB";Expression={"{0:N2}" -f (($_.Used - $_.Free)/1GB)}}, @{Name="FreeGB";Expression={"{0:N2}" -f ($_.Free/1GB)}}, @{Name="TotalGB";Expression={"{0:N2}" -f ($_.Used/1GB)}} |
Format-Table -AutoSize
Monitor System Health
To track system performance over time, you can use this PowerShell script to log CPU usage, memory usage and disk space to a file:
# Define the log file path$logFile = "C:\SystemHealthLog.txt"
# Function to get system health metrics
function Get-SystemHealth {
# Get CPU usage
$cpuUsage = Get-Counter '\Processor(_Total)\% Processor Time'
# Get memory usage
$memoryUsage = Get-Counter '\Memory\Available MBytes'
# Get disk space usage for C: drive
$diskSpace = Get-PSDrive -Name C
$usedSpace = $diskSpace.Used / 1MB
$freeSpace = $diskSpace.Free / 1MB
$totalSpace = $diskSpace.Used + $diskSpace.Free / 1MB
# Format output
$cpuUsageFormatted = "{0:N2}%" -f $cpuUsage.CounterSamples[0].CookedValue
$memoryUsageFormatted = "{0:N2} MB" -f $memoryUsage.CounterSamples[0].CookedValue
$diskSpaceFormatted = "Used: {0:N2} MB, Free: {1:N2} MB, Total: {2:N2} MB" -f $usedSpace, $freeSpace, $totalSpace
# Write to log file
$logEntry = "Date and Time: $(Get-Date) - CPU Usage: $cpuUsageFormatted, Memory Available: $memoryUsageFormatted, Disk Space: $diskSpaceFormatted"
Add-Content -Path $logFile -Value $logEntry
}
# Run the health check
Get-SystemHealth
Modifying or Deleting Scheduled Tasks
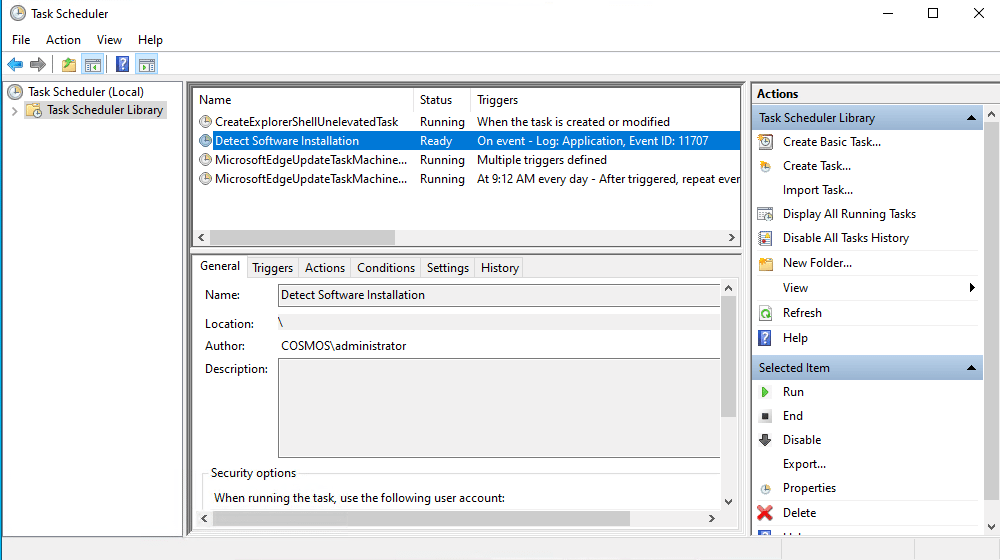
Before you modify or delete one or more scheduled tasks, you might want to review all existing tasks. To see the list of tasks, simply run the Get-ScheduledTask cmdlet.
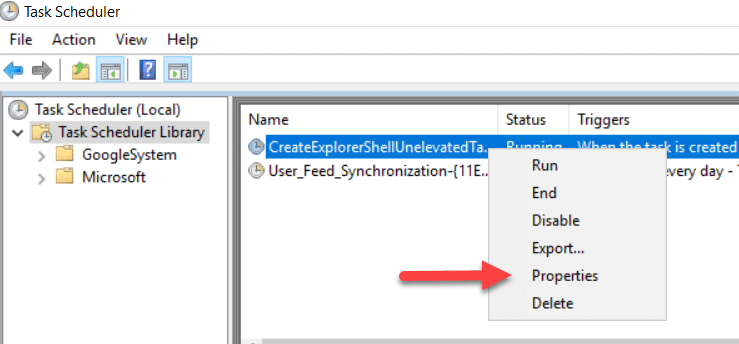
Modifying a Scheduled Task
To modify a task, right-click on it and select Properties, as shown below. Then edit the required settings and click OK to save your changes.
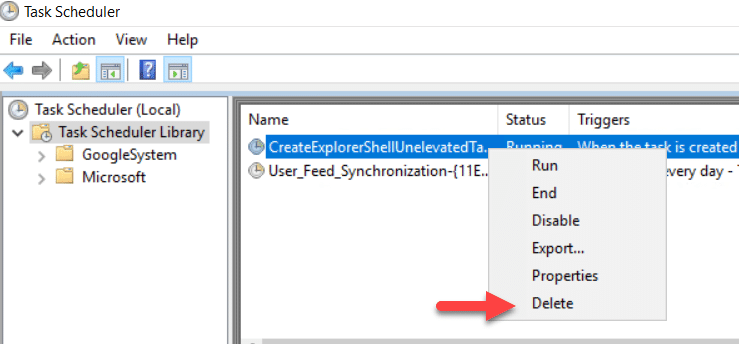
Deleting a Scheduled Task
To delete a scheduled task, right-click on it, select Delete and confirm the action.
Creating Scheduled Tasks with PowerShell Scripts
Introduction to PowerShell Scheduling
To create scheduled tasks, you have another option in addition to Task Scheduler: PowerShell. Creating and managing scheduled tasks directly from the PowerShell interface scheduling can significantly enhance productivity, accuracy and session reliability, especially when managing remote systems through a CimSession.
Below are some of the main PowerShell commands used to create and manage scheduled tasks:
- New-ScheduledTask — Creates a new scheduled task object in PowerShell
- Register-ScheduledTask — Registers a new scheduled task
- New-ScheduledTaskAction — Defines scheduled task actions
- New-ScheduledTaskPrincipal — Stores the user account under which the task will run
- New-ScheduledTaskSettingsSet — Defines scheduled task settings
- New-ScheduledTaskTrigger — Defines scheduled task triggers
Advantages of Using PowerShell for Managing Scheduling Tasks
The benefits of using PowerShell to run scheduled tasks include the following:
- Ease of use — It’s easy to specify complex triggers, conditions and actions.
- Flexibility — You can write and execute sophisticated scripts that can perform a wide range of tasks, from simple file cleanups to intricate system diagnostics and repairs.
- Time savings — Using a PowerShell scheduled task to run a PowerShell script eliminates the need to manually perform repetitive or complex tasks.
- Easier troubleshooting — PowerShell scripts can log detailed information about errors or even attempt to rectify them automatically.
- Remote execution — Scheduled tasks can be executed and throttled across multiple machines. This is particularly beneficial in larger network environments.
- Security — PowerShell includes many security features, such as execution policy and signed scripts, to help ensure that only authorized scripts run on your system.
- Efficiency — Using PowerShell for scheduling tasks usually consumes less system resources than third-party automation tools.
- Adaptability — Scheduled tasks in PowerShell can be easily modified, replicated or extended to meet evolving needs.
Creating a Scheduled Task with PowerShell
A PowerShell script for creating a scheduled task includes the following elements:
- $action — This specifies what the task will do, such as running a PowerShell script, launching an application or executing a command:
$action = New-ScheduledTaskAction -Execute "PowerShell.exe" -Argument "-File C:\Scripts\InstallOfSoftware.ps1"
- $trigger — This specifies when the task will run, such as at a specific time, daily or weekly, or based on system events:
$trigger = New-ScheduledTaskTrigger -Daily -At "10:00AM"
- $principal — This specifies the user account under which the task will run:
$principal = New-ScheduledTaskPrincipal -UserId “NT AUTHORITY\SYSTEM” -LogonType Password
- $settings — This includes options like how to handle task failures, conditions for running and behavior on battery power:
$settings = New-ScheduledTaskSettingsSet -AllowStartIfOnBatteries -DontStopIfGoingOnBatteries -StartWhenAvailable
- Register-ScheduledTask — This registers the task with the Task Scheduler:
Register-ScheduledTask -TaskName “Installation of Software" -Action $action -Trigger $trigger -Principal $principal -Settings $settings
Below you can see execution of the complete script:

Security Considerations and Best Practices
Security Implications of Scheduled Tasks
When you schedule tasks, whether it’s using Task Scheduler or PowerShell, be sure to pay attention to the following security concerns:
- Permission management — Scheduled tasks run with the permissions of the account under which they are scheduled, so they can be abused. This risk is higher if the account has elevated access. Be sure to run scheduled tasks using accounts that have the minimum necessary permissions.
- Script security — The scripts or executables called by scheduled tasks can themselves be vectors for security vulnerabilities. For example, malicious actors can replace or modify scripts stored in unprotected directories to execute harmful commands.
- Process hijacking — If a scheduled task is predictable and runs with high privileges, an attacker might replace the script that the task is supposed to execute with malicious code.
- Auditing and accountability — It’s essential to keep detailed logs of scheduled task creation, modification and execution in order to detect and respond to malicious activity.
- Denial of service — By scheduling tasks that consume excessive system resources to run at critical times, an attacker could disrupt the host system’s ability to perform its intended functions.
Running Scripts with the Appropriate Security Context and the Implications of Using Highly Privileged Accounts
To minimize your attack surface, always run scripts under an account that has the least privilege necessary for the task, and avoid running scripts with administrative rights. To accomplish this, understand what resources, permissions and throttle limits a script requires. For example, does the script need to modify system files, access specific data or communicate over the network?
In addition, use execution policies to control the conditions under which scripts can run. For example, you can restrict the system to run scripts only if they are signed by a trusted publisher.
For scripts that need to run as a service, consider using a Windows managed service account (MSA) or group managed service account (gMSA), which are more secure because their passwords are automatically managed.
Best Practices for Creating Scheduled Tasks
To maximize the benefits of using scheduled tasks, follow these best practices:
- Make sure each task has a clear purpose. Document both what the task does and why it’s needed to help others who might work with the task in the future.
- Establish clear naming conventions. To prevent confusion and improper task execution, ensure that each scheduled task has a unique taskpath.
- Review and test. Carefully review scripts before running them, especially if they are obtained from external sources, with an eye for any suspicious code. Before deploying a scheduled task in a production environment, thoroughly test it in a staged or development environment. It is also a good practice to maintain a repository of approved scripts.
- Implement error handling. Make sure every script can manage common errors gracefully and alert relevant team members when there’s an issue that needs attention.
- Understand dependencies. If a task depends on external services or data, ensure there are checks for availability and graceful handling of outages or delays.
- Consider resource usage. Look for ways to make tasks less resource-intensive, such as by modifying its logic or running frequency. Tasks should be run as frequently as necessary but not so often that they create performance issues. When choosing when tasks run, consider factors like other system activity and potential conflicts.
- Pay attention to security. In addition to the security guidelines provided above, be sure to use appropriate authentication and authorization measures for tasks that require access to secure resources, and make sure that tasks do not inadvertently expose sensitive data.
- Avoid relying on default settings for critical tasks. Customize task configurations to suit your specific needs.
- Store scripts in a secure location. Make sure only users who need to run or modify the scripts have access.
- Sign your scripts. Whenever possible, sign your scripts with a digital certificate issued by a trusted Certificate Authority (CA). This not only verifies the authorship of the script but also ensures that the script has not been tampered with since it was signed.
- Implement monitoring and alerting. Logs are invaluable for diagnosing issues and understanding a task’s actions. Tools that notify administrators of unusual script activity or performance degradation enable quicker response.
- Regularly review and update scheduled tasks. This includes updating any dependencies, adjusting schedules based on new business needs, and retiring tasks that are no longer necessary.
Conclusion
Windows Task Scheduler enables business users and administrators to run PowerShell scripts at specific dates and times on a regular basis, such as daily or weekly, or when specific conditions are met. Automating tasks using Task Scheduler saves time while ensuring that tasks are performed accurately and reliably. More advanced users can use PowerShell to create and manage scheduled tasks.
When scheduling scripts, make sure to follow best practices such as documenting the purpose of the task, using error handling and logging within the scripts, and using the least privilege principle to avoid excessive permissions, which can be a security threat if compromised and used by adversaries.
FAQ
What is Windows Task Scheduler?
Windows Task Scheduler is a built-in tool in the Windows operating system that enables users to schedule tasks and processes to run automatically. With Task Scheduler, you can set up tasks to run at a specified day and time or at a certain interval like daily or weekly.
Why should I use Task Scheduler to automate PowerShell scripts?
By choosing to run PowerShell scripts from Task Scheduler, you can automate repetitive tasks, which ensures that they are performed reliably and accurately without further effort on your part.
How do I open Task Scheduler?
Press Win + R to open the Run dialog. Type taskschd.msc and press Enter.
How do I create a new task in Task Scheduler?
Click on Create Task in the Actions pane on the right side of the Task Scheduler window. Provide a name and description for the task; choose appropriate settings for the Action, Triggers, Conditions and Settings tabs; and click Save.
What are the benefits of naming and describing a task?
Providing a useful name and clear description that explains what the task does and why it is needed helps ensure that each task has a clear purpose and facilitates future maintenance by others who work with the task.
How do I determine the trigger for a scheduled task?
On the Trigger tab for a task, you can specify when the task should run, such as on schedule, at system startup or upon user logon, as well the repetition interval and other criteria.
How do I configure Task Scheduler to run a PowerShell script?
- Go to the Actions tab, click New andselect Start a program from the dropdown menu.
- In the Program/script field, input powershell.exe.
- In the Add arguments field, enter the following, replacing the argument InstallofSoftware.ps1 with the name of your script:
-File C:\Scripts\InstallofSoftware.ps1
How can I set up tasks to run even when the user is not logged on?
On the General tab of the task, select the option Run whether a user is logged on or not.
How do I manage task privileges and ensure scripts stop after a specified duration?
Tasks have the privileges of the account they are run under. You can specify the account to run the task on the General tab.
To ensure a script stops after a given duration, on the Settings tab, select Stop the task if it runs longer than and choose the desired number of hours or days.
How do I control script execution visibility?
You can control script execution and visibility by adding the -NoExit or -Command parameter in the Add Argument field on the Action tab.
What tips can help troubleshoot tasks that do not run as expected?
Password expiration or changes can cause a task to fail. Improperly configured or maliciously designed scheduled tasks (for example, tasks that consume excessive system resources) can lead to a denial of service on the host machine, hurting its availability and performance.
How do I modify an existing scheduled task?
Right-click on the task in the Windows Task Scheduler library, select Properties and make the desired changes to the task’s settings.
How do I delete a scheduled task?
Right-click on the task in the Task Scheduler library and choose Delete.
What are the advantages of using PowerShell for scheduling tasks?
Compared to the Task Scheduler GUI, PowerShell provides more granular control over task configuration, error handling and logging, and makes it easier to define custom scheduling logic. PowerShell also enables you to schedule and run tasks on multiple remote systems from a central location.
What are the New-ScheduledTaskTrigger and Register-ScheduledTask cmdlets used for?
The New-ScheduledTaskTrigger cmdlet is used to define triggers for the task, and the Register-ScheduledTask cmdlet is used to register the task with Windows Task Scheduler.
What are the security implications of scheduled tasks?
Running a scheduled task with a highly privileged accounts increases security risks if the account is compromised, so always choose the account with the least privilege principle in mind.
How should I run scripts with the appropriate security context?
Most important, run scripts under an account with the least privileges necessary to complete the task, and use managed service accounts (MSAs) or group managed service accounts (gMSAs) when appropriate. Consider using execution policies to allow restrict only scripts that are signed by a trusted publisher, and whenever possible, sign your scripts with a digital certificate issued by a trusted Certificate Authority.
What are the best practices for organizing and managing scheduled tasks?
Key best practices include storing scripts in a secure location with access permissions controlled and evaluating scripts in a test environment before implementing them in production.
Since 2012, Jonathan Blackwell, an engineer and innovator, has provided engineering leadership that has put Netwrix GroupID at the forefront of group and user management for Active Directory and Azure AD environments. His experience in development, marketing, and sales allows Jonathan to fully understand the Identity market and how buyers think.
Задача запустить PowerShell скрипт, чтобы он не выдавал всплывающих окон и исполнялся в фоновом режиме по расписанию.
Имеем PowerShell скрипт по пути — «C:\Users\user\Downloads\rdp.ps1» который, например, выводит список залогинившихся по RDP в файл.
Get-WinEvent "Microsoft-Windows-TerminalServices-RemoteConnectionManager/Operational" |
?{$_.ID -eq "1149"} | %{
	New-Object PSObject -Property @{
		MachineName = $_.MachineName
		TimeCreated = $_.TimeCreated
		User = $_.Properties[0].Value
		Domain = $_.Properties[1].Value
		SourceIP = $_.Properties[2].Value
	}
}| export-csv "C:\Users\user\Downloads\rdp-log.txt" -nti
Запускаем планировщик заданий в Windows, справа жмем кнопку создать задачу.
Имя: вводим любое название;
Описание: не обязательное поле;
Выполнять для всех пользователей — выбираем для всех;
Выполнить с наивысшими правами — ставим галку для выполнения с правами администратора;

Переходим на вкладку Триггеры:
Создать — выбираем ежедневно, устанавливаем нужное время, повторять каждые 1 день — жмем ОК;

Переходим на вкладку Действия:
Создать. В поле программа или сценарий вводим:
powershell.exeДобавить аргументы- вводим:
-ExecutionPolicy RemoteSigned -NonInteractive -WindowStyle Hidden -File "C:\Users\user\Downloads\rdp.ps1"

где:
-ExecutionPolicy-задает политику выполнения скриптов для текущего сеанса, может быть Restricted, AllSigned, RemoteSigned, Unrestricted, Bypass;
RemoteSigned — скрипты, подготовленные на локальном компьютере, можно запускать без ограничений, скрипты, загруженные из Интернета — только при наличии цифровой подписи;
-NonInteractive — отключить вывод интерактивных запросов к пользователю;
-WindowStyle Hidden — запуск окна PowerShell в скрытом режиме, незаметно для пользователя.
Жмем ОК и вводим пароль от учетной записи Windows.
Готово.
Добавить комментарий