
Item Preview

XP1.png
XP10.png
XP11.png
XP12.png
XP13.png
XP14.png
XP15.png
XP16.png
XP17.png
XP18.png
XP19.png
XP2.png
XP20.png
XP21.png
XP22.png
XP23.png
XP24.png
XP25.png
XP26.png
XP27.png
XP28.png
XP29.png
XP3.png
XP30.png
XP31.png
XP32.png
XP33.png
XP34.png
XP35.png
XP36.png
XP37.png
XP38.png
XP39.png
XP4.png
XP40.png
XP41.png
XP42.png
XP43.png
XP44.png
XP45.png
XP46.png
XP47.png
XP48.png
XP49.png
XP5.png
XP50.png
XP51.png
XP6.png
XP7.png
XP8.png
XP9.png
196,108
Views
20
Favorites
DOWNLOAD OPTIONS
Uploaded by
Unknown
on
SIMILAR ITEMS (based on metadata)
Though there are several ways to use Windows XP on Windows 10 and 11, using it with the pre-installed image for VirtualBox adds many advantages. We prepared a Windows XP image with VirtualBox guest additions to make things easy. It will allow you to attach and use the latest computer quickly.
You can avoid downloading the correct ISO file, doing every installation step (Unfortunately, the Windows XP installations take a longer time) and additional steps by using this pre-installed image.
You may have unique reasons to have Windows XP on VirtualBox with Windows 11. It could be something you need to check the old legacy applications, play games that support only Windows XP, or open a file that can work only on Win XP. Using Windows XP as a VirtualBox pre-installed image (VDI file) will be handy in any of the above cases.
System Requirements
We believe you have the latest suitable hardware if you are using Windows 11 or 10. It will definitely run Windows XP on it with Oracle VirtualBox.
Download Windows XP Preinstalled VirtualBox Image and use it on Windows 11.
1) Make sure you have the latest Oracle VirtualBox application. It is a desktop virtualization software you can download from the official website here.
2) Download the XP preinstalled image from our website here.

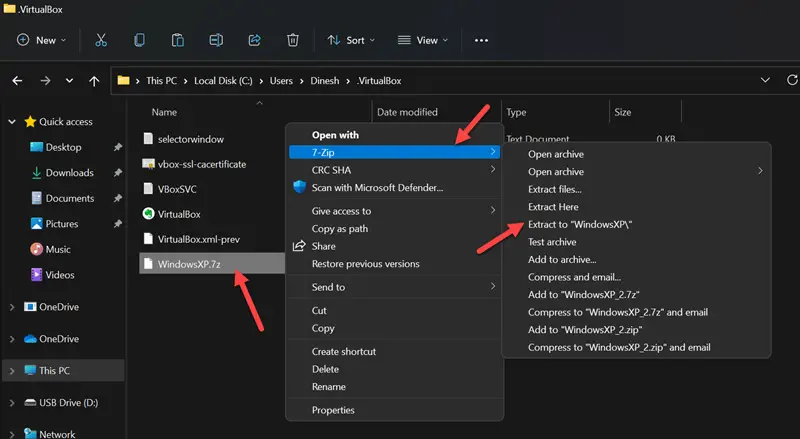
3) You need to have the 7-Zip program to extract this file. You can download 7-Zip from their website here.
4) After the pre-installed image is downloaded, extract it using the 7-Zip program.
5) Open VirtualBox and create a new VM.
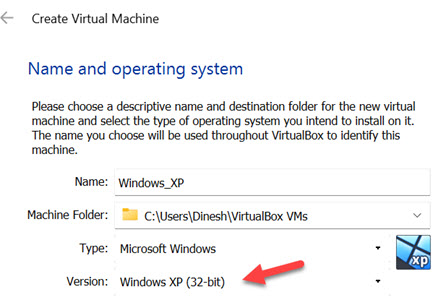
6) Give a name for VM and select the version as Windows XP (32bit).
7) Assign RAM size to 512MB.
 Select ‘Use an existing virtual hard disk option’ on the hard disk creation screen. This will bring up a box where you can choose the available VDI file. We need to browse the Windows XP preinstalled image file we extracted in the earlier step.
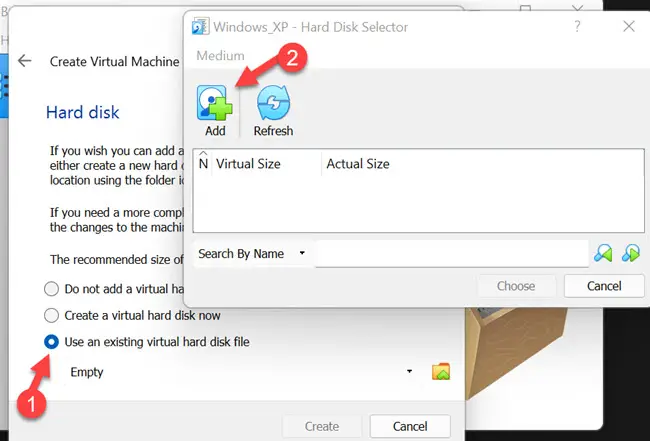
9) Click on the ‘Add’ button and locate the file as shown below.
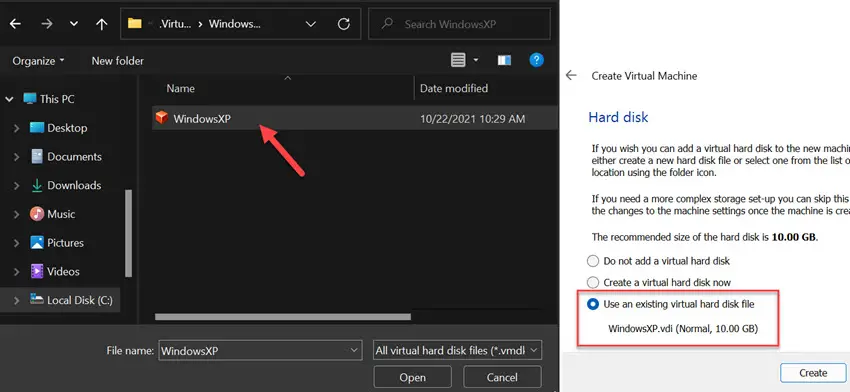
After attaching the file, complete the VM creation steps.
10) Before switching on the VM, let’s tweak a few settings to make the VM work better.
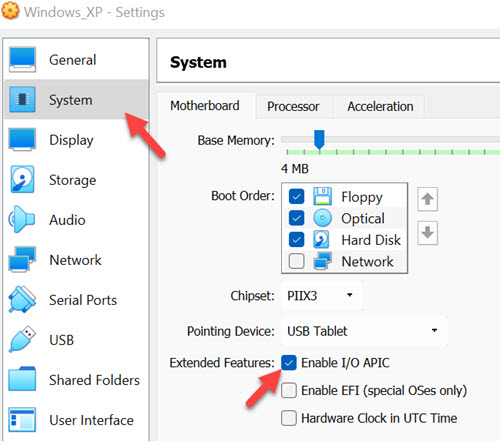
11) Open the VM settings and tick the ‘Enable I/O APIC’ under ‘System’ settings. This will enable us to allocate more the one processer core for the VM.
12) Then, in the ‘Processor’ tab, increase the processers to 2.

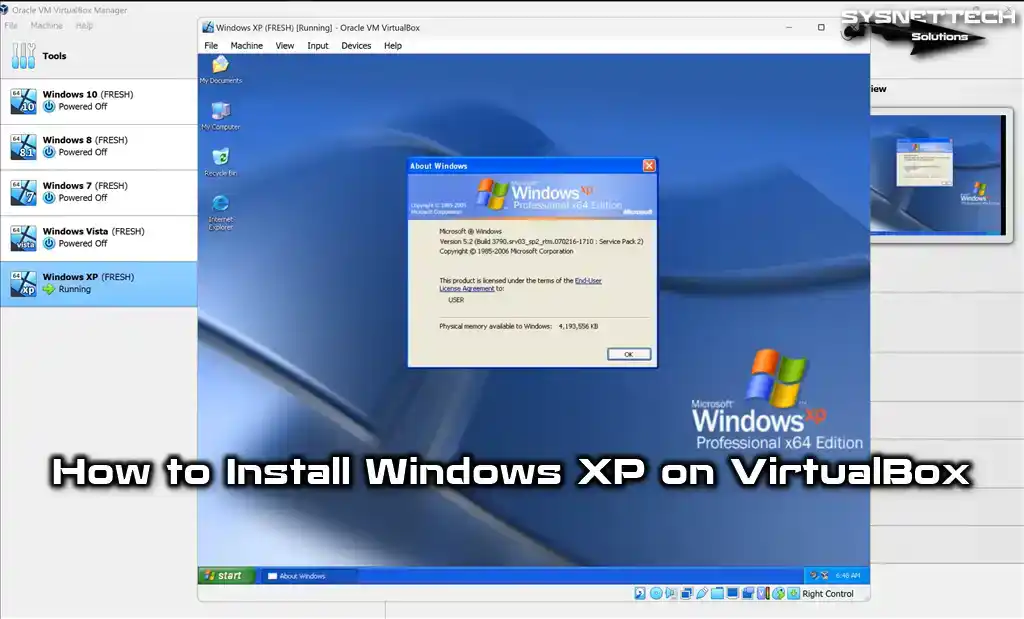
13) Power on the VM now. Since all installation steps are done, and VirtualBox guest additions are installed already, the Windows XP on VirtualBox virtual machine will boot and work smoothly.
Network connectivity (Internet), sound and multiple screen resolutions, including full-screen mode, will work perfectly.
You can change the user or Administrator password.
You should have a working Windows XP virtual machine on your Windows 11/10 physical computer. It is highly recommended to take a snapshot before you make any changes.
Since VirtualBox guest additions are installed on this VM, you can quickly transfer the files/folders between the host and the guest virtual machine. It should be easy to test the legacy applications, games and other activities requiring Windows XP on the latest Windows 11 computer.
Troubleshooting Tips for Windows XP on VirtualBox
Based on the user feedback and findings, here are some troubleshooting tips if your Windows XP virtual machine is not booting or is stuck with the black screen.
- As mentioned in system requirements, if your host computer is Windows 10 or 11, it already has virtualization technology enabled in the BIOS. But, if you are using Windows 8 or 7 without VT-x enabled, you need to enable VT-x in BIOS before trying these steps.
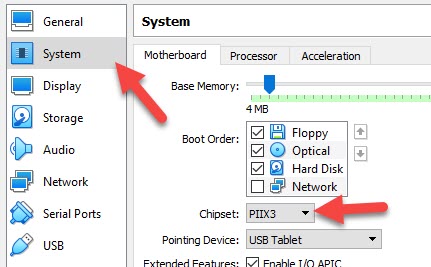
- You can change the chipset under the motherboard settings of the Windows XP virtual machine. It worked for me with PIIX3, but few users reported it worked with ICH9. So, it is better to change the try on your PC.
Вся инфа была взята на этом форуме — ребятам огромное спасибо! Ставил себе на Win 7 и Win 10 (x64) всё запустилось и работает отлично, проверял на двух ноутбуках.
1. Образ системы WinXP с уже установленной и активированной Peugeot Planet 2000. Качаем по ссылке с форума выше либо с гуглдиска, вот ссылочка . Там архив, в нем 2 файла .vbox и .vdi. Распаковываем в какую-нибудь папку на компуктер.
2. Виртуалбокс качаем здесь. Я ставил версию 5.2 скачать можно здесь, возможно подойдёт и последняя актуальная, пробуем отписываемся.
3. Запускаем VirtualBox, дальше вкладка «Машина» и «Добавить». Выбираем ранее скачанный файл .vbox
4. Запускаем в виртуалке Win XP.
Если появилась ошибка вида:
Не удалось открыть сессию для виртуальной машины PP2000.
The VM session was closed before any attempt to power it on.
Код ошибки: E_FAIL (0x80004005)
Компонент: SessionMachine
Интерфейс: ISession {c0447716-ff5a-4795-b57a-ecd5fffa18a4}
рядом с кнопкой «запустить» жмякаем «сбросить», пробуем еще раз и должно всё запуститься нормально.
5. Подключаем сканер, ждём пока установятся драйвера, пользуемся 
Цена вопроса: 0 ₽
Пробег: 0 км
Do you want to run Windows XP SP1 x64 Professional using Oracle VM VirtualBox 7.0 on your Windows 11 & 10 operating systems? In this article, I will tell you how to run an old operating system on a virtual machine. Windows XP may still be valuable for specific applications. I will also emphasize the importance of security and compatibility when running old OSes.
First of all, as we know, virtualization provides a secure and compatible environment. Thus, you must meet the hardware requirements to run Windows XP effectively. For this reason, I will also show you how to configure a more accurate and proper virtual machine. As a result, you can create a computing environment with our professional guide.
How to Set Up Windows XP x64 SP1 Pro on Windows 10 / 11 using Oracle VM VirtualBox 7
On October 25, 2001, Microsoft developed and launched the Windows XP operating system, emphasizing facilitating its utilization across various devices. These devices include home and business computers, laptops, desktops, media devices, and tablets.
The most significant difference of this operating system type, whose first code name is Whistler, is that it supports 32-bit and 64-bit architectures.
By prioritizing performance, stability, and security, Windows XP delivers an optimized user experience. It is the first operating system to have product activation methods to prevent software piracy, which has threatened software developers.
Key features of Windows XP include Internet Explorer 6, Windows Media Player, downgrade/rollback device drivers, remote assistant, advanced firewall, system restore, wireless connectivity, application compatibility mode, and CD Burner.
Although Microsoft ended support for the XP system on April 8, 2014, many people still use this system today. This can create a severe vulnerability to both the local and Internet networks. Hence, we advise against installing Windows XP on your host computer instead of Windows 10 or 11.
However, users who want to use and experience Windows XP or play old games can install it on virtual machines. Thus, they can choose a safer way to use XP on an up-to-date operating system.
Before creating a virtual machine on your host, your processor must support the virtualization feature. Without this support, setting up a virtual computer on your host would not be possible. I recommend checking the virtualization feature of your CPU.
How to Create a New Virtual Machine for Windows XP
After installing the Oracle VM VirtualBox virtualization software on your host operating system, you must set the VM settings correctly to use Windows XP without any problems. Creating a VM that matches the hardware capacity of your physical host computer is essential in terms of performance and compatibility.
Step 1
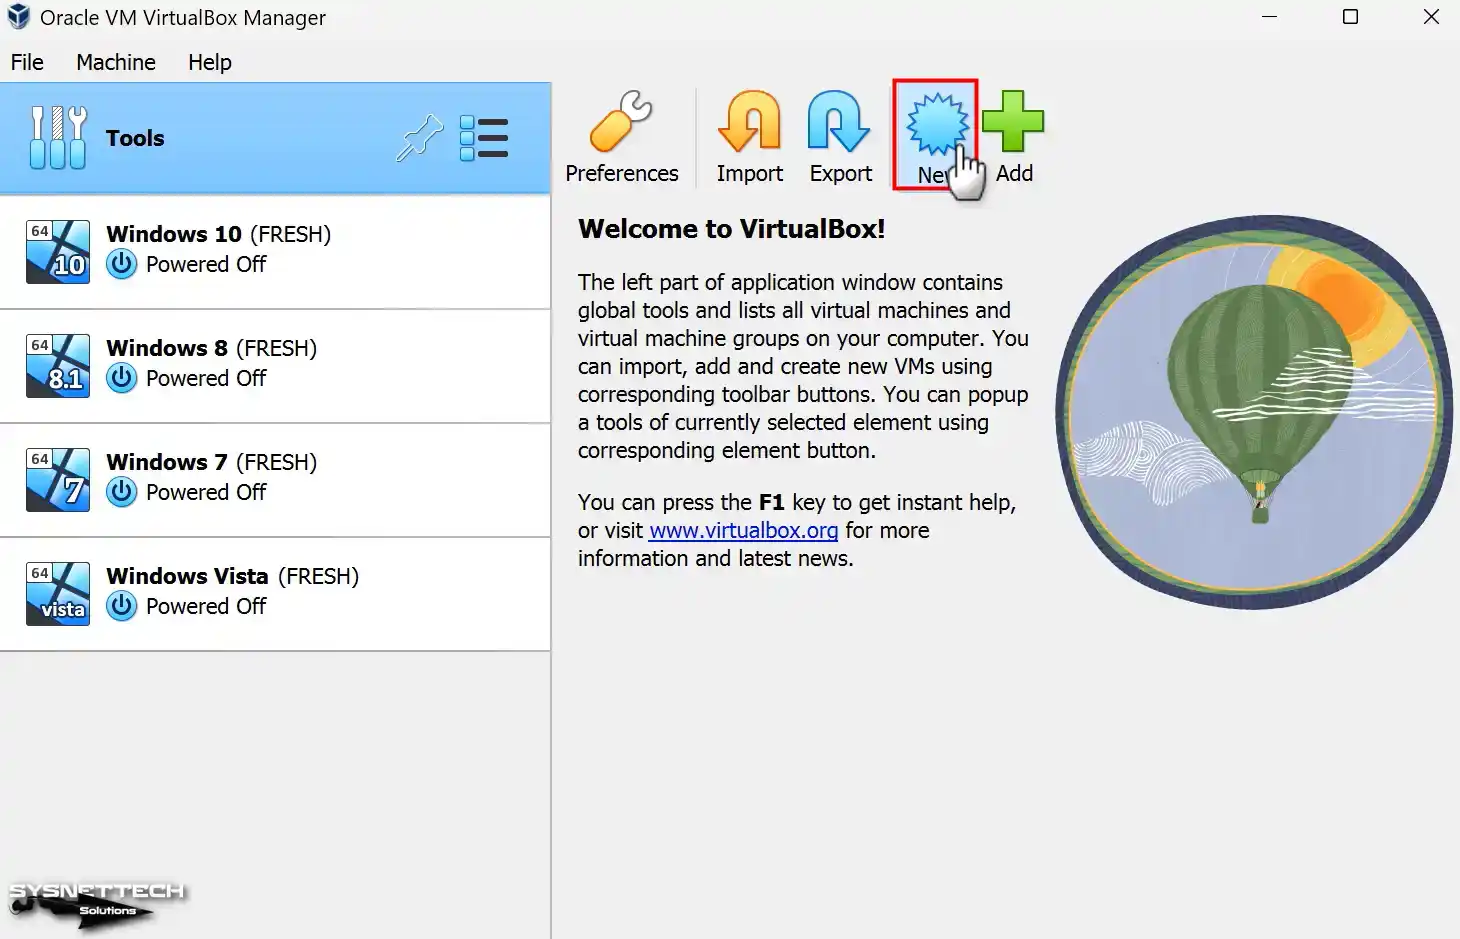
Open your Oracle VirtualBox program and open the virtual machine creation wizard from the tool menu on the program’s homepage or the New shortcut.
Step 2
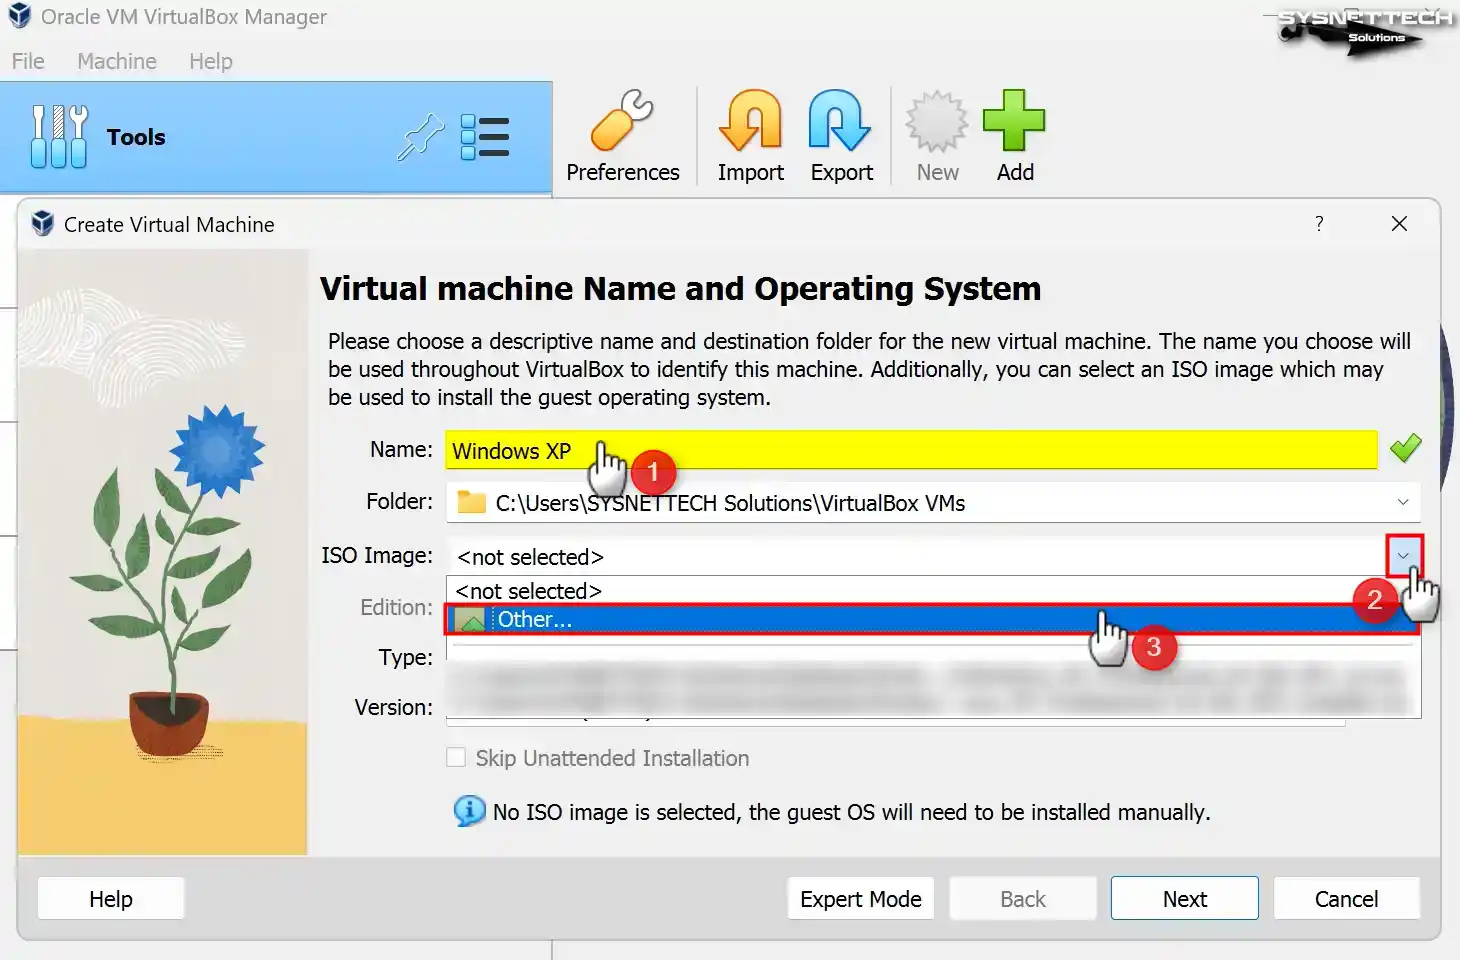
When the virtual machine preparation window appears, the initial step is to enter the name of the operating system you intend to install into the designated Name field. After entering Windows XP in the Name field, the values in the Type and Version fields will be automatically adjusted according to your typing system.
If you see the 32-bit value in the Version field after typing Windows XP and you will install 64-bit, configure this value manually.
You can change the position where you install the virtual machine in the Folder section. Suppose you desire to install the operating system on an external SSD or HDD storage device. In this case, you can pick “Other” from the pop-up window and select the installation location from your host PC.
Select Other from the ISO Image menu to add a Windows XP ISO file to the virtual pc.
Step 3
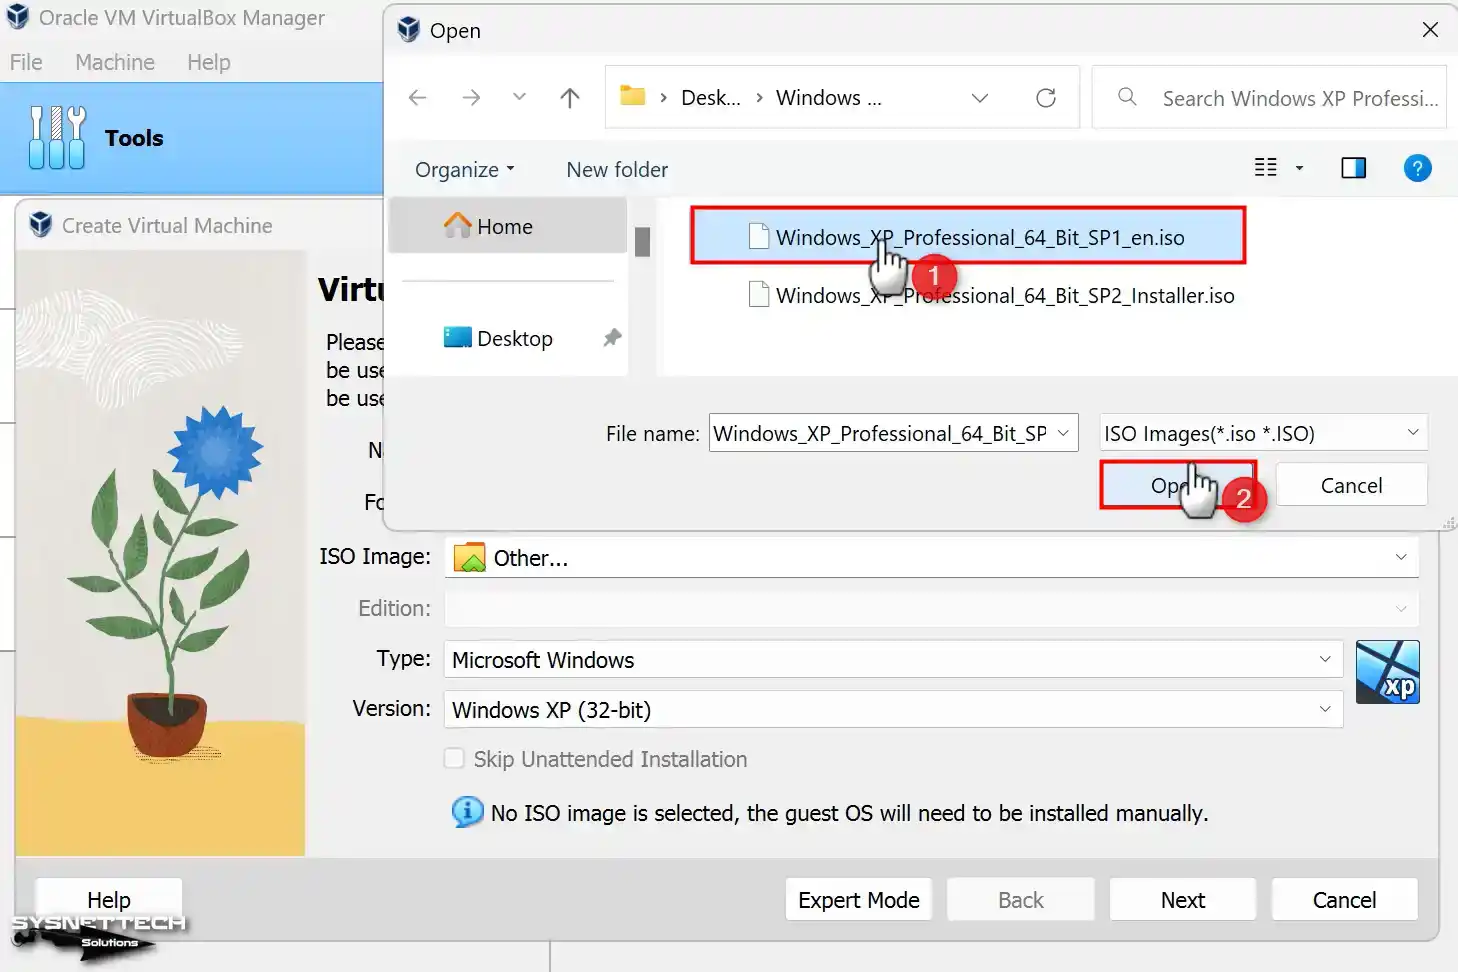
Select the Windows XP Professional 64 Bit SP1 image file you downloaded to your computer from the table below the article and open it.
Step 4
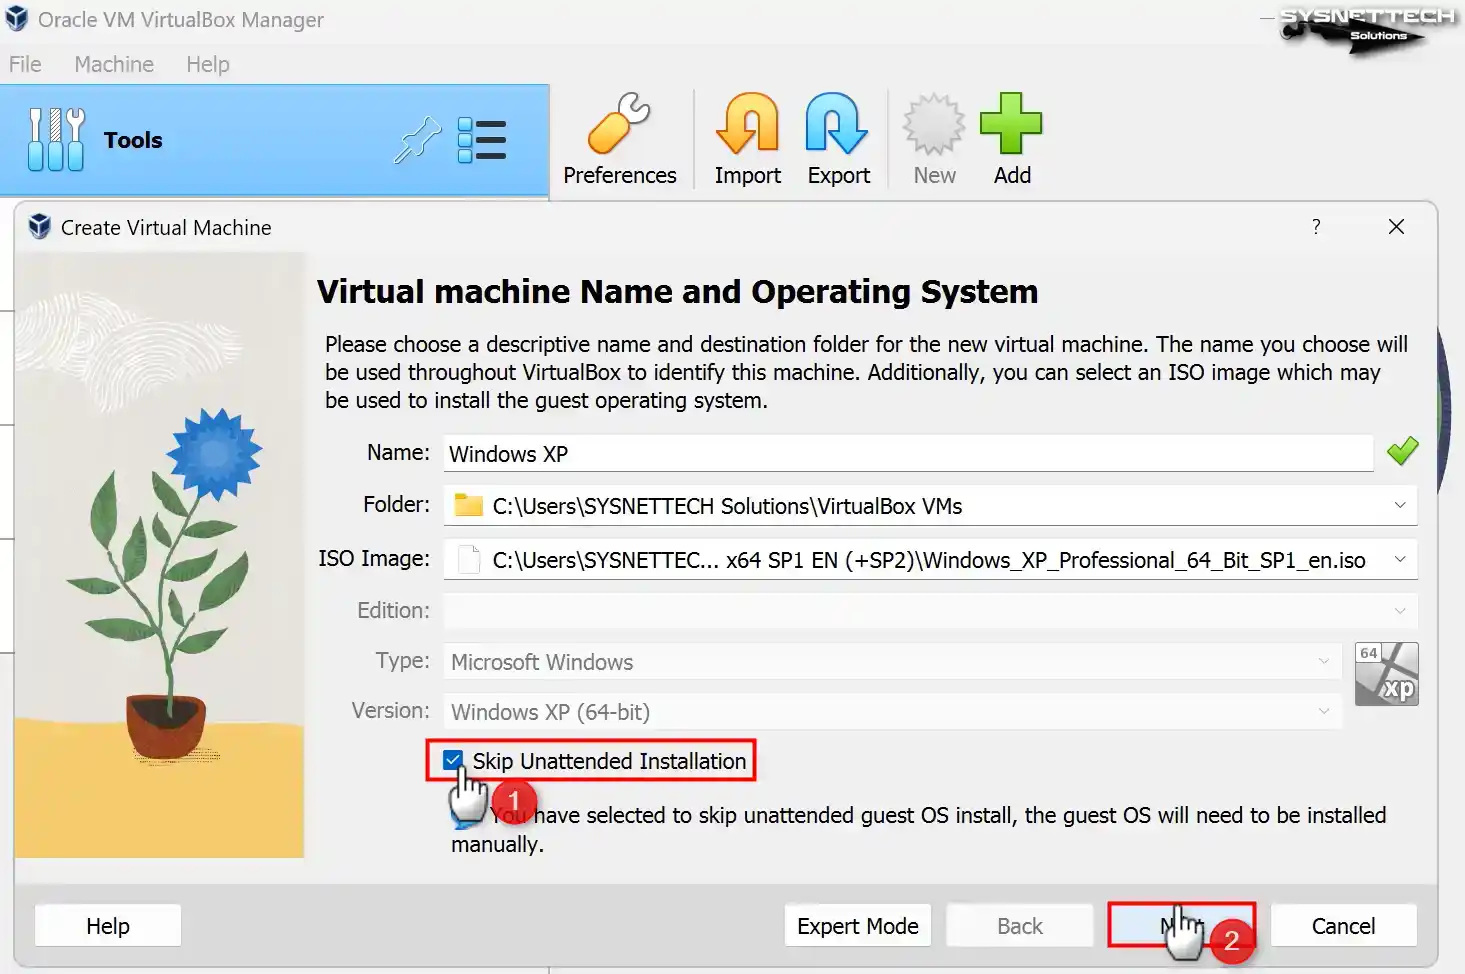
In the 7.x versions of VirtualBox, you can see the unattended installation option as the user interface has changed. Using this option, you can prepare a system with preconfigured usernames or product key settings.
If you prefer to install the system manually, select Skip Unattended Installation and click Next.
Step 5
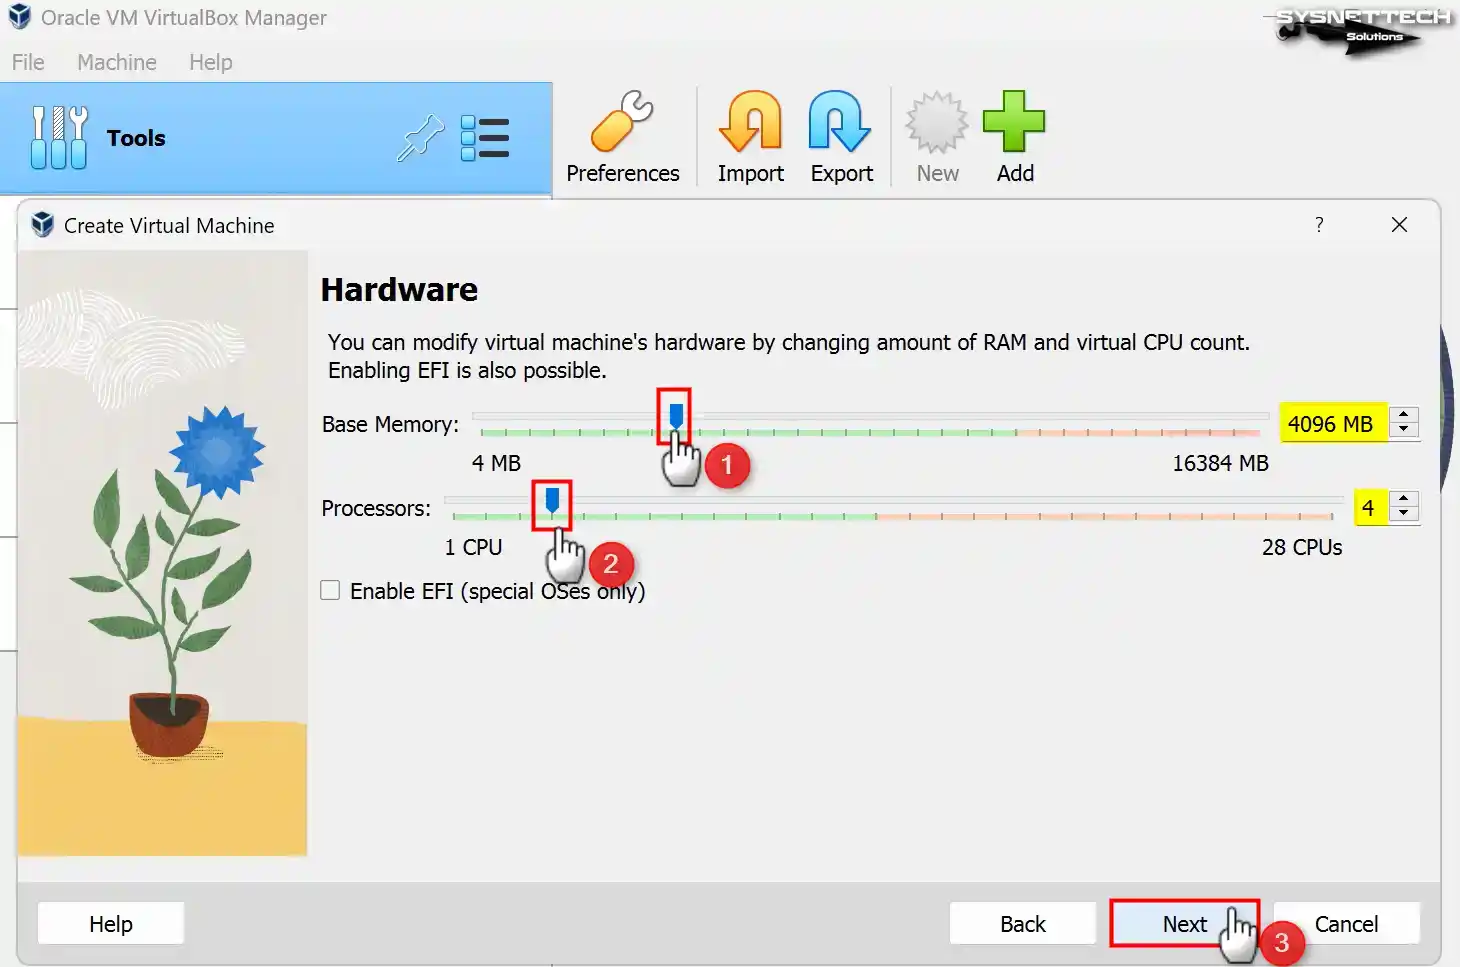
Configure a RAM size of 4096 MB (4 GB) for Windows XP as the base memory size. Suppose your host computer possesses a substantial amount of RAM. In that case, it is proposed to configure this value to a minimum of 4 GB or 8 GB.
In addition, configure the number of virtual processors to 4 so you can use your virtual computer more efficiently.
Step 6
Since you will install Windows XP from scratch in the virtual HDD settings, you must select the Create a Virtual Hard Disk Now option. If you have installed an XP virtual disk, you must select the Add an existing hard disk file option.
In VirtualBox 6.x versions, you can see the old settings on the virtual disk screen. For a sample, if you do not use a VM installed on VirtualBox with other virtualization software, choose VDI (VirtualBox Disk Image). You can use the VDI disk type in other software, but Oracle always recommends using the VDI type.
If you want to use as much disk space as the capacity of the virtual disk file on the disk where you will install the virtual machine, you can choose Fixed Size. Fixed Size can improve the performance of the VM, but it unnecessarily fills up the host disk space.
Therefore, by selecting Dynamically Allocated, only the disk space needed by the VM will be automatically allocated over the host disk. Do not change the path in File Location and Size to save the virtual disk to the installation location you set in the first step of the VM wizard.
Regarding Windows XP, you can modify the virtual disk extent to a minimum of 30 GB. However, it is advisable to determine the disk size based on your specific work requirements.

Step 7
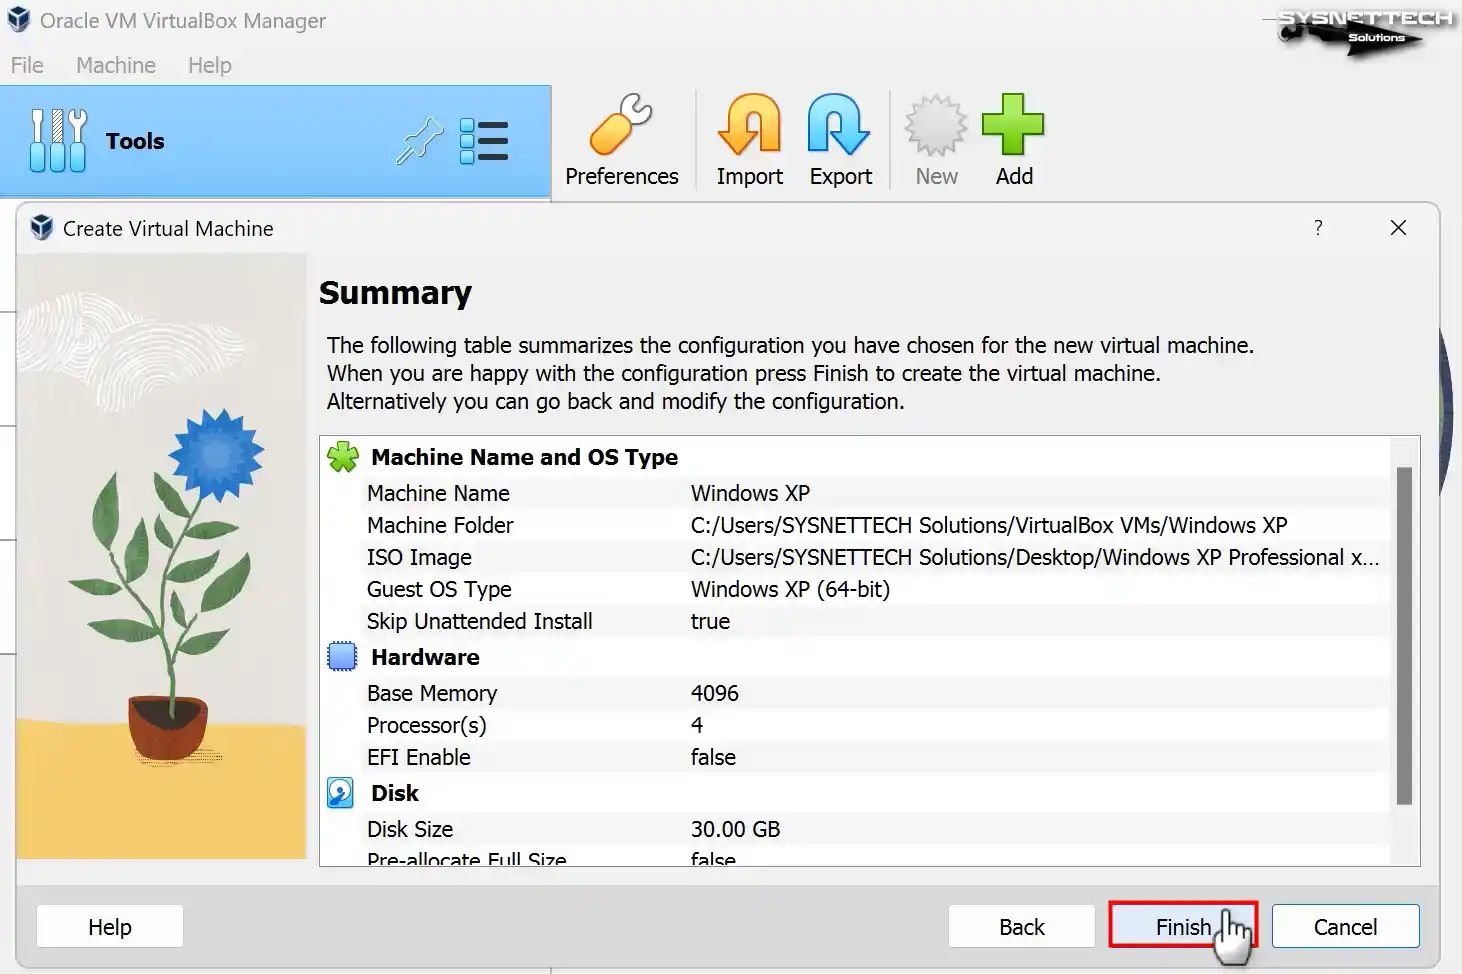
After adjusting the hardware settings of the Windows XP guest machine, check again and close the VM wizard.
Step 8
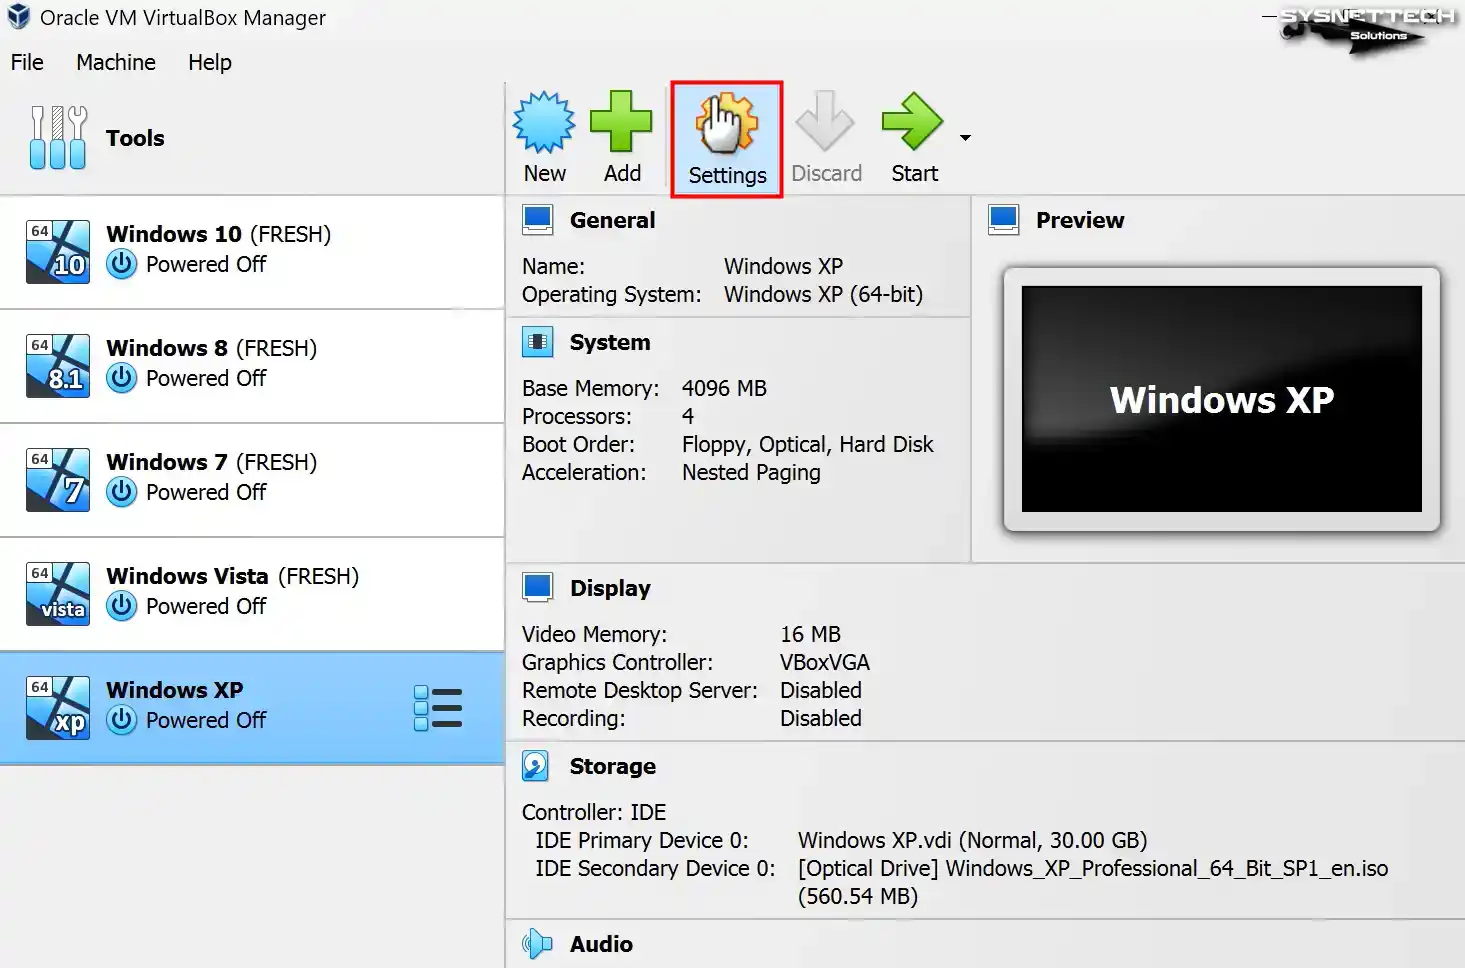
Click Settings to configure the hardware settings of the guest operating system.
Step 9
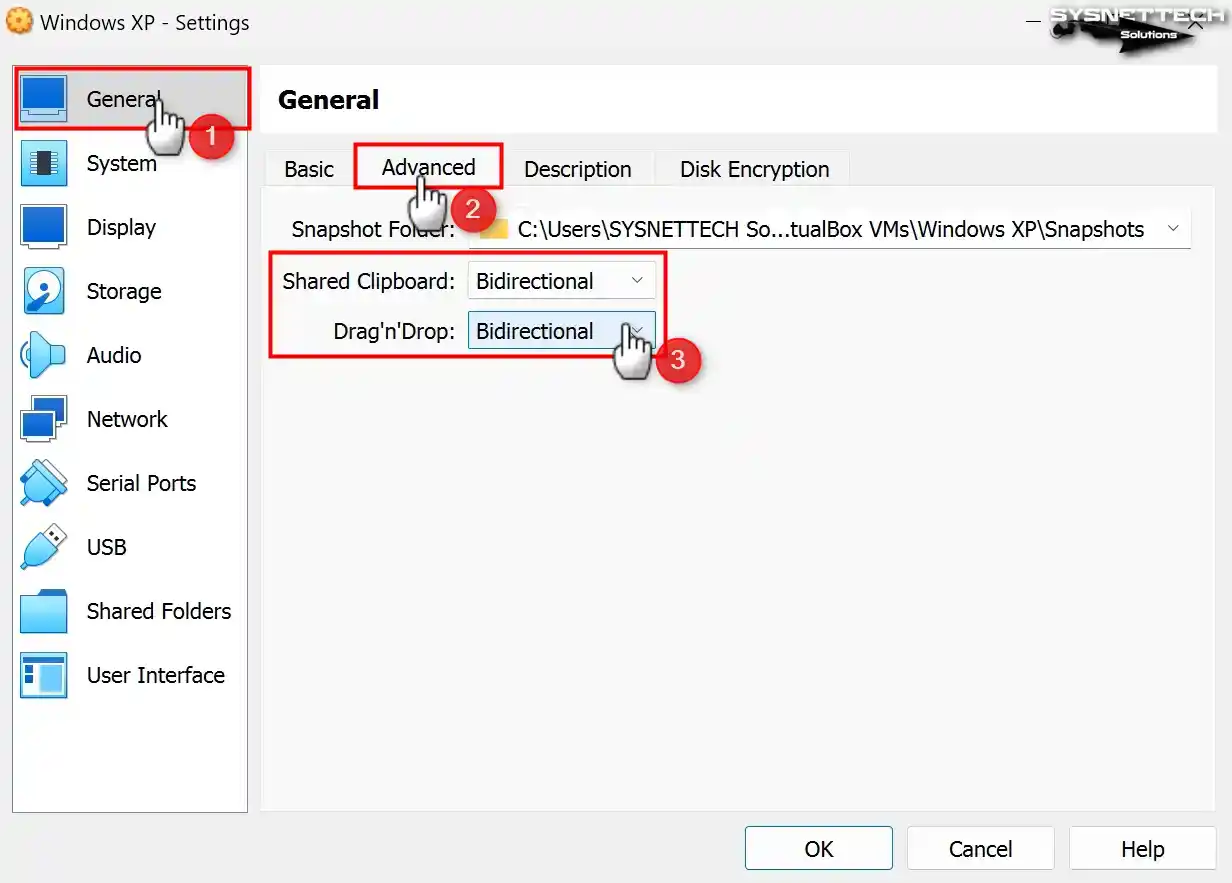
To permit file sharing between the host and the virtual machine in the settings window of the VM, configure the Shared Clipboard and Drag and Drop features as Bidirectional in the General / Advanced tab.
So you can share files or copy/paste text from the host to the VM and from the VM to the host.
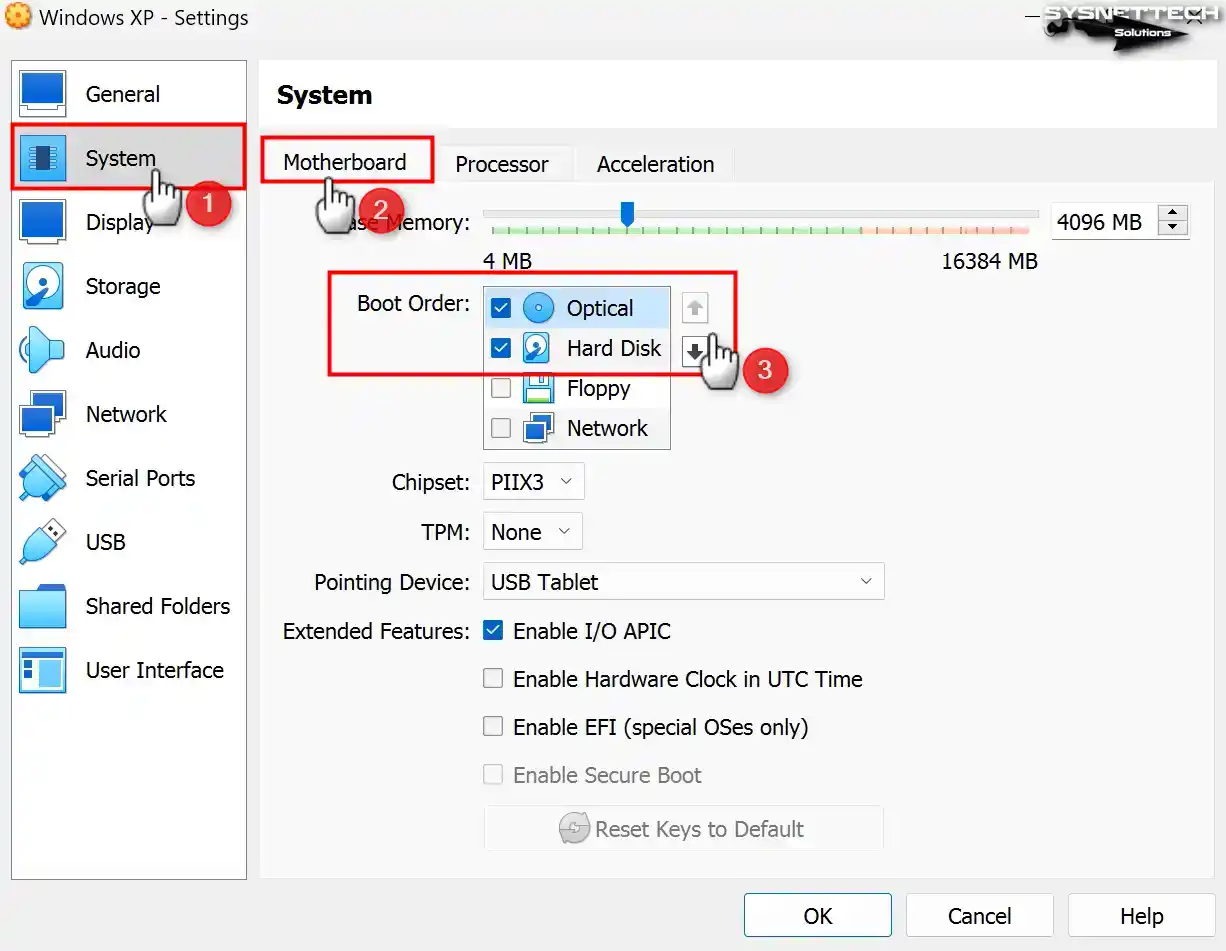
Step 10
To install Windows XP on the virtual pc, select the Optical device as the direct boot device in the Boot Order index in the System / Motherboard settings to add the ISO file to the optical drive.
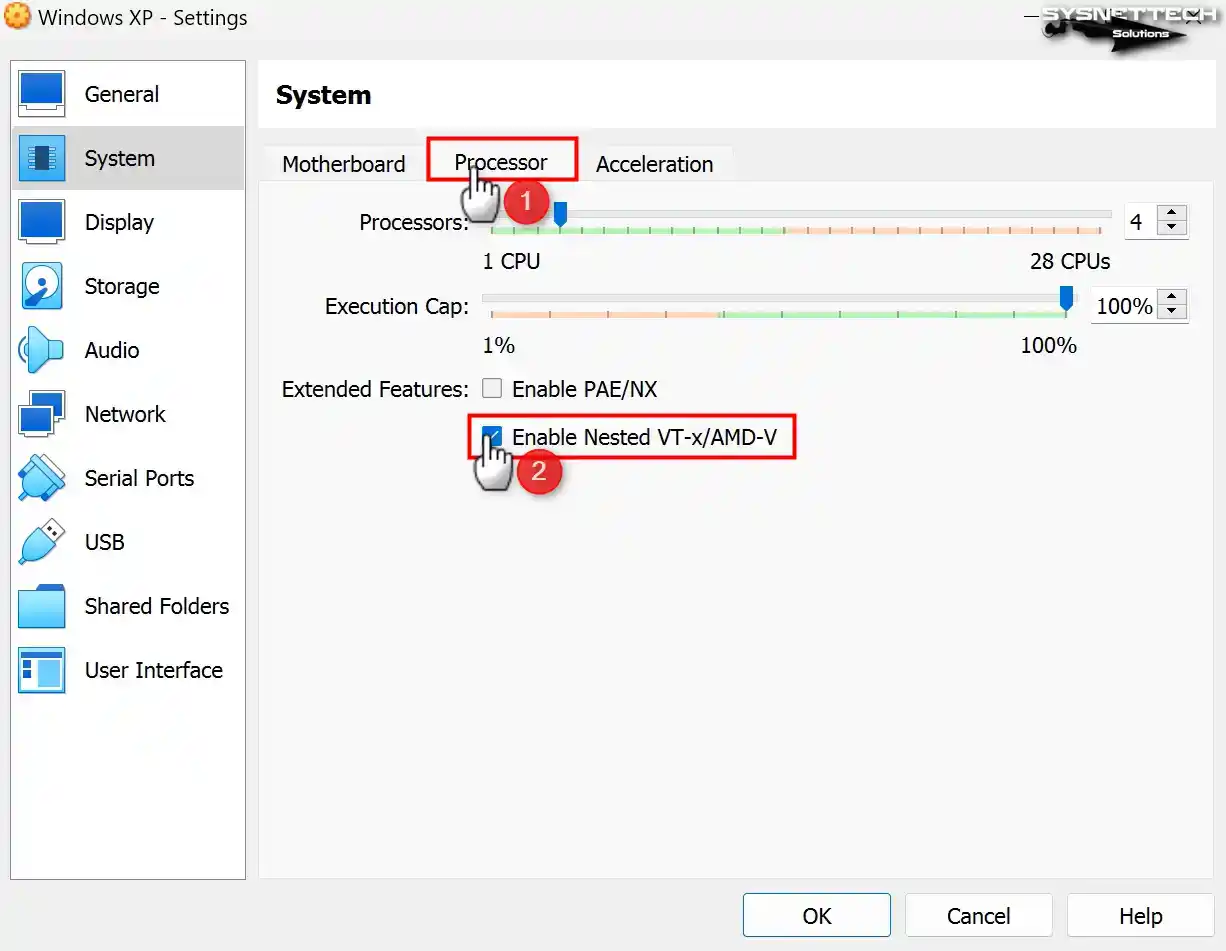
Step 11
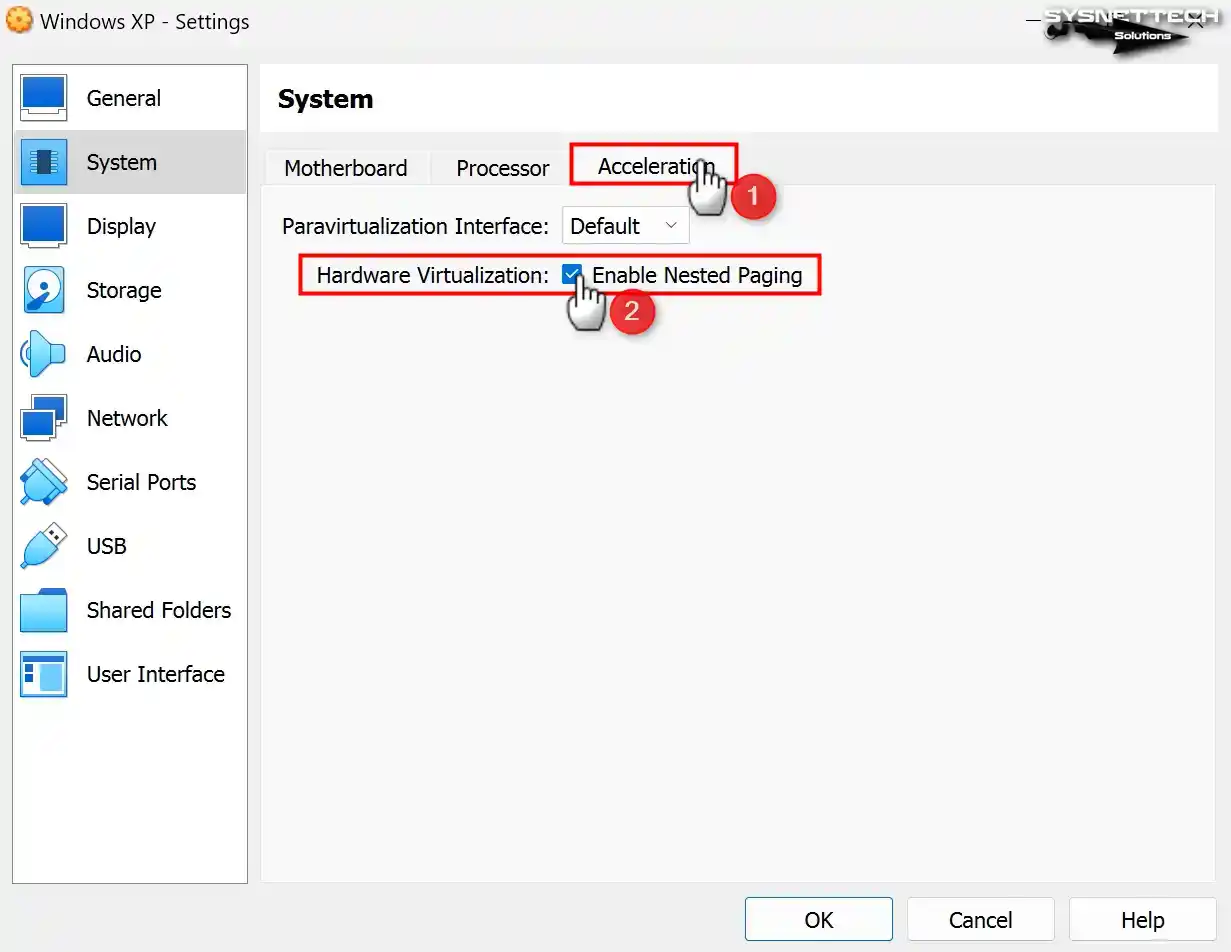
If you plan to use virtualization software on your virtual computer, enable the Nested VT-x/AMD-V feature from the processor device.
Step 12
Enable Nested Paging for better memory management between your host and VM.
In certain conditions, it may be necessary to manually choose the virtualization interface within the Acceleration tab located in the virtual PC system settings.
The Paravirtualization Interface is in Default mode by default. The default mode will automatically select a virtualization engine according to the installed system type. Still, since no VTx interface is set for XP, you can change the value here to Hyper-V.
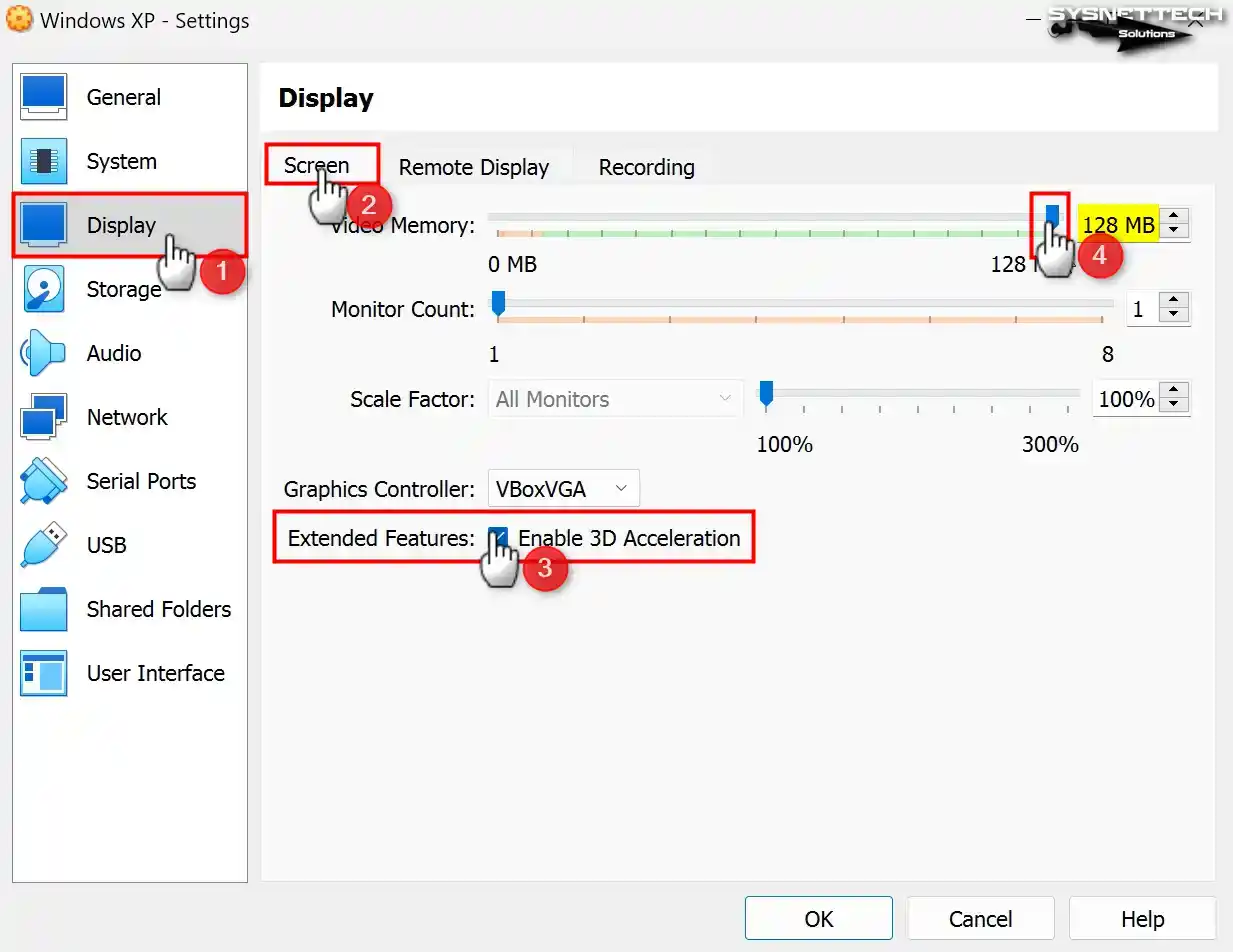
Step 13
Enable 3D acceleration in the Display / Screen settings of the virtual machine and configure the Video Memory size to 128 MB.
Note: Please take note that although you enable 3D graphics acceleration on Windows XP in VirtualBox version 6.1, the Direct3D feature is regrettably no longer supported. If you wish to utilize Direct3D support, installing one of the 6.0 versions of VirtualBox on your system is advised.
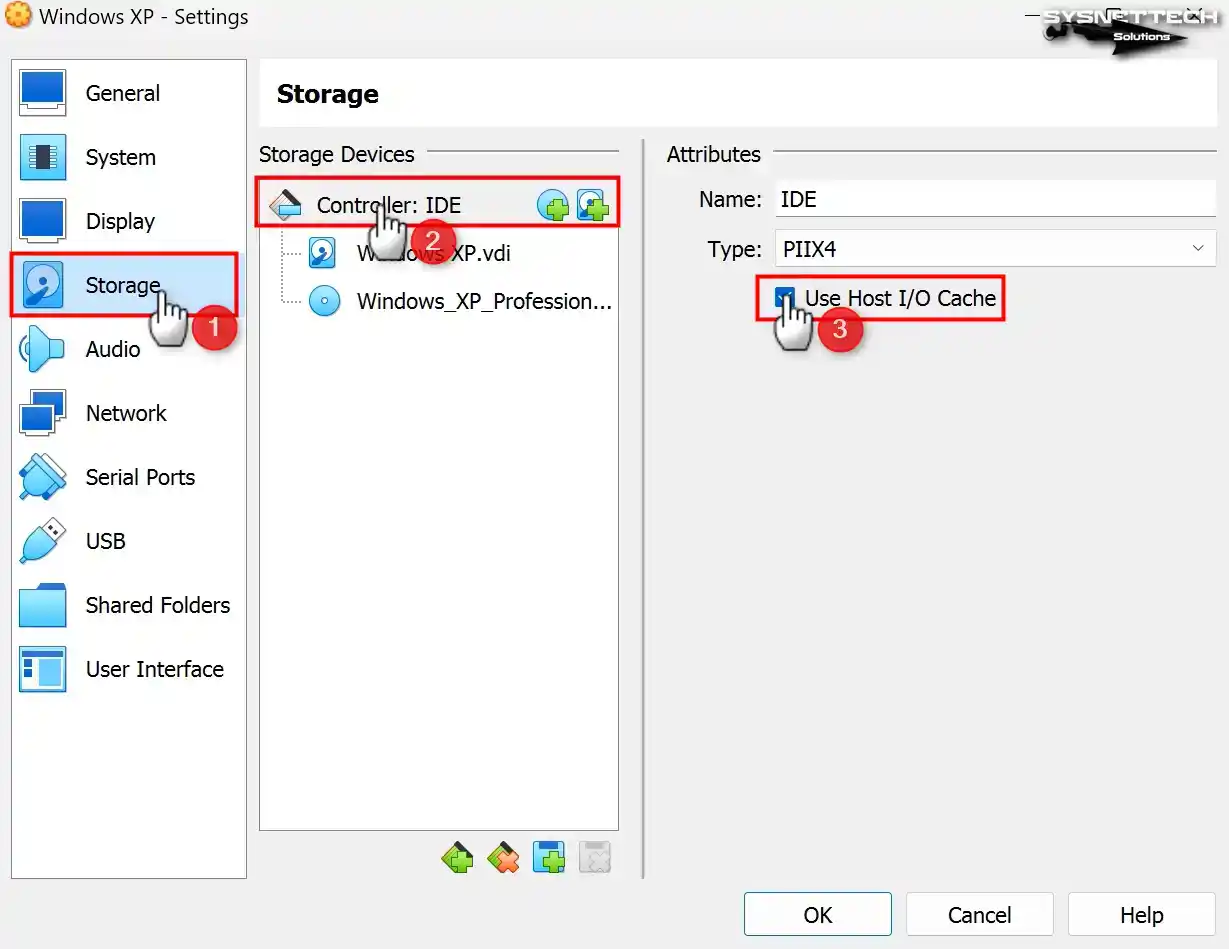
Step 14
By default, the Host I/O Cache feature for the IDE controller is enabled in the storage volumes of the virtual PC. If the Host I/O cache is not allowed, enable it for virtual disk performance.
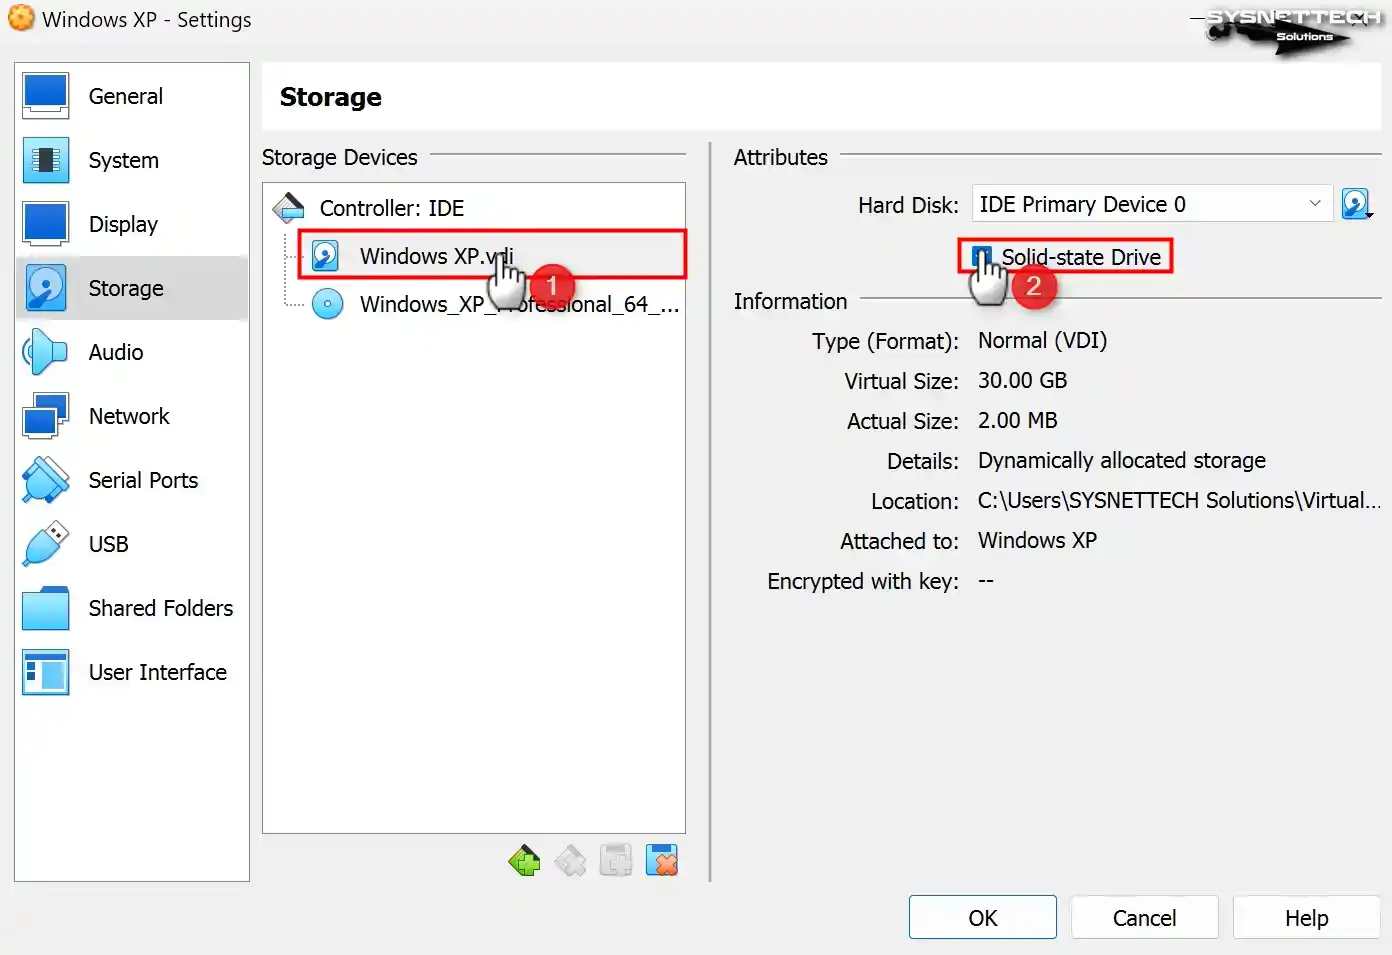
Step 15
Check the Solid-State Drive (SSD) option to configure the WindowsXP.vdi virtual disk file as an IDE SSD.
Step 16
After preparing your Virtual PC, click the Start button to proceed to the steps of installing Windows XP on VirtualBox.

How to Install Windows XP in VirtualBox
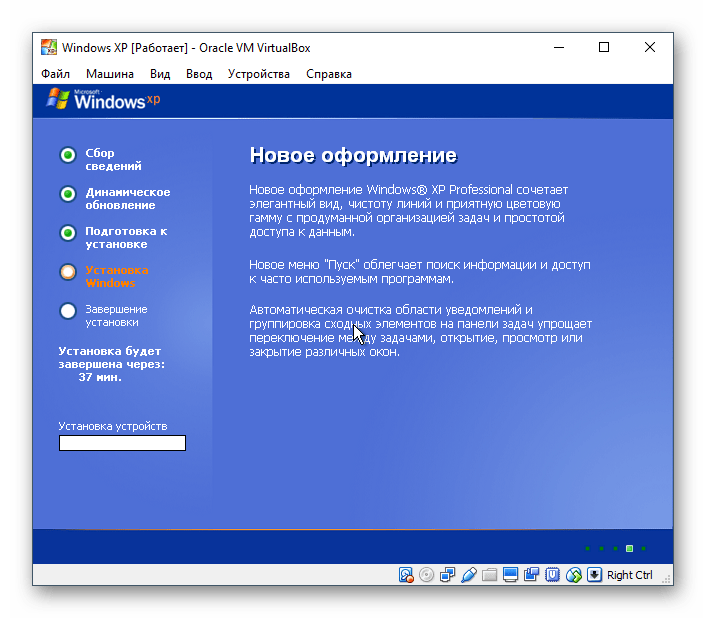
After preparing the Windows XP virtual computer, you need to install Windows using the system’s ISO image. After running the VM with the image file as the startup disk, when the setup wizard opens, you should install it as if installing the Windows platform on a real computer.
Step 1
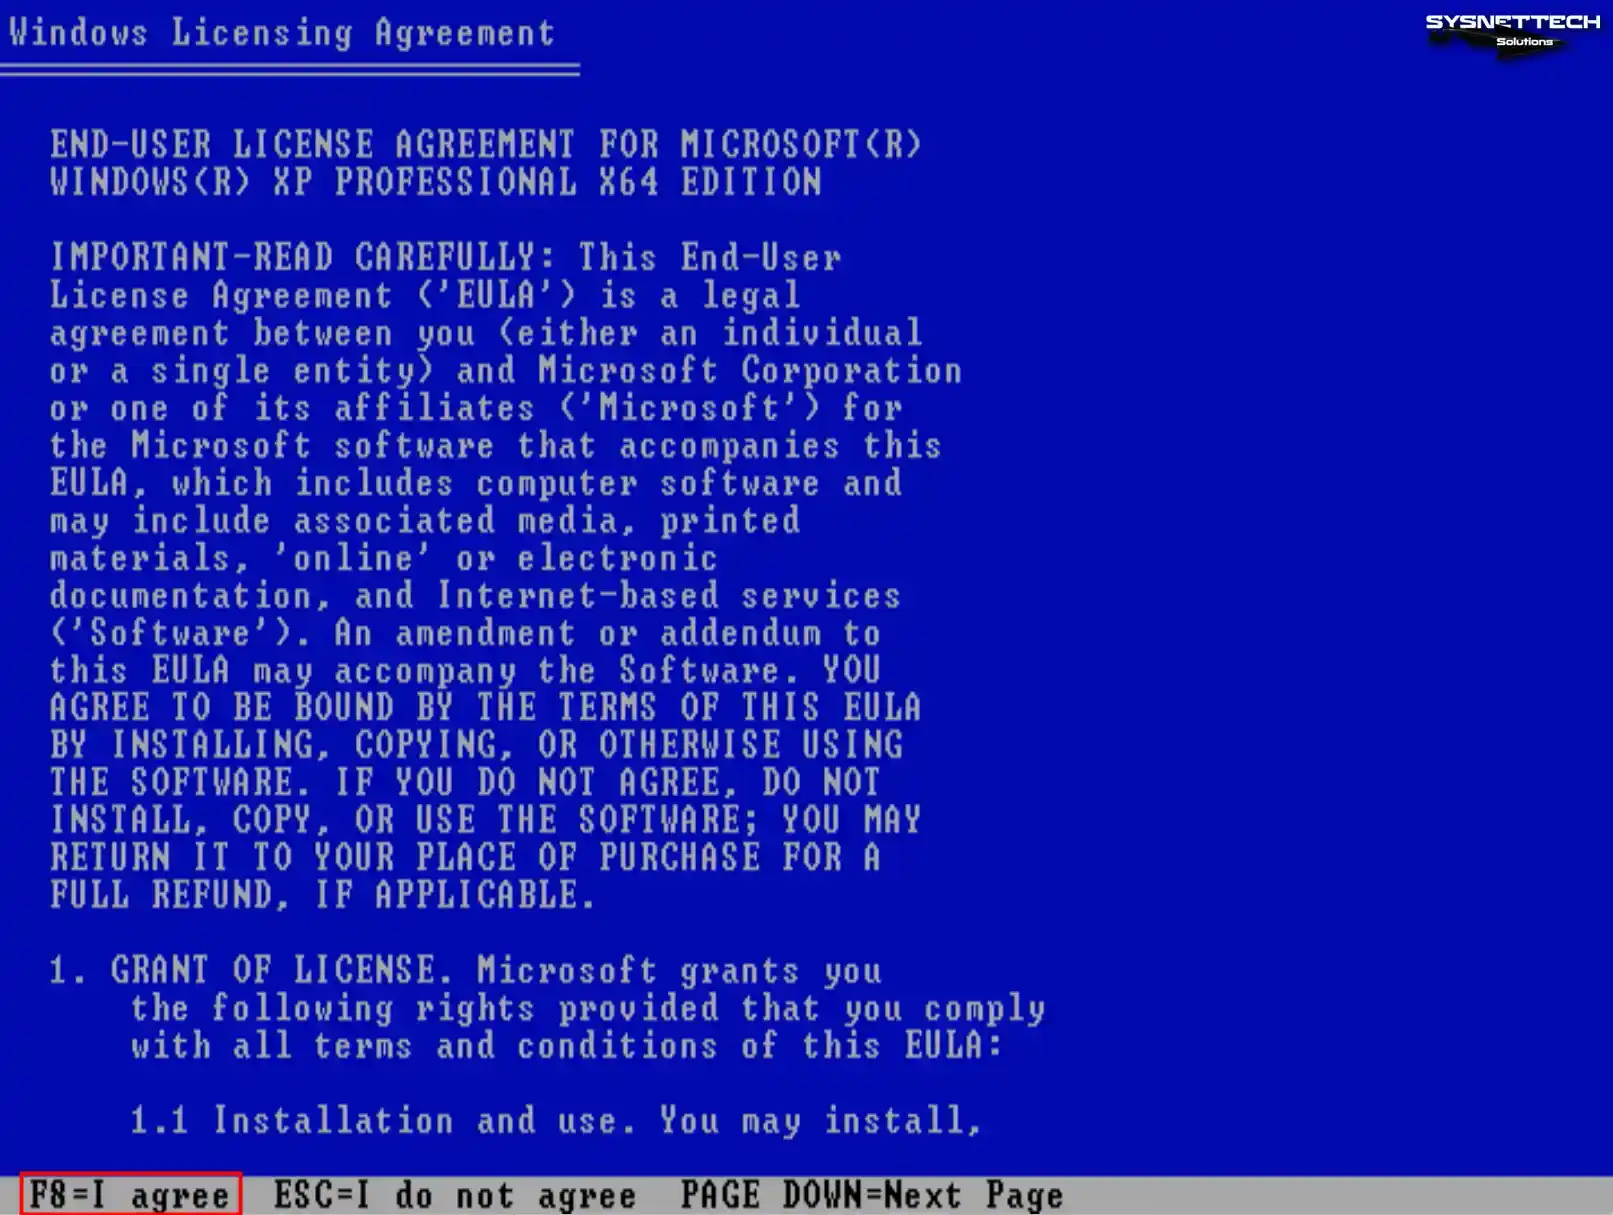
At the Windows XP Professional Setup screen, you must press Enter to begin installing Windows immediately. Otherwise, press F3 to exit the wizard or R to repair your system.

Step 2
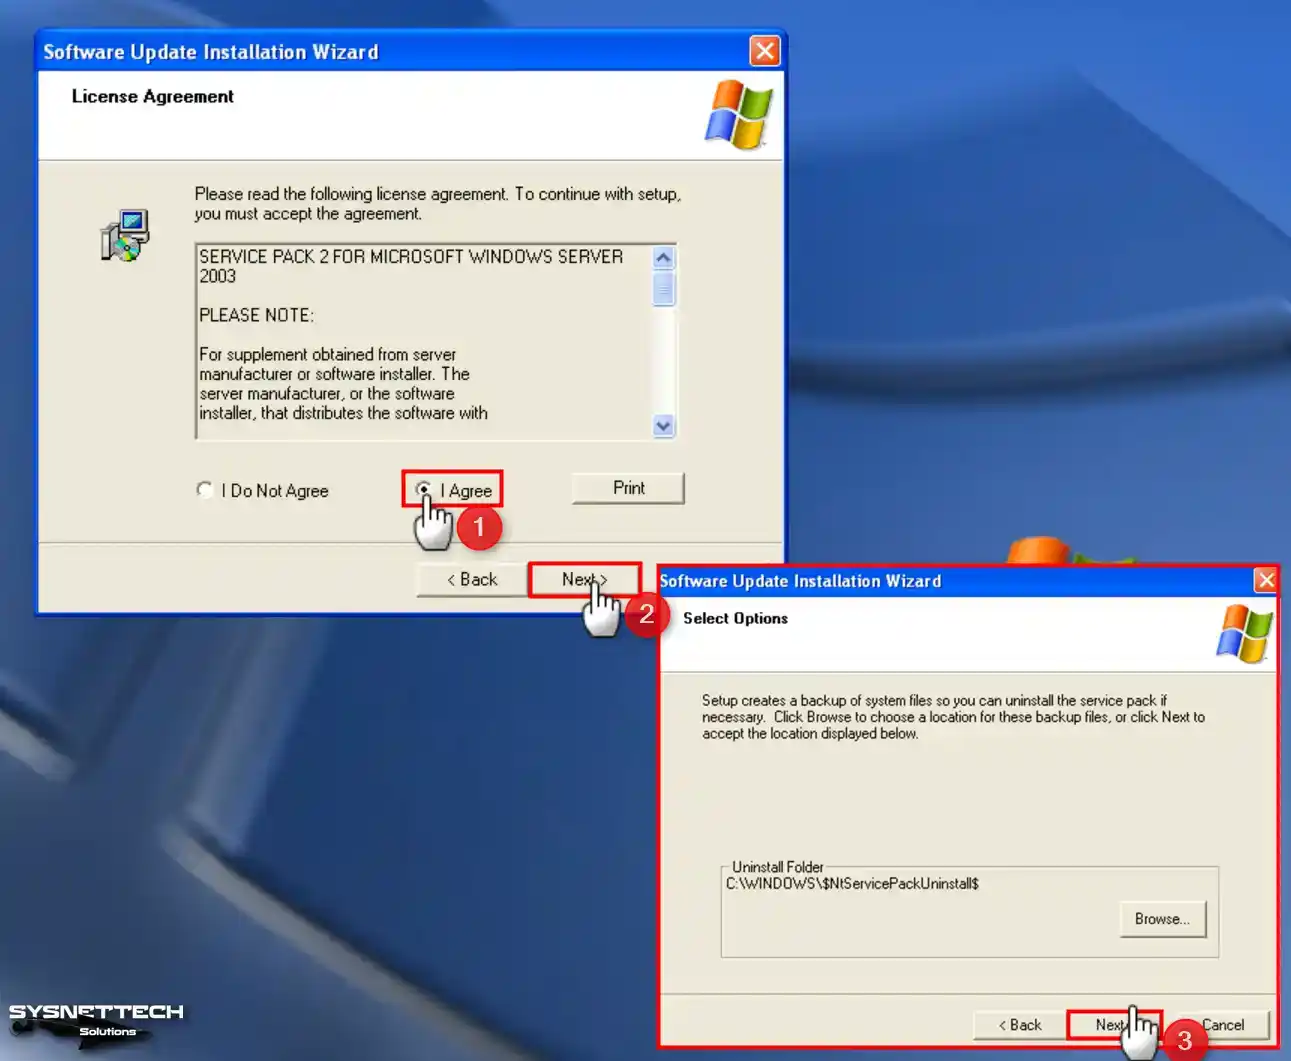
You must press Page Down to read the full text of the Windows XP license agreement in the setup wizard. After reading the license agreement, press the F8 key to accept and continue the installation.
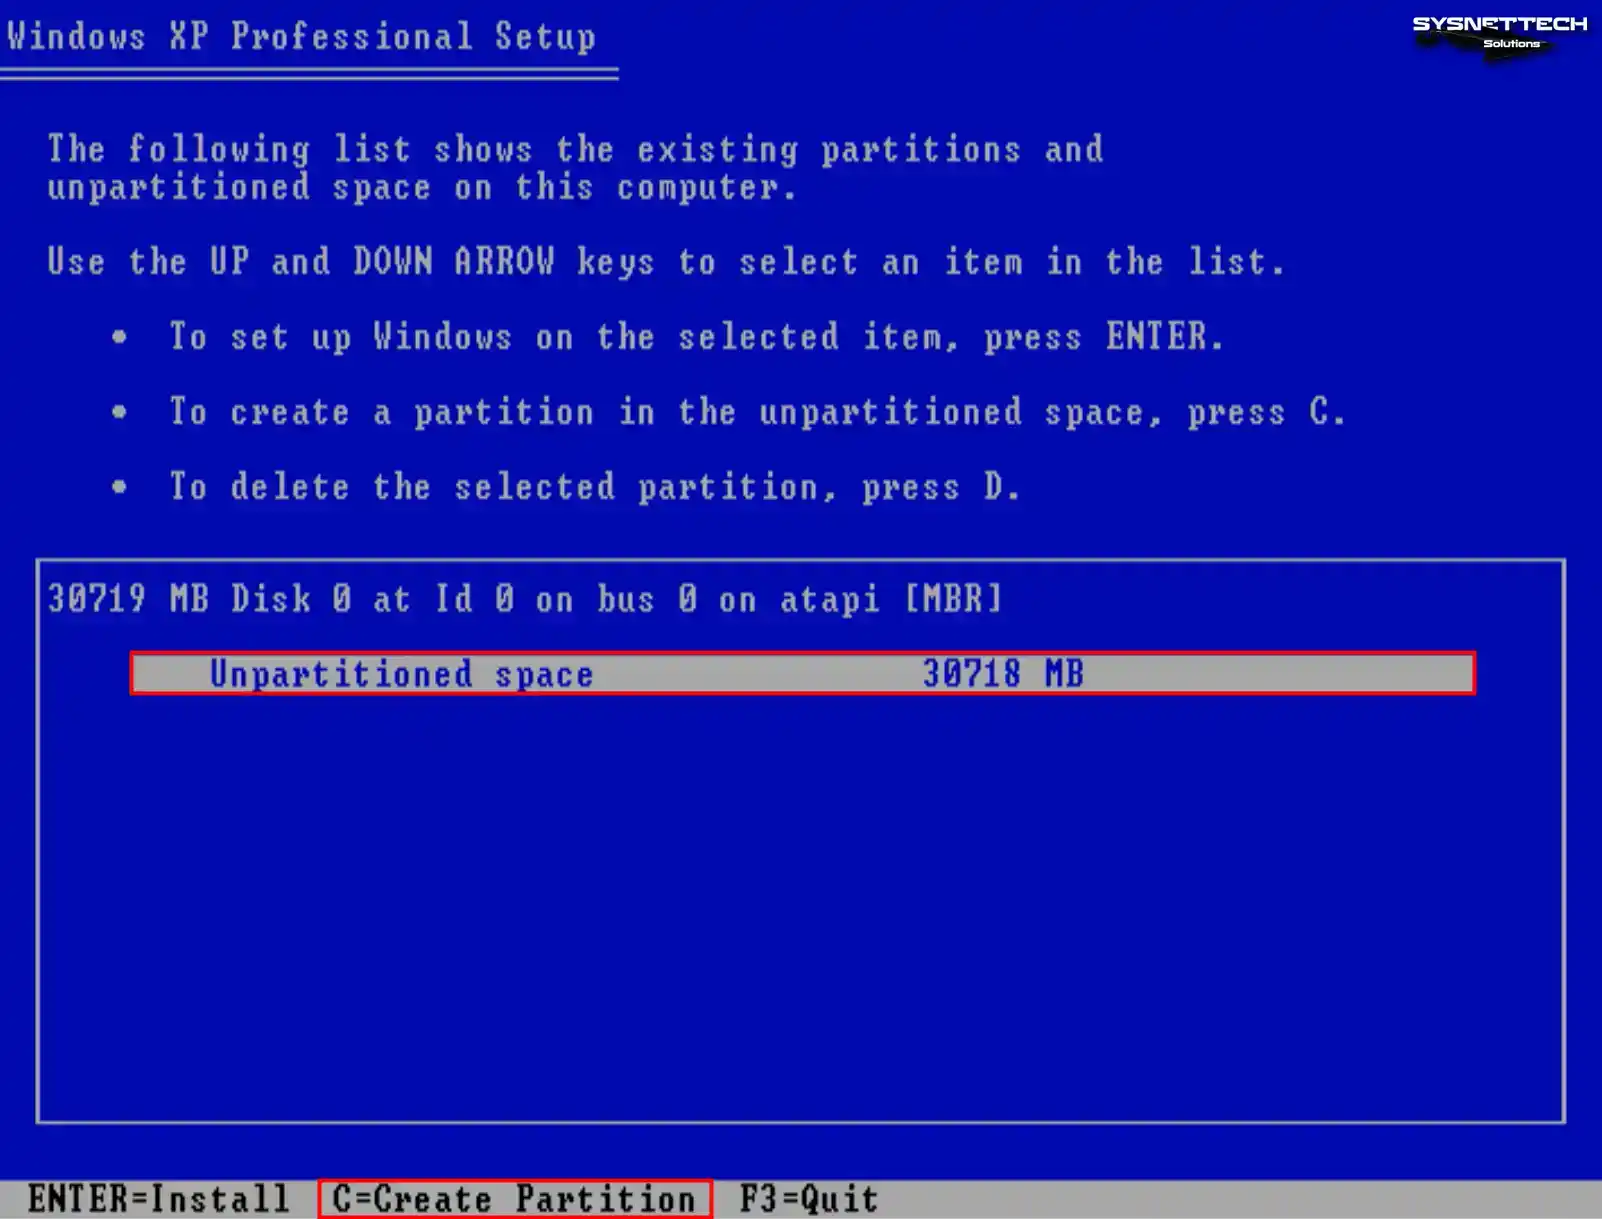
Step 3
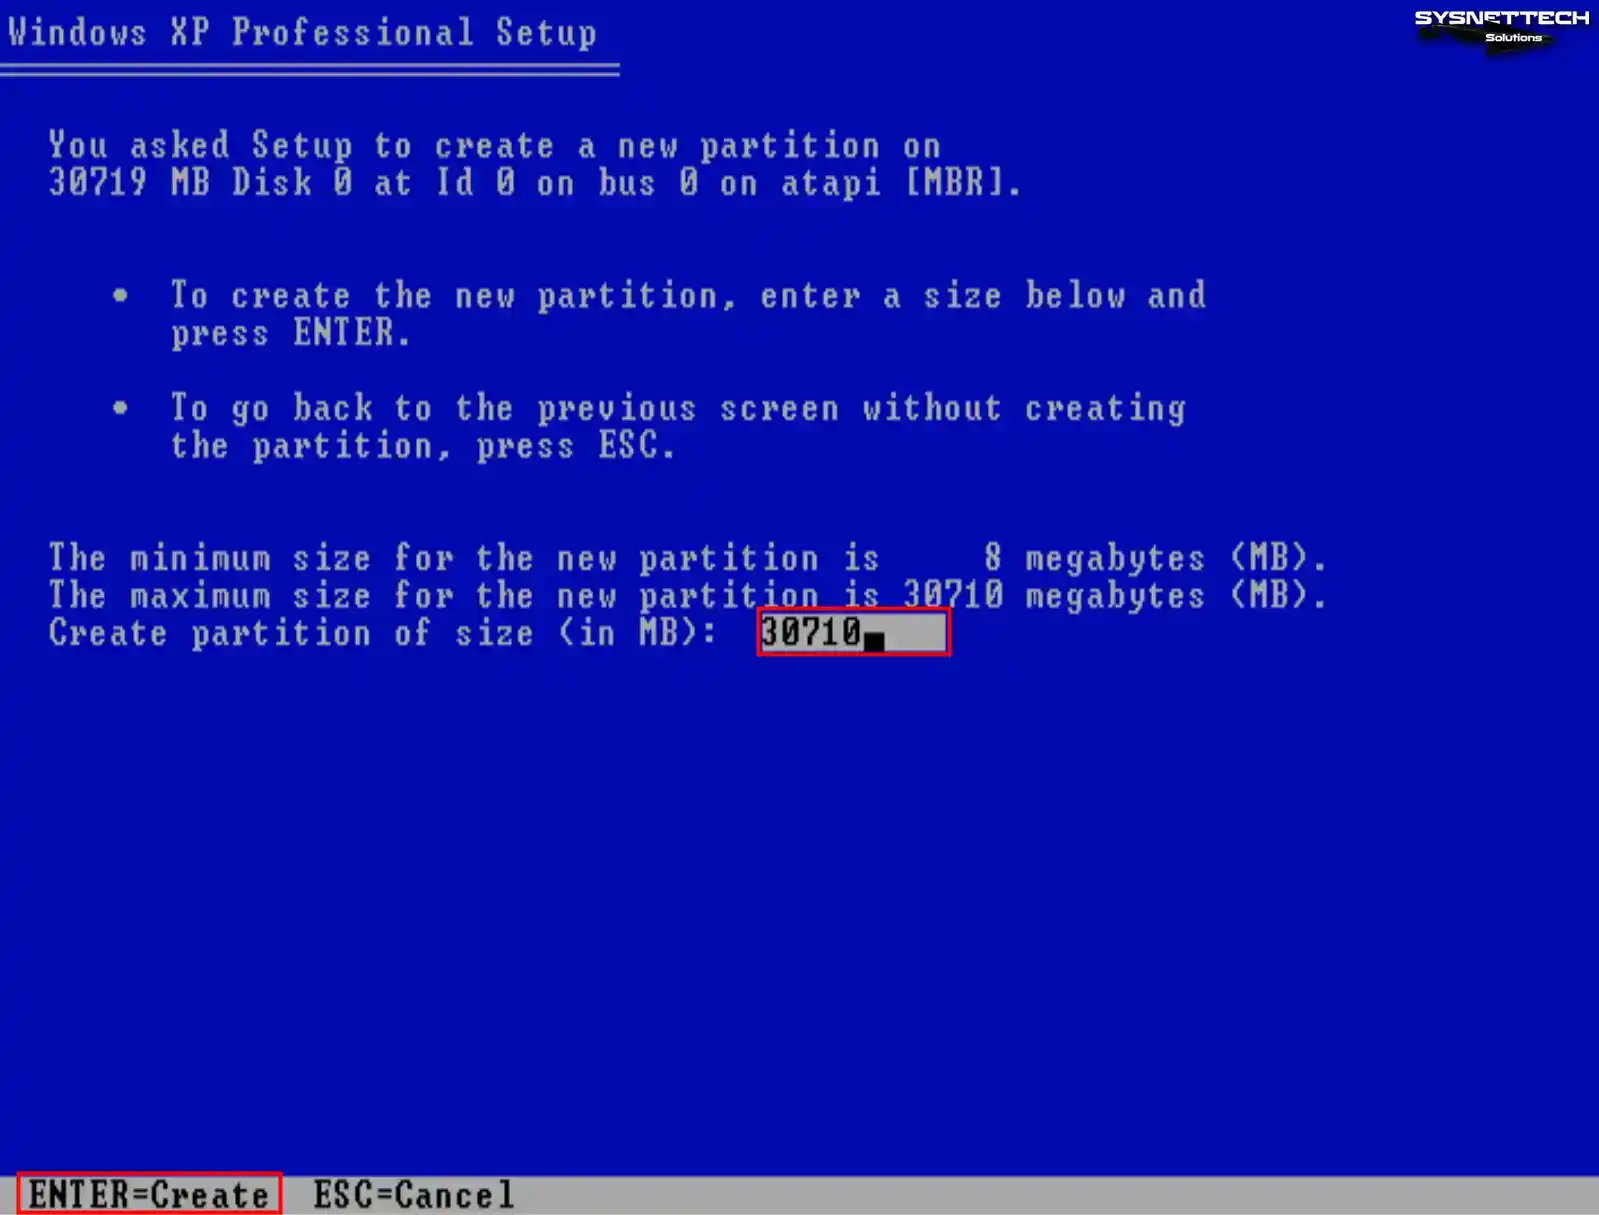
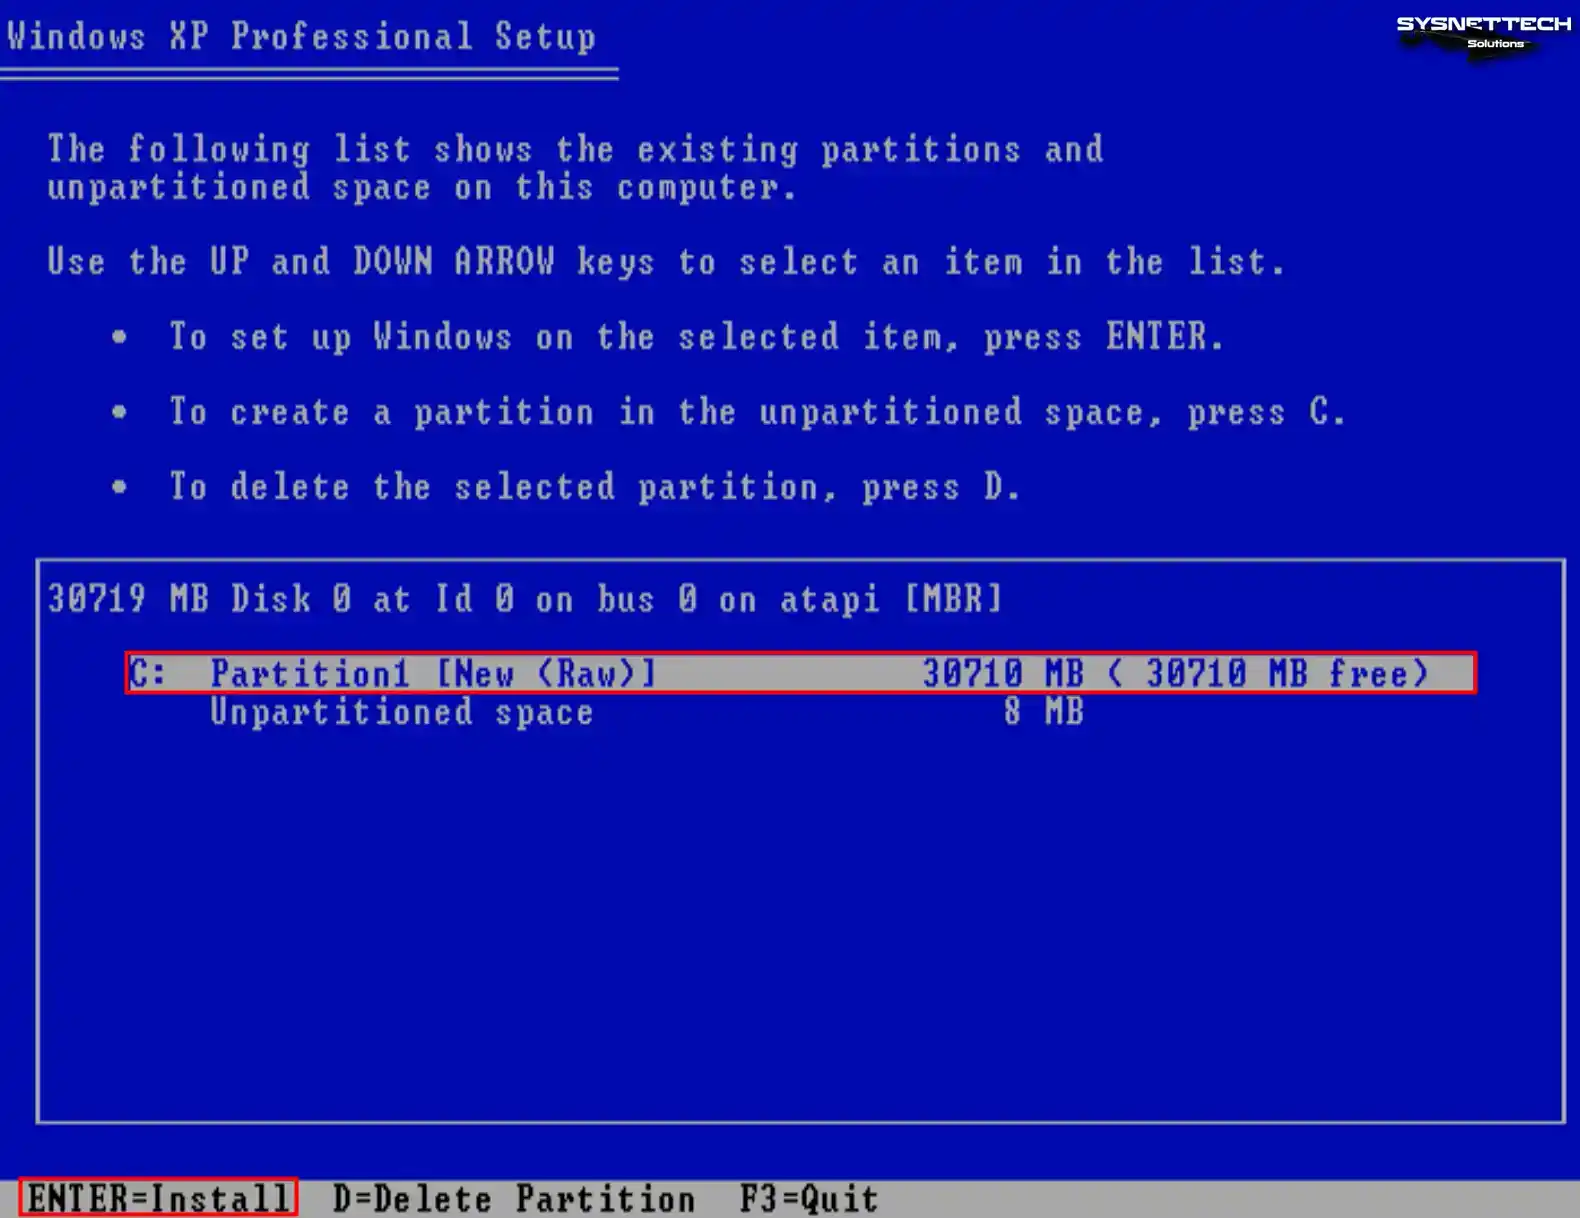
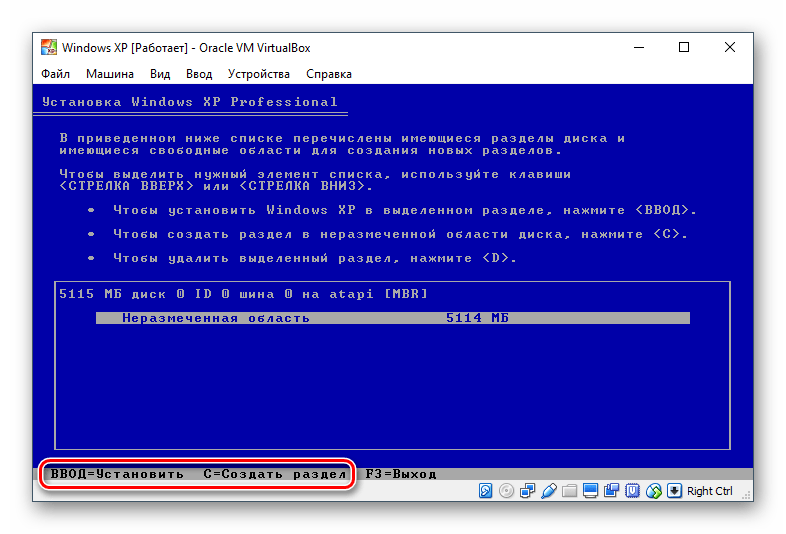
Press the C key to configure the unallocated disk space. You can also press Enter to have the wizard automatically organize the disk space and format the system disk.
Step 4
To make a new partition, you need to edit the disk space to be allocated after clicking C. You should use the entire disk space, as virtual machines generally use smaller disk space.
For example, if you configure the virtual disk size to 100 GB, allocating 20 GB for system setup and 80 GB for backup may make more sense.
Step 5
Press Enter to start the Windows XP installation on the new partition you created.
Step 6
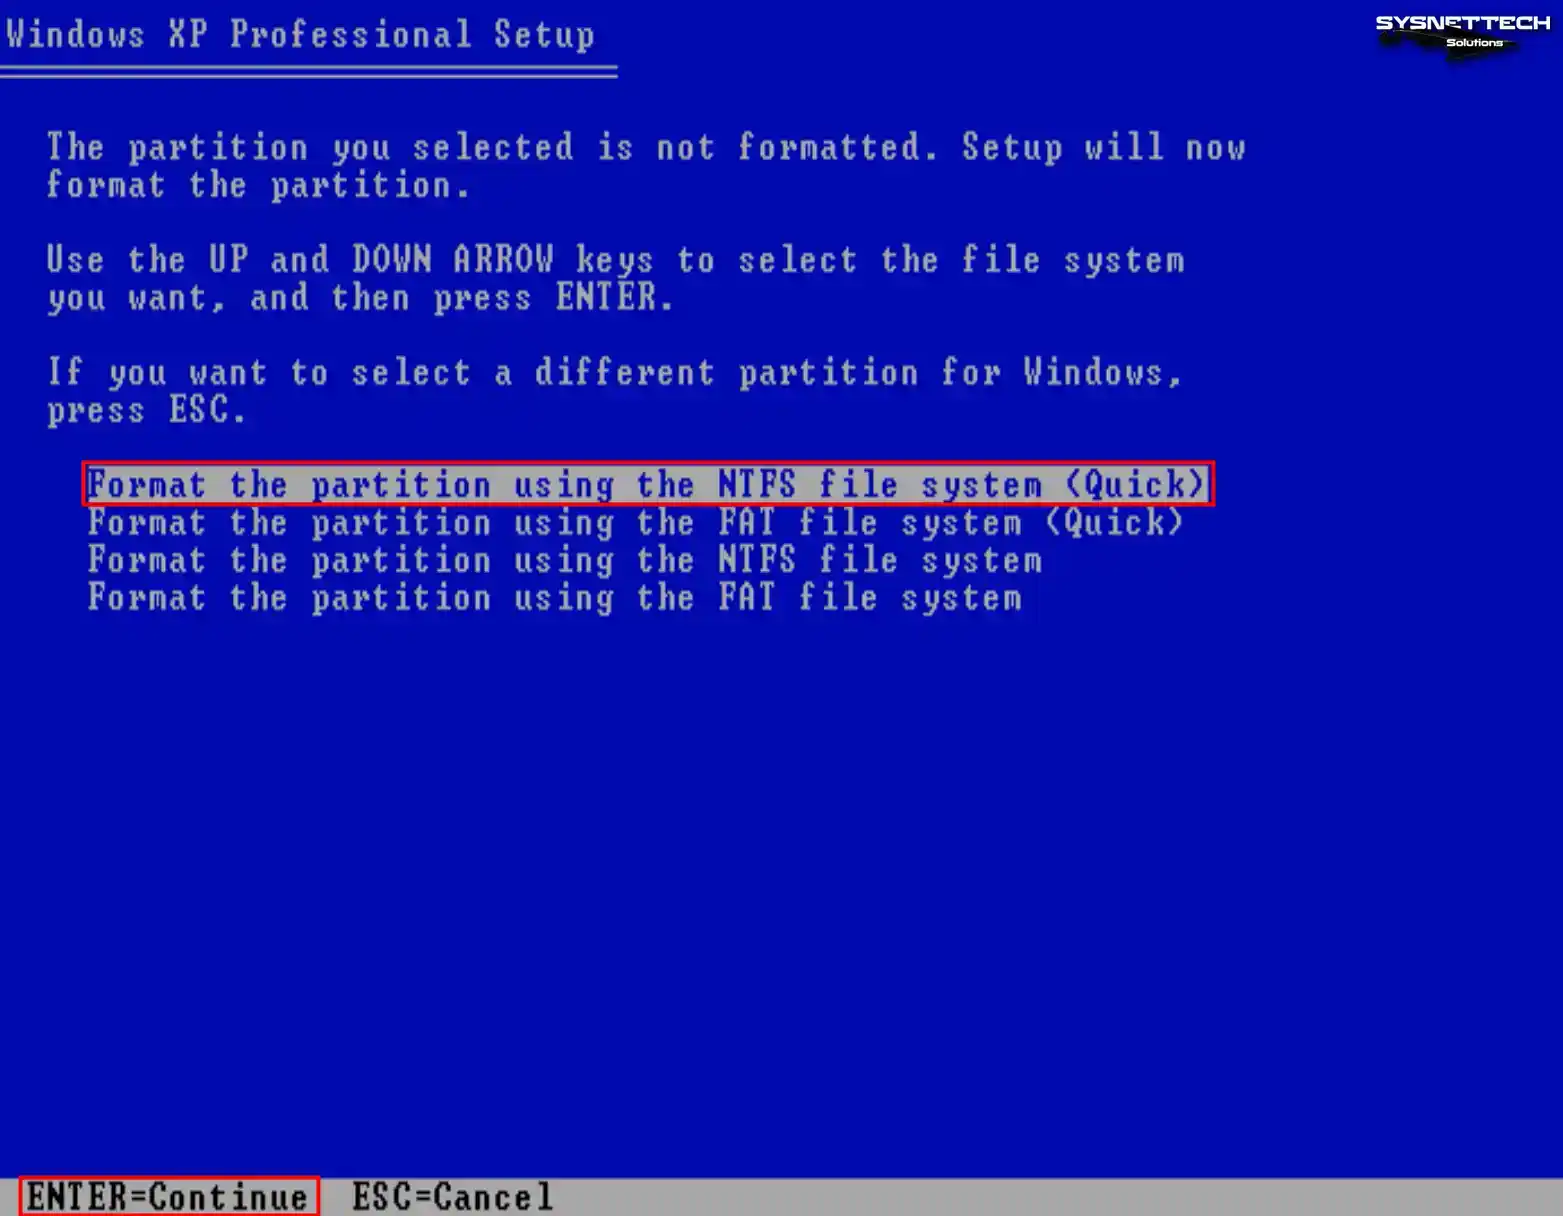
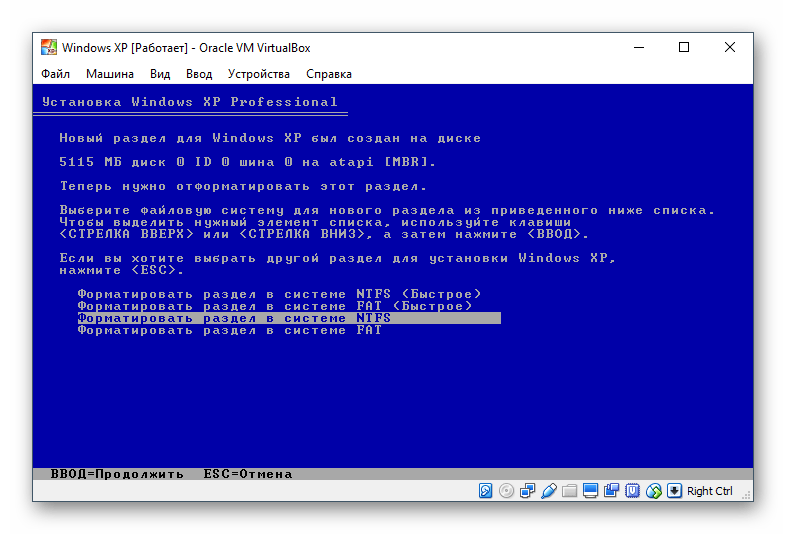
Quickly format the virtual disk of the guest machine using the NTFS file system.
Step 7
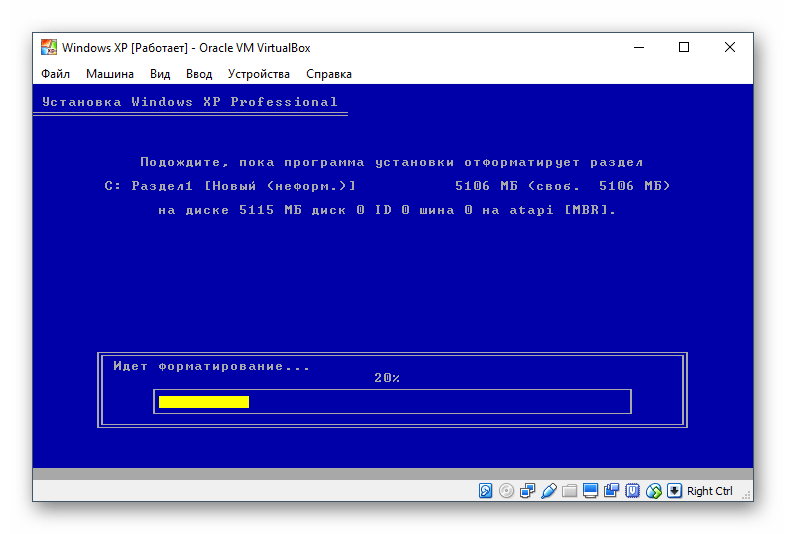
Wait while the setup wizard formats your virtual disk.

Step 8
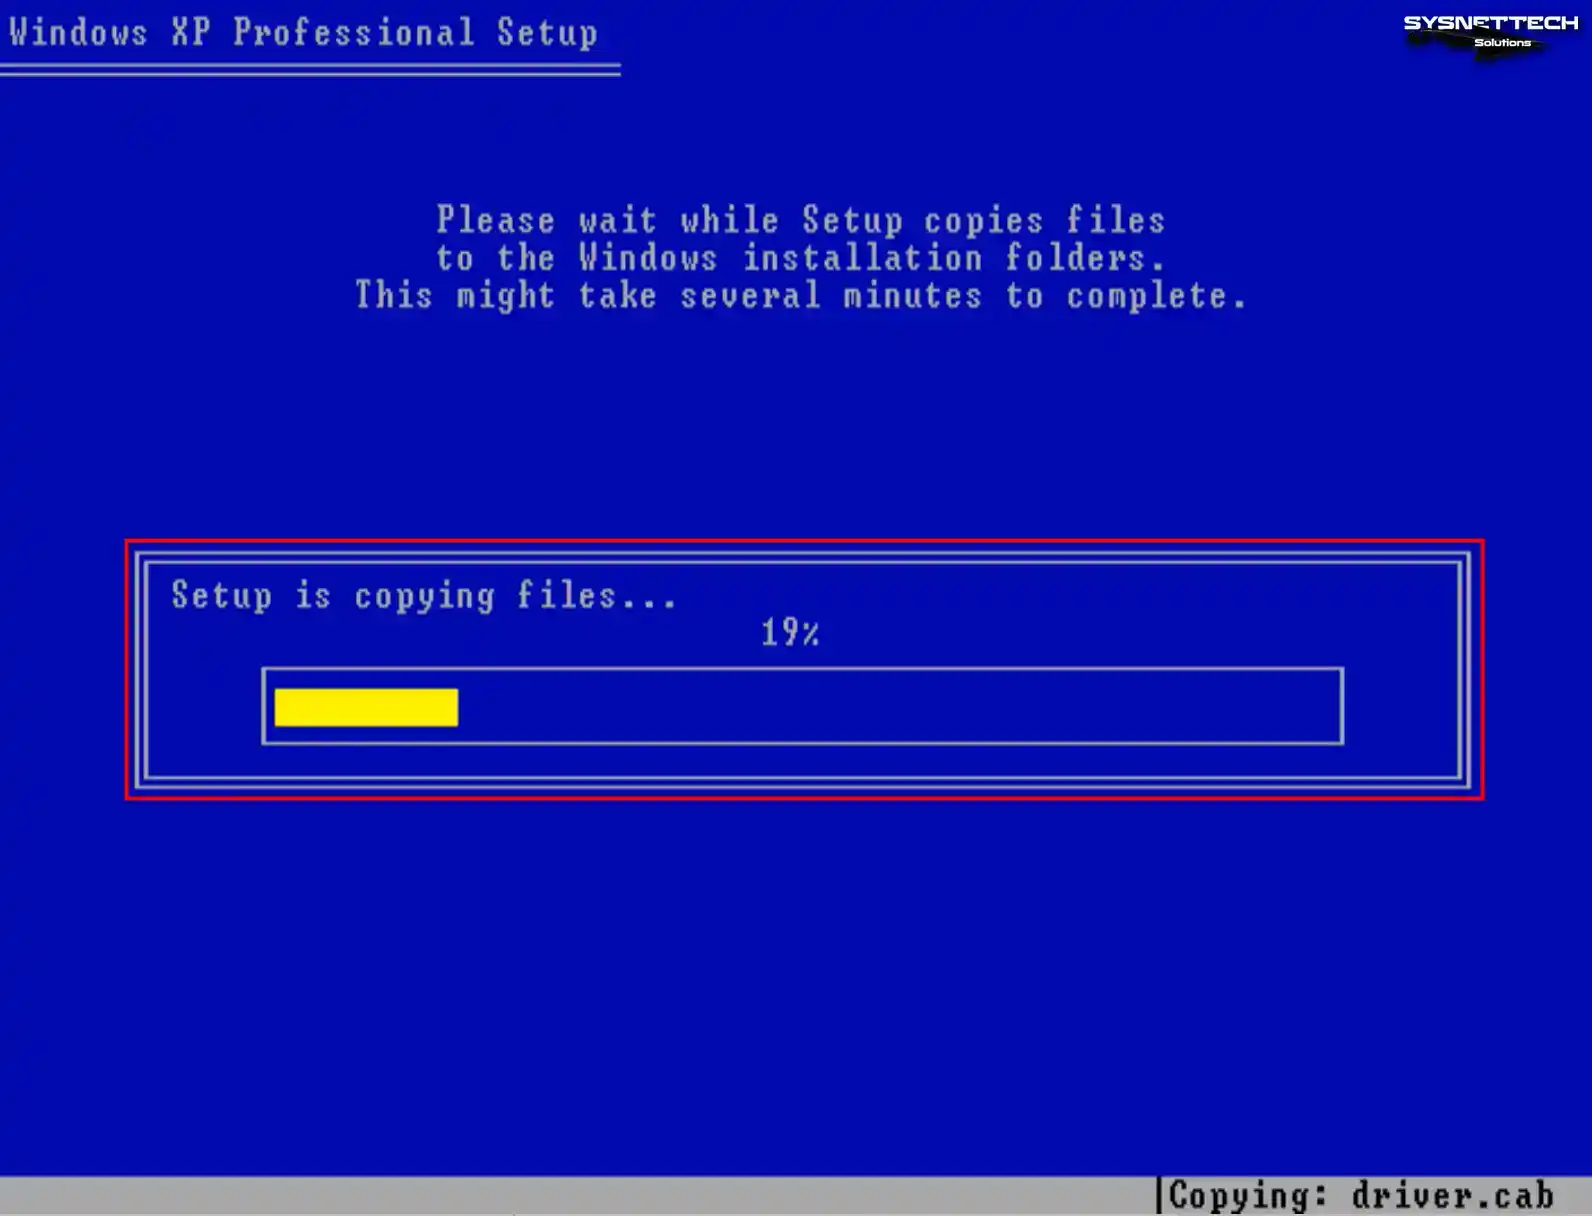
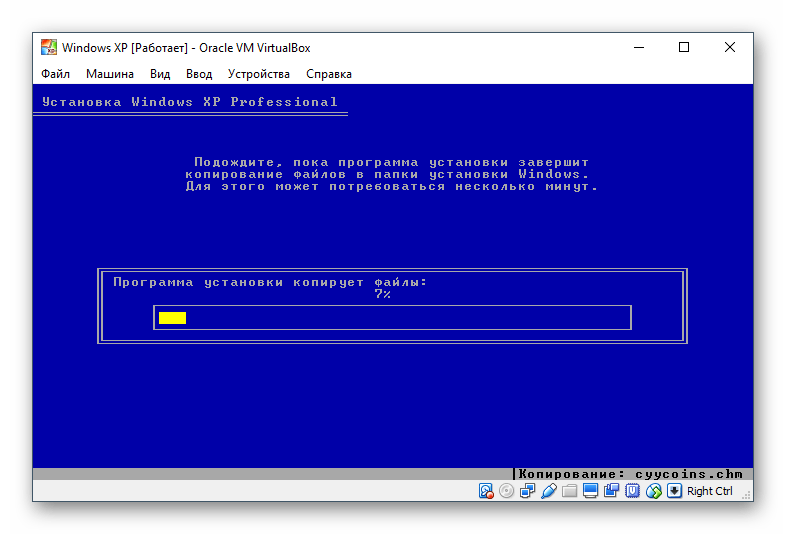
Once the virtual disk has been formatted to facilitate file copying, the XP system files will commence their transfer onto the disk.
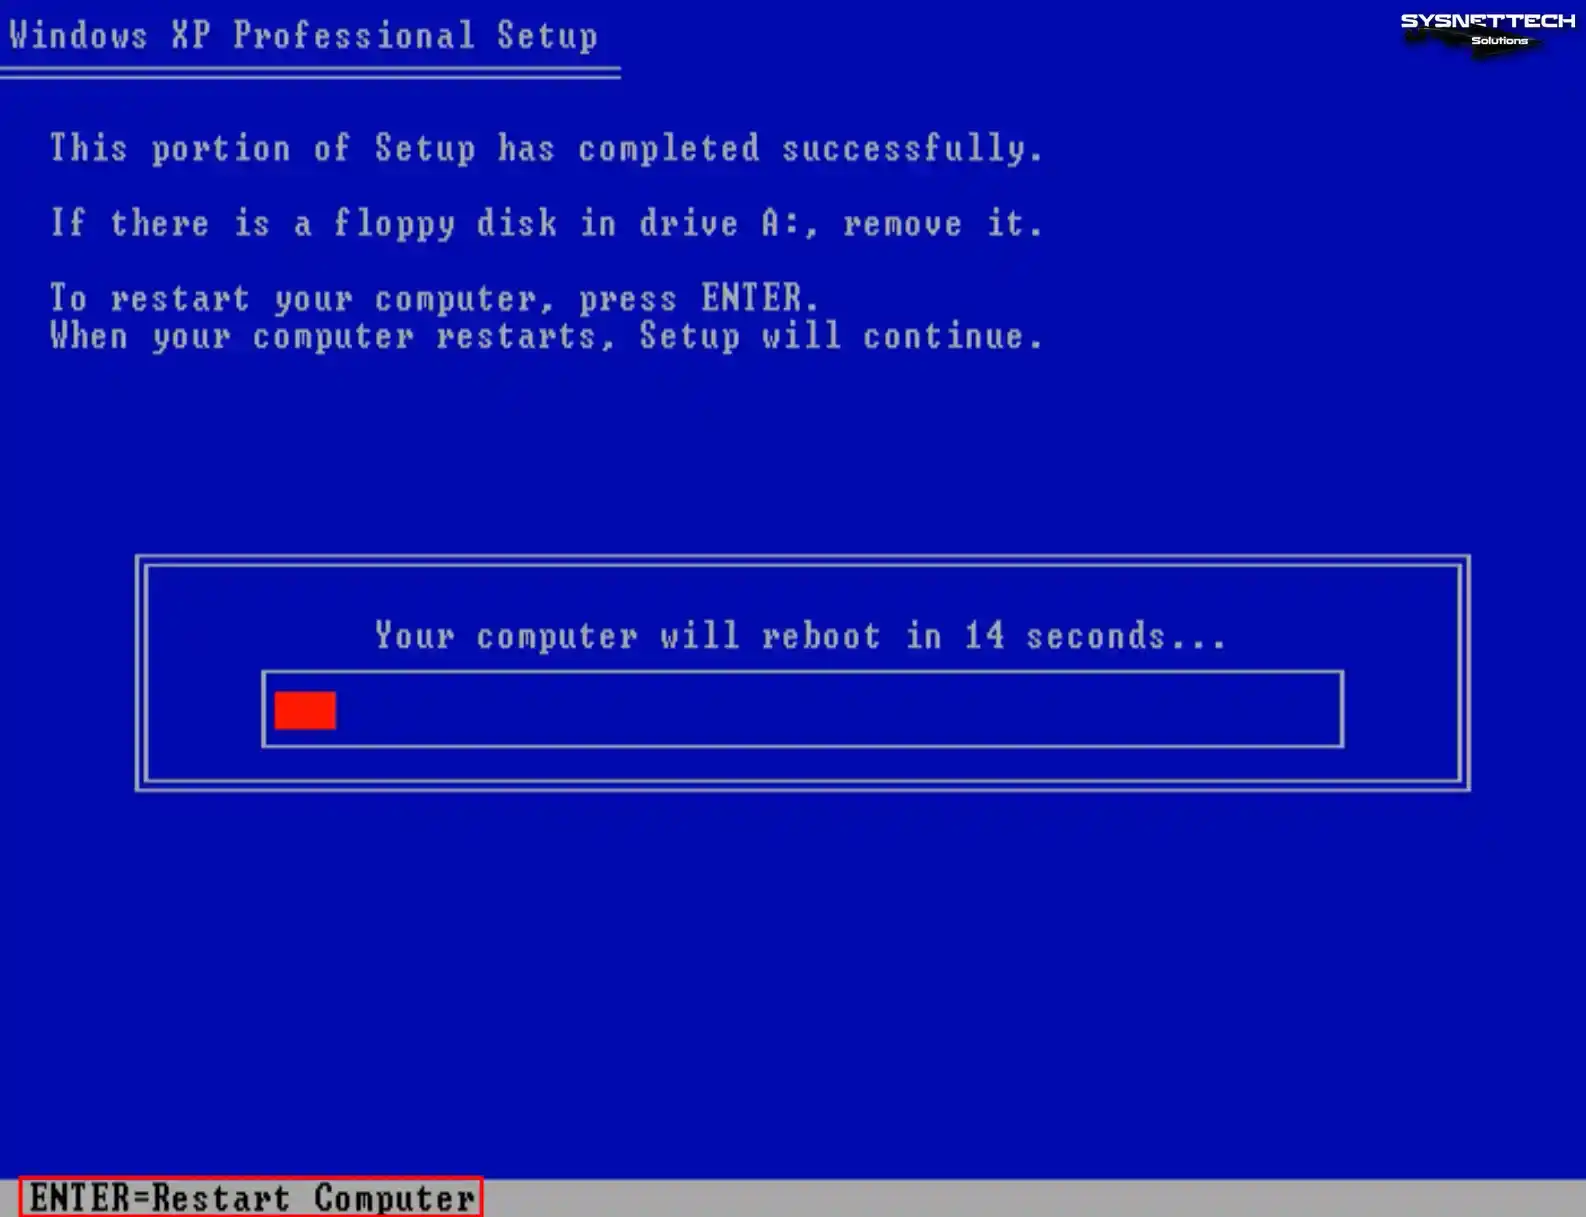
Step 9
After copying the system files, your virtual computer will restart automatically in 15 seconds. You can press Enter to reboot your virtual system immediately. After your guest machine restarts, the installation will continue.
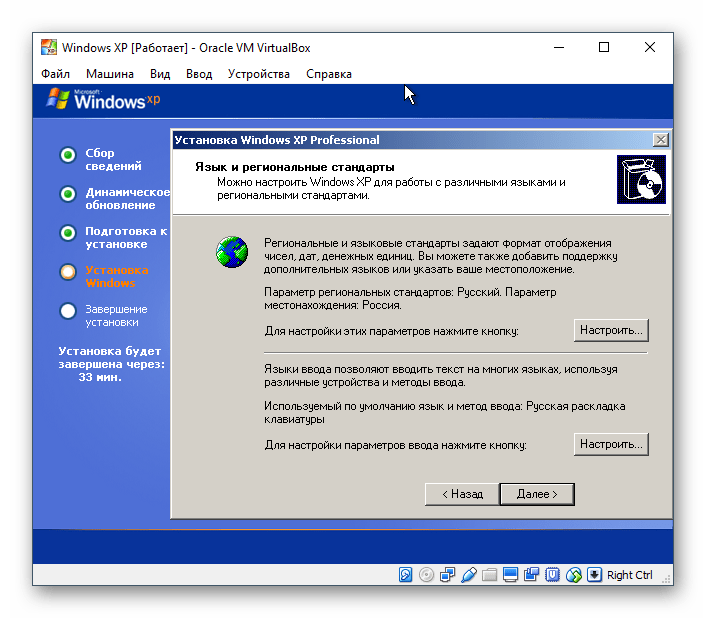
Step 10
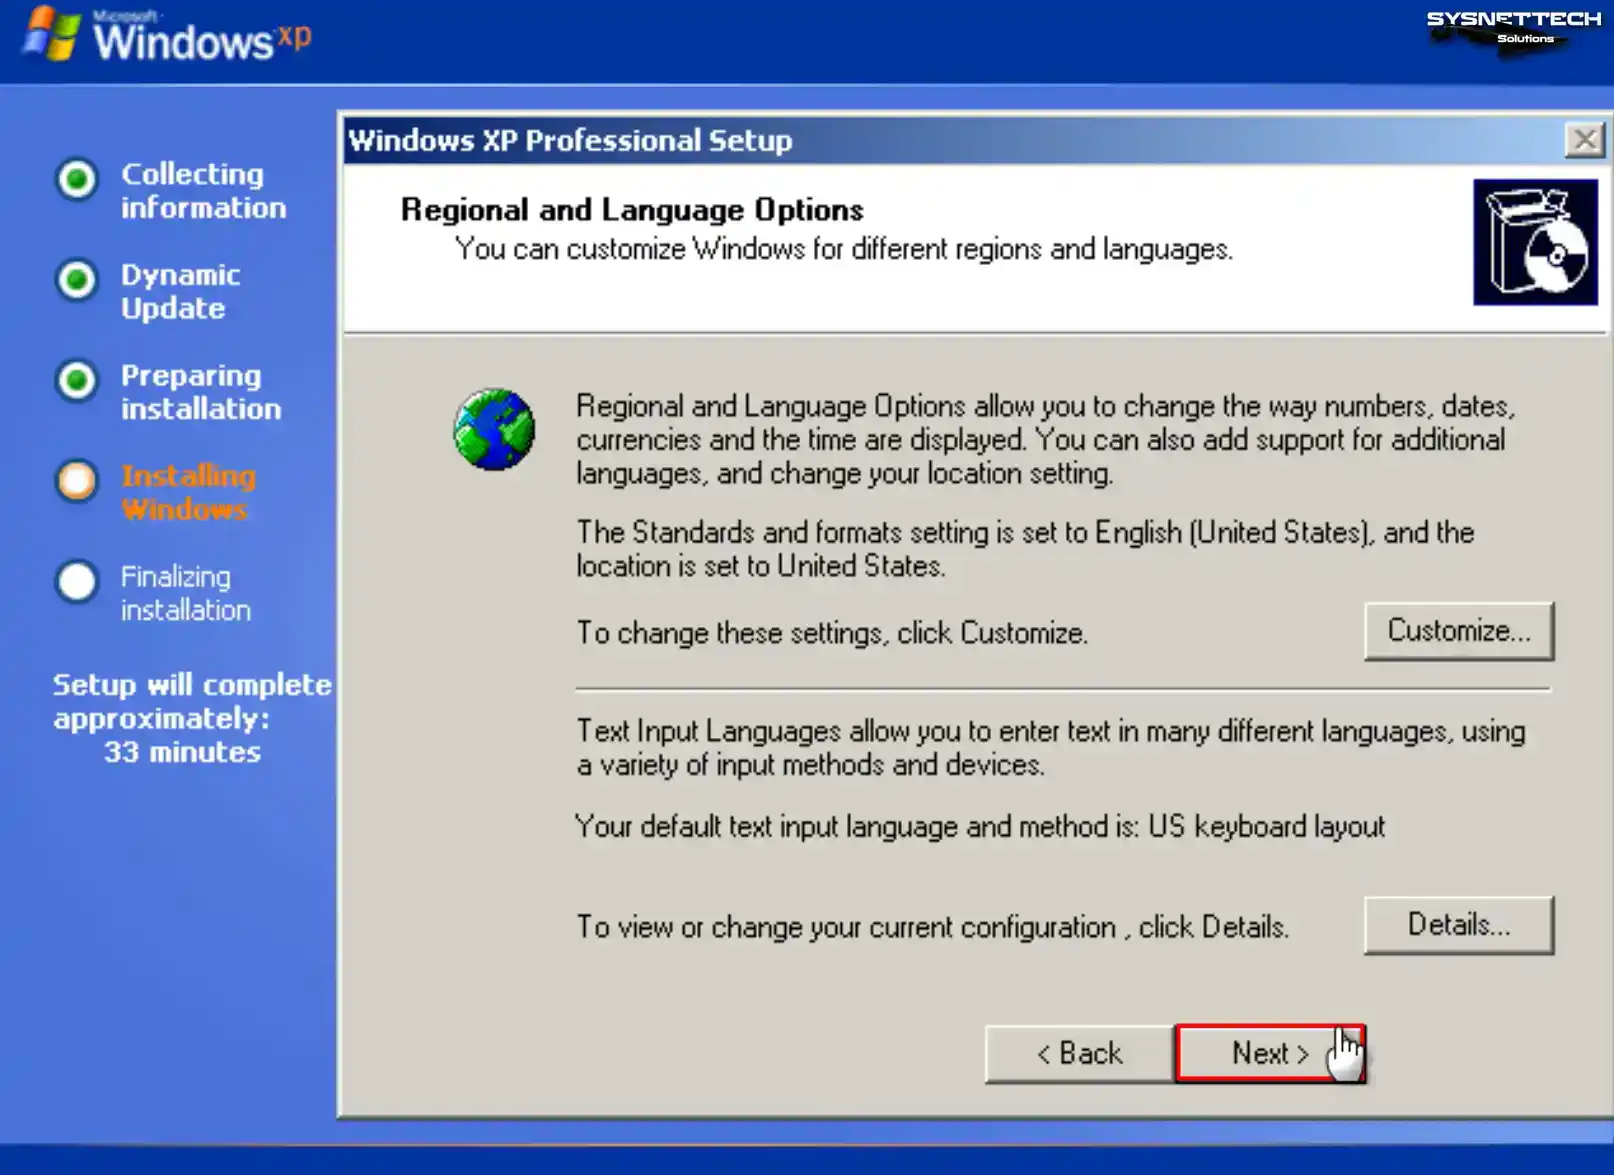
Configure the region and language options of Windows XP according to your country.
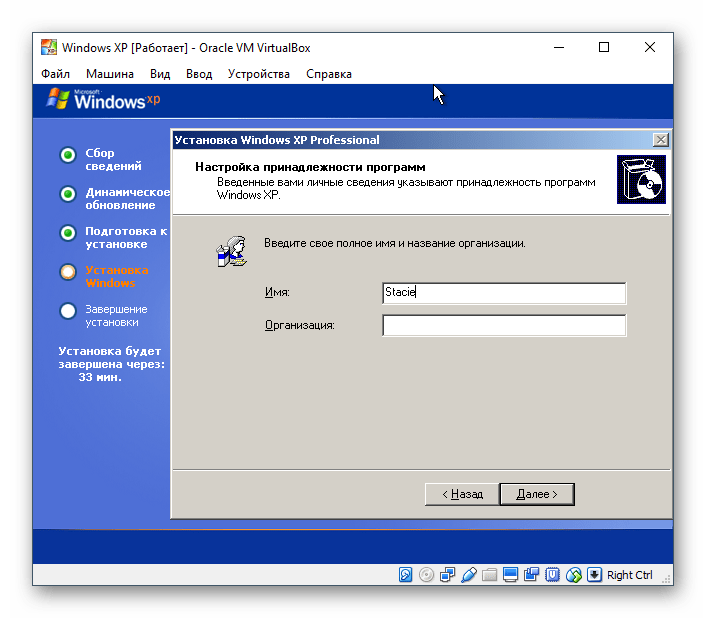
Step 11
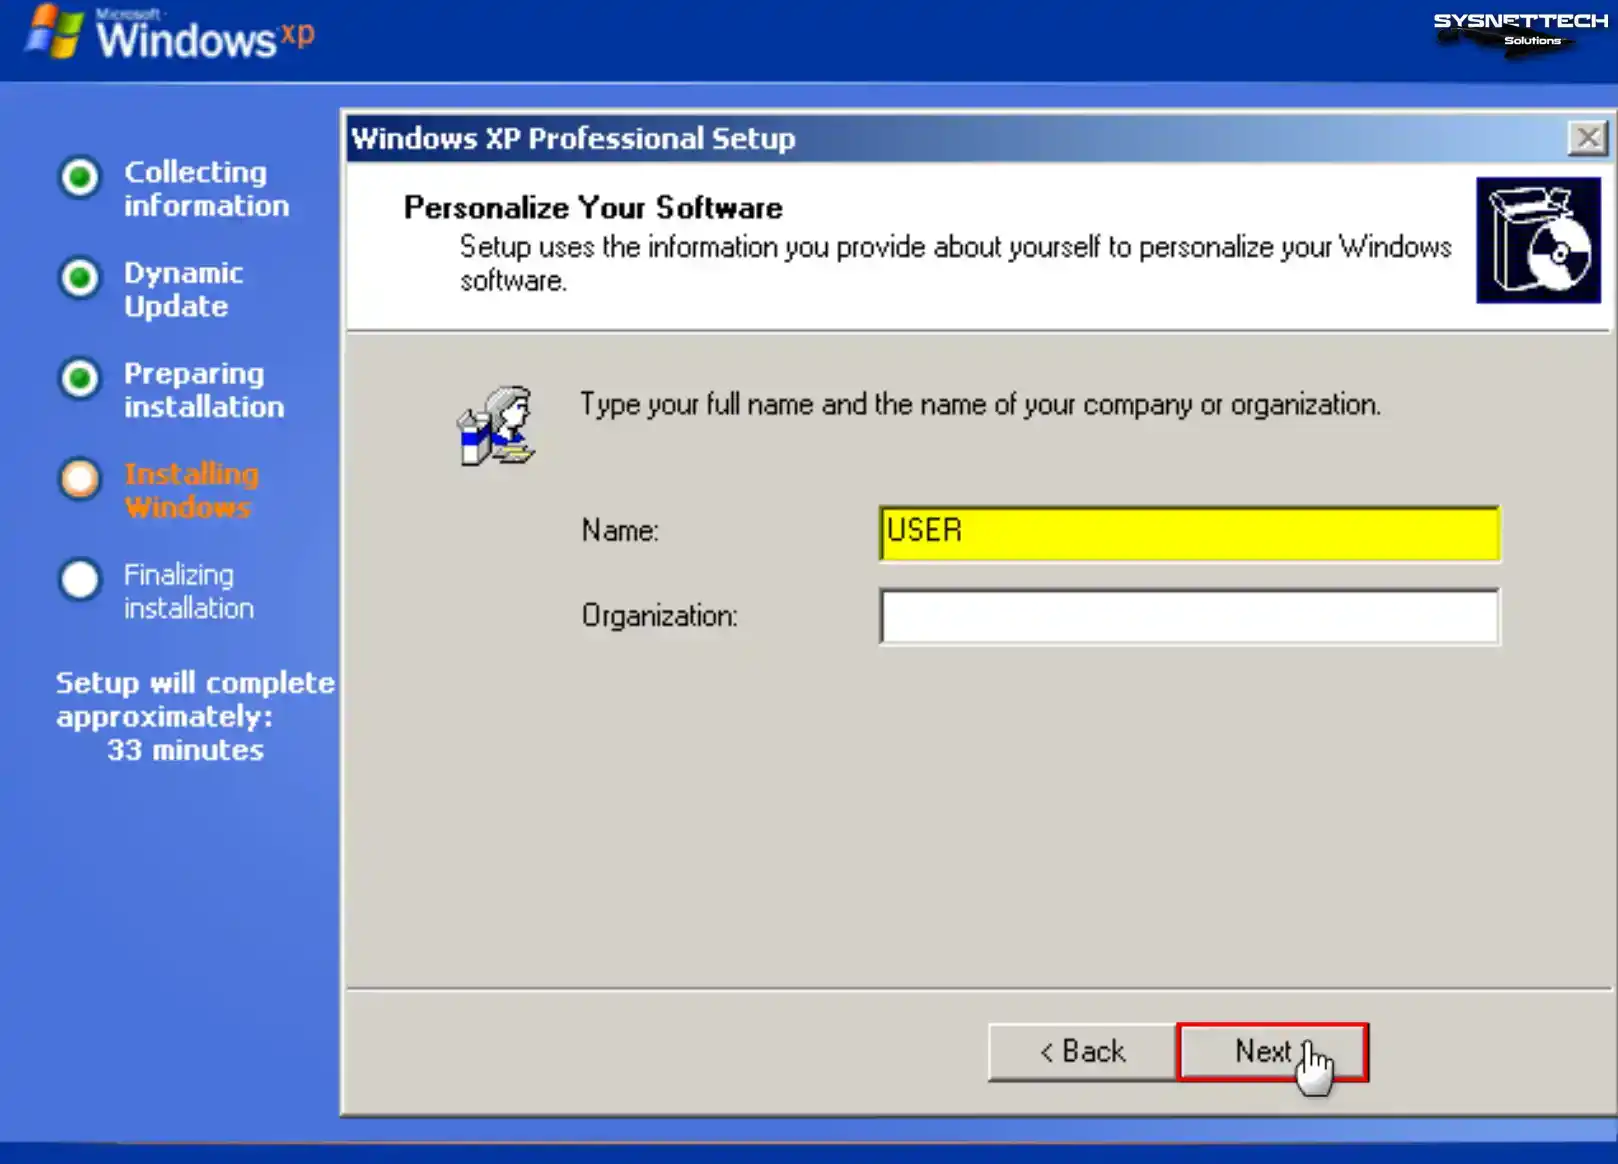
Type a name for the user account you will use in your virtual system and click Next.
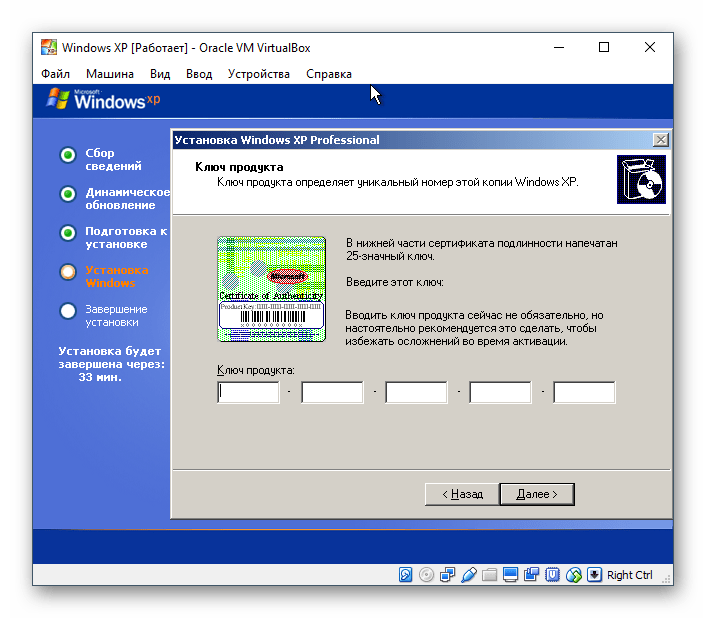
Step 12
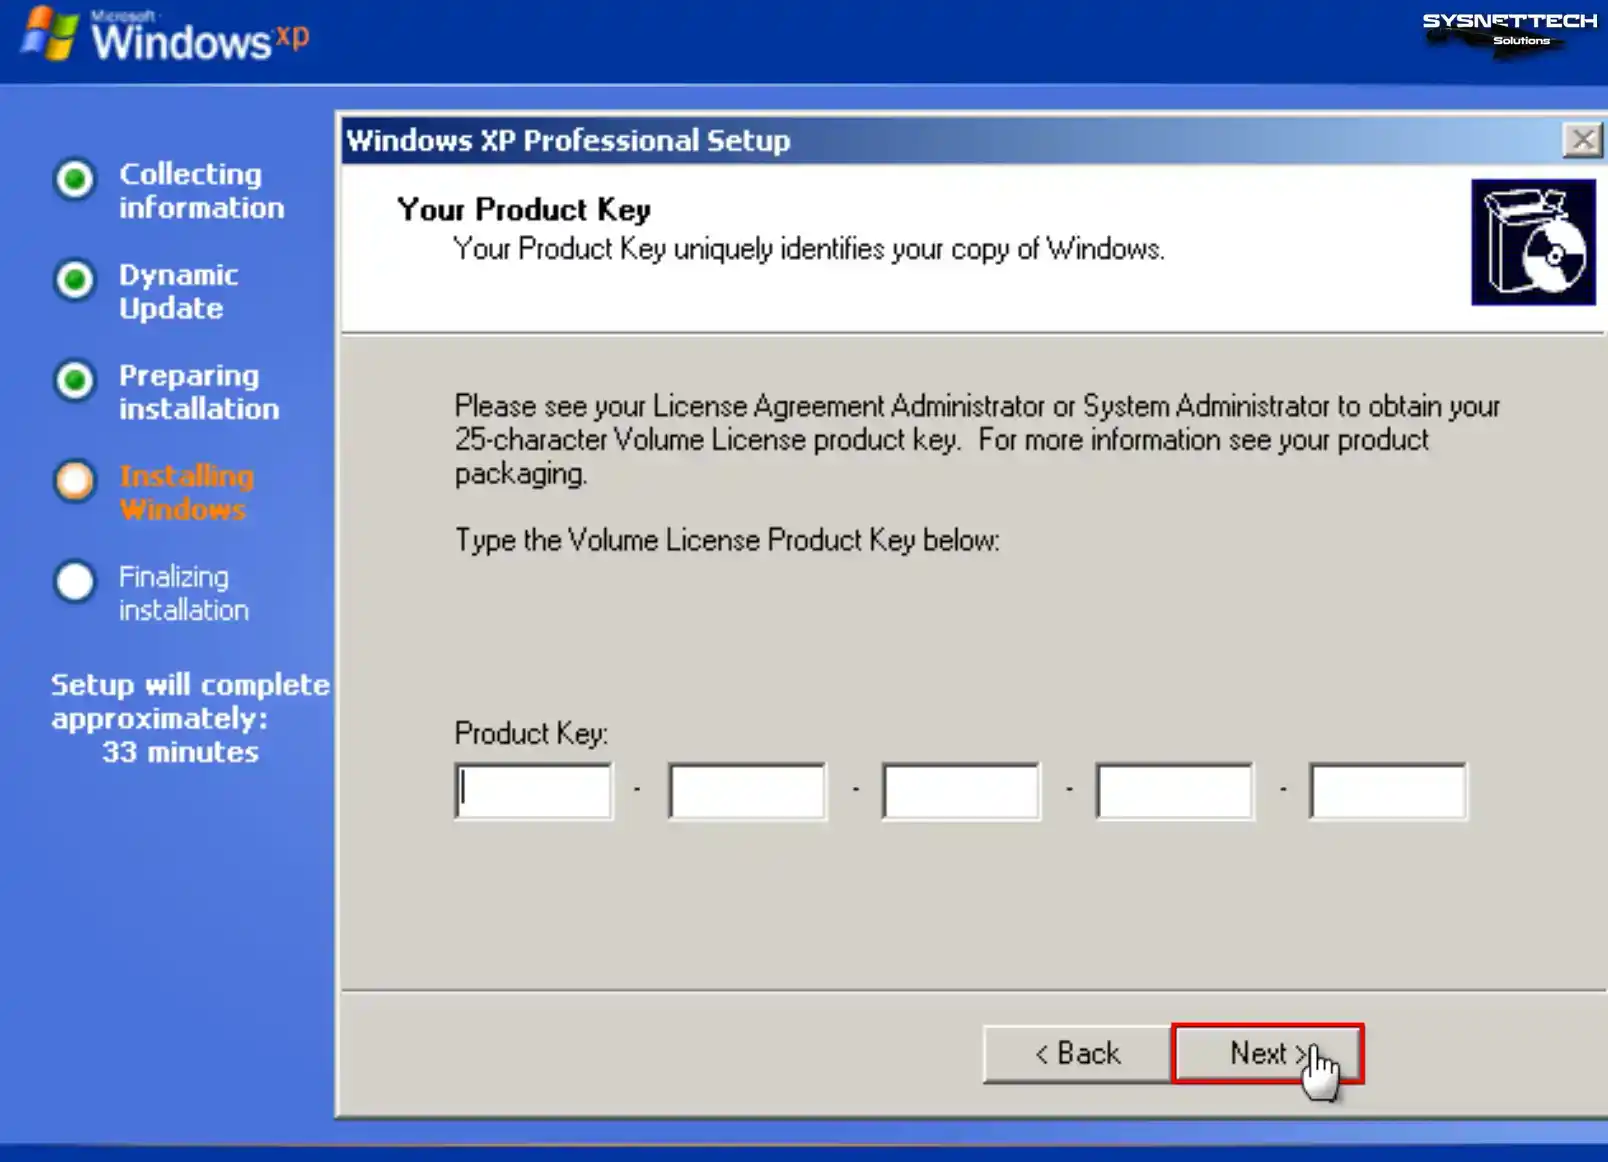
Enter the Windows XP Pro product key you have and click Next.
Step 13
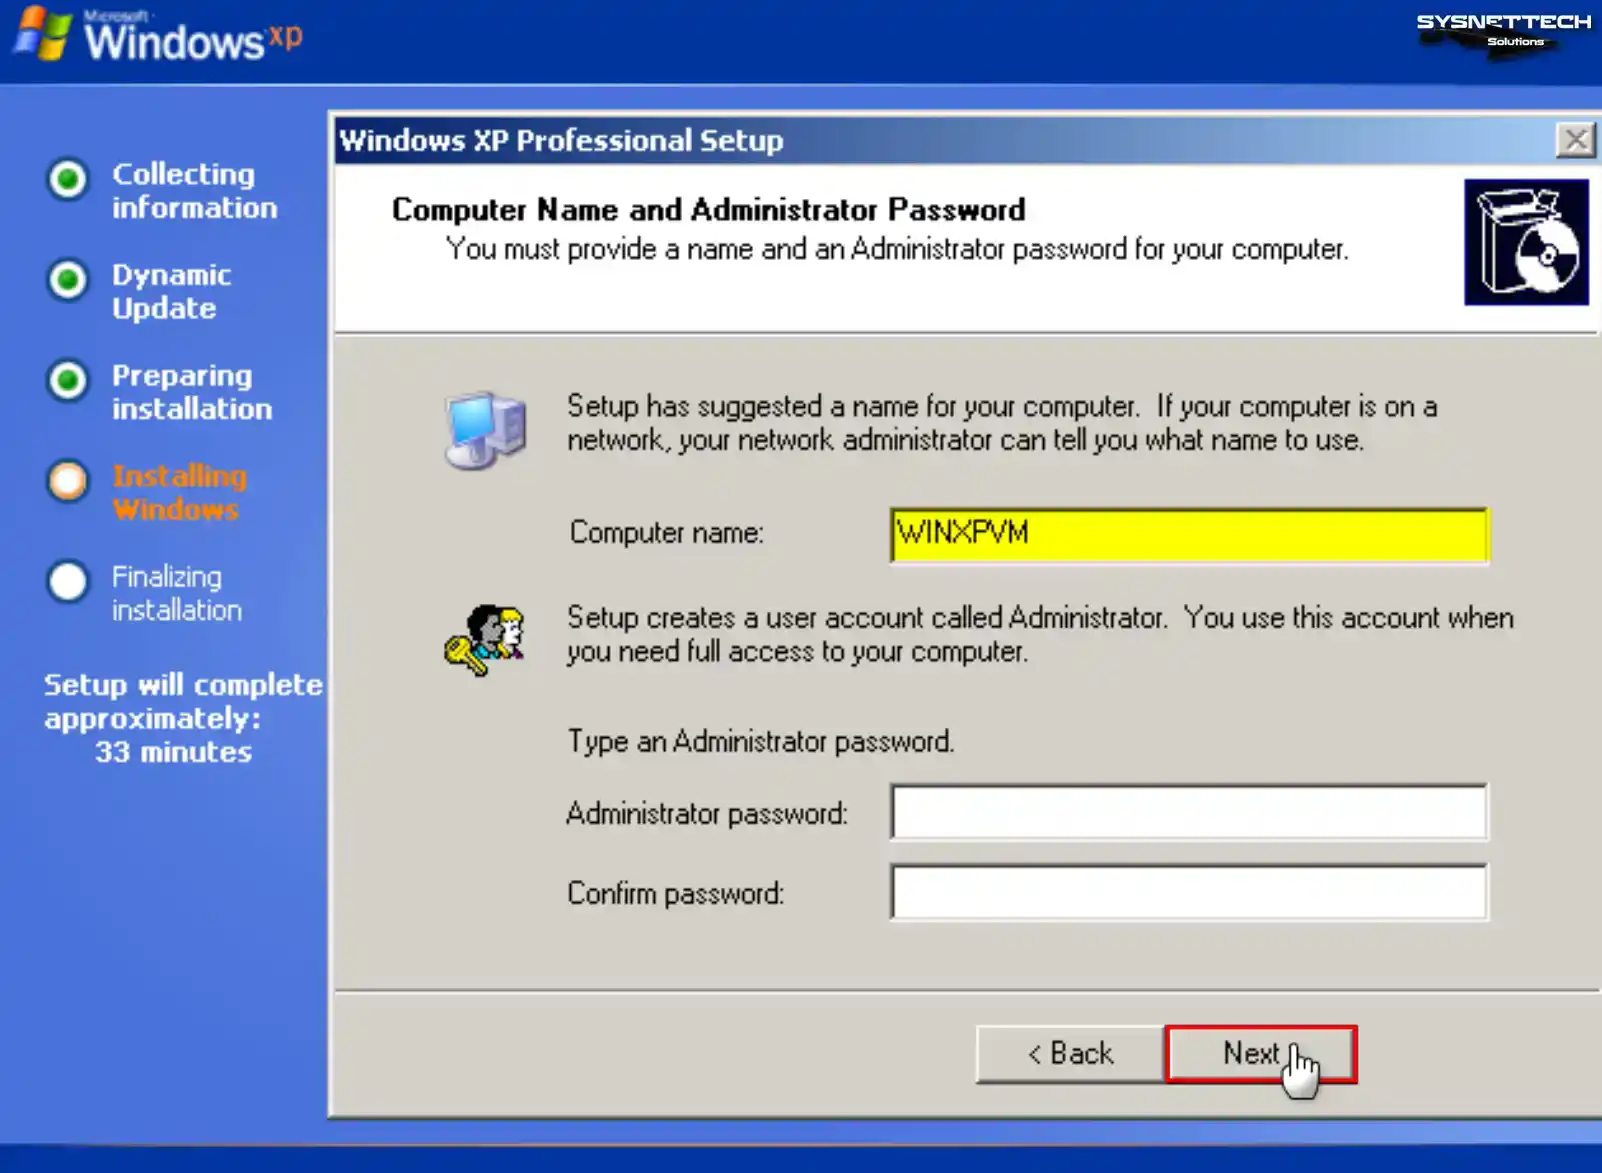
If you use your Windows guest machine in a network environment with multiple computers, ensure the computer name differs from other devices.
Type the PC name you want to use in the Computer Name field and create a new password for the Administrator account with full authority in your virtual system, or leave the relevant fields blank to avoid making a password, and click Next.
Step 14
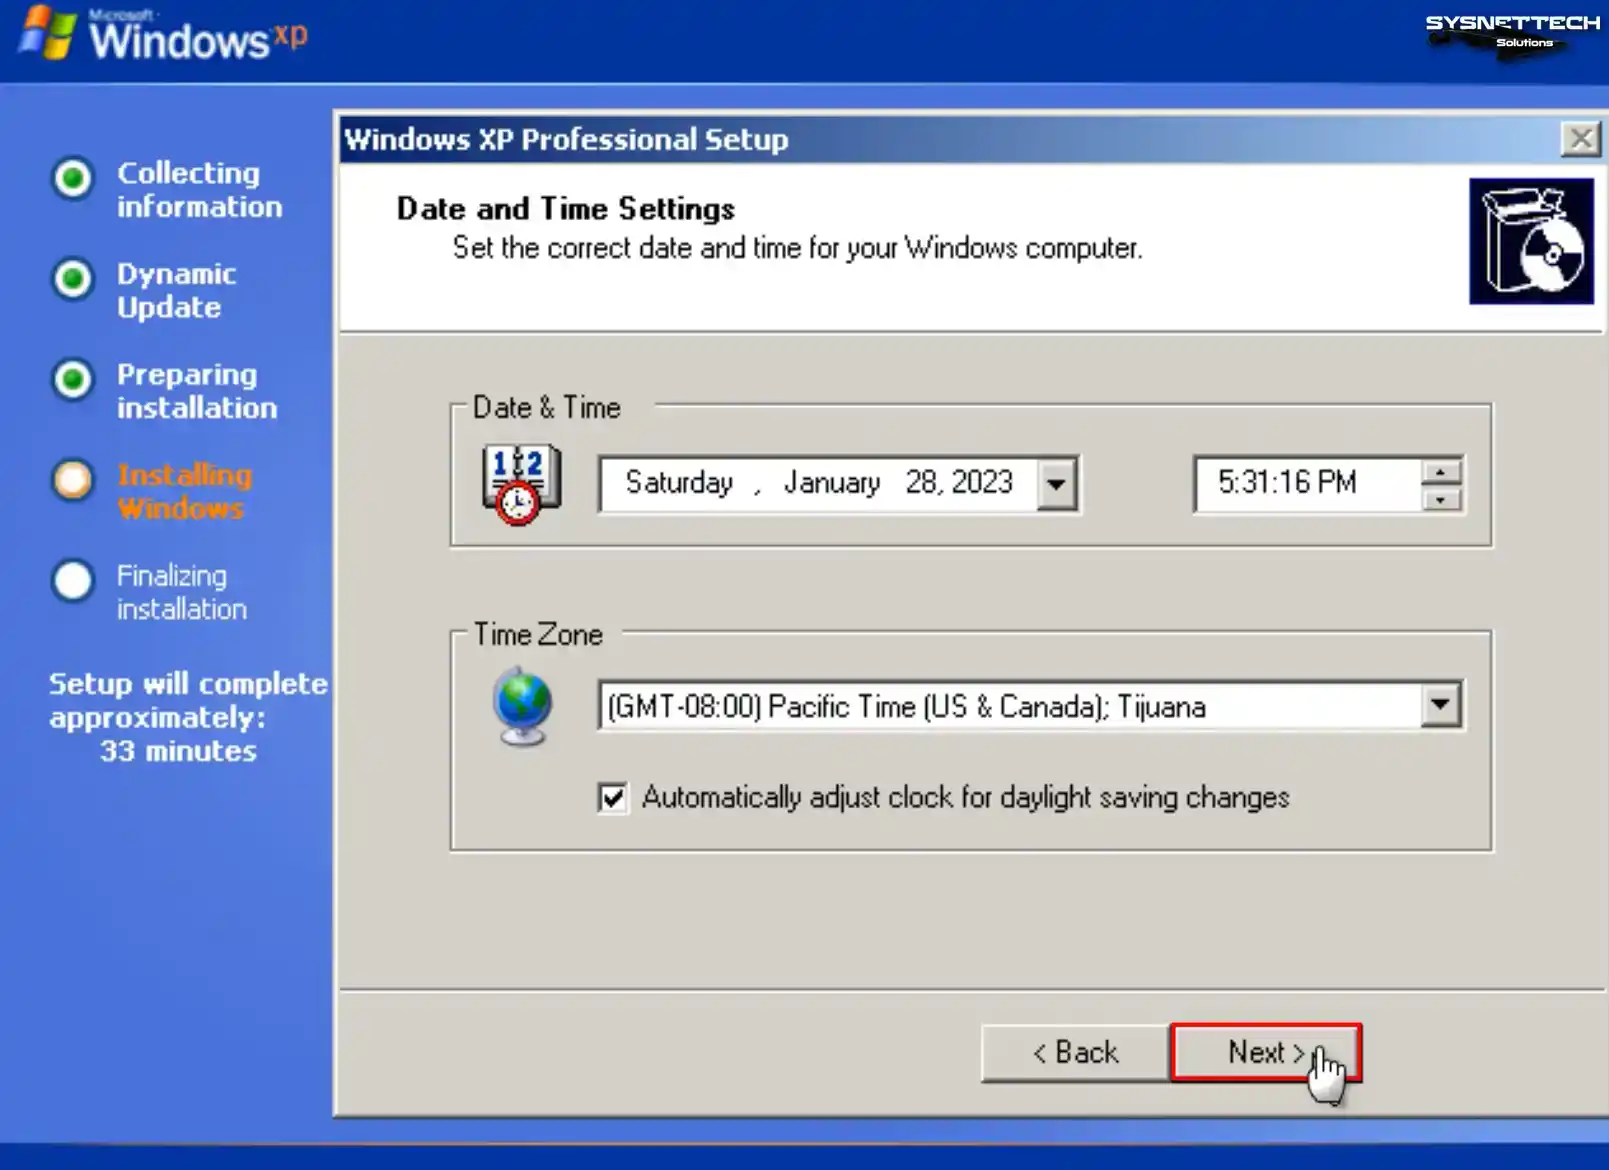
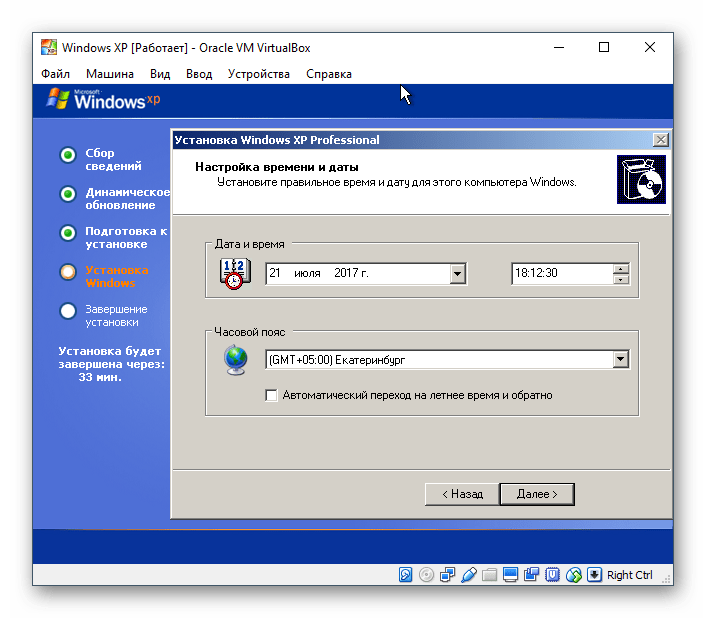
Configure your virtual computer’s date, time, and time zone settings according to your location and click Next.
Step 15
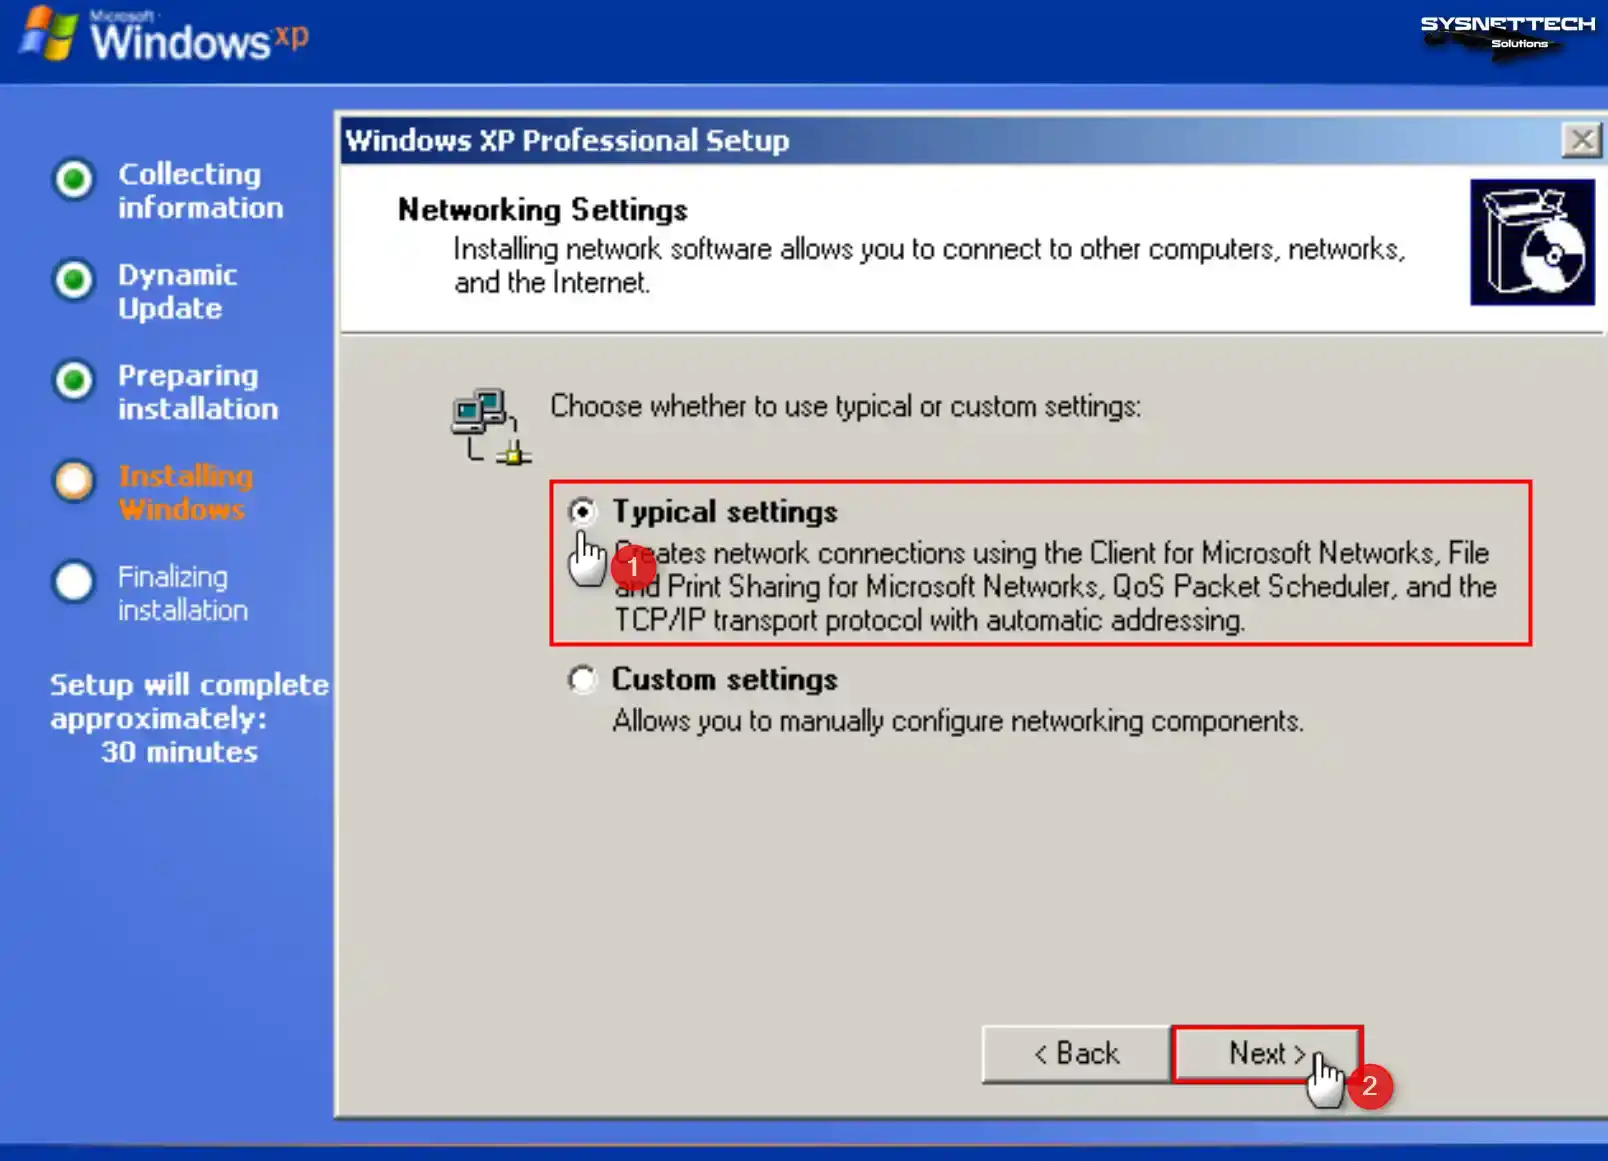
To use your VM in your physical network environment in the Networking Settings window, tick Custom Settings and make the relevant settings. You can also continue the installation by selecting Typical Settings in general.
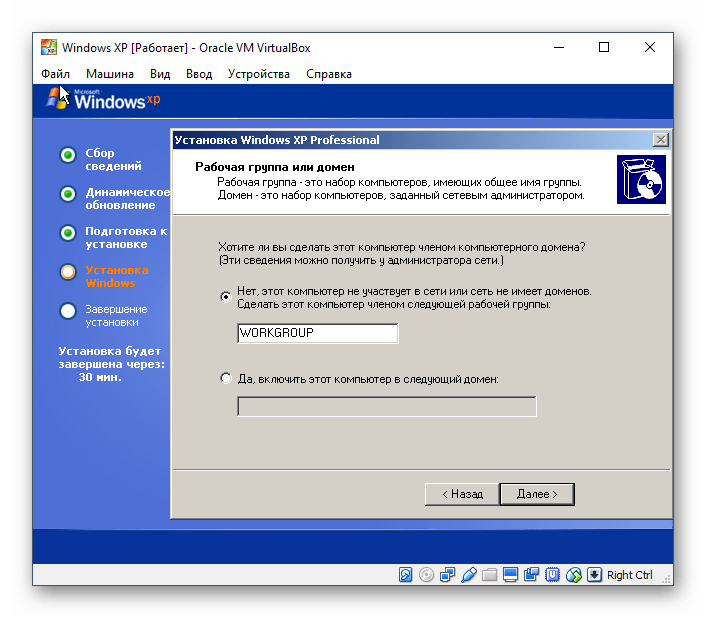
Step 16
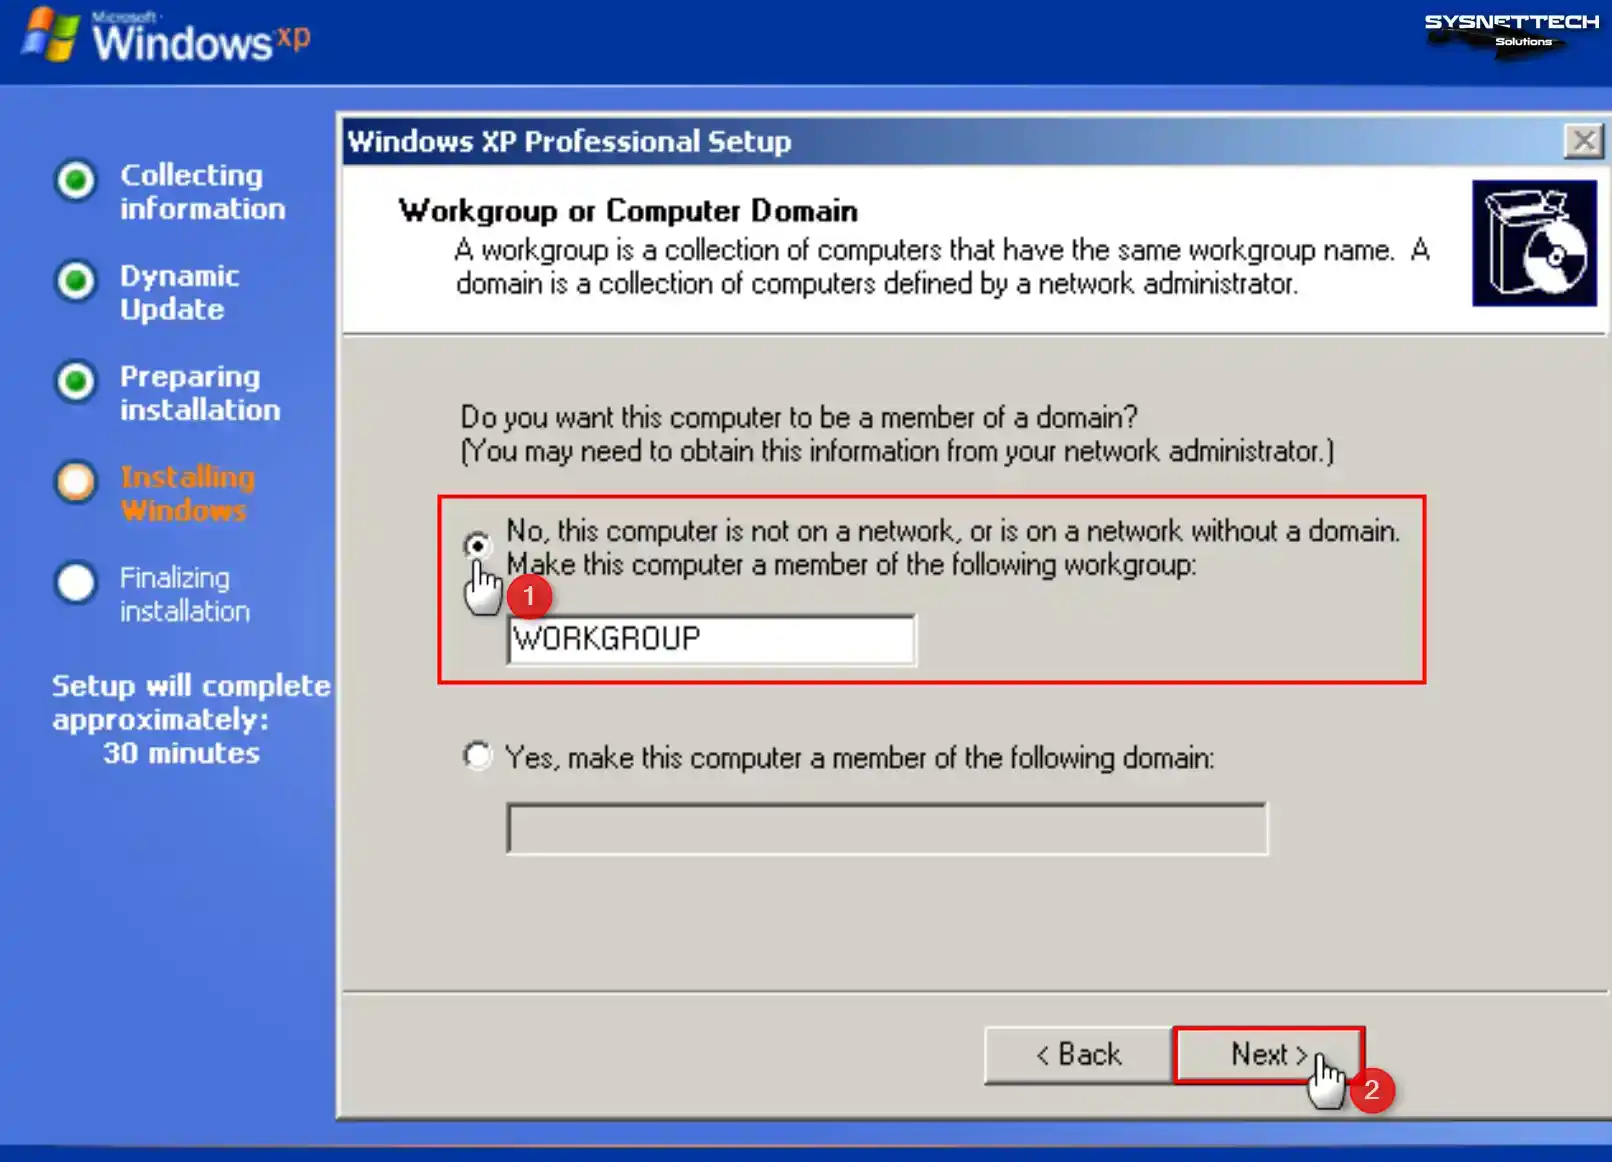
According to your network structure, if you make the virtual machine a member of a Domain environment that provides an Active Directory service, you must select the Yes option and type your Domain information.
To use your VM for personal use without subscribing to a Domain environment, select WORKGROUP and click Next.
Step 17
Wait while Windows XP is installed on the guest machine.

Step 18
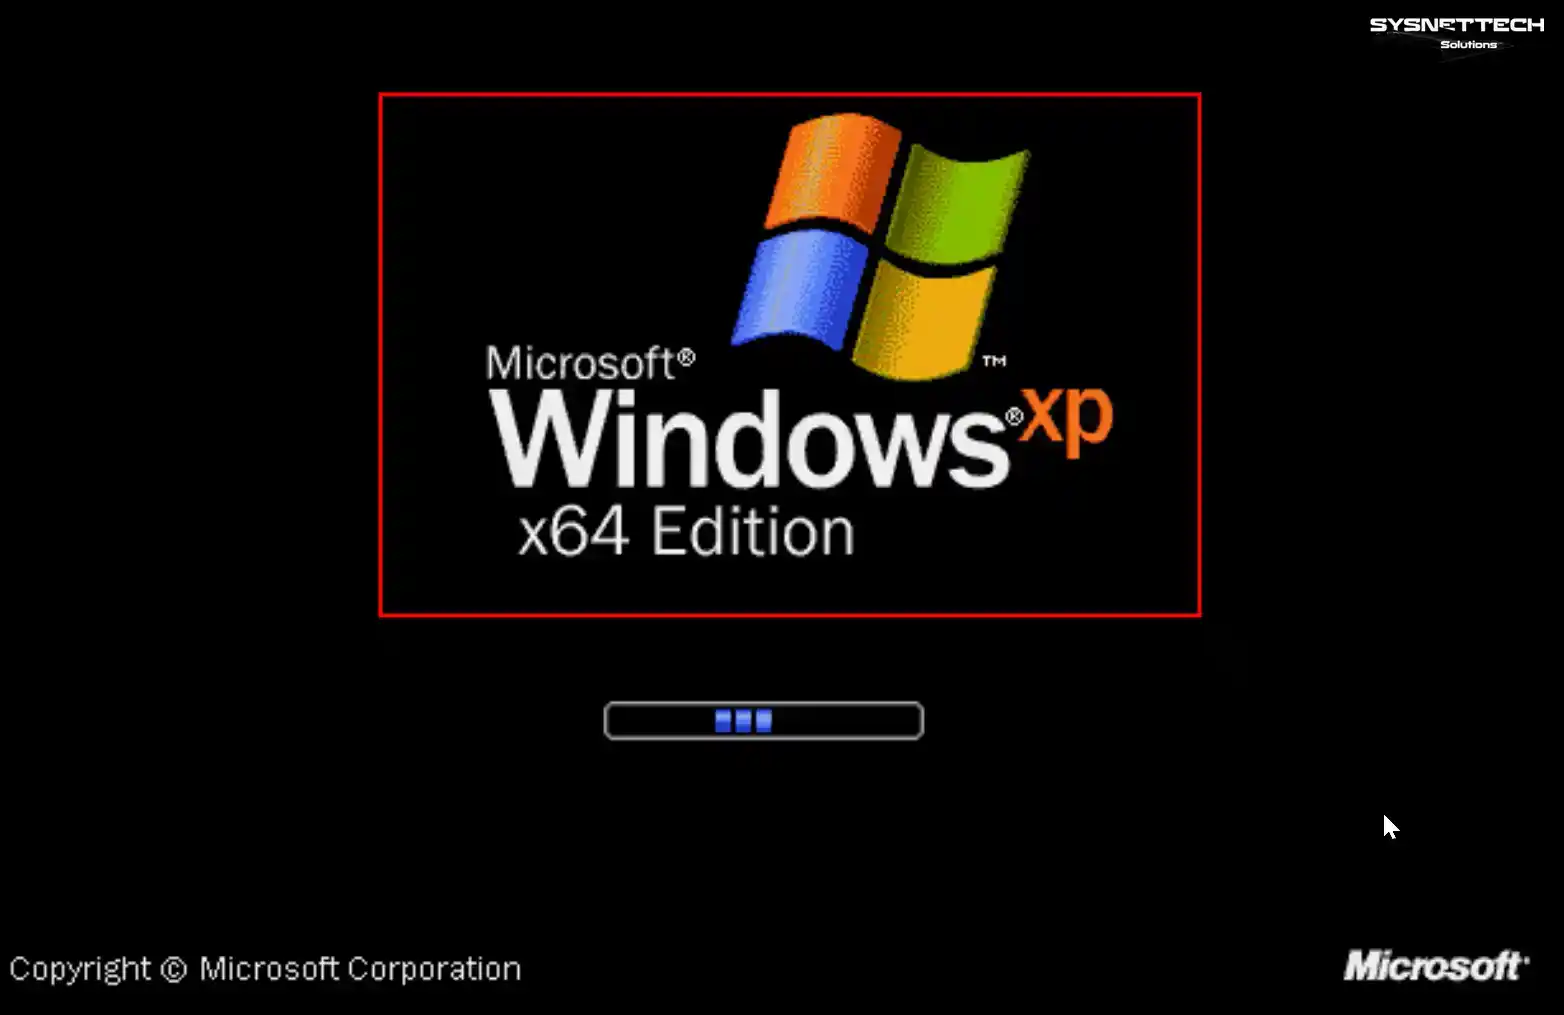
Wait while the Microsoft Windows XP x64 operating system boots up.
Step 19
After the Windows XP system files are copied, your system will reboot, and your desktop environment will be ready.
Step 20
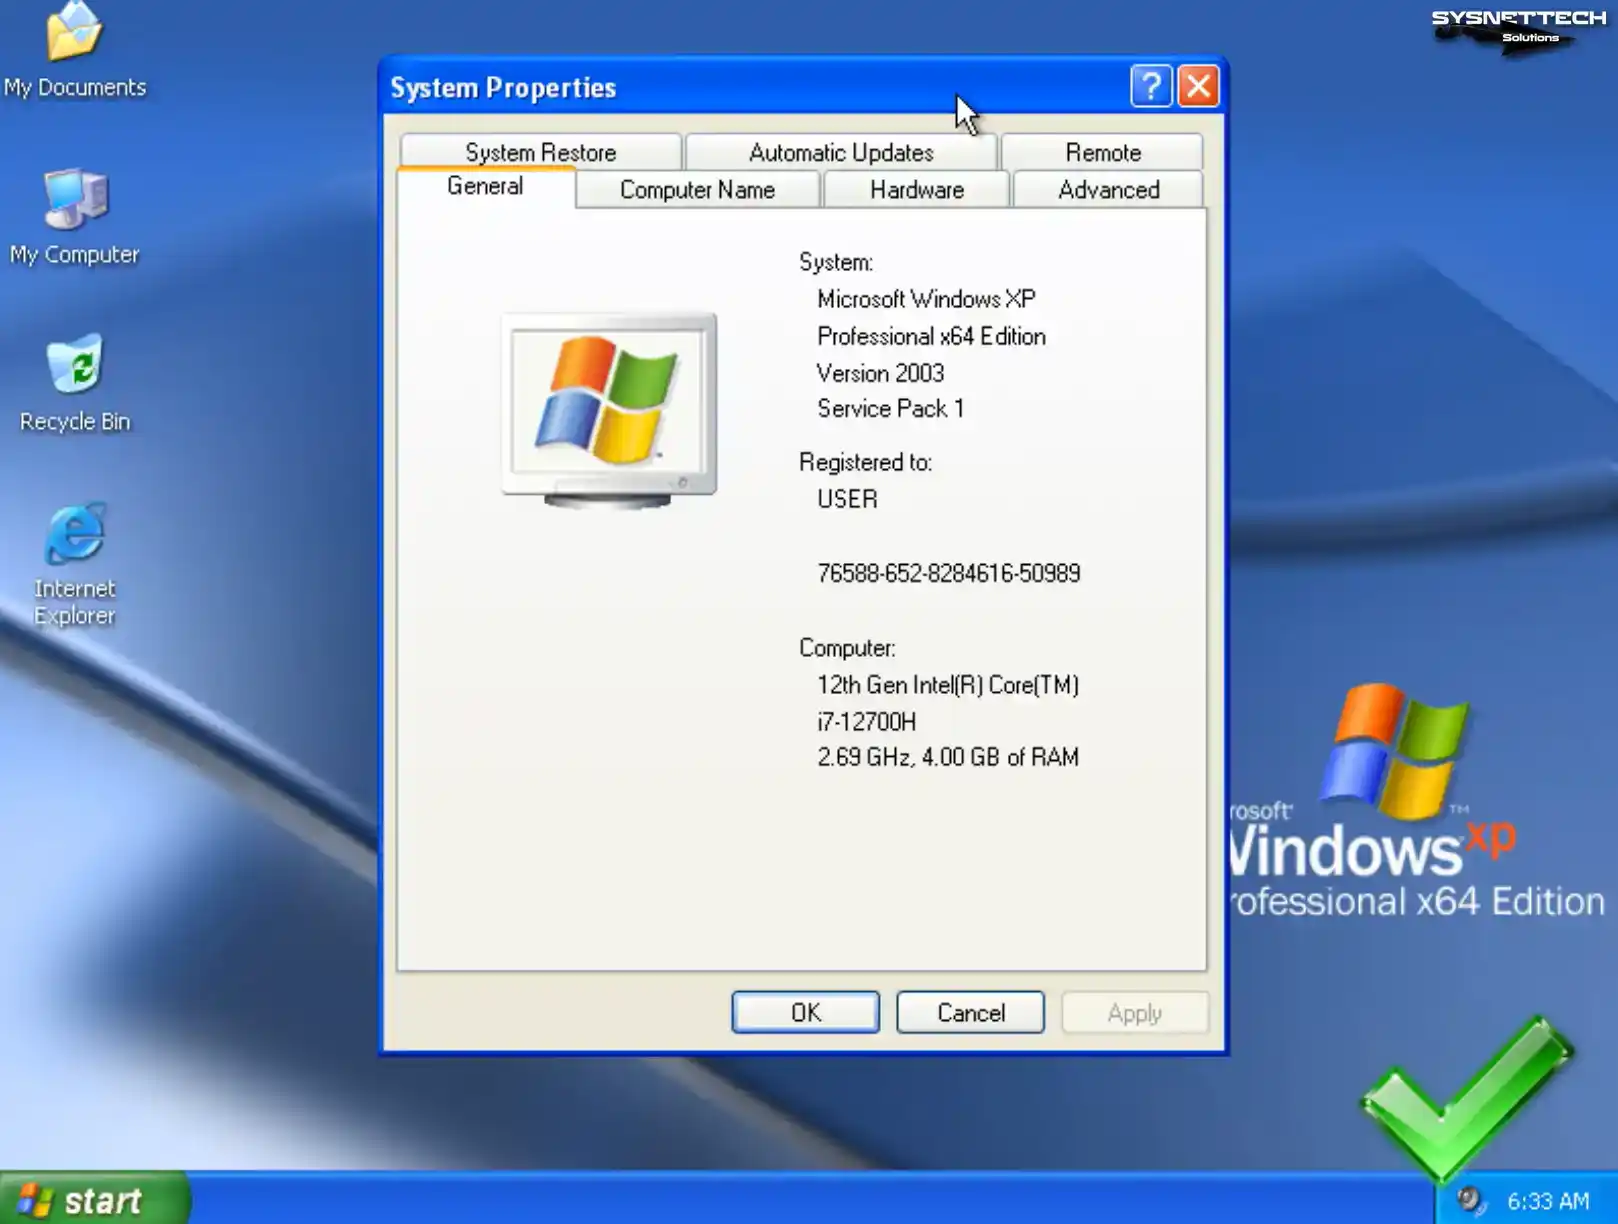
Right-click on My Computer, then click System Properties from the options that appear, and check the system information.
How to Install Guest Additions in Windows XP
After installing Windows XP within the virtual machine, it is essential to install Guest Additions to unlock various functionalities. These include achieving full-screen resolution, facilitating file transfer between the host and the VM, and enabling the utilization of the host computer’s hardware within the VM.
Step 1
To view the Computer Management window, right-click the My Computer icon and select Manage. Once the window appears, navigate to Device Manager and review the drivers that are not installed on your system.
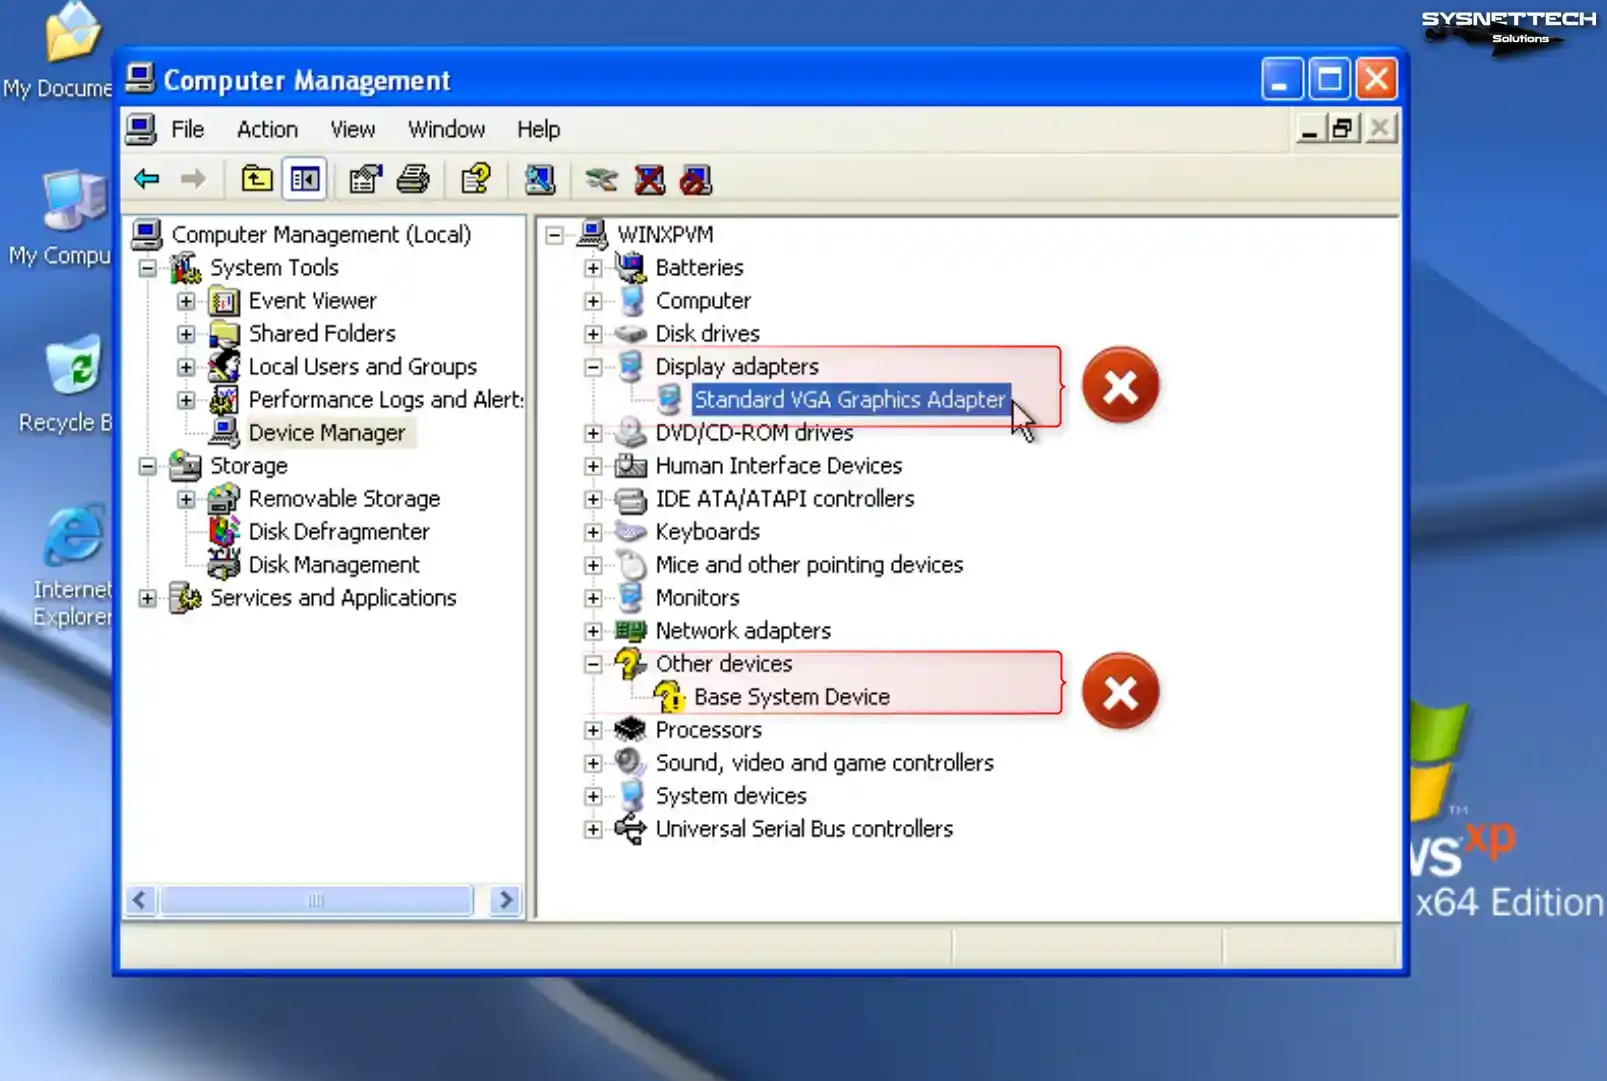
Step 2
Under normal circumstances, when installing Guest Additions on Windows XP, you will encounter an Unsigned Driver warning. This is not an error, but the driver for some devices cannot be fully installed.
To overcome the barrier imposed by unsigned drivers, you must modify a setting in the Group Policy settings. To continue, access the Start menu, enter “gpedit.msc” in the designated text box, and proceed by clicking OK.
When the Group Policy Object Editor is accessed, go to Windows Settings > Security Settings > Local Policies > Security Options and click “Devices: Unsigned driver installation behavior” from the options under Security Options.
Change the Devices: Unsigned driver installation behavior setting to Silently Succeed, and restart your virtual computer after clicking OK.

Step 3
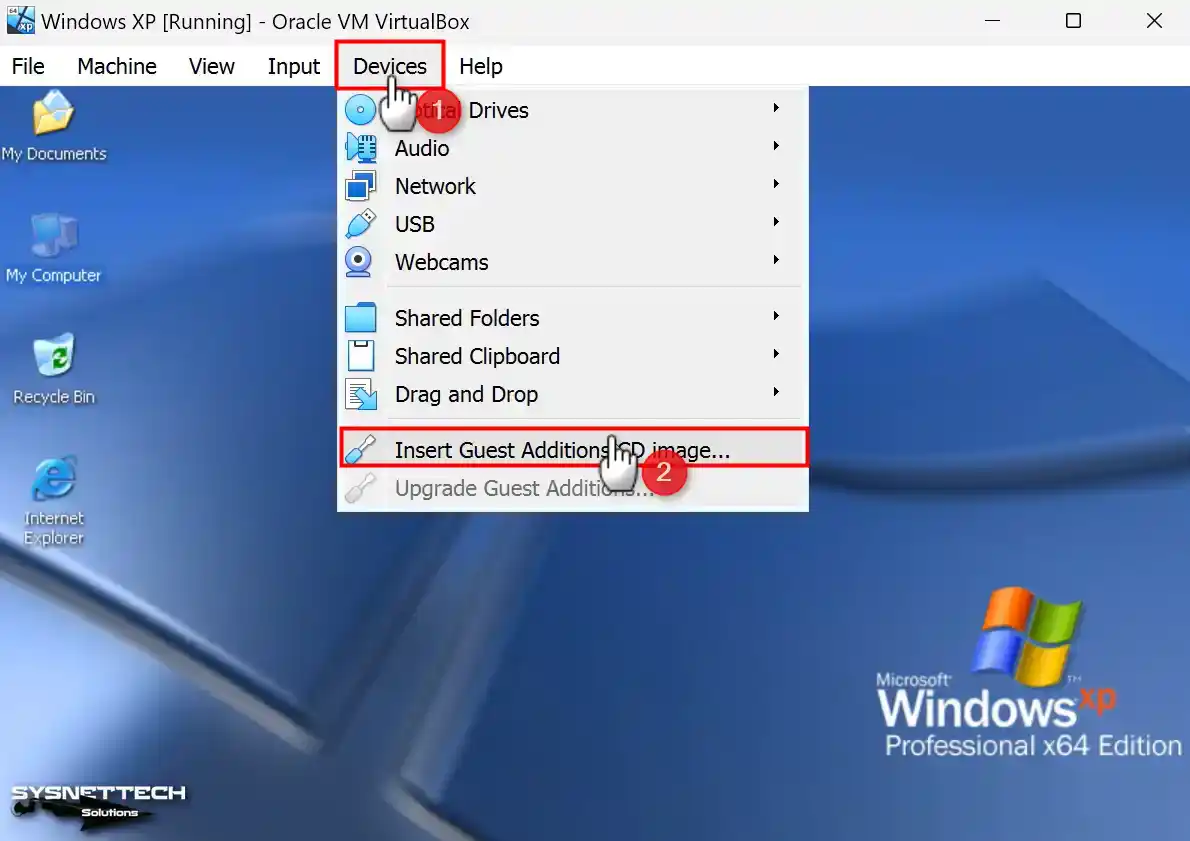
After your guest system is turned on, click Devices / Insert Guest Additions CD Image to install the guest add-ons software.
Step 4
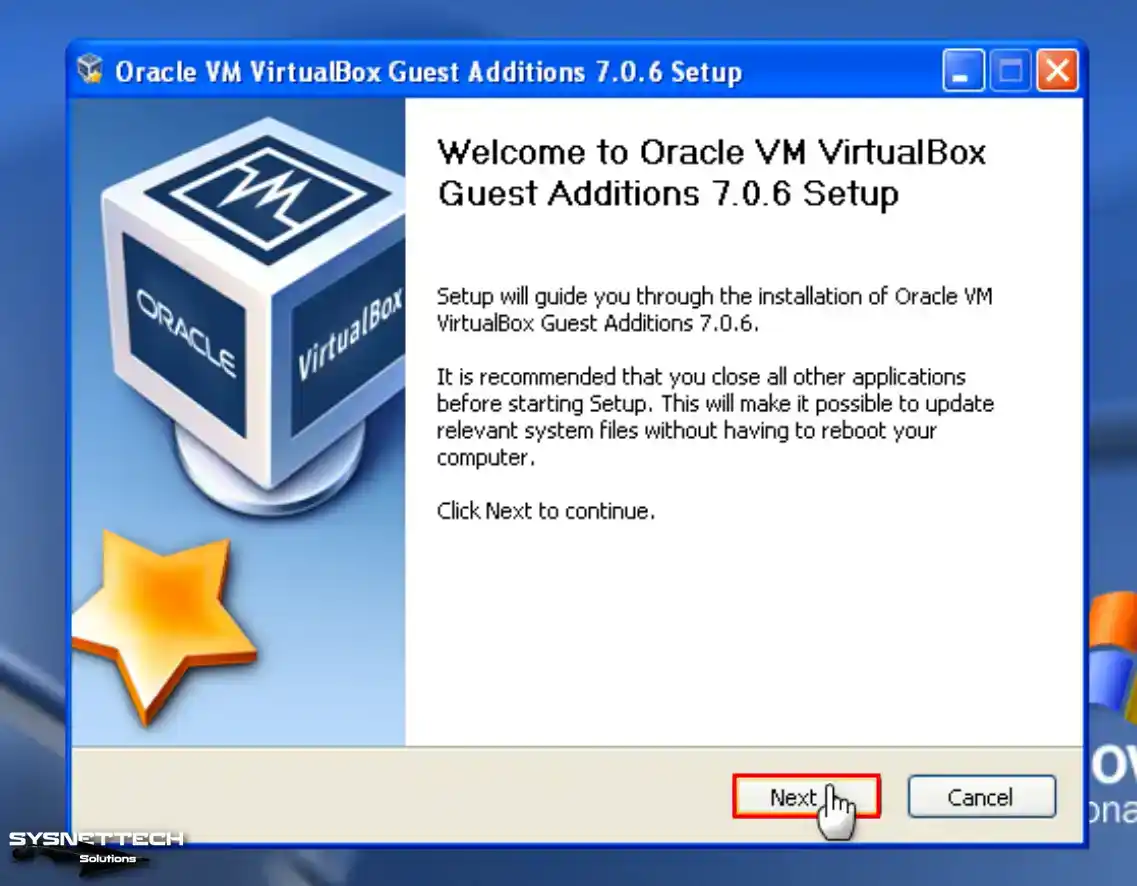
When the Guest Additions installation wizard starts, click Next to continue.
Step 5
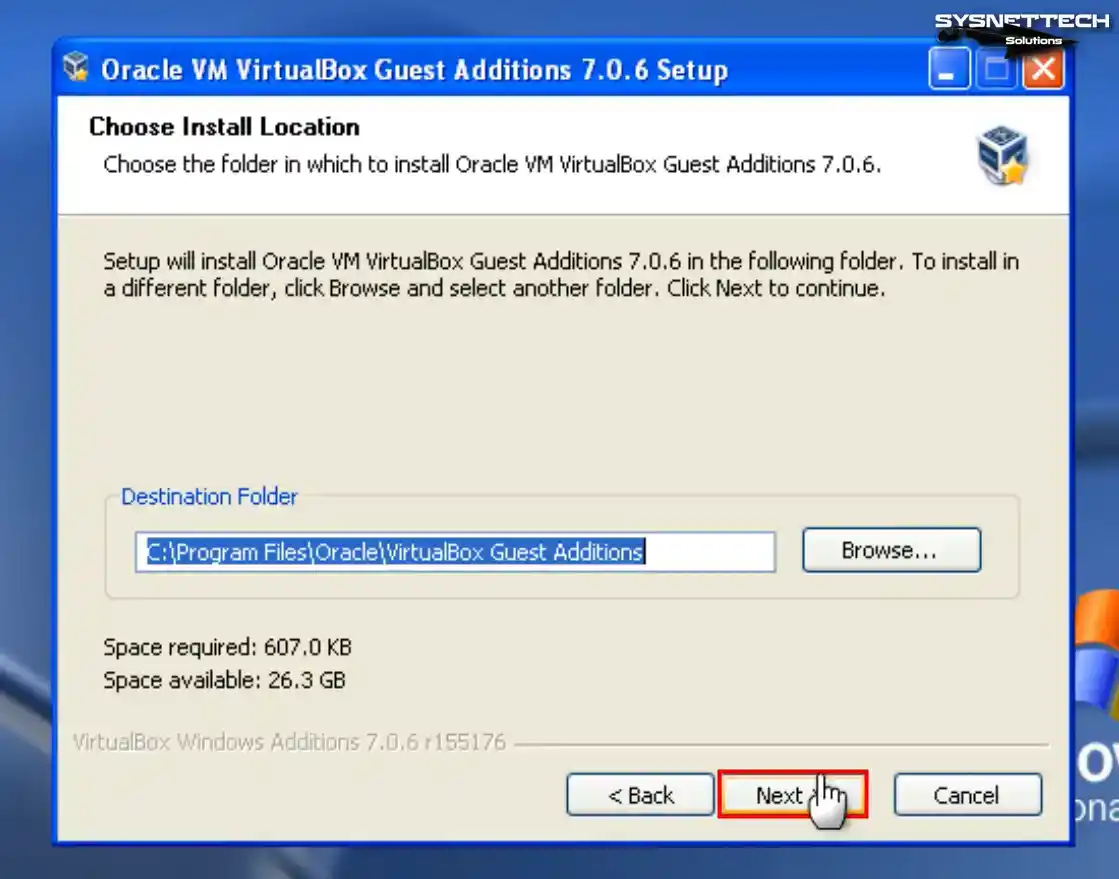
Continue without changing the installation location of the guest add-on software.
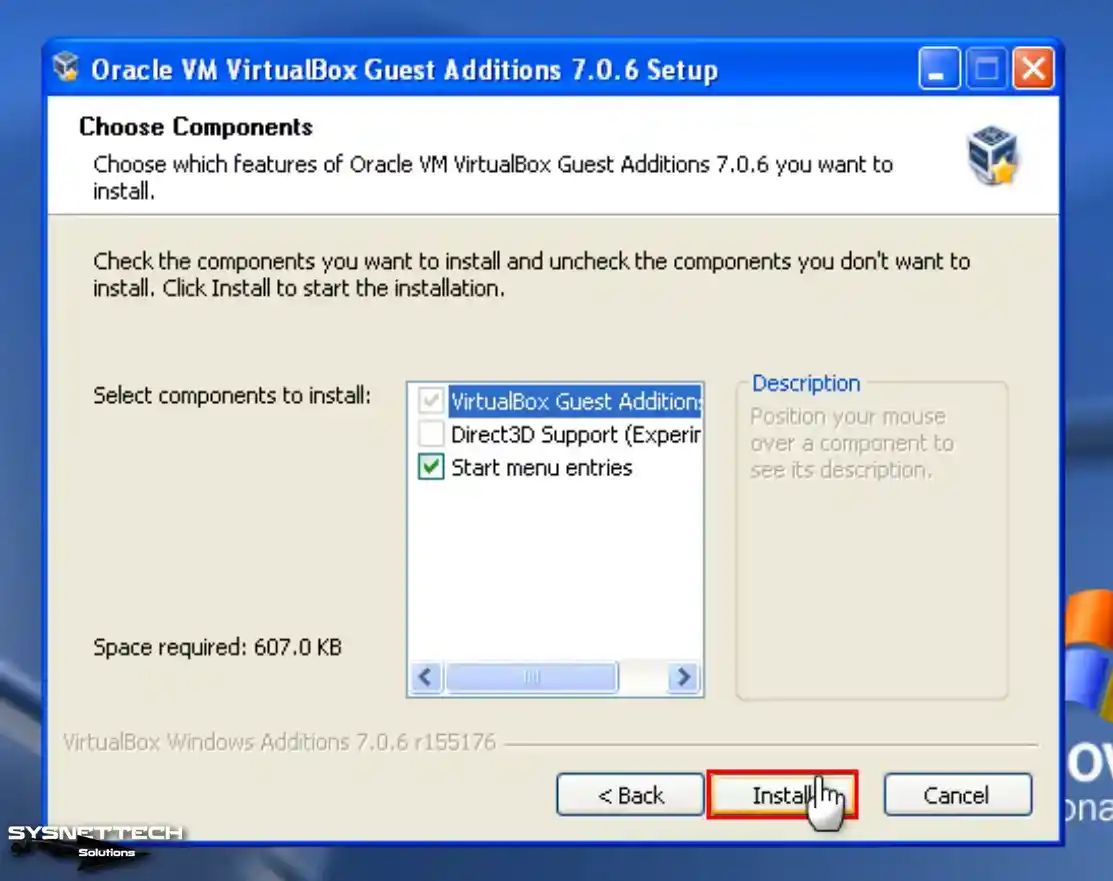
Step 6
You can see that Direct3D Support is not enabled in the Choose Components window of the setup wizard. Direct3D support for older operating systems has been discontinued in version 6.1 of VirtualBox. Therefore, installing the 6.0 version of VirtualBox is imperative to utilize this feature.
Step 7
After installing the tools of your guest system, restart your system.
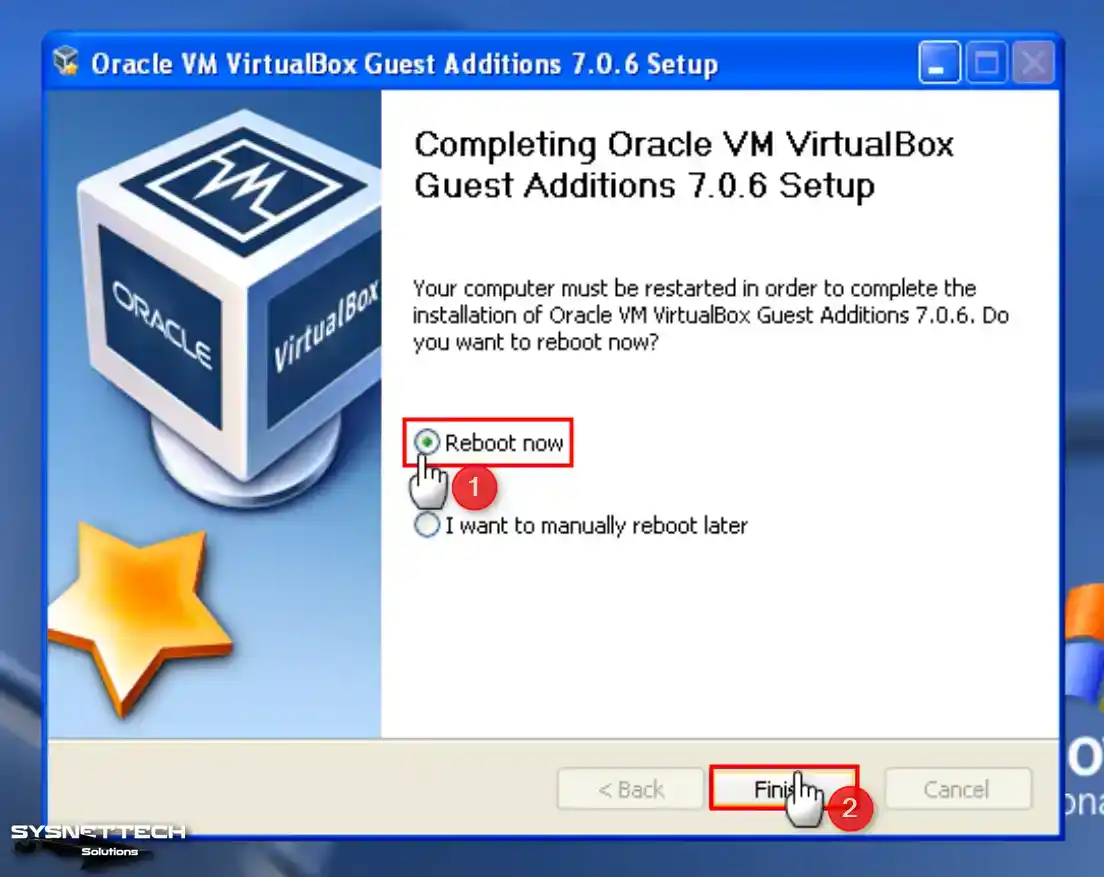
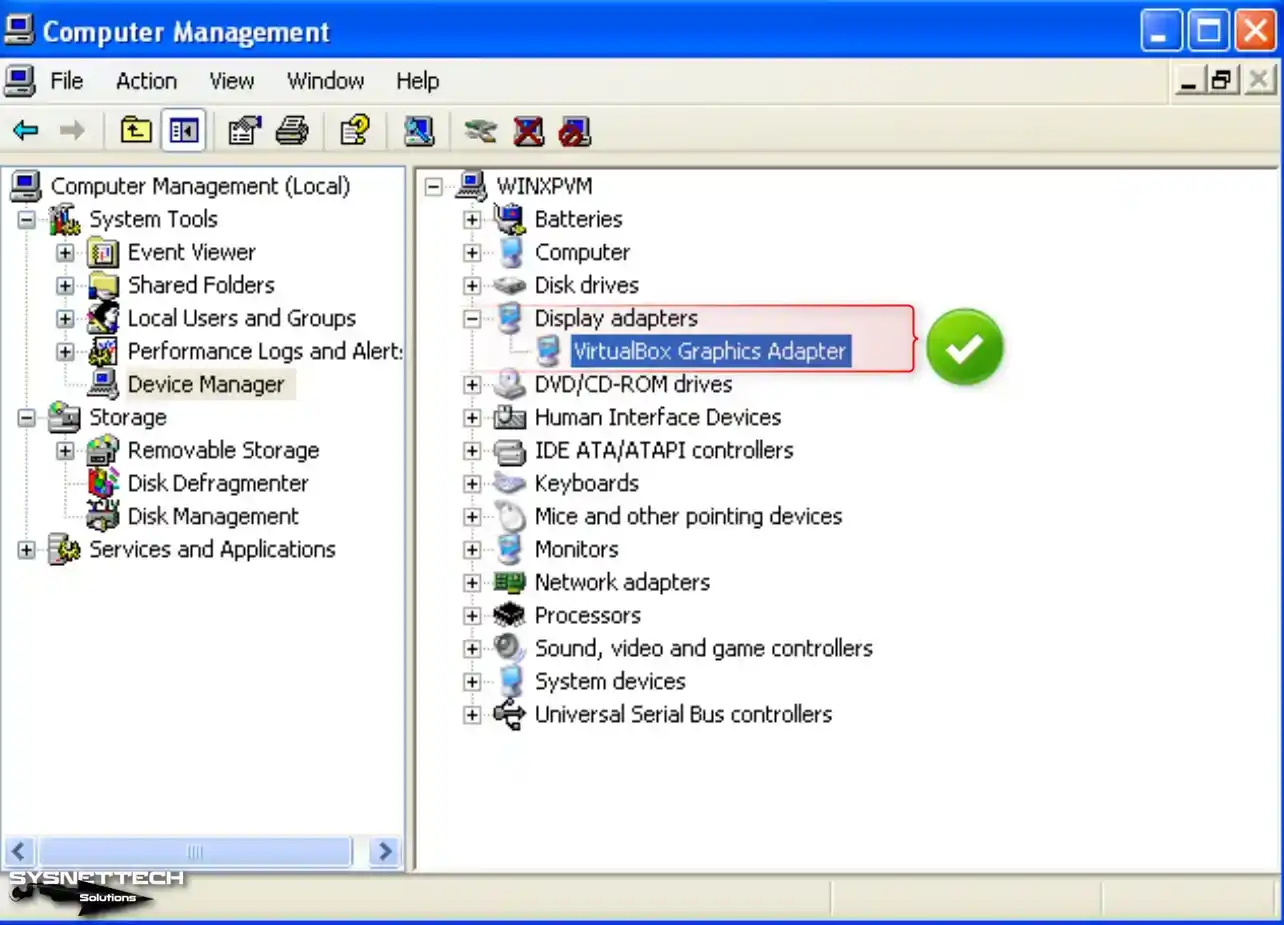
Step 8
After restarting your VM, view Device Manager again; you can see all drivers installed successfully.
Step 9
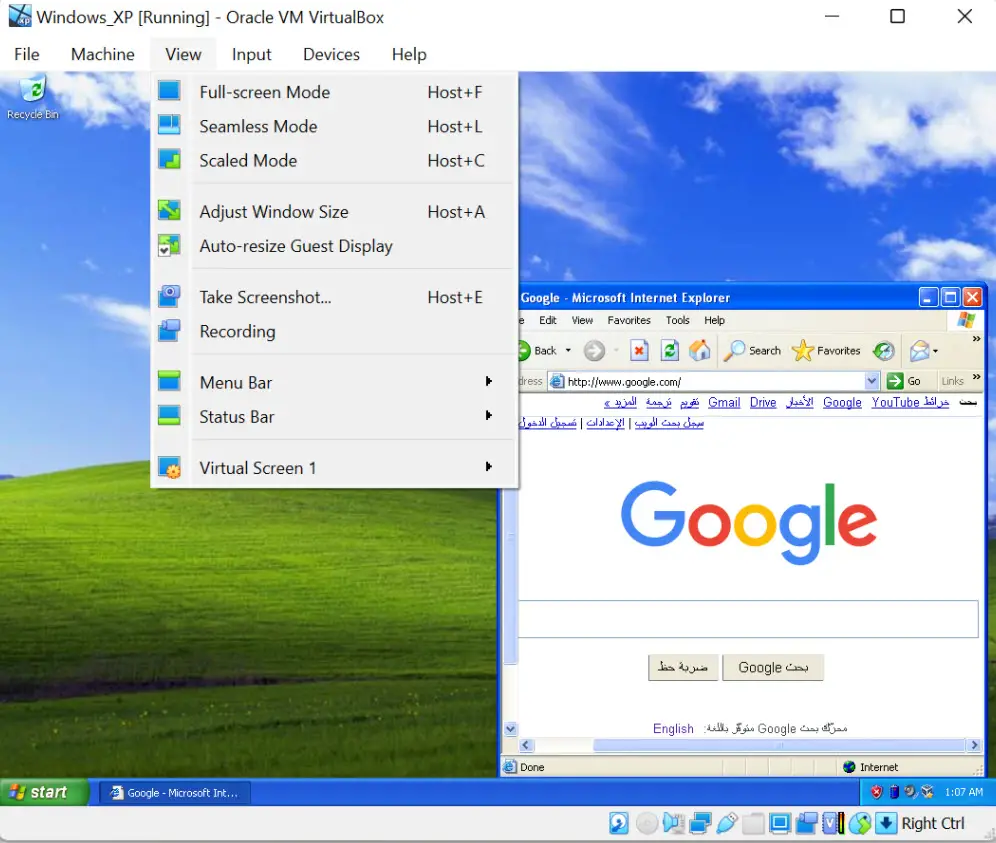
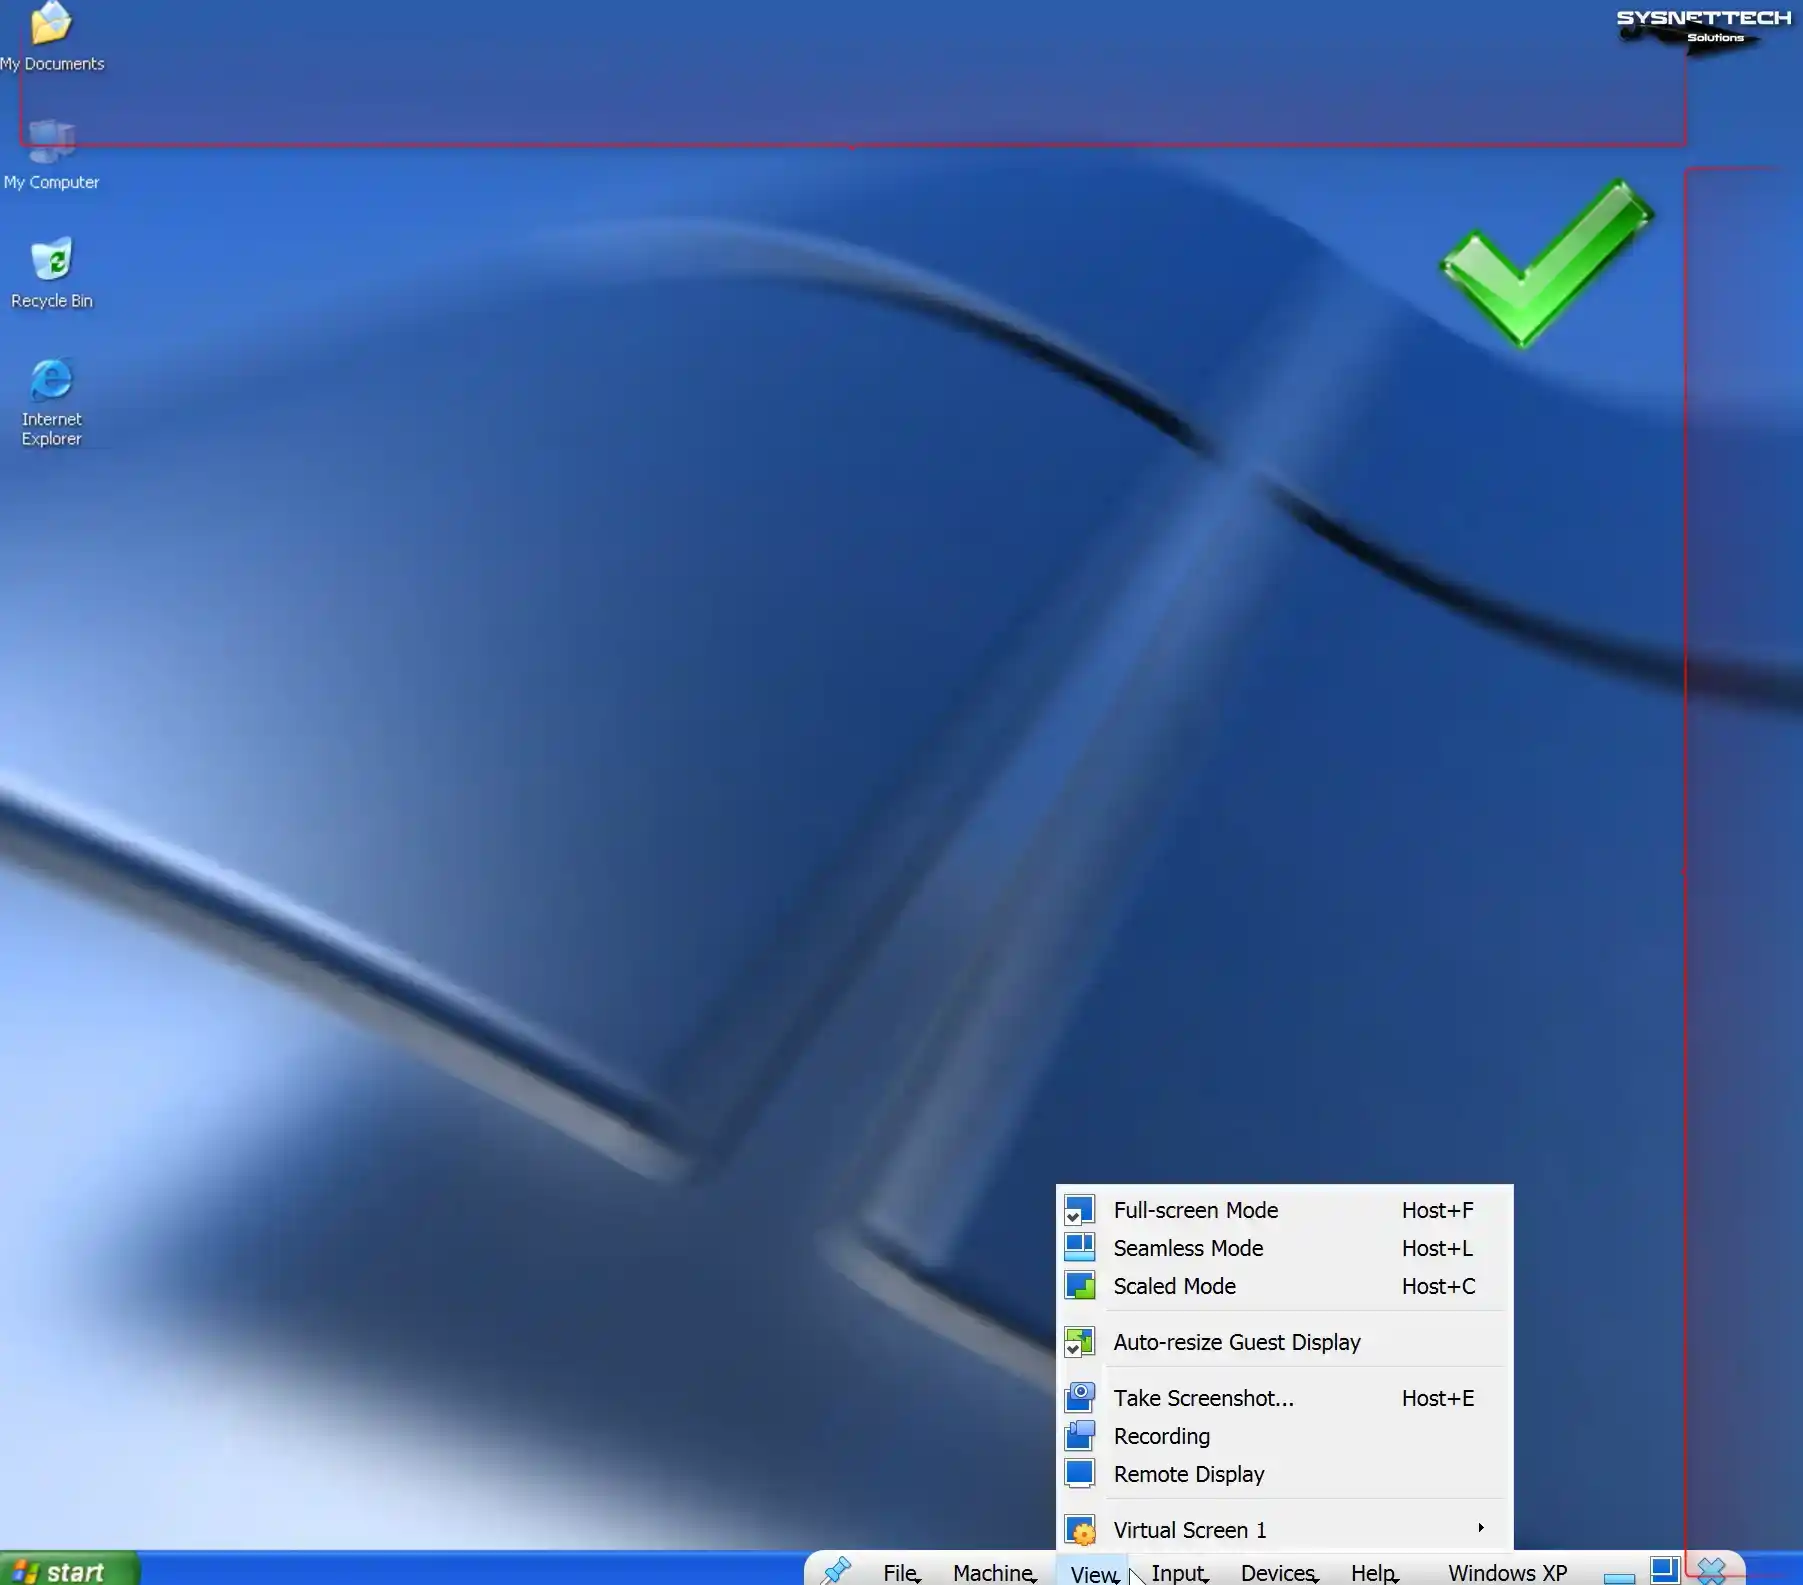
You can use your virtual machine in full-screen resolution or scaled mode with the options in the View tab from the tool menu of VirtualBox.
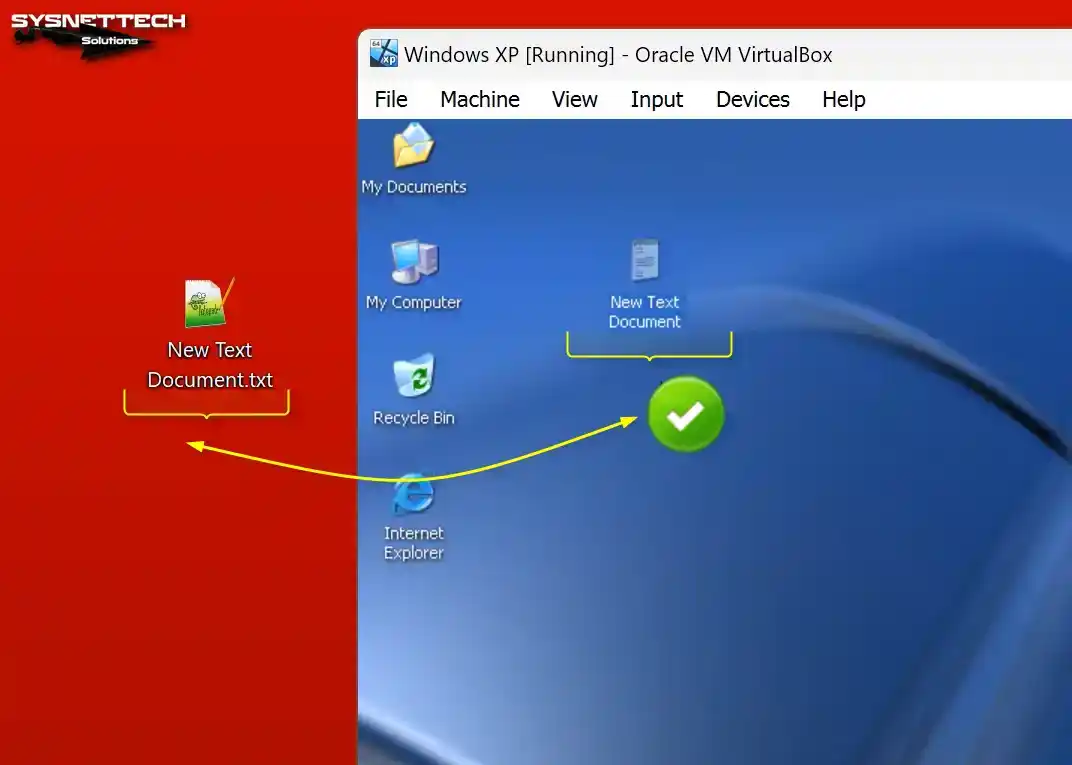
Step 10
When employing the drag-and-drop method, you will observe the successful transfer of a text document from the desktop of your host computer to your virtual computer.
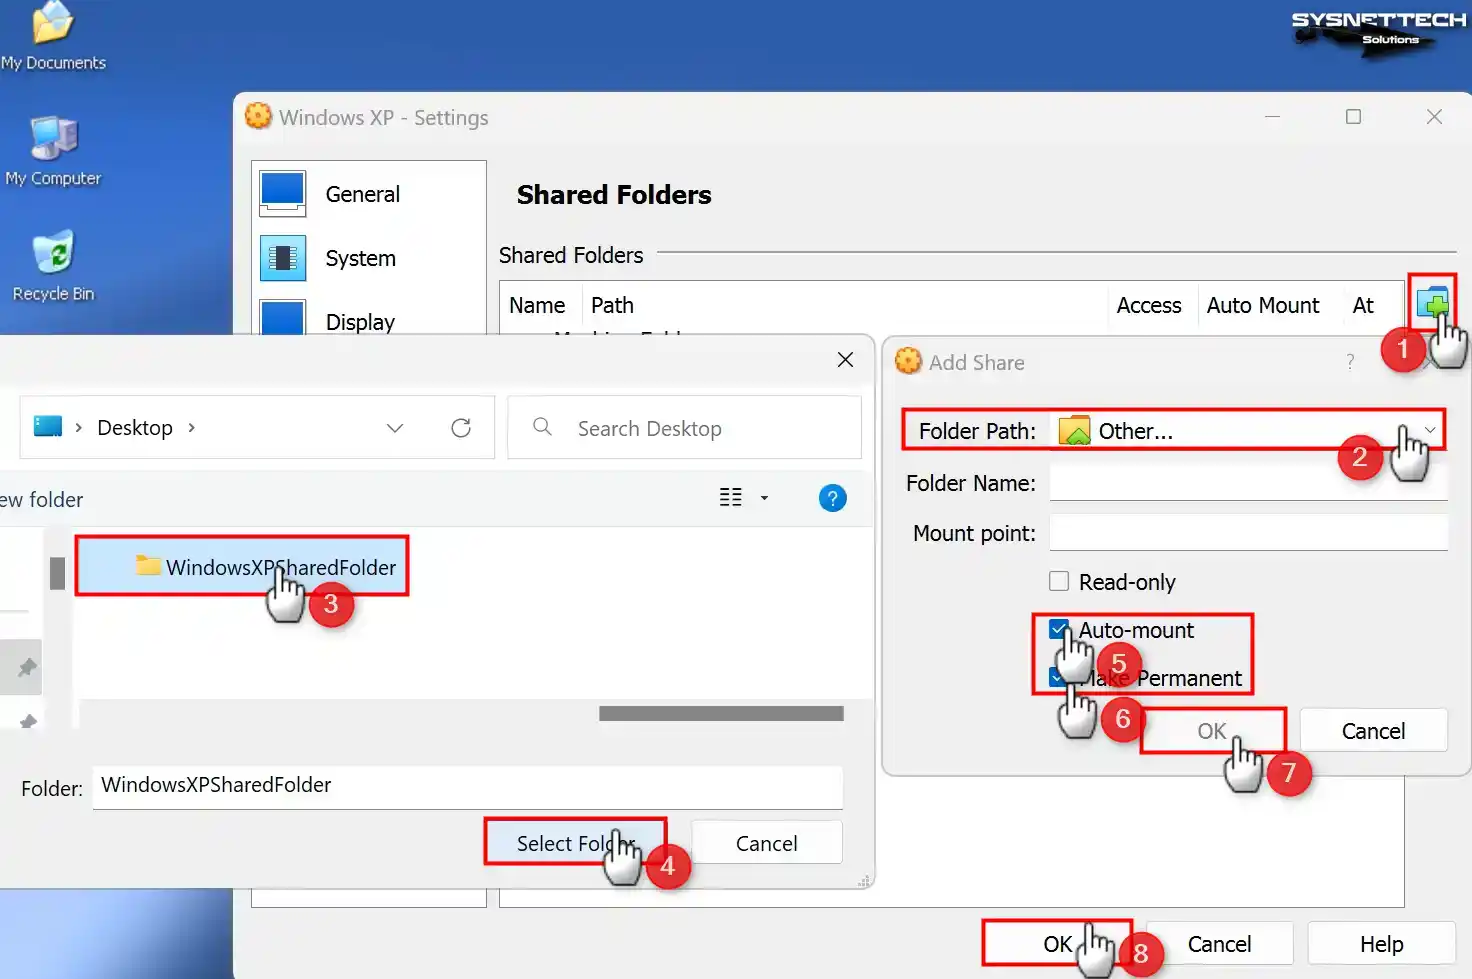
How to Configure a Shared Folder
Unfortunately, folder copying to the virtual machine fails on old systems. Before copying a folder, you must archive it using WinRAR or 7-Zip and then copy it to the VM.
Since it takes time to archive a folder with larger file sizes, you can transfer data faster by creating a public folder for your VM on your host computer and configuring the Shared Folder.
Step 1
Click Devices / Shared Folders / Shared Folders Settings on your Windows XP virtual PC.

Step 2
Click the green + button in Shared Folders settings and open the Add Share window. Specify the folder you created on your host PC in the Folder Path section.
Check the Auto-Mount and Make Permanent options and click OK to add the shared folder as a network drive.
Step 3
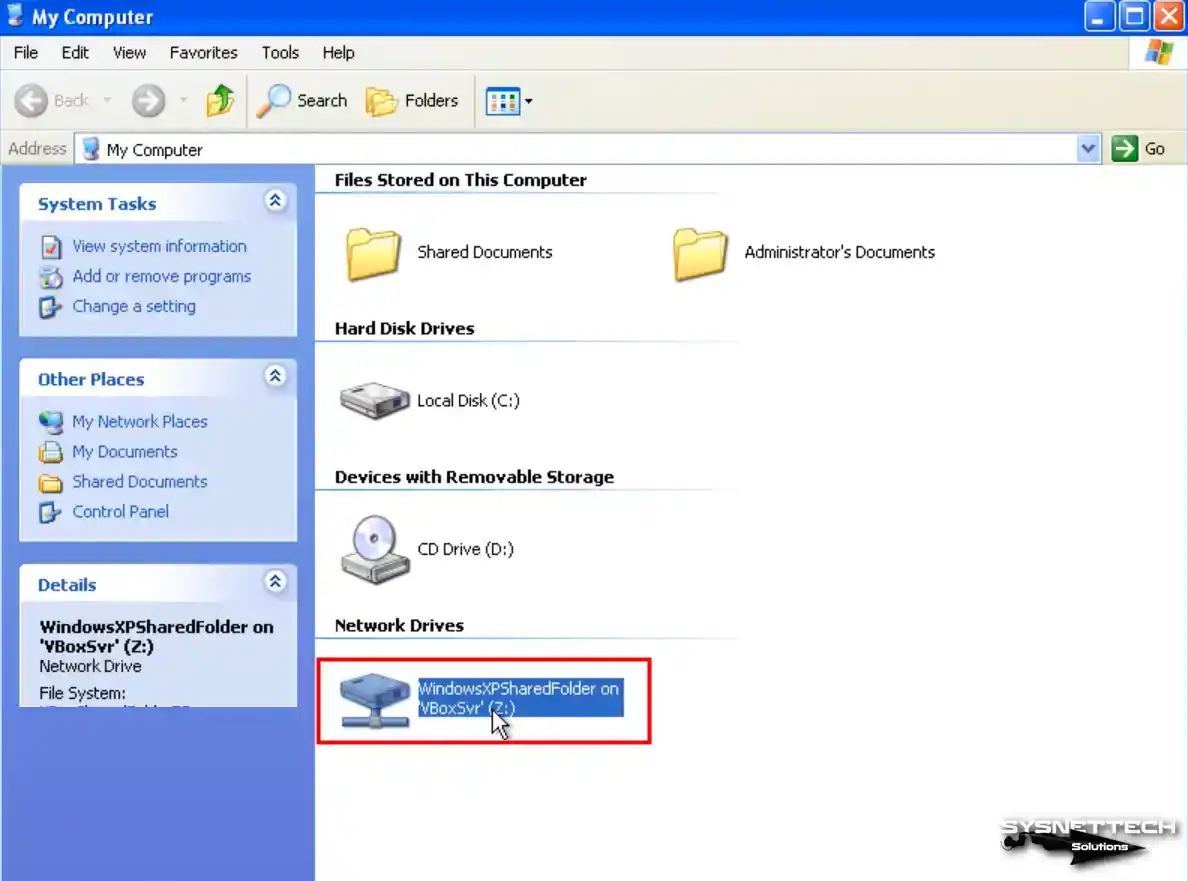
Upon opening the My Computer window, you will notice the inclusion of the Shared Folder as a network drive.
After viewing the network connections, switch to the Folder structure and click Entire Network / VirtualBox Shared Folders on the left. You can see that you can approach the folder on the host over the network.
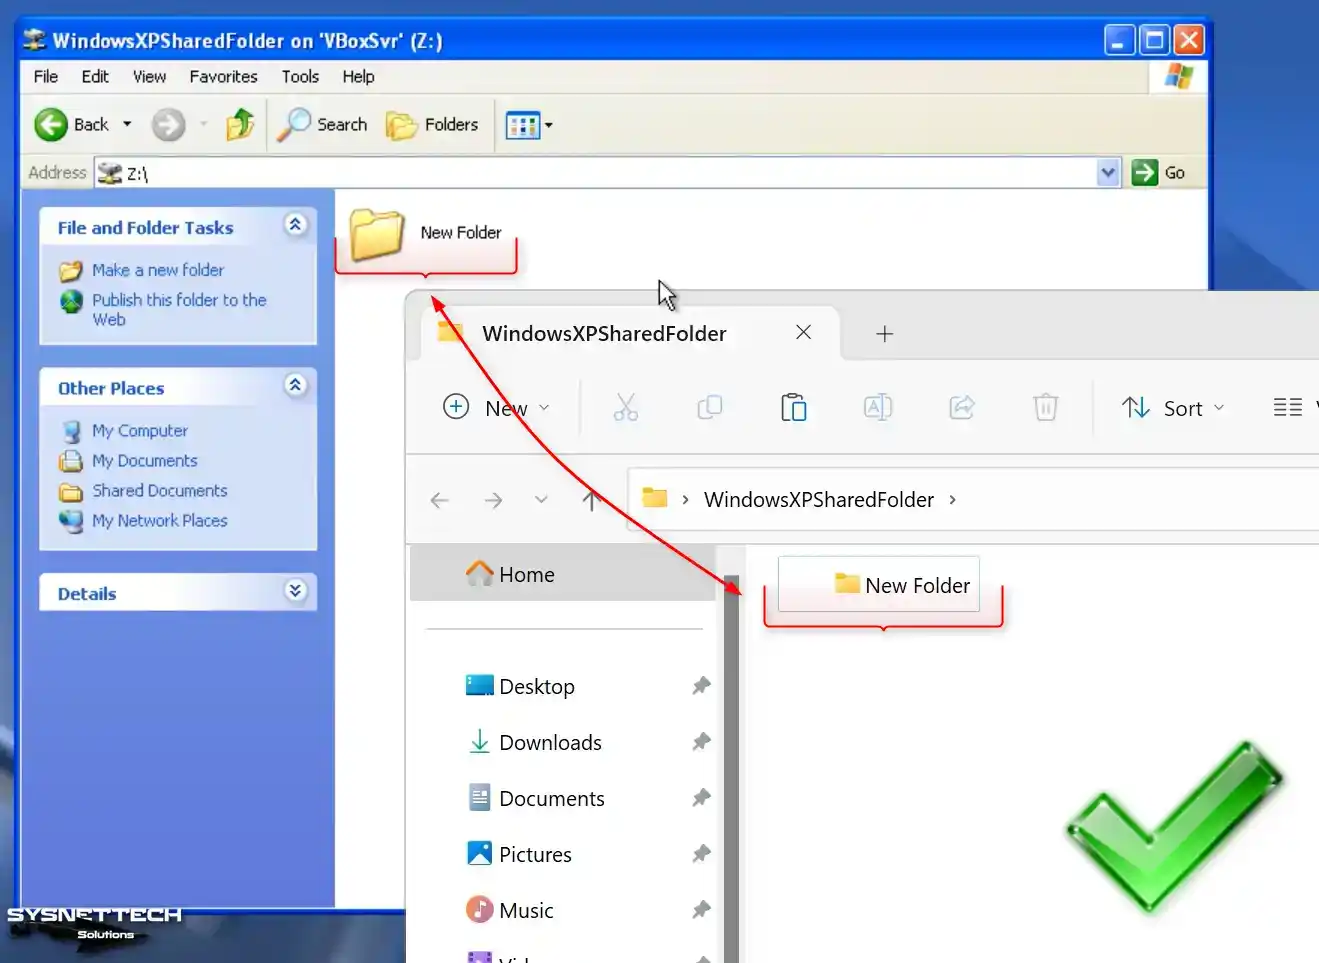
Step 4
Create a folder in the shared folder on your host system and check that this folder is created simultaneously in your VM.
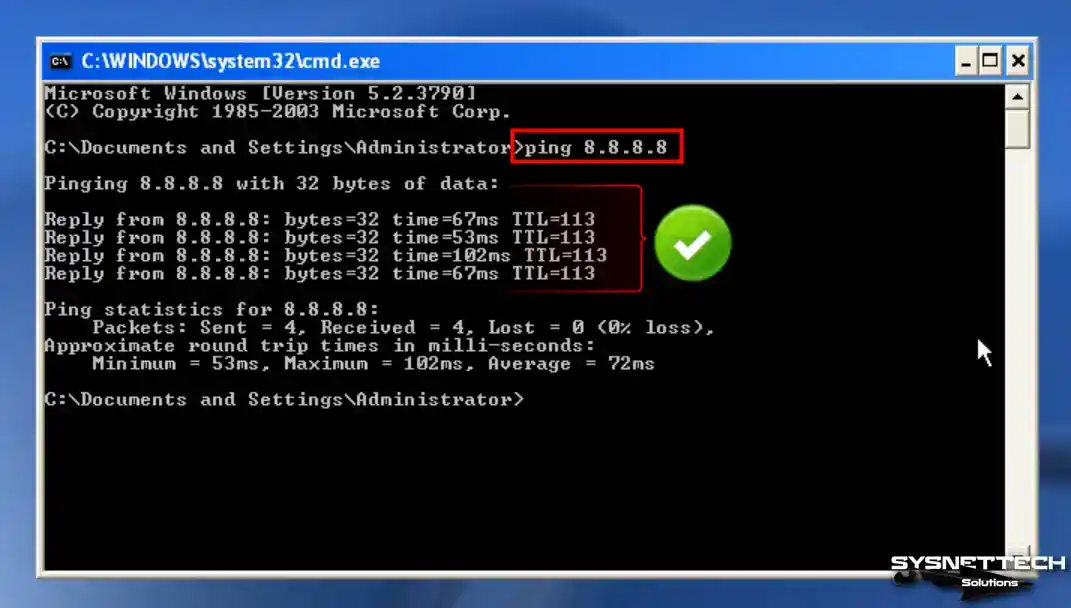
How to Check Internet Connection in Windows XP VM
Network and Internet connection settings are automatically configured after installing a virtual system with Oracle VM VirtualBox or other virtualization software. If the services of your virtualization software become corrupted, you may encounter difficulties in accessing the Internet.
Network settings of Windows XP guest machines running on Oracle VM are configured with a NAT coupler by default, and a different block is created than the IP block you use in your existing network.
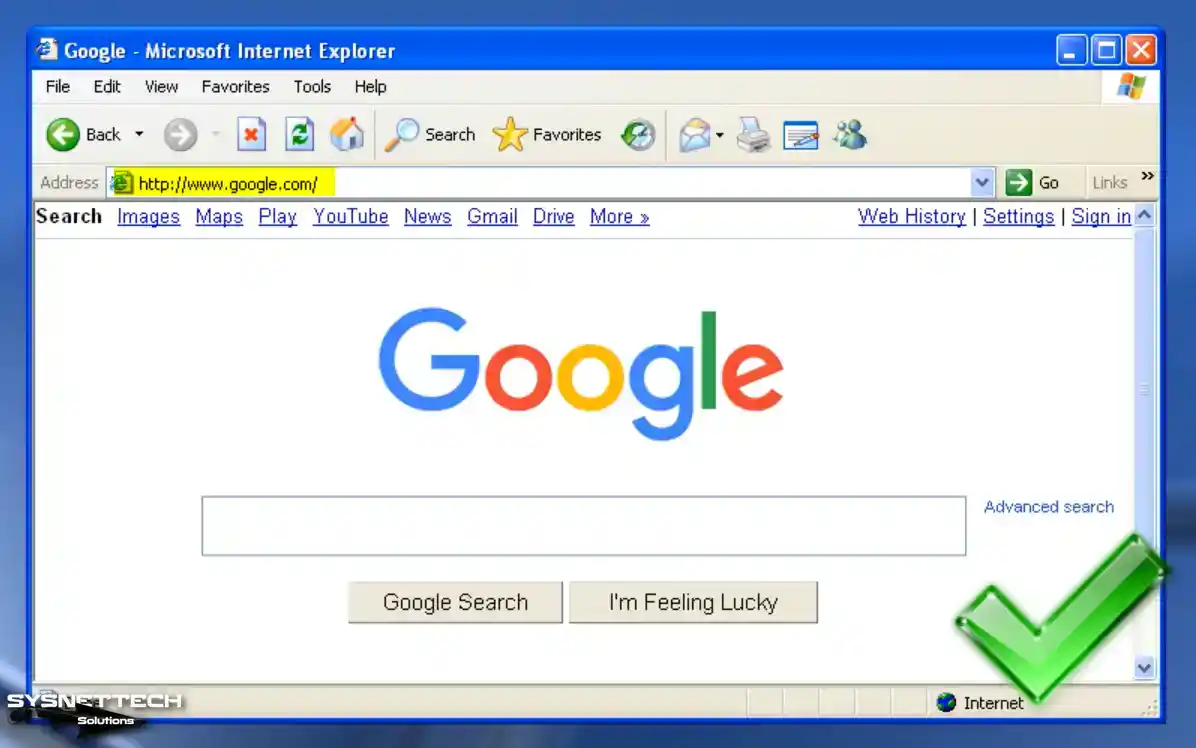
Step 1
Open Run and execute the CMD command to check if the Internet connection is working smoothly in your virtual system. After opening the CMD prompt, ping the Google servers using the ping 8.8.8.8 command.
Step 2
Once the ping test is successful, visit the Google homepage through the Internet Explorer browser to verify the health of your Internet connection.
How to Enable and Install USB 3.0 Driver
By default, enabling USB 3.0 support on a Windows XP virtual machine is not typically feasible. However, you can resolve this issue by substituting the USB controller. While USB 2.0 devices can be operated in the virtual machine without problems, enabling 3.0 or 3.1 supports faster file transfers using the more advanced technology.
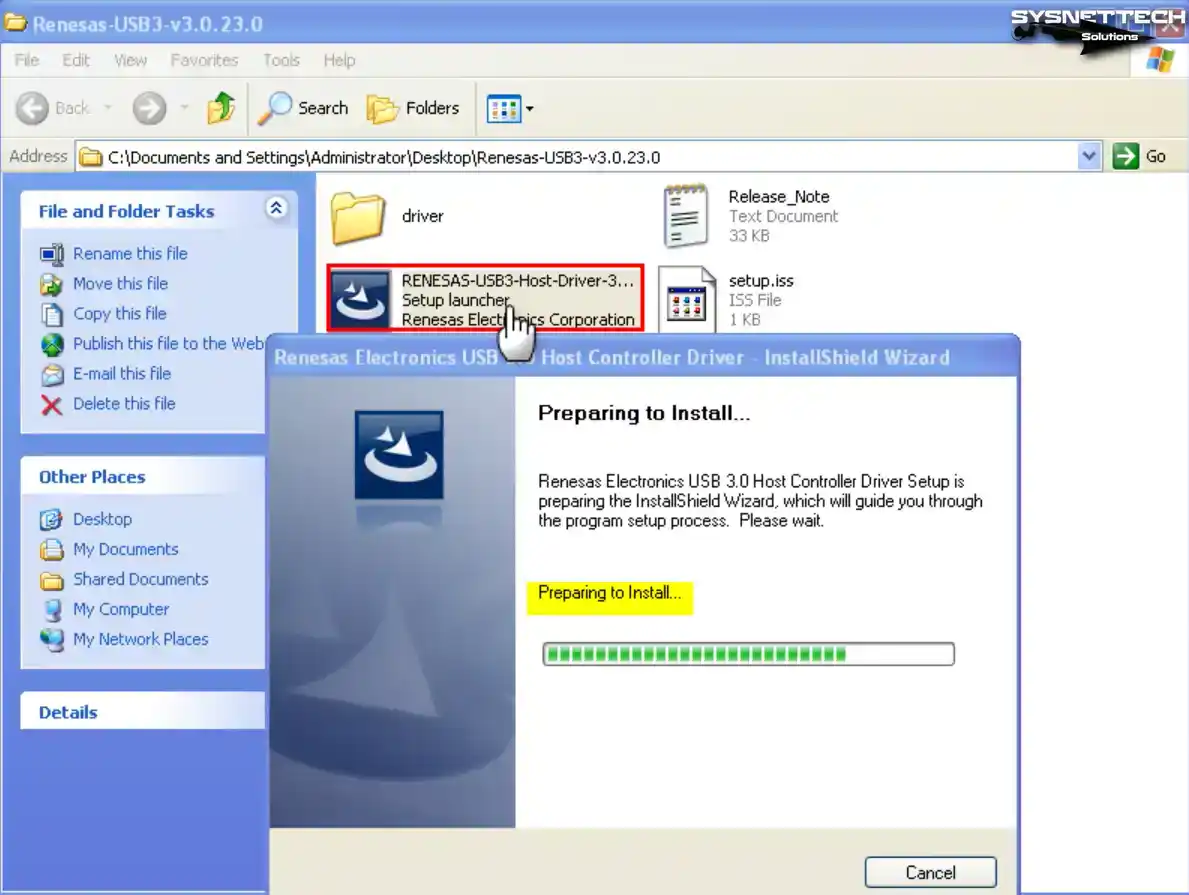
Step 1
Before enabling USB 3.0 on your Windows XP guest machine, it is recommended to download the RENESAS Driver from the table located at the bottom of the article. Once downloaded, copy the driver to your system and proceed to double-click the setup file to initiate the wizard.
Step 2
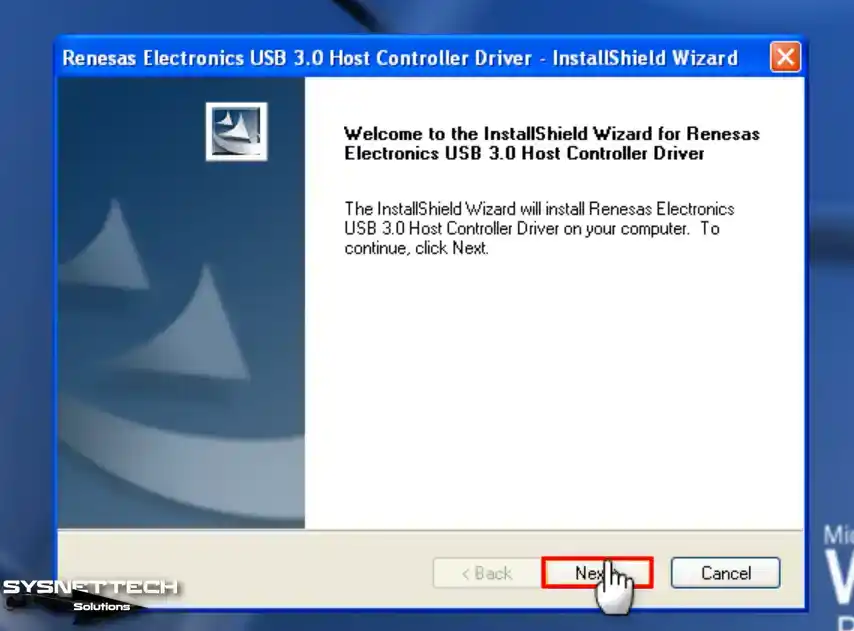
Click Next in the Renesas Electronics USB 3.0 Host Controller Driver wizard.
Step 3
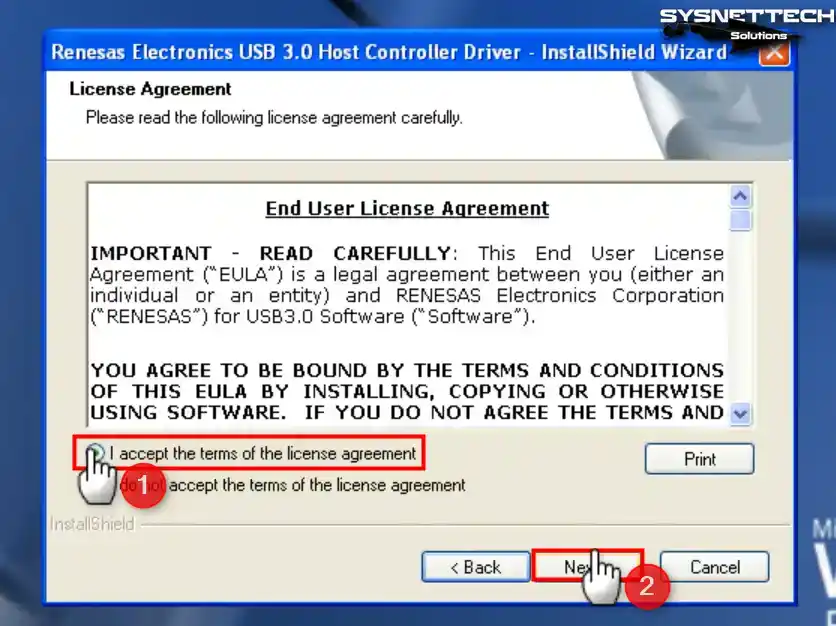
Accept the license agreement of the Renesas Electronics USB driver software and click Next.
Step 4
Click the Install button to build the USB 3.0 driver.
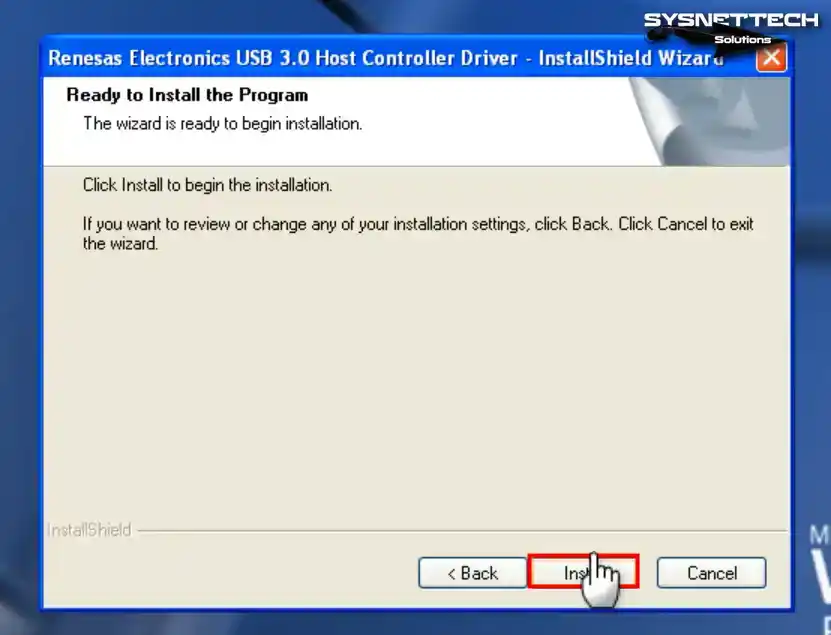
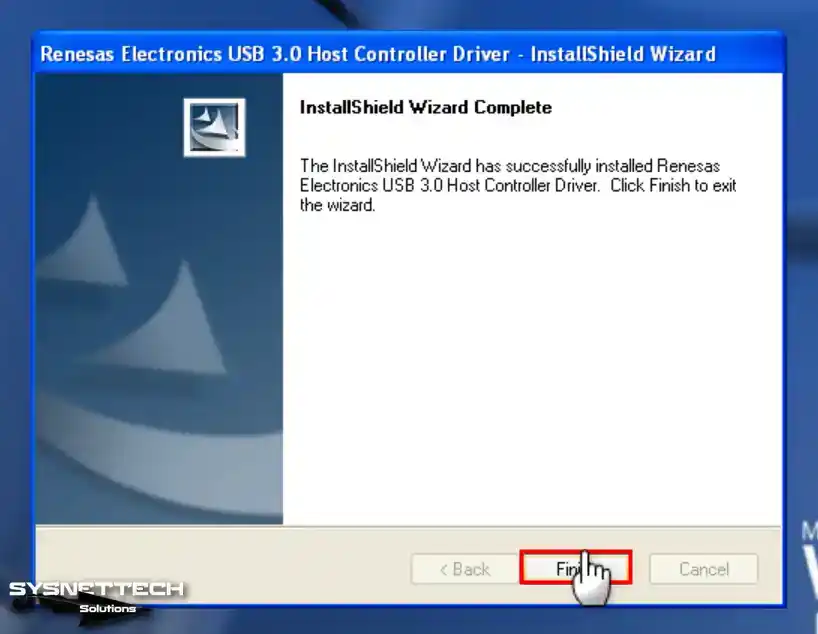
Step 5
After installing the USB 3.0 driver on Windows XP, close the wizard by clicking Finish.
Step 6
Close the Oracle VM VirtualBox on your host PC, go to its installed location, right-click, and click Open in Terminal.
./VBoxManage setextradata 'Windows XP' VBoxInternal/Devices/usb-xhci/0/Config/ChipType uPD720201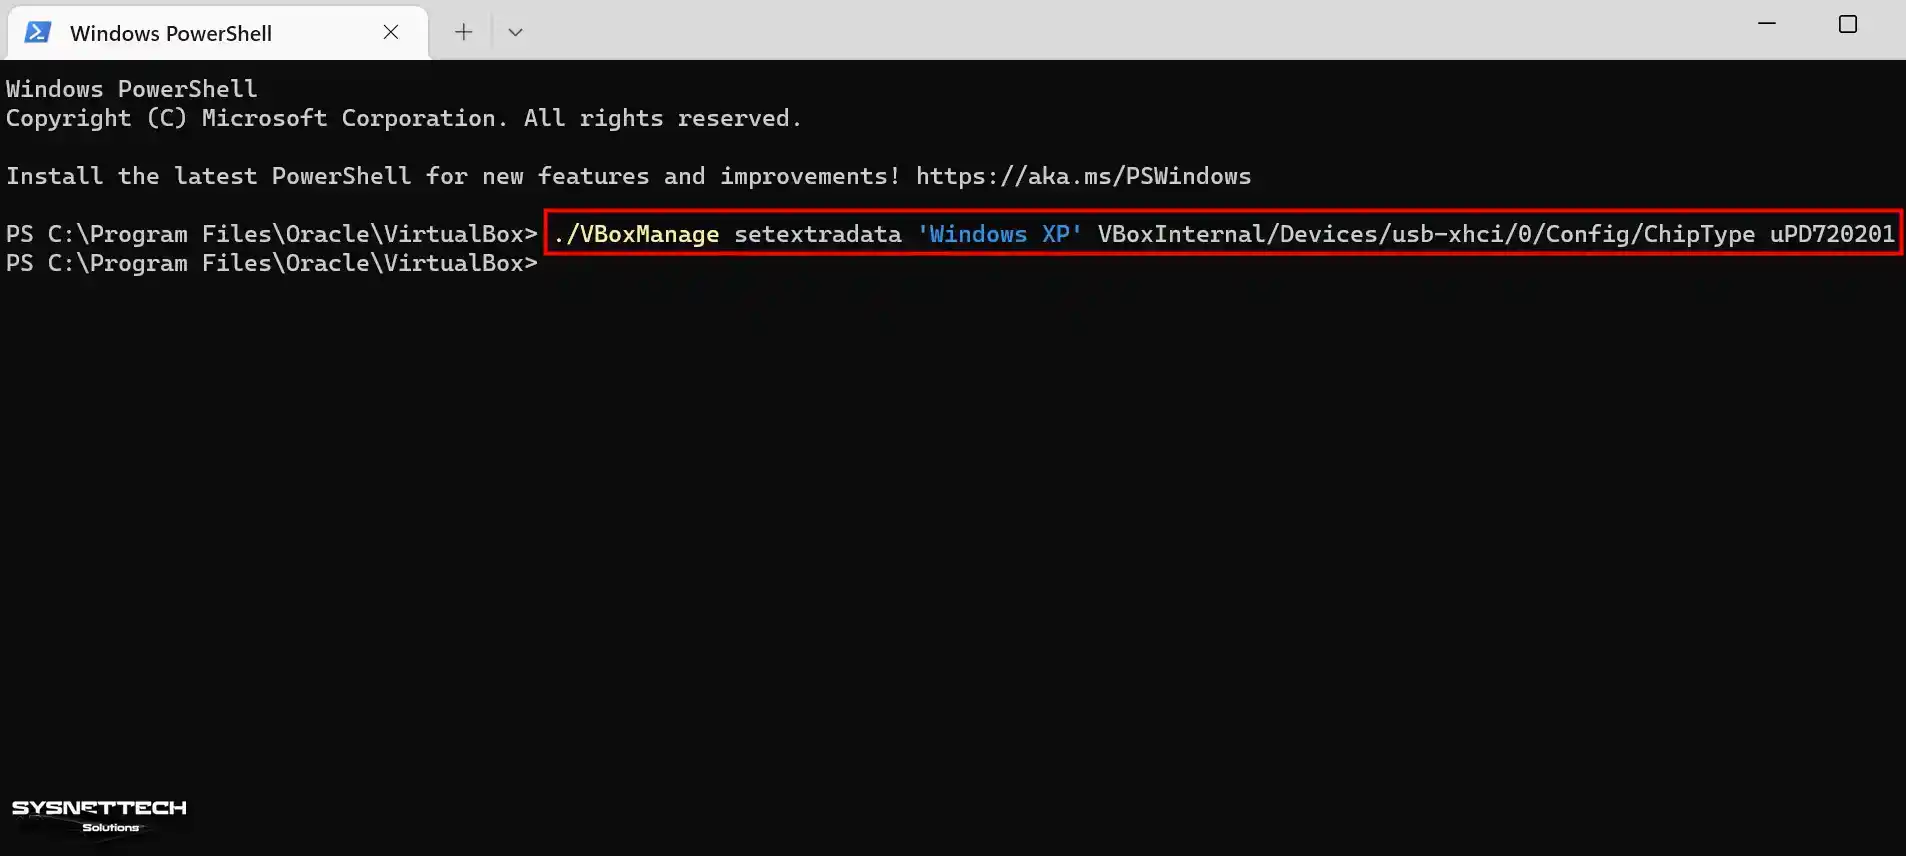
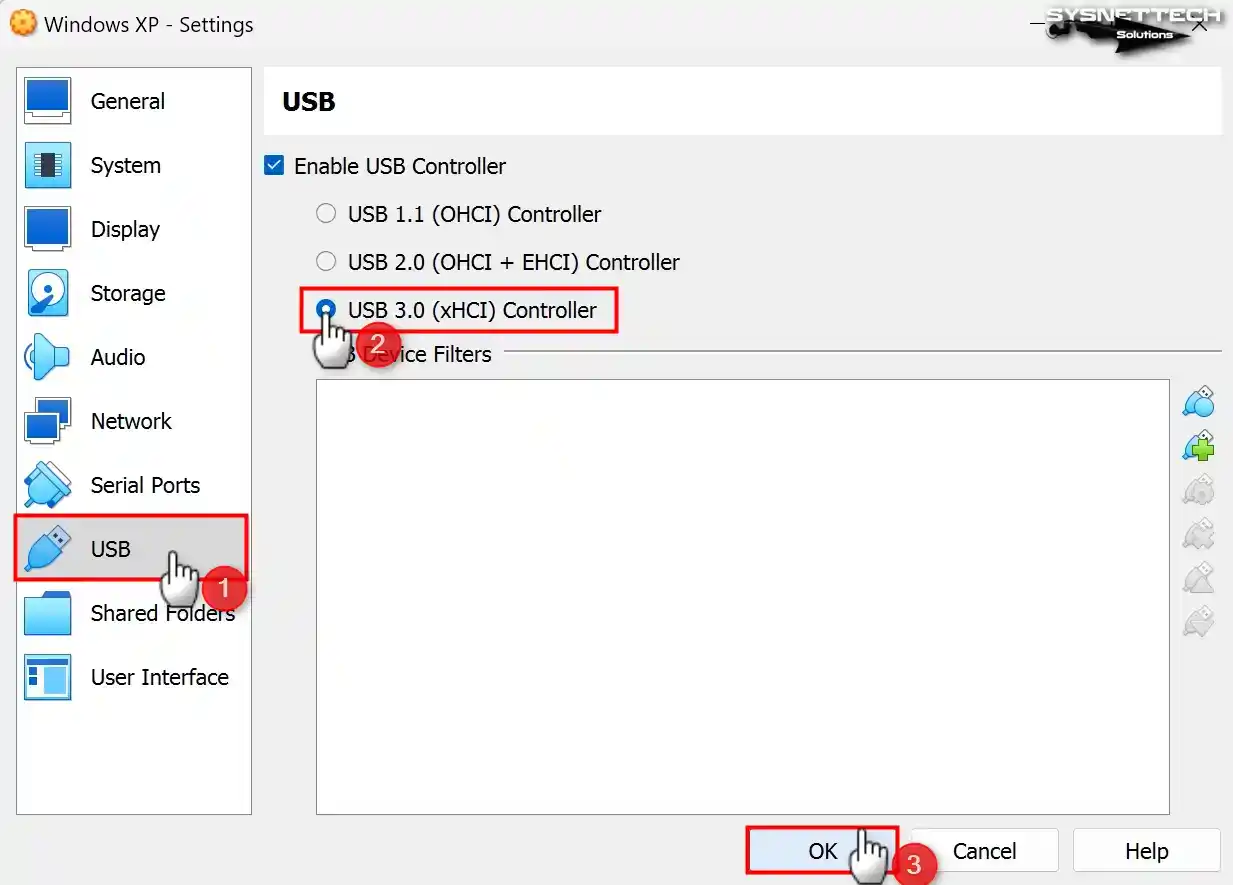
Step 7
Open the Oracle program, select USB 3.0 (xHCI) Controller from the USB controller types, and click OK.
Step 8
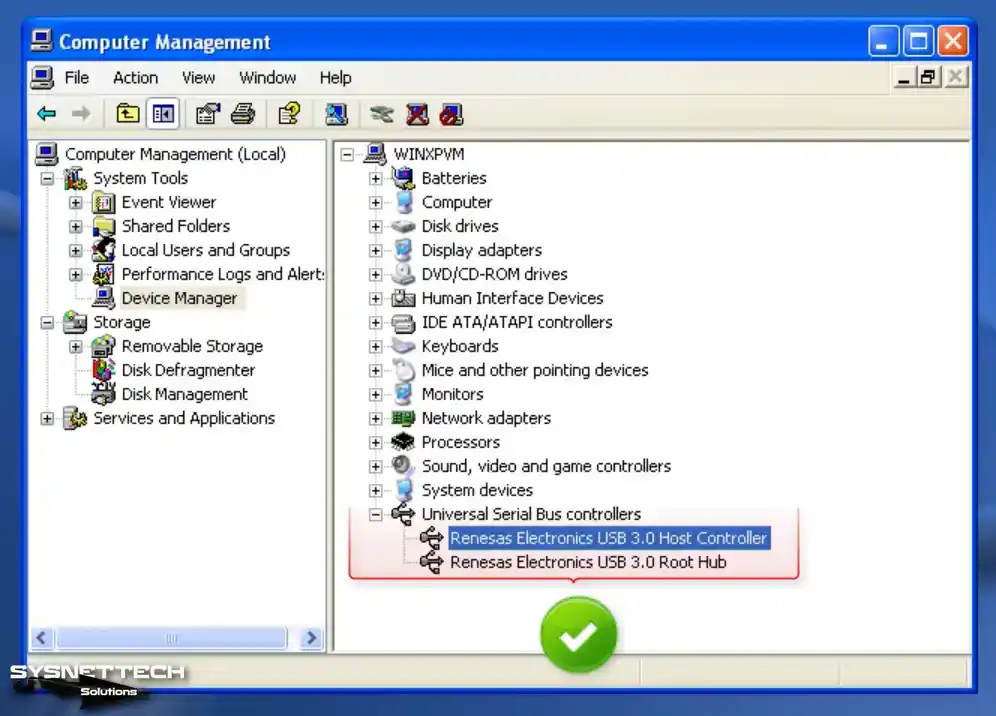
Open the Oracle program again, and after running your virtual PC, open Device Manager and check the Universal Serial Bus (USB) Controller device.
Step 9
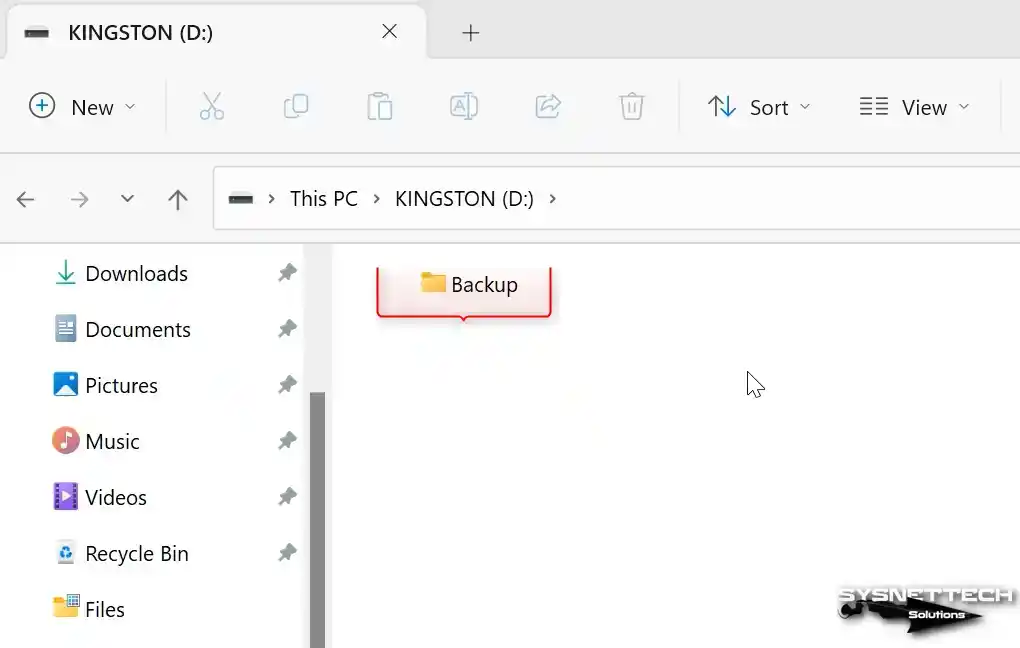
Connect your flash stick to one of the USB 3.0 ports on your computer and establish a folder called “Backup” inside it as an illustrative instance.
Step 10
After inserting your flash memory, click Devices> USB> Kingston DataTraveler 3.0 on the virtual machine.

Step 11
After adding your flash memory to your virtual PC, Mass Storage drivers will be installed automatically. When you view My Computer, you can see your KINGSTON USB stick or any other brand.
Upon inspecting the Device Manager, you will find the USB 3.0 memory under Disk Drives.

How to Change Video Memory to 256 MB
A maximum of 128 MB of GPU memory can be set for Windows XP in Oracle software, but there is a simple way to increase this Size.
Step 1
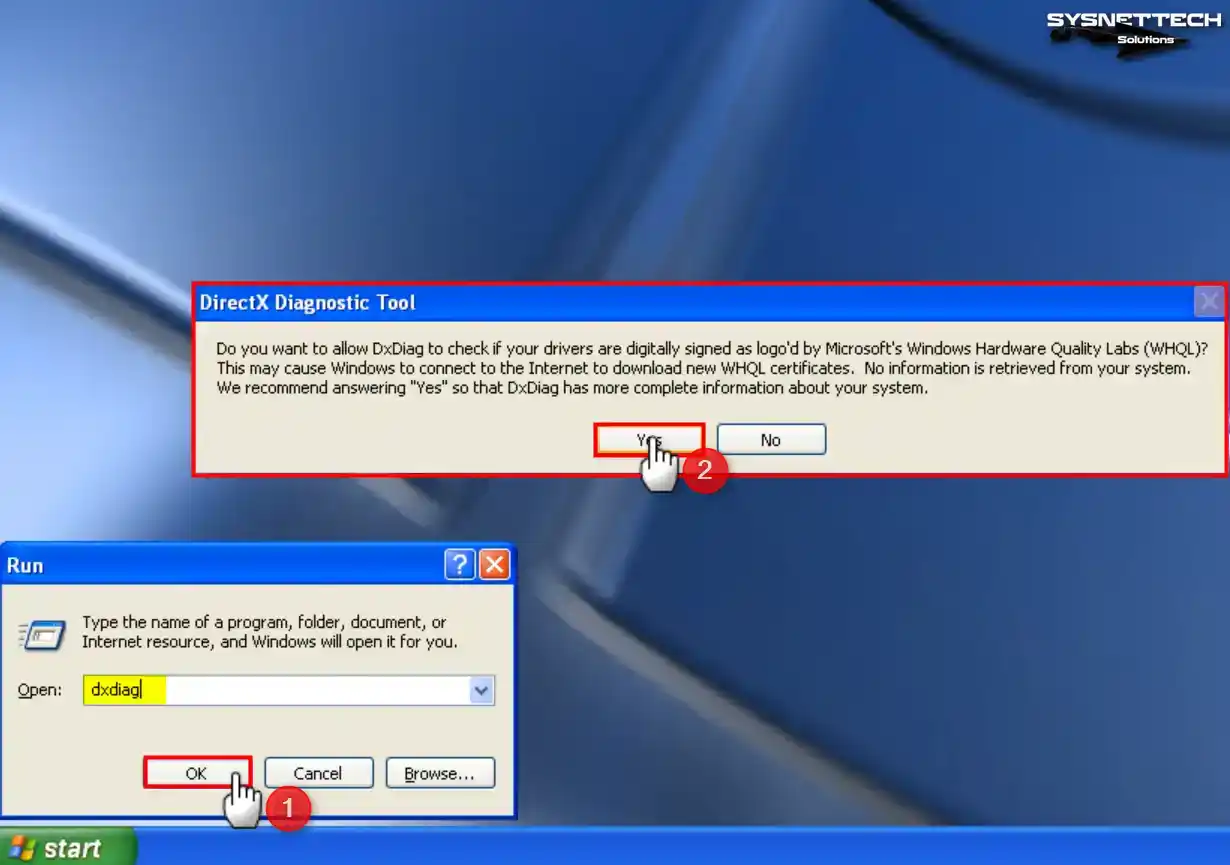
First, execute the dxdiag command in the Run window on your virtual machine and click Yes in the DirectX Diagnostic Tool window.
Step 2
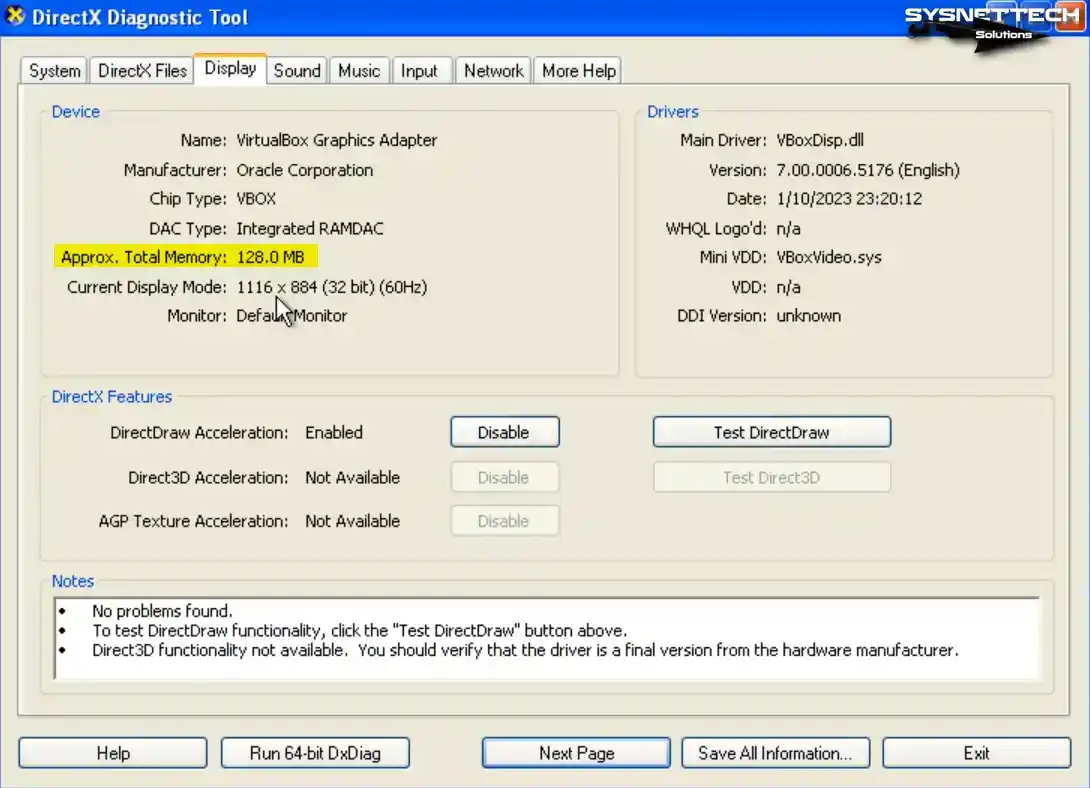
Click the Display tab on DirectX Diagnostic Tools, check the Total Memory size, and check that the GPU memory is 128 MB.
Step 3
Close your virtual computer and VirtualBox program, open PowerShell again in the location where VirtualBox is installed, and execute the following command.
./VBoxManage modifyvm 'Windows XP' --vram 256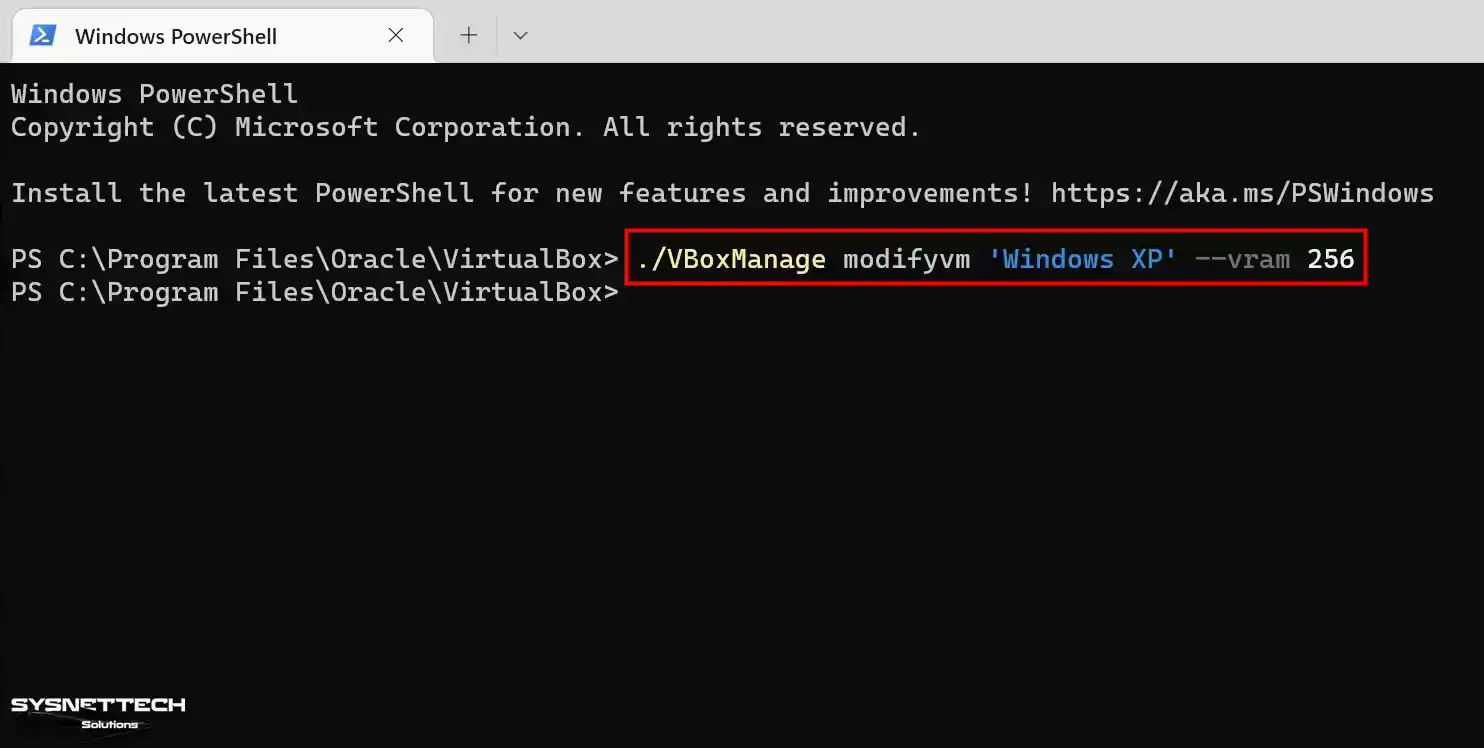
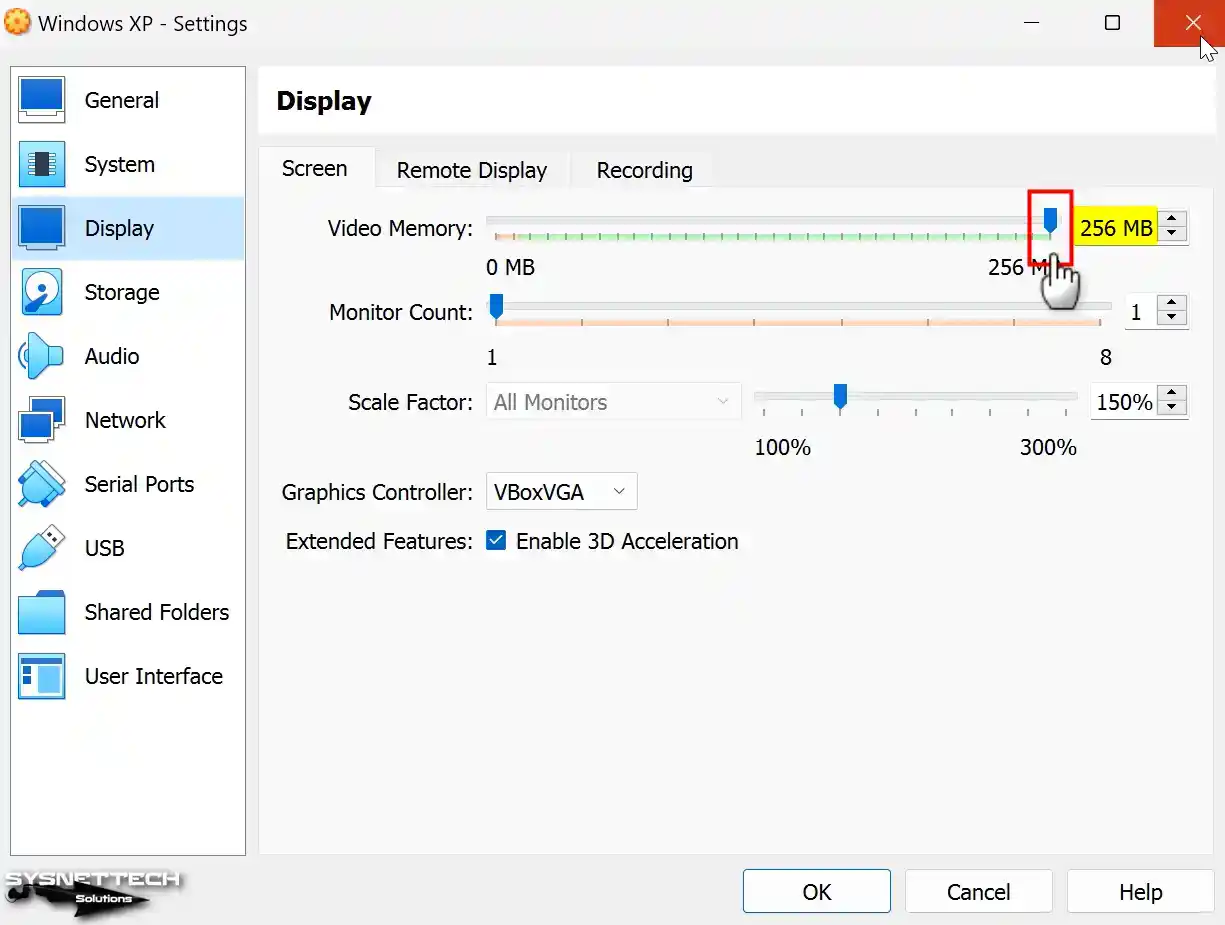
Step 4
Run Oracle VM VirtualBox, and after checking your VM’s settings, the Display / Screen / Video Memory size is 256 MB, and you will see that the operation was successful.
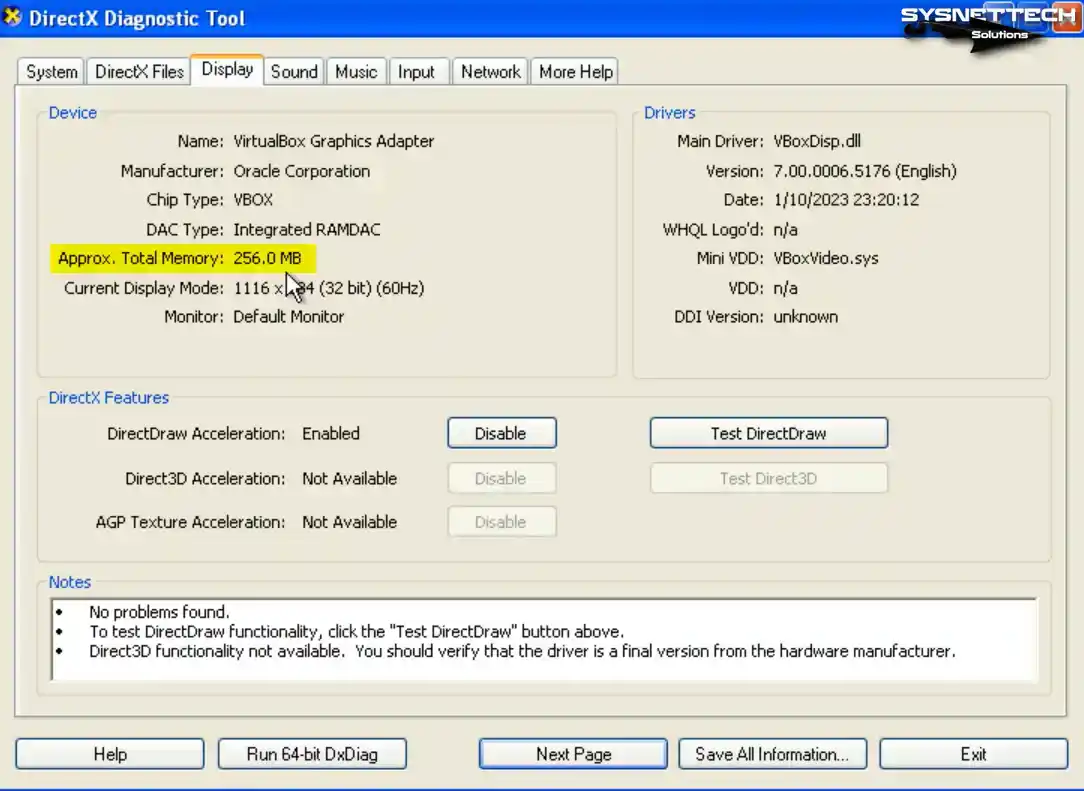
Step 5
When you run your Windows XP guest machine and open the dxdiag tool again, you can see that the total graphics memory size in the Display tab is 256 MB.
How to Upgrade Windows XP SP1 to SP2
If you desire to upgrade to SP2 on the guest appliance after installing the Service Pack 1 (SP1) edition of Windows XP, obtain the ISO image from the table at the base of the article and proceed with the following steps.
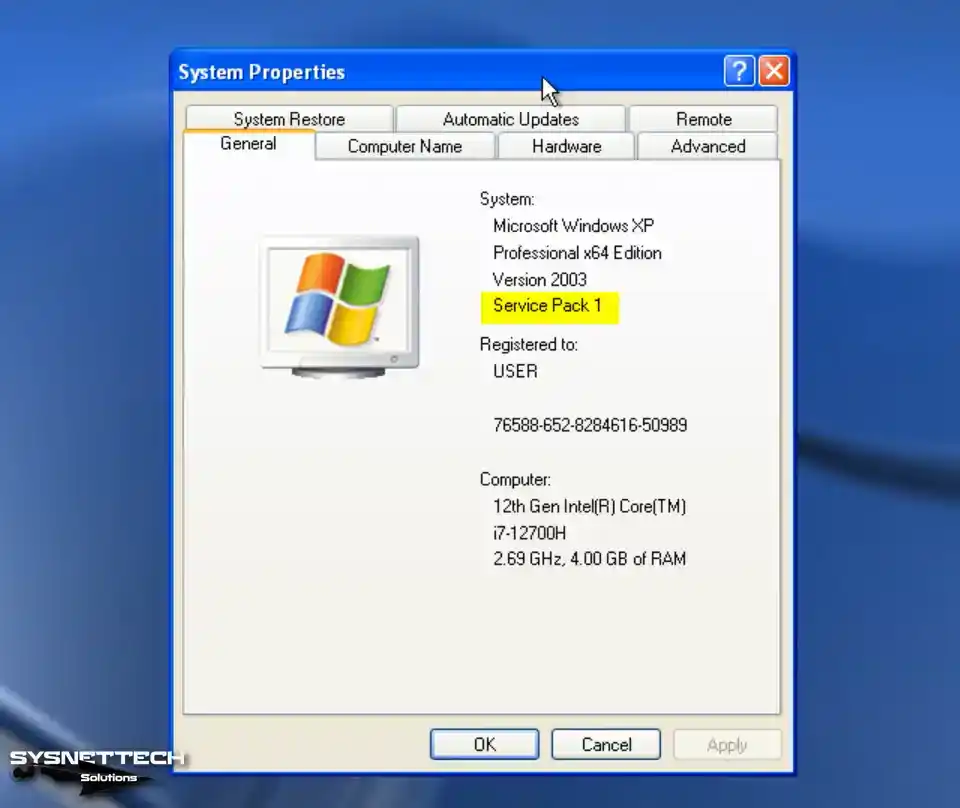
Step 1
First, to view the properties of the XP system installed on your VM, right-click My Computer, open Properties, and check the Service Pack version.
Step 2
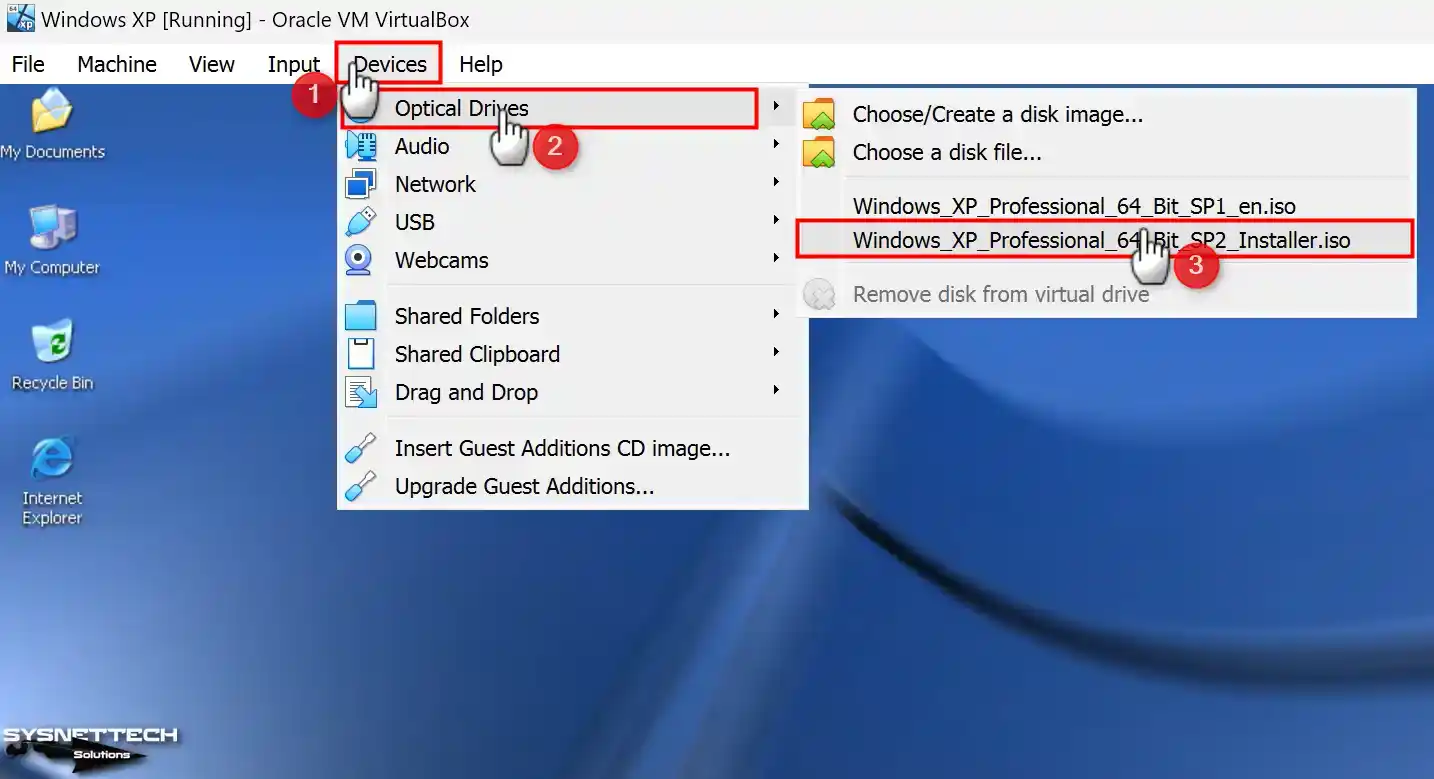
To add the SP2 ISO file to the VM, click Devices> Optical Drivers, select a disk file, choose the Installer image you downloaded to your computer, and click Open.
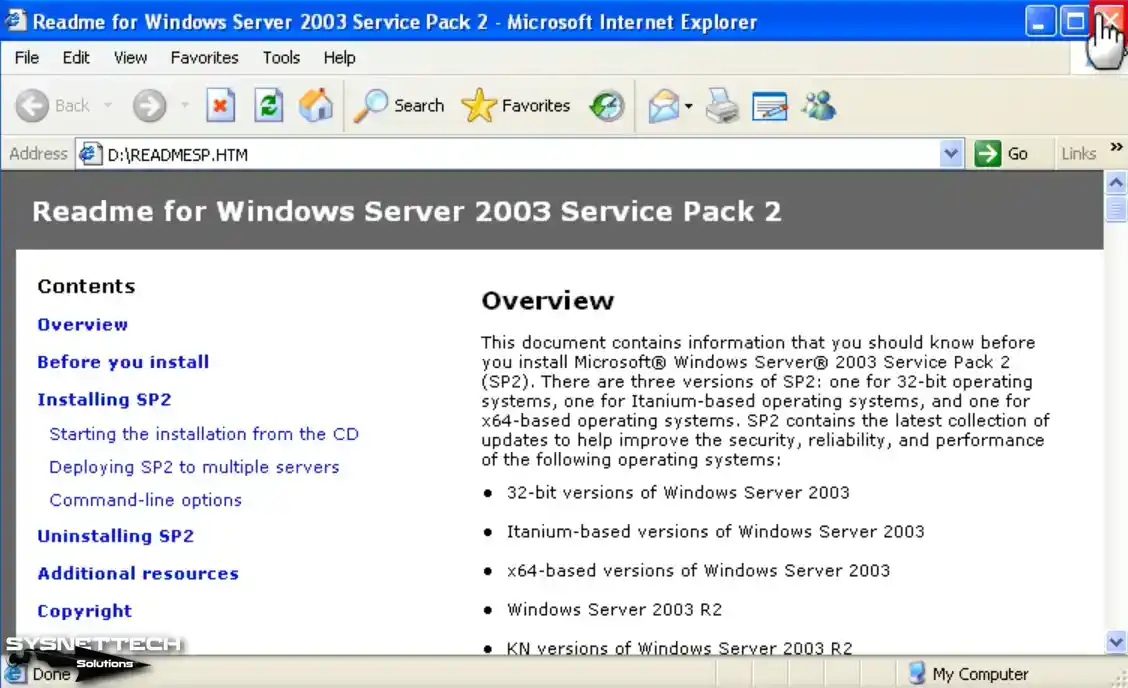
Step 3
When the Readme HTML page opens automatically on your virtual system, close it.
Step 4
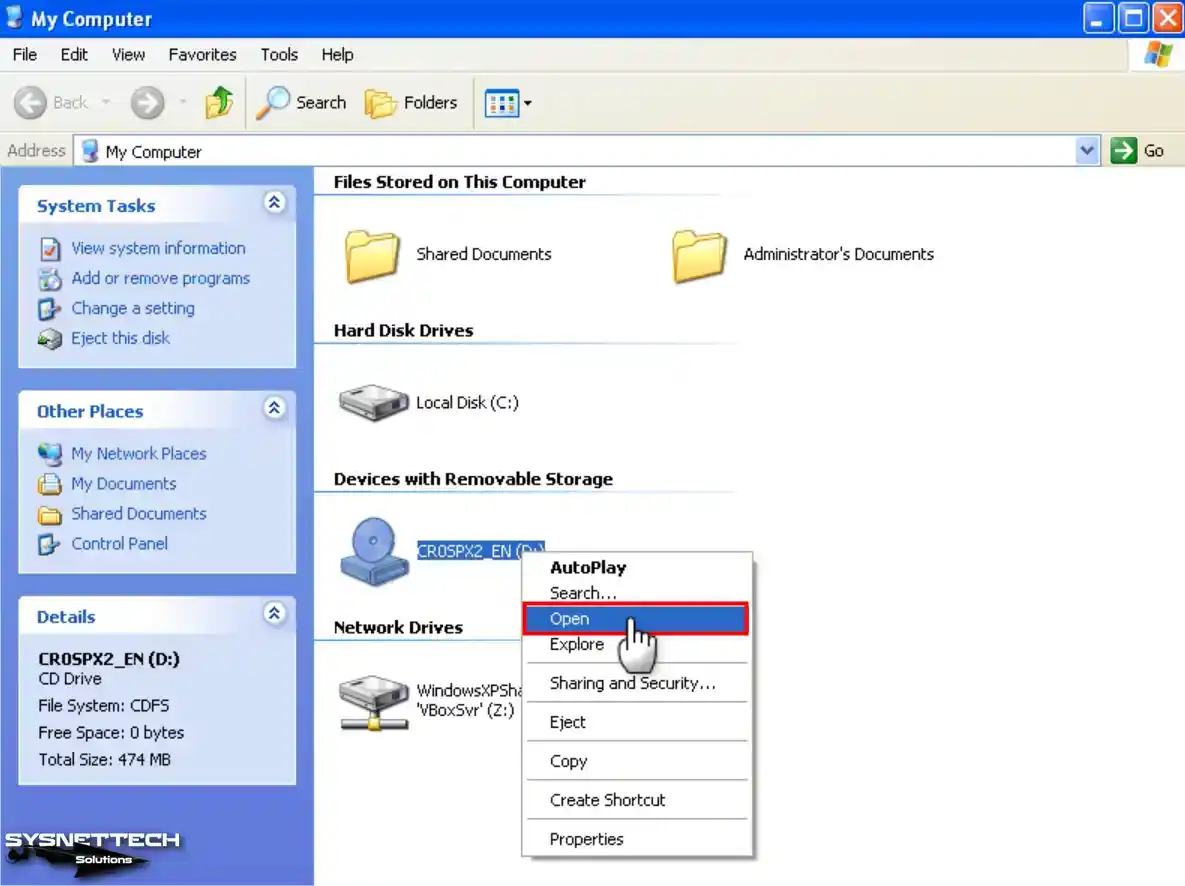
Open My Computer, right-click on the CD drive, and select “Open.”
Step 5
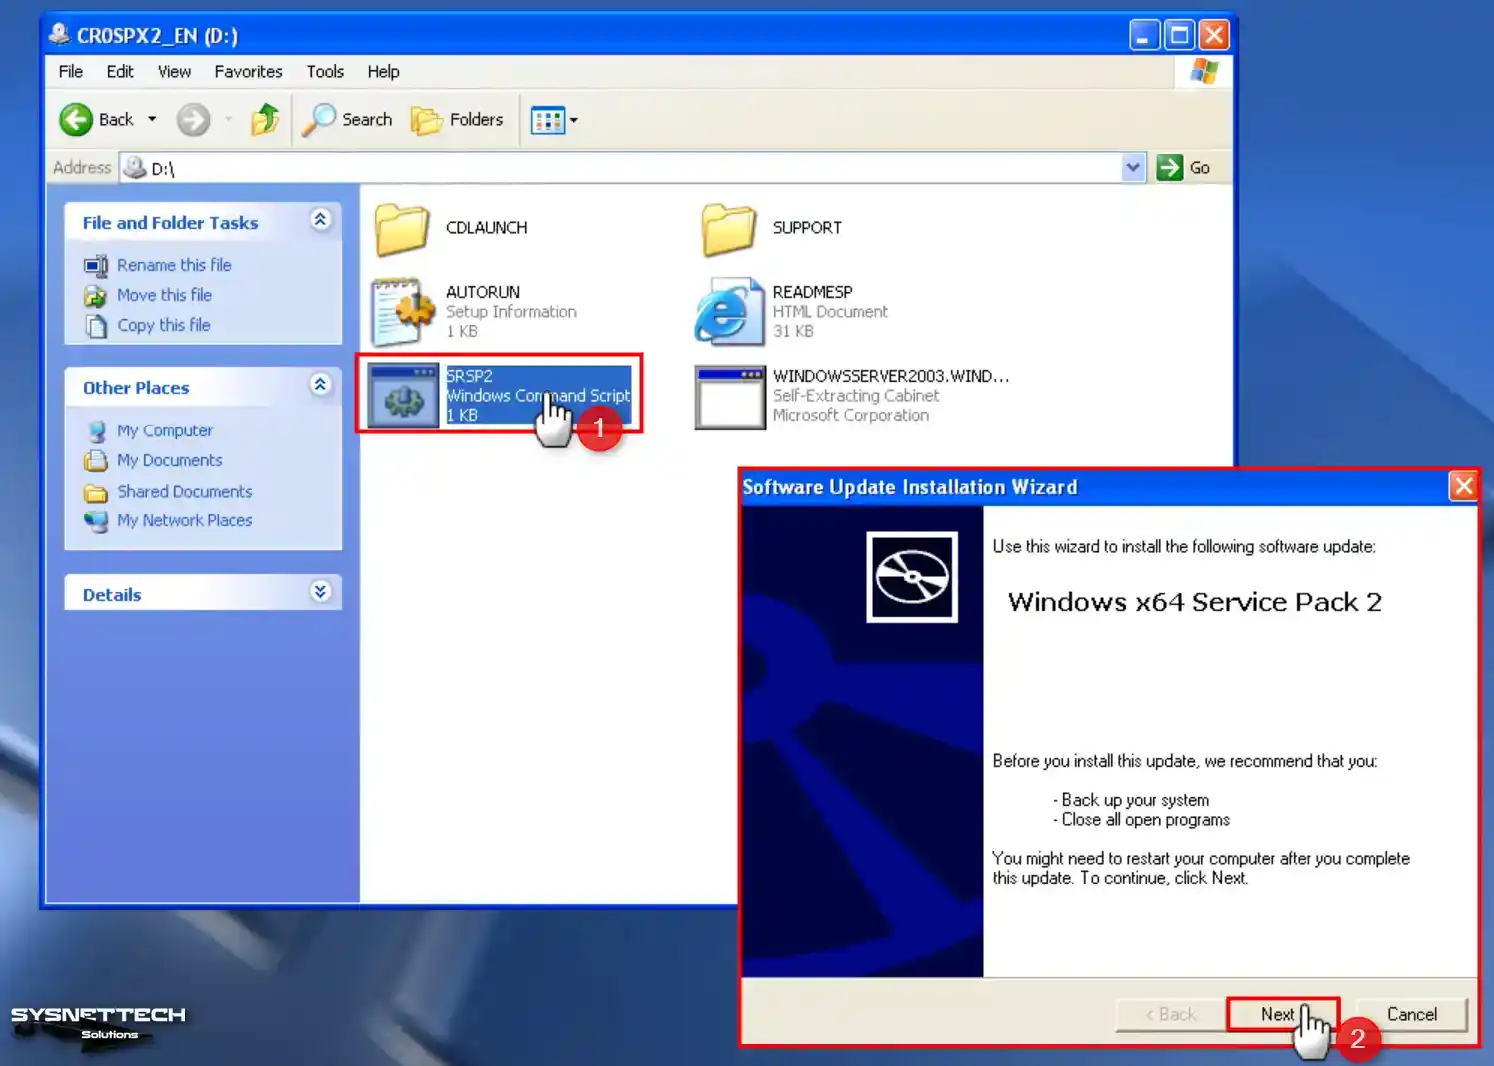
Double-click the SRSP2 command script in the Service Pack 2 CD image and start the installation. Click Next in the Windows x64 Service Pack 2 installation wizard.
Step 6
Accept the SP2 license agreement and click Next. If you want to downgrade Windows XP from SP2 to SP1 later, note the location in the Uninstall Folder. Continue with ‘Next’ to proceed with SP2 installation.
Step 7
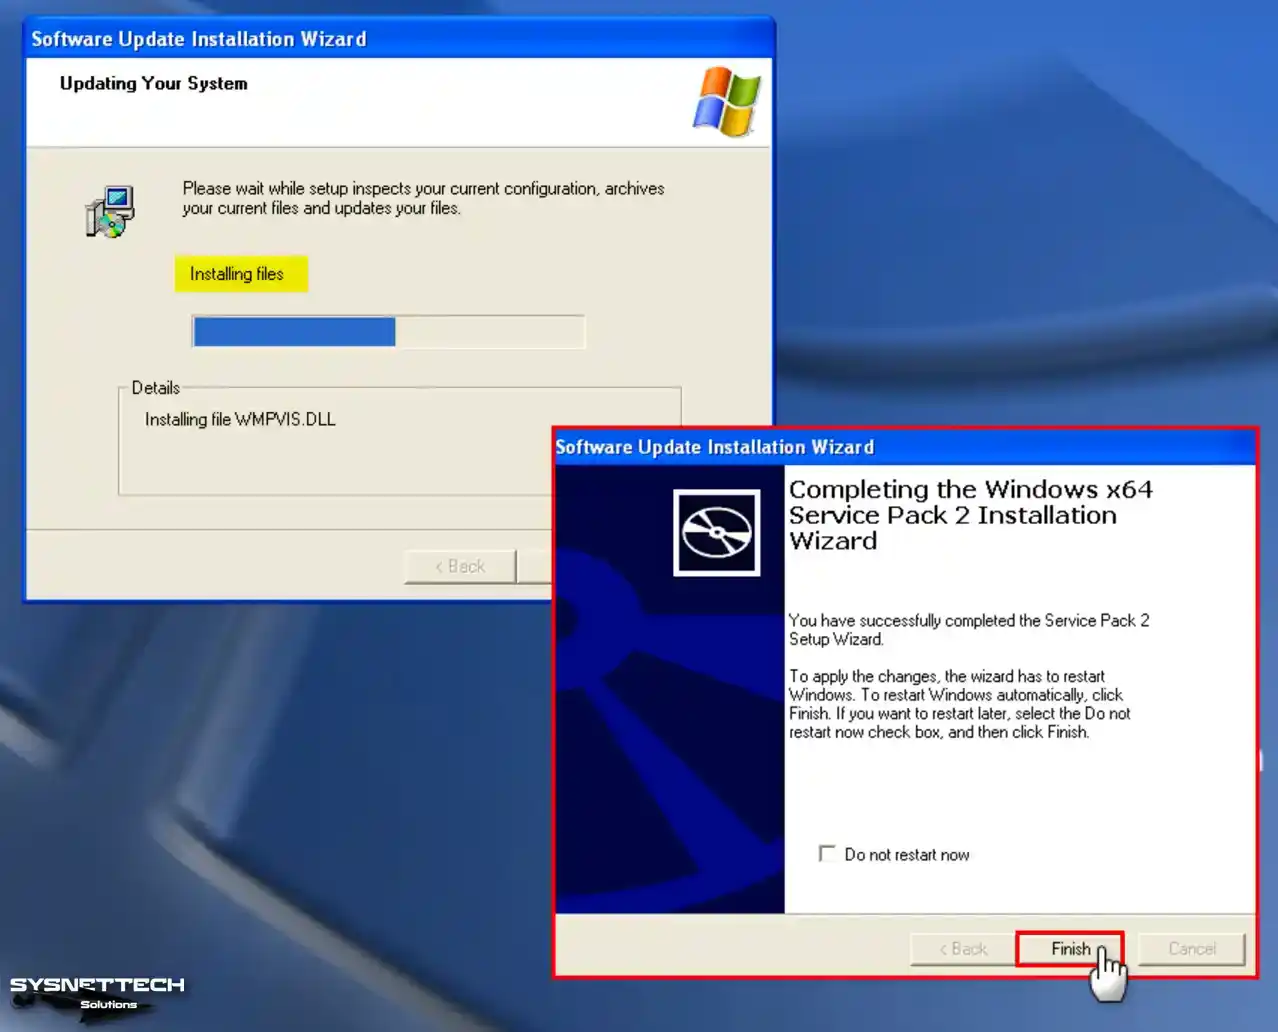
Wait while your virtual Windows XP system updates to SP2. When the SP2 setup wizard is complete, click Finish to restart your virtual system.
Step 8
Upon revisiting the system properties, you will notice that Service Pack 2 (SP2) has been effectively installed.

Video
Installing Old Versions
Windows XP ISO ve USB Driver Download
| File | Links |
|---|---|
| Renesas USB 3.0 Driver | Download |
| Windows XP Pro x64 SP1 ISO + SP2 (EN) | Download |
Conclusion
As a result, you can run a Windows XP SP1 x64 Professional virtual machine with Oracle VM VirtualBox 7.0. You can install XP and enjoy its advantages with the steps I have outlined in this article. However, you can maintain the security and compatibility of your current modern operating system.
It would be best if you also prioritized security when using outdated operating systems. Virtualization offers a controlled solution for interacting with old software. As a result, this method is effective for experiencing old OSes in a secure environment.
Все способы:
- Создание виртуальной машины для Windows XP
- Настройка виртуальной машины для Windows XP
- Установка Windows XP на VirtualBox
- Вопросы и ответы: 62
В этой статье мы расскажем, как установить Windows XP в качестве виртуальной операционной системы, используя программу VirtualBox.
Создание виртуальной машины для Windows XP
Прежде, чем инсталлировать систему, для нее необходимо создать виртуальную машину — ее Windows будет воспринимать как полноценный компьютер. Для этого и предназначена программа VirtualBox.
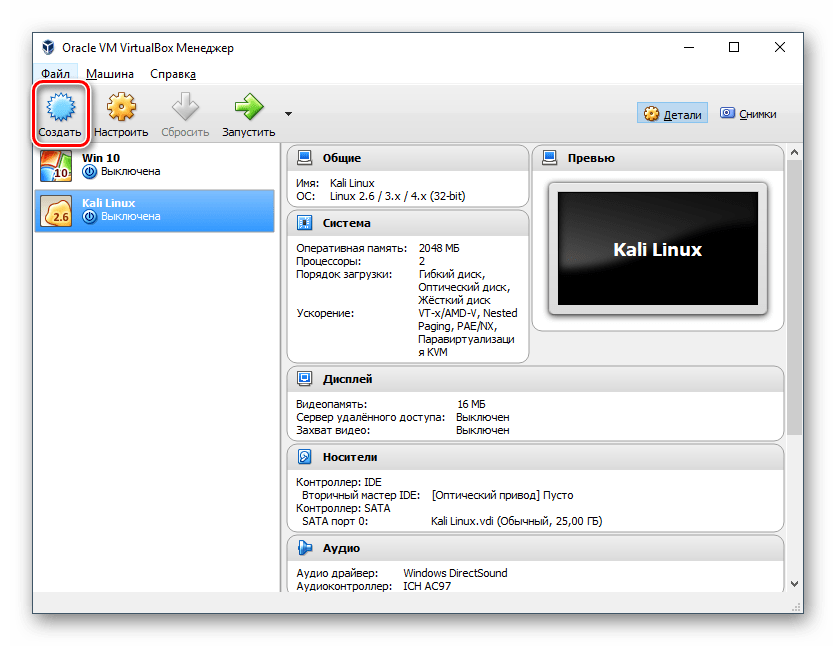
- Запустите VirtualBox Менеджер и нажмите на «Создать».

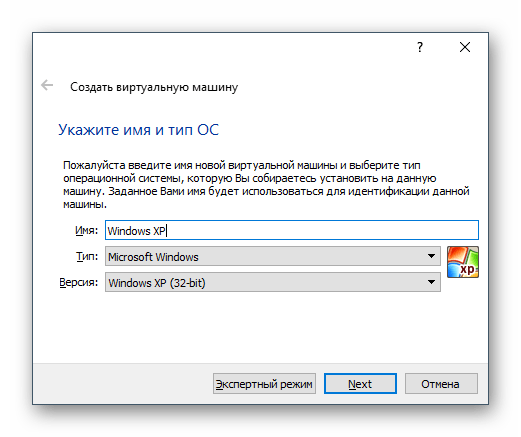
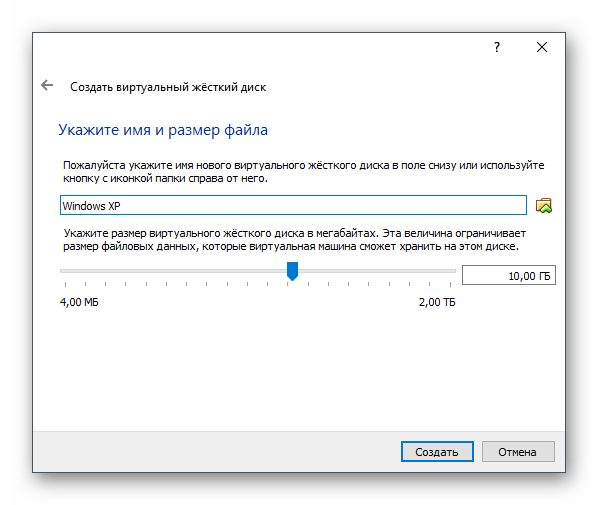
- В поле «Имя» впишите «Windows XP» — остальные поля будут заполнены автоматически.

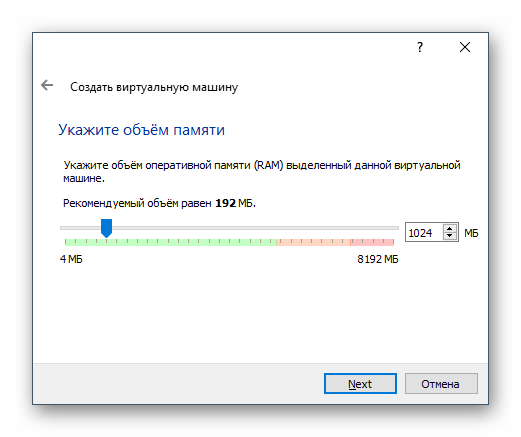
- Решите, сколько RAM вы хотите выделить под устанавливаемую ОС. VirtualBox рекомендует использовать минимум 192 МБ оперативной памяти, но если есть возможность, то используйте 512 или 1024 МБ. Так система не будет тормозить даже при высоком уровне загруженности.
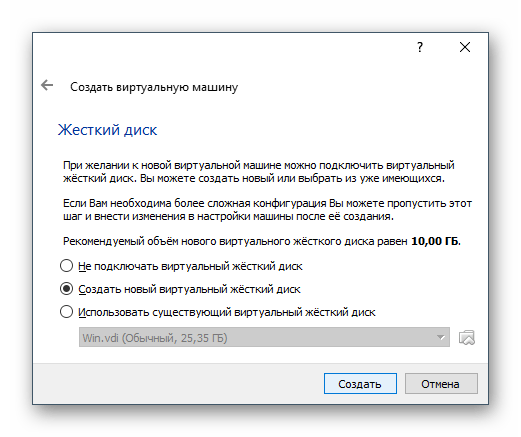
- Вам будет предложено выбрать виртуальный накопитель, который можно подключить к этой машине. Нам это не нужно, поскольку мы собираемся установить Windows, используя ISO-образ. Следовательно, настройку в этом окне менять не нужно — оставляем все как есть и нажимаем на «Создать».
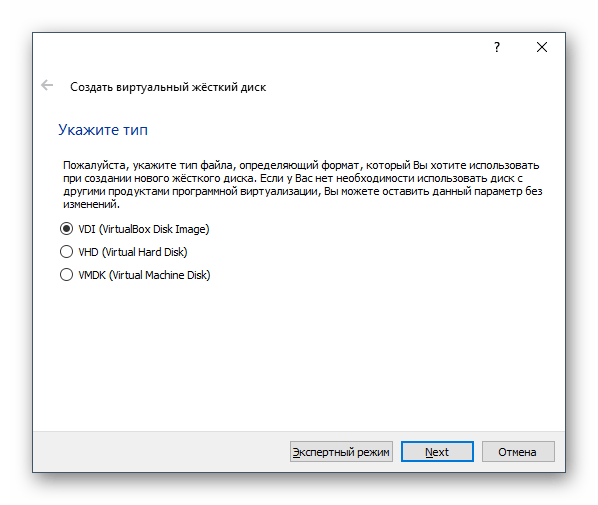
- Тип выбранного диска оставьте «VDI».

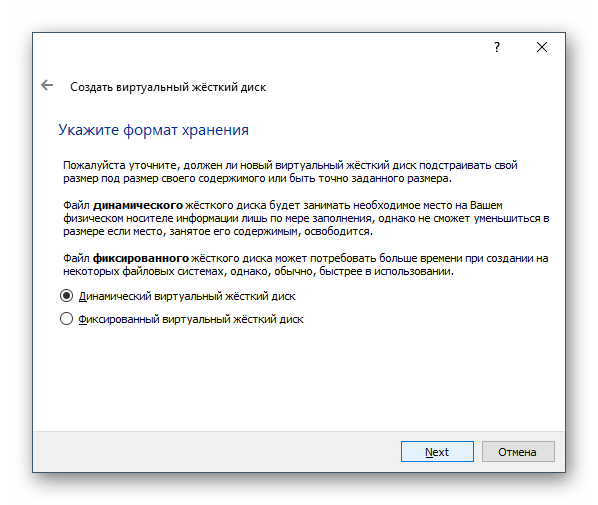
- Укажите подходящий формат хранения. Рекомендуется использовать «Динамический».
- Укажите количество гигабайт, которое вы желаете выделить под создание виртуального жесткого диска. VirtualBox рекомендует выделить 10 ГБ, но вы можете задать и другую величину.
Если на предыдущем шаге вы выбрали вариант «динамический», то Windows XP изначально займет на жестком диске только установочный объем (не более 1,5 ГБ), а затем, по мере ваших действий внутри этой ОС, виртуальный накопитель сможет расшириться максимум до 10 ГБ.
При «фиксированном» формате на физическом HDD сразу же будет занято 10 ГБ.
На создании виртуального HDD этот этап заканчивается, и можно переходить к настройке VM.
Настройка виртуальной машины для Windows XP
Перед установкой Виндовс можно выполнить еще несколько настроек для повышения производительности. Это — необязательная процедура, поэтому ее можно пропустить.
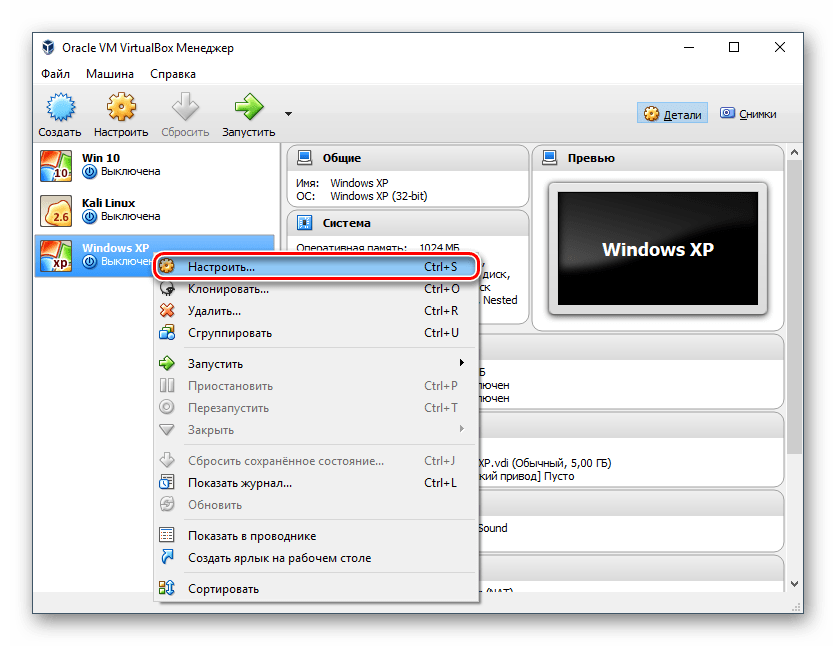
- В левой части VirtualBox Менеджера вы увидите созданную виртуальную машину для Windows XP. Нажмите по ней правой кнопкой мыши и перейдите в «Настроить».
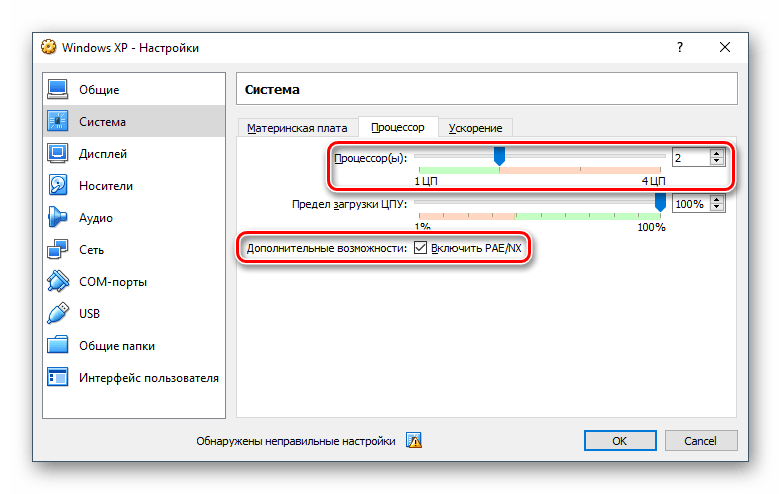
- Переключитесь на вкладку «Система» и увеличьте параметр «Процессор(ы)» с 1 до 2. Для улучшенной их работы задействуйте режим работы PAE/NX, поставьте напротив него галочку.

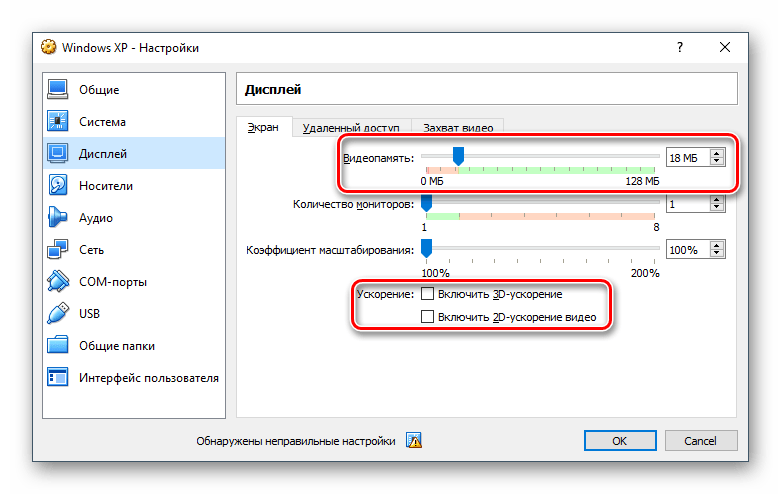
- Во вкладке «Дисплей» вы можете немного увеличить количество видеопамяти, но не переусердствуйте — для устаревшей Windows XP будет достаточно совсем небольшой прибавки.
Также вы можете поставить галочки напротив параметра «Ускорение», включив 3D и 2D.
- При желании вы можете настроить и другие параметры.
После настройки VM можно приступать к установке ОС.
Установка Windows XP на VirtualBox
- В левой части VirtualBox Менеджера выделите созданную виртуальную машину и нажмите на кнопку «Запустить».
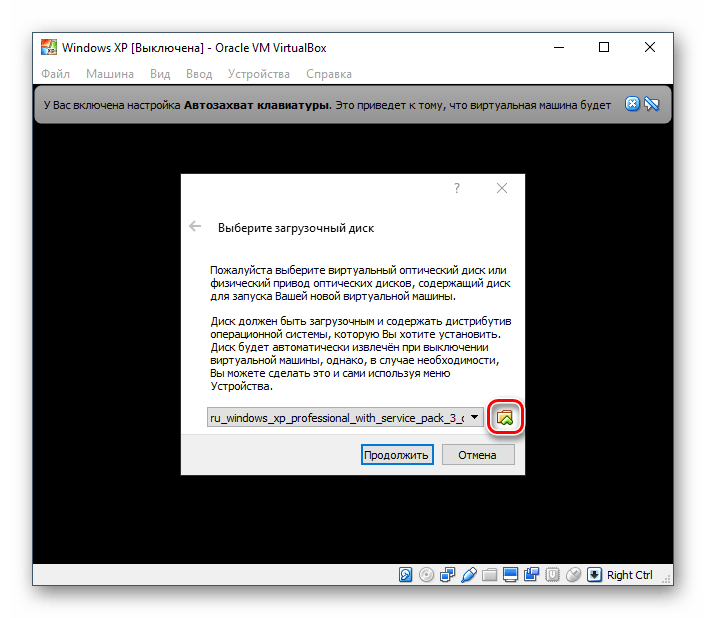
- Вам будет предложено выбрать загрузочный диск для запуска. Нажмите на кнопку с папкой и укажите место, где расположен файл с образом операционной системы.

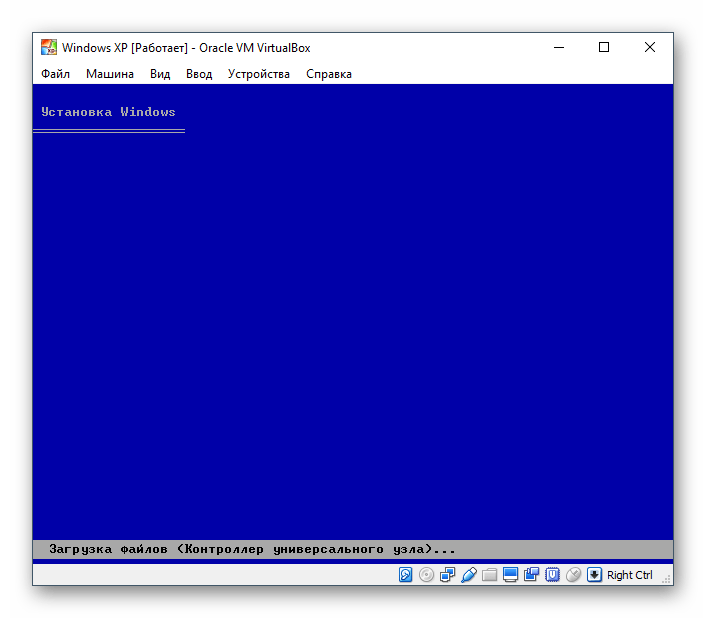
- Запустится установочная утилита Windows XP. Свои первые действия она выполнит автоматически, и вам потребуется немного подождать.
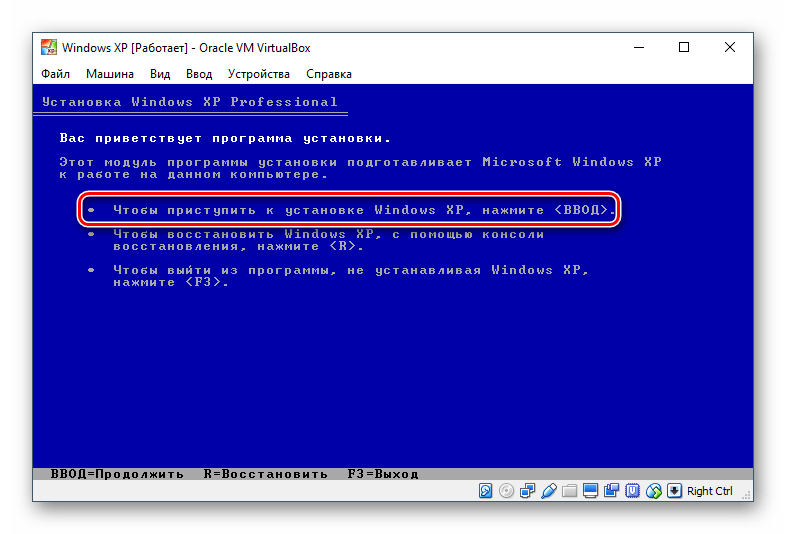
- Вас поприветствует установочная программа и предложит приступить к установке, нажав клавишу «Ввод». Здесь и далее под этой клавишей будет подразумеваться клавиша Enter.

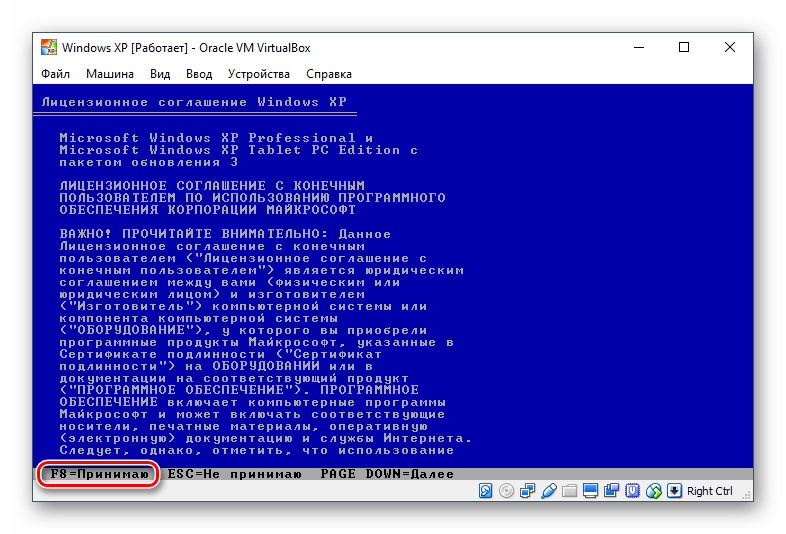
- Откроется лицензионное соглашение, и если вы с ним согласны, то нажмите на клавишу F8, чтобы принять его условия.
- Установщик попросит выбрать диск, куда будет установлена система. VirtualBox уже создал виртуальный жесткий диск объемом, который вы выбрали на шаге 7 при создании виртуальной машины. Поэтому нажмите Enter.
- Эта область еще не размечена, поэтому установщик предложит ее отформатировать. Выберите один из четырех доступных вариантов. Рекомендуем использовать параметр «Форматировать раздел в системе NTFS».
- Дождитесь, пока будет отформатирован раздел.
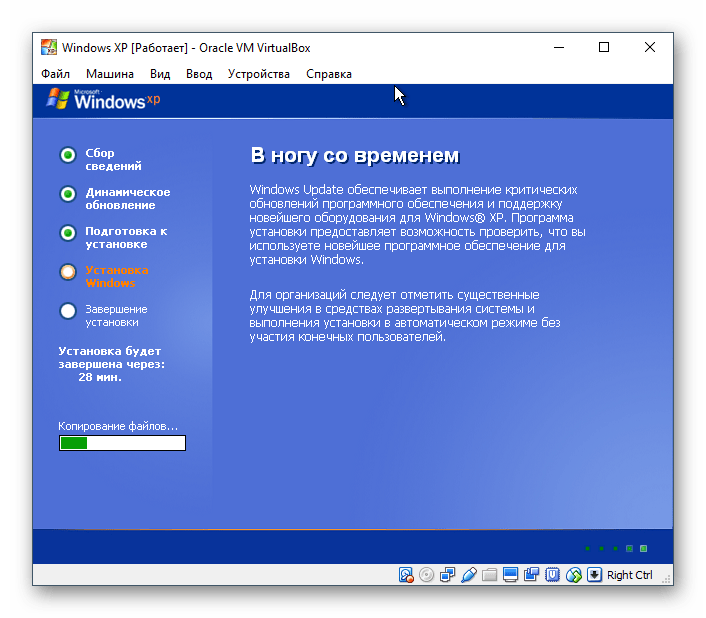
- Программа установки в автоматическом режиме выполнит копирование некоторых файлов.
- Откроется окно с непосредственной установкой Windows, и сразу же начнется установка устройств, подождите.
- Проверьте правильность выбранных установщиком настроек языка системы и раскладки клавиатуры.
- Введите имя пользователя, имя организации вводить не нужно.
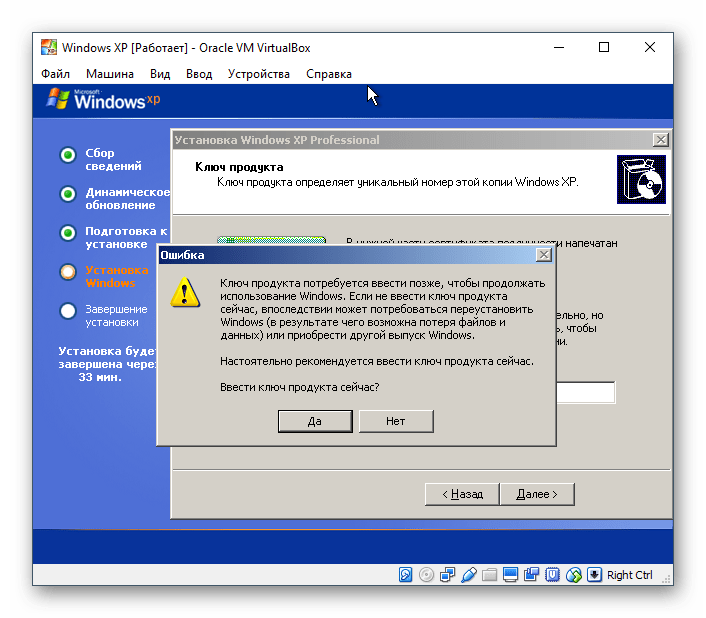
- Введите ключ активации, если он есть. Вы можете активировать Windows позднее.
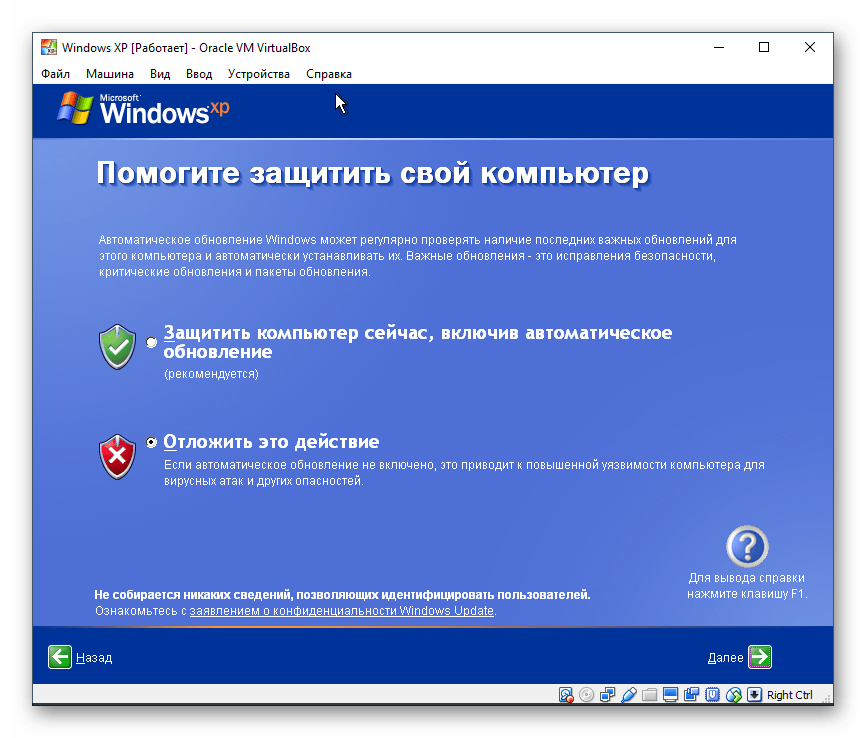
- Если вы желаете отложить активацию, то в окне подтверждения выберите «Нет».
- Укажите имя компьютера. Вы можете установить пароль для учетной записи «Администратор». Если в этом нет необходимости — пропустите ввод пароля.
- Проверьте дату и время, при необходимости измените эти сведения. Укажите свой часовой пояс, найдя город в списке. Жители России могут снять галочку с пункта «Автоматический переход на летнее время и обратно».
- Продолжится автоматическая установка ОС.
- Программа установки предложит настроить сетевые параметры. Для обычного выхода в интернет выберите «Обычные параметры».
- Шаг с настройкой рабочей группы или домена можно пропустить.
- Дождитесь, пока система закончит автоматическую установку.
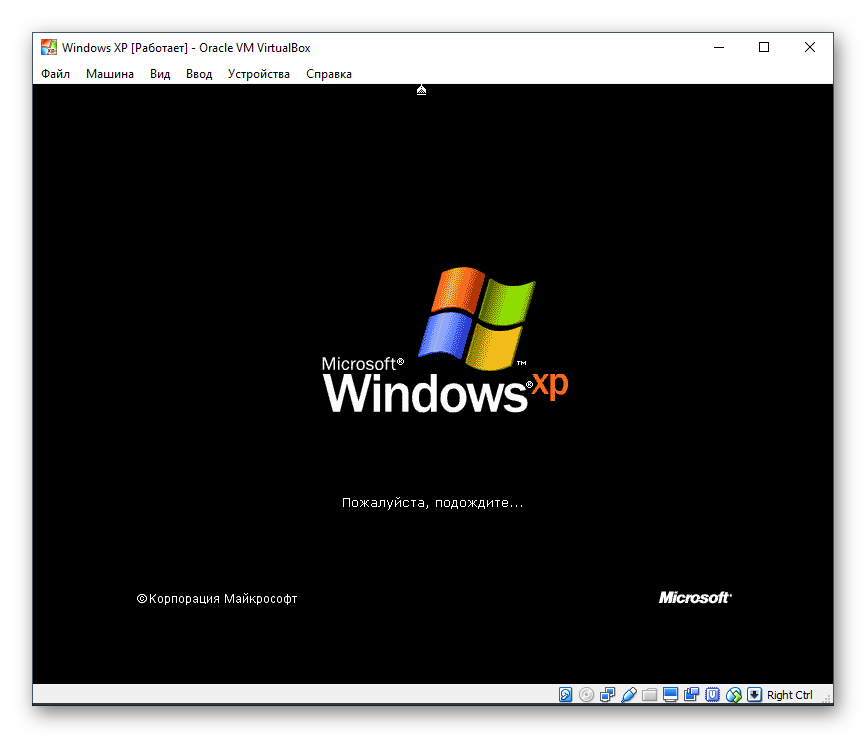
- Виртуальная машина будет перезагружена.
- После перезагрузки необходимо выполнить еще несколько настроек.

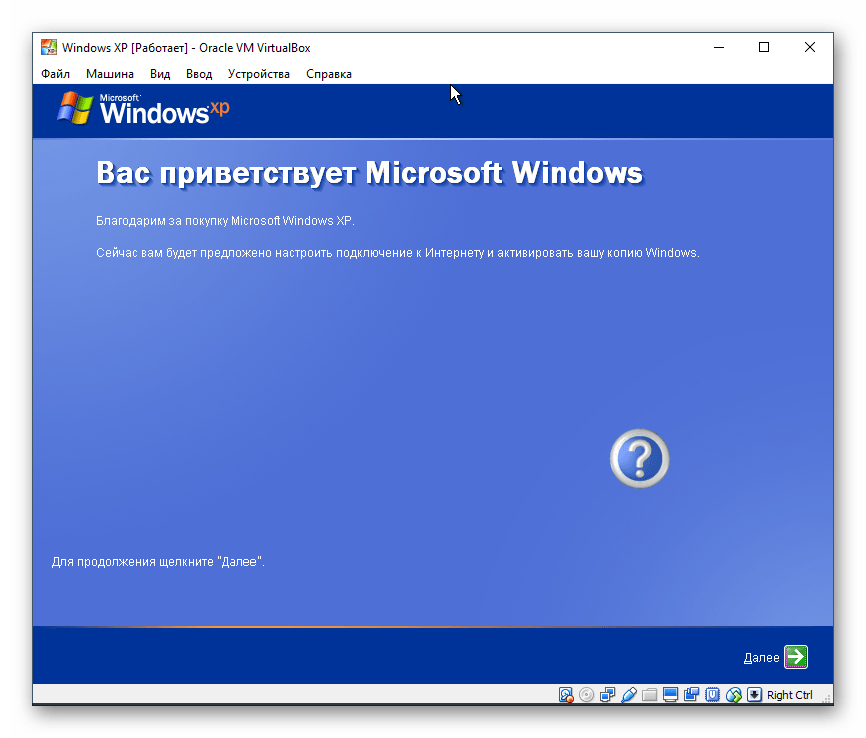
- Откроется приветственное окно, в котором нажмите «Далее».
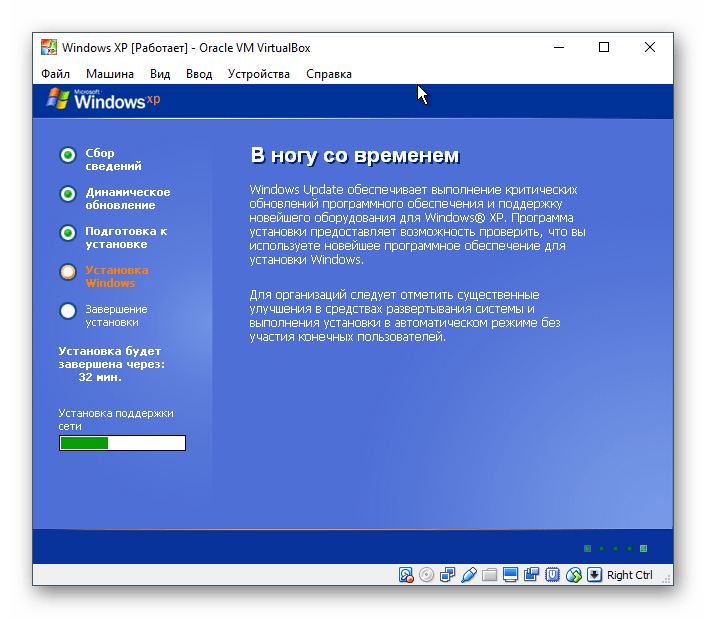
- Установщик предложит включить или отключить автоматическое обновление. Задайте параметр в зависимости от личных предпочтений.
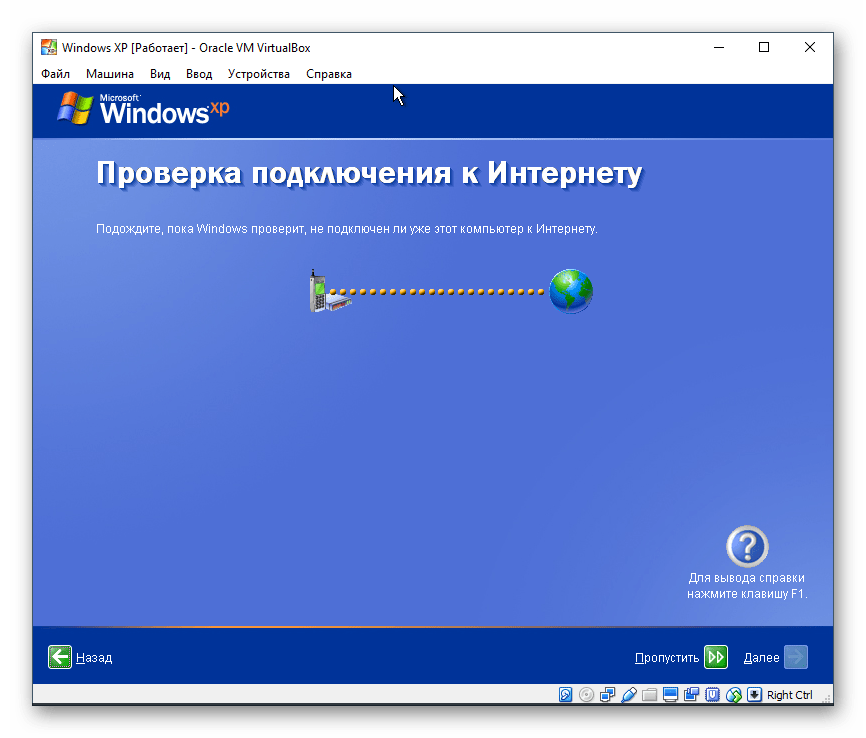
- Дождитесь, пока будет проверено подключение к интернету.
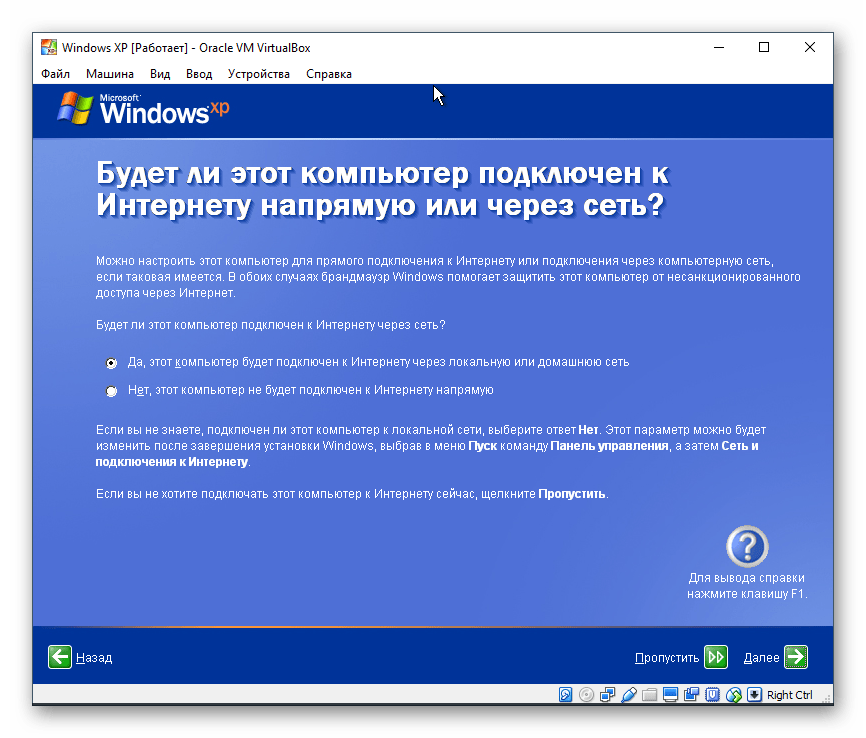
- Выберите, будет ли компьютер подключен к интернету напрямую.
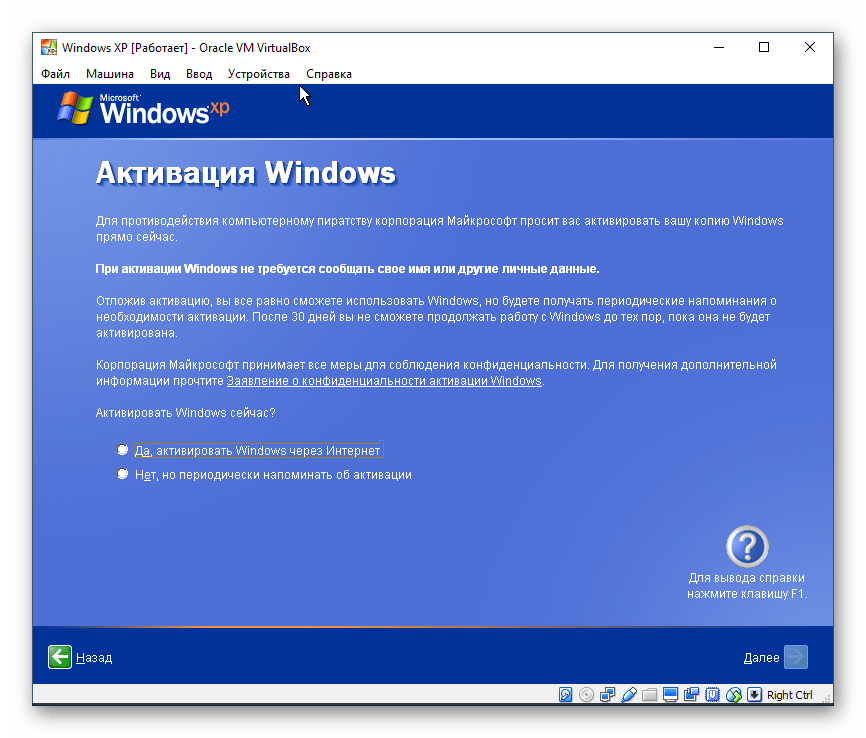
- Вам будет повторно предложено активировать систему, если вы этого еще не сделали. Если не активировать Виндовс сейчас, то это можно будет сделать в течение 30 суток.
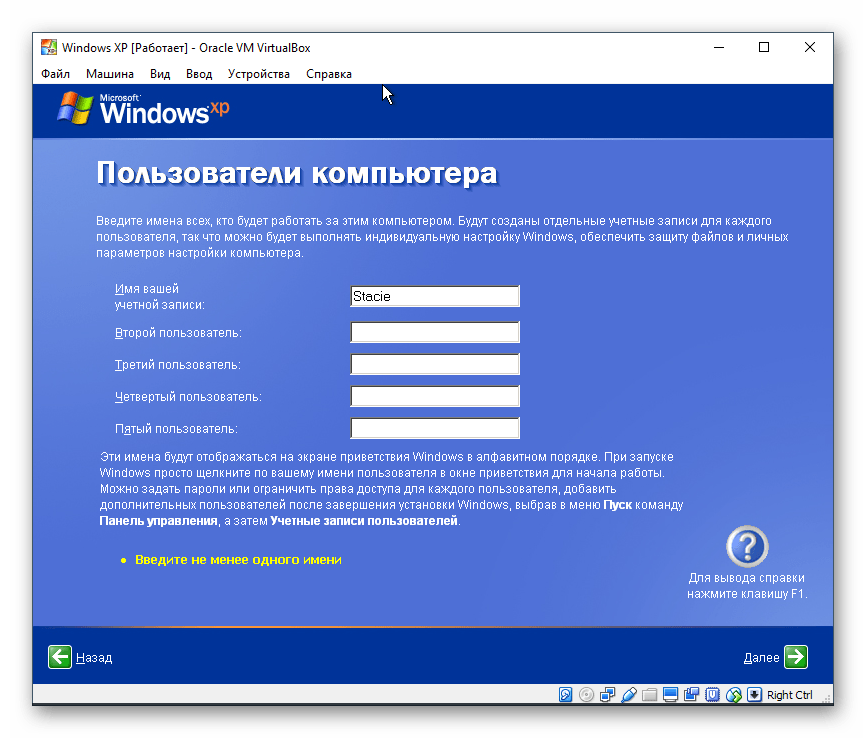
- Придумайте имя учетной записи. Необязательно придумывать 5 имен, достаточно ввести одно.
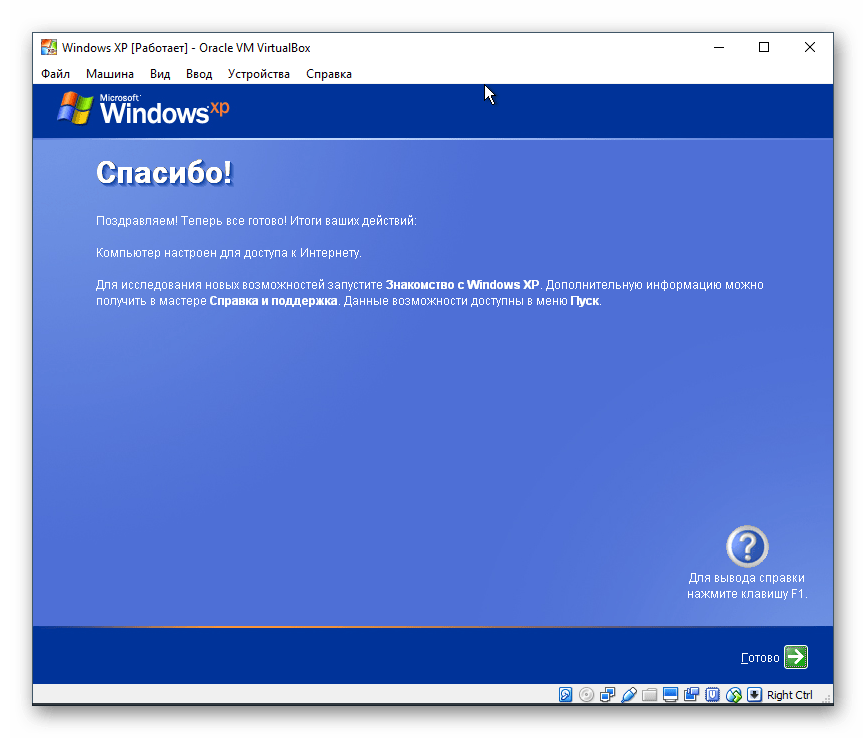
- На этом шаге настройка будет завершена.
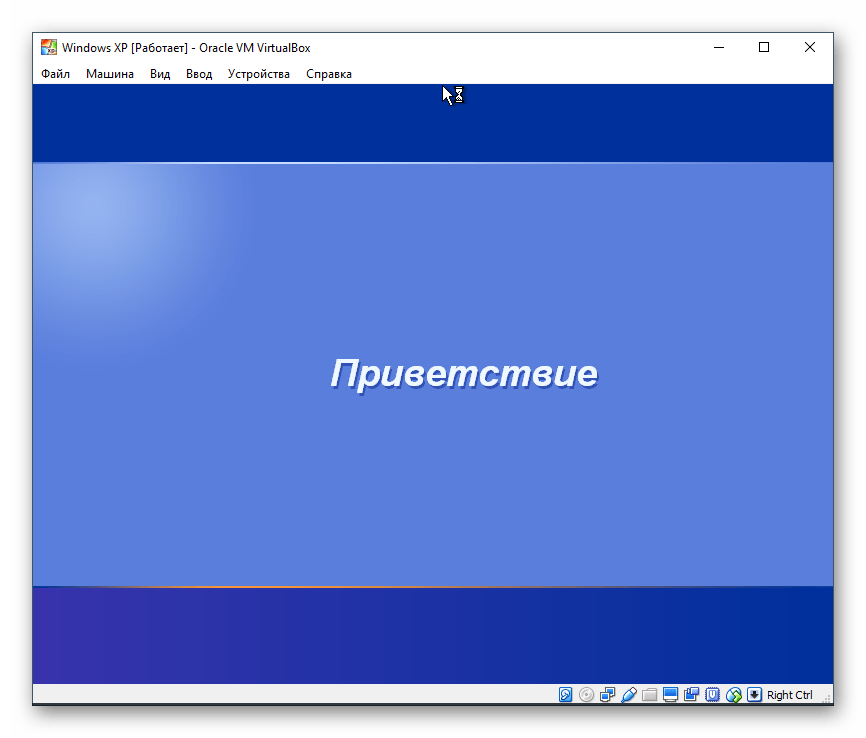
- Начнется загрузка Windows XP.


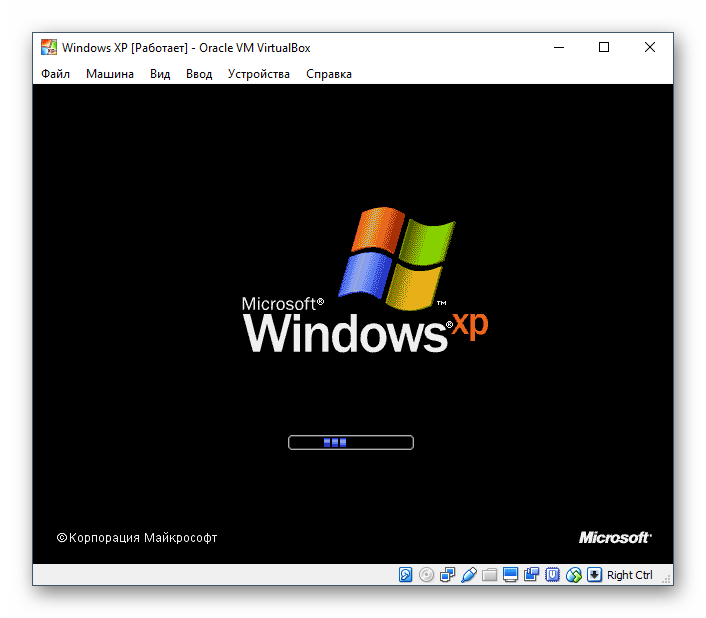
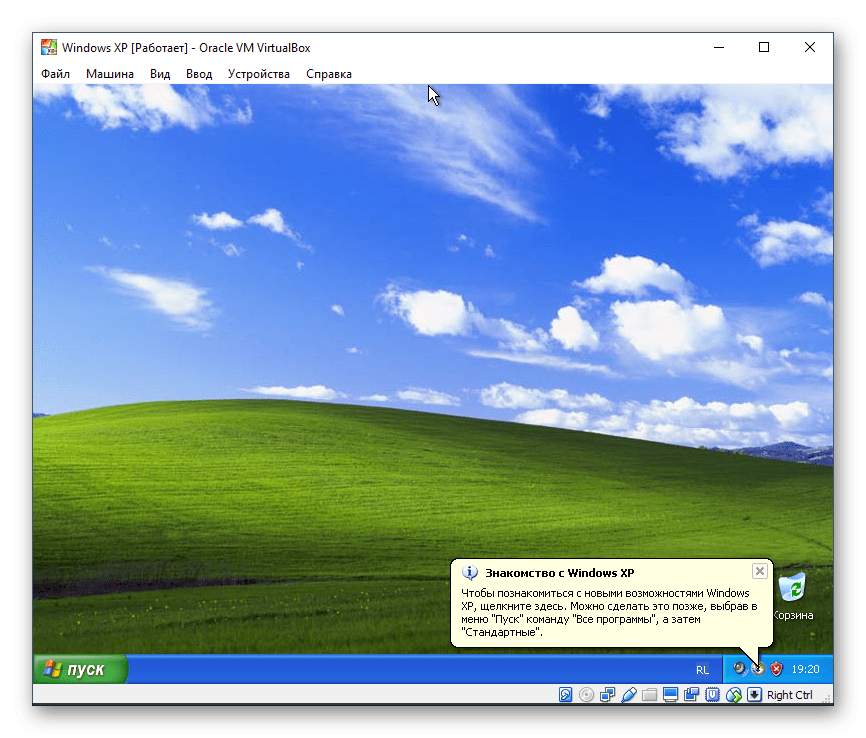
После загрузки вы попадете на рабочий стол и сможете начать пользоваться операционной системой.
Установка Windows XP на VirtualBox очень проста и не занимает много времени. При этом пользователю нет необходимости искать драйвера, совместимые с компонентами ПК, как это было бы необходимо делать при обычной установке Windows XP.
Наша группа в TelegramПолезные советы и помощь