
If you still use Windows 7 and you still have programs that are no longer compatible with this version of Windows, Microsoft has everything planned, because it allows you to reinstall a Windows XP SP3 virtual machine legally in a few clicks.
Indeed, no IT knowledge will be necessary to use it.
You will simply need to download 2 files and install them.
This solution is called Windows XP Mode and is available for people who have a professional, enterprise, or ultimate edition of Windows 7.
Note that this still requires support and activation of the Intel VT-x or AMD-V in the BIOS of your motherboard since the Windows XP Mode solution is based on the older virtualization solution : Microsoft Virtual PC.
- Installing Windows XP Mode
- Installing Windows Virtual PC
- Configuring Windows XP Mode
- Reactivate the Windows XP home screen
- Uninstall Windows XP Mode
1. Installing Windows XP Mode
To get started, download and install Windows XP Mode from the Microsoft Download Center (via archive.org, as Microsoft removed the file from their server).
The downloaded «WindowsXPMode_en-us.exe» file will be approximately 469 MB, which is normal since it contains a virtual hard disk with a Windows XP SP3 installation.

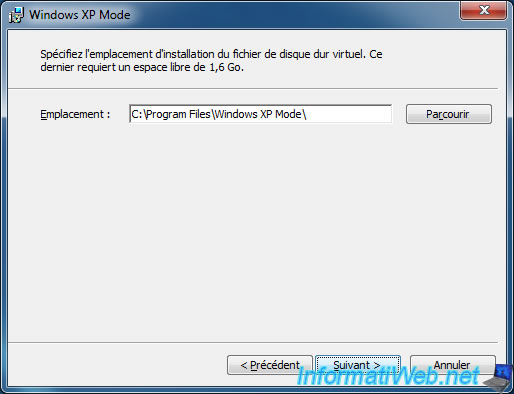
Select where you want to extract the virtual hard disk from Windows XP.
Note that it may take more space depending on what you install in this virtual machine.
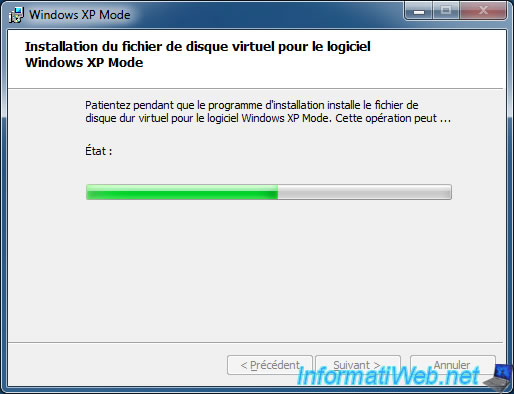
Wait while installing Windows XP Mode.
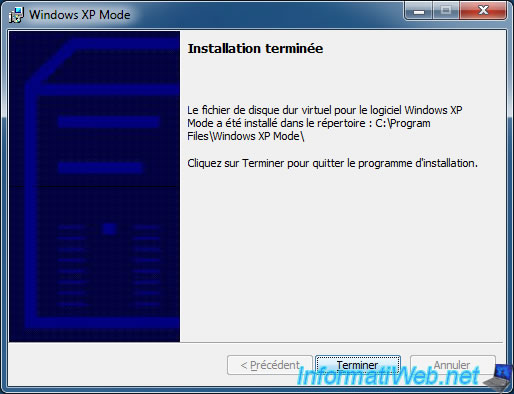
Now, you have a virtual hard disk with Windows XP SP3 inside.
But, in order to use it, you will also need the virtualization solution from Microsoft compatible with this virtual hard disk.
2. Installing Windows Virtual PC
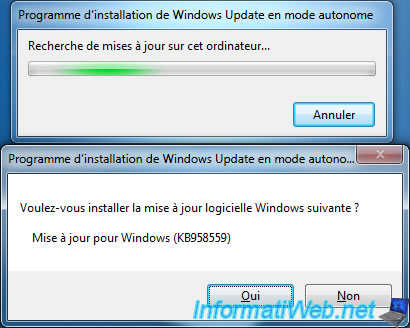
To use your Windows XP virtual machine, you will need to download and install Windows Virtual PC (which is free).
Note that this virtualization solution is provided by Microsoft as a Windows Update (KB958559) and can only be used under Windows 7.
Download the version adapted to your version of Windows 7 :
- for Windows 7 in 32-bit (x86) : Windows6.1-KB958559-x86-RefreshPkg.msu
- for Windows 7 in 64-bit (x64) : Windows6.1-KB958559-x64-RefreshPkg.msu
To remove the requirements for Windows XP Mode and Windows Virtual PC (which requires enabling the Intel vt-x/AMD-V virtualization feature in the BIOS), download and install the KB977206 update for Windows 7 also from archive.org (direct links : Windows6.1-KB977206-x86.msu / Windows6.1-KB977206-x64.msu).
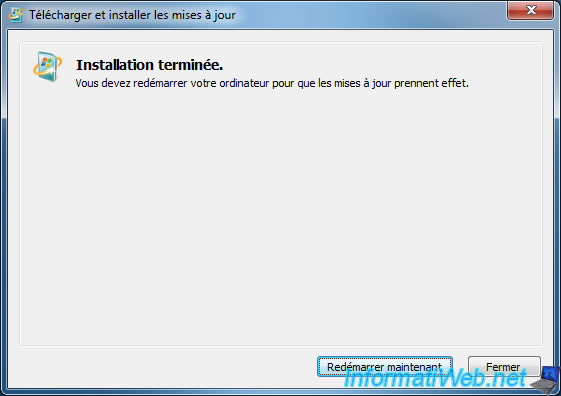
Wait while installing this update.
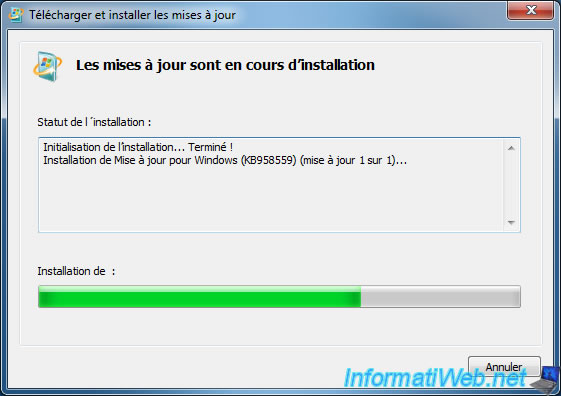
Then, restart your computer.
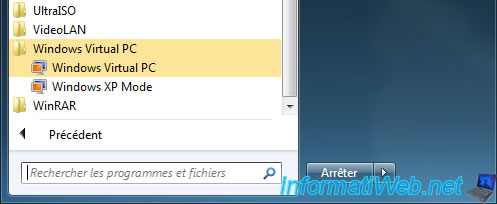
After restarting your computer, you will find a new «Windows Virtual PC» folder in the Windows 7 Start menu with 2 shortcuts :
- Windows Virtual PC : to access the list of your virtual machines (including XP mode)
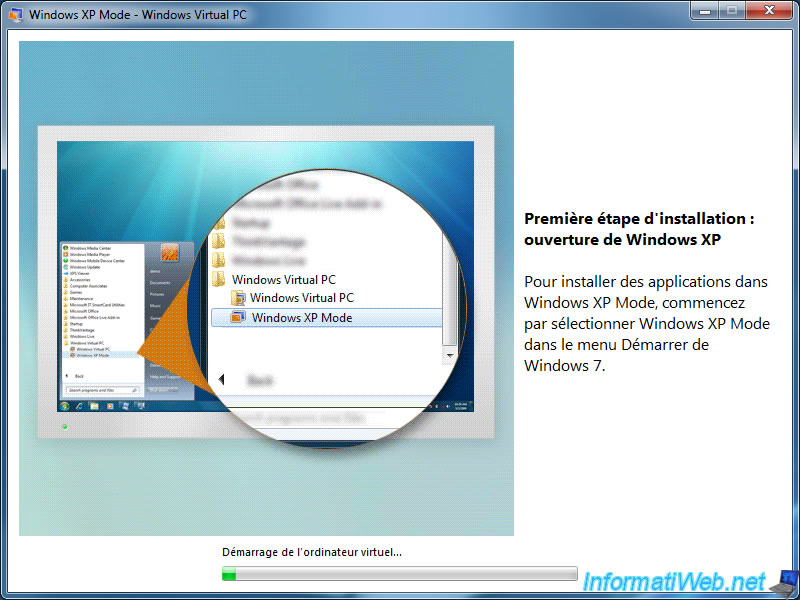
- Windows XP Mode : to launch the «Windows XP Mode» virtual machine
Click on «Windows XP Mode».
Note : if you want to reset this installation of Windows XP one day, you will just have to uninstall the «Windows XP Mode» program installed on your Windows 7 PC, then reinstall it.
This will remove the «Windows XP Mode» virtual machine, as well as its virtual hard disk, and restore both items to their original configuration.
3. Configuring Windows XP Mode
Accept the license agreement.

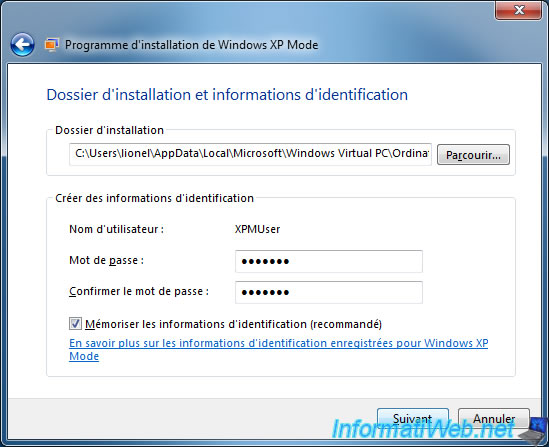
By default, an account named «XPMUser» (for XP Mode User) will be created in this virtual machine.
Enter a password for this user and choose whether you want the password stored.
In this case, the account will be password protected, but the integration features of Virtual PC will allow you to use this virtual machine without having to enter it.
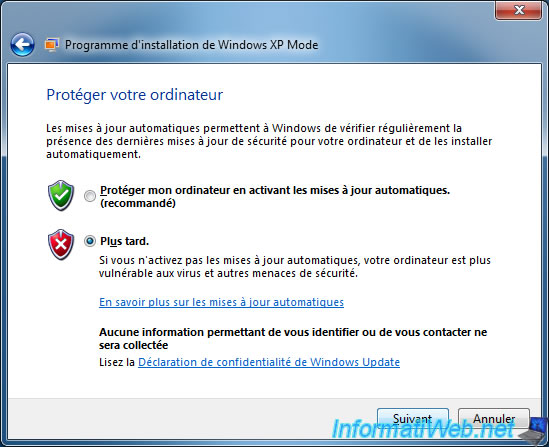
Choose whether you want to automatically install updates for Windows XP (knowing that anyway, this will never protect you 100% of hackers as the support of Windows XP is over).
Click : Start installation.
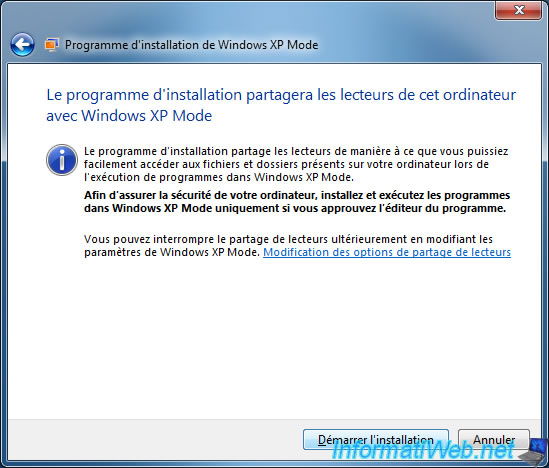
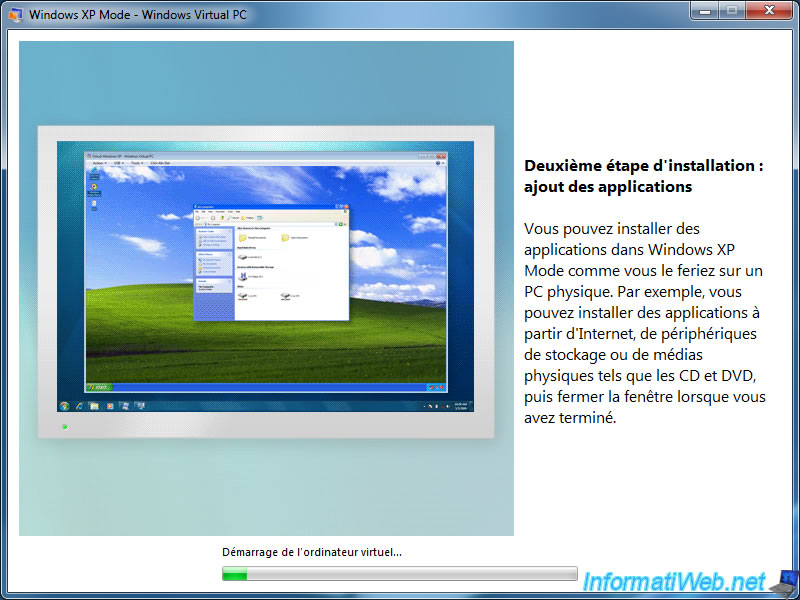
Wait while setting up Windows XP Mode.
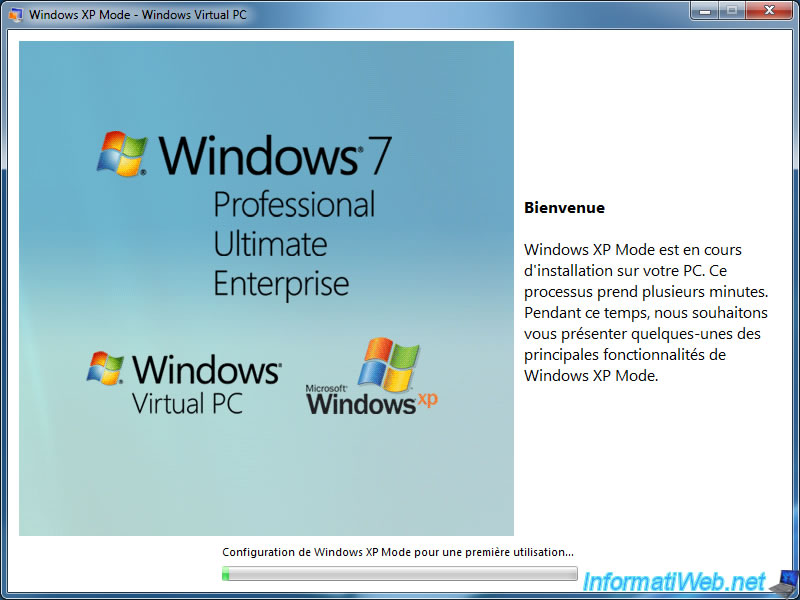
As you can see, the wizard will start the virtual machine in the background.
In fact, by default, Windows installation is generalized by Microsoft through sysprep, and the wizard will perform the rest of the configuration through an answer file (sysprep.inf).
As you can see, you will be able to add applications (for example : programs that run on Windows XP, but that no longer work under Windows 7).
However, Windows Virtual PC will probably not allow you to play old games (unlike other newer virtualization solutions like VMware Workstation).
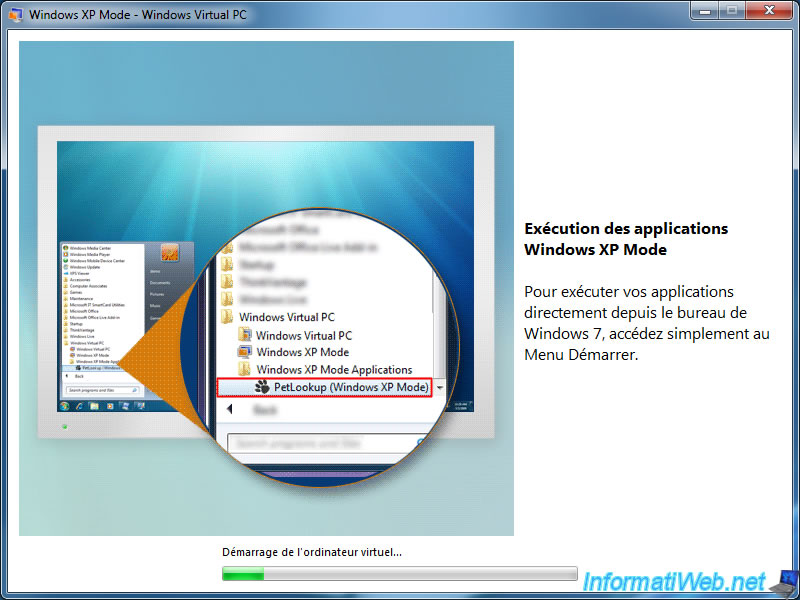
Thanks to the integration features that are automatically installed in this virtual machine, you will automatically find the shortcuts of the applications installed in it in the Windows 7 start menu.
Once the Windows XP setup is complete, this window will close.
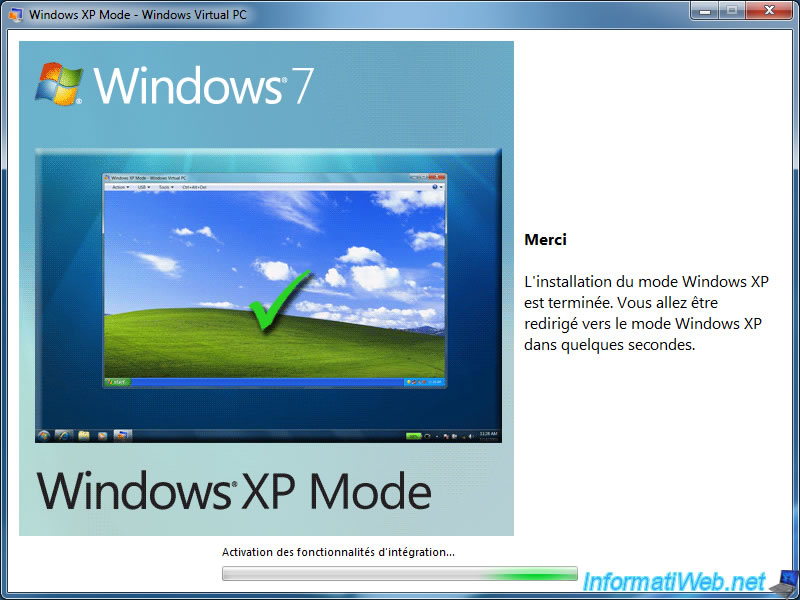
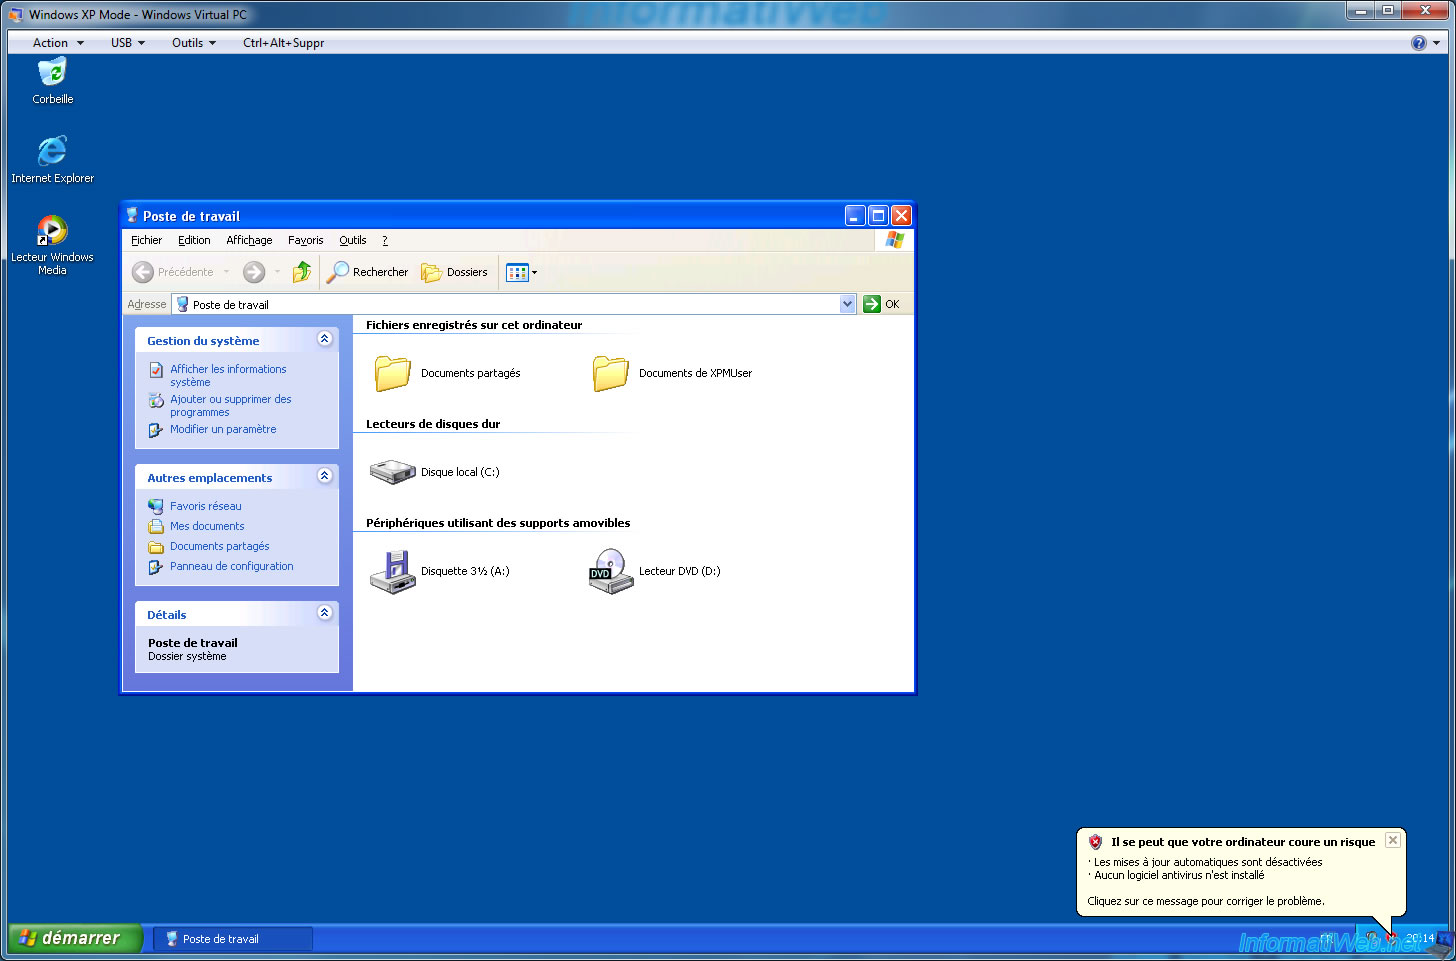
The Windows XP virtual machine appears and starts without problems.
Here you are with a real installation of Windows XP SP3 legally pre-activated by Microsoft that will allow you to reuse your old programs without problems while maintaining the performance and security of Windows 7 for your everyday use.

As you can see in the system properties of Windows XP, this is a SP 3 version of Windows XP and Windows XP is activated by the «manufacturer» of this computer (OEM).
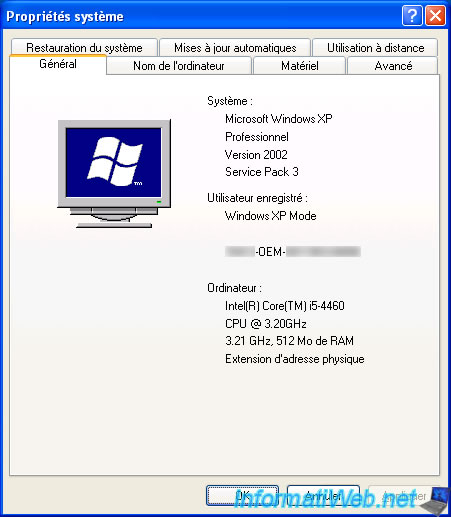
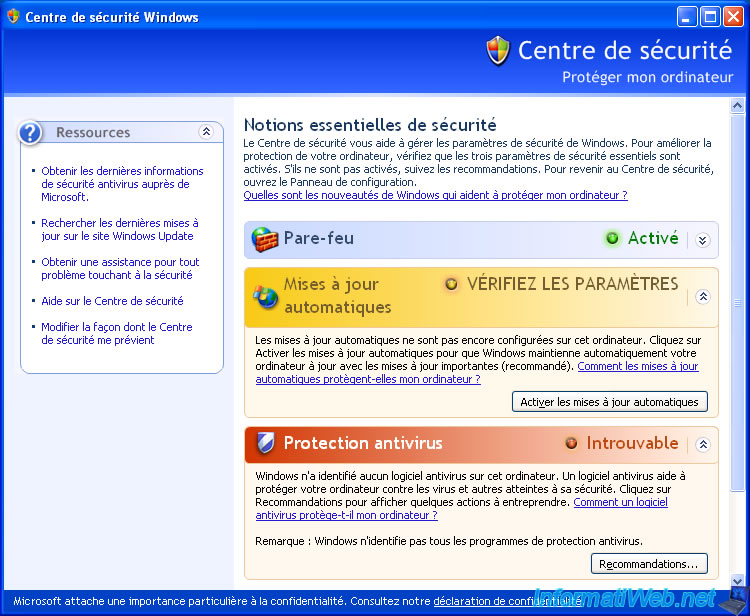
Since this is Windows XP SP 3, you will also benefit from the Windows XP SP 2 security center.
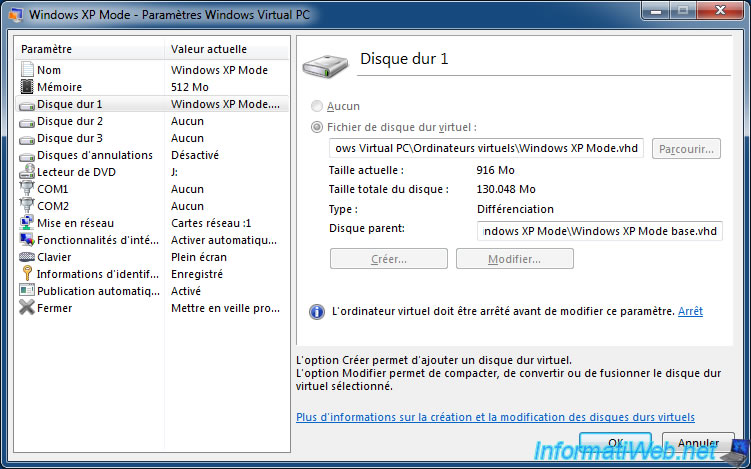
Open the settings for this virtual machine by clicking Tools -> Settings.

As you can see, by default, everything you add to this virtual machine will be stored in the «Windows XP Mode.vhd» virtual hard disk and not in the «Windows XP Base.vhd» base.
In case of formatting your physical PC, it will be necessary to save only the file «Windows XP Mode.vhd» (which contains only your data and applications installed in XP).
Be careful though to a «security breach» present by default in this XP mode.
Indeed, if you know a minimum of virtualization, you know that it is to run one or more machines independent of the host system (the physical PC) and that they are therefore completely isolated from the host system.
Except that in the case of Windows XP Mode, Microsoft preferred the ease of use, rather than security.
Which means that, by default, you have access to all the partitions of your physical PC from this virtual machine.
If you launch a virus in this virtual machine, it will have the opportunity to infect all files on your physical PC.
To remedy this problem, first install an anti-virus in this virtual machine (a free anti-virus will be enough).
Then, you have 2 possibilities.
The first is to completely disable the integration features. But this will also disable clipboard sharing, which can be a hassle if you want to copy/paste files or programs from your physical PC to this virtual machine.
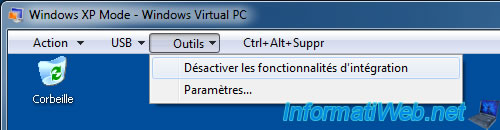
The other, more practical solution is to uncheck the «Drives» checkbox in the «Integration Features» section.

You can also disable the automatic publishing of virtual applications in the «Auto Publish» section.
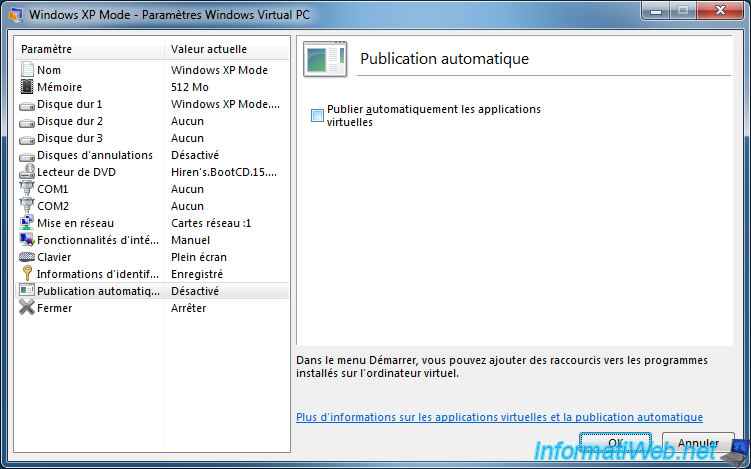
Note that the changes made will be taken into account the next time the virtual machine is started.
What Microsoft doesn’t say is that you must shut down the virtual machine, and then restart it, not restart it or close the window (which, by default, puts Windows XP in hibernation instead of shuting down the VM).
To turn it off completely (shut down Windows XP completely), use the «Run» option of Windows XP and type this in the box :
Batch
shutdown /s -t 0
The virtual machine stops.
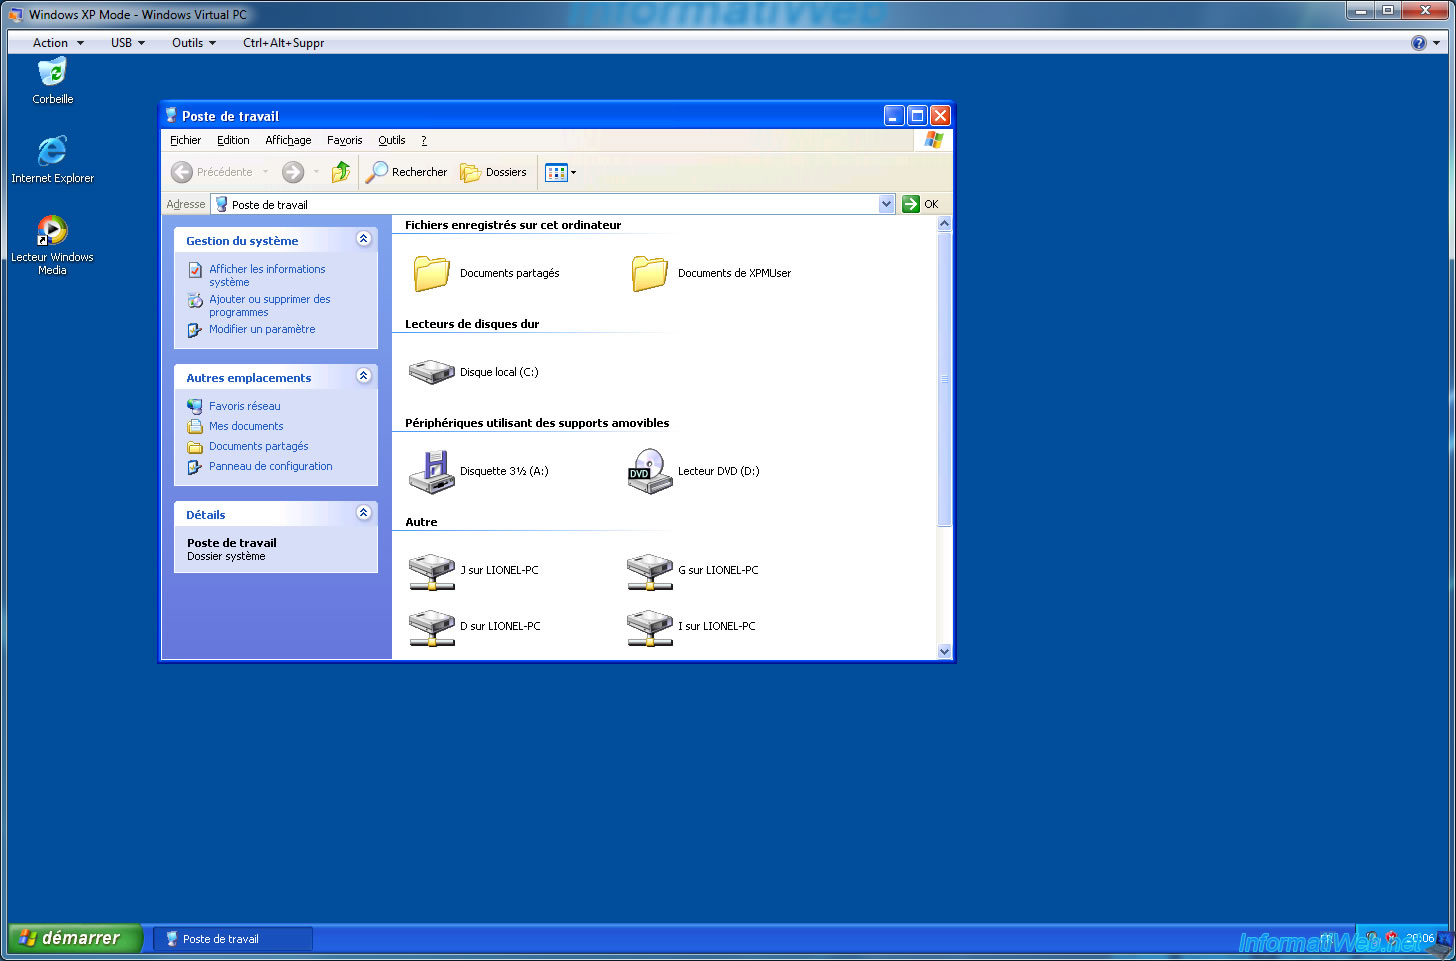
Then, restart the «Windows XP Mode» virtual machine from the Windows 7 start menu and open the workstation.
As expected, the drives (partitions) of your physical PC are no longer accessible from the virtual machine.
Напомню, что такой процесс интеграции первоначально был разработан, чтобы помочь корпоративным клиентам Microsoft включать любые обновления ОС в образ и распространять этот образ внутри корпоративной сети, что поможет сократить потери времени на то, чтобы после установки исходной версии ОС на многочисленные ПК дождаться установки множества . Если есть возможность предварительной интеграции, то Вы можете держать установочный образ ОС всегда обновленным, что обеспечит минимум потерь времени на постустановочные действия. Microsoft также использует этот механизм, что стоит отметить, чтобы постоянно обновлять свои дистрибутивы вновь вышедшими обновлениями.
Конечно же, все то, что здесь задокументировано, будет представлять интерес прежде всего для обычных пользователей и, возможно, малого бизнеса, которые не имеют доступа к программе volume-лицензирования Microsoft, посредством которой можно своевременно получать самый «свежий» выпуск дистрибутива. Любой, кто устанавливал Windows XP Service Pack 2 (SP2) в прошлом году, может сказать Вам, что нет ничего хуже монотонности установки самой ОС и затем необходимости установить более ста ее обновлений с многочисленными перезагрузками. Ведь такой метод — это не правильно.
Но выполнив интеграцию имеющегося у Вас дистрибутива Windows XP Service Pack 2 (SP2) с новым SP3, Вы, по крайней мере, избавитесь от необходимости обновлять систему в следующий раз, когда Вы собиретесь ее переустанавливать. И вместо установки ста с лишним обновлений, Вам понадобится установить лишь малое их количество. (Конечно же, число обновлений с течением времени продолжит увеличиваться.)
ПРОЧТИТЕ, ЭТО ВАЖНО: В то время, как я буду излагать читателям материал по интеграции, Вы должны понимать, что Вы берете на себя всю ответственность и риск! Убедитесь, что Вы полностью сделали копию всей информации на вашей системе перед осуществлением операций по стиранию/установке ОС или ее обновления/интеграции. Помните, что впоследствии Вы должны будете выполнить активацию Вашей копии ОС Microsoft Windows, что может потребовать от Вас совершения междугородних звонков и выхода в интернет. Будьте готовы вернуться к Вашей предыдущей системе, установленной с имеющегося дистрибутива Windows XP SP2 на компакт-диске или ином носителе информации, если что-либо не удастся. Если Вы считаете себя оптимистом, то худшее, что может произойти — это необходимость повторной установки XP SP2 с последующей установкой SP3. Это не так уж и ужасно.
Необходимые требования для проведения работы:
На этот раз я привожу Вам набор инструкций по интеграции, используя только свободно доступные утилиты и программы (то есть абсолютно бесплатные), которые Вы можете абсолютно точно найти в сети. Вот — то, что Вам понадобится в ходе дальнейшей работы:
• Установочный диск Windows XP Home или Professional с SP2. Возможно, что оригинальный установочный компакт-диск с XP SP1 тоже будет нормально работать, но я проводил свои работы на XP SP2, имея под рукой обычный retail-диск и диск, полученный по программе volume-лицензирования. (Вы вполне можете попробовать поработать и с OEM-диском от изготовителя Вашего ПК, но 100% гарантии дать не могу, все зависит от того, как была изменена разметка диска и образа.) Нормальный диск или Upgrade CD от Microsoft работают вполне прекрасно. Мною проводилась процедура интеграции на дистрибутивах с обычных одинарных дисков, пользователей Windows Media Center и TabletPC ничем порадовать, но и огорчить не могу.
• Автономный установщик Windows XP Service Pack 3. Этот файл размером в 316Mб теперь доступен с
Вебсайта Microsoft.
• ISO Buster. Этот полезный инструмент восстановления данных может быть загружен абсолютно бесплатно.
• Nero 8 Trial. Это ознакомительная версия, доступная бесплатно, включающая только лишь сам Nero Burning ROM. (Если Вы захотите заплатить за программу, то сможете использовать все прилагающиеся дополнения к ээтому продукту.) Замечу, что возможно использование утилиты ImgBurn вместо Nero 8.
• Другие файлы. Вам могут понадобиться дополнительные файлы после проведения интеграции, они могут прилагаться на компакт-диске или USB с комплектацией Вашего компьютера. Этими файлами могут быть драйвера для Вашего оборудования (особенно обратите внимание на наличие драйверов для сетевых устройств), а также уже скаченные обновления для Вашего ПО, но это еще упомянется в Пункте 6 ниже.
Убедитесь, что Вы загрузили автономный установщик XP SP3, ISOBuster и Nero 8 Trial перед продолжением! Устанавливая Nero, Вам будет предложено установить множество дополнительных модулей, длинный список которых будет представлен в открывшемся диалоговом окне. Помните, только Nero Burning ROM, третий в списке, нам требуется (см.рисунок).
 в имеющийся у Вас дистрибутив Windows. Пошаговое руководство.")
Начиная с этого момента, я предполагаю, что Вы загрузили и установили все, что требуется, сделали копию важных данных и готовы продолжить.Важное примечание для пользователей Windows Vista: Вы можете выполнить дальнейшие указания, работая как в Windows XP, так и в Windows Vista, на ваш выбор. Я пробовал и так, и так, но скриншоты, представленные в данной публикации, сделаны на Windows XP. У меня есть лишь одна оговорка для пользователей Vista: по некоторым причинам, попытки интеграции SP3 в Windows XP Professional, полученный по программе volume-лицензирования, окончились неудачей, которая проявила себя при попытке дальнейшей активации продукта — Windows перестала признавать действительный ключ продукта. Чтобы избежать подобной проблемы, убедитесь, что вы обладаете Администраторскими привелегиями при выполнении действий, описанных в Пункте 3.
Чтож, давайте начнем!
Пункт 1: Скопируйте содержимое установочного компакт-диска Windows XP на жесткий диск
Откройте Мой компьютер (в Vista — Компьютер) и выберите наверху меню «Сервис», а затем «Свойства папки». В диалоговом окне Свойства папки найдите и отметьте пункт «Отображать скрытые файлы и папки». Далее, снимите метку с пункта «Скрывать защищенные системные файлы (Рекомендовано)». Подтвердите Ваши действия в открывшемся предупреждении, нажмите «OK», чтобы закрыть диалоговое окно.
Вставьте установочный диск с Windows XP в привод вашего ПК и закройте все появившиеся окна автозапуска. В Моем компьютере (или просто Компьютере), кликните правой кнопкой по значку привода и из контекстного меню выберите пункт «Откурыть». Оставьте окно открытым, чтобы видеть содержимое компакт-диска.
Вновь откройте Мой компьютер. На сей раз, перейдите в корневой каталог вашего жесткого диска (C:\), Вы можете выбрать по своему усмотрению и любое другое местоположение, куда бы хотели временно поместить файлы с компакт диска, которые Вы в конечном счете объедините с SP3. Создайте папку, например xp (C:\xp). Затем создайте вторую папку, например sp3 (C:\sp3).
Теперь, переместите ВСЁ содержимое установочного компакт-диска Windows XP в папку C:\xp.
 в имеющийся у Вас дистрибутив Windows. Пошаговое руководство.")
Пункт 2: Распакуйте содержимое установочного файла XP SP3 на Ваш жесткий диск
Теперь Вам потребуется извлечь файлы из установщика SP3. Пока копируются файлы с компакт-диска на жесткий диск, копируем автономный установщик Windows XP SP3 (стандартное название windowsxp-kb936929-sp3-x86-enu.exe для англ. языка) в директорию C:\sp3. Нам потребуется командная строка (для Windows XP нажимаем Пуск-Выполнить, в появившемся диалоговом окне набираем «cmd», ав Windows Vista достаточно открыть меню Пуск и набрать cmd в строке Поиска).
После этого, используя нижеприведенные команды, переходим в директорию C:\sp3 и извлекаем установочные файлы туда (Отметьте, что надпись [ENTER], означает нажатие клавиши ENTER):
cd \ [ENTER]
cd sp3 [ENTER]
windowsxp-kb936929-sp3-x86-enu.exe -x:c:\sp3 [ENTER]
Появится диалоговое окно процесса извлечения файлов из архива, которое покажет ход извлечения.
Когда процесс распаковки завершится, вы увидите соответствующее окно. Нажмите ОК для продолжения.
Внутри директории C:\sp3 Вы увидите новую папку i386, которая содержит только что извлеченные файлы.
Оцените статью: Голосов
Details
Windows
XP Mode for Windows 7 makes it easy run many of your productivity programs that
run on Windows XP on Windows 7. It uses virtualization technology such as
Windows Virtual PC to provide a Virtual Windows XP environment for Windows
7.
Windows
XP Mode provides a 32-bit virtual Windows XP Professional Service Pack 3 (SP3)
environment. This download includes a virtual hard disk (.vhd file) with
Windows XP SP3 preinstalled. Client virtualization software, such as Windows
Virtual PC is required to use Windows XP Mode.
System Requirements
Supported Operating
System
Windows 7 Service Pack 1
Windows 7
Professional, Windows 7 Ultimate, or Windows 7 Enterprise.
· Hard
disk requirement: 2GB for installing
Windows XP Mode. Additional 15GB of hard disk space for the virtual Windows
environment.
Note: You can use Windows Virtual PC to run Windows
XP Mode on your computer. Windows Virtual PC requires processor capable of
hardware virtualization, with AMD-V™, Intel® VT or VIA® VT turned on in the
BIOS.
Windows XP Mode for Windows 7, 8.x, and 10
Последний сервис пак для Windows XP именуется как SP3, но есть пользователи у которых не установлен этот пакет обновлений, а установлена версия Windows XP SP1 или Windows XP SP2. Поскольку эти сервис паки уже давно не поддерживается, многие программы и игры могут не работать, и даже не будут устанавливаться. Для решение этой проблемы достаточно установить пакет обновлений SP3 и ваши не рабочие программы будут работать на Вашей системе. В данной статье я расскажу как превратить Windows XP с сервис паком SP2 в XP SP3 или SP1 в XP SP3, без скачивания и установки увесистого обновления в 303 Мегабайта.
Теперь попробуем без установки пакета обновлений, сделать данную систему с третьим сервис паком.
1. Открываете меню «Пуск», далее «Выполнить…».
2. В открывшуюся форму вводите «regedit», тем самым вызывая редактор реестра.
3. Нас будет интересовать раздел реестра «HKEY_LOCAL_MACHINE»
4. Идём по пути «HKEY_LOCAL_MACHINE\SYSTEM\CurrentControlSet\Control\Windows » и находим параметр «CSDVersion».
5. Клацаете два раза на этом параметре, открывается окно. Нас интересует содержимое поля «Значение:», по-умолчанию будет значение «200».
Это значение меняете на «300», нажимаем кнопку «ОК», закрываем редактор реестра и перезагружаем компьютер.
Проверяем версию системы в свойствах, вместо SP2 стало SP3.
Готово.
Категория: Статьи
by Microsoft
A complete, licensed copy of Windows XP contained in a virtual hard disk
Operating system: Windows
Publisher:
Microsoft
Antivirus check: passed
Report a Problem
Windows XP Mode is a specially prepared distribution for Microsoft Virtual PC, allowing you to run a full version of Windows XP in Windows 7. The program can be run as a regular application and run in a separate window. This may be useful to solve compatibility problems if some important programs that have been running WinXP do not work in Windows 7.
In Windows XP Mode, you can perform all the operations you might have performed on a normal system. You can work with hard drives and CDs, use flash drives, install applications, work with files, use office software and much more. Since the program was created to facilitate the migration to Windows 7, some programs that consume a lot of resources and actively use the graphics adapter, such as 3D games, may not work.
After installing the programs in the virtual OS, links to them become available in Windows 7, Start menu→Windows Virtual PC→Windows XP Mode Applications. When you start a link to a program from the menu, the virtual operating system will automatically start up in invisible mode and the selected application.
Windows XP Mode allows running older software not compatible with Windows 7, improving functionality and user experience.
The system requires Microsoft Virtual PC software installed and hardware virtualization support from the processor. The XP Mode package contains Windows XP Professional Service Pack 3.
— a complete Windows XP SP3 operating system;
— the ability to work with the operating system as with a standard application;
— the ability to run Windows XP applications directly from Windows 7;
— the small size of the installer;
— easy installation and use of the system.
Allows running of old programs not compatible with newer Windows.
Offers additional layer of data protection with isolated virtual environment.
Provides seamless application publishing and launching from host machine.
Limited to Professional, Enterprise and Ultimate editions of Windows 7.
Doesn’t support 3D graphics, limiting gaming and graphic design capabilities.
Requires hardware virtualization technology, which not all computers have.
Theo
Sun, Apr 7, 2024
Windows XP Mode is a Windows XP specific software package. It is basically a virtual operating system package. It is a completely free package.This package software can emulate Windows XP SP3. It allows the users to run programs that are Windows XP exclusive. The user experience also feels pretty native like Windows XP as well. This software can also work like a virtualization platform. However, it does not receive any official updates anymore.
👨💻️ USER REVIEWS AND COMMENTS 💬
image/svg+xmlBotttsPablo Stanleyhttps://bottts.com/Florian Körner
Josh
A software for Windows that makes it easy to install and run many programs that run on Windows XP, directly on a computer running Windows 7
image/svg+xmlBotttsPablo Stanleyhttps://bottts.com/Florian Körner
Connor Kibble
The Windows XP Mode software offers a virtual Windows XP environment to run legacy applications.
image/svg+xmlBotttsPablo Stanleyhttps://bottts.com/Florian Körner
Rory O.
Windows XP Mode is a virtualization software that allows users to run older applications that are not compatible with newer operating systems like Windows 7 or 8. It emulates a Windows XP environment, allowing users to install and run legacy software. The software includes a license for Windows XP to be installed within a virtual machine, and also integrates with the host operating system to provide seamless integration with the user’s existing desktop environment. Other features include support for USB devices, network printing, and the ability to copy and paste between the host and virtual machines.
image/svg+xmlBotttsPablo Stanleyhttps://bottts.com/Florian Körner
Kai Wesen
Windows XP Mode is a virtualization software that allows users to run older Windows XP programs on newer versions of Windows operating systems.
image/svg+xmlBotttsPablo Stanleyhttps://bottts.com/Florian Körner
Lewis
Windows XP Mode is a software utility for the Windows 7 operating system. Its most important feature allows users to run applications that are compatible only with Windows XP. This unique capability is particularly beneficial if you have older software versions that aren’t designed for newer Windows versions. Windows XP Mode essentially creates a virtual environment that replicates the XP operating system, enabling seamless operation of outdated applications.
image/svg+xmlBotttsPablo Stanleyhttps://bottts.com/Florian Körner
Joseph
Windows XP Mode is a virtual machine package for Windows 7. Its primary function is to enable users to run applications that are only compatible with Windows XP. Whilst it’s essentially a copy of the XP version of Windows, this software is integrated into your Windows 7 operating system, providing a seamless operation for end users. Its seamless user interface makes for an efficient workspace, saving the user time and effort. Notably, it also has a built-in functionality for USB devices, allowing for easy data transfer and compatibility.
Old school software to run old applications on newer systems.
Free open source for file transfer on Windows
A freeware BASIC-like scripting language designed for automating the Windows GUI and general scripting
Software compatale with windows 7 and 8 to optimize the usages of your computer
A feature packed mobile management tool that lets you view , compose SMS messages, manage music, movies, or photos
An excellent iOS cleaner tool that clean up junk files on iPhone, iPad, iPod Touch, windows