
После установки Windows 10 поверх уже установленной системы (это может быть только Windows 7 или Windows 8.1), пользователь может без переустановки вернуть предыдущую версию ОС, если новая ОС работает нестабильно, или просто не понравилась. В этой статье мы покажем, как откатить установку Windows 10, рассмотрим особенности и ограничения процесса такого даунгрейда.
Содержание:
- Откат Windows 10 после апгрейда предыдущей версии Windows
- Папки Windows.old и $WINDOWS.~BT и 30 дневный период
- Запуск даунгрейда Windows 10 через режим восстановления
- Восстановление каталогов Windows.old и $WINDOWS.~BT после удаления
- Windows 10 Anniversary Update и 10 дневный период
Откат Windows 10 после апгрейда предыдущей версии Windows
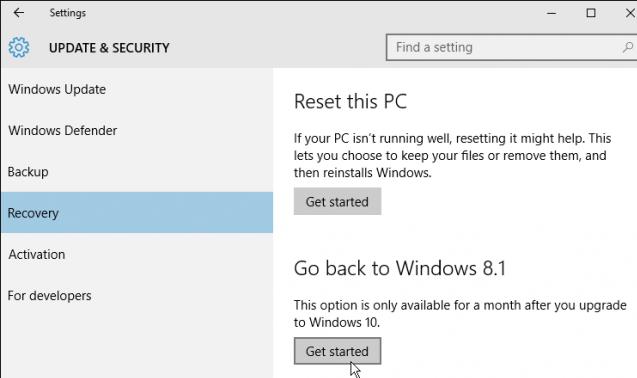
Чтобы откатиться к старой версии ОС, в Windows 10 откройте меню Start и перейдите в раздел -> Settings -> Update and Security — > Recovery (в русской версии Пуск -> Параметры -> Обновление и безопасность -> Восстановление). В разделе Recovery в секции Go back to Windows 8.1 / Вернуться к Windows 8.1 (или Windows 7 в зависимости от версии ранее установленной ОС) нужно нажать кнопку Get started / Начать.
В открывшемся окне нужно будет указать причину, по которой Windows 10 вас не устраивает, и затем, следовать простым инструкциям мастера. После перезагрузки, компьютер загрузится в специальном режиме, в котором будет выполнено удаление Windows 10 и восстановление предыдущей системы. На экране в это время будет отображаться надпись «Restoring your previous version of Windows».

После еще одной перезагрузки, загрузится рабочий стол ранее установленной версии Windows.
Папки Windows.old и $WINDOWS.~BT и 30 дневный период
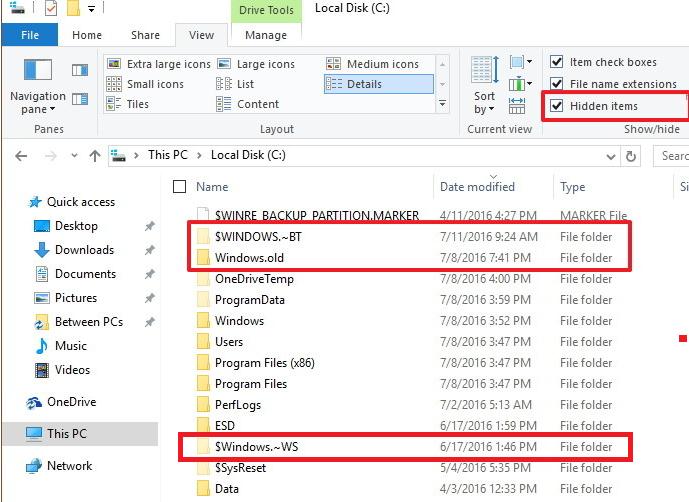
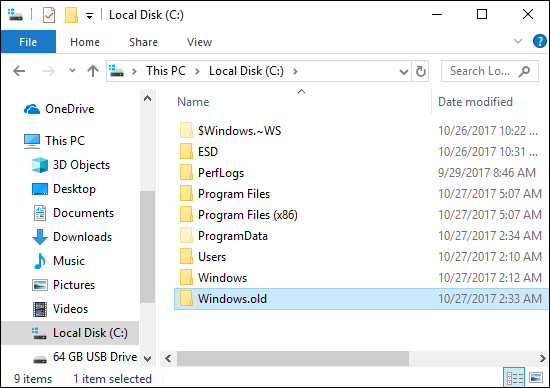
Возможность восстановление предыдущей ОС доступна только в течении 30 дней после выполнения апгрейда до Windows 10. Через 30 дней задание обслуживания Windows автоматически удалит скрытые каталоги Windows.old и $WINDOWS.~BT (в некоторых случаях также имеется каталог $Windows.~WS) в корне системного диска. Именно в этих каталогах хранятся данные и файлы предыдущей версии Windows, необходимые для выполнения отката. Поэтому, если вы планируете сохранить возможность откатить Windows 10, ни в коем случае нельзя удалять каталоги Windows.old и $WINDOWS.~BT с помощью мастера очистки диска или вручную.
Чтобы иметь возможность выполнить даунгрейд ОС и через 30 дней, нужно переименовать эти три каталога, например, в BAK-Windows.old, BAK-$WINDOWS.~BT и BAK-$Windows.~WS. В этом случае, Windows 10 не будет удалять эти каталоги, т.к. их имена изменились.
В дальнейшем, при выполнении отката, нужно вернуть каталогам оригинальные имена.
Запуск даунгрейда Windows 10 через режим восстановления
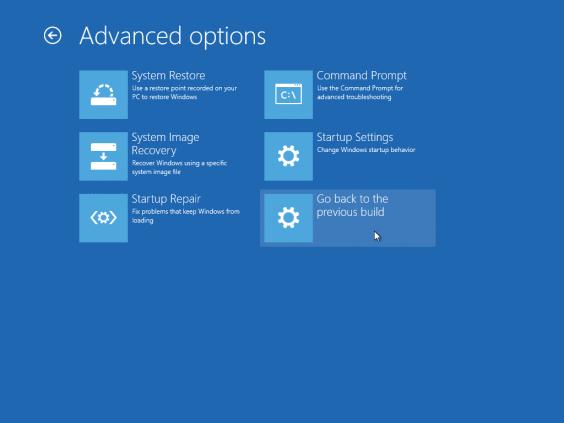
Если невозможно получить доступ к рабочему столу Windows (система не грузится или имеются другие ошибки), то для запуска процедуры возраста к предыдущей версии, нужно загрузить Windows 10 специальном режиме восстановления. Для запуска этого режима можно воспользоваться этой инструкцией, загрузиться с установочного диска Windows 10 (описано тут) или три раза подряд по питанию прервать нормальную загрузку компьютера. В появившемся окне Advanced Recovery Options нужно выбрать Troubleshoot -> Advanced options и нажать кнопку Go back to the previous build.
Восстановление каталогов Windows.old и $WINDOWS.~BT после удаления
В том случае, если после обновления до Windows 10 прошло больше месяца, вы не сможете откатиться к предыдущей версии Windows, т.к. каталоги Windows.old и $WINDOWS.~BT были автоматически удалены. Поэтому, чтобы вернуть предыдущую версию Windows, сначала придется попытаться восстановить данные в этих каталогах. Успех этой процедуры зависит от того, как активно используется ваш диск, сколько на нем свободного места, как давно было выполнено удаление и качества утилиты для восстановления удаленных файлов.
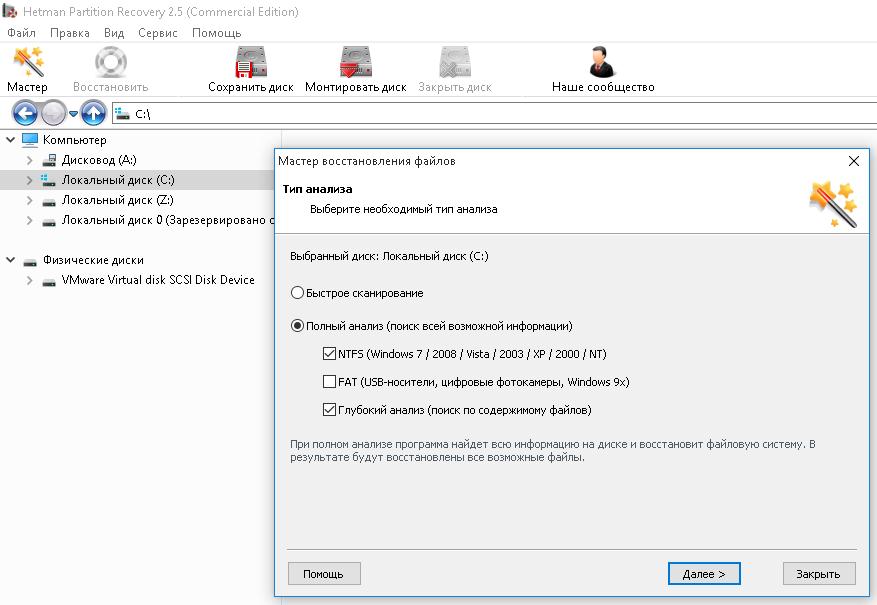
Я воспользовался уже хорошо зарекомендовавшей себя программой Hetman Partition Recovery.
- Запускаем Hetman Partition Recovery, выбираем системный диск C: и запускаем полный анализ NTFS тома на предмет удаленных каталогов.

- Если все хорошо, сканер должен обнаружить в корне диска каталоги Windows.old и $WINDOWS.~BT. Выберите их и восстановите (желательно для начала на отдельный логический или жесткий диск)

- После окончания процедуры восстановления удаленных ранее файлов, скопируйте их на системный диск.
- Можно приступать к откату ОС.

Важно. Настоятельно рекомендуем перед выполнением отката ОС с помощью восстановленных таким образом файлов, создать полную резервную копию системы!
Windows 10 Anniversary Update и 10 дневный период
В том случае, если вы ставили Windows 10 из официального ISO образа системы, вышедшего после 2 августа 2016 года, имейте в виду: начиная с Windows 10 Version 1607 (так называемый Anniversary Update), Microsoft уменьшил время, в течении которого можно откатить систему, с 30 до 10 дней! Видимо по мнению MS система уже достаточно хороша, чтобы в течении 10 дней понять понравилась ли она пользователю или нет.
how to downgrade windows 10 to windows 7
Downgrading from Windows 10 to Windows 7 can be a bit tricky, but it’s doable. The process involves backing up your data, obtaining a Windows 7 installation disk or ISO file, and doing a clean install of Windows 7. You’ll need to make sure you have all the necessary drivers and software ready for Windows 7.
Step by Step Tutorial: Downgrading from Windows 10 to Windows 7
In this process, we will guide you through each step to successfully move from Windows 10 back to Windows 7. Buckle up, and let’s dive into downgrading!
Step 1: Backup Your Data
Back up all important files to an external drive or cloud storage.
Losing data is the last thing you want to happen. Make sure every document, photo, and file you care about is safely stored somewhere other than your computer. You can use an external hard drive or services like Google Drive or Dropbox.
Step 2: Obtain Windows 7 Installation Media
Get a Windows 7 installation disk or an ISO file.
You’ll need a legitimate copy of Windows 7. If you don’t have a disk, you can download the ISO file from Microsoft’s website. Make sure you have a valid product key.
Step 3: Create a Bootable USB Drive
Use a tool like Rufus to create a bootable USB drive with the Windows 7 ISO.
Rufus is a free tool that helps you make a bootable USB drive. You’ll need at least an 8GB USB stick. Load the ISO file into Rufus and let it create the bootable drive for you.
Step 4: Change Boot Order in BIOS
Restart your computer and enter the BIOS to change the boot order, ensuring the USB drive is first.
When your computer restarts, press the key that takes you to the BIOS setup (often F2, F12, or Delete). In the BIOS menu, find the boot order settings and set your USB drive as the first boot option.
Step 5: Start the Windows 7 Installation
Plug the USB drive into your computer and restart it to begin the Windows 7 installation process.
Your computer should boot from the USB drive, starting the Windows 7 installer. Follow the on-screen instructions to begin the installation.
Step 6: Format the Hard Drive
When prompted, choose to format your hard drive to remove Windows 10.
This step will erase everything on your hard drive, so make sure you’ve backed up all your data. Formatting the drive ensures a clean installation of Windows 7.
Step 7: Install Windows 7
Follow the installation prompts to install Windows 7.
The installer will guide you through the steps, including selecting your language, time, and keyboard settings. Eventually, you’ll reach the part where the installation begins, and you’ll just need to wait for it to complete.
Step 8: Install Drivers and Updates
After installation, install the necessary drivers and Windows updates.
Once Windows 7 is installed, you’ll need to install drivers for your hardware. Visit your computer manufacturer’s website to download them. Don’t forget to run Windows Update to get the latest patches and updates.
After completing these steps, your computer will be running Windows 7. You can then restore your data from your backup.
Tips for Downgrading from Windows 10 to Windows 7
- Make sure you have a legitimate copy of Windows 7 and a valid product key.
- Keep all necessary drivers handy, either on a USB drive or downloaded beforehand.
- Consider creating a system image of your current Windows 10 setup, just in case you need to revert.
- Double-check your backup to ensure no important files are missed.
- Ensure your computer’s hardware is compatible with Windows 7; some newer hardware might not have drivers for the older OS.
FAQs about Downgrading from Windows 10 to Windows 7
What happens if I don’t back up my data?
You risk losing all your files, documents, and applications during the downgrade process.
Can I use my Windows 10 product key for Windows 7?
No, you need a valid Windows 7 product key to activate your installation.
How do I know if my hardware is compatible with Windows 7?
Check the manufacturer’s website for driver support or use tools like the Windows Upgrade Advisor.
Will I receive updates for Windows 7?
Microsoft has ended support for Windows 7, so you won’t receive any new updates or security patches.
Can I dual-boot Windows 10 and Windows 7?
Yes, you can set up a dual-boot system, but it requires partitioning your hard drive and installing both OS separately.
Summary
- Backup Your Data
- Obtain Windows 7 Installation Media
- Create a Bootable USB Drive
- Change Boot Order in BIOS
- Start the Windows 7 Installation
- Format the Hard Drive
- Install Windows 7
- Install Drivers and Updates
Conclusion
Downgrading from Windows 10 to Windows 7 is a task that many users contemplate for various reasons. Whether it’s for nostalgia, software compatibility, or personal preference, knowing how to successfully perform this downgrade is crucial. By following the detailed steps outlined above, you can ensure a smooth transition from Windows 10 back to Windows 7.
Remember, though, that Windows 7 is no longer supported by Microsoft, which means no new updates or security patches. This can make your system vulnerable to new threats. Always keep this in mind and weigh the pros and cons before making the switch.
If you’re ready to go ahead, make sure you’re well-prepared with backups and drivers. Happy downgrading!
Matt Jacobs has been working as an IT consultant for small businesses since receiving his Master’s degree in 2003. While he still does some consulting work, his primary focus now is on creating technology support content for SupportYourTech.com.
His work can be found on many websites and focuses on topics such as Microsoft Office, Apple devices, Android devices, Photoshop, and more.
In this article, we will see how to perform a Windows 10 downgrade, without losing your stuff – even if more than 30 days have passed after the original upgrade. If you are unhappy with Windows 10, and prefer to get back to Windows 7 or Windows 8, this tutorial will help you do that, and most importantly – help you preserve all your stuff in the process, including your programs, profile, settings, documents, pictures, music, movies, favorites, wallpaper and everything else.
Before you begin
The first step in a major install like this is to back up everything you’ve got. After the downgrade, your programs and data will be gone, and you will need to restore them to get back to normal. We recommend using the Migration Kit Pro, which allows to easily back up, and most importantly easily restore programs, settings and files after the downgrade (even though it will be a different Windows version). Alternatively, you can also use any 3rd party backup product that can perform a full system image backup, although that would only allow you to restore files, not programs.
Performing the downgrade
Once you have your backup, it’s time to perform the actual downgrade. There are two possibilities:
- If your current Windows 10 was an upgrade from an older Windows, and it has been less than 30 days since the upgrade, you can use the Windows 10’s built-in roll-back feature. Click here to see the steps for that.
- If your Windows 10 was pre-installed on the computer, or if it has been more than 30 days since the upgrade, you will have to do the Windows install manually. Click here to see the steps for that.
Performing a manual downgrade
- Performing a manual downgrade means that you simply install a fresh Windows 7 or Windows 8, just as you would on any other machine. Then, you recover your stuff onto it.
- Make sure you have a backup before you start, either with the Migration Kit Pro (which allows to restore programs, files and everything else) or with any other backup.
- If you are using the Migration Kit Pro, then to perform a fully restorable backup, use its Moving from Machine to Container scenario. This will create a single container file that has all the programs and files from your original Windows 10. Store that container somewhere off the Windows 10 – for example, on an external USB drive or on a network share.
- Once you have your backup, install Windows 7 or Windows 8 on the machine.
- Once Windows 7 or Windows 8 is installed, and you have a clean OS installation, proceed to the “Recovering your programs, settings and files” section.
Using Windows 10 built-in downgrade (inside the 30-day window)
-
- Open Start Menu, and select “Settings” (top-left).
- Go to the Update & Security menu.
- In that menu, select the Recovery tab.
- Look for the option to “Go back to Windows 7/8”, and click on “Get Started” to begin the process. If you do not see that option, this means that you will need to do a manual downgrade – see instructions below.
- You will be asked a few questions regarding your reasons for downgrade, and you will be notified hat you will have to reinstall your apps and programs (if you are using the Zinstall Migration Kit Pro, you will not have to do that of course).
- Confirm the questions, and start the downgrade process.
- Once the process is done, continue to the “Recovering your programs, settings and files” section.
Recovering your programs, settings and files
- Once you are back to Windows 7 or 8, it is time to restore your programs, settings and files.
- If you have used Zinstall Migration Kit Pro to backup your stuff before the downgrade, all you need to do is run it on the freshly installed Windows. Use the “Moving from Container to Machine” scenario, and it will restore everything, including programs, and have everything configured for you.
- If you have used some other backup tool (not Migration Kit Pro), you will need to manually restore your files, and then reinstall the programs you need accordingly.
That’s it – you are back to Windows 7 (or 8)!
Video tutorial – how to transfer to a new computer
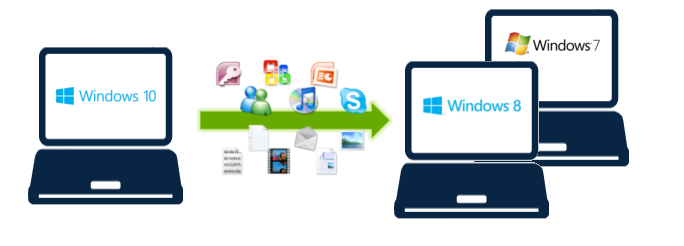
Do you want to downgrade Windows 10 to Windows 7, Windows 8 or Windows 8.1? Three options to downgrade and uninstall Windows 10 are available, depending on your Windows PCs setup: Recover your previous Windows 7 / Windows 8 / Windows 8.1 installation by uninstalling Windows 10, downgrade Windows 10 by using you previous Windows 7, Windows 8 or 8.1 backup and downgrade Windows 10 by a clean installation of Windows 7, Windows 8 or 8.1.
Recovery option: How to downgrade / uninstall Windows 10 and recover your previous Windows installation
- Go to the Settings app (shortcut Windows key + I) and click on ‘Update & Security‘ and select ‘Recovery‘. If your system is still eligible for downgrading, you see the option ‘Go back to Windows 8.1‘ / ‘Go back to Windows 8‘ / ‘Go back to Windows 7‘. Click the ‘Get started‘ button for proceeding.
Downgrade Windows 10_01_go back to Windows 8.1 option avalaible - Select an option why you’re going back, e.g. ‘for another Reason‘ and then click ‘Next‘.
Downgrade Windows 10_02_why are you going back - Answer the next question “Check for updates?” with ‘No, Thanks‘.
Downgrade Windows 10_03_check for updates option - Now you get a warning that you need to reinstall some apps and programs, and you will lose any changes made after upgrading to Windows 10. A file backup is not necessary, but recommended. Then click ‘Next‘.
Downgrade Windows 10_04_what you need to know - Make sure you know your Windows 8.1 password as you’ll be locked out of the system without it. If you signed in with your Microsoft ID, you have to use its password. Click ‘Next‘.
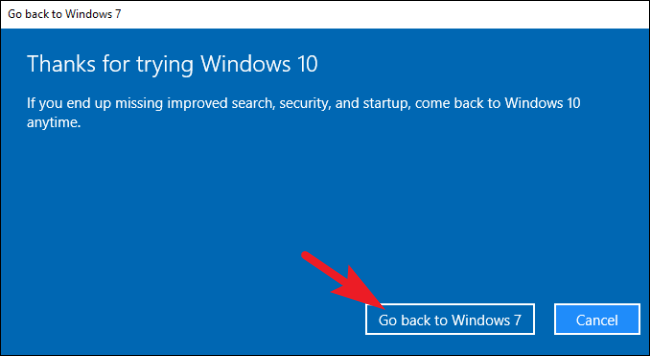
Downgrade Windows 10_05_don’t get locked out - Finally, click on ‘Go back to Windows 8.1‘ / ‘Go back to Windows 8‘ / ‘Go back to Windows 7‘ and let the process complete.
Downgrade Windows 10_06_thanks for trying Windows 10
Notes:
- Make a backup of your system before downgrading!
- The process will take some time depending on your system configuration. Once you’re back on Windows 8.1, don’t forget to check all your apps are installed correctly and check for new updates, as, after a few weeks, it’s likely to be out-of-date.
- The windows 8.1 back up folders are ‘Windows.old‘ and the invisible folder ‘$WINDOWS.~BT‘ and will be deleted after 30 days of upgrading to Windows 10. Make ‘$WINDOWS.~BT‘ visible and rename both folders to avoid the automatic deletion by the windows system to still have the option of downgrading after 30 days.
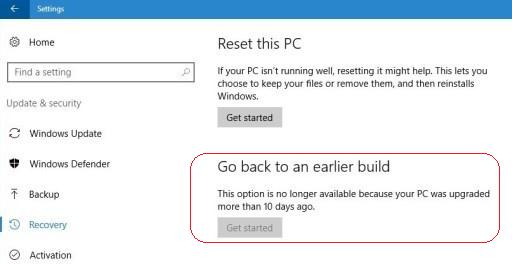
Downgrade Windows 10_07_Windows 8.1 backup folders - If it’s been over a month — or if you’ve run the Disk cleanup tool and removed the “Previous Windows installations” files or deleted the C:\Windows.old folder by hand — you’ll no longer see this option. Windows 10 appears to automatically remove the old Windows installation files after a month to free up space.
Downgrade Windows 10_08_go back to Windows 8.1 option no longer available - Microsoft’s process will preserve your local files, but not settings or third-party programs.
Backup option: How to downgrade / uninstall Windows 10 by using you previous Windows 7, Windows 8 or 8.1 backup
If you created a full backup of your computer before upgrading to Windows 10, you can simply make a new backup of your new files since the last full backup or just make a copy of all your files to an external hard drive. Also, note any new software installation since the last full backup, as you’ll need to reinstall them after rolling back.
You can do this by:
- Searching for Control Panel with Cortana.
- Navigating to ‘Programs and Features‘.
- Arranging the list of apps in your system by ‘Installed On‘.
- Once you have the backup of your files, and you know the apps you need to install, reboot your computer using the ‘repair disk‘, which you’re prompted to create after creating the initial full backup.
Note: If you don’t have repair disk, you can also boot with the Windows 8.1 / 8 / 7 ISO files to perform the recovery (see Clean Install Option).
After rebooting, follow these steps:
- While in the Setup wizard, click ‘Next‘, and then ‘Repair your computer‘.
- Click ‘Troubleshoot‘, and then click ‘Advanced options‘, and select ‘System Image Recovery‘.
- Select the operating system you to recover from, click ‘Next‘, and then ‘Finish‘ to begin with the recovery process.
Once the process completes, you’ll be back to the previous version of your operating system, in this case, Windows 8.1.
Now, if you have made a lot files changes, it’ll be recommended you delete all of your files and restore the updated versions using the new backup you created before downgrading back to Windows 8.1. Also, don’t forget reinstall any software since the last backup.
Clean install option: How to downgrade /uninstall Windows 10 by a clean installation of Windows 7, Windows 8 or 8.1
- Make a bootable USB flash drive the Windows 8.1, 8 or 7 ISO file.
- Reboot your computer with the Windows 8.1 / 8 / 7 bootable USB flash drive (make sure your PC is set to boot from the drive with installation files).
- During the Windows Setup, click ‘Next‘, accept the licensing, and click ‘Next‘.
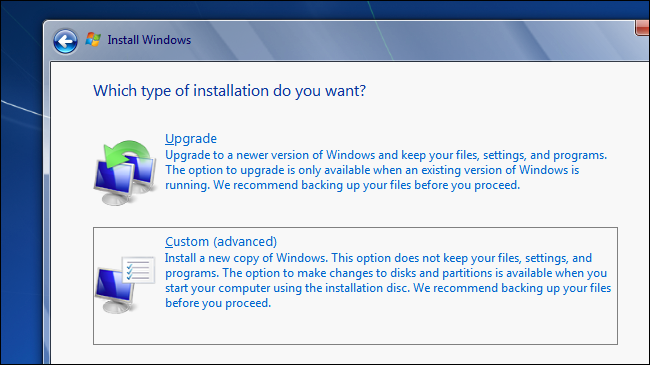
- Click the option ‘Custom: Install Windows only (Advanced)‘ option to do a clean installation.
- Delete any partition created by you current operating system.
- Select the empty drive and click ‘Next‘ to begin the installation process.
Notes:
- If you have a dedicated partition to store files or a secondary hard drive, you don’t have to delete these partitions. After the installation process completes, you’ll be back to your previous version of Windows.
- Now the only thing left is to restore your documents and other files from the backup, and you’ll need to re-install any software you have previously installed.
Using one out of three options to downgrade Windows 10 to Windows 8.1, Windows 8 or Windows 7 let you recover your previous Windows installation.
Stay tuned! 😉
Hi there,my name is Gee Are, blogger and analyst. Blogging is my Passion! I’m the founder and owner of the two blogs called pabst.socialmedia and miapple.me — Tech.Blog.My work experience as a blogger and analysist (Internet Intelligence, SEO and social media) is the basis of the services of pabst.socialmedia.Find more about me.
Quick Links
-
Go Back to Windows 7 or 8.1
-
This Process Uses the Windows.old Folder
-
How to Downgrade if Windows 10 Doesn’t Give You The Option
Don’t like Windows 10? As long as you’ve upgraded within the last month, you can uninstall Windows 10 and downgrade your PC back to its original Windows 7 or Windows 8.1 operating system. You can always upgrade to Windows 10 again later.
Even if it’s been more than a month, you should be able to perform a clean install of the version of Windows that came with your PC using fresh installation media and its product key.
Go Back to Windows 7 or 8.1
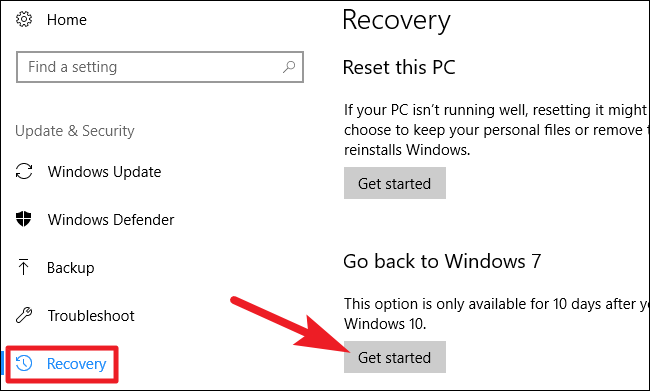
If you’ve upgraded a PC to Windows 10—not performed a clean install, but an upgrade—you have an easy option that lets you revert to the last version of Windows. To access this, hit Windows+I to open the Settings app, click the «Update & security» icon, and then switch to the «Recovery» tab. You should see a «Go back to Windows 7» or «Go back to Windows 8.1» section. Click the «Get Started» button in that section to get rid of your Windows 10 install and restore your previous Windows install.
Windows will first ask you why you want to go back. Just pick anything, and then click the «Next» button.
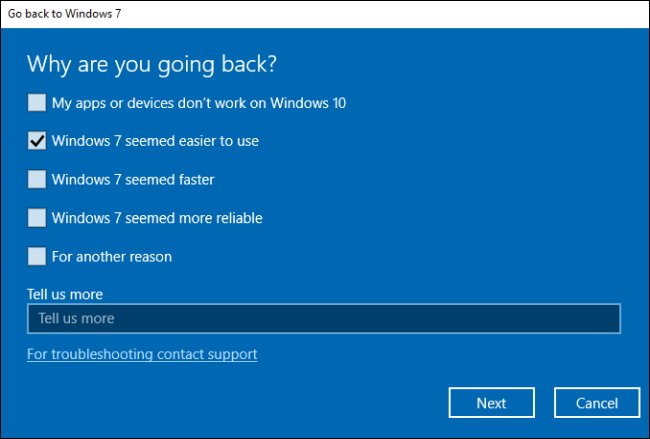
Next, it will run you through a couple of screens where it asks if you want to try updating Windows 10 instead (to see if it makes anything better), and then reminds you that if you have a password, you’ll need to remember it or disable it while you can. When you get to the final screen, click the «Go back to Windows 7 (or 8.1)» button to make it happen.
Windows will then restore your previous version, restarting your PC a couple of times along the way.
This Process Uses the Windows.old Folder
Downgrading is possible because Windows 10 stores your old Windows installation in a folder named «C:\Windows.old» on your PC. You can see this folder in File Explorer, though you shouldn’t attempt to delete it from here. You can also browse the Windows.old folder and restore files from it.
Obviously, storing every single file from your old Windows installation takes a lot of space. If you open the Disk Cleanup application, you’ll see just how much space it uses. Hit Start, type «Disk cleanup» into the search box, and then click the result to run it.
In the Disk Cleanup window, click the «Clean up system files» button.
In the list of files Disk Cleanup can remove, find the «Previous Windows installation(s)» entry, and can see just how much space it’s consuming on your hard drive. If you’re sure you don’t want to go back to your previous version of Windows, use Disk Cleanup tool to remove those files and immediately free up space.
How to Downgrade if Windows 10 Doesn’t Give You The Option
Assuming you have an old computer you upgraded to Windows 10, that computer previously had Windows 7 or 8.1 on it. That means that computer came with a product key that allows you to use Windows 7 or 8.1 on it. If you can’t downgrade to your old version (maybe it’s been to long, or maybe something went wrong with your downgrade attempt), you’ll have to perform a clean install of Windows—something PC geeks often do on new computers, anyway.
Thankfully, Microsoft now offers easy downloads for Windows 7 and 8.1 ISO files. Download the Windows installation media and burn the ISO file to a disc or copy it to a USB drive using Microsoft’s Windows USB/DVD download tool. You can then boot from it and reinstall Windows 7 or 8.1 fresh, telling it to overwrite the Windows 10 system already on your hard drive. Be sure you have backup copies of all your important files from your Windows 10 PC first.
You’ll have to find your PC’s product key if you do this. On a Windows 7 PC, examine your PC for a «certificate of authenticity» sticker with a key on it. The sticker may be on the back of your desktop case, on the bottom (or inside the battery compartment) of your laptop, or it may have come on a separate card with your PC. On a Windows 8 PC, you may not have to do this at all—the key may be embedded in your computer’s firmware. If so, Windows 8.1 will automatically detect it and allow you to reinstall Windows 8.1 without even asking you to enter a key.
If you bought a new PC that came with Windows 10 and you want to go back to a previous version of Windows, that’s tougher. To do this legitimately, you’ll need to purchase a Windows 7 or 8.1 license and install it from scratch, entering the product key you purchased during the install process.
If an important program or hardware device you use doesn’t work on Windows 10, you’ll want to downgrade. If Windows 10 just seems unstable, you’ll want to go back to your previous version of Windows and wait a while longer before attempting an upgrade. Or, if you’d just rather hang onto Windows 7 for a while longer, you can downgrade. If you’ve upgraded a PC to Windows 10 once, you’ll always be able to do it again later.