
Item Preview

XP1.png
XP10.png
XP11.png
XP12.png
XP13.png
XP14.png
XP15.png
XP16.png
XP17.png
XP18.png
XP19.png
XP2.png
XP20.png
XP21.png
XP22.png
XP23.png
XP24.png
XP25.png
XP26.png
XP27.png
XP28.png
XP29.png
XP3.png
XP30.png
XP31.png
XP32.png
XP33.png
XP34.png
XP35.png
XP36.png
XP37.png
XP38.png
XP39.png
XP4.png
XP40.png
XP41.png
XP42.png
XP43.png
XP44.png
XP45.png
XP46.png
XP47.png
XP48.png
XP49.png
XP5.png
XP50.png
XP51.png
XP6.png
XP7.png
XP8.png
XP9.png
196,006
Views
20
Favorites
DOWNLOAD OPTIONS
Uploaded by
Unknown
on
SIMILAR ITEMS (based on metadata)
Do you want to run Windows XP SP1 x64 Professional using Oracle VM VirtualBox 7.0 on your Windows 11 & 10 operating systems? In this article, I will tell you how to run an old operating system on a virtual machine. Windows XP may still be valuable for specific applications. I will also emphasize the importance of security and compatibility when running old OSes.
First of all, as we know, virtualization provides a secure and compatible environment. Thus, you must meet the hardware requirements to run Windows XP effectively. For this reason, I will also show you how to configure a more accurate and proper virtual machine. As a result, you can create a computing environment with our professional guide.
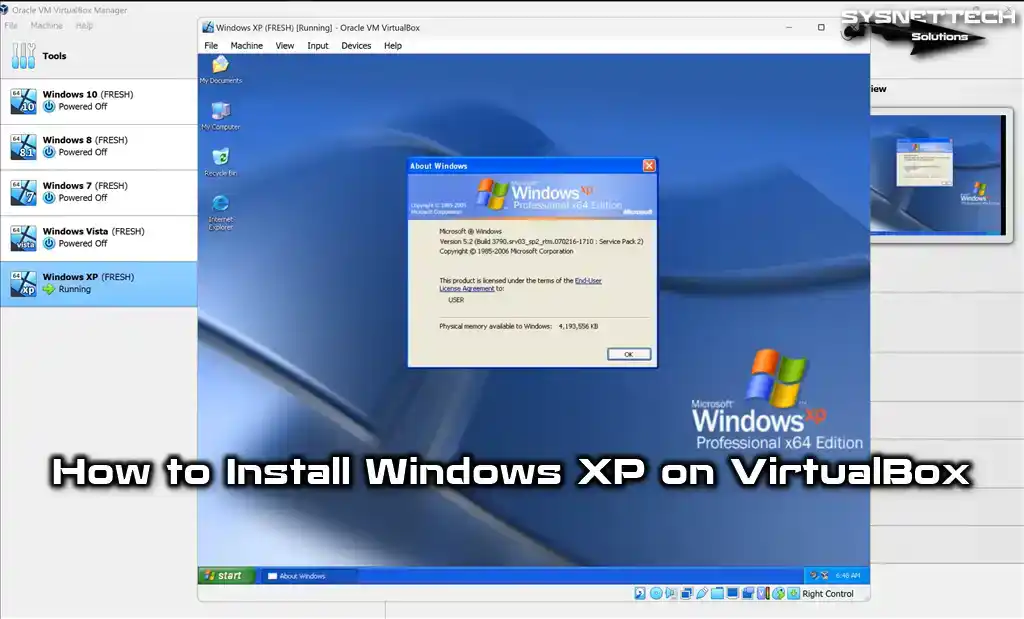
How to Set Up Windows XP x64 SP1 Pro on Windows 10 / 11 using Oracle VM VirtualBox 7
On October 25, 2001, Microsoft developed and launched the Windows XP operating system, emphasizing facilitating its utilization across various devices. These devices include home and business computers, laptops, desktops, media devices, and tablets.
The most significant difference of this operating system type, whose first code name is Whistler, is that it supports 32-bit and 64-bit architectures.
By prioritizing performance, stability, and security, Windows XP delivers an optimized user experience. It is the first operating system to have product activation methods to prevent software piracy, which has threatened software developers.
Key features of Windows XP include Internet Explorer 6, Windows Media Player, downgrade/rollback device drivers, remote assistant, advanced firewall, system restore, wireless connectivity, application compatibility mode, and CD Burner.
Although Microsoft ended support for the XP system on April 8, 2014, many people still use this system today. This can create a severe vulnerability to both the local and Internet networks. Hence, we advise against installing Windows XP on your host computer instead of Windows 10 or 11.
However, users who want to use and experience Windows XP or play old games can install it on virtual machines. Thus, they can choose a safer way to use XP on an up-to-date operating system.
Before creating a virtual machine on your host, your processor must support the virtualization feature. Without this support, setting up a virtual computer on your host would not be possible. I recommend checking the virtualization feature of your CPU.
How to Create a New Virtual Machine for Windows XP
After installing the Oracle VM VirtualBox virtualization software on your host operating system, you must set the VM settings correctly to use Windows XP without any problems. Creating a VM that matches the hardware capacity of your physical host computer is essential in terms of performance and compatibility.
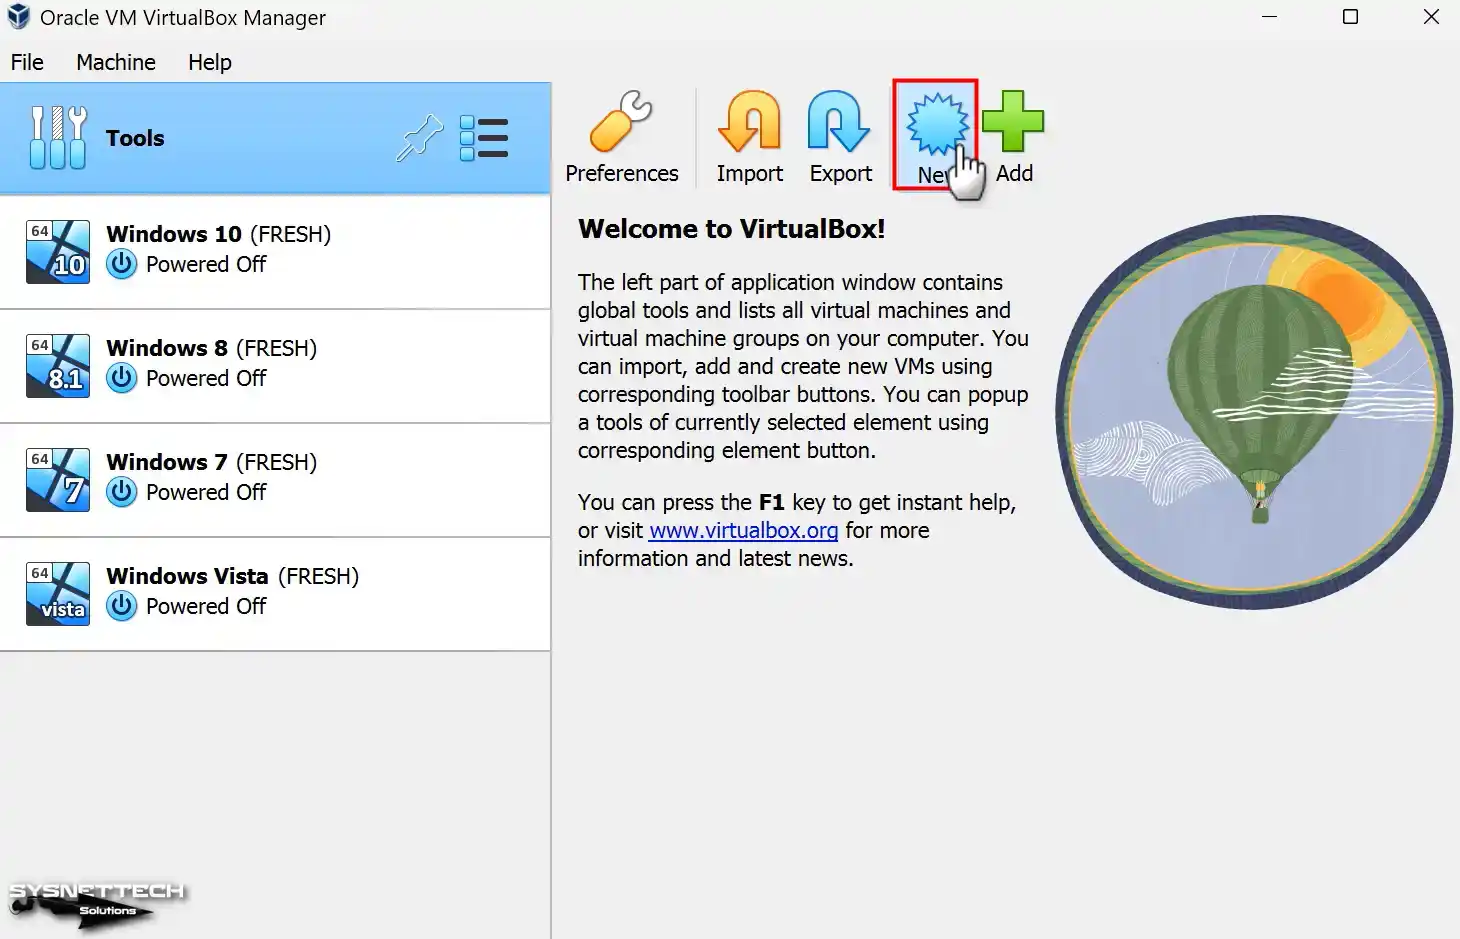
Step 1
Open your Oracle VirtualBox program and open the virtual machine creation wizard from the tool menu on the program’s homepage or the New shortcut.
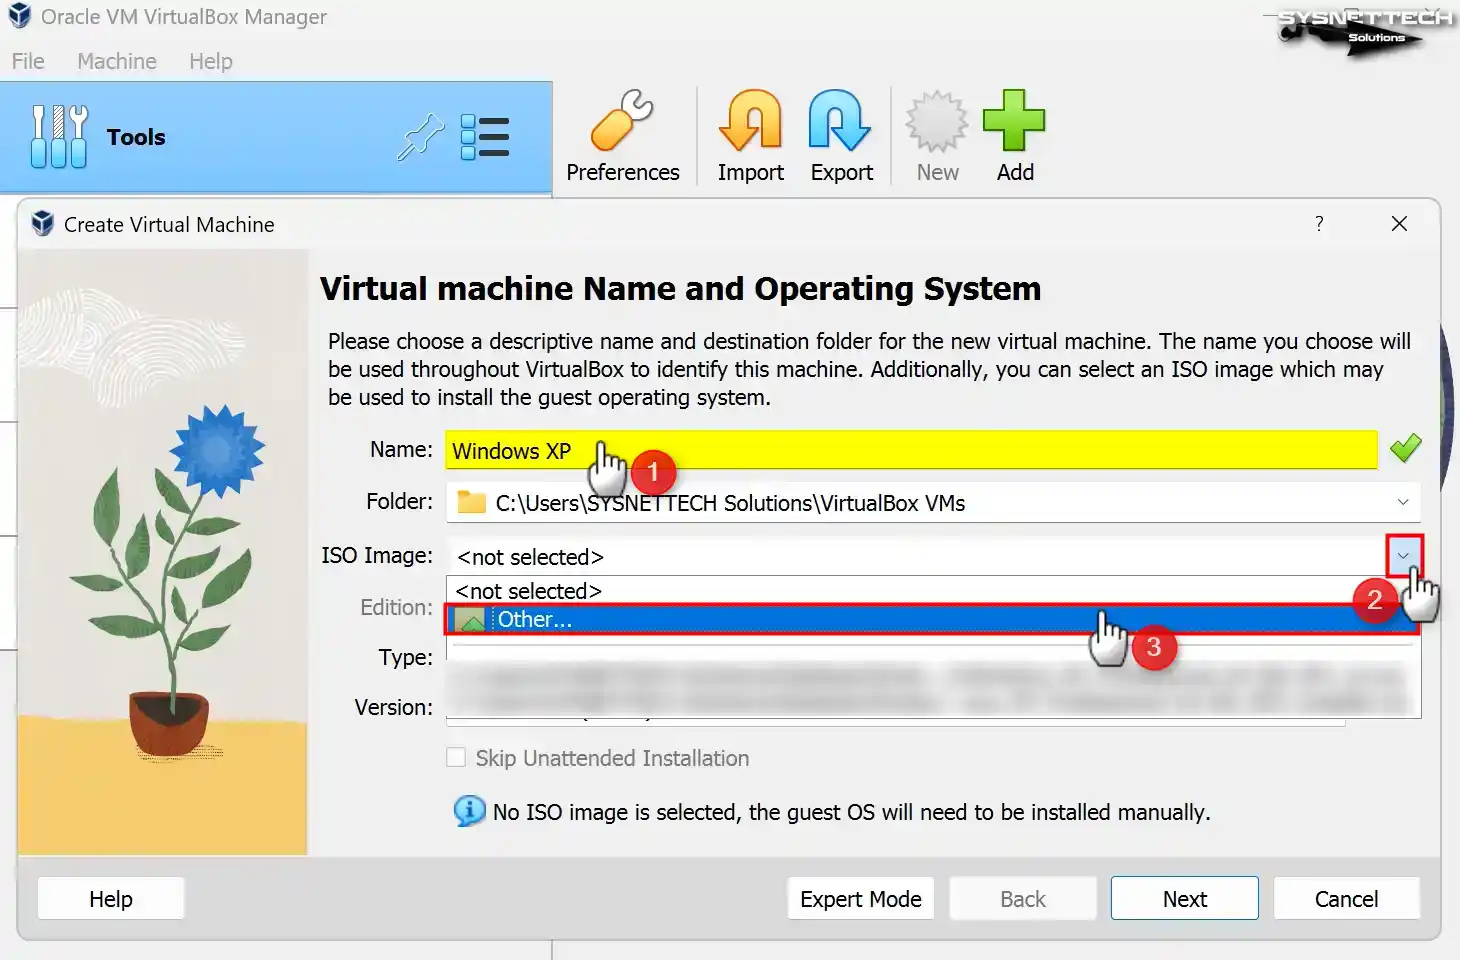
Step 2
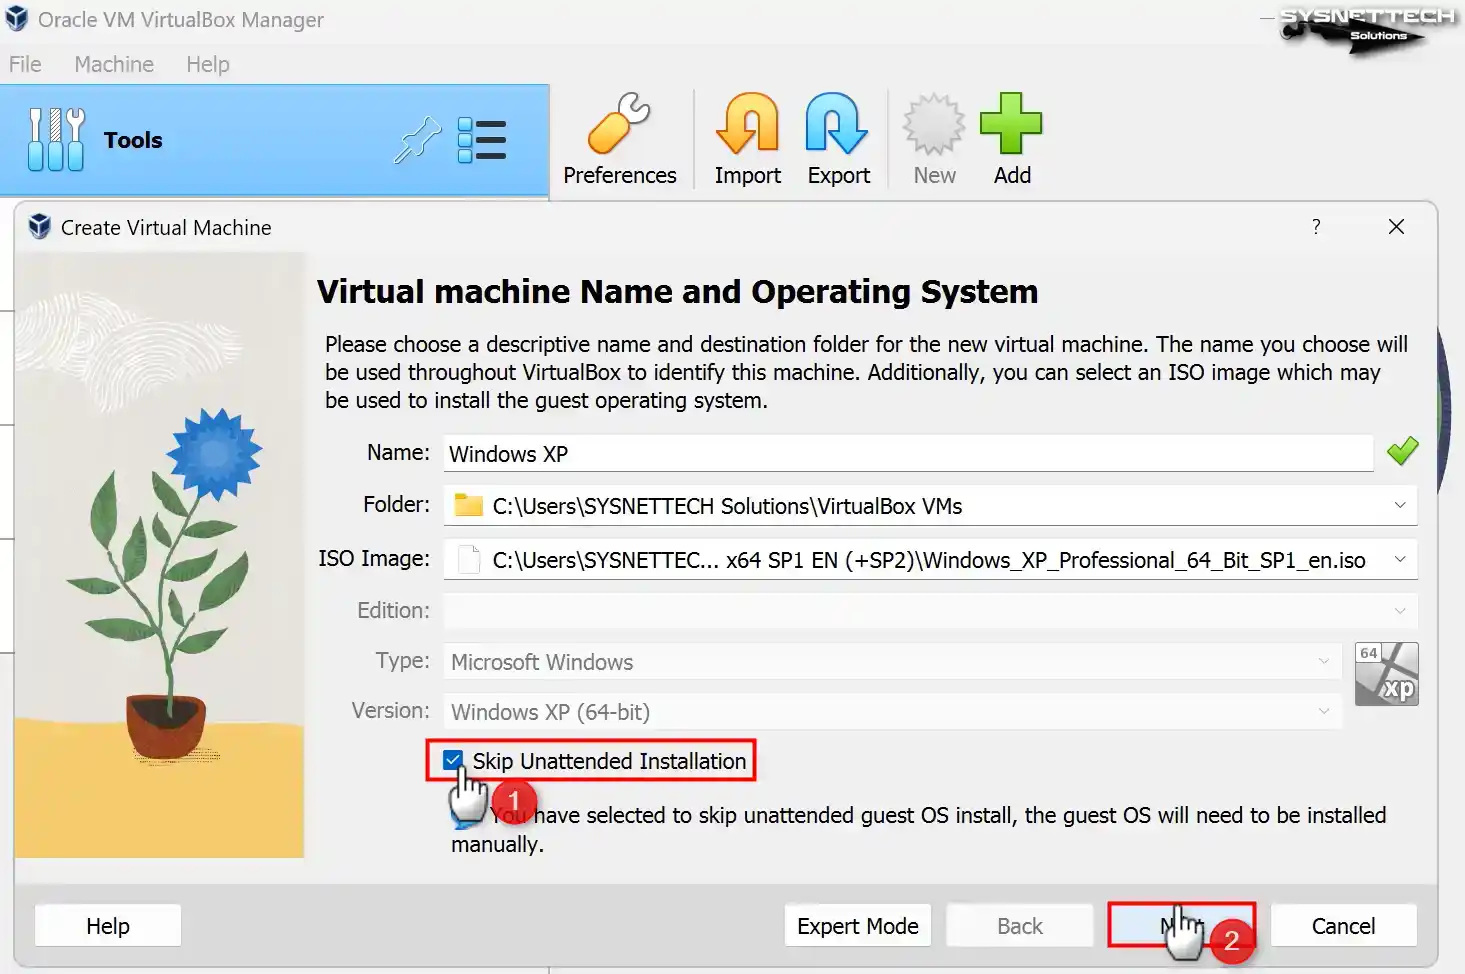
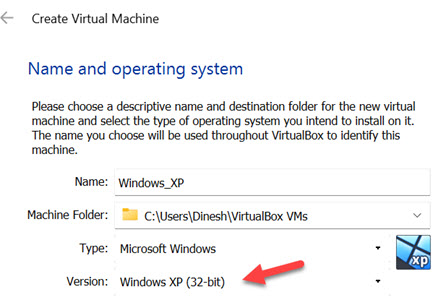
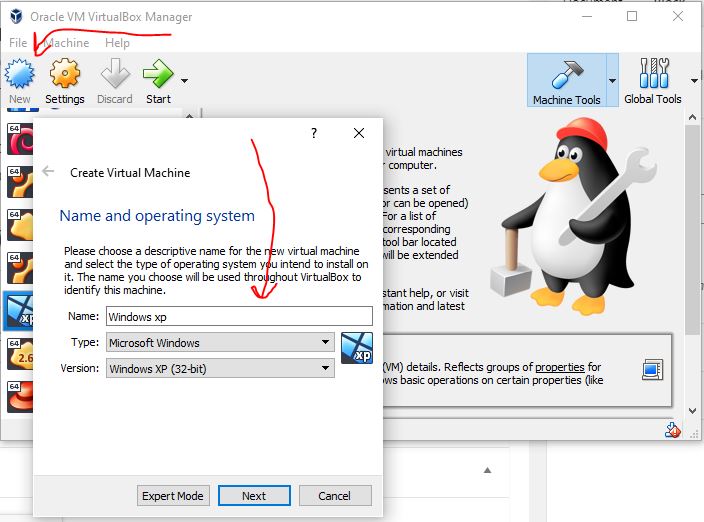
When the virtual machine preparation window appears, the initial step is to enter the name of the operating system you intend to install into the designated Name field. After entering Windows XP in the Name field, the values in the Type and Version fields will be automatically adjusted according to your typing system.
If you see the 32-bit value in the Version field after typing Windows XP and you will install 64-bit, configure this value manually.
You can change the position where you install the virtual machine in the Folder section. Suppose you desire to install the operating system on an external SSD or HDD storage device. In this case, you can pick “Other” from the pop-up window and select the installation location from your host PC.
Select Other from the ISO Image menu to add a Windows XP ISO file to the virtual pc.
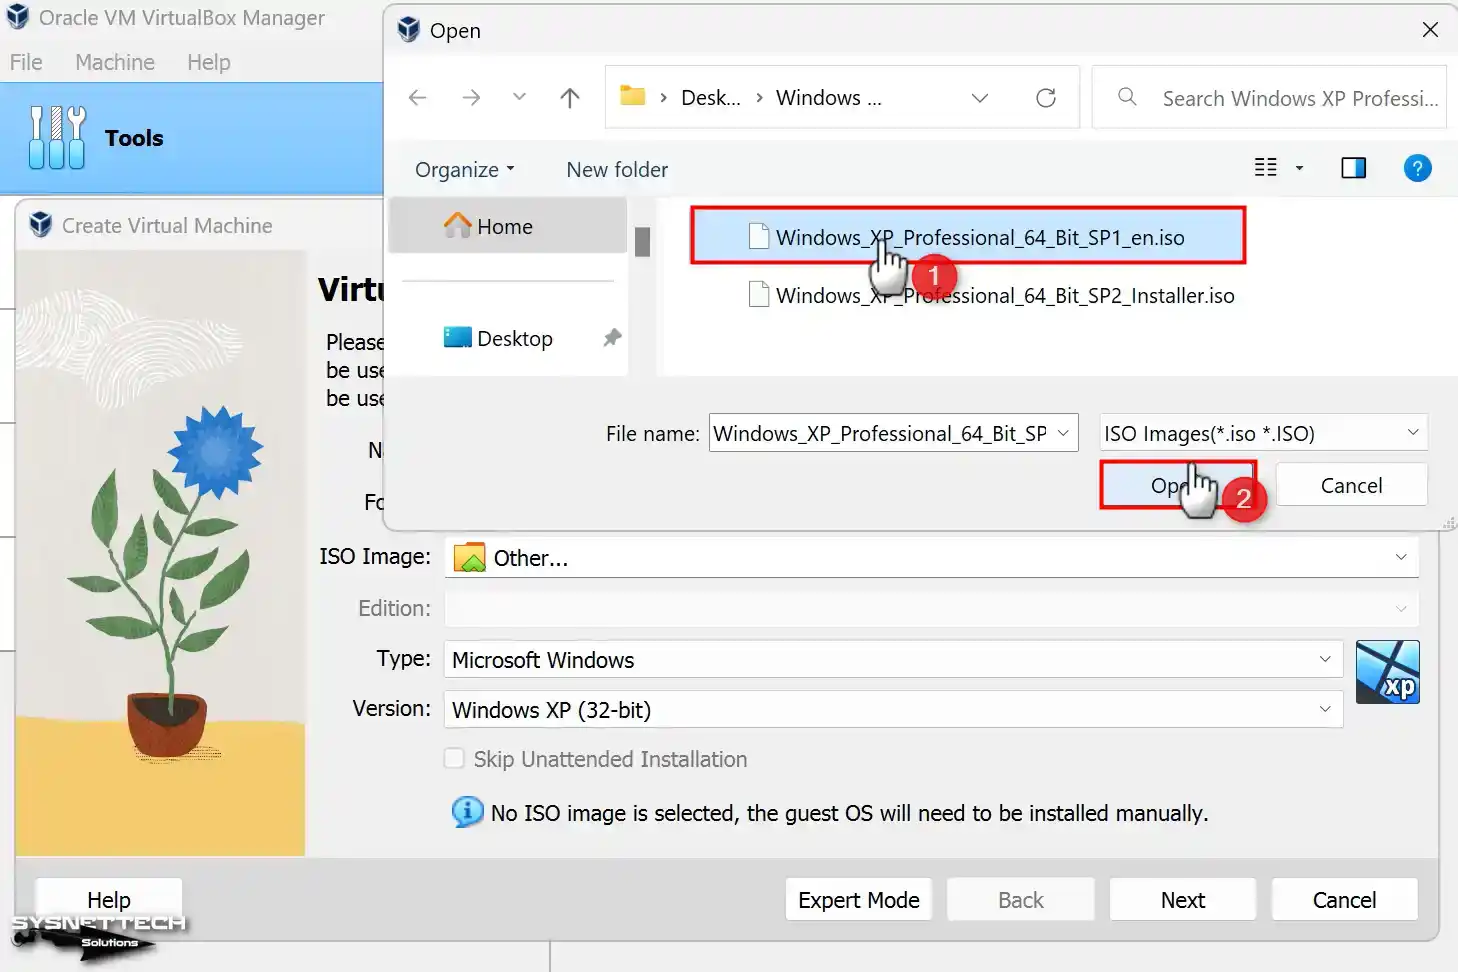
Step 3
Select the Windows XP Professional 64 Bit SP1 image file you downloaded to your computer from the table below the article and open it.
Step 4
In the 7.x versions of VirtualBox, you can see the unattended installation option as the user interface has changed. Using this option, you can prepare a system with preconfigured usernames or product key settings.
If you prefer to install the system manually, select Skip Unattended Installation and click Next.
Step 5
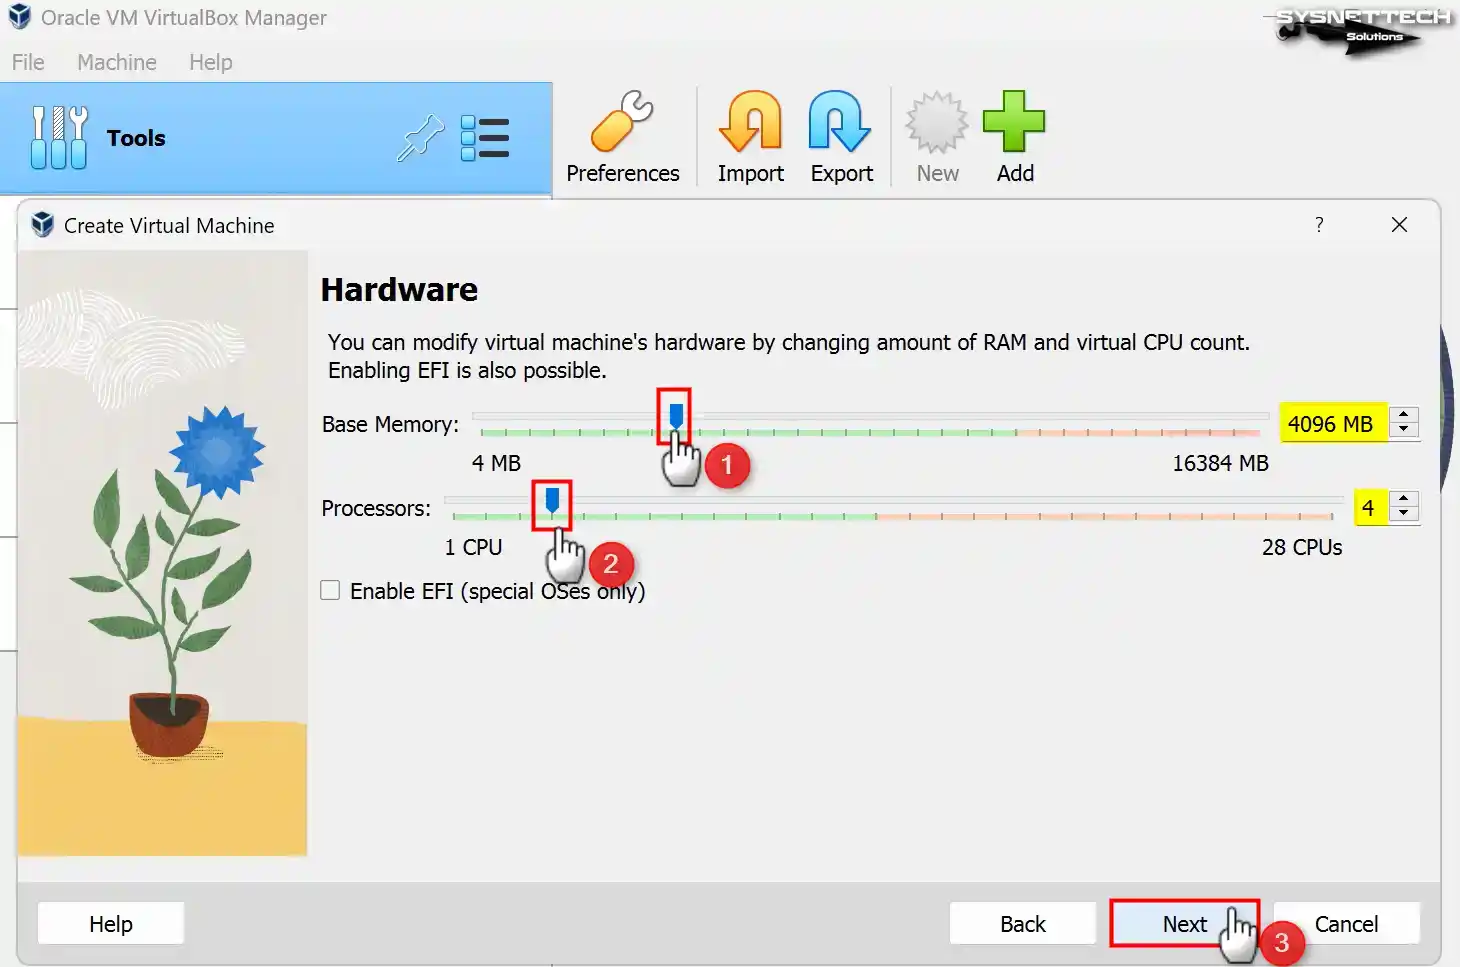
Configure a RAM size of 4096 MB (4 GB) for Windows XP as the base memory size. Suppose your host computer possesses a substantial amount of RAM. In that case, it is proposed to configure this value to a minimum of 4 GB or 8 GB.
In addition, configure the number of virtual processors to 4 so you can use your virtual computer more efficiently.
Step 6
Since you will install Windows XP from scratch in the virtual HDD settings, you must select the Create a Virtual Hard Disk Now option. If you have installed an XP virtual disk, you must select the Add an existing hard disk file option.
In VirtualBox 6.x versions, you can see the old settings on the virtual disk screen. For a sample, if you do not use a VM installed on VirtualBox with other virtualization software, choose VDI (VirtualBox Disk Image). You can use the VDI disk type in other software, but Oracle always recommends using the VDI type.
If you want to use as much disk space as the capacity of the virtual disk file on the disk where you will install the virtual machine, you can choose Fixed Size. Fixed Size can improve the performance of the VM, but it unnecessarily fills up the host disk space.
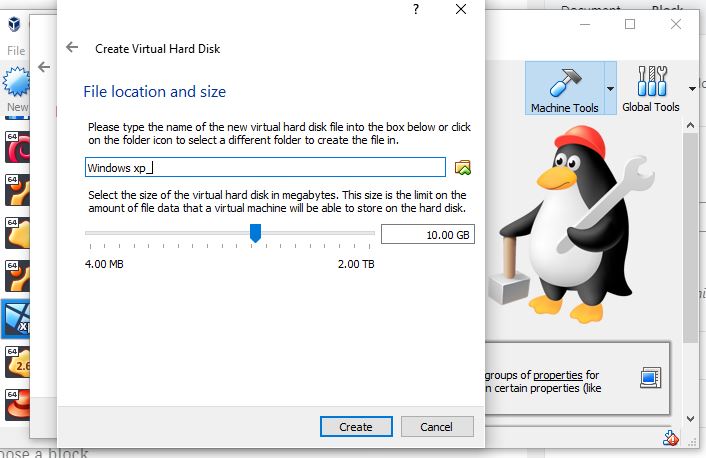
Therefore, by selecting Dynamically Allocated, only the disk space needed by the VM will be automatically allocated over the host disk. Do not change the path in File Location and Size to save the virtual disk to the installation location you set in the first step of the VM wizard.
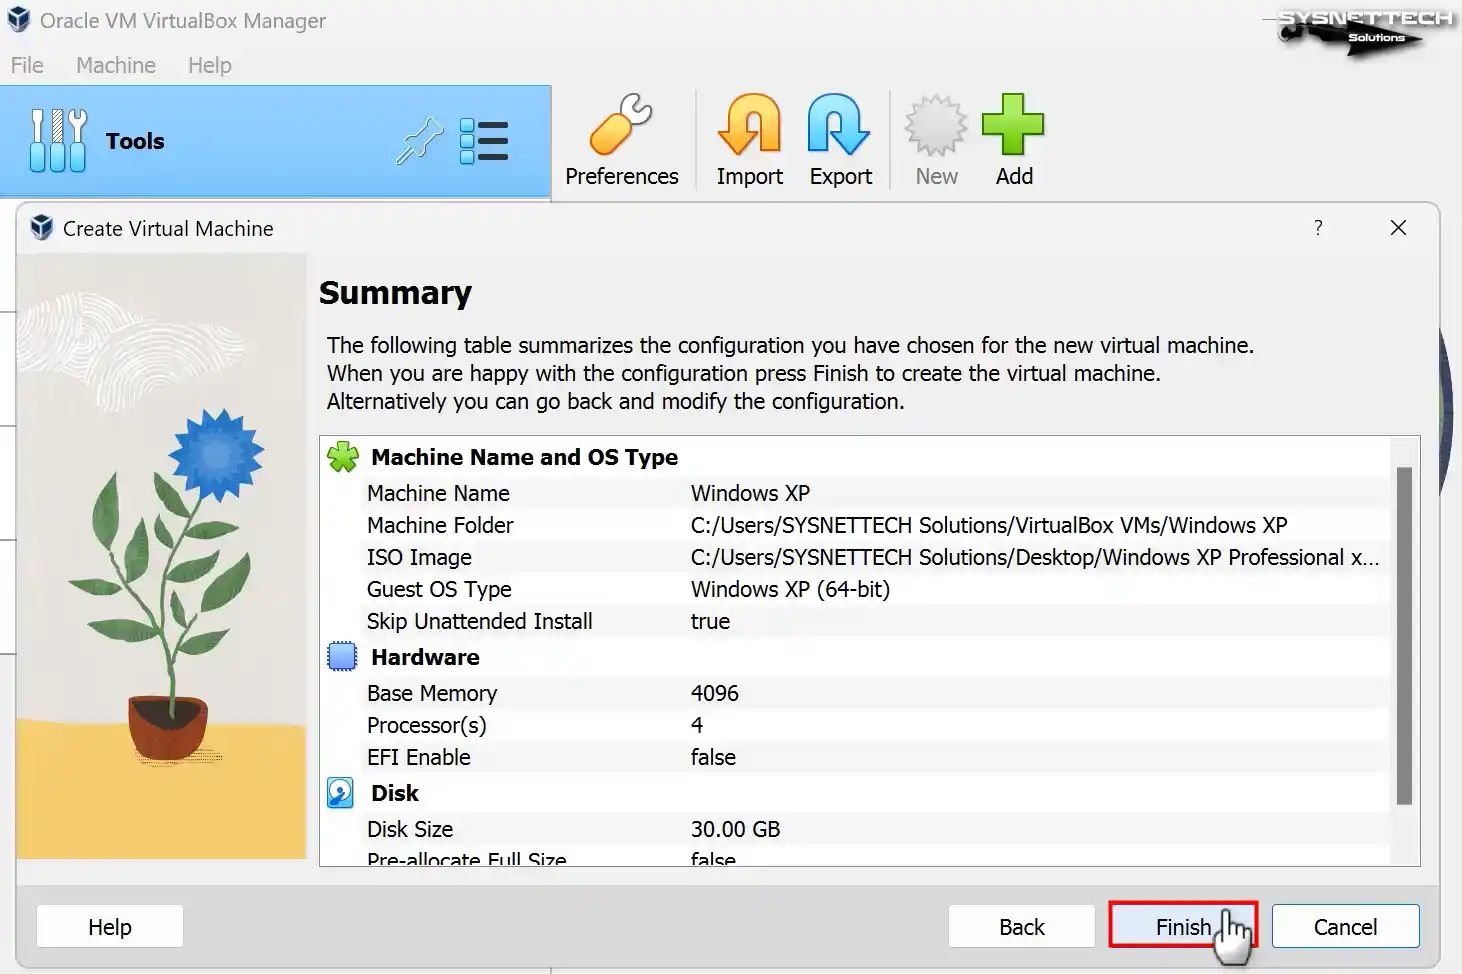
Regarding Windows XP, you can modify the virtual disk extent to a minimum of 30 GB. However, it is advisable to determine the disk size based on your specific work requirements.

Step 7
After adjusting the hardware settings of the Windows XP guest machine, check again and close the VM wizard.
Step 8
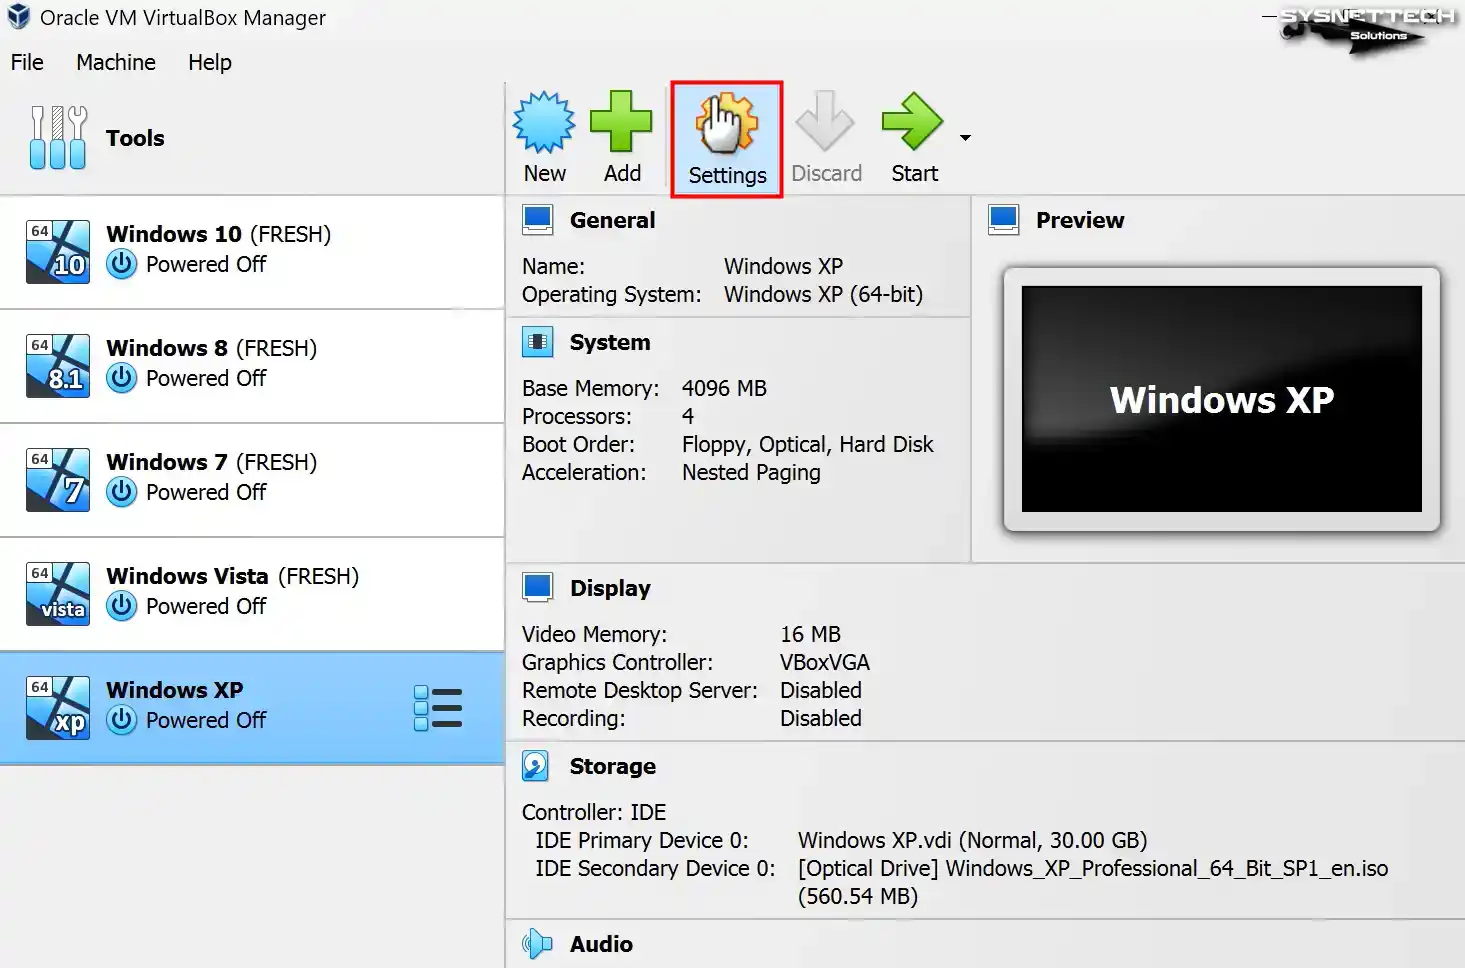
Click Settings to configure the hardware settings of the guest operating system.
Step 9
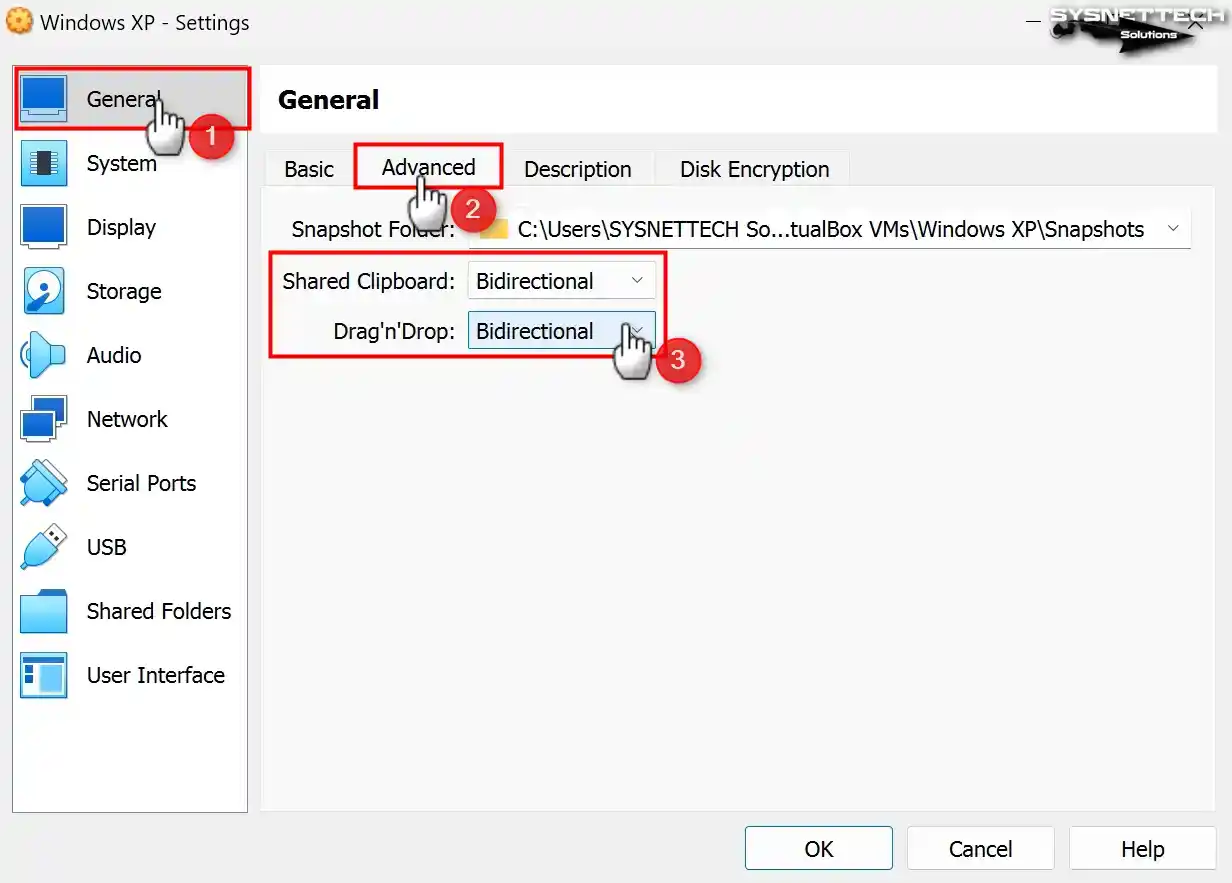
To permit file sharing between the host and the virtual machine in the settings window of the VM, configure the Shared Clipboard and Drag and Drop features as Bidirectional in the General / Advanced tab.
So you can share files or copy/paste text from the host to the VM and from the VM to the host.
Step 10
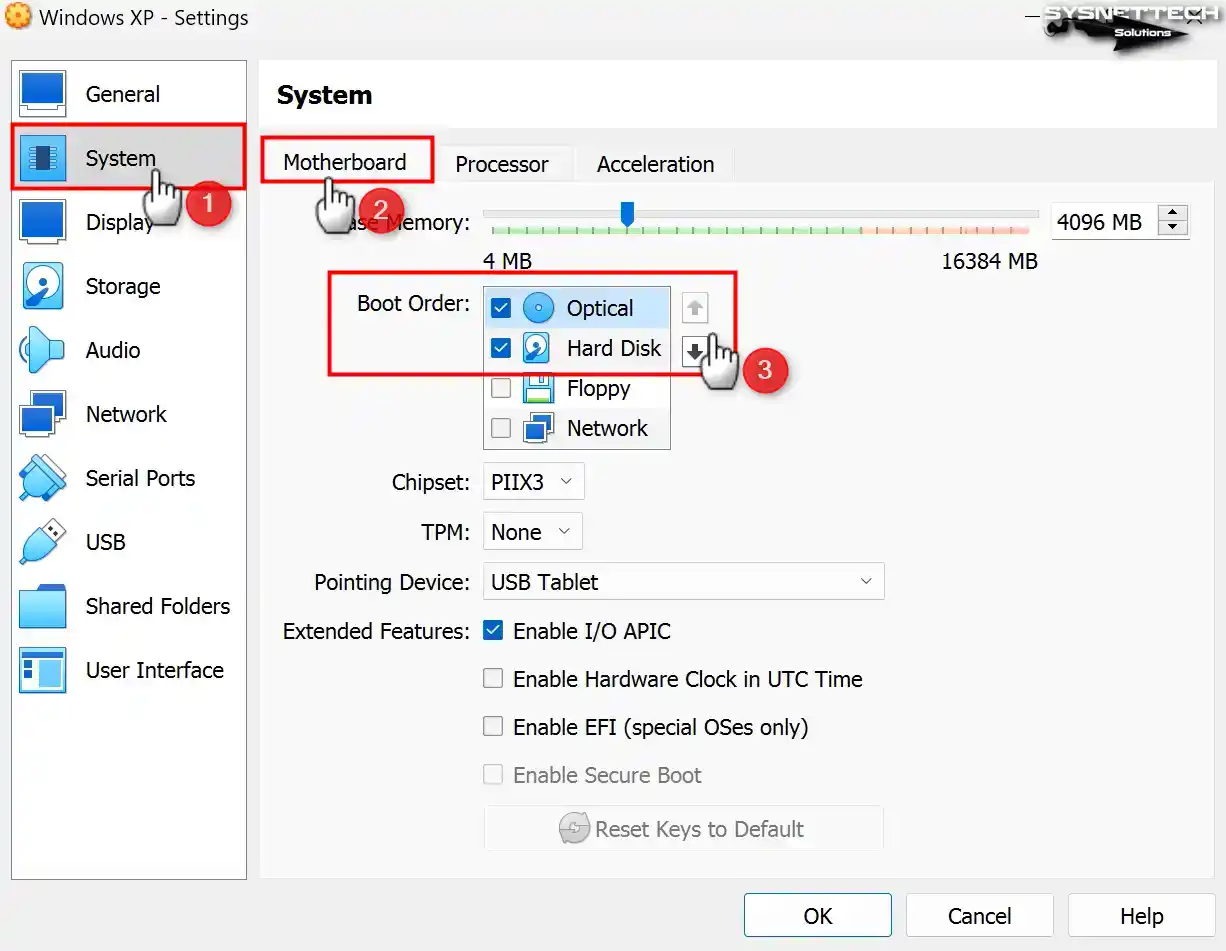
To install Windows XP on the virtual pc, select the Optical device as the direct boot device in the Boot Order index in the System / Motherboard settings to add the ISO file to the optical drive.
Step 11
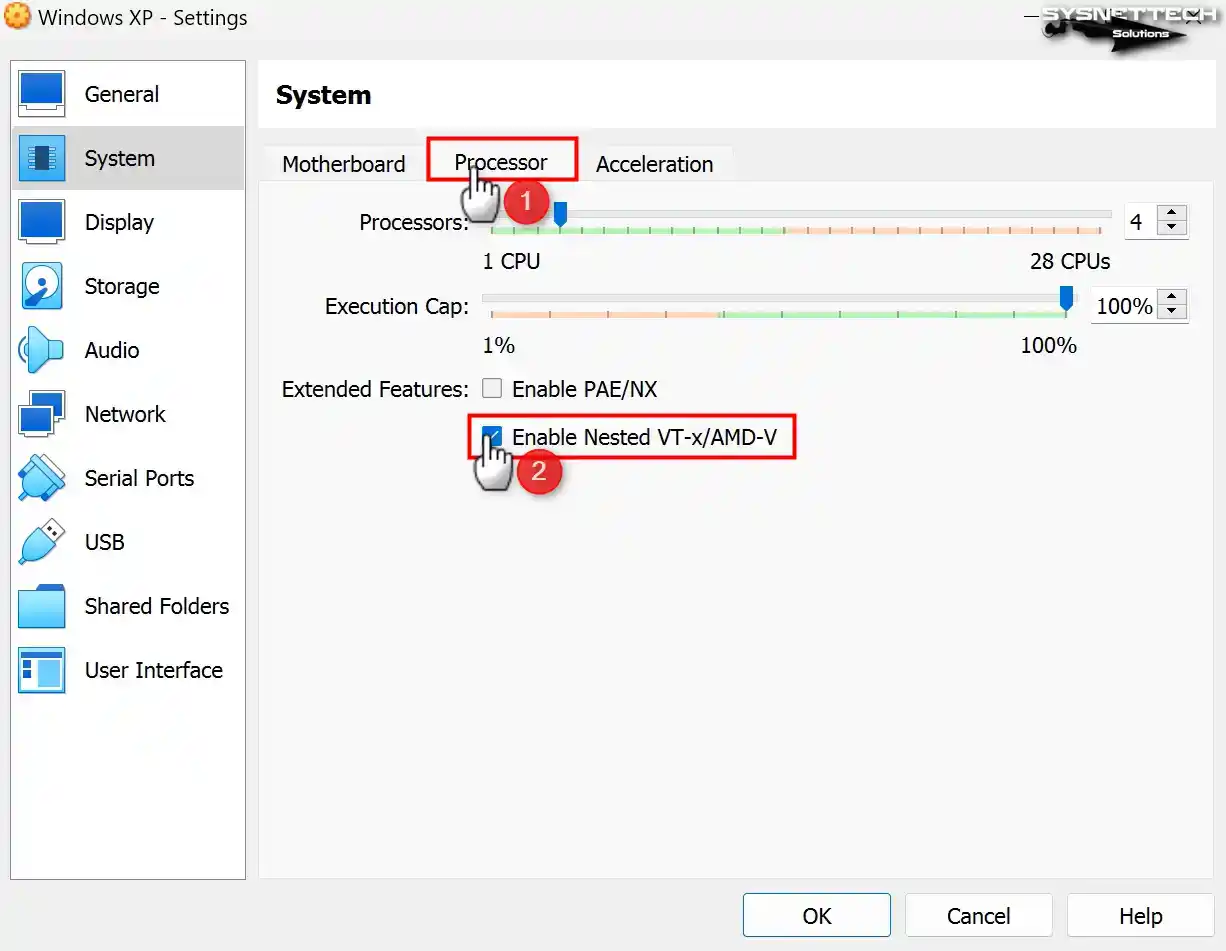
If you plan to use virtualization software on your virtual computer, enable the Nested VT-x/AMD-V feature from the processor device.
Step 12
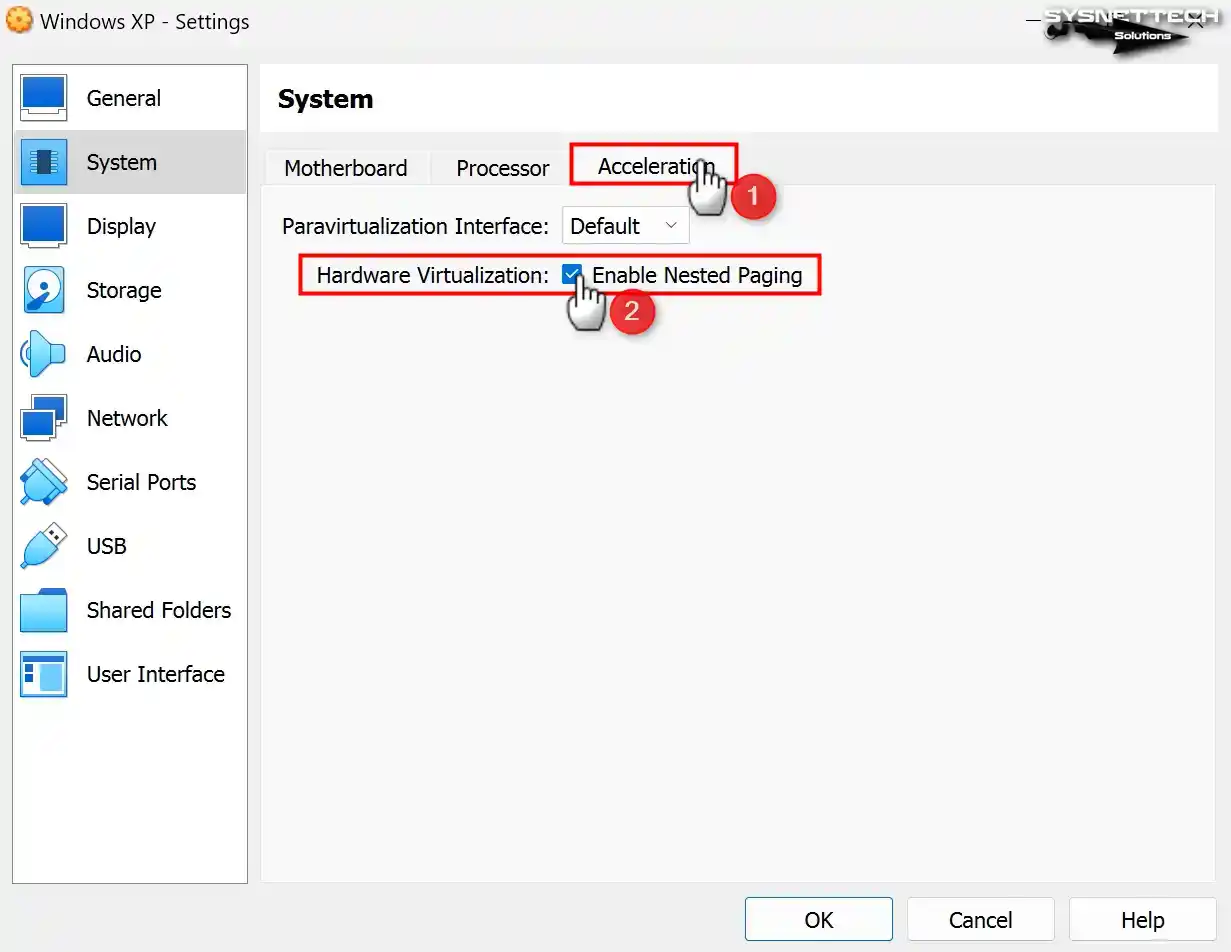
Enable Nested Paging for better memory management between your host and VM.
In certain conditions, it may be necessary to manually choose the virtualization interface within the Acceleration tab located in the virtual PC system settings.
The Paravirtualization Interface is in Default mode by default. The default mode will automatically select a virtualization engine according to the installed system type. Still, since no VTx interface is set for XP, you can change the value here to Hyper-V.
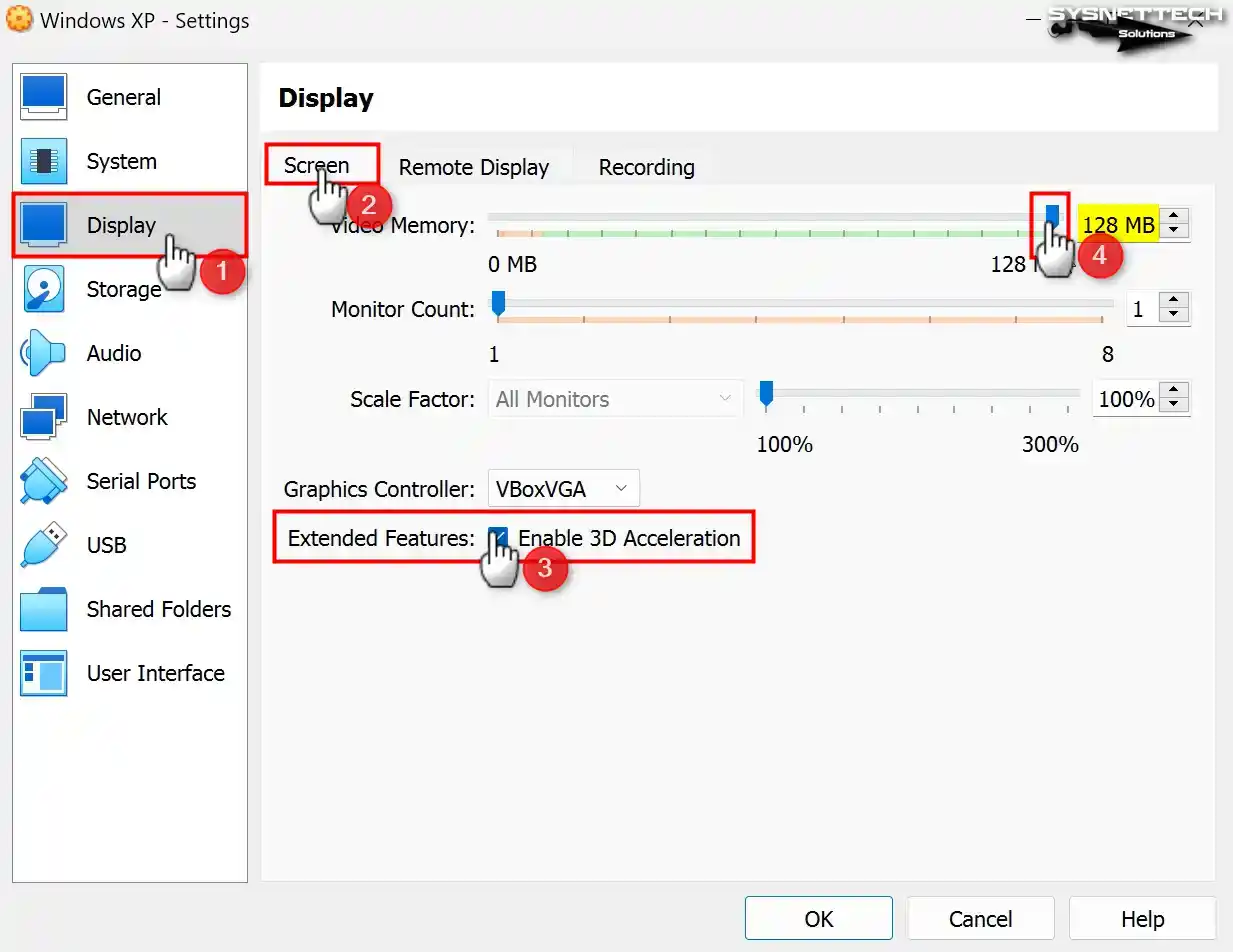
Step 13
Enable 3D acceleration in the Display / Screen settings of the virtual machine and configure the Video Memory size to 128 MB.
Note: Please take note that although you enable 3D graphics acceleration on Windows XP in VirtualBox version 6.1, the Direct3D feature is regrettably no longer supported. If you wish to utilize Direct3D support, installing one of the 6.0 versions of VirtualBox on your system is advised.
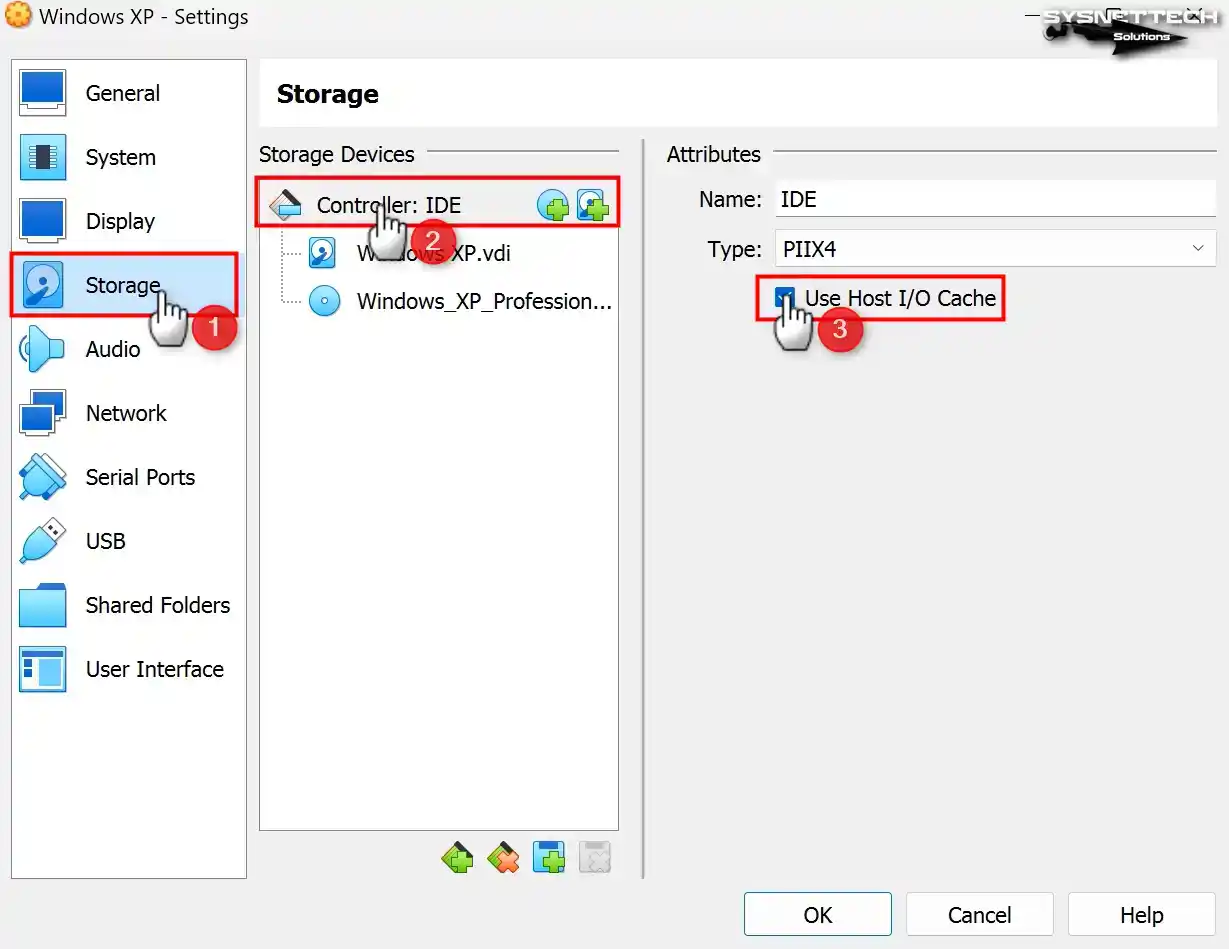
Step 14
By default, the Host I/O Cache feature for the IDE controller is enabled in the storage volumes of the virtual PC. If the Host I/O cache is not allowed, enable it for virtual disk performance.
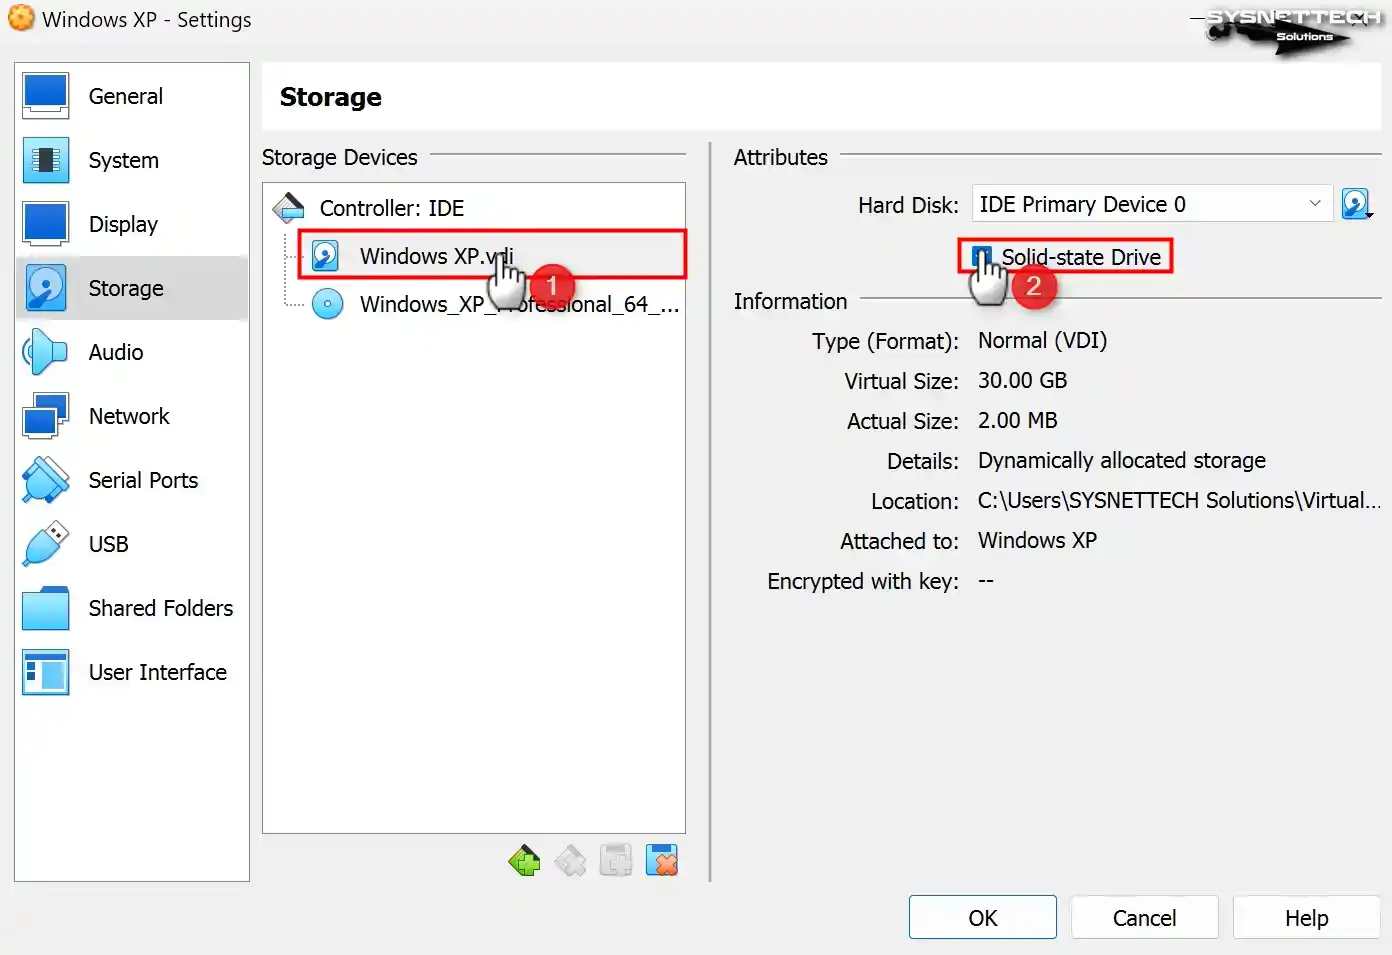
Step 15
Check the Solid-State Drive (SSD) option to configure the WindowsXP.vdi virtual disk file as an IDE SSD.
Step 16
After preparing your Virtual PC, click the Start button to proceed to the steps of installing Windows XP on VirtualBox.

How to Install Windows XP in VirtualBox
After preparing the Windows XP virtual computer, you need to install Windows using the system’s ISO image. After running the VM with the image file as the startup disk, when the setup wizard opens, you should install it as if installing the Windows platform on a real computer.
Step 1
At the Windows XP Professional Setup screen, you must press Enter to begin installing Windows immediately. Otherwise, press F3 to exit the wizard or R to repair your system.

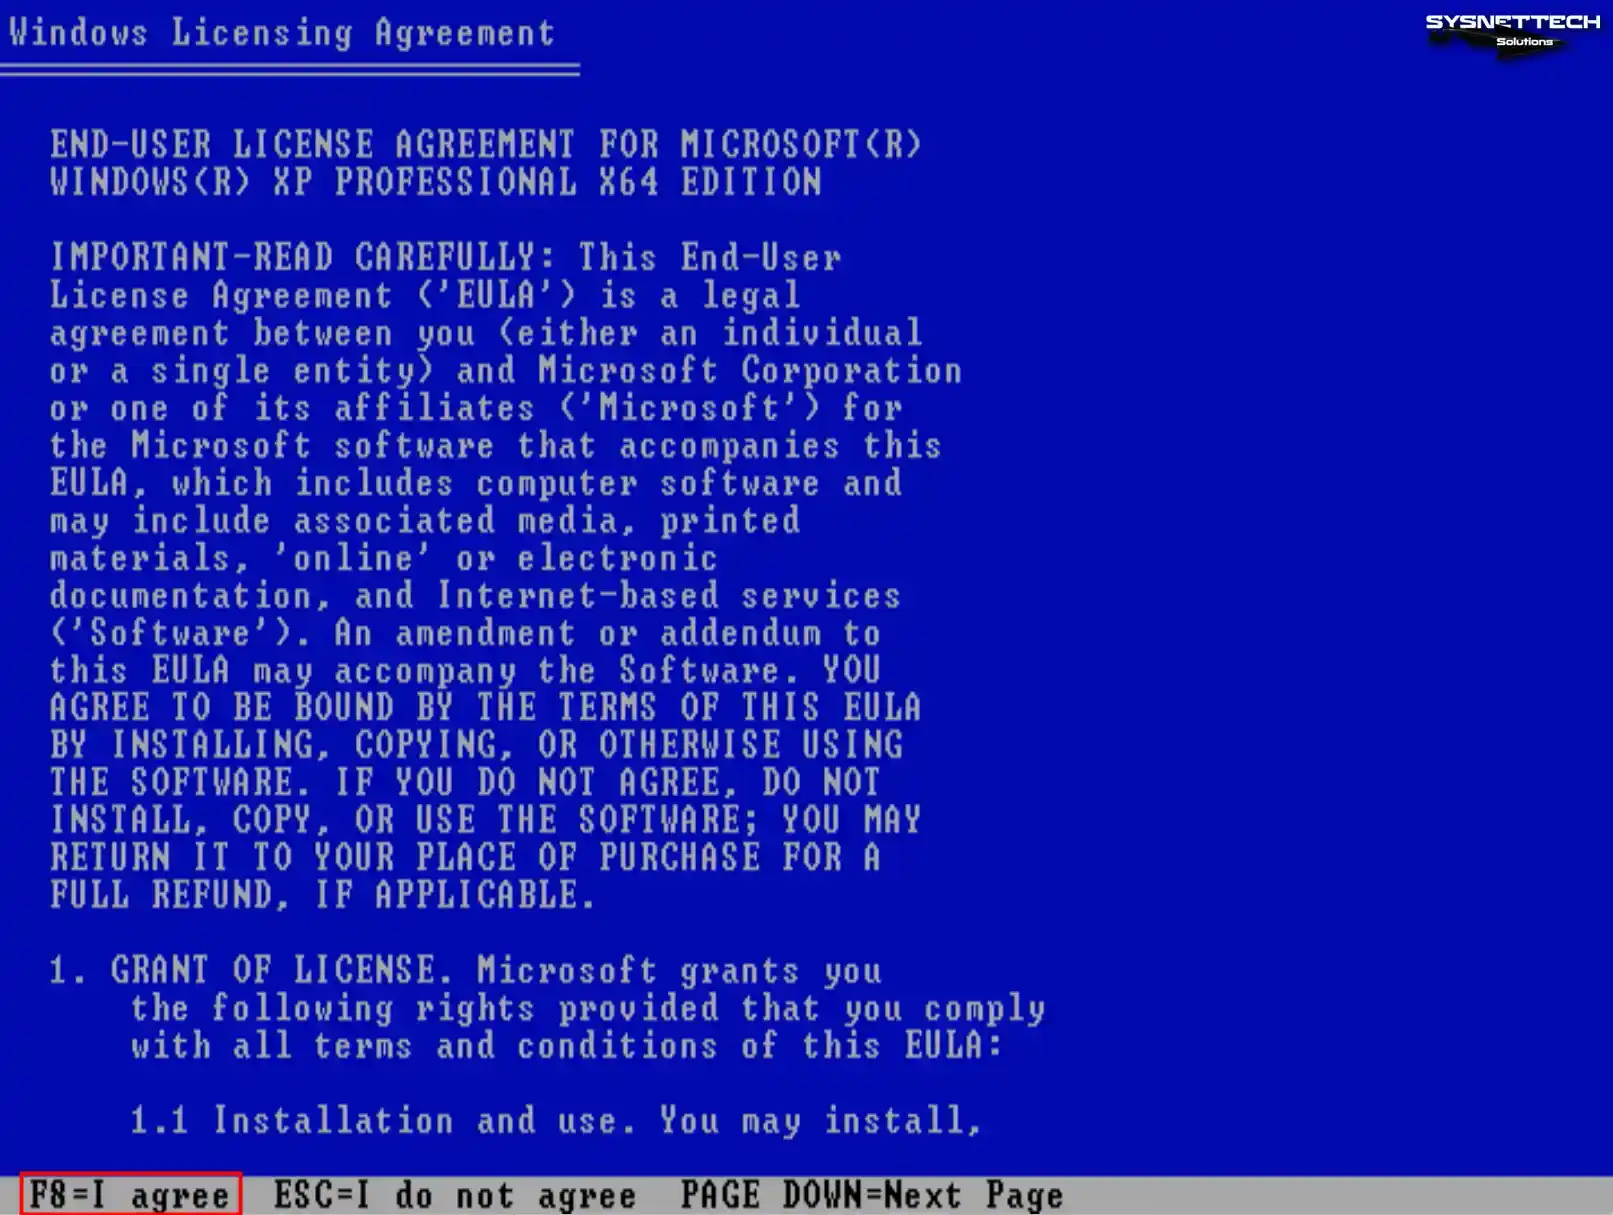
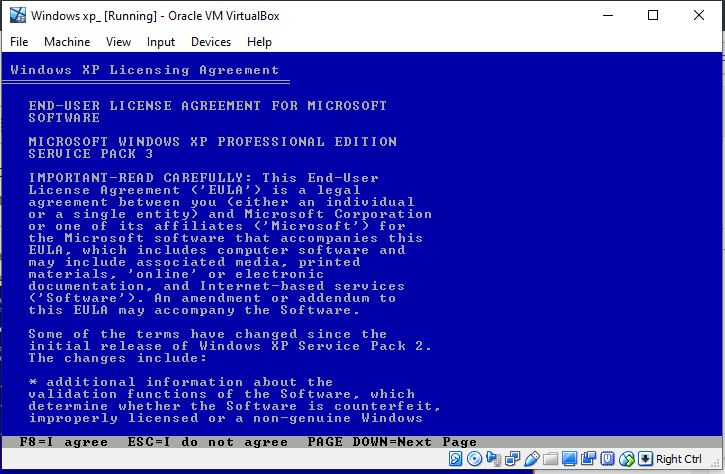
Step 2
You must press Page Down to read the full text of the Windows XP license agreement in the setup wizard. After reading the license agreement, press the F8 key to accept and continue the installation.
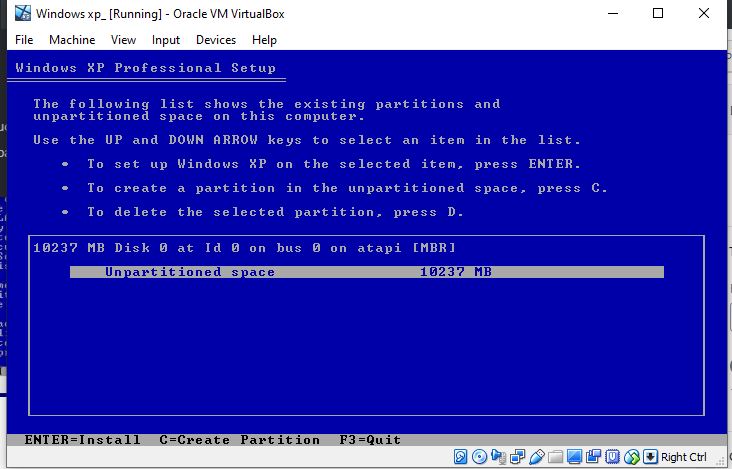
Step 3
Press the C key to configure the unallocated disk space. You can also press Enter to have the wizard automatically organize the disk space and format the system disk.
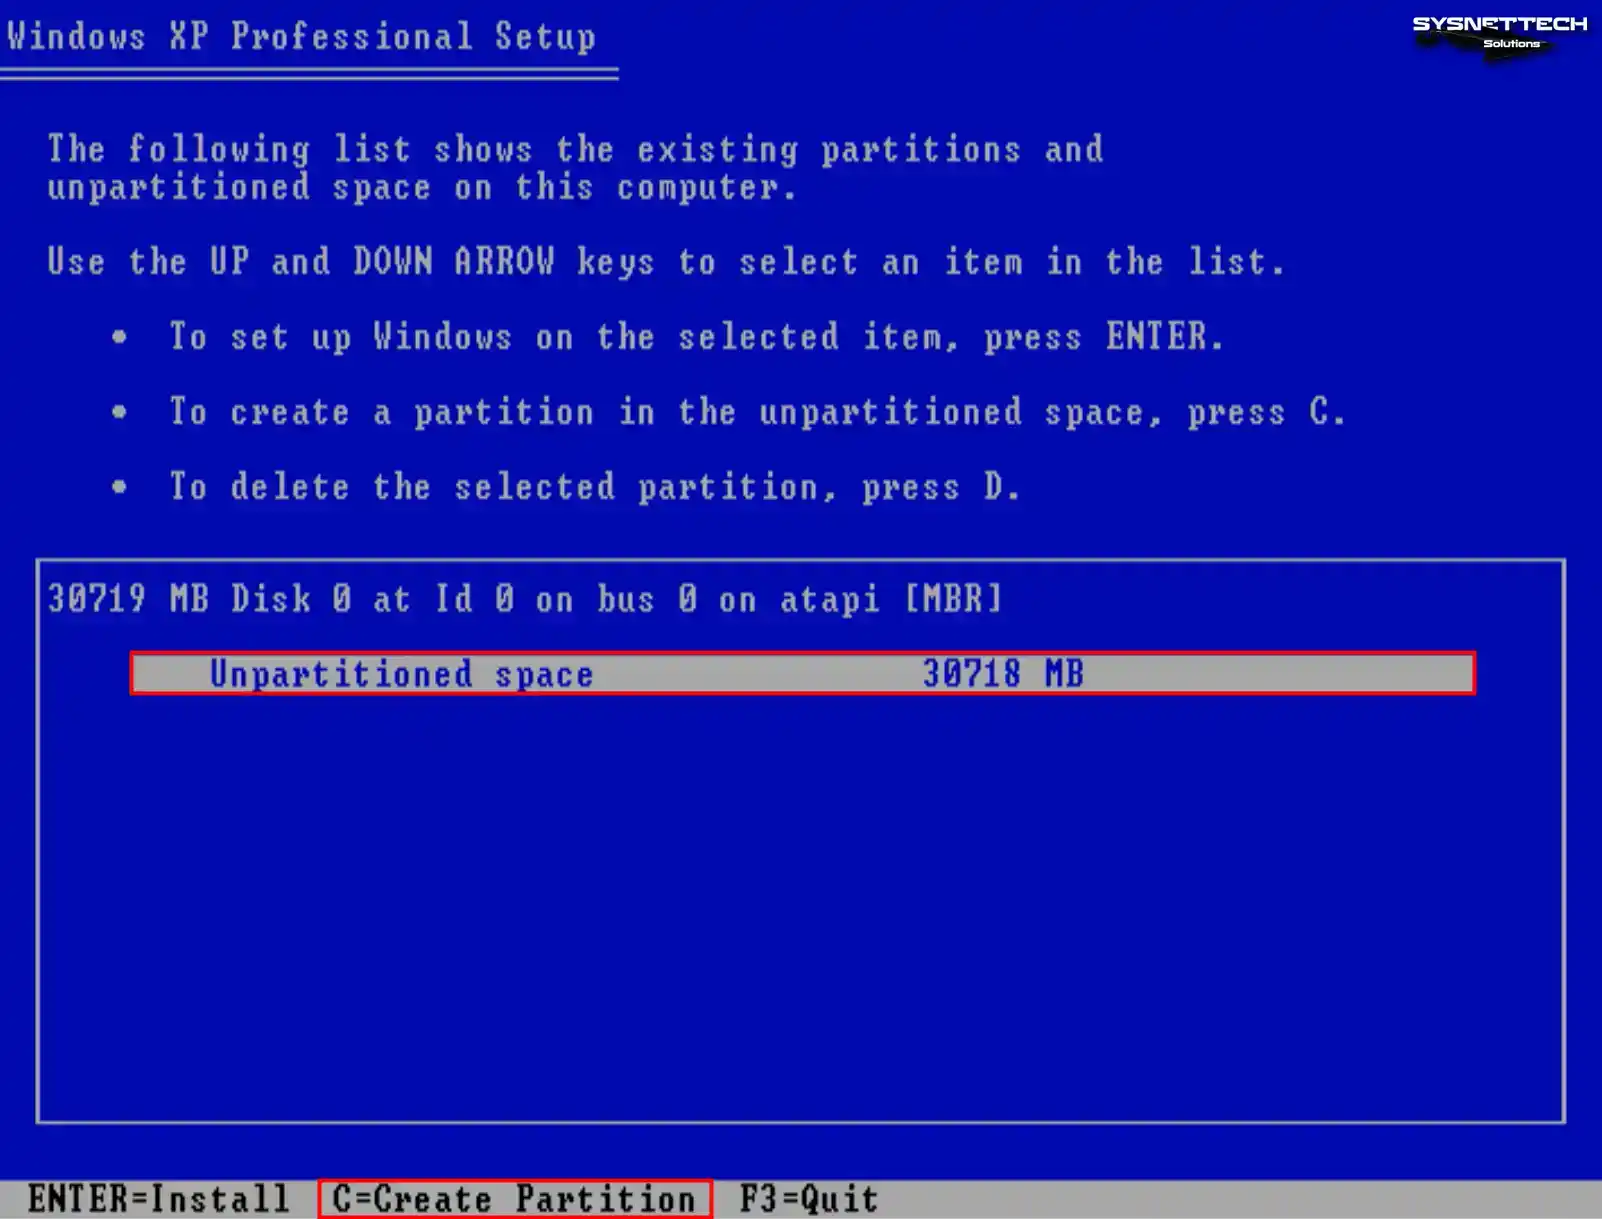
Step 4
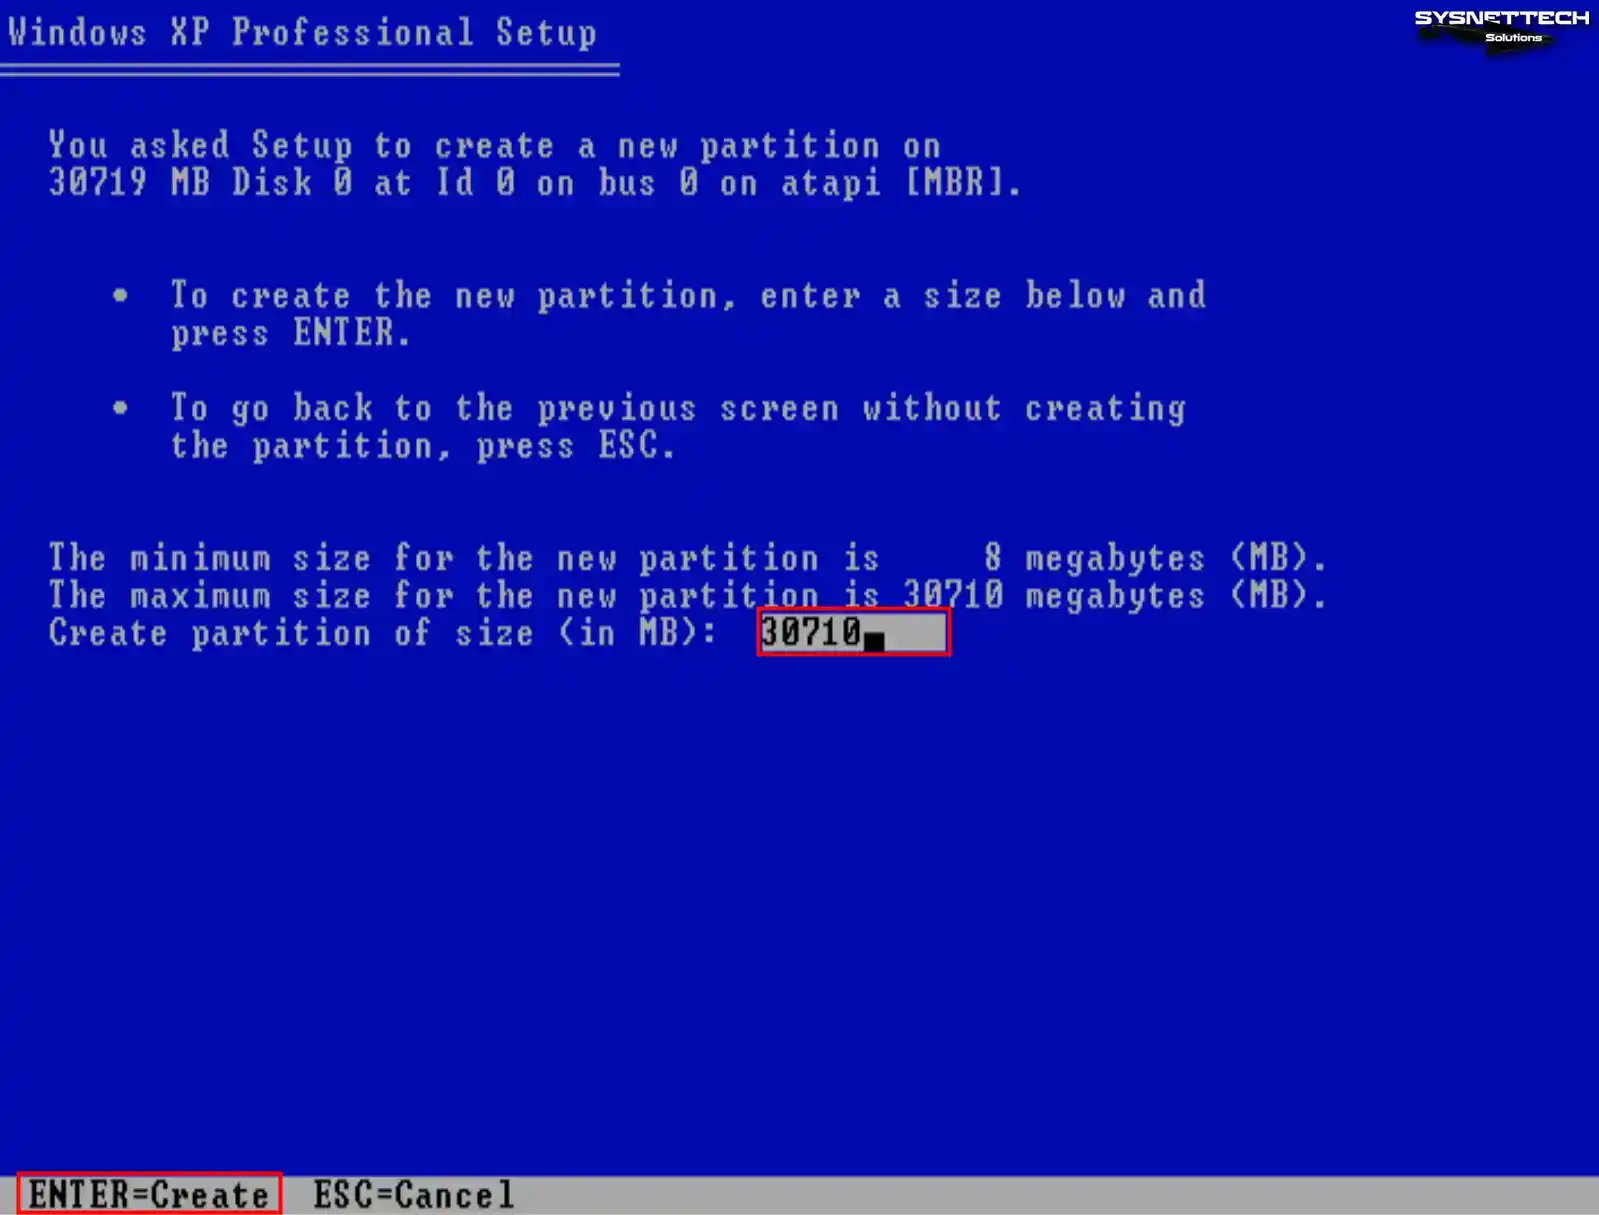
To make a new partition, you need to edit the disk space to be allocated after clicking C. You should use the entire disk space, as virtual machines generally use smaller disk space.
For example, if you configure the virtual disk size to 100 GB, allocating 20 GB for system setup and 80 GB for backup may make more sense.
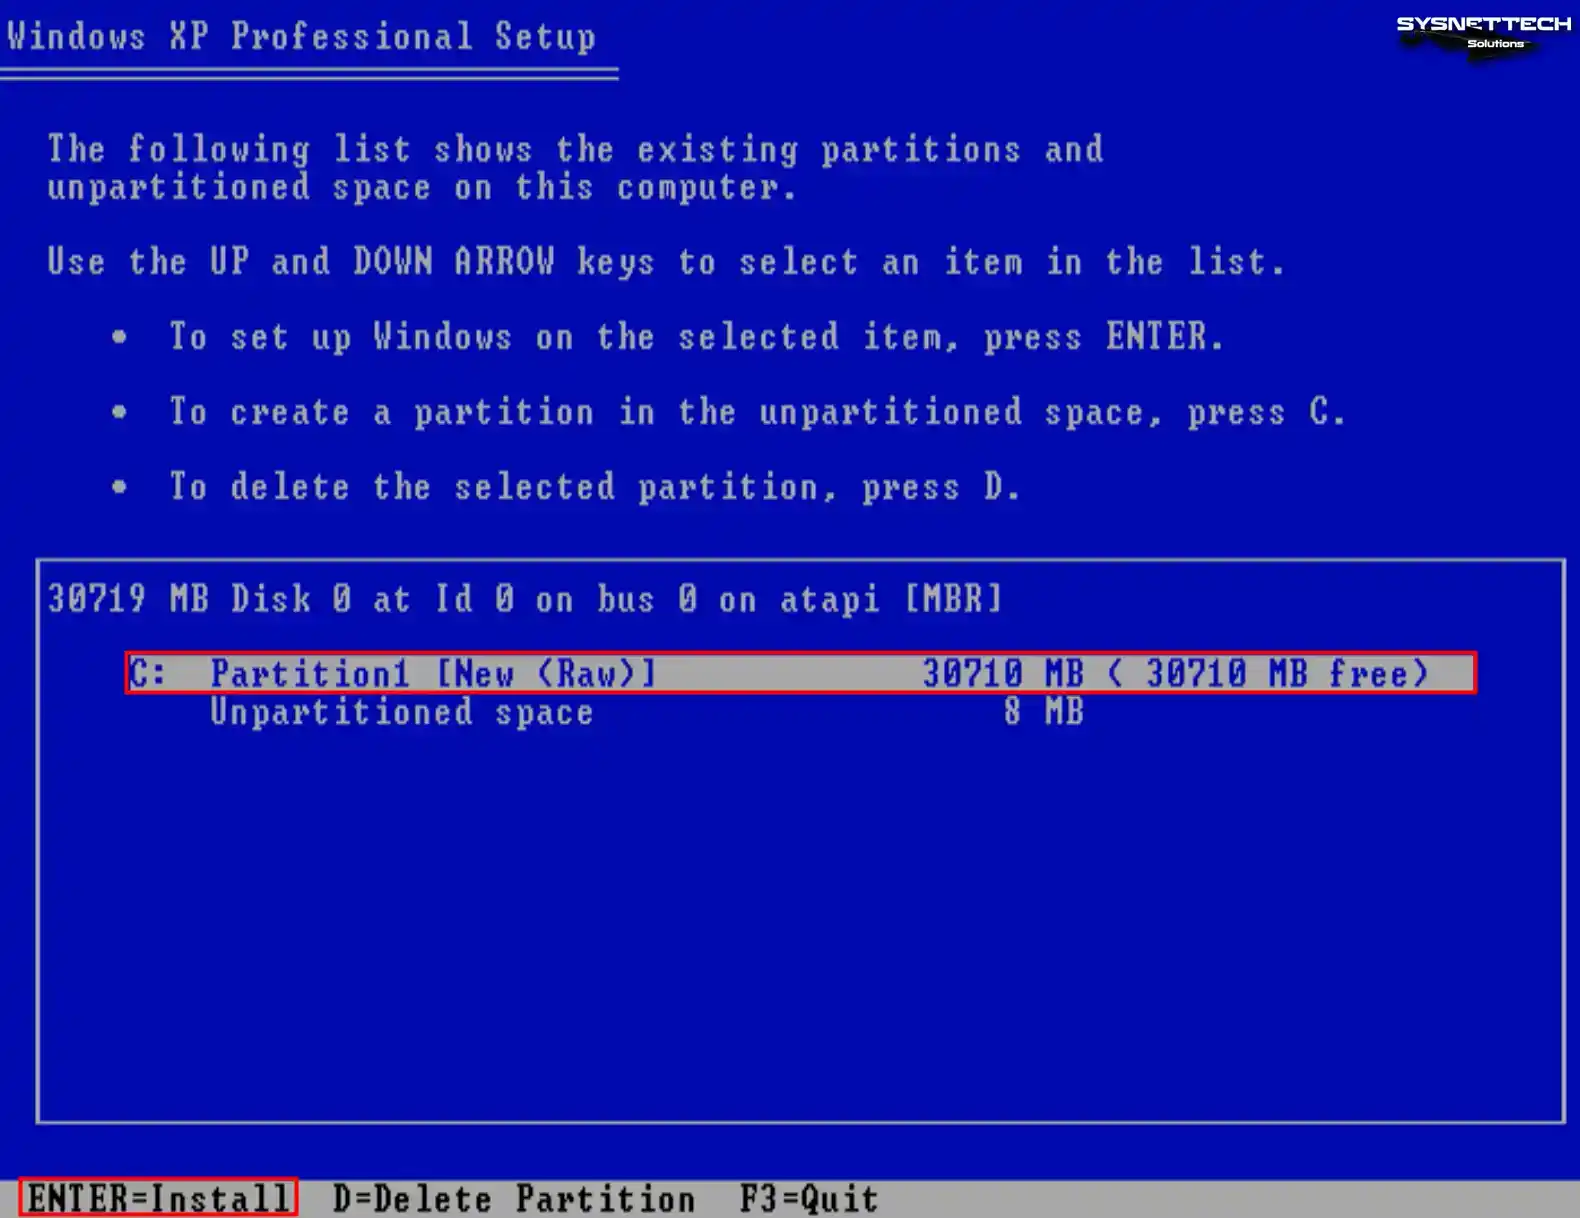
Step 5
Press Enter to start the Windows XP installation on the new partition you created.
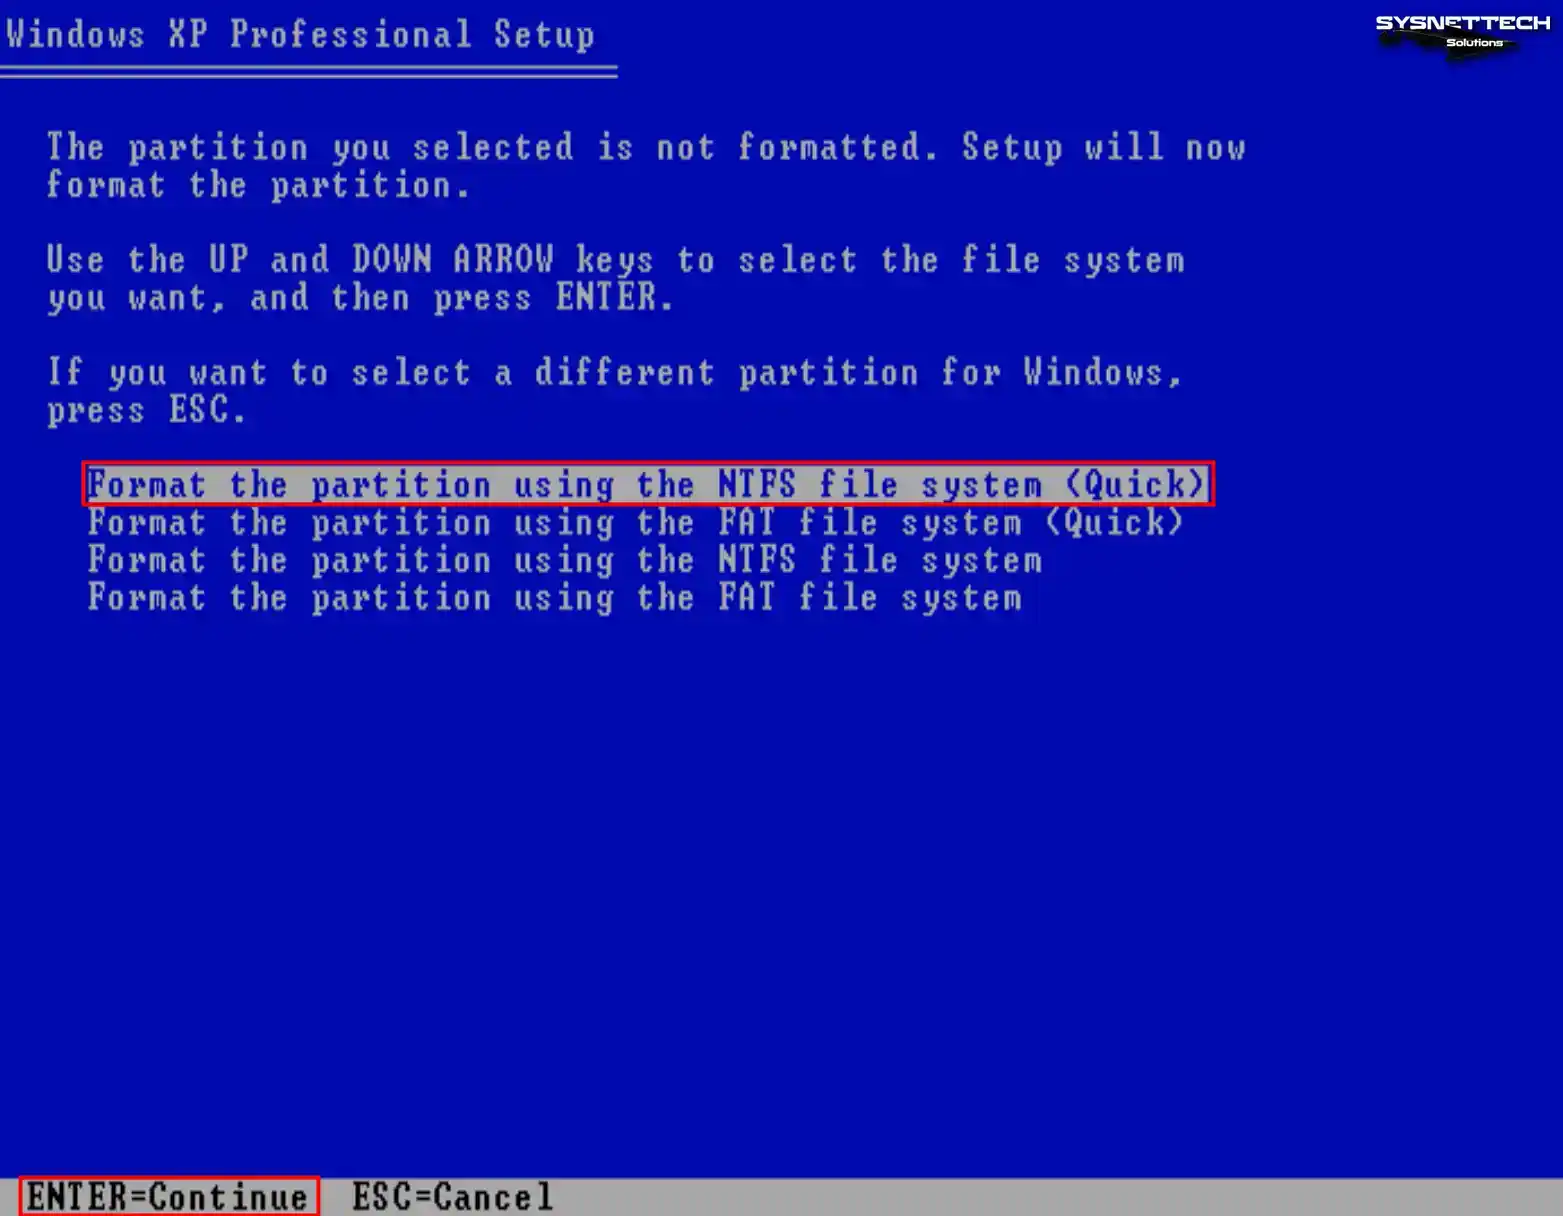
Step 6
Quickly format the virtual disk of the guest machine using the NTFS file system.
Step 7
Wait while the setup wizard formats your virtual disk.

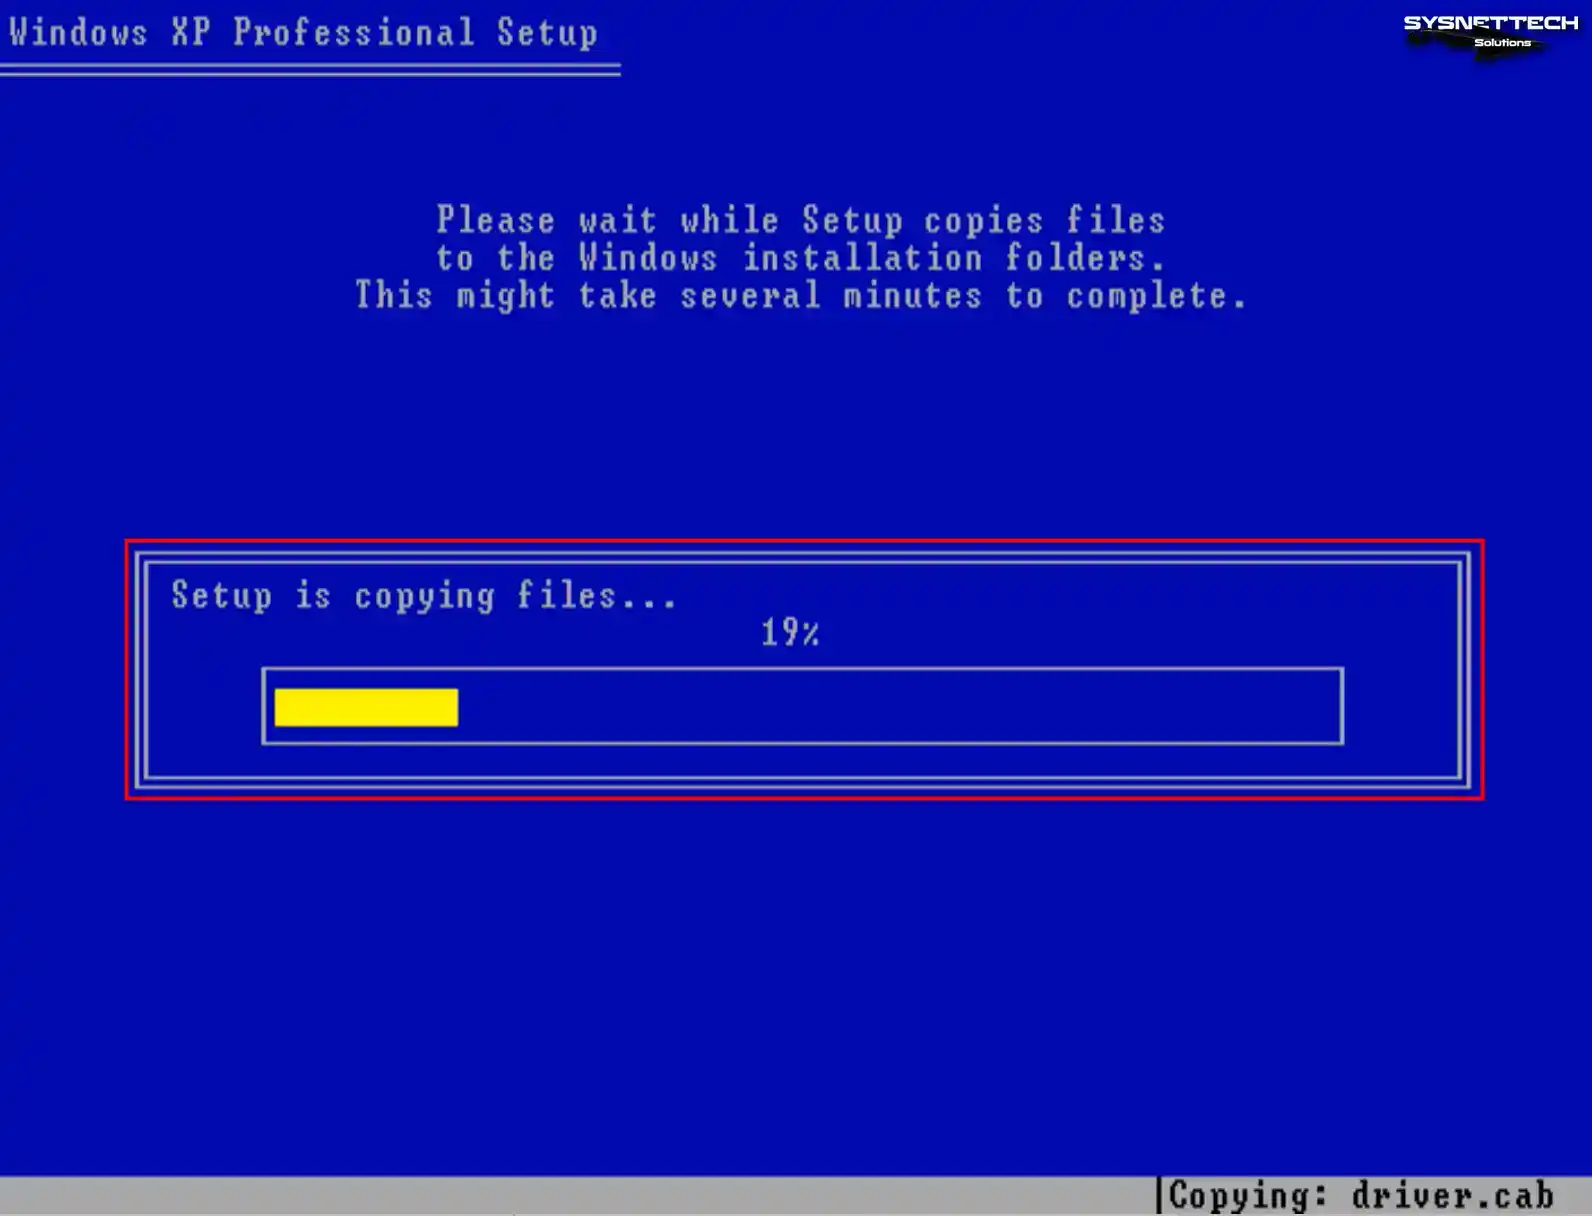
Step 8
Once the virtual disk has been formatted to facilitate file copying, the XP system files will commence their transfer onto the disk.
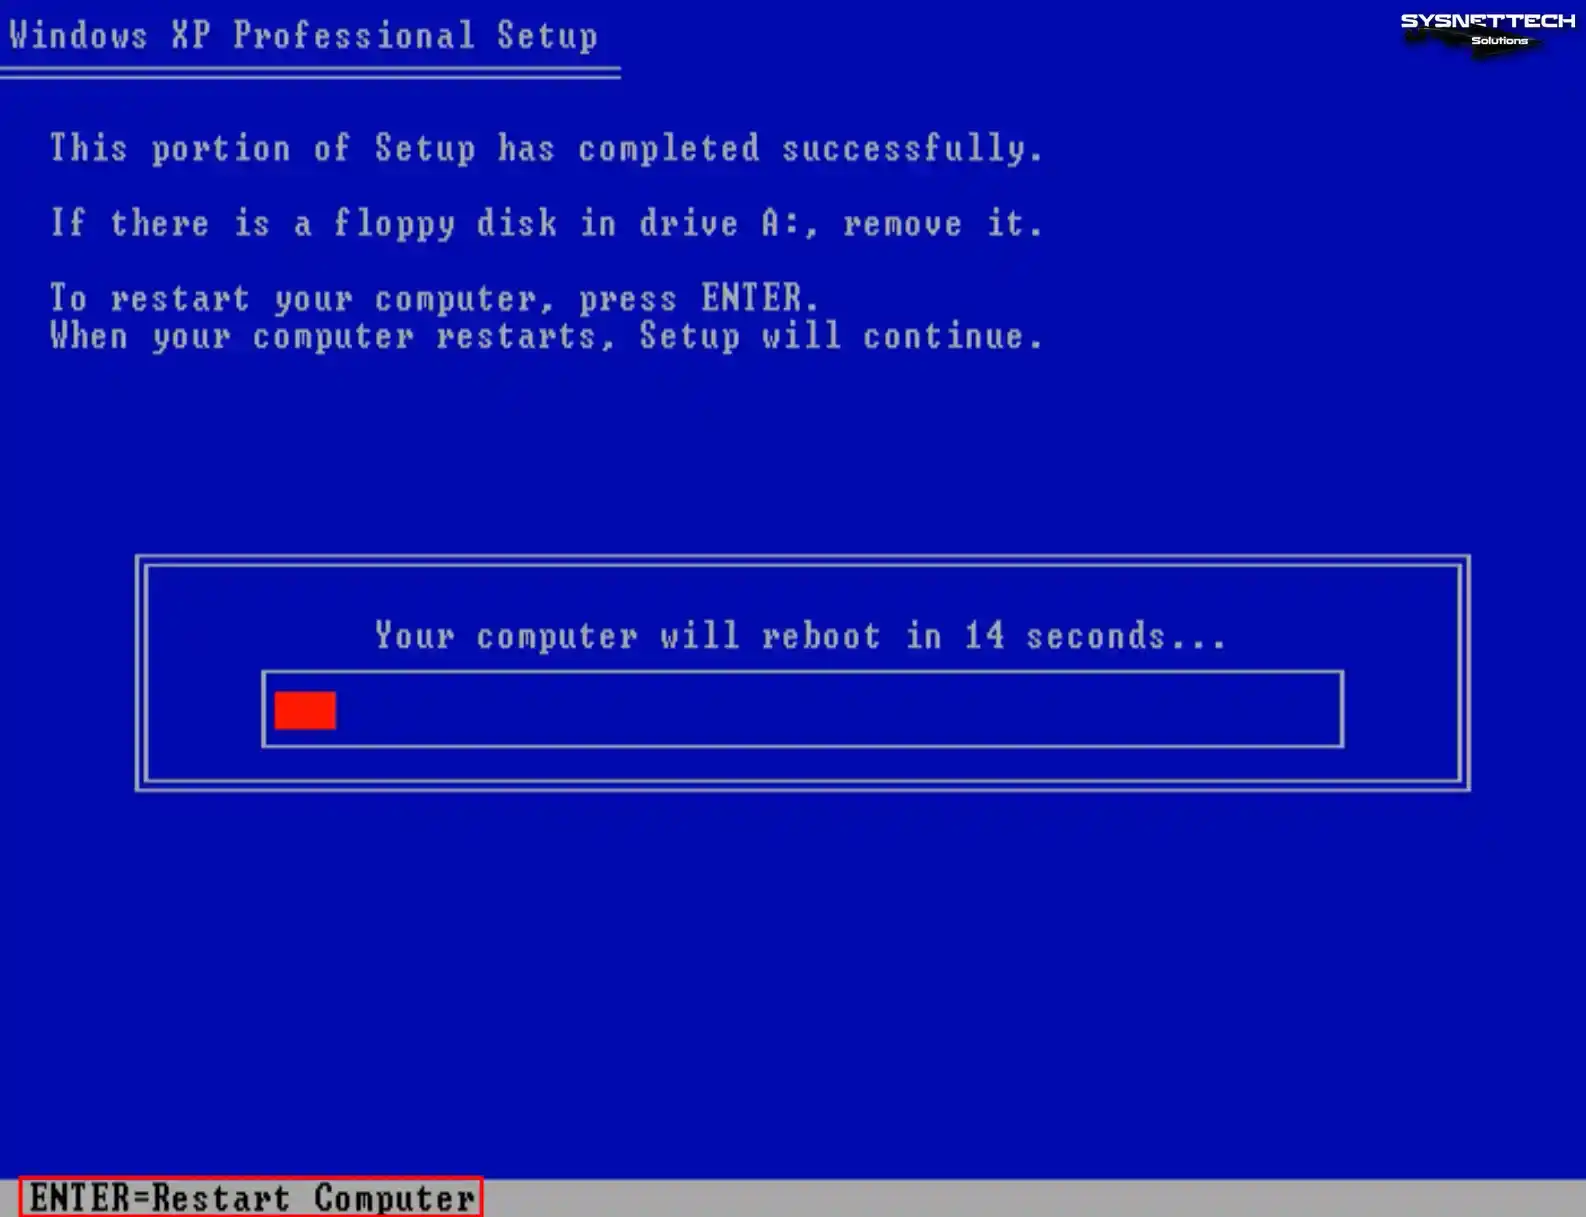
Step 9
After copying the system files, your virtual computer will restart automatically in 15 seconds. You can press Enter to reboot your virtual system immediately. After your guest machine restarts, the installation will continue.
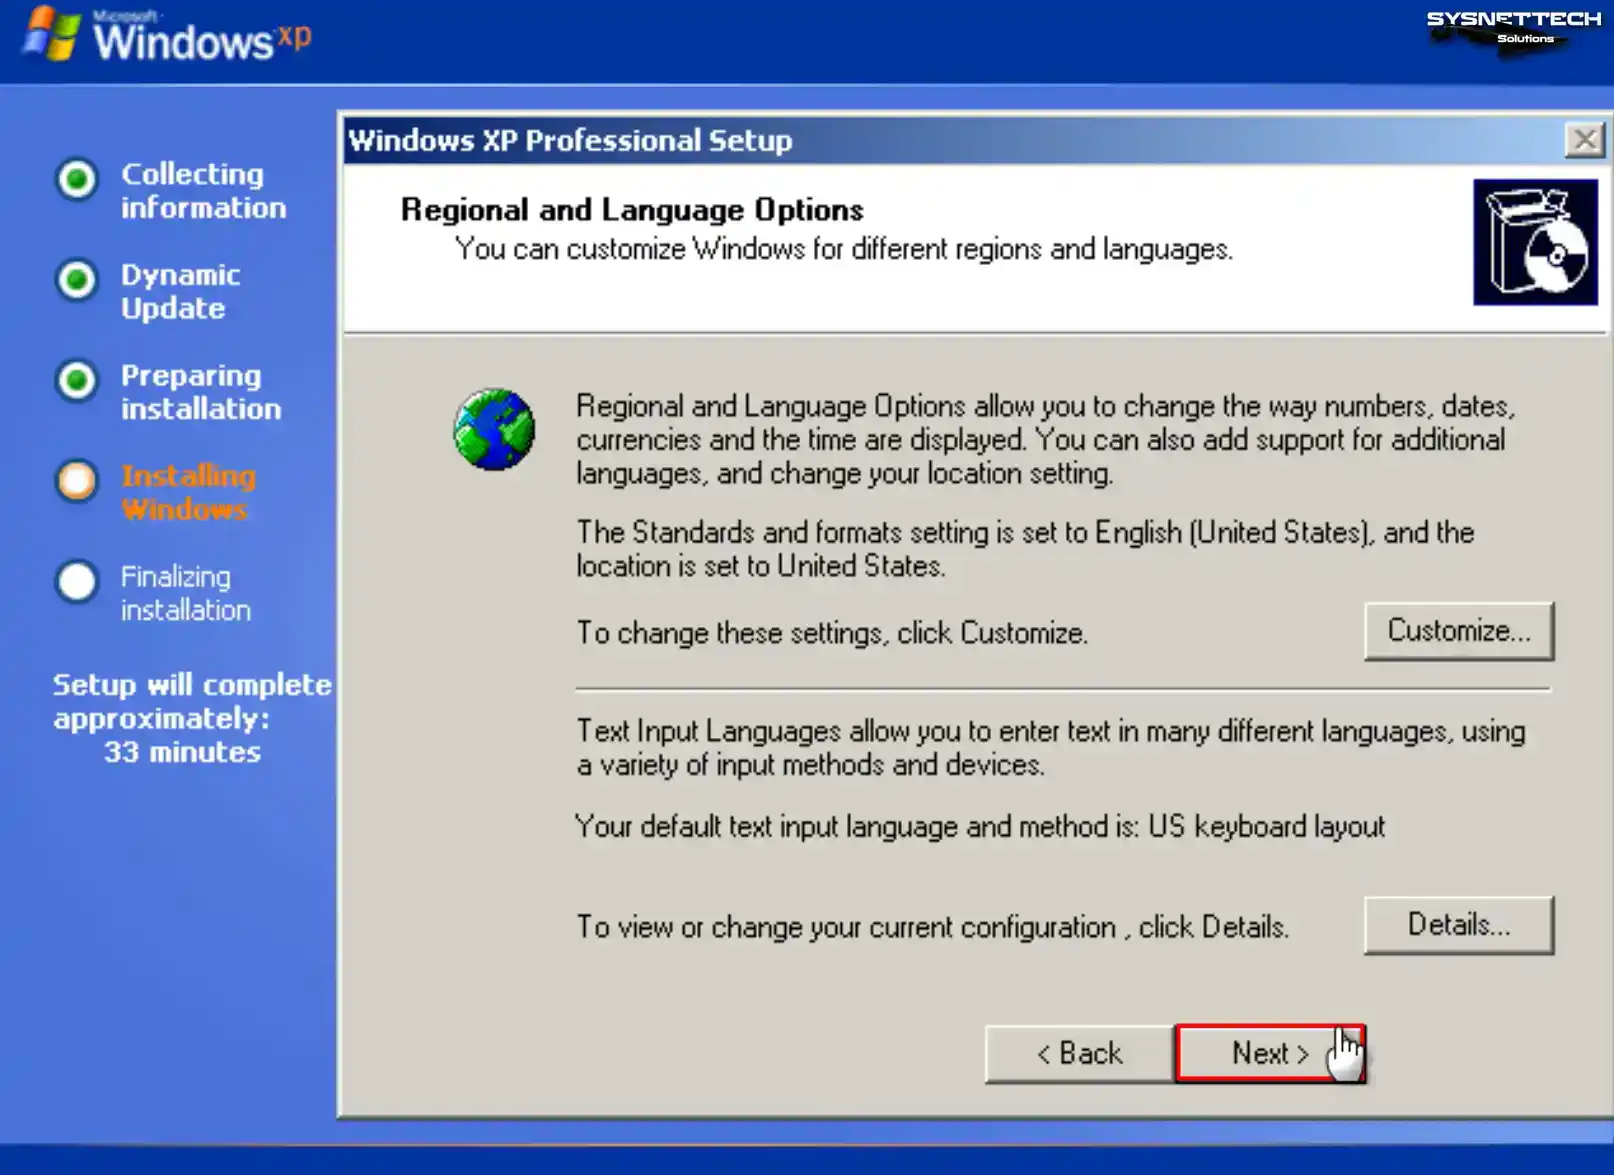
Step 10
Configure the region and language options of Windows XP according to your country.
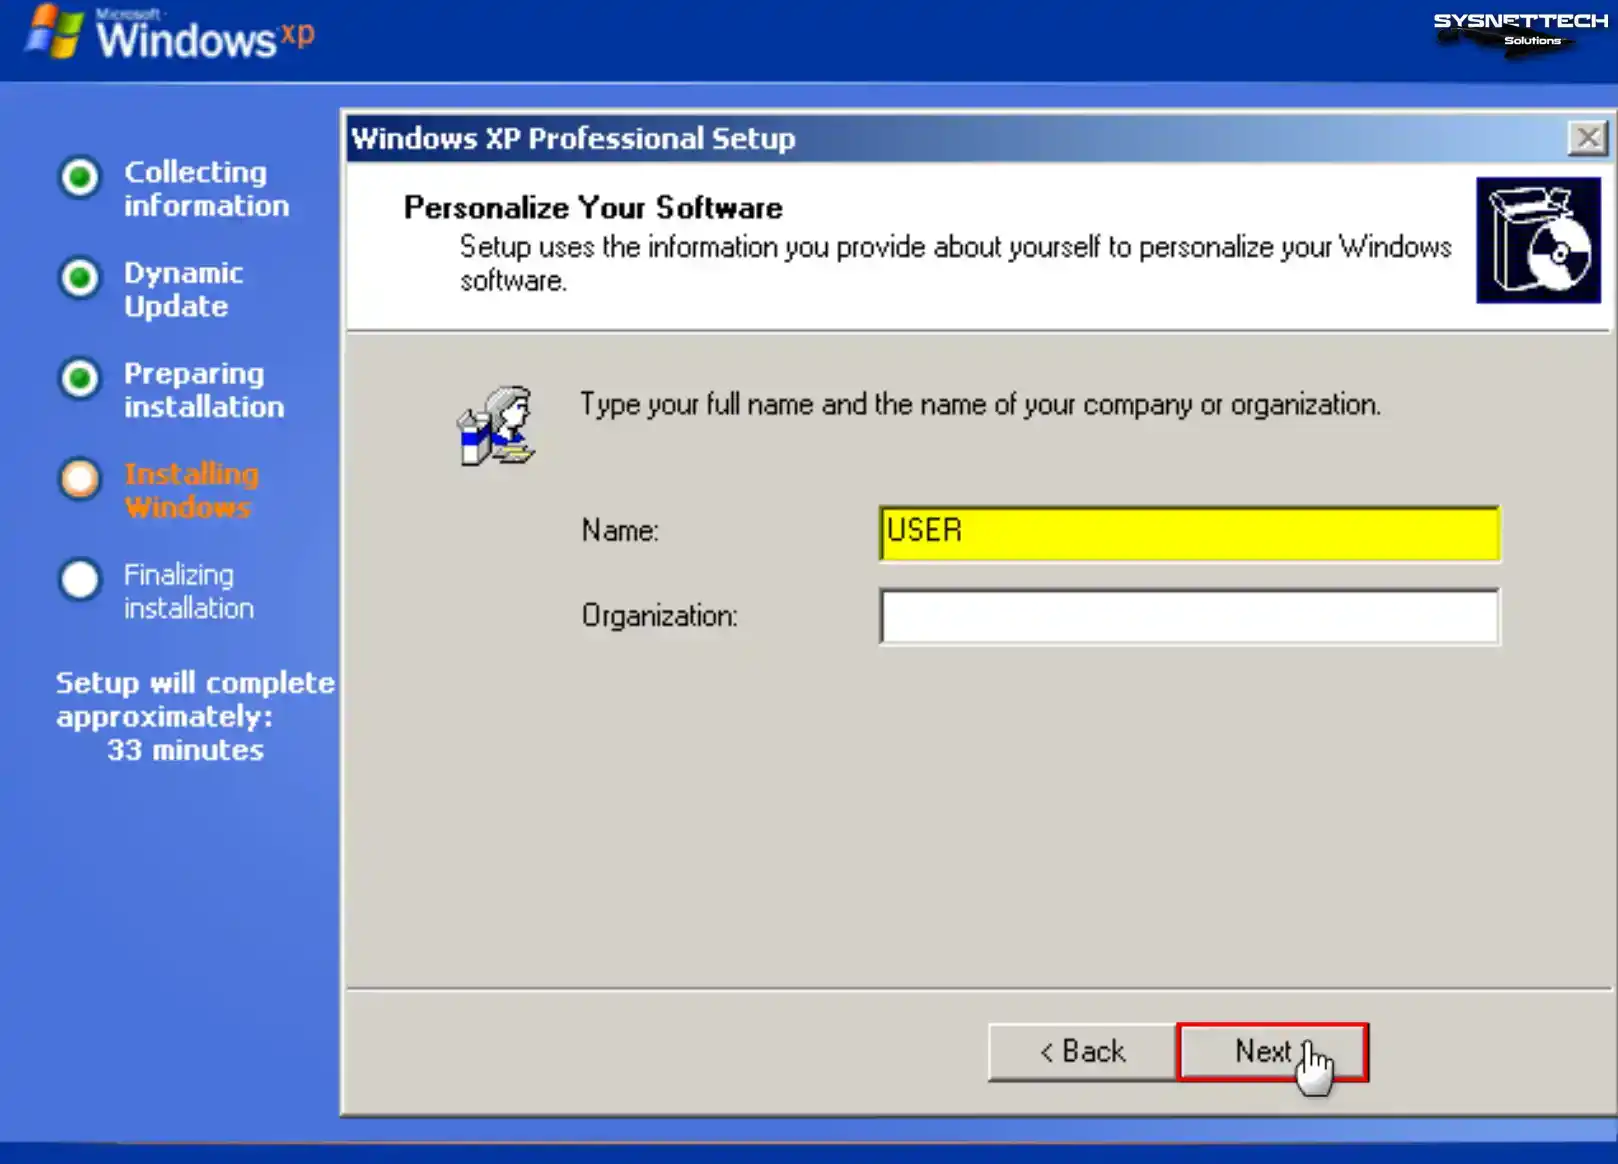
Step 11
Type a name for the user account you will use in your virtual system and click Next.
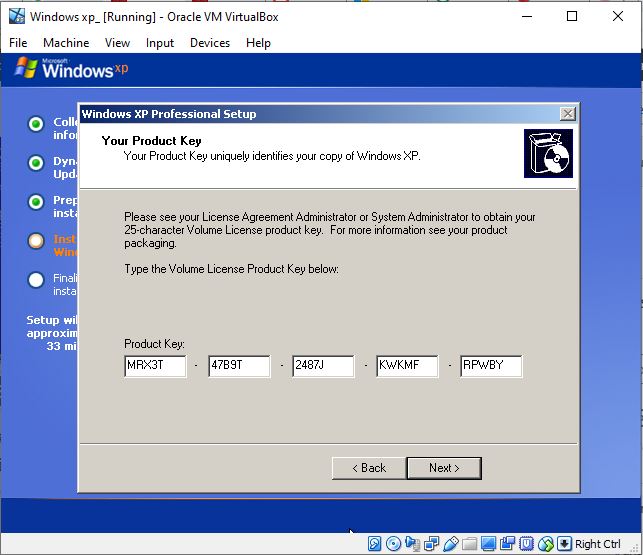
Step 12
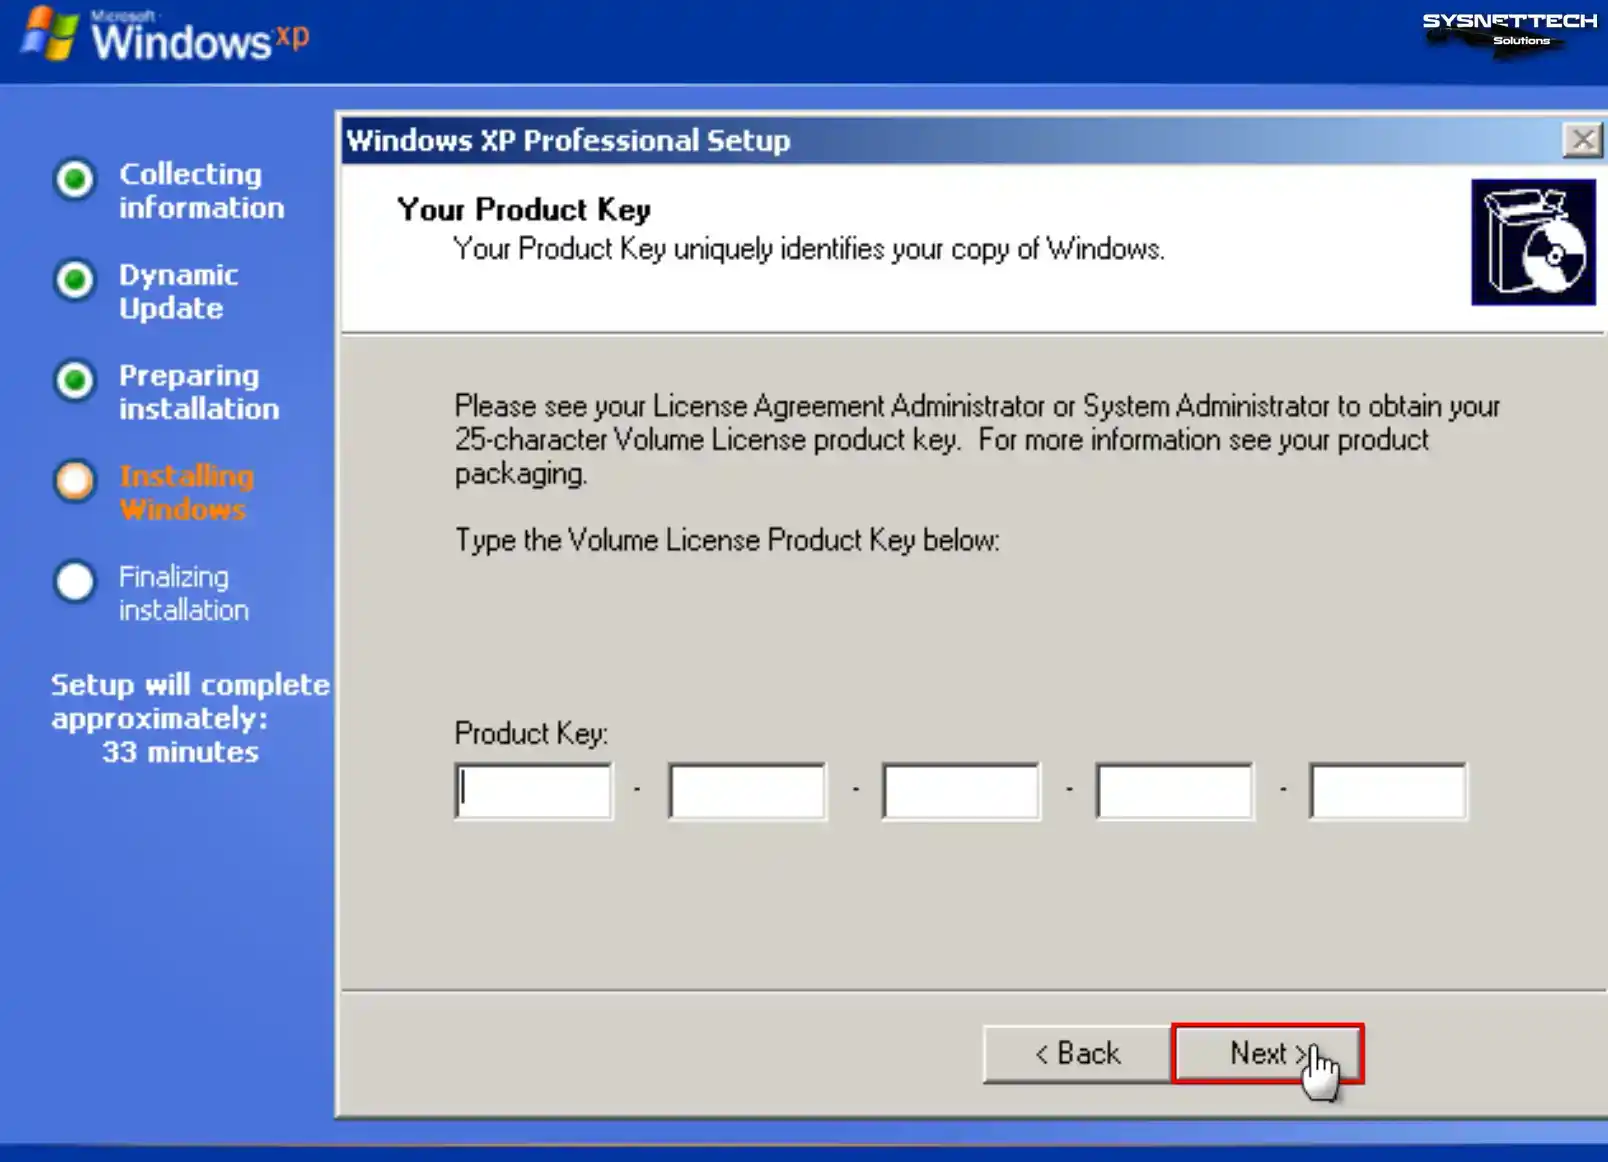
Enter the Windows XP Pro product key you have and click Next.
Step 13
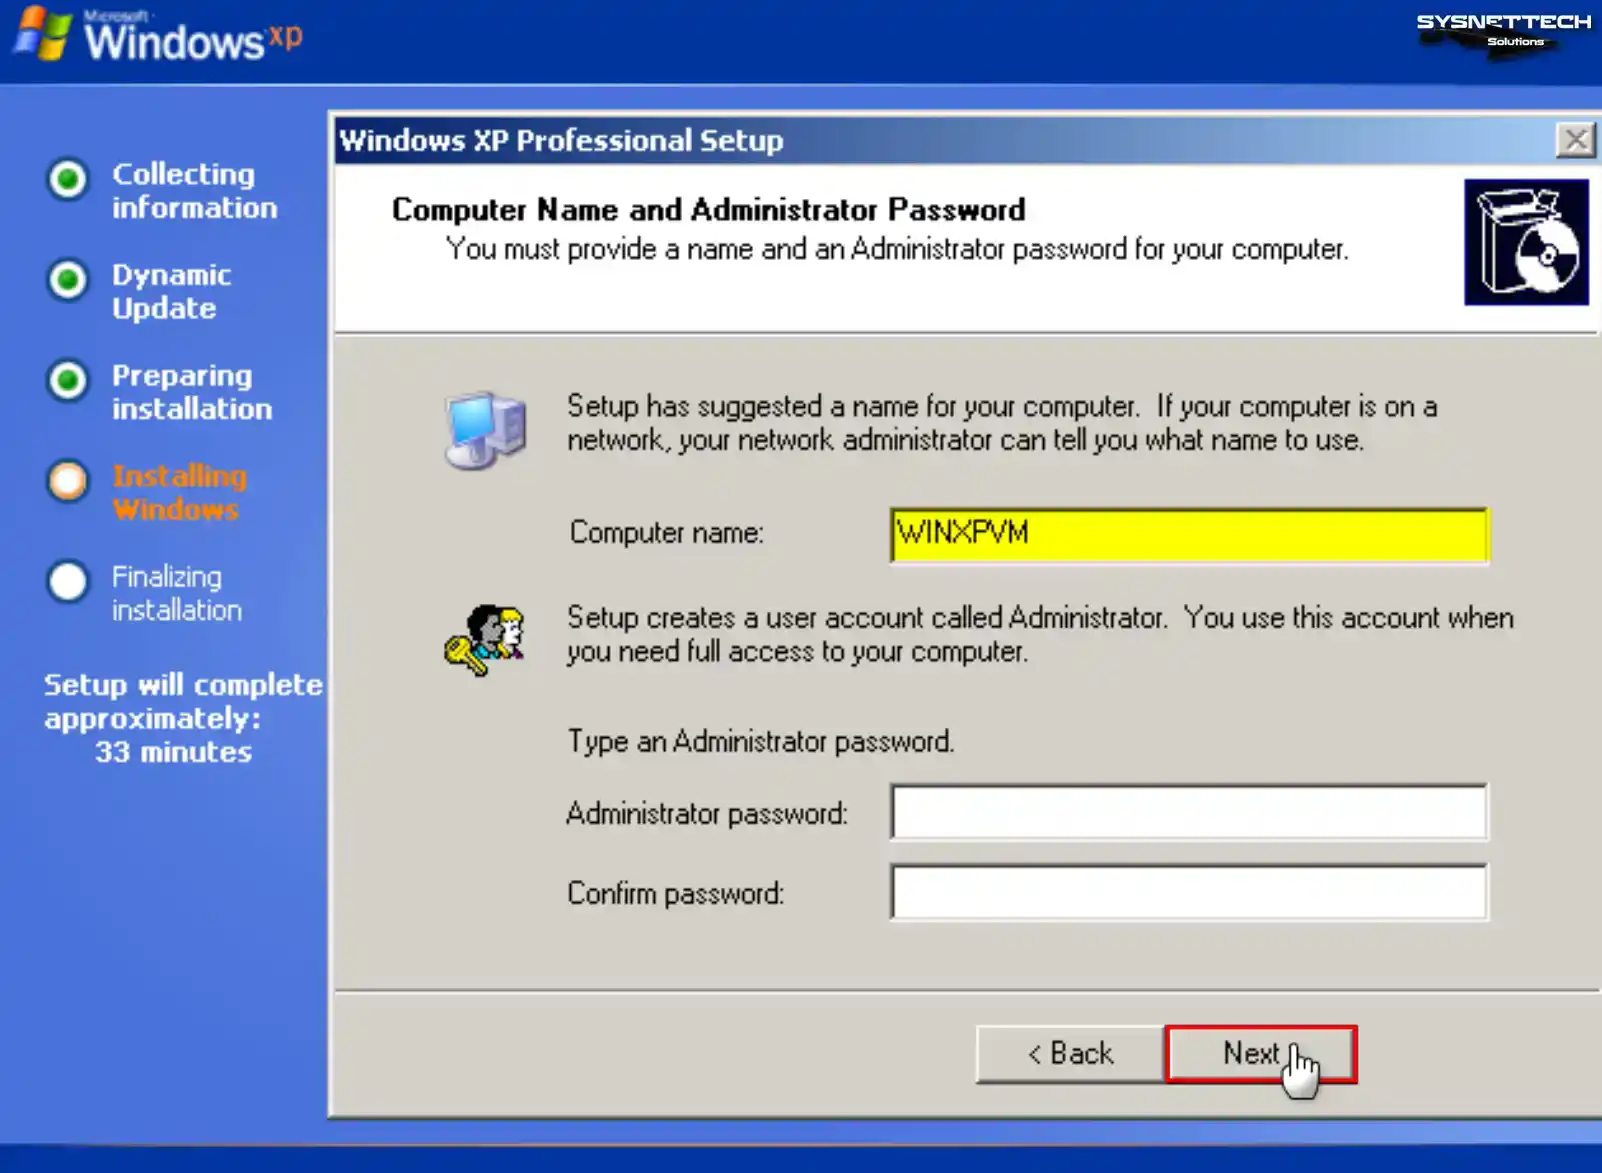
If you use your Windows guest machine in a network environment with multiple computers, ensure the computer name differs from other devices.
Type the PC name you want to use in the Computer Name field and create a new password for the Administrator account with full authority in your virtual system, or leave the relevant fields blank to avoid making a password, and click Next.
Step 14
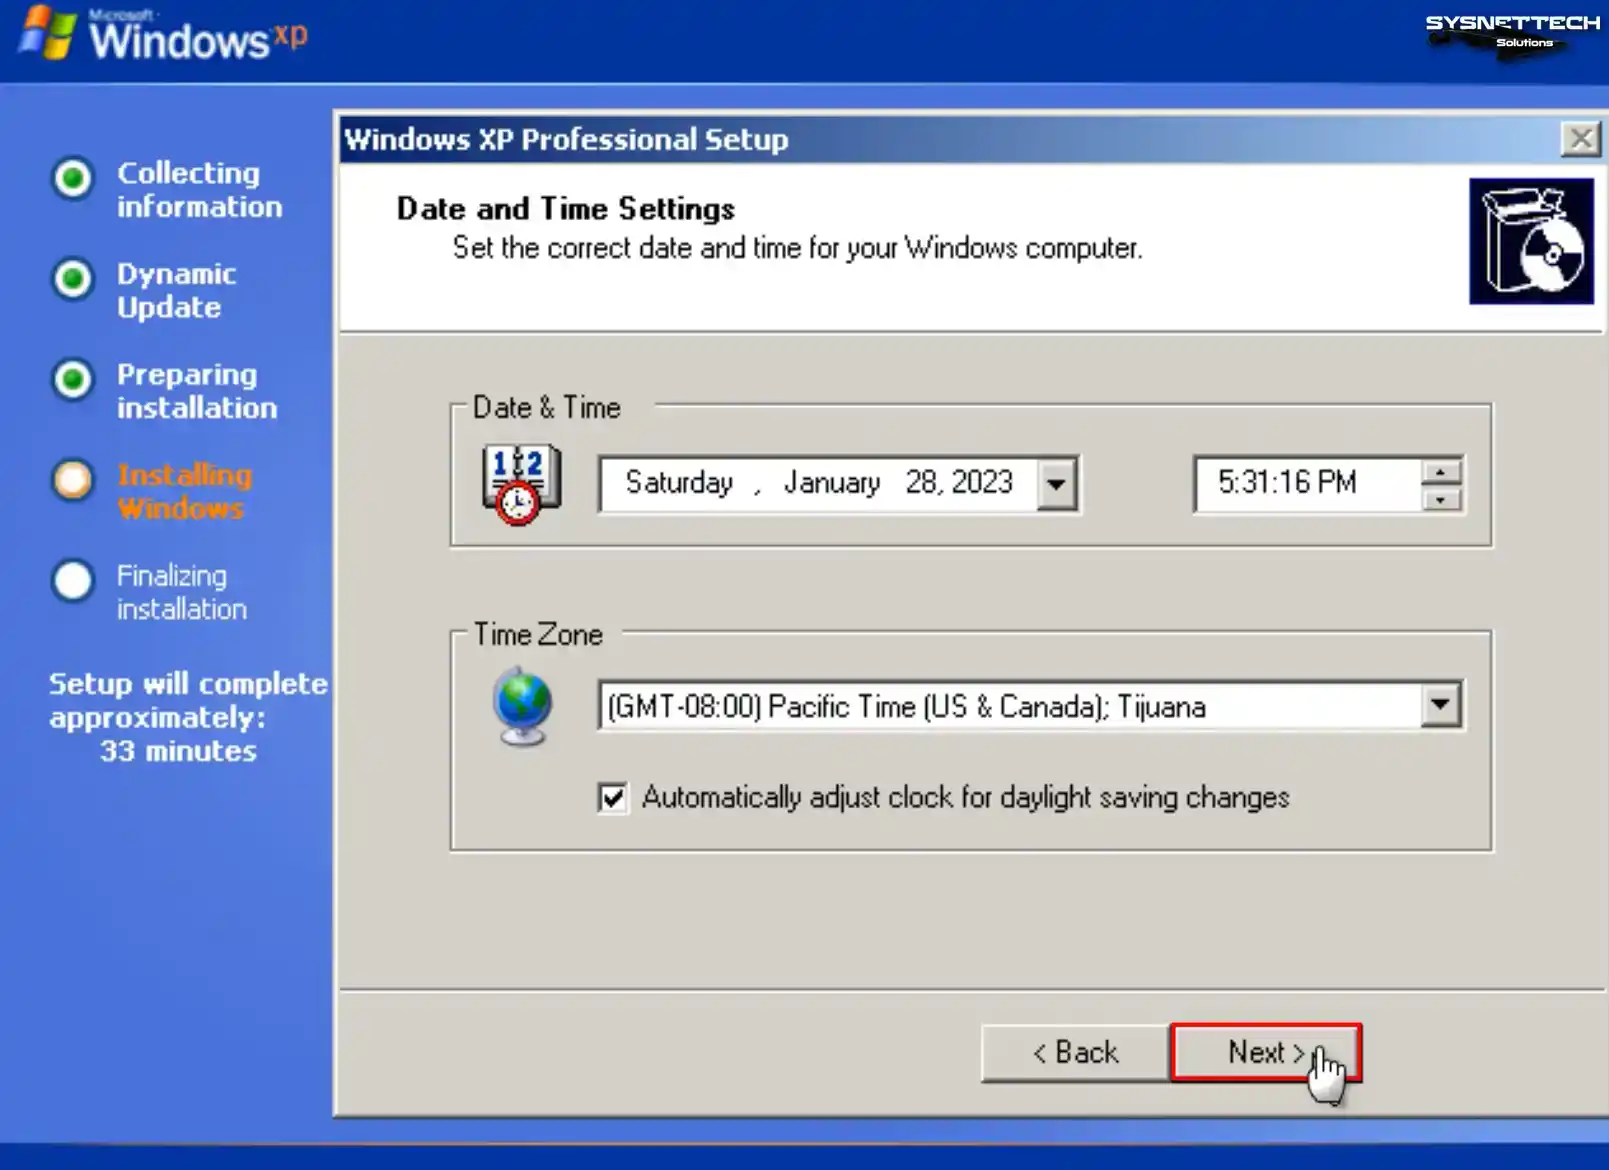
Configure your virtual computer’s date, time, and time zone settings according to your location and click Next.
Step 15
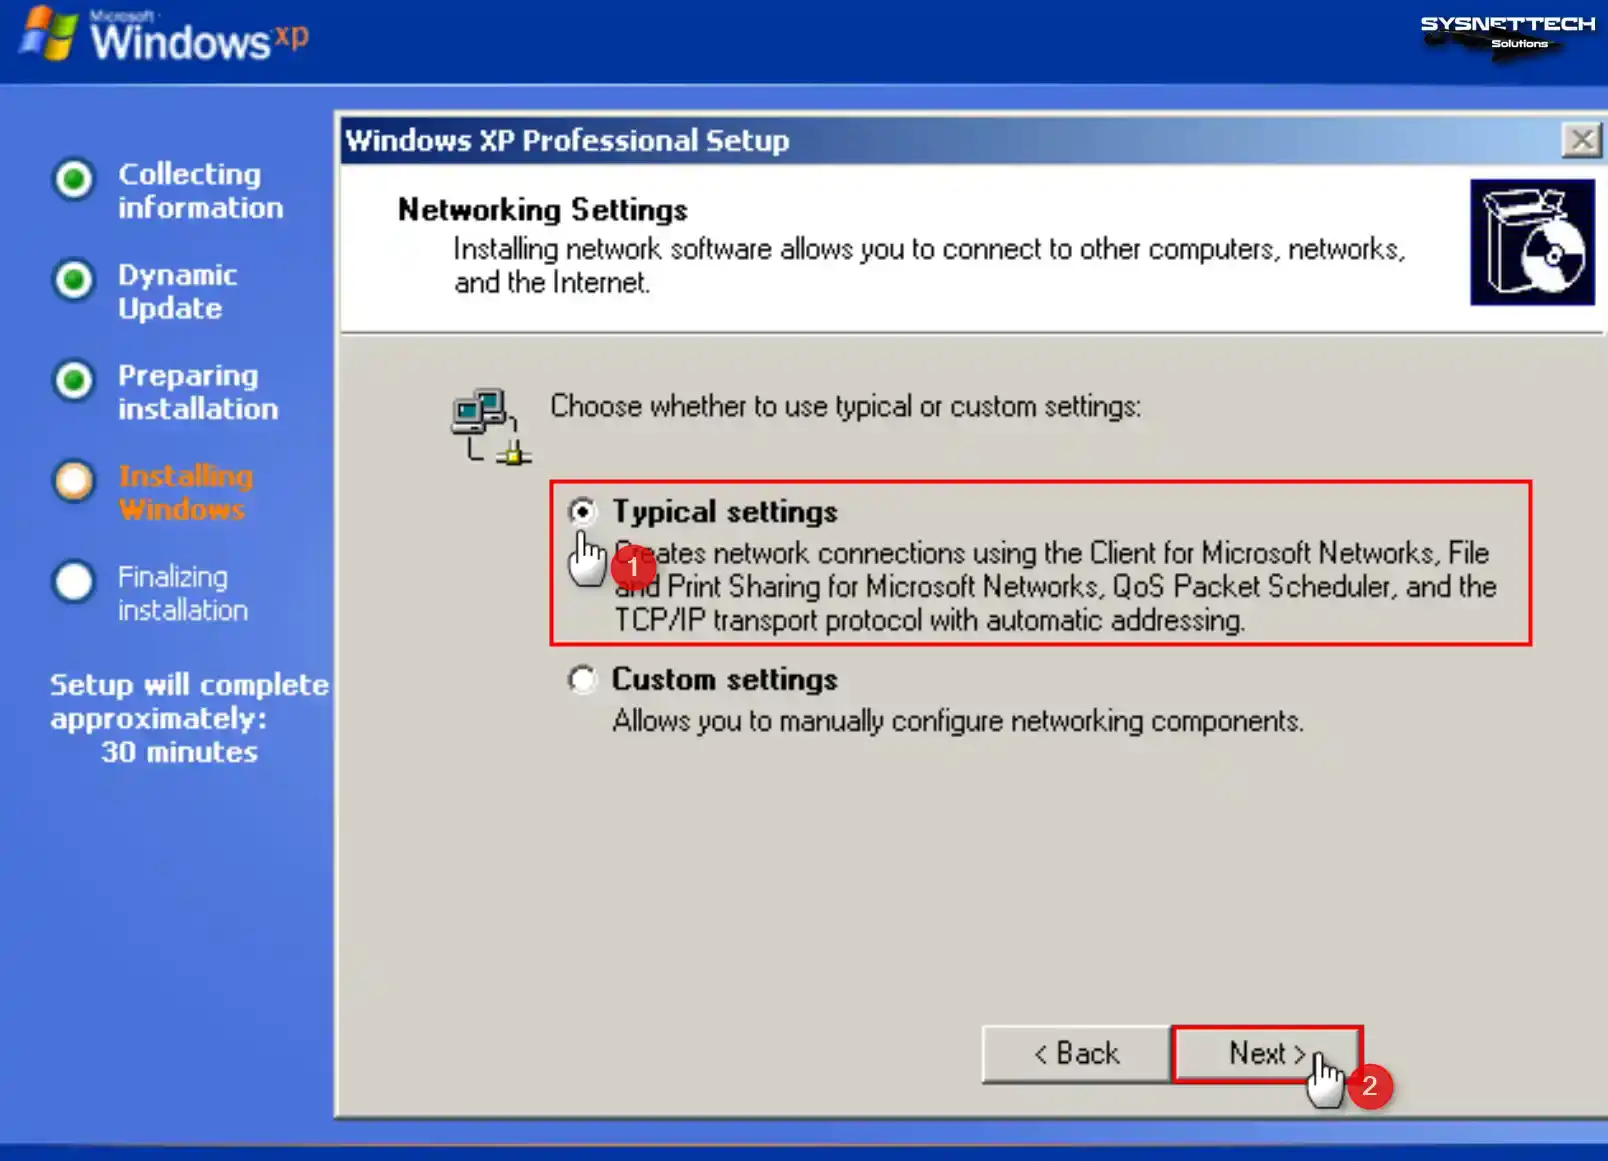
To use your VM in your physical network environment in the Networking Settings window, tick Custom Settings and make the relevant settings. You can also continue the installation by selecting Typical Settings in general.
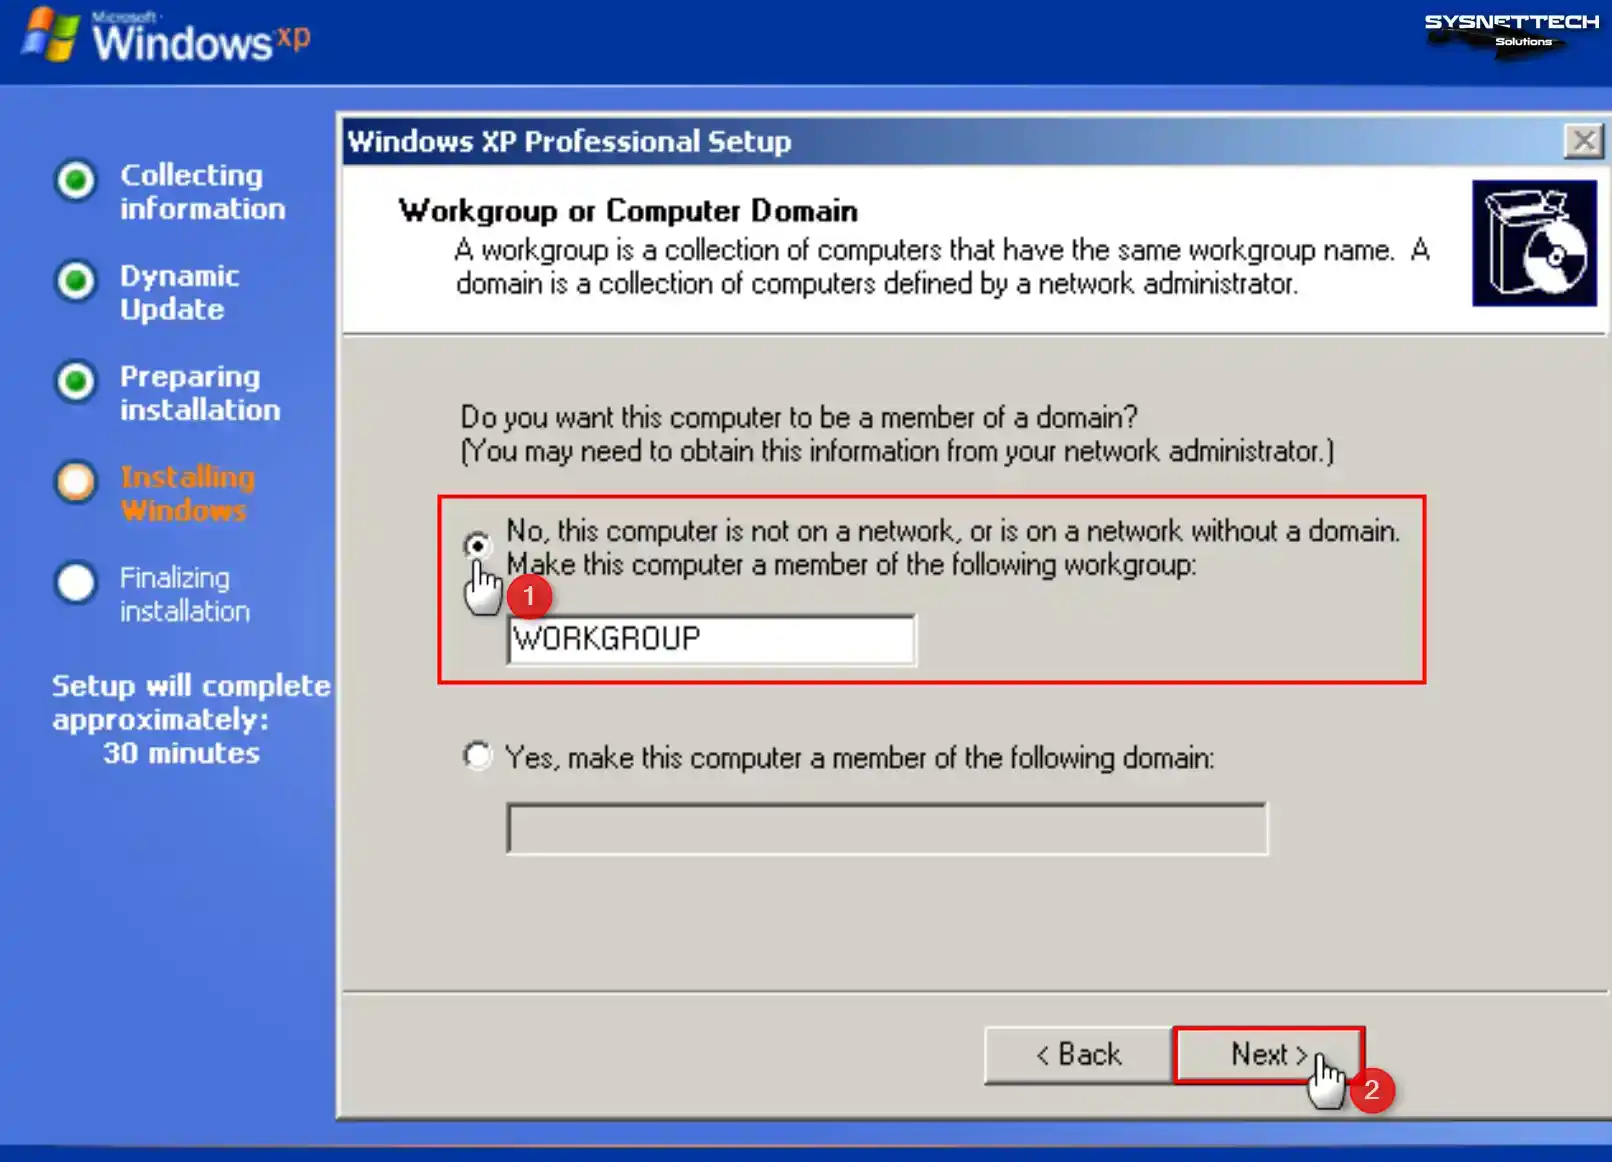
Step 16
According to your network structure, if you make the virtual machine a member of a Domain environment that provides an Active Directory service, you must select the Yes option and type your Domain information.
To use your VM for personal use without subscribing to a Domain environment, select WORKGROUP and click Next.
Step 17
Wait while Windows XP is installed on the guest machine.

Step 18
Wait while the Microsoft Windows XP x64 operating system boots up.
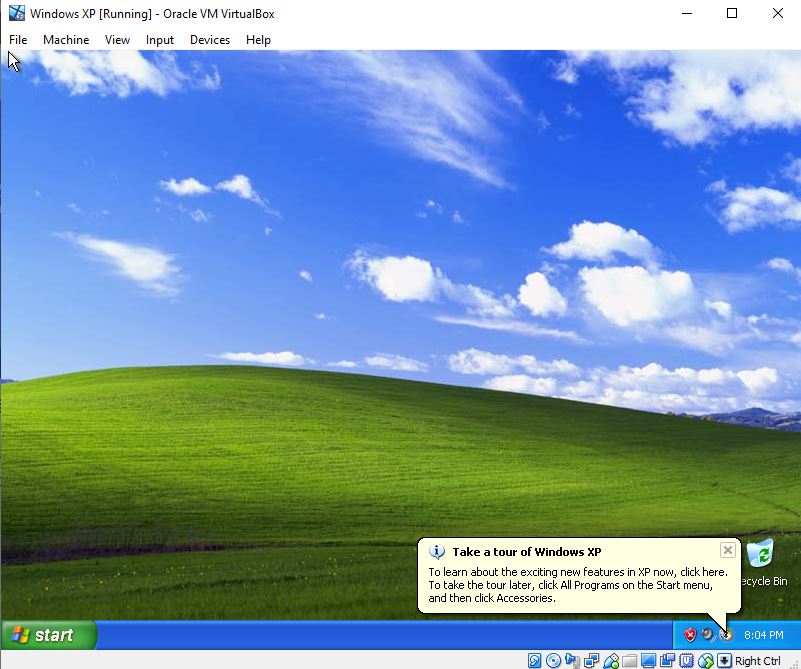
Step 19
After the Windows XP system files are copied, your system will reboot, and your desktop environment will be ready.
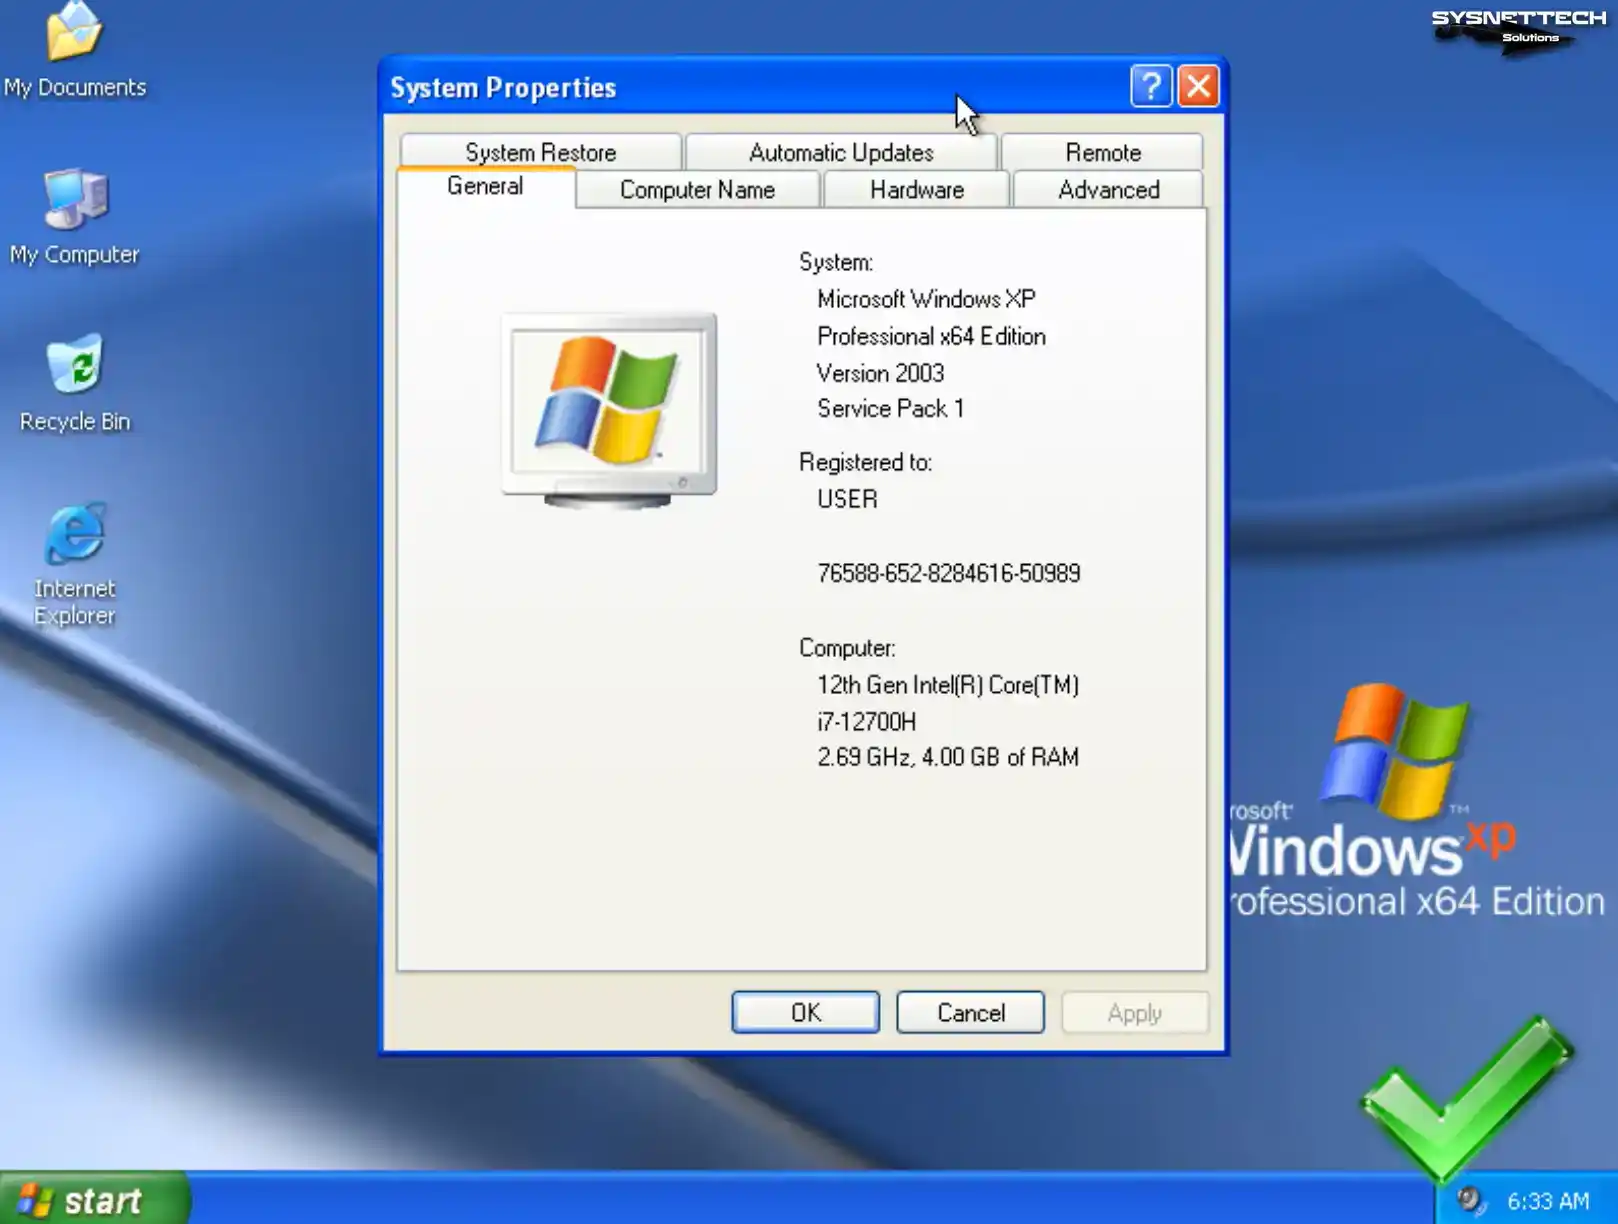
Step 20
Right-click on My Computer, then click System Properties from the options that appear, and check the system information.
How to Install Guest Additions in Windows XP
After installing Windows XP within the virtual machine, it is essential to install Guest Additions to unlock various functionalities. These include achieving full-screen resolution, facilitating file transfer between the host and the VM, and enabling the utilization of the host computer’s hardware within the VM.
Step 1
To view the Computer Management window, right-click the My Computer icon and select Manage. Once the window appears, navigate to Device Manager and review the drivers that are not installed on your system.
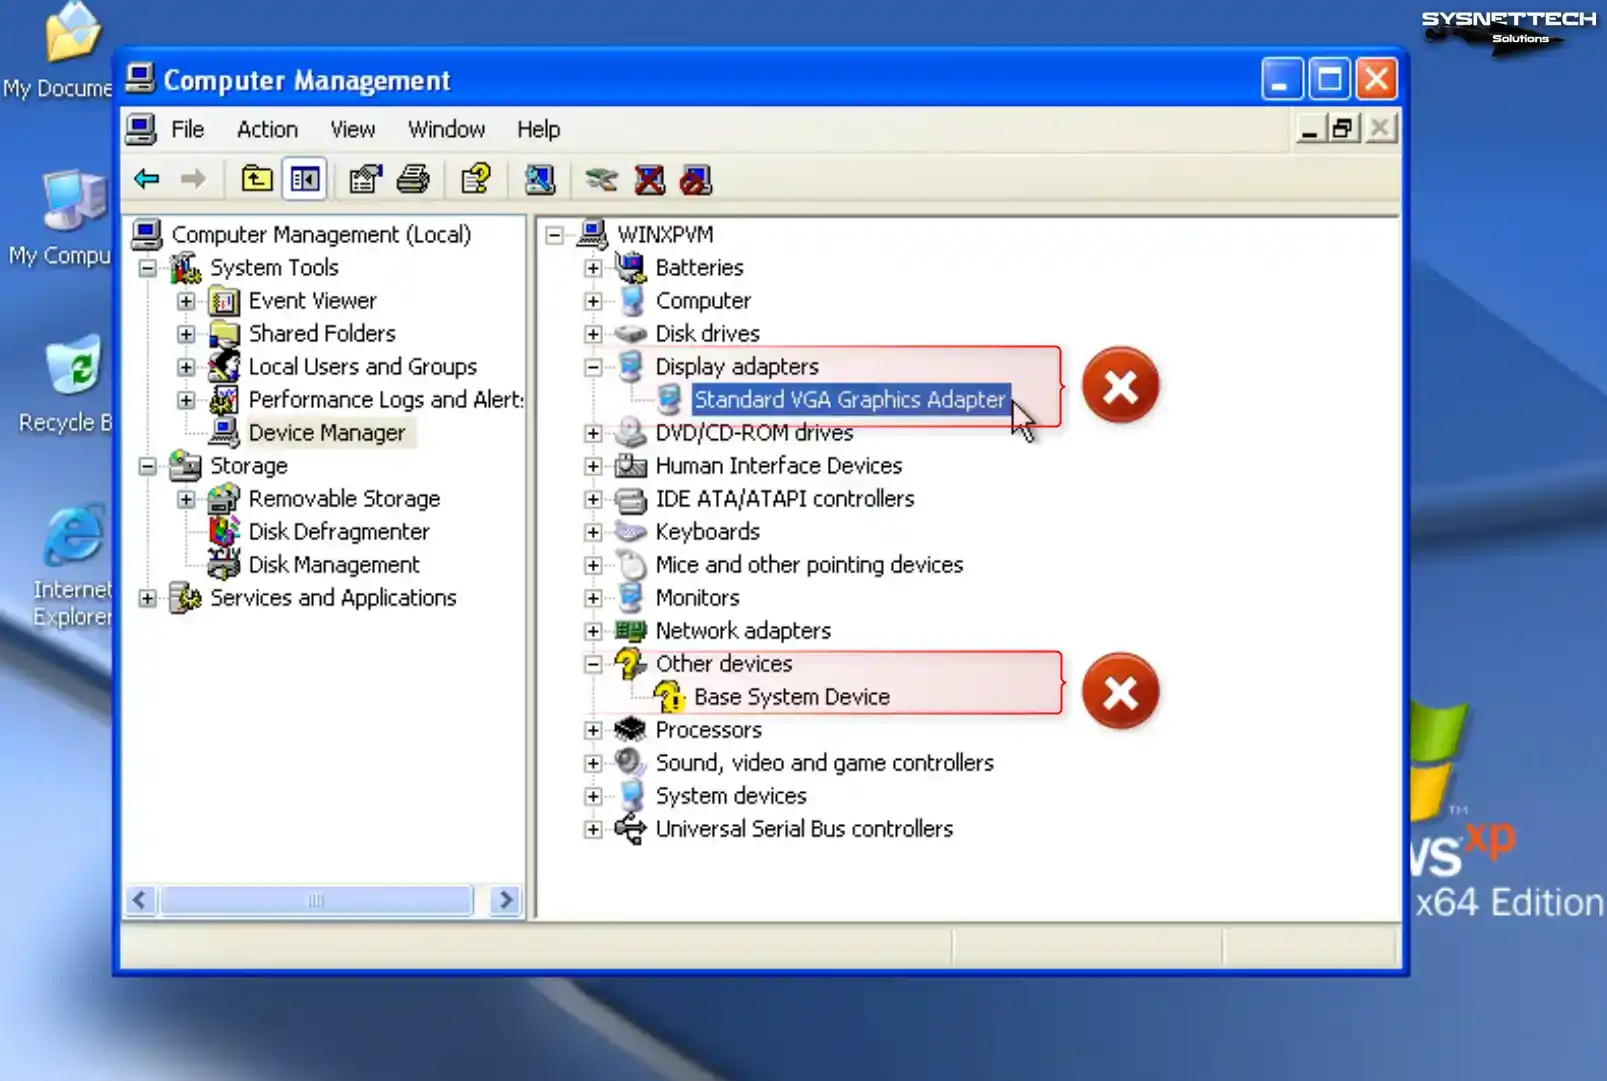
Step 2
Under normal circumstances, when installing Guest Additions on Windows XP, you will encounter an Unsigned Driver warning. This is not an error, but the driver for some devices cannot be fully installed.
To overcome the barrier imposed by unsigned drivers, you must modify a setting in the Group Policy settings. To continue, access the Start menu, enter “gpedit.msc” in the designated text box, and proceed by clicking OK.
When the Group Policy Object Editor is accessed, go to Windows Settings > Security Settings > Local Policies > Security Options and click “Devices: Unsigned driver installation behavior” from the options under Security Options.
Change the Devices: Unsigned driver installation behavior setting to Silently Succeed, and restart your virtual computer after clicking OK.

Step 3
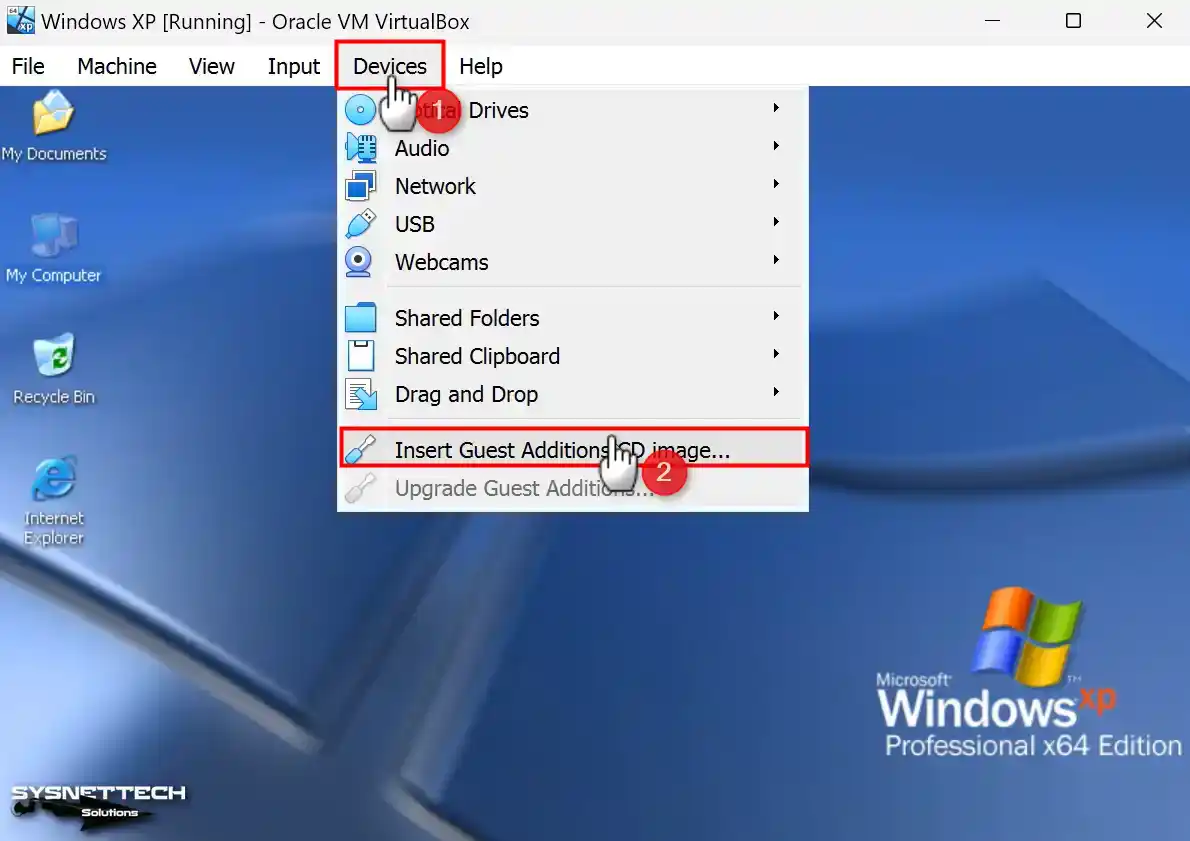
After your guest system is turned on, click Devices / Insert Guest Additions CD Image to install the guest add-ons software.
Step 4
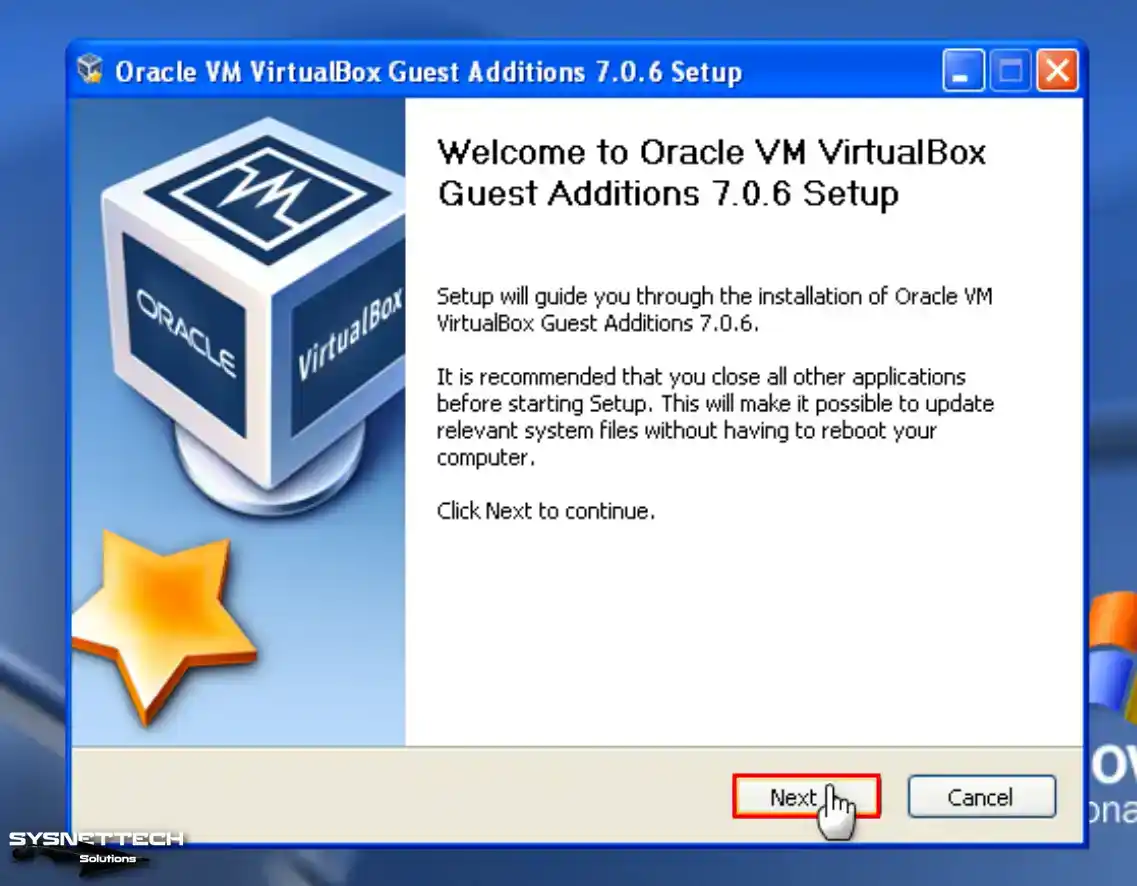
When the Guest Additions installation wizard starts, click Next to continue.
Step 5
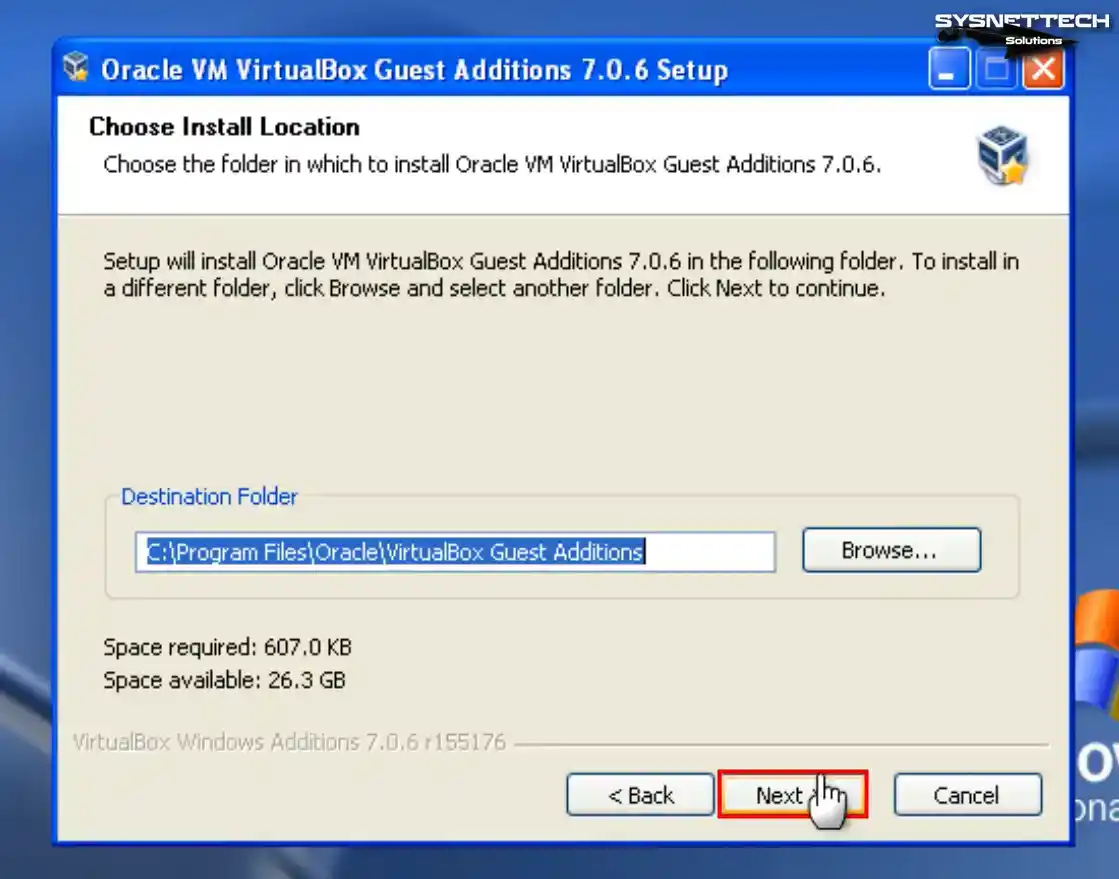
Continue without changing the installation location of the guest add-on software.
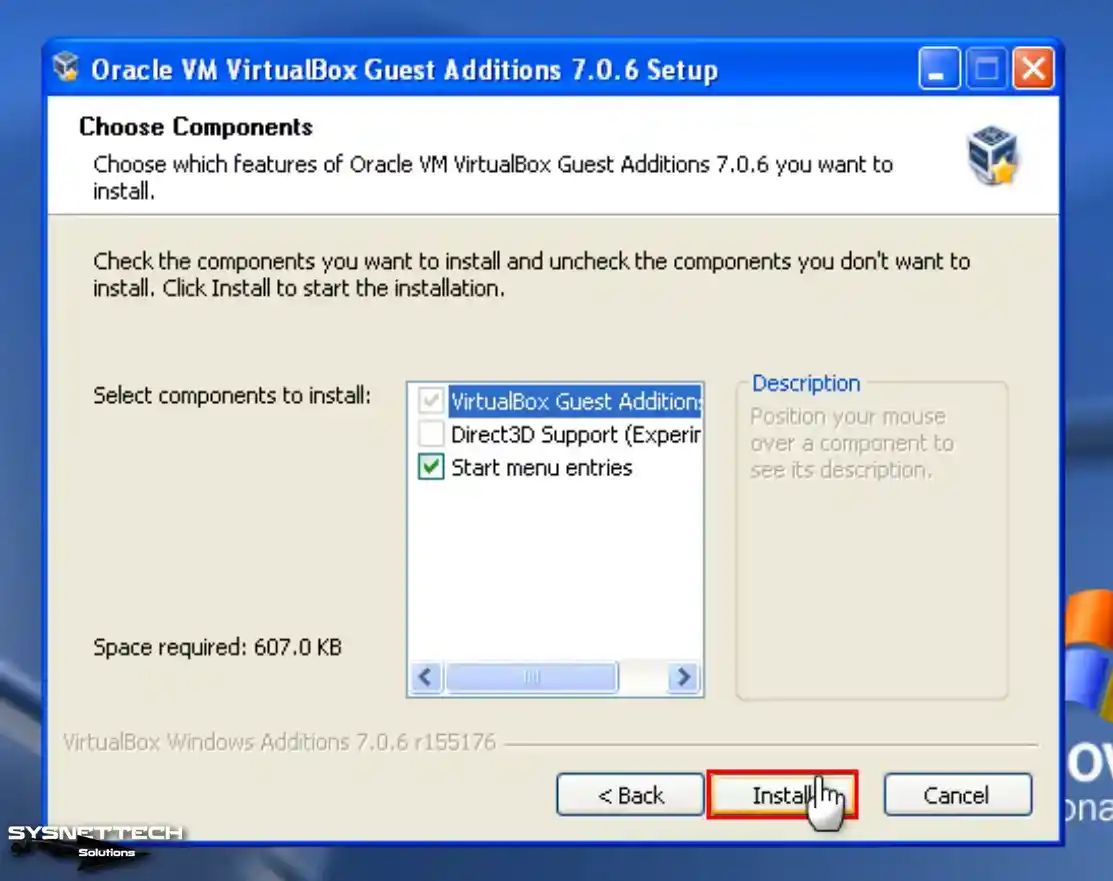
Step 6
You can see that Direct3D Support is not enabled in the Choose Components window of the setup wizard. Direct3D support for older operating systems has been discontinued in version 6.1 of VirtualBox. Therefore, installing the 6.0 version of VirtualBox is imperative to utilize this feature.
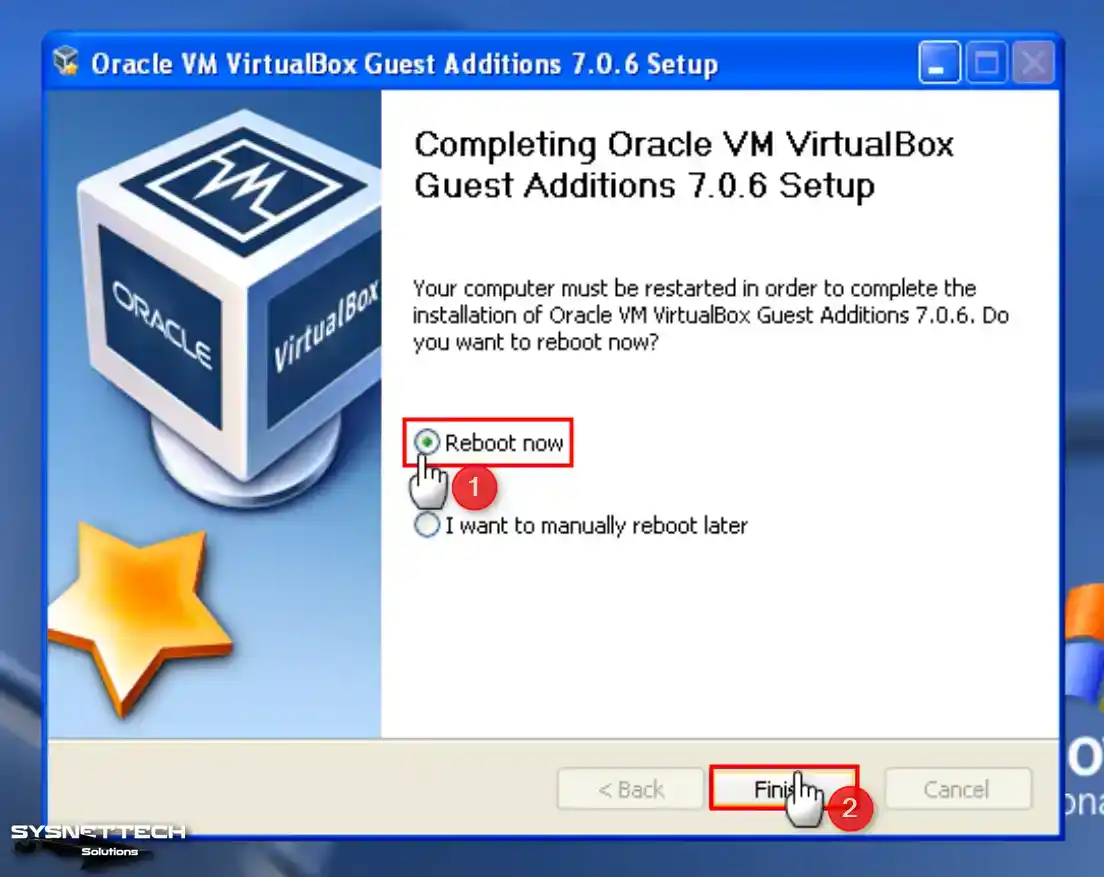
Step 7
After installing the tools of your guest system, restart your system.
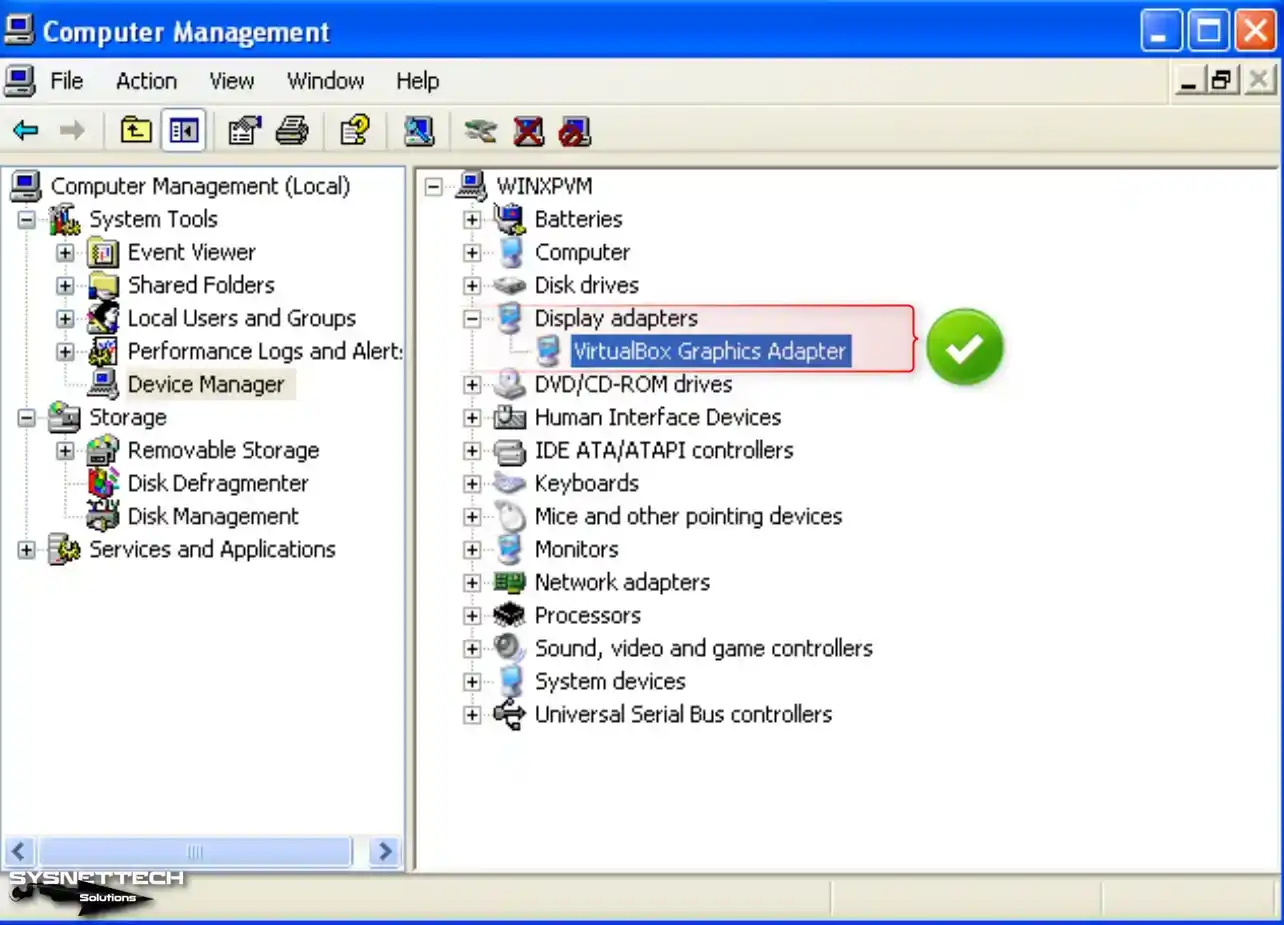
Step 8
After restarting your VM, view Device Manager again; you can see all drivers installed successfully.
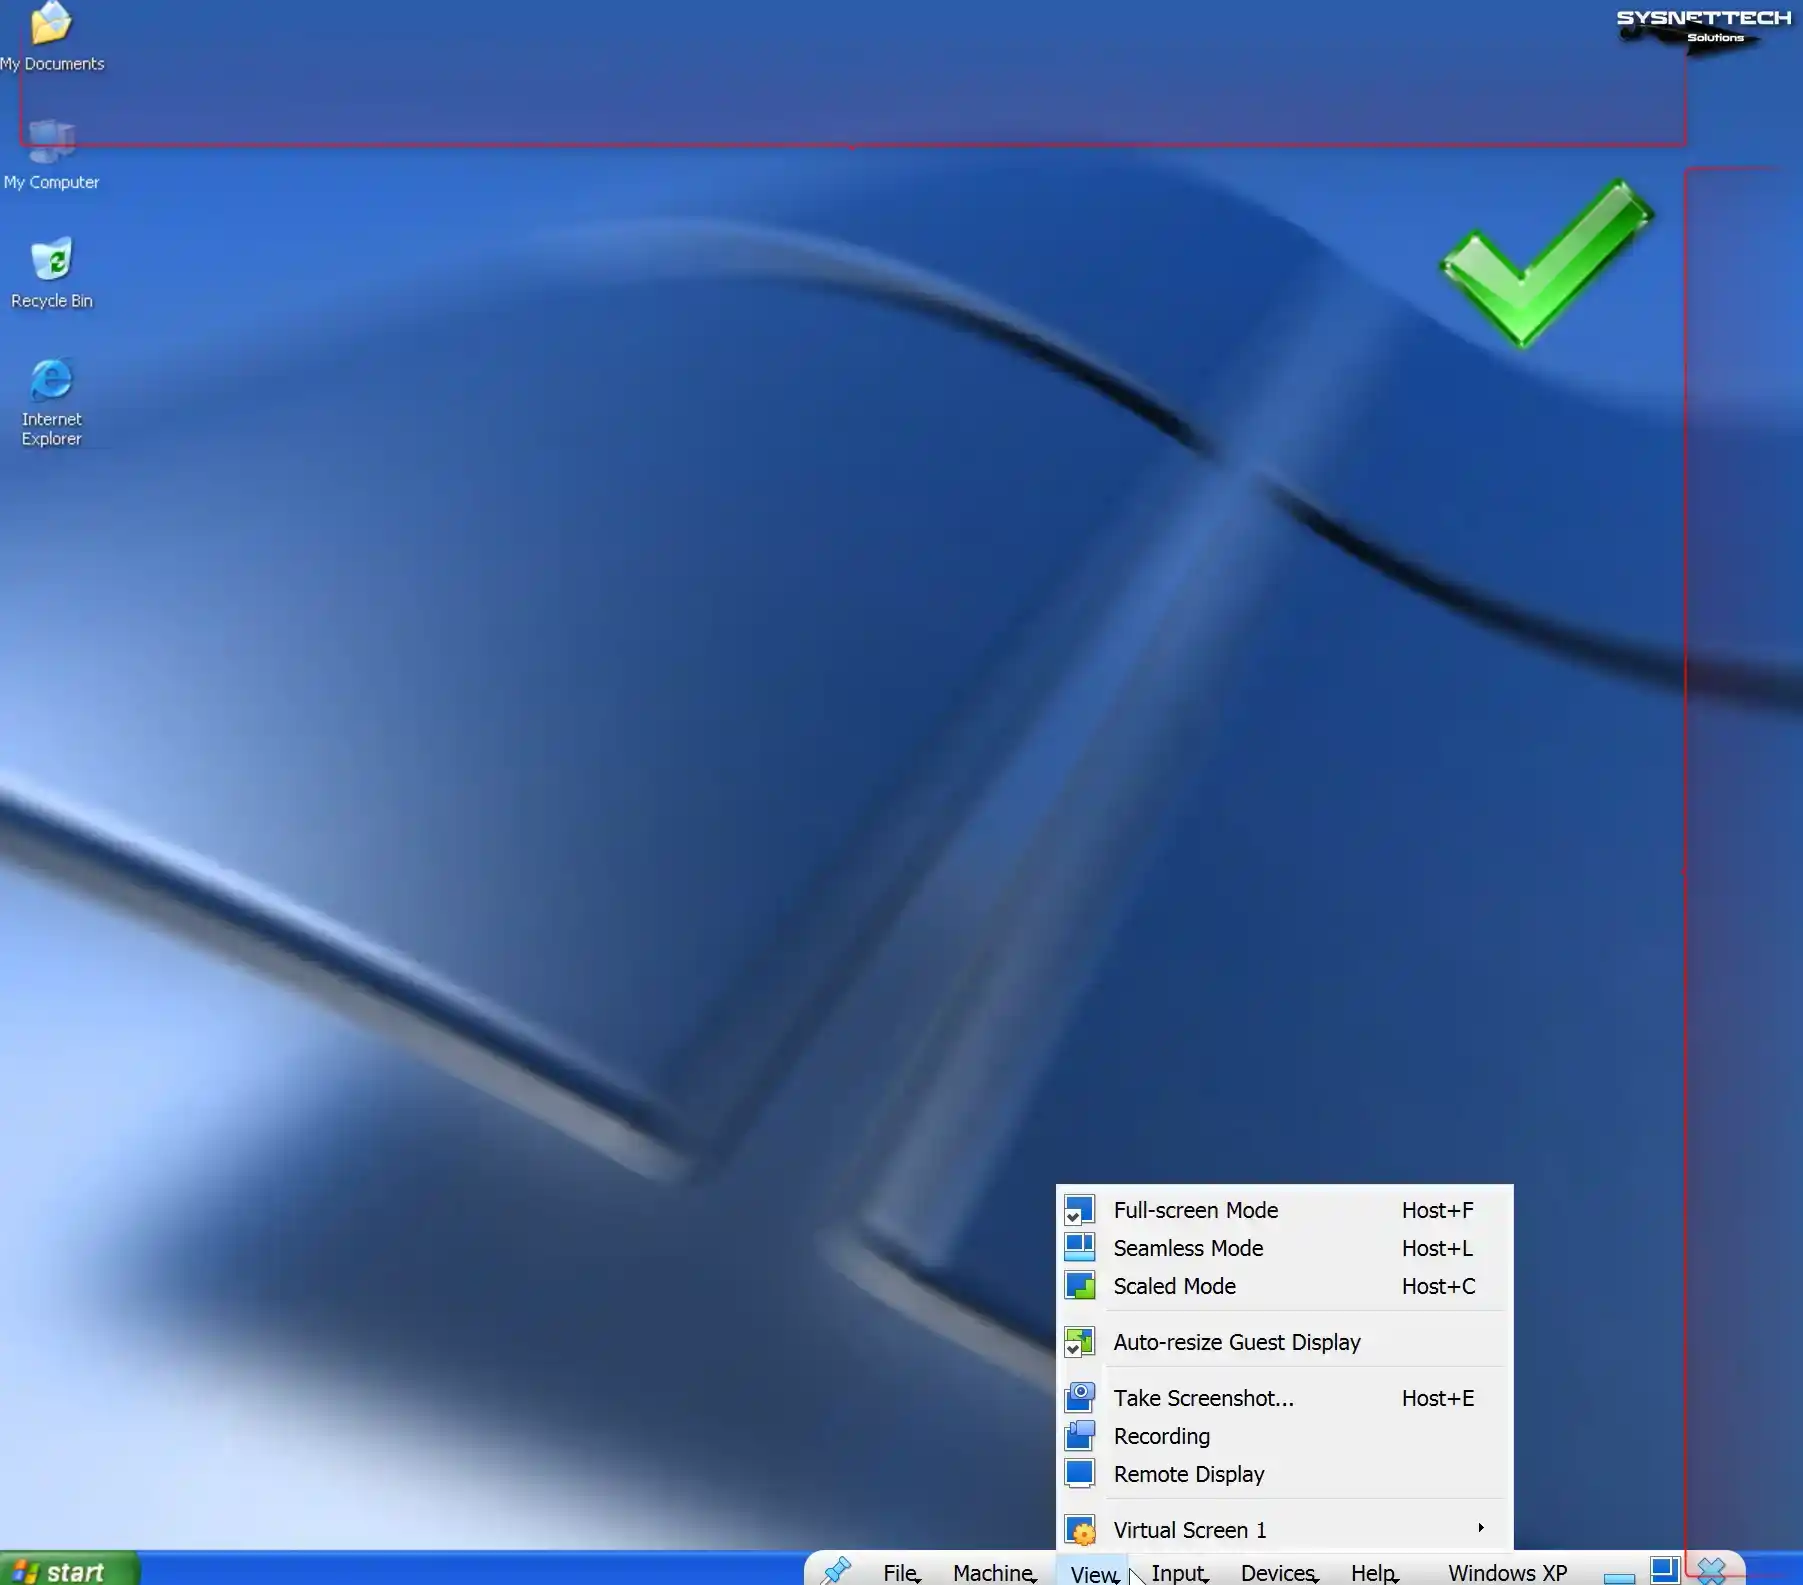
Step 9
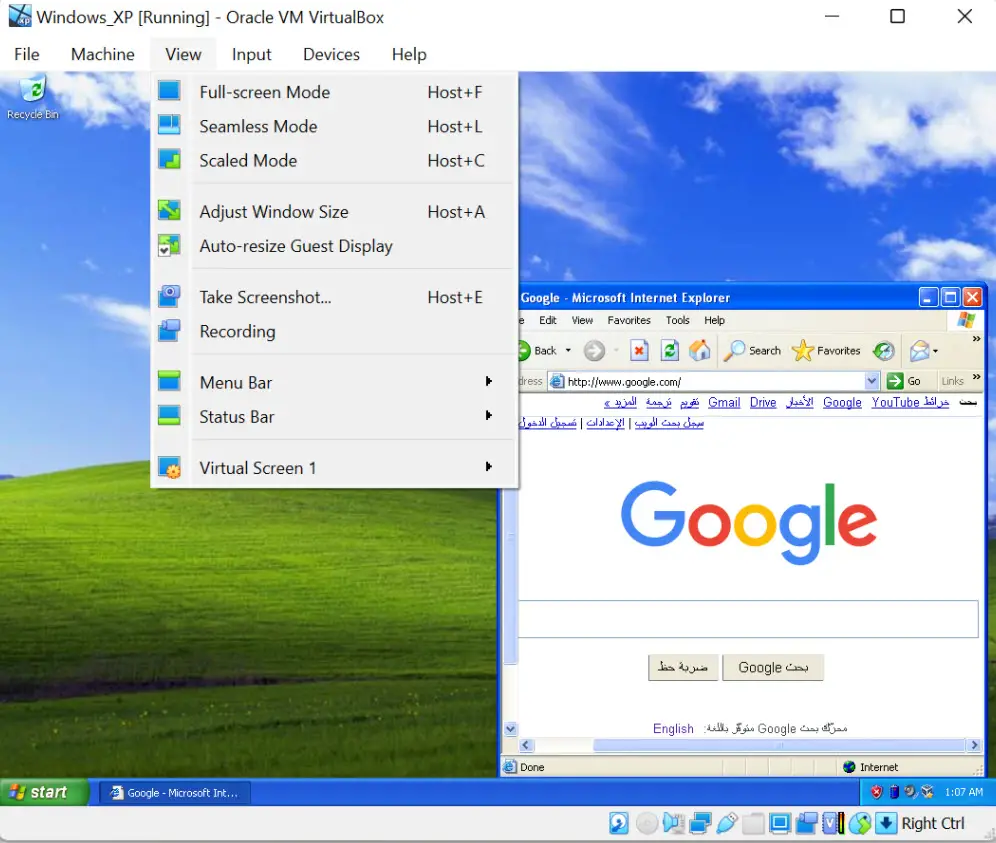
You can use your virtual machine in full-screen resolution or scaled mode with the options in the View tab from the tool menu of VirtualBox.
Step 10
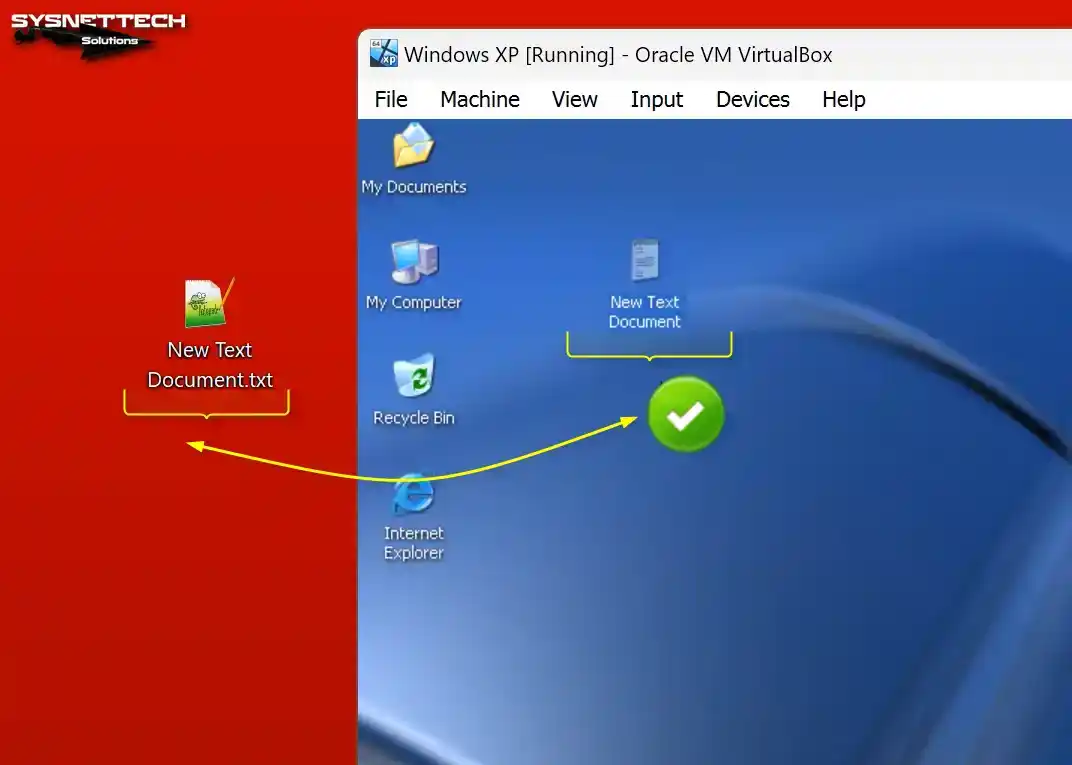
When employing the drag-and-drop method, you will observe the successful transfer of a text document from the desktop of your host computer to your virtual computer.
How to Configure a Shared Folder
Unfortunately, folder copying to the virtual machine fails on old systems. Before copying a folder, you must archive it using WinRAR or 7-Zip and then copy it to the VM.
Since it takes time to archive a folder with larger file sizes, you can transfer data faster by creating a public folder for your VM on your host computer and configuring the Shared Folder.
Step 1
Click Devices / Shared Folders / Shared Folders Settings on your Windows XP virtual PC.

Step 2
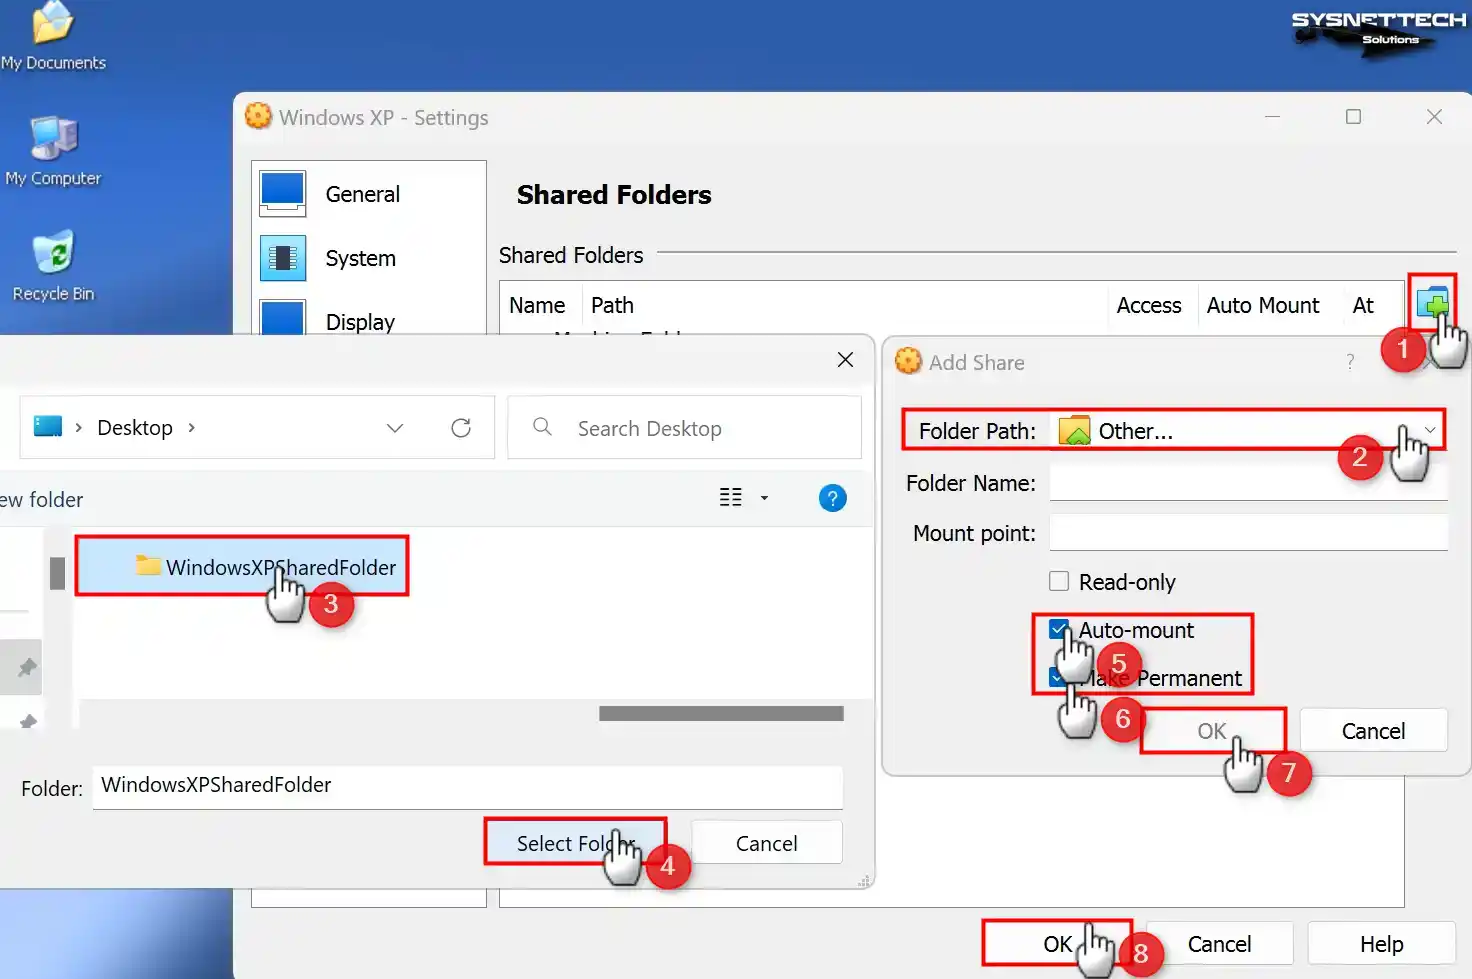
Click the green + button in Shared Folders settings and open the Add Share window. Specify the folder you created on your host PC in the Folder Path section.
Check the Auto-Mount and Make Permanent options and click OK to add the shared folder as a network drive.
Step 3
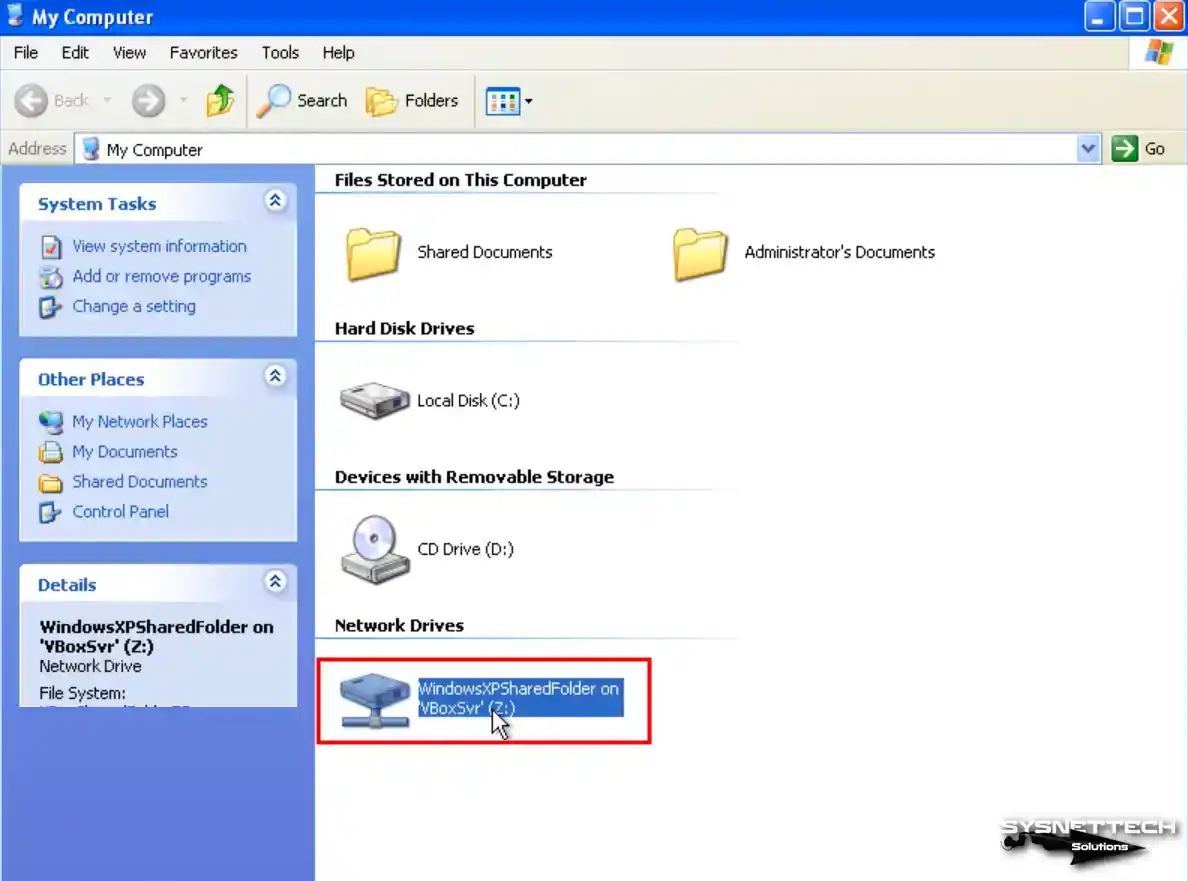
Upon opening the My Computer window, you will notice the inclusion of the Shared Folder as a network drive.
After viewing the network connections, switch to the Folder structure and click Entire Network / VirtualBox Shared Folders on the left. You can see that you can approach the folder on the host over the network.
Step 4
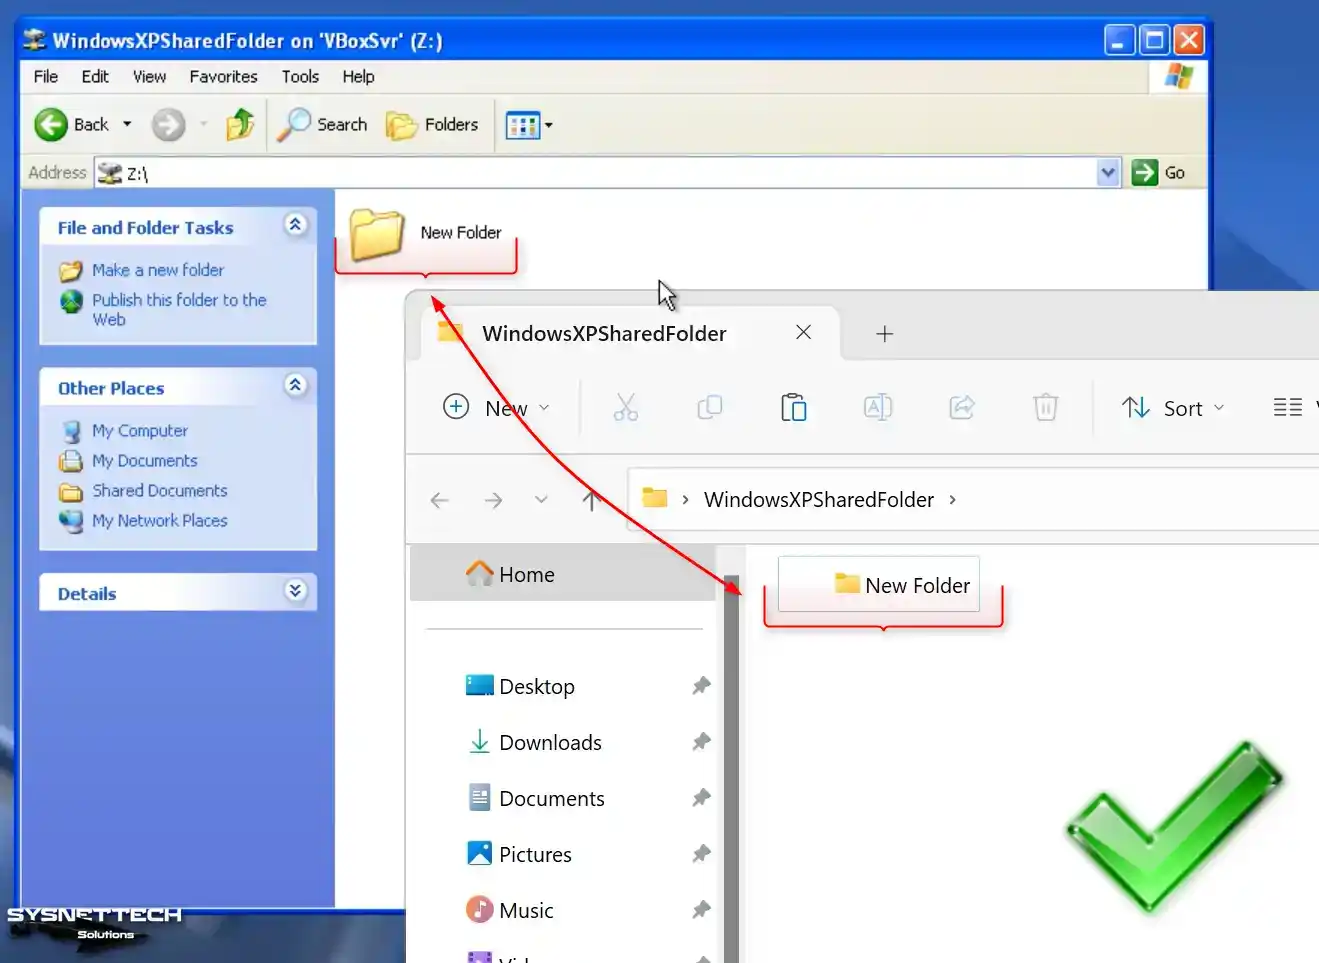
Create a folder in the shared folder on your host system and check that this folder is created simultaneously in your VM.
How to Check Internet Connection in Windows XP VM
Network and Internet connection settings are automatically configured after installing a virtual system with Oracle VM VirtualBox or other virtualization software. If the services of your virtualization software become corrupted, you may encounter difficulties in accessing the Internet.
Network settings of Windows XP guest machines running on Oracle VM are configured with a NAT coupler by default, and a different block is created than the IP block you use in your existing network.
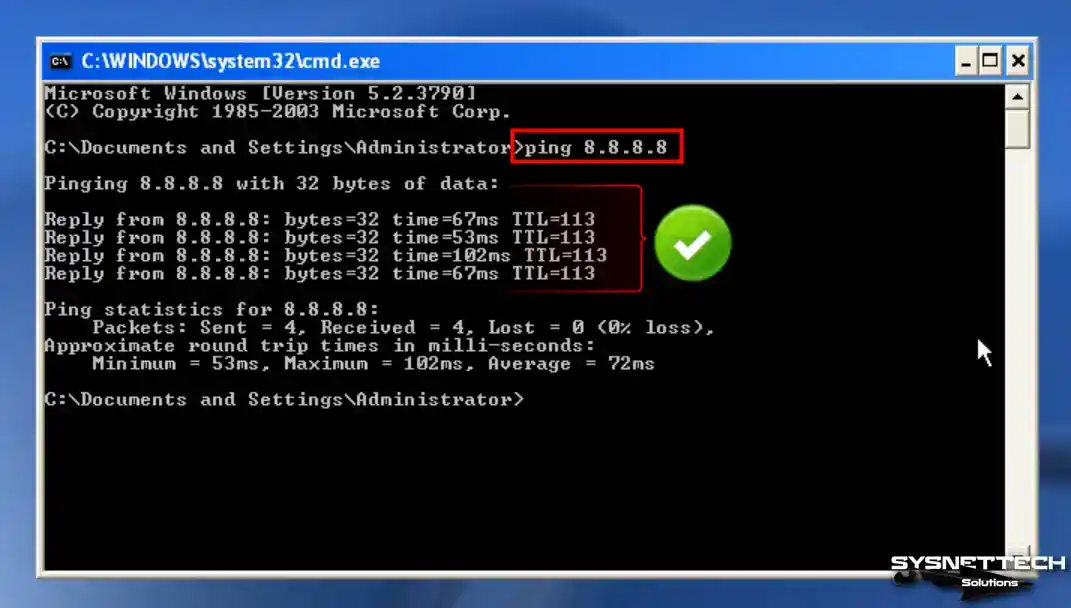
Step 1
Open Run and execute the CMD command to check if the Internet connection is working smoothly in your virtual system. After opening the CMD prompt, ping the Google servers using the ping 8.8.8.8 command.
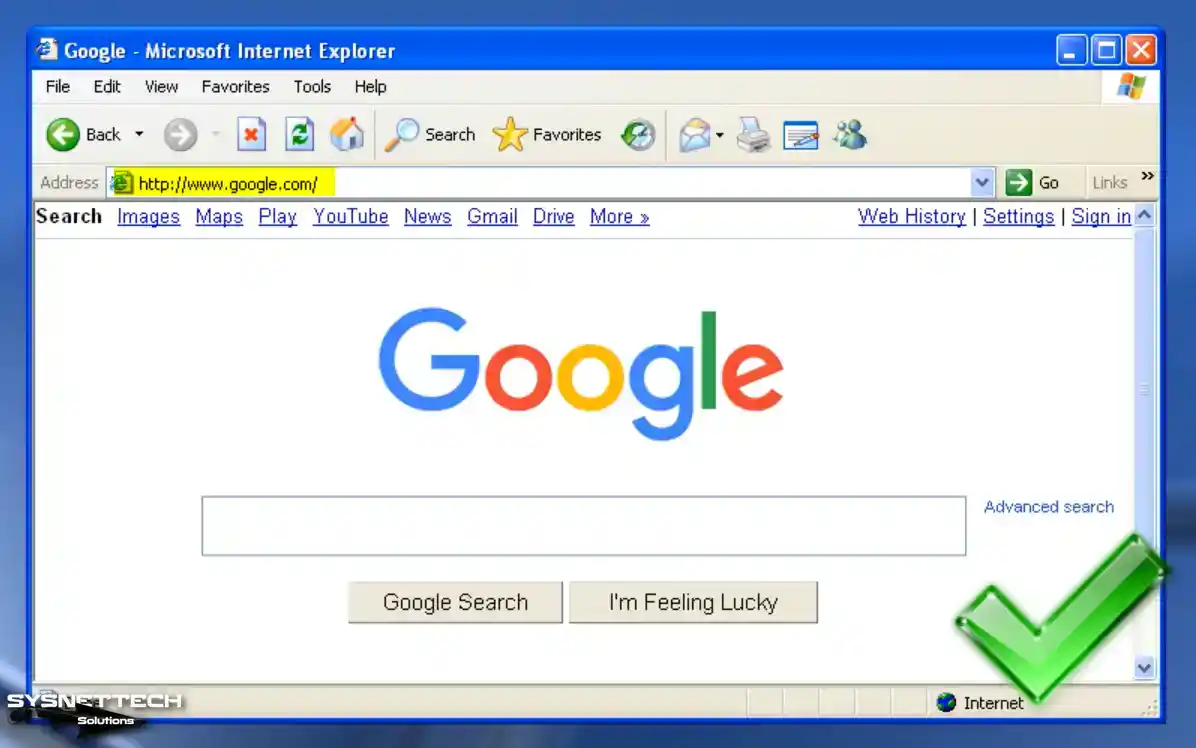
Step 2
Once the ping test is successful, visit the Google homepage through the Internet Explorer browser to verify the health of your Internet connection.
How to Enable and Install USB 3.0 Driver
By default, enabling USB 3.0 support on a Windows XP virtual machine is not typically feasible. However, you can resolve this issue by substituting the USB controller. While USB 2.0 devices can be operated in the virtual machine without problems, enabling 3.0 or 3.1 supports faster file transfers using the more advanced technology.
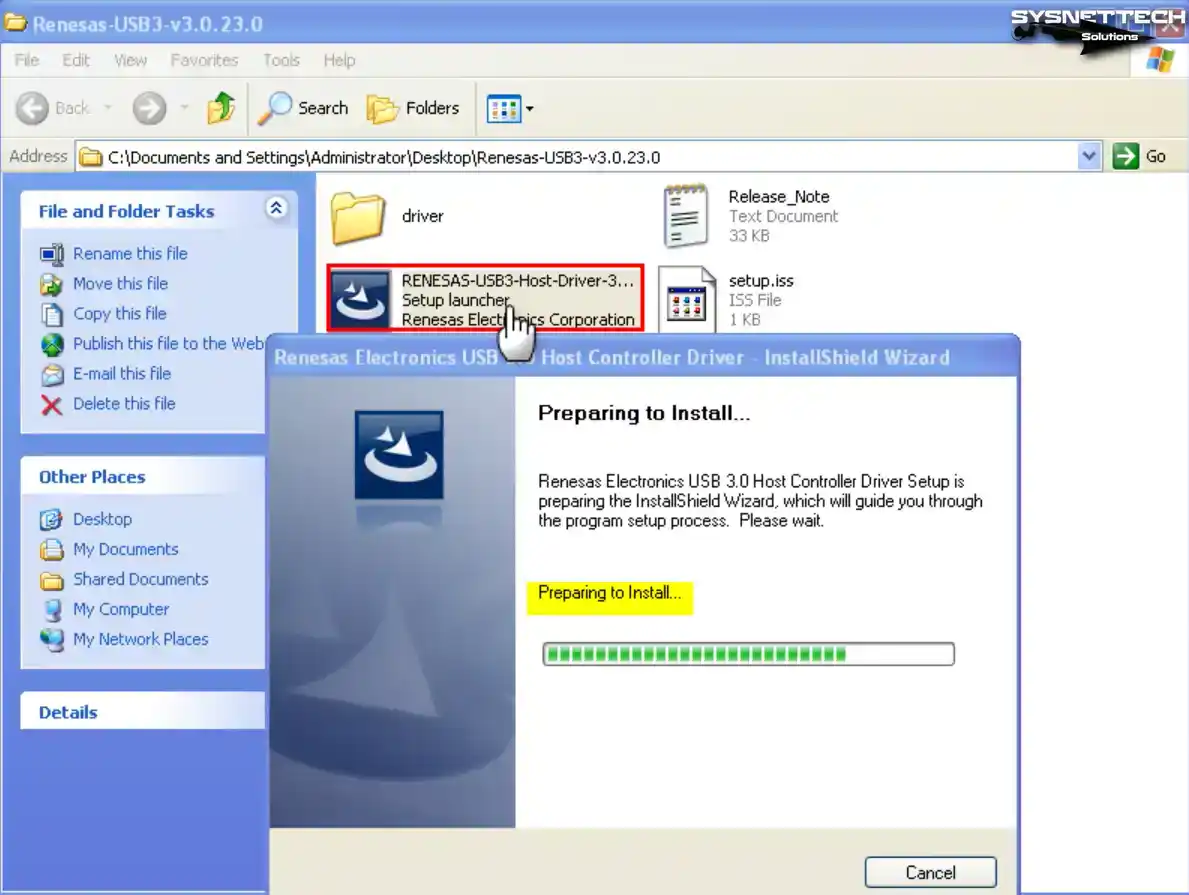
Step 1
Before enabling USB 3.0 on your Windows XP guest machine, it is recommended to download the RENESAS Driver from the table located at the bottom of the article. Once downloaded, copy the driver to your system and proceed to double-click the setup file to initiate the wizard.
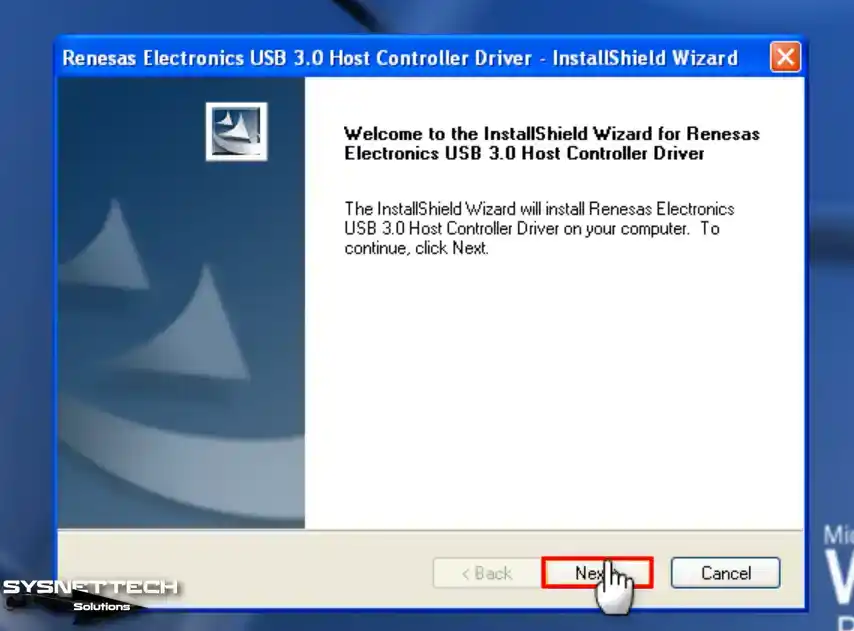
Step 2
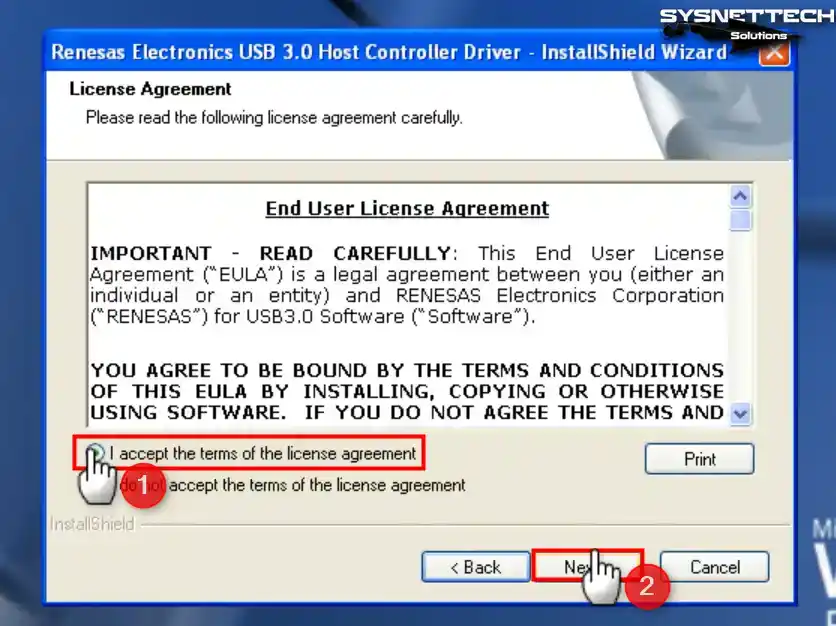
Click Next in the Renesas Electronics USB 3.0 Host Controller Driver wizard.
Step 3
Accept the license agreement of the Renesas Electronics USB driver software and click Next.
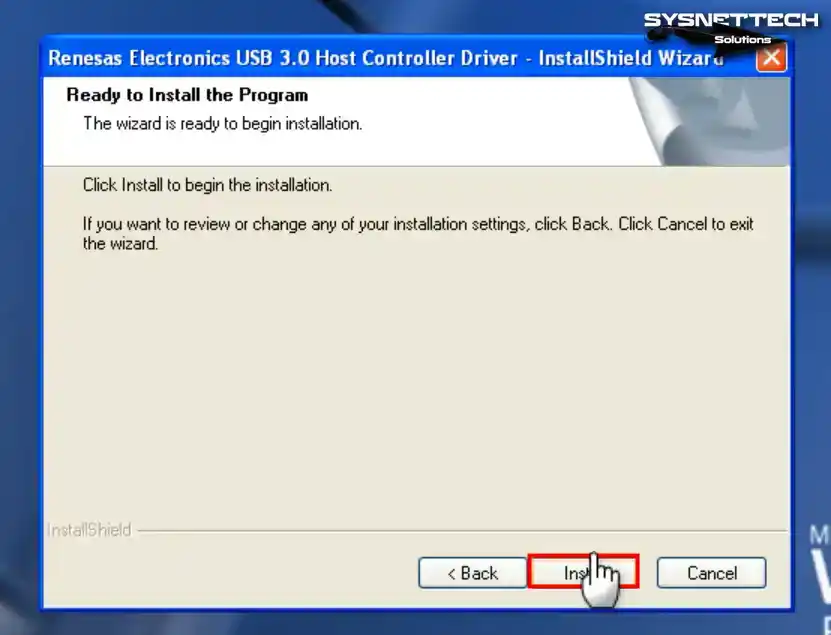
Step 4
Click the Install button to build the USB 3.0 driver.
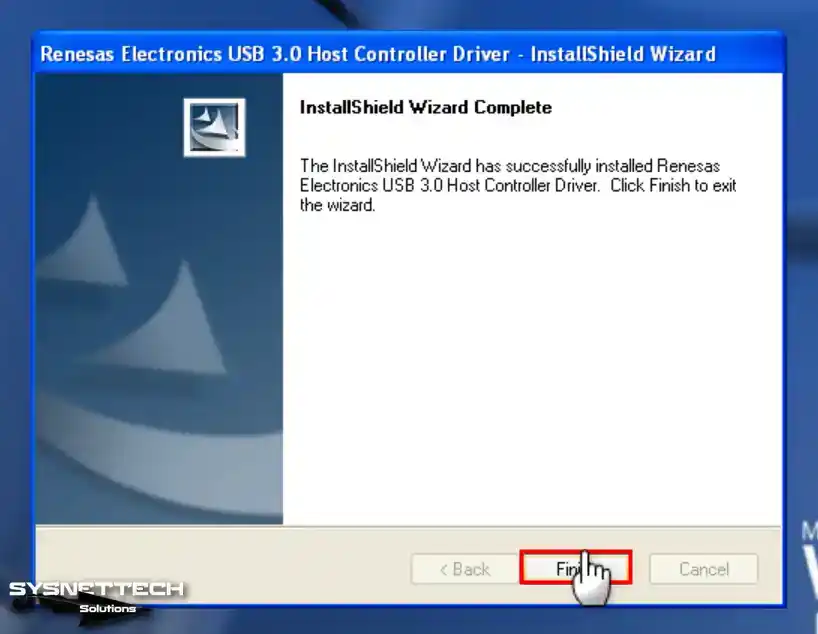
Step 5
After installing the USB 3.0 driver on Windows XP, close the wizard by clicking Finish.
Step 6
Close the Oracle VM VirtualBox on your host PC, go to its installed location, right-click, and click Open in Terminal.
./VBoxManage setextradata 'Windows XP' VBoxInternal/Devices/usb-xhci/0/Config/ChipType uPD720201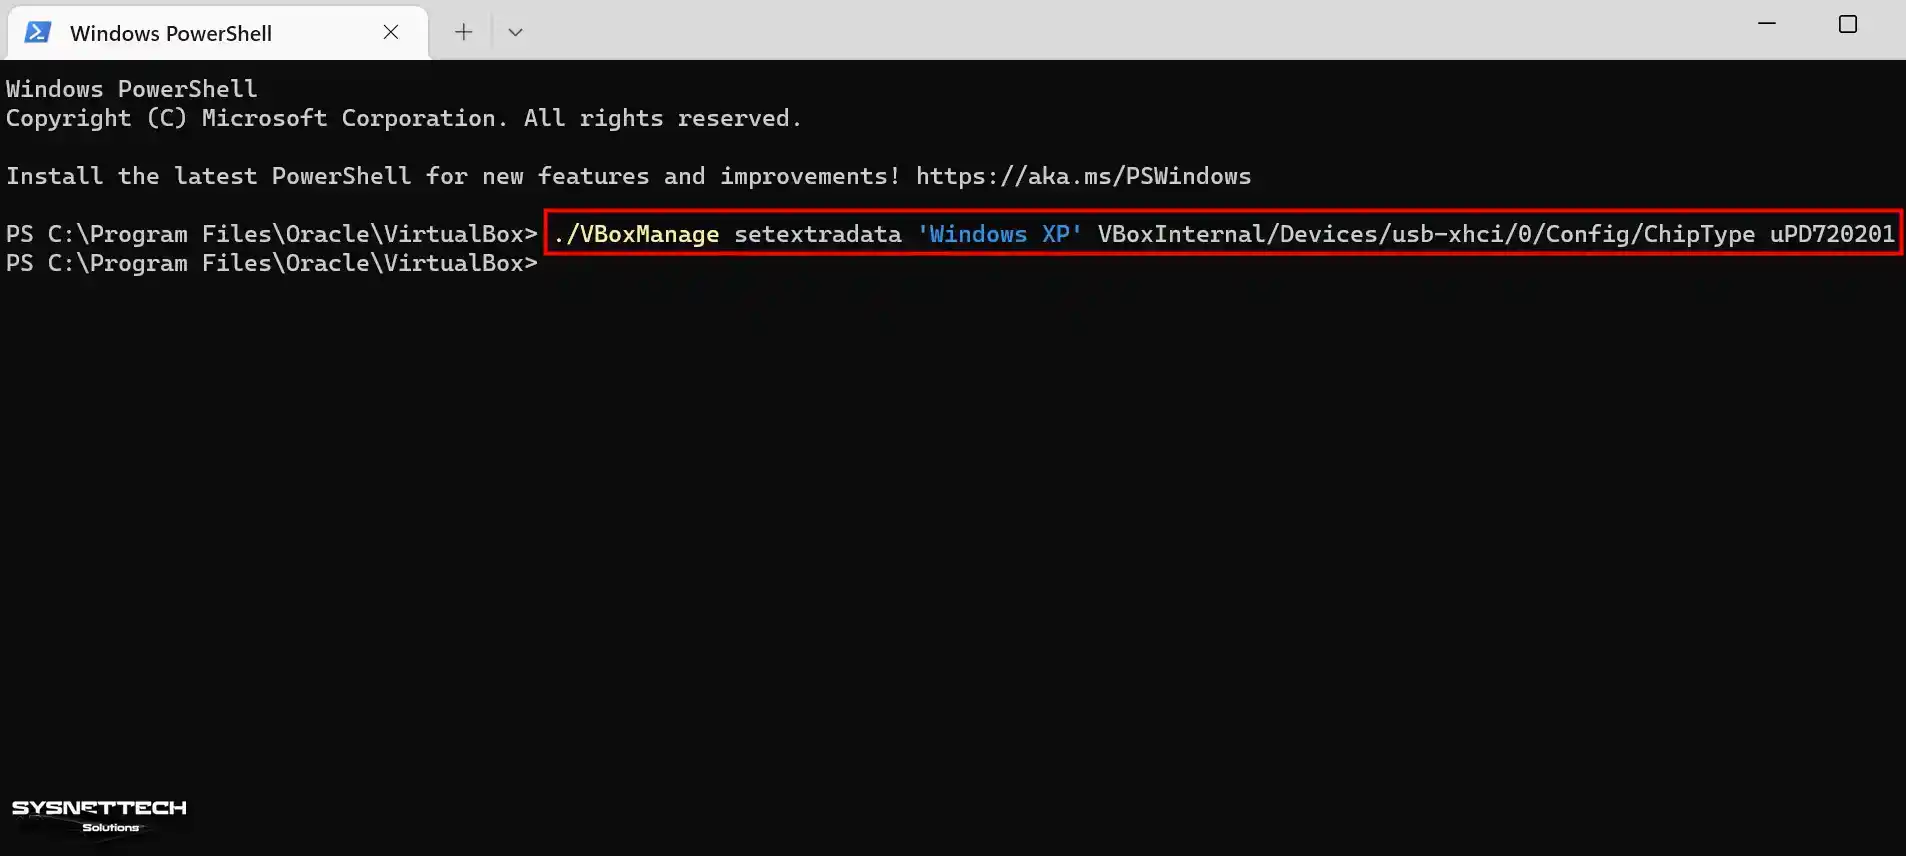
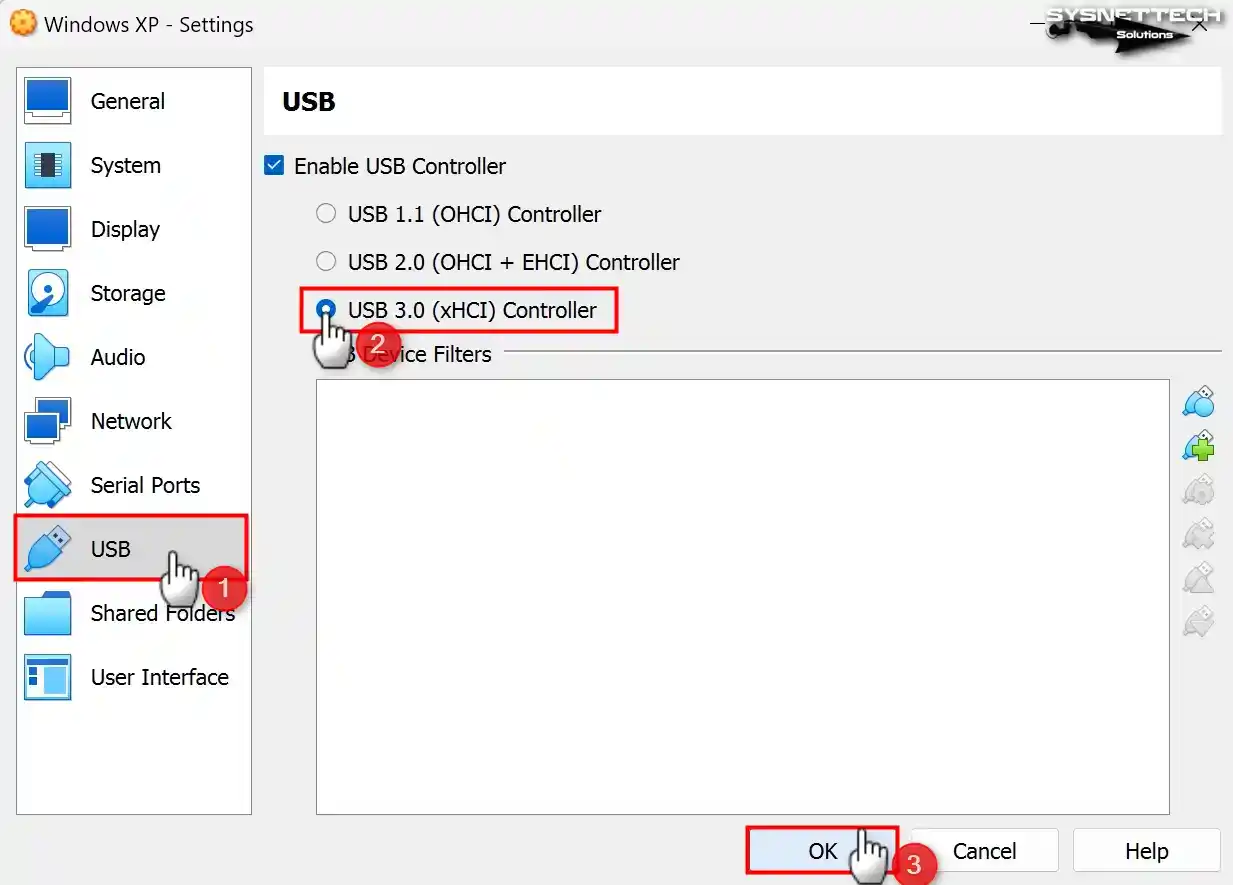
Step 7
Open the Oracle program, select USB 3.0 (xHCI) Controller from the USB controller types, and click OK.
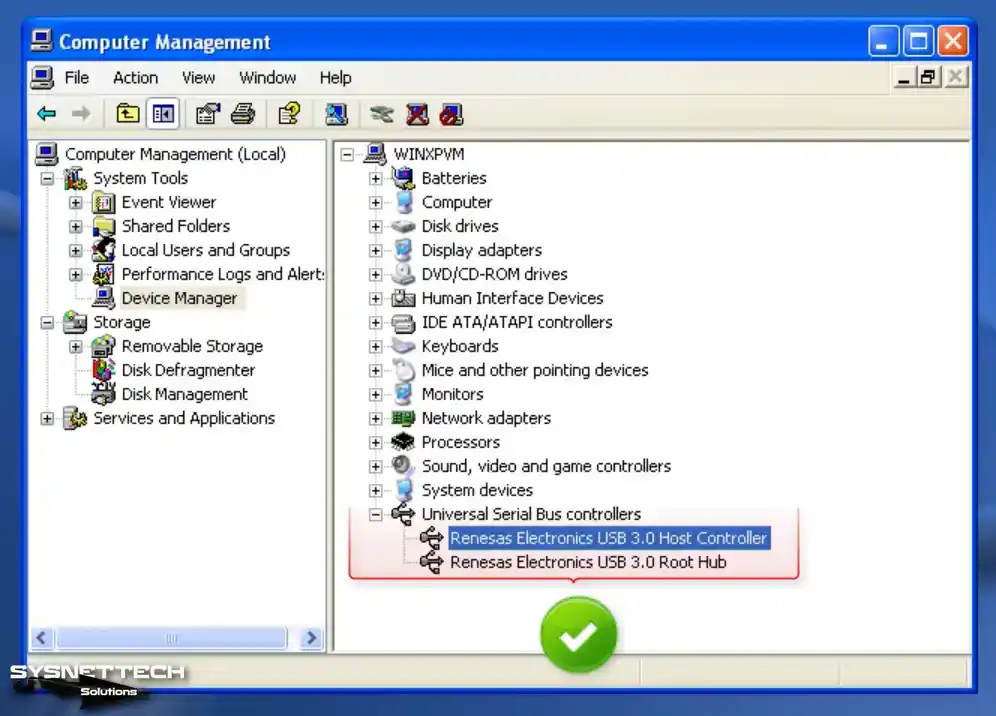
Step 8
Open the Oracle program again, and after running your virtual PC, open Device Manager and check the Universal Serial Bus (USB) Controller device.
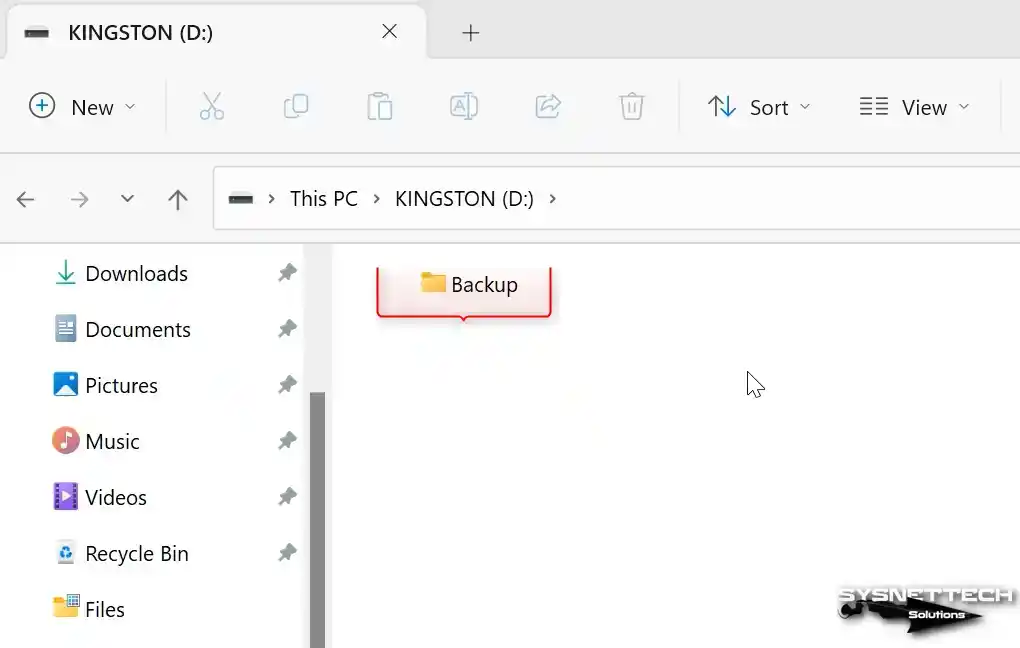
Step 9
Connect your flash stick to one of the USB 3.0 ports on your computer and establish a folder called “Backup” inside it as an illustrative instance.
Step 10
After inserting your flash memory, click Devices> USB> Kingston DataTraveler 3.0 on the virtual machine.

Step 11
After adding your flash memory to your virtual PC, Mass Storage drivers will be installed automatically. When you view My Computer, you can see your KINGSTON USB stick or any other brand.
Upon inspecting the Device Manager, you will find the USB 3.0 memory under Disk Drives.

How to Change Video Memory to 256 MB
A maximum of 128 MB of GPU memory can be set for Windows XP in Oracle software, but there is a simple way to increase this Size.
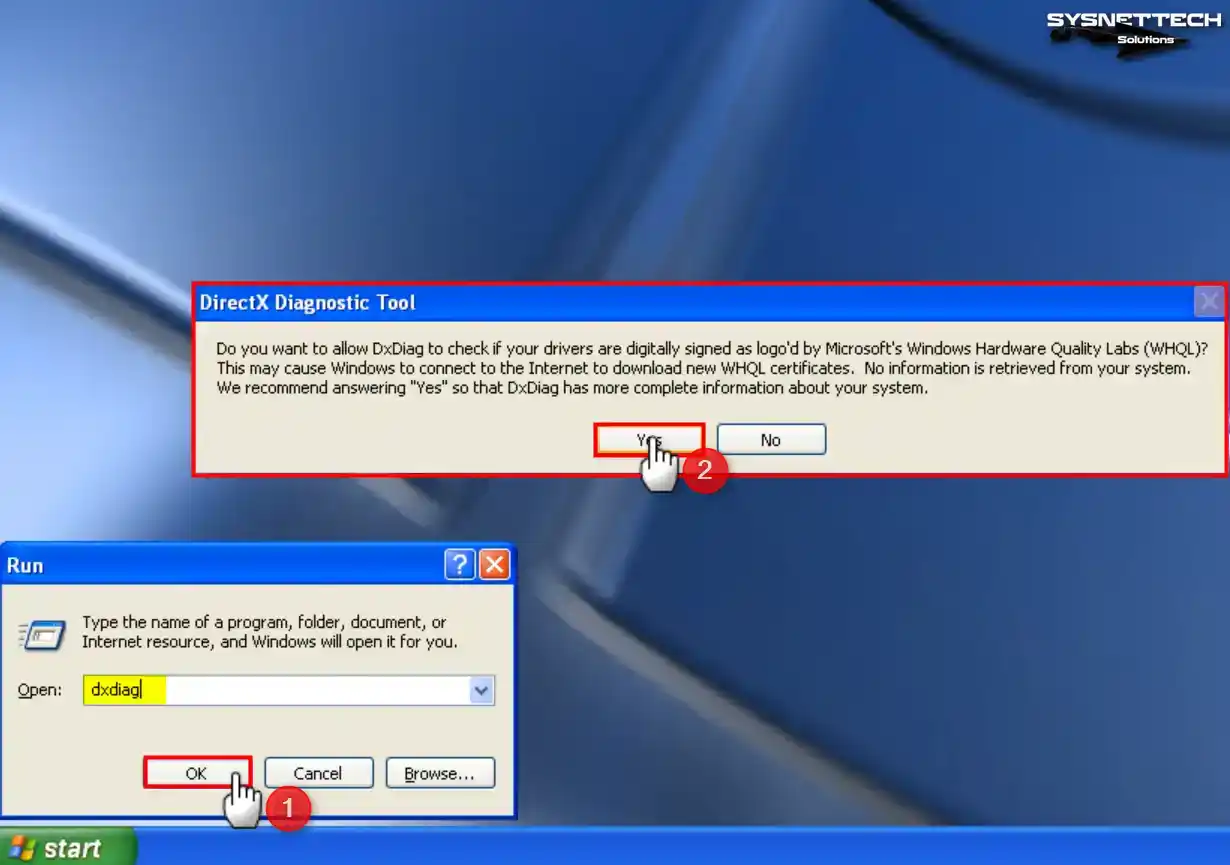
Step 1
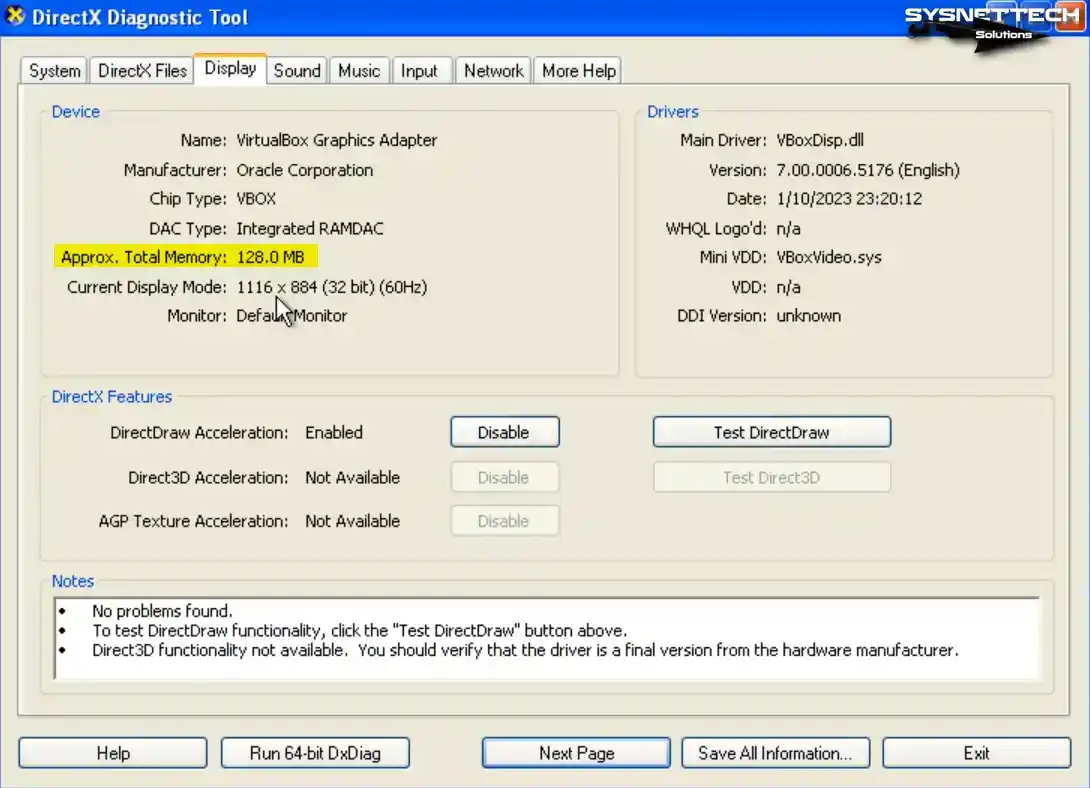
First, execute the dxdiag command in the Run window on your virtual machine and click Yes in the DirectX Diagnostic Tool window.
Step 2
Click the Display tab on DirectX Diagnostic Tools, check the Total Memory size, and check that the GPU memory is 128 MB.
Step 3
Close your virtual computer and VirtualBox program, open PowerShell again in the location where VirtualBox is installed, and execute the following command.
./VBoxManage modifyvm 'Windows XP' --vram 256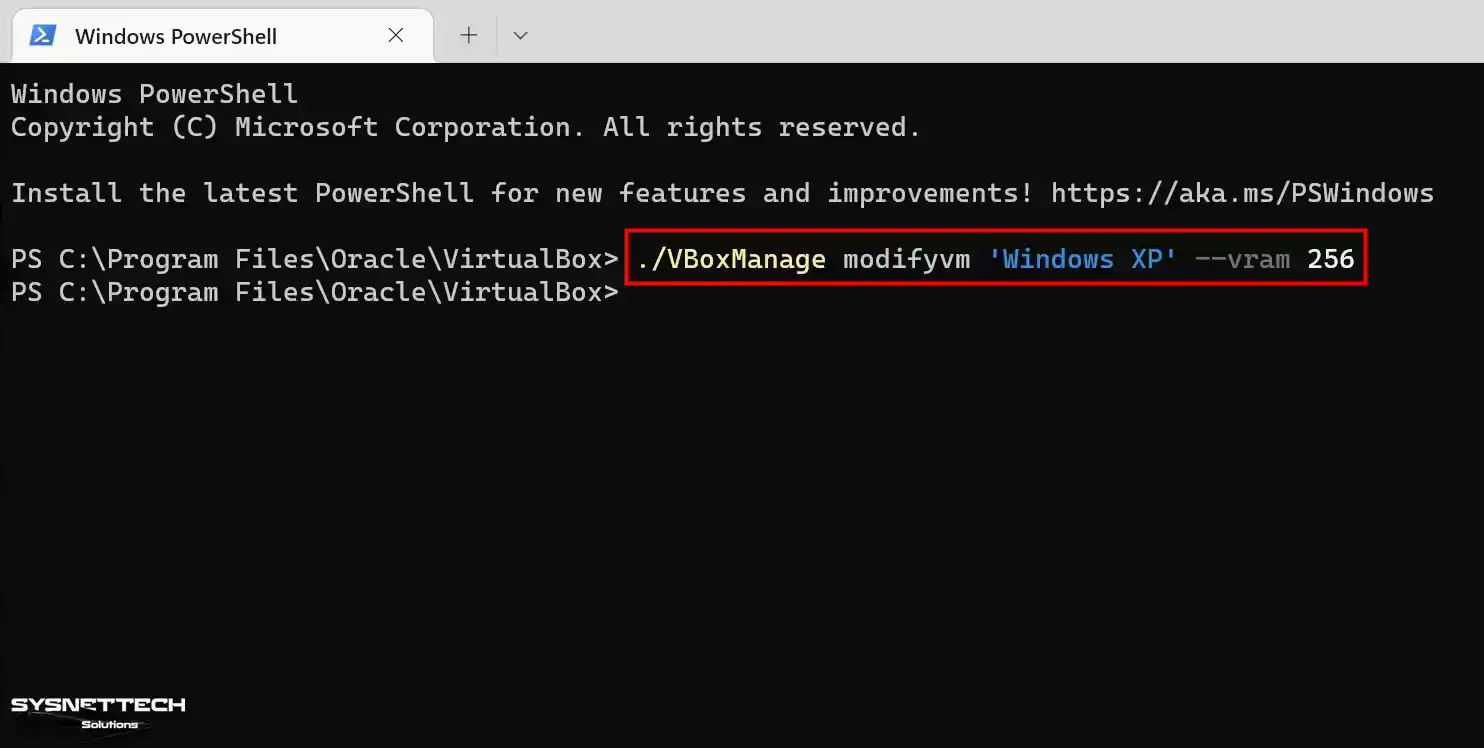
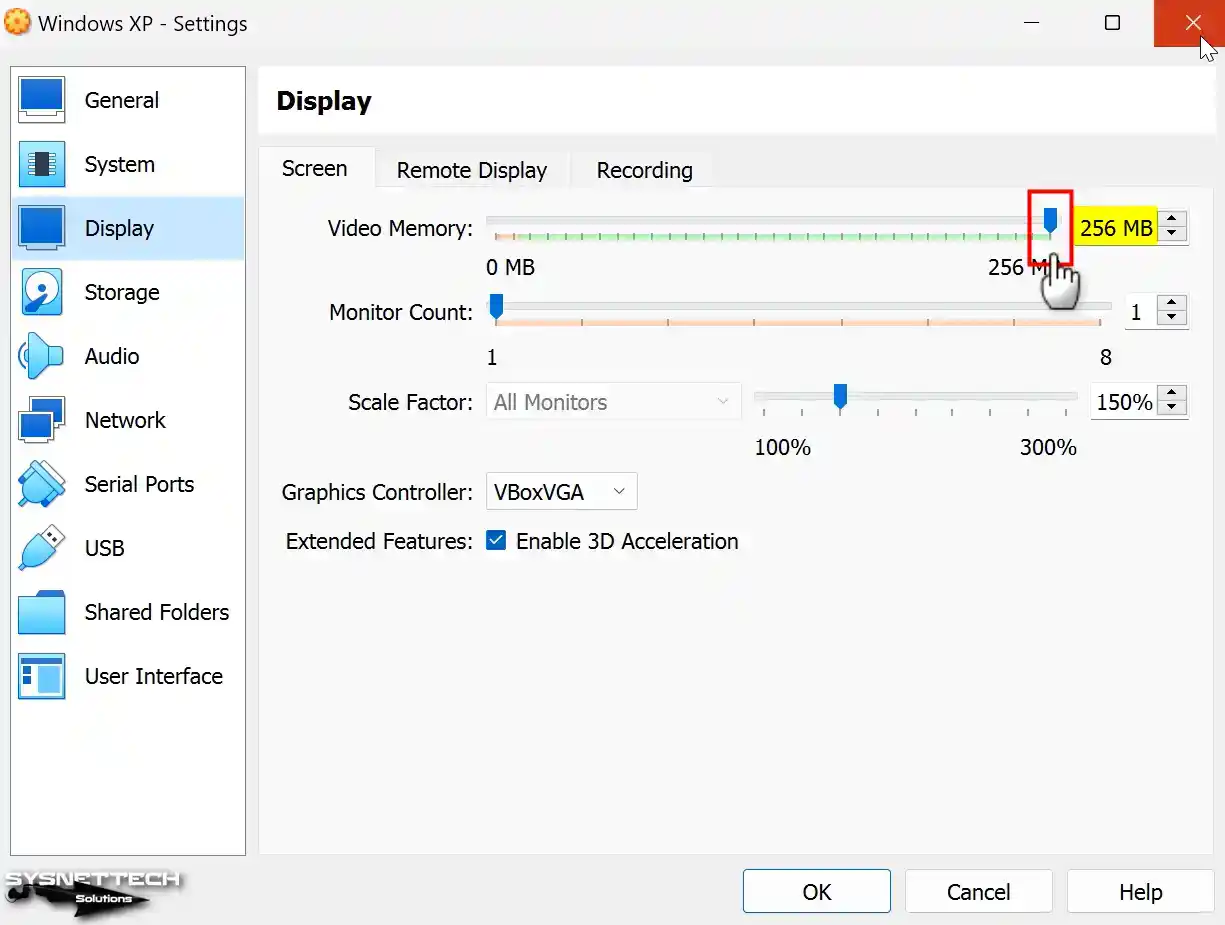
Step 4
Run Oracle VM VirtualBox, and after checking your VM’s settings, the Display / Screen / Video Memory size is 256 MB, and you will see that the operation was successful.
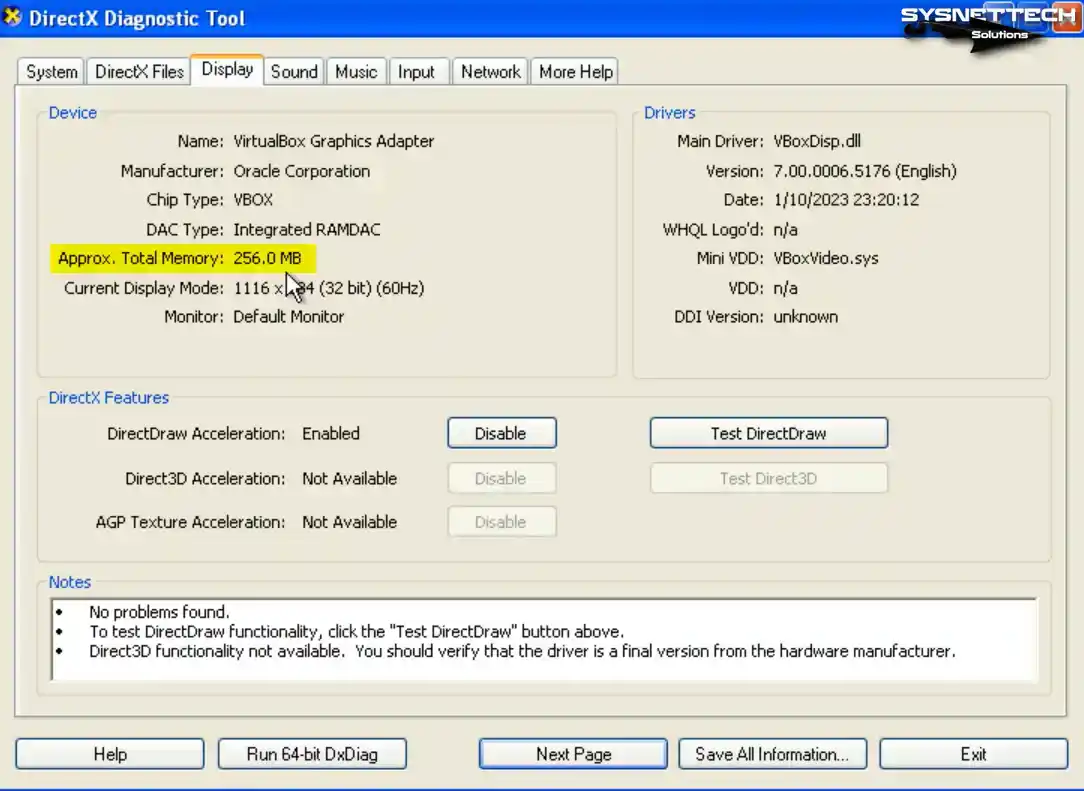
Step 5
When you run your Windows XP guest machine and open the dxdiag tool again, you can see that the total graphics memory size in the Display tab is 256 MB.
How to Upgrade Windows XP SP1 to SP2
If you desire to upgrade to SP2 on the guest appliance after installing the Service Pack 1 (SP1) edition of Windows XP, obtain the ISO image from the table at the base of the article and proceed with the following steps.
Step 1
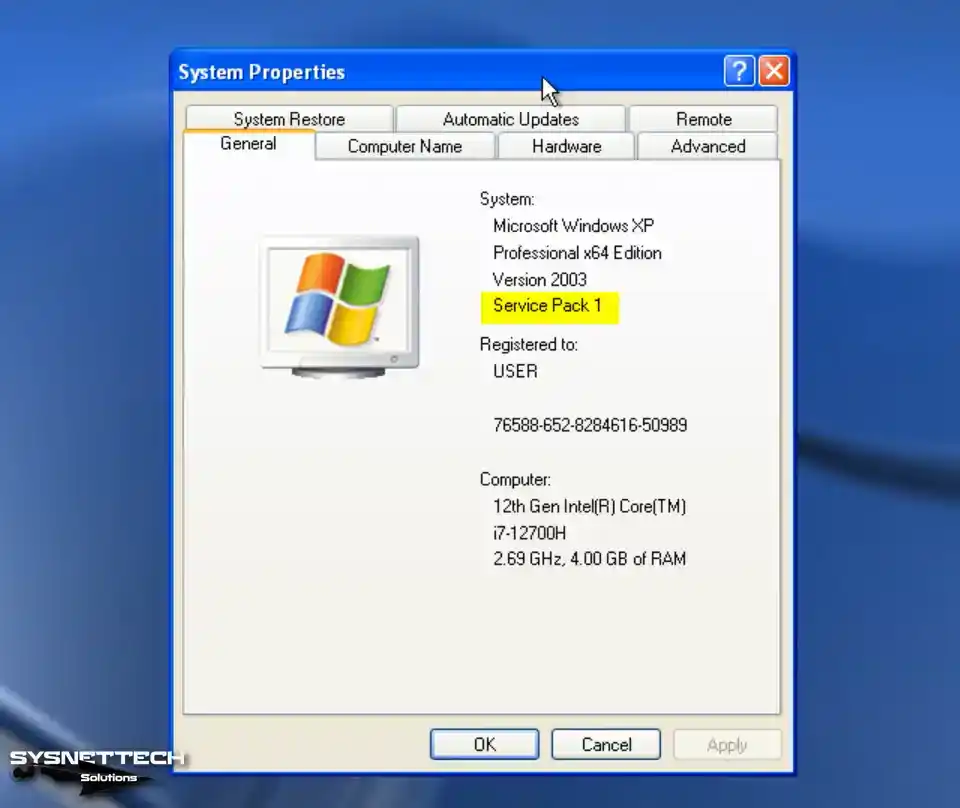
First, to view the properties of the XP system installed on your VM, right-click My Computer, open Properties, and check the Service Pack version.
Step 2
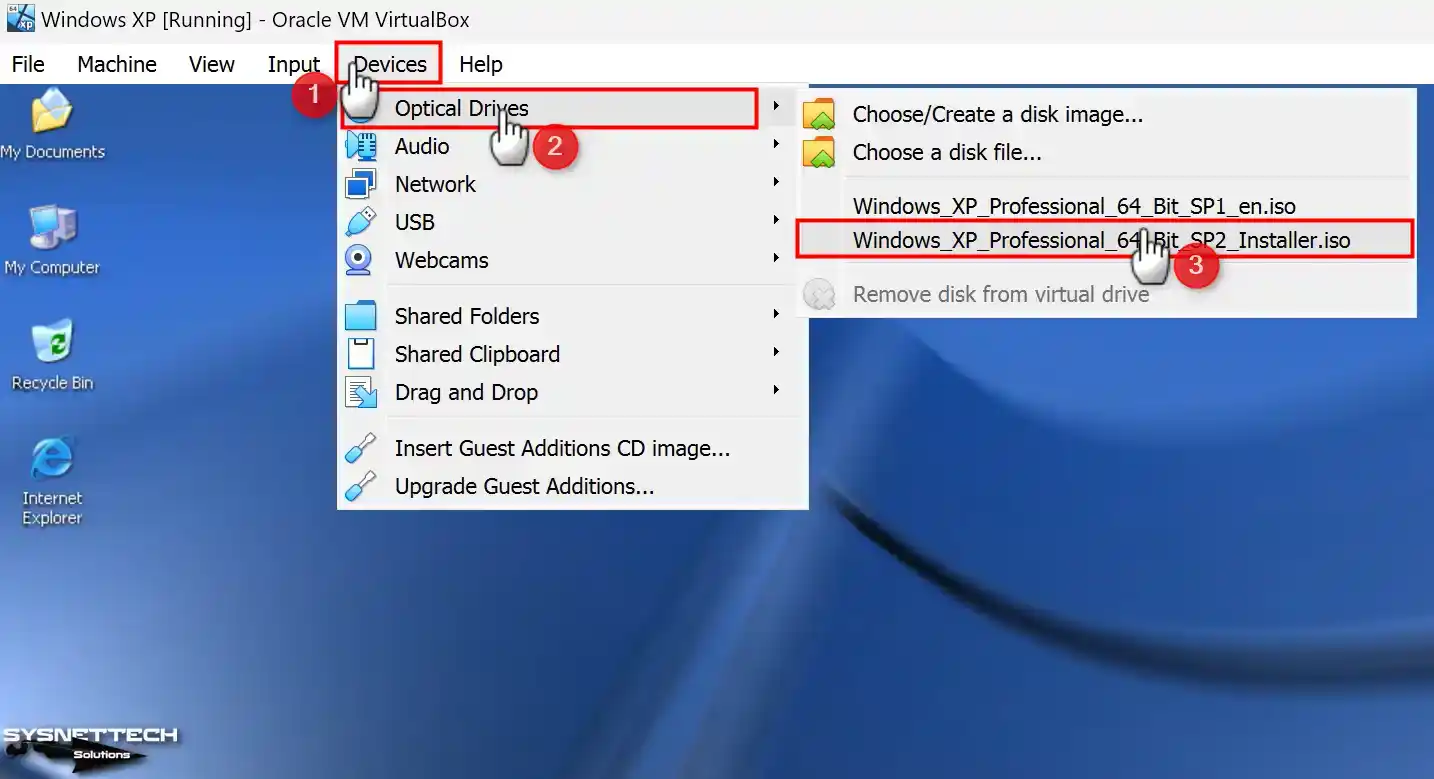
To add the SP2 ISO file to the VM, click Devices> Optical Drivers, select a disk file, choose the Installer image you downloaded to your computer, and click Open.
Step 3
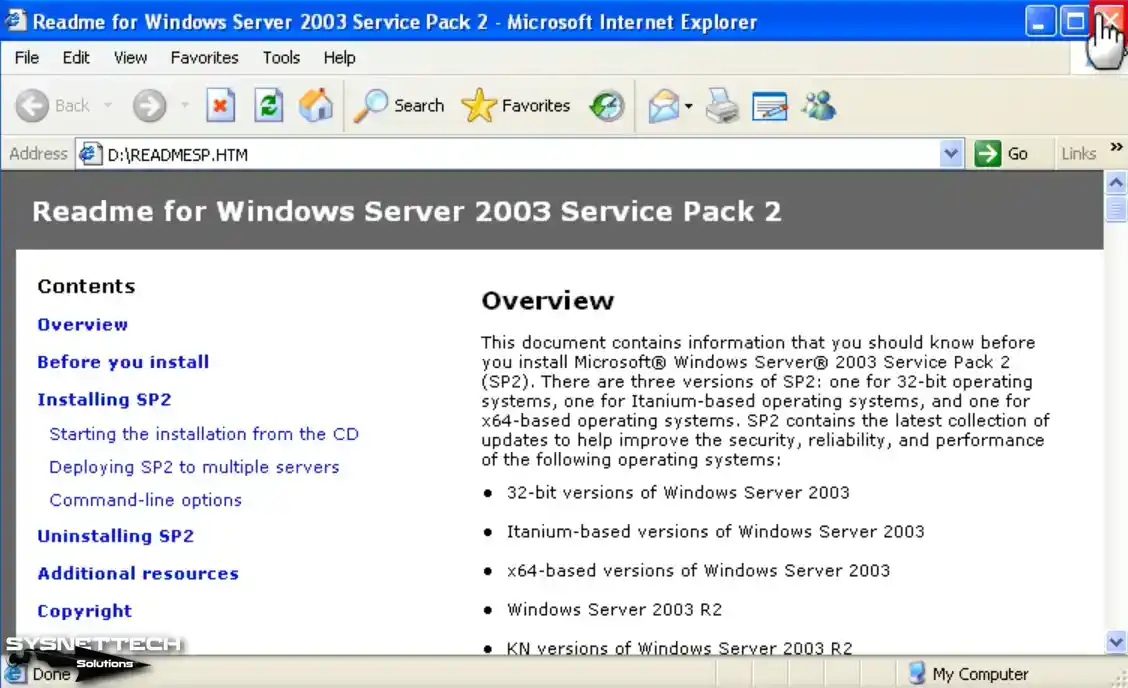
When the Readme HTML page opens automatically on your virtual system, close it.
Step 4
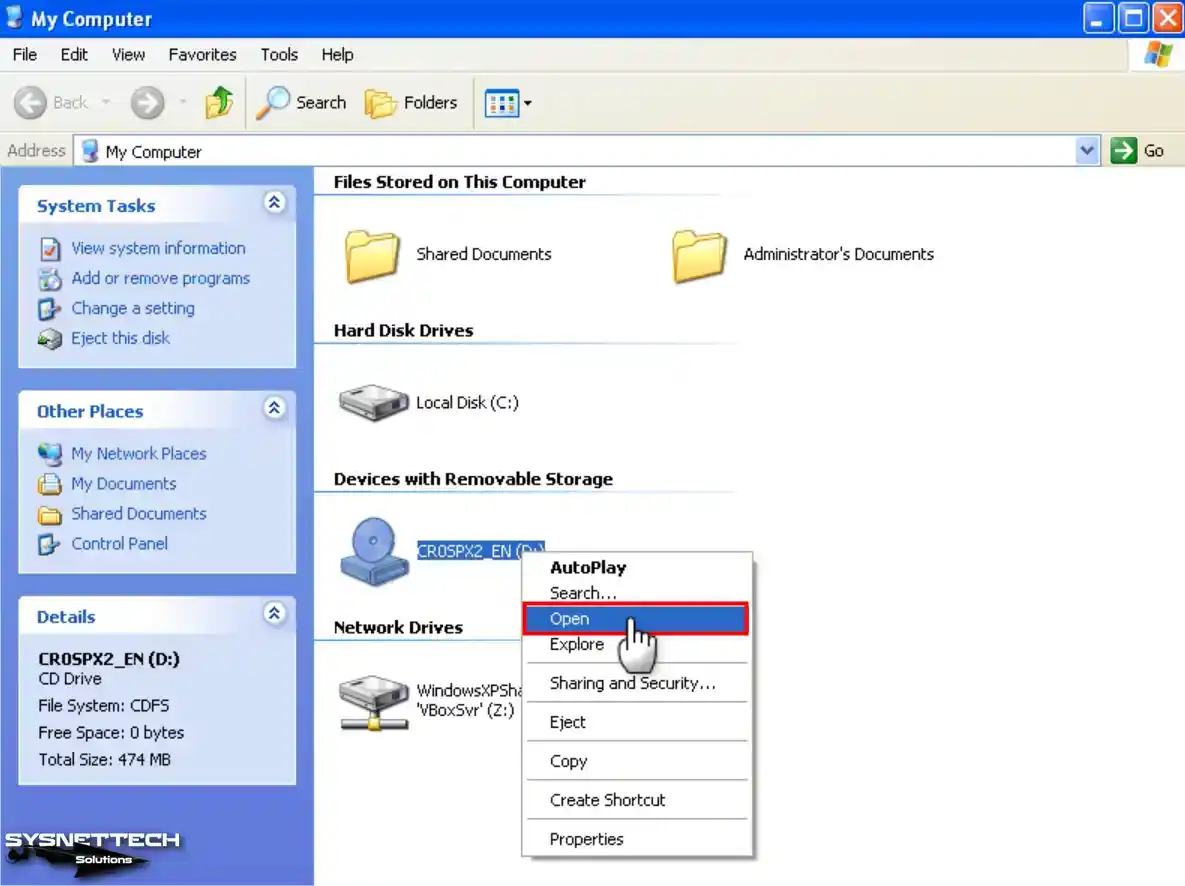
Open My Computer, right-click on the CD drive, and select “Open.”
Step 5
Double-click the SRSP2 command script in the Service Pack 2 CD image and start the installation. Click Next in the Windows x64 Service Pack 2 installation wizard.
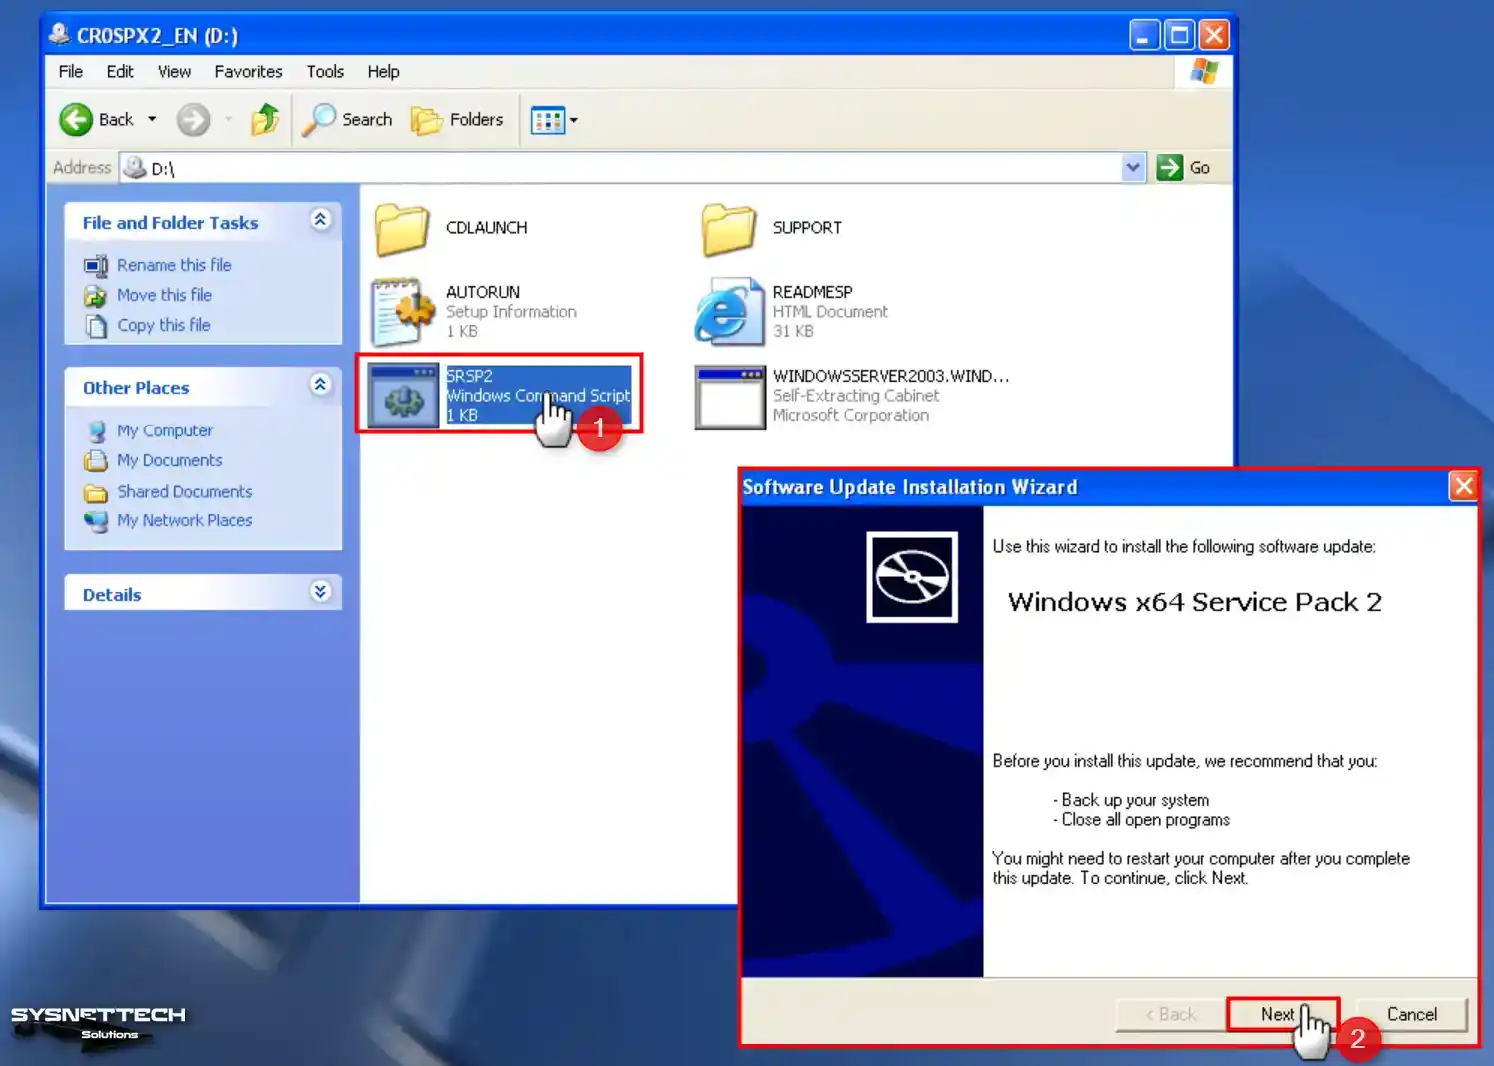
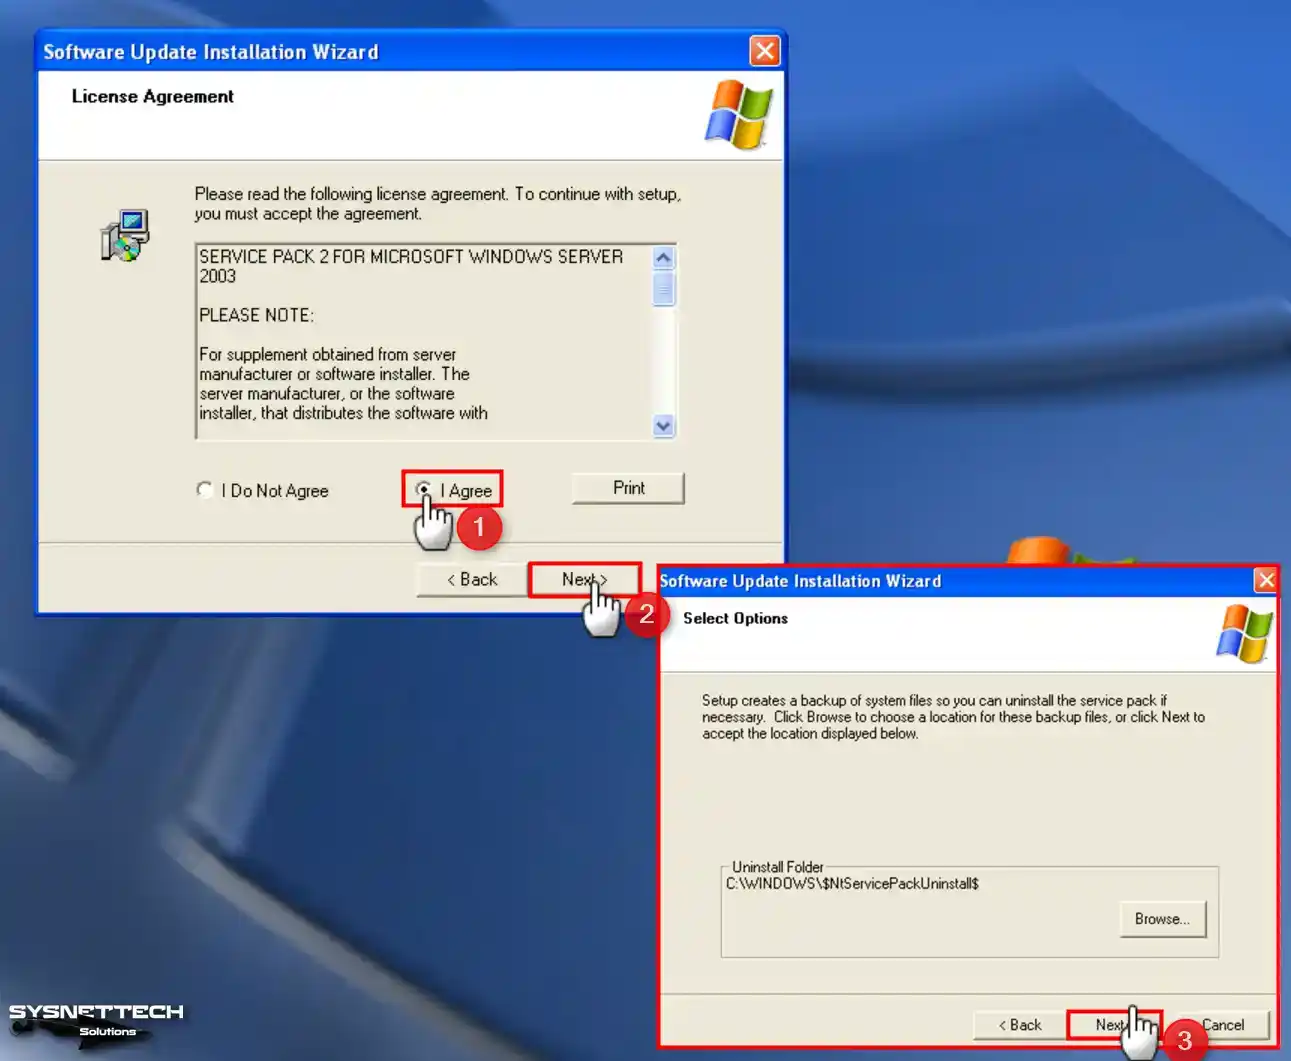
Step 6
Accept the SP2 license agreement and click Next. If you want to downgrade Windows XP from SP2 to SP1 later, note the location in the Uninstall Folder. Continue with ‘Next’ to proceed with SP2 installation.
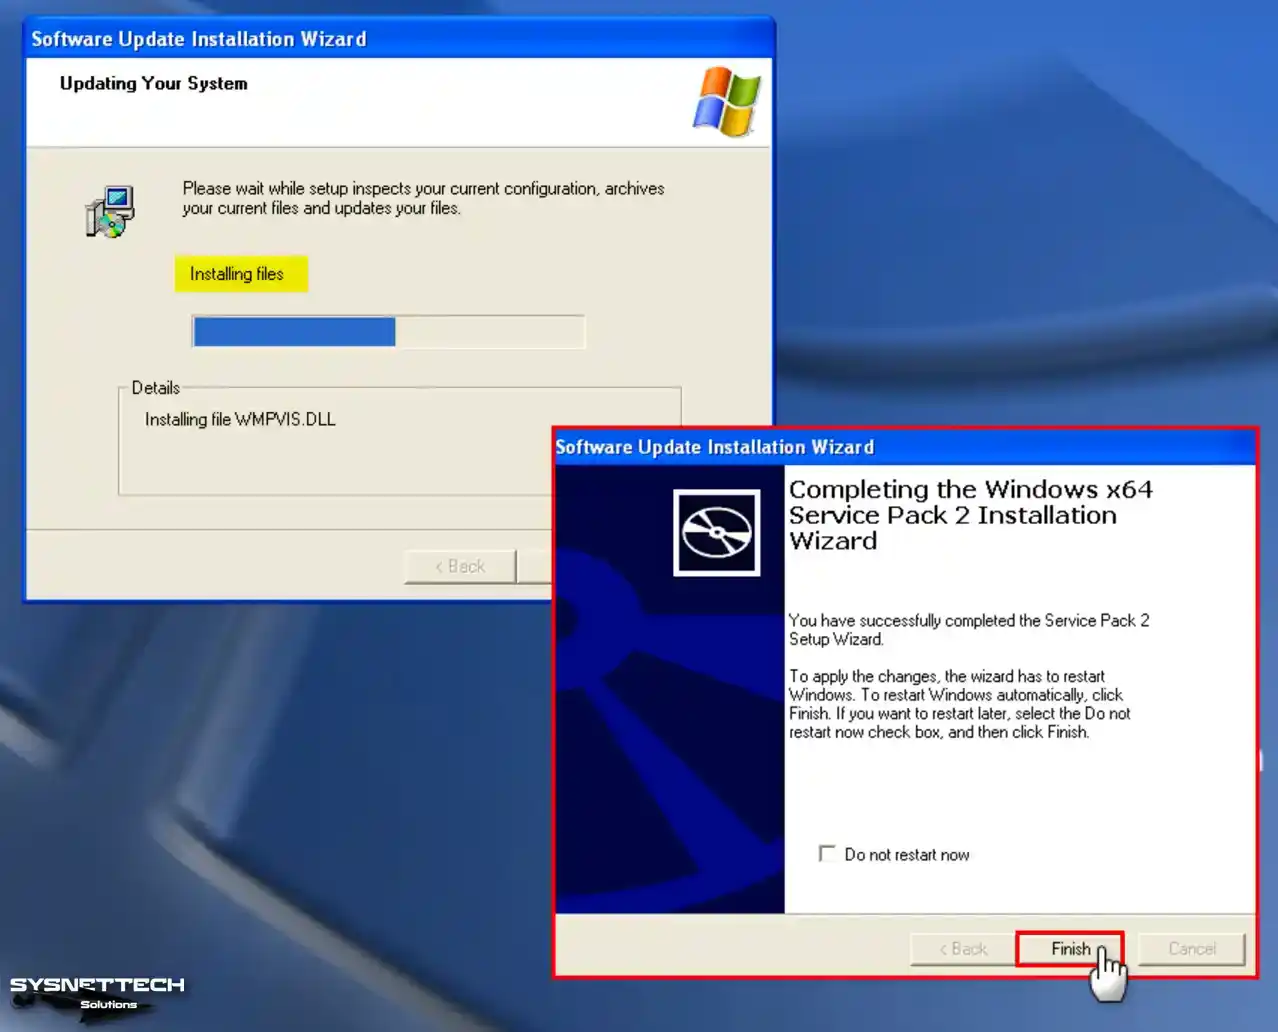
Step 7
Wait while your virtual Windows XP system updates to SP2. When the SP2 setup wizard is complete, click Finish to restart your virtual system.
Step 8
Upon revisiting the system properties, you will notice that Service Pack 2 (SP2) has been effectively installed.

Video
Installing Old Versions
Windows XP ISO ve USB Driver Download
| File | Links |
|---|---|
| Renesas USB 3.0 Driver | Download |
| Windows XP Pro x64 SP1 ISO + SP2 (EN) | Download |
Conclusion
As a result, you can run a Windows XP SP1 x64 Professional virtual machine with Oracle VM VirtualBox 7.0. You can install XP and enjoy its advantages with the steps I have outlined in this article. However, you can maintain the security and compatibility of your current modern operating system.
It would be best if you also prioritized security when using outdated operating systems. Virtualization offers a controlled solution for interacting with old software. As a result, this method is effective for experiencing old OSes in a secure environment.
Though there are several ways to use Windows XP on Windows 10 and 11, using it with the pre-installed image for VirtualBox adds many advantages. We prepared a Windows XP image with VirtualBox guest additions to make things easy. It will allow you to attach and use the latest computer quickly.
You can avoid downloading the correct ISO file, doing every installation step (Unfortunately, the Windows XP installations take a longer time) and additional steps by using this pre-installed image.
You may have unique reasons to have Windows XP on VirtualBox with Windows 11. It could be something you need to check the old legacy applications, play games that support only Windows XP, or open a file that can work only on Win XP. Using Windows XP as a VirtualBox pre-installed image (VDI file) will be handy in any of the above cases.
System Requirements
We believe you have the latest suitable hardware if you are using Windows 11 or 10. It will definitely run Windows XP on it with Oracle VirtualBox.
Download Windows XP Preinstalled VirtualBox Image and use it on Windows 11.
1) Make sure you have the latest Oracle VirtualBox application. It is a desktop virtualization software you can download from the official website here.
2) Download the XP preinstalled image from our website here.

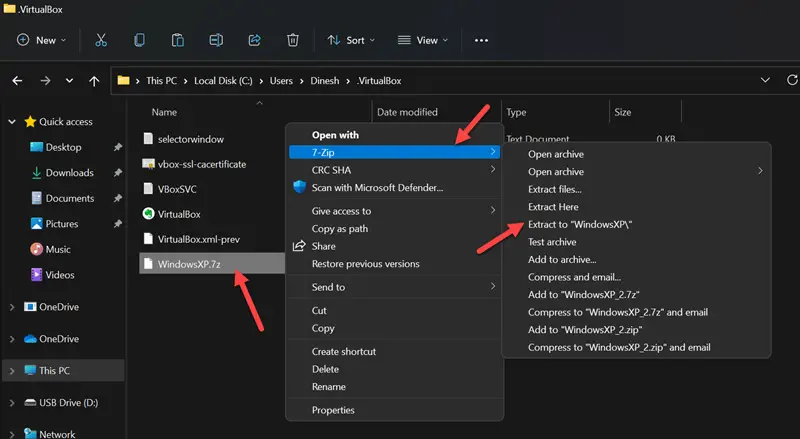
3) You need to have the 7-Zip program to extract this file. You can download 7-Zip from their website here.
4) After the pre-installed image is downloaded, extract it using the 7-Zip program.
5) Open VirtualBox and create a new VM.
6) Give a name for VM and select the version as Windows XP (32bit).
7) Assign RAM size to 512MB.
 Select ‘Use an existing virtual hard disk option’ on the hard disk creation screen. This will bring up a box where you can choose the available VDI file. We need to browse the Windows XP preinstalled image file we extracted in the earlier step.
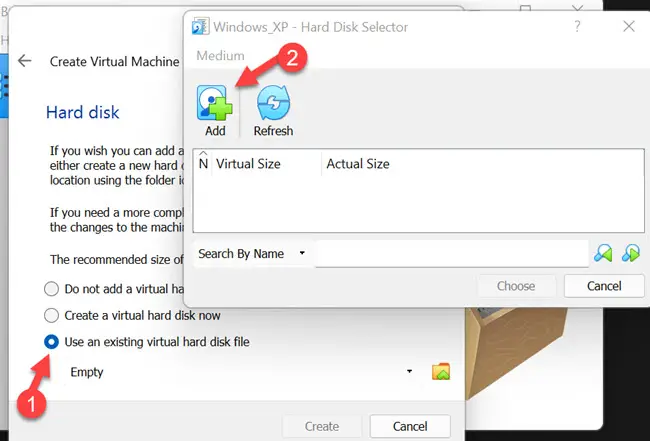
9) Click on the ‘Add’ button and locate the file as shown below.
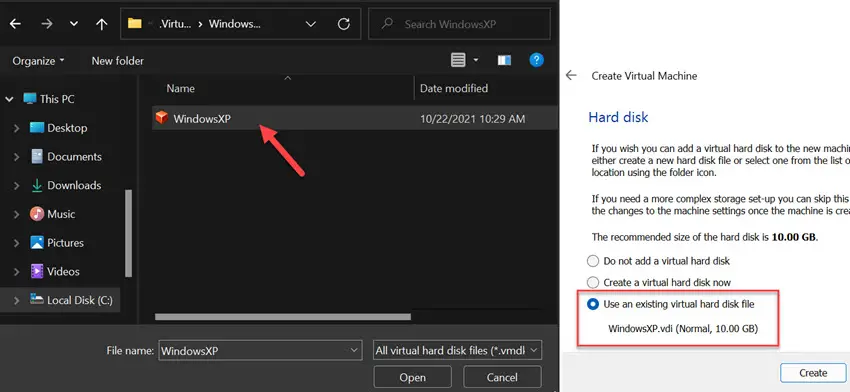
After attaching the file, complete the VM creation steps.
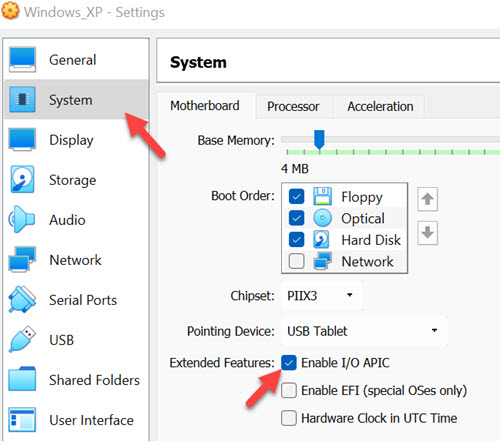
10) Before switching on the VM, let’s tweak a few settings to make the VM work better.
11) Open the VM settings and tick the ‘Enable I/O APIC’ under ‘System’ settings. This will enable us to allocate more the one processer core for the VM.
12) Then, in the ‘Processor’ tab, increase the processers to 2.

13) Power on the VM now. Since all installation steps are done, and VirtualBox guest additions are installed already, the Windows XP on VirtualBox virtual machine will boot and work smoothly.
Network connectivity (Internet), sound and multiple screen resolutions, including full-screen mode, will work perfectly.
You can change the user or Administrator password.
You should have a working Windows XP virtual machine on your Windows 11/10 physical computer. It is highly recommended to take a snapshot before you make any changes.
Since VirtualBox guest additions are installed on this VM, you can quickly transfer the files/folders between the host and the guest virtual machine. It should be easy to test the legacy applications, games and other activities requiring Windows XP on the latest Windows 11 computer.
Troubleshooting Tips for Windows XP on VirtualBox
Based on the user feedback and findings, here are some troubleshooting tips if your Windows XP virtual machine is not booting or is stuck with the black screen.
- As mentioned in system requirements, if your host computer is Windows 10 or 11, it already has virtualization technology enabled in the BIOS. But, if you are using Windows 8 or 7 without VT-x enabled, you need to enable VT-x in BIOS before trying these steps.
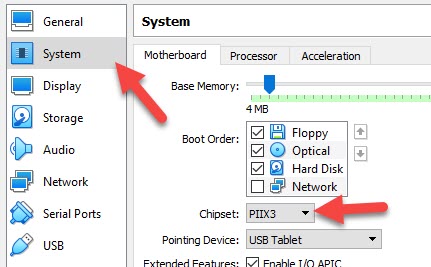
- You can change the chipset under the motherboard settings of the Windows XP virtual machine. It worked for me with PIIX3, but few users reported it worked with ICH9. So, it is better to change the try on your PC.
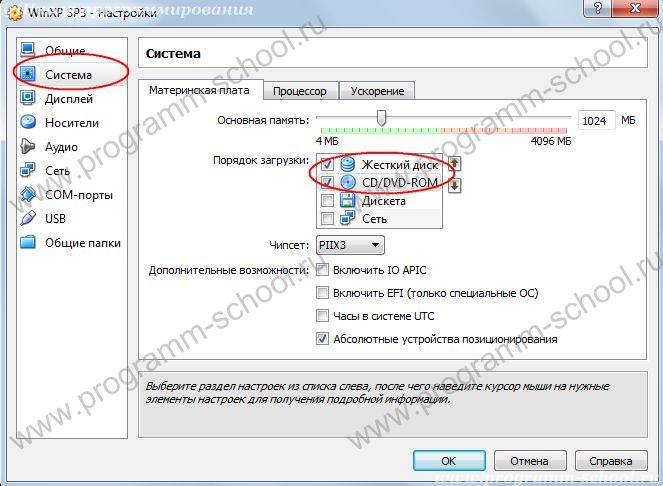
В данной статье будет рассмотрена установка Windows XP Service Pack 3 на виртуальную машину Oracle VM VirtualBox. Рассмотренные действия так же подходят и для «реальной установки» системы, исключение, необходимость указать в БИОСе материнской платы, приоритет загрузки с CD/DVD, если таковой не указан. Где находится раздел настройки приоритета загрузки зависит от версии БИОСа и производителя. Если возникнут вопросы по данному моменту, Вы можете задать их в комментарях.
Приступим!
Я буду производить установку системы с образа DVD диска, поэтому монтирую его в виртуальный привод с помощью программы DEAMON Tools. Если Вы устанавливаете с оптического диска, то соответственно вставьте диск в CD/DVD-Rom. Не забудьте указать верный CD привод. Как это сделать было описано здесь в разделе «Носители».
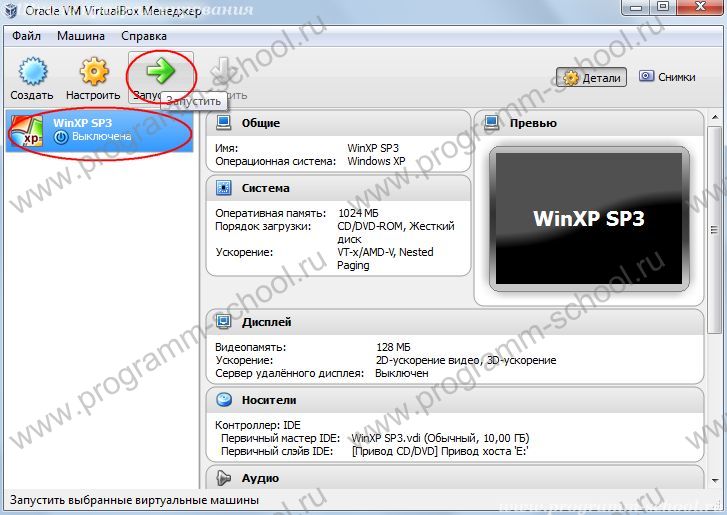
Запускаем наш менеджер виртуальной машины «Пуск->Все программы->Oracle VM VirtualBox-> Oracle VM VirtualBox». В списке выбираем созданную нами ранее виртуальную машину “WinXP SP3” и жмем «Запустить».
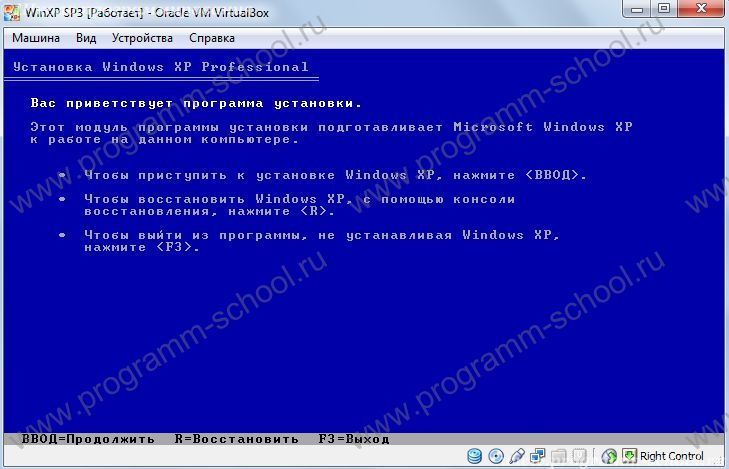
Если привод был указан верно, то начнется загрузка установщика с диска CD/DVD.
В первом окне мы указываем действия клавишами:
- Установка Windows XP
- Восстановление системы с помощью консоли
- Выход.
Для установки жмем клавишу Enter.
Далее появятся условия лицензионного соглашения. Жмем F8 – Принимаю.
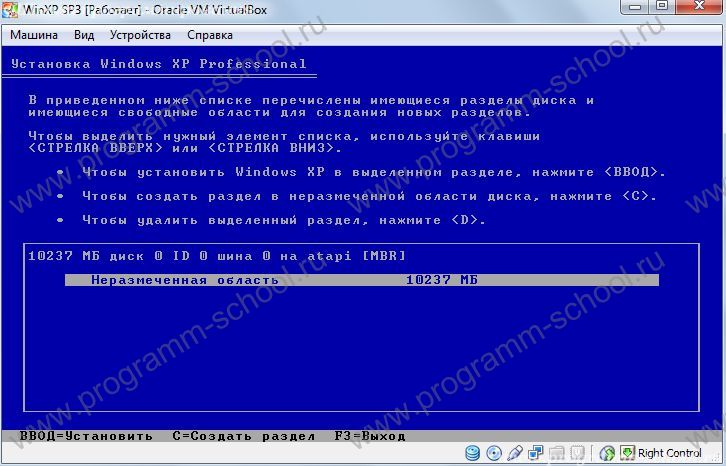
В появившемся окне нам будет предложено выбрать раздел диска на который мы хотим установить нашу систему. Т.к. ранее мы создали только один виртуальный жесткий диск объемом 10Гб, то он и будет нам предложен. Обратите внимание на то, что диск отображается как неразмеченная область — это связанно с тем, что мы пока еще не задали ему формат (NTFS, FAT32 или др.). Жмем «Ввод (Enter)».
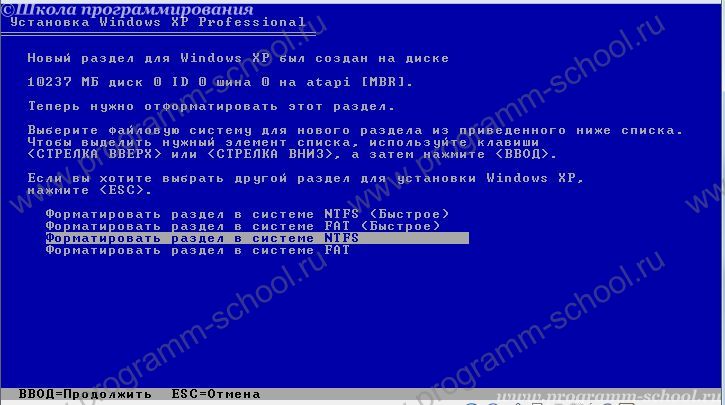
Нас перебросило в следующее меню, в котором предложено форматировать наш раздел. Доступны следующие пункты:
- Форматировать раздел в системе NTFS (быстрое)
- Форматировать раздел в системе FAT (быстрое)
- Форматировать раздел в системе NTFS
- Форматировать раздел в системе FAT
Немного поясню отличия.
Форматировать раздел в системе NTFS (быстрое) – данный вариант затирает только таблицу адресов раздела т.е. данные физически остаются записанные, но система их видеть не будет. Соответственно при записи новых данных на раздел старые постепенно будут затираться. Так же, при таком варианте остаются сбойные сектора. Данный вариант форматирования быстрый, и подходит больше для новых дисков, хотя и нежелателен.
Форматировать раздел в системе FAT (быстрое) – аналогично первому варианты, только изменен способ организации записи данных (если раздел ранее отформатирован в NTFS, то FAT не будет отображаться).
Форматировать раздел в системе NTFS – этот вариант производит формат всего раздела (таблицы адресов и всех секторов), при этом сбойные сектора будут отброшены из таблицы адресов. Такой вариант подходит если Вы производите переустановку системы на которой были много кратные действия перезаписи.
Форматировать раздел в системе FAT – аналогично пункту 3, но данная файловая система не поддерживает файлы размером больше 4Гб. В наше время данный тип системы уже не актуален.
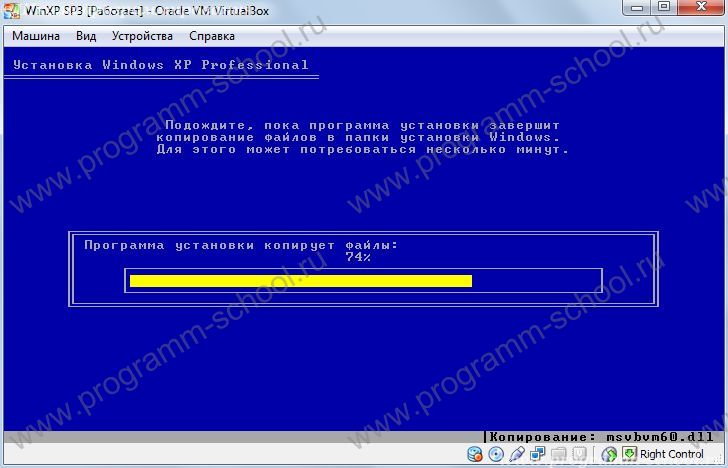
В нашем случае вполне подойдет первый вариант «Форматировать раздел в системе NTFS (быстрое)». Выбираем его и жмем Enter. Ждем окончания форматирования, а затем, копирования файлов системы.
После завершения копирования, машина будет перезагружена. После перезагрузки, у нас опять начнется запуск с CD/DVD, его нужно отменить или если появилось меню выбора загрузки, выберите «загрузка с диска C». Как отменить загрузку с CD ?! Необходимо в настройках виртуальной машины, в разделе «Система«, первым поставить «Жесткий диск» или снять галочку с «CD/DVD Rom«
Продолжение установки Windows.
В окне «Язык и региональные стандарты», Вы можете настроить стандарты, такие как денежная единица, формат отображения даты и др. Так же, языки ввода и язык по умолчанию. Данные параметры можно оставить по умолчанию. Жмем «Далее»

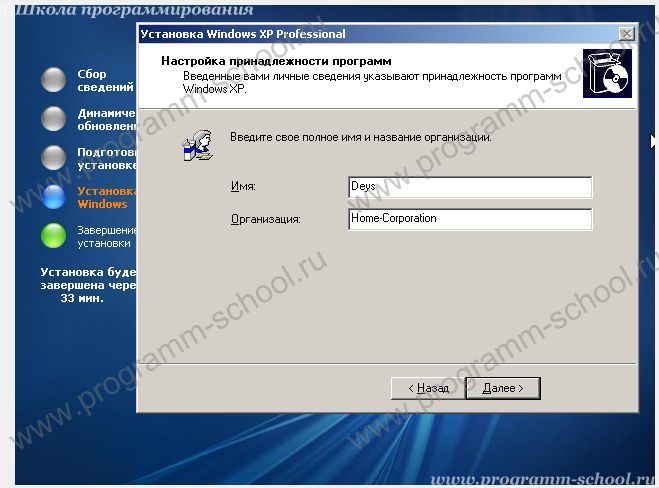
Следующее окно нам предложит указать имя и название организации. Вбиваем любую информация, как правило эта информация привязывается к файлам, например doc. Жмем «Далее»
В следующем окне нас попросят ввести 25 значный CD ключ, который указан на коробке c приобретенной версией Windows XP.
После ввода жмем «Далее».
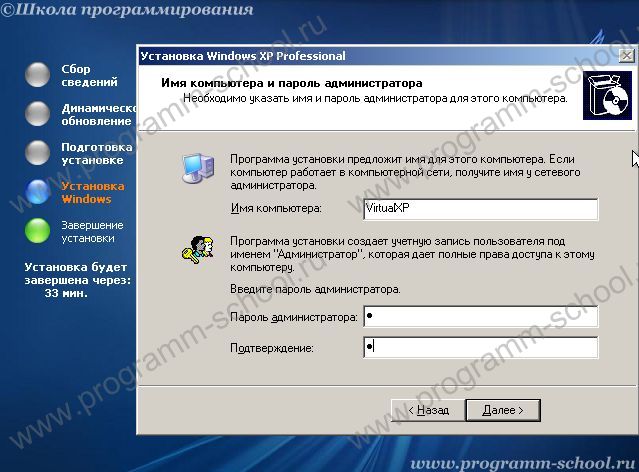
Следующим шагом нам предложат задать имя нашего компьютера и пароль для учетной записи администратора.
Назовем наш ПК : VirtualXP
Пароль укажем: 1 (если Вы устанавливаете систему на физический ПК, то пароль рекомендуется задать более сложный!).
Жмем «далее».
Настройка даты и времени. Если все устраивает, жмем «далее», иначе, вносим свои значения.
В сетевых параметрах оставляем «Обычные параметры» и жмем «Далее»
Зададим рабочую группу – я указал «HATA1» т.к. все домашние компьютеры у меня входят в эту группу. Вы можете указать иной. Этот параметр пригодится в дальнейшем для настройки общего доступа к каталогам ПК по сети. «Далее>»
Теперь дожидаемся окончания процесса установки. Как правило он занимает 15-30 минут. После окончания система будет перезагружена.
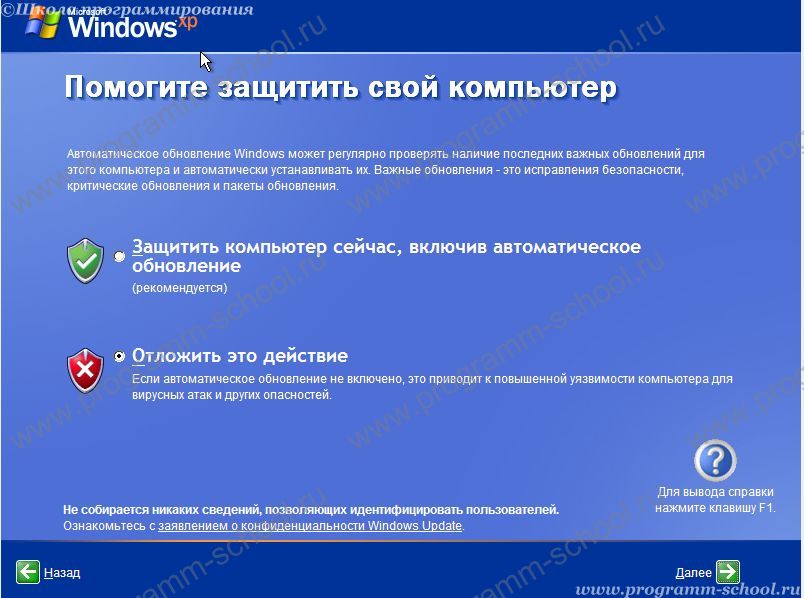
При первом запуске, нас попросят указать параметры обновления, ввести имя учетной записи.
Обновление я отключаю, Вы на свое усмотрение, но учтите для этого нужна легальная версия. Жмем «Далее»
Пропустим параметры подключения к интернету. Настроим их позже. Жмем «Пропустить».
Регистрация в майкрософт, укажем «Нет, как-нибудь в другой раз». Жмем «Далее»
В следующем окне, указываем имена учетных записей. Затем жмем «Далее» и «Готово».
На этом установка Windows XP завершена. Как видите, ничего сложного.
Можете извлечь установочный диск и рекомендуется в настройках виртуальной машины изменить приоритет загрузки если его не изменили ранее.
Далее: Установка дополнений гостевой ОС в VirtualBox
There are a couple of methods to install Windows XP Virtual machine on Windows 10 using different platforms such as Oracle VirtualBox, Vmware, and Hyper-V.
Windows XP virtual machine on VirtualBoxStep 1: Download Windows XP ISO and LicenseStep 2: Install VirtualBox on Windows 10/8/7Step 3: Create a Virtual Machine for Windows XPStep 4: Set memory size (Virtual RAM)Step 5: Create a Virtual Hard disk (VHD) for XP virtual machineStep 6: Set ISO image for bootStep 7: Start Windows XP Virtual MachineStep 8: Installing Windows XP
Windows XP is an old but dominant operating system of the world during its heydays. However, this Windows XP is not supported officially but is available in bootable ISO image form for free to download and use. Yes, we don’t need to pay anything for Windows XP Service Pack 3 Licenses and ISO, both are available on an internet archive website.
Here we will show how to install Windows XP on Oracle VirtualBox as an emulator on Windows 10 step by step using its ISO file. This will allow you to continue to use Windows XP on Emulator without having to install it on your PC.
Windows XP virtual machine on VirtualBox
Here is a glance at the steps we are going to follow for the installation of Windows XP Virtual Machine using ISO file on VirtualBox running on Windows 10. However, the steps will be the same for Windows 8, Windows 7, and Windows Vista.
- Download the Windows XP ISO file and copy the license key as well and save it on a notepad. For links see the main step 1 of this article.
- Install Oracle VirtualBox on your Windows 10/8/7 PC
- Run the VirtualBox and click on the NEW button to create a new Virtual Machine.
- Type the name of the OS -Windows XP and the rest will be set by default.
- Create a Virtual Hard disk (VHD) and set RAM.
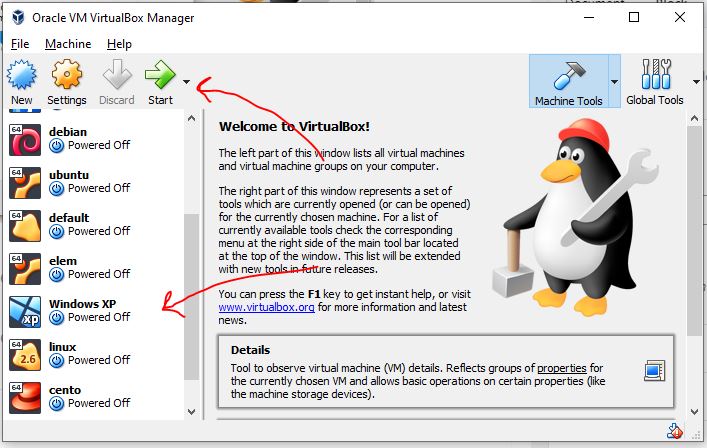
- Select the created Windows XP virtual Machine appearing on the left side of the VirtualBox main screen.
- Click on the Settings option from the menu.
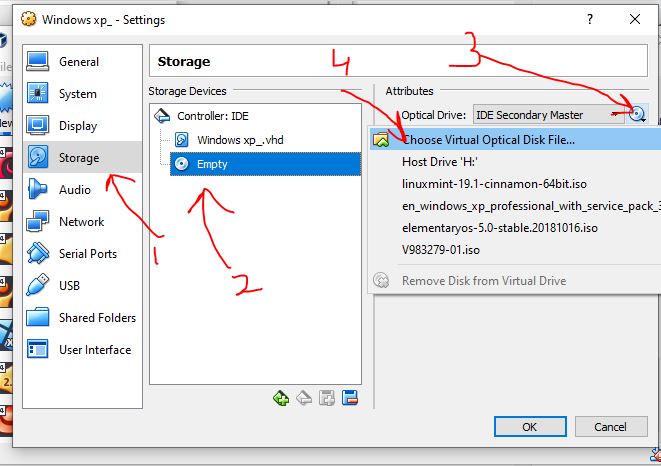
- Select the Storage Settings
- Click on the empty CD icon and then again from the attributes select the CD icon.
- Navigate and select the downloaded windows XP ISO file.
- Save it and Start the Virtual Machine and the Windows XP boot menu will appear.
- Follow the installation wizard and it will be on your Oracle Virtualbox to experience.
—New VirtualBox version allows unattended installation of Windows XP—-
Here are the steps to follow:
Name your virtual machine – Windows XP or whatever you want. And then click on the Arrow icon given at front of the ISO image option. Select “Other…” and then navigate to your downloaded Windows XP ISO image from Archive.org.
After that simply click on the Next button.

Under Unattended Guest OS Install Setup, the default username (vboxuser) and password (chnageme) will be given. Change them with whatever you want to set for your user account on Windows XP.

Also, paste the product key available on the same page from where you have downloaded the Win XP ISO image. Also, Change the hostname to whatever you would like to use. Once done click on the Next button.

Windows XP can run perfectly fine at 512MB, for better performance use 1GB where the CPU core can be one or two.

Let’s the default 10GB select because it is enough.

Soon the setup will start copying the files.


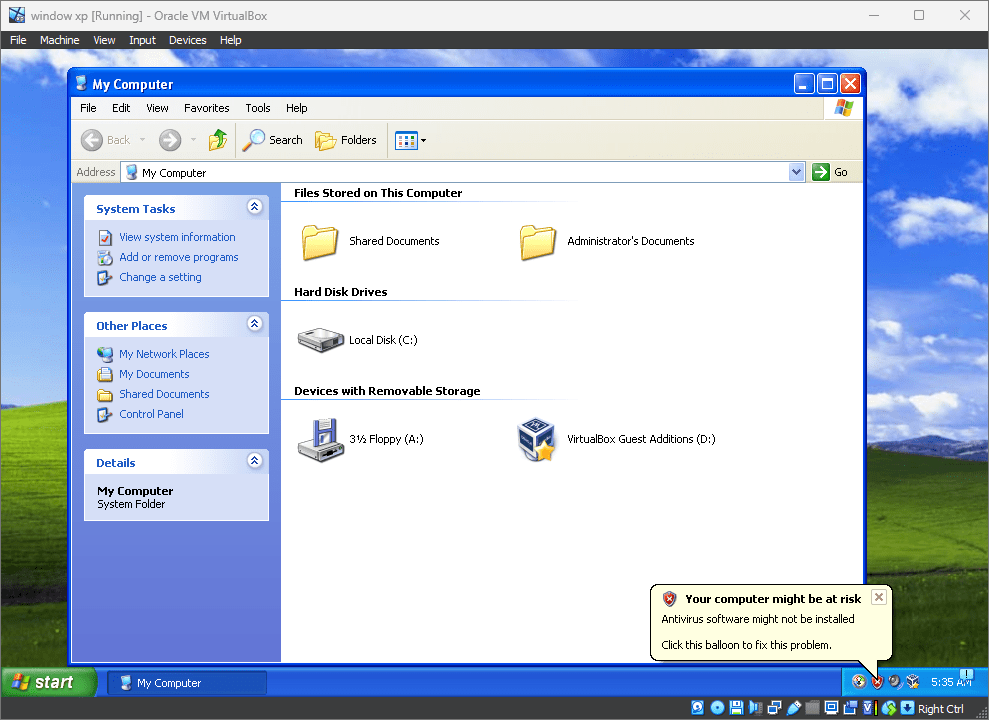
Once the installation is done, click on the Devices -> optical and select VBoxGuestAdditions.ISO file.

Open My Computer and double-click on the Virtual Box Guest Additions drive. This will start the installation.

Once the installation is done, just reboot your system.

——old VirtualBox versions method—-
Step 1: Download Windows XP ISO and License
The first step towards the Virtual installation is to get an ISO image of this old operating system. As I mentioned above that it is free and avail by Microsoft itself officially along with the License key. Thus, use this link which will open the page of Archive.org, where click on the ISO image link given on the right side under the Download section, this will allow you to download the Windows XP Professional SP3 x86 ISO image. Just on the same page, the free but official professional key for the same will have been given. Copy that and jot down somewhere like NotePad.
Step 2: Install VirtualBox on Windows 10/8/7
So, we have now the ISO file of Windows XP professional 32-bit service pack 3, it’s time to get the Oracle VirtualBox. Here is the link to Download VBox. In case you already have the Vbox on your system then simply move to next.
The installation of the VBox is like any other executable software meant for Windows nothing will be complicated at all.
Step 3: Create a Virtual Machine for Windows XP
Run VirtualBox and click on the New button given on the Menu of it. Now in the Name box, type- Windows XP, and its corresponding options will automatically get set up. Then click on the Next button.
Step 4: Set memory size (Virtual RAM)
Although Windows XP perfectly works under 512 MB RAM, however, here we are assigning 1GB for better working and smooth performance.

Step 5: Create a Virtual Hard disk (VHD) for XP virtual machine
To store the installation file we need to attach a Virtual Hard drive to our Virtual Machine. The VirtualBox will automatically set it to 10GB which is enough. Thus, leave the default settings and click on the NEXT.
On the Next window, it will ask you to select the type of Virtual Hardrive, by default it will be VDI, however, here we are selecting VHD. It is because in case, tomorrow we want to run it under Windows Hyper-V, we can easily use the Windows XP VHD image.
Next, Select Dynamically allocated option.
File allocation and Size: By default, the VirtualBox will save all files of the machine on C: drive, if you want to change click on the folder icon and select the place.
Finally, click on the Create button.
Step 6: Set ISO image for boot
Select the created VirtualMachine and click on the Settings button given on the top menu of VBox.
From Settings -> click on the Storage-> Empty CD icon under storage device-> again on CD icon of Attributes and then “Choose Virtual Optical Disk File“.
An explorer will open and select the downloaded Windows XP ISO image.
Click on the OK button.
Step 7: Start Windows XP Virtual Machine
Now, our XP Virtual Machine is ready, time to boot it up. For that select the created virtual machine from the left side of the VBox panel and click on the Start button given in the menu of the same.
Step 8: Installing Windows XP
Windows XP Professional Setup will open, press the Enter button to continue.

Press F8 to accept the Windows XP Licensing Agreement.
As we are installing Windows XP on VirtualBox, thus, a single partition will appear, simply press the enter button to format the whole partition.
By default, a slow formatting option will be selected, use the arrow key of the keyboard and select “ Format the partition using the NTFS file system (Quick)”.

After some time, it will ask you to enter the license key for Windows XP. Type this official serial key: MRX3F-47B9T-2487J-KWKMF-RPWBY and click on the NEXT button to complete the installation.
Once it will be done, you will get the old but very familiar interface of Windows XP with a familiar startup sound.
Thus, in this way, we can install our old Windows XP system on VirtualBox Virtual Machine for testing legacy software or learning purpose.
Other Articles to read:
- How to boot VirtualBox from USB?
- Best Free Virtualbox Alternative for Linux
- How to install CentOS 7 on a PC via bootable USB
- Qemu Ubuntu Tutorial to install & setup virtual machines