
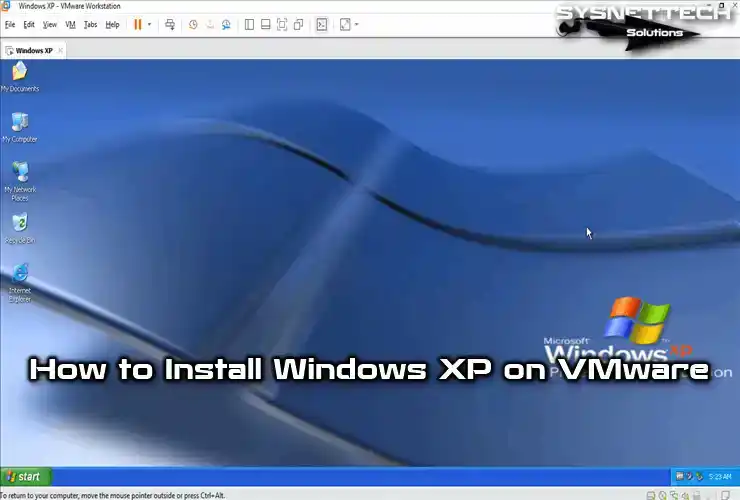
A Virtual Machine with Windows XP Professional for VMware.
Alternative link: https://drive.google.com/file/d/1mQGC5gINWuSFQ1hG1-T0rcUI-XDXwW4e/view?usp=share_link
Details:
Already activated
Weight: Around 7Gbs
Service Pack 3
Software installed:
Mozilla Firefox
Office 2003
Adobe Photoshop CS2 and ImageReady
Notepad++
avast! Antivirus
QuickTime Player
VLC Media Player
Audacity
iTunes
CDBurnerXP
Plus! XP
Doom
RollerCoaster Tycoon
The Sims
CPUID CPU-Z
Microsoft Virtual PC
MiniTool Partition Wizard Free
Adobe Acrobat Reader
Adobe Flash Player
Nero 9 Essentials
Legacy Update
- Addeddate
- 2023-03-19 23:06:50
- Identifier
- winxprovm
- Scanner
- Internet Archive HTML5 Uploader 1.7.0
comment
Reviews
(1)
There is 1 review for this item. .
2,519
Views
3
Favorites
1
Review
DOWNLOAD OPTIONS
Uploaded by
dario_mj
on
Though there are several ways to use Windows XP on Windows 10 and 11, using it with the pre-installed image for VirtualBox adds many advantages. We prepared a Windows XP image with VirtualBox guest additions to make things easy. It will allow you to attach and use the latest computer quickly.
You can avoid downloading the correct ISO file, doing every installation step (Unfortunately, the Windows XP installations take a longer time) and additional steps by using this pre-installed image.
You may have unique reasons to have Windows XP on VirtualBox with Windows 11. It could be something you need to check the old legacy applications, play games that support only Windows XP, or open a file that can work only on Win XP. Using Windows XP as a VirtualBox pre-installed image (VDI file) will be handy in any of the above cases.
System Requirements
We believe you have the latest suitable hardware if you are using Windows 11 or 10. It will definitely run Windows XP on it with Oracle VirtualBox.
Download Windows XP Preinstalled VirtualBox Image and use it on Windows 11.
1) Make sure you have the latest Oracle VirtualBox application. It is a desktop virtualization software you can download from the official website here.
2) Download the XP preinstalled image from our website here.

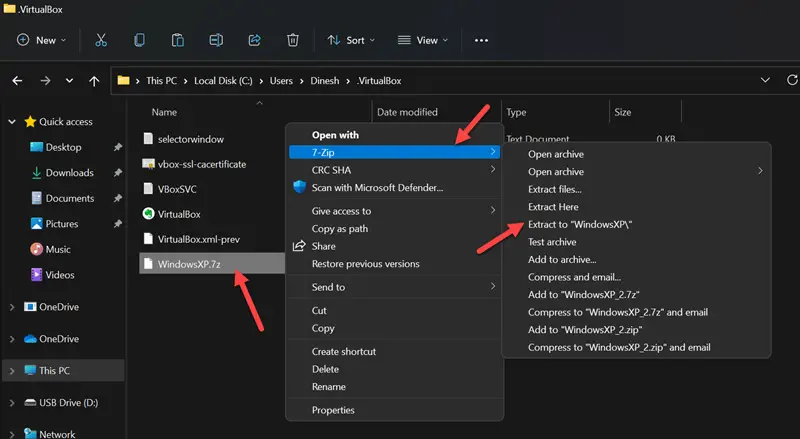
3) You need to have the 7-Zip program to extract this file. You can download 7-Zip from their website here.
4) After the pre-installed image is downloaded, extract it using the 7-Zip program.
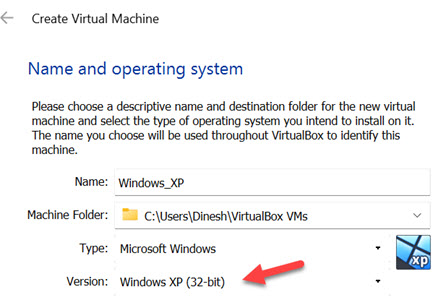
5) Open VirtualBox and create a new VM.
6) Give a name for VM and select the version as Windows XP (32bit).
7) Assign RAM size to 512MB.
 Select ‘Use an existing virtual hard disk option’ on the hard disk creation screen. This will bring up a box where you can choose the available VDI file. We need to browse the Windows XP preinstalled image file we extracted in the earlier step.
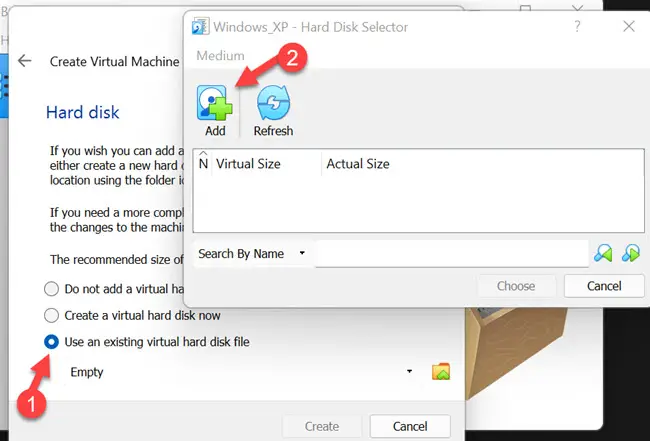
9) Click on the ‘Add’ button and locate the file as shown below.
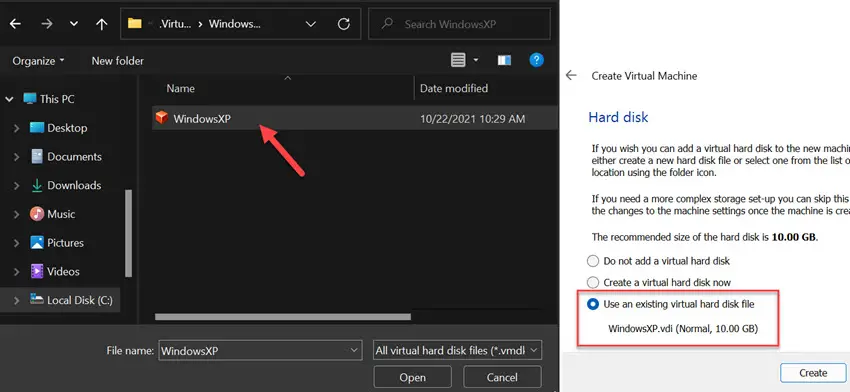
After attaching the file, complete the VM creation steps.
10) Before switching on the VM, let’s tweak a few settings to make the VM work better.
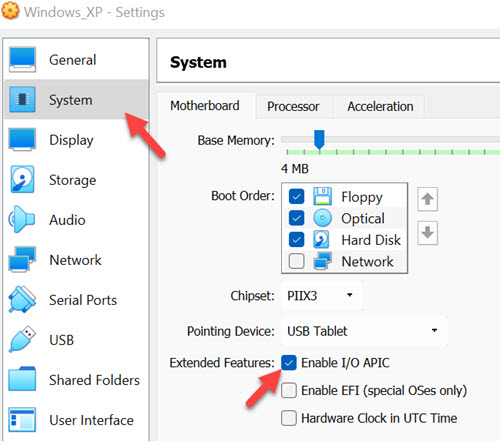
11) Open the VM settings and tick the ‘Enable I/O APIC’ under ‘System’ settings. This will enable us to allocate more the one processer core for the VM.
12) Then, in the ‘Processor’ tab, increase the processers to 2.

13) Power on the VM now. Since all installation steps are done, and VirtualBox guest additions are installed already, the Windows XP on VirtualBox virtual machine will boot and work smoothly.
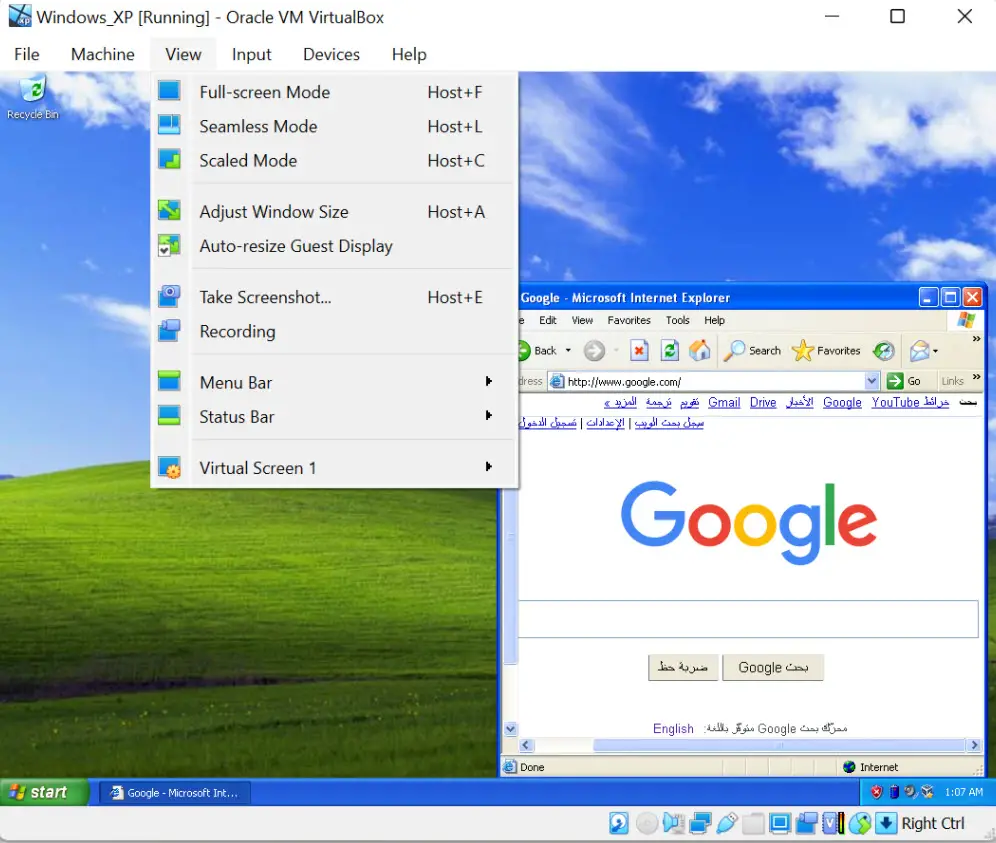
Network connectivity (Internet), sound and multiple screen resolutions, including full-screen mode, will work perfectly.
You can change the user or Administrator password.
You should have a working Windows XP virtual machine on your Windows 11/10 physical computer. It is highly recommended to take a snapshot before you make any changes.
Since VirtualBox guest additions are installed on this VM, you can quickly transfer the files/folders between the host and the guest virtual machine. It should be easy to test the legacy applications, games and other activities requiring Windows XP on the latest Windows 11 computer.
Troubleshooting Tips for Windows XP on VirtualBox
Based on the user feedback and findings, here are some troubleshooting tips if your Windows XP virtual machine is not booting or is stuck with the black screen.
- As mentioned in system requirements, if your host computer is Windows 10 or 11, it already has virtualization technology enabled in the BIOS. But, if you are using Windows 8 or 7 without VT-x enabled, you need to enable VT-x in BIOS before trying these steps.
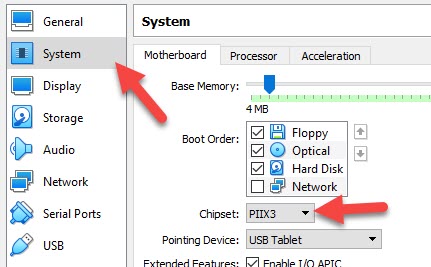
- You can change the chipset under the motherboard settings of the Windows XP virtual machine. It worked for me with PIIX3, but few users reported it worked with ICH9. So, it is better to change the try on your PC.
Вся инфа была взята на этом форуме — ребятам огромное спасибо! Ставил себе на Win 7 и Win 10 (x64) всё запустилось и работает отлично, проверял на двух ноутбуках.
1. Образ системы WinXP с уже установленной и активированной Peugeot Planet 2000. Качаем по ссылке с форума выше либо с гуглдиска, вот ссылочка . Там архив, в нем 2 файла .vbox и .vdi. Распаковываем в какую-нибудь папку на компуктер.
2. Виртуалбокс качаем здесь. Я ставил версию 5.2 скачать можно здесь, возможно подойдёт и последняя актуальная, пробуем отписываемся.
3. Запускаем VirtualBox, дальше вкладка «Машина» и «Добавить». Выбираем ранее скачанный файл .vbox
4. Запускаем в виртуалке Win XP.
Если появилась ошибка вида:
Не удалось открыть сессию для виртуальной машины PP2000.
The VM session was closed before any attempt to power it on.
Код ошибки: E_FAIL (0x80004005)
Компонент: SessionMachine
Интерфейс: ISession {c0447716-ff5a-4795-b57a-ecd5fffa18a4}
рядом с кнопкой «запустить» жмякаем «сбросить», пробуем еще раз и должно всё запуститься нормально.
5. Подключаем сканер, ждём пока установятся драйвера, пользуемся 
Цена вопроса: 0 ₽
Пробег: 0 км
In this article we will show you how to create a Windows XP Virtual Machine. What is a virtual machine you may ask?
One of our guest writers explains it in great detail in one of our previous articles titled Virtualization and its Uses in the Tech World:
A Virtual Machine is a piece of software which emulates (pretends), to be machine (computer) to do an abnormal task such as running Windows on a Macintosh computer for example, to occur via the trapping of computer instructions. It is quite literally a computer running ON a computer. One of the by-products of this is that the two systems can be entirely separated from each other, which allows a level of security that just can’t be matched.
Now, lets make your own XP Virtual Machine.
- To begin, download and install Free VMware player (you will need to fill out a few questions before download). This is what our virtual machine will be running inside of.
- Choose what size you would like your Virtual Machine hard drive size to be (this will take up real hard drive space). I have created several different sizes available for download (right click, save file as..). For testing purposes, the 4Gb is a good choice:
- 4GB Version
- 8GB Version
- 10GB Version
- 15GB Version
- 20GB Version
- Download the appropriate file based on which Windows XP you own (right click, save as..) and save it in the same folder that you saved the previous file in:
- For XP Pro: WindowsXPPro.vmx
- For XP Home: WindowsXPHome.vmx
- Insert your WindowsXP CD into your CD Rom.
- Run VMware player which you installed in the first step and click the “Open” button and find the .vmx file you downloaded. Windows Setup should now begin.
- To interact inside your virtual machine, double click on the Window or press CTRL+G. This will make anything you do with the mouse or keyboard work inside the Virtual Machine only and not the desktop you are currently using. To escape the Virtual Machine so you can control your regular desktop, press CTRL+ALT.
- Install WindowsXP as you normally would by following the prompts. When the installation finishes you will see your new Windows XP Virtual Machine Desktop.
- To quit the Virtual Machine, either shutdown the VM version of Windows XP as you do for your normal desktop, or simply close the VMWare Player.
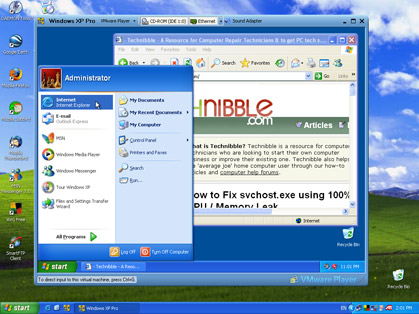
Window XP Virtual Machine. Windows XP being run from within Windows XP
For anyone who wants to experiment further with these Virtual Machines (for techies and geeks):
If you want to try this with other Windows operating systems such as Windows 2000. Open up the .vmx file with Notepad and it will look something like this:
config.version = “8”
virtualHW.version = “3”
ide0:0.present = “TRUE”
ide0:0.filename = “WindowsXPPro.vmdk”
memsize = “64”
MemAllowAutoScaleDown = “FALSE”
ide1:0.present = “TRUE”
ide1:0.fileName = “auto detect”
ide1:0.deviceType = “cdrom-raw”
ide1:0.autodetect = “TRUE”
floppy0.present = “FALSE”
ethernet0.present = “TRUE”
usb.present = “TRUE”
sound.present = “TRUE”
sound.virtualDev = “es1371”
displayName = “Windows XP Pro”
guestOS = “winXPPro”
nvram = “WindowsXPPro.nvram”
MemTrimRate = “-1”ide0:0.redo = “”
ethernet0.addressType = “generated”
uuid.location = “56 4d 5c cc 3d 4a 43 29-55 89 5c 28 1e 7e 06 58”
uuid.bios = “56 4d 5c cc 3d 4a 43 29-55 89 5c 28 1e 7e 06 58”
ethernet0.generatedAddress = “00:0c:29:7e:06:58”
ethernet0.generatedAddressOffset = “0”tools.syncTime = “TRUE”
ide1:0.startConnected = “TRUE”uuid.action = “create”
checkpoint.vmState = “”
Change the guestOS value to “windows2000pro” and the other WinXPPro values to Win2000 (the rest are just names so they dont matter as much).
Also, these .vmx files are optimized for computers with only 256mb of ram which is why “memsize” equals 64. If you are running 512mb of ram then you might want to set this value to 128 for added performance.
If you would like to customize the size of the .vdmk files. Download Qemu located here and install it to a location such as “c:\program files\qemu”.
Goto Start > Run and type CMD.
In the command window, while in the qemu directory (eg, c:\program files\qemu>) type:
qemu-img.exe create -f vmdk WindowsXPPro.vmdk 13G
Replace the 13G with whatever file size you want the VM partition to be (in this case, 13 gig) and it will create it in your qemu directory. You might want to move this out of this directory. Now all if you have to do is repeat the steps in this article using your own .vmdk and .vmx files and you have a custom Virtual Machine.
Do you want to install and run Windows XP on a new virtual machine using VMware Workstation 17 Pro virtualization software on Windows 10 & 11 operating systems? In this article, I will walk you through the process of installing Windows XP Professional 64-bit SP1 on a virtual computer.
Before I forget, Microsoft has ended support for Windows XP. Despite this, there are still situations when it is necessary to run this legacy operating system, especially for managing automation machines or other tasks. I’ll show you how to create a new virtual machine for XP. Next, I will walk through the entire installation process, from configuring hardware compatibility to selecting the virtual disk type. As a result, you will have your virtual Windows XP running on your PC!
How to Set Up Windows XP Professional 64 Bit SP1 on Windows 10 using VMware Workstation 17
As you know, Windows XP was a popular operating system at the time. Microsoft ended its support for XP entirely in 2014. Therefore, it would be logical to use an up-to-date operating system such as Windows 10 on your host computer.
However, since automation machines used in some institutions or organizations were produced on an old date, they need Windows XP or an older operating system to be managed. In case of such need, it is recommended that systems such as XP run on desktop or laptop computers with old hardware.
Suppose you do not have an old computer, of course. In that case, you can use old operating systems on virtual machines by using virtualization software such as VMware on your current computer.
Or suppose you still want to use Windows XP even though it is an old system, as we mentioned, after installing a virtualization program such as VMware, VirtualBox, or Hyper-V on your Windows 10 computer. In that case, you can build this system on the virtual machine.
Host & VM Requirements for Windows XP
You must have some requirements to run Windows XP using VMware Workstation 17 Pro on your actual PC. In particular, these depend on the hardware capabilities of the host computer. However, you should know the specific needs of the virtual machine. However, for a perfect VM, here are the general rules you should consider:
Host Requirements:
- Processor: VMware Workstation 17 Pro requires a 64-bit x86 processor clocked at least 1.3 GHz. However, you would be better off using a modern multi-core processor with a higher clock speed.
- RAM: I recommend at least 4 GB RAM. However, allocating more RAM increases performance significantly.
- Storage: You need enough free disk space for VMware Workstation and virtual machines. You should also have extra space for VM files and XP files.
Virtual Machine Requirements:
- Processor: You can run your Windows XP system on a single-core processor. However, you can increase itPowerer by allocating more than one core.
- RAM: I recommend allocating at least 1 GB of RAM. You can also determine the RAM allocation yourself for better performance.
- Disk Space: Allocate enough virtual disk space for Windows XP according to the work you will do.
- Graphics: VMware Workstation 17 Pro supports 3D graphics acceleration. However, you need to adjust the graphics settings according to XP.
As a result, specific system requirements vary depending on the intended use. However, while you are running XP in a virtual environment, pay attention to the compatibility of your host PC’s hardware with VMware. Plus, I recommend sticking to the recommended settings for optimal performance.
How to Create a New Virtual Machine for Windows XP
Before proceeding with the installation steps, you need to install the VMware virtualization program on your computer. After installation, download the XP ISO file to your host computer by clicking the button below and create a new VM by following the steps below.
Windows XP Pro x86/x64 SP1 ISO + SP2 Installer
Step 1
After installing VMware Workstation 17 Pro on your computer, run the program and press Create a New Virtual Machine on the homepage to set up a new virtual machine. When the VM wizard opens, tick Custom (Advanced) and click the Next button.

Step 2
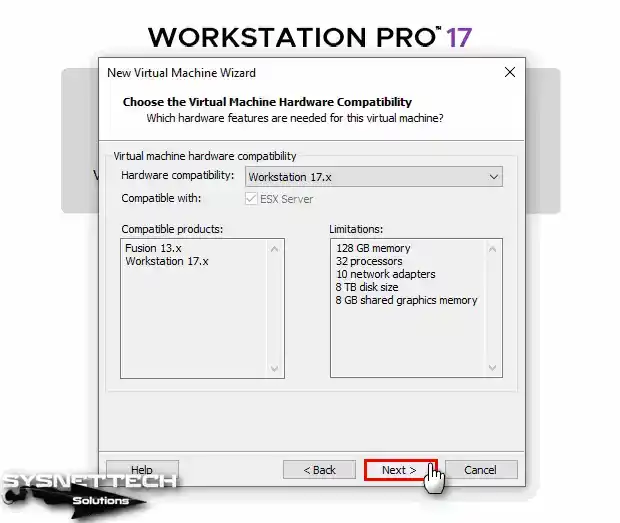
In the Choose the Hardware Compatibility window, select the latest version of the Workstation program you are using. In this window, you will see the version of Workstation Pro currently installed on your computer.
If you are installing on an older version, you will not be able to select 17.x, so update Workstation Pro. Next, choose Workstation 17.x for VMware virtual machine compatibility, and then hit the Next button.
Step 3
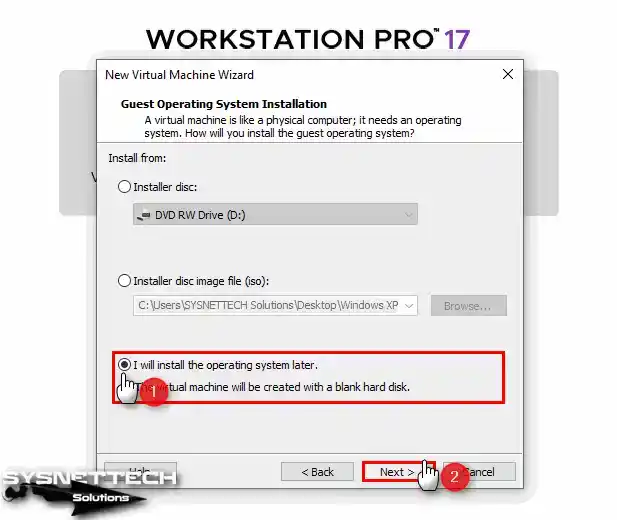
When installing a new virtual machine, I recommend choosing the “I will install the operating system later” option. This allows you to adjust advanced settings that better align with the intended operating system before installation. So, as soon as you make this selection, proceed by clicking the “Next” button.
Step 4
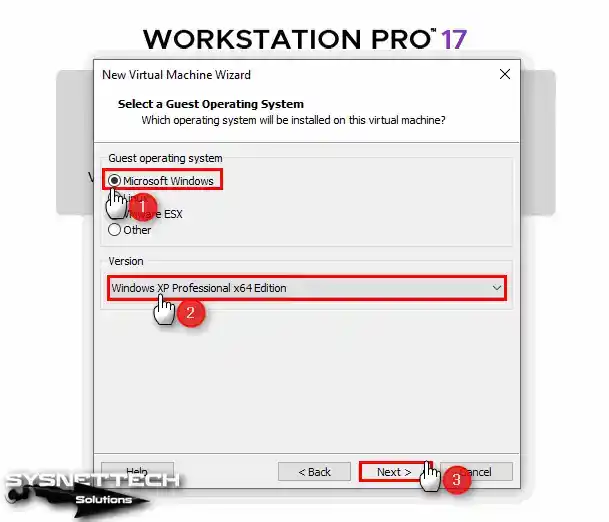
When installing XP on a virtual machine, start by selecting the “Microsoft Windows” option in the Select a Guest Operating System window. Then, select “Windows XP Professional” from the Version section.
Step 5
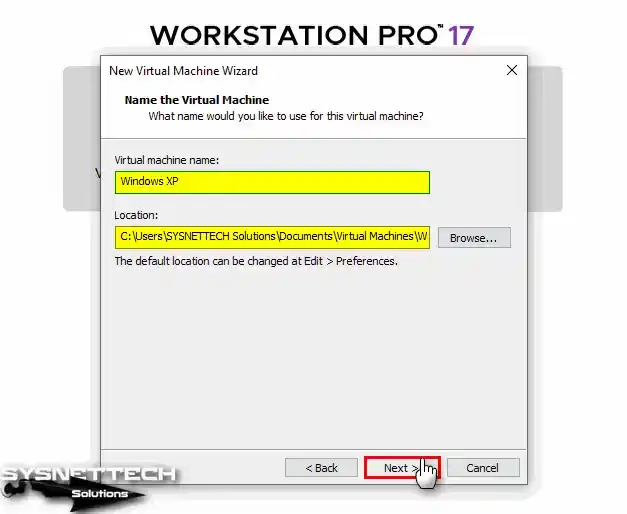
In the “Name the Virtual Machine” section, type the name of the operating system you will install. In the Location section, if you want to store the virtual machine on a USB 3.0 or 3.1 external disk, configure the relevant location.
To change the installation location of the VM, press the Browse button in this window and select the relevant location in the window that opens.
Step 6
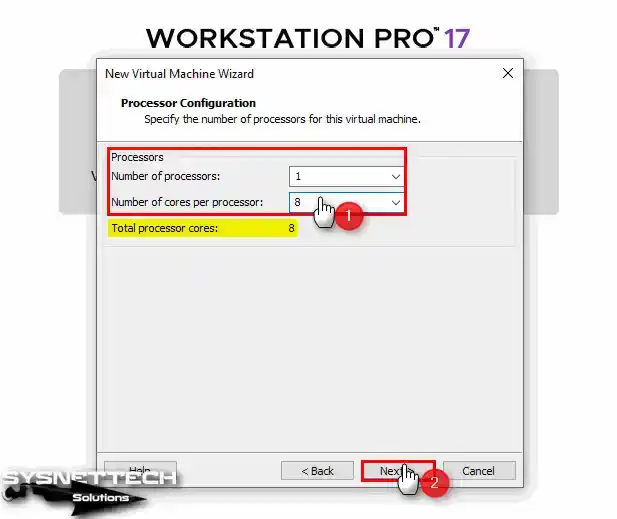
In the Processor Configuration window, configure the number of processors and cores for XP depending on the hardware features of your computer.
If you have a fast PC and want to install it faster, you can configure 1 processor and 8 core values for the virtual machine.
Step 7
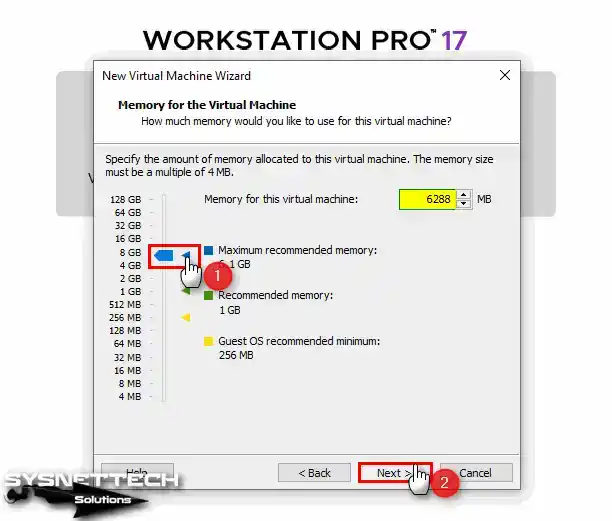
Likewise, you can assign a 4 GB RAM size to the virtual computer or choose the maximum memory size according to the RAM capacity of your physical computer.
Step 8
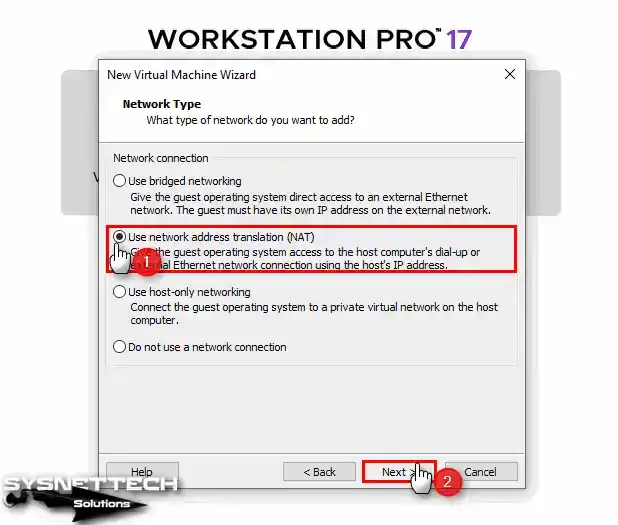
If you want to connect to the Internet after installing the virtual operating system, select Bridged or NAT in the Network Type window.
Step 9
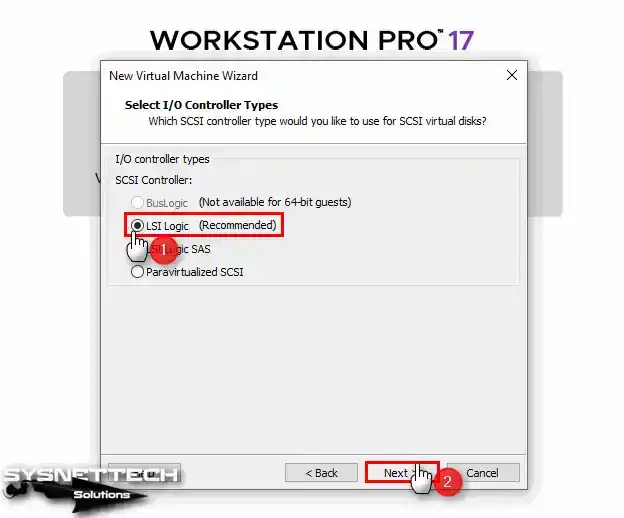
Once you’ve chosen the default LSI Logic option in the I/O Controller window, click Next to continue.
Step 10
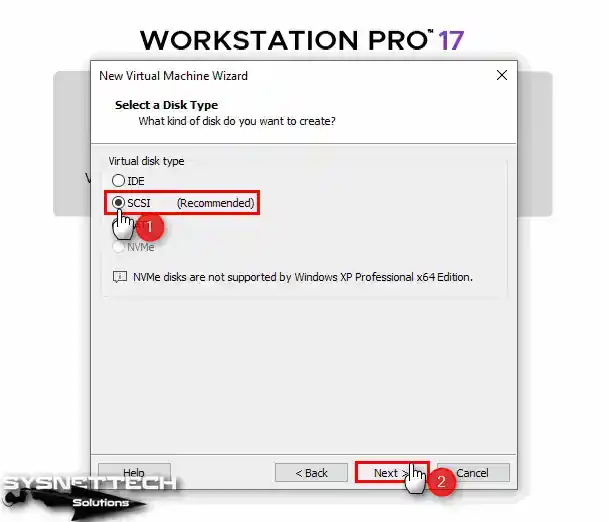
In the Select a Disk Type window, select which disk controller you want to install the virtual system with. Here, you need to select the SCSI disk type that is selected by default. Because Microsoft has ended its support for XP, the SATA disk structure is not supported. Still, some hosts provide SATA type and USB 3.0 support.
You may also see the warning that XP cannot be installed on the NVMe disk. NVMe is supported by current operating systems as it is a new disk controller.
Step 11
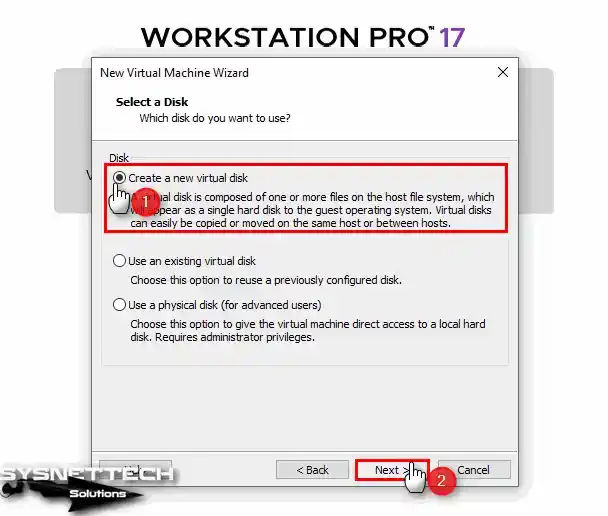
In the Select a Disk window, you can add the system disk you installed earlier or create a new virtual disk here. Additionally, you can use a physical disk in the VM.
For a clean system installation, select Create a new virtual disk and press Next.
Step 12
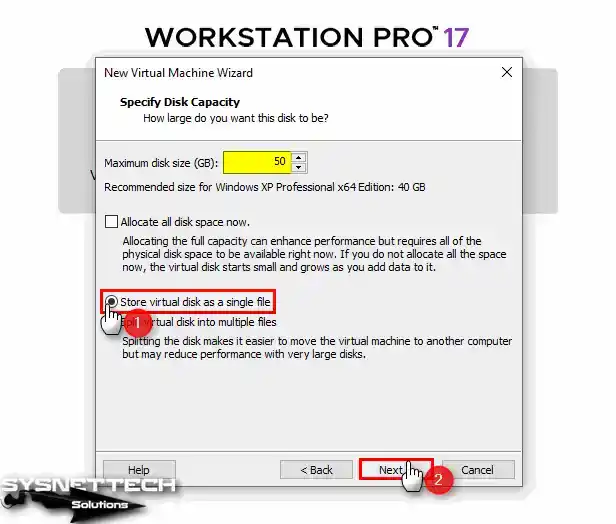
When setting up a virtual machine for Windows XP Professional, it is usually sufficient to allocate a virtual disk of 40 GB in size. However, virtual machines are different for basic tasks and professional work. Therefore, I recommend that you consider the disk size to be 20 GB or 50 GB for advanced tasks.
Make sure to back up the virtual machine disk file in a single file format. So, check that you have ticked the ‘Store virtual disk as single file’ option.
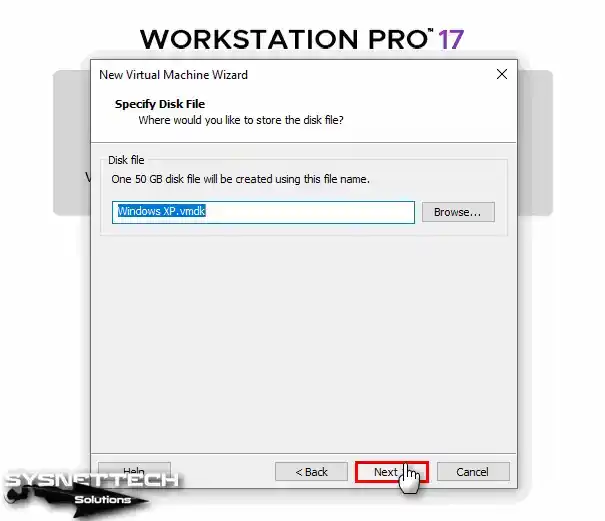
Step 13
You can change the name and location of the WinXP virtual machine disk file in the Specify Disk File window. However, since you will be installing it on an external disk, the disk name refers to the name that will be stored in the installation location.
Step 14
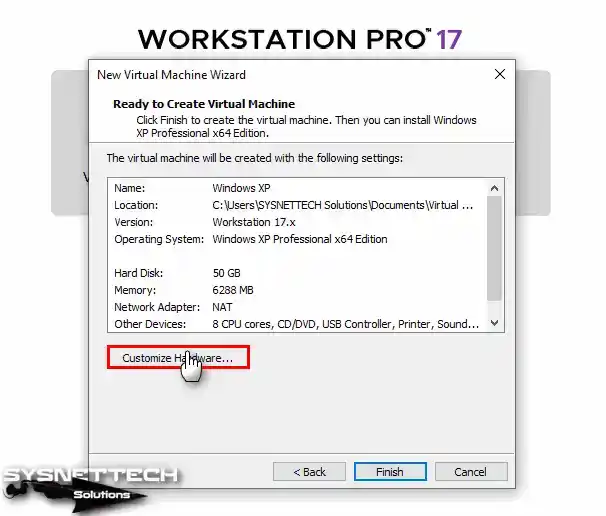
At the final stage of the virtual machine setup, hit the Customize Hardware button to add the ISO to the VM and enable virtualization.
Step 15
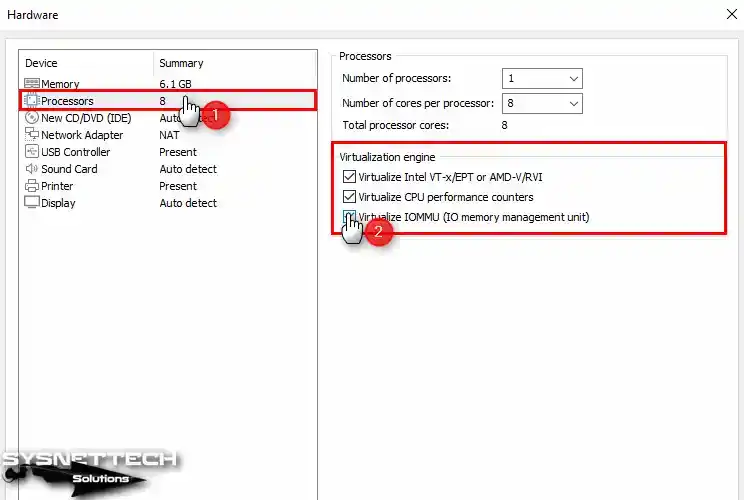
In the Hardware settings window, choose Processors and tick all the options in the Virtualization Engine section.
- Virtualize Intel VT-x/EPT or AMD-V/RVI
- Virtualize CPU Performance Counters
- Virtualize IOMMU (IO Memory Management Unit)
Step 16
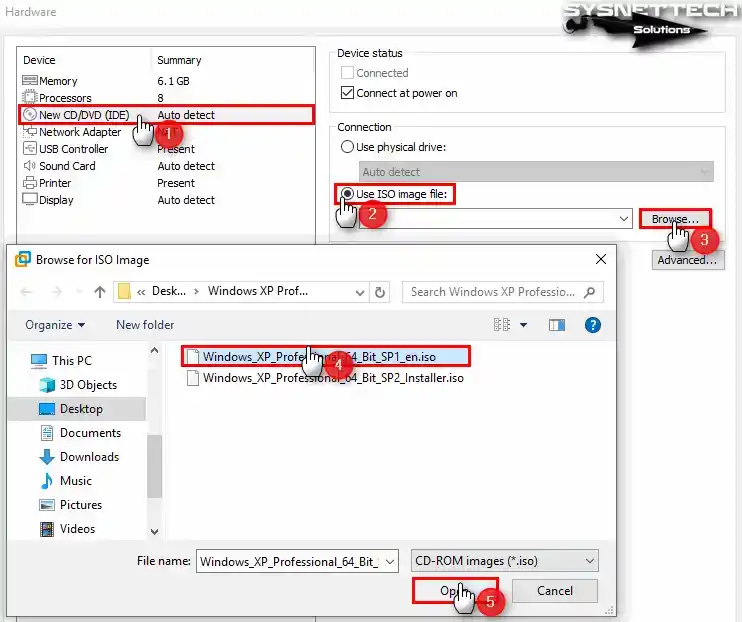
Choose the CD/DVD device to add the ISO file to the virtual computer, and then select the Use ISO image file option and click the Browse button.
Select the Windows XP SP1 ISO file you downloaded to your host computer and press the Open button.
Step 17
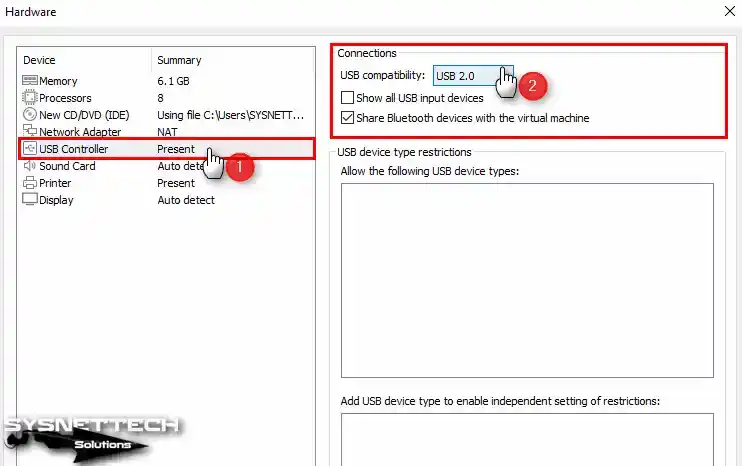
Select USB 2.0 compatibility from the USB Controller device settings.
Step 18
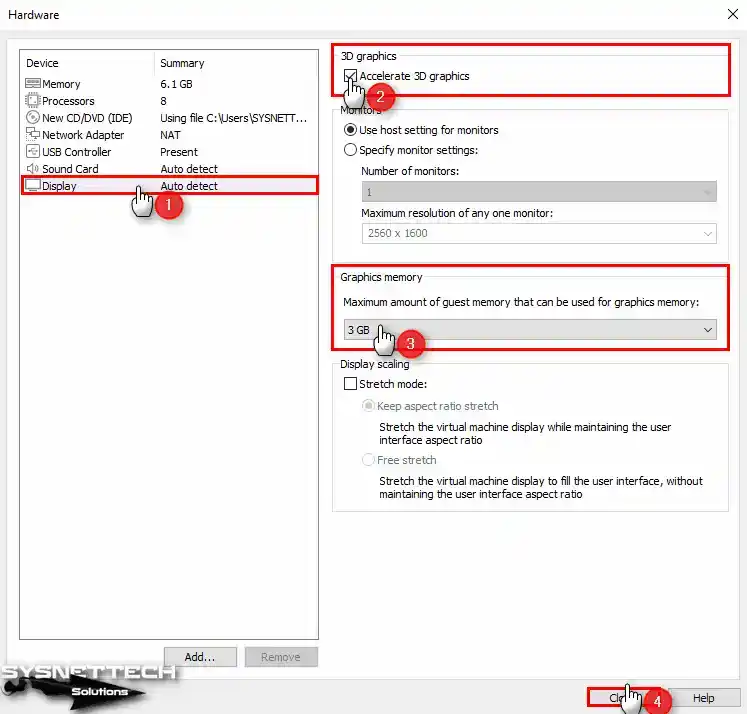
After clicking on the Display device, enable 3D graphics acceleration and configure the Graphics Memory size to a value that your host can support.
Step 19
After completing the necessary preparations, hit the Close button to close the hardware settings of the virtual computer.
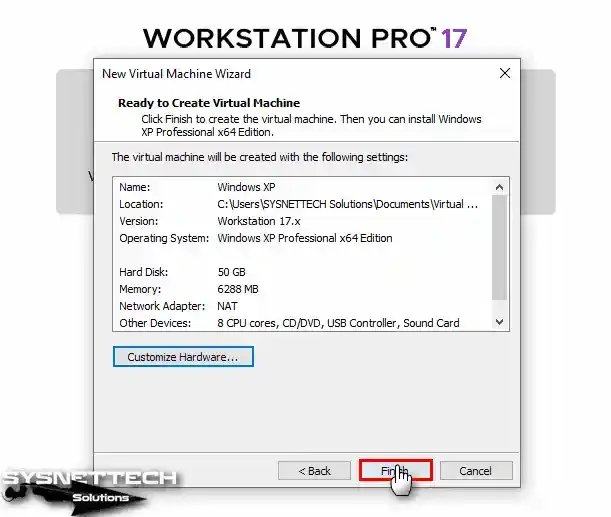
Step 20
You can start installing the virtual XP system now by clicking the Power button on this virtual machine.
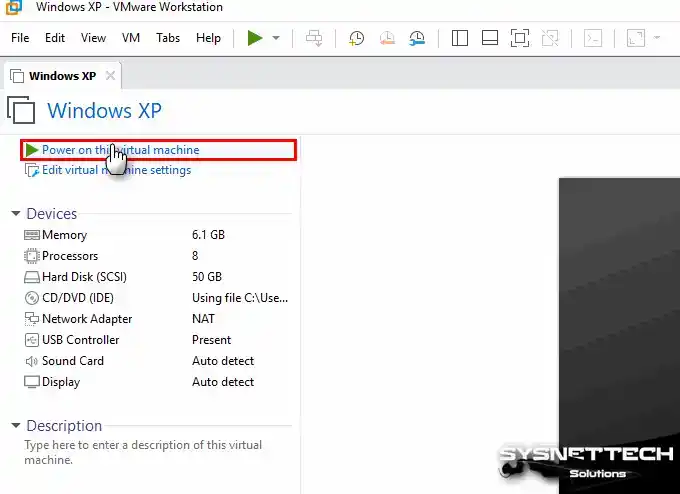
After you install and configure a new virtual machine (VM) for Windows XP, the setup wizard will start automatically when you start the VM. Alternatively, you can install XP on a physical computer by following the steps below.
Steps:
Step 1
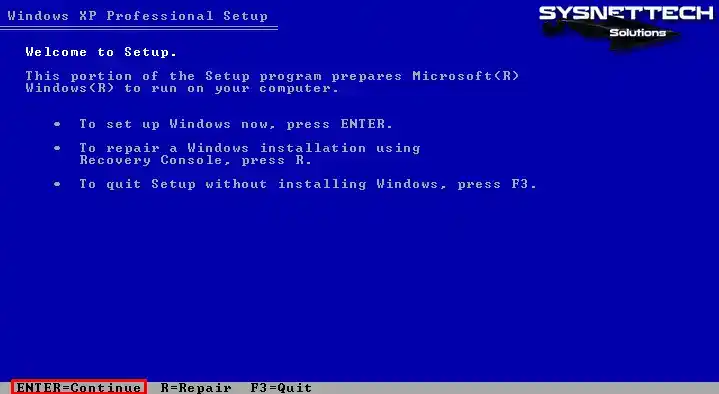
Suppose you do not have an ISO file with SATA drivers integrated when the Windows Setup wizard opens. In that case, you can press the F6 key to install the relevant drivers in this step.
If you have a computer with Windows XP installed, you can Repair your system on this screen. Otherwise, press Enter to install from scratch.
Step 2
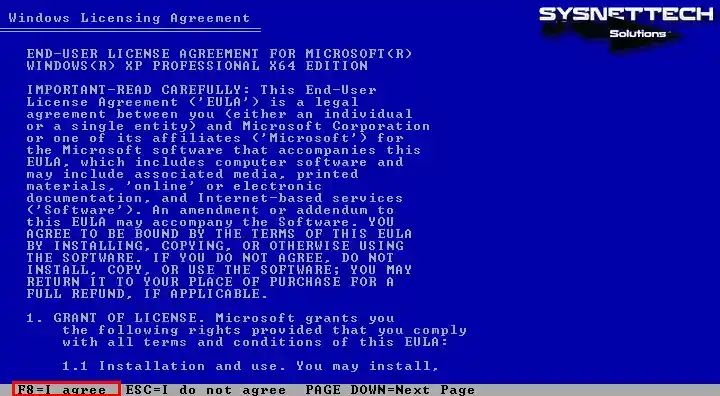
Please review the license agreement carefully before proceeding with the installation of the Windows XP Professional system. After reading the agreement, you can press F8 to indicate your acceptance.
Step 3
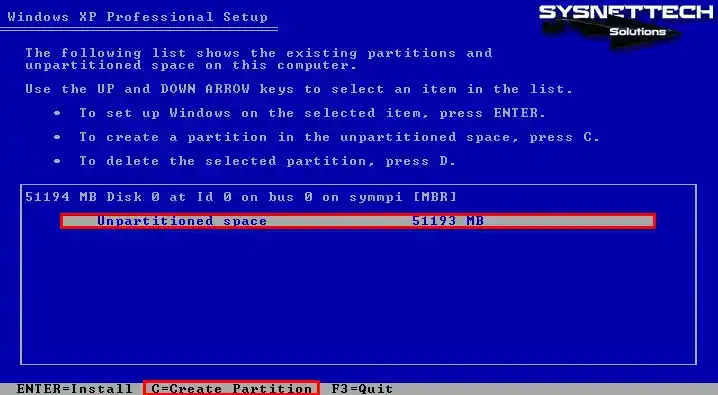
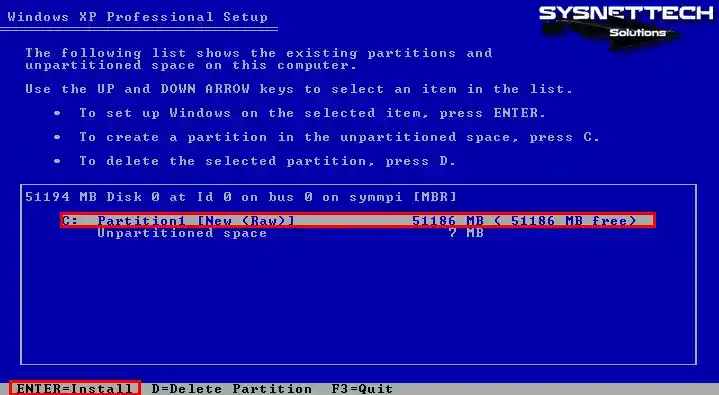
Now, press C to partition the XP virtual disk. If you want to start the installation immediately, press ENTER.
Step 4
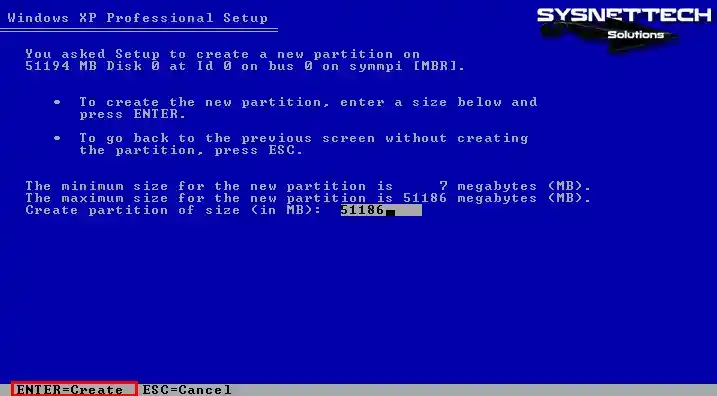
Press Enter to create the entire HDD size you have assigned for the Virtual PC.
Step 5
Press Enter to install XP on the C Partition you created.
Step 6
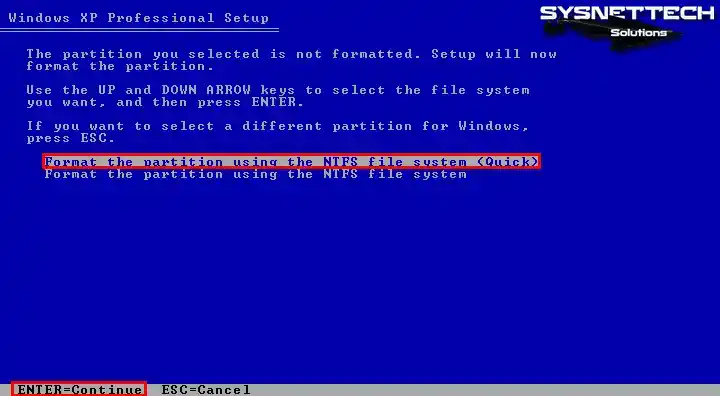
Remember to use the NTFS format for your virtual disk. It’s essential for keeping your physical PC’s hard drive healthy and working well over time. Regular formatting can help your hard drive last longer and run better.
Step 7
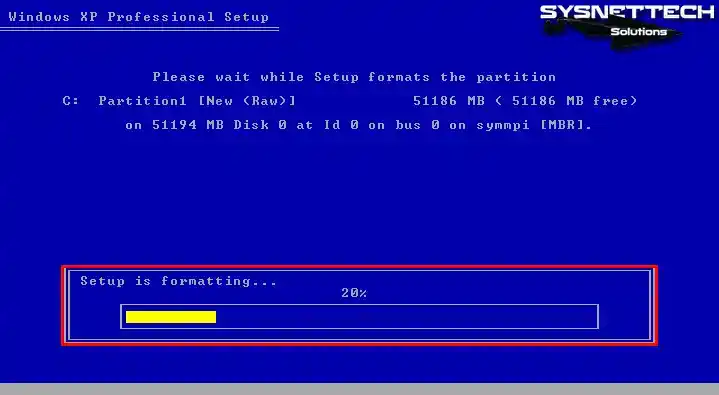
Wait while the Setup formats the virtual disk.
Step 8
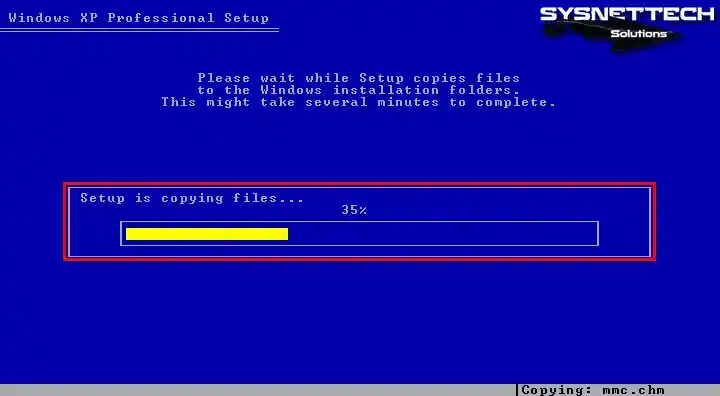
Wait while Setup copies the necessary files for the XP system.
Step 9
After the first stage of the installation wizard is completed successfully, press Enter to restart the virtual system or wait for the timer to expire.
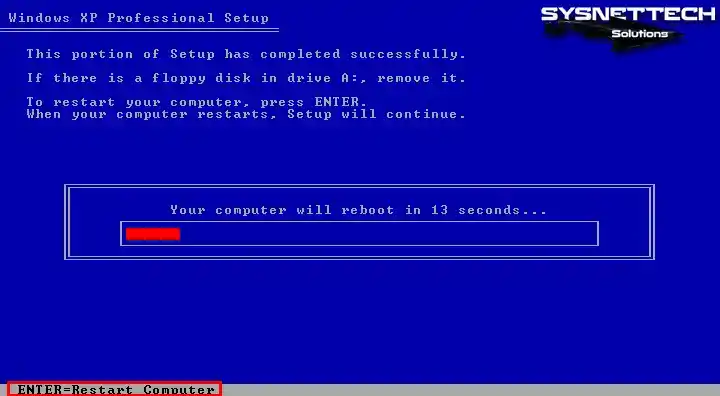
Step 10
Setup will continue when Windows XP restarts.

Step 11
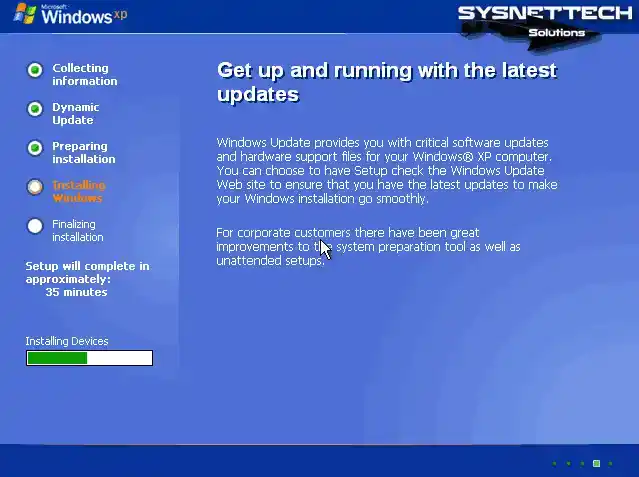
Wait while Setup installs and prepares the necessary devices for installation.
Step 12
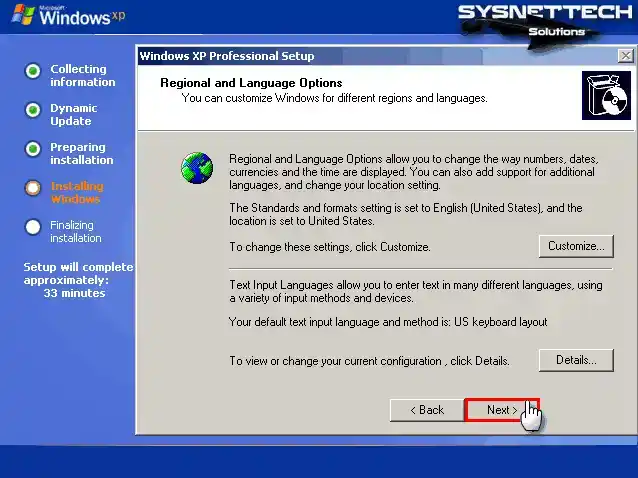
When the window for Regional and Language Options opens, you can set your country and time zone by clicking Customize. Thus, to pick your keyboard layout, choose Details.
Step 13
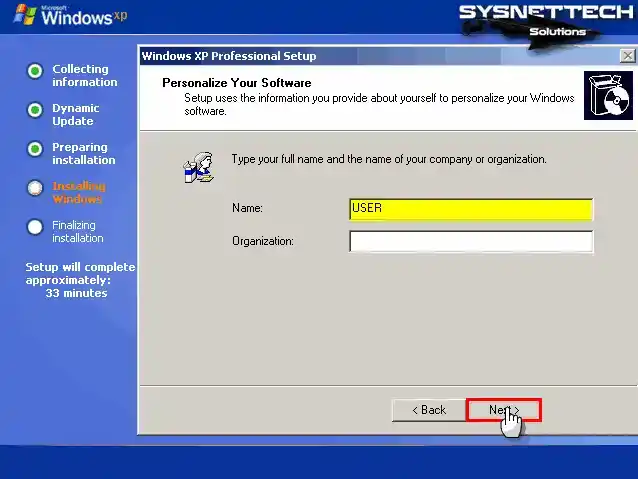
In the Personalize Your Software screen, type a name for your user account. If you’re part of an organization, type its name too, then proceed with the Next button.
Step 14
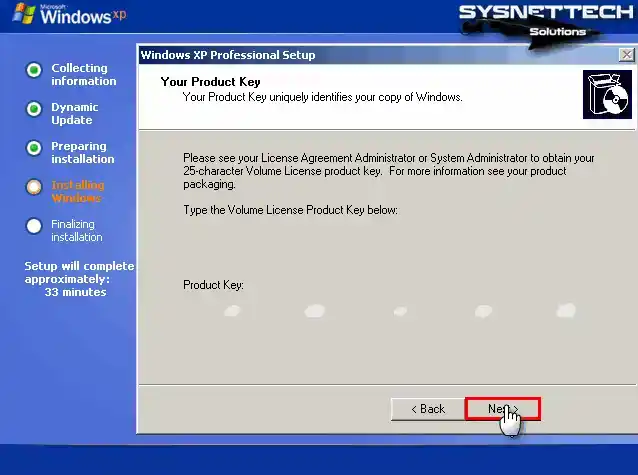
In the Your Product Key window, enter the installation key for Windows XP Pro 64 Bit Service Pack 1 and continue.
Step 15
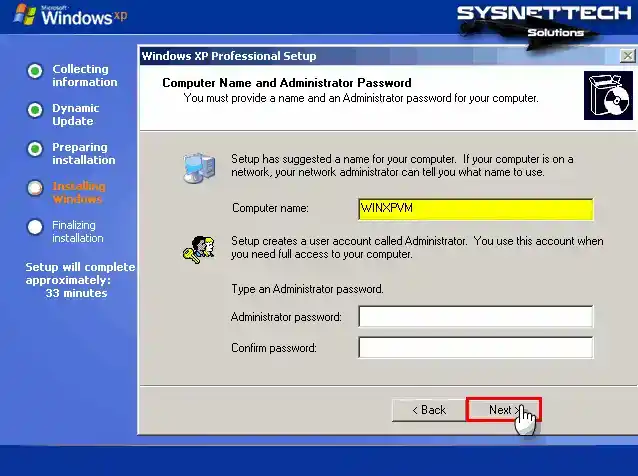
In the Computer Name and Administrator Password area, type a name for your virtual PC. If you want to set a password for the admin account, type it and press Next.
Step 16
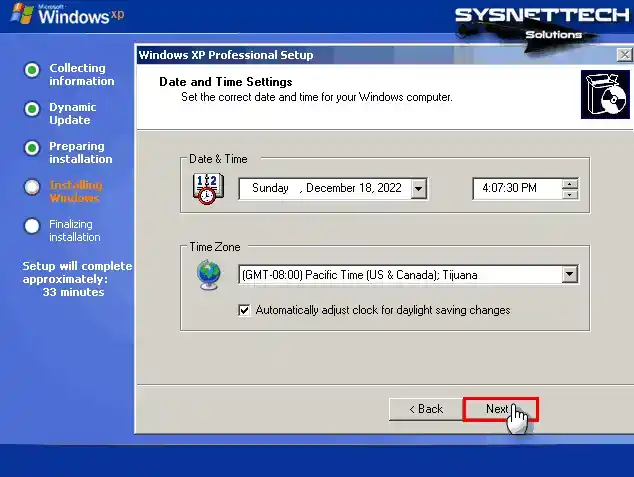
In the Date and Time Settings area, set your time zone and installation date to match your location, then hit Next.
Step 17
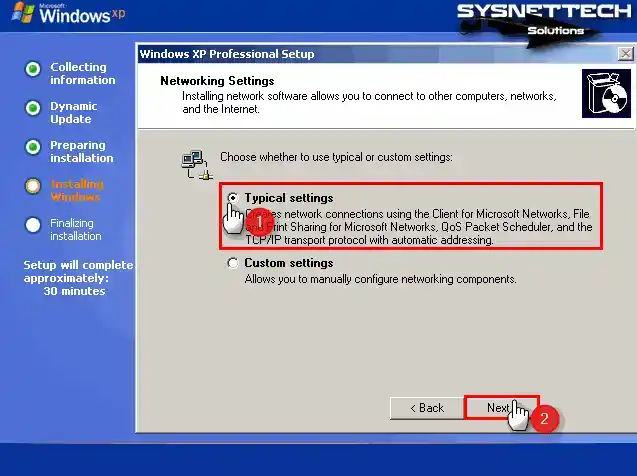
In the Networking Settings window, if you’re not using the VM in a domain, choose the default option “Typical Settings.”
Step 18
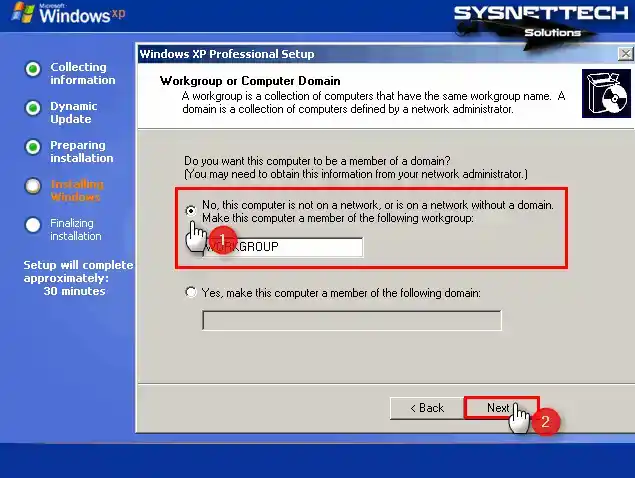
In the Workgroup or Computer Domain screen, if you’re not using the VM in a domain, choose “Workgroup.”
Step 19
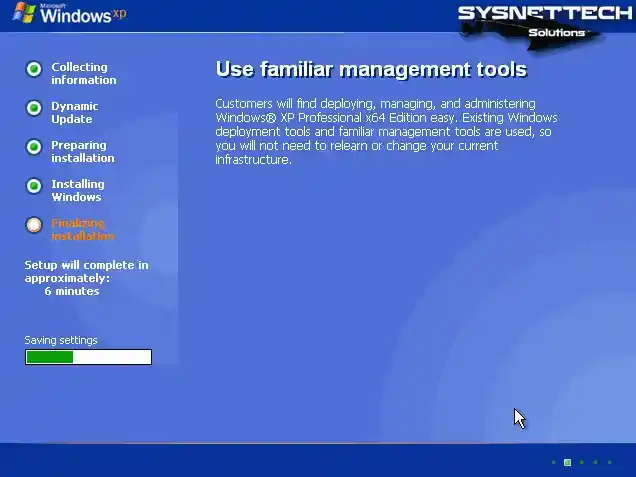
Wait while the setup wizard configures the remaining settings.
Step 20
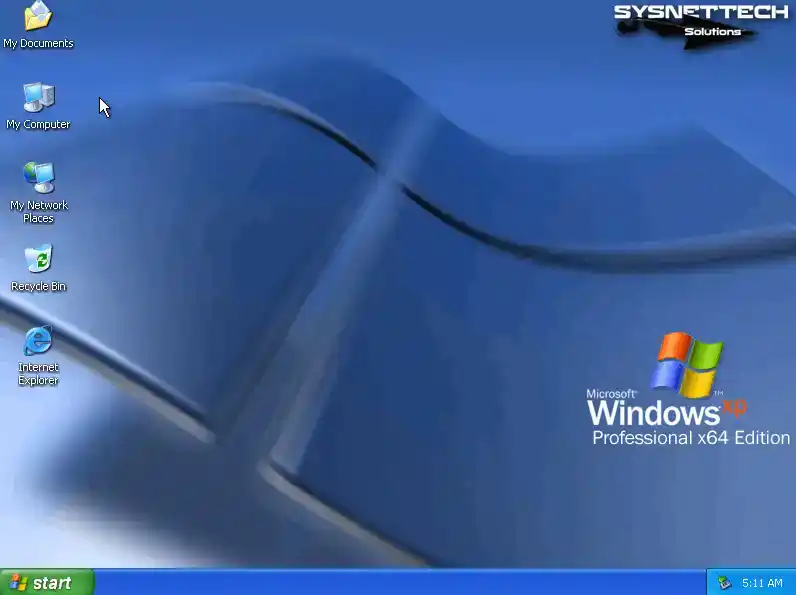
After the installation is complete, your Windows XP desktop screen will be ready.
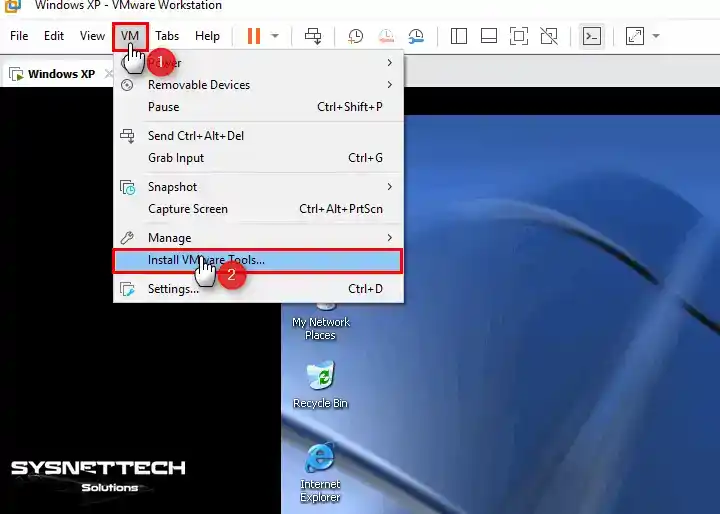
How to Install VMware Tools
After installing Windows XP with VMware, you can build the drivers for devices that are not installed in your virtual system by installing VM Tools on the virtual machine. You can use the Shared Folder feature to transfer or send files between the host and the guest VM. Because of that, adjust the screen resolution to full screen for a better view.
Step 1
First, right-click on My Computer in the guest XP, then choose Manage. Next, hit Device Manager to see a list of drivers that may not be installed, as shown in the image below.

Step 2
Press VM / Install VMware Tools from the tool menu to install the drivers for the virtual PC.
Step 3
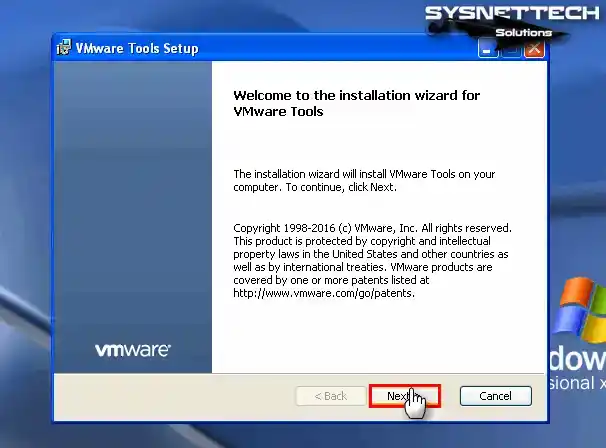
Wait while VMware Tools prepares for installation on the virtual PC. When the installation wizard opens, click Next to go to the next step.
Step 4
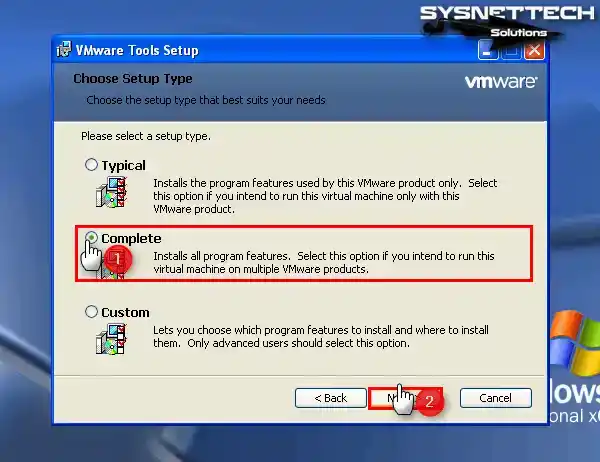
In the Choose Setup Type window, if you plan to use the virtual machine with other VMware products later on, choose Complete and click Next.
Step 5
Click the Install button to start installing all the features of the virtual machine utility.

Step 6
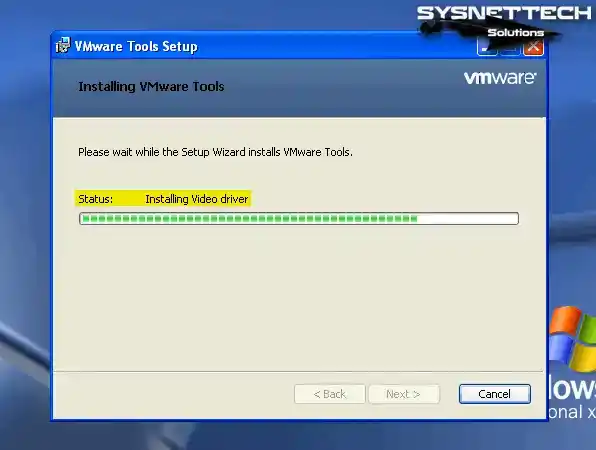
Wait while the video and other hardware drivers of your virtual system are installed.
Step 7
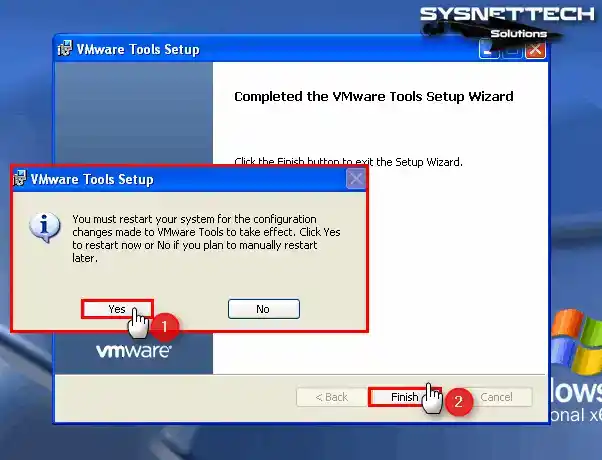
Click Yes to restart your virtual computer and check if the drivers are installed. When you view the Device Manager again, you can now see that drivers such as VMware SVGA II are installed in your virtual system.
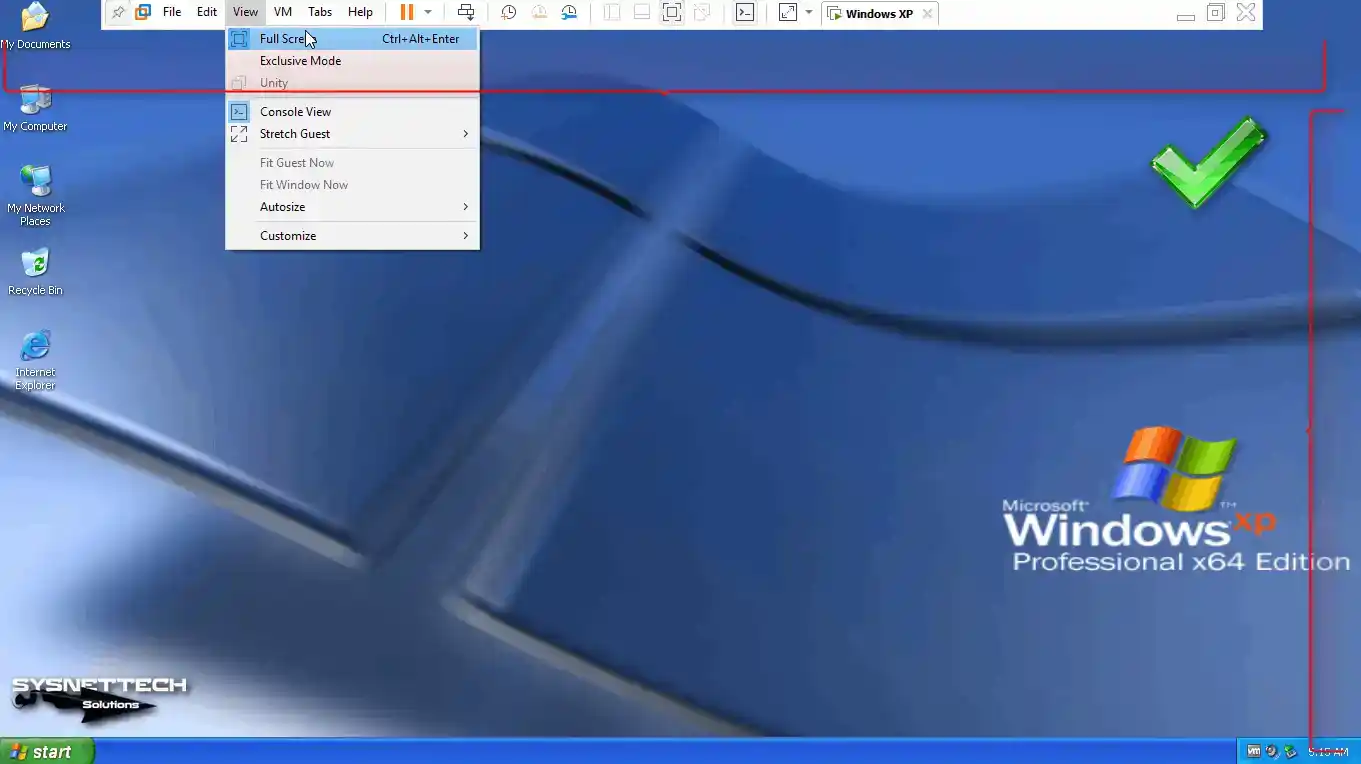
Step 8
Click View / Full Screen from the Workstation tool menu and check that your virtual PC is adapted to full-screen mode.
Step 9
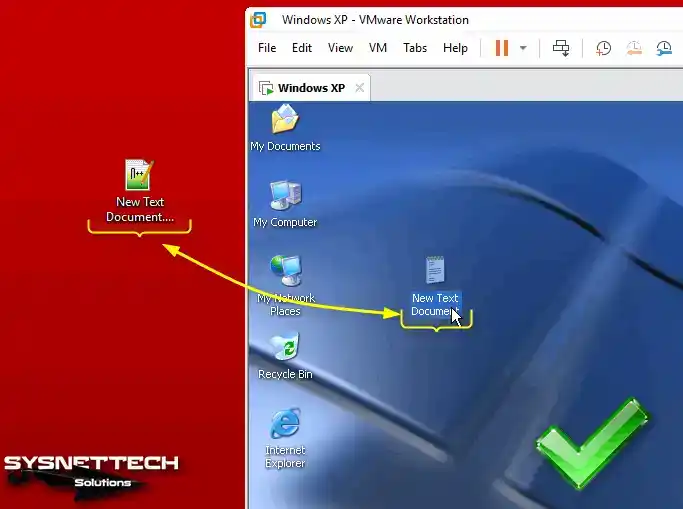
Make a new text document on your host OS. Then, try dragging and dropping it into the XP virtual OS. You’ll see that the file transfers over successfully.
Also, open the Internet Explorer browser and visit Google, and you can see that the Internet connection is working fine.
How to Configure Shared Folder
Creating a shared folder in virtual machines makes it easy to transfer files between the PC and the VM. When you drag and drop a file, it might take some time. However, using the Shared Folder feature makes the process faster, especially for files of the same size.
Step 1
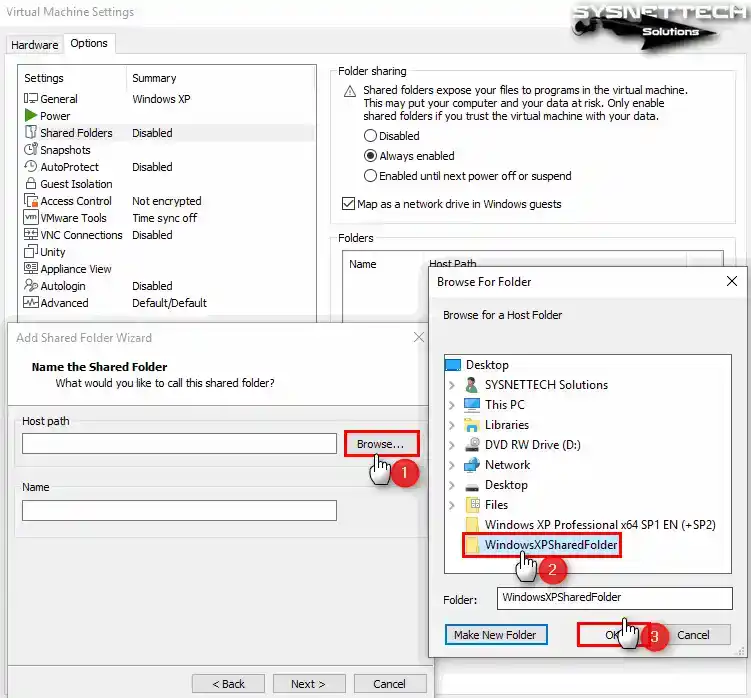
Click VM / Settings from the Workstation Pro menu to open the properties of the virtual machine you have installed.
When the Virtual Machine Settings window opens, click the Options tab and then click Shared Folders. In the Folder Sharing section, check Always Enabled to enable this feature, and also select “Map as a network drive in Windows Guests” to configure it as a network drive, and then click the Add button.
When the Shared Folder Wizard opens, click Next directly.

Step 2
In this window, select the folder you want to share, type a name, and click Next.
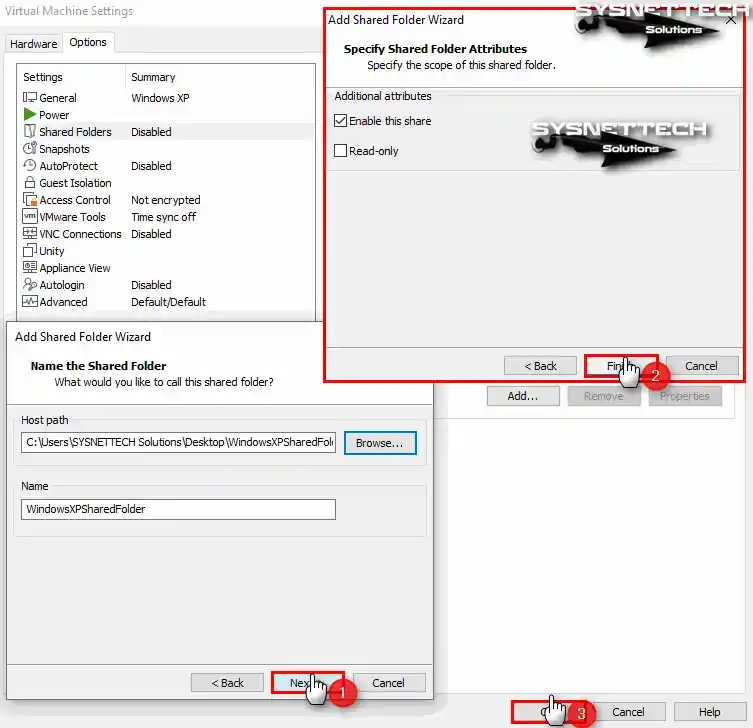
Step 3
In order to make the folder you added available for sharing in the folder properties window, enable sharing by ticking “Enable this share” and click Finish.
After editing the path of the shared folder, close the VM settings.
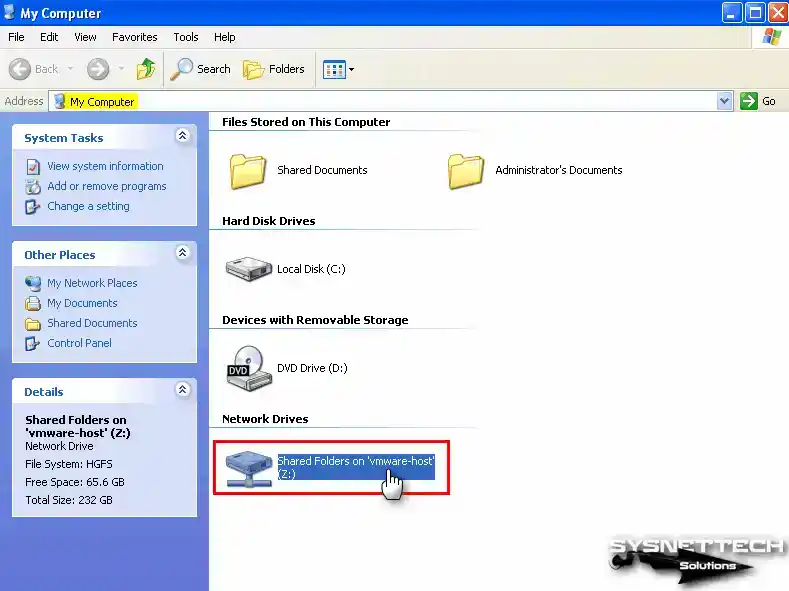
Step 4
When you look at the Shared Folder on my computer, check that it works in the Network Drives section.
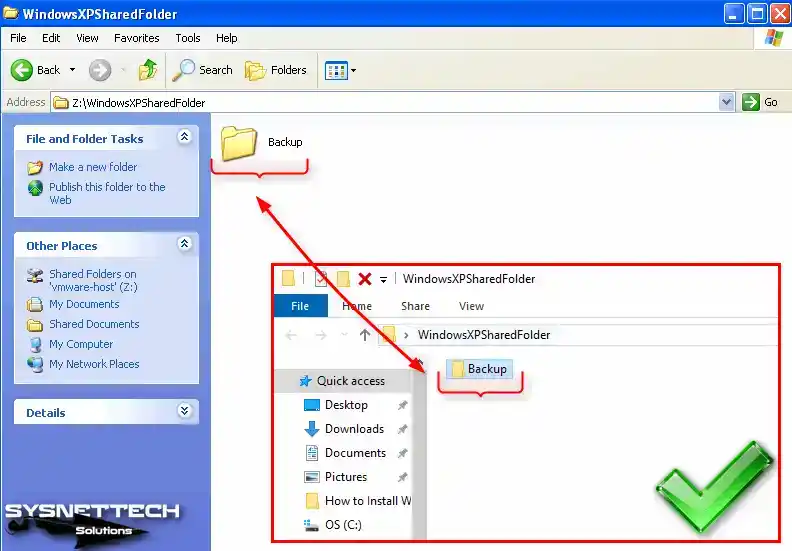
Step 5
When you open the folder attached as a network drive, you can see that you can access the related files.
Additionally, click Add a Network Place from the options under Network Tasks to add the shared folder to My Network Places. Click Next when the add network location wizard opens.
Double-click on Choose another network location or click Next when the relevant option is selected. Open the vmware-host content by clicking the Browse button in the Internet or Network Address section, select Shared Folders, and click OK.
To access Shared Folders over the network, click Next after selecting the location. At this point, click Finish to close The Add Network Place Wizard.
Click My Network Places and check the location you added in the Local Network window. You can see that you can access the files when you view the Shared Folder content over the network.
How to Use USB Flash Memory
Instead of using the Shared Folder feature to transfer files, a faster solution is the use of USB flash memory.
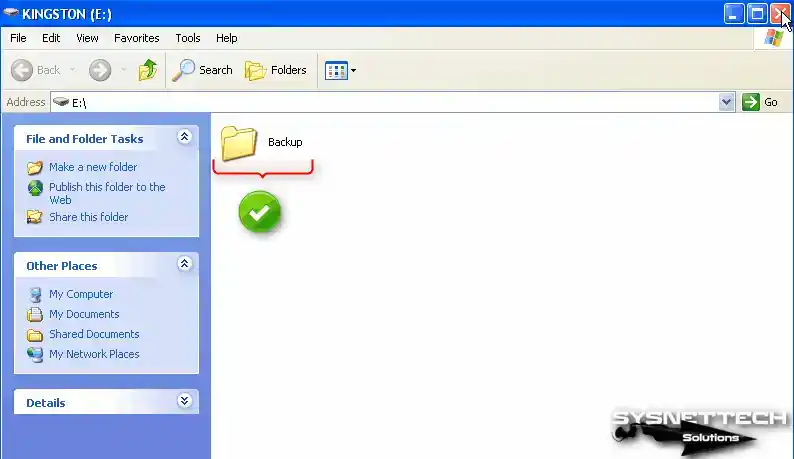
Step 1
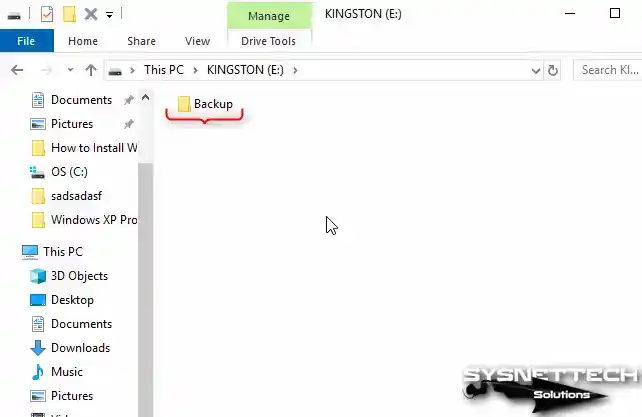
Insert a flash memory into one of the free USB ports of your host computer and create a folder named Backup, for example.
Step 2
To connect the USB disk to the virtual machine, click VM / Removable Devices / Name of your USB / Connect from the tool menu.
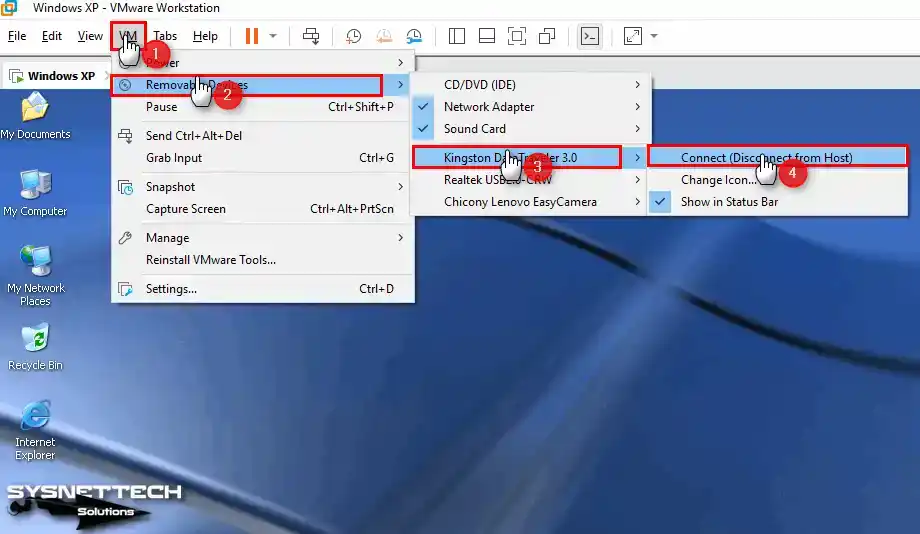
Step 3
When USB drivers are automatically installed in your virtual system, you can access your USB and see the folders and files you have created.
How to Install & Upgrade Windows XP SP2 Software Package from SP1 to SP2
To upgrade Windows XP 64-bit from SP1 to SP2, you can install an ISO file that includes SP2 files or install the SP2 software package from scratch.
Step 1
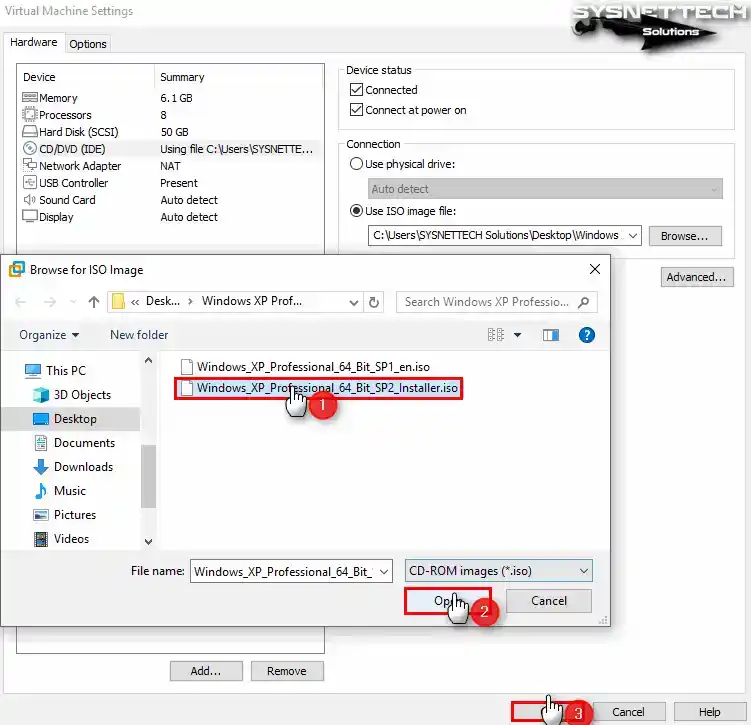
To add the Microsoft Windows XP SP2 ISO image to the guest machine, right-click on the DVD drive and choose Settings. With the CD/DVD device selected, choose the Browse button to add the SP2 ISO location to the Use ISO Image File section.
Select the Windows XP SP2 Installer.iso file and hit the Open button. To enable the DVD device, check the Device Status option and press the OK button to close the window.
Step 2
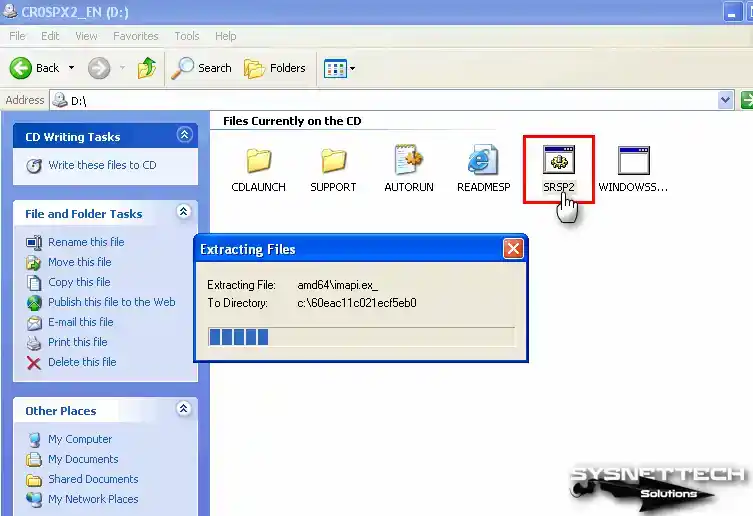
When the Service Pack 2 ISO image is automatically mounted to the system, you will automatically see the Readme page. Close the Readme.HTM webpage and open My Computer. To view the contents of the ISO image mounted in the Removable Storage section, press the right button and then choose Open.
Right-click / Open the SRSP2 file in the CD/DVD media to start the installation.
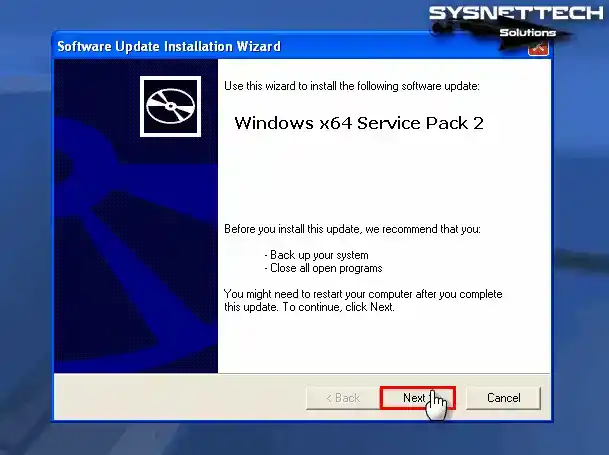
Step 3
Proceed by clicking on the Next button within the Windows x64 Service Pack 2 installation wizard.
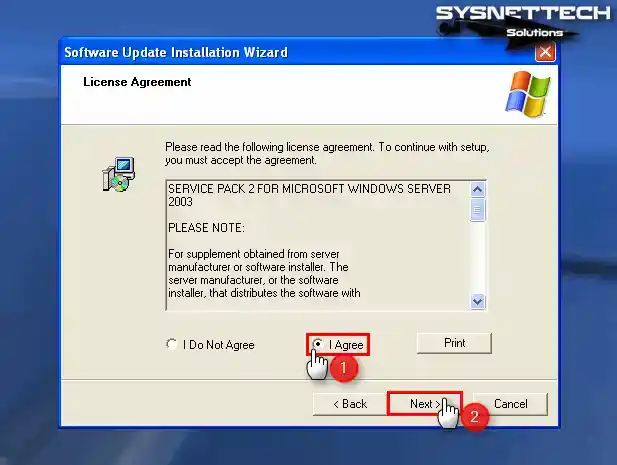
Step 4
Check “I Agree” to accept the Service Pack 2 license agreement and press Next.
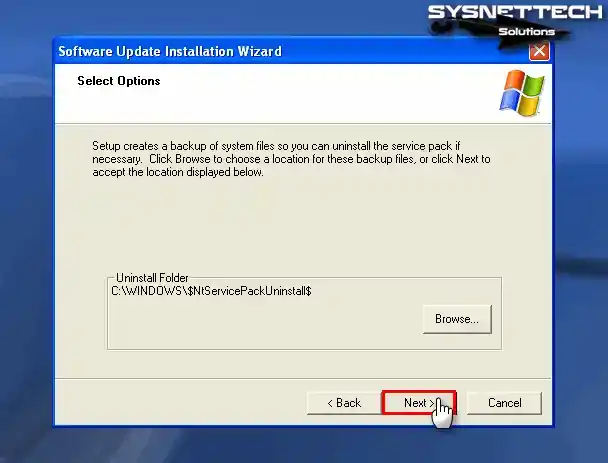
Step 5
Proceed in the Select Options window without changing the Uninstall Folder location.
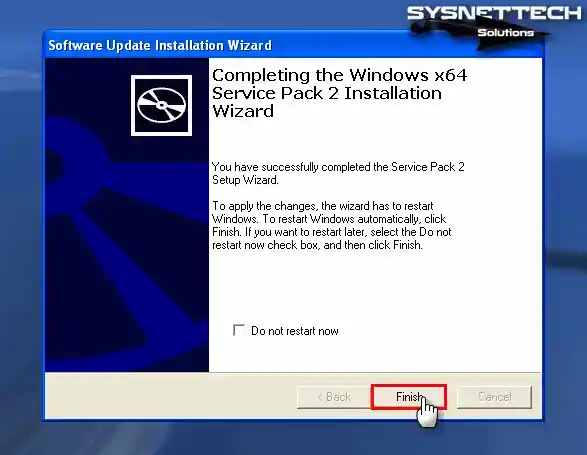
Step 6
Wait while Windows XP Service Pack 2 is being installed. The system update period may take some time, so do not do anything on your system.
After installing Service Pack 2, restart your virtual system by clicking the Finish button.
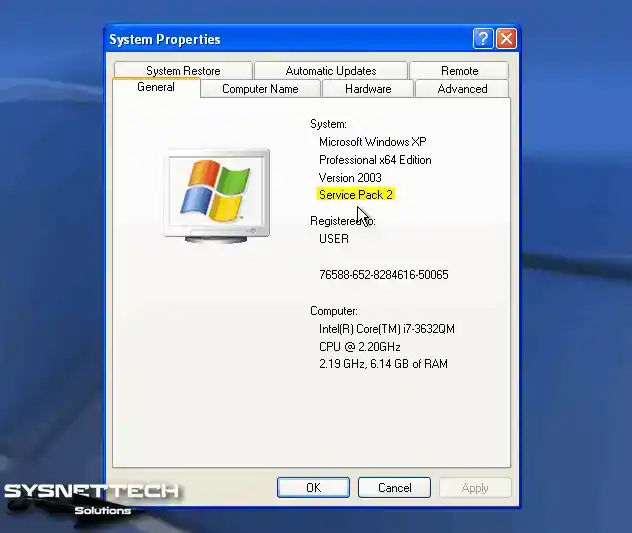
Step 7
After right-clicking on my computer, press System Properties, and you can check the Service Pack version in the system section of the window that opens.
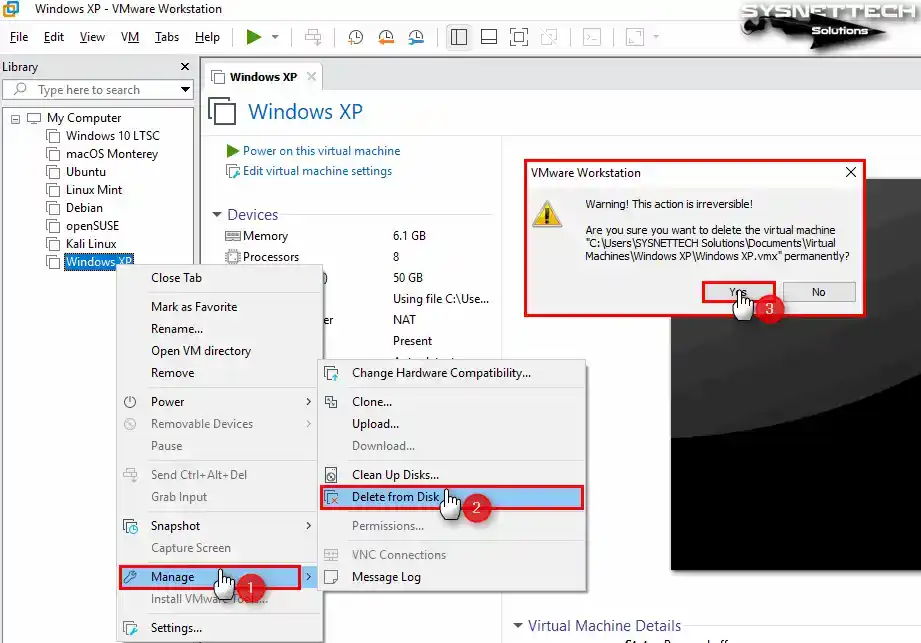
How to Delete the Windows XP Virtual Machine
Suppose you decide not to use the guest machines that you have prepared with VMware on your physical computer. In that case, we recommend that you completely delete the VM files from your host disk.
Right-click on your guest system from the left panel of Workstation Pro, then choose Manage / Delete From Disk. As soon as you select Yes in the warning window that opens, all VM files will be deleted entirely from your host disk.
Video
Installing Old Versions
You can easily install and use Windows XP operating system on 12, 14, 15, or 16 versions of Workstation Pro.
| Workstation Pro | YouTube Video | Slide |
|---|---|---|
| 12 Pro | Watch | – |
| 14 Pro | Watch | – |
| 15 Pro | Watch | View |
| 16 Pro | Watch | View |
| 17 Pro (New) | Watch | – |
Frequently Asked Questions (FAQ)
- Is Windows XP compatible with VMware Workstation?
Yes, VMware software supports Windows XP as a guest operating system. This is valid for both new and old versions. Thus, you can install this system without any compatibility issues with virtualization software.
- How do I install Windows XP on a virtual machine?
As soon as you prepare your virtual PC, first obtain the ISO image to install XP. Immediately afterward, connect this image file from your VM’s CD/DVD hardware. Afterward, you can achieve success by following the XP installation instructions. You can complete the process by entering the product key during installation.
- Do I need to install VMware Tools for Windows XP?
Yes, you should definitely install VMware Tools on your XP guest system because VMware Tools installs essential system drivers and utilities. Thus, you increase your VM performance and have better graphics.
- Are there any special settings I need to configure for the XP virtual machine?
Once your virtual system is installed, you can customize the network connection, screen resolution, and other virtual hardware. You can achieve maximum performance by adjusting these settings according to your host PC. In short, you can handle these by accessing the virtual machine settings from within the Workstation.
Conclusion
As a result, you can set up a virtual machine that will run Windows XP on a modern computer. Thus, you get a practical and effective solution for managing legacy systems. With the detailed steps I provide, you can safely create a virtual environment that meets XP’s specific requirements.
With this approach, you ensure the continued availability of legacy software while retaining the advantages of the current operating system. Additionally, you can seamlessly bridge the gap between legacy and modern computing environments by leveraging virtualization technologies such as VMware Workstation 17 Pro.