
Если вам необходимо использовать Windows XP, а на компьютере установлена Windows 10 home, нет необходимости устанавливать устаревшую систему рядом с новой. Достаточно использовать XP mode в Windows 10 — и все получится.
Для того, чтобы вы могли установить Windows XP mode на Windows 10, нужно немного подготовиться, поскольку Microsoft предлагает такой режим по умолчанию только для Windows 7.
Для начала загрузите бесплатное приложение Windows XP-Mode на сайте Microsoft. То, на каком языке будет работать это приложение, не играет решающей роли.
Если на вашем компьютере не установлена программа-архиватор, загрузите и установите бесплатную версию WinRAR, поскольку вам понадобится инструмент для распаковки модуля XP.
После загрузки откройте загруженный Windows XP-Mode с помощью WinRAR. В архиваторе перейдите в каталог, куда вы загрузили модуль XP. Дважды щелкните соответствующий EXE-файл (например: «WindowsXPMode_en-us.exe»), чтобы отобразить его содержимое.
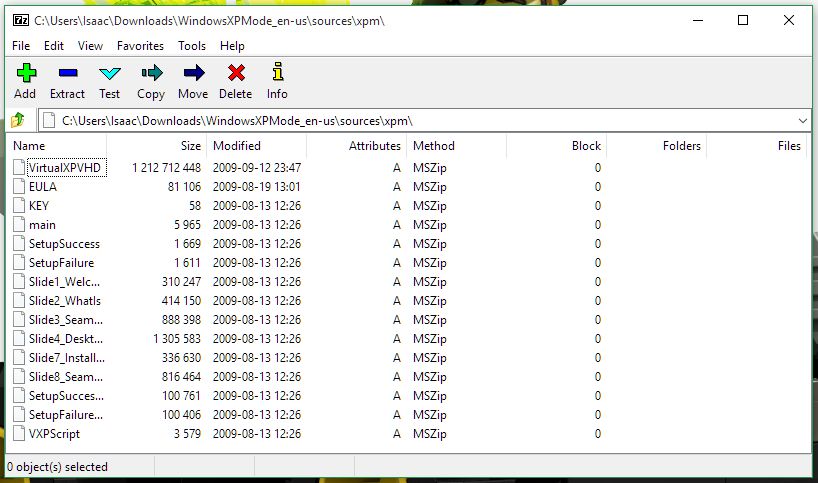
Кроме WinRAR можно использовать любой другой архиватор, например, 7Zip
- Откройте папку «sources» и извлеките файл «xpm». Вы можете просто перетащить его в любую папку.
- Через архиватор WinRAR зайдите в каталог, куда вы перенесли файл «xpm» и дважды кликните по нему. Теперь вы увидите целый ряд файлов, среди которых важен только VirtualXPVHD. Извлеките его так же, как описано выше, с помощью перетаскивания.
- Переименуйте файл в VirtualXPVHD.vhd.
- Наконец, загрузите и установите бесплатную программу VirtualBox.
Создание виртуальной машины
После подготовки нужно создать виртуальную машину и запустить Windows XP mode со своего рабочего стола.
- Переместите вновь созданный файл «VirtualXPVHD.vhd» в папку на рабочем столе, которую вы больше не будете изменять. В будущем VirtualBox всегда будет искать и использовать именно этот файл по этому адресу.
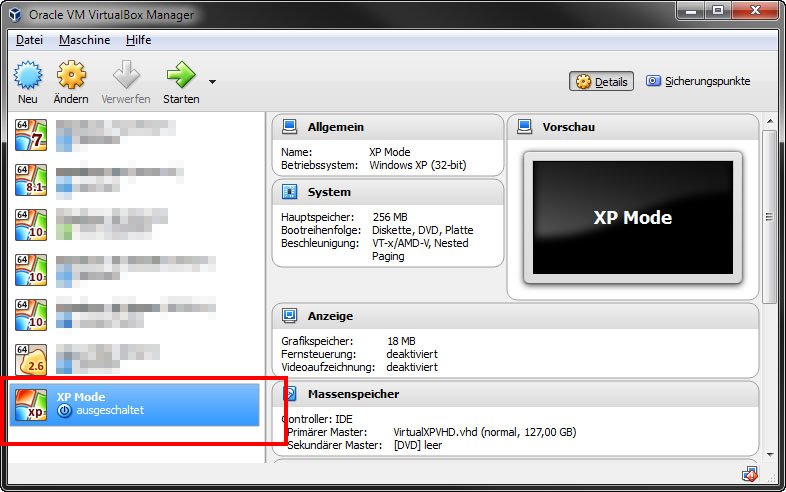
- Запустите VirtualBox и создайте новую виртуальную машину в поле «Новое». В следующем поле введите имя виртуальной машины по вашему выбору, выберите «Microsoft Windows» в качестве типа, а «Windows XP (32-разрядная версия)» — в качестве версии.
- В разделе «Диск» выберите «Использовать существующий диск», щелкните значок папки и выберите файл «VirtualbXPVHD.vhd» в директории, которую вы используете.
- Теперь нажмите на кнопку «Создать».
Windows 10: установка XP mode — запуск Windows XP
Теперь вы можете запустить Windows XP из VirtualBox:
- Выберите только что созданную виртуальную машину из списка в VirtualBox;
- Нажмите на зеленую стрелку «Старт» в верхней панели.
Возможно, VirtualBox не будет корректно распознавать мышь, поэтому вам придется выполнить начальную настройку с помощью клавиатуры.
Как только вы переключились на рабочий стол Windows XP, для начала лучше установить гостевые дополнения (VirtualBox Guest Additions) на старую ОС. Это позволит лучше эмулировать видеокарту, использовать общие папки и т.д.
Дополнения VirtualBox — это один файл образа CD-ROM, который называется VBoxGuestAdditions.iso. Этот файл образа находится в каталоге установки VirtualBox. Чтобы установить гостевые дополнения для конкретной виртуальной машины, нужно смонтировать этот файл ISO в старой ОС в виде виртуального компакт-диска и установить оттуда.
Если вы хотите использовать старое программное обеспечение в режиме XP, вы должны установить и запустить эти программы в VirtualBox.
Читайте также:
- Как отменить синхронизацию данных с OneDrive в Windows 10
- Лучшие сборки Windows 10: сравниваем, тестируем
Фото: CHIP, компания-производитель, pixabay.com
If you’re having trouble running an older version of Windows on your new Windows 10 PC, you might be wondering how to get an XP emulator to run on your machine. While Windows 10 does not include an XP mode, you can emulate it on your new PC using a virtual machine like VirtualBox. In order to run XP on Windows 10, you’ll need to install a licensed version of Windows XP on your new PC. Once you’ve done this, you’ll be able to use XP mode in a window on your Windows 10 desktop. But this method is a bit more complex and requires a Windows XP license. In addition, it has limited support for hardware peripherals.
To make sure your XP program runs properly, you must install a Windows XP compatibility driver. Usually, these drivers are found in the Device Manager. You can also check the Update & Security section to see if there are any updates available. Once installed, update your device drivers. You can do this in Device Manager or by using a professional driver update tool. However, you must remember to backup all your files first before proceeding with the installation process.
Can I Run Windows XP Mode in Windows 10?
Windows XP mode is an extension to the Windows operating system that lets you run older versions of the system. While Windows XP no longer receives support from Microsoft, you can still use it to run older versions of Windows as long as you have the proper hardware. To run Windows XP mode on your computer, you must first download and install a component called XP Mode. This component allows you to run legacy applications like Word and Excel in a windows XP environment. The XP Mode will open in a standard window with a menu bar. Besides this, XP Mode allows you to install USB drives and create custom settings.
To use Windows XP mode, you must install VMware Tools and follow a few steps. The first step is to download the necessary updates. Once you have done this, the installation will begin. When the installation is finished, you must restart the computer to use the new operating system. Make sure you save your work before proceeding. Once the installation is complete, click Start and browse to All Programs > Windows Virtual PC. Double-click on the Windows XP Mode icon. Accept the licensing agreement and enter the password for your virtual machine.
How Do I Install XP Mode on a Windows 10 Machine?
To install XP Mode, you need VMware Tools installed on your machine. To install VMware Tools, follow these steps. It will automatically download and install. Make sure to accept the UAC permissions and restart your PC. After installing VMware Tools, restart your machine to finalize the changes. When the VM restarts, it will ask for drivers and reboot. Follow the instructions provided by the installation process to install the drivers.
XP mode requires a processor that supports HAV. Compatible processors include Intel-VT, AMD-V and VIA VT. You can run the tool to detect whether your processor supports HAV. If you don’t have HAV, use Windows Virtual PC to remove the requirement. This tool allows you to use XP Mode without HAV. While it is not available on Windows 10, you can use it to run Windows XP applications.
Once you have installed the software, you can reboot the machine. To start the Windows XP install process, you need to choose a new computer name and set the password for the administrator account. Next, change the time zone and date settings to the correct ones for your location. Click OK to finish the installation process. The operating system will reboot after it finishes. If you have installed the program correctly, you should be able to use the OS without having to buy the original hardware.
If you have a computer with an aging operating system, you may be wondering whether it’s safe to continue using it on a new machine. Although Windows XP still meets the minimum system requirements for Windows 10, you’ll be without technical support or security updates. And besides, it is extremely vulnerable to viruses. So if you want to use Windows XP in 2020, you’ll need to update to a new version of Windows.
The answer is a little more complicated. The easiest way to do this is to install a copy of Windows XP on an Oracle VM virtual machine. Using VMware Workstation, you’ll install the old operating system on the virtual machine, then run Windows XP alongside your new version of Windows 10.
In order to run XP on Windows 10, you must first reinstall the operating system. It will wipe out all your files, settings, and apps. Before you begin the process, backup all your data. Backups are crucial for security reasons. Since you’ll lose some of the data during the system installation, you need to protect it. Use System Tools to make a backup of your files and settings.
Can I Install Windows XP After Windows 10?
After installing Windows 10 on your computer, you can now go back to your old PC. You’ll notice a number of changes in the system. For example, you’ll see the option to choose the boot device as a CD drive instead of an HDD. That’s a bit unusual, but it will work. Moreover, the process of installing Windows XP after Windows 10 will not void your warranty.
If your computer was built with Windows XP, you might still be able to run it after Windows 10. Despite being almost 19 years old, millions of users still use this OS. Whether it’s because you’re using a machine that’s too old or because you’re upgrading to Windows 10, it’s essential to check its compatibility with the new version. Only compatible computers can run Windows 10 or be un-upgraded to previous versions.
While most modern motherboards are built with USB ports, you’ll still be able to use some XP software and hardware. If you’re using a PC that’s more than a decade old, you may be able to use an XP-compatible keyboard and mouse. But you’ll need to install the latest version of Windows 10 first to be able to use it properly.
Can I Downgrade From Windows 10 to XP?
Can I downgrade from Windows 10 to XP? If so, you’ll need a licensed copy of the previous operating system. To get started, read “What you need to know”.
If you’re on a volume license, you may be able to downgrade from Windows 10 to XP. In order to do so, contact the administrator of your PC and ask for the permission. Otherwise, you’ll need to buy a license for the full version and insert a downgrade-eligible Windows media into your PC. Once you’ve done this, follow the instructions for installation. Enter your product key in the appropriate fields to begin the process.
To downgrade your Windows operating system, first you need to find the Start menu (bottom-left of screen). Click on the gear-shaped settings icon. From here, you’ll find Update & Security, Recovery, Get Started, and Go Back to Windows XP or 7. Select one of these options and follow the prompts. There are several reasons why you’d want to downgrade, so write them down in the “tell us more” box.
Is Windows XP Free Now?
Whether you are looking for a simple, free operating system or you’d like to upgrade from a more recent version, you can find it here. Windows XP has many benefits. Compared to the Windows 7 and 8 versions, this one runs smoothly on low-end hardware. It also is relatively stable and easy to learn, and has a consistent, intuitive GUI. Free versions of Windows XP are available from Microsoft, and they come with all security patches. This way, you can download the latest version without paying for anything.
Windows XP has been out of mainstream use for several years now. Although Microsoft is no longer supporting the operating system, there are still pockets of PC users who still use it. According to NetMarketShare, 1.26% of PCs still run XP. Meanwhile, Windows 7 is the most popular operating system in use today, with 68% of PCs running it. So, is XP Free Now?
How Do I Run Old Programs on Windows 10?
If you are looking for ways to run older programs on Windows 10, you have come to the right place. While Windows 10 does support some older software and games, you may be wondering how to run these programs in the most recent version of the operating system. Windows compatibility tab in the Properties menu lets you check the compatibility of a program with Windows version 10. Click OK to continue. Alternatively, you can use manual mode to check the program’s compatibility.
To run an older program in Windows 10, you must first disable driver signature enforcement. In order to do this, you must go to the “Properties” option and then select the “.exe” file to open it in compatibility mode. Once you have disabled driver signature enforcement, you can then open the program and see if it runs properly. Once you have successfully completed this, click “Close.”
Learn More Here:
1.) Windows Help Center
2.) Windows – Wikipedia
3.) Windows Blog
4.) Windows Central

So you’ve received a new laptop running Windows 7 Professional, but still need to run legacy XP programs?
Well, you’re in luck. Microsoft makes available to you free of charge a Windows XP virtual machine, and in today’s article we’ll show you how to get it up and running.

Part 1: Downloading and installing Windows Virtual PC
Our first step will be to download and install a free copy of Microsoft’s Virtual PC, as it’s required to run XP Mode.
Step 1) To get Virtual PC, start by clicking on the below link:
-
http://www.microsoft.com/en-us/download/details.aspx?id=3702
Step 2) This will bring you to the Microsoft Download center as shown below:

Step 3) Next, click on the “Download” button, select either the 32 or 64 bit version, and press “Next”:

Step 4) Now choose a location you’ll remember to save the download file to:

Step 5) When the download completes select “Open”:

Step 6) If you received a security warning select “Allow”:

Step 7) Now press “I Accept” to continue:

Step  This starts the installation process as seen below:

Step 9) When the installation is complete, you’ll need to restart your PC before you can use Windows Virtual PC:

Step 10) Now that you have Windows Virtual PC installed, you’ll find it in your Start Menu Programs as shown below:


Part 2: Downloading and Installing Windows XP Mode
Now that you have downloaded and installed Windows Virtual PC, the next step is to download and install Windows XP Mode.
Step 1) Start by clicking on the download link below:
-
http://www.microsoft.com/en-us/download/details.aspx?id=8002
Step 2) Next, click on the “Download” button:

Step 3) Now select the version you want, and click on “Next”:

Step 4) At this point you may get notice that a popup has been blocked. If you do, unblock it:

Step 5) Now save the installation file to an easy to remember location:

Step 6) Once the download finishes, select “Run”:

Step 7) If you receive a security warning, select “Run” again:

Step Now you will see the Windows XP Mode setup window. Start the installation by selecting “Next”:

Step 9) Choose an installation path and choose “Next”:

Step 10) Once setup completes, select “Finish”:

Step 11) Windows XP Mode will now show up in your Start Menu. Launch it to continue the setup:

Step 12) Check the “License Terms” checkbox, and press “Next”:

Step 13) Choose a password for your login, and press “Next”:

Step 14) Selection “Not right now,” and press “Next”:

Step 15) Now click on “Start Setup”:

Step 16) While setup progresses a short tutorial will be shown:

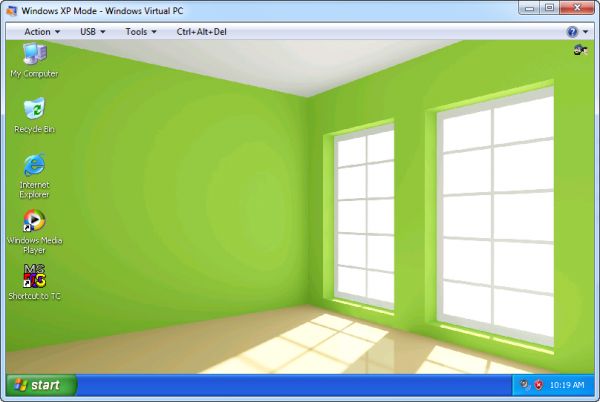
Step 17) Once done initializing, Windows XP Mode will launch and you’ll now see a virtual Windows XP desktop. At this point you can install your legacy software onto Windows XP Mode:

Note: Windows XP Mode automatically maps your Windows 7 drives and storage devices to allow you easy access to your installation files.

I hope the above article on how to download and install Windows XP Mode was helpful.
If you have any comments, questions, or suggestions, please don’t hesitate to leave them with us by filling out the “post a comment or question” link below
Until next time, Peace ✌️
If you enjoy this episode please give it a Like, and consider Sharing as this is the best way for us to find new guests to come on the show.
Shawn M Tierney
Technology Enthusiast & Content Creator
Eliminate commercials and gain access to my weekly full length hands-on, news, and Q&A sessions by becoming a member at The Automation Blog or on YouTube. You’ll also find all of my affordable PLC, HMI, and SCADA courses at TheAutomationSchool.com.
- Author
- Recent Posts
I’m a lifelong Technology Enthusiast who began programing in the early 80’s on the Apple II and VIC-20 personal computers. After earning a degree in Electronics, I worked as a Certified Controls and Information Automation Specialist for 25 years before leaving to become a full time Industrial Automation instructor and mentor at TheAutomationSchool, as well as publishing industry interviews, news, and product how-to’s at TheAutomationBlog.com. If you’re interested in my training, mentoring, or becoming a sponsor, please schedule a teams meeting with me via https://calendly.com/shawntierney/business-meeting
Discover more from The Automation Blog
Subscribe to get the latest posts sent to your email.
How to install Windows 10 the XP-Mode, we will show you in this guide step for step. So that you can continue to use Windows XP without having to install it on your PC.
Windows 10: XP-Mode install — you need
So you can install the XP-Mode in Windows 10, you need some preparation, because Microsoft offers these for Windows 7.
- Download on the Microsoft website the free Windows XP Mode download. Whether you are loading the file «windowsxpmode_de-de.exe» or «windowsxpmode_n_de-de.exe» it does not matter. The only difference is that in the N-variant of the Windows Media Player is not included.
- If you don’t have a Decompression program installed on your PC, download the Free Version of «WinRAR» download and install this. The Tool you need to have the XP module to unpack.
- Then open with WinRAR the downloaded XP Mode. To do this, navigate in WinRAR to the directory in which you downloaded the XP module. Click on the appropriate EXE file (for example: «windowsxpmode_de-de.exe») twice, to display the content of ads.
- Open the «sources» directory and extract the file «xpm». To do this, you can also Drag-and-Drop into any folder.
- Now, navigate in WinRar to the folder where you have the file «xpm» unzipped, and click on it twice. You will now see a whole series of files with only the file «VirtualXPVHD» is important. You extract this in the same way as above using the Drag-and-Drop.
- Rename the file finally, in the «VirtualXPVHD.vhd» to.
- Download last the Free program «Virtualbox» and install it.

Download the XP-Mode (see Screenshot)
Create a new virtual machine
After the preparations, you can now create a virtual machine. Then, you can start Windows XP from your Desktop:
- Move the just created file «VirtualXPVHD.vhd» into a folder that you will no longer change. Virtualbox will look in the future, namely, always exactly this file in the same place and use.
- Start Virtualbox and create a new virtual machine with the «New»field. To do this, you can also access this manual in a draw.
- In the following field you can enter any name, select type «Microsoft Windows» and Version «Windows XP (32-bit)».
- In the section, «panel», choose «Existing hard disk use», click on the folder icon and select the file «VirtualbXPVHD.vhd» in to the used folder.
- Now click on the Button «Generate».

By Virtualbox is Screenshot fast ()
Windows 10: XP-Mode install — Windows XP
You can now launch Windows XP from Virtualbox, out:
- Select the newly created virtual machine from the list in Virtualbox.
- Click on the «Start» in the top bar.
- May be your mouse is not recognized in VirtualBox, so you need to make the initial configuration by using the keyboard. Once you click on the Desktop of Windows XP arrived, you should therefore not necessarily as a first, the guest additions install.
- You want to use old Software in XP mode, you need to install this in VirtualBox and start it.

Now you need to start XP (Screenshot)
Microsoft
Windows XP Mode
for Windows 7, 8.x, and 10
100% WORKING /
FULL VERSION
!!!
VM settings
— Name: Windows XP Mode
— Processors / Cores: 1 CPU / 1 Core
— VT-x/AMD-V: Disabled
— Memory: 256 MB (minimum) ~ 4096 MB (maximum)
— Hard Disk(s): VirtualXPVHD.vhd/vmdk (127 GB)
— Optical(s): Auto detect x1
— Floppy(ies): Auto detect x1
— Network Adapter(s): NAT x1
— USB Controller: USB 2.0 present
— Sound Card: Auto detect
— Display: Auto detect with 3D
— Graphics Memory: 32 MB (minimum) ~ 8 GB (maximum)
— Shared Folders:
1: Name= Host OS C, Path= C:\, Mode: R / W
— Other Devices: No present
OS objectives
— Supported Host Operating Systems:
Windows 7 and higher (any editions)
— Supported Virtual Machines:
Windows Virtual PC
VMware Workstation Player 6.x and later
VMware Workstation Pro 10.x and later
Oracle VM VirtualBox 5.2 and later
Microsoft Hyper-V (experimental)
— User name: Administrator
— Password: XPMUsers
— Account type: Administrator
— 32-bit (IA-32 / x86)
— Professional edition
— English language
— All updates are installed
— Disk cleanup already
— Includes extra features
— Includes extra languages support
— Includes extra updates
— Cracked version (use AntiWPA v3.4.6)
— Modified version the Windows XP Mode
See details: Please read to «
Readme.txt
«