
Here is how to use the legendary Windows XP on Windows 10 or Windows 11. You are going to download Windows XP ISO for VirtualBox and then perform the installation. This way, you are going to use Windows XP without losing any files or changing your current OS.
Inside the VirtualBox, you can do all things that are possible on Windows XP. From installing applications, and running games, to checking your newly developed application inside the platform.
Windows XP ISO download for VirtualBox
Windows was released way back in 2001 and was available for 11 years. Later on, the only Windows OS that was capable to beat that record was Windows 7. Windows XP brought tons of new features, amazing tools, and a brand-new interface. It was provided for both 32-bit and 64-bit systems. I have provided the x64 ISO file of Windows XP, if you want x86 then you can comment down.

File: Windows_XP_Pro_x86_x64.ISO
Size: 475 MB
Language: English
Developer: Microsoft
Click here to download Windows XP ISO for VirtualBox for free.
Related: Free Download Windows XP SP3 ISO
System Requirement for Windows XP
Most of the current systems can easily run Windows XP. Since the OS was released way back and requires low specs to run, so you won’t need to worry about the system requirements. For running Windows XP, you will need:
Processor: Pentium 4 with 1 GHz or better
Memory: you will need 512 MB RAM or more. It is recommended to have 1 GB for running Windows XP Professional.
Storage: a total of 4 GB of free storage is required.
Hardware: CD/DVD ROM is required in addition to Keyboard, Mouse, Speakers, and Super VGA (800×600 screen resolution support).
There is a great chance that you are using Windows XP on Windows 10 or Windows 11. I would recommend you to have at least 1 GB RAM and 5 GB more storage as compared to the required specs for Windows 10 or 11. This way, you could run Windows XP on VirtualBox smoothly.
Overview of Windows XP

The OS was released in 2001 by Microsoft. It was released as the successor of Windows 2000 and Windows ME. Windows XP aka Win XP was released for both 32-bit and 64-bit systems.
In the new Windows OS, you will find new features like Internet Explorer, Windows Shell elements, TAPI, Remote Assistance, and much more. You would also find a brand new interface that includes a new desktop, taskbar, Start menu, eye-catching icons, and easy navigation throughout the OS.
While using the OS, you will also find Firewall, Windows Defender, and other tools for security. This is also the first Windows OS that supports Microsoft Java Virtual Machine.
Microsoft has released Windows XP into two different editions: Windows XP Home and Windows XP Professional. They have released a total of three service packs of Windows XP and later other editions of Windows XP were also released.
- Windows XP Home
- Windows XP Professional
- Windows XP Tablet
- Windows XP Stater
- Windows XP Media Center
These were the editions released by Microsoft.
Windows XP Home
This edition of Windows XP was released for home users only. As compared to the Professional edition. The Home edition has fewer features and options.

- The first thing you will notice is the friendly interface of the OS.
- You will also find the process of Startup and Hibernation faster.
- Features such as Windows Media Player are also added.
- A Wireless Network option is also added.
- Multitask Manager is much faster as compared to previous versions of Windows OS.
Windows XP Professional
Windows XP Professional was released for professional works. This edition is faster, more efficient, and stable as compared to other editions. Here are some of the features of Win XP Professional.

- For burning files on CD or DVD, there is the CD/DVD burner feature.
- Windows Media Player is also present.
- Big corporates can use the Remote Desktop Access feature.
- For security reasons, there is also the Internet Connection Firewall.
- A wide range of hardware is supported.
- You will find the booting and hibernation process faster.
- All the applications on the Windows XP will be launched faster.
- There is also a wireless connection too.
How to Install Windows XP on VirtualBox?

Installing Windows XP on VirtualBox is the same as installing Windows 10 on VirtualBox. Begin the operation by downloading VirtualBox and then perform the installation on your system.
Once the installation got completed then you will use the direct links above to download Windows XP ISO for VirtualBox. The downloading setup file is around 456 MB in size and will be downloaded within a few minutes.
After the download of Windows XP got completed then you will run VirtualBox.
Create a new VM (virtual machine) on VirtualBox. Now you are going to open Settings and insert the amount of RAM memory, processors, storage space, and graphics power for your VM. When all the settings of the new VM are set, you are going to apply the changes and exit Settings.
Before we continue any further, make sure you have selected the downloaded ISO file of Windows XP in VM settings and the location the new VM will be created.
Begin the installation of Windows XP. From here on, it is the same installation process as installing Windows XP. Here you are going to use the same installation steps that we did in “How to Install Windows XP From ISO Image?”.
After the installation of Windows XP on VirtualBox, you will notice some restrictions. There will be lesser options for the installation of applications. This is because you will need to install the VM VirtualBox Extension on VirtualBox.
The Extension pack will enable tons of features with the option to install an app inside the VM. Here is “Download Oracle VM VirtualBox Extension Pack”. From downloading to installation, all the required things are present. If you want to run multiple Windows OS on a single system then you can also use the Dual boot option.
Click here to learn how to dual boot two Windows OS.
Product key of Windows XP
After the installation of Windows XP, you will see the notification of the product key. Most likely, you will find the product key phase during the installation. Even if you skipped the phase, you will be asked for the product key again in the future.
The product key is essential to activate Windows XP either on VM or any system. Here you can use the product key given to activate your Windows XP.
QW4HD DQCRG HM64M 6GJRK 8K83THow to make bootable CD/DVD or USB for Windows XP?
For creating a bootable CD/DVD or USB, you will need to download Windows XP. Then you are going to insert your blank CD/DVD into your system. If you have a USB then you are going to format the USB and then burn the ISO file.
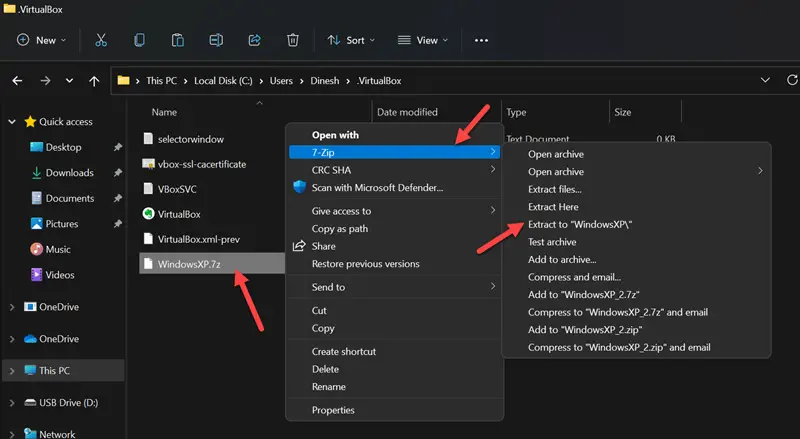
If you have downloaded it from other sites, then you will find the setup file of Windows XP as zipped. Here you are going to use third-party tools such as 7Zip or WinRAR to extract all the files.
Exacting the files is necessary and once got extracted, you will burn the file.
Now that you have inserted your CD/DVD or USB into your system, you are going to use a third-party tool for burning the setup file. For this kind of task, Rufus is the thing.
Download Rufus and double-click on it. Since Rufus doesn’t require any installation, you are going to use the application directly. Now select all the options accordingly and then you are going to select the CD/DVD that you want to burn the setup file on.
Once all the options are selected, you are going to click on the Start button. The burning of Windows XP will begin, and the system will notify you when the operation got completed.
When the operation got completed then you are going to eject your CD/DVD from your system. Congratulation! That CD/DVD or USB that you are holding is a bootable USB of Windows XP.
The same operation can be performed with other tools. However; we have used Rufus as it is robust, stable, and friendly. Instead of Rufus, you can use any of the tools that you think are better.
Can I run Windows XP on VirtualBox?
Of course, you can run Windows XP on VirtualBox. Not only Windows XP but you can also run Windows 7, Windows Vista, Windows 8, Windows 10, Windows 11, and even earlier versions like Windows 2000, Windows ME, or Windows 95.
VirtualBox is not limited to only Windows OS, but you can also run Linux distros (Ubuntu, Kali, Mint, Red Hat, Fedora), macOS (from macOS 10.0 to macOS Monterey), and Android.
It is a powerful virtualization tool that can be used for virtualization purposes. You can use it to check other OS or to check your developed app on multiple OS without performing any installation. One installation and you have access to that OS any time you want.
For using the Windows OS, you are going to create a new VM. This VM will be configured from Settings and then the setup file will be provided. Then you perform the installation of Windows XP.
After the installation of VirtualBox, it is recommended to install the VM extension pack of VirtualBox. Without an extension pack, you are limited to fewer options of VirtualBox. By installing the extension pack, you have access to tons of other options that were not valid.
Can I Run Windows XP With a 4 GB RAM PC?
For running Windows XP on any system, it is recommended to have 512 MB RAM memory for Windows XP Home and 1 GB for Windows XP Professional. Having 4 GB of RAM is an advantage to run the OS smoothly and efficiently.
Microsoft recommends having a Pentium 4 or better with 1 GB of RAM and 800×600 screen resolution support for running Windows XP. You are only required to have 25 GB of free storage for Windows XP. Increasing the specs will only make things run smoother.
As compared to Windows XP required, 4 GB is more than enough. You can even run Windows 7 with 4 GB of RAM on your PC.
When was Windows XP released?
Windows XP was released way back in the 2000s. The OS was developing under the codename “Neptune” built on Windows NT Kernel. However; later Microsoft changed the direction of the entire project with the codename “Whistler”.
This was not based on Windows 95 or MS-DOS. After some time, on 24 August 2001, the OS was released for Manufacturing. By 25 October 2001, the OS was publicly available.
Microsoft has released a total of 3 service packs for Windows XP. SP3 of Windows XP was released on 21 April 2008. Windows XP was the successor of Windows 2000 and Windows ME. Later on, the Windows OS was succeeded by Windows Vista.
Mainstream support for Windows XP ended on 14 April 2009. Whereas the extended support ended on 8 April 2014.
Windows XP was a legendary OS that is used by users even today. It has been more than 20+ years and still, there are users who are using the OS and still love it. If you have used Windows 2000 or earlier versions of Windows OS, you will notice how good the OS is.
Not only Microsoft has changed the entire interface, navigation, and icons to make things friendly. But there were also major changes in hardware support too. They have removed support for PC-98, i486, and SGI Visual Workstation 320 and 540. Microsoft made sure that Windows will only run on 32-bit x86 CPUs and devices with BIOS Firmware.
If you have further questions related to downloading Windows XP ISO for VirtualBox or installation related then you can comment down. Any kind of question that catches your attention can be a problem experienced by others. So comment down and I will fix that problem as soon as possible.
Though there are several ways to use Windows XP on Windows 10 and 11, using it with the pre-installed image for VirtualBox adds many advantages. We prepared a Windows XP image with VirtualBox guest additions to make things easy. It will allow you to attach and use the latest computer quickly.
You can avoid downloading the correct ISO file, doing every installation step (Unfortunately, the Windows XP installations take a longer time) and additional steps by using this pre-installed image.
You may have unique reasons to have Windows XP on VirtualBox with Windows 11. It could be something you need to check the old legacy applications, play games that support only Windows XP, or open a file that can work only on Win XP. Using Windows XP as a VirtualBox pre-installed image (VDI file) will be handy in any of the above cases.
System Requirements
We believe you have the latest suitable hardware if you are using Windows 11 or 10. It will definitely run Windows XP on it with Oracle VirtualBox.
Download Windows XP Preinstalled VirtualBox Image and use it on Windows 11.
1) Make sure you have the latest Oracle VirtualBox application. It is a desktop virtualization software you can download from the official website here.
2) Download the XP preinstalled image from our website here.

3) You need to have the 7-Zip program to extract this file. You can download 7-Zip from their website here.
4) After the pre-installed image is downloaded, extract it using the 7-Zip program.
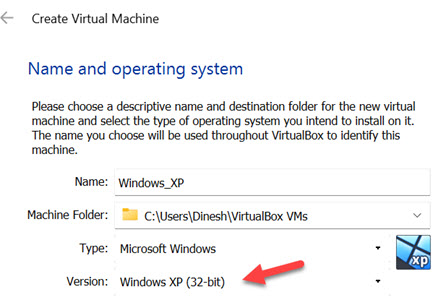
5) Open VirtualBox and create a new VM.
6) Give a name for VM and select the version as Windows XP (32bit).
7) Assign RAM size to 512MB.
 Select ‘Use an existing virtual hard disk option’ on the hard disk creation screen. This will bring up a box where you can choose the available VDI file. We need to browse the Windows XP preinstalled image file we extracted in the earlier step.
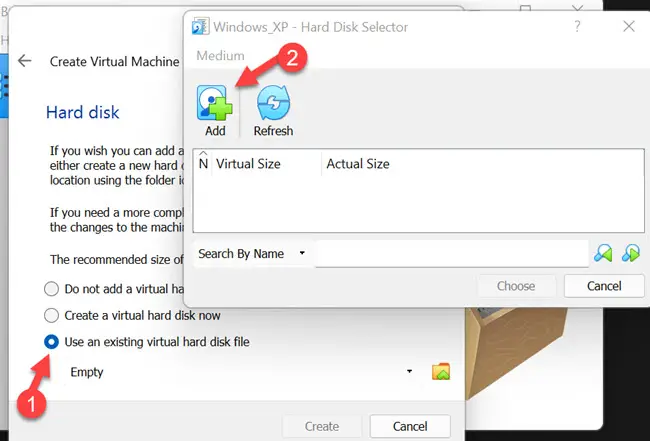
9) Click on the ‘Add’ button and locate the file as shown below.
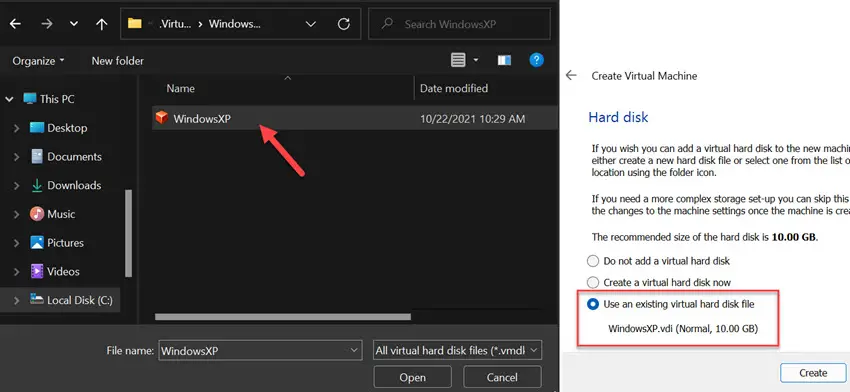
After attaching the file, complete the VM creation steps.
10) Before switching on the VM, let’s tweak a few settings to make the VM work better.
11) Open the VM settings and tick the ‘Enable I/O APIC’ under ‘System’ settings. This will enable us to allocate more the one processer core for the VM.
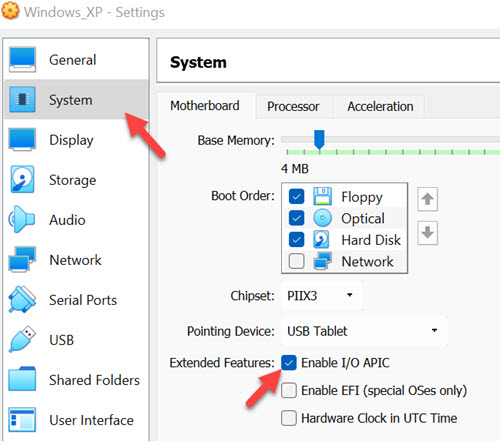
12) Then, in the ‘Processor’ tab, increase the processers to 2.

13) Power on the VM now. Since all installation steps are done, and VirtualBox guest additions are installed already, the Windows XP on VirtualBox virtual machine will boot and work smoothly.
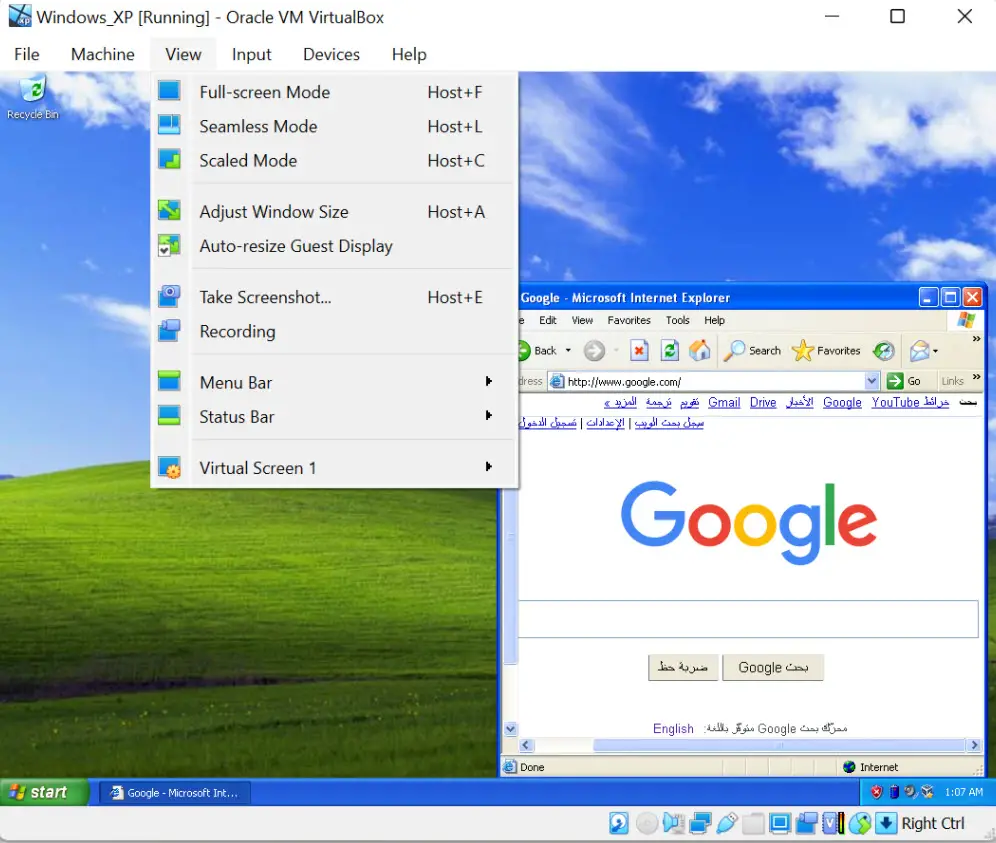
Network connectivity (Internet), sound and multiple screen resolutions, including full-screen mode, will work perfectly.
You can change the user or Administrator password.
You should have a working Windows XP virtual machine on your Windows 11/10 physical computer. It is highly recommended to take a snapshot before you make any changes.
Since VirtualBox guest additions are installed on this VM, you can quickly transfer the files/folders between the host and the guest virtual machine. It should be easy to test the legacy applications, games and other activities requiring Windows XP on the latest Windows 11 computer.
Troubleshooting Tips for Windows XP on VirtualBox
Based on the user feedback and findings, here are some troubleshooting tips if your Windows XP virtual machine is not booting or is stuck with the black screen.
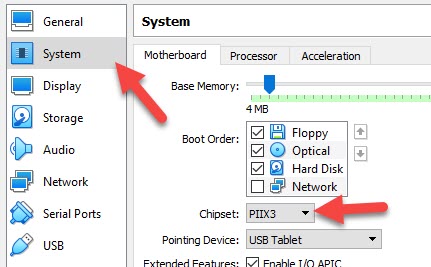
- As mentioned in system requirements, if your host computer is Windows 10 or 11, it already has virtualization technology enabled in the BIOS. But, if you are using Windows 8 or 7 without VT-x enabled, you need to enable VT-x in BIOS before trying these steps.
- You can change the chipset under the motherboard settings of the Windows XP virtual machine. It worked for me with PIIX3, but few users reported it worked with ICH9. So, it is better to change the try on your PC.
Item Preview

XP1.png
XP10.png
XP11.png
XP12.png
XP13.png
XP14.png
XP15.png
XP16.png
XP17.png
XP18.png
XP19.png
XP2.png
XP20.png
XP21.png
XP22.png
XP23.png
XP24.png
XP25.png
XP26.png
XP27.png
XP28.png
XP29.png
XP3.png
XP30.png
XP31.png
XP32.png
XP33.png
XP34.png
XP35.png
XP36.png
XP37.png
XP38.png
XP39.png
XP4.png
XP40.png
XP41.png
XP42.png
XP43.png
XP44.png
XP45.png
XP46.png
XP47.png
XP48.png
XP49.png
XP5.png
XP50.png
XP51.png
XP6.png
XP7.png
XP8.png
XP9.png
196,006
Views
20
Favorites
DOWNLOAD OPTIONS
Uploaded by
Unknown
on
SIMILAR ITEMS (based on metadata)
Windows XP is extremely outdated. But that has not stopped Windows enthusiasts from using it. The operating system is so light that every modern machine can run it. If you have Oracle VM VirtualBox, you can even install Windows XP on a Linux device.

But how do you use VirtualBox? Once VirtualBox is in place, how do you install Windows XP on VirtualBox? This guide will give you answers:
How to Install Windows XP on Virtual Box
Step 1. Download Virtual Box and Windows XP ISO
Do you have VirtualBox? If you don’t, download the program. It will mimic your computer by providing a platform to house the operating system. This goes without saying. Download VirtualBox from a trustworthy source.
Download Windows XP ISO
Download Virtual Box
Step 2. Launch the program
Go to ‘Machine’ and then ‘New.’ The goal is to access the virtual machine creation wizard. You can also find it in the tool menu.

Step 3. Enter the name of the operating system in the Name field
Make sure you type ‘Windows XP.’ Once you enter the name, the program will adjust the Type and Version field values accordingly.
However, you should pay attention to the version of windows. The program may specify a 32-bit OS when you prefer 64-bit or vice versa. Fortunately, you can change this value manually.

You can also specify the location where you want to install the virtual machine. Use the Machine Folder section to make this change. If you don’t alter the location, the program will use the default location.

Naturally, you have to configure the specs of the virtual machine to match the demands of the operating system. XP needs 512MB of RAM. But you can settle for 4GB, especially if you have a modern machine with a lot of RAM.
Step 4. A virtual machine needs a virtual hard disc
You can create one by going to the virtual hard disc settings. The settings will give you the option of either making a virtual hard disc or using an existing virtual hard disc file.

The second option applies to consumers with an XP virtual disc on the computer. You can also choose a third option where you don’t create a virtual hard disk.
Step 5. VirtualBox will prompt you to select a hard disk file type
Your options include VDI, VHD, and VMDK. You can choose any file type that suits you. However, many professionals will recommend the VirtualBox Disk Image (VDI).
The program will eventually ask you to specify the storage. VirtualBox wants to know if it should allow the virtual hard disk space to expand as the need arises or if it should set a maximum size.
The ‘Fixed Size’ option will limit the size of the virtual hard disk. ‘Dynamically Allocated’ is the superior option because it allows the virtual machine to manage the resources it has on hand.
Once this is done, you have the option of changing the file location and size. But you can skip this step if the default options are adequate.
Step 6. All that is left at this point is to click ‘Create’ to make the virtual hard disk
Once this is done, you can use the settings tab to adjust the hardware components.
Do you want to transfer files from the host and virtual machine or vice versa? You can also enable that setting at this stage. Go to ‘General’ and look for ‘Shared Clipboard’ and ‘Drag n’ Drop.’ Set the options to ‘Bidirectional.’

Step 7. Now, with your virtual machine in place, you can start the process of installing XP
But before you proceed, stay in the settings. Go to ‘System’ and ‘Motherboard.’ Go to ‘Boot Order’ and consider the options. You can make the optical device, hard disk, floppy, or network the primary boot device.

Go to ‘Processor’ and set the core count. Keep this value at four or above. Although, the host processor may influence your decision.
Step 8. Don’t ignore that last tab
It isn’t mandatory, but you should take a moment to visit ‘Acceleration’ to determine whether you want to manually alter the ‘Hardware Virtualization’ and ‘Paravirtualization Interface options.
Step 9. Next is ‘Display’ and ‘Screen.’
This allows you to configure the ‘Monitor Count,’ ‘Scale Factor,’ and ‘Graphics Controller.’ You can also enable 3D acceleration. The ‘Remote Display’ and ‘Recording’ tabs don’t matter.

Turn your attention to ‘Storage.’ Enable the Host I/O cache. Other important steps include checking the ‘Solid-State Drive’ option, adding the XP ISO file you downloaded, and clicking ‘Start.’
Step 10. Wait for VirtualBox to show the start-up window before selecting the ISO image and then ‘Start.’
At this point, you can install XP the way you usually would on any other machine. The operating system will display a start screen. Choose between setting up Windows, repairing Windows, and quitting.

XP will show you a relatively long license agreement. Read it and accept. You can’t install XP without agreeing to the information in this document.
Step 11. The installer will ask you to organize your disk space, creating partitions where necessary
Format the virtual disk. Make sure you select NFTS. It is superior to other options.

Once the formatting process starts, a yellow bar will show you your progress. When it gets to the end, the installer will copy all the relevant files to the disk.
Step 12. It requires to restart
The virtual machine will either restart automatically or prompt you to restart it by pressing a button. But you’re not done. The configuration process will continue once the virtual machine starts.
You need to enter some basic information, including your region, language of choice, date, time, and name. You must also provide the product key to authenticate your copy of the operating system.
You can create multiple profiles to accommodate the other users of the virtual machine. Don’t forget to adjust your network settings.
With the operating system configured, you can sit back and watch as the installer finishes installing XP.
Step 13. The virtual machine will restart once more
When it boots up, it will show you the Windows XP desktop.

You can start using the operating system however you wish. As you can see, the hardest part is creating the virtual machine. XP is not that difficult to install.
Related: Can you develop iOS apps on Windows in 2022
Related: Run Kali Linux on Windows 10
Tags: install Windows XP on Virtual BoxWindows XP Virtual box
Windows XP is a classic operating system that was widely used by millions of users around the world. Despite being succeeded by newer versions of Windows, Windows XP still holds a special place in the hearts of many users who fondly remember its simple yet intuitive design.
In this post, we would like to take you on a trip down memory lane and introduce Windows XP briefly. Windows XP is an operating system that was first released by Microsoft in 2001 and became widely popular among users for its simplicity and stability. However, due to its age, it is no longer supported by Microsoft, which means that there are no more security updates or bug fixes available for it.
But what if you still want to experience the nostalgia of using Windows XP without compromising your security? The answer is to run it on a virtual machine like VirtualBox. In this post, we will show you how to download Windows XP ISO (32 & 64 bit) and install it on VirtualBox, allowing you to use the classic operating system on your modern computer.
To get started, you will need to download the Windows XP ISO file from a reliable source. We will guide you through the process of downloading the ISO file for both 32-bit and 64-bit versions. Once you have the ISO file, we will show you how to set up a new virtual machine in VirtualBox and install Windows XP on it step by step. This will include configuring the virtual machine settings, creating a virtual hard disk, and starting the installation process.
By the end of this post, you will be able to use Windows XP on VirtualBox and experience the classic operating system firsthand. While Windows XP may no longer be supported by Microsoft, it remains a beloved operating system for many users, and using it on a virtual machine is a safe and fun way to relive the past. So, let’s get started on this journey of nostalgia and learn how to install Windows XP on VirtualBox together.
Table of Contents
Download and Install Windows XP on VirtualBox from ISO
If you’re looking to experience the classic Windows XP operating system on your modern computer, running it on a virtual machine is a great option. By using VirtualBox, you can create a virtual environment that mimics the experience of running Windows XP on a physical machine.
Here we’ll guide you through the process of downloading and installing Windows XP on VirtualBox from an ISO file. You’ll be able to set up a new virtual machine and install Windows XP step-by-step.
Check System Requirement
To run Windows XP on VirtualBox, your computer will need to meet certain system requirements. These requirements will ensure that VirtualBox runs smoothly and that you’re able to use Windows XP without experiencing any performance issues. Here are the basic system requirements you’ll need:
- A modern computer with at least 2 GB of RAM (4 GB or more recommended)
- A dual-core or quad-core processor with at least 2 GHz clock speed (or faster)
- At least 20 GB of free hard drive space for the virtual machine and Windows XP installation files
- VirtualBox software installed on your computer
Meeting these system requirements will ensure that you’re able to run Windows XP on VirtualBox smoothly and without any performance issues. However, keep in mind that if you plan to use Windows XP for more intensive tasks like gaming or video editing, you may need a more powerful computer with higher system requirements. But first, let’s download Windows XP ISO for VirtualBox.
Download Windows XP for VirtualBox
File: Windows XP x64.iso, Windows XP x86.iso
Size: 512.19 MB
Setup: Full Offline Installer
Developer: Microsoft
Last Update: 15 May 2017
Create a Virtual Machine in VirtualBox for Windows XP
After you have downloaded Windows XP ISO for VirtualBox, you’ll need to create a virtual machine. Here’s how to do it:
- Launch VirtualBox and select New from the toolbar to create a new virtual machine.
- In the Name and OS Type section, give your virtual machine a name and select Microsoft Windows as the type of operating system. Choose Windows XP as the version, either 32-bit or 64-bit, depending on the ISO file you have.
- In the Memory section, allocate at least 1 GB of RAM for the virtual machine. Adjust this amount as needed depending on your computer’s resources.
- In the Hard Disk section, choose to Create a virtual hard disk Now and click Create.
- Select VDI as the hard disk file type, and choose Dynamically allocated for the storage details.
- Set the virtual hard disk size to at least 20 GB or more, depending on how much space you want to allocate to Windows XP. Click Create to finish.
Your new virtual machine will now appear in the VirtualBox Manager. You’re now ready to install Windows XP on the virtual machine.
Install Windows XP on VirtualBox
Once you have created a virtual machine for Windows XP in VirtualBox, the next step is to install the operating system. Here’s how to do it:
- Start the virtual machine by selecting it in the VirtualBox Manager and clicking Start.
- In the Select start-up disk window, click on the folder icon and navigate to the Windows XP ISO file that you downloaded. Select it and click Start.
- The Windows XP installer will launch. Follow the prompts to complete the installation process, which includes entering your product key, selecting the partition where you want to install Windows XP, and creating a user account.
- Once the installation is complete, install the VirtualBox Guest Additions. These are additional software packages that provide better integration between the host and virtual machine, including features such as shared clipboards and shared folders.
- To install the Guest Additions, select Devices from the VirtualBox menu bar, and then click Insert Guest Additions CD image. This will mount the Guest Additions ISO file inside the virtual machine.
- Follow the on-screen instructions to install the Guest Additions. Once the installation is complete, restart the virtual machine.
And that’s it! You should now have a fully functional Windows XP virtual machine running inside VirtualBox. It is as easy as it sounds. The details might take your brain startling but you will find the process easy. And that is how you will download and then install Windows XP on VirtualBox from ISO.
Some key features of Windows XP
Windows XP was a popular operating system released by Microsoft in 2001, and it remained widely used for over a decade. Here are some key features of Windows XP:
User-friendly interface: Windows XP introduced a new graphical user interface that was both easy to navigate and visually appealing.
Improved stability: Compared to its predecessor Windows 98, Windows XP was much more stable and reliable, with fewer crashes and errors.
Increased security: Windows XP included several security enhancements, such as a built-in firewall and automatic security updates, to help protect against viruses and other malware.
Improved multimedia support: Windows XP introduced new multimedia features, including improved video playback, support for DVD burning, and the ability to create custom slideshows.
Compatibility with older software: Windows XP was designed to be compatible with older software and hardware, making it easier for users to upgrade their systems without having to replace all of their existing equipment.
Remote desktop access: Windows XP included a built-in feature that allowed users to access their desktops remotely, making it easier to work from home or on the go.
Overall, Windows XP was a popular and well-loved operating system that offered a range of features and improvements over its predecessors. While it may no longer be supported by Microsoft, many users continue to run it on virtual machines or older hardware due to its reliability and compatibility with older software. And if you want to download Windows XP ISO for VirtualBox then you use the link above.