
Windows iSCSI forward authentication
Test
Boot into a Windows XP operating system stored on an iSCSI target.
DUT configuration
No physical disks present. System configured to boot from NIC equipped with gPXE ROM.
Environment configuration
iSCSI target running IETD set up to require forward CHAP authentication. DHCP server providing network configuration and iSCSI root-path.
Result
Success is defined as reaching the Windows graphical login screen.
Detailed test procedure
Prerequisites
-
Image of installation CD (in this test, XP Professional SP 2):
dd if=/dev/cdrom of=winxp.iso -
QEMU
-
iscsitarget
Windows Setup
Create hard disk image: qemu-img create -f raw hd.img 4G
Boot setup CD in QEMU: qemu -hda hd.img -cdrom winxp.iso -boot d
Install as usual. Format as NTFS (quick) to save time, using the entire disk.
After the first reboot, allow booting from hard disk (do not press a key at the “Boot from CD” prompt).
First try at the graphical stage of setup got stuck at “Installing Devices” for at least an hour. TODO: investigate if this is due to kqemu or other environmental factors, or restart QEMU between setup stages. Restarting QEMU allows it to continue…
Enter a name (“Test” for this example), then enter the product key.
Accept the default computer name and blank administrator password.
Accept the default time configuration.
Accept the default network configuration and workgroup.
After this stage of setup completes and another reboot, setup is complete.
Click OK on the Display Settings dialog to adjust the screen resolution, then click OK to accept the change.
After some time, the first-run wizard appears; press Next.
Select “Not now” on the Windows Update page, then click Next.
Click “Skip” on the network configuration page.
Select “No” on the activation page and click Next.
Enter “Test” as the first username and click Next.
Click Finish.
At this point, you should be at the Windows desktop.
TODO: Network adapter did not acquire an address from QEMU’s DHCP server; reboot allowed it to work.
iSCSI initiator setup
Download the Microsoft iSCSI initiator in the VM, then run the installer.
Select “Initiator Service” and “Software Initiator” only, then click Next.
Select “I agree”, then click Next.
Click Finish when the installation is complete.
Download http://git.etherboot.org/releases/sanbootconf/sanbootconf-latest.zip and extract it, then run install.bat.
Now setup is complete; shut down the Windows machine.
iSCSI target setup
On the iSCSI target machine, edit /etc/ietd.conf to add a target.
Target iqn.2000-01.test.etherboot.org:iscsiboot.xp
        Lun 0 Path=/path/to/hd.img
        IncomingUser testuser userpassword
        OutgoingUser testtarget targetpassword
Ensure the iSCSI target is running. (ex. Gentoo: /etc/init.d/ietd start)
Booting with gPXE
TODO: authentication
Create a gPXE script as follows and boot it:
#!gpxe
sanboot iscsi:my.target.dns.name::::iqn.2000-01.test.etherboot.org:iscsiboot.xp
(where my.target.dns.name is the DNS name or IP of the machine running the iSCSI target)
Windows should boot to the desktop.
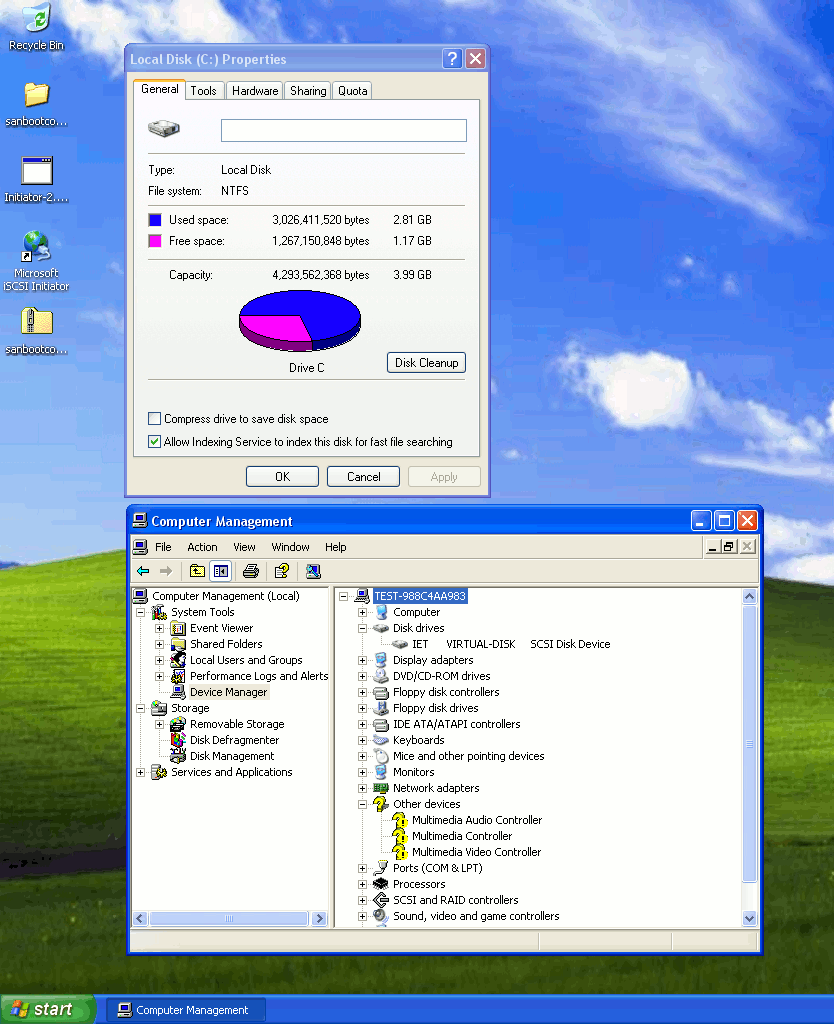
Table of Contents
Installing Windows XP \ 2003 directly to an iSCSI target
About IntegrateDrv
IntegrateDrv is a program that lets you integrate Plug and Play drivers into a Windows Installation.
Using this program, you can install Windows 2000 \ XP \ 2003 Directly to an iSCSI target.
Prerequisites
-
sanbootconf (1.1.1 or newer, 1.1.2 is required for Windows 2000)
-
Text-mode setup does not support the virtual bus device architecture, if you have an nVidia network adapter, Broadcom NetXtreme II, or other adapter that its official driver implements a virtual bus, you have to obtain a text-mode compatible driver (a.k.a RIS-compatible driver) to be used during the installation. (a text-mode compatible driver for nVidia NICs is bundled with IntegrateDrv)
Using IntegrateDrv
There are two ways to use this program:
Method #1: Integrating to an iSCSI disk containing Windows setup
Instructions:
Creation of an iSCSI disk containing Windows setup:
1. Create a new disk on your iSCSI target.
2. Create a primary partition on the disk you’ve just created (the partition has to be XP \ 2003 compatible, so it’s best to create the partition from Windows XP \ Server 2003 OS).
3. Mark the new partition as active.
4. Format the partition you have just created.
5. Use winnt32.exe to create an installation of the OS you want to install on the new partition:
To install a 32-bit edition of Windows the command is:
D:\I386\winnt32.exe /syspart:c /tempdrive:c /makelocalsource /noreboot
To install a 64-bit edition of Windows the command is:
D:\AMD64\winnt32.exe /syspart:c /tempdrive:c /makelocalsource /noreboot
-
assuming C is the drive letter assigned to the new partition
-
assuming D is the CD where the OS installation is located
-
the /syspart and /tempdrive switches will make sure that all the necessary boot files will be copied to the specified drive
6. Select “New Installation (Advanced)” and complete the process of creating the installation on the disk.
Integration of the iSCSI components:
7. Use IntegrateDrv to integrate the NIC drivers, Microsoft iSCSI Initiator and sanbootconf into the temporary Windows installation Directories:
if the computer used is the target computer, the command you should use is:
IntegrateDrv.exe /driver=..\Driver\E1000\x86 /driver=..\Driver\iScsiPrt\x86 /driver=..\Driver\sanbootconf /local /preconf /target=C:\
if the computer used is the not the target computer, or you would like to use NICBootConf, the command you should use is:
IntegrateDrv.exe /driver=..\Driver\E1000\x86 /driver=..\Driver\iScsiPrt\x86 /driver=..\Driver\sanbootconf /driver=..\Driver\nicbootconf /target=C:\
-
you shoud specify the path to your network adapter driver instead of the Intel E1000 in the example above.
-
the /local and /preconf switch tells IntegrateDrv that the machine running IntegrateDrv is the target machine, and that the NIC should be pre-configured based on the local machine’s hardware configuration.
-
NICBootConf is a driver that configure the NIC during boot (with NICBootConf, your system will still successfully boot via iSCSI even if you’ll move your network adapter from one PCI slot to another).
8. You will be asked to specify a default static TCP/IP address. if all goes well, this address will not be used, and instead sanbootconf / iScsiBP will set the address that was provided by your DHCP server.
9. Congratulations, you now have an iSCSI capable Windows XP \ 2003 installation, you can reboot your machine, and use the sanboot command to boot into the installation:
dhcp net0
sanboot iscsi:192.168.1.11::::iqn.2007-08.name.dns.target.my:iscsiboot
10. The installation should detect your iSCSI disk:
11. During GUI-mode installation phase, you’ll be warned about installing unsigned drivers:
Some of the drivers had to be modified to start during boot, and as a result their signature is no longer valid, you can safely ignore these warnings, and approve the installation:
Method #2: Creating an iSCSI capable installation CD
you can use IntegrateDrv as described in step 7 above to create an iSCSI capable Windows installation CD.
The easiest way is to use nLite to create a working directory, and then use IntegrateDrv to integrate the necessary drivers to this working directory using the /target switch, and then create a bootable ISO using nLite.
-
Note that if you use sanbootconf you must use mkisofs as the ISO creation engine.
After you’ve created a CD with the necessary iSCSI drivers, you use the sanhook command to connect to the iSCSI target, and then exit iPXE and fall back to the CD-ROM (your BIOS should be set up accordingly):
dhcp net0
sanhook iscsi:192.168.1.11::::iqn.2007-08.name.dns.target.my:iscsiboot
exit
If all goes well, and your BIOS is configured properly and bug-free, then Windows setup should start running from the CD-ROM and the iSCSI disk should be recognized.
Supplement
Additional notes from years after the hey days of XP 2003.
-
placeholder for future notes that does help to render this list more nicely
Steps:
1.Setup pxe server with gpxe
2.Setup iscsi target
3.Install new OS, or transfer existing OS, to a volume that will be shared over iscsi.
4.Install iscsi boot support
5.Boot over iscsi !
6.Summary :
Lets start!
1.Setup bootstrap loader with gpxe
using gpxe boot strap loader (for sanboot option)
Here below I use Tiny Pxe Server.
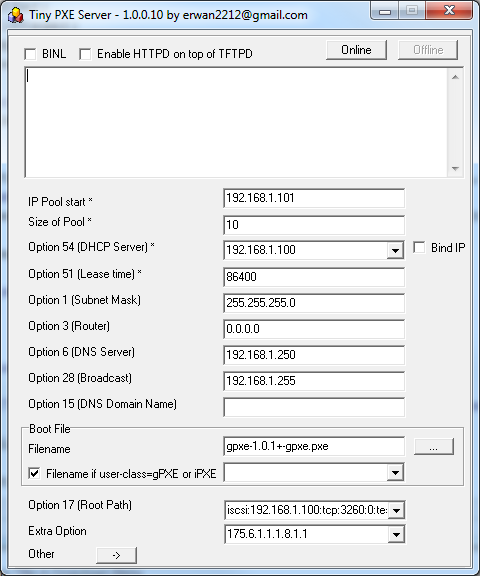
The root path : iscsi:192.168.1.100:tcp:3260:0:test
dhcp extra option : 175.6.1.1.1.8.1.1
we set keep-san=1 (in case we want to install directly to san) and dhcp priority=1 to over rule any dhcp server on your lan.
recommended: do not fill the router field due to a bug within ms iscsi initiator and the gateway (see here)
Note : as an option, you can skip the dhcp/tftp server by using a boot disk (floppy or cdrom) made by gpxe.
Go there Rom-o-matic.net,
-choose floppy image as output format (or cdrom),
-choose « all-drivers » as NIC Type,
-tick time_cmd and digest_cmd,
-and use the following embedded script :
#!gpxe
echo « Greetings! Hit Ctrl-C to bail out. »
sleep 5
echo « Going to DHCP on primary network adapter »
ifopen net0
dhcp net0
clear net0.dhcp/gateway:ipv4
sanboot iscsi:192.168.1.100::::xp
Use the generated boot disk on your physical computer or in your virtual image.
2.Setup iscsi target
–iscsi cake can mount any thing like vhd, vmdk, disk, etc.
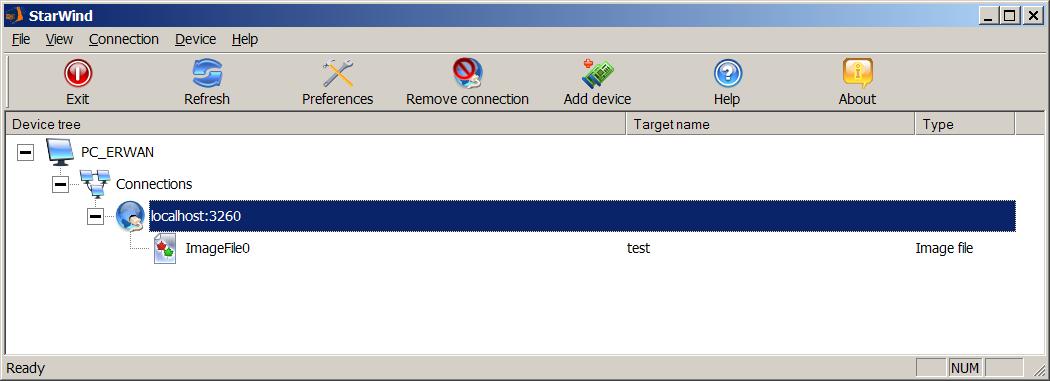
–rocket division startwind can mount image files,disks, etc.
–openfiler / freenas can also act as iscsi target but can « only » create disks, not mount them.
The iscsi target can be used either during the installation or for the transfer of an existing windows installation to an iscsi volume.
Here below a screenshot of one xp disk mounted in Starwind (free for one connection).
3.Install new OS, or transfer existing OS, to an image that will be shared over iscsi.
Installation choices :
-(1) install directly to an iscsi target (vista, windows 2008 or windows 7). see howto
-(2) have a vmdk point to a blank img file (monolithic vmdk option) and install thru vmware. See below how to.
Here below vmware settings to install xp on a physical device (choice 2 above).
Note that \\.\physicaldrive1 is actually a vmdk pointing to my disk image file (which we will use later in starwind).
See lower in that page on how to make that vmdk.
-(3) install to a local physical disk and clone it to an img file afterwards. See below how to.
If you have an existing windows, transfer it to an image file using a one to one disk cloning software.
Get clonedisk here : https://erwan.labalec.fr/clonedisk
Backup the physical drive, not the logical drive / partition.
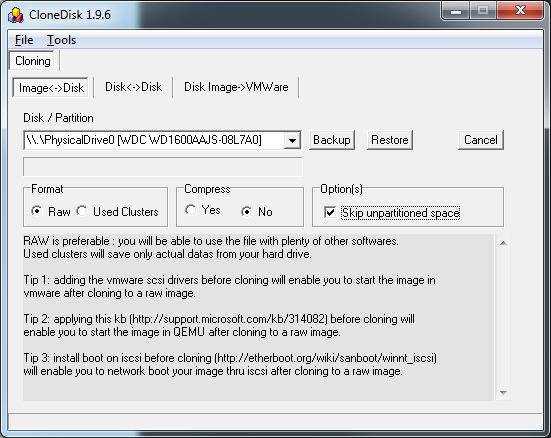
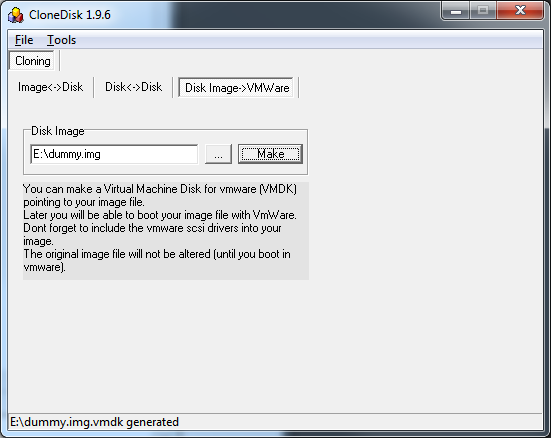
Note1 : CloneDisk can create a vmdk file for you, pointing to the image file of your disk.
You may even be able to boot on your image file from within vmware server.
If so, dont forget to install the scsi vmware driver before cloning and to restart in safe mode on the target vm guest.
Note2 : QEMU can also use the raw image file.
Then apply this http://support.microsoft.com/kb/314082 before launching in QEMU to avoid a 0x7b BSOD.
4.Install iscsi boot support in your operating system (before cloning/transfer)
For xp : http://etherboot.org/wiki/sanboot/winnt_iscsi
Note : once the iscsi initiator installed on XP, dont forget to run the SAN Boot Configurator (http://www.etherboot.org/wiki/sanboot/winnt_iscsi_sanbootconf)
for w2k3: http://etherboot.org/wiki/sanboot/win2k3
Not needed for W2k8, Vista and Windows7 as they support natively iscsi boot.
Note : you have to set the msiscsi service to start=auto (and possibly to add the target to the iscsi initiator?).
(sc config MSiSCSI start= auto)
5.Boot over iscsi !
If not done yet, setup your iscsi target (see step 2) with a prepared image file.
Unless you have an hba with iscsi support or network card with gpxe built in, setup your pxe server (step 1).
Lets test it in vmware.
See below the vm settings (diskless!)
see below the disk seen from Windows , once booted over iscsi.
Constraint : network card needs to be the same before/after in order to boot.
You can add another network card before migrating to another computer, see here http://etherboot.org/wiki/appnotes/port_winnt_sanboot .
6.Summary :
-we have setup a pxe server (dhcp & tftp & gPXE)
-we have setup a scsi target
-we have installed windows to a flat file and served that file thru the iscsi target (in a vmware guest)
-we have setup iscsi boot support in our windows
-we have started a diskless computer (in a vmware guest)
-we have booted on san using the iscsi protocol thanks to gPXE
possible improvements:
-flash your network card with gPXE, turning it into a boot on san device.
see http://www.etherboot.org/wiki/romburning
In that case you dont need a pxe server anymore, config (target and rootpath) is saved directly in the network card.
-flash your motherboard network rom with gPXE.
see http://www.etherboot.org/wiki/biosext
Same idea as above.
-Use a gpxe nic rom in vmware to skip the dhcp/tftp part (nbios.filename vmx parameter).
Same idea as above but virtual…
Introduction
Unlike Windows 7 installer, Windows XP installer doesn’t support sanboot iSCSI target access. This is the most tricky part to install Windows XP on iSCSI target. Other problem is identify a matched network driver as all traffic will transmit over network.
Prepare a iSCSI target
First, setup a new iSCSI target for the Windows XP instance. The minimum disk size is 2GB. For illustration purpose, the iSCSI target in this article is
iscsi:nas.example.com::::iqn.example.com:winxp
Setup iSCSI target
Next, the iSCSI target should be formatted to NTFS file system and mark active with Windows XP utilities and tools. These tasks may perform in existing Windows XP system or virtual machine.
To connect to iSCSI target disk in Windows XP, download Microsoft iSCSI Software Initiator Software. Install the software in Windows XP and connect the iSCSI target:
Start Control Panel | Administrative Tools | Computer Management | Disk Management, the new iSCSI target disk should appear in the disk array:
Setup a new primary partition on the disk:
Assign a drive letter to the partition:
and format to NTFS file system:
Remember to mark the partition active:
The new iSCSI disk E:\ is ready to use now.
Prepare Windows XP setup files
To prepare windows installation from iSCSI target disk itself, use winnt32.exe in the installation CD or ISO file:
Assume drive D:\ contain the Windows XP installer:
D:\I386>winnt32 /syspart:E /tempdrive:E /makelocalsource /noreboot
The command prepare a Windows XP installation in drive E.
The next screen prompt for Installation Type. Chose New Installation (Advanced).
Follow the screen instruction to complete the initial setup.
Integrate iSCSI components
After finish Windows XP installer setup, the iSCSI target disk contain the necessary Windows XP setup files and it it ready to start setup soon. However, the Windows XP installer do not have iSCSI initiator and sanboot service nor it has matched NIC network driver. It still not ready yet for iSCSI booting. Our next task is integrate iSCSI initiator, sanboot service and network driver into the Windows XP installation.
First, download a third party tools IntegrateDrv to perform integration. Extract the tools and run the command in console to perform integration:
IntegrateDrv.exe /driver=..\Drivers\PRO100\win32\NDIS5x /driver=..\Drivers\iScsiPrt\x86 /driver=..\Drivers\sanbootconf /driver=..\Drivers\nicbootconf /target=E:\
The above command install a network driver from Intel Pro100. IntegrateDrv provides very limited network driver. It is usually not suitable for most situation. You should supply a matched network driver in the integration. Most problem happen in later boot up stage are mostly related to unmatched or incompatible network driver. Perform this step with care to make sure the iSCSI boot up success in next stage.
A network configuration may prompt to specify IP address, network mask and default gateway IP at the end of integration. You may ignore it if there is a DHCP service in the network:
If everything goes well, the iSCSI target is ready to boot up and perform actual Windows XP installation. Remember to disconnect or logoff the iSCSI target disk before perform installation:
Boot iSCSI target to install Windows XP
The iSCSI target disk integrated with necessary iSCSI component may now boot from target computer to perform Windows XP installation now. From iPXE prompt during network boot up, execute these:
dhcp net0
sanboot iscsi:nas.example.com::::iqn.example.com:winxp
The iSCSI target disk should boot up to perform familiar Windows XP installation. Follow the screen instruction to finish the installation. During installation, the installer may prompt for unsigned driver for both iSCSI initiator and network driver, press Yes to continue the installation:
After finish installation, use the above sanboot command to start the Windows XP instance for normal daily usage.
Reference
- Installing Windows XP \ 2003 directly to an iSCSI target. URL: http://ipxe.org/appnote/xp_2003_direct_install
- Integrate mass-storage text-mode or PNP drivers into windows 2000 \ XP \ 2003 setup. URL: http://iknowu.dnsalias.com/files/public/integratedrv/IntegrateDrv.htm
CCBoot. Описание, установка, настройка.
Компания Youngzsoft разработала продукт CCBoot, позволяющий осуществлять «бездисковую загрузку» Windows XP, Windows Server 2003, Vista, Windows 7 и Windows Server 2008 с iSCSI. «Бездисковый» компьютер подключен к жесткому диску через сеть и загружает операционную систему с удаленно расположенной машины. CCBoot использует быстро развивающийся iSCSI протокол с gPXE технологией бездисковой загрузки.
CCBoot предлагает абсолютно бездисковую загрузку. Без необходимости в локальном жестком диске открывается широкий спектр возможностей для управления сетью. С помощью такой конфигурации, диски для многих компьютеров в сети могут управляться централизованно, что облегчает резервное копирование, резервирование и динамическое распределение ценных ресурсов хранения и в то же время сокращение издержек для предприятия.
Загрузка из ISCSI значительно облегчает администрирование системы. Избавление серверов от загрузочного тома позволяет администраторам управлять инвестициями в их ISCSI сети хранения данных, увеличивая безопасность данных, целостность и упрощая восстановление, повышая уровень доступности, скорость быстрого развертывания серверов и смену варианта использования, а также позволяет более эффективно использовать ресурсы хранения.
Преимущества:
- Значительно сокращаются первоначальные вложения и текущие расходы.
- Сокращается энергопотребление и требования к охлаждению.
- Ускоряется развертывание, модернизация и изменение роли серверов.
- Уменьшается сложность системы и риски ошибок.
- Увеличивается степень доступности критических систем.
- Реализация расширенной системы аварийного восстановления.
Установка и развертывание iSCSI Boot Server
Установка iSCSI Boot Server
Скачиваем инсталляционный пакет CCBoot Server последней версии http://www.ccboot.com/download.htm.
Запускаем ccbootsetup.exe на сервере, жмем кнопку Next. Устанавливаем без особенностей, в конце мастер установки попросит перезагрузить компьютер.

Рисунок 1
CCBoot использует следующие порты:
- 67 (DHCP),
- 69 (TFTP),
- 3260 (iSCSI),
- 1000 (Загрузка образа),
- 8001 (Служба управления).
Откройте доступ на эти порты в брандмауэре своего сервера, убедитесь, что загрузка клиентского компьютера проходит успешно. Начиная с версии CCBoot v2.1 также необходимо открыть порт 66 в качестве резервного порта DHCP.
Замечание: Для успешной загрузки клиентского компьютера выключите другие службы DHCP в своей сети, включая службу DHCP роутера.
Запустите CCBoot, появится следующее окно:

Рисунок 2
Настройка iSCSIBootServer
Детали сетевого соединения:
IP сервера: 192.168.1.131
Основной шлюз: 192.168.1.1
DNS Address: 192.168.1.1
IP Mask: 255.255.255.0
DHCPRange: 192.168.1.128-192.168.1.254
Запустите Мастер настройки сервера (CCBoot, «Options»->»Options Wizard») и последовательно настройте сервер:

Рисунок 3
Убедитесь, что в поле «DHCP Server IP» установлено верное значение. Нажмите кнопку «Scan DHCP», чтобы проверить, есть ли другие DHCP-серверы в Вашей сети. Если таковые имеются, отключите их, чтобы клиентский компьютер получал IP-адрес от DHCP-сервера CCBoot.

Рисунок 4
В поле «Server IP Address» пропишите IP-адрес сервера CCBoot, который также является вашим DHCP-сервером.
Значение полей «Write-back File Path» и «Image Save Path» установите в соответствии с вашими пожеланиями.
«Write-back File Path» используется для хранения данных, полученных от клиентов. Для этого рекомендуется использовать диски большого объема с файловой системой NTFS и размером кластера 32K.
«Image Save Path» используется для хранения iSCSI загрузочных образов. Диски также должны быть отформатированы в файловой системе NTFS с размером кластера 32K. Рекомендуется использовать быстрые диски, например SAS.

Рисунок 5
На шаге «Server Cache Settings» оставьте все значения по умолчанию.

Рисунок 6
На шаге «Other Settings» также оставьте все значения по умолчанию. Нажмите кнопку Готово и в появившемся окне подтвердите перезагрузку.
Создание системного образа WinXP для бездисковой iSCSI загрузки
Для бездисковой загрузки Windows XP необходимо сперва создать образ системы Windows XP и сохранить его на сервере CCBoot. Для этого:
Выберите один компьютер с жестким диском в качестве эталонного компьютера, с которого будет сниматься образ системы и затем сохраняться на сервер.
Удалите все существующие разделы на жестком диске. Создайте небольшой MBR-раздел объемом примерно 40 Гб, остальное пространство оставьте неразмеченным. Отформатируйте созданный раздел в системе NTFS. Установите на него Windows XP.
На эталонный компьютер установите драйверы для сетевой платы, чипсета и другие драйвера низкого уровня.
Откройте свойства сетевого подключения и настройте их так, как показано ниже:
Рисунок 7
Нажмите кнопку Свойства.
Рисунок 8
Выберите «Протокол Интернета (TCP/IP) » и нажмите кнопку Свойства.

Рисунок 9
Выберите «Получить IP-адрес автоматически» и «Получить адрес DNS-сервера автоматически», затем нажмите кнопку ОК для сохранения.
В окне программы CCBoot вы увидите нового клиента (PC128) в списке клиентов (Рисунок 10), который был добавлен автоматически в тот момент, когда клиентский компьютер получил IP-адрес от DHCP-сервера CCBoot.

Рисунок 10
Дважды щелкните по клиенту (PC128) для редактирования и в появившемся окне установите галочки напротив «Enable Upload Image» и «Keep Write-back File» (Рисунок 11), затем нажмите кнопку «Save»; на запрос «Are you sure to delete write-back file?» ответьте «Нет».

Рисунок 11
Скачайте инсталляционный пакет клиента CCBoot: http://www.ccboot.com/download.htm. Запустите ccbootsetupclient.exe и нажимайте кнопку Далее до завершения установки. Затем запустите клиент CCBoot (Рисунок 12).

Рисунок 12
Нажмите кнопку «Install CCBoot Client». Когда установка завершится, перезагрузите клиентский компьютер.
После перезагрузки, запустите CCBootClient еще раз, введите нужное значение в поле «Server IP address», это значение должно совпадать с IP-адресом компьютера, на котором установлен сервер CCBoot. В поле «Image File Name» введите имя сохраняемого образа системы эталонного компьютера, нажмите кнопку «Upload Image»для загрузки образа на сервер CCBoot. Затем CCBoot создаст iSCSI-загрузочный образ на сервер в папку, путь к которой был введен в качестве значения в поле «Image Save Path».
Заметка: CCBoot поддерживает два формата файла-образа. Формат образа «.VMDK» поддерживается в случае, если сервер CCBoot установлен на компьютере под управлением операционной системы Windows 2003. Форматы образа «.VMDK» и «.VHD» поддерживается в случае, если сервер установлен на компьютере под управлением операционных систем Window 7 или Windows 2008. Как показано на рисунке 12, формат файла образа зависит от расширения файла, которое вы укажите в названии файла в поле «Image File Name». Например, если Вы пропишите «XP01.vmdk» в поле «Image File Name», это будет означать, что используется формат «.VMDK» файла образа, если Вы пропишите «XP01.vhd», значит, используется формат «.VHD» файла образа.
II. iSCSI загрузка Windows XP по сети
В программе CCBoot на сервере дважды щелкните на клиенте PC128 (Рисунок 10). Откроется мастер настройки свойств компьютера, снимите галочки напротив полей»Enable Upload Image» и «Keep Write-back File».
Отключите жесткий диск от эталонного компьютера, а в качестве первого устройства для загрузки установите «boot from LAN» (или network, PXE rom и т.д.) в настройках BIOS-а для бездисковой загрузки (Рисунок 13).

Рисунок 13
Во время первой бездисковой загрузки Вы можете изменить имя компьютера (Рисунок 14).
Рисунок 14
Измените имя компьютера на нужное, нажмите кнопку Enter для продолжения загрузки (Рисунок 15).

Рисунок 15
На сервер CCBoot, по пути «Options» -> «Settings» -> «Default Client Settings» -> «Disk Group» -> press the «>>» button, выберите «XP01.vmdk» в качестве загрузочного образа по умолчанию в поле «System Image Selection».
Описанное в пунктах 2 и 4 проделайте для бездисковой загрузки компьютеров, имеющих такое же аппаратное обеспечение, как и эталонный компьютер.
III. Дополнительные Инструкции
- Образ, который был загружен на сервер в качестве эталонного, может использоваться для бездисковой iSCSI загрузки Windows XP для других компьютеров. Для этого нужно установить драйвера (видео, звук и др.), запустить службу Windows updates и обновить образ через инструмент обновления образа updateimage.
- Если Вы планируете использовать iSCSI бездисковую загрузку Windows XP с одного образа для клиентов с разным аппаратным обеспечением, необходимо включить PnP. Ознакомьтесь со статьей — how to create a single image for all specifications.