
Microsoft Windows operating system has been in almost complete dominance of the PC market since it was first released in 1985. We all remember the good releases like Windows 7, while unforgettable releases like Windows Millenium are ones we’d sooner forget.
One of the best Windows releases to date is Windows XP, with a small number of users continuing to use this 20-year-old operating system on their PC. If you want to experiment with XP today, you could use a Windows XP emulator on Android using the Limbo app.

An emulator is software that allows you to run software on a device it wasn’t made for. For instance, you could run an Android emulator on Windows to give you access to Android apps without needing to own an Android device yourself.
Emulators create the right conditions for older software to work. This is why the most common emulators are game emulators, which allow you to play old console games on your PC, where consoles such as the Wii U can be emulated.
You can do the same with Windows XP. A Windows XP emulator is merely a Windows XP virtual machine, letting you run this older system on newer hardware. The portability of mobile devices, such as Android smartphones and tablets, make it an obvious choice for running a portable Windows XP emulator.
You can control this from your Android device or use VNC to turn XP into a remote desktop, letting you connect and control it from another device such as your PC.

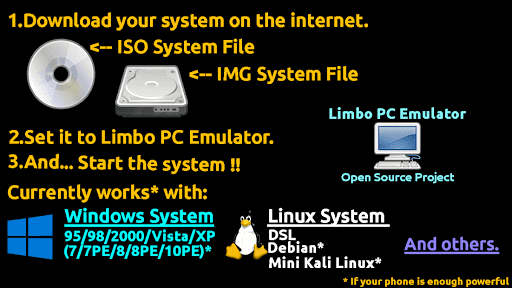
Downloading Windows XP ISO
Before you begin installing your Windows XP emulator, you’ll first need the Windows XP installation files in the ISO image file format.
If you have an old Windows XP installation CD to hand, you can create an ISO file using it. Despite the age of the operating system, you’ll still need a legitimate Windows XP product key to activate Windows.
If you don’t have the old XP installation files to hand, you may be able to locate these online. For instance, you could use the files provided as part of the Windows XP mode software to create an ISO file. This is Microsoft’s own XP emulator, originally for Windows 7 PCs, and is a legitimate source for XP installation files.
Once you have the ISO file, you’ll need to move this to your Android device. If your device has a microSD card, remove and connect this to your PC first before transferring the ISO file to it, then return the card to your device.
Otherwise, use a direct PC-to-Android cabled connection to copy the file to your internal storage. You could also use Bluetooth to transfer your files, but given the size of the ISO file, this could take some time to complete.
Installing Limbo On Android
Once you have the Windows XP installation files accessible on your Android device in the ISO file format, you’ll need to install the Limbo emulator app. The emulator isn’t available in the Google Play Store, so you’ll need to download and install it manually.
You could install the app from your PC using ADB or, alternatively, you can access the Limbo download page from your Android device’s browser and download the latest APK release file (the android-x86-release to emulate PC hardware).
- You’ll need to allow Android APK installations from sources other than Google Play before you can do this. Depending on your Android device version, Android will ask you for permission to install from unknown sources when you attempt to open the APK file. Follow the instructions on-screen to do this.

- Once Android has permission to install apps from unknown sources, attempt to open the APK file again. This will launch the package installer. Tap Install to authorize the installation of the app.

Setting Up Windows XP On Android
You can use Limbo to emulate a PC capable of running Windows XP, using the ISO file to install it on your device.
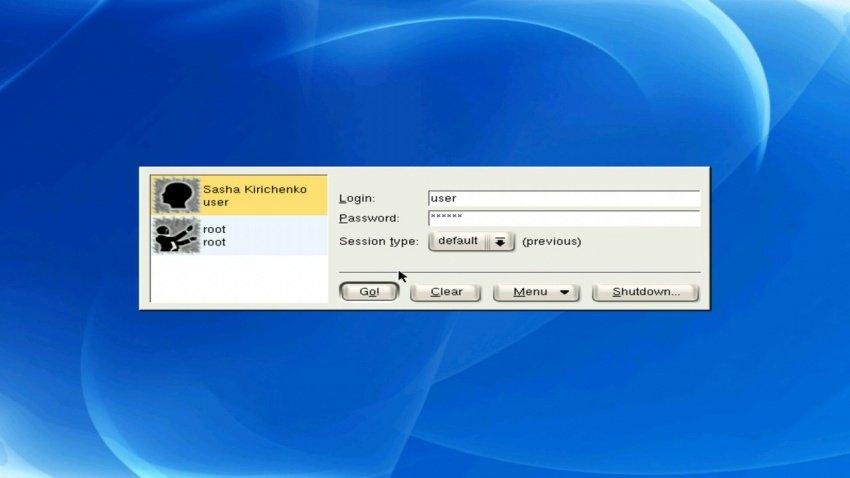
- To start, open the Limbo app. You’ll need to acknowledge the license agreement when you first launch it, so tap I Acknowledge to accept this.

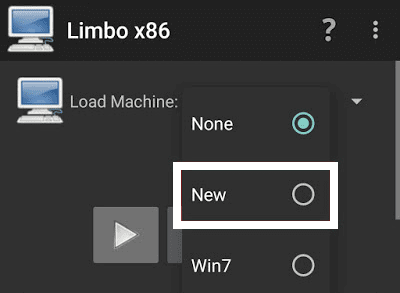
- You can begin setting up the right virtual PC for your XP installation from the main Limbo screen. From the Load Machine drop-down menu, tap Next.

- Give your new virtual machine a name (for instance, Windows XP), then tap Create to confirm.

- Limbo will offer you access to a list of Linux operating systems to download. Click Cancel, as you’re installing Windows from the ISO file instead.

You’ll need to configure your virtual machine settings to emulate the right PC hardware for XP. Tap each section to set the following configuration.
- Under CPU/Board, set the settings to the following: x64 Architecture, PC Machine Type, SandyBridge CPU Model, 2 CPU Cores, 1024 RAM Memory (MB). You can select a higher CPU Cores and RAM Memory (MB) values if your device has more CPU cores and memory available.

- Under Disks, tap the checkbox to enable Hard Disk A. Select New from the drop-down menu, give the image a name, set a minimum size of 2GB, then tap Create.
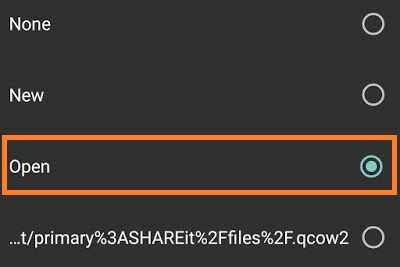
- Under Removable, tap Open next to CDROM. Select the XP ISO file here.

- Under Boot, set Hard Disk as the Boot from Device option.
- Under Graphics, set vmware as the Video Display option.

- For security reasons, it isn’t sensible to provide an internet connection to your XP emulator. If you understand the risks, you can do this under the Network section before you launch it.
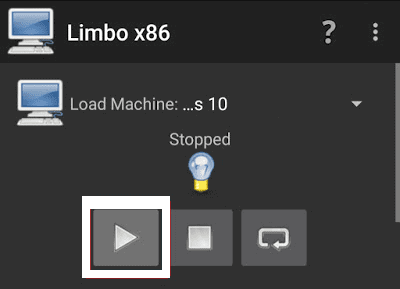
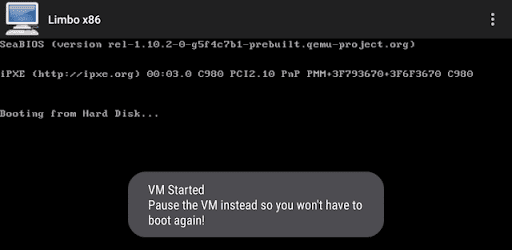
- Once your settings are in place, tap the play/start button to begin running the XP emulator on your device.

Accessing The Windows XP Emulator
You can access the Windows XP emulator using the Limbo app as soon as you press Play. The settings above are designed to allow you to use XP from your device, using the touch screen to move the mouse cursor. You can also use a Bluetooth mouse and keyboard for easier access.
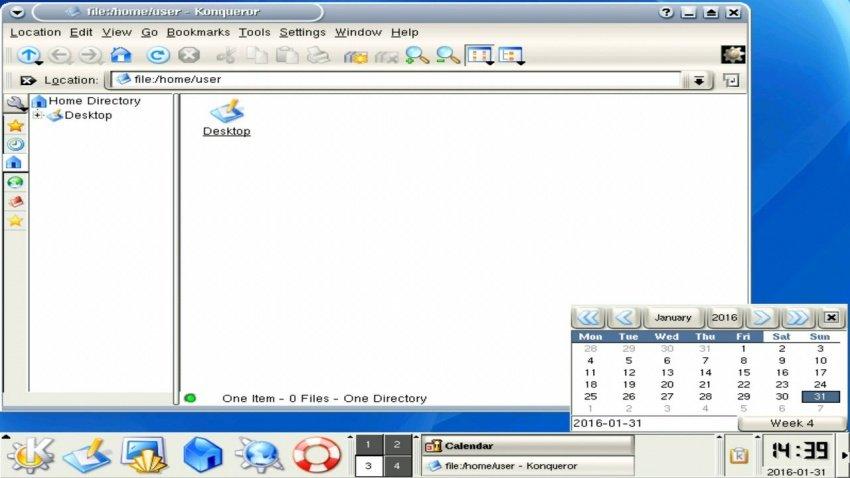
You’ll need to follow the on-screen instructions when you first launch your virtual machine to install XP to the virtual hard drive file you created. This will follow a typical XP setup, letting you configure your locale and other XP settings. The installation may take some time to complete.

Once XP is installed, you can begin using it how it was designed to be used. You’ll need to remove the XP ISO from the Removable section to ensure that the ISO file doesn’t load the installer files, however.
If you want to access XP remotely, you’ll need to change the User Interface setting from SDL to VNC to be able to use a VNC client like VNC Viewer on your PC to remotely access the emulator while it runs on your device.
Leaving Windows XP Behind
If you need to run old software, or you’re just keen to play an old-school PC game, using Limbo to run Windows XP on Android offers a quick and easy way to do it. If you want a newer operating system to try, you could install Linux on Android, either directly or as a virtual machine.
Windows XP is a very old operating system, however. If you know anybody using XP on their own PC, make sure to recommend that they upgrade to Windows 10 urgently to get the newest features and security. If you’re running Windows 10 yourself, don’t forget to keep Windows updated for the same reasons.
Related Posts
- How to Rename Bluetooth Devices in Windows, Android, iOS, and Mac
- How to Check AirPods Battery in Android and Windows
- How to Transfer Files from iPhone or Android to PC
- View Photo EXIF Metadata on iPhone, Android, Mac, and Windows
- Scale Down an Image in Windows, Mac, iOS, and Android
With the help of this tutorial, you can easily boot Win XP ROM on your device without using any computer or rooting your expensive device.
Android is a Linux based OS which empowers the user with the functionality that is best for them. It provides you advanced features like multi-tasking, security, fast and responsive user interface. It also helps you to boot any other OS on your device without any headache.
Most of the geeks who do not want to root their expensive device, prefer to use Windows Launcher on their devices. But in this tutorial, I will show you step by step guide (Blueprint) to install Windows XP on your device using Limbo PC emulator without root.
How to Install Windows XP on Android using Limbo Emulator
Required files:
- Download Windows XP image (ROM) file and keep it in your Micro SD card. Click here
- And then download and install Limbo PC emulator. Click here to download.
Follow the below tutorial:
Note: I assume that you have already downloaded the required files from the above links.
- Install the Limbo pc emulator in your android device (either tablet or mobile) and open the app.
- At your Limbo dashboard, You will have a dropdown menu for load machine. You need to tap the dropdown menu and then select “New.” see below picture.

- Now, a pop-up window will appear. You need to enter the name of the your new virtual machine and then click on ‘Create‘. see below picture
- Now you need to select PC in Architecture option.
- Now you need to select x64 in Machine Type option.
- Then you have to select SandyBridge in CPU Model option:
- After that you have to choose 4 Cores in CPU cores option.
- Then after you need to select 880 MB RAM in RAM memory option. You can select more RAM if your device has more than enough RAM.
- Hard disk option: Here you need to select the “OPEN” option. After that, you will be redirected to your SD card. Now you need to locate the downloaded windows XP ISO file and then select the file.

- Device option: Here you need to select Hard Disk in the boot settings.
- VGA Display option: Here you need to select Vmware.
- User Interface option: Here you need to select SDL.
- Now you need to match all the settings as shown in the below picture one by one.
- Now you need to click on Play Option. It will start booting process of windows xp.

- While booting being in process. You device screen will look something like below picture.

- When the booting process will be 100% completed. You device screen will look something like below picture.

- That’s it.

I hope that the above step by step guide has helped you for installing Windows XP on your android device (tablet or mobile) without root using limbo emulator.
Для работы проектов iXBT.com нужны файлы cookie и сервисы аналитики.
Продолжая посещать сайты проектов вы соглашаетесь с нашей
Политикой в отношении файлов cookie
Прошлый пост о том, как на Android работает Windows 95, доказал, что Limbo — вещь годная. Не такая шустрая, как QEMU, но вполне сносная. И на ней — о Боги — запустился Fallout! С минимальным фреймрейтом, но играть было можно. Так что теперь, используя сие благословение цифровых богов, можно заняться тем, чем я, собственно, и хотел заняться ранее. А именно — тестировать различные игры и ОС. Начну с последнего.
Итак, Windows 95 от MVoloshin я проверил, всё работает, запускается F1, скорость не самая шустрая, но удобоваримая. Разрешение экрана меняется, Интернета нет, диски подключаются без особых проблем. От того же MVoloshin есть микро-образ Windows 98, в распакованном варианте весящий чуть больше 130 мегабайт. Что, если мне не изменяет память, меньше, чем весит W95. Занятно.
С параметром в 392 мегабайта оперативной памяти ОС загружаться не захотела, пришлось понизить значение до 92. Загрузилась система раза в три быстрее, чем Windows 95, но это и немудрено, ведь установленных программ в ней почти нет. Только пара стандартных. На ней было бы забавно протестировать игры на наличие в ОС драйверов, но это уже будет чуть позже.

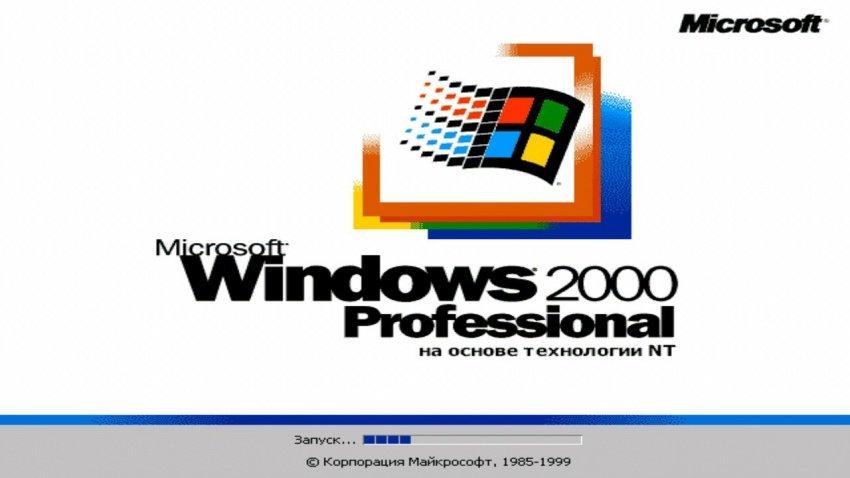
Следующей в очереди является Windows 2000 от germantm7025. Образ в распакованном виде весит почти 800 мегабайт, что должно стать первым мало-мальски серьёзным испытанием для Limbo. Версия, которую я добыл, является Win2000 Professional «на основе технологии NT». После минутной загрузки меня встретил экран профиля. Нажав «ОК», я после ещё минутного ожидания попал на голубой экран, на котором появились сначала меню «Пуск», а после — иконки приложений.
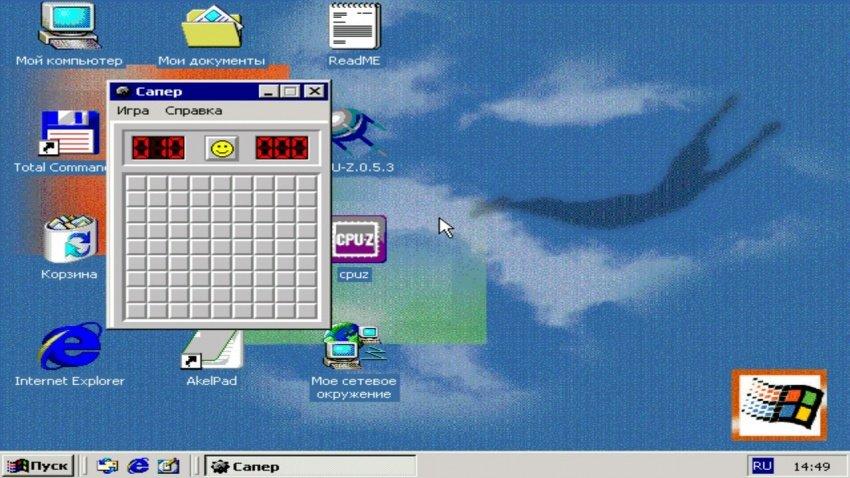
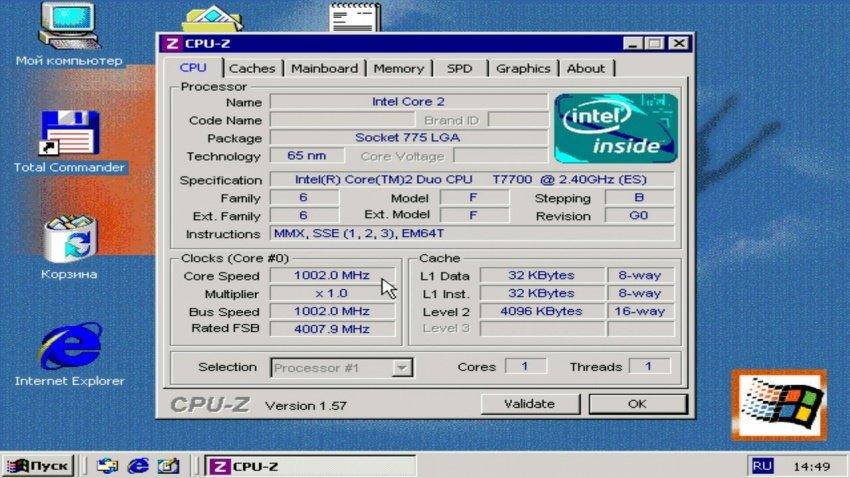
Программ — как собак блохастых. Total Commander, uTorrent, CPU-Z/GPU-Z, AkelPad, QiP 2010. Стандартные, включая Outlook, Word и Internet Explorer, тоже на месте. В общем, полный фарш. Интернет, впрочем, не хочет работать (или я просто не знаю, как его настроить на Windows 2000, что более вероятно). Максимальное разрешение экрана — 1280 х 1024 точки. И да, предустановленные игры вроде Сапёра, Косынки и даже Пинбола в образе есть!
Настала очередь культовой «хрюши», Windows XP. Я использовал сборку от всё того же MVoloshin, оригинальную версию без пакета обновлений, вышедшую в 2001 году. Весит сборка 1 гигабайт, запускается довольно долго, и не содержит в себе ничего лишнего. Но и без вырезки встроенных приложений на сей раз обошлось.
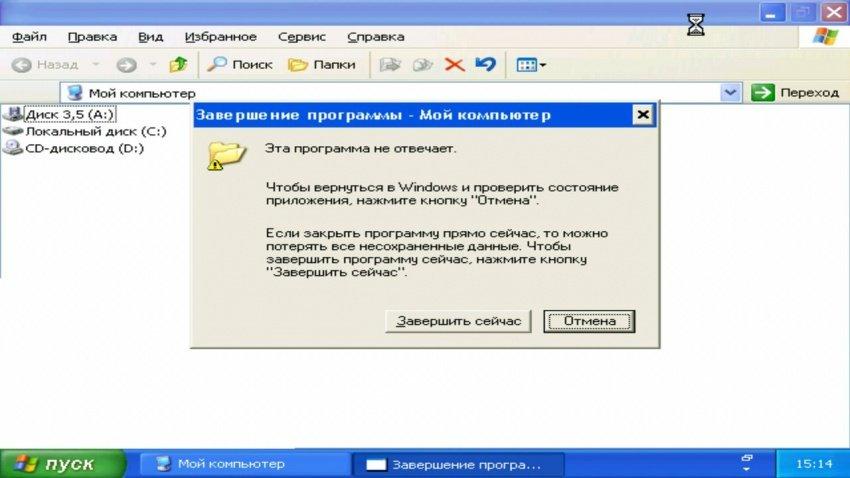
Последнее сказалось, кстати, довольно критичным, так как именно в XP у меня в первый раз зависло одно из окон. Если быть точным, то «Мой компьютер», при попытке посмотреть на интерфейс дисков. Ну, соскучился я по нему, захотелось мне. И окно зависло. Так что если нужна работоспособность повыше, то лучше выбрать менее увесистый образ.
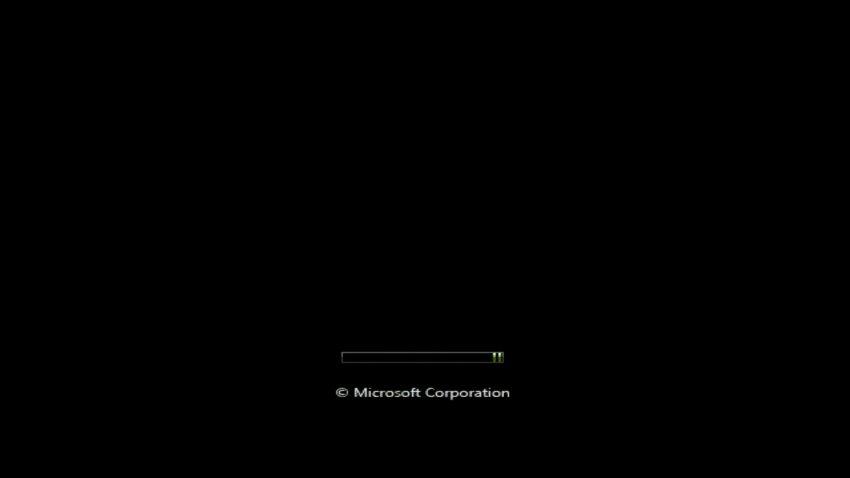
Повышаем ставки! Windows 7, Сборка Live CD от всё того же MVoloshin, урезанная версия, занимающая всего 500 мегабайт в распакованном виде и с оболочкой в виде стандартного интерфейса Windows из более старых представителей. Первый запуск прошёл печально и безуспешно, так как уперся в ошибку загрузки диска. А всё дело в том, что сборка Live CD предназначается для загрузки с CD-ROM, а не в качестве жесткого диска.
После обратной смены имени, выставления оперативки чуть поболее, чем 96 мегабайт, я… запустил процесс. Прошло три минуты, прежде чем мои глаза узрели надпись «Starting Windows». Ещё через минуту появился анимированный логотип. И тут я понял, что пора идти ставить чай… Или что-нибудь покрепче, а-ля кофе или кефир.
Предсказав время загрузки в 10 минут, я ошибся и был сему факту обрадован, так как уже через две минуты увидел курсор, которым даже можно было двигать. К сожалению, двигать им можно было на чёрном экране, который пропал… аккурат на десятую минуту. Сменить фамилию на «Ванга», что ли? Вместо чёрного экрана, кстати, появилась фоновая картинка, в которую я пялился ещё минут сорок. И десять минут настраивался рабочий стол.
Итого — час реального времени до полной загрузки. Работоспособность ОС, разумеется, я ставлю под вопрос, запуск приложений — тоже. «Мой компьютер» открывался три с лишним минуты, про более серьёзные задачи говорить не буду. В общем, запустить-то я вещь запустил, но большего добиться не смог.

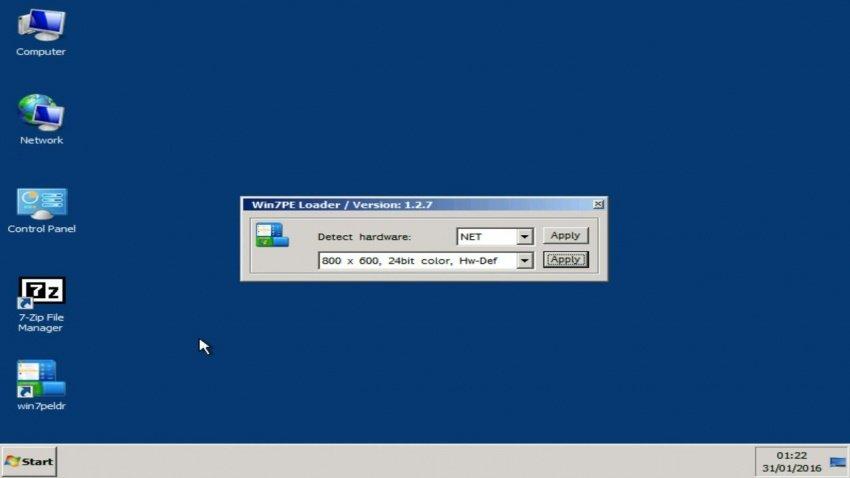
Если же у тебя возникнет нужда в Win 7 на Android, а ждать час загрузки — не вариант, то единственное, что я могу предложить, это Windows PE, он же — Preinstallation Environment. Сборки с подобным названием урезаны самими разработчиками, и позволяют загружаться с флешек, дисков и прочих миниатюрных носителей информации. А моя версия 3.0 от AndrewAVX ещё и полностью совместима с приложениями для Windows 7, что должно быть идеальным вариантом для работы.
К сожалению, на моём устройстве с рекомендуемыми параметрами:
Интерфейс: VNC,
Процессор: Phenom/Core2Duo/KVM,
Количество ядер: на выбор,
ОЗУ: от 176 до 512 МБ
Устройство загрузки: CD ROM,
Видеокарта: любая
Включенные «Multithread AIO» и «Высокий приоритет».
… сборка всё равно не запустилась по непонятным причинам. Надеюсь, у других это получится лучше.
На закуску я проверю Linux. Запускать эту ОС на Android для знающих людей — всё равно, что жарить куриное филе в яйце. Почти что тавтология, зато обычно получается вкуснятина. Так вот, я буду запускать версию с KDE от AntiBillOS. Образ весит немного, но для входа в учётную запись требуется пароль — 111111, который нужно ввести. Без клавиатуры этого сделать никак нельзя, поэтому пришлось подключать свою, от компьютера, через OTG.
Система работает не то, чтобы шустро, но и не тормозит, как Семёрка. Меня позабавило, как панель задач по нажатию на стрелочку уехала вбок, я такого поворота событий никак не ожидал, и завороженно смотрел за её движением, ожидая, насколько глубоко она уйдёт, и можно ли будет её потом достать оттуда. Вряд ли вместе с виртуальной лупой в ОС встраиваются виртуальные клещи…

Но всё обошлось, я запустил «Home», и понял, что в Linux на удивление часто проскакивают двойные нажатия, когда я того не хочу. В целом, работоспособность на 6 из 10, скорость средняя, а зачем нужен Linux на Android — я понятия не имею.
В следующий раз я загляну чуть поглубже в прошлое, и достану из пыльных закоулков Интернета образы ОС, которые могут быть даже старше меня. Устроим небольшую археологическую раскопку!
Table of Contents
- LIMBO FOR ANDROID DEVICES
- Download LIMBO X86
- DOWNLOAD WINDOWS XP
- Download from google drive
Windows xp is an operating system that does not consume many resources, we can install it in limbo with an emulator of our android device, however, this operating system contains many vulnerabilities, but in the same way this super well do emulation tests on our android. Because it makes us think about everything that has been done to be able to how it is possible to process an operating system on our android and of course the factors for processing, RAM, CPU etc..
As we can install windows xp on our android terminal, we must first use an emulator that allows us to virtualize the OS.
Little by little the windows and MacOS operating systems evolved, and a few years ago windows reached such a great popularity.
On a large scale, android terminals are evolving as PCSs did, with more and more power, storage and performance, but the software has more and more features and functions.
On the other hand, windows xp is an operating system that is already dead, and we saw it in old computers that today do not compare with anything to what we know today.
The devices are capable of handling large amounts of information in a matter of seconds.
In order to install Windows XP on our terminal, we will do it by means of a program called LIMBO.
This program can be easily found and allows us to mount images of operating systems such as Linux, windows, ubuntu, etc.
To install it just download the apk or from the play store.
Once installed, follow the steps in the video at the bottom of this post.
Previously we will configure and start the operating system, it may take a few minutes to start because the speed of the processor is very limited.
Now we can use the operating system, I recommend that you use an external mouse for convenience.
2018-01-21
Limbo v2.10.0
— Overrun with QEMU 2.10.0
— Windows is compatible
— Fixed UI issue when updating values randomly — Acquisition
and appropriate releases of Wifi and Wake locks
— Corrected the units dialog box — Corrected the
memory leaks in the user interface
— On the move to support Android Studio development onwards.
— Minimum requirements: Android OS 4.2+
LIMBO FOR DEVICES OF ANDROID
Download LIMBO X86
DOWNLOAD WINDOWS XP
Download from google drive
How to Hack Facebook with termux from your android WITHOUT ROOT
Windows XP — одна из самых популярных операционных систем, которая была выпущена в 2001 году. Даже спустя много лет после выпуска, многие пользователи всё ещё предпочитают использовать Windows XP из-за его простоты и надёжности. Если вы хотите воссоздать атмосферу работы с Windows XP на вашем современном компьютере, то у вас есть отличная возможность использовать эмулятор Limbo.
Limbo — это эмулятор, который позволяет запускать ряд операционных систем на разных архитектурах, в том числе и Windows XP. Чтобы запустить Windows XP на Limbo, вам необходимо создать образ самой операционной системы. В данной статье мы рассмотрим подробную инструкцию, которая поможет вам создать образ Windows XP для эмулятора Limbo.
Прежде всего, вам потребуется оригинальный дистрибутив Windows XP. Вы можете приобрести лицензионную копию или воспользоваться уже имеющейся у вас установочным диском. Помимо этого, необходимо будет загрузить программу для создания образов дисков, такую как ISO Recorder, и образ установочного диска Windows 7. Если у вас нет доступа к компьютеру с Windows XP и образу установочного диска Windows 7, то вы можете воспользоваться поиском в Интернете для их скачивания.
Обратите внимание: Важно соблюдать законодательство об авторских правах и не использовать пиратские копии программного обеспечения.
Шаг 1 — Установка эмулятора Limbo
Перед тем, как начать создавать образ Windows XP для эмулятора Limbo, вам потребуется установить сам эмулятор на ваше устройство. В этом разделе мы пошагово рассмотрим процесс установки Limbo.
1. Перейдите на официальный сайт Limbo и скачайте последнюю версию эмулятора.
2. После загрузки файла установщика, запустите его и следуйте инструкциям по установке. Обычно установщик Limbo предлагает выбрать путь для установки и указать язык интерфейса.
3. После установки запустите эмулятор Limbo. Вам будет предложено создать новый виртуальный компьютер или загрузить уже существующий образ операционной системы.
4. Для создания нового виртуального компьютера вам потребуется настроить такие параметры, как тип процессора, объем оперативной памяти, размер жесткого диска и другие. Выберите настройки в соответствии с требованиями вашей системы и требованиями операционной системы Windows XP.
5. После настройки параметров виртуального компьютера, выберите образ операционной системы Windows XP. Если у вас уже есть образ, просто укажите путь к нему. Если нет, вы можете использовать оригинальный дистрибутив Windows XP и создать из него образ. Для этого откройте Limbo и перейдите в настройки виртуального компьютера, затем выберите опцию для создания нового образа.
6. После выбора образа операционной системы, можно приступать к запуску эмулятора. Нажмите «Start» или «Запустить», и Limbo начнет выполнение виртуального компьютера.
Теперь, когда у вас установлен эмулятор Limbo, вы можете перейти к следующему шагу — созданию образа операционной системы Windows XP.
Шаг 2 — Загрузка образа Windows XP
1. Проверьте системные требования:
Перед тем, как загрузить образ Windows XP, убедитесь, что ваш компьютер или эмулятор Limbo соответствуют следующим системным требованиям:
— Процессор: Pentium 233 мегагерц (МГц) или лучше;
— Оперативная память: 64 МБ;
— Пространство на жестком диске: 1.5 ГБ;
— Графический адаптер: Super VGA (800 x 600) или выше;
— CD- или DVD-привод;
— Клавиатура и мышь или совместимое устройство указания.
2. Получите образ Windows XP:
Существуют несколько способов, как получить образ Windows XP:
— Если у вас есть лицензионный диск с Windows XP, вы можете создать образ диска с помощью специального программного обеспечения, такого как ImgBurn;
— Если у вас нет лицензионного диска, вы можете скачать образ Windows XP с официального веб-сайта Microsoft или с других надежных источников;
— Учтите, что загрузка и использование пиратских копий Windows XP является незаконным и может привести к юридическим последствиям.
3. Сохраните образ Windows XP на компьютере:
После того, как у вас есть образ Windows XP, сохраните его на вашем компьютере в удобном для вас месте.
Образ Windows XP обычно представляет собой файл с расширением .iso или .img
4. Готово!
Теперь у вас есть образ Windows XP, который можно будет использовать для создания эмулятора Limbo и запуска Windows XP на вашем компьютере.
Шаг 3 — Создание виртуальной машины
После того, как вы установили эмулятор Limbo на своем устройстве, необходимо создать виртуальную машину, на которой будет работать Windows XP.
1. Запустите эмулятор Limbo и откройте вкладку «Настройки».
2. В разделе «Создать виртуальную машину» нажмите на кнопку «Добавить».
3. Введите название виртуальной машины, например «Windows XP».
4. Выберите операционную систему «Windows» и ее версию «Windows XP».
5. В разделе «Сетевая карта» выберите тип подключения «NAT».
6. Установите количество оперативной памяти (ОЗУ), например 512 МБ.
7. В разделе «Слот для USB» установите значение «USB 2.0».
8. Установите количество процессоров, например 1.
9. В разделе «Жесткий диск» выберите тип диска «Файл образа» и укажите путь к образу Windows XP, который вы создали на предыдущем шаге.
10. Нажмите кнопку «Сохранить» для создания виртуальной машины.
Теперь вы создали виртуальную машину, на которой будет запущена Windows XP в эмуляторе Limbo. Вы можете перейти к следующему шагу — настройке виртуальной машины.
Шаг 4 — Установка Windows XP в эмулятор Limbo
После того как мы подготовили образ Windows XP для эмулятора Limbo и настроили все необходимые параметры, мы можем приступить к установке операционной системы.
Для этого выполните следующие действия:
- Запустите эмулятор Limbo.
- Нажмите на кнопку «Load Machine», чтобы загрузить созданный нами образ Windows XP.
- Выберите загруженный образ в списке доступных машин и нажмите кнопку «Start» для запуска виртуальной машины.
- В открывшемся окне эмулятора выберите пункт «Boot from CD-ROM» и нажмите «Enter», чтобы загрузиться с установочного диска Windows XP.
- Дождитесь завершения загрузки и следуйте инструкциям на экране для установки Windows XP.
- На этапе выбора раздела для установки операционной системы выберите ранее созданный виртуальный диск.
- После завершения установки Windows XP перезапустите виртуальную машину.
Поздравляю! Теперь у вас установлена Windows XP в эмуляторе Limbo. Вы можете начинать использовать операционную систему и настраивать ее под свои потребности.