
Item Preview
There Is No Preview Available For This Item
This item does not appear to have any files that can be experienced on Archive.org.
Please download files in this item to interact with them on your computer.
Show all files
13,340
Views
6
Favorites
3
Reviews
DOWNLOAD OPTIONS
Uploaded by
bigspoon88
on
SIMILAR ITEMS (based on metadata)
- Главная
- Сборки форумчан. (трекер)
- LiveCD/DVD/Flash
- Сборки OS Windows
| Статистика раздачи |
|
Размер: 2.73 GB | Зарегистрирован: 3 года 7 месяцев | Скачан: 53 раза |
|
Сидов: 14 [ 0 KB/s ] Подробная статистика пиров |
|
|
Отправлено: 09-Май-2016 15:57
Отправлено: 09-Май-2016 15:57
|
В сборке присутствует набор драйверов IDE/SATA/SAS/SCSI/RAID в папке C:\DP_MassStorageЕсли нет необходимости в AHCI драйвере, но загрузка прерывается BSOD (неподходящий драйвер) или компьютер зависает, используем: Установка1. Разворачиваем образ TBI с помощью TeraByte Image на жесткий диск. Если сборка разворачивается на первый раздел, отмечаем галочками следующие опции восстановления: Особенности— Пакет обновления SP3. Патчиacpi.sys — ACPI Patch v6.0.5048 (2019.11.1) для поддержки Intel 370/390 и AMD Ryzen. Программы.NET Framework 1.1-4.0 Контрольная суммаBackup_ALL_WinXP_Pro.TBI
Скриншоты:Скачать можно по ссылке:
Последний раз редактировалось: Viktor_Kisel (2023-06-05 10:40), всего редактировалось 106 раз(а) |
Отправлено: 14-Сен-2020 21:58
(спустя 4 года 4 месяца)
Отправлено: 14-Сен-2020 21:58
(спустя 4 года 4 месяца)
Viktor_Kisel |
Что, совсем без шансов? даже пытаться не стоит? А что пытаться? Если нету USB2.0 их не нарисуешь. 3. Удачная загрузка — Открывается командная строка, где бежит куча строк или что-то в этом роде. Пара секунд, снова ловлю тоже самое окно. Питания на клаве с мышкой так и нет. А должны установиться: Generic USB 3.0 xHCI driver v1.1 — универсальный USB 3.0 драйвер для Windows XP, портированный с Windows 8 + Intel SATA 4.7.0.1098. 5. При загрузке заместо логотипа Windows XP вижу черный экран. Попробовать удалить файл Windows\DriverPack\DRV\MassStorage.7z (с Intel SATA 4.7.0.1098) перед вторым запуском WinXP (можно сразу удалить до первого запуска). но не понял про ACPI. Что нужно сделать, чтобы сменить драйвер? В тупую его заменить в директории на другой? Делать это до первого старта? или после? Просто заменить до первого старта! |
Отправлено: 14-Сен-2020 22:05
(спустя 7 минут)
Отправлено: 14-Сен-2020 22:05
(спустя 7 минут)
cwdlcs |
80328
cwdlcs Что, совсем без шансов? даже пытаться не стоит? А что пытаться? Если нету USB2.0 их не нарисуешь. 3. Удачная загрузка — Открывается командная строка, где бежит куча строк или что-то в этом роде. Пара секунд, снова ловлю тоже самое окно. Питания на клаве с мышкой так и нет. А должны установиться: Generic USB 3.0 xHCI driver v1.1 — универсальный USB 3.0 драйвер для Windows XP, портированный с Windows 8 + Intel SATA 4.7.0.1098. 5. При загрузке заместо логотипа Windows XP вижу черный экран. Попробовать удалить файл Windows\DriverPack\DRV\MassStorage.7z (с Intel SATA 4.7.0.1098) перед вторым запуском WinXP (можно сразу удалить до первого запуска). но не понял про ACPI. Что нужно сделать, чтобы сменить драйвер? В тупую его заменить в директории на другой? Делать это до первого старта? или после? Просто заменить до первого старта! Понял, спасибо. Завтра буду пробовать. |
Отправлено: 14-Сен-2020 22:21
(спустя 16 минут)
Отправлено: 14-Сен-2020 22:21
(спустя 16 минут)
Viktor_Kisel |
|
Отправлено: 15-Сен-2020 13:40
(спустя 15 часов)
Отправлено: 15-Сен-2020 13:40
(спустя 15 часов)
cwdlcs |
Просьба проверить завтра следующие 3 варианта: а)через WinPe разворачиваю образ, заменяю тупым копированием acpi.sys. 2) До первого запуска под WinPE сменить файлик ACPI и при первой загрузке выбрать: Backup/Restore and Partition Work. Произойдет «Remove all drivers» и подберется нужный SATA AHCI драйвер и далее все как обычно. С этим вариантом ситуация аналогична первому. 3) До первого запуска удалить файл Windows\DriverPack\DRV\MassStorage.7z (с Intel SATA 4.7.0.1098) и проверить после второго ребута на третьей загрузке — будет черный экран или загрузится нормально? Этот вариант не привел к успеху с установкой драйверов на юсб. Но если вместе с ним заменить ACPI, то получим ситуацию, как и в первом случае. Последний раз редактировалось: cwdlcs (2020-09-15 18:46), всего редактировалось 6 раз(а) |
Отправлено: 15-Сен-2020 18:42
(спустя 5 часов)
Отправлено: 15-Сен-2020 18:42
(спустя 5 часов)
cwdlcs |
|
Отправлено: 15-Сен-2020 20:07
(спустя 1 час 24 минуты)
Отправлено: 15-Сен-2020 20:07
(спустя 1 час 24 минуты)
Viktor_Kisel |
|
Отправлено: 15-Сен-2020 20:22
(спустя 15 минут)
Отправлено: 15-Сен-2020 20:22
(спустя 15 минут)
cwdlcs |
80357
cwdlcs Понял, спасибо. Завтра буду пробовать |
Отправлено: 15-Сен-2020 20:27
(спустя 5 минут)
Отправлено: 15-Сен-2020 20:27
(спустя 5 минут)
Viktor_Kisel |
Может еще и драйвер Intel HD 530 где-то валяется под рукой? :)) Snappy Driver Installer (SDI_RUS) — хватает для таких случаев |
Отправлено: 21-Окт-2020 15:20
(спустя 1 месяц 5 дней)
Отправлено: 21-Окт-2020 15:20
(спустя 1 месяц 5 дней)
OmTatSat |
|
Отправлено: 21-Окт-2020 18:12
(спустя 2 часа 52 минуты)
Отправлено: 21-Окт-2020 18:12
(спустя 2 часа 52 минуты)
UserX |
80978
Правда не полностью полноценно Загляните сюда — Windows XP SP3 2020 — сборка системы для современного ПК. |
Отправлено: 28-Ноя-2020 19:22
(спустя 1 месяц 7 дней)
Отправлено: 28-Ноя-2020 19:22
(спустя 1 месяц 7 дней)
Viktor_Kisel |
|
Отправлено: 28-Ноя-2020 19:58
(спустя 36 минут)
Отправлено: 28-Ноя-2020 19:58
(спустя 36 минут)
Ander_73 |
81634
5.1.2600.7017 Дык вроде вот: Каталог Центра обновления Майкрософт www.win-raid.comWindows XP (32-bit) Kernel update dates (compile date time stamp in ntoskrnl.exe, Y.M.D H:M:S): Список обновлений«SP3QFE\ntkrnlpa.exe» = «_sfx_0000._p», «_sfx_.dll» |
Отправлено: 28-Ноя-2020 21:00
(спустя 1 час 1 минута)
Отправлено: 28-Ноя-2020 21:00
(спустя 1 час 1 минута)
Viktor_Kisel |
|
Отправлено: 28-Ноя-2020 21:20
(спустя 20 минут)
Отправлено: 28-Ноя-2020 21:20
(спустя 20 минут)
Ander_73 |
|
Отправлено: 28-Ноя-2020 21:26
(спустя 5 минут)
Отправлено: 28-Ноя-2020 21:26
(спустя 5 минут)
Viktor_Kisel |
пока искал хотфикс раз …дцать прочитал, что он вызывает БСОД и его надо сносить сразу, как только вдруг случайно он завёлся. Хрен его знает, у меня ntkrnlmp.exe(7649) — заменю для начала на ntkrnlmp.exe(7581) |
Страница 28 из 29
Показать сообщения:
Текущее время: 14-Май 19:08
Часовой пояс: UTC + 3
Вы не можете начинать темы
Вы не можете отвечать на сообщения
Вы не можете редактировать свои сообщения
Вы не можете удалять свои сообщения
Вы не можете голосовать в опросах
Вы не можете прикреплять файлы к сообщениям
Вы можете скачивать файлы
-
Home
-
News
- How to Create Windows XP Bootable USB Drive Easily
By Shirley | Follow |
Last Updated
This post on MiniTool introduces how to create Windows XP bootable USB drive via different media creation tools. If you are not familiar with the Windows XP bootable drive creation process, continue reading to find detailed instructions.
Although Windows XP is outdated (mainstream support ended on April 14, 2009, and extended support ended on April 8, 2014) and no longer receives security updates, there are still many users who insist on using the XP system due to habit, compatibility needs, or emotional factors.
It may not be so easy to install an outdated Windows operating system. Here we will show you how to make a Windows XP bootable USB drive, then you can use it to install the system.
How to Create Windows XP Bootable USB
In the following part, we will introduce two useful tools to make a Windows XP bootable USB drive.
Preparations:
1. Prepare a USB drive and format it to the NTFS file system.
When making a boot drive, boot information and operating system files will be written to the USB drive. Therefore, you need to back up files on the USB flash drive and format that drive in advance.
Connect the USB drive to your computer, then press the Windows + E key combination to open File Explorer. Next, right-click the USB drive and choose Format. In the pop-up window, choose the NTFS file system, tick the Quick Format option, then click Start.
Alternatively, you can use a professional and free partition management tool, MiniTool Partition Wizard, to format the USB drive for free. This tool helps you avoid various disk formatting errors in File Explorer.
MiniTool Partition Wizard FreeClick to Download100%Clean & Safe
2. Download the Windows XP ISO file.
No matter which method you choose to take listed below, you will need to have a Windows XP ISO file.
This article may be helpful: Free Download Windows XP ISO: Home & Professional (32 & 64 Bit)
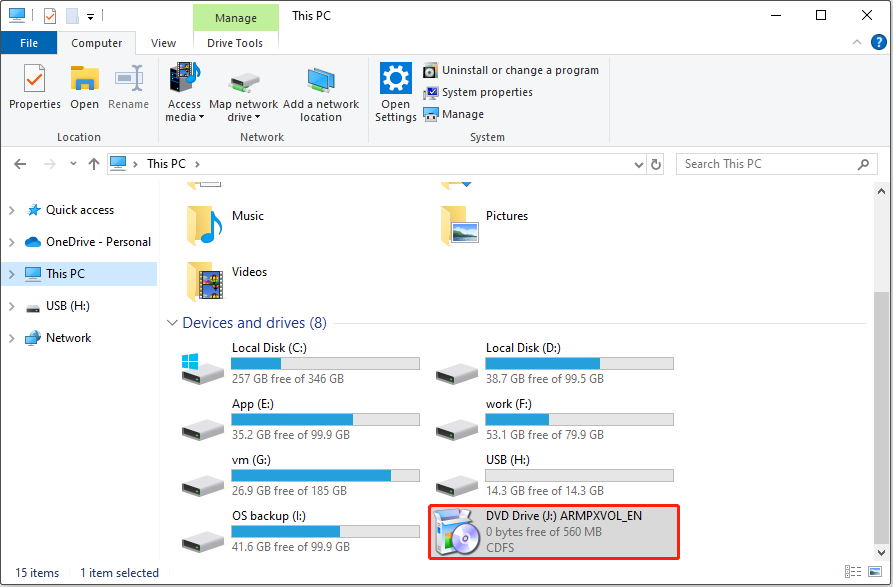
After that, create a new folder on your desktop or another convenient location, and name it Windows XP. Next, double-click the DVD Drive in File Explorer to open it, then copy all the files and paste them to the newly created Windows XP folder.
Way 1. Make Windows XP Bootable USB Using WinSetupFromUSB
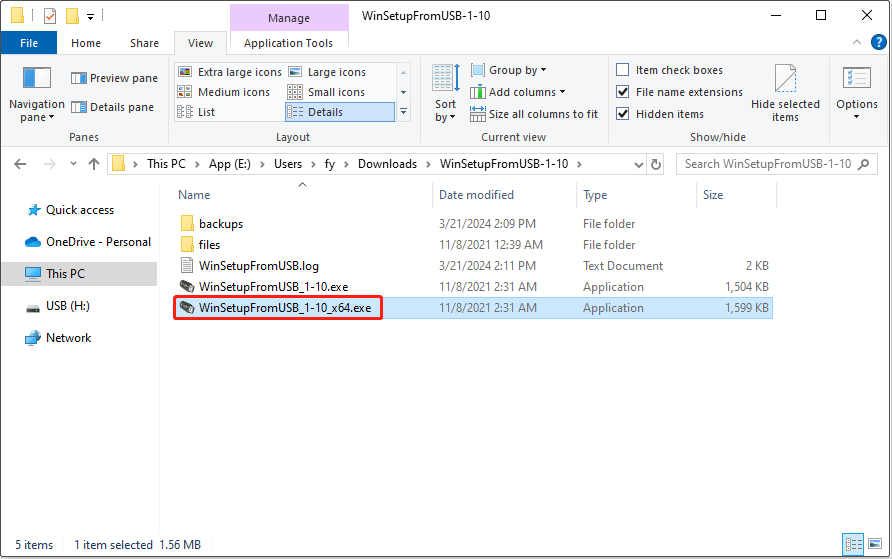
WinSetupFromUSB is a Windows program for creating multi-boot USB flash drives to install various operating systems, including Windows and Linux. You can use this tool to create a Windows XP bootable drive by referring to the steps below.
Step 1. Download WinSetupFromUSB on your computer. You need to follow the instructions on your screen to extract the archive file to another location and then double-click on the extracted exe file to run the software.
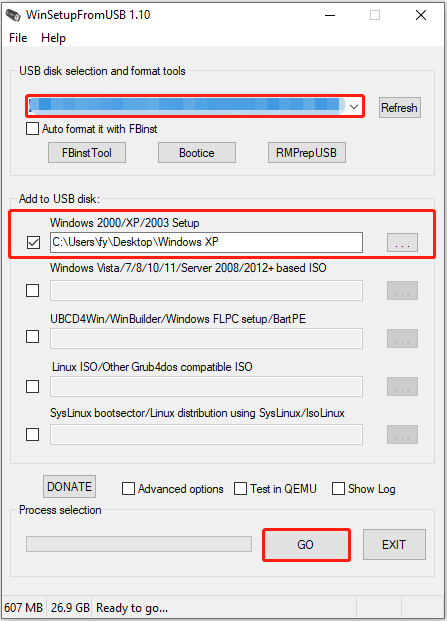
Step 2. The formatted USB disk should be automatically selected under USB disk selection and format tools. You need to tick the Windows 2000/XP/2003 Setup checkbox and then click the three-dot icon on the right side to select the Windows XP folder.
In the new pop-up window, click I accept to continue. Finally, click the GO button to start the bootable drive creation process.
Once the bootable USB drive is created, you can connect it to the computer where you want to install Windows XP and boot from the USB drive, then follow the on-screen instructions to complete the installation task.
Tips:
If you need to recover files from a formatted USB drive, you can try MiniTool Power Data Recovery. This secure and reliable file recovery tool supports recovering files under various data loss situations, such as accidental deletion, disk formatting, hard drive corruption, OS crash, virus infection, and more. Its free edition supports recovering 1 GB of files for free.
MiniTool Power Data Recovery FreeClick to Download100%Clean & Safe
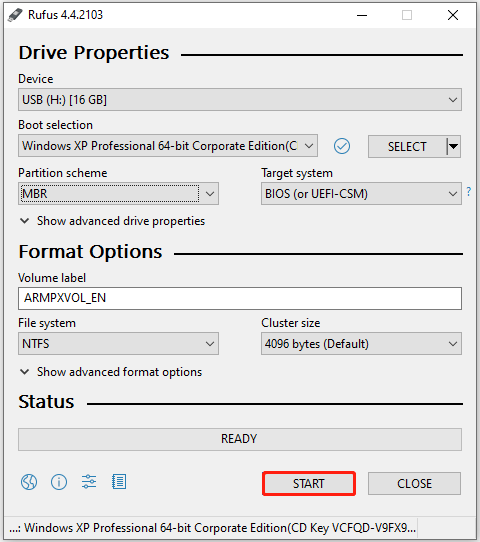
Way 2. Create Windows XP Bootable USB With Rufus
Rufus is also an auxiliary tool for formatting and creating USB boot disks that you can use to create Windows XP bootable USB.
Step 1. Download Rufus and install it.
Step 2. Double-click the executable file to run Rufus.
Step 3. Choose the formatted USB drive under Device. Click the SELECT button to select the Windows XP ISO file under Boot selection. Finally, click the START button.
Bottom Line
All in all, you should know how to create Windows XP bootable USB drive after reading this post. You can opt for the WinSetupFromUSB tool or the Rufus software. Once you get a bootable drive, you can connect it to the target computer and boot from this drive, then install the Windows XP OS.
About The Author
Position: Columnist
Shirley graduated from English major and is currently an editor of MiniTool Team. She likes browsing and writing IT-related articles, and is committed to becoming a professional IT problem solver. The topic of her articles are generally about data recovery, data backup, and computer disk management, as well as other IT issues. In spare time, she likes watching movies, hiking and fishing.
i Visage/Stockbyte/Getty Images
Installing Windows XP to a USB flash drive can be useful in case your hard drive ever crashes or your computer becomes infected with a virus.
To install Windows XP to a USB flash drive, however, you must prepare the drive for installation. You cannot simply insert the drive into your computer and begin installing to it Windows XP. Instead, you must make a copy of Windows XP and use special software to install that copy your USB drive.
Step 1
Restart your computer and access your BIOS setup screen. Check your boot settings to make sure \»USB-HDD\» is listed as an option. If a USB boot option is not available, you may need to update your BIOS firmware, or you may not be able to boot to USB on your computer at all.
Step 2
Check the USB drive manual, or contact the drive’s manufacturer, to make sure the drive is bootable. Your drive should also be large enough to hold Windows XP. A USB drive at least 2GB in size is ideal.
Step 3
Download the HP USB Disk Storage Format Tool. Run the software, then select your USB drive from the list of devices. Select to format to the FAT file system, then click \»Start\» to format the drive.
Step 4
Click \»Start,\» \»All Programs,\» \»Accessories\» and \»Run.\» Type \»%systemroot%\» into the dialogue box. Press \»Enter.\» The system root folder will open.
Step 5
Click \»Tools,\» then \»Folder Options.\» Click the \»View\» tab, and then select the \»Show Hidden Files and Folders\» option. Click \»OK.\»
Step 6
Copy \»boot.ini,\» \»ntldr\» and \»ntdetect\» from your system root folder. Paste these files into your USB drive.
Step 7
Download, install and run PEBuilder to your computer. PEBuilder will allow you to make a bootable copy of Windows XP. Write down the set of numbers following \»PEBuilder v,\» located on the top of the window. This is PEBuilder’s version number.
Step 8
Insert your Windows XP Install CD into your CD or DVD drive. Click the \»…\» next to the \»Source\» field, then select your Windows XP install files from your CD.
Step 9
Leave the \»Custom\» field blank and the \»Output\» field as \»BartPE.\» Click \»Build\» to create the Windows XP installation copy.
Step 10
Click \»Start,\» \»All Programs,\» \»Accessories\» and \»Run.\» Type \»cmd.exe\» in the box, then press \»Enter.\»
Step 11
Insert your flash drive into your computer. Type \»cd\\» to go to your PC’s root directory, then type \»cd pebuilder#\plugin\peinst\», replacing \»#\» with your PEBuilder version.
Step 12
Type \»peinst\», then press \»Enter.\» A menu will appear. Type \»1\» to access the \»Change source path\» option. Type \»c:\pebuilder#\BartPE\», again replacing \»#\» with your PEBuilder version.
Step 13
Type \»2\», then press \»Enter.\» Type your USB drive letter, followed by \»:\», then press \»Enter.\» Type \»5\» and press \»Enter\» again. Windows XP will be installed to your flash drive.