
In this article, we will elaborate on how you can set up an OpenSSH server in WSL. Also, how can we locally connect to Ubuntu via cmd from the Windows OS we are running locally in our system? Use the Windows Powershell here, it would be easy to do the steps.
Users need to have Windows Subsystem for Linux (WSL) installed and setup in their device. The steps and requirements are different for Windows 10 and Windows 11 users, so please keep that in Mind.
Steps to Install WSL/WSL 2 in Windows 10 –
Step – 1: Open Windows PowerShell as Admin (Start menu > PowerShell > right-click > Run as Administrator) and copy paste the following command.
dism.exe /online /enable-feature /featurename:Microsoft-Windows-Subsystem-Linux /all /norestart
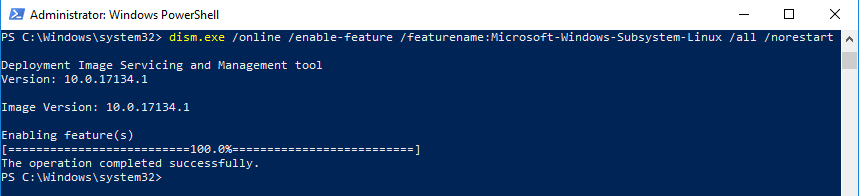
Output of the above command
Step – 2 (Very Important Step): With the release of Windows 11 and so many updates of Windows 10, WSL version 2 is now available for some of the Windows 10 Machines. In the previous step we have installed only WSL but if supported WSL 2 needs to be installed. First check the followings-
- For x64 systems: Version 1903 or later, with Build 18362 or later.
For ARM64 systems: Version 2004 or later, with Build 19041 or later.
To check the Version and Build number press Windows Key + R and type the command winver and press Enter of Click Okay.
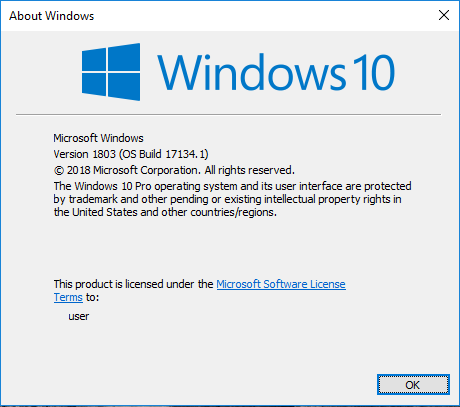
Output
If the version and build number is greater than or equal to as mentioned in step 2 then only follow the below steps, otherwise after step 2 jump to step 6
Step – 3: Open Windows PowerShell as Admin (Start menu > PowerShell > right-click > Run as Administrator) and copy paste the following command. (If powershell is not already opened from Step 1).
dism.exe /online /enable-feature /featurename:VirtualMachinePlatform /all /norestart
Step – 4: We need to download and install the latest Linux Kernel update package. Search for
- WSL2 Linux kernel update package for x64 machines. (For windows 10 64-bit machines)
- WSL2 Linux Kernel update package for ARM64 (For ARM64 machine).
Step – 5: After downloading and installing the above-mentioned packages open PowerShell in Admin mode and run the following command to set WSL 2 as the default version when installing any new Linux distribution.
wsl --set-default-version 2
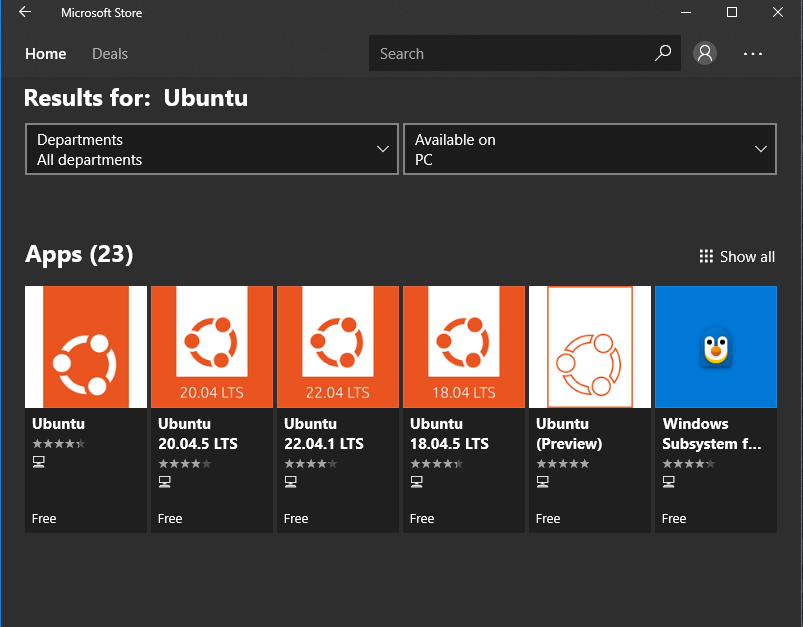
Step – 6: Open Microsoft Store and search for Ubuntu and download any of the following version (it is always recommended to download the Latest version).
Step – 7: After downloading open that and follow the steps mentioned to install it. Then after installation open the newly created Ubuntu file from the start Menu. user will be asked to create a username and password for the first time, create it and remember it, as user will need the password later while running any command using sudo.
Ubuntu asking for username and password for the first time use
Steps to Install WSL 2 in Windows 11-
Unlike Windows 10, WSL2 for Windows 11 is already available to download from Microsoft Store as an Application. But first check the followings
- Windows 11 (build 22000 or higher).
- Virtual Machine Platform optional feature is enabled.
User can find the build number from the About option from the settings (Settings > System > About) and check the number beside OS build. If the number is not higher or similar of 22000 user can’t install WSL in Windows 11 by following the steps here. Please follow the steps mentioned above.
OS build
Step – 1: After checking the OS Build search for Windows Features in the search bar and click Turn windows features on or off (Which is a part of Control Panel). Click that and find Virtual Machine Platform and click the checkbox (Enable it).
Windows Feature

Virtual Machine Platform
Step – 2: Search for Windows Subsystem For Linux in Microsoft Store. Click on the File named Windows Subsystem for Linux Preview and click on Get. Then click install.

WSL for Linux
After installing the WSL downloaded in above step, please follow the Step 6 and Step 7 of Windows 10 installation as both the process are similar from now.
If the user face any issue installing or downloading packages they might refer to the original Ubuntu website where all the packages are mentioned and steps are elaborated.
Stepwise Implementation
Step 1: After installing everything required open the Ubuntu terminal from the start menu then write the following command.
sudo apt install openssh-server
After that, it will ask for your root password which you have set up during the installation. You will see the following output if you haven’t done anything wrong.

openssh-server setup
Step 2: Now we will generate an ssh key. Write the following command in the Ubuntu terminal.
ssh-keygen -A
If you get any ‘Permission denied’ error then just add ‘sudo’ before the command i.e
sudo ssh-keygen -A
Remember the generated host key.
Step 3: Now we will just start the server.Enter the following command
sudo service ssh start
After that, It will require firewall permission which has to be allowed and we will get the following output

Starting SSH server
Step 4: (Optional) Now we need to allow the server to the firewall. For this purpose, we will use the ‘ufw’ command which is also known as Uncomplicated Firewall (ufw) which is used to manage the firewall rules in Linux.
sudo ufw allow ssh
And you will receive an output like this

allowing ssh server
Step 5: Now we will be connecting to the SSH server running using WSL from our local Windows Command Line. First, open the cmd/terminal in windows and write the below command.
ssh-keygen -t rsa
The above command will generate and store the public/private RSA key pair and you will be asked to enter a passphrase (work as a password) to store that if you want you can keep it empty too, just press enter twice.
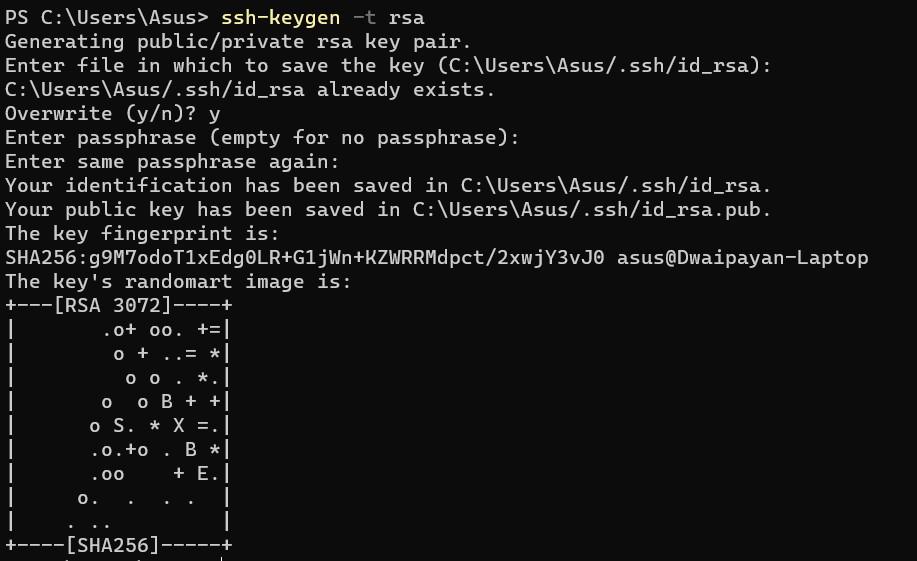
the output of the above command
Step 6: Now we have to navigate to the folder where the last command has saved the key. Use the ‘cd’ command to reach there (The entire path will be shown in the Ubuntu terminal, just type that). Usually, it gets stored in the ‘.ssh‘ folder, to reach there type the following command
cd ~/.ssh #To reach there
ls # To check the contents of that folder if it has the id_rsa.pub file

Checking if id_rsa.pub exists in the correct location
As you can see in the above output, after reaching there you will see there is a file named id_rsa.pub, we need to copy and paste it into a folder that is easily accessible, for now, we are copying it into the desktop using the cmd. Write the following command in cmd
copy id_rsa.pub C:\Users\<your_user_name>\Desktop
The above command also doesn’t return any output, but the user can verify it by checking if the file has been copied into their desktop
Step 7: Now as the id_rsa.pub file is handy we will copy this and save this to the root directory of the Ubuntu. For that, we need to reach the desktop from the Ubuntu terminal. Enter the following command in Ubuntu Terminal.
cd /mnt/c/Users/<your_user_name>/Desktop
After that command type ‘ls’ to recheck whether we are on the Desktop or not.

You will see an output something like this after executing the above command.
Step 8: Now we need to copy and paste the id_rsa.pub file into the ssh folder of the Linux system with a different name. Enter the following command into the PowerShell or command prompt.
cp id_rsa.pub ~/.ssh/authorized_keys
Output: We will get the following output after running above command
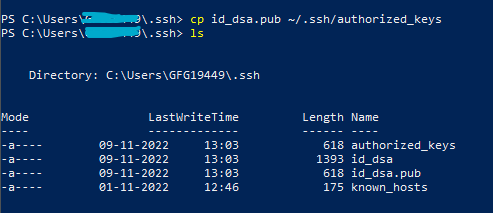
Here, we have given the new name ‘authorized_keys’ you can give anything you want. After copying the file we need to go to the ssh folder and check the key using the cat command.
cd ~/.ssh
ls # Optional command , just to see the content of the folder
cat authorized_keys
The last command will give us the output as the public key.

The output of cat authorized_keys and cat id_rsa.pub is the same.
Step 9: As we have copied and saved the file into the Desktop we will just use the cat command to check the key.
cat id_rsa.pub
The output of the above command is the key that we will use while connecting to the WSL server from Windows cmd. The output will be the same as of the previous command i.e cat authorized_keys.
Step 10: Now we need to check the IP address from the Ubuntu terminal. Enter the following command.
ifconfig
If the above command does not work then, enter the below command and then try again.
sudo apt install net-tools
When it gives a successful output copy the IP address from there.
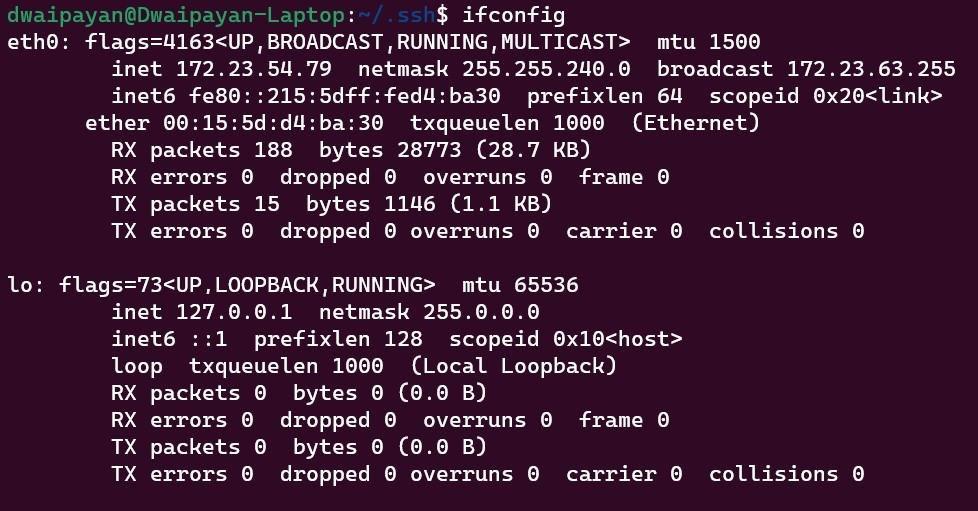
Your IP Address will be written after the first inet.
Step 11: Now from the Windows Terminal we will connect to the Ubuntu via ssh command.
ssh <username_of_your_Ubuntu>@<ip_address_copied_from_ifconfig>

Your windows cmd will look something like this after using the above command. You are now connected to the Ubuntu Terminal of WSL via your local cmd. All the Linux commands will run here and you can access the data of that WSL from here.
Уровень сложностиСредний
Время на прочтение4 мин
Количество просмотров4.1K
Так вышло — что вы гордый обладатель wsl на своем домашнем компьютере. Однако по какой то причине не настроили подключение к своей любимой вычислительной машинке по ssh? Возрадуйтесь! Это пост — инструкция, для создания довольно защищенного способа доступа к своей кранчилке циферок. Для дополнительной защиты — будем использовать google‑authentificator так как это домашний сервер, и не хочется чтобы к нему получили доступ из‑за глупой утечки.
Результат
Выполнив шаги в методичке получим возможность очень удобно подключиться к wsl через vscode:
-
Нажимаем значок подключения по ssh. (сначала надо установить расширение для vscode которое позволяет это делать)

-
Выбираем наш хост сконфигурированый через
~/.ssh/config
-
Здесь вводим наш verification code из гугл аутентификатора.

-
Ну и успешно заходим.


Что используется в решении
-
Windows11
-
Роутер с OpenWRT (мастхев в наши времена)
-
Статический айпи от провайдера (может и не потребоваться, однако в моем случае концепт NAT behind NAT ломал подключение)
Методичка
К сожалению подключение я оформлял довольно давно, а пост записываю только сейчас, поэтому может получиться что не выйдет записать stepbystep гайд. Но все равно думаю будет полезно.
Сначала настраиваем ssh на windows:
Изначальный гайд, для продвинутых — https://gist.github.com/mattbell87/f5bd7b78c8d0ad7f0dfc3addae4f4897#default-shell-method. Но если не хочешь разбираться, просто листай дальше.
Методом проб и ошибок обнаружил для себя, что работает только такой:
-
открываем powershell от администратора
-
Add-WindowsCapability -Online -Name OpenSSH.Server~~~~0.0.1.0
Start-Service sshd
Set-Service -Name sshd -StartupType 'Automatic'
New-ItemProperty -Path "HKLM:\SOFTWARE\OpenSSH" -Name DefaultShell -Value "C:\WINDOWS\System32\bash.exe" -PropertyType String -Force
Get-Service -Name sshd -
Генерируем сертификаты и кладем в папку
C:\Users\<Пользователь>\.sshобязательно с дефолтным названием, чтобы не пришлось настраивать known_hosts. Мои выглядят так.
-
Готово. SSH на Windows11 настроен.

Настройка SSH на роутере.
Изначальная статья, откуда черпал вдохновение https://forum.openwrt.org/t/howto-openssh-with-mfa-on-openwrt-19-07-x-using-google-authenticator/88025
-
Подключаемся к роутеру. По умолчанию можно подключиться только локально и через dropbear.
-
Перемести встроенный в OpenWrt SSH-сервер Dropbear так, чтобы он работал только в локальной сети (LAN) и не использовал порт 22 (например, используй порт 20022). Это можно настроить в Luci по адресу:
http://192.168.1.1/cgi-bin/luci/admin/system/admin/dropbear.Если что-то пойдёт не так с OpenSSH, ты всё равно сможешь войти в систему по сети через Dropbear.
-
Подключись теперь по новому dropbear порту в выполни следующие команды
opkg update opkg install google-authenticator-libpam openssh-server-pam ssh-keygen -t ed25519 # возможно этого хватит, но если нет - то добавь ключи в authorized_keys service sshd restart google-authenticator -
Далее настрой google-authentificator по инструкции с этой ссылки (в целом там все понятно по промптам) https://www.digitalocean.com/community/tutorials/how-to-set-up-multi-factor-authentication-for-ssh-on-ubuntu-16-04#:~:text=Run the initialization app
-
Отредактируй файл /etc/ssh/sshd_config (например, с помощью команды
nano /etc/ssh/sshd_config), чтобы внести следующие изменения:PermitRootLogin yes|PubkeyAuthentication yesChallengeResponseAuthentication yesUsePAM yesAuthenticationMethods publickey,keyboard-interactive -
Отредактируй файл
/etc/pam.d/sshd(например, с помощью командыnano /etc/pam.d/sshd), чтобы внести следующие изменения:
закомментируй строку#auth include common-auth
Добавь в конец файла authrequired /usr/lib/security/pam_google_authenticator.so -
service sshd restart -
Настрой правила трафика в брандмауэре (по адресу: http://192.168.1.1/cgi-bin/luci/admin/network/firewall/rules), если хочешь иметь возможность подключаться к OpenSSH из интернета.
Настройка ssh на тачке для подключения
Добавь в ~/.ssh/config следующие строки, аккуратно заполнив их своими данными
Host router
    Port <порт для подключения к роутеру по SSH не DROPBEAR!>
    HostName <ip роутера (статический который выдал провайдер)
    User root
    IdentityFile ~/.ssh/router_2
    ForwardAgent yes

Host windows
    ProxyCommand ssh -W %h:%p router
    HostName <хостнейм windows компьютера внутри роутера>
    User artem
    IdentityFile ~/.ssh/windows
    ServerAliveInterval 60
    ServerAliveCountMax 3
Дополнительные настройки
Если хочется — можно настроить например запуск и гашение тачки через wakeonlan.
-
Устанавливаем wakeonlan на роутере.
-
Для запуска машины из режима сна: Подключаемся к роутеру, и выполняем следующую команду:
wakeonlan -i <хост машины windows внутри OpenWRT> 04:7C:16:C7:30:E8 -
Для погружения машины обратно в сон (для людей которые выключают газ и свет при уходе из дома), в терминале vscode когда уже поключились к винде — выполняем команду:
shutdown.exe /s
Выводы
Сильно заморочившись и поняв дзен сетей — можно получить действительно очень удобный и безопасный доступ к своей локальной машинке. Я например теперь даю отдохнуть своей больной спине от позы кешью-креветки и работаю за компьютером лежа на диванчике 
Оглавление:
- 1 Шаг 1. Установить сервер OpenSSH в дистрибутиве WSL 2
- 2 Шаг 2. Настроить сервер OpenSSH в дистрибутиве WSL 2
- 3 Шаг 3. Проброс порта в WSL 2
- 4 Шаг 3. Создание правила в брандмауэре Windows 10
- 5 Шаг 4. Проверяем SSH-соединение с WSL 2
Статья последний раз была обновлена 02.07.2024
Решается задача по передаче определенных файлов с Linux-машины на Windows-машину в одной локальной сети (решение подойдет и для внешнего соединения при условии настройки доступов за NAT). Для того, чтобы все настраивать в одной экосистеме (Linux), на Windows-машине будет использоваться уже установленная WSL 2. Да, да, да, есть портированные версии OpenSSH для версий Windows отличных от 10-ки, а SSH-сервер можно настроить и на самой Windows 10 стандартно без заморочек с WSL, но интереснее поиграться с подсистемой, ведь подобный способ подключения к WSL могут использовать и различные веб-приложения. Вопросы безопасности не поднимаются, рассматривается сам механизм получения доступа по SSH к дистрибутиву WSL 2 внутри локальной сети (LAN).
Шаг 1. Установить сервер OpenSSH в дистрибутиве WSL 2
sudo apt install openssh-server
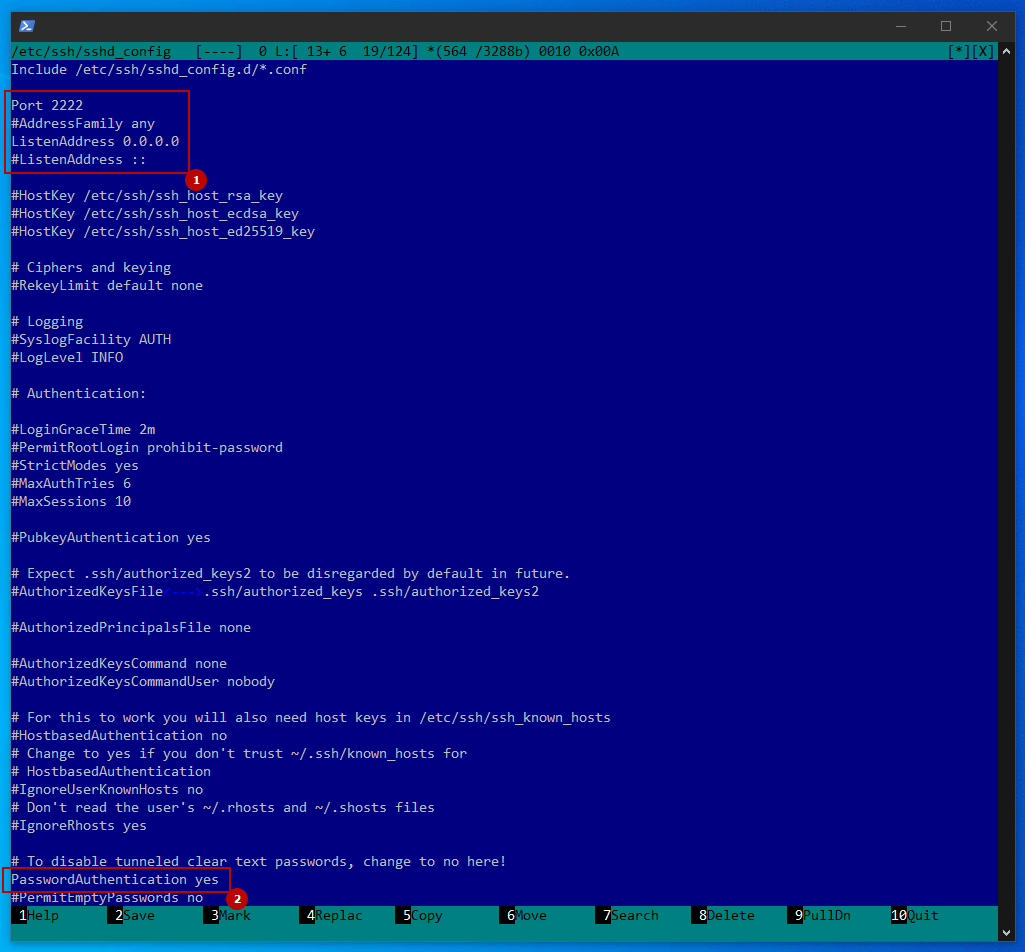
Шаг 2. Настроить сервер OpenSSH в дистрибутиве WSL 2
Все настройки расположены в конфигурационном файле /etc/ssh/sshd_config. SSH обычно эксплуатирует 22 порт, я предпочитаю использовать 2222, его легко запомнить и он отличается от аналогичного порта на «материнской» Windows-машине. Если указано 0.0.0.0 — то подразумевается подключение с любого IP. Если аутентификация будет проходить по паролю (лично мне не захотелось в этом случае заморачиваться с настройкой пары ключей), тогда нужно указать yes в строке с PasswordAuthentication.
В итоге сам сервис надо запустить.
service ssh start
Шаг 3. Проброс порта в WSL 2
В WSL 2 имеется виртуализированный адаптер Ethernet с собственным уникальным IP-адресом. Узнать его можно по команде из под WSL — ip addr.
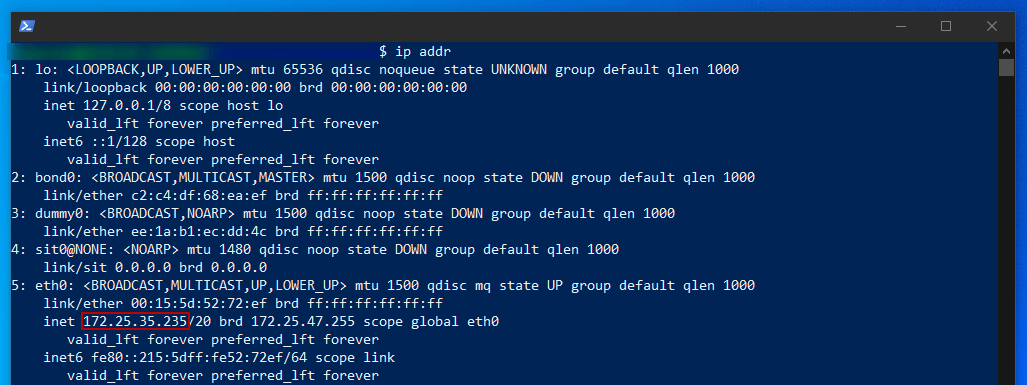
Ниже приводится пример команды PowerShell (запускать с административными правами), которая добавляет прокси-сервер портов, ожидающий передачи данных на порту узла 2222 и перенаправляющий все подключения на порт 2222 виртуальной машины WSL 2 с IP-адресом 172.25.35.235
netsh interface portproxy add v4tov4 listenaddress=0.0.0.0 listenport=2222 connectaddress=172.25.35.235 connectport=2222
Все записи прокси-сервера можно посмотреть по команде:
netsh interface portproxy show v4tov4

Их можно все удалить с помощью:
netsh int portproxy reset all
Шаг 3. Создание правила в брандмауэре Windows 10
В данном случае опять запускать PowerShell от имени администратора.
netsh advfirewall firewall add rule name=”Open Port 2222 for WSL2” dir=in action=allow protocol=TCP localport=2222
Шаг 4. Проверяем SSH-соединение с WSL 2
Сперва пробуем подключиться к WSL 2 из под «материнской» Windows (подразумевается что это 10-ка и стоит SSH-клиент). С WSL у меня уже настроена пара ключей, так что запроса пароля не последует.
ssh -p 2222 ваш_логин_wsl@172.25.35.235
Теперь попробуем подключиться со сторонней Linux-машины, в данном случае я уже обращаюсь не к виртуальному IP-адресу WSL, а к локальному адресу «материнской» Windows-машины, который у меня 192.168.0.4
ssh -p 2222 ваш_логин_wsl@192.168.0.4
Так как для стороннего компьютера у меня не настроен доступ по ключу, поэтому придется ввести пароль от WSL. Сразу оговорюсь, если используется такой метод подключения в Shell-скриптинге, то проще и безопаснее настроить пару ключей, также для ввода ключа можно перейти в интерактивный режим (expect) или использовать утилиту sshpass, что я и сделал.
sudo apt install sshpass
Теперь можно подключиться в одну строчку так:
sshpass -p ваш_пароль_wsl ssh -p 2222 ваш_логин_wsl@192.168.0.4
Далее все, что душе угодно! Можно использовать scp, rsync, скриптинг…
- Об авторе
- Недавние публикации
IT-специалист широкого профиля, в настоящее время занимаюсь разработкой и преимущественно продвижением веб-сайтов (SEO, SEM, SMO, SMM).

There are many guides on the internet showing how to set up an SSH server inside WSL. This is currently not that easy and in my experience, it is not really stable. An alternative to this is to run the SSH server outside of WSL on the windows side and set its default shell to the WSL shell (or any other shell for that matter).
Installing the OpenSSH Server
Windows has been shipping with an OpenSSH client and server for a long time. They are not installed by default but can be activated either in the settings as described in the official docs or with the following PowerShell commands.
You will need to start PowerShell as Administrator
First, install the OpenSSH client and server.
Add-WindowsCapability -Online -Name OpenSSH.Client~~~~0.0.1.0
Add-WindowsCapability -Online -Name OpenSSH.Server~~~~0.0.1.0
Enter fullscreen mode
Exit fullscreen mode
Enable the SSH service and make sure the firewall rule is configured:
# Enable the service
Start-Service sshd
Set-Service -Name sshd -StartupType 'Automatic'

# Confirm the firewall rule is configured. It should be created automatically by setup. Run the following to verify
if (!(Get-NetFirewallRule -Name "OpenSSH-Server-In-TCP" -ErrorAction SilentlyContinue | Select-Object Name, Enabled)) {
    Write-Output "Firewall Rule 'OpenSSH-Server-In-TCP' does not exist, creating it..."
    New-NetFirewallRule -Name 'OpenSSH-Server-In-TCP' -DisplayName 'OpenSSH Server (sshd)' -Enabled True -Direction Inbound -Protocol TCP -Action Allow -LocalPort 22
} else {
    Write-Output "Firewall rule 'OpenSSH-Server-In-TCP' has been created and exists."
}
Enter fullscreen mode
Exit fullscreen mode
Congratulations, you have installed the SSH server on your Windows machine. And all without manually setting up a background service or modifying config files.
Setting WSL as Default Shell
To directly boot into WSL when connecting, we need to change the default shell from cmd.exe or PowerShell.exe to bash.exe, which in turn runs the default WSL distribution. This can be done with the PowerShell command:
New-ItemProperty -Path "HKLM:\SOFTWARE\OpenSSH" -Name DefaultShell -Value "C:\WINDOWS\System32\bash.exe" -PropertyType String -Force
Enter fullscreen mode
Exit fullscreen mode
Note: even though the shell is running on the Linux side, the SSH server is still on windows. This means you have to use to windows username to log in, and the SCP command copies files relative to the user directory on windows.
Enable Key-based Authentication (non-Admin User)
Note: If the user account has Admin permissions, read the next chapter, otherwise continue reading.
Create the folder .ssh in the users home directory on windows: (e.g. C:\Users\<username>\.ssh). Run the following commands in PowerShell (not as administrator).
New-Item -Path ~\.ssh -ItmeType "directory"
New-Item -Path ~\.ssh\authorized_keys
Enter fullscreen mode
Exit fullscreen mode
The file .ssh\autzorized_keys will contain a list of all public keys that shall be allowed to connect to the SSH server.
Copy the contents of your public key file (usually stored in ~/.ssh/id_rsa.pub) to the authorized_keys file. If a key is already present, paste your key on a new line.
Enable Key-based Authentication (Admin User)
If the user is in the Administrators group, it is not possible to have the authorized_keys file in the user directory for security purposes.
Instead, it needs to be located on the following path %ProgramData%\ssh\administrators_authorized_keys. A second requirement is that it is only accessible to Administrator users, to prevent a normal user from gaining admin permissions.
To create the file start PowerShell as administrator and run the following command.
New-Item -Path $env:programdata\ssh\administrators_authorized_keys
Enter fullscreen mode
Exit fullscreen mode
This will create the file with the correct permissions. Now open the file and paste your public key into it. The public key should be located at ~/.ssh/id_rsa.pub. If a key is already present, paste your key on a new line.
Verifying everything works
Verify that you can SSH into your machine by running the following inside WSL:
IP=$(cat /etc/resolv.conf | grep nameserver | cut -d " " -f2) # get the windows host ip address
ssh <user>@$IP
Enter fullscreen mode
Exit fullscreen mode
Or from PowerShell and cmd:
ssh <user>@localhost
Enter fullscreen mode
Exit fullscreen mode
Drawbacks
There are some drawbacks to this approach. If you rely on some programs or scripts to work over SSH, this might not be the method for you. Most scripts expect a unix machine on the other end, or if they expect a windows machine they will most likely not be configured to deal with WSL.
If you however just want to connect to your pc to copy some files or change some settings this approach is perfectly fine.
How to Connect to WSL through SSH from a Mac
Windows Subsystem for Linux (WSL) is a powerful feature that allows you to run a Linux environment directly on Windows. This guide will walk you through the process of setting up SSH access to your WSL environment from a Mac.
Step 1: Set Up SSH Server in WSL
- Open your WSL distribution.
- Update your package list:
- Install the OpenSSH server:
sudo apt install openssh-server
- Edit the SSH configuration file:
sudo nano /etc/ssh/sshd_config
- Ensure the following lines are present and uncommented:
Port 2222 PasswordAuthentication no PubkeyAuthentication yes - Save and exit the file (Ctrl+X, then Y, then Enter).
- Start the SSH service:
Step 2: Set Up Port Forwarding on Windows
- Open PowerShell as Administrator on Windows.
- Get your WSL IP address and set up port forwarding:
netsh interface portproxy add v4tov4 listenport=2222 listenaddress=0.0.0.0 connectport=2222 connectaddress=$((wsl hostname -I).trim())
Step 3: Configure Windows Firewall
- Open Windows Defender Firewall with Advanced Security.
- Click on «Inbound Rules» and then «New Rule».
- Choose «Port» and click Next.
- Select «TCP» and enter «2222» for the port number.
- Allow the connection and apply the rule to all profiles.
- Name the rule (e.g., «WSL SSH») and finish the wizard.
Step 4: Generate SSH Key on Mac
- Open Terminal on your Mac.
- Generate a new SSH key:
ssh-keygen -t rsa -b 4096
- Follow the prompts, using the default file location and adding a passphrase if desired.
Step 5: Copy SSH Key to WSL
- Display your public key:
- Copy the output.
- In your WSL terminal:
mkdir -p ~/.ssh
nano ~/.ssh/authorized_keys
- Paste your public key into this file, save, and exit.
- Set correct permissions:
chmod 700 ~/.ssh
chmod 600 ~/.ssh/authorized_keys
Step 6: Configure SSH on Mac
- Edit your SSH config file:
- Add the following:
Host wsl
    HostName <WINDOWS_IP>
    User <WSL_USERNAME>
    Port 2222
    IdentityFile ~/.ssh/id_rsa
Replace
<WINDOWS_IP>with your Windows machine’s IP address and<WSL_USERNAME>with your WSL username.
Step 7: Connect from Mac to WSL
- In your Mac’s terminal, connect using:
You should now be connected to your WSL environment!
Common Issues and Resolutions
Despite following the steps above, you might encounter some issues. Here are some common problems and how to resolve them:
1. Connection Timeout
Symptom: SSH connection attempt results in a timeout.
Possible causes and solutions:
- WSL SSH service is not running.
- Solution: In WSL, run
sudo service ssh start
- Solution: In WSL, run
- Port forwarding is not set up correctly.
- Solution: Check with
netsh interface portproxy show v4tov4 - If empty, set up port forwarding as described in Step 2
- Solution: Check with
- Windows Firewall is blocking the connection.
- Solution: Verify the firewall rule for port 2222 is active
2. Authentication Failure
Symptom: Connection establishes, but you get a «Permission denied (publickey)» error.
Possible causes and solutions:
- The public key is not properly added to
authorized_keys.- Solution 1: Verify the content of
~/.ssh/authorized_keysin WSL - Solution 2: use
ssh-copy-idto update~/.ssh/authorized_keyson linux:- Enable password login from Linux by updating
/etc/ssh/sshd_config, setPasswordAuthenticationtoyes - Run
ssh-copy-idfrom your macssh-copy-id -i ~/.ssh/id_rsa -n -p 2222 <your user name>@<your windows machine name or ip address>
- Enable password login from Linux by updating
- Solution 1: Verify the content of
- Incorrect permissions on SSH files.
- Solution: In WSL, run:
chmod 700 ~/.ssh
chmod 600 ~/.ssh/authorized_keys
- Solution: In WSL, run:
- Incorrect filename for authorized keys.
- Solution: Ensure the file is named
authorized_keys, notauthorized_usersor anything else
- Solution: Ensure the file is named
3. SSH Server Refuses Connection
Symptom: You get a «Connection refused» error.
Possible causes and solutions:
- SSH server is not running on the specified port.
- Solution: Check SSH config in WSL (
/etc/ssh/sshd_config) to ensure it’s set to use port 2222
- Solution: Check SSH config in WSL (
- WSL instance is not running.
- Solution: Open a WSL terminal on your Windows machine to start the instance
4. Host Key Verification Failed
Symptom: You get a «Host key verification failed» error.
Possible causes and solutions:
- The host key has changed (common if you’ve reinstalled WSL).
- Solution: Remove the old key from your Mac’s
known_hostsfile:ssh-keygen -R "[your_windows_ip]:2222"
- Solution: Remove the old key from your Mac’s
5. WSL IP Address Changes
Symptom: Connection worked before, but suddenly stops working.
Possible causes and solutions:
- WSL IP address has changed after a restart.
- Solution: Update the port forwarding rule with the new IP:
- In WSL, get the new IP:
ip addr show eth0 - In Windows PowerShell (as admin), update the rule:
netsh interface portproxy delete v4tov4 listenport=2222 listenaddress=0.0.0.0
netsh interface portproxy add v4tov4 listenport=2222 listenaddress=0.0.0.0 connectport=2222 connectaddress=<NEW_WSL_IP>
- In WSL, get the new IP:
- Solution: Update the port forwarding rule with the new IP:
6. Incorrect Default Shell
Symptom: You connect successfully but get an unexpected shell environment.
Possible causes and solutions:
- Windows OpenSSH is not using the WSL shell.
- Solution: Set the default shell for SSH connections:
- In Windows PowerShell (as admin):
New-ItemProperty -Path "HKLM:\SOFTWARE\OpenSSH" -Name DefaultShell -Value "C:\Windows\System32\wsl.exe" -PropertyType String -Force
- Restart the SSH service:
Restart-Service sshd
- In Windows PowerShell (as admin):
- Solution: Set the default shell for SSH connections:
Remember, when troubleshooting SSH connections, the verbose mode (ssh -v wsl) can provide helpful diagnostic information. Don’t hesitate to use it when you encounter issues.
By being aware of these common issues and their solutions, you’ll be better prepared to troubleshoot any problems that arise when setting up SSH access to your WSL environment from your Mac.
Contributing
If you have suggestions for improving this guide, please feel free to create an issue or submit a pull request.
License
This project is licensed under the MIT License — see the LICENSE file for details.