
(Image credit: Future)
Although you can manage many aspects of wireless networks using the Settings app (and Control Panel), sometimes, you may still need to perform more advanced tasks. For example, recover the wireless password for a particular profile, view detailed information about saved profiles, or create a report to troubleshoot issues, which are not common tasks available with other tools.
Whatever the reason it might be, if you have to complete more advanced networking tasks, Windows 10 includes the netsh (network shell) command-line tool that you can use to view, troubleshoot, and configure virtually every network adapter on the device.
This guide will walk you through the steps to manage wireless networks with the netsh command-line tool on Windows 10.
How to view Wi-Fi network profiles stored on Windows 10
To view the wireless network profiles on Windows 10, use these steps:
- Open Start.
- Search for Command Prompt, right-click the top result, and select the Run as administrator option.
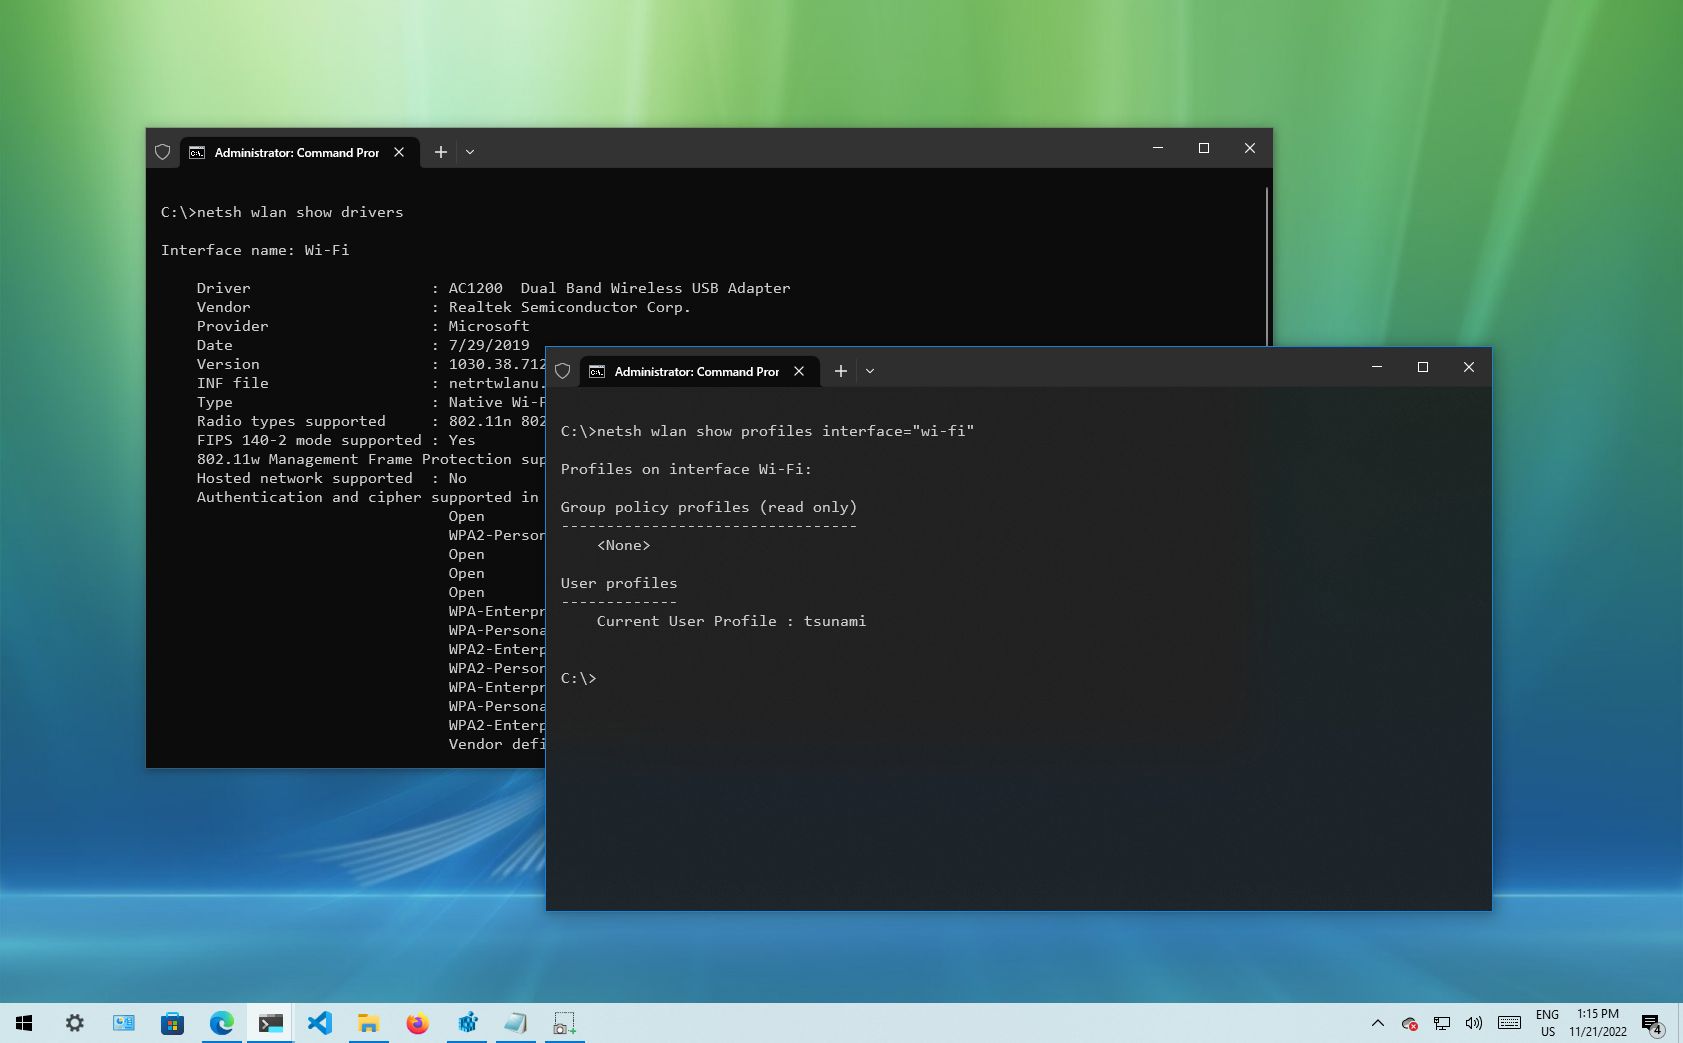
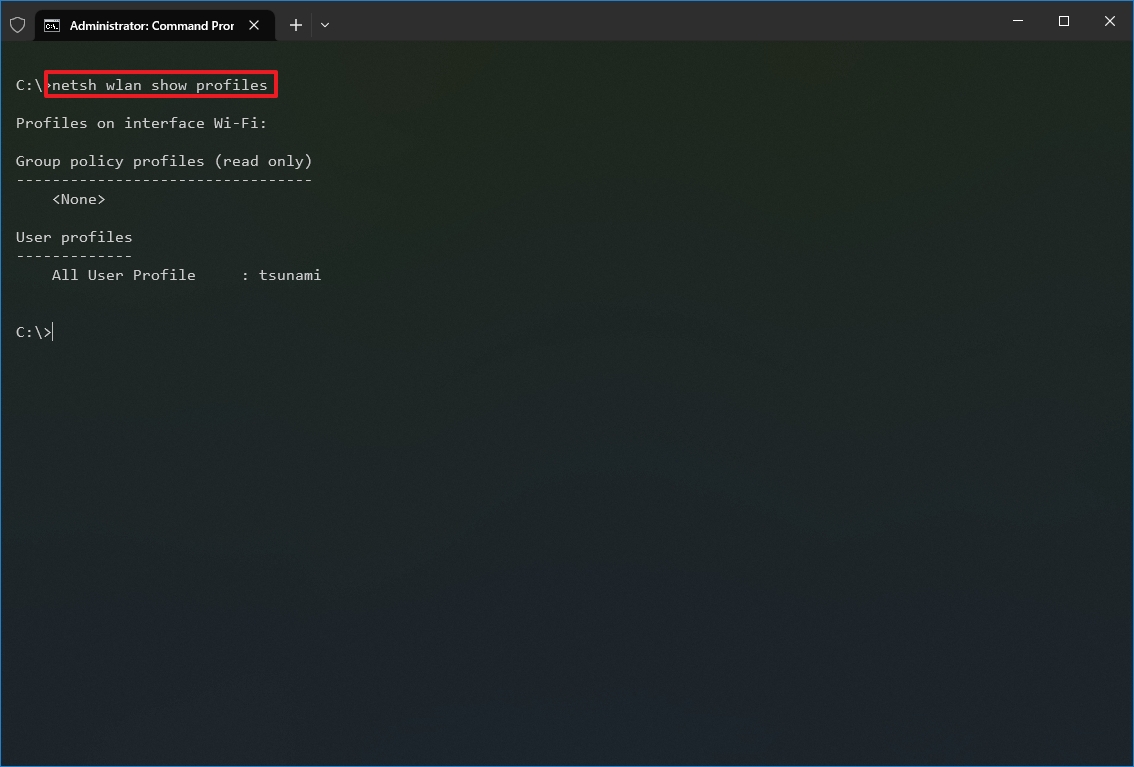
- Type the following command to view the wireless network profiles saved on your computer and press Enter: netsh wlan show profiles
- (Optional) Type the following command to view the saved profiles for a specific interface and press Enter: netsh wlan show profiles interface=»WLAN-INTERFACE-NAME»
In the command, replace the WLAN-INTERFACE-NAME for the actual name of the interface. You can use the netsh interface show interface command to find out the exact name. For example, this command shows the profiles saved for the «Wi-Fi» interface: netsh wlan show profiles interface=»wi-fi»
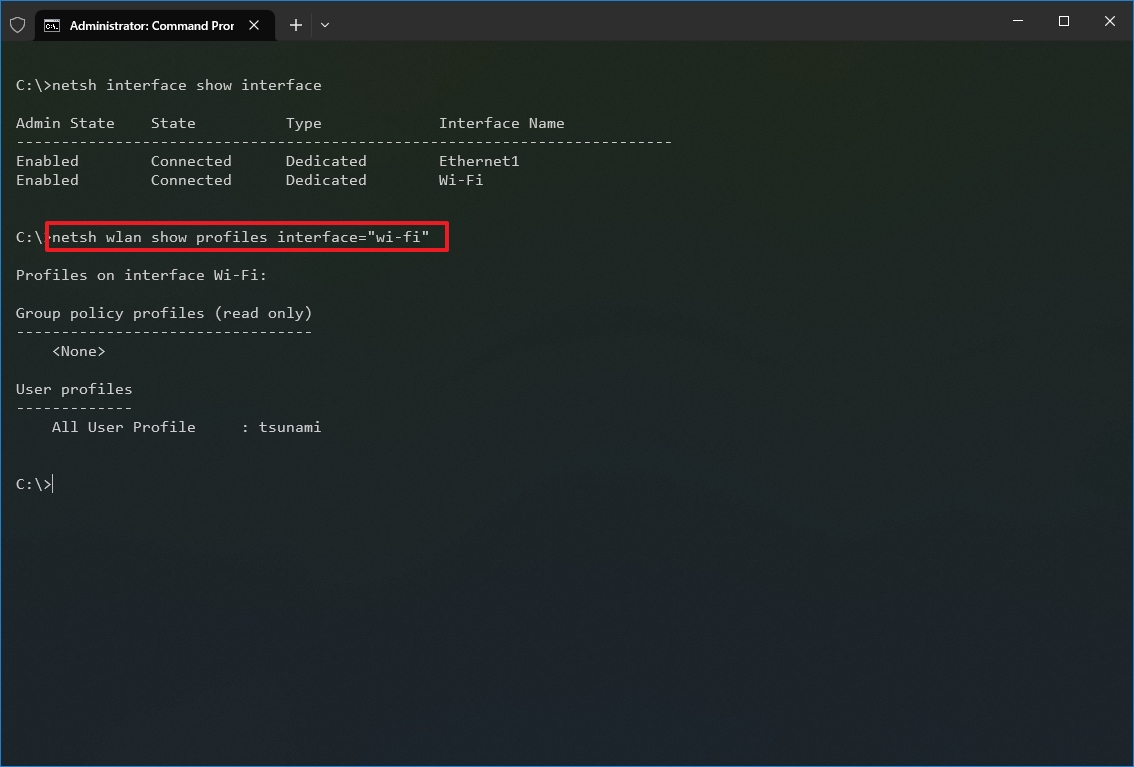
Once you complete the steps, the command will output the profiles from all the wireless networks you connected to in the past on every adapter installed on the computer.
How to view Wi-Fi network driver info on Windows 10
To view the wireless adapter driver information, use these steps:
All the latest news, reviews, and guides for Windows and Xbox diehards.
- Open Start.
- Search for Command Prompt, right-click the top result, and select the Run as administrator option.
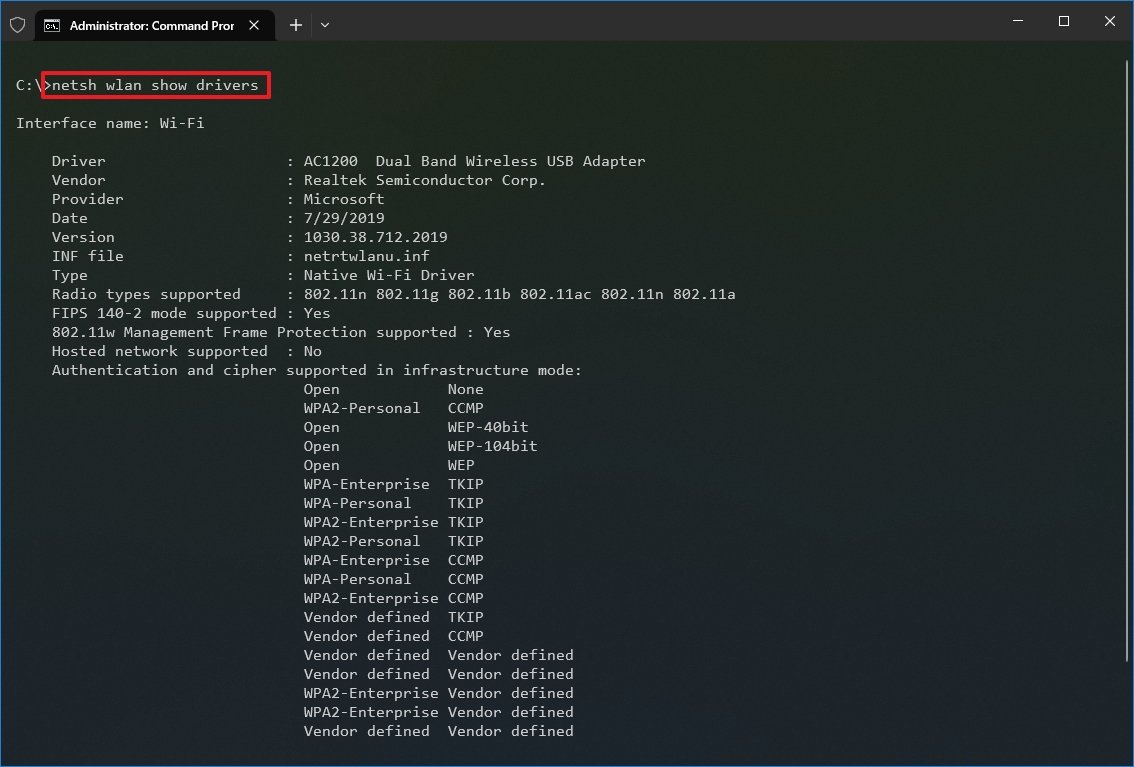
- Type the following command to view the wireless network profiles saved on your PC and press Enter: netsh wlan show drivers
- (Optional) Type the following command to view the adapter capabilities and press Enter: netsh wlan show wirelesscapabilities
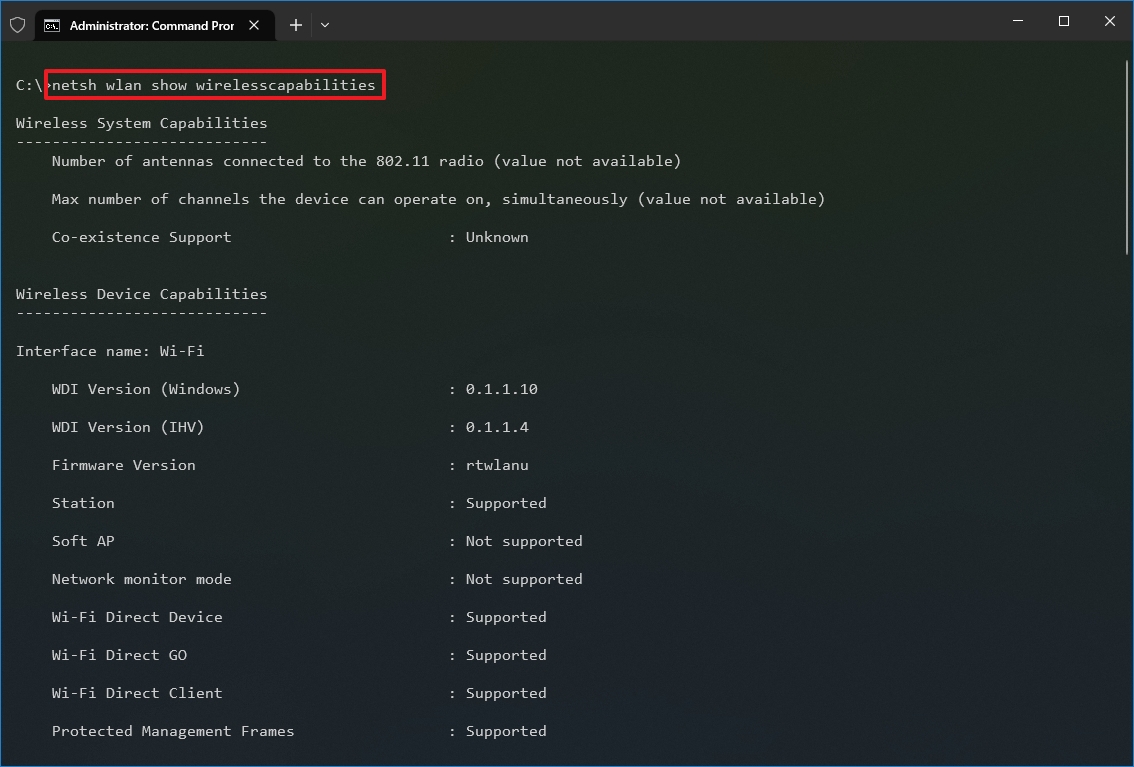
After you complete the steps, the command will provide relevant information about the driver, including vendor, version, radio type (for example, 802.11ax, 802.11a, 802.11n, etc.) and wireless authentication support, and more.
If you use the command to view the capabilities, you will see a list of all the wireless features available and those supported by the adapter.
How to view Wi-Fi network adapter settings on Windows 10
To check the wireless adapter settings on Windows 10, use these steps:
- Open Start.
- Search for Command Prompt, right-click the top result, and select the Run as administrator option.
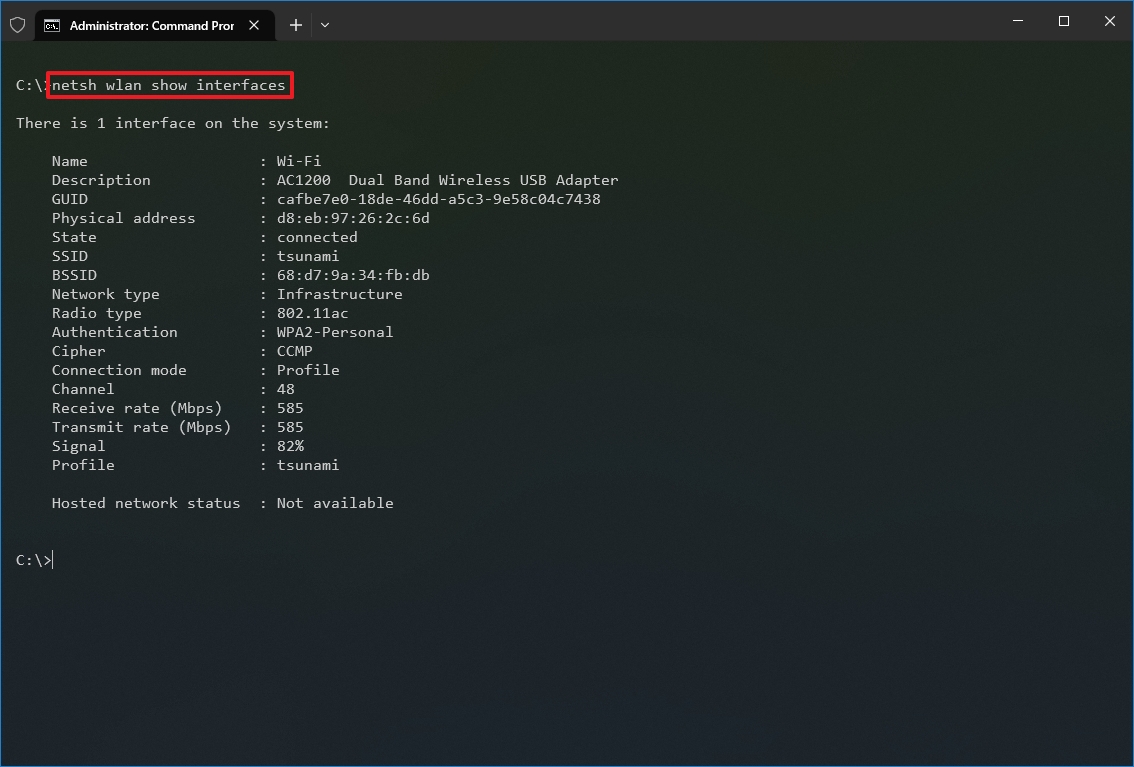
- Type the following command to view wireless settings and press Enter: netsh wlan show interfaces
- (Optional) Type the following command to view the settings for a specific interface and press Enter: netsh wlan show interface name=»WLAN-INTERFACE-NAME»
In the command, replace the WLAN-INTERFACE-NAME for the actual name of the interface. You can use the netsh interface show interface command to find out the exact name. For example, this command shows the profiles saved for the «Wi-Fi» interface: netsh wlan show interface name=»wi-fi»
Once you complete the steps, the netsh tool will display the current wireless settings for one or all the adapters, including name, description, physical address, SSID, radio type (for example, 802.11ac), security authentication method, and the current transmission rates, and signal strength.
How to view Wi-Fi network security key on Windows 10
To find out the wireless security key (also known as the Wi-Fi password), use these steps:
- Open Start.
- Search for Command Prompt, right-click the top result, and select the Run as administrator option.
- Type the following command to view the wireless password and press Enter: netsh wlan show profile name=»WLAN-PROFILE-NAME» key=clear
In the command, replace the WLAN-PROFILE-NAME with the profile name you want to see its security key. For example, this command shows the password for the tsunami network: netsh wlan show profile name=»tsunami» key=clear
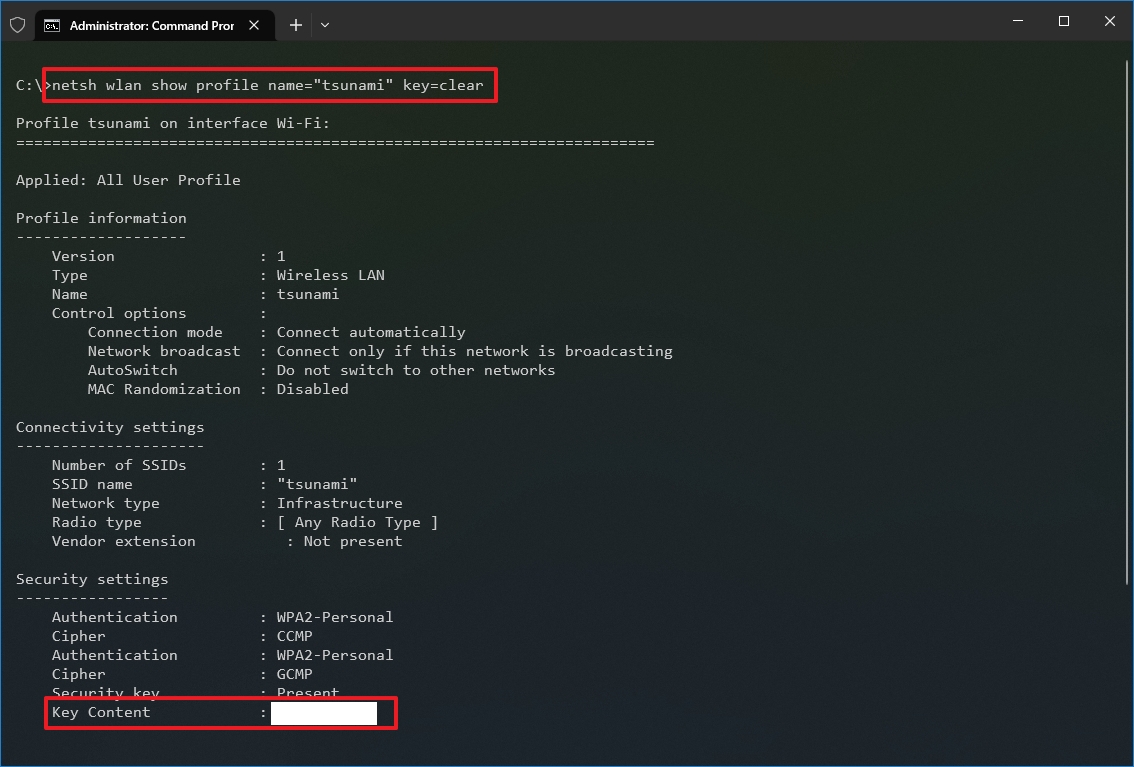
After completing the steps, you will know the network security key for the specified profile.
Although you can view the current network password through the wireless adapter properties in Control Panel, you can use this command to recover any network security key of any profile stored on the device.
How to stop Wi-Fi network automatic connection on Windows 10
Sometimes, you may have a device configured to connect to different wireless networks automatically, but you then realize that it always connects to the access point even when it offers poor connectivity or the network is out of range. In those cases, you can run a command to stop connecting to known networks automatically.
To prevent a device from connecting to a Wi-Fi network automatically, use these steps:
- Open Start.
- Search for Command Prompt, right-click the top result, and select the Run as administrator option.
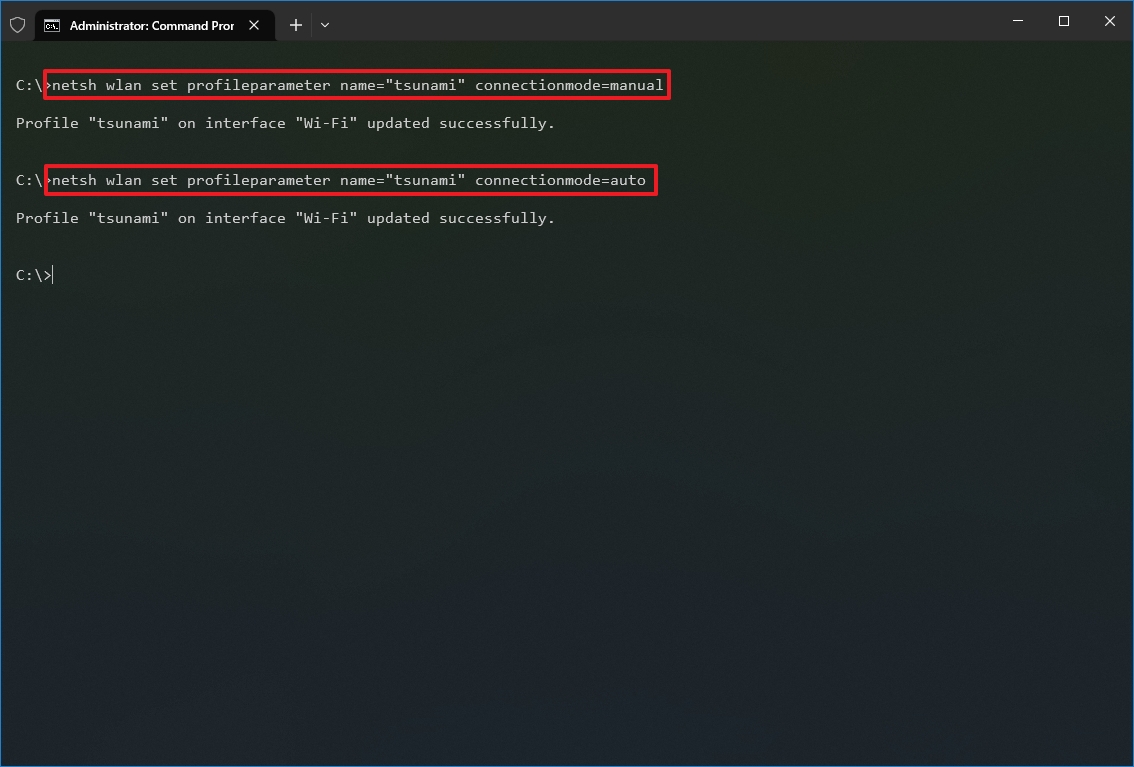
- Type the following command to disable auto-connect and press Enter: netsh wlan set profileparameter name=»WLAN-PROFILE-NAME» connectionmode=manual
In the command, replace WLAN-PROFILE-NAME with the name of the wireless profile. For example, this command disables automatic connections for the tsunami network: netsh wlan set profileparameter name=»tsunami» connectionmode=manual
- (Optional) Type the following command to change the network priority and press Enter: netsh wlan set profileparameter name=»WLAN-PROFILE-NAME» connectionmode=auto
In the command, replace WLAN-PROFILE-NAME with the wireless profile name you are trying to change its priority. For example, this command makes the tsunami profile a priority: netsh wlan set profileparameter name=»tsunami» connectionmode=auto
- Quick note: Windows 10 will always make a priority for those networks you choose to connect automatically. You can use the above command if you want to move up a network in the precedence list.
Once you complete the steps, Windows 10 will no longer try to connect to wireless networks automatically.
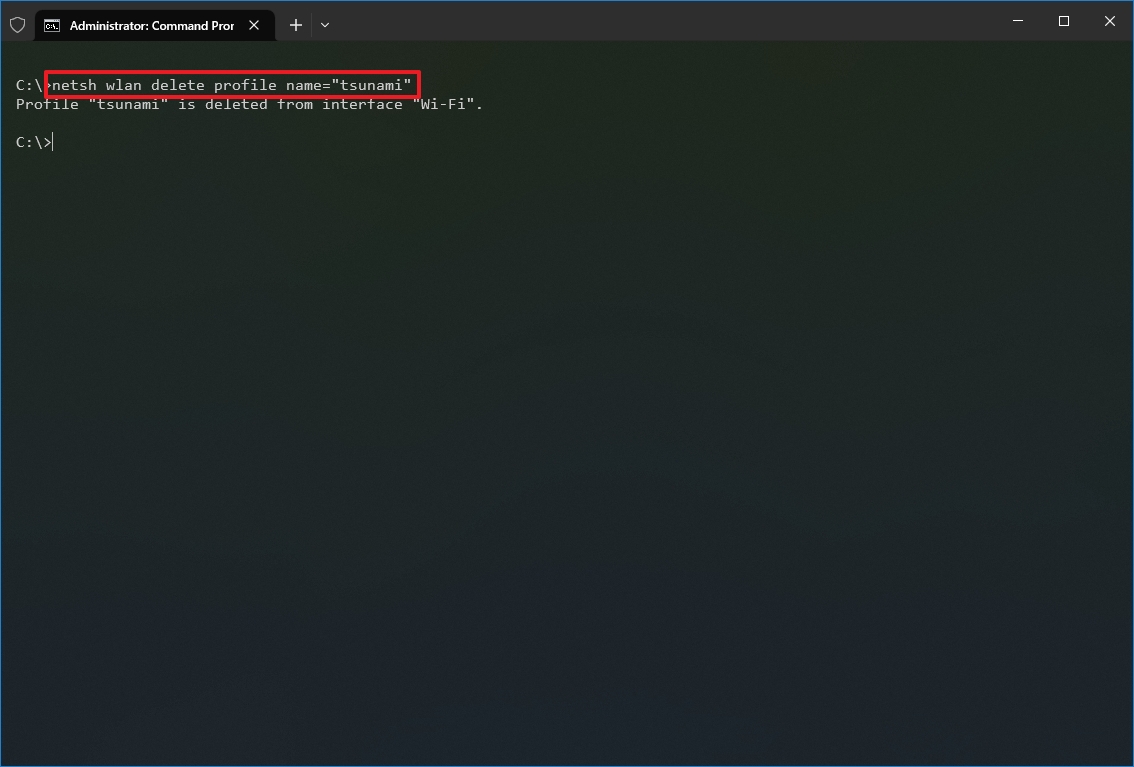
How to delete Wi-Fi network profile on Windows 10
When you no longer need to connect to a particular wireless network, the access point is no longer available, or you need to reset the network profile settings, you can use the netsh command-line tool to delete any profile stored on your computer.
To delete a Wi-Fi profile on Windows 10, use these steps:
- Open Start.
- Search for Command Prompt, right-click the top result, and select the Run as administrator option.
- Type the following command to delete a network profile and press Enter: netsh wlan delete profile name=»WLAN-PROFILE-NAME»
In the command, replace WLAN-PROFILE-NAME with the name of the wireless profile. For example, this command deletes the tsunami profile: netsh wlan delete profile name=»tsunami»
After you complete the steps, the wireless profile will be deleted from the device. If you need to reconnect, you will need to go through the connection process again, and you will have to provide the network password as necessary.
How to export and import Wi-Fi network profiles on Windows 10
There was an option in Control Panel in previous versions of Windows to export and import wireless network profiles. However, the feature was removed on Windows 8.1 and Windows 10 in favor of the new feature to sync these settings using a Microsoft account. But it is still possible to export and import the Wi-Fi settings using the netsh command-line tool.
Export wireless settings
To export the wireless settings, use these steps:
- Open Start.
- Search for Command Prompt, right-click the top result, and select the Run as administrator option.
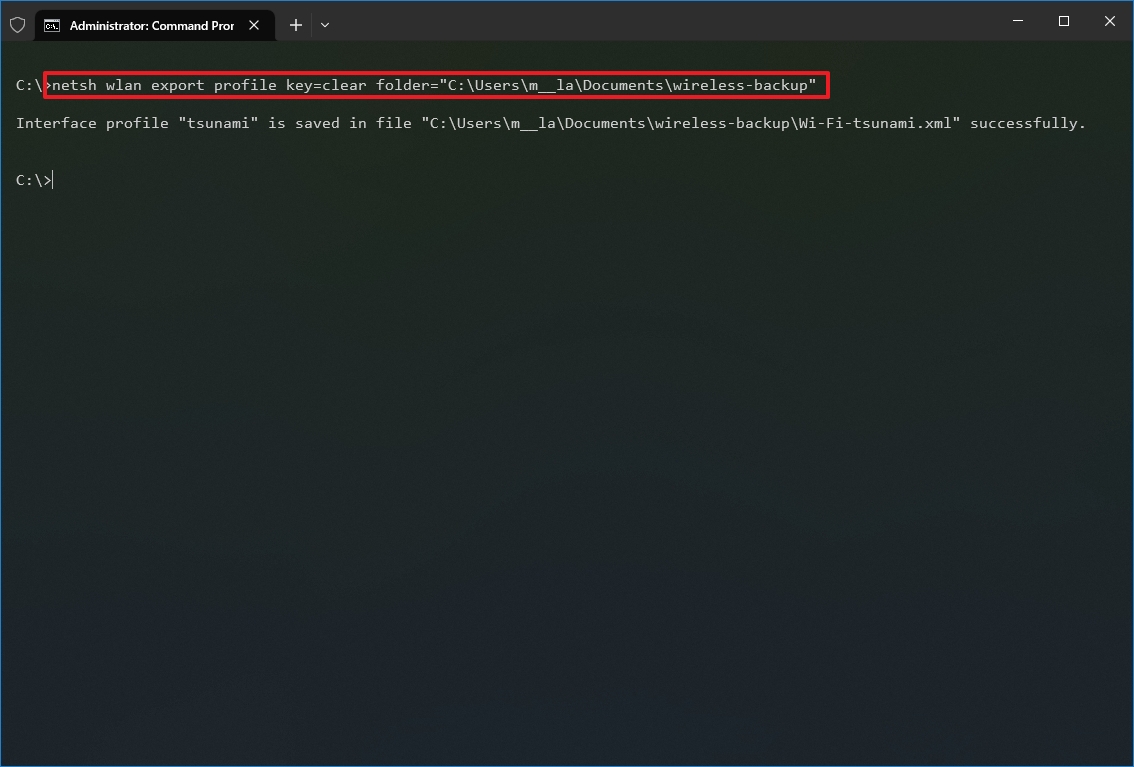
- Type the following command to export the wireless profiles stored on the device and press Enter: netsh wlan export profile key=clear folder=»FOLDER-PATH»
In the command, replace FOLDER-PATH with the path to the export destination folder. For example, this command export the profiles to the «wireless-backup» folder: netsh wlan export profile key=clear folder=»C:\Users\username\Documents\wireless-backup»
- (Optional) Type the following command to export a specific profile and press Enter: netsh wlan export profile name=»WLAN-PROFILE-NAME» key=clear folder=»FOLDER-PATH»
In the command, replace the WLAN-PROFILE-NAME with the profile name you want to export and the FOLDER-PATH with the folder location to export the information. For example, this command exports only the tsunami profile to the «wireless-backup» folder: netsh wlan export profile name=»tsunami» key=clear folder=»C:\Users\username\Documents\wireless-backup»
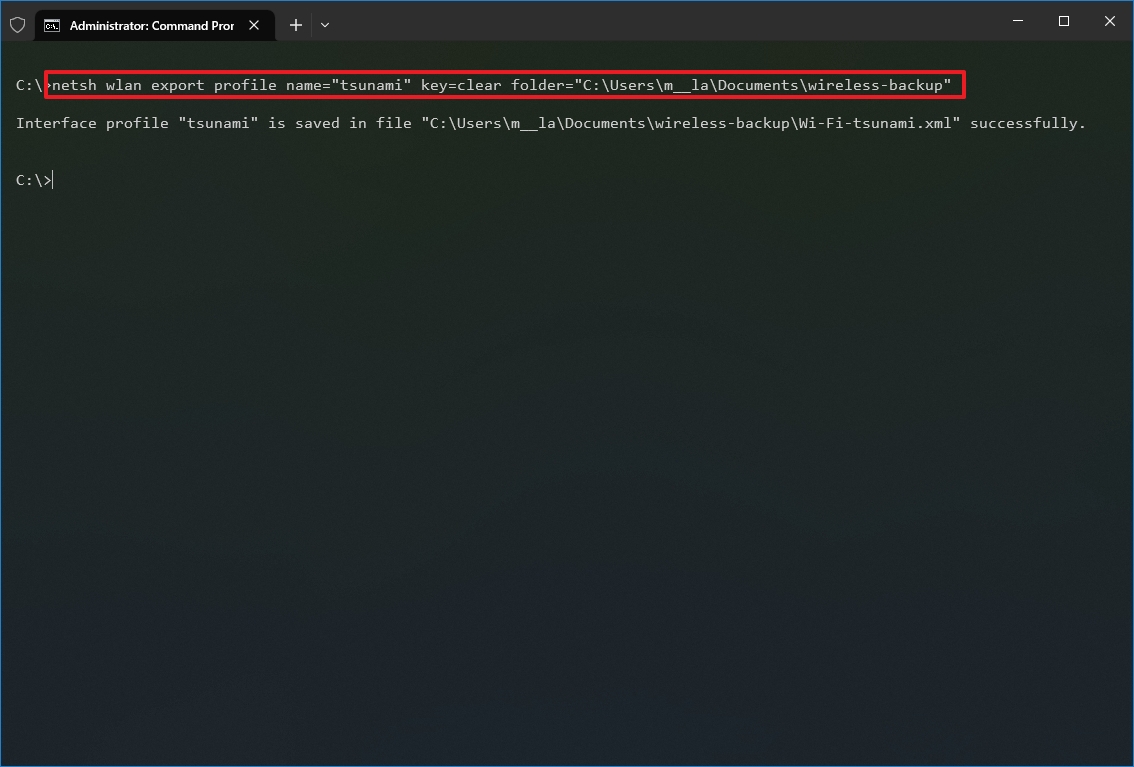
Once you complete the steps, all the profiles will be exported to your specified location. The output will also show the name and path for each XML file backup.
The export command will create an XML file for each wireless network profile stored on the device. Also, we are using the «key=clear» option, which will request to store the network security key for each network in the XML file. As a result, keep these records secure, as they can easily be viewed or edited using any text editor.
Import wireless settings
To import the wireless settings on Windows 10 with command lines, use these steps:
- Open Start.
- Search for Command Prompt, right-click the top result, and select the Run as administrator option.
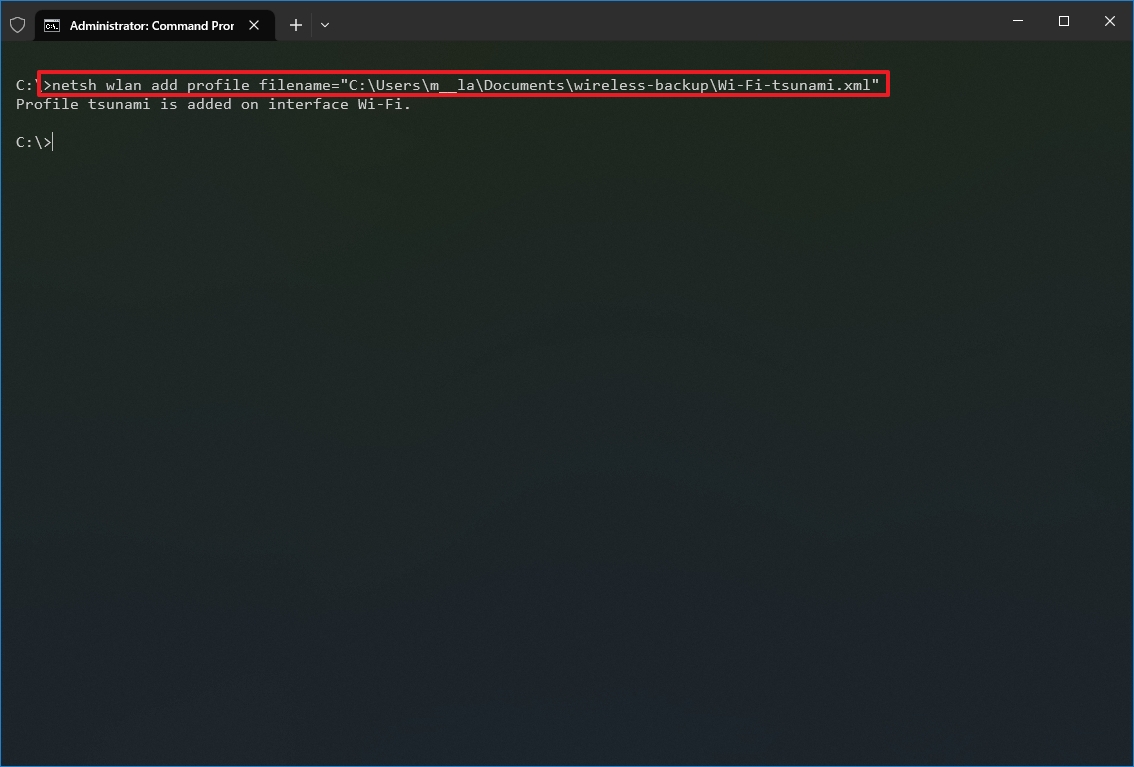
- Type the following command to import the wireless profiles and press Enter: netsh wlan add profile filename=»FOLDER-PATH\WLAN-EXPORTED-FILE»
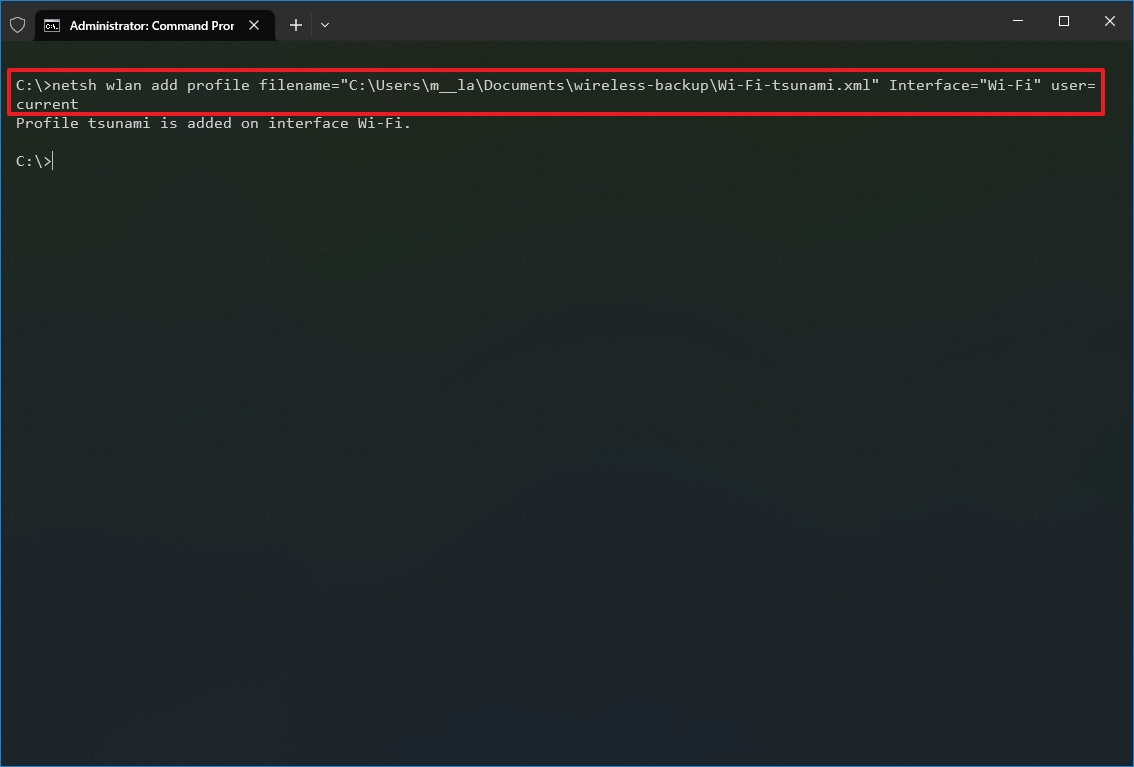
In the command, replace FOLDER-PATH\WLAN-EXPORTED-FILE with the path and file name for the exported file. For example, this command imports a specific profile stored in the «wireless-backup» folder: netsh wlan add profile filename=»C:\Users\username\Documents\wireless-backup\Wi-Fi-tsunami.xml»
- Quick tip: If you have multiple profiles, then repeat the steps and make sure to update the file path and filename of the exported profile.
- (Optional) Type the following command to import a profile to a particular wireless interface and current user and press Enter: netsh wlan add profile filename=»FOLDER-PATH\WLAN-EXPORTED-FILE» Interface=»WLAN-INTERFACE-NAME» user=current
In the command, change FOLDER-PATH\WLAN-EXPORTED-FILE for the exported file’s path and name containing the profile information and WLAN-INTERFACE-NAME with the name of the interface you want to import the settings. For example, this command imports the settings to the Wi-Fi interface: netsh wlan add profile filename=»C:\Users\username\Documents\wireless-backup\Wi-Fi-tsunami.xml» Interface=»Wi-Fi» user=current
After you complete the steps, the profile will be imported, allowing the device to connect to the wireless network without additional configuration.
How to create Wi-Fi network adapter report on Windows 10
If you need to troubleshoot the wireless connectivity to an access point, netsh also includes a command to create a detailed report with many important details.
To create a wireless report, use these steps:
- Open Start.
- Search for Command Prompt, right-click the top result, and select the Run as administrator option.
- Type the following command to create a wireless adapter report and press Enter: netsh wlan show wlanreport
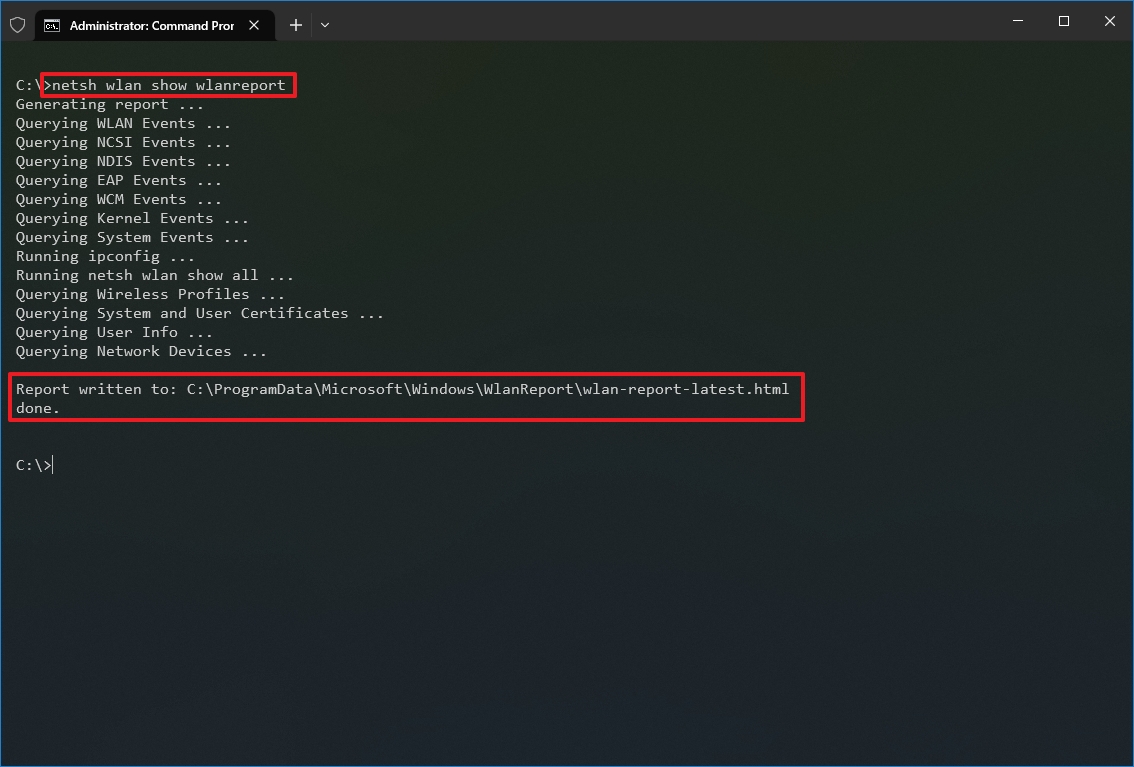
- Type the following command to open the report and press Enter: C:\ProgramData\Microsoft\Windows\WlanReport\wlan-report-latest.html
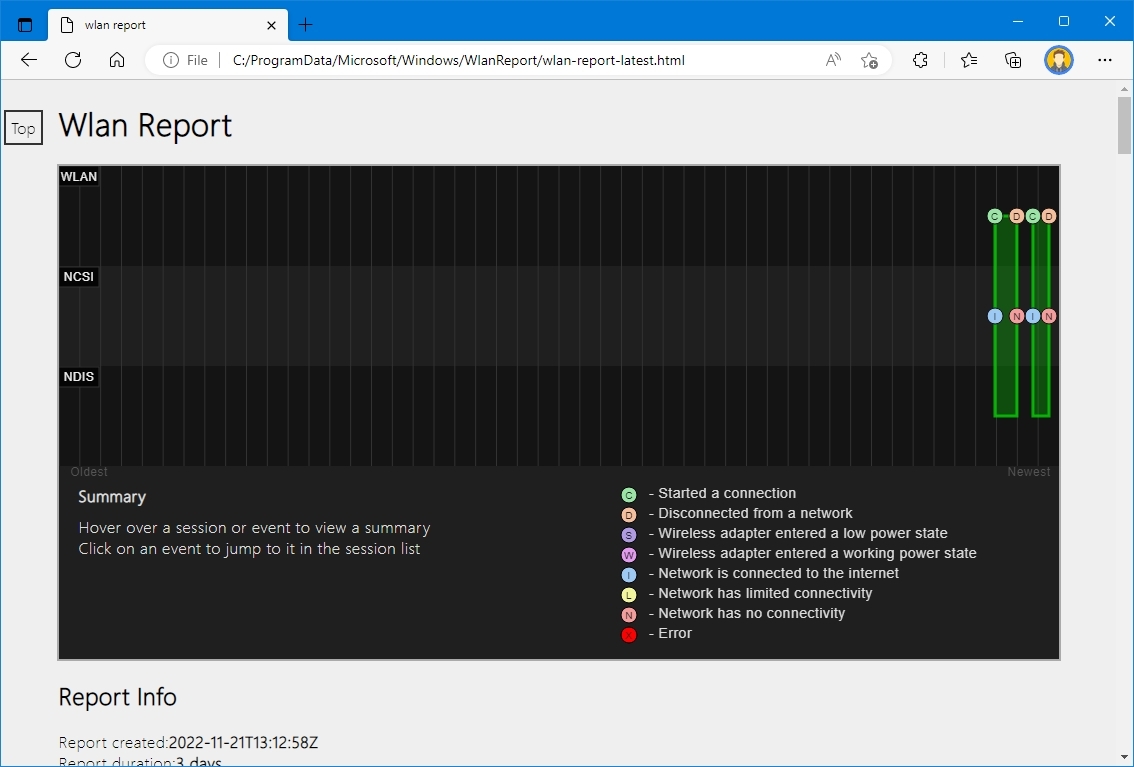
Once you complete the steps, the report will open with the default web browser.
The wlan reports contain a graph of the connectivity status, including information such as when the connection started, when it got disconnected, errors, and more. The report also summarizes the network adapters’ information configured on your system, successful and failed sessions, disconnect reasons, and more. It is a detailed report that can help you ping point many Wi-Fi connectivity issues.
While you can manage many wireless settings through the Settings app, the netsh command-line tool gives you more advanced tools to view, configure, and troubleshoot Wi-Fi and Ethernet connections.
We only focus on the most common commands, but you can always use the «netsh wlan» command to view all the available options.
More resources
For more helpful articles, coverage, and answers to common questions about Windows 10, visit the following resources:
- Windows 11 on Windows Central — All you need to know
- Windows 10 on Windows Central — All you need to know
Mauro Huculak has been a Windows How-To Expert contributor for WindowsCentral.com for nearly a decade and has over 15 years of experience writing comprehensive guides. He also has an IT background and has achieved different professional certifications from Microsoft, Cisco, VMware, and CompTIA. He has been recognized as a Microsoft MVP for many years.
How to connect, delete and manage WiFi networks using command prompt (cmd) in your Windows PC/laptop using netsh wlan commands
Nowadays internet connectivity is everything. For the Internet, we have Wi-Fi connections that we manage and use through the network settings on Windows 7/8.1/10 computers.
You can also connect, manage, and delete your WiFi networks using the command prompt.
In fact, the command prompt offers many more features than the standard network connection settings in Windows 10.
Also Read- A-Z Windows CMD Commands List
To do this we only require a CMD(Command Prompt) with Administrator privileges and will have to use netsh wlan commands.
Table Of Contents
- How to connect to wifi using cmd with netsh wlan commands-
- 1# View various wireless network profiles saved on your PC
- 2# View WiFi adapter driver information
- 3# View wireless adapter settings
- 4# Recover your WiFi password from any of the WiFi connection profiles saved on your PC
- 5# Connecting to a WiFi network using command prompt
- 6# Stop your PC connecting automatically to a wireless network out of range
- 7# Delete wireless network profile stored on your PC
- 8# Export and import wireless network profiles
- 9# Generate a complete report of the wireless adapters on your PC/laptop
How to connect to wifi using cmd with netsh wlan commands-
Before we dive into the guide. You’ll need to open the Command Prompt with administrator rights to perform most of the commands. To do this, use the Windows key + X keyboard shortcut, and select Command Prompt (Admin).
Or search cmd and right click run as administrator
1# View various wireless network profiles saved on your PC
Command > Netsh WLAN show profiles
Every time you connect to a wireless access point, the operating system creates a “wireless network profile”, and it’s stored on your computer, you can view all these profiles using the following command line on the Command Prompt Netsh WLAN show profiles.
Alternatively, you can use the “interface” parameter to show the list of profiles for a particular wireless adapter:
Netsh WLAN show profiles interface=”your WiFi interface name”
2# View WiFi adapter driver information
Command > Netsh WLAN show drivers
When you need to get driver information about your computer’s wireless adapter, you can use the the above command. The result will show the exact drivers being used, the WiFi radios on your PC/laptop alongwith driver version number.
You can further use this command to check your WiFi capabilities. Type in the following command
C:\Netsh WLAN show wirelesscapabilities
The results will show you exactly what your WiFi connection is capable of including WiFi Direct service capabilities.
3# View wireless adapter settings
Command > Netsh WLAN show interfaces
You can see the details of your WiFi interfaces using above command. The results will show you description of the interface, SSID, BSSID, Cipher, authentication type, channel, average receive and transmit rate and radio type.
If you have multiple WiFi connections saved on your PC, the “Show interfaces” command will display the information for all the wireless adapters on your computer. If you only need to see the information for one adapter, you can use the following command:
Netsh WLAN show interface name=”your wifi connection name”
4# Recover your WiFi password from any of the WiFi connection profiles saved on your PC
Command > Netsh WLAN show profile name=”your WiFi connection name” key=clear
If you lost and cannot remember your network security key to connect another device to a particular Wi-Fi access point, you can use the above command to view your WiFi password. You can also use this command to see the data limits if you have set them.
5# Connecting to a WiFi network using command prompt
Command > netsh wlan set hostednetwork mode=allow ssid=”your WiFi connection name” key=”your WiFi connection password”
You can use the above command to sign into your WiFi network. The above command is particularly useful if your WiFi settings in Windows 10 is not visible/cannot be connected due to some reasons. The additional commands are C:\netsh wlan start hostednet and C:\netsh wlan stop hostednetwork These two commands will start and stop your WiFi hotspot connection.
6# Stop your PC connecting automatically to a wireless network out of range
Command > Netsh WLAN set profileparameter name=”your WiFi connection name” connectionmode=manual
Normally, you would have configured your Windows 10 PC to connect to different WiFi networks automatically. While this is the best way to connect, sometimes notice that your laptop connects automatically to a WiFi connection that has zero or poor connectivity instead of an available full network WiFi connection. In such a case you can use the above command to prevent your computer from connecting to different networks automatically. If you want to move again to the automatic mode use the following command C:\Netsh WLAN set profileparameter name=” your WiFi connection name” connectionmode=auto
7# Delete wireless network profile stored on your PC
Command > Netsh WLAN delete profile name=”the WiFi connection you want to delete”
When you no longer need to connect to a particular wireless network, the access point is no longer available, or you need to reset the network profile settings, you can also use Netsh WLAN to delete any profile stored on your computer using the above command. If you can’t remember the name of the network profile, you can use the C:\Netsh WLAN show profiles command to list all the available profiles and select the one you want to delete.
8# Export and import wireless network profiles
Command > Netsh WLAN export profile key=clear folder=”the folder you want to save this report”
Sometimes you need to export and import wireless profiles. The above command exports all your wireless network profiles available on your PC. If you want to export a specific WiFi connection profile to a specific location, use this command > C:\Netsh WLAN export profile name=”your WiFi connection name” key=clear folder=”the folder you want to save this report”
9# Generate a complete report of the wireless adapters on your PC/laptop
Command > Netsh WLAN show WLANreport
Trouble shooting WiFi connection problems is very difficult as Internet has lots of conflicting tutorials and troubleshooting guide. Also you should know the exact problem you are facing while connecting to WiFi.
Using the above command will generate a full detailed WiFi networks report to the following location > C:\ProgramData\Microsoft\Windows\WLANReport\WLAN-report-latest.html.
Once the WLAN report has been created, copy and paste the path into your web browser’s address bar to open the report.
You can use this report to troubleshoot the problems, ask help on tech forums. The WLAN reports contain a graph with details of the connectivity status, including information, such as when the connection started, when it got disconnected, errors, and more.
The report also summarizes network adapters information configured on your system, session success/failures, disconnect reasons, and a lot more. It’s a very detailed report that can help you to ping point many Wi-Fi connectivity issues.
ALSO READ:
- How to Hack WiFi Password Using New WPA/WPA2 flaw
- How To Find WiFi Password When Forgot It
CONCLUSION:
So this was how to connect to wifi using cmd (command prompt) with netsh wlan commands
To find the network interface name in Windows Command Prompt, use the command `getmac` or `ipconfig` to display the interface names along with their corresponding MAC or IP addresses.
getmac
or
ipconfig
Understanding CMD and Network Interfaces
What is CMD?
Command Prompt (CMD) is a command-line interpreter available in various Windows operating systems. It allows users to execute commands to perform various system tasks, from simple file manipulations to more complex network configurations. CMD is a powerful tool for both novice users and advanced system administrators, enabling users to interact with the system directly and automate tasks through scripting.
What is a Network Interface?
A network interface refers to a hardware or software component that allows a device to connect to a network. In the context of computers, it typically represents the point at which the computer interfaces with networking hardware (such as a network card) or virtual interfaces (like software-based connections).
Network interfaces can be broadly classified into two categories:
- Wired interfaces (e.g., Ethernet) connect through physical cables and provide a stable connection.
- Wireless interfaces (e.g., Wi-Fi) connect without cables, offering flexibility but with potential disruptions.
How to Reset Network Settings Windows 11 Cmd Effortlessly
Launching CMD
How to Access Command Prompt
To find the network interface name in Windows CMD, you first need to access the command prompt. Here’s how you can do that:
-
Using the Start Menu: Click on the Start menu, type “cmd” or “Command Prompt” in the search bar, and hit enter. A CMD window will open.
-
Using Run dialog: Press Windows Key + R to open the Run dialog. Type “cmd” and press Enter. This will launch the Command Prompt.
Additionally, if you need administrative privileges for certain commands, right-click on the Command Prompt icon and select “Run as administrator.”

How to Get Battery Serial Number from Cmd
Finding the Network Interface Name
Using the `ipconfig` Command
The `ipconfig` command is a vital tool for network diagnostics in Windows. This command provides information about your network configuration and allows you to view the details of each network interface.
-
Command Example:
ipconfig /all -
When you execute this command, you will see a wealth of information about your network interfaces. Look for the section labeled “Ethernet adapter” or “Wireless LAN adapter,” depending on your connection type.
-
What to Look For: The names of network interfaces are typically listed under “Description.” For instance, you might see an entry that says “Wi-Fi” or “Ethernet,” denoting the respective interfaces in your system.
In the output, you’ll also find essential details about each interface, such as the IPv4 Address and Subnet Mask, which can help you further understand your network setup.
Using the `Get-NetAdapter` Command (Windows PowerShell)
Alternatively, if you prefer using PowerShell, the `Get-NetAdapter` command provides an efficient way to view interface information. PowerShell is often utilized for its enhanced scripting capabilities.
-
Command Example:
Get-NetAdapter -
Upon execution, this command displays a list of all network adapters configured on your system. You will see columns like «Name,» «Status,» and «Mac Address.»
-
Detailed Output Explanation: The Name column directly correlates to the network interface name you’re looking for. For example, it may show names like “Wi-Fi” for wireless connections or “Ethernet” for wired connections, along with their operational status (Up or Down), helping you quickly ascertain which interfaces are active.
Exploring the `netsh` Command
The `netsh` command is another powerful tool that aids in network configuration and communication troubleshooting.
-
Command Example:
netsh interface show interface -
Running this command provides a concise output showing the interfaces on your system along with their statuses.
-
Interpreting the Output: Focus on the column labeled “Interface Name” to find the network interface names. The status will tell you whether an interface is connected or disconnected, which can be particularly useful in troubleshooting scenarios.
How to Get Laptop Serial Number from Cmd: A Quick Guide
Advanced Tips and Tricks
Filtering Results
If you have multiple interfaces and want to narrow your search, the `findstr` command can filter the output effectively.
- Using findstr Example:
ipconfig /all | findstr /C:"Description" - This command will return only the lines in the `ipconfig` output that contain the word “Description,” thus allowing you to focus directly on network interface names.
Saving Output to a File
For further analysis or documentation, you might want to save the output of your commands into a text file.
- Using Redirection Example:
ipconfig /all > network_info.txt - This command creates a file named `network_info.txt` in the current directory, containing the output of the `ipconfig /all` command. You can then review or share this file as needed.
How to Unlock Administrator Account in Windows 10 Using Cmd
Troubleshooting Common Issues
When trying to find your network interface names in CMD, you may encounter common errors:
-
No interfaces found: This could happen if the network drivers are not installed or if the network interfaces are disabled. Ensure that your network adapters are working correctly and enabled in device settings.
-
Access Denied: If certain commands require administrative privileges, make sure you are running CMD as an administrator.
For troubleshooting, verify your network connections and consider updating network drivers through the Device Manager.
How to Run Cmd as Administrator in Windows 11
Conclusion
Knowing how to find network interface names in Windows CMD is crucial for effective network management and troubleshooting. Whether you prefer using `ipconfig`, `Get-NetAdapter`, or `netsh`, mastering these commands can help you navigate your network settings with confidence.
How to Install Python on Windows 11 Using Cmd
Additional Resources
For further reading and detailed documentation on CMD commands, visit the official Microsoft documentation. You can also explore community forums and tutorials that delve into CMD networking and scripting techniques.
How to Get Wifi Password Using Cmd Windows 11
FAQ Section
What are the differences between PowerShell and CMD?
PowerShell offers enhanced capabilities, incorporating both command-line features and a scripting language, enabling more complex tasks than CMD. CMD is more straightforward and often used for basic tasks, whereas PowerShell excels in automation and managing system complexities.
Can I find interface names on older versions of Windows?
Most commands discussed are compatible with older versions of Windows, though command syntax may vary slightly. It’s important to check related documentation for those specific versions.
Are there graphical alternatives to find network interface names?
Yes, Windows provides a graphical interface to view network settings, which can be accessed through Control Panel > Network and Sharing Center > Change adapter settings. This method can be more user-friendly for those less familiar with command-line tools.
Узнаем список доступных интерфейсов сети
netsh wlan show interface
Выводим список Wifi сетей
netsh wlan show networks
Для подключения к WiFi сети служит команда
netsh wlan connect name=ИмяПрофиляСети
Можно указать конкретный интерфейс, при помощи которого выполнять подключение. Синтаксис таков: netsh wlan connect name=ИмяПрофиляСети interface=ИмяИнтерфейса
У меня бы это выглядело так:
netsh wlan connect name=TRENDnet interface=»Wireless Network Connection 3″
Отключение от WiFi сети Чтобы отключиться от WiFi сети, необходимо выполнить следующую команду
netsh wlan disconnect
Или указать конкретный интерфейс
netsh wlan disconnect interface=ИмяИнтерфейса
При помощи netsh можно просмотреть все доступные профили:
netsh wlan show profile
И, собственно, подключиться к сети с выбранным профилем:
netsh wlan connect ssid=ИмяСети name=ИмяПрофиляСети
If you are using a Windows 10 computer with a wireless network connection, you can use the Settings app and Control Panel to manage various aspects of your wireless network connections.
However, you may need to perform some advanced tasks such as show wireless network profile information, generate wireless connection report, and find the security key from different Wi-Fi profiles. In these cases, you can not perform those tasks offered by the Settings app and Control Panel.
For these reasons, Microsoft offers a Netsh command-line utility to manage your wireless and wired network settings. You can view, troubleshoot, and configure virtually every network adapter on a local or remote computer using this utility.
You can use Netsh WLAN command to view your wireless settings, generate reports, import, export and delete wireless profiles from your computer.
In this tutorial, we will show you how to use Netsh WLAN command-line tool to manage Wireless connections in Windows 10.
View Wireless Adapter Settings
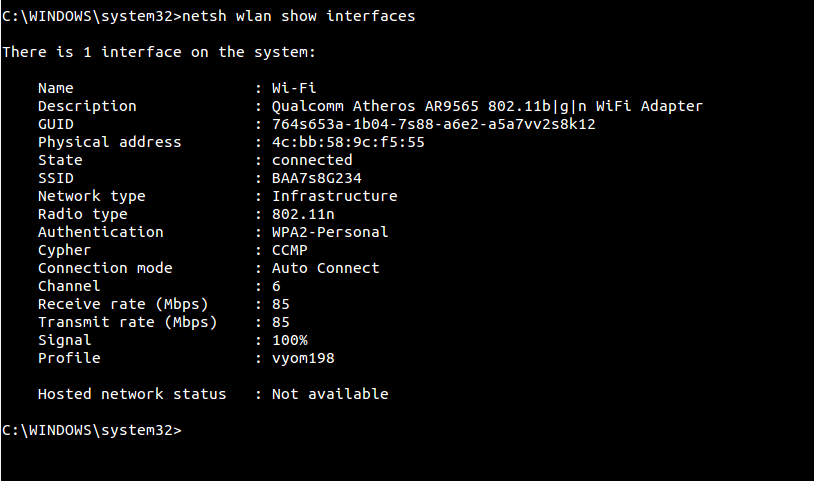
You can see the detailed information about your wireless adapter including, radio type, channel, wireless signal, and type of authentication your computer is currently using with the netsh wlan command.
First, log in to Windows 10 with an Administrator account. Open Start menu, search for Command Prompt, right-click on the search result and select the Run as administrator.
Now, run the following command:
netsh wlan show interfaces
You should see the detail information of your wireless adapter in the following screen:
View Wireless Driver Information
In some cases, you may also need to get driver information about your computer’s wireless adapter. You can get it with the following command:
netsh wlan show drivers
You should see the following screen:
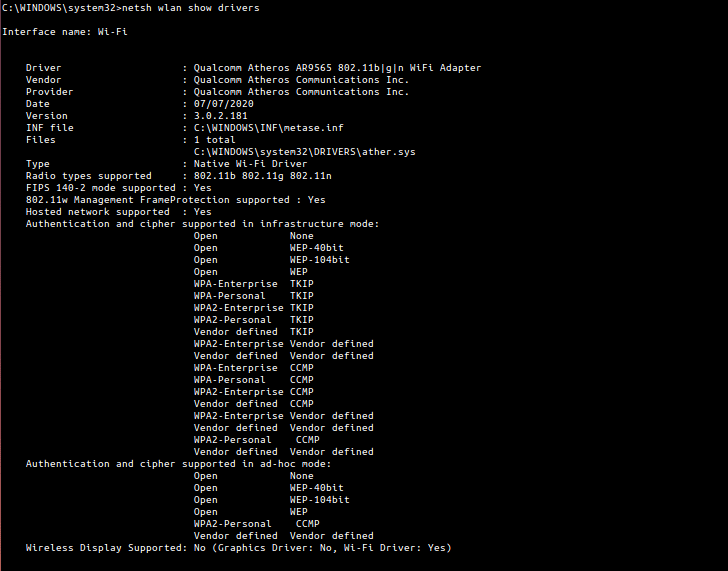
You will get relevant information about the driver currently installed on your system, including vendor, version, radio type, and wireless display support, and much more.
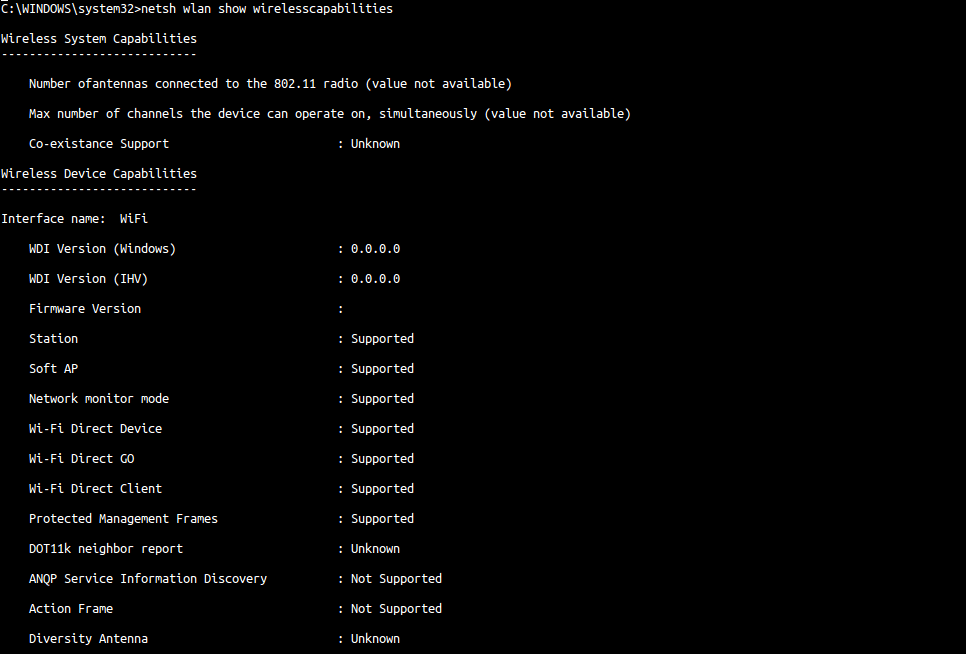
Wireless Adapter Capabilities
You can also use the following command to view all supported wireless adapter capabilities:
netsh wlan show capabilities
You should see the detail information in the following screen:
View Wireless Network Profiles
When you connect to any wireless network, windows creates a wireless network profile and store it on your computer.
You can view all these profiles stored in your computer with the following command:
netsh wlan show profiles
You should see the following screen:

If you want to delete any wireless network profile, run the following command:
netsh wlan delete profile name=[profile name]
You can also remove all profiles with the following command:
netsh wlan delete profile *
Export and Import Wireless Profile
You can export your wireless network profile to the XML file with the following command:
netsh wlan export profile name="profile name" key=clear folder=c:\
If you want to import the wireless profile from the XML file, run the following command:
netsh wlan add profile filename="path_and_filename.xml" interface="interface_name"
Find/View Wireless Network Password (no Software needed)
Some times, you may need to find your wireless network password if you forgot it or would like to share your wi-fi password with another user in your network.
If you forgot your wireless network password then you can recover it from the wireless network profile saved in your computer.
You can display it with the following command:
netsh wlan show profile name="vyom198" key=clear
You should see the following screen:
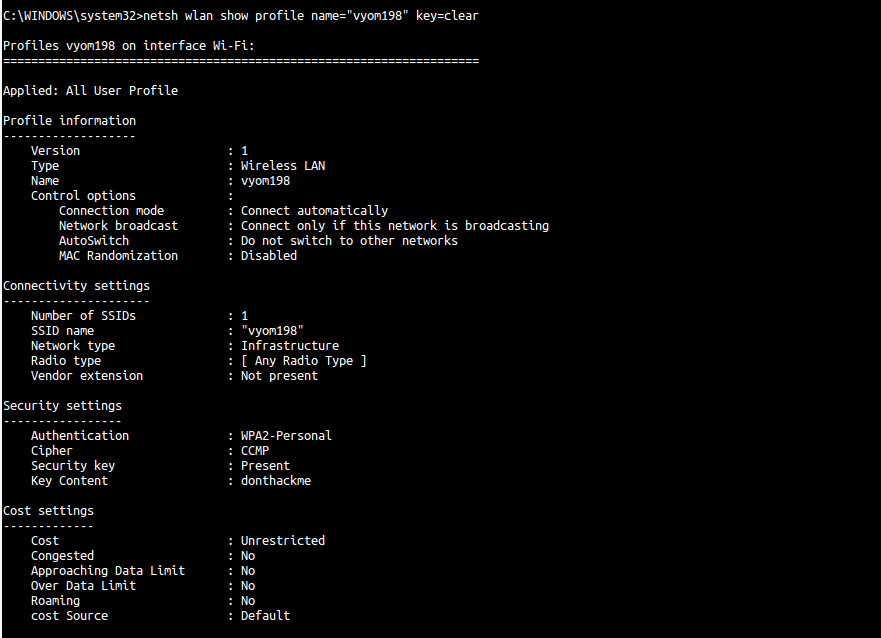
You can see the Wi-fi password/key in the Key Content field above.
Generate Wireless Adapter Report
If you have any wireless connectivity issue then you can troubleshoot it by generating a detailed report with many important details.
You can create a wireless report with the following command:
netsh wlan show wlanreport
This will generate a report and save in the WlanReport folder.
You can view this report in your web browser. The reports contain a graph with much useful information such as, connectivity status, errors, summery of the network adapter, session success/failures, disconnect reasons, and a lot more.
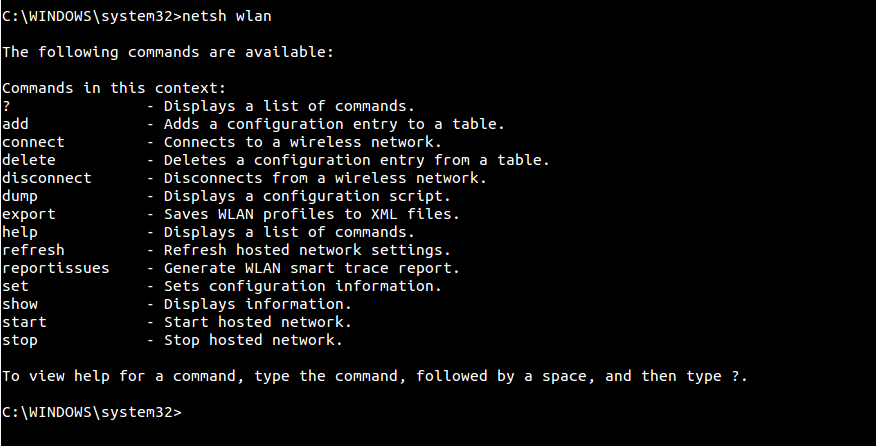
Netsh WLAN Help
Netsh is a simple and very powerful utility that comes with many useful options. If you don’t remember all commands, you can list all available options with the following command:
netsh wlan
You should see the following screen:
Conclusion
In this tutorial, you learned how to manage a wireless network with netsh command on Windows 10. We hope this will help you troubleshoot wireless network issues and perform day-to-day tasks.