
Before you start
Objectives: learn how to manage disks in Vista.
Prerequisites: you have to know what is File system.
Key terms: volume, create, spanned, file, drive, space, simple, stripped, unallocated, letter
Device Manager
First let’s check our disks in Device Manager. Right-click on computer, select the ‘Manage’ option, and then go to Device Manager. Let’s open Disk drives. Notice that in our case we have one disk installed.
Image 330.1 – Disk Drives in Device Manager
Let’s open the properties of that hard disk and then go to the Volumes tab. Here we will click the Populate button which will query the hard drive and find the various volumes that have been configured on the disk.
Image 330.2 – Volume Tab
In our case we can see that there’s one volume with a drive letter of C. While we can see the physical disks that are in our system using Device Manager, to manage file system we will typically go to Disk Management. Let’s say that we have bought two new disks and that we have attached the to our computer. We will use Disk Management console to set them up.
Disk Management
Disk Management is also part of the Computer Management console which we have already opened. Simply select it from the menu on the left. To open Disk Management we can always go to Control Panel > System and Maintenance > Administrative Tools > Computer Management > Disk Management. On the top of the Disk Management window we can see all of the volumes that exist on our computer. Notice that we have only one volume. The bottom portion in the middle shows us each individual disk along with the volumes on each disk. Notice that we have two new disks with unallocated space.

Image 330.3 – Disk Management
In our case Disk 0 is the first disk and it has one volume (C). To be more precise, we have one partition on our disk, and one volume which is using that single partition. Notice that we also have two other disks which are not initialized and the space is unallocated, so before we move on we have to solve that issue. To initialize a disk simply right-click it (in Disk Management) and select the Initialize Disk option. The following window will appear.
Image 330.4 – Initialize Disk
We will use the MBR partition style and click OK. After we have done that we can work with our disks. Let’s play with them a bit. Let’s create a spanned volume from two disks.
Spanned Volume
Spanned volume is made up of disk space on more than one disk. We can create a spanned volume if we need a volume that is too big for a single disk. We can also expand a spanned volume by adding free space from another disk. To do that right click on Disk and select the ‘New Spanned Volume’ option. The wizard will appear. We want our new volume to be 512 MB in size so in in our configuration notice that we have taken 256 MB from every disk.

Image 330.5 – Spanned Volume Configuration
After we click ‘Next’ we will select to assign a drive letter E to our new volume and to format it using NTFS file system. We will also named it ‘Spanned’. Before we continue we will get a warning that our disks have to be converted to dynamic disks.

Image 330.6 – Dynamic Disk Warning
That’s fine with us so we can just click OK. If we look in Disk Management console now, we can see our new volume E. Notice that when we click on it on one disk, it will also be selected on all other disks.
Image 330.7 – Spanned Volume in Disk Management
So, the spanned volume contains space from two separate partitions on two separate disks, Disk 1 and Disk 2. Let’s create a Stripped Volume now.
Stripped Volume
Stripped volume stores data in stripes on two or more disks. That gives us faster access to our data than a simple or spanned volume. To create stripped volume, right-click on disk (in Disk Management console) and select the ‘New Stripped Volume’ option. The wizard will appear. In our case we will select both disks and take 256 MB on each disk. Our configuration looks like this.

Image 330.8 – Stripped Volume Configuration
We will assign drive letter F to it, format it with NTFS, and label it with ‘Stripped’. Our disks in Disk Management Console now look like this.
Image 330.9 – Spanned and Stripped Volumes Created
Simple Volume
Let’s also create a simple volume on Disk 1. A simple volume can only be on a single disk. To do that we will right-click on Disk 1 and select the ‘New Simple Volume’ option. The wizard will appear. In our case we will select the rest of the space on Disk 1 which is 478 MB.
Image 330.10 – Simple Volume Configuration
We will assign drive letter G to it, format it with NTFS and label it with ‘Simple’. Our volumes now look like this.
Image 330.11 – Simple Volume Added
If we don’t assign a drive letter to our volume and if we don’t format it, we won’t be able to use it in Windows. It will exists as a volume in Disk Management, but as a volume without a drive letter label.
Unallocated Space
Notice that on Disk 2 there’s additional space on the disk that is labeled as unallocated. Unallocated simply means that it is a portion of a disk that has not been assigned to a partition or a volume. We can use the unallocated space on the disk to create additional partitions or volumes.
Windows Explorer
We can look at the data that exists on a volume by going to ‘Computer’ or ‘My Computer’ in Windows Explorer. Here we can see the volumes that exist on our computer. Those are C:, E:, F: and G:.

Image 330.12 – Hard Disk Drives in Computer
Notice that they correspond to the volumes that we have defined in Disk Management. Also notice that the unallocated portion on Disk 2 can not be used in Explorer. To see the files that are saved on a volume we can just double click on the volume. Let’s open our Spanned volume. We currently don’t have any files on it. To create a file we can simply right-click and chose New. Then we choose a type of document that we want to create. In our case we will create two text documents, Text 1 and Text 2. Of course we can open a program and edit these documents.
Image 330.13 – Text Documents
We can also use folders to organize our documents. Folders are simply markers that allow us to organize how the files are viewed on the disk. They don’t actually change the position of the file on the disk. They simply change how we see the files when we browse the file system. For example, let’s create new folder called ‘Intro’ and move our file Text 2 to it.
Image 330.14 – Intro Folder
So, we didn’t actually moved the file to a different location on the disk. We have simply associated the Text 2 file with the Intro directory. That way as we browse the volume we can use the folders to organize our files.
Formatting
Formatting prepares the volume with the structure that is necessary to save files on the volume. Without formatting the operating system does not know how to identify files within the portion of the disk. Let’s see how to format hard drive from Explorer. We wil work on our simple volume which has drive letter G. We have already formatted it, but for the purpose of demonstration we will do it again trough Explorer. We will right click it and select the ‘Format’ option.
Image 330.15 – Formatting Options
By default NTFS is the file system type that Windows prefers, although we can also chose FAT or FAT32. We will leave our label ‘Simple’ and check the Quick Format option. When we click on Start we will get a warning which tells us that formatting erases all the data that’s on the disk. In our case this is fine because there’s nothing on the disk to begin with. If we have something important on our disk, we have to be sure to back it up.
Remember
We can use Device Manager to view the physical disks that are installed on our computer. By viewing the properties of the disk we can also look at the volumes that have been defined on that disk. With Disk Management we can view the disks, the partitions as well as the volumes for each of the disks. We can also see unallocated space on a disk. We use Disk Management to create partitions, volumes, to perform formatting and assign drive letters. We use Explorer to browse the file system and view the contents of the disk. Folders are ways of organizing files. Files contain the data that programs create.
439
439 people found this article helpful
Use the Disk Management utility to make changes to drives in Windows
What to Know
- Control Panel > System and Security > Windows Tools > Computer Management > Disk Management
- Alternatively, open Command Prompt and execute diskmgmt.msc.
- Make a shortcut: Right-click desktop, New > Shortcut. Type diskmgmt.msc, select Next. Change name, Finish.
You’ll need to open the Disk Management tool to partition a hard drive, format a hard drive, change a drive letter, or perform other disk-related tasks. You won’t find a shortcut to Disk Management in the Windows Start menu or Apps screen because it’s not a program in the same sense that most other software is.
How to Open Disk Management in Windows
The most common and operating-system-independent way to open Disk Management is through the Computer Management utility, described below.
-
Open Control Panel. In most versions of Windows, Control Panel is most readily available from its shortcut on the Start menu or Apps screen.
-
Select System and Security. If you’re viewing the Large icons or Small icons view of the Control Panel, you won’t see this link. If you’re on one of those views, select Windows Tools or Administrative Tools and skip to Step 4.
System and Security is only found in Windows 11, 10, 8, and 7. In Vista, the equivalent link is System and Maintenance, and in XP, it’s called Performance and Maintenance. See What Version of Windows Do I Have? if you’re not sure.
-
Select Windows Tools (Windows 11) or Administrative Tools. It’s located near the bottom of the window, so you might need to scroll down to see it.
This window is called System and Maintenance or Performance and Maintenance in Vista and XP, respectively.
-
In the window that’s now open, double-tap or double-click Computer Management.
-
Choose Disk Management on the left side of the window. It’s located under Storage.
If you don’t see it listed, you might need to select the plus or arrow icon to the left of the Storage icon.
Disk Management may take several seconds or more to load but will eventually appear on the right side of the Computer Management window.
You can now partition a hard drive, format a hard drive, change a drive’s letter, or do whatever else you need to do in Windows’ disk manager tool. Most free disk partitioning software tools can also accomplish these hard drive tasks.
Other Ways to Open Disk Management
You can also type a simple command in any version of Windows to open Disk Management. This method might be much faster for you if you’re used to running commands in the Run dialog box or Command Prompt.
Just execute diskmgmt.msc from either of those command line interfaces. See How to Open Disk Management From the Command Prompt for more detailed instructions.
To immediately launch the tool, you can also make your own shortcut to Disk Management right on your desktop.
Here’s how:
-
Right-click or tap and hold any empty space on the desktop.
-
Go to New > Shortcut.
-
Type diskmgmt.msc and then press Next.
-
Customize the name if you want, and then select Finish.
If you’re running Windows 10 or Windows 8, and you have a keyboard or a mouse, Disk Management is one of many quick-access options on the super-useful Power User Menu. Just right-click the Start button or try the Win+X combination on your keyboard.
If Explorer won’t even run, meaning that you can’t use the desktop to make a shortcut, access the Start button, or open Command Prompt, Task Manager might be your only option.
To open Disk Management with Task Manager, first open Task Manager (Ctrl+Shift+Esc is one easy method) and then go to Run new task at the top (Windows 11) or File > Run new task (select More details first if you don’t see the File menu). What you’ll see looks exactly like the Run dialog box; enter the diskmgmt.msc command there to open the program.
FAQ
-
Make sure you’re logged in as an administrator before you open Disk Management. Go to Start > Settings > Accounts. If you’re not logged in as an admin, switch to that account or select Change account type to designate a new administrator account.
-
Open Disk Management as an administrator and select the drive you want to change. Right-click and select Change Drive Letter and Paths > Change, then pick a new drive letter and choose OK > Yes. Keep in mind that you can’t change the drive letter of the partition that contains the Windows operating system, which is usually the C drive.
Thanks for letting us know!
Get the Latest Tech News Delivered Every Day
Subscribe
Main Content of This Guide:
About Disk Management? Who Is This Guide for?
I. What Is Disk Management Windows 10/11?
II. How to Open Disk Management in All Windows PC?
III. How to Use Windows Disk Management to Set Up Hard Drive?
IV. Troubleshooting of Disk Management Windows 10/11 Error
V. Disk Management Software for Windows
About Disk Management? Who Is This Guide for?
If you decide to manage disks or partitions via Windows Disk Management, this guide is meant for you. You may be a beginner at manually partitioning a targeted device or a user with a half-baked idea for getting everything in the disk management Windows 10/11. This guide is written for you. According to our latest practice, you are in the right place if you want to learn the ultimate overview of the basics of disk manager utility. This guide won’t provide the obscure terminology that swirls in your mind but makes it easier for novices to understand Windows 10/11 disk management and its features, steps to run it, and fix errors without hassle.

I. What Is Disk Management Windows 10/11?
Windows Disk Management is a software utility in Microsoft Windows that provides a graphical interface for disk management. It works to manage disk drives and partitions in a computer system. The main goal of disk management is to optimize disk space use and improve the system’s performance.
In older versions of Windows, disk management can be accessed through the Disk Administrator tool. Starting with Windows Vista, disk management is integrated into the Computer Management console.
Windows Disk Management Availability: Windows 2000, Windows XP, Windows Vista, Windows 11, Windows 10, Windows 8, Windows 7, and all Windows Server versions.
Disk Management seems like a powerful software available on all Windows versions. Is it strong enough? What features does this software come with?
Essential Feature 1 of Disk Management — Manage Disks
- Initialize a new disk — After getting or replacing a new drive, initialize it before using the disk on the computer.
- Convert an MBR disk to a GPT disk or change a GPT disk into an MBR disk — MBR and GPT are partition styles. Read on what is GPT or MBR if you’re interested.
- Change or assign a drive letter.
- Change a dynamic disk to a basic disk.
- Manage virtual disk: It enables the creation and attachment of VHD.
- Check the disk’s properties.
Essential Feature 2 — Manage Basic Volumes with Disk Management
- Create a new simple volume.
- Manage basic volumes, including extending, shrinking, deleting, and formatting an essential volume.
- Set partition as active.
Benefits and Drawbacks of Disk Management Windows 10/11
✅What we like about Disk Management: It is entirely free and requires basic partition functions. What a big attraction for users tired of downloading third-party software that claims to be a free feature but requires to upgrade for a fee.
❎What we don’t like with Disk Management: Extending or shrinking volume requires changing disk size in MB. It’s hard to count for a novice. Moreover, the functions also have unexpected errors like extend volume greyed out, hard drive not showing up, etc.
II. How to Open Disk Management on All Windows PCs?
Where is disk management in Windows? To open disk management, you can run it from the disk management command and control panel:
To Access Disk Management with Shortcut (Disk Management Command)
- Press the Windows key + R to open the Run dialog box.
- Then type «diskmgmt.msc» and press Enter.
This will open the disk management console. From here, you can view all of your hard drives and partitions and perform various actions on them.
To Get into Windows Disk Management from Control Panel
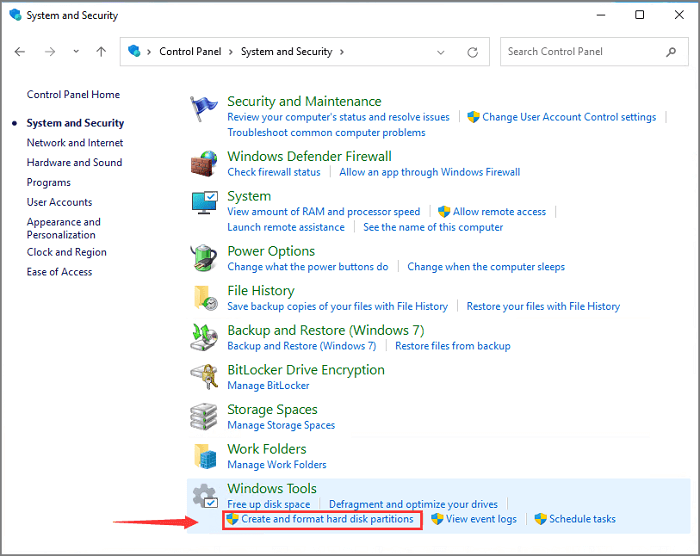
Search and open Control Panel from the Start menu > Click on the «System and Security»> Type «disk management» on the top-right box > Click on the «Create and format hard disk partitions» under Windows Tools section.
Get More Opening Options
Still curious about other options? Read to open disk management in Windows 11 from the quick access menu, dialog, task manager, and more.
III. How to Use Windows Disk Management to Set Up Hard Drive?
Giving your hard drive a makeover is ordinary as that device is sophisticated but vulnerable to viruses or time. One of the ways to extend the lifespan is to set up your hard drive, manage the disk or partition space, and use unallocated free space. Here are some easy step-by-step tutorials to partition hard drive:
1. Initialize A New Disk
2. Create A New Volume
3. Extend or Shrink Volume
4. Format Partition
5. Convert MBR to GPT or Vice Versa
6. Change A Drive Letter
7. Convert Basic to Dynamic Disk
1. Use Windows 10 Disk Management to Initialize A New Disk
Step 1. Install or connect a new hard drive to the computer.
Step 2. Open Disk Management with the former options.
Step 3. Locate and find the hard drive and click on the «Initialize Disk» from the menu.
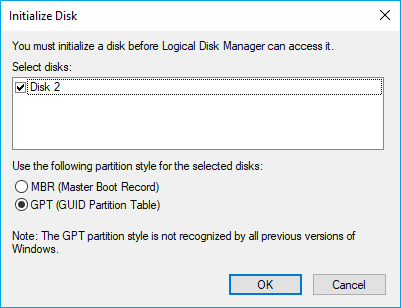
Step 4. Select the correct disk to initialize in the Initialize Disk dialog box. Then, set the partition style you want.
You May be Concerned about more ways to initiate a hard drive:
2. Create A New Volume by Disk Management
Step 1. Launch Disk Management.
Step 2. You can see the free space marked as «Unallocated». Right-click the unallocated space and click «New Simple Volume…»
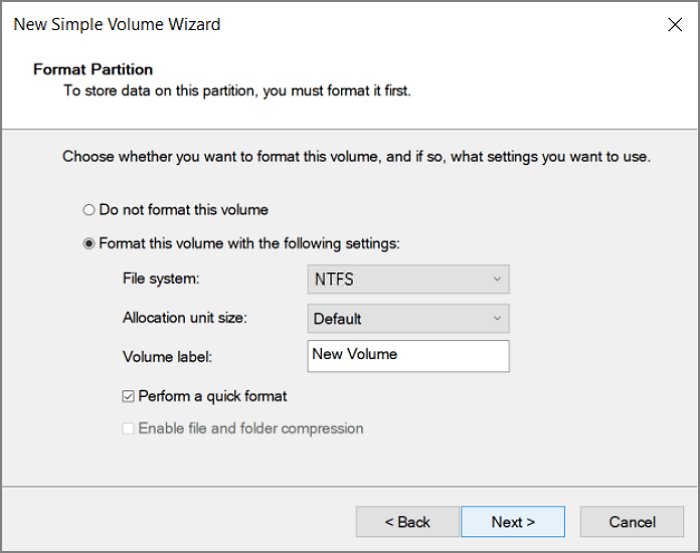
Step 3. Set file system, allocation unit size, and volume label and click Next.
Get More Info
Still, want to get more tips? Check to read the complete guide of new simple volume.
3. Extend or Shrink Volume via Windows Disk Management
Step 1. Run Disk Management.
Step 2. Click the volume you want to extend or shrink. Click the «Extend Volume» or «Shrink Volume».
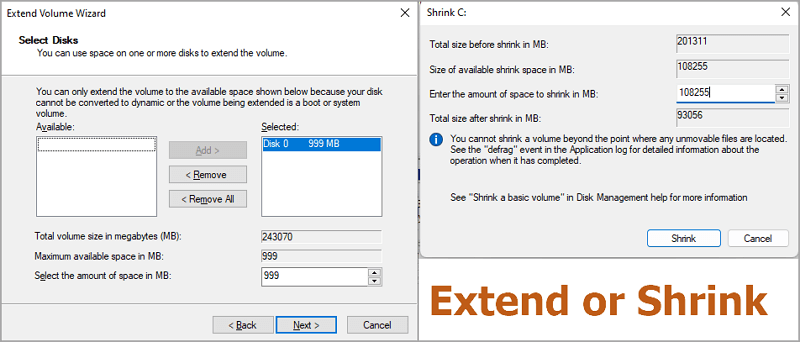
Step 3. Adjust the size in MB.
On the «Extend Volume Wizard», change the space size. And go to Next > Finish.
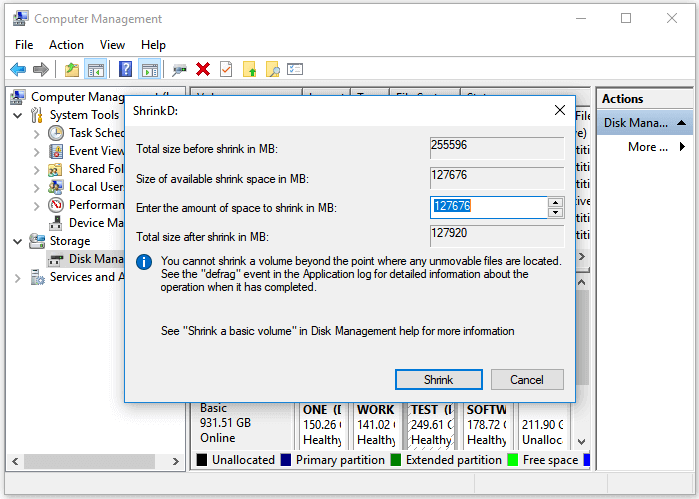
On the shrink dialog box, enter the amount of space to shrink in MB. Then click «Shrink».
If the extended volume greyed out, move to the troubleshooting section.
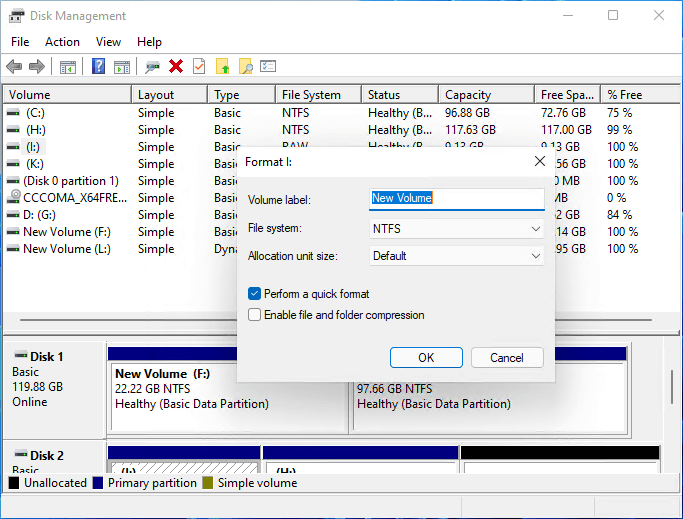
4. Format Partition by Disk Management Windows 10
Note: Format function indeed causes data loss. Remember to back up all important data first.
- Open Windows partition utility.
- Right-click a volume you want to format and choose «Format…».
- Change the volume label, file system, and allocation unit size. And select «Perform a quick format».
- Click OK.
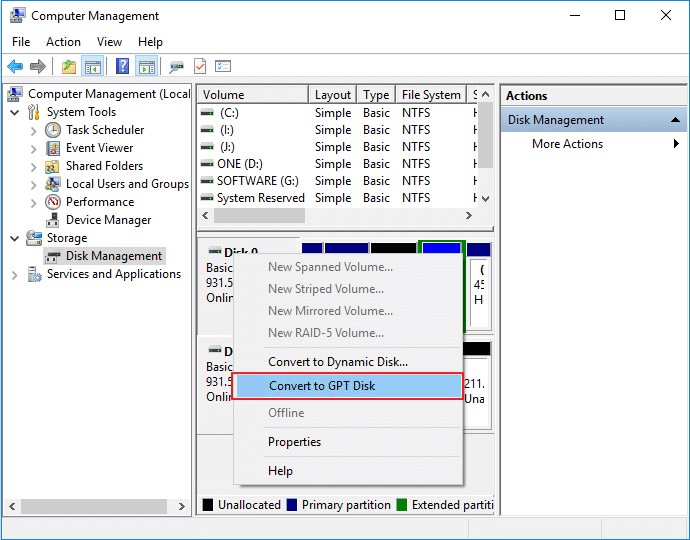
5. Convert MBR to GPT or Vice Versa
Notice: Watch out for data loss! Changing partition style (Convert MBR to GPT or convert GPT to MBR) requires deleting partitions in Disk Management. Please back up the essential data.
- Delete all volumes: Launch Disk Management > Right-click the volume on the targeted disk > Click «Delete Volume»> Click «Yes».
- Start to convert partition style: Right-click the targeted disk and choose «Convert to GPT Disk» or «Convert to MBR Disk».
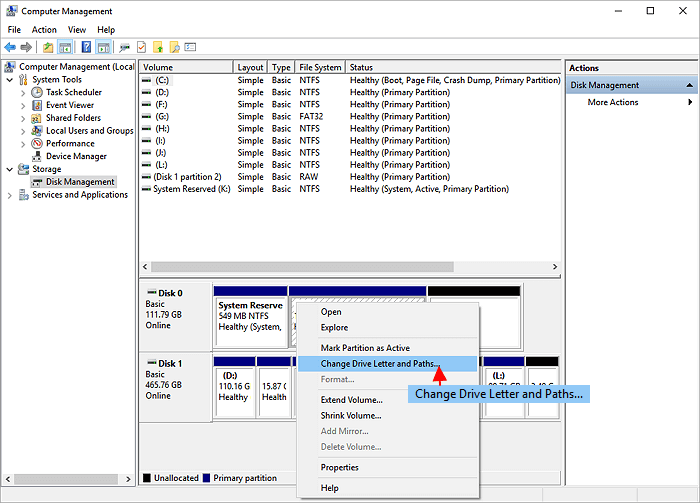
6. Change A Drive Letter with Windows 10 Disk Management
Run Disk Management > Right-click the partition and click «Change Drive Letter and Paths…»> Pick the new drive letter > Click «OK».
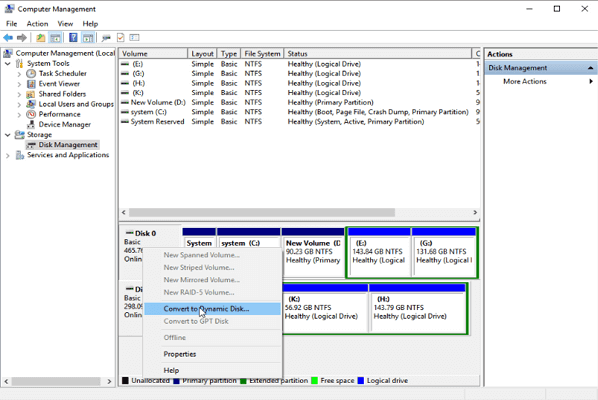
7. Convert Basic to Dynamic Disk
Launch Disk Management > Right-click the disk for converting > Click «Convert to Dynamic Disk…»
Not enough? Read on to apply other features in Disk Management:
Note that Disk Management is not a one-size-fits-all solution. If you get any greyed-out error or hard drive not showing up issue, get the help of the Troubleshooting part. If that doesn’t help, don’t worry. Keep reading the following tips to troubleshoot these errors.
IV. Troubleshooting Disk Management Windows 10/11 Errors
(X)Error 1. Extend Volume Greyed out
Can’t extend volume? Extending volume greyed out is a standard error that can happen when trying to expand the partition size on a hard drive. There are a few reasons this error might occur, but the most common cause is that the hard drive is out of space. You can shrink a volume that has enough space in Disk Management to make unallocated space:
- Run Disk Management > Take a peek at a partition next to the targeted volume > Select «Shrink Volume» and click OK.
LEARN MORE
Need a detailed guide? Click here to learn about Extend Volume Greyed Out.
(X)Error 2. New Simple Volume Out
A new simple volume greyed out is a problem that can occur when trying to create a new volume on a disk that has been partitioned using the Master Boot Record (MBR) scheme. This problem can occur if the disk has more than four primary partitions. To create a new volume on such a disk, you must first delete one of the existing primary partitions. You can then create a new primary partition in its place. Alternatively, you can convert the disk to the GUID Partition Table (GPT) scheme, which supports up to 128 partitions.
Back to change MBR to GPT with Disk Management.
LEARN MORE
Try more solutions to fix New Simple Volume Greyed out
(X)Error 3. Format Volume Greyed Out
Disk Management format greyed out is a common issue when trying to format a storage drive. This usually happens because the drive is corrupted or bad sectors are on the disk. When this happens, the format option will be greyed out, and you won’t be able to format the drive. You’ll most likely need to use a third-party tool to format the drive. See the software on the next part.
Other Quick Troubleshooting in Disk Management:
V. Disk Management Software for Windows
We know that managing hard drives can be done manually via Disk Management. However, as we see in the former part, you may encounter some errors that count too much time. Why not try another free program and finish tasks in seconds? See one alternative to disk management:
Free Partition Manager — EaseUS Partition Master
EaseUS Partition Master is a free hard disk partitioning tool that enables you to resize, move, merge, and convert partitions on your hard drive. With EaseUS Partition Master, you can easily create, delete, format, and extend partitions. The software also includes a partition recovery wizard that enables you to recover deleted or lost partitions.
Check More Tools
Move to get the other nine free disk manager.
People Also Ask about Disk Management
1. Why does my hard drive not showing up?
- The drive is properly connected to your computer.
- The drive has become corrupted or damaged.
- The drive hasn’t been appropriately formatted.
2. How much storage does a dynamic disk require for the disk management database?
When creating a dynamic disk, you must specify how much storage to allocate for the disk management database. This database is used to track changes to the dynamic disk and store information about the disk’s layout. The database size will depend on the number of disks and partitions on the dynamic disk, as well as the number of updates made to the disk. You should allocate at least 2MB of storage for the database.
3. Which of the following is not a linux/unix file or disk management command?
- A. cfdisk
- B. xfsdump
- C. tar
- D. xterm
The Right answer is «xterm».
|
Чтобы сделать новый раздел (в Vista он называется «том»), щелкните на кнопке «Пуск», введите diskmgmt.msc и нажмите Enter для открытия утилиты «Управление дисками». Чтобы создать пространство для нового тома нажмите на существующем томе правой кнопкой мыши и выберите «Сжать том».
Vista подсчитает возможный объем пространства, который Вы можете использовать, и откроет диалоговое окно, где Вы можете ввести размер нового тома. Там же Вы можете увидеть общий размер до сжатия, максимально доступное пространство для сжатия и размер старого тома после сжатия. После процедуры сжатия щелкните на вновь созданном томе с надписью “Не распределен” правой кнопкой мыши и выберите «Создать простой том». Затем следуйте пошаговой инструкции мастера создания и форматирования нового тома. После окончания Вы увидите Ваш новый том, представленный в окне утилиты «Управление дисками». Необходимо отметить, что Вы можете сжать только тома, использующие файловую систему NTFS. Ваш жесткий диск в новом компьютере почти наверняка использует именно NTFS. Автор текста: Тимофей Шеронов Оцените статью: Голосов |