
From Wikipedia, the free encyclopedia
This article is about Microsoft’s former line of tablets. For the company’s current line of tablet PCs, see Microsoft Surface.
Microsoft Tablet PC is a term coined by Microsoft for tablet computers conforming to hardware specifications, devised by Microsoft, and announced in 2001 for a pen-enabled personal computer and running a licensed copy of the Windows XP Tablet PC Edition operating system or a derivative thereof.[1]
Hundreds of such tablet personal computers have come onto the market since then.[2]
In 2003, original equipment manufacturers released the first tablet PCs designed to the Microsoft Tablet PC specification. This generation of Microsoft Tablet PCs were designed to run Windows XP Tablet PC Edition, the Tablet PC version of Windows XP.[3] This version of Microsoft Windows superseded Microsoft’s earlier pen computing operating environment, Windows for Pen Computing 2.0. After releasing Windows XP Tablet PC Edition, Microsoft designed the successive desktop computer versions of Windows, Windows Vista and Windows 7, to support pen computing intrinsically. The Tablet PC with Windows XP released in 2001 had 128 megabytes of RAM and a 600 megahertz processor, with a storage capacity of 10 GB.[4]
Following Windows for Pen Computing, Microsoft has been developing for tablets running Windows under the Microsoft Tablet PC name.[5] According to a 2001 Microsoft definition[6] of the term, «Microsoft Tablet PCs» are pen-based, fully functional x86 PCs with handwriting and voice recognition functionality. Tablet PCs use the same hardware as normal laptops but add support for pen input. For specialized support for pen input, Microsoft released Windows XP Tablet PC Edition. Today there is no tablet specific version of Windows but instead support is built into both Home and Business versions of Windows Vista and Windows 7. Tablets running Windows get the added functionality of using the touchscreen for mouse input, hand writing recognition, and gesture support. Following Tablet PC, Microsoft announced the UMPC initiative in 2006 which brought Windows tablets to a smaller, touch-centric configuration. This was relaunched in 2010 as Slate PC, to promote tablets running Windows 7[7] Slate PCs are expected to benefit from mobile hardware advances derived from the success of the netbooks.
Many tablet manufacturers are moving to the ARM architecture with lighter operating systems, Microsoft followed suit in 2012 with Surface and Windows RT. Though Microsoft has Windows RT for ARM support it has kept its target market for the smartphone industry with Windows Phone 8. Some manufacturers, however, still have shown prototypes of Windows CE-based tablets running a custom shell.
Recent developments of tablet computers with Windows featured Microsoft’s Surface line, which ran the Windows RT operating system, and later Windows 8.1 and x86 and ARM versions of Windows 10.
Booklet PCs are dual screen tablet computers that fold like a book. Typical booklet PCs are equipped with multi-touch screens and pen writing recognition abilities. They are designed to be used as digital day planners, internet surfing devices, project planners, music players, and displays for video, live TV, and e-reading.
Slate computers, which resemble writing slates, are tablet computers without a dedicated keyboard. For text input, users rely on handwriting recognition via an active digitizer, touching an on-screen keyboard using fingertips or a stylus, or using an external keyboard that can usually be attached via a wireless or USB connection.
Tablet PCs typically incorporate small (8.4–14.1 in or 21–36 cm) LCD screens and have been popular in vertical markets such as health care, education, hospitality and field work. Applications for field work often need a tablet PC that has rugged specifications that ensure long life by resisting heat, humidity, and drop/vibration damage. This added focus on mobility and/or ruggedness often leads to eliminating moving parts that could raise vulnerability.
Also known as Netvertible; Convertible notebooks have a base body with an attached keyboard. They more closely resemble modern laptops, and are usually heavier and larger than slates.
Typically, the base of a convertible attaches to the display at one joint called a swivel hinge or rotating hinge. The joint allows the screen to rotate through 180° and fold down on top of the keyboard to provide a flat writing surface. This design, although the most common, creates a physical point of weakness on the notebook.
Some manufacturers have attempted to overcome these weak points. The Panasonic Toughbook CF-19, for example, is advertised as a more durable convertible notebook. One model by Acer (the TravelMate C210) has a sliding design in which the screen slides up from the slate-like position and locks into place to provide the laptop mode.
Convertibles are by far the most popular configuration of tablet PCs, because they still offer the keyboard and pointing device (usually a touchpad) of older notebooks, for users who do not use the touchscreen display as the primary input method.
Hybrids, coined by users of the HP/Compaq TC1000 and TC1100 series, share the features of the slate and convertible by using a detachable keyboard that operates similarly to a convertible when attached. Hybrids are not the same as slate models with detachable keyboards. Detachable keyboards for pure slate models do not rotate to allow the tablet to rest on it like a convertible.
An examples of hybrids are Microsoft Surface (10.6 or 12) or Fujitsu Stylistic (11.6 with an Intel-i5-vPro processor).[8]
Windows 7 touch capability is similar to Microsoft PixelSense technologies (formerly known as Microsoft Surface). This is a gesture and touch-centric UI enhancement that works with most current touch computers. Windows has a history of tablet technology including Windows XP Tablet PC Edition.[9][10] Tablet PC Edition is a superset of Windows XP Professional, the difference being tablet functionality, including alternate text input (Tablet PC Input Panel) and basic drivers for support of tablet PC specific hardware. Requirements to install Tablet PC Edition include a tablet digitizer or touchscreen device, and hardware control buttons including a Ctrl-Alt-Delete shortcut button, scrolling buttons, and at least one user-configurable application button.
Service Pack 2 for Windows XP includes Tablet PC Edition 2005 and is a free upgrade. This version brought improved handwriting recognition and improved the Input Panel, allowing it to be used in almost every application. The Input Panel was also revised to extend speech recognition services (input and correction) to other applications.
With the succession of Windows Vista, the Tablet PC functionality no longer needed a separate edition. Tablet PC support is built into all editions of Windows Vista with the exception of Home Basic and Starter editions. This extends the handwriting recognition, ink collection,[11] and additional input methods to any computer running Vista even if the input device is an external digitizer, a touch screen, or even a regular mouse. Vista also supports multi-touch functions and gestures (originally developed for the Microsoft PixelSense version of Vista) and is now usable by the public with the release of multi-touch tablets. Windows Vista also significantly improved handwriting recognition functionality with the introduction of a handwriting recognition personalization tool as well as an automatic handwriting learning tool.
Tablet functionality is available in all editions of Windows 7 except the Starter edition. It introduces a new Math Input Panel that recognizes handwritten math expressions and formulas, and integrates with other programs. Windows 7 also significantly improved pen input and handwriting recognition by becoming faster, more accurate, and supportive of more languages, including East Asian writing systems. Personalized custom dictionaries help with the recognition of specialized vocabulary (like medical and technical terms), and text prediction speeds up the input process to make note-taking faster. Multi-touch technology is also available on some Tablet PCs, enabling more advanced interaction using touch gestures with your fingers the same way a mouse is used.[12] Despite such advances, problems may arise with tablet functions of the OS, when, for instance, touch screen drivers are recognized as PS/2 mouse input rather than a touch input device. In such instances tablet functions may be unavailable or severely restricted in functionality.
Windows applications
[edit]
Applications developed for the tablet PC cater to the configuration and functionality available on the platform. Many forms of applications incorporate a pen-friendly user interface and/or the ability to hand write directly in the document or interface.
A brief description of the applications included follows:
- Experience Pack
- Ink Desktop: an Active Desktop control designed to run in the background and allow the user to write directly on the desktop.
- Snipping Tool: a screen capture application which allows the tablet pen to be used to select a portion of the screen and then annotate it and save as a file or send in an email.
- Ink Art: a painting application developed by Ambient Design originally as ArtRage, licensed to Microsoft for release to Tablet PC users.
- Ink Crossword: a crossword application developed to mirror the experience of a paper crossword puzzle on a tablet PC.
- Media Transfer: a synchronization utility designed to download music, pictures, and videos from computers in the same network.
- Education Pack
- Ink Flash Cards: an application designed to assist memorization by using a flashcard approach, enabling the user to hand write their own flash cards and display them back in a slide show.
- Equation Writer: a recognition tool specializing in converting handwritten mathematical equations to a computer-generated image for pasting into other documents.
- GoBinder Lite: an organization and note-taking application developed by Agilix Labs.
- Hexic Deluxe: a game with a tablet PC specific gesture enabled for easier use with the tablet.
- Touch Pack
The Touch Pack for Windows 7 is a free package of games and programs optimized for multitouch input.
- Microsoft Blackboard
- Microsoft Garden Pond
- Microsoft Rebound
- Microsoft Surface Globe
- Microsoft Surface Collage
- Microsoft Surface Lagoon
- Application software
- Microsoft Windows Journal
- Microsoft Office OneNote
- Einstein Technologies Tablet Enhancements for Outlook
- FutureWave Smartsketch drawing program published by FutureWave Software
- GO Corporation
- Agilix GoBinder
- Mobilis – Protectis Range
- EverNote
- InkSeine: Prototype Tablet GUI/Interface – Microsoft Research
- Xournal – a Linux notetaking application
- OnSite Companion Construction Software for Tablet PC
- Stardraw Control – room automation, home cinema control system
Microsoft Tablet PCs vs. traditional notebooks
[edit]
The advantages and disadvantages of tablet PCs are highly subjective measures. What appeals to one user may be exactly what disappoints another. The following are commonly cited opinions of the tablet PC platform:
- Use in environments not conducive to a keyboard and mouse such as lying in bed, standing, or handling with one hand.
- Lighter weight, lower power models can function similarly to dedicated reading devices like the Amazon Kindle.
- Touch environment makes navigation easier than conventional use of keyboard and mouse or touchpad in certain contexts such as image manipulation, or mouse oriented games.
- Digital painting and image editing is enhanced and more realistic than painting or sketching with a mouse.
- The ability for easier or faster entering of diagrams, mathematical notations, and symbols.
- Allows, with the proper software, universal input, independent from different keyboard localizations.
- Some users find it more natural and fun to use a stylus to click on objects rather than a finger, mouse or touchpad, which are not directly connected to the pointer on screen.
- Use in entertainment for all media.
- Higher cost – convertible tablet PCs can cost significantly more than their non-tablet counterparts, laptops, although this premium has been predicted to fall.[13]
- Input speed – handwriting can be significantly slower than typing speeds, the latter of which can be as high as 50–150 words per minute; however, Slideit, Swype and other technologies are able to provide alternate, faster methods of input.[citation needed]
- Screen and hinge damage risk – Tablet PCs are handled more than conventional laptops, yet are built on similar frames; in addition, since their screens also serve as input devices, they run a higher risk of screen damage via impacts and misuse. A convertible tablet PC’s screen hinge nay rotate around two axes, unlike a normal laptop screen, subsequently increasing the number of possible mechanical and electrical (digitizer and video cables, embedded Wi-Fi antennas, etc.) failure points.
- Ergonomics – a tablet PC does not provide room for a wrist rest while the screen is folded into slate mode. In addition, the user will need to move their arm constantly while writing.
- Weaker video abilities – Most tablet PCs are equipped with embedded graphics processors instead of discrete graphics cards. In July 2010, the only tablet PCs with discrete graphics cards were the HP TouchSmart tm2t, and the Gateway M285-E which has the ATI Mobility Radeon HD5450 and X1400 series
In addition to the host of features found on regular laptops, tablet PCs may also possess:
- Capacitive contact technology, which can sense fingers on the screen without needing significant pressure for system to recognize an input.[14]
- Palm recognition, which prevent inadvertent palms or other contacts from disrupting the pen’s input.[14]
- Multi-touch abilities, which can recognize multiple simultaneous finger touches, allowing for enhanced manipulation of on-screen objects.[15]
- Similar devices
- E-book reader
- Comparison of e-book readers
- Tablet computer
- History of tablet computers
- Comparison of tablet computers
- Microsoft Surface
- Related components
- Bluetooth
- High Speed Packet Access (HSPA)
- Solid-state drive (SSD)
- ^ Microsoft Tablet PC
- ^ List of Tablet PC since 2002 (Italian)
- ^ Microsoft (2005). «Windows XP Tablet PC Edition 2005 Hardware Requirements». www.microsoft.com. Archived from the original on 2006-01-01. Retrieved 2006-01-01.
- ^ Hume, Samuel. «Pen-Based Computing» (PDF). Applied Clinical Trials. Retrieved Nov 16, 2015.
- ^ «Microsoft Tablet PC». 16 October 2006.
- ^ «Tablet PC Brings the Simplicity of Pen and Paper to Computing». Microsoft.
- ^ «Live from Steve Ballmer’s CES 2010 keynote». Engadget. 7 January 2010. Retrieved 4 August 2010.
- ^ www.fujitsu.com/uk/products/computing/pc/tablets/stylistic-q702/ Archived 2014-09-03 at the Wayback Machine (August 2014)
- ^ MSDN: Windows XP Tablet PC Edition: Tablet PC: An Overview, Microsoft, 2004-08-24, retrieved 2008-09-04
- ^ Windows XP Tablet PC Edition: Tablet PC: An Overview (PDF), Microsoft, 2002-06-01, archived from the original (PDF) on 2008-07-19, retrieved 2008-09-04
- ^ MSDN Ink collection
- ^ «Tablet PC — Windows 7 features». Microsoft.com. Retrieved 2011-08-01.
- ^ Convertibles: The new laptop bling? — CNET News.com
- ^ a b Tablet PC offers capacitive touch sensing capability., Dell, Inc
- ^ jkOnTheRun:So what is multi-touch?
- Jeff Han Talks About Touch-Driven Computer Screens at HowStuffWorks
- Comparison table of convertible tablets
- Microsoft Center for Research on Pen-Centric Computing
- Notes on the History of Pen-based Computing (YouTube)
- Annotated bibliography of references on Pen and Tablet Computers
In the “old days,” working on a document usually
meant pulling out a blank sheet of paper, taking up a pen (or some other
writing instrument), and then writing out your thoughts in longhand.
Nowadays, of course, electronic document editing supersedes this
pen-and-paper approach almost entirely. However, there are still plenty
of situations when people still write things out in longhand:
-
Jotting down an address or other data while on the phone
-
Taking notes at a meeting
-
Recording a list of things to do while visiting a client
-
Creating a quick map or message for faxing
-
Sketching out ideas or blueprints in a brainstorming session
Unfortunately, for all but
the most trivial notes, writing on paper is inefficient because you
eventually have to put the writing into electronic form, either by
entering the text by hand or by scanning the document.
What the world has needed
for a long time is a way to bridge the gap between purely digital and
purely analog writing. We’ve needed a way to combine the convenience of
the electronic format with the simplicity of pen-based writing. After
several aborted attempts (think of the Apple Newton), that bridge was
built in recent years: the Tablet PC. At first glance, many Tablet PCs
look just like small notebook computers, and they certainly can be used just like any notebook. However, a Tablet PC boasts three hardware innovations that make it unique:
-
A touch screen
(usually pressure-sensitive) that replaces the usual notebook LCD
screen. Some Tablet PC screens respond to touch, but most respond to
only a specific type of pen (discussed next). -
A digital pen
or stylus that acts as an all-purpose input device: You can use the pen
to click, double-click, click-and-drag, and tap out individual
characters using an onscreen keyboard. In certain applications, you can
also use the pen to “write” directly on the screen, just as though it
were a piece of paper, thus enabling you to jot notes, sketch diagrams,
add proofreader marks, or just doodle your way through a boring meeting. -
The
ability to reorient the screen physically so that it lies flat on top
of the keyboard, thus making the screen’s orientation like a tablet or
pad of paper. (Note, however, that there are now some Tablet PCs that
don’t support this feature and have lids like regular notebooks.)
Note
Some Tablet PCs come with a screen that’s sensitive to finger touches. Windows Vista supports these screens.
The first Tablet PCs came
with their own unique operating system: Windows XP Tablet PC Edition.
With Windows Vista, the Tablet PC–specific features are now built into
the regular operating system, although they are activated only when
Vista is installed on a Tablet PC (and you’re running any Vista edition
except Home Basic).
Before moving on to the new
Tablet PC, I should note that Vista comes with a couple of tools that
were also part of the XP version: Windows Journal and Sticky Notes.
These programs are identical to the XP versions.
Changing the Screen Orientation
The first Tablet PC feature to mention is one that you’ve already seen.
The new Mobility Center comes with a Screen Orientation section that
tells you the current screen orientation . There are four settings in all:
-
Primary Landscape—
This is the default orientation, with the taskbar at the bottom of the
display and the top edge of the desktop at the top of the display. -
Secondary Portrait—
This orientation places the taskbar at the right edge of the display,
and the top edge of the desktop at the left of the display. -
Secondary Landscape— This orientation places the taskbar at the top of the display, and the top edge of the desktop at the bottom of the display.
-
Primary Portrait— This
orientation places the taskbar at the left edge of the display, and the
top edge of the desktop at the right of the display.
Setting Tablet PC Options
Before you start
inking with Vista, you’ll probably want to configure a few settings, and
Vista offers quite a few more than XP. Your starting point is the
Control Panel’s Mobile PC window—specifically, the renamed Tablet PC
Settings icon (formerly named Tablet and Pen Settings). Select Start, Control Panel, Mobile PC, Tablet PC Settings.
In the Tablet PC
Settings dialog box that appears, the General tab is basically the same
as the old Settings tab (you can switch between right-handed or
left-handed menus and calibrate the pen), and the Display tab is
identical to its predecessor (it offers another method to change the
screen orientation).
However, the new Handwriting Recognition tab has two sections (as shown in Figure 1):
Figure 1. Use the Handwriting Recognition tab to activate new Vista features for improving handwriting recognition.
-
Personalization— This increases the accuracy of the handwriting recognizer
(the feature that converts handwritten text into typed text), but only
when the Use the Personalized Recognizer check box is activated. -
Automatic Learning—
This feature collects information about your writing, including the
words you write and the style in which you write them. Note that this
applies not only to your handwriting—the ink you write in the Input
Panel, the recognized text, and the corrected text—but also to your
typing, including email messages and web addresses typed into Internet
Explorer. To use this feature, activate the Use Automatic Learning
option.
Working with the Tablet PC Input Panel
As with XP Tablet PC
Edition, Windows Vista comes with the Tablet PC Input Panel tool that
you use to enter text and other symbols with the digital pen instead of
the keyboard. You have two ways to display the Input Panel:
-
In Vista, an icon
for the Input Panel appears in a small tab docked on the left edge of
the screen. Hover the mouse pointer over the tab to display it, and then
click the icon or any part of the tab. -
Move
the pen over any area in which you can enter text (such as a text box).
In most cases, the Input Panel icon appears near the text entry area.
Click the icon when it appears.
Figure 2 shows the Input Panel.
Figure 2. Use the Writing Pad to write words or short phrases by hand.

Tip
You can also add an icon
for the Input Panel to the Vista taskbar. Right-click the taskbar and
then click Toolbars, Tablet PC Input Panel.
The
layout of the Input Panel is slightly different from the XP version,
with the icons for the writing pad, character pad, and onscreen
Keyboard, and the Options button along the top. The miniature keyboard
that appears with the writing pad and character pad is slightly
different as well, with the notable difference being the addition of the
Web key full time. (In XP Tablet PC Edition, the Web key appeared only
when you were entering a web address.) This makes sense because users
often need to write URLs in email messages and other correspondence.
The Vista Input Panel also comes with quite a few more options than its predecessor. Vista gives you two ways to see them:
-
In the Input Panel, click Tools and then click Options in the menu that appears.
-
In the Tablet PC Settings dialog box, display the Other tab and click the Go to Input Panel Settings link.
Here’s a list of some of the more significant new settings:
-
AutoComplete
(Settings tab)— When this check box is activated, the Input Panel
automatically completes your handwriting if it recognizes the first few
characters. For example, if you’re writing an email address that you’ve
entered (via handwriting or typing) in the past, Input Panel recognizes
it after a character or two and displays a banner with the completed
entry. You need only click the completed entry to insert it. This also
works with web addresses and filenames. -
Show the Input Panel Tab
(Opening tab)— Use this check box to toggle the Input Panel tab on and
off. For example, if you display the Tablet PC Input Panel toolbar in
the taskbar, you might prefer to turn off the Input Panel tab. -
You Can Choose Where the Input Panel Tab Appears (Opening tab)— Choose either On the Left Edge of the Screen (the default) or On the Right Edge of the Screen.
-
New Writing Line
(Writing Pad tab)— Use this slider to specify how close to the end of
the writing line you want to write to before starting a new line
automatically. -
Gestures
(Gestures tab)— In XP Tablet PC Edition, you could delete handwritten
text by “scratching it out” using a Z-shape gesture. Many people found
this hard to master and a bit unnatural, so Vista offers several new
scratch-out gestures, which you turn on by activating the All
Scratch-Out and Strikethrough Gestures option.Note
Vista offers four new scratch-out gestures:
Strikethrough— A horizontal line (straight or wavy) through the text.
Vertical scratch-out— An M- or W-shaped gesture through the text.
Circular scratch-out— A circle or oval around the text.
Angled scratch-out—
An angled line (straight or wavy) through the text. The angle can be
from top left to bottom right, or from bottom left to top right. -
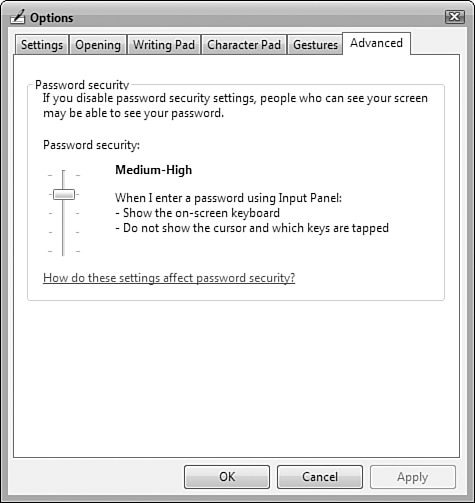
Password Security (Advanced tab)— This slider (see Figure 3)
controls the security features that Vista uses when you use the pen to
enter a password into a password text box. At the High setting, Vista
automatically switches to the onscreen keyboard (and doesn’t allow you
to switch to the writing pad or character pad) and doesn’t show the pen
pointer or highlight the keys that you tap while entering the password.Figure 3. The Input Panel Options dialog box offers many new features,
including security settings that protect password entries.
Using Pen Flicks
The Input Panel onscreen keyboard has keys that you can tap with your
pen to navigate a document and enter program shortcut keys. However, if
you just want to scroll through a document or navigate web pages, having
the keyboard onscreen is a hassle because it takes up so much room. An
alternative is to tap-and-drag the vertical or horizontal scroll box, or
tap the program’s built-in navigation features (such as the Back and
Forward buttons in Internet Explorer).
Vista gives you a third choice for navigating a document: pen flicks.
Pen flicks are gestures that you can use in any application to scroll
up and down in a document, or to navigate backward or forward in
Internet Explorer or Windows Explorer:
-
Scroll up (about one screenful)— Move the pen up in a straight line
-
Scroll down (about one screenful)— Move the pen down in a straight line
-
Navigate back— Move the pen to the left in a straight line
-
Navigate forward— Move the pen right in a straight line
Tip
For a pen flick to work, you need to follow these techniques:
-
Move the pen across the screen for about half an inch (at least 10mm)
-
Move the pen very quickly
-
Move the pen in a straight line
-
Lift your pen off the screen quickly at the end of the flick
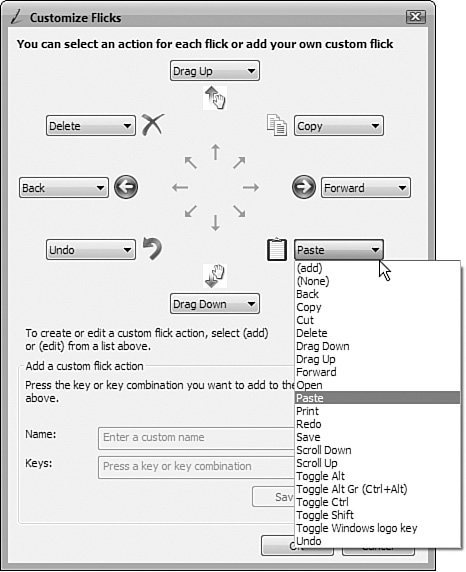
You can also set up pen flicks for other program features:
-
Copy— Move the pen up and to the left in a straight line
-
Paste— Move the pen up and to the right in a straight line
-
Delete— Move the pen down and to the right in a straight line
-
Undo— Move the pen down and to the left in a straight line
To activate and configure flicks, follow these steps:
|
1. |
Select Start, Control Panel, Mobile PC, Pen and Input Devices. The Pen and Input Devices dialog box appears. |
|
2. |
Display the Flicks tab, shown in Figure 4. Figure 4. Use the Flicks tab to activate and configure pen flicks.
|
|
3. |
Activate the Use Flicks to Perform Common Actions Quickly and Easily check box. |
|
4. |
Select the flicks you want to use:
|
If you activate the
Navigational Flicks and Editing Flicks option, the Customize button
enables. Click this button to display the Customize Flicks dialog box
shown in Figure 5.
You use this dialog box to apply one of Vista’s built-in actions (such
as Cut, Open, Print, or Redo) to a flick. Alternatively, click (add) to
create a custom action by specifying a key or key combination to apply
to the flick.
Figure 5. Use the Customize Flicks dialog box to apply different actions or key combinations to a flick gesture.
Tip
If you forget which flick
performs which action, you can easily find out by displaying the Pen
Flicks icon in the taskbar’s notification area. In the Flicks tab,
activate the Display Flicks Icon in the Notification Area check box.
(Note that the icon doesn’t show up until you attempt at least one
flick.) Clicking this icon displays the Current Pen Flicks Settings
fly-out that shows your current flick setup.
Setting Pointer Options
While we’re in the Pen and Input Devices dialog box, I should also point out the new Pointer Options tab, shown in Figure 6.
By default, Vista provides you with visual feedback when you single-tap
and double-tap the pen and when you press the pen button. I find that
this visual feedback helps when I’m using the pen for mouse-like
actions. If you don’t, you can turn them off by deactivating the check
boxes.
Figure 6.
Use the new Pointer Options tab to toggle Vista’s visual feedback for
pen actions such as tapping and double-tapping.
Personalizing Handwriting Recognition
When you use a Tablet PC’s digital pen as an input device, there will
often be times when you don’t want to convert the writing into typed
text. A quick sticky note or journal item might be all you need for a
given situation. However, in plenty of situations, you need your
handwriting converted into typed text. Certainly, when you’re using the
Input Panel, you always want the handwriting converted to text. However,
the convenience and usefulness of handwritten text directly relates to
how well the handwriting recognizer does its job. If it misinterprets
too many characters, you’ll spend too much time either correcting the
errors or scratching out chunks of text and starting again.
Rather than just throwing
up their hands and saying “That’s life with a Tablet PC,” Microsoft’s
developers are doing something to ensure that you get the most out of
the handwriting recognizer. Windows Vista comes with a new tool called
Handwriting Personalization (select Start, All Programs, Tablet PC,
Personalize Handwriting Recognition), shown in Figure 7.
Figure 7. Use the new Handwriting Personalization tool to improve the Tablet PC’s capability to recognize your handwriting.
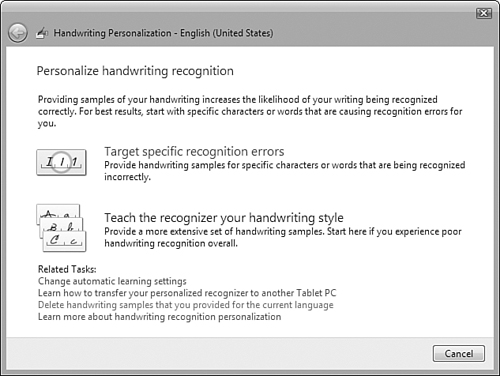
This feature gives
you two methods that improve the Tablet PC’s capability to recognize
your handwriting (you can run separate recognition chores for each user
on the computer):
-
Target Specific Recognition Errors—
With this method you teach the handwriting recognizer to handle
specific recognition errors. This is the method to use if you find that
the Tablet PC does a pretty good job of recognizing your handwriting,
but often incorrectly recognizes certain characters or words. By
providing handwritten samples of those characters or words and
specifying the correct conversion for them, you teach the handwriting
recognizer to avoid those errors in the future. -
Teach the Recognizer Your Handwriting Style—
With this method, you teach the handwriting recognizer to handle your
personal style of handwriting. This is the method to use if you find
that the Tablet PC does a poor job of recognizing your handwriting in
general. In this case, you provide a more comprehensive set of
handwritten samples to give the handwriting recognizer an overall
picture of your writing style.
If you select Target Specific Recognition Errors, you next get a choice of two wizards:
-
Character or Word You Specify—
Run this wizard if a character or word is consistently being recognized
incorrectly. For a character, you type the character and then provide
several samples of the character in handwritten form, as shown in Figure 8 (for the lowercase letter u,
in this case). The wizard then asks you to provide handwritten samples
for a few characters that are similarly shaped. Finally, the wizard asks
for handwritten samples of words that contain the character. For a
word, the wizard asks you to type the word; then it asks you to write
two samples of the word by hand.Figure 8. The wizard asks you to provide several handwritten samples of the character being recognized incorrectly.

-
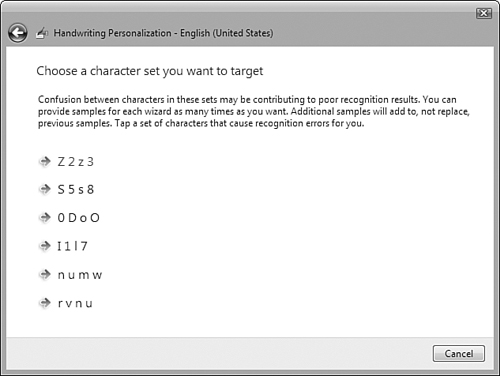
Characters with Similar Shapes—
Run this wizard if a particular group of similarly shaped characters is
causing you trouble. The wizard gives you a list of the six sets of
characters that most commonly cause recognition problems, as shown in Figure 9.
After you choose a set, the wizard goes through each character and asks
you to write by hand several samples of the character and of the
character in context.
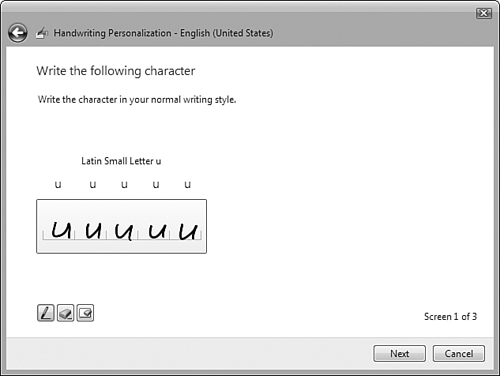
Figure 9. The wizard asks you to choose from a list of six sets of characters that are commonly confused when handwritten.
If you select Teach the Recognizer Your Handwriting Style, you get a choice of two wizards:
-
Sentences—
This wizard displays a series of sentences, and you provide a
handwritten sample for each. Note that there are 50 (!) sentences in
all, so wait until you have a lot of spare time before using this
wizard. (The wizard does come with a Save for Later button that you can
click at any time to stop the wizard and still preserve your work. When
you select Sentences again, the program takes you automatically to the
next sentence in the sequence.) -
Numbers, Symbols, and Letters— This wizard consists of eight screens that take you through the numbers 0 to 9; common symbols such as !, ?, @, $, &, +, #, <, and >; and all the uppercase and lowercase letters. You provide a handwritten sample for each number, symbol, and letter.
When you’re done, click
Update and Exit to apply your handwriting samples to the recognizer.
Note that this takes a few minutes, depending on the number of samples
you provided.
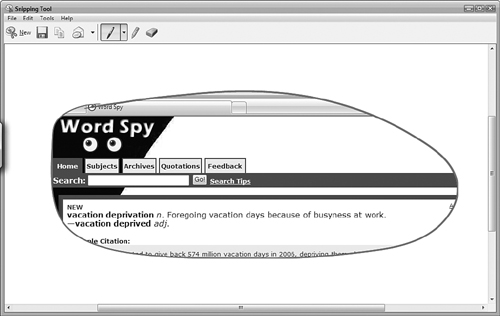
Using the Snipping Tool
Windows Vista includes a feature called the Snipping Tool
that enables you to use your pen to capture (“snip”) part of the screen
and save it as an image or HTML file. Here’s how it works:
|
1. |
Select |
|
2. |
Click |
|
3. |
Pull down the New list and select one of the following snip types:
|
|
4. |
Use Figure 10. Use the new Snipping Tool to use your pen to capture part of the screen.
|
ПРАКТИЧЕСКИЙ ВЗГЛЯД
В конце 2006 г. корпорация Microsoft выпустит новую версию своей настольной ОС — Windows Vista, но уже сейчас известно, что в ней не будет Tablet PC Edition. По той причине, что функционал Windows Tablet PC будет включен в состав Windows Vista Business, которая станет наиболее массовым вариантом ОС делового назначения, и в Windows Vista Home Premium, предназначенной для домашних пользователей среднего уровня. То есть средства перьевого ввода перестанут быть экзотикой и превратятся в обыденные компоненты ПК.
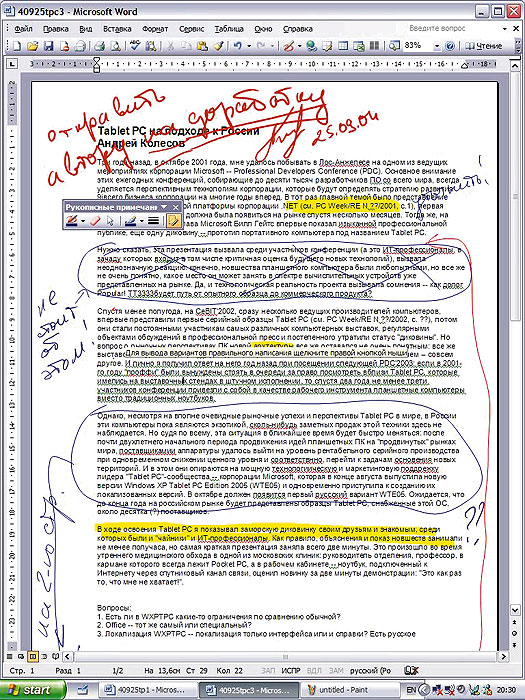
Рис. 1. Рукописные пометки в документе Word выглядят гораздо убедительнее
Напомним: основная идея Tablet PC — сочетание вычислительной мощности ноутбуков и новых способов “чернильно-перьевого” (P&I, pen-and-ink) ввода с помощью сенсорного экрана-планшета достаточно большого размера (10—12 дюймов и более). В результате пользователь получает целый ряд качественно новых возможностей при работе со знакомыми офисными и деловыми приложениями в их полнофункциональном варианте.
Речь идет в первую очередь о рукописном вводе при общении с компьютером. Оказывается, нередко можно вообще отказаться от, казалось бы, таких неотъемлемых компонентов ПК, как клавиатура и мышь. Пользователи вдруг с удивлением обнаружили, что писать от руки можно очень быстро, а главное — это удобно (например, при конспектировании лекций, когда нужно быстро вводить не только текст, но различные рисунки, графики, формулы). Правда, многим из них придется восстанавливать утраченные навыки письма.
Отметим, что сегодня на рынке имеются и ноутбуки с сенсорным экраном (а скоро, наверное, появятся и подобные настольные дисплеи), но они, как правило, существенно дороже и больше по габаритам, т. е. уступают “таблеткам” в мобильности применения, в том числе в “полевых условиях”.
Сегодняшние Tablet PC по вычислительной мощности и функциональности в целом обеспечивают примерно те же самые возможности, что и недорогие офисные ноутбуки, включая поддержку беспроводных соединений, установку дисплея с высоким разрешением, автономное питание от батарей, подсоединение внешних устройств — монитора, клавиатуры, мыши. Основные минусы — более скромные параметры видеосистемы и отсутствие встроенного DVD-накопителя, что, впрочем, легко исправить подключением внешнего устройства. Зато габариты и масса устройств более подходят для мобильного применения — от 1,2 до 2 кг (масса увеличивается в основном за счет повышения мощности батарей).
Такой компьютер будет не очень удобен для ИТ-профессионалов, работающих в офисе, или для любителей “крутых” игр. Но он открывает прикладным специалистам новые возможности для применения ПО профессионального уровня, причем непосредственно в условиях мобильных деловых процессов. Именно поэтому поставщики Tablet PC особое внимание уделяют вертикальным рынкам — системе образования, здравоохранению, финансовой сфере и т. д.
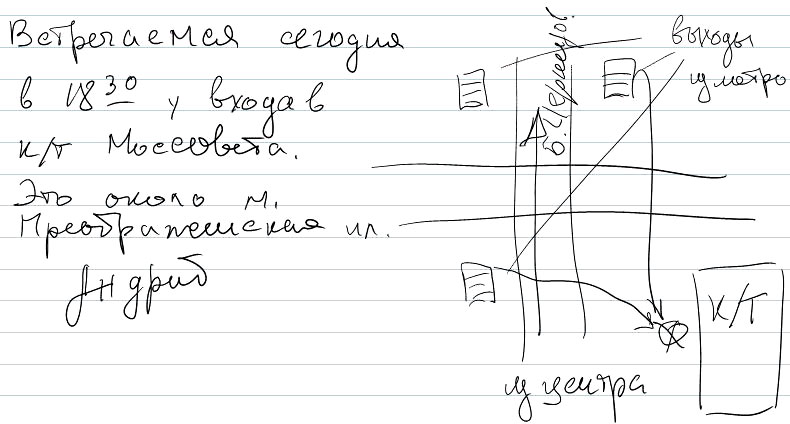
Рис. 2. Перьевой ввод очень хорошо подходит для переписки
Tablet PC выпускаются в двух основных вариантах: планшетном (slate) и трансформируемом (convertible). Разница между ними заключается в отсутствии или наличии клавиатурного блока в базовом комплекте. Впрочем, это различие довольно условно: для автономных планшетов можно приобрести и подключить внешнюю подставку и клавиатуру и использовать компьютер в настольном варианте, а для второго типа — наоборот, можно снять клавиатуру (многие модели позволяют это делать) и работать, как с грифельной доской.
Далее мы рассмотрим несколько сценариев, которые покажут возможные пути смещения интересов от привычных ПК к планшетам.
Вариант 1. Обычный ПК как планшет
Существует довольно много ситуаций, когда перо будет более эффективным, чем привычные мышь или клавиатура, даже если вы сидите в удобном кресле за офисным компьютерным столом. Самый простой случай, если вам нужно сообщить приятелю или деловому партнеру, как проехать к вашему дому или офису. Лучше всего такую схему нарисовать. А если вы профессионально занимаетесь дизайном, то перо будет почти идеальным инструментом.
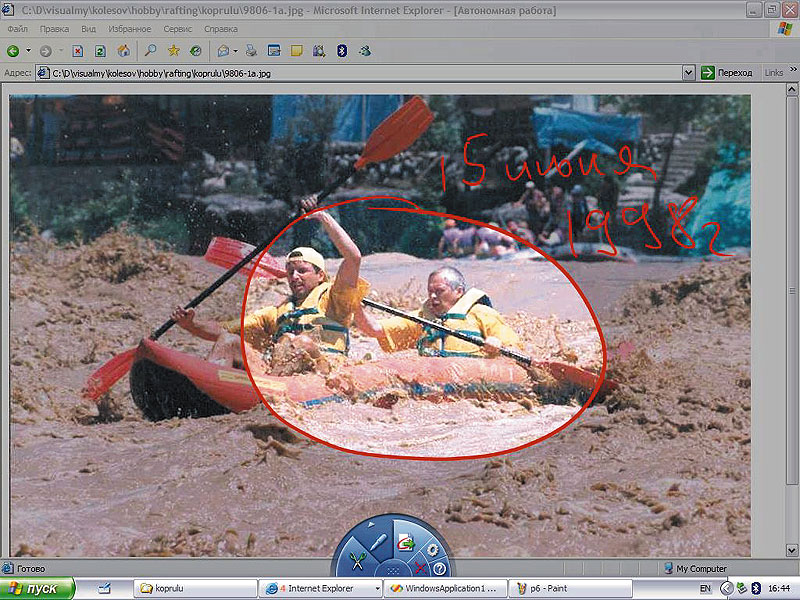
Рис. 3. С помощью Snipping Tool можно вырезать фрагмент экрана произвольной формы
Чтобы убедиться в этом, советую поработать с приложением Ink Art, которое входит в бесплатный пакет Experience Pack for Windows XP Tablet PC Edition 2005 (www.microsoft.com/windowsxp/downloads/tabletpc/experiencepack). Оно предназначено для создания графических произведений. В его состав включён большой набор соответствующих инструментов: текстурные полотна, кисти, мелки, цветные карандаши и т. д. Художники, профессионалы и любители по достоинству оценят возможность рисования или раскрашивания с использованием пера прямо на экране. Есть еще важно отличие от варианта с применением мыши — Ink Art использует способность планшета отслеживать силу нажима на перо, т. е. позволяет моделировать реальные действия человека при работе с традиционными пишущими принадлежностями.
Вариант 2. Планшет удобнее, чем ПК
Вообще говоря, существует довольно много случаев, когда рукописный ввод текста предпочтительнее, чем клавиатурный. В первую очередь — если нет необходимости в оцифровке введенной информации. Например, вам принесли Word-документ, который вы должны не отредактировать, а просто снабдить пометками, которые автор должен учесть при доработке (рис. 1). Такую операцию можно выполнить и сидя за монитором, но согласитесь: если бы у вас была возможность, то удобнее было бы развернуть экран и положить его перед собой вместо клавиатуры. Даже если вы сидите в кресле за столом.
Ну а дальше можно вспомнить, что большинство электронных писем пишется лишь для того, чтобы их только прочитал (а не редактировал) адресат. И что далеко не все пользователи ПК стучат по клавиатуре увереннее, чем пишут пером. Впрочем, даже если вы строчите по клавишам, как пулемет, порой все же гораздо удобнее использовать графические пояснения с кратким рукописным текстом вместо длинных описаний (рис. 2). Такой режим письма уже сегодня реализуется в Outlook 2003 (получатели посланий на обычных ПК увидят его графический образ).
В качестве еще одного примера можно привести приложение Snipping Tool из того же Experience Pack. Данный инструмент позволяет выбрать и вырезать любой фрагмент экрана — часть Web-страницы, офисного документа или какого-то другого приложения. Фрагмент может быть не только прямоугольным, но и любой формы, очерченной пером (рис. 3). Изображение можно сразу снабдить рукописными комментариями, а потом отправить его, например, по электронной почте. При работе с Web-ресурсами адрес URL вставляется автоматически.
Вариант 3. Только Tablet PC!
Это когда вам приходится пользоваться компьютером не в удобном кресле, а в полевых, мобильных условиях: сидя на подоконнике или в автомобиле, стоя у кровати пациента и т. д. (рис. 4).
В этой ситуации, как правило, нет необходимости ввода большого объема информации, а возможности распознавания рукописного текста будут вполне удовлетворять вас по качеству. Хотя на самом деле вы довольно быстро убедитесь, что во многих случаях вам не очень-то и нужны такие преобразования, вполне достаточно просто хранения данных в графическом виде, тем более что многие задачи вообще не связаны с вводом текстов.
В Интернете я нашел одну любопытную историю, рассказанную студентом, который с помощью Tablet PC и приложения MS Office InfoPath 2003 провел в аэропорту Окленда небольшое социологическое исследование среди пассажиров, заполняя анкеты по форме, которая содержала только фиксированные варианты ответов на шесть вопросов. Это можно было сделать просто, водя пером по экрану. За один час ему удалось опросить 35 человек, получив сразу после этого готовую сводную таблицу результатов.
Прочитав это, я сам запустил InfoPath на своем Tablet PC и убедился в его “планшетных” возможностях. Оказалось, что в этой программе можно заполнять поля прямо пером, причем с очень хорошим качеством распознавания вводимого текста (рис. 5).
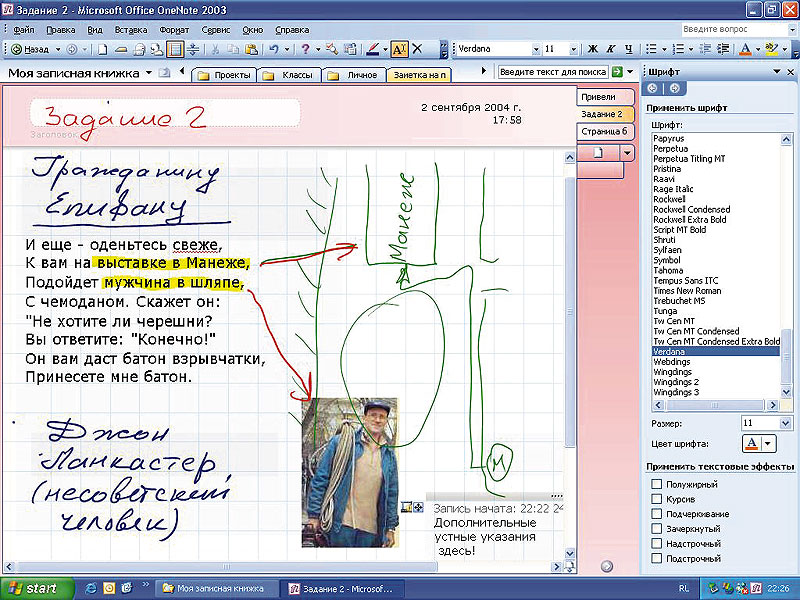
Рис. 5. OneNote поможет навести порядок в персональной информации
Это объясняется тем, что тут применяется механизм контекстно-зависимого распознавания (Contextual Awareness) с возможностью использования различных правил обработки вводимой информации. Это особенно актуально для работы с документами, представленными в виде форм с полями, заполняемыми данными определенного типа (телефонные номера, имена людей, списки профессий и пр.). Задействование данного механизма позволяет существенно повысить скорость ввода информации и улучшить качество распознавания.
Но, конечно, наибольший эффект от Tablet PC получается, когда вы работаете с программами, которые изначально были созданы с ориентацией на новые функции компьютера. Лучший пример — это приложение MS Office OneNote 2003 (рис. 6), очень удобный инструмент для гибкого управления персональной информацией в самых разных форматах ее представления (см. PC Week/RE, № 4/2005, с. 12).
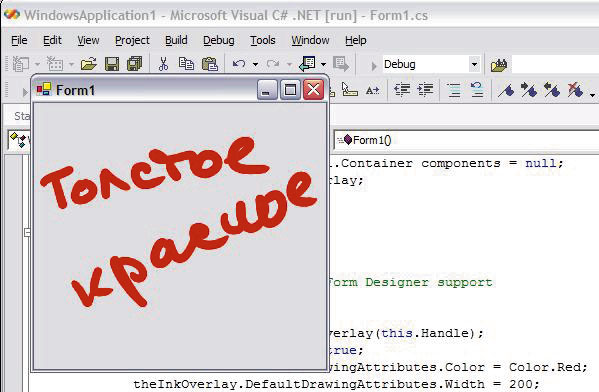
Рис. 6. Первое Tablet-приложение
Ну а с более простыми и бесплатными программами для планшетного ПК можно ознакомиться, скачав их, например, с сайтаwww.microsoft.com/windowsxp/tabletpc.
Следующий шаг — разработка планшетных приложений
Но одно дело пользоваться готовыми приложениями, а совсем другое — чем-то созданным под тебя. Или самому написать программу, которая использовала бы возможности Tablet PC. Кстати, для профессионального разработчика это отличный путь опередить конкурентов в освоении новой техники!
В действительности справиться с такой задачей совсем не сложно, решить ее можно в несколько последовательных этапов.
1. Задействовать возможности стандартной планшетной панели перьевого ввода. Для этого в общем-то и делать ничего не нужно. Достаточно просто загрузить программу, написанную для обычного настольного ПК, на планшетный компьютер. Она будет автоматически поддерживать перо в качестве указателя курсора (параллельно с мышью), а если у нее есть поля текстового ввода, то им так же автоматически будут доступны функции планшетной панели ввода.
2. Делать перьевые пометки поверх форм приложения. Нужно загрузить и установить на компьютер бесплатный набор Windows XP Tablet PC Edition Development Kit 1.7. Затем при работе в среде Visual Studio .NET подключить к проекту библиотеку Microsoft Tablet PC API DLL. Для формы напишем вот такой код:
InitializeComponent();
theInkOverlay = new InkOverlay(this.Handle);
theInkOverlay.Enabled = true;
С помощью этих трех строк кода мы получили возможность писать пером на форме. Добавим к нашему проекту еще два оператора:
theInkOverlay.DefaultDrawingAttributes.Color = Color.Red;
theInkOverlay.DefaultDrawingAttributes.Width = 200.
Теперь (рис. 6) мы можем писать красным цветом с шириной линии 2 мм (одна логическая единица ширины равна 0,01 мм).
3. Использовать функции распознавания. Тут нужно будет написать уже пару десятков строк кода, чтобы сделать форму, выполняющую преобразование перьевого текста в алфавитно-цифровой вид (рис. 7).

Рис. 7. Простое приложение с функцией распознавания рукописного ввода
4. Применить механизм контекстно-зависимого распознавания. Надо более детально разобраться с объектной моделью средств поддержки перьевого ввода, но результирующий программный код также займет не более десятка строк кода.
Помимо бесплатного набора Tablet PC SDK для создания “изощренных” решений могут пригодиться дополнительные средства третьих фирм (см. PC Week/RE, № 21/2005, с. 35). С помощью всего этого инструментария освоить новшества планшетных ПК и получить при этом хорошие шансы опередить профессионалов смогут даже новички в программировании. Ведь в деле покорения целины порой важны не столько квалификация и опыт, сколько оперативность, воображение и настойчивость.
Комментарии
Только зарегистрированные пользователи могут оставлять комментарий.
Регистрация
Авторизация
|
Интересно |
|

Мобильные операционные системы стали неотъемлемой частью бизнес-процессов, включая работу на объектах критической … 
В 2025 году конкуренция на рынке мобильных приложений достигла нового пика. По данным Data.ai, средний … 
Независимо от стратегии, компании должны подходить к защите неуправляемых устройств с пониманием и уважением … 
Разработка мобильных приложений находится на подъеме. Мэри Шеклет, президент консалтинговой компании Transworld Data … 
В 2025 г. квантовые вычисления перейдут от экспериментальных прорывов к практическому применению, которое … |
Windows Vista has built-in Tablet PC support which turns computer to fully functional, practical and comfortable tablet PC when users are on the move. Tablet PC components in Windows Vista include integrated pen support, touch-screen support, digital-ink input, snipping tool, handwriting recognition technologies, and innovative hardware.
Windows Vista Home Premium, Windows Vista Business, and Windows Vista Ultimate editions include Tablet PC features. In most cases, Tablet PC Optional Components should be installed and enabled by default. However, if you can’t find any Tablet PC related programs and functions, here’s how to install and enable or turn on the Tablet PC support in Windows vista.
- Click on Windows Vista Start button, and go to Control Panel.
- Click on Programs link.
- Click on Turn Windows features on or off link. If User Account Control requests for elevation confirmation, click on Continue button.

- Scroll down the list of features in Windows Features dialog window, tick the check box for Tablet-PC Optional Components.

- Click OK to start installation of Tablet PC Optional Components in Vista.


Voila, once installation finished, all Tablet PC features now available in Windows Vista, even if it’s a desktop or notebook computer.
This is a copy of Windows Vista Ultimate that has been stripped of all the, let’s
not lie, crap it has…
The overall install took me 10minutes on my laptop with 1gb of ram
It only used 5gb of my hardrive unlike the 17gb vista usually does…
If you want the nice look and workings of Vista but have a computer without the specs…
Look no further!!!! Tiny Vista Ultimate is your option
This has the vista aero theme and looks and works just like vista…
To put it short i installed this onto VMware and gave it 128mb or ram and it installed perfectly…
When I gave it 512mb it ran smoother then my xp does on my 2gb computer…
No Activation needed
REQUIREMENTS:
256mb RAM
16mb Video Card
CPU: Tested on many and none have failed Even my 9yr old pc could install it
FILES REMOVED:
ACCESSORIES
————
-Accessibility
-Disk Cleanup
-Mobility Center
-Speech Support
-Welcome Center
-Windows Sidebar and Gadgets
DRIVERS
——-
-Display adapters
-Diva Server
-Modems
-Printers
-QLogic Fibre Channel Adapter
-Scanners
-TV Tuners
GAMES
——
-Game Explorer
-Inbox Games
-Premium Inbox Games
HARDWARE SUPPORT
—————-
-Fax Support
LANGUAGES
———
-Japanese
-Korean
-Simplified Chinese
-Table Driven Text Input Processor
-Traditional Chinese
MULTIMEDIA
———-
-Media Center
-Movie and DVD Maker
-Music and Video samples
-Sample Pictures
-Screensavers
-SideShow
-Wallpapers
-Windows Calendar
NETWORK
——-
-Connect to a Network Projector
-Internet Information Services (IIS)
-Remote Desktop and Assistance
-Windows Collaboration
SERVICES
———
-Diagnostics
-Distributed Transaction Coordinator (DTC)
-Error Reporting
-Volume Shadow Copy
-Windows Search
SYSTEM
——
-Beep
-BitLocker Drive Encryption
-Component Cache (winsxs)
-Digital Locker
-Disk Defragmenter
-Disk Quota
-Guided Help
-Help
-IMAPIv2 Burning Support
-Malicious Software Removal Tool
-Manual Install (Setup.exe)
-******oft Agent
-******oft Message Queue (MSMQ)
-Natural Language
-Parental Controls
-Performance Counters
-Reliability and Performance Monitor
-Remote Differential Compression
-Run a legacy CPL elevated
-Security Center
-Sync Center
-System Restore
-Tablet PC
-User Account Control (UAC)
-Windows Backup
-Windows Defender
-Windows Easy Transfer
-Windows SAT (Performance Index)
-Windows Ultimate Extras
OPTIONS (using vLite)
———————
DEP (Data Execution Prevention) = Disabled (AlwaysOff)
User Account Control (UAC) = Disabled
AntiSpyware Realtime Protection = Disabled
Memory requirement = 256MB
AutoPlay = Disabled
Paging Executive = Enabled
Power scheme = Balanced
Power button = Default
Sleep button = Default
Hibernation = Off
TWEAKS (using vLite)
———————
Control Panel — Classic View = Enabled
Show hidden files and folders = Yes
Show protected operating system files = Yes
Show extensions for known file types = Yes
IE Phishing Filter = Enabled
IE Phishing Verification Ballon Tips = Default