
This article will guide you through effortlessly setting up Windows Vista on a new virtual machine by leveraging the cutting-edge Microsoft Hyper-V virtualization software combined into the Windows 10 or 11 operating system.

How to Install Windows Vista OS on a Virtual Machine using the Hyper-V Software
Microsoft presented the Windows Vista system, reaching consummation on November 8, 2006, followed by its official release on January 30, 2007. Despite its initial launch, Microsoft extended its unwavering support for this operating system for a remarkable span of 10 years until finally concluding its official support on April 11, 2017.
Windows Aero feature, Windows Sidebar feature that enriches the desktop and DirectX10 support were introduced with Windows Vista for the first time.
This version has features that offer incredible ease of use for home and business users, allow applications to work and develop better, and increase the security of user information.
Although the user interface and graphics were greatly improved, Microsoft released a significant update for this system when users encountered system slowness and many security vulnerabilities.
It is Microsoft’s first operating system that uses 64-bit architecture most effectively and also introduced Microsoft Office 2007 and Exchange Server 2007 applications.
How to Create a New VM for Windows Vista
Once you have successfully installed the Hyper-V virtualization software, seamlessly integrated into Microsoft’s advanced Windows 10 system, on your host computer equipped with virtualization capabilities, you can effortlessly install various Windows operating systems, encompassing the latest and earlier versions. This empowers you to explore multiple Windows experiences with utmost ease and convenience.
It is crucial to meticulously configure the operating system settings to ensure a smooth and successful virtual machine setup using Hyper-V. This becomes particularly important when dealing with discontinued systems, as an improper configuration may result in compatibility issues, preventing the functioning of essential hardware components like network adapters. Therefore, paying careful attention to these settings is paramount to guarantee optimal performance and hardware compatibility within the virtual environment.
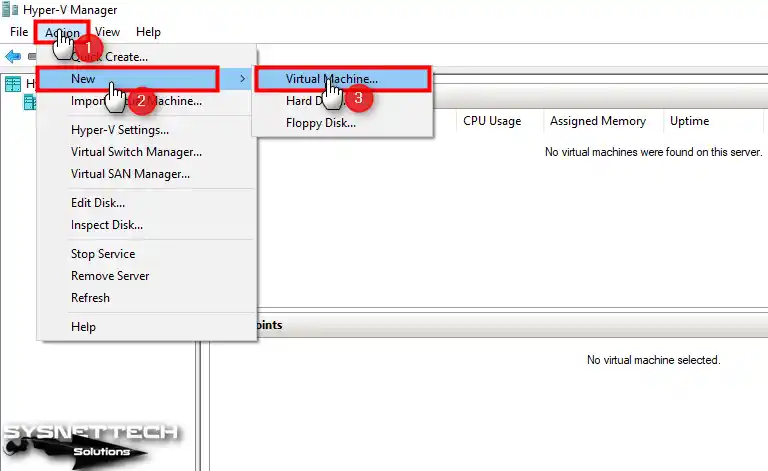
Step 1
After running Hyper-V, click Action / New / Virtual Machine to start the virtual computer creation wizard.
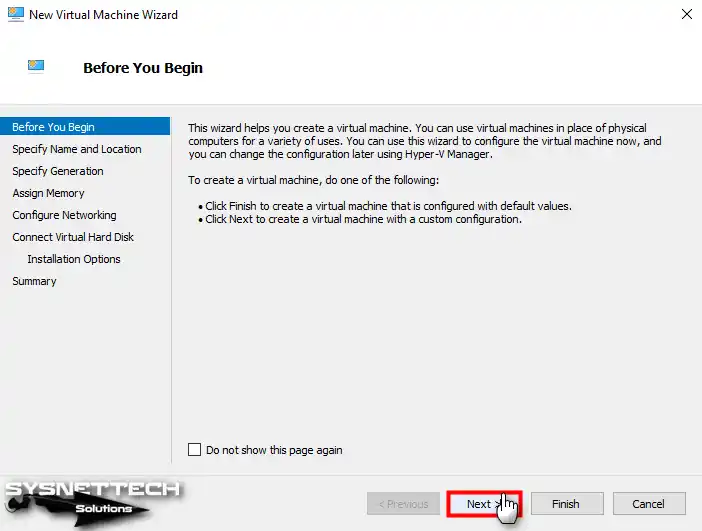
Step 2
When the VM wizard opens, click Finish if you want an automatic virtual machine to be created with default settings, or click Next to prepare a manual VM.
Step 3
Type the name in the Name field of the Windows operating system. For those seeking to designate an external storage unit as the installation location, select the corresponding option and effortlessly specify the desired area by clicking the Browse button.

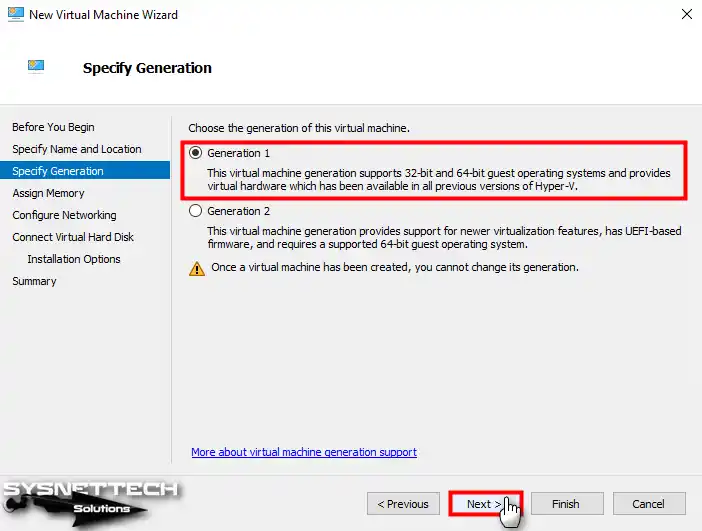
Step 4
When you install an old system in the Generation selection window, you must select Generation 1 because older systems do not support UEFI firmware. If you install a newer system, such as Windows 10, you can enable UEFI by selecting Generation 2.
You must choose Generation 1, as Windows Vista does not support UEFI by default—some resources on the Internet show that Vista also supports UEFI installation methods.
However, in our article, we choose the BIOS-based Generation 1 because we will install it with an original Vista image.
Step 5
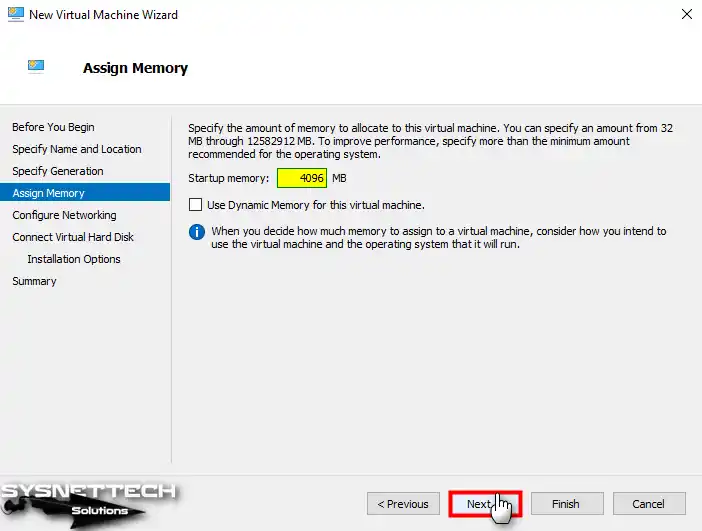
Use another guest machine other than a Windows Vista virtual machine on your host computer. You can make more administrative resource allocations by enabling the Dynamic Memory feature.
If you will use only one VM in Hyper-V, turn off the Dynamic Memory feature for performance and write the RAM size allocated to the VM in the Startup Memory field.
Step 6
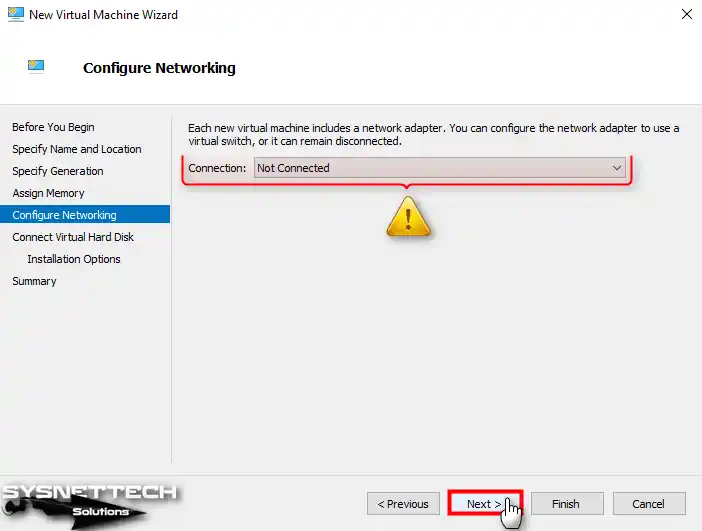
Continue without selecting any adapter in the network settings window of the virtual computer because Vista is an old system, and the driver for the network adapter is not installed automatically.
Step 7
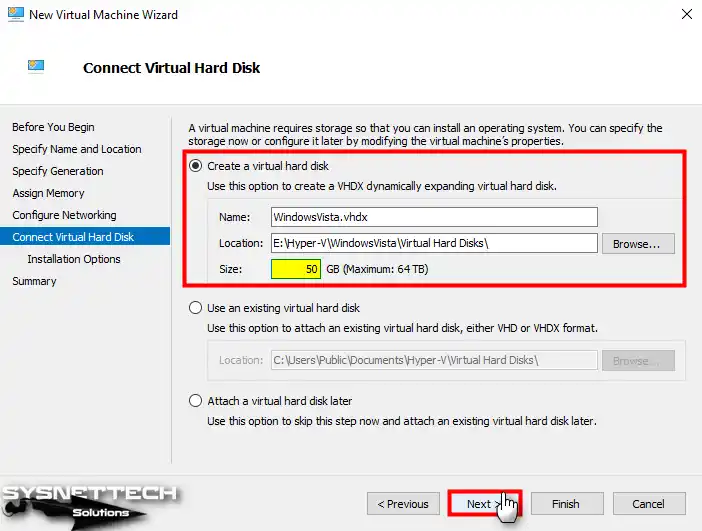
By default, the virtual disk size is set to 127 GB. Still, if you install your guest system for testing purposes only, you can select the virtual HDD capacity of 50 GB.
Step 8
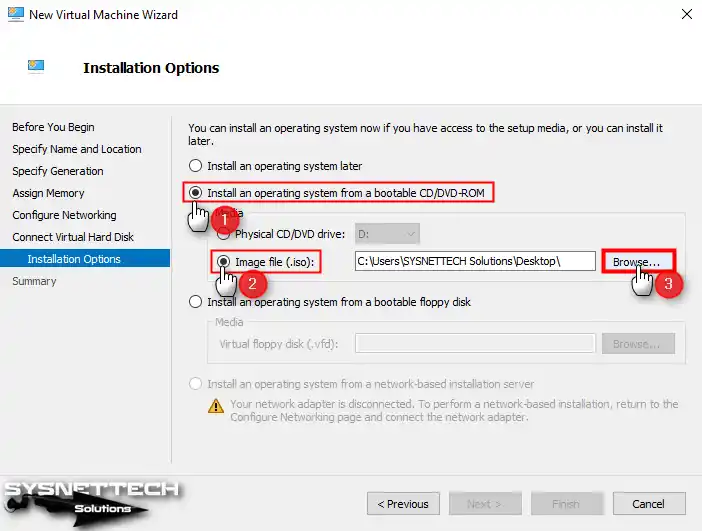
Installing the guest operating system on your virtual machine gives you two convenient options: utilizing your host’s CD/DVD drive or employing a bootable ISO image. This flexibility allows you to seamlessly install the desired operating system from a physical CD/DVD or by leveraging a virtual image stored in the ISO format. Choose the plan best suits your needs and proceed with the installation process.
Step 9
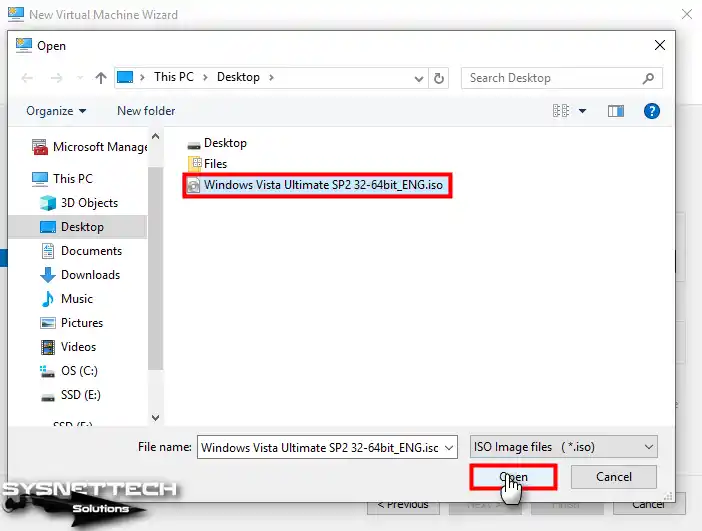
In the window that opens, add the Windows Vista Ultimate SP2 x86/x64 EN ISO image you downloaded to your computer from the .
Step 10
After adding the Windows image file to the VM, click Next to continue.

Step 11
Close the window after checking the settings you made in the Virtual PC’s summary configuration.

Step 12
After preparing the virtual machine, open the Virtual Switch Manager before adding an old network adapter and creating an external switch.
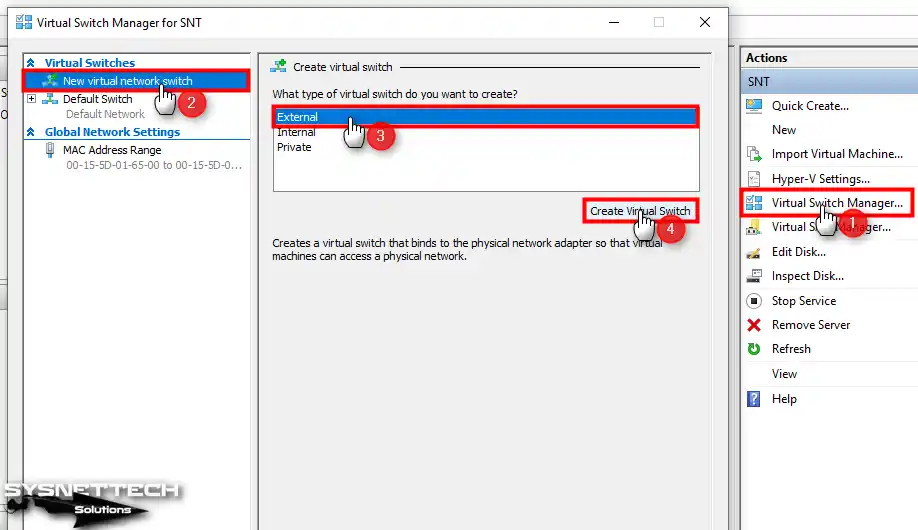
Step 13
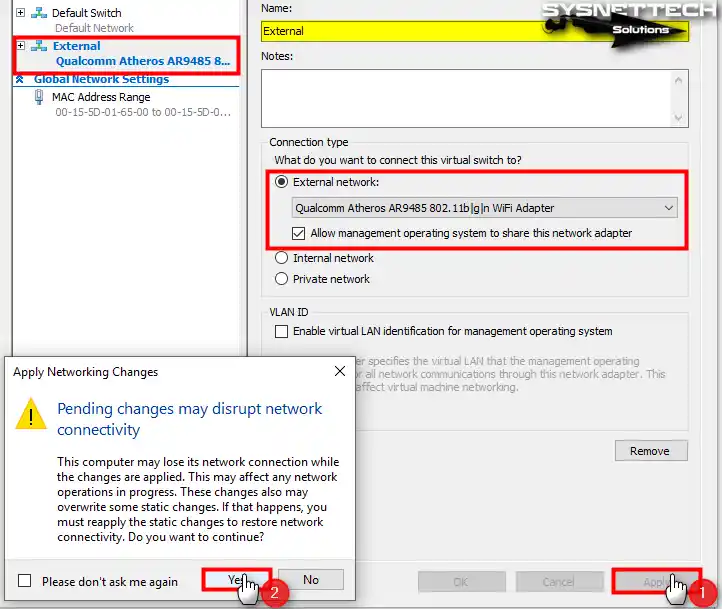
Type a name for the External Switch, configure the External Network setting as your host’s adapter connected to the Internet, and apply the settings.
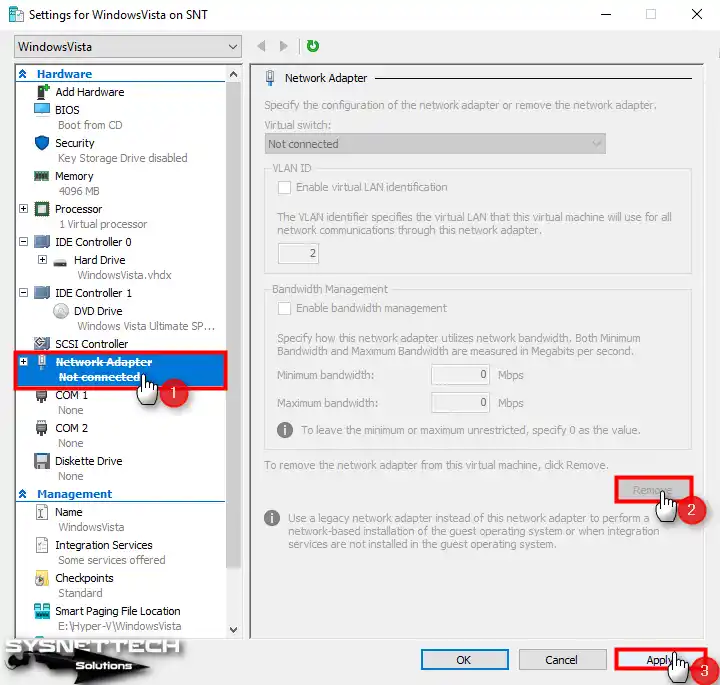
Step 14
Please open the settings of the virtual machine you created in Hyper-V. Once there, locate the Network Adapter device and proceed to click on the Remove button. Finally, apply the action to complete the process.
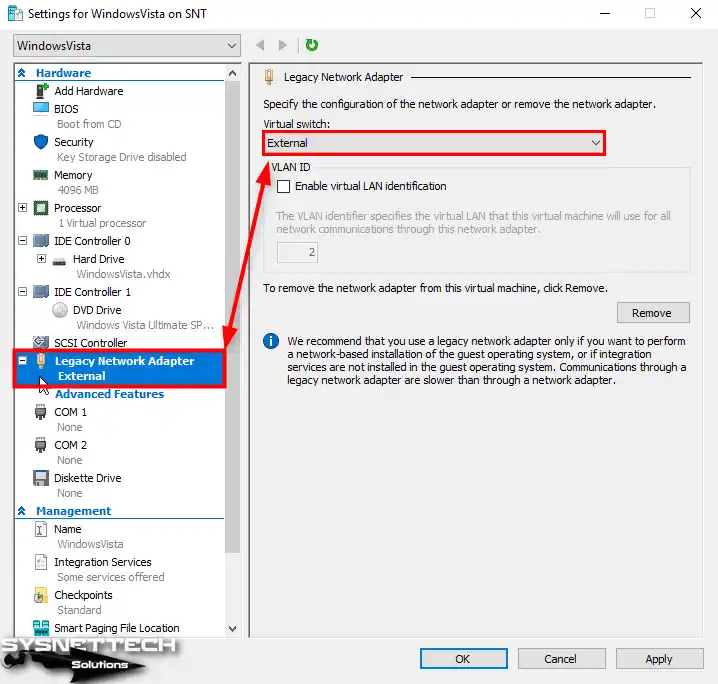
Step 15
In the VM’s settings window, select Add Hardware, then tick Legacy Network Adapter and click Add.

Step 16
View the old adapter settings and configure the Virtual Switch setting as External Switch.
Step 17
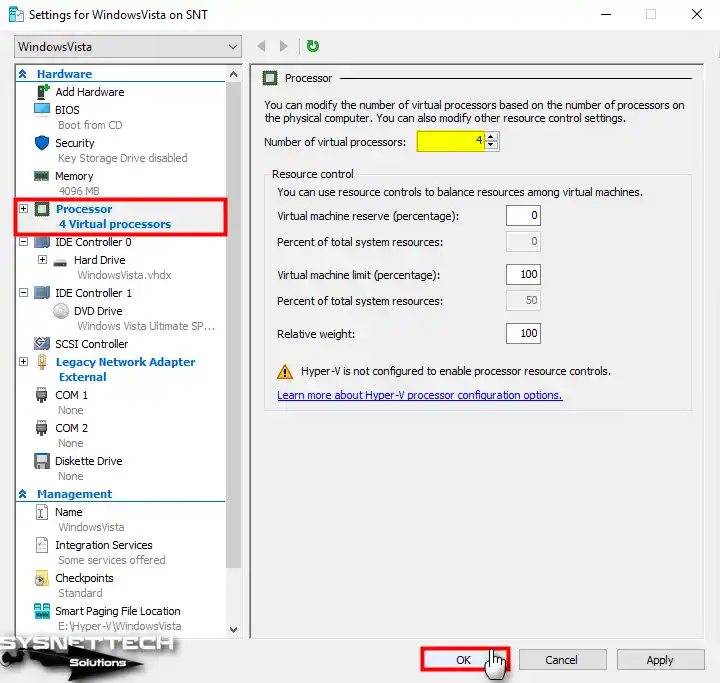
You can increase VM performance by configuring the number of Processors depending on the hardware power of your host.
Step 18
In the Virtual Machines section, right-click the VM and click Connect. Upon establishing a connection with the virtual computer, you can install the guest system by clicking either the Start icon or the button in the tool menu.

How to Install Windows Vista
After successfully preparing and running the virtual PC, the next step is installing the operating system.
Step 1
After running the VM, press Enter on x64 Setup when Windows Boot Manager opens.

Step 2
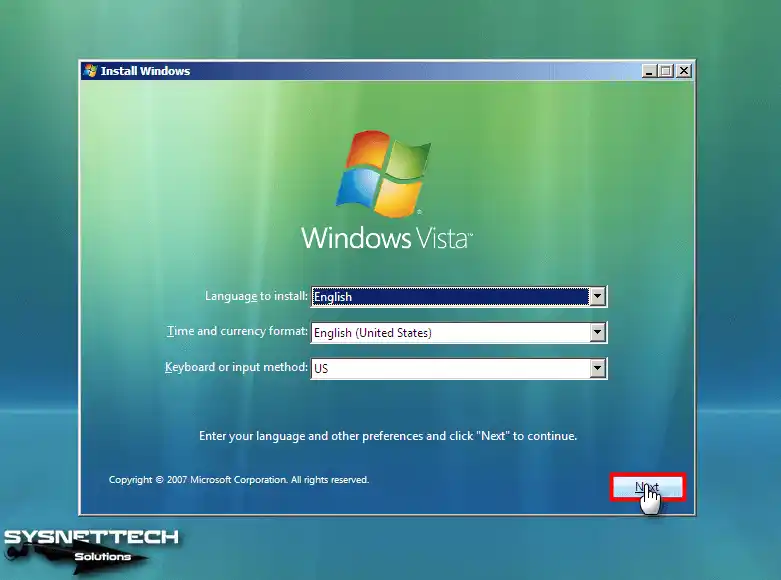
Configure your system display language, time and format, and keyboard layout on the Windows Vista setup screen and click Next.
Step 3
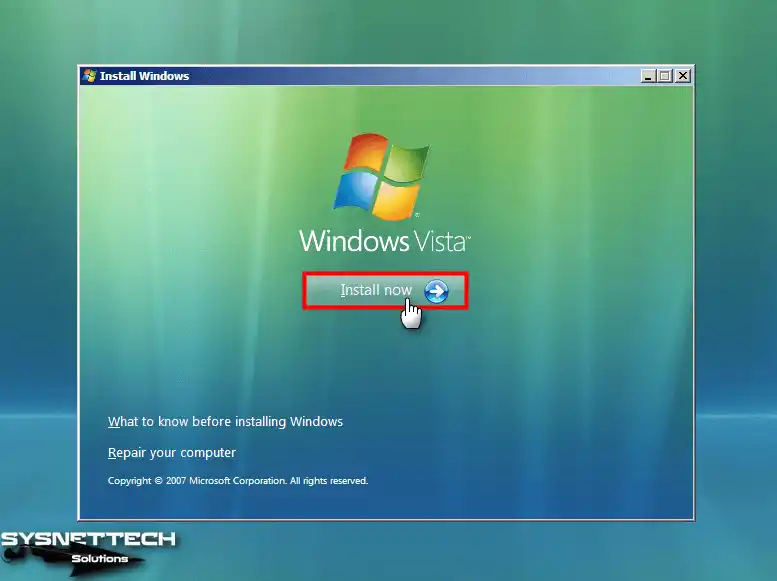
In this step of the installation wizard, you can get more information, repair your system or start the installation directly by clicking Install Now before installing Windows.
Step 4
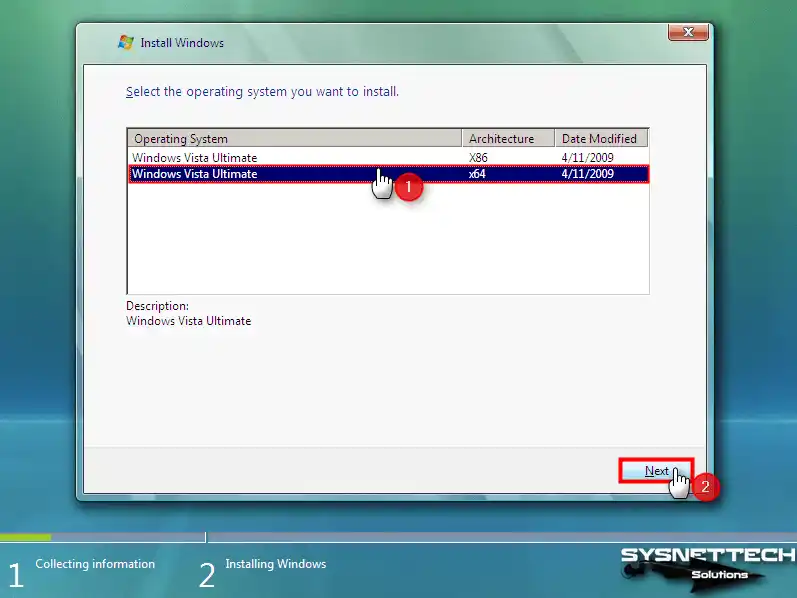
Select the Windows Vista architecture you want to install on the guest machine and click Next again.
Step 5
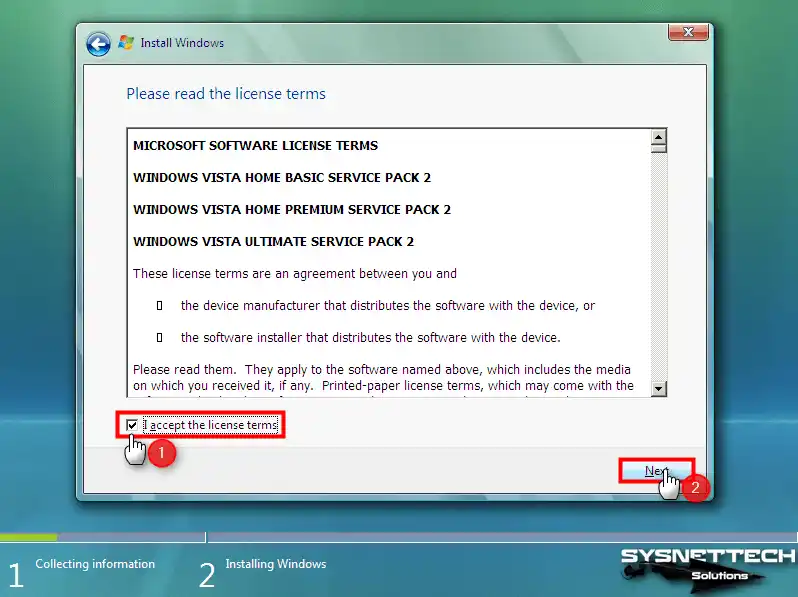
After reading the Windows Vista Ultimate SP2 license agreement, accept it and click Next.
Step 6
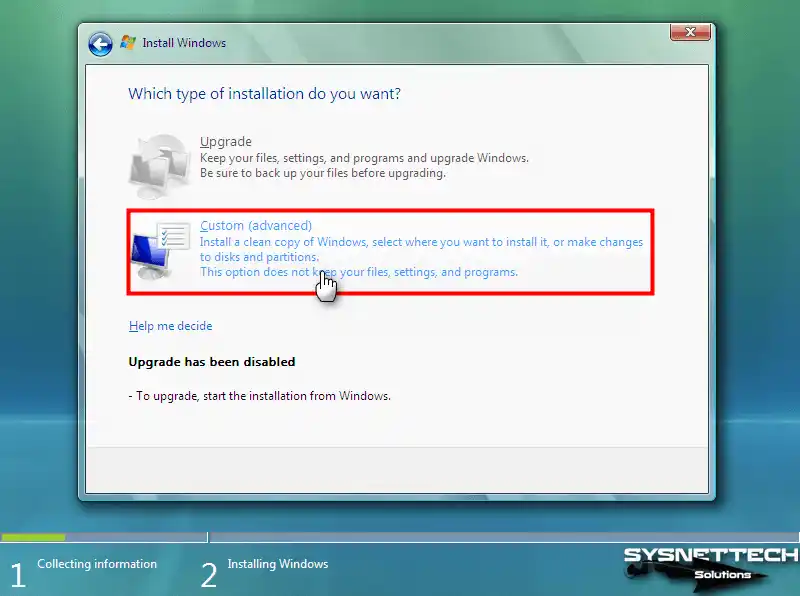
Since you are installing Windows Vista from scratch, choose Custom (Advanced) and continue.
Step 7
Click Drive Options to edit the virtual disk or click Next to configure partitions to start the installation automatically.

Step 8
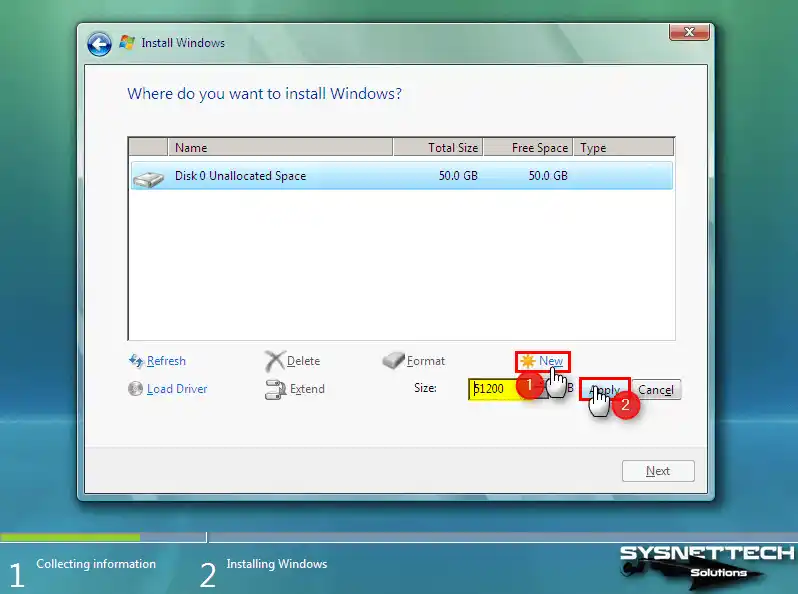
To create a new partition in the disk configuration window, click the New option, followed by the Apply button.
Step 9
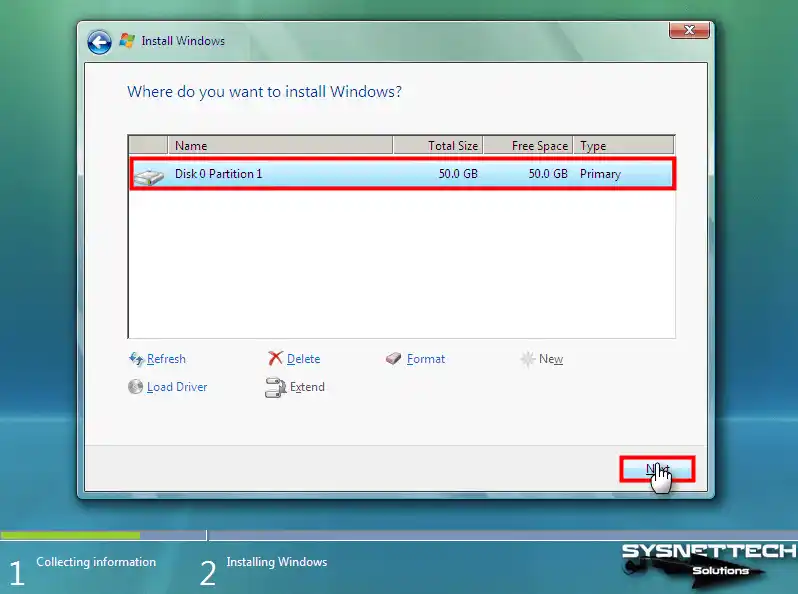
After creating a new partition on the disk, click Next to install the primary section.
Step 10
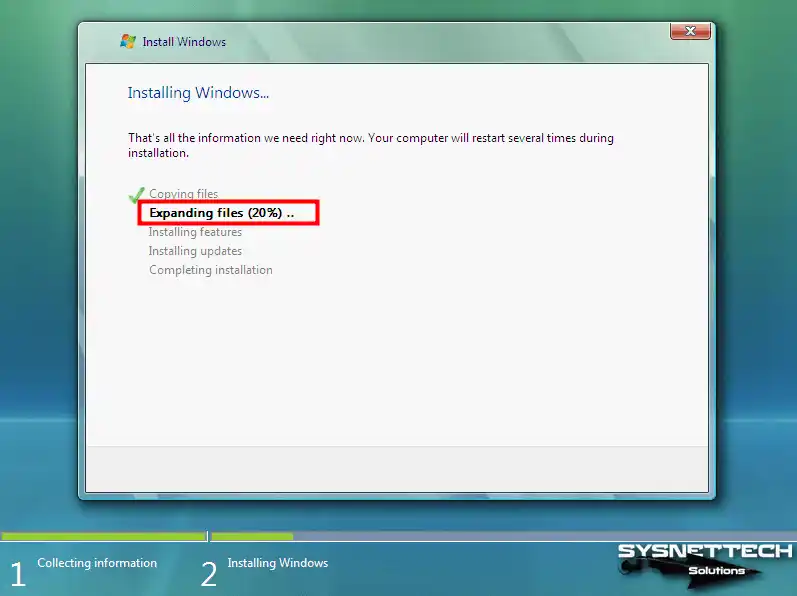
Wait while the setup wizard expands the Windows Vista system files.
Step 11
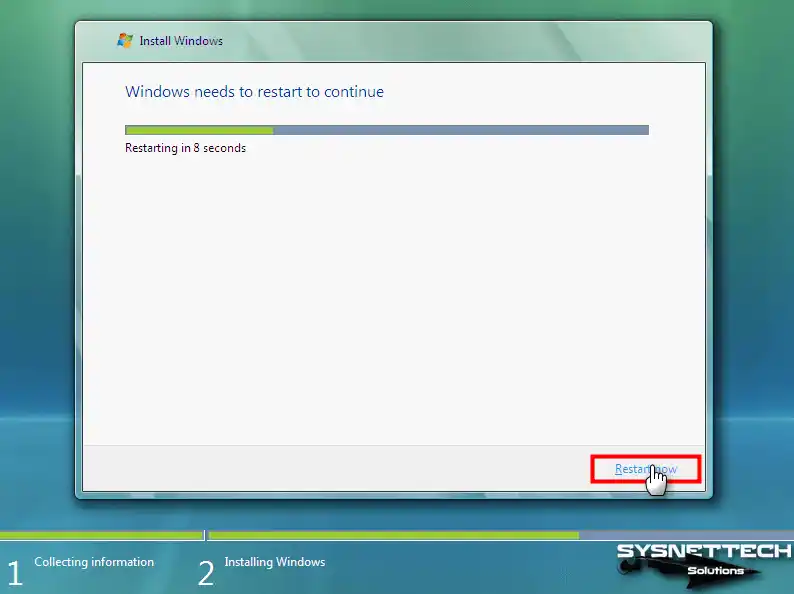
Your virtual system will restart within the specified time; otherwise, click the Restart Now button to renew immediately.
Step 12
After your virtual system restarts, wait while the setup wizard configures the final settings.

Step 13
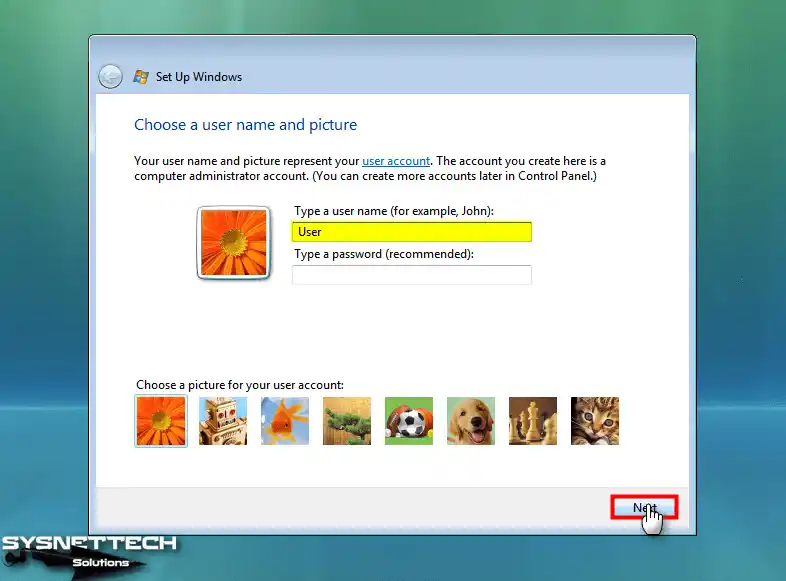
Type a username for your Vista guest operating system and select the profile picture you want to use, and click Next.
Step 14
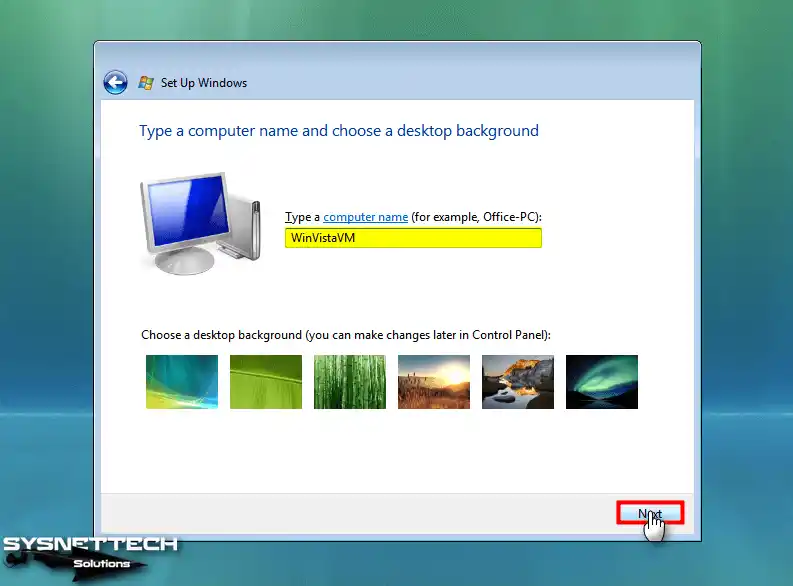
Likewise, type a computer name that will differ from other computers in your network environment, select your desktop background photo, and click Next again.
Step 15
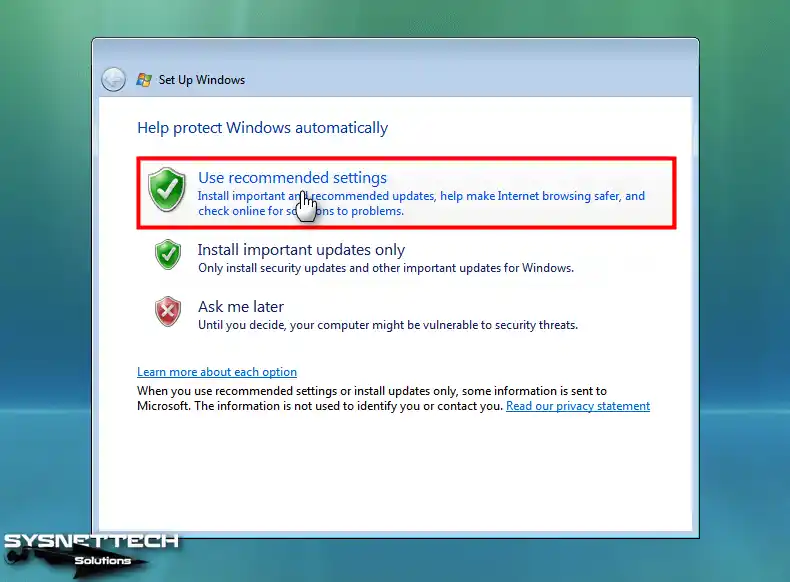
Click Use Recommended Settings for Windows Update settings or configure system updates later.
Step 16
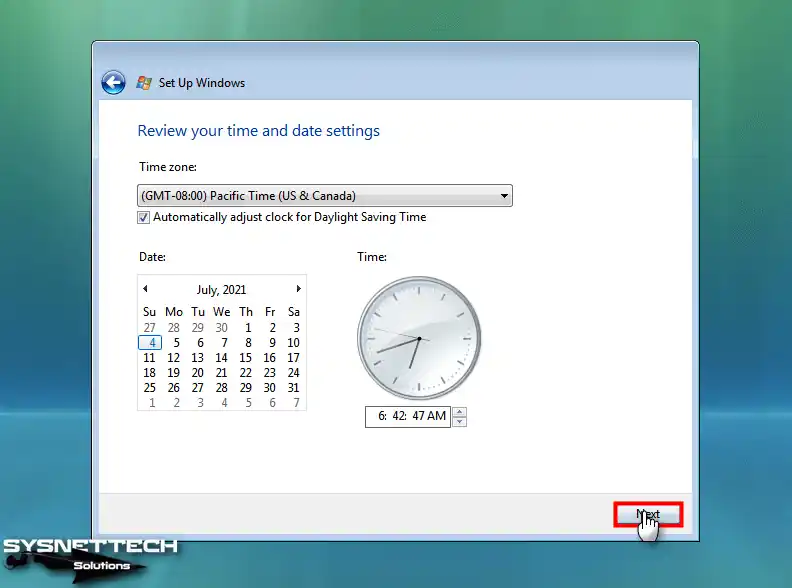
Configure your guest machine’s time and date settings according to the time zone of your country.
Step 17
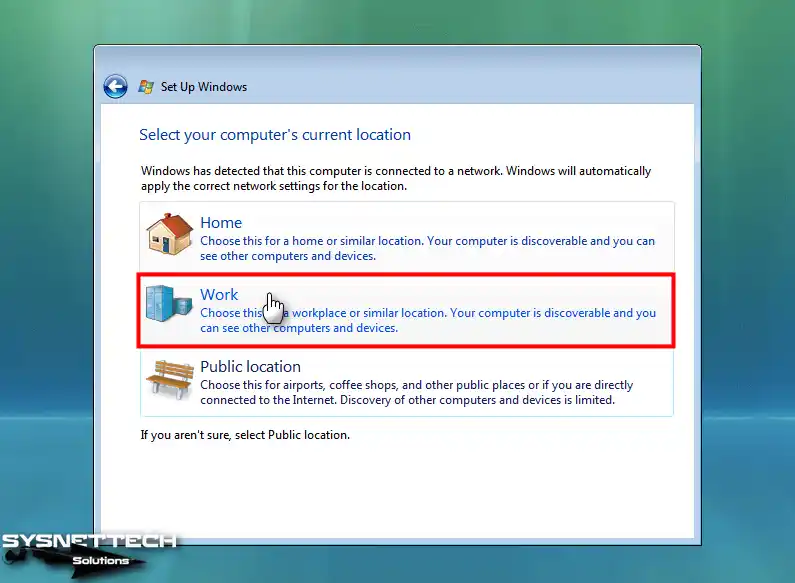
You can configure where you physically use your host computer as a home, work, or general environment.
Step 18
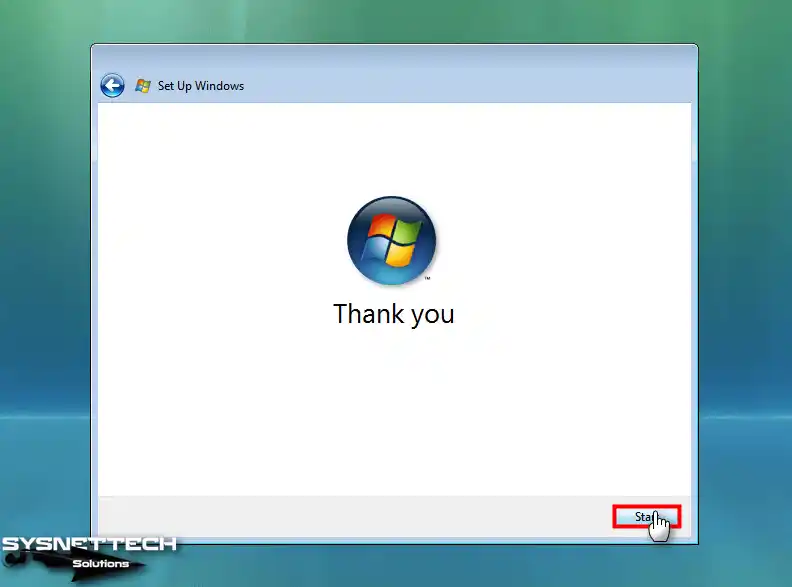
After configuring the necessary system settings, click Start to launch your virtual system.
Step 19
After your system restarts, wait while the Windows Vista setup wizard performs hardware performance.
Step 20
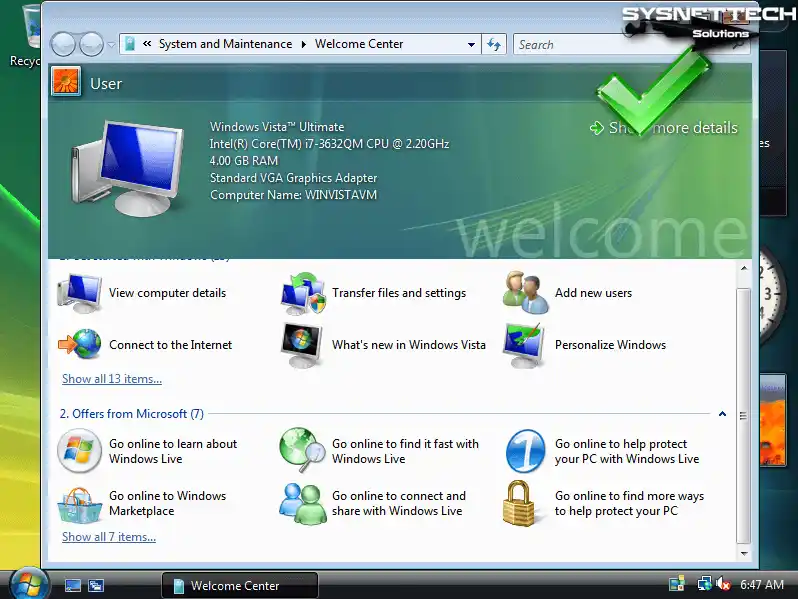
When your Microsoft Windows Vista virtual system is turned on, you can see your system information in the Welcome Center window on the desktop and make the necessary settings.
How to Check Internet Connection
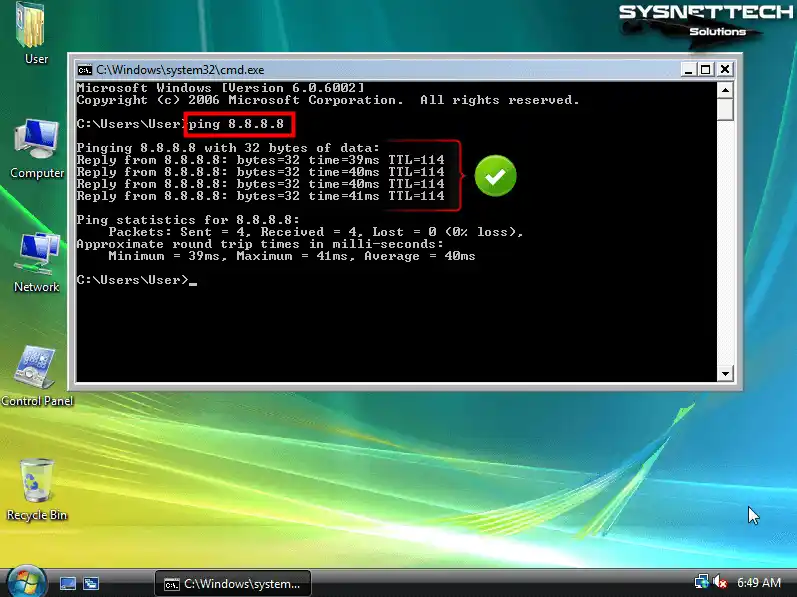
After installing the virtual machine, one initial task is verifying the Internet and network connection. If you had installed the adapter added by default in the VM wizard, you would not be able to access the Internet. So we have added a legacy network adapter to the VM.
Step 1
Open the start menu on your virtual computer, open the CMD command prompt, and test your Internet connection by pinging the Google servers by executing the ping 8.8.8.8 command.
Step 2
When the ping check is successful, open Internet Explorer and check your connection by visiting the homepage of the Google search engine.

How to Use the Virtual Machine in Full-Screen Resolution Using Remote Desktop Connection
After installing Windows Vista with Hyper-V, you may experience screen resolution problems and be unable to hear system sounds when you connect to the VM. Therefore, you can connect to your guest system using the Remote Desktop Connection tool on the host, use the full-screen mode, and hear the system’s sounds.
Step 1
Before connecting to the guest VM using a remote desktop, obtaining the IP address assigned to the machine by the DHCP server in your local network is necessary.
Open Network and Sharing Center and click View Status, then click Details in the Local Area Connection Status window and note down the address in IPv4 IP Address.

Step 2
After checking the IP address of the virtual machine, right-click on My Computer and open Properties to allow remote connections.
Click Advanced System Settings in the opened window, and when the System Properties window opens, select the “Allow connections from computers executing any version of Remote Desktop (less secure)” option from the settings in the Remote tab and click OK.

Step 3
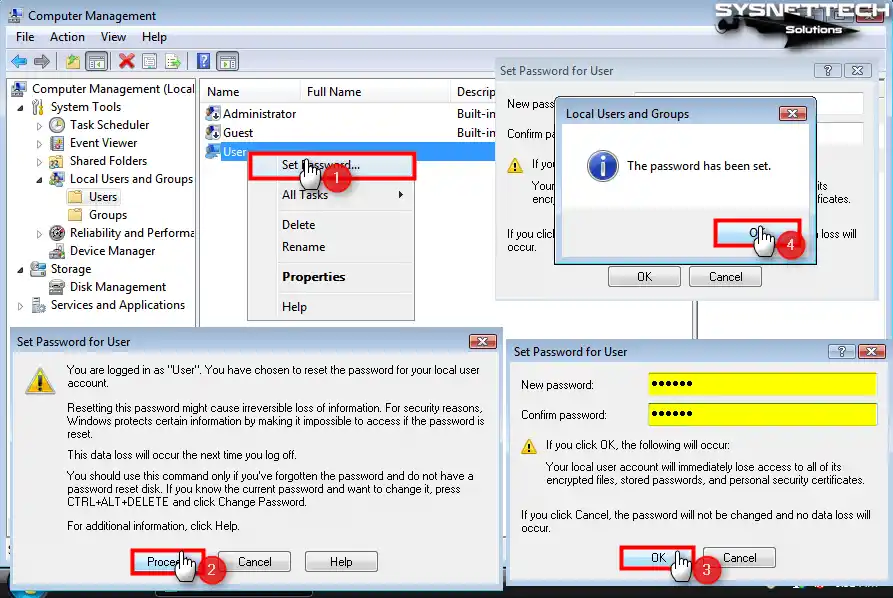
Finally, it would help if you created a user password to establish a remote desktop connection from the host to the VM.
Right-click / Manage on my computer, click Users under Local Users and Groups in the Open Computer Management window, and right-click / Set Password on the user account.
Create a memorable password in the Set Password for User window and click OK.
Step 4
Locate and launch the Remote Desktop Connection tool from the Start menu on your host computer.
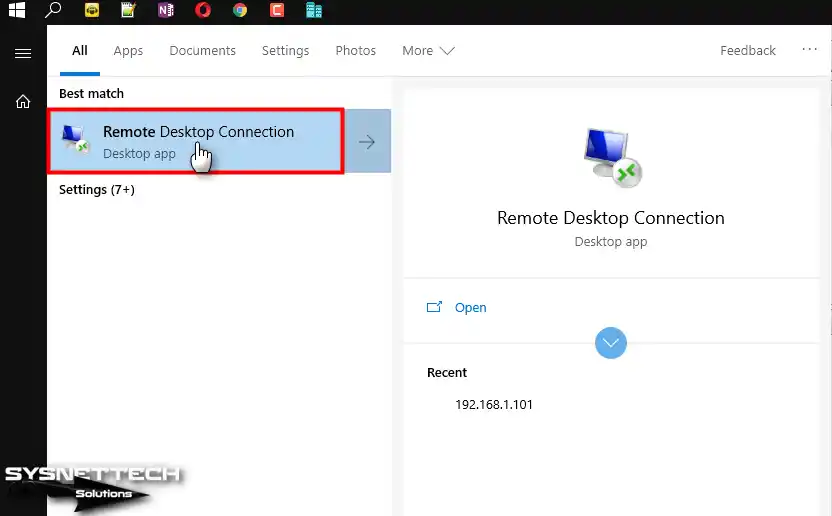
Step 5
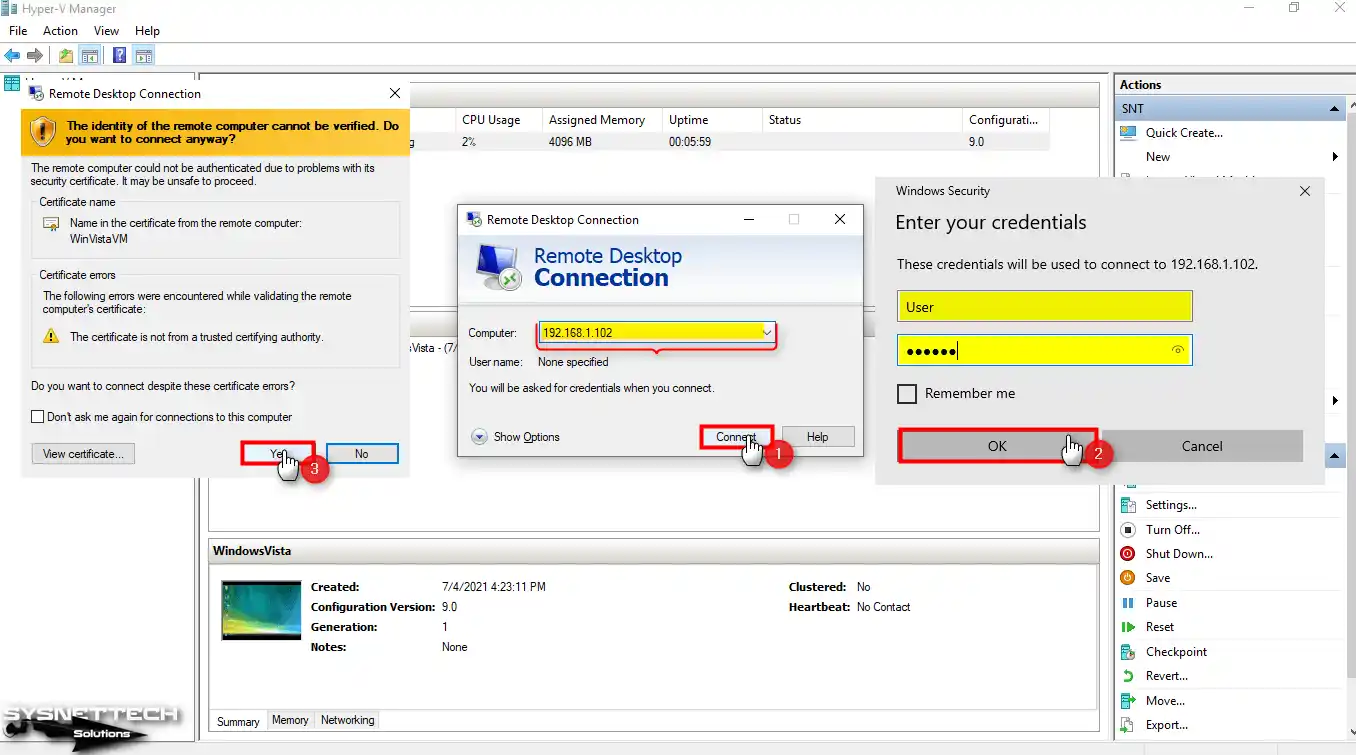
Enter the IP address of the virtual device in the Computer field, and then click on Connect. Following, enter the user name and password of the guest system, and finally, click OK. When you get a certificate error during a remote desktop connection, click Yes and continue.
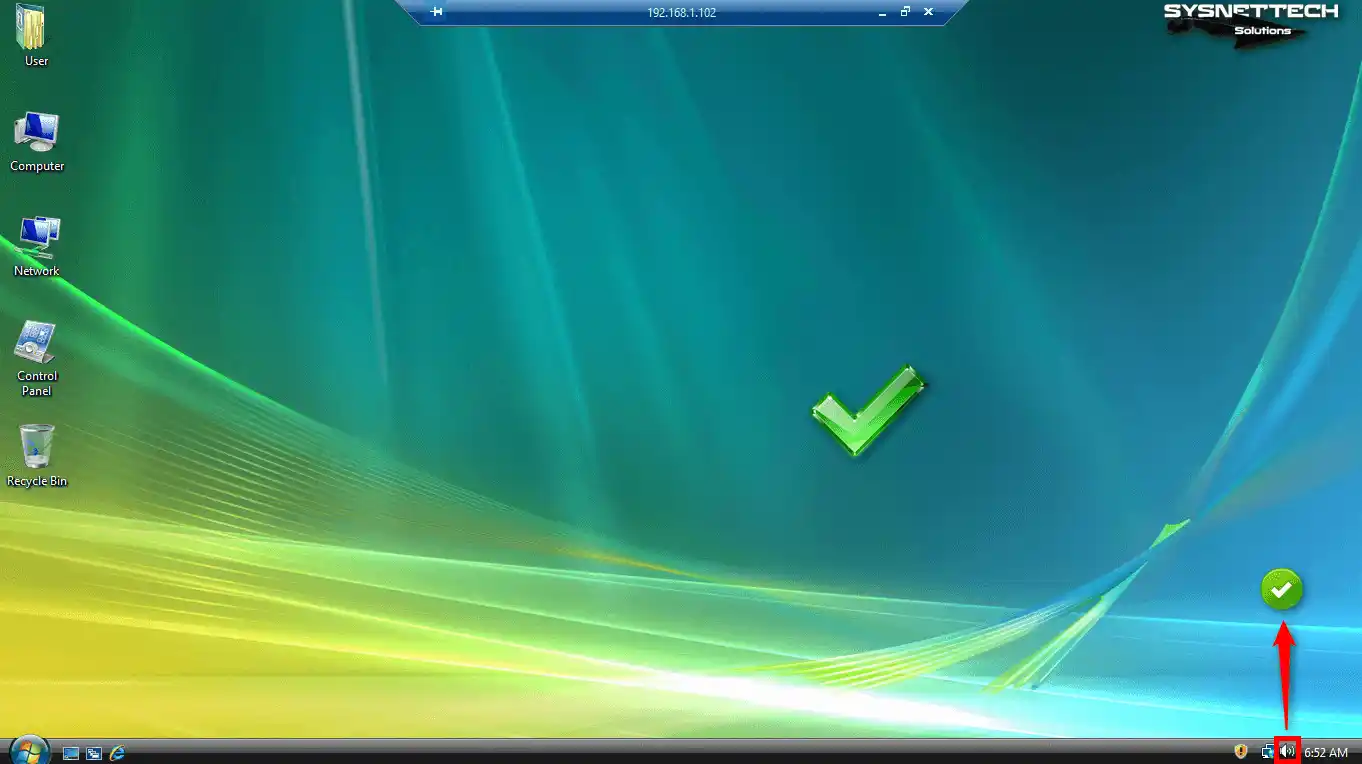
Step 6
After making a remote desktop connection to the Windows Vista virtual system, you can use the VM in full-screen resolution and hear system sounds.
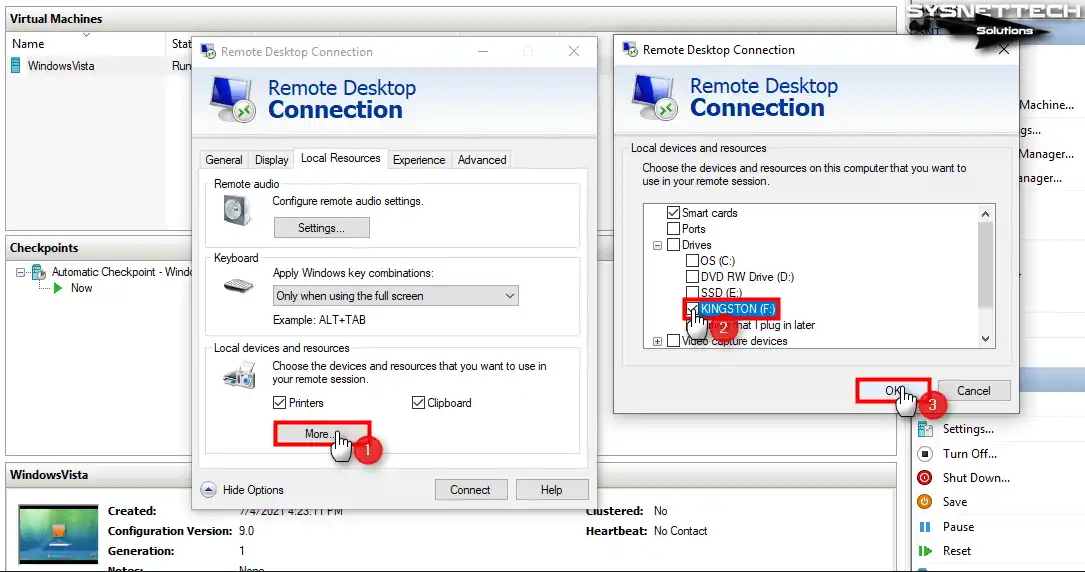
How to Use USB Flash Memory in VM
Suppose you want to use USB flash memory on the guest machine. In that case, you must configure the local resources in the VM in the Remote Desktop Connection tool.
Step 1
Open the remote desktop application on your host and click on Show Options and the Local Resources tab before connecting to the VM.
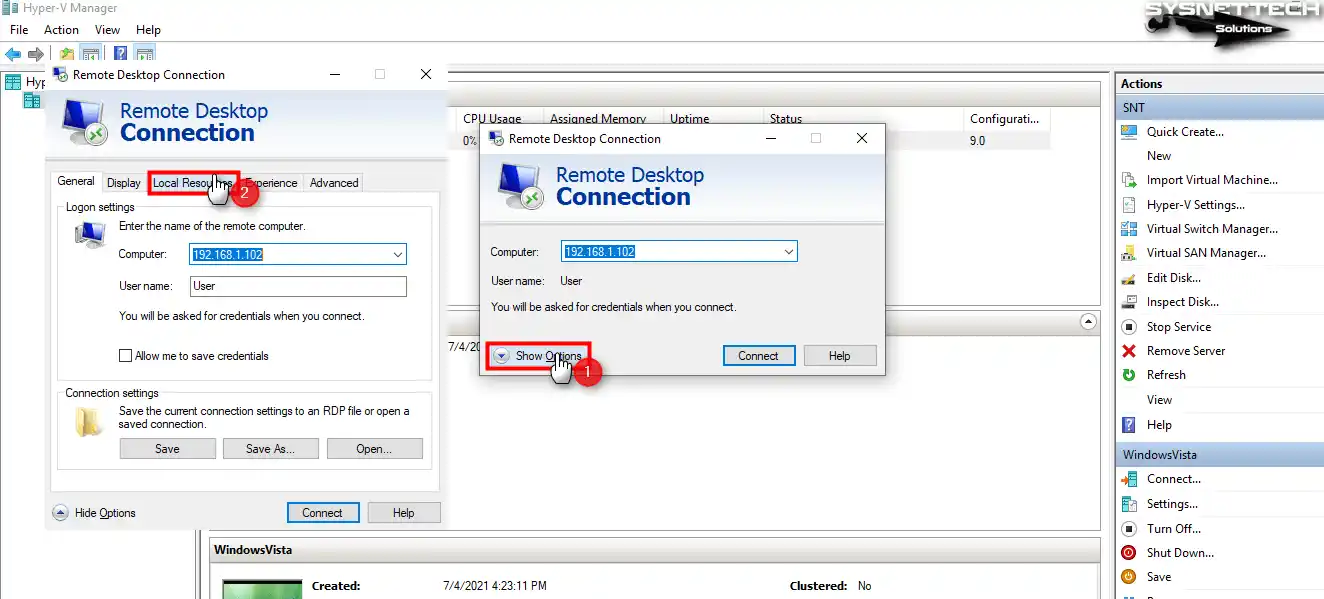
Step 2
In the Local Resources settings, click the More button under Local Devices and Resources; in the window that opens, under Drives, mark the USB memory you have inserted in your host and click OK.
Step 3
If you wish to stop the window from appearing whenever you attempt to connect to the guest system, select the “Don’t ask me again for connections to this computer” choice and click Connect.
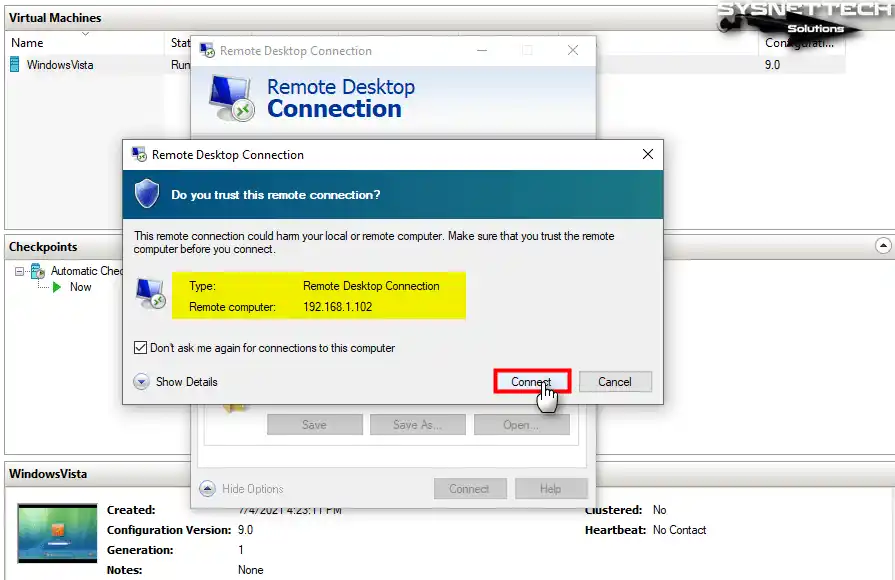
Step 4
In the Windows Security window, type the password of the user account and click OK, then click Yes to bypass the certificate error.

Step 5
After viewing My Computer, you can see your flash memory listed in Other.

Step 6
You can see the files or folders you have created in flash memory on the VM or host on both machines.

Video
Could you still use the old Windows Vista? Even though Microsoft doesn’t officially help with it anymore. However, you can still use Windows Vista on your computer with a unique tool called Hyper-V.
We’ll show you how to put it up in this article. Whether you’re feeling nostalgic or need to use some old software that only runs on Vista, we’ve got you covered!

Credit: Microsoft
The Rise and Fall of Windows Vista: A Look Back at Microsoft’s Revolutionary Operating System
On January 30, 2007, Microsoft showed off its new computer system named Windows Vista. It had some neat new features, like a stylish design called Aero, a different start button, and fast ways to find important things.
However, some folks found that Vista made their old computers work slower and needed help blocking lousy software. To solve these issues, Microsoft put out a significant update.
Even with the fixes, Microsoft stopped giving direct help to Vista on April 10, 2012. It destroyed even more help on April 11, 2017. If you’re still using Vista, you might run into some issues since it’s not getting any more support.
Installing Windows Vista in Hyper-V
If you’ve got an old computer with old parts and you want to use an old system on it, you can do that using something called a virtual machine. You can either watch this video that shows you how or follow the steps we’ve written here. Just do what the instructions say, and you’ll be able to get that old system running on your computer smoothly.
- To run Hyper-V software on your Windows 10, go to where you can turn things on or off in Windows, choose Hyper-V, click OK, and restart your computer once it’s done installing.
- Look for and open the Hyper-V Client software from the start menu. Once you’re in the Hyper-V Manager, make sure to create an External Switch that you’ll need for guest machines before you install Windows. The Default Switch links virtual computers to your home network using a NAT adapter, but sometimes it can mess with your network. So, click on the Virtual Switch Manager tool in the Actions part to make an External Switch instead.
- Select “External” in the Virtual Switch Manager, then press the “Create Virtual Switch” button. Once you’ve done that, pick “External Network” as one of its options. Choose your computer’s Ethernet or Wi-Fi adapter, and then press OK to close the window.
- To make a virtual computer, do these steps. First, click on the “Actions” button. Then, pick “New” from the menu that shows up. Lastly, select “Virtual Machine” from the list. This lets you make a new virtual machine that you can set up however you want.
- When you see the “Before You Begin” window, click the “Next” button to start manually making your VM. This kicks off the process and lets you adjust your virtual machine settings to fit your needs.
- In the “Specify Name and Location” window, type the name of the operating system you want in the “Name” box. Then, if you’re going to save the virtual machine in an external place, click “Browse” and pick the folder on your external storage device where you want to put it.
- In the Specify Generation window, you’ll see two things: Generation 1 and Generation 2. Generation 1 is for older Windows, such as Vista, and it uses BIOS. Generation 2 is for newer software like Windows 10, and it uses UEFI. Since Vista doesn’t work with UEFI, pick Generation 1 for BIOS.
- In the “Assign Memory” window, you need to decide how much RAM to give to your virtual system. If you’re going to run lots of virtual machines at the same time in Hyper-V, you can turn on Dynamic Memory. This helps you use your computer’s resources better among all the virtual machines. But if you’re only running one virtual PC, don’t use Dynamic Memory. Instead, uncheck it and give the VM a fixed size of 4096 MB, which is 4 GB.
- If you don’t want to pick a network adapter in the “Configure Networking” window, you can just skip that part and go to the next step. But remember, this might mean you won’t be able to connect well or at all to the network.
- In the “Connect Virtual Hard Disk” window, you can change how big or small the virtual hard disk is, depending on what you need. By default, Hyper-V gives the Windows Vista virtual machine a disk space of 127GB. But you can change it to the recommended minimum of 50GB.
- In the “Installation Options” window, pick the option that says “Install an operating system from a bootable image file.” This lets you add a Windows Vista ISO file to the virtual machine. Just hit the “Browse” button and choose the image file you downloaded on your PC.
- In the “Summary” window, you’ll see all the settings for your virtual computer. If there’s something you want to change, you can go back to the previous screens. When you’re happy with everything, click “Finish” to close the wizard.
- After making the Windows Vista virtual PC, go into its settings. Then, change the number of virtual processors to 4 or more, depending on how strong your computer is.
- Since Vista is an old system, it doesn’t work with the new adapter card that Hyper-V sets up by default. This means you won’t be able to connect to the Internet or your local network. To fix this, go into the VM settings, delete the current network adapter, and add a Legacy Network Adapter using the “Add Hardware” option. Then, choose the External Switch you made earlier for this Legacy Network Adapter.
- To start installing Windows Vista, click on the Start button. This will connect your system to your guest OS and let you begin the installation.
Conclusion
To sum up, even though Microsoft doesn’t give direct help to Windows Vista anymore, you can still use it with Hyper-V. Just follow the steps we talked about in this article, and you can set up a virtual machine to run it on your PC, even if it’s old.
Whether you’re feeling nostalgic or need to use old software that only works on it, Microsoft’s VTx software can help you out. So, if you’re missing Microsoft Vista, why not give it a shot with Hyper-V?
If you want to test a newer Windows version on a VM, you can read our article about installing Windows 8 on Hyper-V. It was a big deal for Microsoft because it had a new interface made for touchscreens and other cool stuff. Our guide shows you how to make a virtual machine and put it on it using Hyper-V. That way, you can try out its features yourself, even if your computer setup is different.
Also, if you want to run an even older PC system than Vista on your device, have a look at our guide about installing Windows 2000 on Hyper-V.
В. Как установить встроенный компонент Hyper-V из RTM выпуска Windows Server 2008 в Windows Vista SP1?
О. Установить встроенный компонент Hyper-V выпуска Windows Server 2008 RTM на компьютере Vista SP1 нельзя. Однако ядро и базовые компоненты Vista SP1 и Server 2008 одинаковы. Нет никаких технических препятствий для их совместной работы. Поэтому можно настроить отдельные компоненты для функционирования с Vista SP1.
Предупреждение: по моему опыту, эта процедура не всегда завершается успешно. Возможно, придется подождать появления Vista-совместимого набора встроенных служб.
Если виртуальная машина настроена для работы с сетевым адаптером, но не с унаследованным сетевым адаптером, запустите диспетчер устройств. Будет получено сообщение о неизвестном устройстве. Щелкните на неизвестном устройстве правой кнопкой мыши и выберите пункт Update Driver Software. Убедитесь, что выбран режим установки Integration Services, в котором службы Integration Services будут подключены к диску VM DVD и обеспечат доступ к содержимому. Затем вручную просмотрите программные драйверы и перейдите к папке DVD-архитектуры Integration Services. Просмотрите папку и установите драйвер VMBus. Это нужно для поддержки сети и обновленных элементов интерфейса.
Home
Gadgets
Hyper-V gadget for Windows Vista and Windows 7
If you are using Hyper-V there is no way you won’t be using the Hyper-V gadget that is available and has been available for a long time for Windows Vista and now also Windows 7. The gadget lists all your virtual machines and easily let you start, stop, shut down or save the virtual machines.
Download the Hyper-V gadget
About Author
Andreas Stenhall
I’m Andreas Stenhall and my work passion is the Windows client in combination with Microsoft 365 security and management services. I do consulting, I produce and teach my own courses, I lecture and I present and my formal work title is prinicipal workplace advisor and architect at Coligo in Stockholm, Sweden. I’m also proud to be an Microsoft MVP since 2009. I have presented at BUILD, TechEd in the US and Europe and regional TechDays. Follow me on twitter @AndreasStenhall.