
Table of Contents
A virtual USB drive can be attached to virtual machines, virtual USB drives bear great resemblance to physical external hard drives in terms of functionality and their dependency on your computer’s memory.
How to make a virtual USB drive in Windows 11
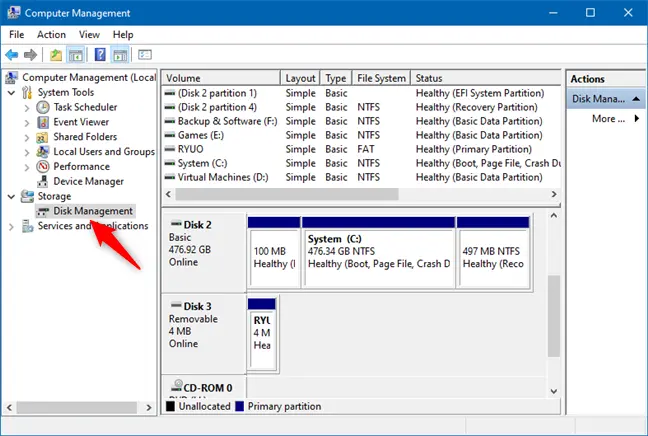
1. Right click on the Windows Start icon then select Disk Management.
2. Once the app is launched, click on the button then click the Create VHD option
3. Now, click to locate the folder in which you would like to store your virtual USB drive in Windows 11. And type the name for the virtual drive.
4. Next step is to determine the size of your virtual USB drive. From under Virtual hard disk size, specify the size in any of the following formats Megabytes (MB), Gigabytes (GB), Terabytes (TB).
5. Now, under Virtual hard disk format. Select the radio button to save your virtual USB drive as *.vhdx or *.vhd format.
Note
Note: We strongly recommend using the VHDX format, and the VHD format only if it is absolutely necessary.
6. Now, you will need to select the type of your virtual USB drive under Virtual hard disk type:
- Dynamic expanding option if you have chosen VHDX in the step 5.
- Fixed size option if you have chosen VHD in the step 5.
Finally click OK. Now, you have created a virtual USB drive on your Windows 11.
Configure the virtual USB device
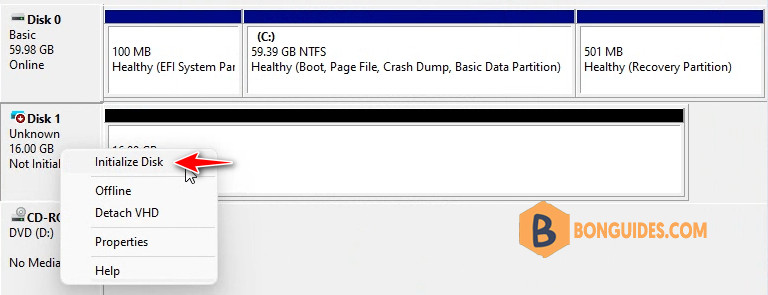
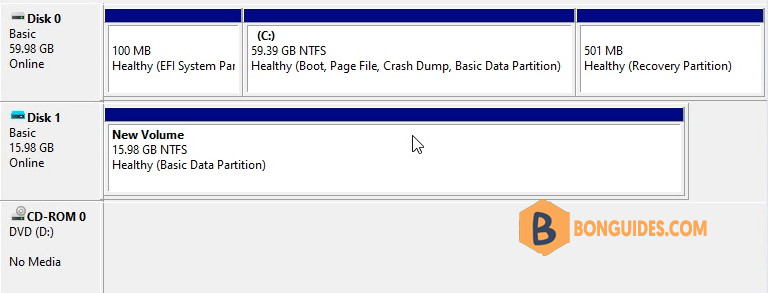
1. After the virtual device is created, you will see it in the disk list. Let’s right click on the disk then select Initialize Disk option.
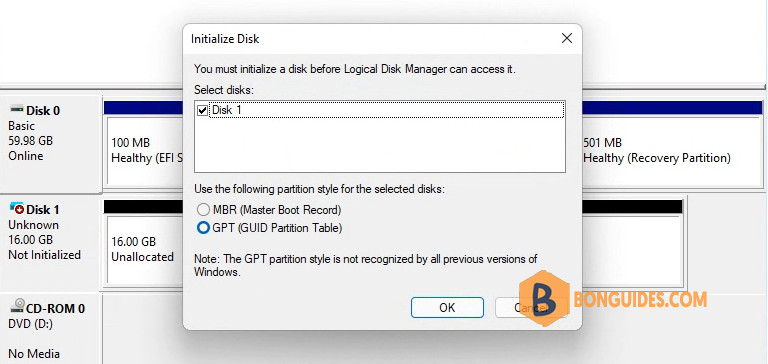
2. Select the partition style for the selected disk.
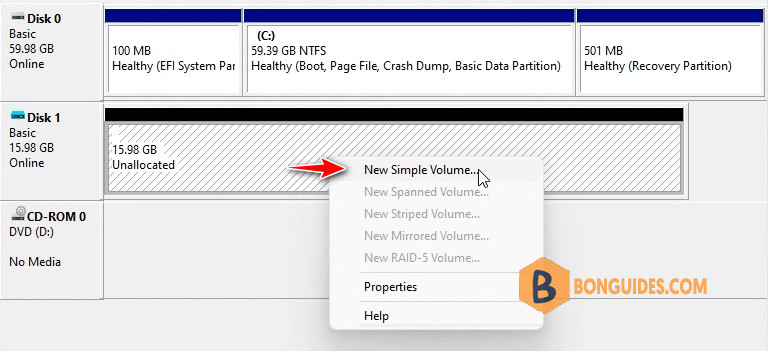
3. Once done, right click on the Unallocated area then create a New Simple Volume.
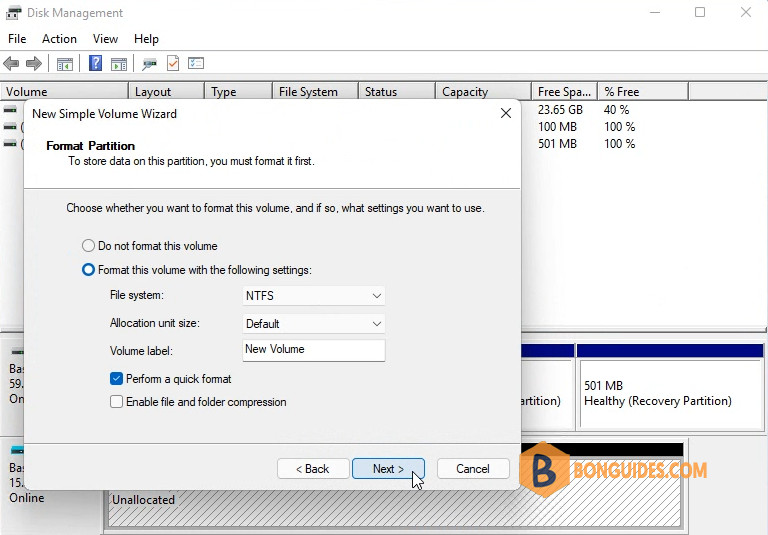
4. Create the partition following the wizard and enter the name for the volume.
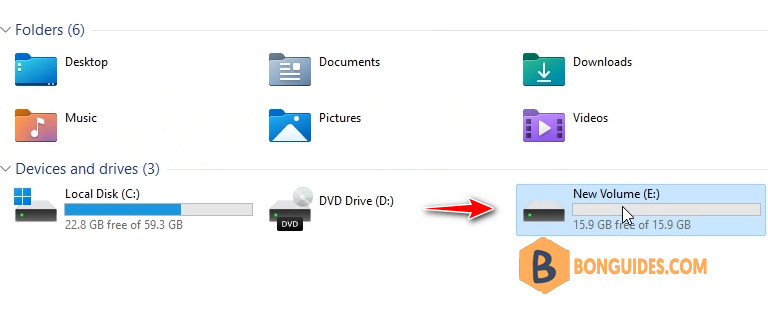
Now, your virtual USB drive is ready, you can see it in the My Computer in Windows Explorer.
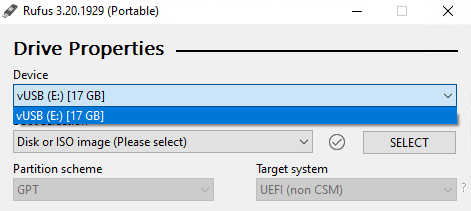
When I open the Rufus app, the virtual USB drive is listed in the device list.

Yoodley is reader-supported. When you buy through links on our site, we may earn an affiliate commission.
A virtual USB drive can be best defined as a computer within a computer, lacking the processing power of a physical USB drive, but brimming with storage.
Attached to virtual machines, virtual USB drives bear great resemblance to physical external hard drives in terms of functionality and their dependency on your computer’s memory.
Now that you have caught up on a brief about virtual USB drives, we shall move on to the core part where we discuss how you can create a virtual USB drive in Windows, and other OS.
You can create a virtual USB drive in Windows using both third party applications and the system software. Let us look at both of them in detail.
Method 1: Using System Software
- Open Start and search for Disk Management. Click on the first search result that appears.
- Once the app is launched, click the ‘Action’ button and click the ‘Create VHD’ option.
- Now, select ‘Browse’. This will allow you to locate the folder in which you would like to store your virtual USB drive in Windows 10.
- When prompted with a “File name” field, enter a name for the drive.
- Now, you will be prompted to save your USB drive. Select the ‘Save as type file’ drop down menu and select how you want to save your virtual USB drive – as *.vhdx or as *.vhd.
- Now, click on ‘Save’.
- Next step is to determine the size of your virtual USB drive. To do this, from under ‘Virtual hard disk size’, specify the size in any of the following formats that you deem fit:
- Megabytes (MB)
- Gigabytes (GB)
- Terabytes (TB)
- Now select the format for your drive from VHD and VHDX. You can do this from under the ‘Virtual hard disk format’ dropdown. We strongly recommend using the VHDX format, and the VHD format only if it is absolutely necessary.
- Now, you will need to select the type of your virtual USB drive. From under ‘Virtual hard disk type’, select:
- ‘Dynamic’ expanding option if you have chosen VHDX in the last step
- ‘Fixed size’ option if you have chosen VHD in the last step.
- Finally click OK. Now, you have created a virtual USB drive on your Windows OS.
Method 2: Using a third-party software IMDisk
IMDisk Toolkit includes a virtual disk driver and a library, specifically the DiscUtils library. With a GUI 32 bit, IMDisk Toolkit has multiple uses such as mounting image files of a hard drive, CD-ROM, and/or creating several RamDisks. However, in this post, we’ll be using IMDisk to purposely create a virtual USB drive on Windows.
To create a virtual USB drive in IMDisk, you will first need to download the toolkit from any trusted source. Once you have it in the zipped format, extract the stable file to the folder. Next, install the software by running the IMDisk installation file. Locate where you want to install the software, then click ‘Next’.
Now, click on ‘Install’ and then ‘OK’. Once you have installed the program, launch it by accessing it from its allocated place. Follow the steps below to create a virtual USB drive using IMDisk:
- Go to ‘File’. Select ‘Mount new virtual disk’.
- Once a box with options appears on your screen, select a name for your drive in ‘Image File’. Select ‘Create virtual disk in virtual memory’ from under ‘Image Access’ options.
- Specify the size of the drive and the drive type.
- Click on OK and you have successfully created a virtual USB drive using IMDisk.
How to make a virtual USB drive in Linux?
To create a new virtual disk for an existing Linux virtual machine:
- Login as a root user (this account has full privileges) by opening the command terminal pressing CTRL+Alt+T.
- In the command terminal, write su – and press Enter. You will be prompted to enter the password to root.
- Once you are logged in as root user, run the following command and make note of the sdx entries:
ls /dev/sd*
- Now, log in to the vCenter Server using vSphere Client and once in the inventory, right click and select ‘Edit’ to edit settings.
- Click the ‘Hardware’ tab and click ‘Add’. Next, select ‘Hard Disk’ and then click on ‘Next’.
- Upon completing the wizard, reboot your Linux virtual machine and login using the root credentials in the command terminal again.
- Now run the following command:
ls /dev/sd*
- You will now notice a new set of entries post running the command.
- Create one partition on new disk, example to sdx: fdisk /dev/sdx
Command (m for help): p
Command (m for help): n
Command action
e extended
p primary partition (1-4)
p
Partition number (1-4): 1
First cylinder (1-22400, default 1): <RETURN>
Using default value 1
Last cylinder or +size or +sizeM or +sizeK (1-22800, default 22800): 22400
Command (m for help): w
The partition table has been altered ! - Create an ext3 file system for the new disk partition you just created in the last step, using the command:
mkfs -t ext3 /dev/sdx1
- Use command fdisk -l for verification of the new disk partition you have created.
- Use the command mkdir /New_Directory_Name for creating a mount point.
- If you wish to display the current content for say, /etc/fstab: use the following command
cat /etc/fstab
- To edit fstab, use text edit and add the following line, so that /etc/fstab is available across reboots of the virtual machine:
/dev/sdx1 /New_Directory_Name ext3 defaults 1 3
- Reboot your Linux virtual machine and the virtual USB drive as a new disk partition will now be available.
How to make a virtual USB drive in Mac?
You can create an empty disk image, add data to it, then use it to create disks, CDs or DVDs.
To create a virtual USB drive in MacOS, you will need to create a disk image, add data, and then use it to create disks, CDs, or DVDs.
Here is how you can create a disk image in MacOS:
- Go to Disk Utility app, then choose File > New Image > Blank Image.
- Give your disk image a name, add tags, and choose the saving location.
- Now, add a size to your disk image in the ‘Size’ field.
- Select ‘Format’, and then choose the format for your disk from the following options available:
- APFS or APFS (case-sensitive).
- Mac OS Extended (Journaled) or Mac OS Extended (Case-sensitive, Journaled)
- MS-DOS (FAT)
- ExFAT
- Now, if you choose to add encryption to the disk image, click on the pop menu labelled as ‘Encryption’. Next choose an encryption option.
- Choose the image format from the ‘Image Format’ pop-up and choose from one of the following options:
- Sparse bundle disk image
- Sparse disk image
- Read/write disk image
- DVD/CD master
- Finally click ‘Save’ and then ‘Done’.
- From the Finder, locate your disk image and copy your files to the mounted disk image. Next, eject it.
- Now, restore the disk image to a disk.
FAQs
1. How to mount an ISO image in Windows?
Mounting an ISO image in Windows 8 and 10 is an easy job, as these Windows versions come with a built-in ability to mount ISO disc image or a VHD virtual hard drive image file. But if you are working on Windows 7 or Vista, you require a third party application tool like WinCDEmu which is an open-source disc mounting program. WinCDEmu supports various types of image files like BIN, NRG, MDS/MDF, CCD, and IMG; it can also be used in Windows 8 or 10.
Here are the 3 steps to mount an ISO image in Windows 8 and 10: ( Without using WinCDEmu )
- Go to the ISO image which you want to mount, then double click on it. It works only when you have no programs associated with the ISO image on your system.
- Right click on the ISO image file and select the “Mount” option.
- Select the ISO file from the file explorer, and then click on the ” Mount ” button under the Disk Image Tools ” tab on the ribbon. Once mounting is successful, it will appear as a new drive under This PC. In order to unmount the ISO file, right click on the drive, and select “Eject”.
On Windows 7 or Vista follow the given steps:
- Install WinCDEmu application on your PC and let it install the hardware drivers that it requires.
- Once WinCDEmu is installed successfully, double click on the ISO image file to mount it or right click on the disk image file and click “Select drive letter & mount” and “OK” option.
- To unmount the disk image, right click on the virtual disk drive and select “Eject” option.
2. How can I use my Android phone as a USB drive?
- Connect your android device to your PC using a USB data cable. Once connected, a ” USB Storage” notification will appear in the notification panel of your device. Select the ” USB Storage” and click the “OK” option.
- An AutoPlay box will appear on your PC, choose the “Open Folder” option. And now a new storage drive will appear under This PC, as a Removable Disk. Now you can easily transfer files from your PC’s hard drive to an appropriate folder on your Android Phone.
3. How to open a VHD file?
Steps to open a VHD file on Windows are given below;
- Save the VHD file to the desktop. In case if you have downloaded the compressed file, you can easily find it in the downloads.
- Launch the WinZip application from the start menu or the desktop shortcut. To open the VHD file- click on the VHD file and choose open option.
- Select the VHD files which you want to extract.
- Now click on 1-click Unzip option and choose Unzip to PC from the WinZip toolbar.
- Choose the folder where you want to extract the file and click the Unzip button.
- Once extraction is successful, close the Winzip application, and go to the folder where you extracted the file and easily access it from there.
4. How to add a virtual printer port?
Steps to add a virtual printer port are as follows:
- Go to the start button, open the control panel and from the hardware and Sound select printers option.
- Click on add printers option.
- From the add Printer wizard, click on add a local printer.
- Then choose Create a new port option. Make sure that the local port is selected in the list and then click on next.
- Type \\computer name\printer name in the Port Name dialog box, and then click OK.
- Now complete the rest of the wizard and then click on Finish.
5. How to create a multi-partition USB drive that also acts as the bootable ubuntu.iso?
- Partition the pendrive as you like, to give space for the ISO image in a FAT partition, the first one.
- Now Run lsblk to identify which device is your pendrive, i.e /dev/sdb, being the first partition the FAT one, i.e /dev/sdb1. Mount it, i.e /media/user/PENDRIVE
- Then mark this partition as bootable, from Disk Utility.
- Run the following commands:
sudo apt install grub-efi-amd64 dirs=(dev bin sbin etc sys usr proc lib lib64) for dir in “${dirs[@]}”; do mkdir -p /media/user/PENDRIVE/$dir sudo mount –bind /$dir /media/user/PENDRIVE/$dir done sudo chroot /media/user/PENDRIVE/ grub-install –force –removable –target=x86_64-efi –efi-directory=/ /dev/sdb1 sudo chroot /media/user/PENDRIVE/ grub-install –force –removable –target=i386-pc –boot-directory=/ /dev/sdb - Unmount the binded dirs and remove them:
for dir in “${dirs[@]}”; do sudo umount /media/user/PENDRIVE/$dir rm -r /media/user/PENDRIVE/$dir done - Create a file grub.cfg under /media/user/PENDRIVE/grub/ with their content:
set root='(hd0,1)’ configfile /boot/grub/grub.cfg - Mount the Ubuntu ISO and copy the grub.cfg file in /media/user/PENDRIVE/boot/grub/
- Alter the file¹, in this example with ubuntu-20.04.1-desktop-amd64.iso
set root='(hd0,1)’
set iso_path=/ubuntu-20.04.1-desktop-amd64.iso
loopback loop $iso_path
menuentry “Ubuntu” {
set gfxpayload=keep
linux (loop)/casper/vmlinuz iso-scan/filename=$iso_path file=/cdrom/preseed/ubuntu.seed maybe-ubiquity quiet splash —
initrd (loop)/casper/initrd
}
- Copy the ISO image in the partition (the first FAT one).
Ready, you have now an EFI/i386 bootable pendrive with the partitions you created.
Read More
- Can You Use Two Graphic Cards at the Same Time?
- Is it safe to delete AppData\Local\Temp?
- How to activate Windows XP now that support has ended?
Want to create a virtual USB Drive on your Windows PC? Virtual USB Drive or Virtual Hard Disk resembles the physical disk but the only difference is that the virtual disk is a file that is stored on a physical disk.
A virtual hard disk or a virtual USB drive is created with a .vhdx or .vhd extension. You can store all your files on a virtual USB drive including photos, videos, and documents, as well as install OS on it.
You can attach a physical disk on the PC but a virtual USB drive is stored within the storage of your system.
Unlike a physical disk that is attached to your computer, a virtual disk is a file on your storage.
If you want to create a virtual USB Drive in Windows but don’t know how to do so then this article will help you with it.
If you like to follow tutorials in a video format, we have attached a video on how to create a virtual USB drive on Windows PC down below:
In this article, we will be discussing how you can create a virtual USB Drive in Windows.
You can use Disk Management to create a virtual USB drive on your system. You can also use third-party software like ImDisk to create the virtual disk.
We will guide you with both methods to help create a virtual disk on your system. To do so, follow the steps given below:
#1. Using Disk Management
Disk Management is a system utility that allows you to make changes to your disk. For instance, you can mount a disk, unmount a disk, format a drive, delete a partition, etc.
To create a virtual USB Drive in Windows using Disk Management, follow the steps given below:
- Press Windows + X key combo and from the menu that opens up, click on Disk Management. In the Disk Management window, click on the Action tab and then click on Create VHD.
- Next, click on the Browse button and ahead to the location where you want to save the file.
- Enter the name in the File Name field to continue ahead.
- Now, click on the drop-down menu stating ‘MB’ next to Virtual hard disk size and then select the size in MB, GB, or TB.
- Now, in the empty field enter the size of the virtual hard disk.
- Under the Virtual Hard Disk Format option, you will be asked to select VHD or VHDX format.
- VHD- This type of virtual disk supports up to 2040GB storage size.
- VHDX– This type of virtual disk supports sizes larger than 2040GB up to 64TB. Also, this type of virtual disk is resilient to power failure.
- Next under the Virtual Hard Disk Type, you will have to select Fixed Size or Dynamically Expanding.
- Fixed Size- Choose this option if you have selected VHD format.
- Dynamically Expanding- Select this option if you have selected the VHDX format earlier.
- Once done, click on OK and the virtual USB drive will be created.
- By default the Virtual USB drive you have created will not be initialized; you will have to initialize it to use it.
- To do so, right-click on the disk and then click on Initialize Disk.
- On the next window, you need to select the partition style:
- Master Boot Record (MBR) – This partition style uses a standard BIOS partition table.
- GUID Partition Table (GPT)- This partition style uses Unified Extensible Firmware Interface (UEFI).
- Select the partition style and click on OK.
- Now, the disk will be marked as unallocated. Right-click on the unallocated disk, and then click on New Simple Volume.
- Follow the on-screen instructions to create a simple volume.
#2. Using ImDisk
You can also use third-party software like ImDisk to create a Virtual USB drive on your PC. To use ImDisk to create a virtual USB drive, follow the steps given below-
- Download the ImDisk Toolkit from this link and install it on your PC.
- Once the app is installed, open it on your PC.
- Click on the File button at the top and then click on Mount New Virtual Disk.
- On the next screen, you have to enter the name of the image file of the virtual disk.
- Next, under the Image Access option select Create virtual disk in virtual memory option.
- You need to set the size of the virtual disk and also select the drive type.
- Once done, click on OK to create the virtual disk.
Conclusion
This is how you can create a virtual USB drive on your Windows PC. You can use the virtual USB drive you create to install a separate operating system on it without modifying the partition.
You can also store files and backup of your data on the physical USB drive you have created.
FAQ
How Do I Initialize A Virtual Hard Drive?
Open Disk Management on your system. Right-click on the disk that is not initialized, and then click on Initialize Disk option to initialize the disk.
Is Virtual Memory The Same As HDD?
Virtual Memory is the space from your HDD or SDD which will act like RAM. This will allow multitasking while not consuming much of your physical RAM.
How Do I Create Virtual Disk In Windows 11?
You can use Disk Management or third-party apps like ImDisk to create a virtual disk in Windows 11. The steps for the same have been discussed in this article above, you can follow them to create a virtual disk in Windows 11.
Windows 10, Windows 11, Windows 7, Windows 8, Windows Server, Windows Vista, Windows XP
- 02.03.2022
- 45 378
- 5
- 21
- 19
- 2
- Содержание статьи
- Использование ImDisk Virtual Disk Driver
- Использование графического интерфейса
- Использование командной строки
- Комментарии к статье ( 5 шт )
- Добавить комментарий
- Использование ImDisk Virtual Disk Driver
Использование ImDisk Virtual Disk Driver
ImDisk Virtual Disk Driver — бесплатная программа для эмуляции дисков, которую можно скачать с её официального сайта. Установка программы максимально автоматизирована, и требует простого запуска скачанного файла.
Использование графического интерфейса
Создание и монтирование образа
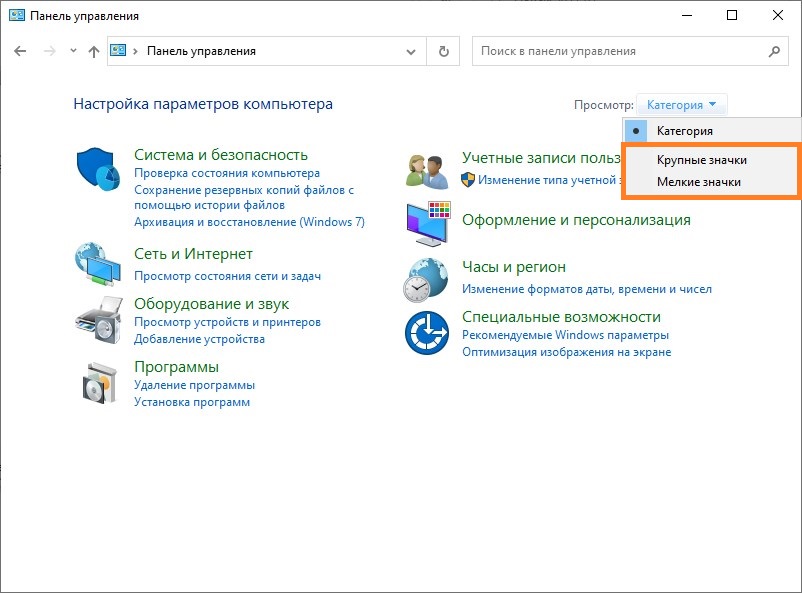
- Открываем Панель управления (владельцам Windows 10 следует прочитать этот материал в случае возникновения трудностей с открытием Панели управления).
- Убеждаемся, что включен вид Панели задач «Крупные значки«, или «Мелкие значки«.

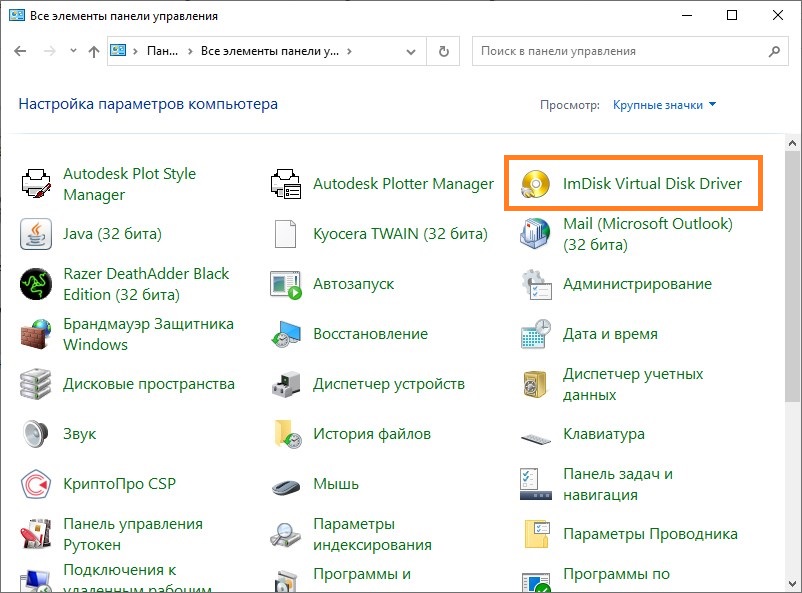
- Открываем «ImDisk Virtual Disk Driver«.
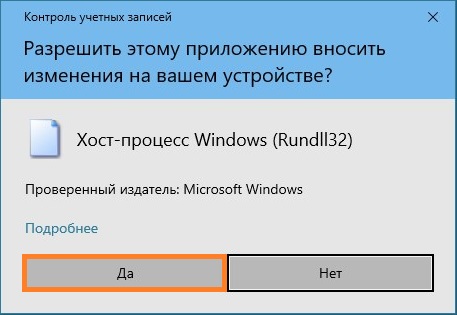
- В случае появления окна «Разрешить этому приложению вносить изменения на вашем устройстве?», нажимаем «Да».

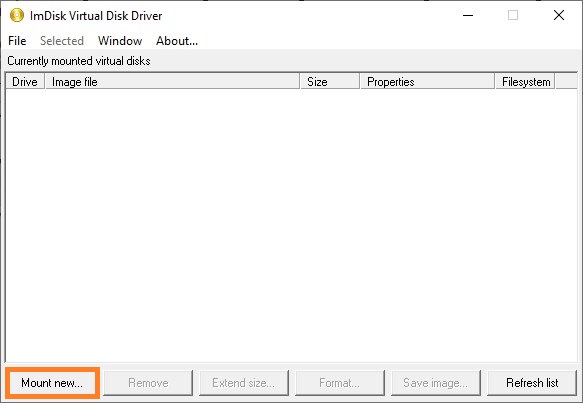
- В окне «ImDisk Virtual Disk Driver«, нажимаем на кнопку «Mount new…«.

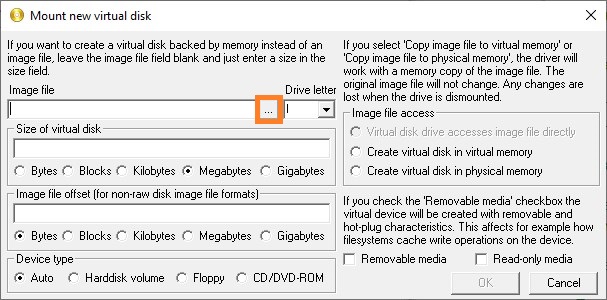
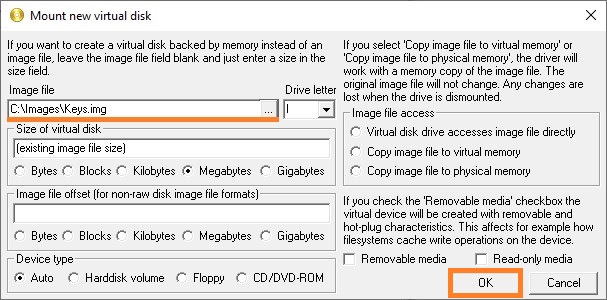
- В появившемся окне «Mount new virtual disk«, переходим к полю «Image file» и нажимаем на кнопку с тремя точками.

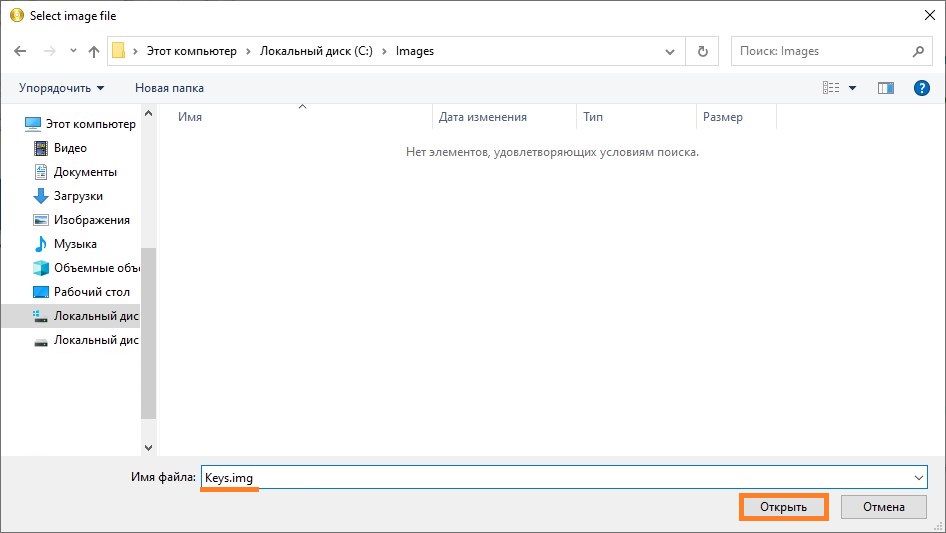
- В появившемся окне переходим в нужную для сохранения образа директорию (например — C:\Images), после чего в поле «Имя файла» пишем имя файла — например, Keys. После имени файла, через символ точки, следует дописать расширение img. Далее, следует нажать на кнопку «Открыть».

- Появится окно с сообщением, что подобный файл не существует, и предложит его создать. Соглашаемся с предложением, нажав кнопку «Да».
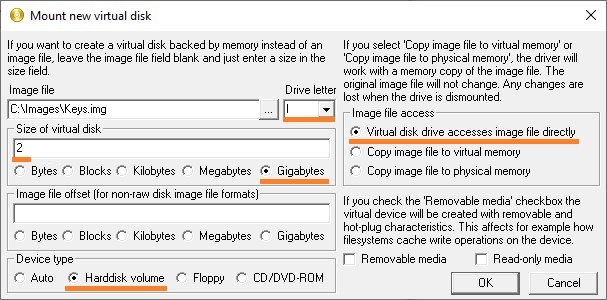
- Теперь выставляем остальные настройки:
- Drive letter — устанавливаем букву диска для монтируемого образа
- Size of virtual disk — размер создаваемого образа в виде цифрового значения и единицы измерения. В качестве примера поставлено значение 2 GB.
- Device type — устанавливаем тип устройства. Для того, чтобы устройство воспринималось как съемный накопитель, ставим «Harddisk volume«.
- Image file access — тип доступа к образу. Ставим значение «Virtual disk drive accesses image file directly«, для того, чтобы программа напрямую работала с образом на диске.
Выставив все нужные настройки, нажимаем «ОК».
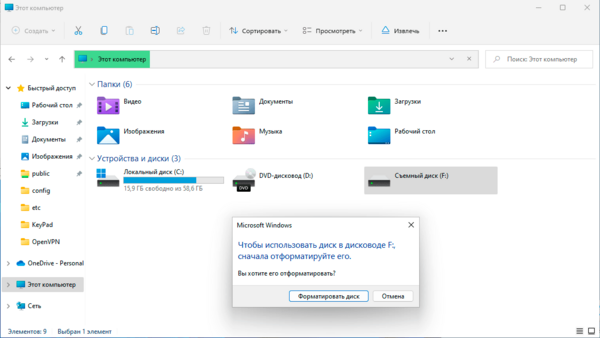
- После нажатия на кнопку «ОК» будет создан новый образ, который будет смонтирован в систему под выбранной буквой диска. Поскольку образ только что созданный, то на нем не содержится никакой файловой системы, а значит для начала с ним работы, нужно его отформатировать в понятную для Windows файловую систему. По умолчанию, Windows сама предложит провести данную процедуру, но если этого не произошло, придется сделать это самому — зайдя в Проводник (или любой другой файловый менеджер), выбрать свежесмонтированный виртуальный диск, и попробовать открыть его. После этого должно появится сообщение с предложением провести форматирование диска. Нажимаем на кнопку «Форматировать диск».
В следующем окне можно все оставить по умолчанию, и просто нажать на кнопку «Начать».
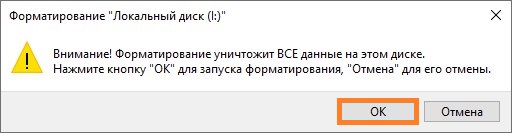
После этого, появится предупреждение о том, что все данные на диске будут безвозвратно потеряны — поскольку, на данном диске ничего нет, то смело нажимаем на кнопку «ОК», после чего непосредственно начнется сама процедура форматирования.

По окончанию форматирования появится соответствующее окно, которое можно закрыть, нажав на кнопку «ОК», после чего закрыть предыдущее окошко, нажав на кнопку «Закрыть».
- Теперь можно пользоваться свежесозданным виртуальным диском, как флешкой.
Повторное монтирование образа
К сожалению, после перезагрузки данный образ придется монтировать вручную заново. Делать это через графический интерфейс не очень удобно, по этому, если навыки обращения с компьютером позволяют — лучше это сделать через командную строку (с использованием bat файла или задания в Планировщике заданий). Про то, как использовать ImDisk Virtual Disk Driver через Командную строку будет написано ниже.
Для монтирования уже имеющегося образа, следует выполнить следующие действия:
- Открываем Панель управления, а в ней — «ImDisk Virtual Disk Driver«.
- Нажимаем на «Mount new virtual disk«.
- Нажимаем на символ трех точек у пункта «Image file», и выбираем уже имеющийся файл образа.
- После этого, оставляем все остальные значения по умолчанию, и нажимаем на кнопку «ОК», после чего произойдет монтирование образа, и он будет готов к работе.
Использование командной строки
ImDisk Virtual Disk Driver предоставляет удобные возможности управления через командную строку. Не смотря на то, что действий здесь придется выполнять меньше, результат будет такой же, как и при использовании графического интерфейса.
Создание и монтирование образа
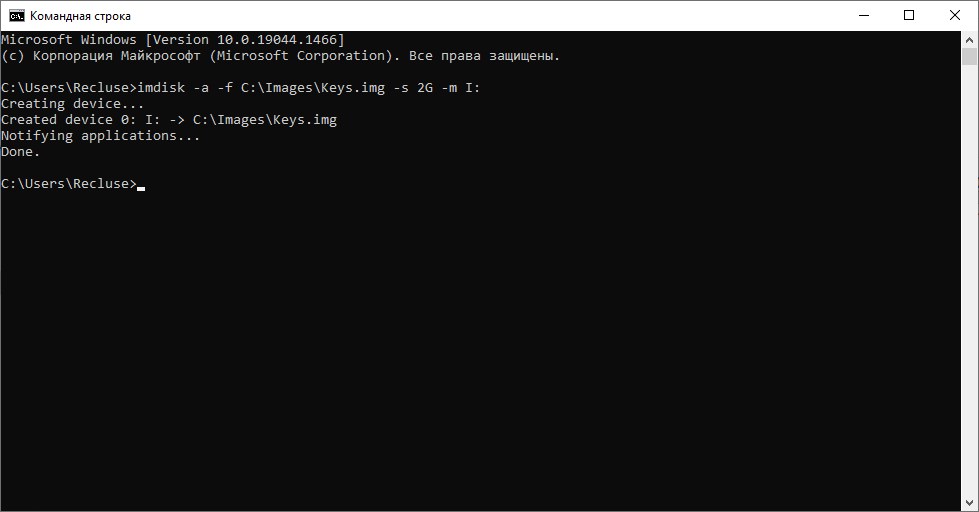
Для создания образа и монтирования его под нужной буквой, необходимо выполнить следующую команду:
imdisk -a -f C:\Images\Keys.img -s 2G -m I:В данном случае использованы следующие параметры ImDisk:
- -a — подключение образа.
- -f — путь к образу.
- -s — размер создаваемого образа. В данном примере используется размер 2G (2 гигабайта), можно использовать любой другой, указав нужный размер.
- -m — буква монтируемого диска.
Перед дальнейшим использованием свежесозданного диска, потребуется провести его форматирование, о проведении которого можно прочитать выше, где описывалась работа ImDisk через графический интерфейс.
Повторное монтирование образа
Как отмечалось в части, посвященной работе с графическим интерфейсом ImDisk, после перезагрузки компьютера, виртуальный образ придется монтировать вручную. Сделать это через командную строку можно с помощью следующей команды:
imdisk -a -f C:\Images\Keys.img -m I:
Как видно, используются все те же параметры, что и в команде для создания и монтирования образа выше (там же и описание параметров), за исключением отсутствуюшего параметра -s, который необходим только при создании образа.
Современный мир все больше и больше переходит к использованию онлайн-хранилищ и привычные типы физических накопителей потихоньку становятся историей. При этом необходимость их использования все еще остается, а некоторый специализированный софт может прямо требовать наличие физического накопителя. Но это не всегда возможно, например, в виртуальных средах или на удаленных системах. В этом случае нам на помощь придут эмуляторы. В данной статье мы рассмотрим работу с ImDisk — простым и мощным решением для работы с виртуальными накопителями.
Онлайн-курс по устройству компьютерных сетей
На углубленном курсе «Архитектура современных компьютерных сетей» вы с нуля научитесь работать с Wireshark и «под микроскопом» изучите работу сетевых протоколов. На протяжении курса надо будет выполнить более пятидесяти лабораторных работ в Wireshark.
ImDisk — это драйвер виртуального диска для Windows позволяющий подключать файлы образов как флешки, флоппи-диски, оптические накопители или обычные диски. Поддерживаются 32-х и 64-х битные версии начиная с Windows NT/2000 и Windows Server 2003, при этом программа без проблем работает в последних версиях Windows 10/11 и Windows Server.
Получить ее можно на официальном сайте разработчика: http://www.ltr-data.se/opencode.html/#ImDisk, мы настоятельно рекомендуем скачивать программу именно оттуда.
Установка не должна вызвать затруднений, для скачивания доступно два варианта: инсталлятор и архив с пакетным файлом для установки. При этом будет установлена консольная утилита для управления драйвером imdisk.exe и графическая оснастка для панели управления.
Работа в графическом режиме
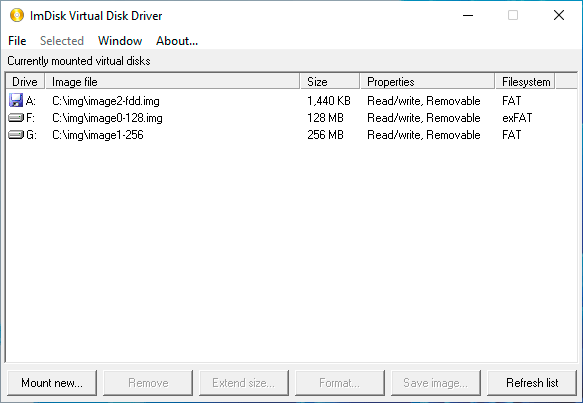
Для работы в графическом режиме перейдите в Панель управления и откройте оснастку ImDisk Virtual Disk Driver. В открывшемся окне будут представлены все смонтированные виртуальные приводы, но пока здесь ничего нет. После чего нажмем Mount New и заполним параметры нового диска как показано на рисунке ниже.
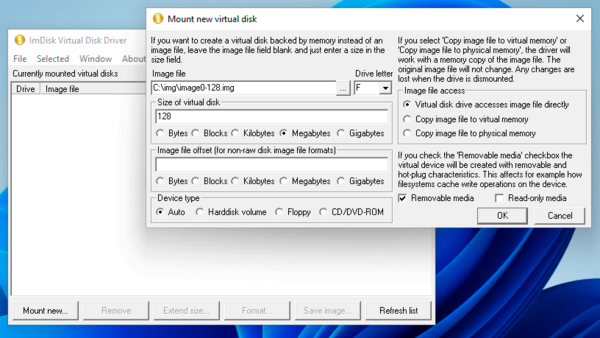
Прежде всего укажем файл образа, если он не существует то программа предложит его создать, затем букву диска и размер образа (только при создании). Тип устройства — авто, если не нужно явно указать тип эмулируемого оборудования.
В разделе Image file access выбираем Virtual disk drive accesses image file directly, что обеспечит прямую работу с файлами образа. Два других режима копируют его содержимое в память и все несохраненные изменения при размонтировании образа будут потеряны, а если с их указанием создать новый образ, то он будет присутствовать только в памяти.
Для создания виртуальной флешки установите дополнительно флаг Removable media, также можно смонтировать образ только на чтение.
В нашем случае мы создали виртуальный флеш-накопитель на 128 МБ, что вполне достаточно для работы с той же электронной подписью или ключами защиты.
После создания накопитель автоматически будет смонтирован с указанной буквой и нам останется его только отформатировать.
Дальнейшая работа с диском ничем не отличается от работы с обычной флешкой или иным типом эмулируемого носителя.
Управление образами в оснастке также понятно: для размонтирования используйте Remove, Extend size позволяет увеличить размер, а Save Image сохранит изменения образа если вы смонтировали его в память.
В целом все просто и понятно, но графическая оснастка не предоставляет всех возможностей драйвера, которые доступны в режиме командной строки.
Работа в режиме командной строки
Чтобы получить справку по всем доступным опциям и ключам просто наберите в командной строке:
imdisk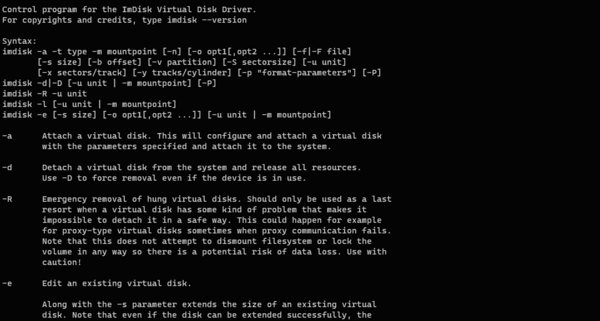
Для того, чтобы создать образ флешки аналогичной той, которую мы создавали в графическом режиме выполните:
imdisk -a -f C:\img\image0-128.img -s 128K -m F: -o remКоротко разберем ключи:
- -a — выполнить монтирование
- -f — путь к файлу образа
- -s — создать файл указанного размера
- -m — точка монтирования (буква диска)
- -o — дополнительные опции монтирования
Дополнительные опции монтирования довольно разнообразны и позволяют гибко управлять создаваемыми образами, в нашем случае мы указали тип монтируемого устройства — rem — съемный диск.
При этом опций можно использовать несколько, указав их через запятую, без пробела. Так создавая образы большого размера вы можете создать их в виде разреженного диска, который сразу не резервирует место, а растет по мере наполнения данными, для этого добавьте опцию sparse:
imdisk -a -f C:\img\image3-2G.img -s 2G -m F: -o rem,sparseПосле чего можем убедиться что созданный образ размером 2 ГБ на самом деле занимает единицы килобайт. Но имейте ввиду, данная возможность доступна только при использовании файловой системы NTFS на разделе для хранения образов.
В некоторых случаях нам может потребоваться эмулировать более специфический носитель, полный их перечень можно получить в списке параметров монтирования, а мы для примера создадим флоппи-диск. У него есть свои особенности: размер образа должен совпадать с размером реальных дискет, т.е. иметь значения 160K, 180K, 320K, 360K, 640K, 720K, 820K, 1200K,1440K, 1680K, 1722K, 2880K, 123264K или 234752K.
imdisk -a -f C:\img\image2-fdd.img -s 1440K -m A: -o fdУ другого типа носителя — оптического диска тоже есть свои особенности: для его монтирования обязательно нужен готовый образ, создать чистый диск нужного объема не получится. Также образа с расширениями .iso, .nrg и .bin по умолчанию монтируются как оптические диски.
В дальнейшем созданные образа можно просто монтировать командой:
imdisk -a -f C:\img\image0-128.img -m F: -o remОпции монтирования в некоторых случаях можно не указывать, в таком случае образ будет смонтирован с типом auto. Например:
imdisk -a -f C:\img\image.iso -m E:В этом случае мы точно знаем, что файл с расширением .iso будет смонтирован как оптический и дополнительных опций не указываем.
Для размонтирования образа используйте:
imdisk -d -m F:При этом система проверит использование диска и если он занят каким-либо процессом, то в операции будет отказано. Чтобы принудительно размонтировать диск выполните:
imdisk -D -m F:При необходимости размер виртуального диска можно увеличить, но учтите, что увеличится только само доступное пространство диска, файловая система останется прежнего размера. Без повторного форматирования расширить на увеличившееся пространство можно только NTFS, для иных файловых систем диск нужно будет заново отформатировать или прибегнуть к стороннему софту.
Расширить можно только смонтированный диск, объем на который вы хотите увеличить диск указывайте в ключе -s:
imdisk -e -s 256M -m F:В результате выполнения данной команды к существующим 128 МБ накопителя прибавится еще 256 МБ и его итоговый размер станет 384 МБ.
Монтирование виртуальных накопителей на постоянной основе
Очень часто нужно монтировать созданные нами накопители на постоянной основе. В русскоязычном сегменте каких только способов не предлагается, начиная от пакетных файлов в автозагрузке и заканчивая планировщиком задач. Однако все гораздо проще, ImDisk умеет монтировать образы самостоятельно, сразу после загрузки драйвера.
Для того, чтобы образ автоматически монтировался достаточно один раз смонтировать его с ключом -P:
imdisk -a -f C:\img\image0-128.img -m F: -o rem -PВ этом случае драйвер добавит нужные записи в реестр и будет монтировать образ автоматически при каждой загрузке. Чтобы отключить автомонтирование достаточно один раз размонтировать образ с тем же самым ключом:
imdisk -D -m F: -PПросто, быстро и надежно. А для того, чтобы не изобретать велосипеды и использовать указанную штатную возможность достаточно было просто прочитать встроенную справку. Кстати, рекомендуем это обязательно сделать, особенно если вы хотите изучить программу более подробно, потому как ее возможности не исчерпываются описанными.
Онлайн-курс по устройству компьютерных сетей
На углубленном курсе «Архитектура современных компьютерных сетей» вы с нуля научитесь работать с Wireshark и «под микроскопом» изучите работу сетевых протоколов. На протяжении курса надо будет выполнить более пятидесяти лабораторных работ в Wireshark.