
,
The error «The local device name is already in use» on Windows, usually occurs when the drive letter assigned to a network shared folder is already being used by another disk or drive on the system.
Beyond that, the «local device name is already in use» problem can also appear if the «File and Printer Sharing» feature is not allowed in the Firewall, or if the computer’s connection to the domain is incorrect or unsuccessful (for domain-joined computers) .
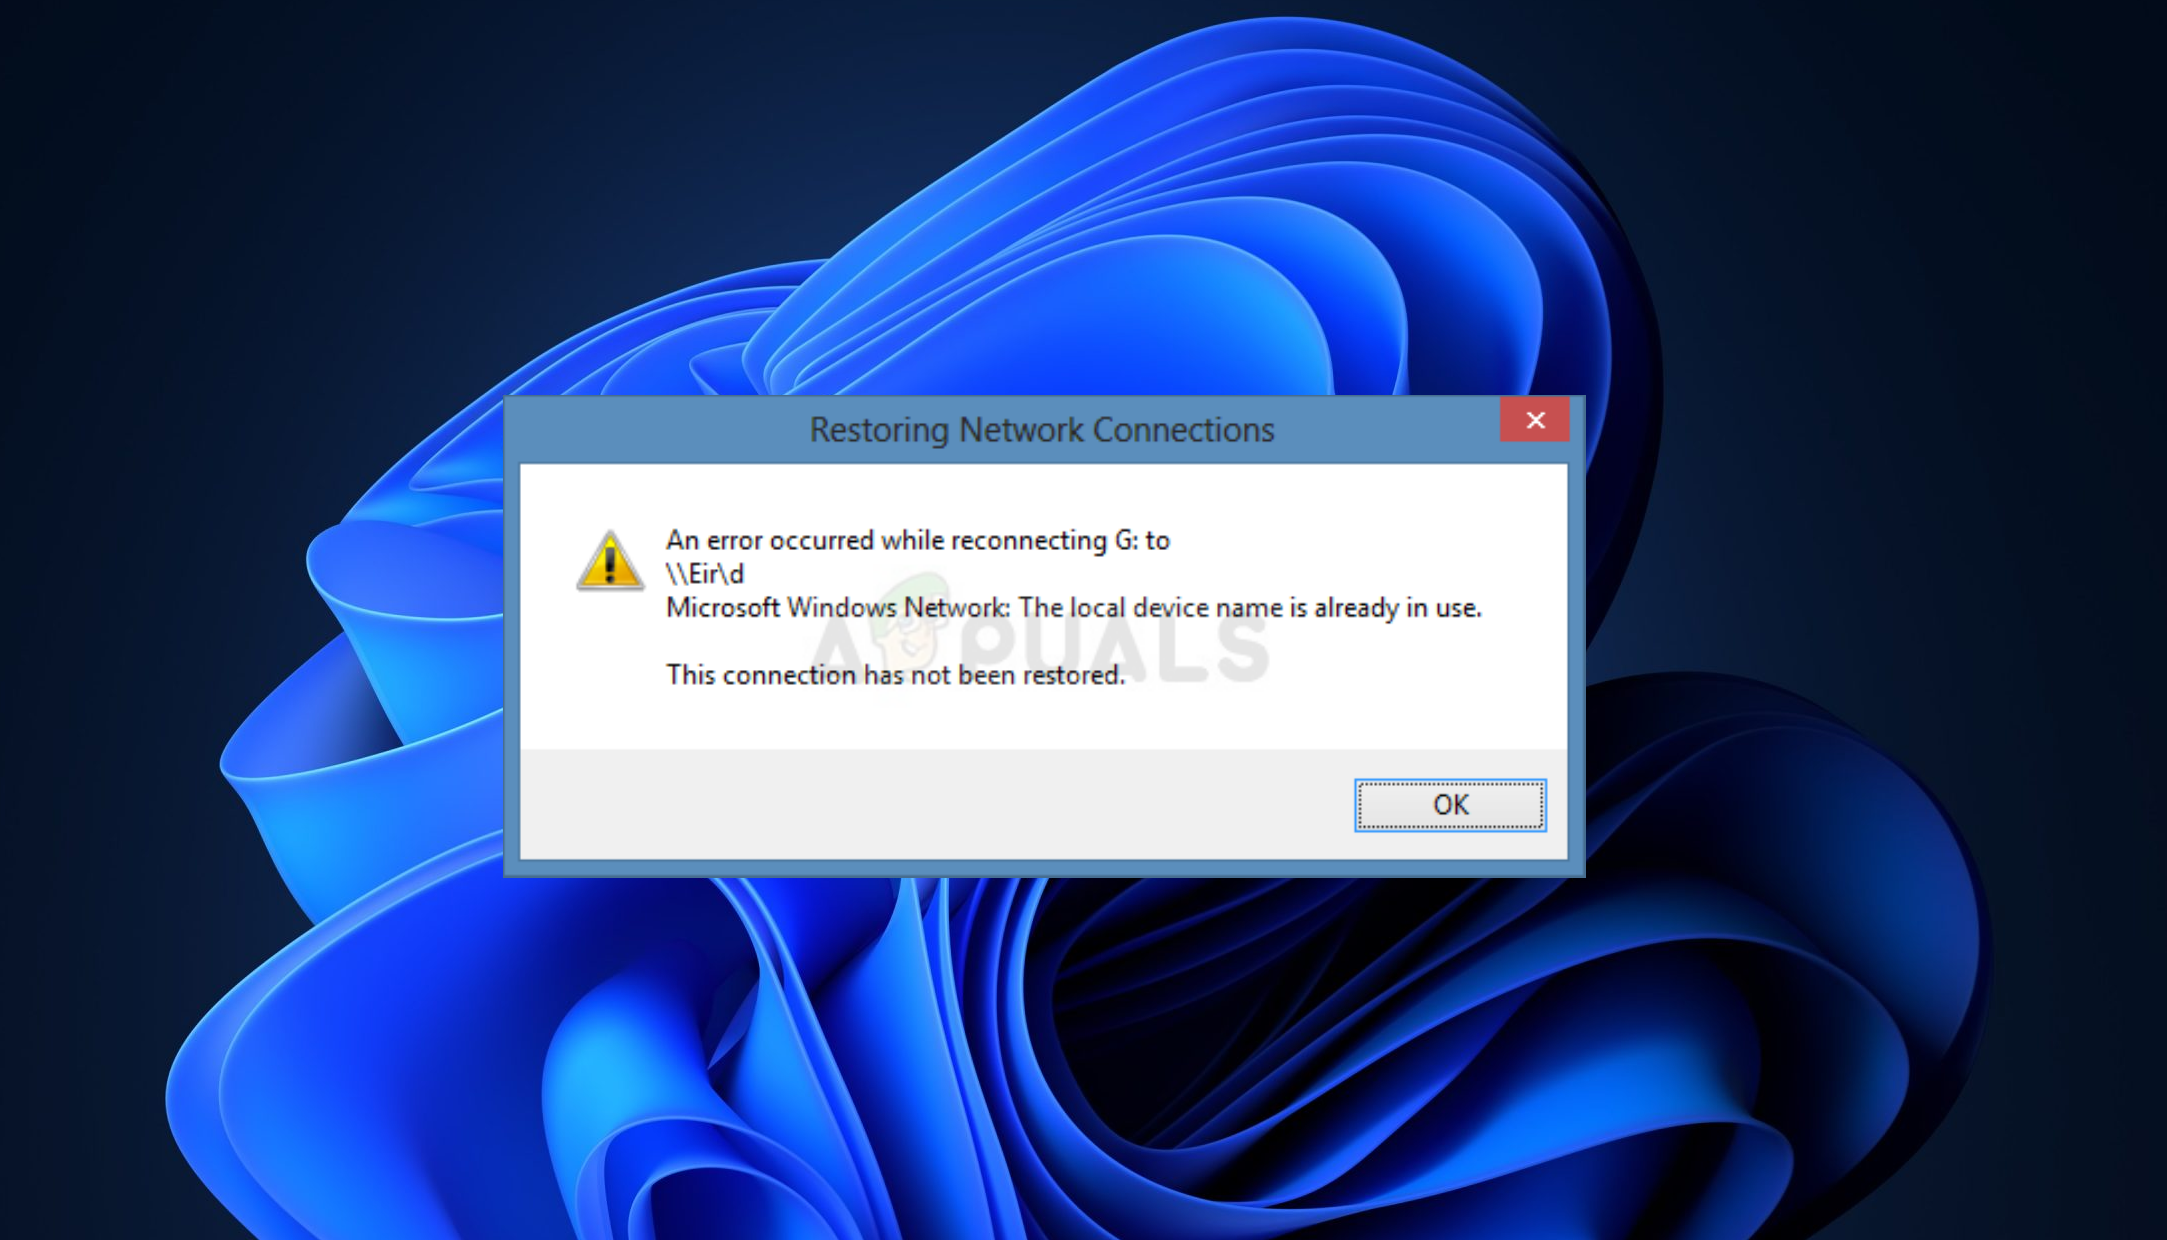
This guide contains several methods to fix the following problem in Windows when attempting to access a network mapped drive using File Explorer:
«An error occurred while reconnecting <drive letter:> to <Path to Network Shared Folder>. Microsoft Windows Network: The local device name is already in use. This connection has not been restored.»

How to FIX: Local Device Name is Already in Use on Windows 10/11.
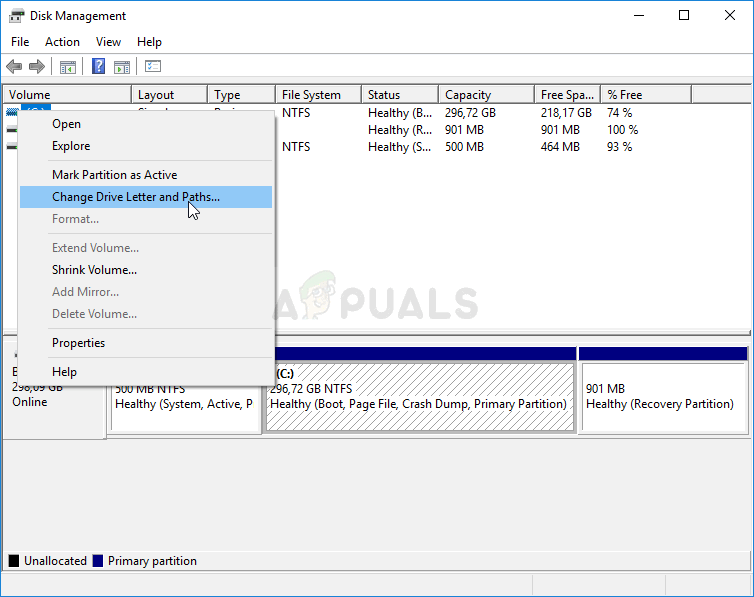
Method 1. Ensure that the Driver Letter is not Used to another Disk/Drive.
As I mentioned above, the «Local device name is already in use» error is caused if Windows has already assigned the drive letter of the mapped network drive to another local drive or disk. So the first step is to ensure that this does not happen.
1. Press the Windows + R keys to open run command box.
2. In run command box, type: diskmgmt.msc and hit Enter or click OK to open Windows Disk Management console.

3. In Disk Management, check the drive letters already assigned to your local disks/drives/removable drives/CDROMs, etc., and make sure that no one of them is the same as the drive letter you have assigned to the network mapped drive.
If one of your local drives has the same drive letter as the network mapped drive, proceed to next step to change it, otherwise skip to next method.
* e.g.: If you mapped a network shared folder with the letter «E:», and the letter «E:» is used from a local drive, (like in the screenshot bellow), change it to another drive letter.

4a. To change the drive letter of the local drive, right-click on it and select Change Drive Letter and Paths…

4b. Then click Change.

4c. Use the drop-down menu to choose a different drive letter and click OK and then Yes to confirm the change.

5. Restart the PC and check if the problem is solved.
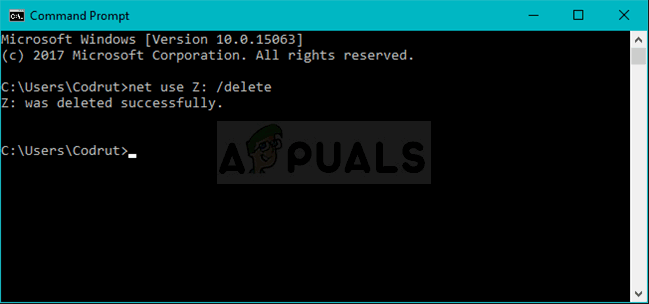
Method 2. Remap the Network Drive using Command Prompt.
The next method to fix the «local device name already is use» issue, is to re-map the network shared drive from command prompt:
1. Type command prompt in the search box. Then select the Command Prompt app and click Run as administrator.

2. In the command prompt type the following command and hit Enter to remove all the network mapped drives and click Y when prompted.
- net use * /delete

3. When the operation is complete, type the following command to re-map the network drive/shared folder and press Enter:*
- net use Drive_Letter: \\Server\Share /user:username password
* Note: In the above command replace the «Drive_Letter:» with the letter that you want to map the network shared folder, the «\\Server\Share« with the path of the network shared folder and the «username password» with the correct username and password. e.g.
- net use Z: \\192.168.1.70\Downloads /user:admin 123456

4. Now open explorer and see if the error «The local device name is already in use» has been resolved.
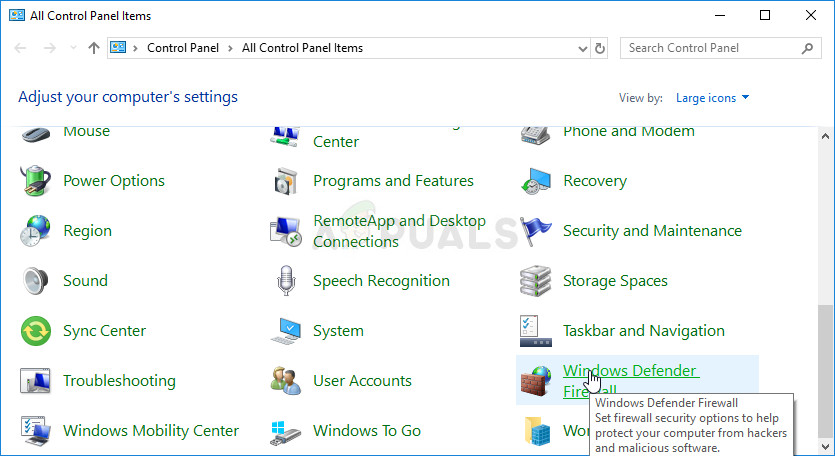
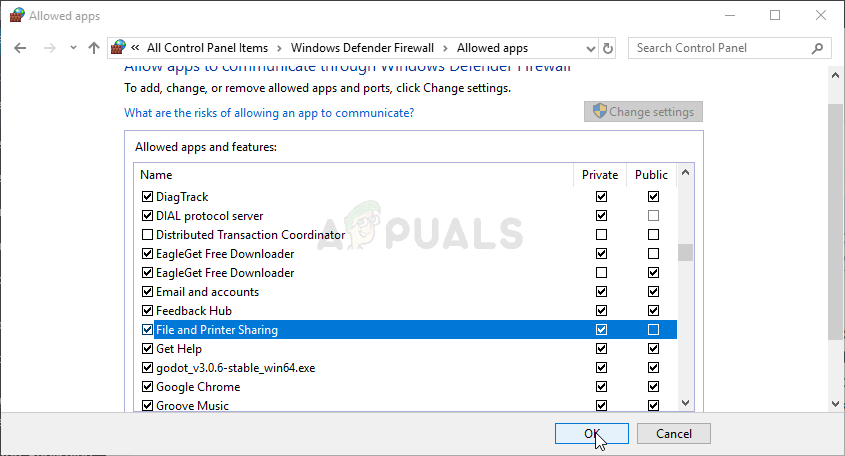
Method 3. Enable File and Printer Sharing in Windows Defender Firewall.
If the File and Printer Sharing feature is disabled in Windows Firewall, this can cause the error «The local device name is already in use».
1. Type control panel in the search box and click on Control Panel app shown under Best match results.

2. Set the View by: to «Large icons» or to «Small icons«, then click on the Windows Defender Firewall.

3. Then click Allow an app or feature through Windows Firewall, from the left side list of options.

4. Click the Change settings button in the upper right corner of the window.

5. Locate and check the box next to the File and Printer Sharing option and also check the boxes Private and Public. When done, click OK to apply the change.

6. Finally, restart your computer to see if the error persists.
Method 4. FIX «Local Device Name is Already in Use» in Registry (1)
All the assigned drive letters for the local and network drives, are stored under the «MountPoints2» key in the registry. So, the next method to fix the mentioned problem is to delete the «MountPoints2» registry key in order to force Windows to recreate it and the information that contains, at next reboot.
1. Type regedit in the Search box and click on Registry Editor app shown under Best match results.

2. In registry navigate from the left pane at this location.
- HKEY_CURRENT_USER\SOFTWARE\Microsoft\Windows\CurrentVersion\Explorer\MountPoints2

3. Then, right-click at the MountPoints2 key and click Delete.

4. When prompted, click Yes to confirm your decision.

5. Close the Registry Editor and restart your PC.
7. After restart, open File Explorer and check if you can access the mapped network drive without error.
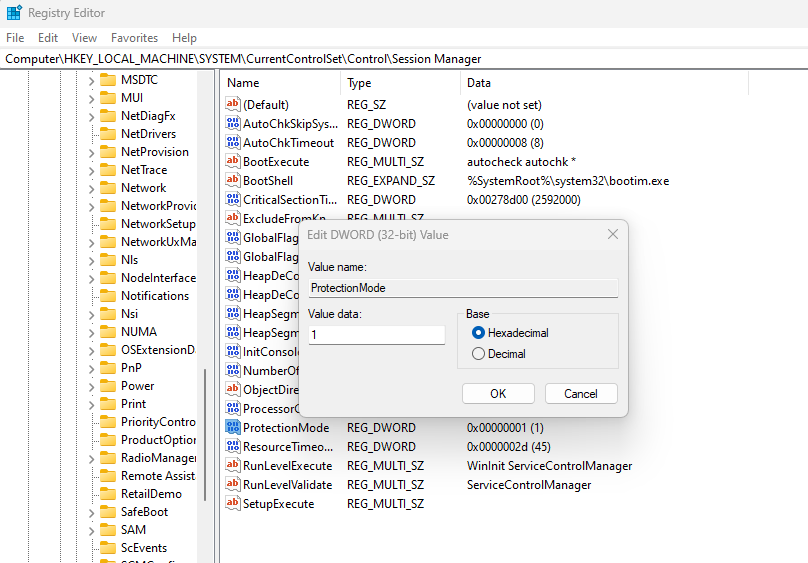
Method 5. FIX «The Local Device Name is Already in Use» in Registry (2)
The next method to fix the mentioned error is to ensure that the policy object «System objects: Strengthen default permissions of internal system objects» is set to Enabled. To do that, via registry:*
1. Open the Registry Editor and navigate to the following location:
- HKEY_LOCAL_MACHINE\SYSTEM\CurrentControlSet\Control\Session Manager
2. In the right pane locate the ProtectionMode REG_DWORD and see if it has the value 1. If not, open it, type «1» in Value Data box and then restart your PC.

* Note: To modify this setting via the Group Policy Editor:
1. Navigate to:
- Local Computer Policy > Computer Configuration > Windows Settings > Security Settings > Security Options
2. Open the policy System objects: Strengthen default permissions of internal system objects (e.g., Symbolic Links) and set it to Enabled.

Method 6. Re-Join Computer to Domain.*
* Note: This method applies only to computers joined to an Active Directory Domain.
If the computer is joined to a Domain then proceed and remove it from the domain. Then restart the computer and then re-add it in the domain to resolve the «Local Device Name is Already in Use on Windows » problem.
Method 7. Check if the Server has Enough Free Storage Space.
The mentioned issue can sometimes occur if there is insufficient storage space on the server/computer with the shared folder. Therefore, make sure that the free space of the server/computer is not exhausted has at least 3-5 GB of free storage space.
That’s it! Which method worked for you?
Let me know if this guide has helped you by leaving your comment about your experience. Please like and share this guide to help others.
If this article was useful for you, please consider supporting us by making a donation. Even $1 can a make a huge difference for us in our effort to continue to help others while keeping this site free:
- Author
- Recent Posts
Konstantinos is the founder and administrator of Wintips.org. Since 1995 he works and provides IT support as a computer and network expert to individuals and large companies. He is specialized in solving problems related to Windows or other Microsoft products (Windows Server, Office, Microsoft 365, etc.).
The error The Local Device Name is Already in Use is commonly encountered by those who frequently interact with networked systems and occurs during the network drive mapping process. The issue occurs when users attempt to access a network drive and are confronted with the following message:
An error occurred while reconnecting <drive letter> to <file path> Microsoft Windows Network: The local device name is already in use. This connection has not been restored.
Usually, this problem surfaces when users try to access files in a shared folder or map network drives within a domain. To resolve this error effectively, consider the following methods.
Pinpointing the exact cause can accelerate the troubleshooting process and help you find the most appropriate resolution. Possible reasons include:
- Drive mapping errors: Sometimes, glitches in network drive mapping result in issues such as duplicate drive letters.
- Unassigned drive letters: Errors may occur when drive letters are not correctly designated or are missing.
- Disabled File and Printer Sharing: When File and Printer Sharing is deactivated in your firewall settings, network-related errors, including this one, can occur.
- Insufficient server space: Increasing the space on the network server’s root drive is known to resolve this error.
1. Delete a Registry Key
Over time, the registry can accumulate entries that are no longer in use or that conflict with current settings. Deleting the specific registry key associated with drive mounting effectively cleans out these digital cobwebs, allowing your system to refresh its network drive connections without stumbling over past configurations that are now outdated or problematic.
Before proceeding, it’s important to back up your registry. Refer to our guide on how to back up the registry for careful instructions.
- Open the Registry Editor by typing regedit into the search bar.
Accessing the Registry Editor - Navigate to the following path using the Registry Editor’s left pane:
HKEY_CURRENT_USER\Software\Microsoft\Windows\CurrentVersion\Explorer
- Right-click the MountPoints2 key within the Explorer key, select Delete from the context menu, and confirm any following prompts.
- Restart your computer and check if the error message still appears.
2. Remap the Drive Using Command Prompt
This process involves using much-recognized commands to first sever any existing ties to network drives and then establish a new, fresh connection. It’s similar to rebooting a problematic device; through remapping, the network paths are reset, potentially clearing the error and allowing for smooth access to the designated network resources.
This process renews the connection to the network resource, allowing the system to establish a new mapping without the conflict associated with duplicate drive names or outdated connections.
- Search for Command Prompt, right-click the top result, and select Run as administrator.
- Type the following command in the Command Prompt window and press Enter:
net use * /delete

- After successfully executing the command, run the next command:
net use Z: \\server\share /user:username password
Make sure to replace username and password with your actual network credentials, and then check if the issue persists.
3. Correctly Assign Drive Letters
When a network drive is mapped, it uses a specific letter as an identifier. If this letter isn’t available or is accidentally assigned to another device, it leads to a conflict, prompting the error. By accessing Disk Management and assigning a unique, unused drive letter to the network drive, you effectively eliminate any overlap or confusion, thereby resolving the issue and restoring access to the networked resource.
- Make sure no files on the storage devices you plan to modify are in use. Avoid copying or transferring files to or from the disk before making changes.
- Press Windows Key + X and select Disk Management from the menu.
Opening Disk Management - In Disk Management, right-click the volume that requires a new drive letter and choose Change Drive Letter and Paths. Then, select a new letter from the list.

Modifying Drive Letter and Paths - Avoid selecting the letters A or B, as they were traditionally reserved for floppy drives and could lead to issues with older software. Click Apply to confirm, accept any prompts, and then close the utility. Check if the error has been resolved.
4. Enable File and Printer Sharing in Your Firewall
When File and Printer Sharing is disabled, your computer’s firewall may block network discovery and file sharing services, which are essential for accessing drives on a network. By enabling this feature, you allow your system to communicate with other devices on the network, facilitating the successful mapping of network drives and, in turn, potentially resolving the error.
- Open the Control Panel using the Windows search functionality.
- Change the Control Panel view to Large or Small icons and locate Windows Defender Firewall.

Accessing Windows Defender Firewall - Select it and click on the Allow an app or feature through Windows Firewall link in the sidebar. Click the Change settings button, providing admin permissions if prompted.
- Find and tick the box for File and Printer Sharing, press OK to save changes, and reboot your device.

Enabling File and Printer Sharing - After restarting, try accessing the network again to see if the error has been corrected.
5. Change the ProtectionMode Value in the Registry
This particular setting influences how the operating system manages permissions and access to network drives. When changed, it adjusts the way network resources are allocated, potentially resolving conflicts that might cause the error, especially when users without administrator privileges are engaging with network drives.
This minor yet powerful adjustment basically instructs your system to relax certain security parameters, thereby facilitating smoother network connections and drive mappings.
- Press Windows Key + R, type regedit into the run dialog, and hit Enter.
- Navigate to the following registry path:
HKEY_LOCAL_MACHINE\System\CurrentControlSet\Control\SessionManager\
- Locate the ProtectionMode key.
- Change the key value from 0 to 1, save your changes, and restart your computer to check if the issue is resolved.

If the problem remains, try manually removing the mappings with this command in an elevated Command Prompt:
net use * /del /y
Note: If needed, replace the asterisk (*) with the particular drive letter.
The error may also come from inadequate space on the server’s root drive. Should you have access to the server, free up necessary space by deleting non-essential files.
Whilst there is no definitive minimum for free space, it’s a good practice to clear a few gigabytes. After making space, reassess to determine if the error persists.
Kevin Arrows
Kevin Arrows is a highly experienced and knowledgeable technology specialist with over a decade of industry experience. He holds a Microsoft Certified Technology Specialist (MCTS) certification and has a deep passion for staying up-to-date on the latest tech developments. Kevin has written extensively on a wide range of tech-related topics, showcasing his expertise and knowledge in areas such as software development, cybersecurity, and cloud computing. His contributions to the tech field have been widely recognized and respected by his peers, and he is highly regarded for his ability to explain complex technical concepts in a clear and concise manner.
Такие читатели, как вы, помогают поддерживать MUO. Когда вы совершаете покупку по ссылкам на нашем сайте, мы можем получать партнерскую комиссию. Читать далее.
Ошибка «Имя локального устройства уже используется» не является чем-то необычным. Если вы работаете с любым типом сети, даже с локальной сетью, вы вполне вероятно столкнетесь с ней в какой-то момент. К счастью, это также обычно легко решить.
Вот наиболее распространенные причины этой ошибки, а также наиболее вероятные решения.
Что вызывает ошибку имени локального устройства?
Может быть несколько возможных причин этой ошибки, но определить точную причину может быть сложно. Наиболее распространенными являются неназначенные буквы дисков и неправильные настройки общего доступа к файлам и принтерам.
Также возможно, что к появлению этой ошибки может привести нехватка места на сетевом сервере. Вы должны проверить эту возможность в первую очередь. Если причиной является нехватка места для хранения, ни одно из следующих решений не будет иметь значения.
Если на сетевом сервере достаточно места, вы можете перейти к описанным ниже методам, чтобы решить проблему на локальном устройстве.
1 Включить общий доступ к файлам и принтерам
Вы всегда должны держать брандмауэр включенным, но иногда это может мешать общему доступу к файлам и принтерам. Это может привести к ошибке Имя локального устройства уже используется. К счастью, вы можете легко включить общий доступ к файлам и принтерам в настройках брандмауэра.
Если вы используете сторонний брандмауэр, обратитесь к документации, чтобы найти настройку. Вот как включить общий доступ к файлам и принтерам в брандмауэре Microsoft.
- Найдите Панель управления с помощью поиска Windows и щелкните результат поиска, чтобы открыть его.
- Нажмите Система и безопасность > Брандмауэр Защитника Windows чтобы увидеть настройки брандмауэра.
- В левом меню нажмите Разрешить приложение или функцию через брандмауэр а затем щелкните Изменить настройки кнопка.
- Прокрутите вниз, чтобы найти Общий доступ к файлам и принтерам в списке и нажмите кнопку Общественный флажок.
- Нажмите Хорошо и перезагрузите компьютер, чтобы изменения вступили в силу.
Иногда настройки общего доступа к файлам и принтерам для брандмауэра могут быть сброшены после серьезного обновления. Просто потому, что вы знаете, что включали его в прошлом, стоит проверить еще раз.
2 Переназначьте сетевой диск с помощью командной строки
Windows автоматически назначит букву вашему сетевому диску. При отображении сети назначенные буквы могут перепутаться и даже отсутствовать вовсе. Переназначение сетевого диска может исправить это и предотвратить ошибку.
- Лучший способ переназначить сетевой диск — через командную строку. Искать команда в поиске Windows и выберите Запустить от имени администратора.
- Под курсором введите: чистое использование D / удалить. Заменять Д с буквой диска, который вы хотите удалить. Затем нажмите Входить.
- Теперь переназначьте диск, набрав: net use D: \\server\share /user: имя пользователя пароль. Замените букву диска и пароль пользователя и имени пользователя соответствующими данными.
Если это не помогло, попробуйте переназначить буквы дисков вручную. Конечный результат аналогичен, но иногда переназначение не работает, если переназначение пути к диску вручную работает.
3 Переназначить буквы диска
Другой распространенной причиной этой ошибки является неправильно назначенная буква диска. Переназначить букву диска легко, если вы не столкнетесь с ошибкой «Буква диска недоступна».
- Искать Управление диском с помощью поиска Windows или щелкните правой кнопкой мыши меню «Пуск» и выберите его в скрытом меню.
- В разделе «Управление дисками» найдите раздел или диск, который вы хотите изменить, и щелкните его правой кнопкой мыши.
- Выбирать Изменить букву диска и пути, а затем щелкните значок Добавлять кнопка.
- Нажмите Назначьте следующую букву диска и используйте раскрывающееся меню, чтобы выбрать новую букву для раздела или диска.
Если требуемая буква диска недоступна, возможно, она уже используется на другом диске или разделе. Он также может быть связан со съемным диском, который в данный момент не подключен. Если буквы дисков A и B доступны, а их часто нет, лучше их не использовать. Эти буквы традиционно зарезервированы для дисководов гибких дисков и для использования со старыми версиями ОС.
Узнать больше о почему буквы дисков обычно начинаются с C в Windows.
4 Повторно инициализируйте браузер компьютеров
Менее вероятным решением этой ошибки, но иногда помогающим, является повторная инициализация браузера. Настройки браузера в некоторых случаях могут мешать настройкам сетевого диска. При остановке браузера и его повторной инициализации эти настройки должны быть восстановлены.
- Откройте поиск Windows и введите команда. В результате выберите Командная строка и нажмите Запустить от имени администратора.
- Под курсором командной строки введите: чистая остановка «Обозреватель компьютеров» а затем нажмите Входить.
- Когда команда завершит выполнение, введите: net start «Обозреватель компьютеров» и нажмите Входить.
- Теперь вы можете закрыть редактор реестра и проверить, сохраняется ли ошибка.
Повторная инициализация браузера отличается от простого закрытия и повторного открытия окна браузера. Это гораздо более мощное решение для очистки любых настроек браузера, которые могут конфликтовать.
Узнайте, как оптимизировать и получить максимальную отдачу от вашего компьютера с помощью этих важные советы по производительности Windows.
5. Удалите ключ реестра MountPoints.
Если ни одно из приведенных выше решений не устранило проблему, вы можете попробовать удалить раздел реестра MountPoints в качестве крайней меры. Этот ключ хранит данные о USB и других съемных носителях. Удаление ключа иногда может разрешить конфликты в присвоении букв диска.
- Удаление ключа MountPoints не должно вызывать проблем, но лучше сделать резервную копию реестра на всякий случай. Сделайте это, прежде чем продолжить.
- Откройте редактор реестра, выполнив поиск в Windows Search.
- Перейдите к HKEY_CURRENT_USER\Software\Microsoft\Windows\CurrentVersion\Explorer.
- Ищите Маунтпойнтс2 на правой панели, щелкните правой кнопкой мыши и выберите Удалить.
- Закройте редактор реестра и перезагрузите компьютер.
Ключ реестра MountPoint будет создан заново после удаления и перезапуска. Затем вы можете проверить, исправлена ли ошибка «Имя локального устройства уже используется».
Исправление ошибок имени локального устройства в Windows
Ошибка «Имя локального устройства уже используется» не является редкостью и может быть неприятной. Но, работая с решениями здесь, вы обычно сможете исправить это в течение нескольких минут. Просто не забудьте проверить оставшееся хранилище на сетевом сервере, прежде чем начать копать глубже.

Функция «Подключение сетевого диска» в Windows 10, позволяет подключаться к дискам, размещенным на удаленном компьютере. Для тех организаций и систем, которые подключены к сети, это довольно простой вариант использования. Ошибка «Имя локального устройства уже используется» возникает, когда кто-то пытается получить доступ к этому подключенному диску на своем компьютере. Основная причина этой проблемы — неправильная настройка при создании сетевых дисков. Ошибка гласит:
Произошла ошибка при повторном подключении к сети Microsoft Windows: имя локального устройства уже используется. Эта связь не была восстановлена.
Имя локального устройства уже используется
Лучший способ устранить эту ошибку — переназначить диск.
- Для этого откройте проводник. Выберите «Подключить сетевой диск» на верхней ленте.
- Выберите букву диска, который вы хотите использовать. Выберите «Обзор», чтобы найти местоположение, которое вы хотите отобразить.
- Отметьте следующие опции:
- Повторно подключиться при входе.
- Подключение с использованием разных учетных данных.
- В конце нажмите «Готово».

Если подключенный сетевой диск не работает, попробуйте включить общий доступ к файлам и принтерам.
- Для этого откройте панель управления.
- Откройте «Центр управления сетями и общим доступом».
- Выберите «Изменить дополнительные параметры общего доступа».
- Нажмите «Включить сетевое обнаружение» и «Включить общий доступ к файлам и принтерам».
Это должно решить проблему с подключением к локальному диску.