
Hello! Windows Server has many features that support system administration. For example, through the users it is possible to manage many administrative and productive tasks. On the other hand, creating a user in the active directory is a simple task. However, by creating multiple users, the situation changes. Because more time and effort is invested. Even more so when creating users from a single department who will have the same role configuration. In this case, Windows Server allows the creation of user templates. That is, create a base user with the configuration and then generate a template of this user. So that this configuration will be copied for all others. Consequently, time is saved by creating the settings for each user, one by one. So let’s see how, to create user template in Windows Server 2019/2016.
Creating user template from the Server Manager. Generating a new user.
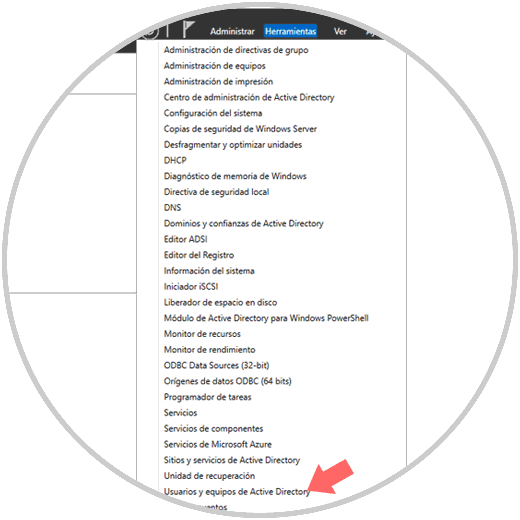
The first thing you have to do is go to the Server Manager. Once there, open the Tools menu and click on Active Directory Users and Computers.

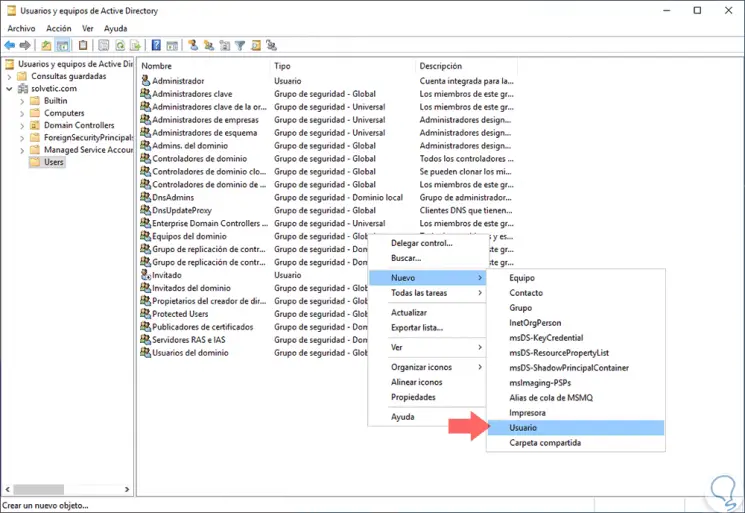
An administration console will be immediately deployed. Please click on Users. Then right-click on an empty space and follow the path below: New>User

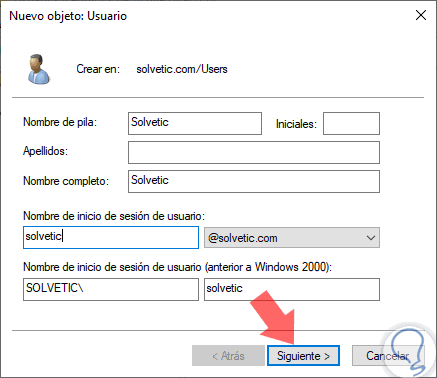
Then enter the data of the new user.

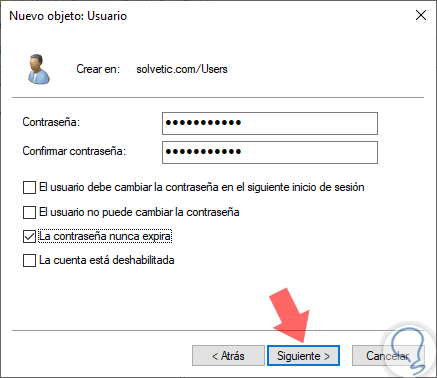
On the next screen, please enter the user’s password. It is also possible to configure some general aspects about it. Press Next to continue

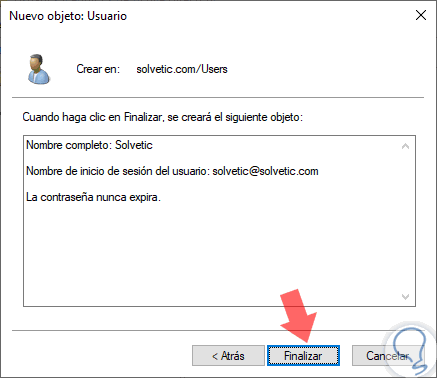
Next we will see a summary of the account to be created. Click on Finish to complete the process.

Setting up some aspects of the new user.
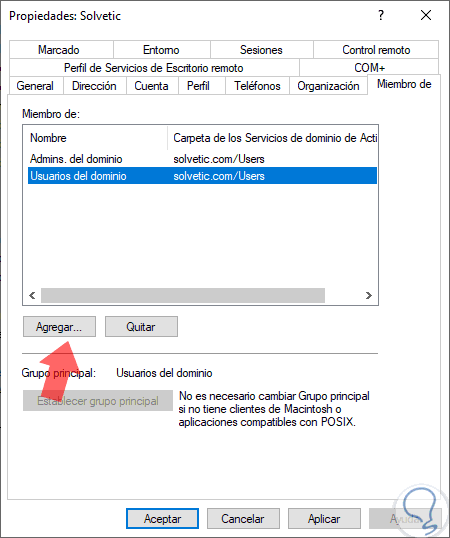
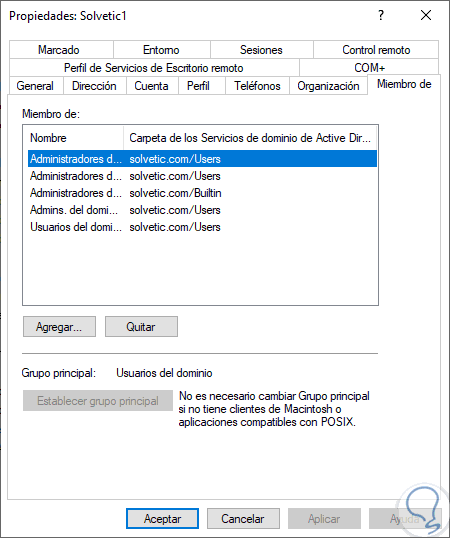
With the previous steps, we have created the basic elements of a new user. However, it is possible to configure some more aspects. With this intention, please double-click on the new user. In this opportunity we will see the groups where the new user is. To edit this configuration, please click on the Member of tab. Then click on Add to enter a new group.

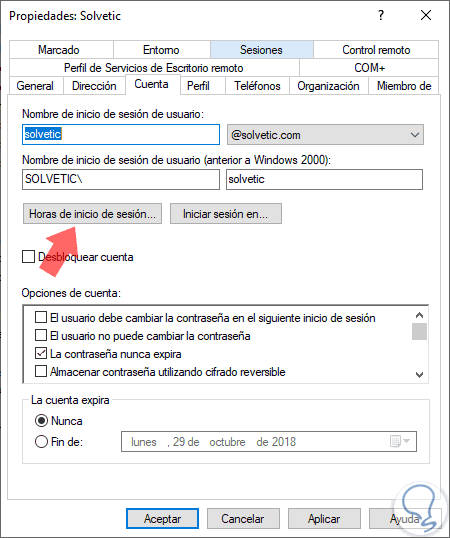
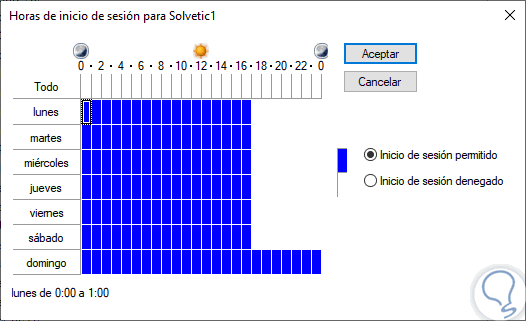
Another aspect that you can edit is the time range allowed for user input. With this intention, click on the Account tab and then on Logon Hours

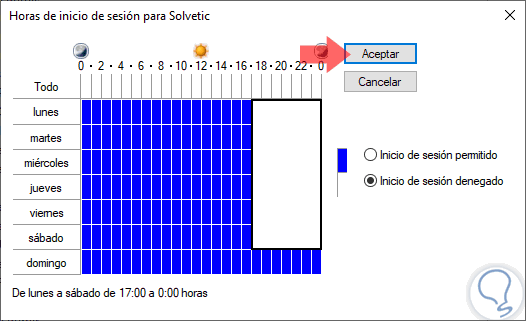
Once there, please edit the time allowed for the Logon. Press OK to continue

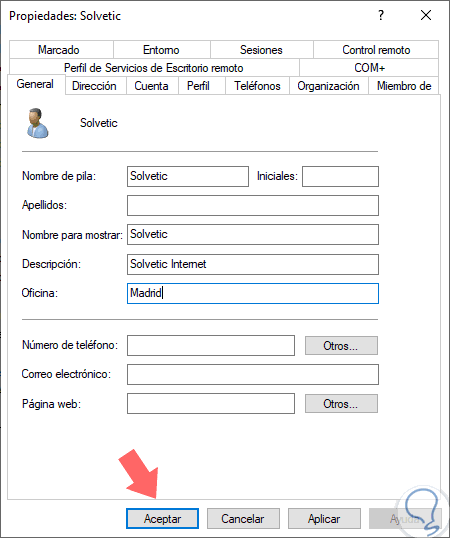
Similarly, we can add any other data relevant to the user.

Creating the new user template in Windows Server
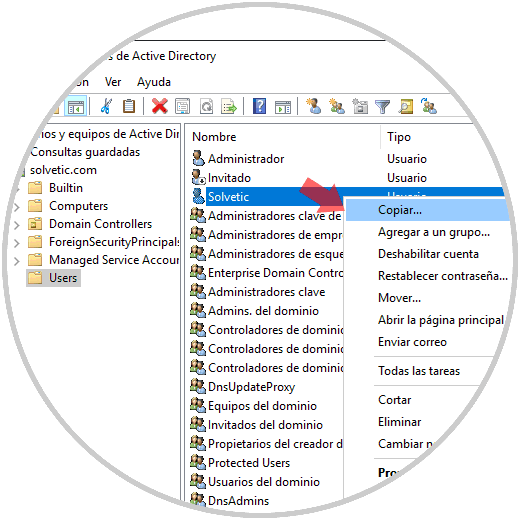
Once the new user is created, it is time to generate the template. With this in mind, right-click on the user and then click on Copy.

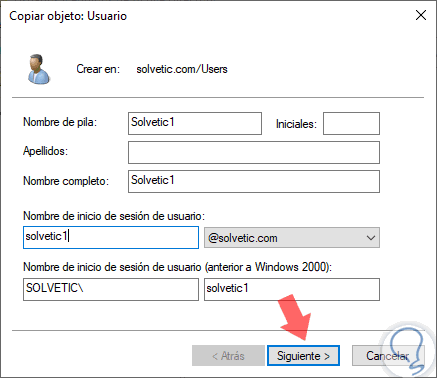
In the next window, please enter the data of the new user.

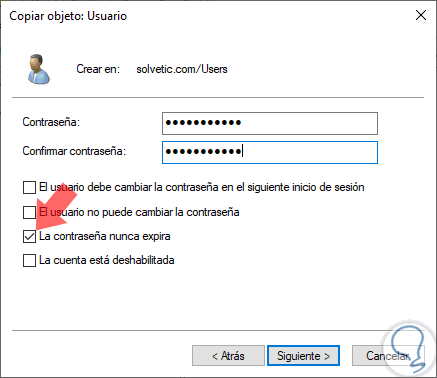
Once again, enter the password for the user.

Finally you will see a message confirming that the data was copied from one user to another.

You can check the above, verifying some configuration of the new user. For example, the Logon times.

Conclusion
At the end of the day, we saw how to create user template in Windows Server 2019/2016. This facilitates the process of creating multiple users. In addition, the time saved can be spent on other important tasks for the company. Very good! That’s all for now. Before I say goodbye, I invite you to see our post about backing up and restoring GPO on Windows Server. Bye!
— Advertisement —
Everything Linux, A.I, IT News, DataOps, Open Source and more delivered right to you.
Subscribe
«The best Linux newsletter on the web»
by: ,
published: Dec 7, 2011,
updated: Dec 9, 2011, in
This article is part of Helge’s Profile Toolkit, a set of posts explaining the knowledge and tools required to tame Windows user profiles.
Administrators frequently have the requirement to adapt newly created user profiles to corporate standards. This is typically done by modifying the default profile, the profile Windows uses as a template when creating new user profiles during logon.
Popular but Unsupported
For more than a decade a popular and officially santioned method of customizing the default profile went like this: log on with a typical user account. Customize that user’s profile. Log off and use either Microsoft’s CopyProfile tool or the User Profile control panel applet to copy the customized profile over the default profile.
Well, that method is no more. As the Deployment Guys describe in a very readable article, Microsoft eventually found out that, because the profile is not cleaned up in the copying process, certain undesired parts of the template user’s personality make it into every user’s profile. As a consequence they:
- declared this method as unsupported,
- removed the CopyProfile tool and
- disabled the button “Copy to…” for all but the default profile in Windows 7.

Would it not have been more logical to fix the copying process so that unwanted information is removed?
Microsoft did build a fixed copying process – though not into Windows, but into Sysprep instead. The problem with that is that there is no documentation available as to what exactly is removed when the template profile is copied to become the default profile. This introduces an element of chance not desired in enterprise environments.
Doing it Right
There is only one alternative to using Sysprep to copy a modified profile over the default profile: modify the default profile directly. This involves identifying where a specific setting is stored, loading the default profile’s registry hive and setting the desired value. The advantage of this approach is that you have full control over the process, which is typically scripted. The downside is that it is more complex. Just logging on and clicking around until the desktop looks good is much easier than hunting down specific settings with Process Monitor.
About the Author
Helge Klein (ex CTP, MVP, and vExpert) worked as a consultant and developer before founding vast limits, the uberAgent company, which was acquired by the Citrix business unit of Cloud Software Group in late 2023.
Previously, Helge applied his extensive knowledge in IT infrastructure projects and architected a user profile management product, the successor of which is now available as Citrix Profile Management. Helge is the author of the popular tools Delprof2 and SetACL. He has presented at Citrix Synergy, BriForum, E2EVC, Splunk .conf, and many other events.
Read more
How to Create a Working Default Template Profile in Windows 7
How to Create a Working Default Template Profile in Windows 7
- Create a new standard local user account (name it ADMIN), add this account to the local Administrators group on the PC. Create a second account, call it MAINT.
- Reboot, then log onto the PC using the local user account from Step 1 (ADMIN).
- Set up profile settings as desired; desktop icons, IE home page, set up anything you want to be the default settings, etc…
- Reboot. When finished, log back onto PC with the MAINT account.
- Double-click “Computer”, then Click Organize, Folder and Search Options. On the View tab, make sure “Show Hidden files, folders and drives” is selected; also uncheck “Hide protected Operating System Files”. Click OK.
- Under C:\Users, rename the hidden “Default” user folder “Default2“. This is a backup of the current default folder, in case something goes wrong.
- Make a copy of the profile (ADMIN) customized in Step 2, rename the folder “Default”.
- Right-click the folder – under Properties, then Security tab – Add “Everyone” permissions with Full Control (include all folders and subfolders).
- Run regedit.exe.
- Click on HKEY-LOCAL-MACHINE. Under File, select “Load Hive”.
- Browse to the “C:\Users\Default” folder, click on ntuser.dat (make sure hidden and system files are displayed). Name the key TEMPLATE_ACCOUNT.
- Right-click on the TEMPLATE_ACCOUNT key, select Export, save the .reg file to the desktop. Open the .reg file with Notepad, and under “Edit – Replace…”, put the user name ADMIN in the “Find what:” field, to be replaced with the string %USERNAME% – choose “Replace All” then save the .reg file. Double-click it to re-import the changes.
- Re-open regedit.exe (or switch over to it if it’s still open).
- Under TEMPLATE_ACCOUNT – Control Panel – Desktop, change “Wallpaper” path to the wallpaper of your choice “C:\XXX\XXX\XXX.jpg (a local OR network path will work here). Check other settings and modify any other keys.
- When done, click on TEMPLATE_ACCOUNT. Then click File, select “Unload Hive”. This will save the changes you made.
- The last step (which is often ignored) is to remove any reference to the previous ADMIN account in the registry. This can be done by going to Start > Run > regedit. Go to HKEY_LOCAL_MACHINE\SOFTWARE\Microsoft\Windows NT\CurrentVersion\ProfileList. In this area of the registry, you will see references to multiple profiles on the system. Find any keys that correspond to the account you set up the template with (ADMIN account), and delete it.
- Log out. Log back in as another account. You will know that it worked when you see your custom settings and when you don’t see a notification that says “a temporary profile has been set up….bla bla bla”.
Share This Story, Choose Your Platform!
Related Posts
Page load link
Go to Top
User Profile Disks (UPD, диски профилей пользователей) позволяет хранить профиль каждого пользователей Remote Desktop Services (
%USERPROFILE%
) в отдельном виртуальном VHDX диске. Такой профиль подключается при входе пользователя в Windows и отключается при выходе (с сохранением изменений в профиле). User Profile Disks можно хранить на внешнем файловом ресурсе, благодаря чему пользователь может получить доступ к своему окружению (профили) при входе на любой сервер фермы RDS. UPD диски представляют собой альтернативу использованию технологий перемещаемых профилей (roaming profile) и перенаправления папок (folder redirection) в терминальных сценариях RDS.
В этой статье мы рассмотрим особенности настроить и использовать профили User Profile Disks на серверах с ролью Remote Desktop Services на Windows Server 2022/2019/2016/2012R2.
Содержание:
- Настройка User Profile Disks в Windows Server RDS
- VHDX файлы с UPD профилями пользователей RDS
- Как расширить/сжать диск User Profile Disk с помощью PowerShell?
- Временный профиль при использовании User Profile Disk в RDS
Настройка User Profile Disks в Windows Server RDS
Создайте общую сетевую папку для хранения файлов профилей UPD. Эту папку нужно разместить на любом файловом сервере за пределами фермы RDS ( рекомендуем расположить сетевую папку на кластере для обеспечения высокой доступности UPD профилей). В нашем примере, путь к такому каталогу будет выглядеть так:
\\srv01\RDSProfiles
.
Создайте в AD группу безопасности, в которую нужно включить все хосты в вашей RDS коллекции. МОжете создать группу с помощью графической консоли ADUC или с помощью PowerShell командлетов из модуля Active Directory for Windows PowerShell:
New-ADGroup mskRDSHCollection1 -path "OU=Groups,OU=MSK,OU=RU,DC=winitpro,DC=loc" -GroupScope Domain -PassThru –Verbose
Add-AdGroupMember -Identity mskRDSHCollection1 -Members msk-rds1$, msk-rds2$, msk-rds3$
Теперь предоставьте права Full Control на папку \\srv01\RDSProfiles для группы mskRDSHCollection1.
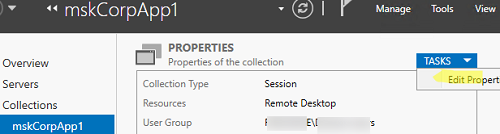
Вы можете включить User Profile Disks в настройках коллекций Remote Desktop при ее создании. Если коллекция уже создана, найдите ее в консоли Server Manager и в верхнем левом углу выберите Tasks-> Edit Properties.
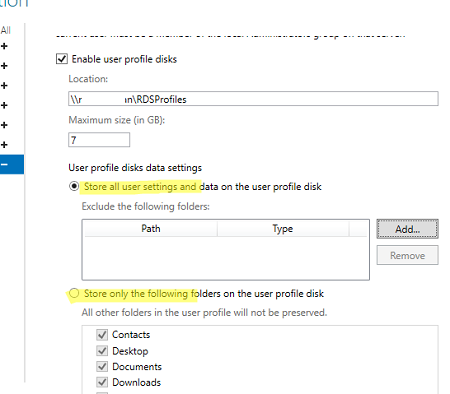
Затем в разделе User Profile Disks включите опцию Enable user profile disks, укажите к созданной ранее сетевой папке (
\\srv01\RDSProfiles
) и задайте максимальный размер диска с профилем (пусть это будет 7 Гб). Сохраните изменения.
Допустимо использовать пространство имен DFS для хранения UPD профилей DFS сервера. На DFS хостах нужно использовать Windows Server 2012 R2 или более новые версии. При использовании предыдущих версий Windows Server вы получите ошибку:
Unable to enable user disks on rVHDShare. Could not create template VHD. Error Message: The network location "\\winitpro.ru\namespace\UPD1" is not available.
Вы можете проверить, что UPD включен для коллекции RDS и получить путь к каталогу, в котором хранятся профиля с помощью команды:
Get-RDSessionCollectionConfiguration -CollectionName mskCorpApp1 –UserProfileDisk

Совет. Для каждой RDS коллекции создается только один vhdx файл с UPD профилем пользователя. Если пользователь подключается к хостам из двух разных RDS коллекций, для каждой из них будет создан отдельный vhdx файл.
По умолчанию UPD диск хранит все содержимое профиля пользователя. Вы можете исключить определенные папки из списка синхронизируемых каталогов. Если каталог исключен из профиля, изменения в нем не будут сохраняться в VHDX диске в сетевом каталоге. Доступные две опции:
- Store all user settings and data on the user profile disk
- Store only the following folders in the user profile disk
При использовании RDS с UPD на Windows Server 2019/2016 со временем вы можете столкнуться со снижением производительности серверов, появления черного экрана при входе в RDP. Подробно проблема описана здесь. Рекомендуем сразу включить на всех RDS хостах параметр реестра DeleteUserAppContainersOnLogoff:
New-ItemProperty -Path “HKLM:\SYSTEM\CurrentControlSet\Services\SharedAccess\Parameters\FirewallPolicy” -Type DWord -Path -Name DeleteUserAppContainersOnLogoff -Value 1
VHDX файлы с UPD профилями пользователей RDS
После того, как вы изменили настройки коллекции и включили UPD, в целевом каталоге будет создан файл UVHD-template.vhdx.
Этот файл представляет собой шаблон виртуального диска с профилем пользователя. Когда новый пользователей подключается к серверу RDS по RDP, этот шаблон копируется и переименовывается в vhdx файл, содержащий в имени SID пользователя. Для каждого пользователя создается отдельный VHDX файл.
Совет. Информацию о событиях входа пользователей можно отслеживать в журнале Event Viewer -> Application (источник User Profile Service) и Applications and Services Logs -> -Microsoft -> Windows -> User Profile Service -> Operational.

Чтобы понять, какому пользователю принадлежит VHDX файл, нужно сопоставить имя UPD файла с именем пользователя. Можно вручную преобразовать SID в имя учетной записи с помощью командлета Get-ADUser:
Get-ADUser -Identity S-1-5-21-305647651-3952524288-2944781117-23711116
Или воспользуйтесь скриптом ShowUPDFolderDetails.ps1, который выводит имена UPD файлов и их владельцев:
$UPDShare = "\\srv01\RDSProfiles"
$UserProfiles = @()
$fc = new-object -com scripting.filesystemobject
$folder = $fc.getfolder($UPDShare)
"Username,SiD" >> export.csv
foreach ($i in $folder.files)
{
$sid = $i.Name
$sid = $sid.Substring(5,$sid.Length-10)
if ($sid -ne "template")
{
$securityidentifier = new-object security.principal.securityidentifier $sid
$user = ( $securityidentifier.translate( [security.principal.ntaccount] ) )
$UserProfile = New-Object PSObject -Property @{
UserName = $user
UPDFile=$i.Name
}
 $UserProfiles += $UserProfile
}
}
$UserProfiles| select UserName, UPDFile

Т.к. UPD профиль представляет собой обычный файл виртуального диска в формате VHDX, вы можете смонтировать его и просмотреть содержимое. Щелкните правой кнопкой по файлу и выберите Mount.
Как вы видите, содержимое VHDX диска представляет набор каталогов и файлов обычного профиля пользователя.
UPD профиль может монтируется в монопольном режиме. Это значит, что, если профиль пользователя сейчас подключен в RDS сессии пользователя или смонтирован вручную, вы не сможете открыть его с ошибкой: The file couldn’t be mounted because it’s in use.
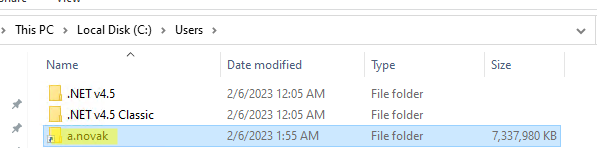
На сервере RD Session Host профиль пользователя в файле VHDX монтируется в каталог C:\users\<username> и выглядит таким образом:
Обратите внимание, что UPD диск привязан к версии Windows Server на RDS хосте. Вы не сможете перенести UPD профиль пользователя с RDS сервера с одной версии Windows Server на другую.
Запись данных в файл vhdx ведется в реальном времени. Т.е. при копировании данных в профиль пользователя на сервере RDS, размер vhdx файла на общем хранилище увеличивается сразу.
Если в Windows уже есть каталог с профилем пользователя, каталог со старым профилем переименовывается в формат <username>-BACKUP-<number>.
VHDX диск монтируется при старте сессии пользователя на VDI или RDS сервере. Каждый UPD профиль монтируется в каталог C:\Users. Список смонтированных VHDX дисков с профилями отображается в консоли Disk Management.
Как расширить/сжать диск User Profile Disk с помощью PowerShell?
Вы можете расширить виртуальный vhdx диск с UPD профилем конкретного пользователя с помощью PowerShell командлета Resize-VirtualDisk из модуля Hyper-V (на компьютере должны быть установлены компоненты управления Hyper-V: Enable-WindowsOptionalFeature -Online –FeatureName Microsoft-Hyper-V-Management-Clients )
Net use U: \\srv01\RDSProfiles
Resize-VHD -Path u:\UVHD-<SID>.vhdx -SizeBytes 30GB
Net use U: /delete
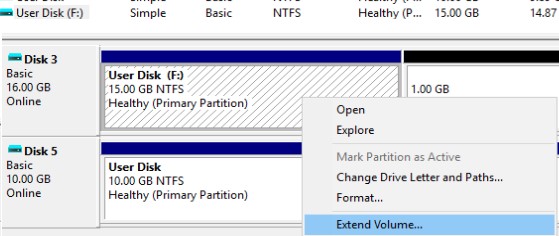
Теперь нужно расширить раздел из графического интерфейса консоли Управления дисками (Disk Manager). Действие –> Подключить виртуальный жесткий диск -> Расширить том.
Либо воспользуйтесь таким PowesShell скриптом:
<#
.Synopsis
This script extend size of VHDX file and resize the disk partition to Max
#>
Param(
[Parameter(Mandatory=$true,ValueFromPipeline=$true)]
[alias("Path")]
[string]$vhdxFile,
[Parameter(Mandatory=$true,ValueFromPipeline=$true)]
[alias("Size")]
[int64]$vhdxNewSize
)
begin{
try {
Mount-VHD -Path $vhdxFile -ErrorAction Stop
}
catch {
Write-Error "File $vhdxFile is busy"
Break
}
$vhdx = Get-VHD -Path $vhdxFile
if ($vhdx.Size -ge $vhdxNewSize){
Write-Warning "File $vhdxFile already have this size!"
$vhdx | Dismount-VHD
Break
}
}
process{
Dismount-VHD -Path $vhdxFile
Resize-VHD -Path $vhdxFile -SizeBytes $vhdxNewSize
$vhdxxpart = Mount-VHD -Path $vhdxFile -NoDriveLetter -Passthru | Get-Disk | Get-Partition
$partsize = $vhdxxpart | Get-PartitionSupportedSize
$vhdxxpart | Resize-Partition -Size $partsize.SizeMax
}
end{
Dismount-VHD -Path $vhdxFile
}
Обратите внимание, что нельзя расширить UPD диск пользователя с активной RDS сессией.
Чтобы уменьшить размер файла UPD (при условии, что вы удалили данные пользователя внутри vhdx файла и размер файлов на диске меньше выделенного ему размера) можно воспользоваться командами:
resize-VHD \\srv01\RDSProfiles\UVHD-<SID>.vhdx –ToMinimumSize
А затем:
Optimize-vhd -path \\srv01\RDSProfiles\UVHD-<SID>.vhdx -mode full
Временный профиль при использовании User Profile Disk в RDS
Одной из частых проблем, с которых вы можете столкнуться при использовании RDS – периодическое появление временных профилей пользователей.
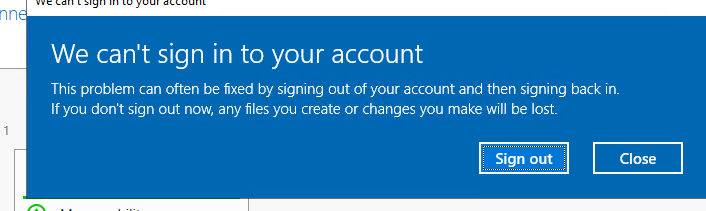
We can’t sign in to your account.
You’ve have been signed in with a temporary profile.
You can’t access your files, and files created in this profile will be deleted when you sign out. To fix this, sigh out and try signing later.
При этом для пользователя создается временный профиль:
Event ID 1511
Source: User Profile Service
Windows cannot find the local profile and is logging you on with a temporary profile. Changes you make to this profile will be lost when you log off.
Чаще всего это связано с тем, что в предыдущей сессии VHDX файл пользователя не был освобожден. Вы можете найти RDSH хост, на котором сейчас подключен VHDX диск пользователя. Вы можете использовать такой PowerShell скрипт (запускается на сервере с ролью RD Connection Broker)
$UserToFind = "a.novak"
$User = $env:USERDOMAIN + '\' + $UserToFind
$RDCollection = Get-RDSessionCollection | where {$_.ResourceType -eq 'Remote Desktop'}
$RDHosts = Get-RDSessionHost -CollectionName $RDCollection.CollectionName | select SessionHost
$Array = Invoke-Command -ComputerName $RDHosts.SessionHost -ScriptBlock { Get-Disk | select Location,DiskNumber | where {$_.Location -notmatch "Integrated"} }
foreach ($VHD in $Array){
$DiskID = (Get-Item $VHD.Location).Name.Substring(5).Split(".")[0]
$objSID = New-Object System.Security.Principal.SecurityIdentifier ($DiskID)
$objUser = $objSID.Translate( [System.Security.Principal.NTAccount])
if ($objUser.Value -eq $User){
$result = "$($objUser.Value) disk number $($VHD.DiskNumber) on $($VHD.PSComputername)"
}else{
$result = "$($User) - no active RSH sessions were found."
}
}
$result

Можно удаленно отмонтировать UPD диск командой:
Invoke-Command -ComputerName $VHD.PSComputername -ScriptBlock { Dismount-VHD -DiskNumber $VHD.DiskNumber }
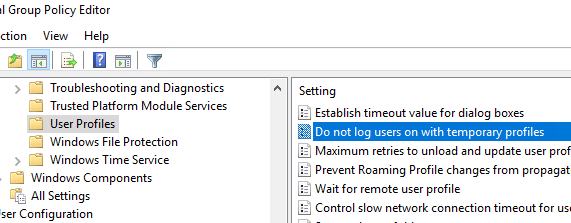
Чтобы уменьшить количество проблем с временными профилями на RDS, рекомендуем настроить таймауты для RDS сессий пользователей (установите отключение через 2-4 часа для неактивных сессий). Также вы можете включить параметр GPO, который запрещает создание временных профилей: Computer Configuration -> Administrative Templates -> System -> User profiles, включите параметр Do not log users on with temporary profiles.
После освобождении VHDX диска администратору нужно вручную удалить временный профиль пользователя:
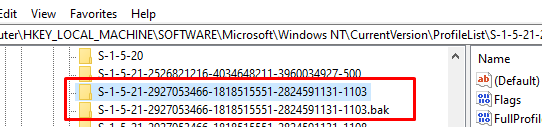
- Удалите ветки с SID пользователя в разделе реестра
HKEY_LOCAL_MACHINE\SOFTWARE\Microsoft\Windows NT\CurrentVersion\ProfileList
. В этом примере есть две ветки, одна из которых с суффиксом .bak);
- Удалите TEMP папку пользователя из каталога
C:\Users
.Подробнее об удалении профилей пользователей в Windows в статье по ссылке.
В этой статье мы рассмотрели, как настроить профили User Profile Disks в RDS на Windows Server. Настройка UPD намного проще чем процесс настройки перемещаемых профилей и перенаправляемых папок. Диски привязаны к коллекции RDS и не могут повредиться при попытке совместного использования профиля несколькими терминальными серверами (в отличии от обычных профилей). Диски профилей пользователей могут храниться на SMB шарах, CSV, SOFS, в SAN или на локальных дисках.
Windows Server 2016 and 2019 provide us with several practical functionalities to maximize the administration of each of the object alternatives that are implemented there. One of these are the users, thanks to which thousands of administrative and productive tasks are executed in the organization..
The creation of a user in the active directory does not require a lot of work, but if it is required to create multiple users it can take time that can be used for other more relevant system tasks; especially if it is about creating several users from a single department, which will have the same configuration at the level of roles and parameters. In this case, the most practical way that Windows Server 2016 and 2019 gives us is to create a base user with all the settings and then create a template for this user, which will be used for everyone else. This saves time as it avoids creating user by user by adding roles and other details.
This is why TechnoWikis will explain how we can create a user template in Windows Server 2019, but the process is the same for Windows Server 2016..
Step 1
To start this process we will go to the «Server Administrator» and there, in the «Tools» menu, select the «Active Directory Users and Computers» option:
Step 2
In the console that will be displayed, we will go to the «Users» section and there we will right click somewhere free to select the «New» / «User» option:
Step 3
We proceed to create the new user as necessary. Click on «Next».
Step 4
Next, we assign the password and define how the account will be managed, this implies defining if the account will be disabled, if the user must change the password, etc. Click on «Next» again.
Step 5
We will see a summary of the account to create. Click on «Finish» to complete the process.
Step 6
Now we will double click on the new user and in the window we will go to the «Member of» tab to add the groups in which the users will be. There we can click on the «Add» button to enter all the required groups.
Step 7
We can go to the «Account» tab where we will see the following. If we wish, click on the «Login time» button to define in what time range the user will have permission to log in to the domain.
Click on «Accept» to apply the changes.
Step 8
Likewise, we can enter all the data that we consider necessary for such user. Once this is defined, click on the «Apply and Accept» button to save the changes.
Step 9
Now we will right click on the user created and edited and select the «Copy» option:
Step 10
The following window will be displayed where we enter the details of the new user. In the next window we enter the password.
Step 11
We can see that the option defined in the previous user is applied, in this case «The password never expires». Click on «Next». Then in «Finish» to complete the creation of the user.
Step 12
Once created we will double click on this user and we can see that all the changes that were applied to the initial user are reflected to this new user:
It’s that simple to create a template for a user and allow their entire profile to be applied to all other users created based on it..