
В Windows 7 и 8.1 можно было ограничить время входа на компьютер для локальных учетных записей с помощью функции родительского контроля (Parental Control). Однако в Windows 10 и 11 аналогичный функционал родительского контроля (Microsoft Family Safety) доступен только для (облачных) учетных записей Microsoft. Однако вы все еще можете с помощью встроенных ограничить время работы (входа) на компьютере для локальных учетных записей Windows.
Например, вы хотите запретить некоторым локальным пользователям входить в Windows в любое время, кроме разрешенного (скорее всего вы оказались тут, чтобы ограничить время нахождения детей за компьютером 😊).
Я хочу разрешить вход в Windows для пользователя в будние дни с 9:00 до 10:00 и 14:00 до 19:00, а в выходные с 12:00 до 14:00. Из графического интерфейса Windows настроить разрешенные часы работы нельзя, но можно воспользоваться командой net user с параметром /time.
Синтаксис команды:
net user <login> /time:<allowed-time>
Для моего сценария, когда нужно разрешить несколько доступных интервалов работы в день команда будет выглядеть так:
net user maksim /times:M-F,9:00-10:00,14:00-19:00;Sa-Su,12:00-14:00

- Разрешенное время должно быть кратно часу. Минуты задать нельзя.
- Расписания для дней разделяются точкой с запятой.
- Команда не должна содержать пробелы.
- Аббревиатуры для дней недели: M,T,W,Th,F,Sa,Su
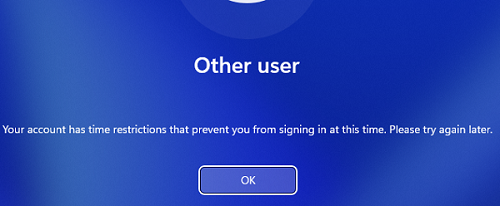
Если пользователь попытается залогиниться на компьютер в запрещенное время, появится сообщение:
Your account has time limit restrictions that prevent you from signing in at this time. Please try again later.
Вы не можете сейчас войти в систему из-за ограничений вашей учетной записи. Попробуйте еще раз позже.
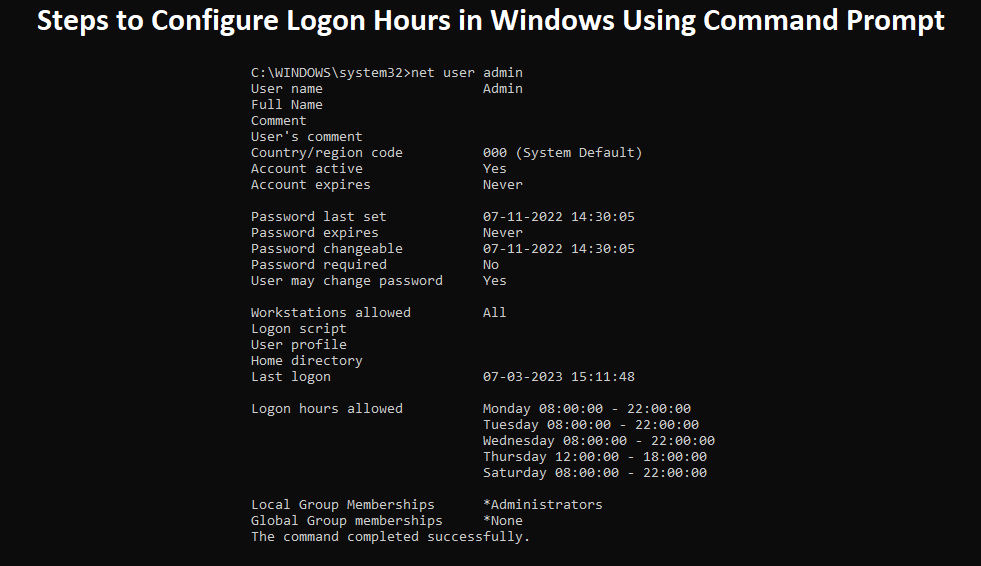
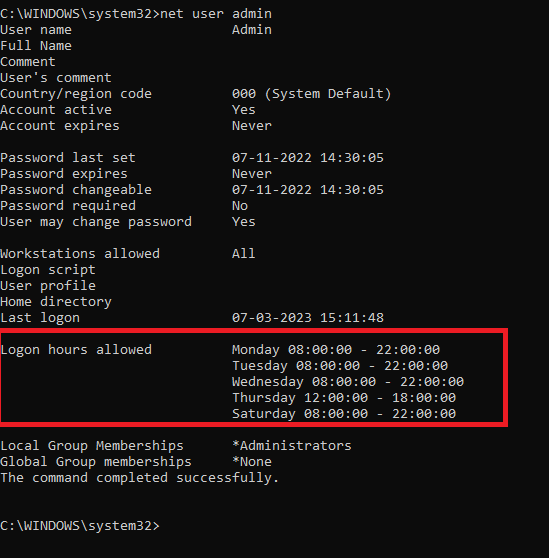
Вывести текущие настройки ограничения работы по времени (Logon hours allowed):
net user maksim
Если нужно отменить ограничения входа пользователя по времени:
net user maksim /time:all
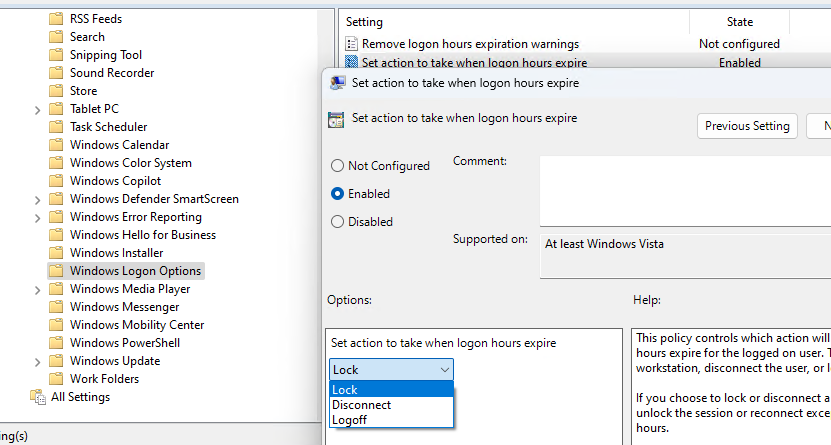
Если разрешенные часы работы на компьютере истекли, нужно отключить или заблокировать его сессию. По умолчанию сеанс не блокируется. Чтобы принудительно отключить сессию пользователя, нужно настроить следующий параметр в редакторе локальной групповой политики (
gpedit.msc
):
- Перейдите в раздел User Configuration -> Administrative Templates -> Windows Components -> Windows Logon Options
- Включите политику Set Action to take when logon hours expire.
- В зависимости от желаемого поведения, выберите в настройках политики действие, которое нужно выполнить при истечении разрешенных рабочих часов. Lock, logoff или Disconnect. Чтобы пользователь не терял несохраненные документы, сессию лучше блокировать.

Можно включить этот параметр через реестр:
reg add HKCU\Software\Microsoft\Windows\CurrentVersion\Policies\System /v LogonHoursAction /t REG_DWORD /d 0x1 /F
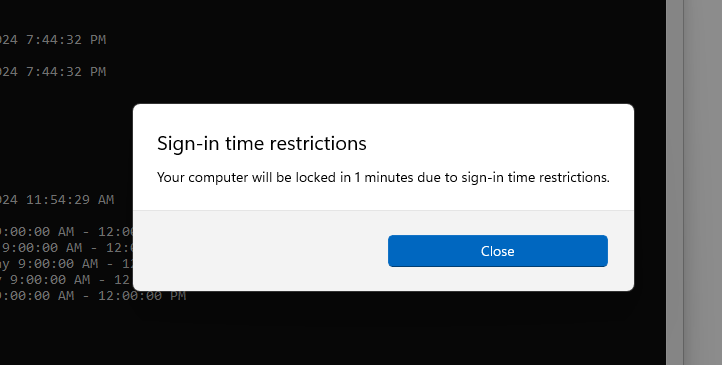
Теперь, когда за минуту до окончания разрешенного времени работы пользователь получит уведомление и его сессия будет заблокирована.
Sign-in time restrictions
Your computer will be locked in 1 minutes due to sign-in time restrictions.
Таким образом, вы сможете настроить простейший родительский контроль и ограничивает время использования компьютера для детей.
In this tutorial, you’ll learn how to find the user’s last logon time using different methods. You can use any of these methods to determine an Active Directory user’s last sign-in date and time.
As a system administrator, there are many situations in which you want to find the user’s last logon date and time. You may probably want to audit any activity or gather all the inactive users in Active Directory over a period of time, etc.
There are numerous third-party software programs available that can help you determine a user’s last logon time. However, many people opt not to use these programs because they typically demand a license. Even if some of them are free, they have certain limitations. These programs must communicate with your Active Directory to retrieve information, and some businesses do not utilize it for security reasons.

What is LastLogonTimeStamp in Active Directory?
The purpose of the LastLogonTimeStamp is to help identify stale user and computer accounts. Administrators can use the lastLogontimeStamp attribute to determine if a user or computer account has recently logged onto the domain.
What is the difference between LastLogon and LastLogonTimeStamp?
The lastlogon attribute is the most accurate way to check active directory users last login time. Lastlogon is only updated on the domain controller that performs the authentication and is not replicated. Whereas LastLogontimestamp is replicated, but by default only if it is 14 days or older than the previous value.
Method 1: Find the user’s logon time in Active Directory
Finding the last logon time of a user is pretty simple using Active Directory.
- Login to a Domain Controller.
- Launch Active Directory Users and Computers console (dsa.msc).
- Click View and ensure Advanced features is turned on.
- On the left pane, click Users and select any user, right click the user account and click Properties.
- In the list of attributes, look for lastLogon. This attribute shows the time the user was last logged in the domain.

Method 2: Find User’s last logon time using CMD
Using the command prompt, you can find the last logon time of the user. You don’t need a domain admin account to get AD user information.
- Click Start and launch the command prompt.
- Run the command: net user username /domain| findstr “Last”
- The CMD output shows the user’s last logon time and date.

Method 3: Find User Last Logon time using PowerShell
You can find the user logon date and time using PowerShell command. You can run the below command either on a domain controller or a member server.
- Log in to a Domain Controller.
- Import the Active Directory PowerShell module, Import-Module ActiveDirectory.
- Run the below PowerShell command to find the user’s login time with date.
Get-ADUser -Identity "username" -Properties LastLogon

When you run the above command, notice that Lastlogon value is in a different format. It’s in a timestamp format and you need to convert the value to a readable format. Use the below command to convert the value to normal time. Do not forget to replace the user name with your username.
Get-ADUser -Filter {Name -eq "username"} -Properties * | Select-Object Name, @{N='LastLogon'; E={[DateTime]::FromFileTime($_.LastLogon)}}

Method 4: Find last Logon Time of User using SCCM
From the SCCM console, you can find the previous logon time of the user account. SCCM uses Active Directory to fetch the information when you run the discovery methods. Discovery creates a discovery data record (DDR) for each discovered object and stores this information in the SCCM database.
There are two prerequisites before you use SCCM to find the logon time of a user:
- You should have enabled the SCCM discovery methods before you intend to determine the user logon details. The Active Directory user discovery method must be enabled.
- On the Active Directory user discovery properties, ensure lastLogon and lastLogonTimestamp attributes are enabled for discovery.
To find the last logon time of a user using SCCM, follow the below steps.
- Launch the Configuration Manager console.
- Navigate to Assets and Compliance\Overview\Users\All Users.
- Search for the user account and right-click the User object.
- On the user properties box, click General tab.
- The LastLogon attribute should reveal the last logon time of a user account.

Method 5: Find user sign-in activity in Microsoft 365 admin center
In the Microsoft 365 admin center, an administrator can view the times a user manually signed in with their username and password in the past 30 days. The user sign-in activity details include the date and time of the login, status and failure reason.
To view the user’s last logon date and time in Microsoft 365 admin center:
- Sign in to the Microsoft 365 admin center.
- Expand Users > Active Users and select a user.
- On the User properties window, under Last sign-in, select View last 30 days.
- The sign-in activity screen shows the user’s last logon date and time for the past 30 days.

Method 6: Find user’s last login details in Intune
If your organization manages Windows devices using Intune, you can find the user’s last login details in the Intune admin center. Sign in to the Intune admin center and go to Users. From the list of users, select a user and now click on Sign-in logs. Here, you can see the date and time of the user’s login, including the user’s location, IP address, and request ID.
To export the user’s sign information, you can click on the Download button. The file can be exported in JSON and CSV formats.

Still Need Help?
If you need further assistance on the above article or want to discuss other technical issues, check out some of these options.
Friend’s Logon hours in Windows allow you to specify the times during which a user account can log on to a computer or server. Configuring the logon hours in Windows or Windows Server for Local users can be useful for several reasons, including security, compliance, resource management, and productivity. (Set Logon Hours for Windows Users Using Command)
From a security standpoint, Limiting the hours in windows prevent unauthorized access to sensitive data or resources. Users can only logged in to their pc or server at a specific time which we have configured in windows or server. As we already discussed by setting the Logon hours we can prevent our PC or Server from unauthorized access. For an example, if any employee or a person leaves their PC or Server unattended, someone else could potentially log on and access confidential information. Similarly, if you have a server that contains sensitive data, you may want to restrict access to authorized users during certain hours to reduce the risk of unauthorized access. By setting logon hours, you can reduce the risk of such incidents.
Steps to Configure Logon Hours in Windows Using “NET USER” Command
You can set logon hours for a Windows or Windows Server local user account using the command prompt by following these steps:
- Open the command prompt as an administrator.
- To view the current logon hours for a user, run the following command:
net user <user name>

- Replace “username” with the actual username of the user account of your Server or PC.
- To set the logon hours for a user, run the following command:
net user <user name> /time:M-Saturday,9am-7pm
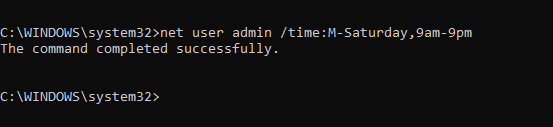
- Again Replace “username” with the actual username of the user account, and “M-Saturday,9am-9pm” with the desired logon hours.
- In this example, “M-Saturday” specifies Monday through Saturday, and “9am-9pm” specifies the hours from 9 AM to 9 PM.
- If you Want to set logon hours for multiple days, separate them with commas. For example:
net user <user name> /times:M,T,W,S,8am-10pm;TH,12pm-6pm
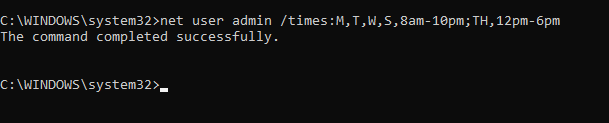
- In this example, the user can log on Monday, Tuesday, Wednesday, and Saturday from 8am to 10pm, and on Thursday from 12pm to 6pm.
- Once you have set the logon hours according to your requirement, you can verify them by running the first command again:
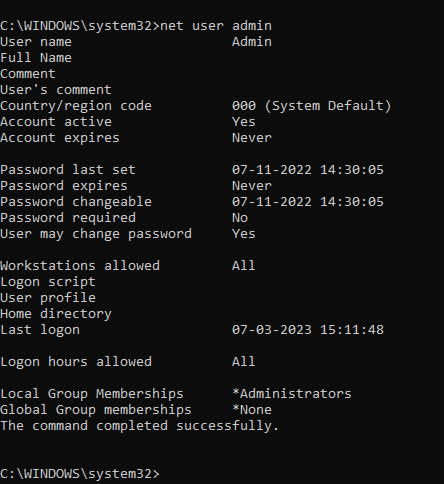
- To allow the user to login at any time OR remove the logon hours restriction for any user, run the following command:
net user <user name> /time:all
- Once you have remove the logon hours restrictions, you can verify them by running the first command again:
So Friend’s By Following Above mentioned Steps you can easily Configure Logon hours for any Windows Pc User or any Windows Server Local User.
Tags: command to configure login hours for windows user, command to set logon hours for windows local user, command to set logon hours in windows, configure logon hours for local users in windows, configure logon hours for local users in windows server, how to configure logon hours for windows server users, how to set login hours in windows, how to set logon hours windows server users, login hours configure in windows, net user command to configure logon hours in windows server, net user command to set login hour for users, net user command to set login hours, net user command to set logon hours in windows, Set Logon Hours for Windows Local Users Using Command Line, Set Logon Hours for Windows Users Using Command, users logon hours configure
Download Windows Speedup Tool to fix errors and make PC run faster
In this post we will see how you can restrict or set a Time Limit for any User Account in Windows 11/10, using the Net User command. Net User is a command-line tool that helps system administrators add or modify user account behavior. We have already taken a look at some Net User commands for administrators, now let us see how to set time limits for Local Accounts.

While you can always use Parental Control or Microsoft Family Safety to do this and more. But in Windows 11/10, this built-in feature is tied to your Microsoft Account.
If you use a Local Account to sign in to your Windows 10 PC, then this command can be of great help to you.
Set login time restrictions for any user account in Windows
To begin, run the command prompt as administrator. Now copy-paste the following command and hit Enter, replacing username with the name of the user account:
net user username /times:M-F,10:00-22:00;Sa-Su,09:00-23:00
This means that the selected user will have access to his/her account from Monday to Friday, from the times 10 am to 10 pm, and on Saturday and Sunday from 9 am to 11 pm.
When you set a time limit for a particular user, then that user will be able to log in and access the PC only between those times. The usage syntax is as follows:
net user <username> /times:{day[-day][,day[-day]] ,time[-time][,time[-time]] [;] | all}
Specifies the times that users are allowed to use the computer. Time is limited to 1-hour increments. For the day values, you can spell out or use abbreviations (that is, M,T,W,Th,F,Sa,Su). You can use 12-hour or 24-hour notation for hours. If you use 12-hour notation, use AM and PM, or A.M. and P.M. The value all means a user can always log on. A null value (blank) means a user can never log on. Separate day and time with commas, and units of day and time with semicolons (for example, M,4AM-5PM;T,1PM-3PM). Do not use spaces when designating times.
In this way, you will be able to restrict a User’s logon hours on Windows PC.
You can use any of these syntaxes – 08:00 or 8am. For example:
net user username /time:M-F,08:00-17:00
net user username /time:M-F,8am-5pm
To restore default and allow the user access at all times, use:
net user username /time:all
Trust this works for you!
Now read: How to restrict the number of Login attempts in Windows?
Anand Khanse is the Admin of TheWindowsClub.com, a 10-year Microsoft MVP (2006-16) & a Windows Insider MVP (2016-2022). Please read the entire post & the comments first, create a System Restore Point before making any changes to your system & be careful about any 3rd-party offers while installing freeware.
,
If you want to view the user login history in Windows 10/11, then this article contains step by step instructions on how to do that.
When a user logs on to a computer, Windows records the time and date of the logon in the Event Viewer. This allows system administrators to find out the last login time or view the full login history of users to gather information about their activity.
This tutorial is divided into two parts. The first part contains instructions on how to view a user’s last login time, and the second part shows how to view the entire user’s login history in Windows 10/11.
- Related article: How to View Last Login Time of a User in Active Directory.
Part 1. View Last Login Time in Windows 10/11.
- View Last Login Date/Time from Command Prompt.
- View Last Logon Time from PowerShell.
Part 2. View Users Login History in Windows 10/11.
- View Login-Logout History in Event Viewer.
- View Login/Logoff History with WinLogOnView.
Part 1. How to View Last Login Time and Date in Windows 11/10.
Method 1. Find Last Login Time using NET USER Command.
The easiest way to find a user’s last logon date and time in Windows 10/11, is by simply executing «NET USER <USERNAME>» command in Command Prompt or in PowerShell. To do that:
1. Open Command Prompt or PowerShell and give the following command to view all the accounts on the machine.
- net user
2. Notice the username of the account that you want to view it’s last logon time, and give the following command to find user’s last logon date and time:*
- net user Username
* Note: Replace the «Username» with the username of the user you want to view the last login time. (e.g. «John» in this example.)

Method 2. Find Last Login Time of All Accounts in PowerShell.
If you want to view the last login date and time of all users in Windows 10/11, then open PowerShell and give the following command:*
- Get-LocalUser | Select Name, Lastlogon
* Note: The above command will show you the last login time of all accounts on your Windows 10/11 computer. If the last logon time for a user is blank, it means that the user has never logged on to the computer.

Part 2. How to View User Login History in Windows 10/11.
Method 3. View User Login-Logout History in Event Viewer.
The Windows Event Viewer allows system users to view all events logged by the system, such as errors or additional information about what has happened, for troubleshooting purposes.
To check the login history in Event Viewer, go to Security logs and view the events with Event ID 4624 or 4648 to view the Logon times, or look at 4647 events to view the Logout times. To do that:
1. Type event viewer on the search box and then open the Event Viewer app.

2. Expand the Windows Logs and select Security.
3a. In Security logs, open one-by-one all the events with Event ID 4624 (or 4648), and find which one has as Logon Type = 2 & at Account Name shows the username of a user (and not SYSTEM, NETWORK SERVICE, etc.).*
3a. Finally, view the Logged time, to see the login time and date of the user.

4. To view the Logoff times of a user, see the events with Event ID 4647.*

* Note: To make you life easier, Create a custom view and type 4624 or 4648 for Logon, or 4647 for Logoff, or see the next method.

Method 4. View Logon & Logoff Times with WinLogOnView.
In my opinion, the easiest way to see all users’ login and logout history, is by using the third-party utility WinLogOnView by NirSoft. To do that:
1. Download WinLogOnView and extract the ZIP file to a folder.
2. Explore the extracted folder and run the WinLogOnView application.
3. On your screen you will see the login and logout time of each computer user, the total duration of their connection and the IP address from which they connected (127.0.0.1 = locally).

That’s it! Which method worked for you?
Let me know if this guide has helped you by leaving your comment about your experience. Please like and share this guide to help others.
If this article was useful for you, please consider supporting us by making a donation. Even $1 can a make a huge difference for us in our effort to continue to help others while keeping this site free:
- Author
- Recent Posts
Konstantinos is the founder and administrator of Wintips.org. Since 1995 he works and provides IT support as a computer and network expert to individuals and large companies. He is specialized in solving problems related to Windows or other Microsoft products (Windows Server, Office, Microsoft 365, etc.).