
Windows Server Core 2012, как и любой другой продукт Microsoft необходимо поддерживать в актуальном состоянии, вовремя устанавливая обновления безопасности, выпускаемые компанией Microsoft (список последних обновлений и патчей на продукты Microsoft доступен в разделе Обзор обновлений безопасности Microsoft).
Установка обновлений безопасности на Windows Server Core 2012 несколько отличается от оной для графического варианта установки Windows Server 2012 (Full GUI). Естественно основное отличие в том, что в Core режиме отсутствует графические элементы управления, позволяющие настроить и запустить установку обновлений (всплывающий балон в трее, и соответствующий элемент в консоли Server Manager). Конечно, из Core режима можно переключится в графический, установить обновления и удалить GUI (подробно процедура переключений между режимами описана в статье Переключение между графическим и Core режимами в Windows Server 2012), однако это не очень удобно и требует дополнительных затрат времени администратора.

Разберем стандартные способы установки обновлений на Windows Server 2012:
- Автоматическое обновление с сервера Microsoft Windows Update или WSUS (Как настроить сервер обновлений WSUS на Windows Server 2012)– сервер автоматически скачивает и устанавливает обновления с заданного сервера WSUS или центра обновлений Microsoft . Этот вариант в большинстве случаев не приемлем, т.к. установка обновлений на серверах обычно выполняется в заранее запланированное окно обслуживания.
- Ручной запуск установки обновлений, полученных с сервера обновлений (Windows Update или WSUS). В такой конфигурации сервер автоматически скачивает обновления с сервера обновлений, но запуск установки патчей осуществляется вручную администратором (предпочтительный вариант).
- Ручная установка обновлений. Администратор самостоятельно скачивает обновления и вручную устанавливает их на сервере.
Управление автоматическим обновлением в Sever Core 2012
Текущие настройки службы обновлений можно получить с помощью команды:
Cscript scregedit.wsf /AU /v
Включить автоматическую установке обновлений можно с помощью команд:
Net stop wsuaserv cscript scregedit.wst /AU 4

net start wsuaserv
Отключить автоматическое обновление можно так:
Net stop wsuaserv

cscript scregedit.wsf /AU 1

net start wsuaserv
Запустить принудительный поиск доступных обновлений можно с помощью команды:
wuauclt /detectnow
Если сервер должен установить обновления автоматически, но не перезагружаться, можно отключить автоматическую перезагрузку Windows после установки обновлений.
Ручная установка обновлений, полученных с WSUS
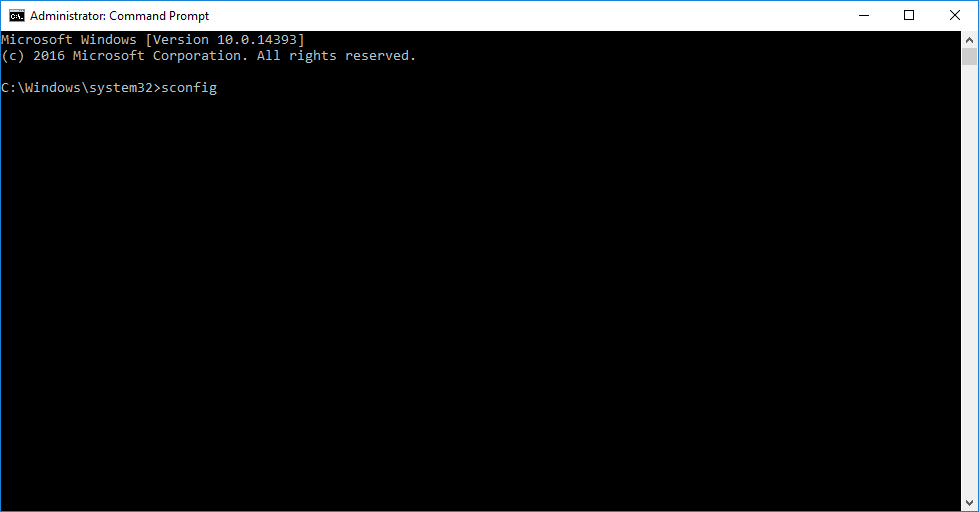
Эта методика установки обновлений на Windows Core 2012 является оптимальной в большинстве случаев: с помощью групповой политики или путем ручной модификации реестра указывается WSUS сервер и задается режим ручного запуска установки обновлений, затем в профилактическое окно администратор сервера вручную стартует установку обновлений. Возникает вопрос: как же запустить установку обновлений, полученных со WSUS сервера, на Windows Core 2012? В этом нам поможет утилита sconfig, входящая в стандартную поставку Windows Core.
Запустите утилиту
sconfig

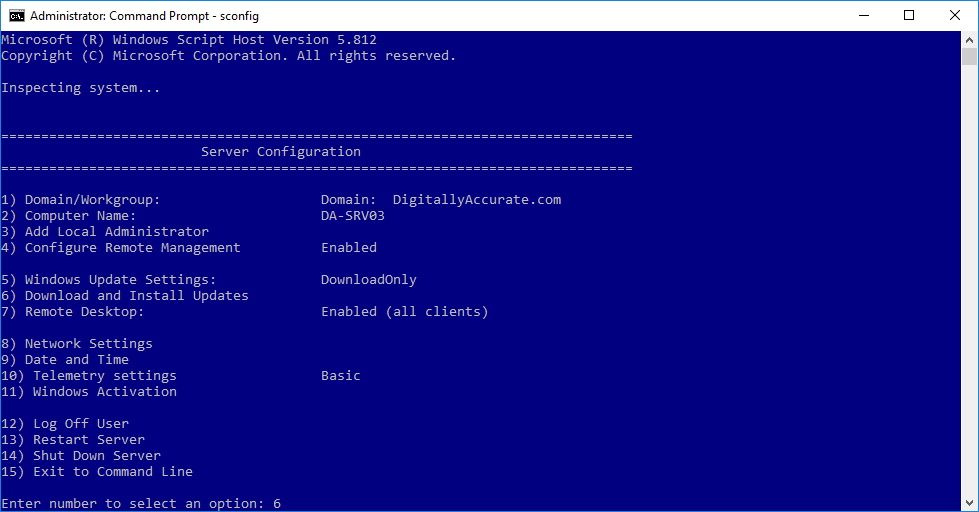
Выберите 6 пункт: Download and Install Updates

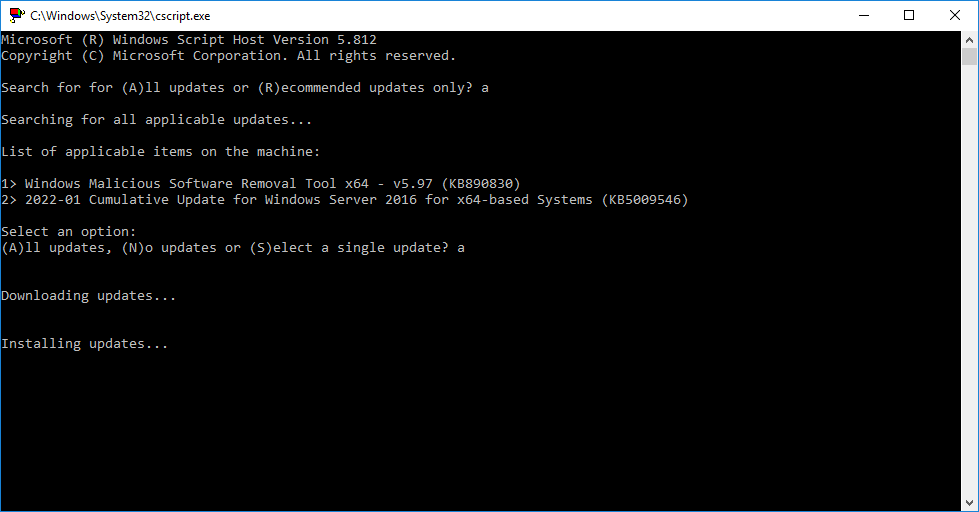
На вопрос необходимо ли искать все или рекомендованные обновления, выберем все (A).

Система обнаружит и отобразит список обнаруженных обновлений и предложит их установить (все сразу, по одному) или совсем отказаться от их установки.

Если выбрана установка обновлений, систем приступит к закачке и установке обновлений Windows Server Core 2012.

После установки обновлений, система может потребовать перезагрузки.

Ручная установка обновлений
Обновлений на Server Core можно установить и вручную, хотя это и достаточно трудоемкий и в большой степени ручной процесс. Необходимо сначала вручную скачать нужные обновлений с сайта Microsoft Update, распаковать их, скопировать на сервер и вручную последовательно их установить.
Вручную обновление можно установить командой:
Wusa <kbupdate>.msu /quiet
В случае необходимости удалить установленное обновление можно так:
Wusa /uninstall <kbupdate>.msu /quiet
Если необходимо узнать, какие обновлений уже установлены, можно вывести их список по методике, описанной в статье Как в Windows вывести список всех установленных обновлений.
In this guide, I will show you how to patch server core installation with the latest Windows Updates. Through Windows Update, you can install the latest patches on the server core automatically or manually install the latest updates.
When you install the Server Core, it is recommended to install the latest patches to keep it secure and updated. Unlike Windows Server (installed with Desktop Experience), the Server Core doesn’t have a GUI to check for updates.
When you have multiple server core installations in your setup, patching all them of the servers becomes a critical task. By patching a server core installation, you get the performance improvements and the known issues or bugs are fixed.

Methods to Patch Server Core Installations
There are three methods that you can use to patch a server running Windows Server Core:
- Using Windows Updates automatically: By using Windows Update, either automatically or with command-line tools, you can patch server core installations.
- Windows Server Update Services (WSUS): Using Windows Server Update Services (WSUS), you can service servers running a Server Core installation.
- Manually install updates on Server Core: Organizations that do not use Windows update or WSUS, you can apply updates manually and keep the server core updated.
Patch Server Core with latest Windows Updates
We’ll now go through the steps to automatically install the latest updates on the server core using Windows Update. The first step involves configuring the update setting on the server core. When a server core is first installed, the update setting is set to Download only. However, the SConfig screen allows you to modify this configuration.

You will be presented with three update options:
- Automatic
- Download Only
- Manual Updates
To enable automatic updates on the server core, type “A” and press the Enter key.

On the SConfig screen, notice that the update setting is now changed to Automatic. We have now enabled automatic updates on the Windows Server core. In the next step, we will check for the latest updates from Microsoft and install them. Select the option 6 to install the updates.

There are three options presented when you choose to install updates on server core:
- All quality updates
- Recommended quality updates only
- Feature Updates
Type the option “1” and press the enter key. The Server Core now checks for the quality updates. From the screenshot below, we see there are 4 Windows updates applicable for the server core.
You can install all the updates, select and install single update or choose not to install any update.

To install all the latest updates on Server Core, select the option “A” and press the enter key. The updates are now downloaded and installed on the server core. Remember that downloading and installing the updates will take time. Make sure the server has connectivity to the internet.

After sometime, the updates are installed on the server core, and we see a server restart is required to complete the installation of updates. Type “Y” and press the enter key to confirm the server restart.

Check Installed Updates on Server Core
There are multiple ways to check the installed updates on server core. You can use any of the commands listed below to get Windows updates installed on server core.
- get-wmiobject -class win32_quickfixengineering
- get-hotfix
- run wmic qfe list from the command line
- View updates by running a command systeminfo.exe

Manually Patch Server Core Installation
To manually install updates on the server core installation, you have to download the update and make it available to the server core installation. At a command prompt, run the following command:
Wusa update.msu /quiet
Depending on the updates that are installed, you may need to restart the computer, although the system will not notify you of this. To uninstall an update manually, run the following command on server core:
Wusa /uninstall update.msu /quiet
Additional Resources
- Patch a Server Core Installation
- Deploy Software Updates Using SCCM ConfigMgr
- Step-by-Step Guide to Import Updates into SCCM | ConfigMgr
- How to Run WSUS Server Cleanup Wizard to Clean Updates
Still Need Help?
If you need further assistance on the above article or want to discuss other technical issues, check out some of these options.
Windows Server Update Services (WSUS) can use a lot of resources, so why not use Windows Server Core and make the most of the resources you have. In this post I’ll go through the initial steps on how to deploy and configure a WSUS server using command line and PowerShell. This guide is also suitable for regular GUI Windows Server installations.
Installing Windows Server Core
Boot the server from the Windows Server media and on the “Select the Operating System you want to install” screen, select the option “Windows Server Standard” or “Datacenter” edition. The other options with “Desktop Experience” in brackets are the options for the other server editions with a GUI also installed.
Please note: You can no longer add and remove the GUI (Desktop Experience) with Windows Server 2016 as you could with Windows Server 2012 & 2012 R2. This is due to numerous problems with keeping the installation and removal process consistent with updates. With Windows Server 2016, the only way to add or remove the GUI is to re-install and select one of the server editions with the “Desktop Experience” option.
Initial Configuration
Once the install process has completed, you will be prompted with a command line window, and asked to set the Administrator password.
- Set the Administrator password.
- Type
sconfigto get the Server Configuration menu. It’s pretty straight forward. In the Server Configuration menu, you can configure all the basics required for the server. - For the first Domain Controller in the new forest, you’ll need to configure at least the Network Settings — IP address, subnet mask, gateway, and DNS.
- You may also want to configure the computer name. Configuring the computer name will require a restart.
- After the restart, log in to the server with the Administrator password you set in step 1.
Tip: “sconfig” is also present in the GUI version of Windows Server, making initial configuration of new servers easier.
Additional Storage Configuration
You may want to configure additional locally attached disks or iSCSI/MPIO storage. Creating new volumes that are locally attached can be done via the diskpart command line tool. Here’s the series of commands to create a new, NTFS formatted volume, with the drive letter of E:\ and the name “Data”, from a second disk in the server using the diskpart tool. First, run diskpart from the command line, then use the following commands:
|
|
iSCSI storage can be configured using the same GUI tools you would use in the GUI version of Windows Server. The MPIO feature must be installed before the tool is available. You can do this via PowerShell:
|
|
When MPIO is installed you can load the MPIO utility using mpiocpl. For the iSCSI utility you can use iscsicpl. iSCSI is installed as part of the base Windows Server feature set.
Install Windows Server Update Services (WSUS)
The following PowerShell command will install the WSUS feature:
|
|
Now we need to run some post install tasks. We’ll create a directory for the WSUS content on the E:\ drive.
To configure WSUS to use the directory we just created and the Windows Internal Database (WID is based on SQL Express), run the following command:
|
|
Alternatively you might want to use an external SQL server for the WSUS database, if so run the following command instead:
|
|
WSUS is now running and able to be configured further. This is possible with PowerShell, but not as straightforward as the installation above so we’ll be using the WSUS MMC on a remote computer or on the server itself if you installed Windows Server with the Desktop Experience.
To obtain the WSUS MMC on a remote computer we’ll need to install the Remote Server Administration tools (RSAT), run the following command in an elevated PowerShell session:
|
|
To view WSUS reports you’ll also need to download and install the following:
- Microsoft Report Viewer 2012 Runtime redistributable
- Microsoft System CLR Types for Microsoft SQL Server 2012: x64 version, x86 version
In case the links to Microsoft System CLR Types fail in future, here is the main download page link. This page links to components from the Microsoft SQL Server 2012 Feature Pack, you need to go to the Install Instructions section and download the specific component you need.
Configuring Windows Server Update Services
Once you have downloaded and installed all the software listed above on our admin PC, you can continue with the configuration.
- Open the Windows Service Update Services Microsoft Management Console (WSUS MMC).
- You should see a “Before You Begin” wizard. Click Next.
- Join the Microsoft Update Improvement Program if you wish.
- Choose Upstream server, as this is the first WSUS server we’ll choose “Synchronize from Microsoft Update”.
- Specify the Proxy Server settings if needed.
- Click “Start Connecting”.
- Select the applicable languages for our environment.
- Select the applicable Products. I recommend selecting all products as we’ll only be downloading updates that we actually need.
- Select the Classifications. I recommend selecting all except Drivers and Driver Sets. Drivers in WSUS increase the size of the database immensely.
- Configure the Sync Schedule. I recommend leaving this on manual until setup and synchronisation has been completed.
- Check the Begin initial synchronization box. This may also take a while.
- Click Finish.
Once the initial configuration is complete, now we can start to configure WSUS for every day operation.
- In the WSUS MMC go to the Options node.
- Setup a Synchronization Schedule. I recommend once or twice a day, out of regular hours. Click OK.
- Go to Automatic Approvals.
- There’s a built-in rule to automatically approve Critical and Security updates, meaning that they will be downloaded and distributed via WSUS without any admin interaction. I recommend enabling this, but don’t run the rule.
- You may also want to add a rule for Definition Updates from Exchange, Office, and Windows Defender if applicable to you. Click OK.
- Now go to Computers.
- Set the option here to Use Group Policy or registry settings on computers and click OK.
- Go to E-Mail notifications and enable them if you want status reports and Emails about the new updates that have been synchronised. Click OK.
- In the WSUS MMC, go to the Computers node.
- Create the computer groups that you require here. I recommend a ‘pilot’ group and a ‘regular’ group both for client devices and servers.
Configuring Group Policy
To enable our clients to get updates from WSUS using the settings above, you’ll need to configure the group policy for them.
- Open the Group Policy Management MMC and go to the Group Policy Objects node.
- Right click on the node and select New to create a new GPO for WSUS. Give it a name and click OK.
- Right click on the new GPO and click Edit to open it.
- Navigate to
Computer Configuration/Policies/Administrative Templates/Windows Components/Windows Update/Manage updates offered from Windows Server Update Service - Go to the setting “Specify intranet Microsoft update service location”.
- We’ll configure both “Set the intranet update service for detecting updates” and “Set the intranet statistics server” to
http://wsus-server-name.contoso.com:8530 - Go to “Enable client-side targeting” and enter the name of a group that you created in WSUS.
- For multiple groups, repeat steps 2 — 7 for each group.
- You can use Active Directory Security Groups to control which client devices have read access to the GPO with the desired WSUS group configuration.
There are lots of other settings in GPO to configure Windows Update that I recommend taking a look, specifically “Configure Automatic Updates” located in Computer Configuration/Policies/Administrative Templates/Windows Components/Windows Update/Manage end user experience which controls when client devices install updates.
Managing Updates
After some time (approximately 24 hours) our client devices should have contacted the WSUS server and be in the correct group. Now we need to approve the updates required for our environment.
- On the overview of our WSUS server, click on “Updates needed by computers”.
- Change the drop down menu “Approval” to “Unapproved” and click “Refresh”.
- Right-click on the Title bar and enable the “Supersedence” column.
- Click on the very tiny “Supersedence” column to sort the updates by Supersedence.
- Approve the top critical, security and any other updates you want to be installed on our devices.
- Once the devices have downloaded, installed, and reported back to the WSUS server, we’ll have a better idea if any more updates are required.
Maintenance and Troubleshooting
Keeping WSUS running over time requires some maintenance. I created a custom PowerShell script that runs every day to perform the maintenance on the database. More specifically it declines and deletes old updates, and old computers. It can also send a notification over e-mail or a webhook with information about it’s clean up run. I’ve posted about it here.
You can also clean up the WSUS database manually using the “Server Cleanup Wizard” found in Options. You can also run this via PowerShell:
|
|
You may encounter an error when trying to connect to the WSUS server using the MMC — Error: Unexpected Error, appears as Event ID 7053 in Event Viewer.
I’ve known this error to occur frequently. One fix is to navigate to %appdata%\Microsoft\MMC and delete the wsus file and then try connecting again.
IIS Configuration
I highly recommend configuring these IIS AppPool settings relating to WSUS. In an elevated PowerShell session run the following commands:
|
|
In the IIS Manager these PowerShell commands change the following values:
WSUS -> Application Pools -> WsusPool -> Advanced Settings
General:
Queue Length: 25000
CPU:
Limit Interval (minutes): 15
Process Model:
Idle Time-out (minutes): 0
Rapid-Fail Protection:
“Service Unavailable” Response: TcpLevel
Recycling:
Private Memory Limit (KB): 0
Regular Time Interval (minutes): 0
Finally, you can also try the following command, if needed:
|
|
Support My Work
If you would like to support me, please check out the link below.
- PayPal
If you have any questions or comments, please leave them below.
Thanks
-Mike
We’re all used to updating our Windows Server operating systems with the Windows Update GUI, but did you know that you can update your server using command prompt and “sconfig”?
The past few years I’ve been managing quite a few Windows Server Core Instances that as we all know, do not have a GUI. In order to update those instances, you need to run Windows Update using the command line, but this method actually also works on normal Windows Server instances with the GUI as well!
Please enjoy this video or read on for why and how!
Why?
Using a GUI is great, however sometimes it’s not needed, and sometimes it even causes problems if it looses the backend connection where it’s pulling the data from. I’ve seen this true on newer Windows operating systems where the Windows Update GUI stops updating and you just sit there thinking the updates are running, when they are actually all complete.
The GUI also creates additional overhead and clutter. If there was an easier alternative to perform this function, wouldn’t it just make sense?
On Windows Server instances that have a GUI, I find it way faster and more responsive to just open an elevated (Administrative) command prompt, and kick off Windows Updates from there.
How
You can use this method on all modern Windows Server versions:
- Windows Server (with a GUI)
- Windows Server Core (without a GUI)
This also works with Windows Server Update Services so you can use this method either connecting to Windows Update (Microsoft Update) or Windows Server Update Services (WSUS).
Now lets get started!
- Open an Administrative (elevated) command prompt
- Run “sconfig” to launch the “Server Configuration” application

- Select option “6” to “Download and Install Windows Updates”
- Choose “A” for all updates, or “R” for recommended updates, and a scan will start
- After the available updates are shown, choose “A” for all updates, “N” for no updates, or “S” for single update selection
After performing the above, the updates will download and install.
I find it so much easier to use this method when updating many/multiple servers instead of the GUI. Once the updates are complete and you’re back at the “Server Configuration” application, you can use option “13” to restart Windows.
Learn how to install the Windows Server Update Services (WSUS) rols on a core installation of Windows Server 2019 or Windows Server 2016 (Including SSL setup).
The core version of Windows Server (or server without desktop experience) is a nice feature. It allows servers to run with a very small footprint and helps saving precious computing resources. One disadvantage of the core servers are the lack of GUIs for the functions and features the server is providing. This requires administrators to switch more often to Powershell to install, configure and administrate basic functionalities, which (on earlier versions) had a full-featured GUI.
After switching to core server and having a lot of hard work to set it up (partially due to my lack of Powershell skills in certain scenarios), I decided to write this guide to help you set up your WSUS on a core installation of Windows Server 2019 (Which works exactly the same on 2016) by using Powershell only (Plus the setup for SSL alternatively via GUI, if you want to use it).
Table of Contents
Prerequisites
- Installed and configured Windows Server 2016 or 2019 core
- Server is already added to the domain and has the required network settings, firewall rules, etc set up
- The server has an additional volume for the update files (Does not have to be setup within the server)
- Microsoft SQL-Server instance is already installed (If you want to use SQL server instead of the Windows internal database)
- An SSL certificate (If you want to use one) with private key and the password as pfx file
- Installed IIS Manager on your client, if you want to manage the IIS with a GUI
This guide will start directly with the installation, so all basic settings have to be done upfront. Use the command sconfig to open a tool for the main settings.
Important: This guide is provided as is and does not guarantee to be without errors or mistake. Use a test environment and create all necessary backups before proceeding.
Installation
Logon to your server and open a Powershell prompt (Via console, remote shell or remote desktop).
Preparing disk, volumes and drives
If your drives are all setup completely including initialization, formatting and drive letters, then you can skip this chapter.
The first thing you might want to change is the letter of your CD/DVD drive. Many tutorials set the WSUS hard disk on drive letter D, but that’s where the CD/DVD is often assigned to.
To change this, you are using the following command to change the drive letter from D to R:
Get-WmiObject -Class Win32_volume -Filter "DriveLetter = 'd:'" |Set-WmiInstance -Arguments @{DriveLetter='R:'}
Next you have to initialize the second hard disk for the update files. Enter
Get-Disk
to get a list of hard disks.
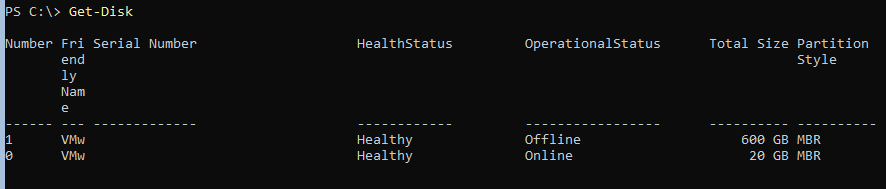
Check the column operational status. If one disk is shown as offline, remember the disk id and switch it to online (Change the 1 after number to your disk number):
Set-Disk -Number 1 -IsOffline $false
Now that disk has to be initialized. Use the same disk number for this command.
Initialize-Disk -Number 1
This initializes the disk using GPT partition style. If you want to use MBR add the parameter -PartitionStyle MBR to the command.
Next step is the creation of a partition.
New-Partition -DiskNumber 1 -Size 90GB -AssignDriveLetter
This creates a 90GB partition and assigns it a drive letter. If the partition should use the entire disk, replace the -Size parameter with -UseMaximumSize:
New-Partition -DiskNumber 1 -UseMaximumSize -AssignDriveLetter

Remember the drive letter of that drive. If you want to use a different letter:
Set-Partition –DriveLetter F -NewDriveLetter D
Now format the newly created drive.
Format-Volume -DriveLetter D -FileSystem NTFS -NewFileSystemLabel WSUS
The file system has to be NTFS (WSUS does not support ReFS) and I prefer the drive to be labeled WSUS, but you can name it whatever you want.
Now create a subfolder WSUS on the new drive as WSUS does not like its content folder to be placed in root.
New-Item -Path D: -Name WSUS -ItemType Directory
Install WSUS
Now, that the server is prepared for the WSUS role, let’s start with the installation.
If you would like to see all WSUS related features, use the Get-WindowsFeauter cmdlet:
Get-WindowsFeature –Name UpdateServices*
Important: The next command is different, depending on if you want to use the Windows Internal Database (WID) or an SQL server instance.
WID:
Install-WindowsFeature -Name UpdateServices-Services,UpdateServices-WidDB -IncludeManagementTools
With SQL server instance:
Install-WindowsFeature -Name UpdateServices-Services,UpdateServices-DB -IncludeManagementTools

If you have used the wrong command, uninstall the features with
Uninstall-WindowsFeature -Name names-from-the-command-used
and then enter the correct command again.
This will install the necessary files and services for your WSUS.
The last step is to tell your server, which SQL instance to use (If you are not using WID) and where to store the update files. Change to the tools folder in the WSUS application directory:
cd 'C:\Program Files\Update Services\tools'
You are going to use the program WSUSutil.exe, which offers many configuration possibilities for your WSUS. The parameter you are using is postinstall. It requires additional parameters depending on your environment.
Important: The next command is different, depending on if you want to use the Windows Internal Database (WID) or an SQL server instance.
WID:
.\WsusUtil.exe postinstall CONTENT_DIR=D:\WSUS
Change the directory if you are using a different path.
MS SQL server:
.\WsusUtil.exe postinstall SQL_INSTANCE_NAME="SQLServer\Instance" CONTENT_DIR=D:\WSUS
Change the SQL server name and instance and the path, if you are using a different folder.

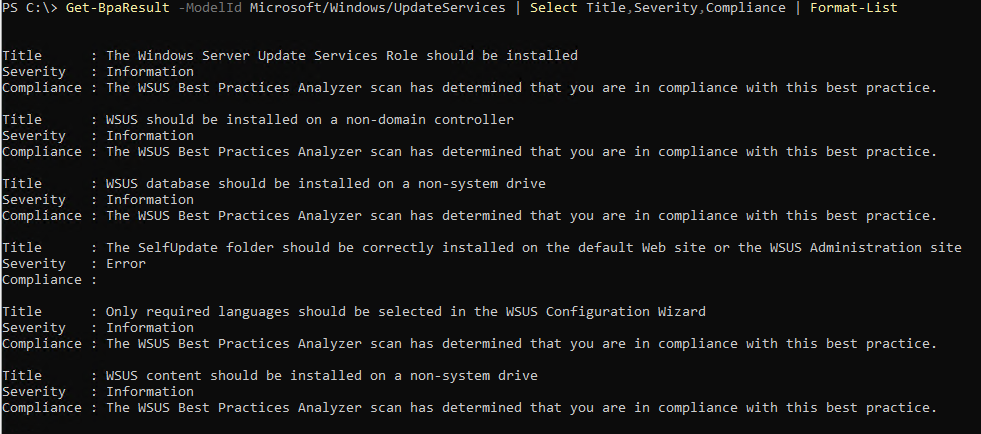
An optional step is to analyze your WSUS installation using the best practice analyzer:
Invoke-BpaModel -ModelId Microsoft/Windows/UpdateServices
Get-BpaResult -ModelId Microsoft/Windows/UpdateServices | Select Title,Severity,Compliance | Format-List
This gives you some hints on how to optimize your system.
And that’s it. Your WSUS is up and running. It does not use SSL and listens on port 8530. You can use the RSAT tools to manage the products, classifications and updates. The RSAT tools for Windows 7 can be downloaded here. Windows 10 as of version 1809 do not need an additional download. The RSAT tools have been moved to optional software features.
There are some optimizations, which are generally recommended for a WSUS installation. The first allows the IIS to use more memory (All available memory) and the second allows it to start more than one worker processes.
First change the private memory limit of the WSUS IIS application pool to 0:
Set-WebConfiguration -Filter "/system.applicationHost/applicationPools/add[@name='WsusPool']/recycling/periodicRestart/@privateMemory" -Value 0
And now change the maximum number of worker processes also to 0 (unlimited):
Set-WebConfiguration -Filter "/system.applicationHost/applicationPools/add[@name='WsusPool']/processModel/@maxProcesses" -Value 0
Configure SSL
Using Powershell
The first step is to import your SSL certificate. As you need to provide the password for your certificate and the cmdlets do not accept the password as plaintext, you need one step more. There are different ways to get the password as secure string. I decided to use the Get-Credential cmdlet:
$mypwd = Get-Credential -UserName 'Enter password below' -Message 'Enter password below'
The certificate file can be located on a local drive or a network or DFS path.
Import-PfxCertificate -FilePath "C:\mypfx.pfx" -CertStoreLocation Cert:\LocalMachine\My -Password $mypwd.Password -Exportable
The certificate store has to be in local machine. Otherwise you cannot use the certificate for your IIS.
And now back to the IIS.
To manage the ISS, you need an additional module:
Import-Module WebAdministration
First check if your WSUS website has bee published successfully:
Get-Website
This list should contain a website “WSUS Administration”.

You will perform 3 steps: you add the SSL certificate to the WSUS website, change some subfolders to require SSL and complete the SSL activation using Wsusutil.exe.
To add the certificate to the IIS binding, you need that binding as object:
$bind = Get-WebBinding -Name 'WSUS Administration' -Protocol https

Please be aware, that the image is not correct. The protocol is case sensitive and requires lowercase letters only. You do not get an error message otherwise, but it simply will not work.
Additionally you need the hash value for your certificate. You can get the hash of your certificate using this command:
Get-ChildItem cert:\LocalMachine\My

Now can you retrieve the object containing your certificate:
$SSLCert=Get-Item cert:\LocalMachine\My\HashOfCertificate
Replace HashOfCertificate with the hash (or thumbprint). Alternatively you can use the TAB key after my\ to switch through all certificates.
With these 2 object, you can finally merge them:
$bind.AddSslCertificate($SSLCert.GetCertHashString(),"my")
The WSUS website is available with SSL encryption as of now. This can be tested by opening https://yourwsus:8531 in a browser. Check the certificate details. If it is not working properly, you may have to restart the website by using the IISRESET command or restarting your server.
Now you need to enforce SSL for certain virtual directories:
Set-WebConfigurationProperty -PSPath 'MACHINE/WEBROOT/APPHOST' -Location 'WSUS Administration/ApiRemoting30' -Filter "system.webServer/Security/access" -Name "sslFlags" -Value "Ssl"
Set-WebConfigurationProperty -PSPath 'MACHINE/WEBROOT/APPHOST' -Location 'WSUS Administration/ClientWebService' -Filter "system.webServer/Security/access" -Name "sslFlags" -Value "Ssl"
Set-WebConfigurationProperty -PSPath 'MACHINE/WEBROOT/APPHOST' -Location 'WSUS Administration/DSSAuthWebService' -Filter "system.webServer/Security/access" -Name "sslFlags" -Value "Ssl"
Set-WebConfigurationProperty -PSPath 'MACHINE/WEBROOT/APPHOST' -Location 'WSUS Administration/ServerSyncWebService' -Filter "system.webServer/Security/access" -Name "sslFlags" -Value "Ssl"
Set-WebConfigurationProperty -PSPath 'MACHINE/WEBROOT/APPHOST' -Location 'WSUS Administration/SimpleAuthWebService' -Filter "system.webServer/Security/access" -Name "sslFlags" -Value "Ssl"
The last step is to complete the SSL configuration for the WSUS. This steps also allows you to specify a different URL (Example: Your server is called SRV01, but you would like to use wsus.company.local):
& 'C:\Program Files\Update Services\Tools\WsusUtil.exe' configuressl wsus.company.local
Restart the server to complete the installation.
Restart-Computer
This concludes the installation and setup of your WSUS and SSL using Powershell only.
Using a GUI
Already sick of using Powershell? Or do you still prefer a GUI? Then this section explains you how to switch your WSUS to SSL using (mainly) a GUI.
Please make sure, that you have installed the IIS manager on your client.
But before you can use a GUI, you have to do some steps in preparation.
The first step is to import your SSL certificate. As you need to provide the password for your certificate and the cmdlets do not accept the password as plaintext, you need one step more. There are different ways to get the password as secure string. I decided to use the Get-Credential cmdlet:
$mypwd = Get-Credential -UserName 'Enter password below' -Message 'Enter password below'
The certificate file can be located on a local drive or a network or DFS path.
Import-PfxCertificate -FilePath "C:\mypfx.pfx" -CertStoreLocation Cert:\LocalMachine\My -Password $mypwd.Password -Exportable
The certificate store has to be in local machine. Otherwise you cannot use the certificate for your IIS.
To administrate the IIS from a remote computer, you have to install a role and allow remote management via a registry key.
Install-WindowsFeature Web-Mgmt-Service
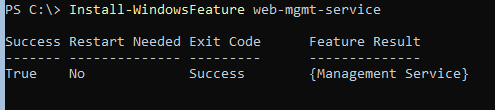
This feature contains all necessary files for remote management, but it is blocked by default as a security measure.
To enable remote connections, update the registry key HKEY_LOCAL_MACHINE\Software\Microsoft\WebManagement\Server\EnableRemoteManagement to 1:
Set-ItemProperty -Path HKLM:\Software\Microsoft\WebManagement\Server -Name EnableRemoteManagement -Value 1
Now start the remote management service:
Start-Service wmsvc
And now back to the GUI:
Open the IIS manager. Click on the “File” menu and select Connect to a server.
Enter the name or IP address of your server.
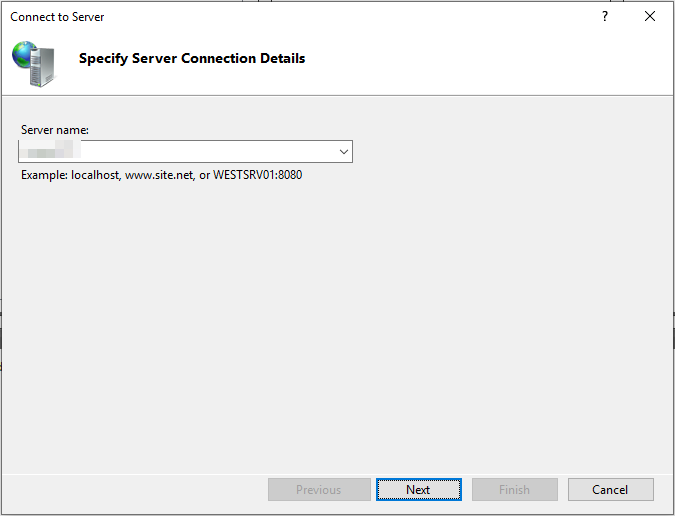
On the next screen, enter the credentials of an administrator for the IIS.

In the connections section, open your server, then Sites and click on WSUS Administration.
Click on Bindings… on the right side.
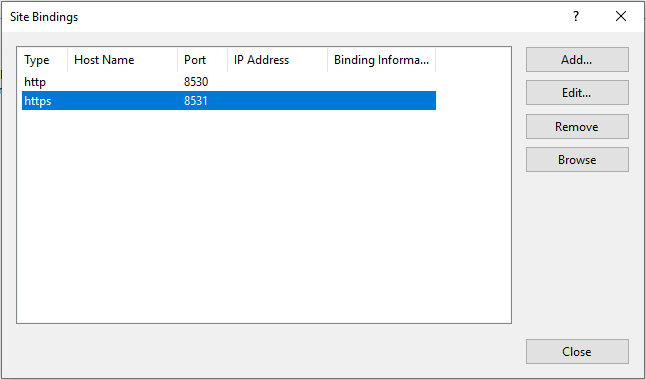
Select the row with https and click on edit….
Choose your SSL certificate from the dropdown list below and click OK.
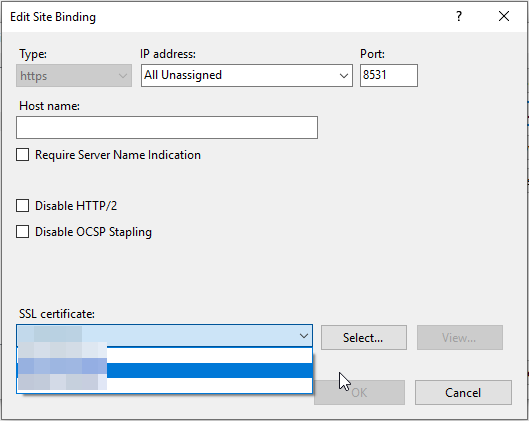
Close the bindings window.
This step has assigned your certificate to the https version of your WSUS websites. The next step is to enforce SSL for certain sites with your WSUS.
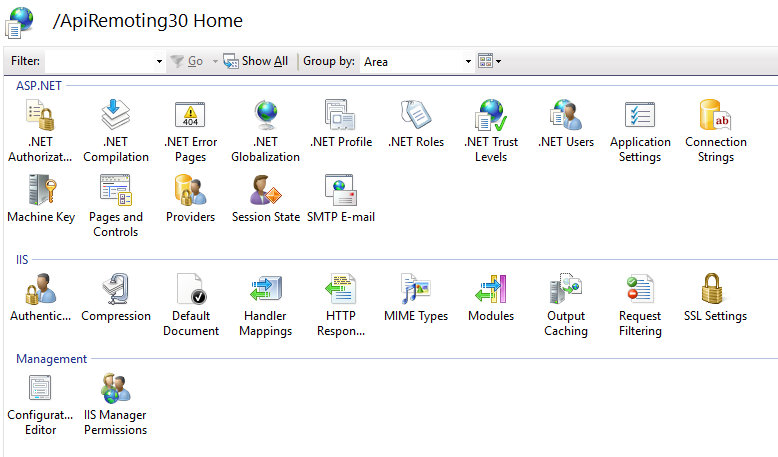
Expand your WSUS Administration site and select ApiRemoting30.
Double click on SSL Settings in the middle section.
Check the box Require SSL and select Ignore.
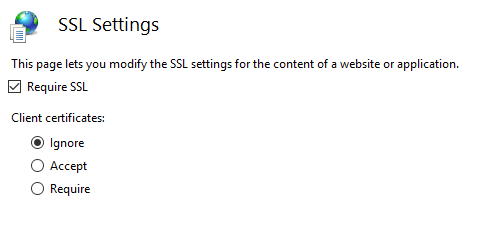
Click Apply on the right side.
Repeat these steps for the following directories (They are all under WSUS Administration):
- ApiRemoting30 (You already did this in the example)
- ClientWebService
- DSSAuthWebService
- ServerSyncWebService
- SimpleAuthWebService
The last step is to complete the SSL configuration for the WSUS. This again needs Powershell or a command prompt (My commands are for Powershell). It also allows you to specify a different URL (Example: Your server is called SRV01, but you would like to use wsus.company.local):
& 'C:\Program Files\Update Services\Tools\WsusUtil.exe' configuressl wsus.company.local
Restart the server to complete the installation.
Restart-Computer