
Applies ToWindows 11 Windows 10
Windows updates provide the latest features and security improvements to help keep your PC more current and more secure. Before the installation process starts, Windows checks to make sure there’s enough storage space on your device for the installation process and for these new features and security improvements.
If there isn’t enough open space on your internal drive, you’ll see a message that tells you Windows requires more space.
Windows needs space to update
We can’t install the latest Windows features and security improvements on your PC due to low disk space.
Tips to free up disk space.
Get more space with external storage
You can temporarily gain extra space by using an external storage device like a USB drive, an SD card, or an external hard drive.
Here’s what you’ll need:
-
An external storage device with 10GB or more of free space, depending on how much additional space you need.
-
An internet connection.
Here’s how to do it:
-
Select Start > Settings > Windows Update .
Note: In Windows 10, you can access Windows Update from Settings > Update & Security.
-
If you don’t have enough free disk space to install updates, you should see an option on the Windows Update tab called Fix Issues. If so, select Fix issues. This will launch a tool that lets you update your PC using an external storage device.
-
Before you use an external storage device for updating, make sure you back up any important files.
-
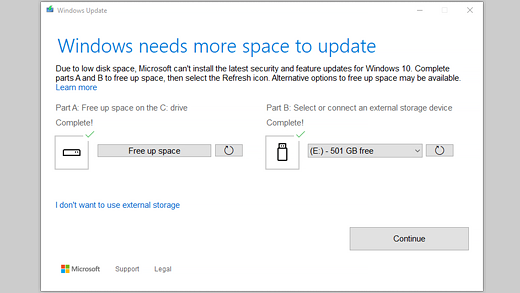
Connect your external storage device and select it from the drop-down menu.
-
Select Next and follow the instructions to finish installing the update.
-
Once the installation is complete, you can safely remove your external storage device.
Even after selecting external storage, if you don’t have enough free space on your internal drive, you might be prompted to free up more space.
If you don’t want to use external storage, select I don’t want to use external storage.
Frequently asked questions
The following questions concern low disk space and Windows Update specifically. Learn more about Windows Update.
When there isn’t enough free space available to install an update, a pop-up notification will prompt you that additional space is required to install the update.
When you select Fix issues, you’ll be informed about how much additional space is needed. You’ll also be notified that you can use an external storage device so that you don’t need to free up quite as much space on your system drive.
The total free disk space your device requires to complete an update varies. Typically, feature updates require 6 GB – 11 GB or more of free space, while quality updates require 2 GB – 3 GB or more. Learn about the difference between a feature update and a quality update.
You need disk space to download the update, download new versions of any optional features and languages that are currently installed, and to apply the update. Additional space is temporarily required to support removal of the update (typically for 10 days). This space can be reclaimed after the update is completed.
To do this, select Start > Settings > System > Storage > Cleanup recommendations. After you’ve selected items to remove, select the Clean up button for that section. Open Storage settings
The update is compressed to reduce download size.
Note: For devices with reserved storage, an update will first use the reserved storage space before using other disk space. For more info, see How reserved storage works in Windows.
The space required to complete a feature update depends on two factors: which update path is followed and the size of optional content and other updates that apply to your PC when the feature update is installed.
Note: For devices with reserved storage, an update will first use the reserved storage space before using other disk space. For more info, see How reserved storage works in Windows.
Windows follows three different feature update paths, depending on the amount of disk space currently available.
-
For PCs with plenty of free disk space
Windows automatically tries to complete more of the update process in the background while you use your PC. This significantly reduces the time your PC will be offline (or unusable) during the update, although it might temporarily use more disk space to complete the update. Learn more about our efforts to reduce offline time during updates (English only at this time).
-
For PCs with limited free space but still enough to complete the update automatically
Windows will automatically optimize for reducing the amount of free disk space required to install the update. This will result in a longer offline install time.
-
For PCs that don’t have enough space to automatically install the update
Windows will prompt you to free up disk space or use external storage to temporarily extend the storage on your PC. If you use an external storage device, Windows won’t need as much free space on the system drive as it temporarily uses your external storage.
Across each of these update paths, the total amount of free disk space required will vary, depending on the optional content installed and other updates that apply to your PC. For example:
-
Optional features. Many optional features available for Windows are pre-installed or acquired on demand by the system, or manually by you. You can see which ones are installed on your PC by going to Start > Settings > Apps > Optional features.Open Optional features settings
These features range in size from less than 1 MB to almost 2 GB for the Windows Mixed Reality portal. You can reduce the amount of space required to install a feature update on your PC by uninstalling optional features you aren’t using. -
Languages installed. Windows is localized into many languages. Although many people only use one language at a time, some people switch between two or more languages. You can see which languages are installed on your PC by selecting Start > Settings > Time & language > Language & region .Open Language settings
During each update, all language resources and any associated typing, text-to-speech, speech-to-text, and handwriting recognition resources must be updated. The content for each language can range from about 175 MB to more than 300 MB. You can reduce the amount of space required to install a feature update on your PC by uninstalling languages you aren’t using. -
Driver updates. OEMs and other hardware partners sometimes publish new graphics, networking, audio, and other drivers in conjunction with the new OS update. The size of these drivers can vary significantly, depending on your PC and on which drivers have been updated.
-
OS quality updates. During a feature update, Windows tries to download and automatically install the latest quality update so that your PC is fully up to date when you start using it. Shortly after the feature update is released, the quality update for that feature update could be as small as a few hundred MB, but as more quality and security changes are implemented, the quality update can increase in size to 1 GB or more. If your PC is short on disk space, you can download and install the quality update after the feature update is complete.
Finally, Windows Update will temporarily disable hiberfile.sys, pagefile.sys, and other system files in order to use the space these files typically consume to apply the feature update. Any files that are disabled to apply the update will be automatically re-enabled when the update is complete. Because these files vary in size depending on how you use your PC and the amount of RAM your PC has, even in cases where two different PCs have the exact same OS image, the amount of free disk space required to complete an update may vary.
The combination of update path and features means there’s a wide range of free disk space required to complete an update. Here are a few examples for PCs updating to Windows 10 version 1803:
|
Optimized for reduced offline time |
Optimized for minimal disk space |
Optimized for minimal disk space with external storage |
|
|---|---|---|---|
|
Minimal optional features, languages, and updates |
20 GB |
5.5 GB+ |
4.5 GB+ |
|
Lots of optional features, languages, and updates |
20 GB+ |
13.75 GB+ |
7 GB+ |
Windows 11 requires a 64-bit processor to run.
When considering what storage hardware to use in your device, don’t look only at the hardware’s storage capacity. Often, the speed of the storage is more important than its size. Devices with slow storage hardware, such as those labeled «HDD» are typically slower to use than those using faster storage hardware, such as those labeled «SSD» or «eMMC.»
You don’t need to remove everything from your hard drive to update your device, but you’ll need to free up enough space to complete the update.
Need more help?
Want more options?
Explore subscription benefits, browse training courses, learn how to secure your device, and more.
After updating your Windows system to the latest version, you may find that your available disk space becomes less. Well then, how to free up disk space after Windows updates? If you have no idea, you can read this MiniTool article to obtain some useful solutions.
Free Space on Drive C Become Less after a Windows Update
Microsoft continues to release major updates for Windows systems that are still in support, such as Windows 10 and Windows 11. After updating/upgrading to a new Windows version, you may find that there is less free space on drive C. Even worse, your C drive is full after Windows updates and your computer runs slowly.
Maybe you know the free disk space will be less, but you don’t know why and how to free up disk space after Windows updates. In this post, we will explain these issues separately.
- Windows 11 22H2 Release Date: Everything You Should Know
- Windows 10 22H2 Release Date: Everything You Should Know
Why Is Disk Space Low Space or Full after Windows 10/11 Updates?
During the Windows 10/11 update process, the system installation will make a backup of your previous setup. This gives you the chance to go back to the previous version of Windows 10/11 in case the new Windows version is not compatible with your PC or the update causes issues/errors.
After the successful installation of the update, the backup will be saved to Windows.old folder in C drive.
The size of Windows.old folder is not small. In a best case scenario, it could be about 12 GB of disk space. But the occupied disk space could easily reach 20 GB or more, depending on the size of your previous Windows installation.
If your C drive had a large amount of free space before the Windows update, your computer may not be affected. Additionally, Windows.old folder will be automatically deleted 28 days later. In a situation like this, you can keep Windows.old folder (for 28 days).
But if the free space in the C drive is not so large before the update, your C drive may be full after a Windows update. This will significantly slow down your computer or even cause other serious issues like computer freezing, and computer shutting down unexpectedly.
To avoid affecting your computer performance, you should free up disk space on drive C after a Windows update. In the following part, we will show you 4 ways to free up disk space after updating to the latest Windows version.
How to Reclaim Space after Windows Updates?
In this part, we will introduce these 4 things you can try to reclaim disk space after Windows updates.
How to Free up Disk Space after Windows 10/11 Update?
- Delete Windows.old folder in the C Drive after Windows Updates.
- Run Storage Sense to free up disk space after Windows Updates.
- Delete the temporary files in the Settings app after Windows Updates.
- Run Disk Cleanup to reclaim more disk space after Windows Updates.
Way 1: Delete Windows.old Folder to Release More Space for Drive C
As we have mentioned in the above part, the Windows.old folder is created to save the installation files of your previous Windows version and the total size of these files is very large. This is for your system recovery needs. If the new Windows version works well on your device and your C drive is full after Windows updates, you can consider deleting Windows.old folder.
- Free Download Rufus 3.19 for Windows 11/10 and Introduction
- Use Rufus to Install Windows 11 22H2 without a Microsoft Account
This will not damage your computer, but you only lose the chance to go back to your previous Windows version.
How to Delete Windows.old folder on Windows 10/11?
You can just find Windows.old folder in C drive and then select it to delete.
Step 1: Press Windows + E to open File Explorer.
Step 2: Open drive C.
Step 3: Scroll down to find Windows.old folder. Then, right-click it and select Delete.
Step 4: On the pop-up window, you can see the folder deletion needs the administrator’s permission. You need to click the Continue button to delete Windows.old folder from the C drive.
Step 5: Go back to the desktop. Then, right-click Recycle Bin and select Empty Recycle Bin. This can permanently remove Windows.old folder from your computer and free up several gigabytes for the C drive.

After these steps, you can go to File Explorer and move your mouse cursor to C drive, and see if it has more free space.
However, not all Windows 10/11 updates will create a Windows.old folder. For example, after you install a feature update or perform an in-place update, a Windows.old folder will be created; if you just install an optional update or a cumulative update, there will be no new Windows.old folder. Then, you can use these methods to reclaim disk space (especially C drive) after Windows updates.
Way 2: Run Storage Sense to Free up Disk Space after Windows Updates
Storage Sense is a Windows built-in storage management tool that can help you free up disk space, delete temporary files, and manage locally available cloud content.
But this tool is not turned on by default. You need to manually turn it on and run it to clean up your computer. You can also set it to automatically run as per your settings.
Here we go:
Step 1: Press Windows + I to open the Setting app.
Step 2: Go to System > Storage.
Step 3: Click Storage Sense under Storage management to continue.

Step 4: Usually, the Keep Windows running smoothly by automatically cleaning up temporary system and app files option is selected by default. You’d better keep this setting. Then, turn on the button under Automatic User content cleanup.
Step 5: The Run Storage Sense now button will be available immediately. You can click this button to run Storage Sense to clean up files.

Tip: Set Automatic User Content Cleanup via Storage Sense
You are allowed to set Storage Sense to automatically run and clean up files on your Windows 10/11 computer. Under Configure cleanup schedules, you can find these 3 options:
Run Storage Sense:
- Every day
- Every week
- Every month
- During low free disk space (default)
Delete files in my recycle bin if they have been there for over:
- Never
- 1 day
- 14 days
- 30 days (default)
- 60 days.
Delete files in my Downloads folder if they haven’t been opened for:
- Never (default)
- 1 day
- 14 days
- 30 days
- 60 days.
You can select your needed options. The changed settings can be automatically saved. After that, Storage Sense will automatically run as per your settings.
Way 3: Deleted the Unnecessary Temporary Files via Storage in the Settings App
Temporary files on Windows 10/11 include Windows update files, Windows upgrade log files, thumbnails, Delivery Optimization Files, Windows error reports and feedback diagnostics, and more. These files are saved in the C drive and take up much disk space.
Here are the steps to delete temporary files on your PC.
Step 1: Open the Settings app on your device.
Step 2: Go to System > Storage.
Step 3: Click Temporary files. It will take a while to calculate the data in it. You should wait patiently.

Step 4: On the next page, you can see which kinds of files are temporary files on Windows. The default selected files are safe to delete. You can also select other kinds of files to delete.
Step 5: Click the Remove files button to delete the selected temporary files from your PC.

Way 4: Run Disk Cleanup to Reclaim More Disk Space after Windows Updates
Disk Cleanup is also a Windows built-in tool to help you remove useless files like the precious Windows setup files from your computer.
Here is how to run Disk Cleanup to free up space on the C drive:
Step 1: Click the search icon from the taskbar and search for disk cleanup.
Step 2: Click Disk Cleanup from the search results to open this tool.
Step 3: C drive is selected by default. Then, click the OK button to continue.
Step 4: On the page, you can select the files you don’t use anymore and click the OK button to continue.
Step 5: A small interface will pop up with a message saying Are you sure you want to permanently delete these files? Click the Delete Files button to confirm the deletion if you are sure.

These are the 4 ways to free up disk space after Windows Updates. When your C drive is full after Windows updates, you can use these methods to delete the unnecessary files to free up more space.
Recover Your Lost and Deleted Files on Windows 10/11?
Although it is relatively safe to delete the Windows setup files using the above methods, some of your important files may get deleted by mistake in rare cases. For example, you mistakenly selected some files that should not be deleted. As long as these files are not overwritten by new data, you can use MiniTool Power Data Recovery (a free file recovery tool) to get them back.
This MiniTool data recovery software is specially designed to recover data from all kinds of data storage devices. It can work on Windows versions, including Windows 11, Windows 10, Windows 8, and Windows 7.
You can use this program to recover files in different situations. For example, when you can’t access a drive to use files in it, you can use this software to recover your needed files to an accessible location. Even if your Windows computer can’t boot normally, you can use this software to create a bootable medium, boot your PC from the bootable medium, and then select your desired files to recover.
This software has a trial edition. You can first use it to scan the drive you want to recover data from and see if it can find the deleted and lost files you care about.
MiniTool Power Data Recovery TrialClick to Download100%Clean & Safe
Step 1: Download and install this software on your computer. To prevent your deleted or lost files from being overwritten, you should not install this software to the original location of the lost/deleted files.
Step 2: Open the software to enter its main interface. This software will show all the drives it can detect under Logical Drives. You can select the target drive and click the Scan button to scan that drive. However, if you are not sure which one is the target drive, you can switch to the Devices tab and select the whole drive to scan.

Step 3: After scanning, you can see the scan results. Then, you can check if you can find the files you want to recover.

Step 4: If you want to use this software to recover files, you need to use a full edition. After getting the license key, you can just enter it in the scan results interface by clicking the key icon from the top menu. Next, you can select files at once and click the Save button to choose a suitable location to save them.
The End
Want to know how to free up space after Windows 10/11 updates? This article shows you some methods you can try. These methods are proved to be effective. You can feel free to try.
Should you have other issues related to Windows updates, you can let us know in the comments. You can also contact us via [email protected].
Guide
When you purchase through links on our site, we may earn an affiliate commission. Here’s how it works.
· Hot!

Windows 10 and 11 receive updates every month, but this time, things are more special. Microsoft just launched the latest Windows 11 feature update, version 24H2, which packs quite a number of new features and changes. However, you will most likely notice that the update took away a massive chunk of disk space. This might become a serious problem on lower-end systems that do not have a lot of space on a system drive.
Here is how to fix the situation and clean up the C drive after installing Windows 11 version 24H2 or another big update. In a nutshell, Windows keeps the pre-update version for emergencies to let you roll back in case of issues. That old copy usually takes over 20GB of free space.
If you are not there yet, check out our guides detailing how to update to Windows 11 version 24H2 on supported systems and how to do that if your computer is not supported.
Clean disk C after installing a Windows update
It is worth mentioning right off the bat that cleaning up the system drive after a major Windows update will prevent you from going back. Consider this fact before purging the old Windows installation since you will have no way to roll back the update in case of serious bugs or issues, and the only way to solve the problem would be to clean-install Windows from scratch.
- Press Win + I to launch Windows Settings.
- Navigate to System > Storage and wait for the system to scan the contents of the C drive.
- Click Temporary Files and wait again—Windows will check what can be safely deleted.

- Place the checkmark next to «Previous Windows Installation(s)» and «Delivery Optimization Files.»
Note: As of right now, there is an allegedly known issue where Windows 11 won’t let you clear 8.6GB of data. If it stays after running a disk cleanup, leave it be and wait for Microsoft to release a fix.
- You can tick additional options. Just be careful not to delete the content of the Downloads folder accidentally (that option is not selected by default).
- Click «Remove files» and wait for Windows to complete the process.


Free space on disk C after updating Windows—another option
Windows 11 still has a lot of legacy components, which means processes can be completed using modern and old interfaces. That is the case with disk cleanup in Windows 11. If you want some nostalgia, here is how to clean disk C using the legacy UI:
- Press Win + R and type cleanmgr. Alternatively, open the Start menu and type Disk Cleanup.
- Select Disk C and click Ok.
- Click «Clean up system files.» This command will let Windows find previous installations and delete them.
- Wait for the scan to complete and place a checkmark next to the «Previous Windows installation(s)» option.
- Click Ok and wait for the process to complete.


That is how you clean disk C after installing a major Windows update.
Updated on Apr 28, 2025
6 Useful Ways to Fix Not Enough Space for Windows 10 Update
How to fix not enough space for Windows 10 update? When your computer fails to install the latest Windows 10 update, refer to the following solutions to troubleshoot.
| Workable Solutions | Step-by-step Troubleshooting |
|---|---|
| Fix 1. Extend C Drive | Step 1. Click «Adjust with 1-Click» to extend C drive; Step 2. Click «OK» to extend C drive automatically…Full steps |
| Fix 2. Delete Useless Files | When the system doesn’t have enough space for Windows 10 update, most users will free up C drive…Full steps |
| Fix 3. Clean Up C Drive | Click the «Start» button, type Disk Cleanup in the Search box, run this program as administrator….Full steps |
| Fix 4. Use External Drive | Step 1. Go to «Settings», click on «Update & security» > «Windows Update» > «Check for Updates»…Full steps |
| Fix 5. Migrate OS | Step 1. Run EaseUS Partition Master, select Migrate OS from the top menu; Step 2. Select the SSD or HDD…Full steps |
| Fix 6. Use Media Creation Tool | Step 1. Go to Download Windows 10 page on Microsoft website via your Windows 10 browser…Full steps |
If you receive an error message while Windows 10 update that tells «Windows needs more space», it means that your computer doesn’t have enough space on C drive to install the latest Windows 10.
Usually, to upgrade to Windows 10, or installing a new build of Windows 10, you’d better prepare 16GB free space on drive C for 32 bit OS and 20GB for 64 bit OS. Besides, since Microsoft enables users to rollback Windows 10 to its previous version, there is a folder called Windows.old created in drive C, which takes several GB of space. So, more space is required for the Windows 10 update.
Not enough space for Windows 10 update problem is mostly caused by low disk space on C drive. To fix this issue, we’ve gathered a few helpful methods from the easier to the more advanced. You may apply any one of them to resolve the issue.
Solution 1. Extend C Drive
If your computer is running out of space for installing the latest Windows 10 update, you can use EaseUS Partition Master to help you expand C drive without formatting. Its partition management features could efficiently move enough free space to extend your C drive for Windows update or Windows installation.
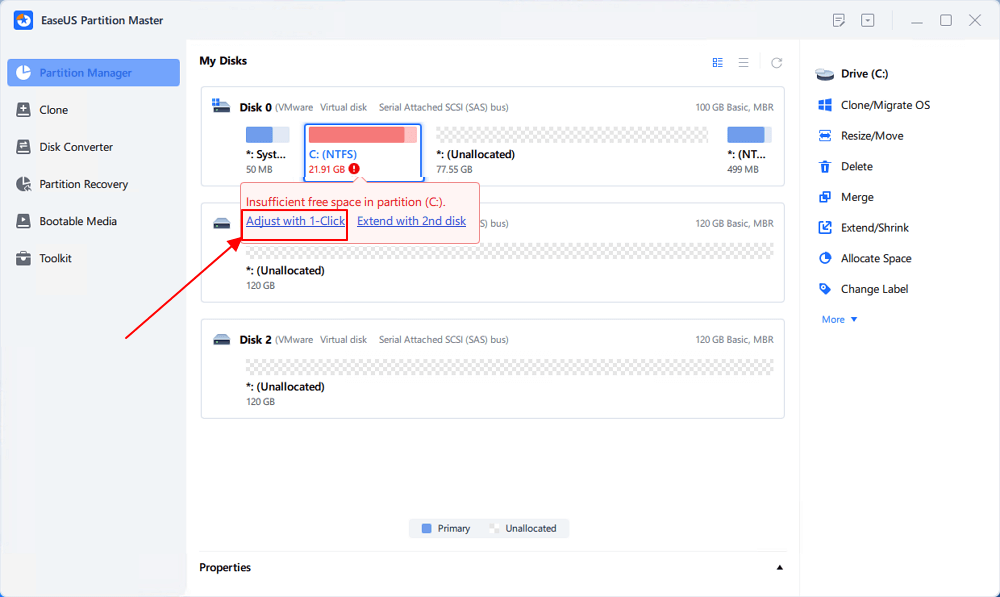
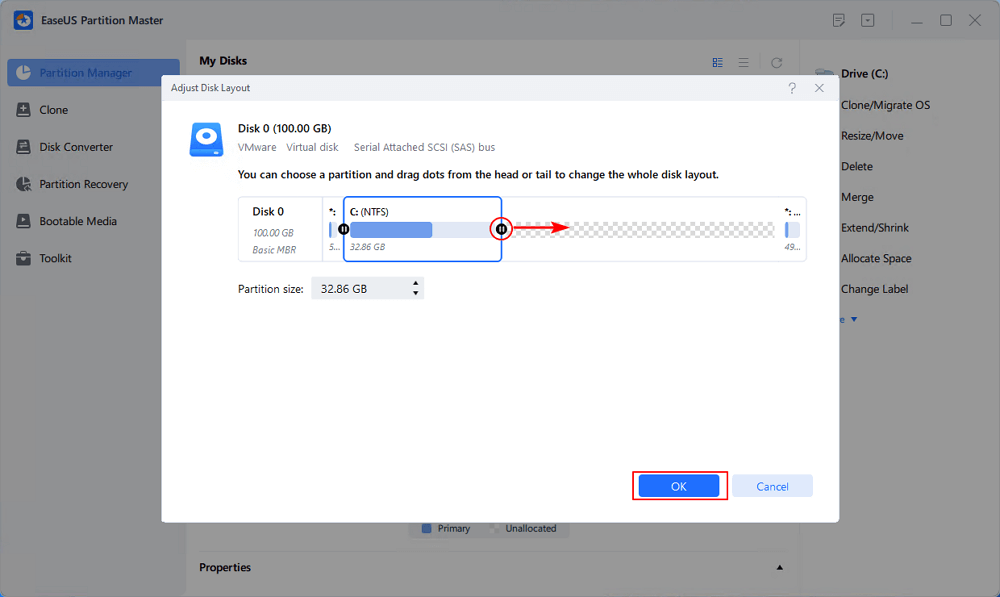
Step 1. Click «Adjust with 1-Click» to extend C drive.
When your C drive is out of space, hover your mouse over the C drive, you will see the Low Disk Space alert on EaseUS Partition Master. Click «Adjust with 1-Click» to extend it.
Step 2. Click «OK» to extend C drive automatically.
By clicking «OK», EaseUS Partition Master will automatically allocate space to your C drive to solve the low space issue.
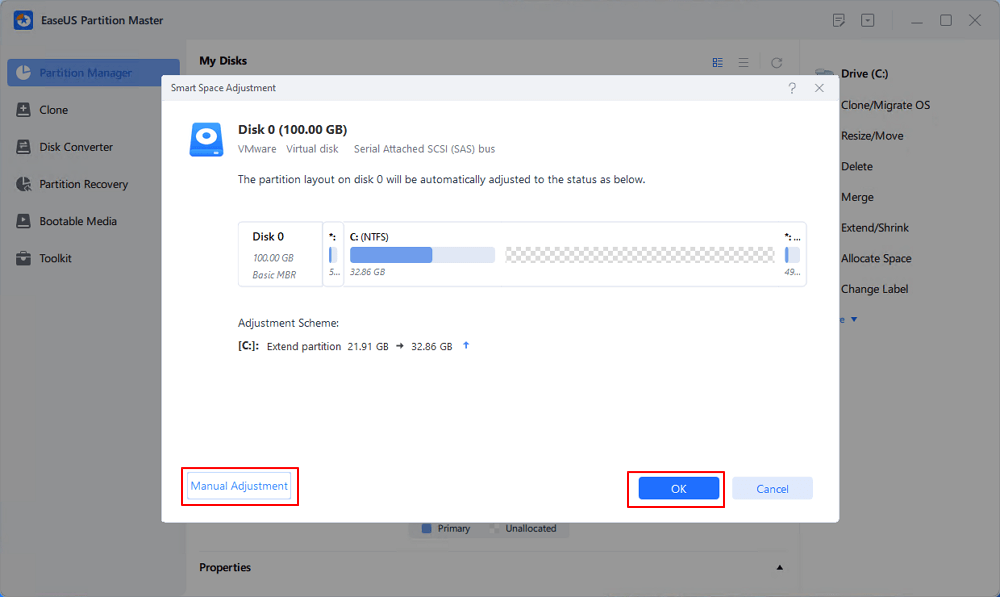
Extra Option: You can also click «Manual Adjustment» to extend the C drive manually.
When turning to Manual Adjustment, select the C drive, and drag dots rightward to add more space to C drive. Click «OK» to confirm.
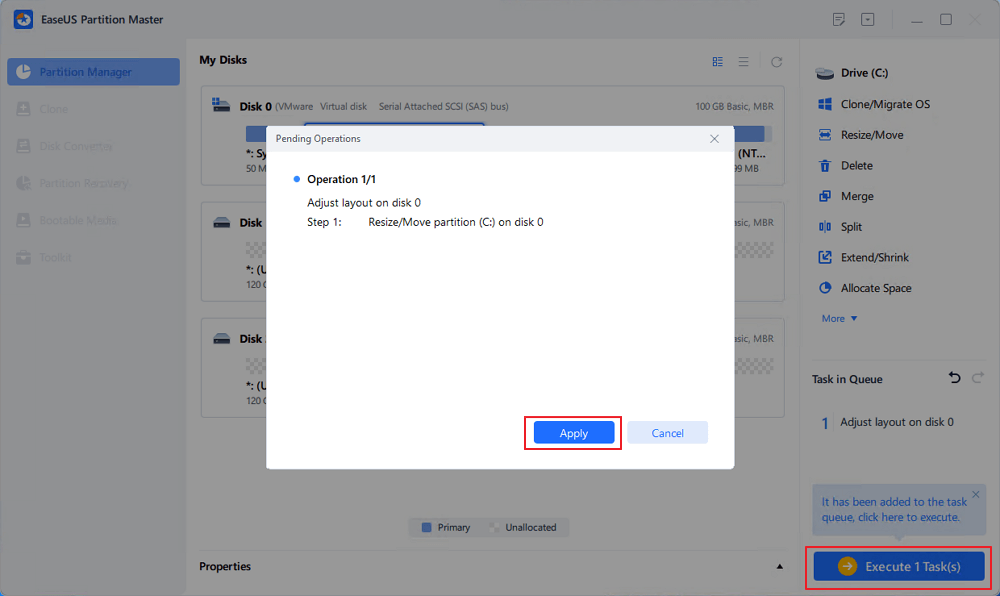
Step 3. Confirm to resolve low disk space in C drive
Click the «Execute Task» button at the top corner and start all pending operations by clicking «Apply».
Other Reliable Windows Partition Manager Software
- Convert file system from FAT32 to NTFS, convert MBR to GPT, convert dynamic disk to basic disk
- Transfer free disk space from one drive to another directly
- Migrate OS to SSD to speed up Windows without reinstalling
Solution 2. Delete Useless Files and Programs
When the system doesn’t have enough space for Windows 10 update, most users will free up C drive by removing files and applications. In order not to delete some important data accidentally, you’d better back up C drive to external hard drive in advance. After that, you can clear out all the files you don’t want to make more free space for Windows update.
Solution 3. Clean Up C Drive to Free up Space
To free up C drive to fix Windows update has not enough disk space, you can use Disk Cleanup to delete some files in the Downloads folder, Recycle Bin, and Temporary files.
Click the «Start» button, type Disk Cleanup in the Search box, run this program as administrator. Choose C drive to clean, select files to delete, and click «OK».
Solution 4. Windows 10 Update Using External Drive
Step 1. Go to «Settings», click on «Update & security» > «Windows Update» > «Check for Updates».
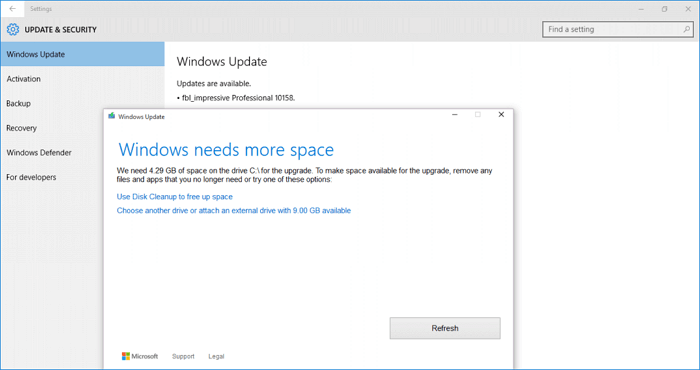
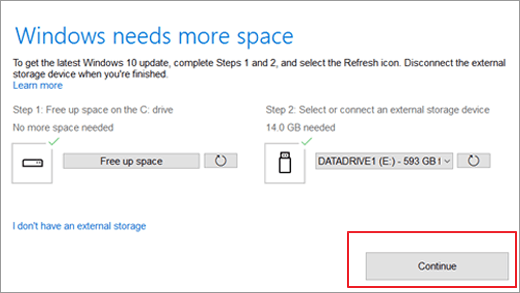
Step 2. Windows will pop up a window and tell you that «Windows needs more space».
Step 3. You can click the «Free up space» option first to see if this can help.
You can see what’s taking the most space on C drive and delete not essential files.
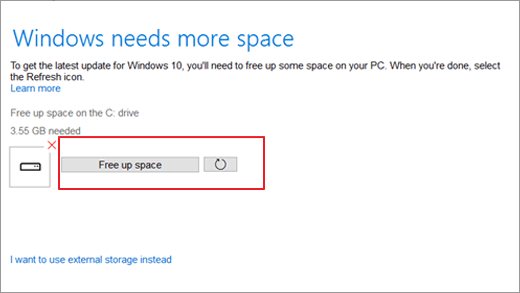
After this, return and select the Fresh icon next to the Free up space button, a green checkmark will show up if the C drive has enough space. You can click «Continue» to install the update.
Step 4. If this doesn’t help, connected an empty external hard drive to your PC and repeat Step 1, click «I want to use external storage instead» when the ‘Windows needs more space’ window pops up.
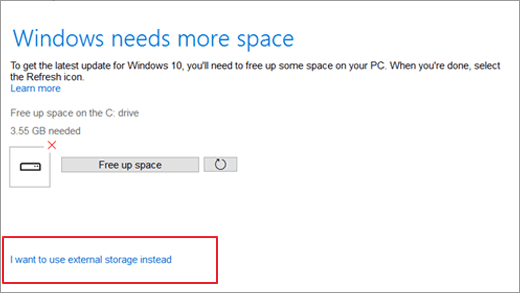
Note: Please format the external storage such as external hard drive first in case the Windows update fail again.
Step 5. If the external hard drive fails to show up, press the Fresh icon, and a green checkmark will appear next to the storage drive icon.
Step 6. Click «Continue» to install the latest Windows 10 update on your PC. And follow the onscreen instructions to complete the Windows 10 update process.
Solution 5. Migrate OS to a Bigger HDD/SSD
If you don’t have an external hard drive to help with Windows upgrades or if your internal hard drive doesn’t have any room to expand the C drive, you might consider upgrading your system disk to an SSD or even a larger HDD to fix the problem of not enough space for Windows 10 update.
EaseUS partition manager provides you with the «Migrate OS» and «Clone» features to transfer Windows OS to SSD/HDD without reinstalling.
Steps to migrate OS to HDD/SSD:
- Run EaseUS Partition Master, and select «Clone» from the left menu.
- Check «Migrate OS» and click «Next».
- Select the SSD or HDD as the destination disk and click «Next».
- Check Warning: the data and partitions on the target disk will be deleted. Make sure that you’ve backed up important data in advance. If not, do it now.
- Then click «Yes».
- Preview the layout of your target disk. Then click «Start» to start migrating your OS to a new disk.
- After this, click «Reboot Now» or «Done» to determine if you want to reboot the computer from the new disk immediately.
«Reboot Now» means to keep the changes instantly, while «Done» means you need to restart the computer later manually.

Note: The operation of migrating OS to SSD or HDD will delete and remove existing partitions and data on your target disk when there is not enough unallocated space on the target disk. If you saved important data there, back up them to an external hard drive in advance.
Solution 6. Update Windows 10 Using Media Creation Tool
This is the last solution to help you upgrade Windows 7/8 to Windows 10, or update Windows 10 to the newest version. Follow the steps below to upgrade or update Windows 10 using the Media Creation Tool.
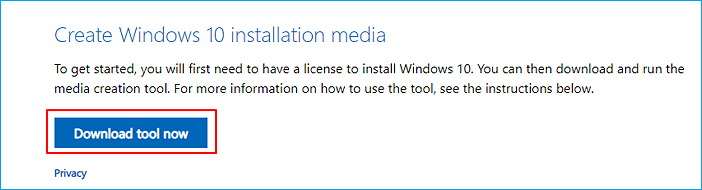
Step 1. Go to Download Windows 10 page on Microsoft website via your Windows 10 browser.
Step 2. Under Create Windows 10 installation media, click the «Download tool now» and run the media file after the downloading.
Step 3. Choose «Upgrade this PC now».
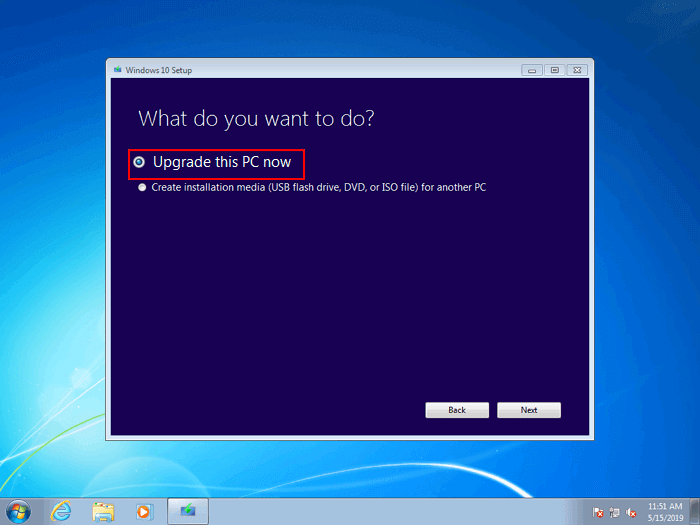
Step 4. Follow through the prompts to set up Windows 10.
Remember to tick «Keep personal files and apps» during the process.
Step 5. Wait for the process to complete, then you may restart your computer and use Windows 10 by then
Other Related Issues for Windows 10 Update
If you fail to install the Windows 10 update with a warning message «This PC can’t run Windows 10…we couldn’t update the system reserved partition.», mostly, it is caused by low system reserved partition space. To troubleshoot, go to read this tutorial: How to fix low system reserved partition on MBR/GPT disk in Windows 7/8/10.
Conclusion
You have learned an error on devices with small free storage space upgrading to Windows 10, how to use an external storage device to perform the upgrade, how to free up space for an upgrade, and more. During the process, EaseUS partition manager software can help you with freeing up space, extending C drive, and migrating OS. It is really useful and helpful.
People Also Ask These Questions
If you still have problems, you can read on to find out the answers.
How much space does Windows 10 need to update?
According to a Microsoft advisory, the new version of Windows 10 — version 190p requires 32 GB or more of space to be installed. This is twice as much as was required for the 32-bit version of Windows 10 in its previous version 1809, which required 16 GB of space.
Can’t free up enough space for Windows Update?
If you fail to free up space you can follow the steps below:
Step 1. Click the Start button
Step 2. Type Disk Cleanup in the Search box, and run this program as administrator.
Step 3. Choose C drive to clean, select files to delete, and click OK.
How do you update Windows 10 when you don’t have enough space?
Free up space on your device:
Step 1. Open your Recycle Bin and remove deleted files.
Step 2. Open your Downloads and delete any files you don’t need.
Step 3. If you still need more space, delete any files you don’t need.
(Image credit: Mauro Huculak)
On Windows 11, during the installation process to the Windows 11 2024 Update (version 24H2) using an in-place upgrade, the system creates a backup of the previous setup to revert the process in case a critical issue occurs.
However, even after the installation, the files are kept inside the «Windows.old» folder, taking around or more than 20GB, which could be significant for devices with limited capacity.
If your computer is low on storage after installing the 2024 Update, Windows 11 includes multiple ways to reclaim most of the lost storage using the Settings app and Disk Cleanup.
In this how-to guide, I’ll explain the steps to delete the previous installation files to free up space after upgrading to the latest version of the operating system.
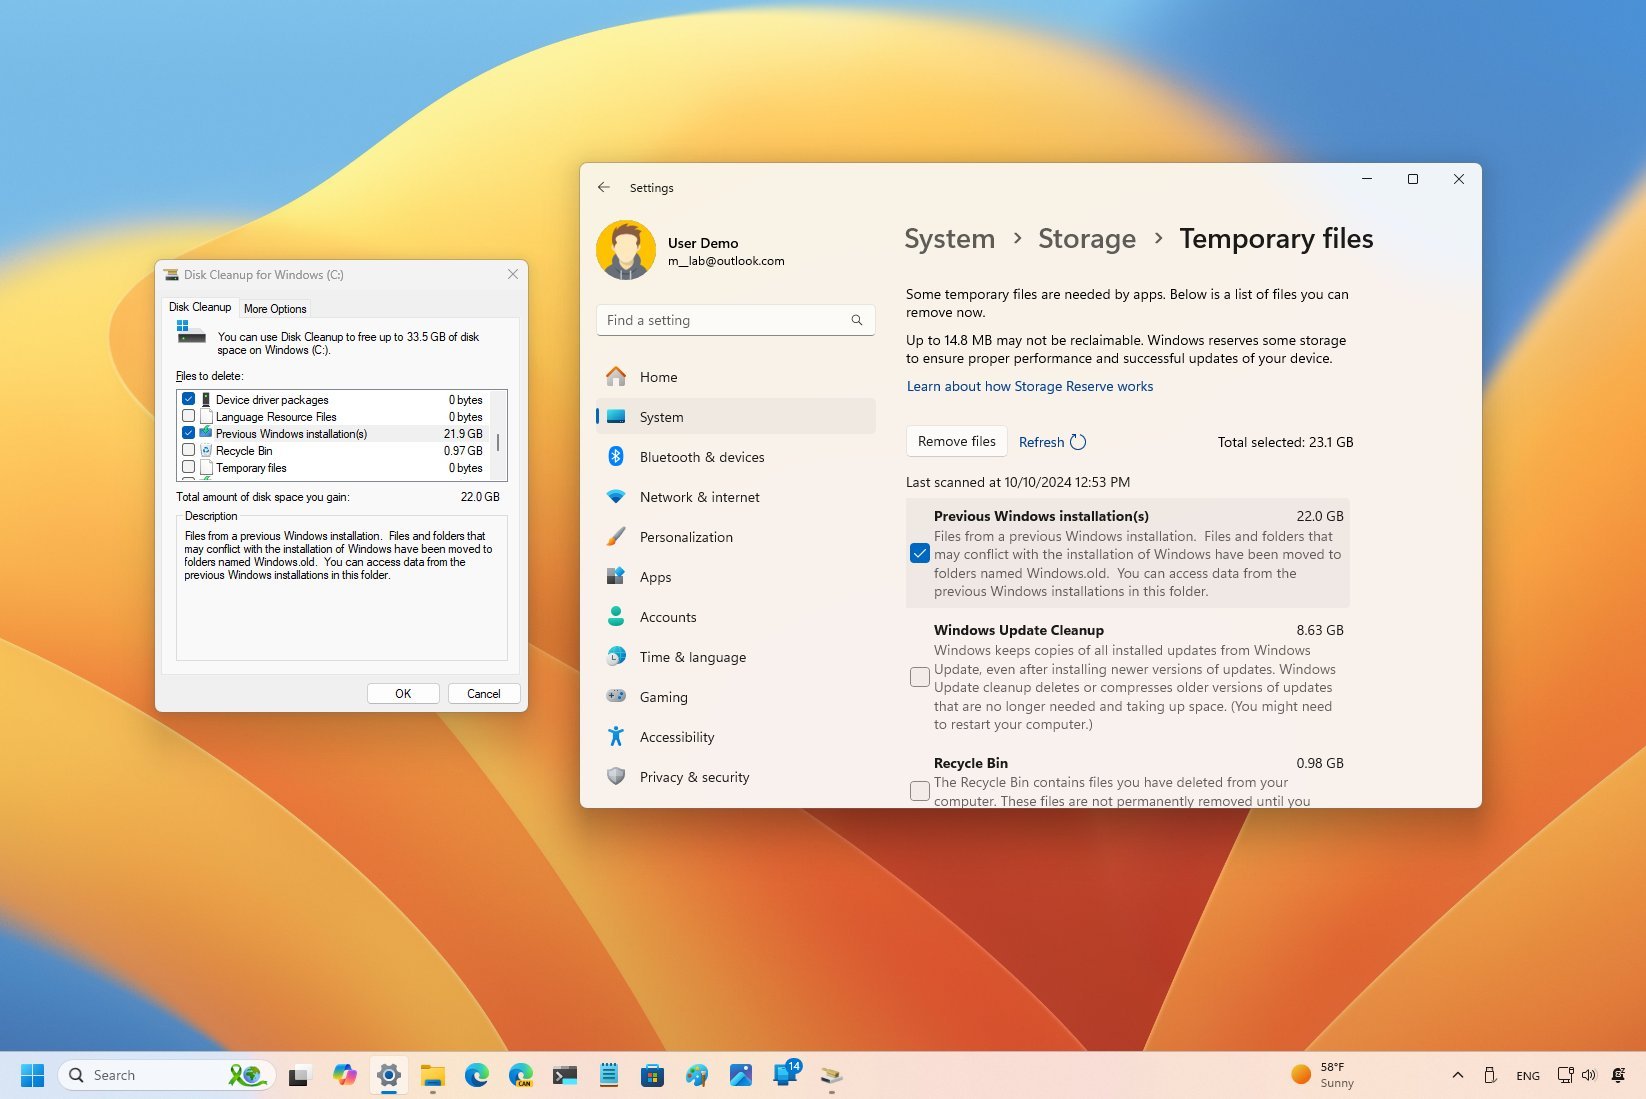
How to free up space after upgrading to Windows 11 2024 Update using Settings
To reclaim space after installing the most recent release of Windows 11, use these steps:
- Open Settings.
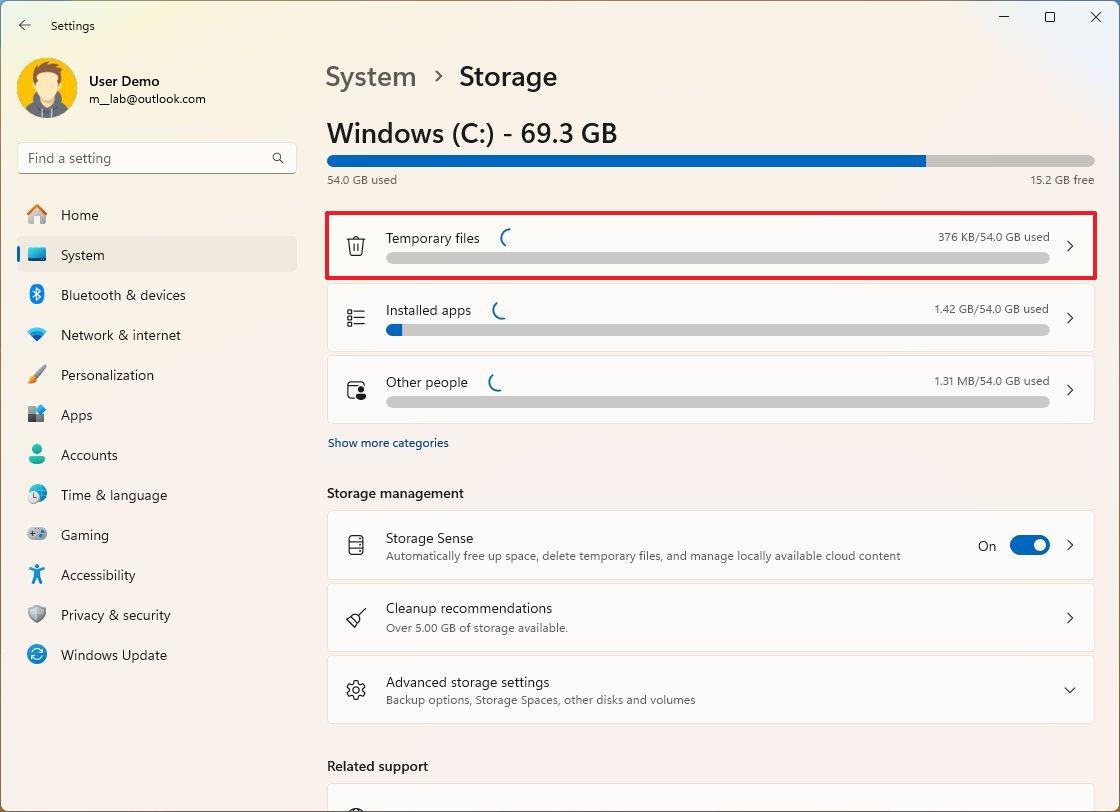
- Click on System.
- Click on Storage.
- Click the Temporary files page on the right-side.
- Clear all the preselected items (if applicable).
- Check the «Previous Windows installation(s)» option.
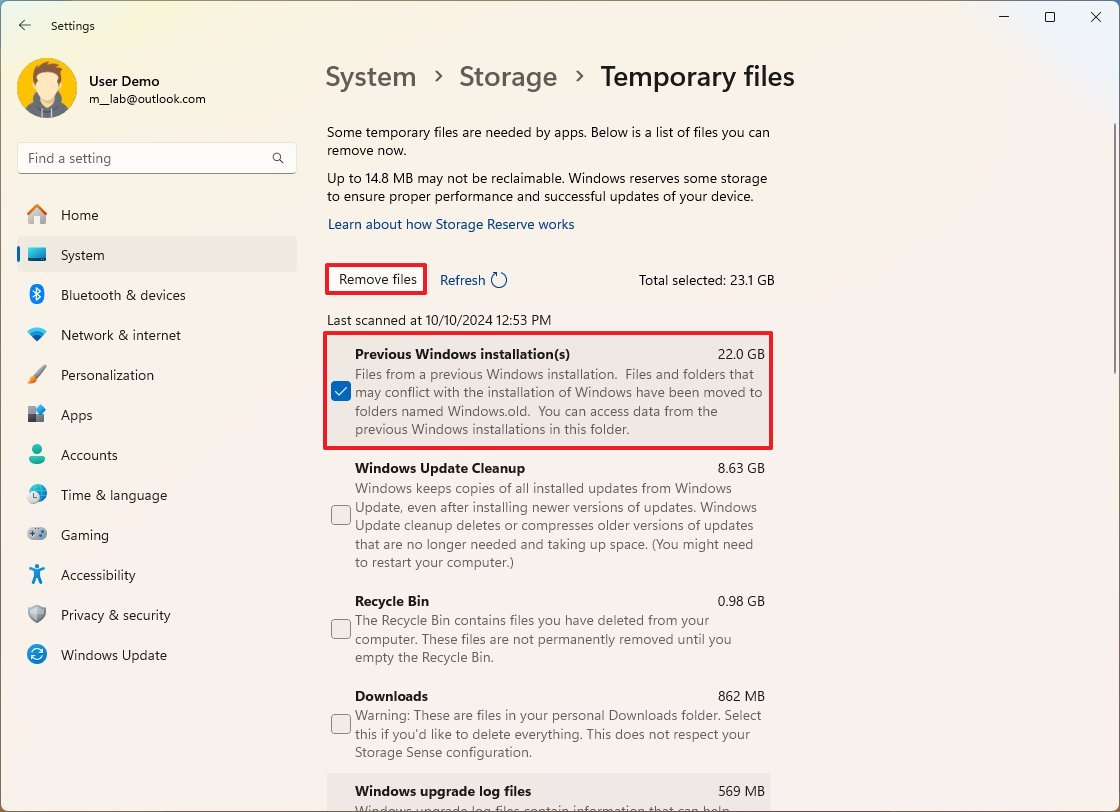
- Click the Remove files button.
Once you complete the steps, you will have some additional space for more important files.
How to free up space after upgrading to Windows 11 2024 Update using Disk Cleanup
To free up space after upgrading to Windows 11 version 24H2, use these steps:
- Open Start.
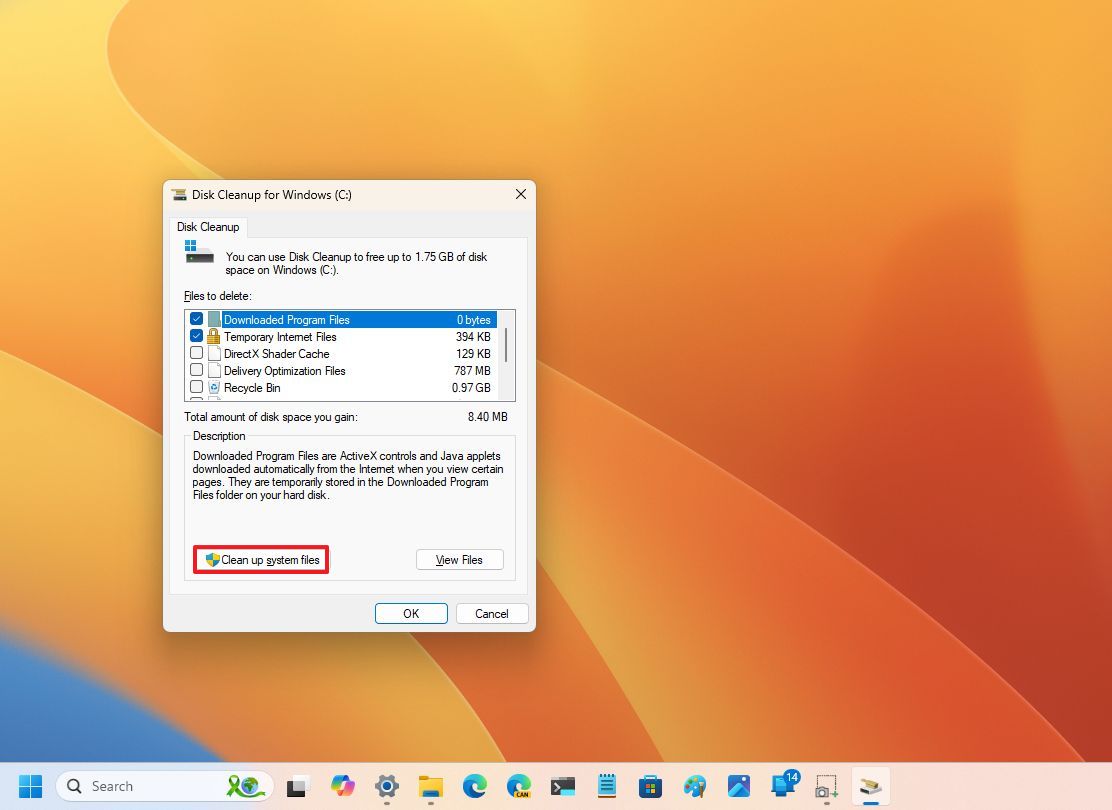
- Search for Disk Cleanup, and click the top result to open the settings.
- Click the «Clean up system files» button.
- Check the «Previous Windows installation(s)» option.
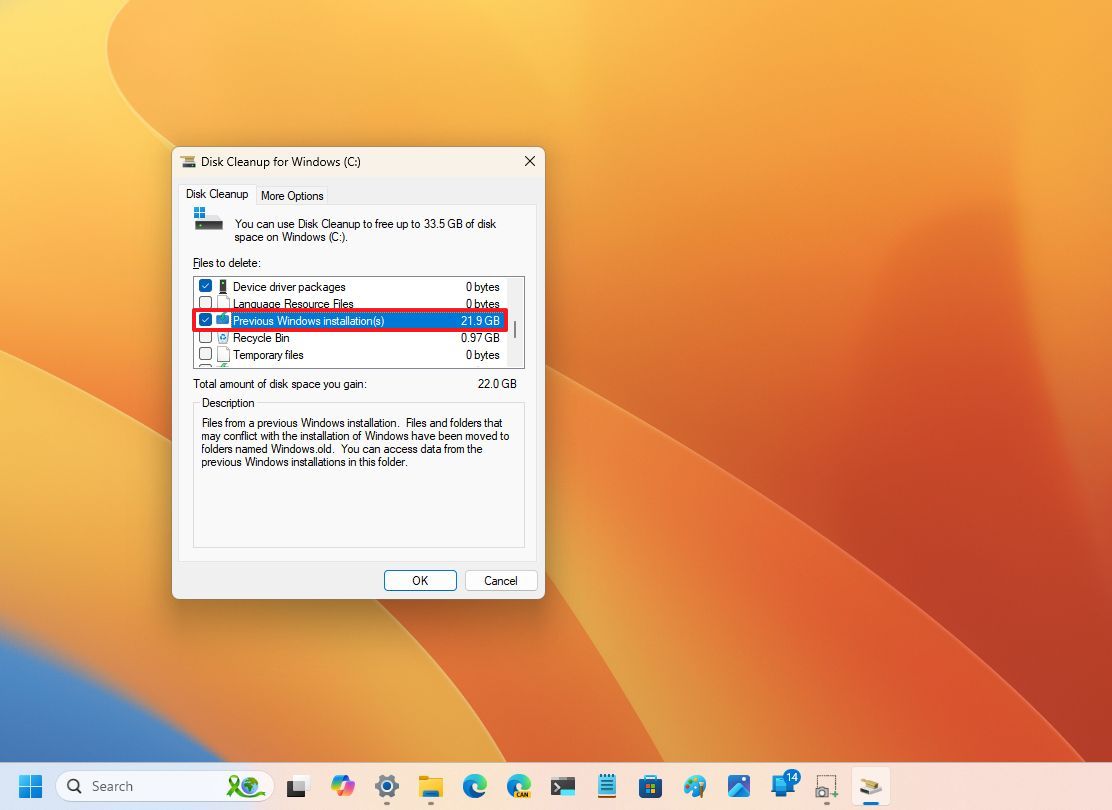
- Clear the Downloads option to avoid deleting downloaded files inside the «Downloads» folder (if applicable).
- Click the OK button.
After you complete the steps, the process will delete the previous installation files, freeing up storage on the installation drive.
Although you can delete the backup files for a previous installation, the option is only available for the first ten days after the upgrade. After that period, the system will delete files automatically.
Also, after proceeding with the deletion of the files, you will no longer be able to roll back to the previous installation through the recovery settings. However, you can still reinstall version 23H2 if you have the installation media by doing a clean installation.
It’s important to note that a number of users have been reporting an issue trying to clear the «Windows Update Cleanup» cache, which contains copies of installed updates. However, this is not related to clearing the files for a previous installation.
More resources
For more helpful articles, coverage, and answers to common questions about Windows 10 and Windows 11, visit the following resources:
- Windows 11 on Windows Central — All you need to know
- Windows 10 on Windows Central — All you need to know
Mauro Huculak has been a Windows How-To Expert contributor for WindowsCentral.com for nearly a decade and has over 15 years of experience writing comprehensive guides. He also has an IT background and has achieved different professional certifications from Microsoft, Cisco, VMware, and CompTIA. He has been recognized as a Microsoft MVP for many years.