
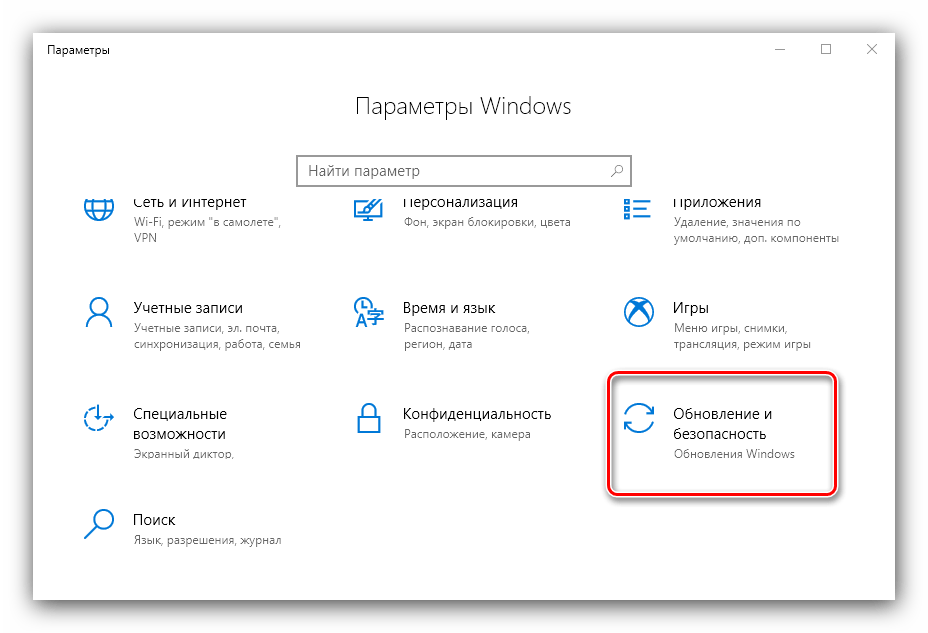
Важно! В этой статье будет рассказано о том, как отключить в операционной системе Windows 10 функцию автоматического обновления. Если вам необходимо отключить службу апдейтов полностью, обратитесь за помощью к другой нашей статье, перейдя по представленной ниже ссылке.
Подробнее: Как навсегда запретить обновление Windows 10
Чтобы отключить обновления в Windows 10, необходимо открыть «Редактор локальных групповых политик», перейти в соответствующий раздел и изменить значение параметра, отвечающего за эту функцию.
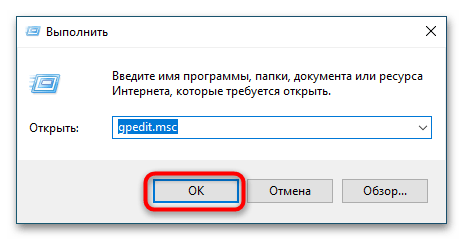
- Откройте «Редактор локальных групповых политик» любым доступным способом. Например, это можно сделать посредством окна «Выполнить». Вызовите его с помощью горячих клавиш Win + R, а затем введите команду
gpedit.mscи нажмите по кнопке «ОК». - Воспользовавшись навигационной панелью в левой части окна, перейдите по представленному ниже пути.
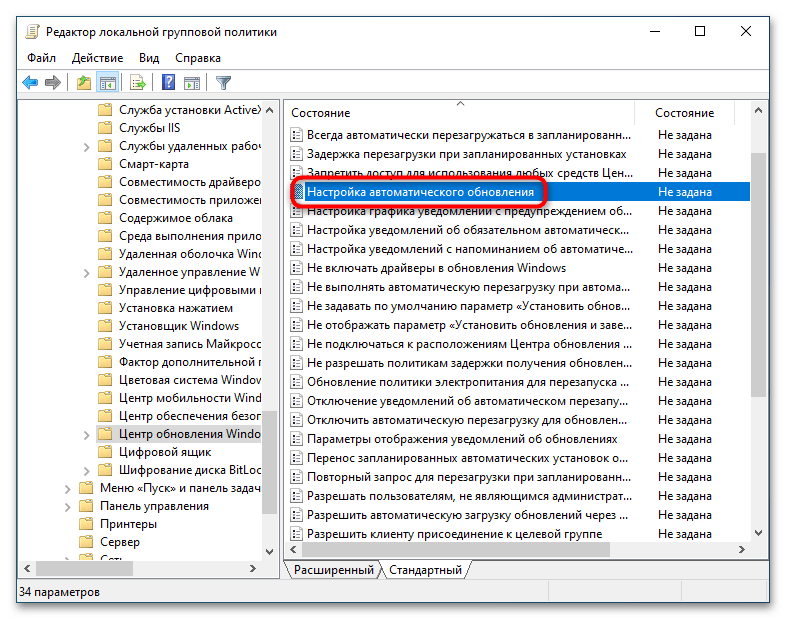
«Локальный компьютер» → «Административные шаблоны» → «Компоненты Windows» → «Центр обновления Windows»Попав в целевую директорию, в основной области найдите параметр с названием «Настройка автоматического обновления» и вызовите его окно свойств. Для этого достаточно кликнуть дважды левой кнопкой мыши по имени файла.
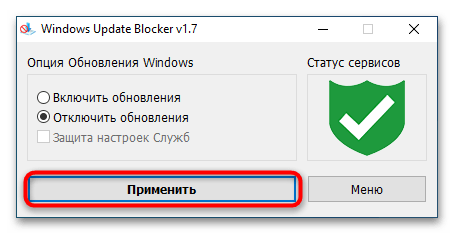
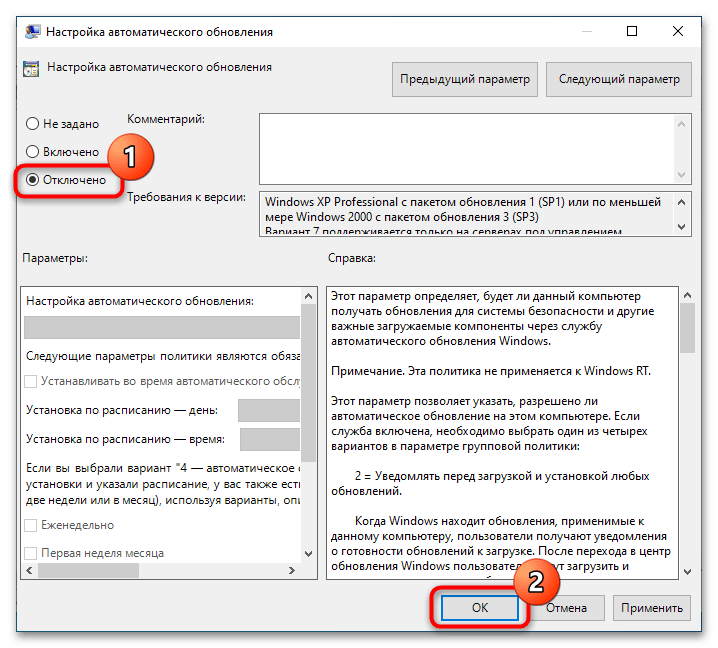
- В свойствах переведите переключатель, расположенный в верхнем левом углу окна, в положение «Отключено». Затем кликните по кнопке «ОК», чтобы применить внесенные изменения.
После проделанных действий операционная система перестанет обновляться в автоматическом режиме. Для этого вам потребуется вручную проверять выход новых апдейтов и инициализировать их инсталляцию. У нас на сайте есть отделительная статья, в которой наглядно демонстрируется то, как это делать.
Подробнее: Установка обновлений Windows 10
Наша группа в TelegramПолезные советы и помощь
GPO — Disable automatic updates on Windows
GPO — Disable automatic updates on Windows
Would you like to learn how to configure a group policy to disable automatic updates on Windows? In this tutorial, we will show you how to disable automatic updates from the Windows update service using a GPO.
• Windows 2012 R2
• Windows 2016
• Windows 2019
• Windows 10
• Windows 7
Equipment list
The following section presents the list of equipment used to create this tutorial.
As an Amazon Associate, I earn from qualifying purchases.
Windows Related Tutorial:
On this page, we offer quick access to a list of tutorials related to Windows.
Tutorial GPO — Disable automatic updates on Windows
On the domain controller, open the group policy management tool.

Create a new group policy.

Enter a name for the new group policy.

In our example, the new GPO was named: MY-GPO.
On the Group Policy Management screen, expand the folder named Group Policy Objects.
Right-click your new Group Policy Object and select the Edit option.
On the group policy editor screen, expand the Computer configuration folder and locate the following item.
Access the option named Windows Update.
Disable the option named Configure automatic updates.

To save the group policy configuration, you need to close the Group Policy editor.
Congratulations! You have finished the GPO creation.
Tutorial — Applying the GPO to disable automatic update
On the Group policy management screen, you need to right-click the Organizational Unit desired and select the option to link an existent GPO.

In our example, we are going to link the group policy named MY-GPO to the root of the domain.

After applying the GPO you need to wait for 10 or 20 minutes.
During this time the GPO will be replicated to other domain controllers.
On a remote computer, verify the Windows update settings.

In our example, we disabled the Windows automatic updates on all domain computers using a GPO.
VirtualCoin CISSP, PMP, CCNP, MCSE, LPIC22021-02-13T12:16:17-03:00
Related Posts
Page load link
Ok
Windows update is an essential service from Microsoft to ensure that all Windows devices will be updated with latest updates. These updates include feature enhancements, driver updates, service packs, security updates, critical updates and other updates. Disabling windows update is not recommended. But because of specific business requirement you may need to disable the windows updates. For example some companies might use 3rd party products for managing and rolling out Windows Updates. This article shows how to disable windows update using group policy.
In this example, Windows client MBG-CL2 is already joined to the Active Directory domain called mustbegeek.local. The domain controller is running on Windows Server 2008 R2. The client machine MBG-CL2 where windows updates needs to be disabled is under the OU “mustbegeek.local\Prod\Billing”.

Step 1. Create a Group Policy Object
Logon to Domain Controller server and open Group Policy Management snap-in from Start → Administrative tools → Group Policy Management. Now expand forest → Domains → mustbegeek.local and select on the OU Group Policy Objects as shown below.

You can create a new GPO from here and then link it to any OU. Create new Group Policy Object by right-clicking on the empty space at the right panel and click New.

Now specify the GPO name as required and click OK as shown below.

After that, right click on “Disable_Windows_Updates” GPO and click on edit. This will open the Group Policy Management Editor, navigate under Computer Configuration. → Policies → Administrative Templates → Windows Components → Windows Update and double click on Configure Automatic Updates policy as shown below.

This will bring up the configuration window of this policy. Here, select Disabled radio button to disable the Windows updates and click OK.

This will save the configuration settings to the newly created GPO, now exit the Group Policy Management Editor.
Step 2. Apply the Group Policy Object
To apply the GPO we must link the policy to a the OU named Billing. In the Group Policy Management snap-in, navigate and right-click on the Billing OU and click on “Link an existing GPO”

Select the GPO “Disable_Windows_Updates” and click OK as shown below.

Step 3. Update and Verify GPO on Client Machine
Now log on to the client machine MBG-CL1 and open up command prompt. Type Gpupdate /force on the client computer to update the GPO settings on the machine. To verify if the GPO settings got applied correctly, type gpresult /r in the command prompt (Run as Admin) as shown below. The policy name will be appear under “Applied Group Policy Objects” under Computer Settings as shown below.

After applying the policy successfully, the ability to configure or schedule the windows update will be disabled. But users can still check for new updates.

The GPO can also be linked using a WMI Query or Security filtering. Refer the article How to Apply GPO to Computer Group in Active Directory to learn about applying group policy using security filtering.
The following two tabs change content below.
- Bio
- Latest Posts
Bipin is a freelance Network and System Engineer with expertise on Cisco, Juniper, Microsoft, VMware, and other technologies. You can hire him on UpWork. Bipin enjoys writing articles and tutorials related to Network technologies. Some of his certifications are, MCSE:Messaging, JNCIP-SEC, JNCIS-ENT, and others.
This article explains how you can disable Check for Updates using Group Policy. To prevent users from manually downloading updates from Microsoft, you can disable the check for updates button.
Most organizations today use Configuration Manager to deploy software updates to computers. Why? Because SCCM makes it easy to deploy and manage the updates.
With Configuration Manager deploying the software updates, you ensure the client computers are patched with the latest updates.

The software update point (SUP) interacts with the WSUS services to configure the software update settings and to request synchronization of software updates metadata.
If you have set up a standalone WSUS server to deploy Windows Updates to your computers, you ensure only the approved updates are deployed to all computers.
When you are using ConfigMgr/WSUS to manage updates, you basically have a complete control over the updates that you deploy. You don’t want users to manually check updates from Microsoft update and install it.
If you are allowing users to check for updates from Microsoft update, any user can download the updates and install. You don’t want users to download unwanted updates and cause issues with the laptop.
And when WSUS or SCCM attempts to deploy the latest updates, it would detect the client computer already has the updates installed.
Why should you disable Check for Updates?
Here are some reasons why you should prevent domain users from using Check for Updates option in Windows.
- A user can manually go to Start > Settings > Windows Update and run check for updates. This option should be disabled on domain computers because a user can manually download unapproved updates. Since these updates aren’t tested by admins, it may affect the stability of the computer.
- When a user manually downloads and installs the updates from Microsoft update, an operating system upgrade could occur. This has been the case in several organizations where an OS upgrade occurred just because the user wanted newer version of operating system. After the upgrade, some applications may not work properly and some settings may change. Overall, it’s a big challenge for system admins to roll back the operating system. To prevent such things, you can restrict users checking updates from Microsoft.
- Allowing users to manually check for updates from Microsoft update defeats the purpose of having WSUS, Configuration Manager in the setup. When you have invested money in a tool that deploys updates to your domain computers, it’s of no use when users download the updates directly from Microsoft update.
The below screenshot is from a computer that is just joined to the AD domain and managed by Configuration Manager.
Notice that check for updates button is active and enabled. In addition, there is a cumulative update available for installation.
If the user clicks download and install, the quality update will download from Microsoft update and install on the computer.
The user may think that the computer requires that optional update whereas it clearly states that it’s an optional quality update.
Now, do you see a reason why you must disable check for updates on domain computers?
 1")
Therefore, in most organizations, a group policy is deployed to the client computers to disable check online for updates from Microsoft update site.
Thankfully, with “Remove access to use all Windows Update features” GPO setting, administrators can disable the “Check for updates” option for users.
The group policy setting essentially blocks the access to Windows update. If you enable this policy setting, user access to Windows Update scan, download and install is removed.
Any background update scans, downloads and installations will continue to work as configured.
How To Disable Check for Updates using Group Policy
The best way to disable check for updates on computers is by using group policy (GPO). Group Policy can be used to apply security settings to users and computers.
The Group Policy allows administrators to define security policies for users and for computers. The GPO is a vast topic, and you can start learning about Group Policy from Microsoft Documentation.
When you create a group policy, you either deploy it to the entire AD domain or select Organizational Units. Whenever you create a new GPO, ensure you test it on pilot computers and then deploy it to wider set of computers.
Let’s create a new group policy disable check for updates from Microsoft Update. Launch the Server Manager and click Tools > Group Policy Management console.
In the Group Policy Management console, expand the domain and right-click Group Policy Objects and select New.
 2")
Specify the GPO name as “Disable Check for Updates from Microsoft Update” or something similar. Click OK.
 3")
After you create the GPO, right click the GPO and select Edit. Edit the GPO and specify the settings to disable check for updates.
 4")
In the Group Policy Object Editor, expand Computer Configuration > Administrative Templates > Windows Components > Windows Update.
In the right pane, from the list of settings, right click the setting Remove access to use all Windows Update features and select Edit.
 5")
The GPO setting Remove access to use all Windows Update features removes access to scan for Windows Updates. The check for updates from Microsoft update button will be disabled.
 6")
Group Policy Result – Check for Updates Disabled
After you apply the above group policy, run the command gpupdate /force on the client machines.
Read: How to Modify Group Policy Refresh Interval for Windows computers.
On the Windows 10 computer, click Start > Settings > Windows Update. Notice that Check for updates button is now disabled. The option to check online for updates from Microsoft update is also gone.
Instead, you see This option is managed by your organization.
 7")
Let’s check if the check for updates button is disabled for Windows 11 computer. On the Windows 11 computer, click Start > Settings > Windows Update. Yes, the check for updates button is disabled. The option to check online for updates from Microsoft update is not available.
 8")
Still Need Help?
If you need further assistance on the above article or want to discuss other technical issues, check out some of these options.
Key Points
- Pause Updates Temporarily: Go to Settings > Windows Update > Pause updates for up to 5 weeks.
- Disable via Group Policy (Windows Pro & Enterprise): Open gpedit.msc, navigate to Computer Configuration > Administrative Templates > Windows Components > Windows Update, then enable Configure Automatic Updates and select Disabled.
- Turn Off via Registry Editor: Open regedit, navigate to
HKEY_LOCAL_MACHINE\SOFTWARE\Policies\Microsoft\Windows\WindowsUpdate\AU, create or modify NoAutoUpdate (DWORD) and set it to1. - Disable Windows Update Service: Open Services (
services.msc), find Windows Update, set Startup type to Disabled, and stop the service.
Are you searching for how to disable Windows updates in Windows 10 or 11? This guide can help.
Windows updates are essential to keeping your system safe with access to the latest tools and features. Updates provide bug fixes, performance improvements, and, perhaps most importantly, security patches that protect your device from potential threats.
Still, there are a few reasons why you may want to disable Windows updates—either temporarily or permanently.
Automate Windows Update Management
Managing Windows updates can be complex and time-consuming. Try NinjaOne for free and automate your update processes to ensure your systems are always up-to-date and secure.
How to disable Windows update in Windows 10
Windows 10 offers several methods to disable Windows updates. Let’s explore four of the most effective ways:
Option 1: Disable the Windows update service
One way to disable Windows updates is by stopping the Windows Update service. Here’s how you can do it:
- Press the Windows key + R on your keyboard to open the Run dialog box.
- Type “services.msc” and press Enter to open the Services window.
- Scroll down and locate the “Windows Update” service.
- Right-click on the service and select “Properties.”
- In the Properties window, change the “Startup type” to “Disabled.”
- Click on “Apply” and then “OK” to save the changes.
By disabling the Windows Update service, you prevent Windows from automatically checking for and installing updates. However, remember that this method only disables the service temporarily and will not prevent updates from being installed when the service is enabled again.
Option 2: Change Group Policy Editor settings
Learning to stop Windows Updates through the Group Policy Editor is also helpful. Here’s how you can use this method:
- Press the Windows key + R on your keyboard to open the Run dialog box.
- Type “gpedit.msc” and press Enter to open the Group Policy Editor.
- Navigate to “Computer Configuration” > “Administrative Templates” > “Windows Components” > “Windows Update.”
- Double-click on “Configure Automatic Updates” to open the settings.
- Select the “Disabled” option to turn off automatic updates.
- Click on “Apply” and then “OK” to save the changes.
Using the Group Policy Editor allows you to have more granular control over Windows updates. You can choose to disable automatic updates entirely or configure specific update settings according to your preferences.
Option 3: Meter your network connection
Windows 10 includes a feature called “Metered Connection,” which can be used to limit the data usage of certain network connections. By setting your network connection as metered, you can effectively prevent Windows from automatically downloading and installing updates. Here’s how you can do it:
- Open the “Settings” app by pressing the Windows key + I on your keyboard.
- Click on “Network & Internet” and select “Wi-Fi” or “Ethernet,” depending on your connection type.
- Scroll down and click on “Advanced Options.”
- Toggle the switch under “Metered Connection” to turn it on.
When your network connection is set as metered, Windows will not automatically download or install updates. However, keep in mind that this method can also prevent other apps from downloading updates or syncing data, so use it judiciously.
Option 4: Use the Windows Registry
The Windows Registry allows you to turn off automatic updates by modifying various system settings. Here’s how you can disable Windows updates using the Registry Editor:
- Press the Windows key + R on your keyboard to open the Run dialog box.
- Type “regedit” and press Enter to open the Registry Editor.
- Navigate to the following key: HKEY_LOCAL_MACHINE\SOFTWARE\Policies\Microsoft\Windows\WindowsUpdate
- Right-click on the “WindowsUpdate” folder and select “New” > “DWORD (32-bit) Value.”
- Name the new value “AUOptions” and set it to “2” to disable automatic updates.
- Click on “OK” to save the changes.
Using the Windows Registry to disable Windows updates provides a more advanced method for controlling update behavior. However, modifying the Registry can be risky if not done correctly, so exercise caution and create a backup of your Registry before making any changes.
Need Help with Windows Update Management?
Have questions about managing Windows updates or how NinjaOne can help? Our experts are here to assist you. Schedule a demo today to learn more.
How to disable Windows update in Windows 11
Option 1: Using Windows services (services.msc)
If you want to permanently stop Windows updates from running in the background, disabling the Windows Update service is one of the most effective methods.
- Press the Windows key + R, type services.msc, and press Enter.
- Scroll down and locate Windows Update in the list.
- Double-click on Windows Update to open its properties.
- Under Startup type, select Disabled from the dropdown menu.
- Click Stop if the service is currently running.
- Click Apply and then Ok to save the changes.
Option 2: Using Group Policy Editor (for Windows 11 Pro & Enterprise)
This method is useful for users with Windows 11 Pro or Enterprise editions. The Group Policy Editor allows you to disable automatic updates through system policies.
- Press the Windows key + R, type gpedit.msc, and press Enter.
- Navigate to
sql
Computer Configuration → Administrative Tempates → Windows Components → Windows Update
- Double-click Configure Automatic Updates on the right panel.
- Select Disabled, then click Apply and Ok.
- Restart your computer for changes to take effect.
Option 3: Using Registry Editor (for all editions)
For Windows 11 Home users, disabling updates via the Registry Editor is an alternative since the Group Policy Editor isn’t available. A word of caution, though: Incorrect registry changes can cause system issues.
⚠️ Take note: Editing the registry is risky. Make sure to backup your registry before proceeding.
- Press the Windows key + R, type regedit, and press Enter.
- Navigate to:
HKEY_LOCAL_MACHINE\SOFTWARE\Policies\Microsoft\Windows\WindowsUpdate\AU
- If the WindowsUpdate and AU keys don’t exist, create them.
- Inside AU, right-click and choose New → DWORD (32-bit) Value.
- Name it NoAutoUpdate and set its value to 1.
- Close Registry Editor and restart your PC.
Option 4: Using metered connection (prevents auto updates)
If you don’t want to fully disable updates but want to limit automatic downloads, setting your network as metered will prevent Windows from downloading updates automatically.
- Open Settings (Win + I)
- Go to Network & Internet.
- Select Wi-Fi or Ethernet, depending on your connection type.
- Click on your connected network.
- Toggle Metered connection to On.
Additional option: Using Windows Update pause feature (temporary solutions)
If you just need to delay updates for a few weeks, Windows 11 has a built-in pause feature that temporarily stops updates.
- Open Settings (Win + I).
- Go to Windows Update.
- Click Pause updates and select a duration.
Why disable Windows updates?
Windows updates are important for security and performance—and having them automated provides a lot of convenience. While keeping your Windows updates on is generally recommended, there are valid reasons why you may want to disable them. For example:
- Higher stability: If you rely on specific applications or devices that aren’t fully compatible with the latest Windows updates, you may run into instability or functionality problems. Disabling Windows updates can help your system run smoothly and without disruption.
- Greater convenience: Windows updates often require system restarts, which can interrupt your workflow and lead to productivity losses—especially if you’re working on a critical project or in a time-sensitive environment. By disabling Windows updates, at least temporarily, you can have more control over when and how your system installs new upgrades.
- Avoid unexpected restarts: Windows may restart your PC at inconvenient times after an update. If an update is installed in the background, Windows may schedule an automatic restart without warning, forcing your system to reboot even if you’re in the middle of a task. This can be particularly disruptive for professionals who rely on uninterrupted access to their devices.
- Prevent compatibility issues: Some updates can break compatibility with older software or hardware. If your business relies on legacy applications, certain updates may lead to software unusable, requiring workarounds or even rollbacks. By disabling updates, you ensure your setup remains stable and fully operational without unexpected compatibility problems.
- Save data on limited internet plans: Automatic updates can consume a lot of bandwidth. Large updates, which can exceed several gigabytes, can quickly eat up your monthly data allowances, leading to additional costs or reduced internet speeds due to throttling.
- Prevent buggy updates: Some updates may introduce new bugs or system instability. To clarify: Windows updates are designed to improve functionality, but not all updates are thoroughly tested for every hardware configuration. This may lead to issues, such as system crashes or even the dreaded blue screen of death.
- Full control: Some users have specific reasons for not wanting to install updates automatically, such as concerns about data usage or privacy. In these cases, disabling Windows updates provides the freedom to choose which updates to install manually, giving users greater control over system maintenance.
Should I permanently disable Windows updates?
Permanently disabling Windows updates is generally not recommended. Windows updates are crucial for maintaining your device’s security and stability. Permanently disabling updates exposes your system to potential security vulnerabilities, and your system misses out on important bug fixes and performance improvements.
This means you’ll need to balance controlling system updates and ensuring your computer’s security. Consider reenabling updates during non-working hours or using tools with more granular control over the update process.
In most cases, reenabling Windows updates is as simple as disabling them in the first place. For example, when changing the Group Policy Editor settings, you should select the “Enabled” option rather than “Disabled.” You can adapt the instructions above depending on your preferred method to turn on Windows updates.
Some other downsides to permanently disabling Windows updates include:
- Security risks: Disabling updates exposes your system to potential security vulnerabilities, as you miss out on crucial security patches and bug fixes. Without regular updates, your computer becomes an easy target for malware, ransomware, and other malicious attacks.
- Performance slowdowns: Windows updates often include performance improvements that can enhance the overall functionality and speed of your computer. Failing to install the latest upgrades will mean that your system won’t be getting a boost.
- Compatibility issues: Compatibility can be a problem for systems running software that is too new and too old. Outdated systems may face compatibility issues with newer software or hardware that require updated Windows versions.
Temporarily switching off Windows updates can help you deal with issues like program incompatibility and productivity concerns. For most users, however, there is little to no benefit from permanently disabling Windows updates. Instead, these users will likely want to turn off Windows updates temporarily by following one of the four methods in the next section.
🔔 Not sure how a new update will impact your systems? Check out our KB Catalog for hundreds of KB articles, each with public sentiment analysis, so you can make informed decisions before updates roll out.
Manage Windows updates efficiently with NinjaOne
Rather than permanently disabling Windows updates, consider utilizing tools like NinjaOne to manage your updates effectively. NinjaOne provides Windows patch management software that offers a robust suite of features, including automated remote patch management, a patch status dashboard, and compliance reporting. Watch a demo or sign up for a free trial.