
Once the WSUS (Windows Server Update Service) is implemented in your company network via Group policy, your Windows 11/10 or 8.1 computer will look for Windows updates via this local WSUS server. Though it helps the network administrator manage the updates and client computers optimally in a larger environment, it may create some issues for end-users. Follow the steps below to disable WSUS by registry key on Windows 10/11 without changing the Group Policy.
When a computer is set to get updates from WSUS, it may not be able to receive required or optional Windows updates until the administrator approves them on the server.
If you take your computer outside the local/company network, you can’t perform the Windows update. For example, you can’t install the latest Windows updates for your office laptop at home.
Also, it prevents any Windows features from downloading from the direct Internet because it is set to download from WSUS only.
This method is simple and easy. As an end-user, you can perform on your computer.
Note: This is a temporary solution. If you connect the computer back to the company network, the WSUS group policy will be applied automatically and revert the changes. The ideal permanent solution is to move your computer to a different OU where the WSUS policy is not applied, which the network/Windows update administrator can only do. So, as normal computer users, we have only the below option to disable WSUS in Windows OS.
- Open Registry Editor (Type regedit in Search)
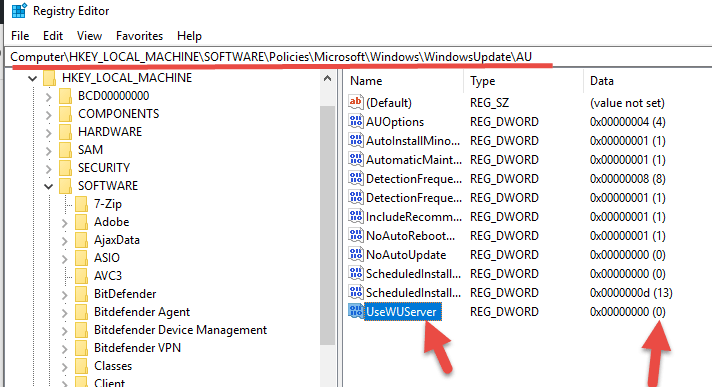
- Access to the following location: HKLM/Software/Policies/Microsoft/Windows/WindowsUpdate/AU/
- Change the value from 1 to 0 in the UseWUServer key. 1 is to use a WSUS server, and 0 is to disable it.
- Once you have changed the above key from 1 to 0, close the registry editor and restart the Windows update service. Even if you are okay, restart the computer to take effect.
Here is the place to restart the Windows update service.

Remove WSUS by PowerShell
If you like to use Powershell commands on the local or remote computer to disable WSUS, follow the below steps.
- Search for PowerShell or access it from the Start menu, then right-click and select run as administrator.
- We need to stop the Windows update service before executing the command. Type Stop-Service -Name wuauserv to stop Windows update service.
- Remove the Windows update registry key that is related to WSUS. Type this command: Remove-Item HKLM: \Software\Policies\Microsoft\Windows\WindowsUpdate -Recurse
- Let’s start the Windows update service by typing Start-Service -name wuauserv
Now connect the computer to the direct Internet and try Windows update or any other component downloads from the Microsoft online update. It should work fine this time.
You may need to check some other guides related to Windows update issues.
Windows 10 Update stuck with 0x80080008 error
Latest Windows Server update issue and solution
If you are still facing some issues downloading and installing Windows updates on the direct Internet, the Windows update service/content may have been corrupted. It is nothing to do with WSUS anymore. You need to look into other directions to solve the problem.
If any of the above solutions did not fix the Windows PC issues, we recommend downloading the below PC repair tool to identify and solve any PC Issues.
Dinesh is the founder of Sysprobs and written more than 400 articles. Enthusiast in Microsoft and cloud technologies with more than 15 years of IT experience.
Настраиваем обновление через WSUS на Home версиях Windows.
В Home версиях MS Windows отсутствует редактор политик безопасности. Этот прискорбный факт делает настройку этих самых политик довольно муторным занятием, потому что всё приходится делать ручками в редакторе реестра.
Частенько интернет-провайдер кроме всего прочего предоставляет собственный WSUS-сервер, скорость загрузки с него обычно выше, чем при обновлении через Интернет, да проверка подлинности для них обычно не требуется.
Чтобы воспользоваться таким счастьем, надо создать REG-файл с таким текстом:
REGEDIT4
[HKEY_LOCAL_MACHINE\SOFTWARE\Policies\Microsoft\Windows\WindowsUpdate]
«WUServer»=»http://wsus-server»
«WUStatusServer»=»http://wsus-server»
«ElevateNonAdmins»=dword:00000001[HKEY_LOCAL_MACHINE\SOFTWARE\Policies\Microsoft\Windows\WindowsUpdate\AU]
«UseWUServer»=dword:00000001
Сохраняем файл, запускаем его и соглашаемся с внесением изменений в реестр.
Теперь проверяем, что служба обновления запущена и работает. Если всё работает, то даем пинка в виде команды:
wuauclt /detectnow
—>
Для обеспечения безопасности и поддержания актуального состояния операционной системы очень важно регулярно загружать и устанавливать последние обновления. Обновление может выполняться как каждым клиентским компьютером с сайта Microsoft Update, так и централизованно, посредством использования сервера Windows Server Update Services (WSUS).
В корпоративной сети рекомендуется использование сервера WSUS, так как при этом достигается значительное снижение Интернет трафика и обеспечивается возможность централизованного управления процессом развертывания обновлений.
Наилучшим способом настройки автоматического обновления является использование групповых политик, однако это возможно только в случае, если в организации есть служба каталогов Active Directory. Если же AD в организации не развернута и компьютеры находятся в рабочих группах, то доменные групповые политики отпадают и настроить клиента на использование WSUS можно либо посредством локальной групповой политики, либо путем прямого внесения изменений в системный реестр компьютера.
Предварительная настройка
Сначала нам необходимо произвести некоторые настройки на сервере WSUS. Открываем консоль управления WSUS и в разделе «Computers» создаем новую группу, в которую будут входить наши компьютеры. Назовем ее Workgroup.

Создав группу идем на вкладку «Options» и там, в разделе «Computers» указываем серверу WSUS размещать компьютеры в группах согласно групповым политикам или настройкам реестра. В противном случае все новые компьютеры автоматически попадают в группу Unassigned Computers.

Групповая политика
Теперь можно приступать к настройке клиента. Заходим на клиентский компьютер, нажимаем Win+R и набираем команду gpedit.msc. Открывается редактор локальной политики компьютера. За настройку обновлений отвечает раздел Конфигурация компьютера — Административные шаблоны — Компоненты Windows — Центр обновления Windows.

Нам надо настроить следующие политики:
Указать размещение службы обновлений Microsoft в интрасети — задаем адрес или имя сервера обновлений, к которому будет выполняться подключение клиента, а также адрес сервера статистики. Можно указать один и тот же адрес для обеих задач.

Разрешить клиенту присоединение к целевой группе — указываем имя группы на сервере WSUS, к которой должен быть присоединен данный компьютер. В нашем случае это Workgroup.

Настройка автоматического обновления — здесь мы задаем режим загрузки и установки обновлений и расписание, по которому обновления будут устанавливаться. Если расписание не задано, то по умолчанию обновления будут устанавливаться ежедневно в 3 часа ночи.

Частота поиска автоматических обновлений — указываем частоту обращений к серверу для проверки на наличие обновлений. Теперь обращения к серверу WSUS будут происходить через заданный промежуток времени со случайным отклонением для проверки наличия разрешенных для установки обновлений.

Перенос запланированных автоматических установок обновлений — задаем время ожидания перед установкой обновлений в том случае, если плановая установка была пропущена по каким либо причинам.

Не выполнять автоматическую перезагрузку, если в системе работают пользователи — даем пользователю возможность выбора времени перезагрузки после установки обновлений. Если этот параметр не задан или отключен, то пользователю выдается уведомление и компьютер автоматически перезагружается через 5 минут.

Реестр
Теперь те же настройки произведем с помощью правки реестра.
Идем в раздел реестра HKEY_LOCAL_MACHINE\SOFTWARE\Policies\Microsoft\Windows\WindowsUpdate. Если раздела нет — создаем его. В разделе создаем следующие ключи:
″WUServer″=http://192.168.0.1 — адрес сервера обновлений;
″WUStatusServer″=http://192.168.0.1 — адрес сервера статистики;
″TargetGroupEnabled″=dword:00000001 — размещать компьютер в целевой группе;
″TargetGroup″=″Workgroup″ — имя целевой группы для компьютера.

Далее в разделе HKEY_LOCAL_MACHINE\SOFTWARE\Policies\Microsoft\Windows\WindowsUpdate\AU создаем ключи:
″NoAutoUpdate″=dword:00000000 — автоматическое обновление включено;
″AUOptions″=dword:00000004 — загружать и устанавливать обновления по расписанию;
″ScheduledInstallDay″=dword:00000001 — устанавливать обновления в 1-й день недели (воскресенье). Для ежедневного обновления нужно задать нулевое значение;
″ScheduledInstallTime″=dword:00000003 — устанавливать обновления в 03:00 часа;
″UseWUServer″=dword:00000001 — использовать для обновлений сервер WSUS. Если задано нулевое значение, то обновление производится с Microsoft Update;
″DetectionFrequencyEnabled″=dword:00000001 — частота проверки обновлений включена;
″DetectionFrequency″=dword:00000012 — проверять наличие обновлений на сервере каждые 12 часов;
″RescheduleWaitTimeEnabled″=dword:00000001 — переносить пропущенную установку обновлений;
″RescheduleWaitTime″=dword:00000010 — запускать пропущенную установку обновлений через 10 минут после включения компьютера;
″NoAutoRebootWithLoggedOnUsers″=dword:00000001 — не перезагружать компьютер автоматически, если на нем работают пользователи.

Автоматизация настройки
Если настраивать предстоит не один компьютер, то процесс можно автоматизировать. Для этого открываем Блокнот, создаем reg-файл и добавляем в необходимые ключи реестра. В нашем случае получился вот такой файл:
Windows Registry Editor Version 5.00
[HKEY_LOCAL_MACHINE\SOFTWARE\Policies\Microsoft\Windows\WindowsUpdate]
″WUServer″=″http://192.168.0.1″
″WUStatusServer″=″http://192.168.0.1″
″TargetGroupEnabled″=dword:00000001
″TargetGroup″=″Workgroup″
[HKEY_LOCAL_MACHINE\SOFTWARE\Policies\Microsoft\Windows\WindowsUpdate\AU]
″NoAutoUpdate″=dword:00000000
″AUOptions″=dword:00000004
″ScheduledInstallDay″=dword:00000001
″ScheduledInstallTime″=dword:00000003
″UseWUServer″=dword:00000001
″DetectionFrequencyEnabled″=dword:00000001
″DetectionFrequency″=dword:00000012
″RescheduleWaitTimeEnabled″=dword:00000001
″RescheduleWaitTime″=dword:00000010
″NoAutoRebootWithLoggedOnUsers″=dword:00000001
Теперь для настройки автоматического обновления будет достаточно перенести этот файл на целевой компьютер и выполнить его.
Возможные проблемы
Если после настройки компьютеры не появляются в консоли WSUS, это может быть связано с тем, что рабочие станции подготовлены с использованием неправильно подготовленных образов, т.е. без использования утилиты sysprep или аналогичных программ. В этом случае машина может иметь дублирующие значения SusClientID в реестре.
Для решения проблемы необходимо произвести на клиенте следующие действия:
- выполнить в консоли cmd команду net stop wuauserv, чтобы остановить службу автоматического обновления;
- запустить regedit и перейти в ветку реестра HKLM\SOFTWARE\Microsoft\Windows\CurrentVersion\WindowsUpdate;
- удалить ключи PingID, AccountDomainSid, SusClientId, SusClientIDValidation (если есть);
- удалить всё содержимое папки %WinDir%\SoftwareDistribution (неофициальная рекомендация);
- в консоли выполнить команду net start wuauserv, чтобы запустить службу автоматического обновления;
- в консоли выполнить команду wuauclt.exe /resetauthorization /detectnow и подождать, пока завершится регистрация рабочей станции на сервере WSUS (10-15 минут);
- если компьютер в консоли не появился, то выполнить команду wuauclt.exe /detectnow. Обычно одного повтора достаточно, но может потребоваться и больше;
- зайти в консоль управления WSUS и убедиться, что рабочая станция успешно зарегистрировалась.
Overview
This article provides steps to modify or remove specific Windows Registry entries related to WSUS (Windows Server Update Services) to ensure the successful installation of Windows patches and remediations on end-user devices. These steps are recommended when WSUS entries exist on devices that do not have WSUS configured, which can interfere with patch installations.
Background
In some cases, devices may retain WSUS-related registry entries even if WSUS is not set up or used in the environment. These entries may prevent the devices from receiving patches or updates, as they may be incorrectly configured to connect to a WSUS server. Removing or modifying these registry entries resolves this issue and allows patches and remediations to be installed properly.
Solution
Follow these steps to remove or modify the WSUS-related registry entries and ensure smooth patch installation
1. Identify the Problematic Registry Entries:
- Open the Registry Editor (regedit).
- Navigate to the following registry keys to find any WSUS-related entries:
- HKEY_LOCAL_MACHINE\SOFTWARE\Policies\Microsoft\Windows\WindowsUpdate
- HKEY_LOCAL_MACHINE\SOFTWARE\Microsoft\Windows\CurrentVersion\WindowsUpdate\Auto Update
2.Modify or Remove WSUS Registry Entries:
If the entries contain an incorrect or non-functional WSUS server address, delete or modify the relevant registry values. Specifically:

- Remove the WSUS Server Address: Delete the key WUStatusServer or set it to
a blank value (-).
- Disable WSUS Update Settings: Set UseWUServer to 0 or delete the key entirely.
3.Create a Registry Modification File: To make the process more efficient and deployable across multiple devices, you can create a .reg file that will automatically modify the registry settings.
Example of a registry modification file:
Windows Registry Editor Version 5.00
[HKEY_LOCAL_MACHINE\SOFTWARE\Policies\Microsoft\Windows\WindowsUpdate]
«WUServer«=-
«WUStatusServer«=-
«EnableWindowsUpdateAutoUpdate«=-
- Open Notepad and paste the above contents.
- Save the file with a .reg extension (e.g., Remove_WSUS_Entries.reg).
4. Deploy the Registry File via Endpoint Management (EM):
- Compress the .reg file into a .zip format for easier deployment.
- Deploy the zipped .reg file across multiple devices using your Saner Endpoint Management (EM) module to ensure consistent configuration.
- Post Deployment WSUS entries got removed on the respective device.


Conclusion
By addressing misconfigured WSUS-related registry entries and deploying changes efficiently through Endpoint Management tools, you can ensure seamless patch installations across all devices. This approach enhances system security, maintains compliance, and reduces administrative overhead, providing a streamlined and reliable update process for your environment.
Was this article helpful?
That’s Great!
Thank you for your feedback
Sorry! We couldn’t be helpful
Thank you for your feedback
Feedback sent
We appreciate your effort and will try to fix the article
More often than not, it is difficult to tell whether Windows Update failure is caused by WSUS itself or by Windows operating system. In that case we may need to remove WSUS settings from the client and restore Windows Update default settings in order to find out where the problem resides.
More often than not, it is difficult to tell whether Windows Update failure is caused by WSUS itself or by Windows operating system. In that case we may need to remove WSUS settings from the client and restore Windows Update default settings in order to find out where the problem resides.
Here are two methods to achieve this.
Remove WSUS Settings via PowerShell
- Click Start and open PowerShell as Administrator (Right Click > Run as Administrator)
- Stop the Windows Update Service by entering the command:
Stop-Service -Name wuauserv - Remove the Windows Update registry key by entering the command:
Remove-Item HKLM:\Software\Policies\Microsoft\Windows\WindowsUpdate -Recurse - Finally, restart Windows Update Service by running: Start-Service -Name wuauserv
Remove WSUS Settings Manually
- Click Start and type regedit into the start search box, then Right Click and Run as Administrator.
- Navigate to HKEY_LOCAL_MACHINE\Software\Policies\Microsoft\Windows\
- Right Click and Delete the registry key WindowsUpdate, then close the registry editor.
- Open the Services Console by entering services.msc in the start search box.
- Find and restart the Windows Update Service